

Page 1
instructions
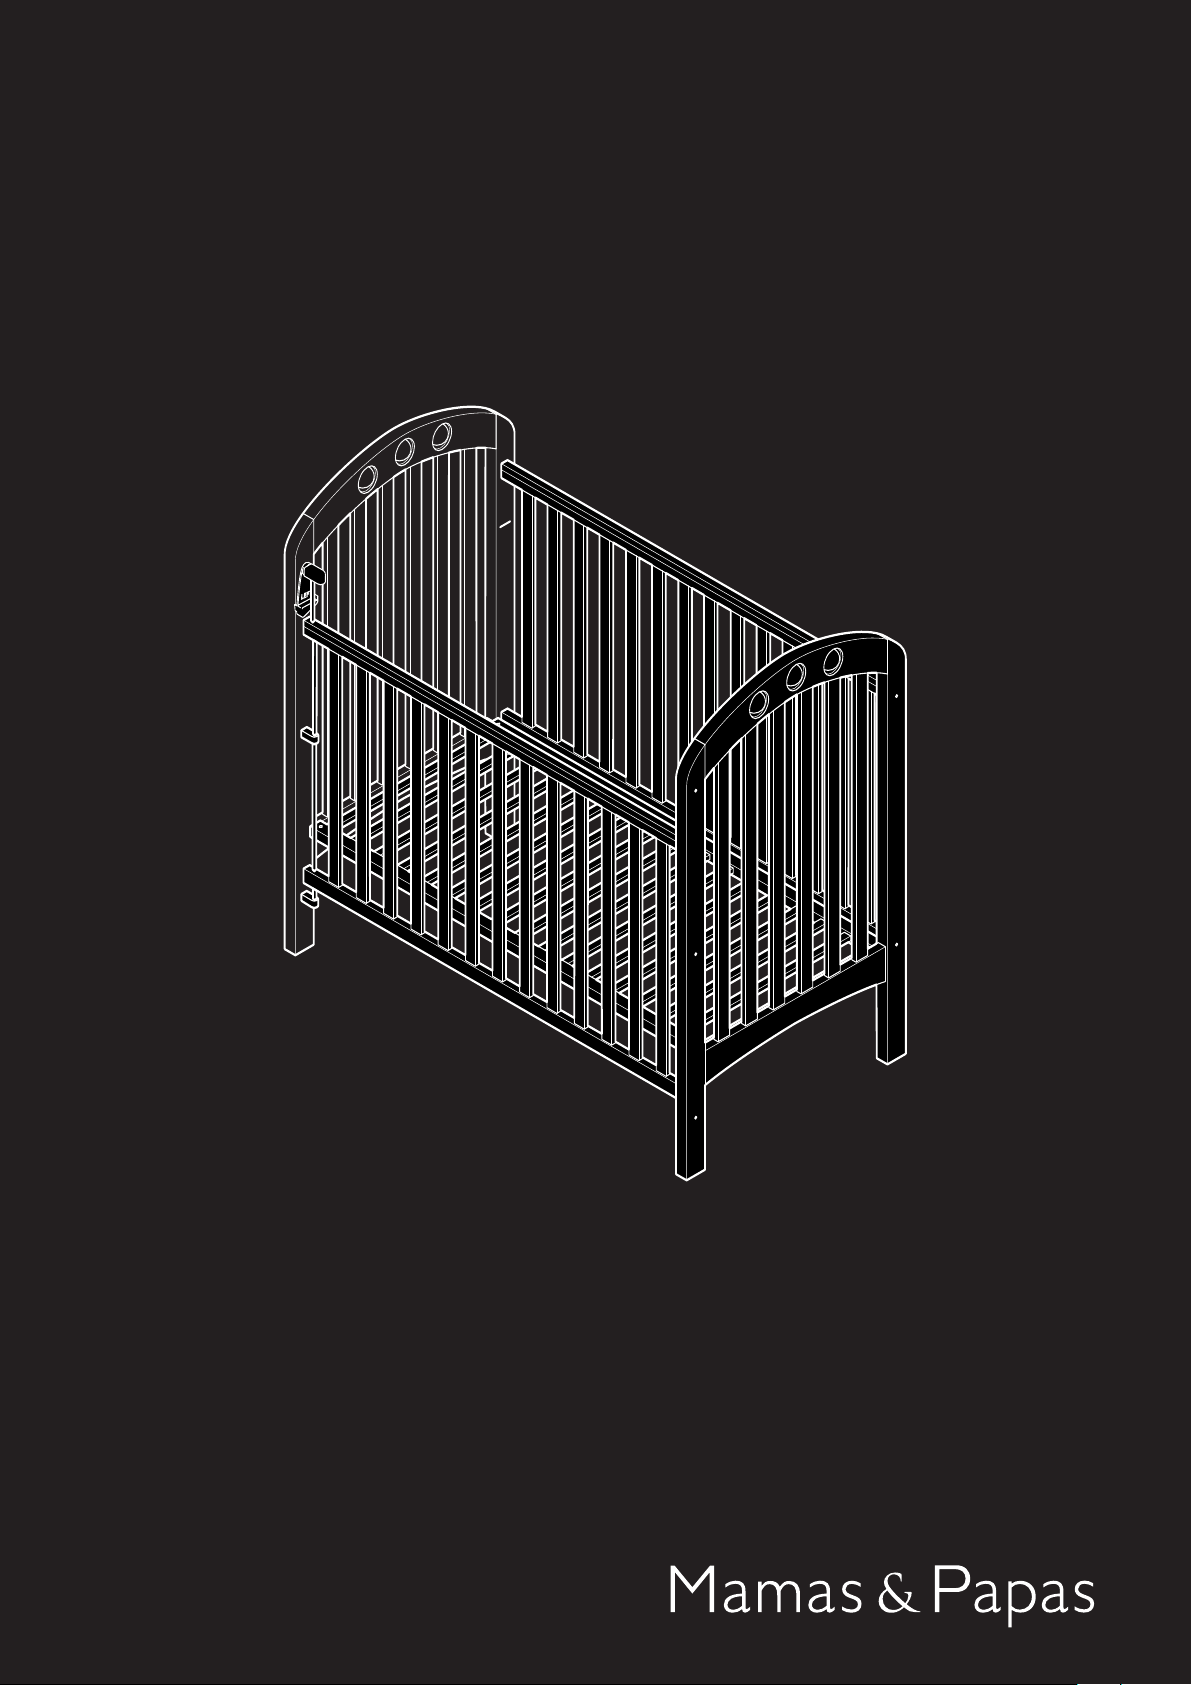
amelia cot
: Please read instructions carefully
T
AN
IMPOR
and keep for future reference
T
Page 2
AMELIA COT
THESE INSTRUCTIONS ARE IMPORTANT PLEASE READ THEM CAREFULLY
AND RETAIN FOR FUTURE REFERENCE.
The corr
is using your cot, ensure they also know how to use it. The safety of your child is your responsibility.
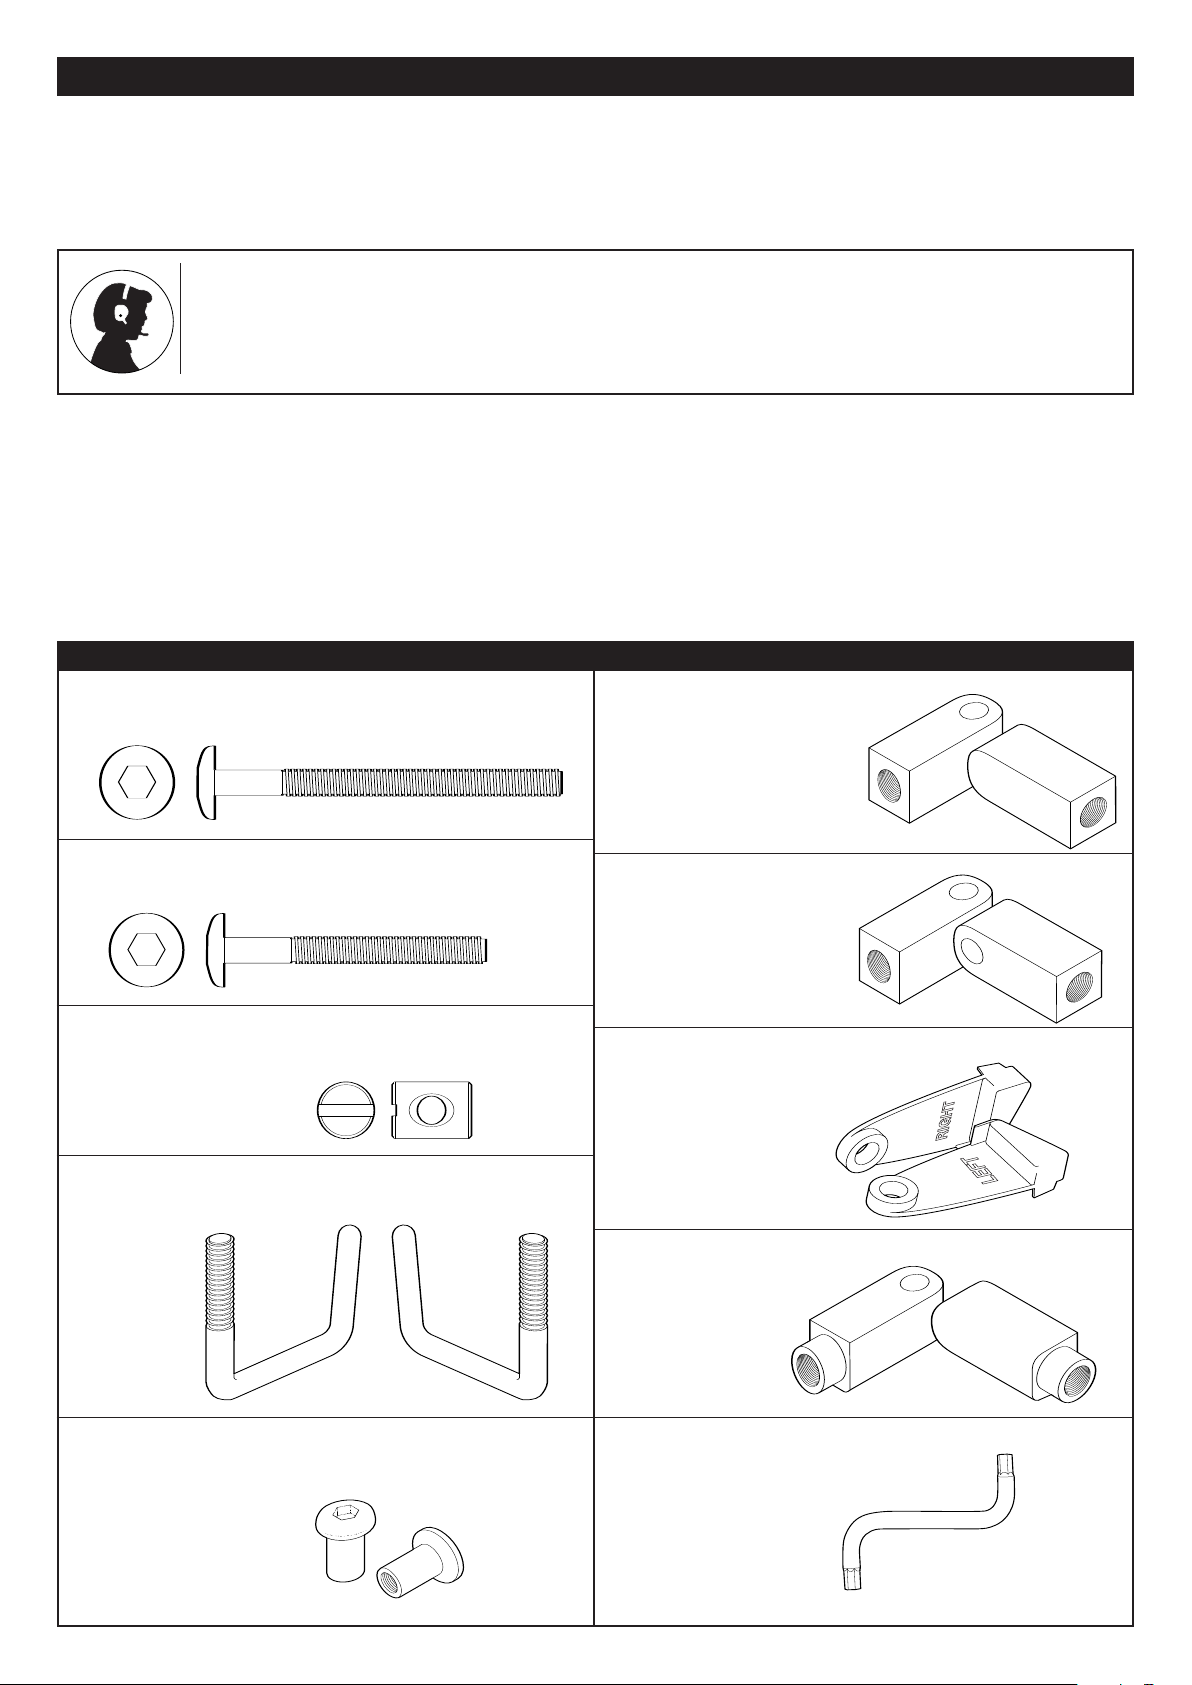
• Unpack all the parts and identify them against the fittings and components lists.
• Do not discard any packaging until you are sure you have all the components and the pack of fittings.
• Read the instructions thoroughly before attempting to construct the cot.
• You may find the construction of your cot easier if you have the help of another person.
• Follow each stage of the construction step-by-step.
Item Description Qty.
F1 Long assembly screws 4
ect use and maintenance of your cot will ensure it gives long and trouble-free use. When somebody else
AFTER SALES SERVICE: If when you receive your Mamas & Papas product you need assistance,
spare parts or if you are unhappy with any aspect of the goods please contact your retailer or our
Customer Car
[email protected]
order to avoid you having to return your product to the retailer
.mamasandpapas.co.uk
www
e Helpline on: 01484 438222
where one of our trained advisors will be able to help you, in
for the latest pr
ou can also e-mail us on
. Y
oduct information.
. You can also visit our website at
BEFORE ASSEMBLY
FITTINGS LIST
Item
F6 Bottom guides 2
Description Qty.
Item Description Qty.
F2 Short assembly screws 6
Item Description Qty.
F3 Barrel nuts 4
Item
Description
Qty.
F4 Base brackets 4
Item Description Qty.
F5 Base bracket nuts 4
Item Description Qty.
F7 Middle guides 2
Item Description Qty.
F8 Drop-side catches 2
Not shown to scale
Item Description Qty.
F9 Top guides 2
Item Description Qty.
F10 Allen key 1
Not shown to scale
– 2 –
Page 3
C6
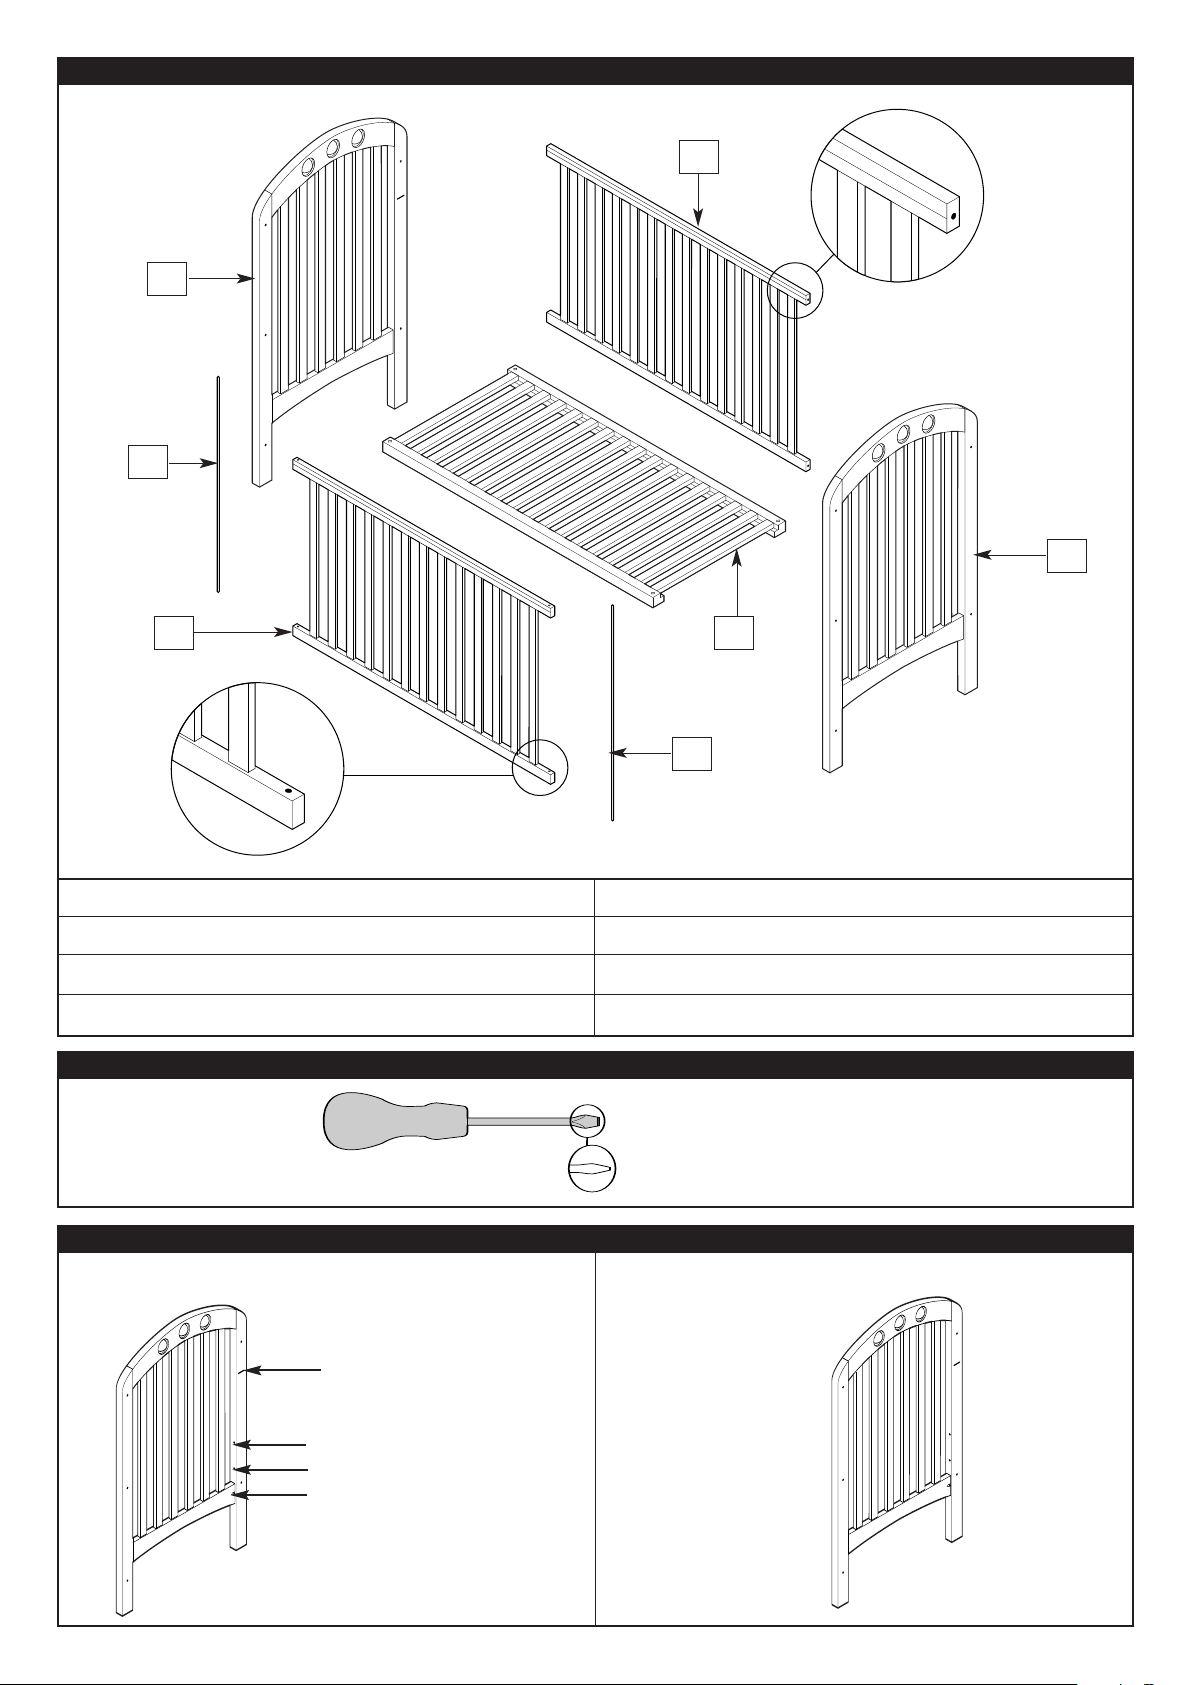
MAIN COMPONENTS
C2
C1
C3
C5
Item Description Qty.
C1 Head end 1
C2 Fixed-side 1
C3 Foot end 1
Item Description Qty.
C4 Base 1
C5 Drop-side 1
C6 Drop-side runners 2
TOOL LIST
Flat-head scr
T
C4
C6
ewdriver
o fit: F3.
INFORMATION FOR FITTING THE COT ENDS
Mattress height mark & base fitting holes.
Mattress height mark
The line engraved on the
inside face of the head end
is for safety reasons (see
instructions for safe use).
Base fitting holes
The three holes for the
height positions of the base
are closer to one side of the
legs edge. This closest edge
must face into the cot.
Fixed-side or drop-side?
x2 Holes = Fixed-side
x3 Holes = Drop-side
– 3 –
Page 4
FITTINGS
F1 / Long assembly screws x 4
F3 / Barr
el nuts x 4
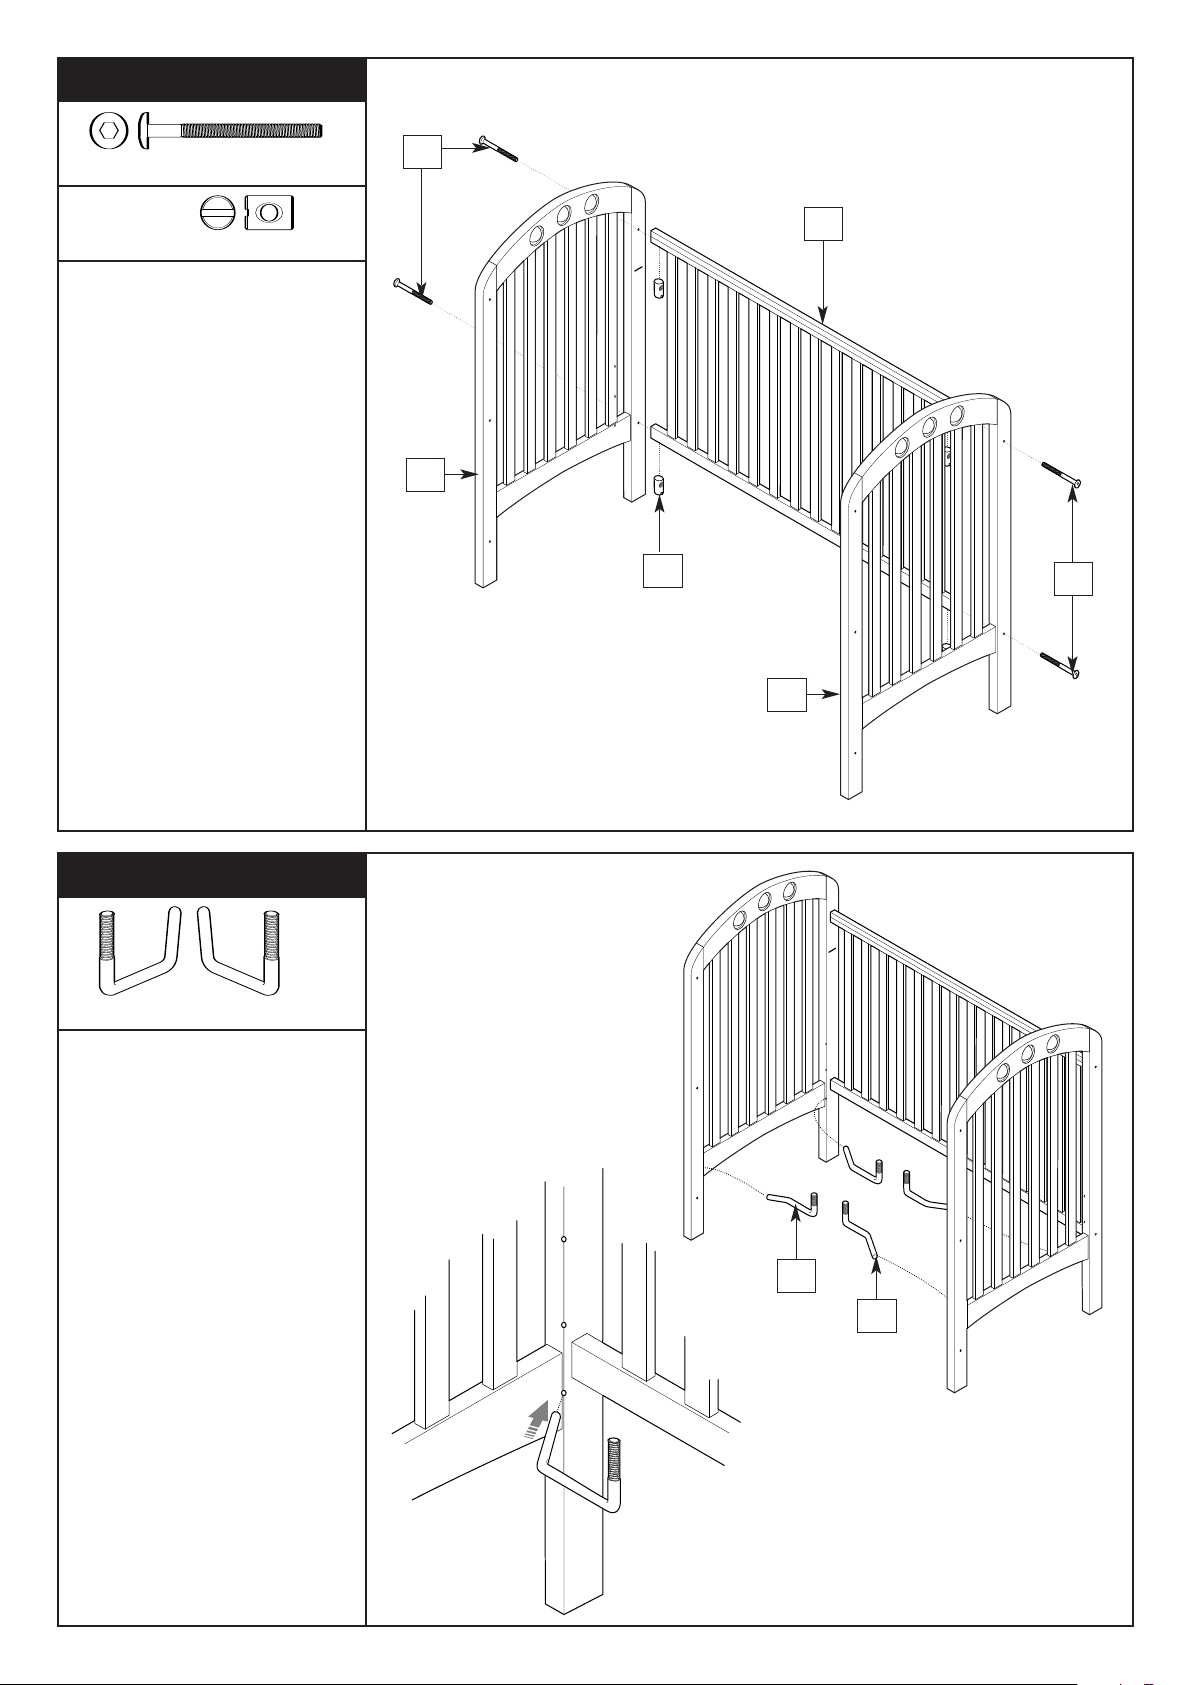
Step 1
Attach the head (C1) and foot
(C3) end to the fixed side (C2).
e the ends are the correct
Ensur
way around (see page 3).
Slot four barrel nuts into the
holes in the underside of the
fixed sides top and bottom
rails. Ensure the slotted heads
of the barrel nuts face out of
the rails.
Slot four long assembly screws
(F1) through the top and
bottom holes in both of the
cot ends. Slot the screws into
the holes in the ends of the
sides rails and tighten them
into the barrel nuts (F3) using
the allen key (F10).
F1
C1
F3
C2
F1
C3
FITTINGS
F4 / Base brackets x 4
Step 2
Please note: The base
brackets (F4) come in left
(x2) and right (x2) hand
versions.
Slot the unthr
the four base brackets into
one of the thr
that you r
e they are all at the
Ensur
same height.
See the ‘instructions for safe
use’ for more information on
base heights.
Note: After fitting, the
threaded ends must be
facing upwards.
eaded ends of
ee base heights
e.
equir
F4
F4
– 4 –
Page 5
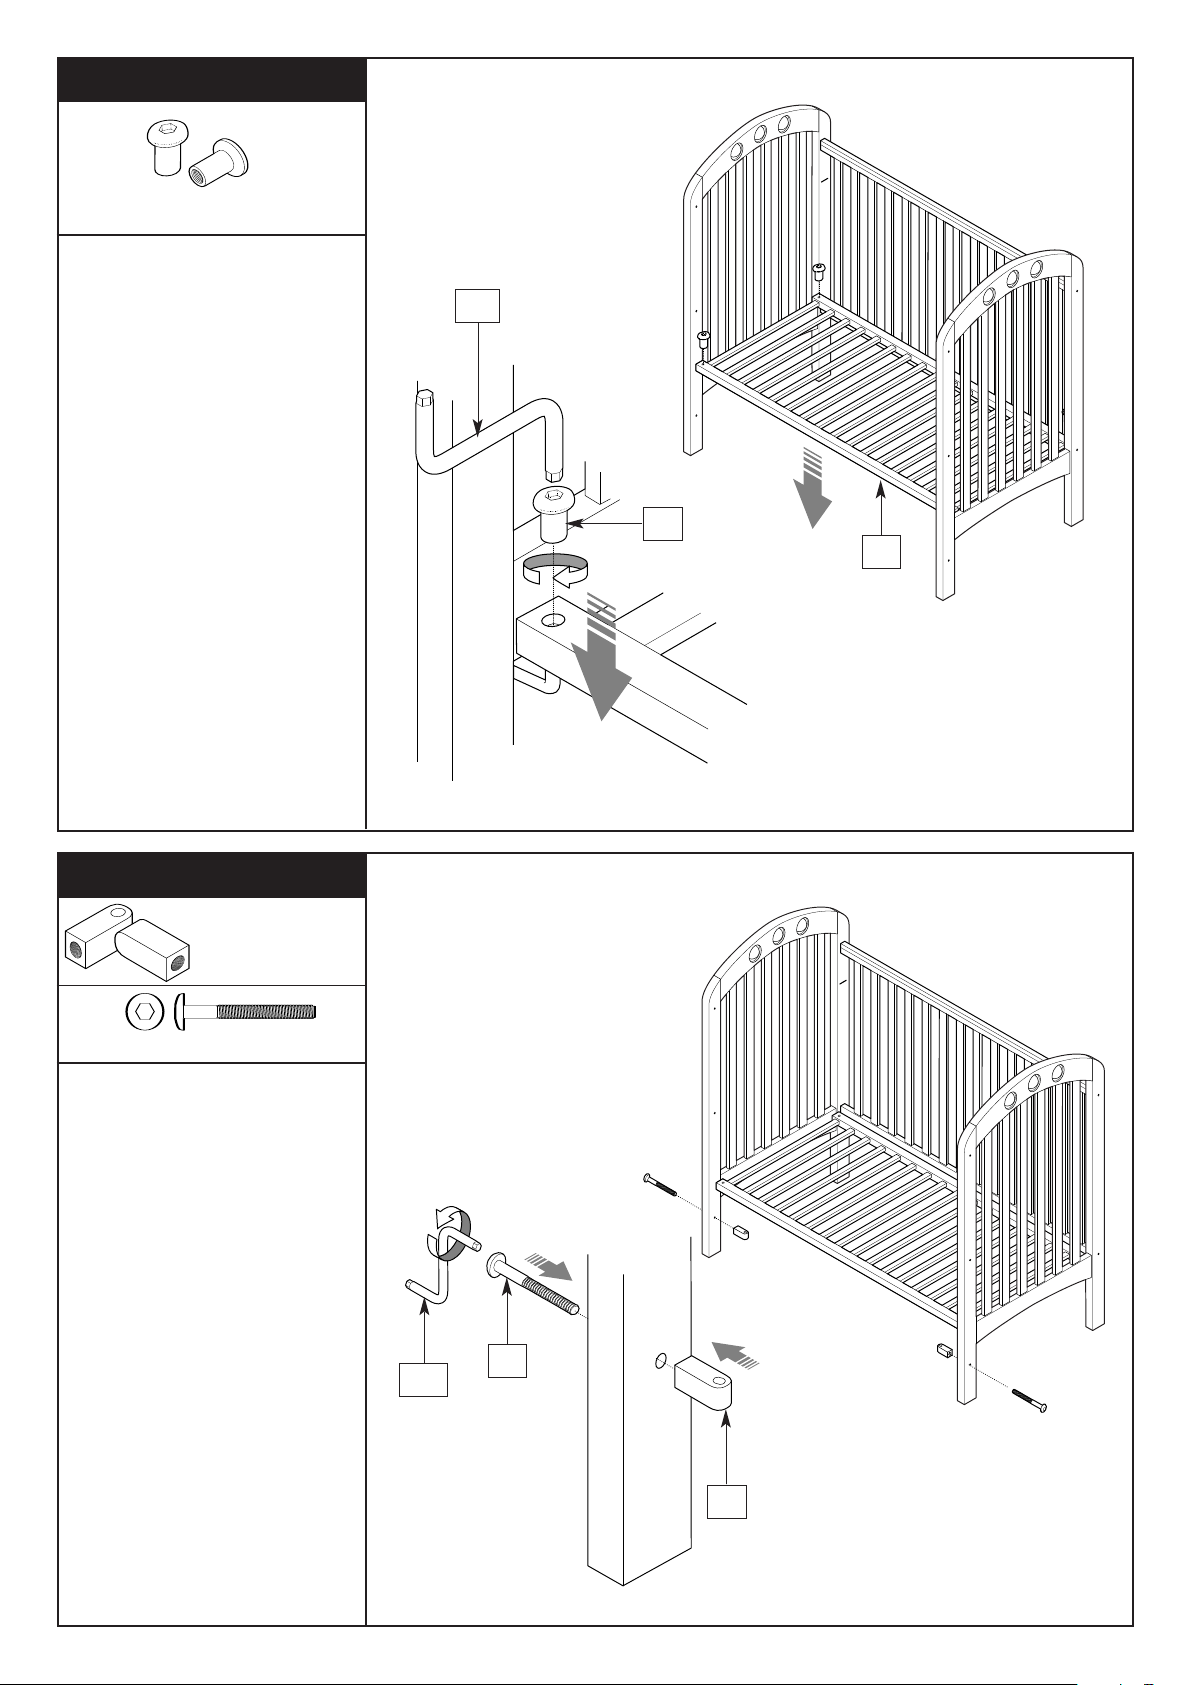
FITTINGS
F5 / Base brack
et nuts x 4
Step 3
Attach the base (C4) (with
the information label facing
upwards) by lowering the
base onto the base brackets
so that the threaded ends of
the base brackets fit into the
holes in the ends of the
base’s rails.
Push the base bracket nuts
(F5) into the holes in the
corners of the base and screw
them onto the threaded ends
of the base brackets using the
allen key (F10).
F10
F5
C4
FITTINGS
F6 / Bottom
guides x 2
F2 /
Short assembly scr
ews x 2
Step 4
Please note: The guides
must always be fitted on the
inside face of both cot ends
(see diagram).
Attach the two bottom
guides (F6) to the two
bottom holes in the cot ends
by pushing two short
assembly screws (F2) through
the holes, then screw them
into the guides Using the
allen k
The r
guides must face upwar
(see diagram).
ey (F10).
ecess in the top of the
ds
F10
F2
F6
– 5 –
Page 6
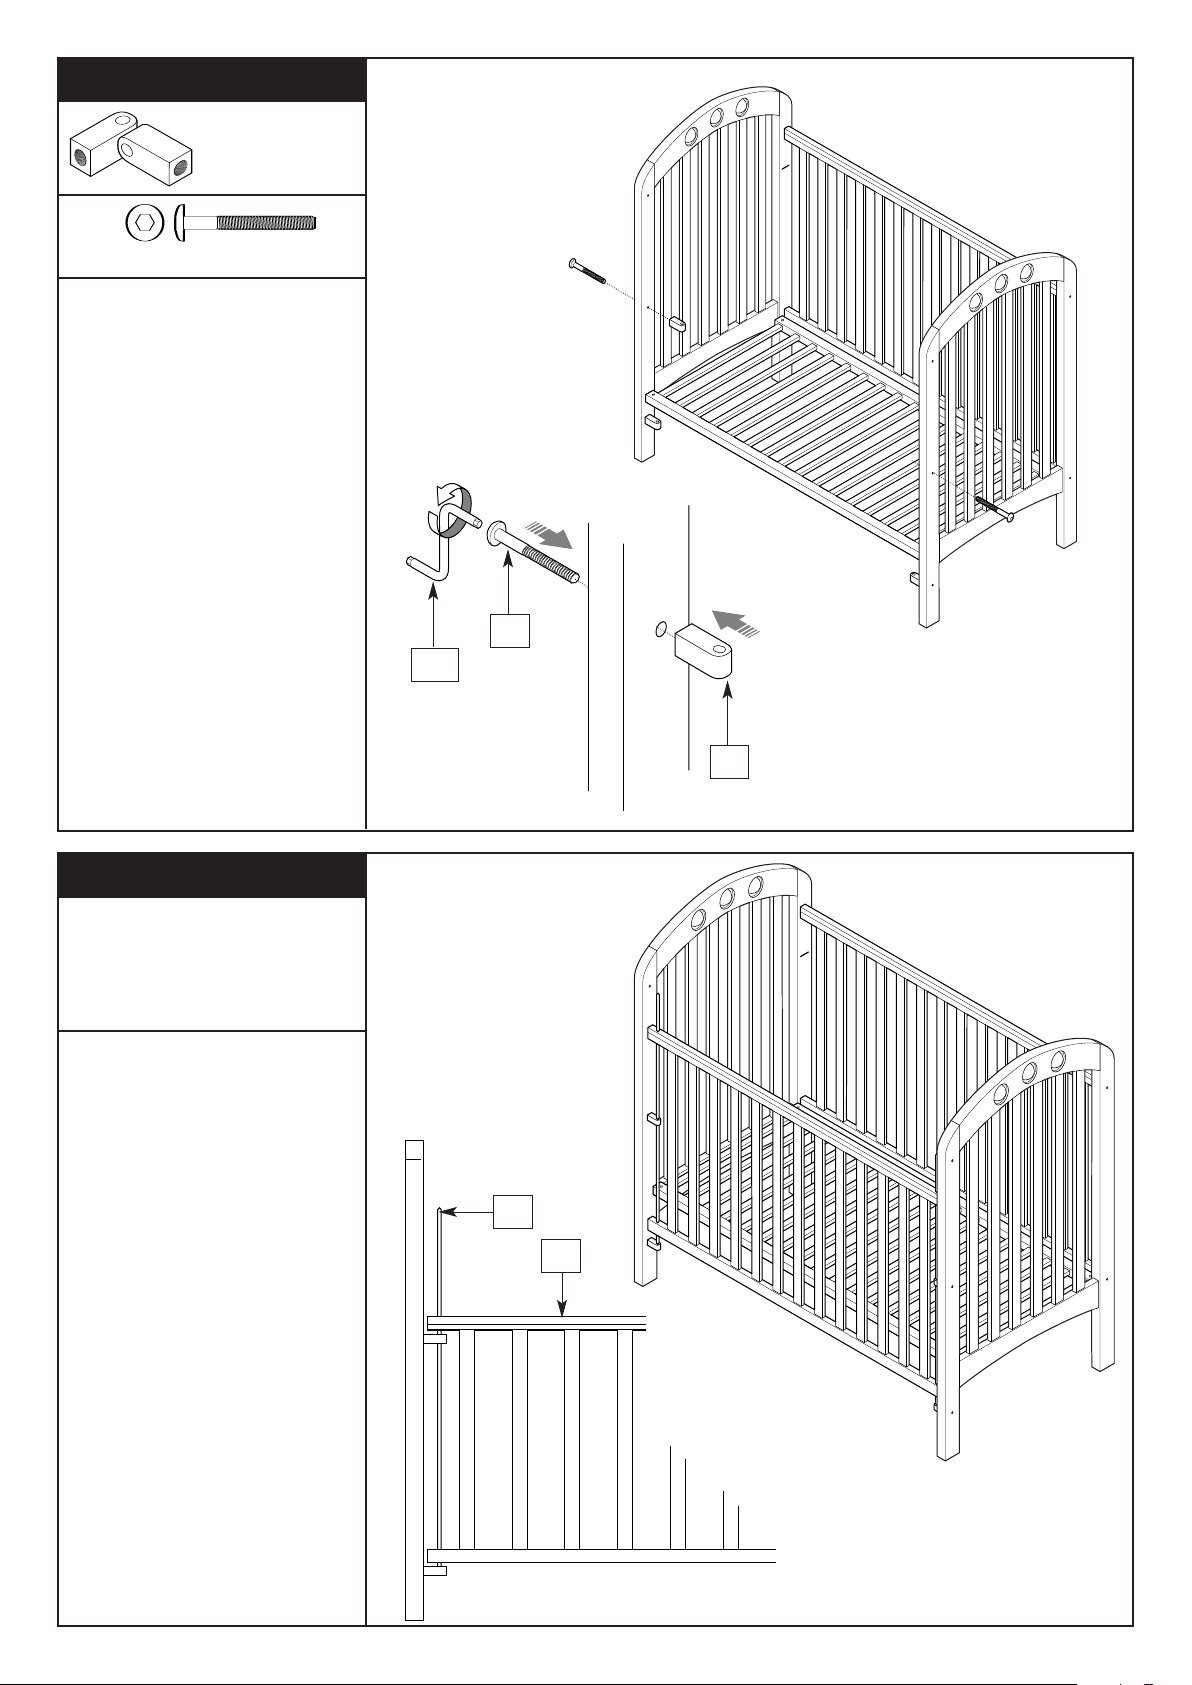
FITTINGS
F7 / Middle
guides x 2
F2 /
Short assembly screws x 2
Step 5
Attach the two middle guides
(F7), (these have a hole going
through them) to the middle
hole in each cot ends by
pushing two short assembly
screws (F2) through the
holes, then screw them into
the guides using the allen key
(F10).
The holes through the guides
must face upwards (see
diagram).
F2
FITTINGS
NONE
Step 6
Please note: Fit the drop-
side with the plastic teething
rail at the top.
Align the holes in the ends of
the top and bottom rail on
op- side (C5) with the
the dr
holes in the guides.
Slide the drop-side rods (C6)
through the holes in the rails
and middle guides.
est in
The ends of the r
the recess in the top of the
bottom guides.
ods r
F10
F7
C6
C5
– 6 –
Page 7
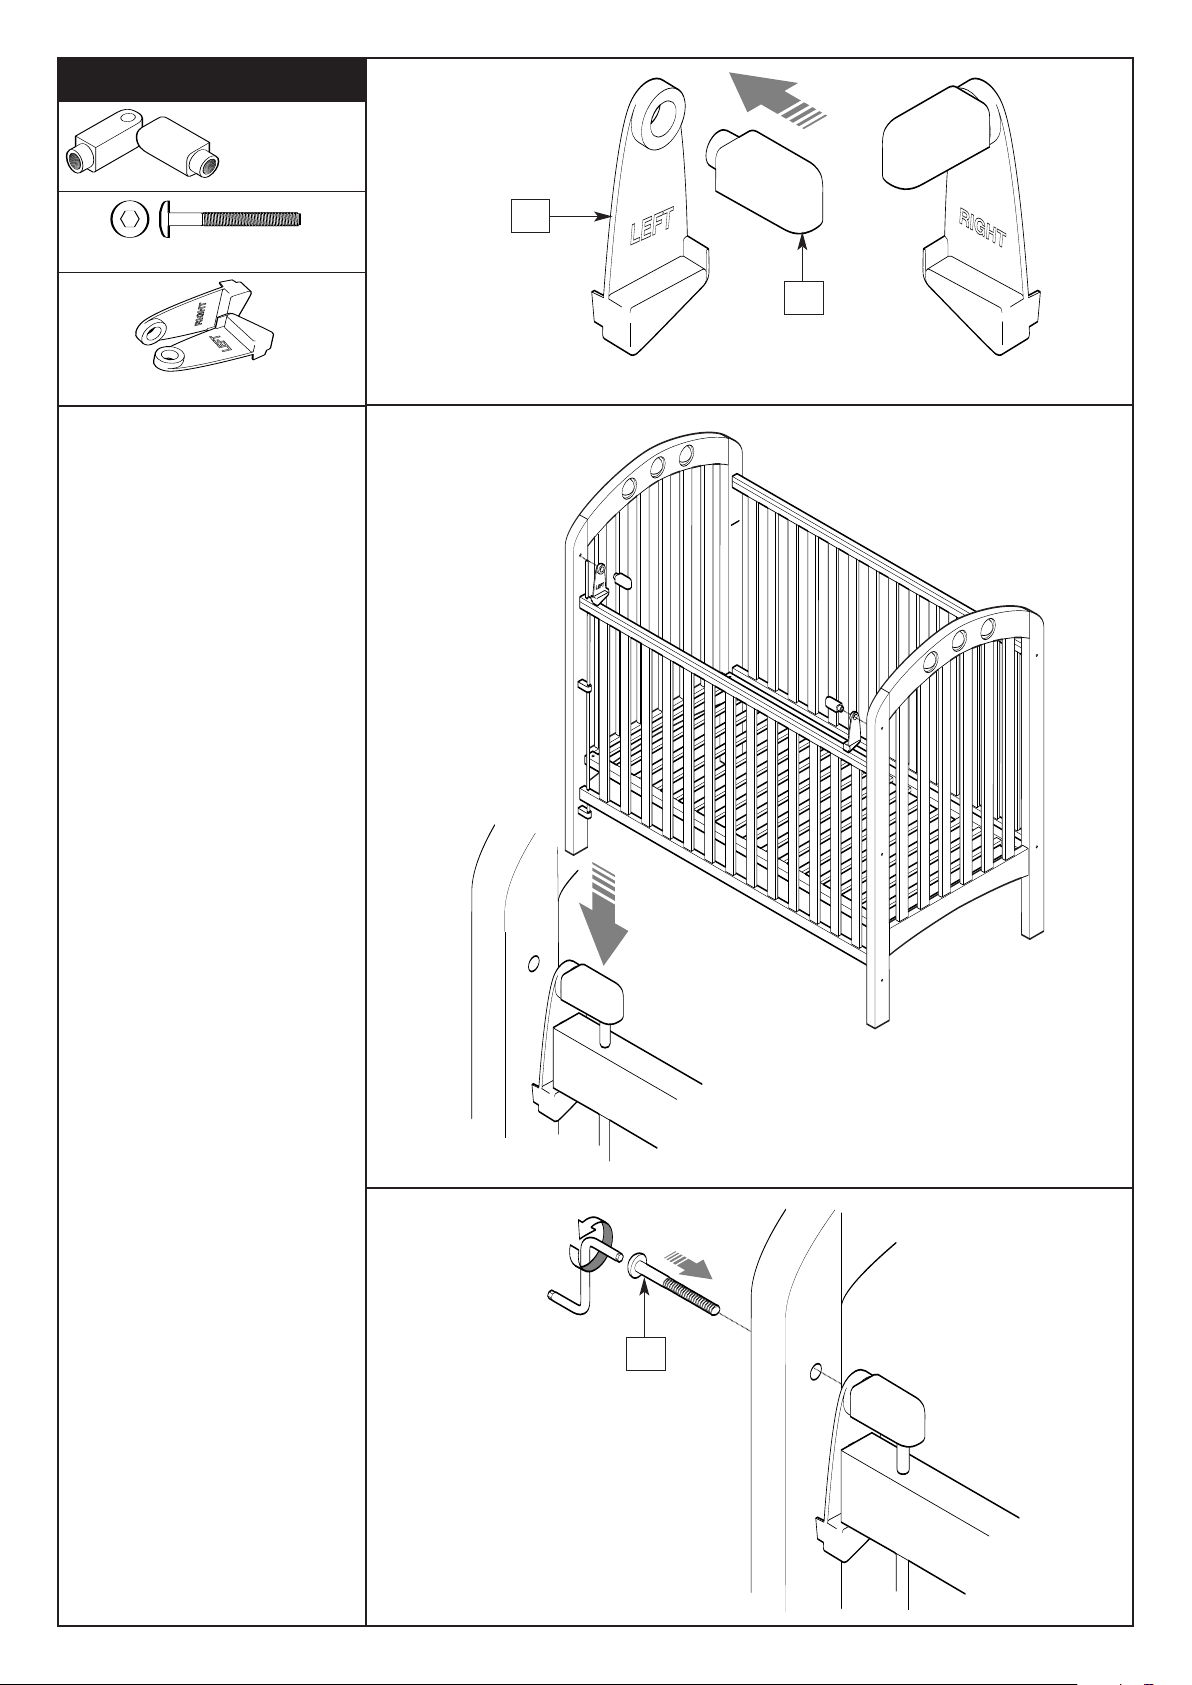
FITTINGS
F9 / Top
guides x 2
Step 7a
F2 /
Short assembly screws x 2
F8 / Dr
op-side catches x 2
Step 7a
Slot the drop-side catches
(F8) onto the narrow ends of
the top guides (F9).
Step 7b
Slot the ends of the dropside rods into the holes in the
underside of the top guides.
Please note; the drop-side
catch marked Left goes on
the left side and the catch
marked Right goes on the
right side.
F8
F9
Step 7b
Step 7c
Slot two short assembly
screws (F2) through the top
holes in the cot ends. Tighten
the scr
holes in the thinner ends of
the top guides.
IMPOR
your child in the cot ensure
that all screws and fittings
ar
particularly the base bracket
nuts.
ews into the thr
:
ANT
T
e fully tightened,
Befor
eaded
e placing
Step 7c
F2
– 7 –
Page 8
INSTRUCTIONS FOR SAFE USE & MAINTENANCE
1. The bottom position of the base is the safest. You should use the cot in this position as soon as your baby
is old enough to sit up.
2. If you leave your child unattended in the cot, always make sure that the drop side is in the highest
position.
3. Never leave anything in the cot which could provide a foothold for your child to climb out or would present
a danger of suffocation or strangulation.
4. All assembly fittings should be tightened properly and care should be taken to ensure that no screws are
loose, a child could trap parts of the body, or clothing (e.g. ribbons, drawstrings, necklaces ) this could
pose a risk of strangulation.
Regularly check that all fittings and components of the cot are fully tightened and in working order. If any
5.
parts have become worn or damaged then do not use the cot, seek advice by calling our Customer Care
Helpline on: 01484 438222.
6. Do not use replacement parts that are not recommended or supplied by Mamas & Papas. Non-approved
parts may render the repair or cot unsafe.
7. Do not place your cot in the close proximity of an open fire and other sources of heat, such as radiators,
electric or gas fires.
8. For reasons of safety we only recommend the use of the Mamas & Papas size 300 mattress for this cot.
9. The mattress should be no more than 40mm shorter or narrower than the internal length or width of the
cot.
10 . The thickness of the mattress chosen should be such that the internal height (the distance between the
surface of the mattress to the upper edge of the cot side) is a minimum of 500mm when the base is set in
the lowest position and a minimum of 200mm when the cot base is set in the highest position.
11. Your cot may be cleaned with a damp cloth.
Never use bleach or harsh abrasives.
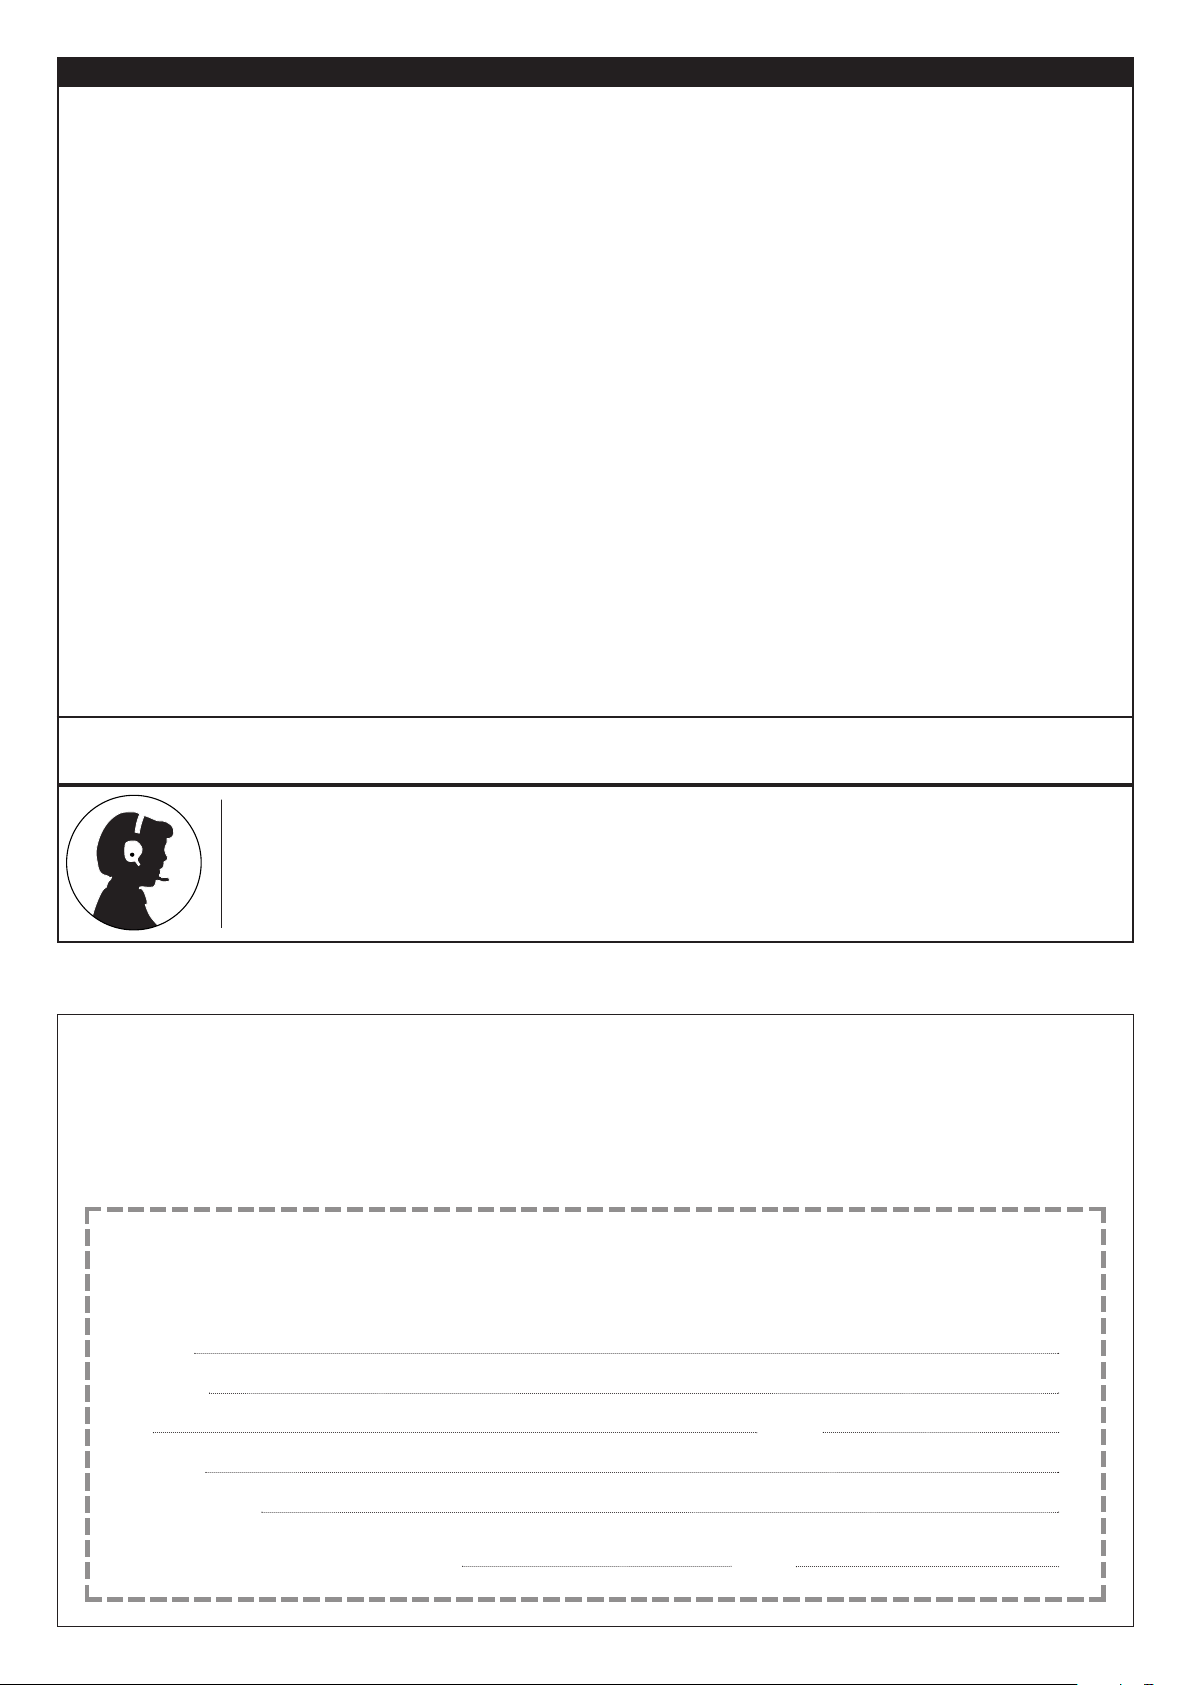
The maximum height (i.e. upper surface) of any mattress fitted must not exceed the line engraved on the
inside of the cot leg. We recommend the use of the Mamas & Papas size: 300 mattress.
AFTER SALES SERVICE: If when you receive your Mamas & Papas product you need
assistance, spare parts or you are unhappy with any aspect of the goods please contact your
retailer or our
you, in order to avoid you having to return your product to the retailer
Customer Care Helpline on: 01484 438222. You may also e-mail us at
where one of our trained advisors will be able to help
. You can also visit our
website at www.mamasandpapas.co.uk for the latest product information.
Due to constant updating and improvements, some components may occasionally differ slightly from the diagrams shown in these instructions.
Any spare components should only be thrown away after you have
We reserve the right to change the specifications of any piece of product without prior notice.
fully constructed your product.
ALL OUR PRODUCTS ARE MADE FROM THE FINEST QUALITY MATERIALS
AND ARE MANUFACTURED UNDER THE STRICTEST QUALITY CONTROLS
We guarantee all our products or part thereof, for a period of six months from the date of delivery to the consumer
I0076: V3/06/04
Or alternatively
against faulty manufacture. This guarantee is not effective against damage caused as a result
of incorrect usage of the product or accidental damage. This in no way affects your statutory rights.
GUARANTEE
.mamasandpapas.co.uk
, call our Guarantee R
Mamas & Papas, Colne Bridge Road, Huddersfield, West Yorkshire. HD5 0RH
To validate this guarantee, please fill in the coupon and return to:
egistration Line on 01484 438225 with your details, or visit our website on: www
Name
ess
Addr
ostcode
P
Retailer
Home Phone No.
Item purchased
By validating your guarantee, your information will be entered onto our database. If you do not wish to receive information from other reputable companies, please let us know.
Amelia Cot Purchase Date Price
– 8 –
 Loading...