

Page 1

MicroCal iTC
User Guide
200
Washing Module
Page 2
Copyright © 2014 Malvern Instruments Ltd.
e
2 MicroCal iTC
200
Washing Module User Guide
MicroCal iTC200 Washing Module MAN0582
Page 3

Table of Contents
MicroCal iTC200 Washing Module
MAN0582
Installation Kit Contents ............................................................................................................................................................ 2
Part 1: Bottle Preparation ........................................................................................................................................................ 7
Part 2: Fluid Connections ......................................................................................................................................................... 8
Part 3: Hardware Connections ............................................................................................................................................. 15
Part 4: Electrical Connections and Grounding ............................................................................................................. 17
Part 5: Washing Module Basic Operation ....................................................................................................................... 19
Part 6: Washing Module Maintenance .............................................................................................................................. 23
Part 7: Washing Module Troubleshooting ....................................................................................................................... 27
MicroCal iTC
3
200
Page 4
Important user information
MicroCal iTC200 Washing Module
MAN0582
Intended use
MicroCal iTC
in research applications.
MicroCal iTC
clinical procedures, or for diagnostic purposes.
Prerequisites
In order to operate the system in the way it is intended, the following prerequisites must
be fulfilled:
• You should have a general understanding of the use of a personal computer running
Microsoft™ Windows™ in the version provided with your product.
• You should understand the concepts of isothermal titration calorimetry.
• You must read and understand the Safety Instructions as outlined in
MicroCal iTC
• The instrument and software must be installed, configured and calibrated as outlined
in MicroCal iTC
Safety notices
This user documentation contains WARNINGS, CAUTIONS and NOTICES concerning the
safe use of the product with meanings as defined below.
is an isothermal titration calorimeter designed for biomolecular interaction studies
200
Washing module is intended for research use only, and shall not be used in any
200
Operating Instructions .
200
Operating Instructions by Malvern Instruments personnel.
200
Notes and tips
A Note is used to indicate information that is important for trouble-free and optimal use of the product.
Not e:
Tip: A tip contains useful information that can improve or optimize your procedures.
4 MicroCal iTC
Washing Module User Guide
200
Page 5
About this manual
MicroCal iTC200 Washing Module
MAN0582
Purpose of the user manual
This user manual provides instructions needed to run MicroCal iTC
isothermal titration calorimetry (ITC) data. This user manual is a complement to
MicroCal iTC
Operating Instructions.
200
and to analyze
200
Typographical conventions
Software items are identified in the text by bold italic text. A colon separates menu levels,
thus F
ile:Open refers to the Open command in the File menu.
Hardware items are identified in the text by b
Text entries that MicroCal iTC software generates or that the user must type are represented
200
by a monotype typeface (e.g., C:\ Origin70\Samples
old text (e.g., Power switch).
).
Regulatory information
For regulatory information regarding MicroCal iTC
Operating Instructions or the MicroCal iTC
User Manual
200
washing module refer to MicroCal iTC
200
200
Associated documentation
Introduction
This section lists the user documentation that is delivered with MicroCal iTC
literature that can be downloaded or ordered from Malvern Instruments.
User documentation
The user documentation for MicroCal iTC
• MicroCal iTC
• MicroCal iTC
• MicroCal iTC
Operating Instructions
200
User Manual
200
Washing Module User Manual (this manual)
200
consists of:
200
Related literature
Additional downloadable material can be found at: www.malverninstruments.com/microcal
and related
200
MicroCal iTC
Washing Module User Guide 5
200
Page 6
Installation Instructions:
MicroCal iTC200 Washing Module
MAN0582
icroCal iTC
M
B
ackground:
Washing Module with Bottle Adapter
200
The bottle adapter allows the MicroCal iTC
Prior models of the washing modules used 30 mL vials that required frequent filling.
it Contents:
K
1 washing module with 1 Hub with cable (ASY501700 )
1 Filling Port Adaptor (ASY020506)
1 Cleaning Device (ASY020513)
1 Syringe Needle Cleaning Tube Assembly (ASY020512)
1 Waste Bottle Tube (ASY020555)
1 Drip Tube, Syringe, Wash Module (MSP021321
1 Drip Tube, Cleaning Device, WM (MSP25013)
1 Power Supply, Wall Mount, 12 VDC (PWS020326)
1 005 O-Ring for Cleaning Device & Adapter (ORG0005V-0 10)
2 USB Cable, Short (CBL020330)
1 Waste Bottle Assembly (Gray Cap) (ASY021615)
1 Water Bottle Assembly (Blue Cap)
1 Buffer Bottle Assembly (White Cap) (ASY021397)
1 Methanol Bottle Assembly (Red Cap) (ASY021398)
1 Filling Port Adapter with Needle (ASY501340)
1 Extra Tubing Set – One set of 5 per pack (KIT020599)
3 Bottle Tubing, External (ASY021608)
1 Replacement Filter –set of 5 per pack (29-0068-42)
(ASY021396)
washing module to be used with full-size bottles.
200
6 MicroCal iTC
Washing Module User Guide
200
Page 7
Part 1: Bottle Preparation
MicroCal iTC200 Washing Module
MAN0582
Not e: Turn the MicroCal iTC
1. Remove the four bottles from their packaging. Using
the standard tubing, the bottles will need to be
located within about three feet (1m) of the washing
module.
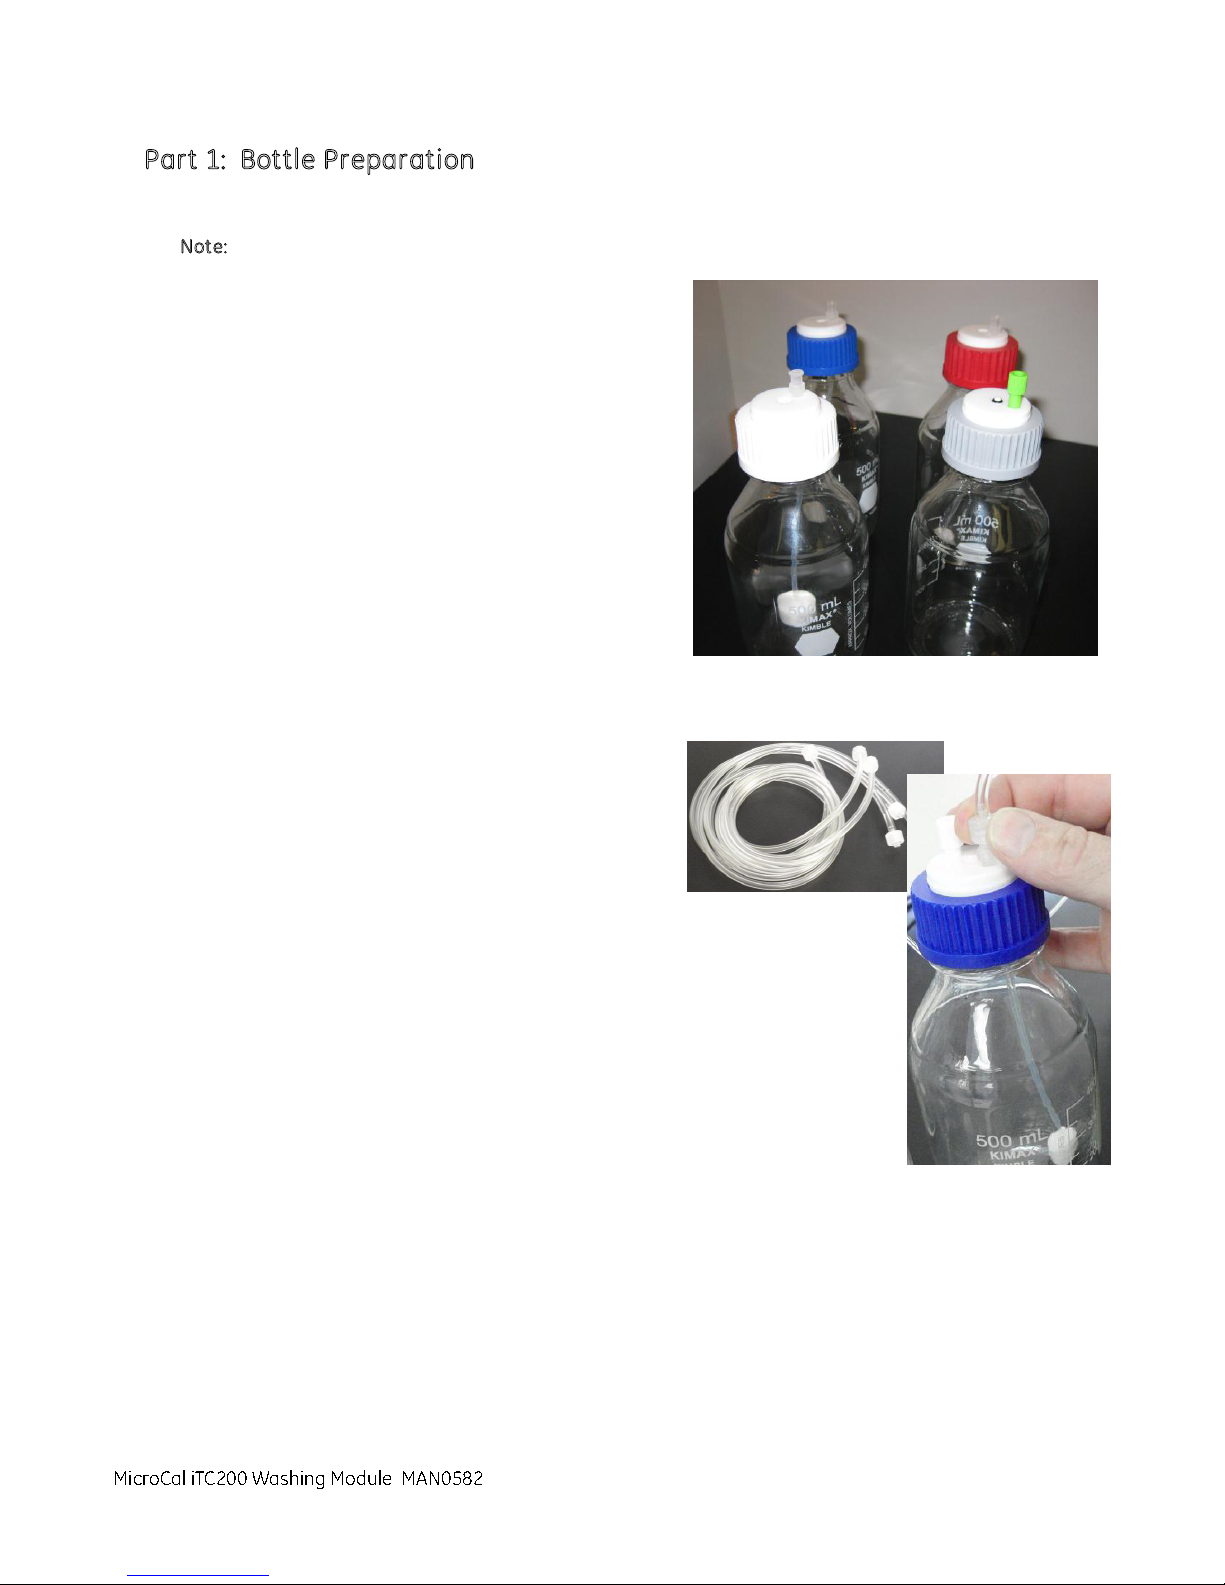
The bottle with the blue top
(ASY021396) will be used for water.
The bottle with the red top
(ASY021398) will be used for methanol.
The bottle with the white top
(ASY021397) will be used for buffer.
The bottle with the grey top
(ASY021615) will be used for waste.
off and disconnect it from power before proceeding.
200
2. The wast
two waste lines. Set them aside.
3. Remove the three tygon tubing assemblies
(ASY021608) from the ir packaging and screw them
onto the tops of the red, white and blue bottles.
4. Set the four bottles aside in a safe location near the cell unit.
e bottle assembly includes
MicroCal iTC
Washing Module User Guide 7
200
Page 8
Part 2: Fluid Connections
MicroCal iTC200 Washing Module
MAN0582
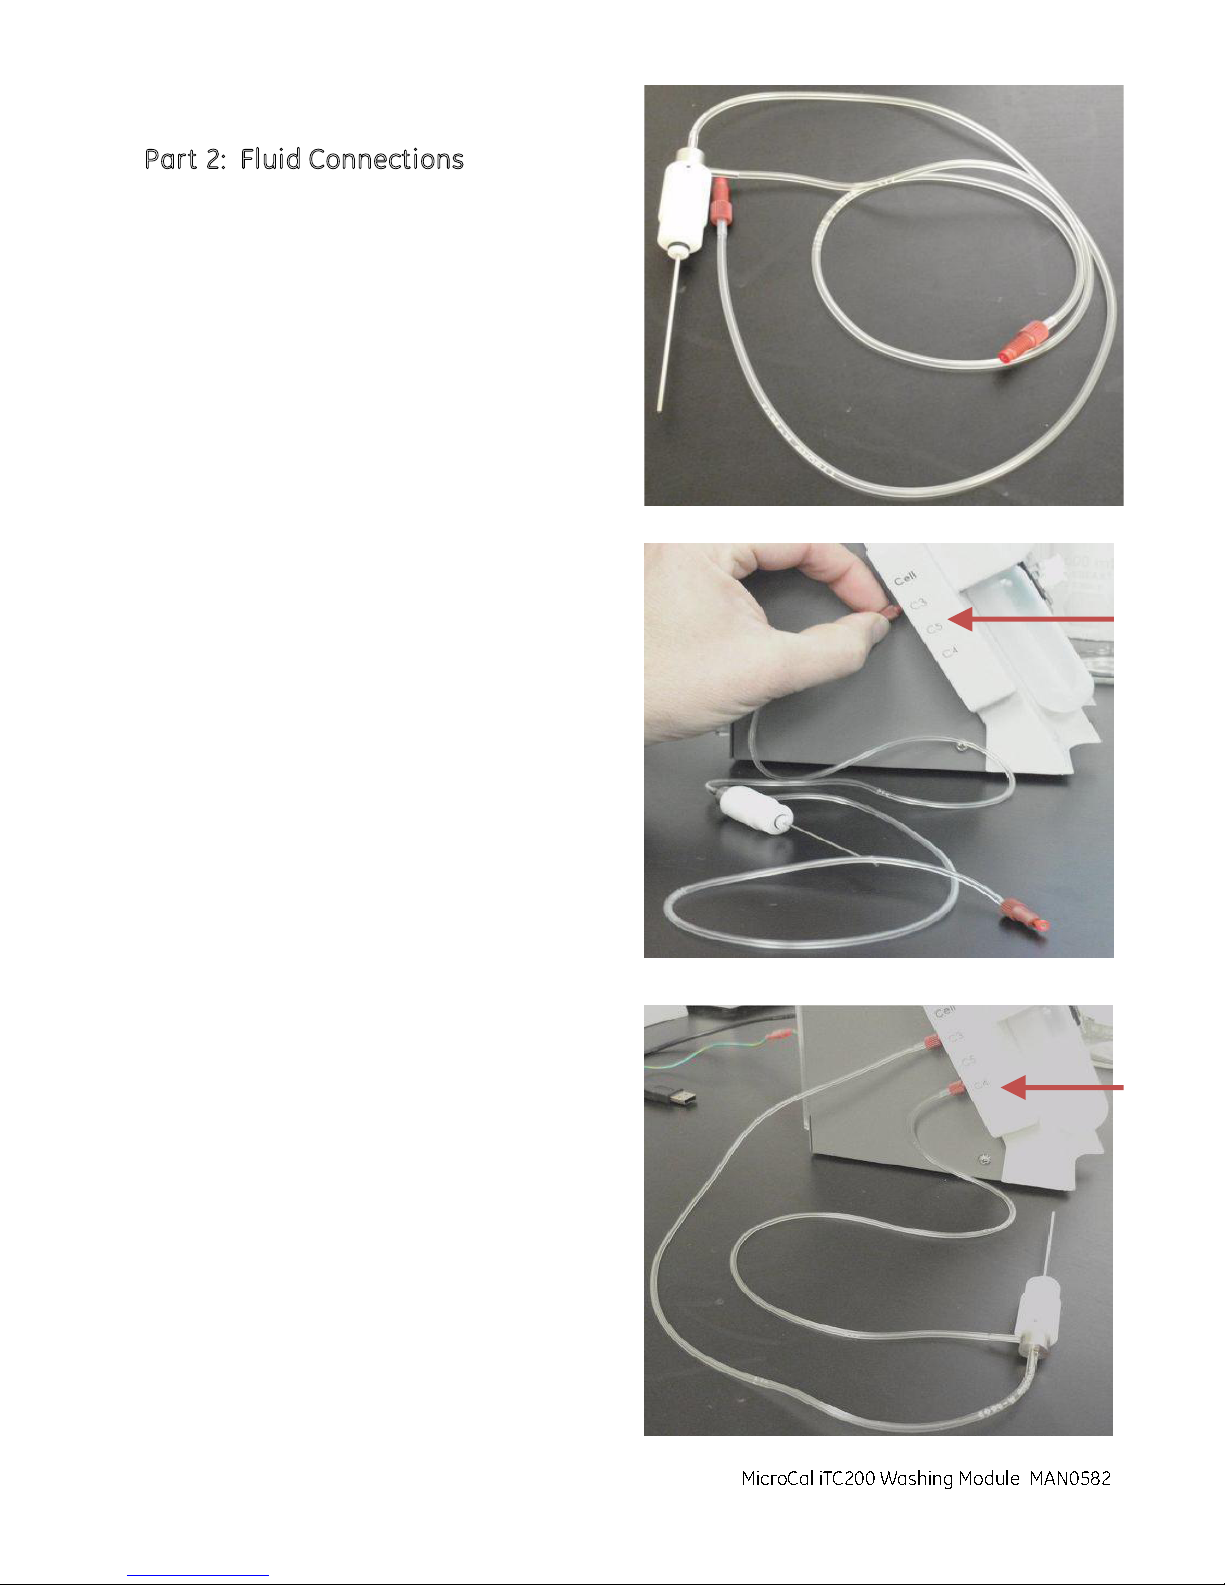
1. Remove the cleaning device (ASY020513) from
its packaging.
2. Connect the line from the top of the device into
the C3 port on the left side of the washing
module. Turn the nut on the red plumbing
connector until it is finger tight.
3. Connect the line that originates at the side of
the device to the C4 port on the left side of the
washing module. Turn the nut on the red
plumbing connector until it is finger tight.
8 MicroCal iTC
Washing Module User Guide
200
Page 9
MicroCal iTC200 Washing Module
MAN0582
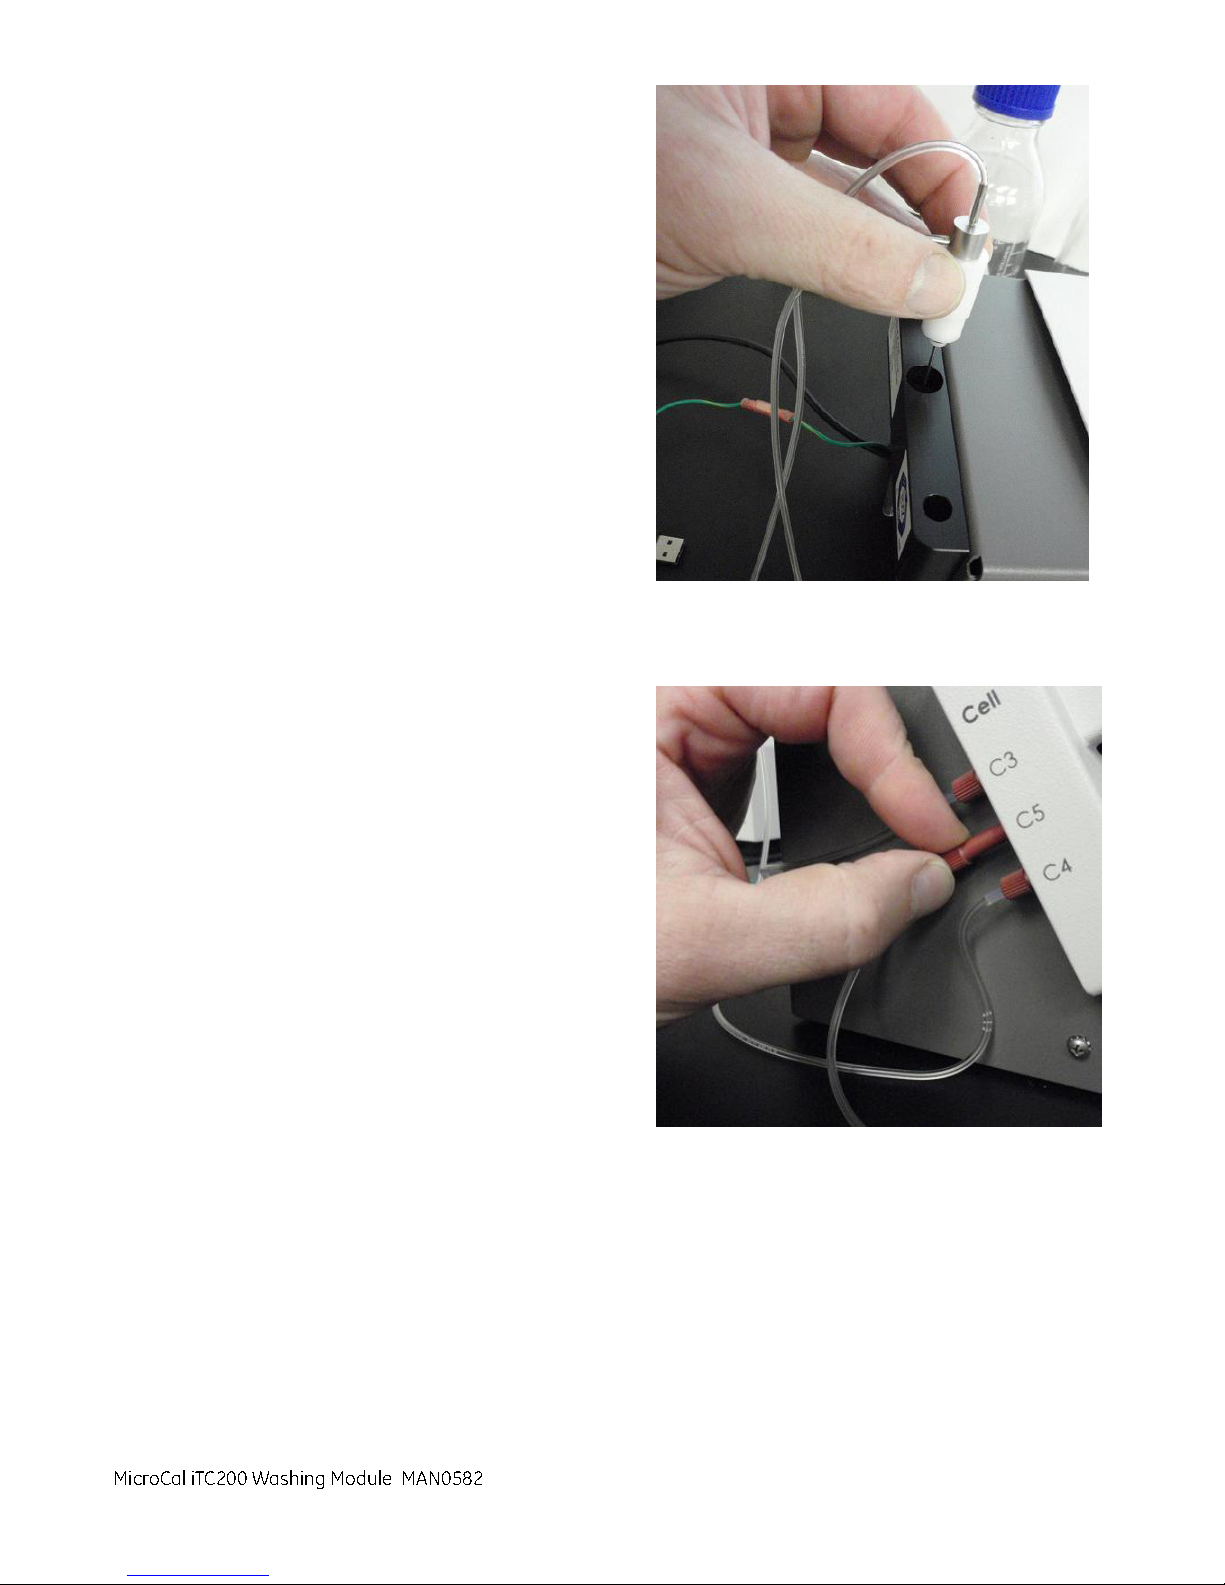
4. Place the cleaning device into the center hole at
the back of the washing module.
5. Two waste lines were set aside in Part 1, Step 2.
Select one of the waste lines based on how far
the waste bottle will be located from the
washing module. Then connect it to the C5 port
on the washing module. Turn the nut on the red
plumbing connector until it is finger tight.
MicroCal iTC
Washing Module User Guide 9
200
Page 10
MicroCal iTC200 Washing Module
MAN0582
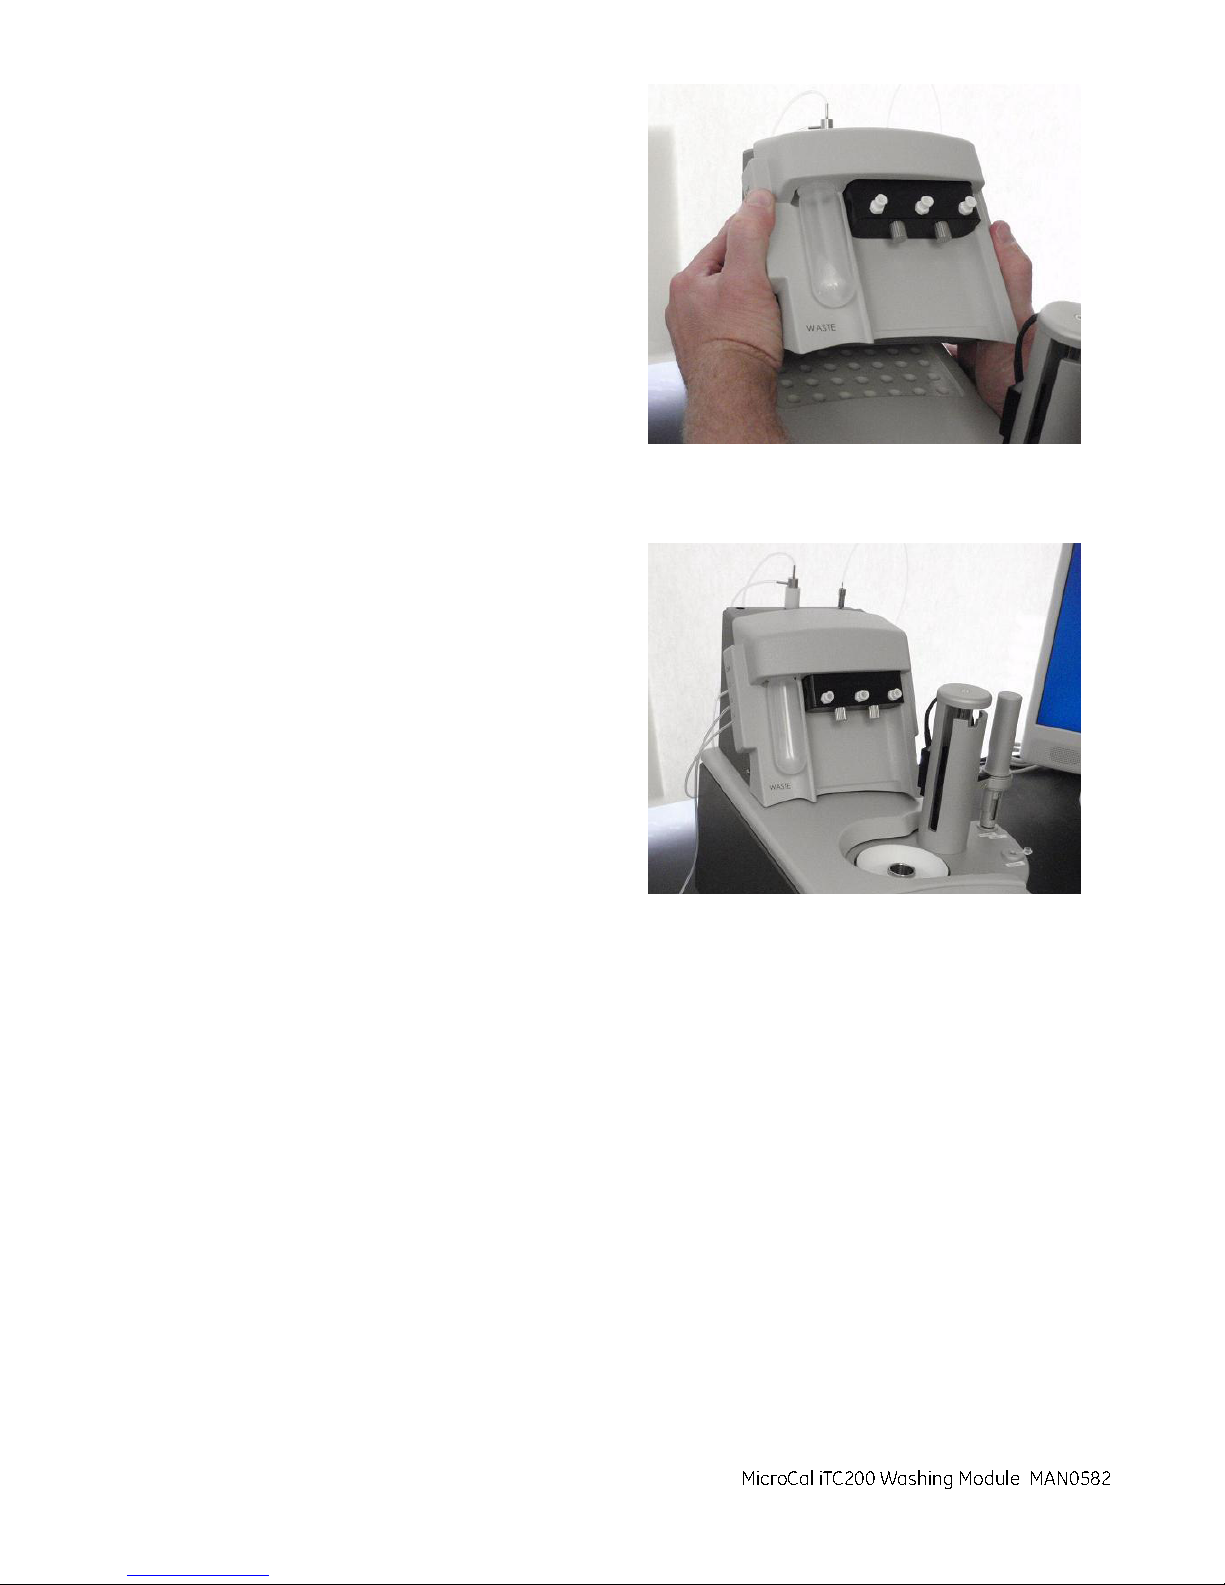
6. Place the washing module on top of the cell
unit. When properly positioned, the feet on the
washing module will fit into the depressions on
the top of the cell unit to keep it from sliding off.
10 MicroCal iTC
Washing Module User Guide
200
Page 11
MicroCal iTC200 Washing Module
MAN0582
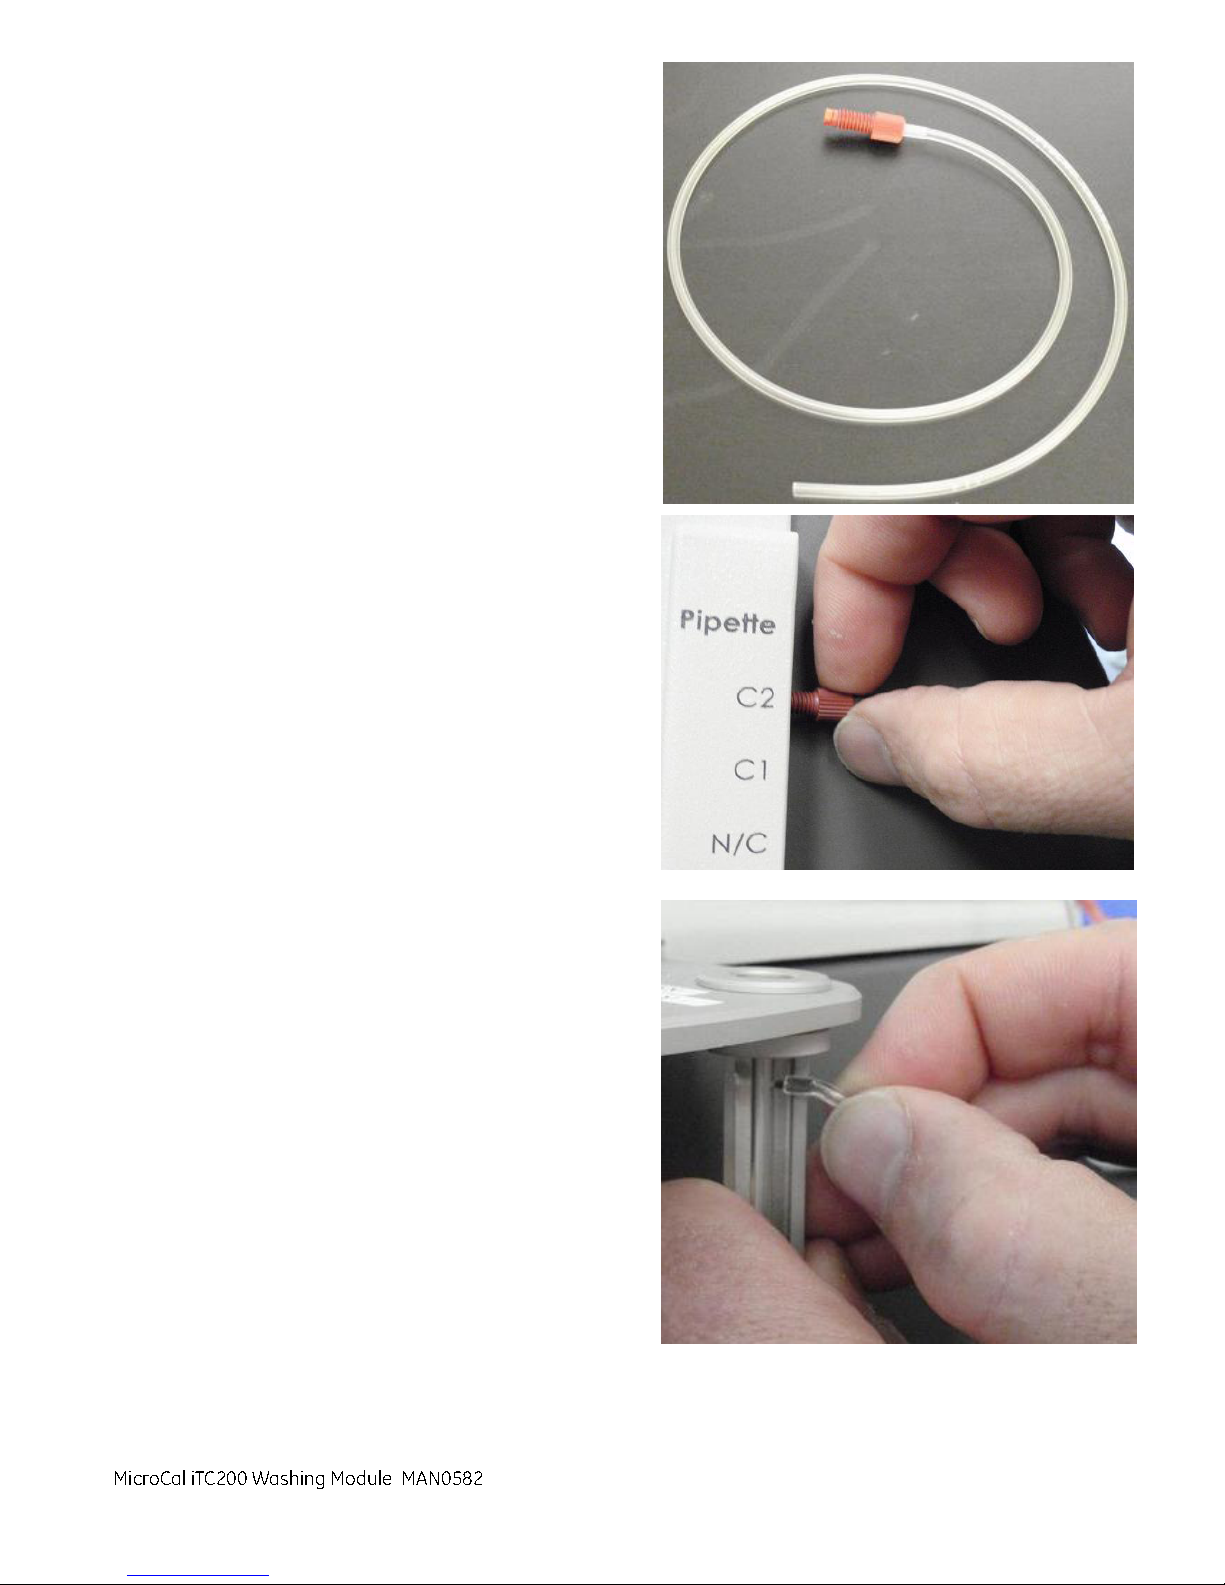
7. Remove the Syringe Needle Cleaning Tube
(ASY020512) from its packaging and connect
it to the C2 port on the right side of the washing
module. Turn the nut on the red plumbing
connector until it is finger tight.
8. Slide the other end of the Syringe Needle
Cleaning Tube onto the port on the Wash Dry
Station (right side of cell unit ).
MicroCal iTC
Washing Module User Guide 11
200
Page 12
Not e: The next two instructions deal with the
MicroCal iTC200 Washing Module
MAN0582
installation of the Fill Port Adapter (FPA). The FPA
assembly includes a separate set of instructions to
cover installation of the FPA into the pipette. The
installation of the FPA is critical for instrument
functionality. Follow the instructions carefully. For
the purpose of the installation of the washing
module, the FPA will be located in its secondary
position in the port on the back right side of the
washing module.
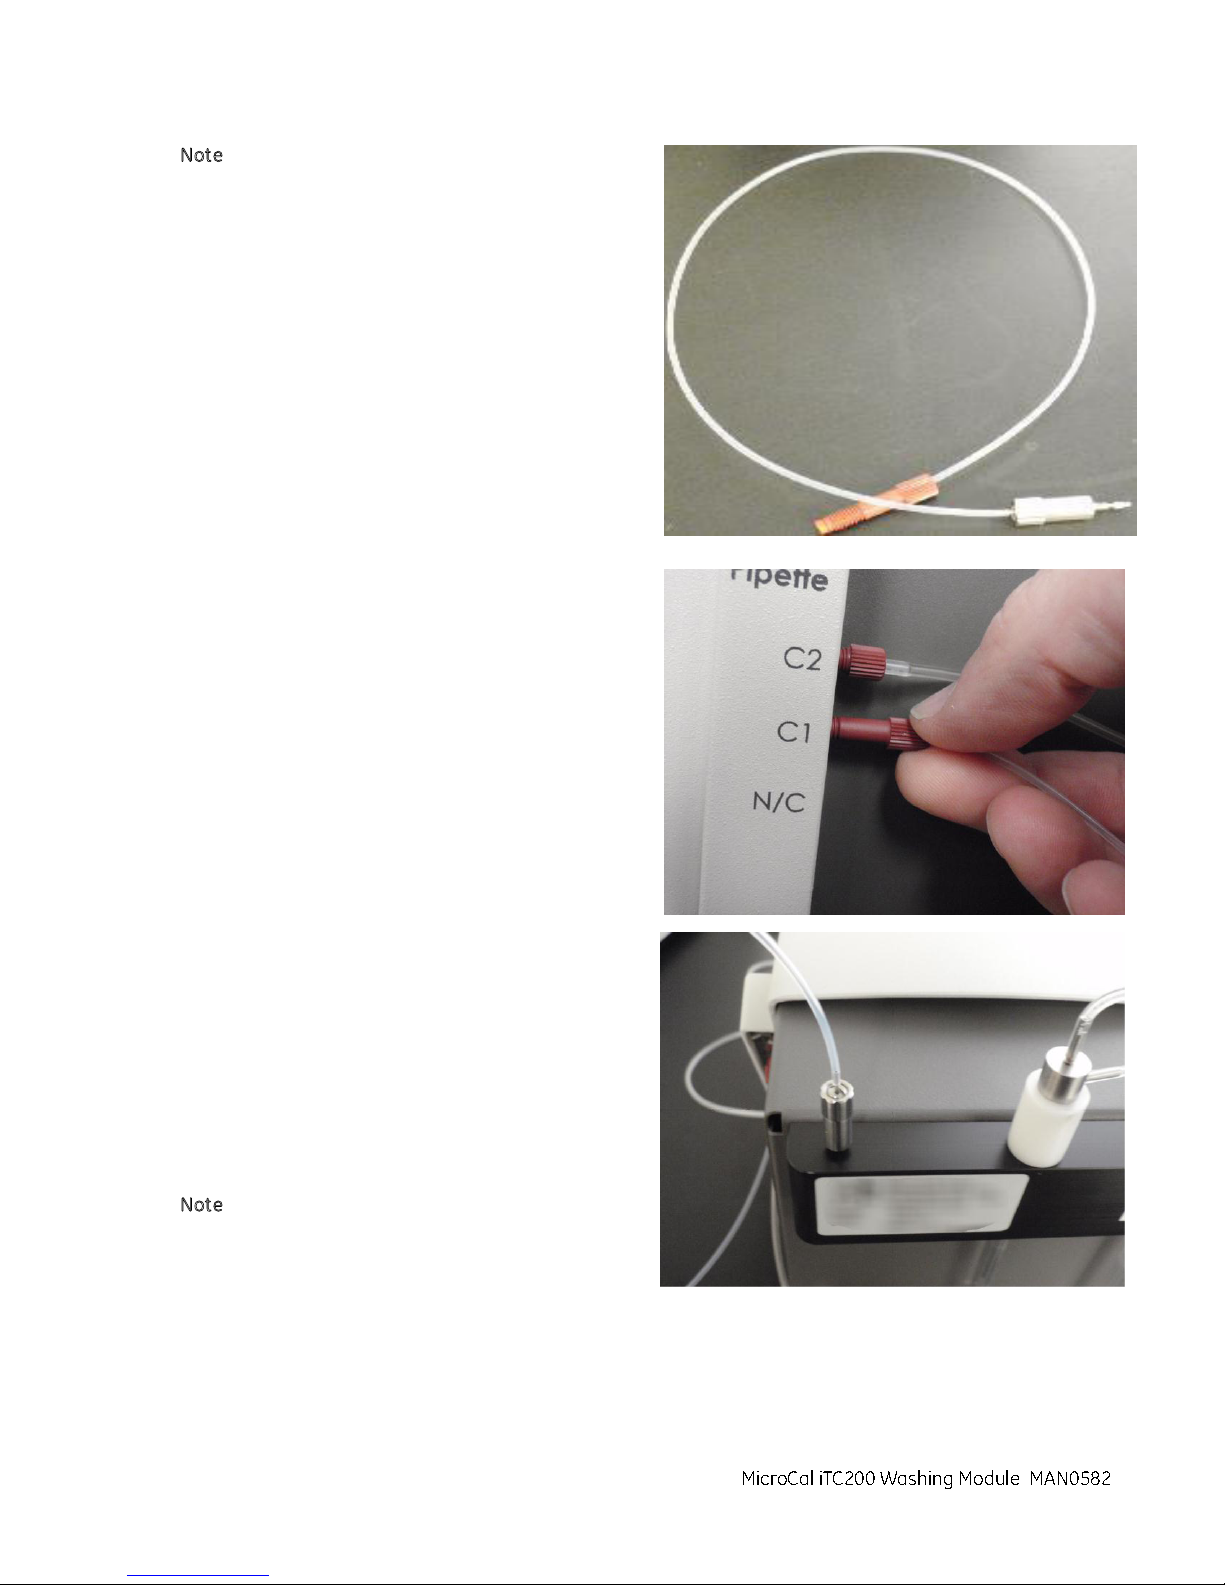
9. Remove the fil
l port adapter (FPA) (ASY020506)
from its packaging and screw the red ferrule into
the C1 port on the right side of the instrument.
10. Thread the FPA into the port on the back right
side of the washing module and turn it down
until it is flush with the top of the housing.
ote: The image at right is taken from the back of
N
the washing module, so the FPA is shown on the left
side.
12 MicroCal iTC
Washing Module User Guide
200
Page 13
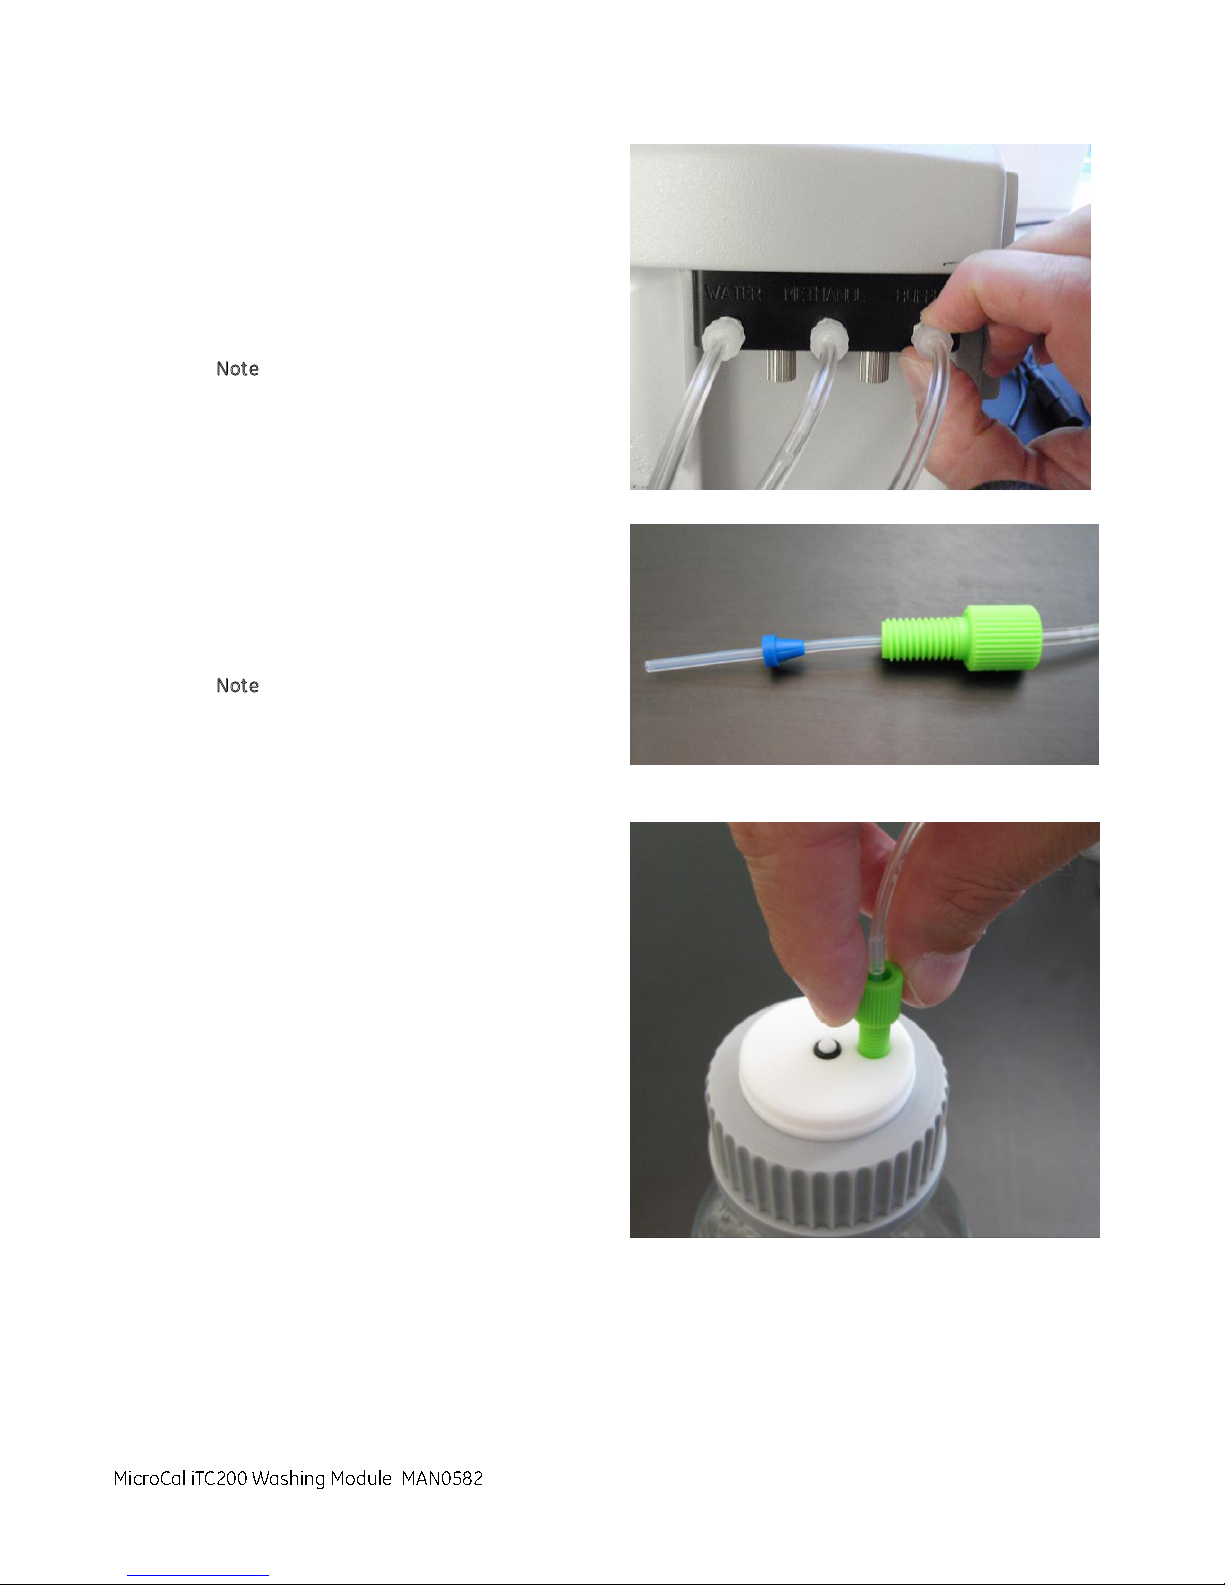
11. Run the tubing from the bottles to the bottle
MicroCal iTC200 Washing Module
MAN0582
adapter as follows:
Blue bottle to the water inlet port
Red bottle to the methanol inlet port
White bottle to the buffer inlet port
N
ote: Do not over-tighten.
12. Remove the securing nut from the top of the
waste bottle and slide the open end of the
waste tubing though it. Then slide the ferrule
with the cone end facing towards the
securing nut over the tubing as shown.
N
ote: The opposite end of the waste tube
should be installed in the C5 port on the
washing module. See step 5 above.
13. Insert the waste line (connected to the C5
port on the washing module) into the Grey
(waste) bottle and tighten the securing nut
until it is finger tight.
MicroCal iTC
Washing Module User Guide 13
200
Page 14
MicroCal iTC200 Washing Module
MAN0582
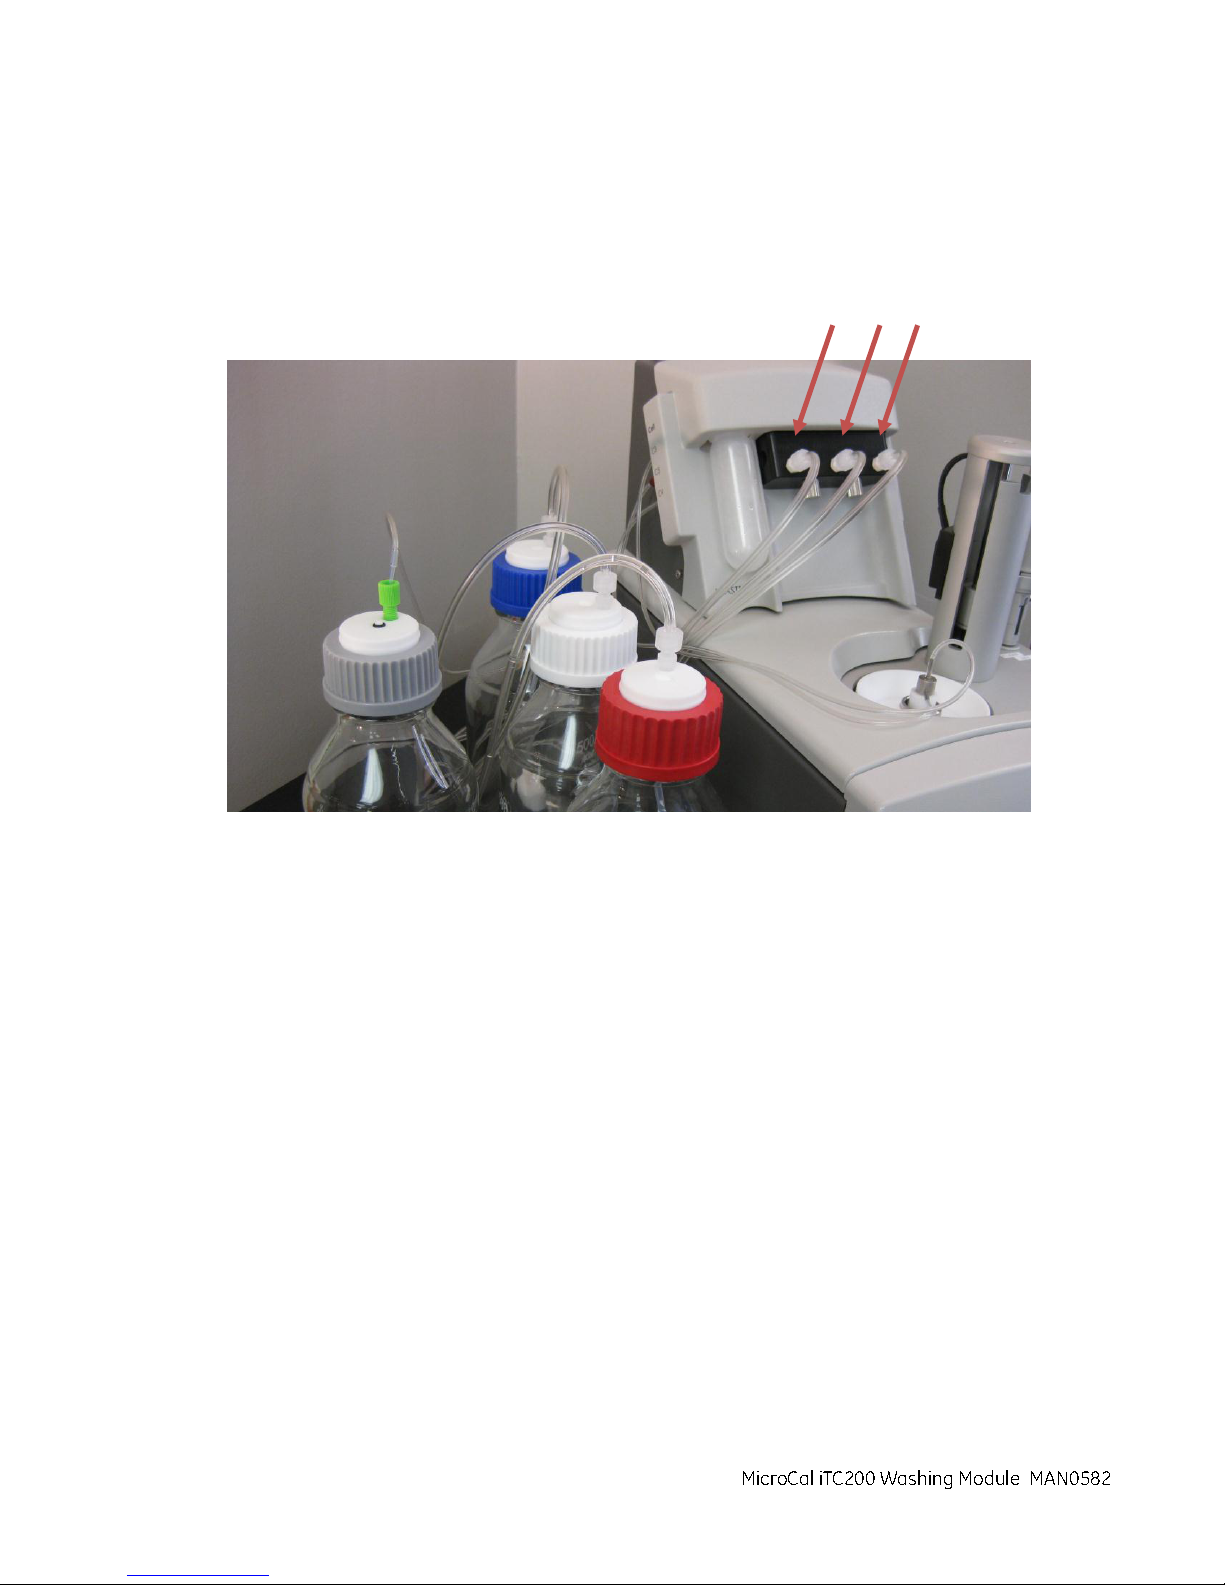
14. Bundle the three fluid lines from the adapter and position them so they will not interfere with your
experiments.
14 MicroCal iTC
Washing Module User Guide
200
Page 15
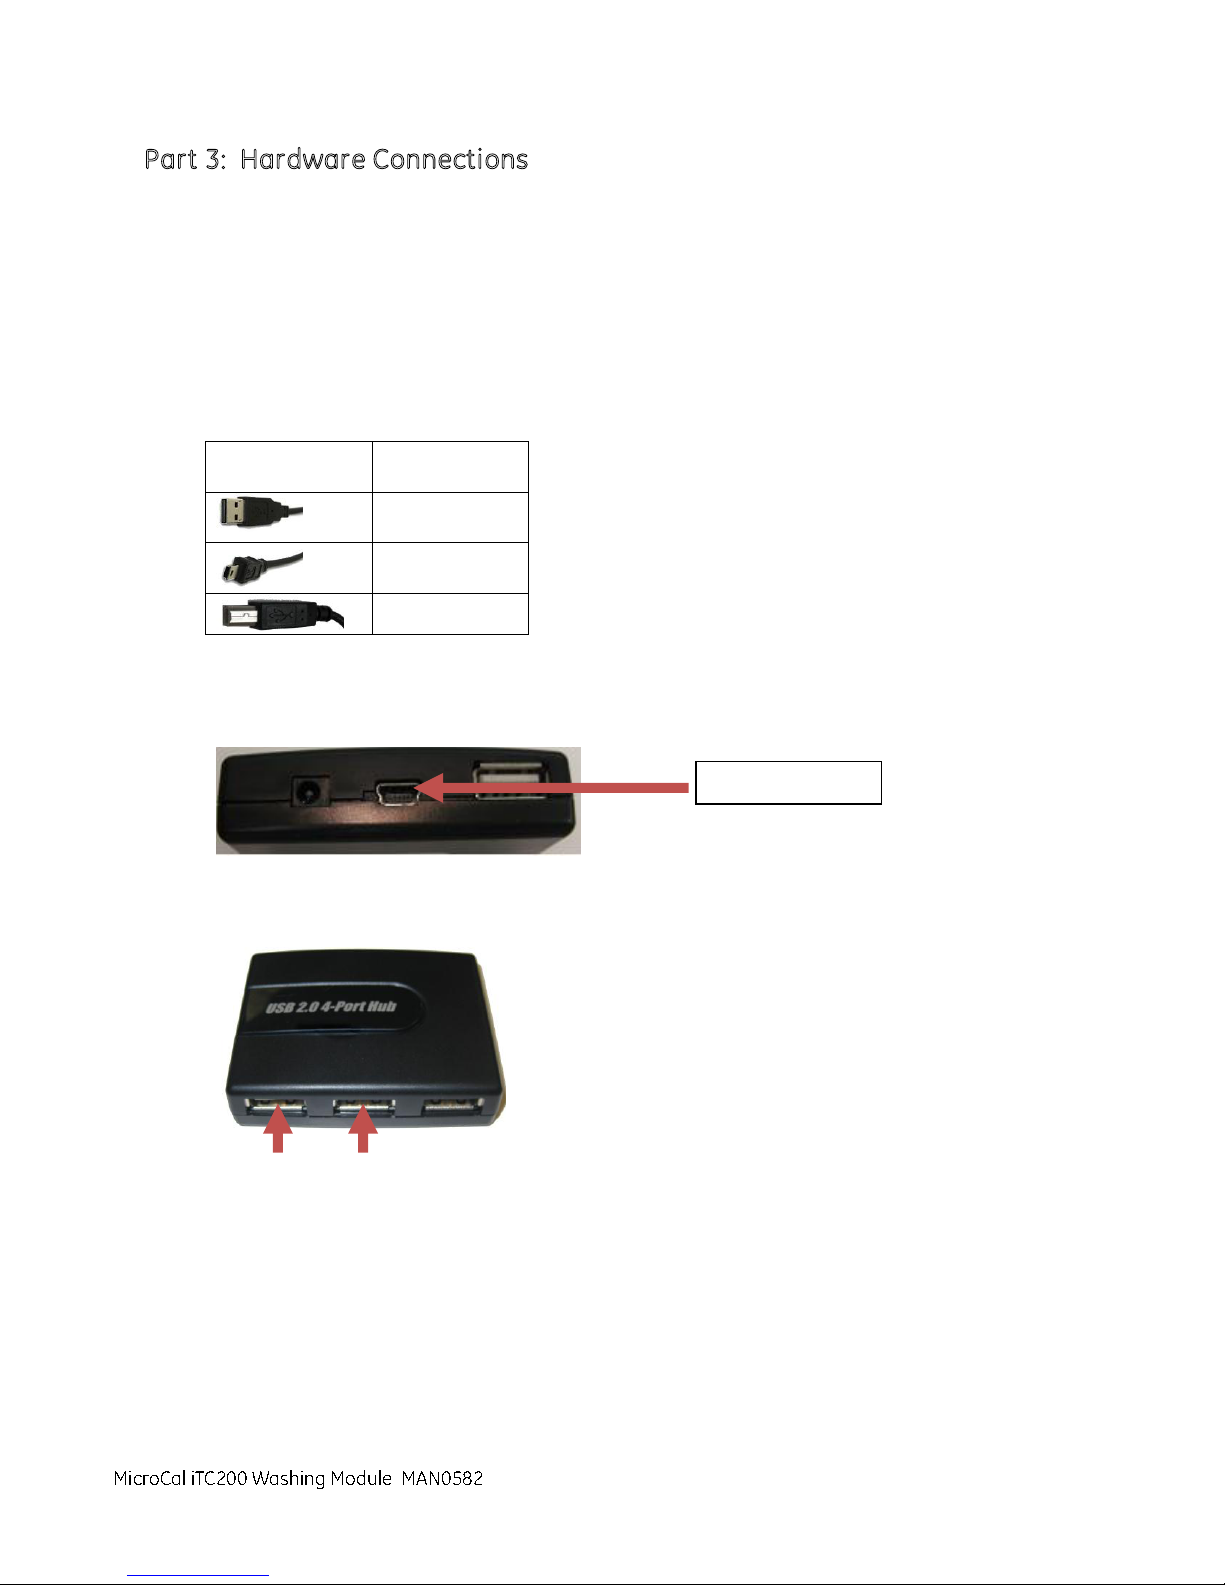
Part 3: Hardware Connections
Connector
Description
type A
type B (mini)
type B
Controller PC
MicroCal iTC200 Washing Module
MAN0582
The connections between the washing module, the MicroCal iTC
cell unit are made through a standard USB 4-port hub.
The hardware necessary to connect the three pieces of the system includes:
1 USB 2.0 4-port hub
1 Type A-B (mini) USB connector
2 Type A-B (standard) USB connectors
Table 1
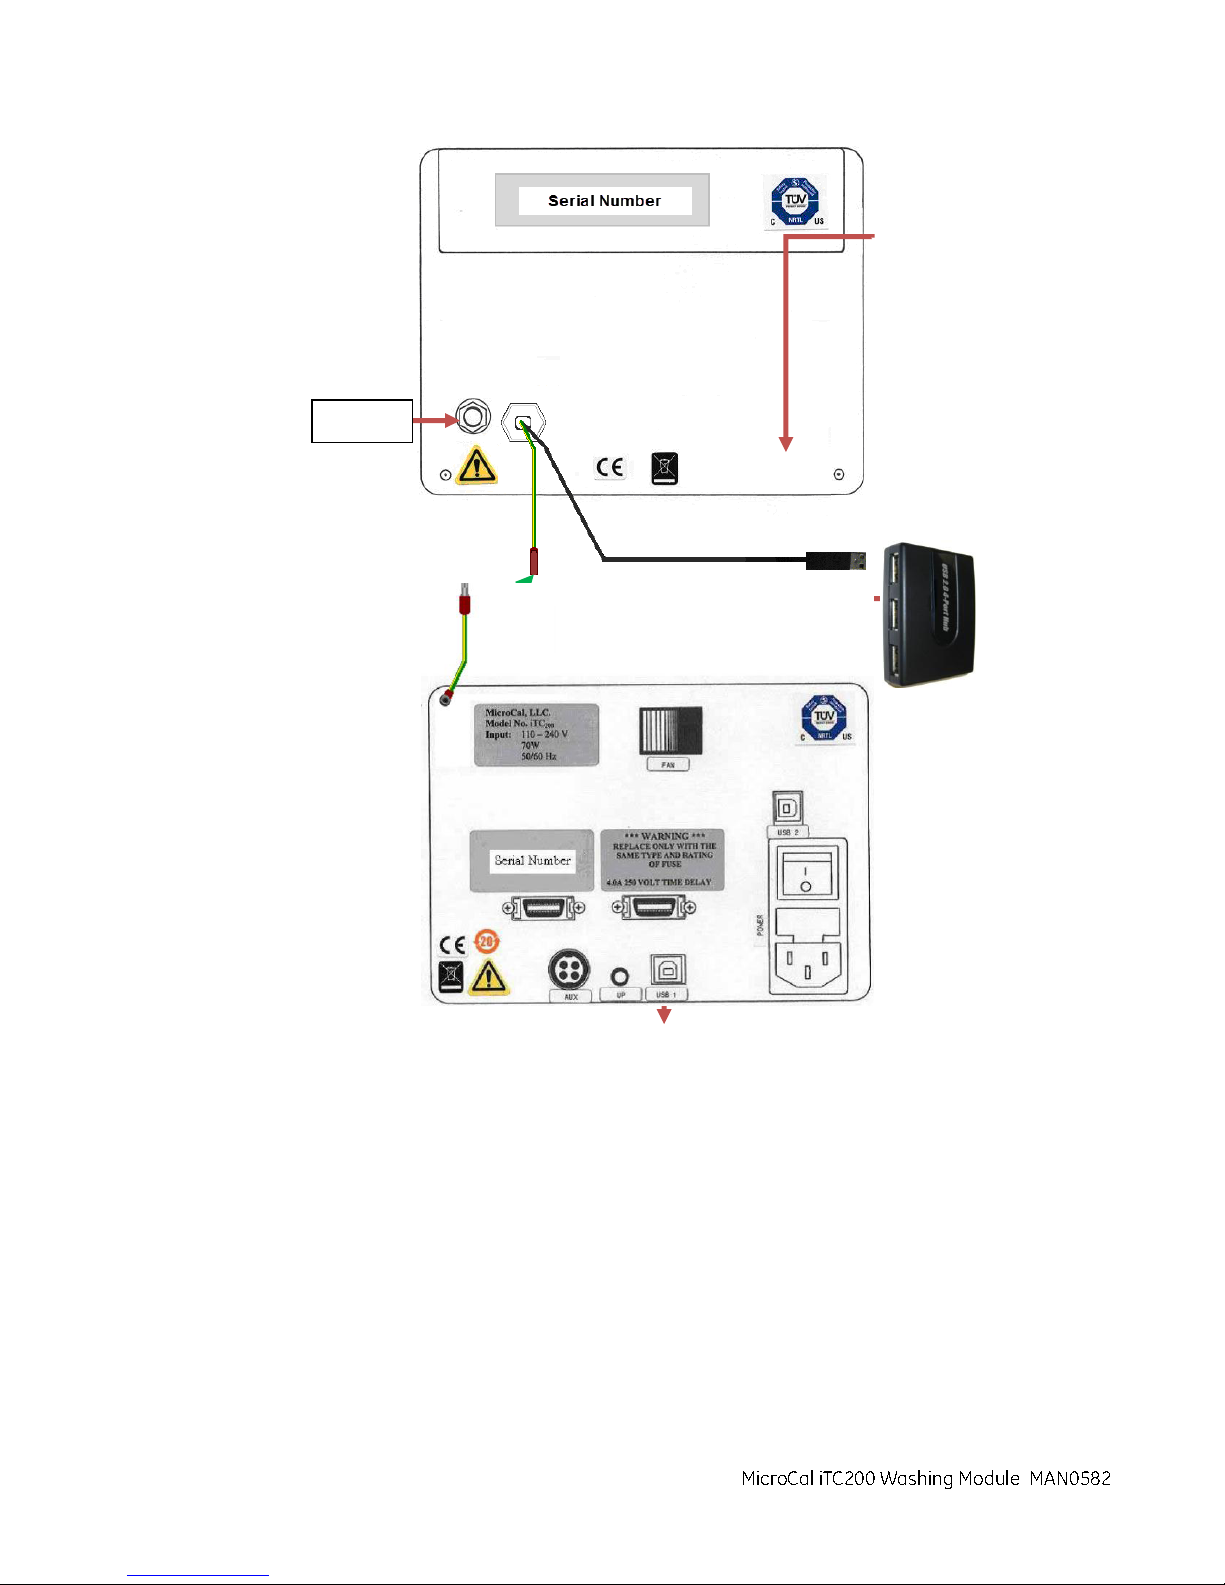
1. Identify the only cable with the USB type B (mini) cable end. Connect the type B (mini) cable end to
the USB hub. Connect the USB type A end of that cable to the labeled Controller PC USB port.
controller PC and the MicroCal iTC
200
200
2. Connect the USB type A ends of two USB cables to the hub as shown below.
3. Connect the USB type B ends to the USB 1 and USB 2 connectors on the rear of the MicroCal iTC
cell unit .
4. Place the washing module on top of the MicroCal iTC
5. Connect the USB type A end from the washing module to the hub.
6. Connect the green grounding strap wire between the washing module and the MicroCal iTC
unit.
cell unit .
200
200
200
cell
MicroCal iTC
Washing Module User Guide 15
200
Page 16
Power
MicroCal iTC200 Washing Module
MAN0582
16 MicroCal iTC
Washing module and Micro Cal iTC
cell unit
200
Washing Module User Guide
200
Page 17
Part 4: Electrical Connections and Grounding
WARNING
To enhance safety always plug the i nstrument into a
Ground Fault Circuit Interrupter (GFCI) device.
MicroCal™ iTC
200
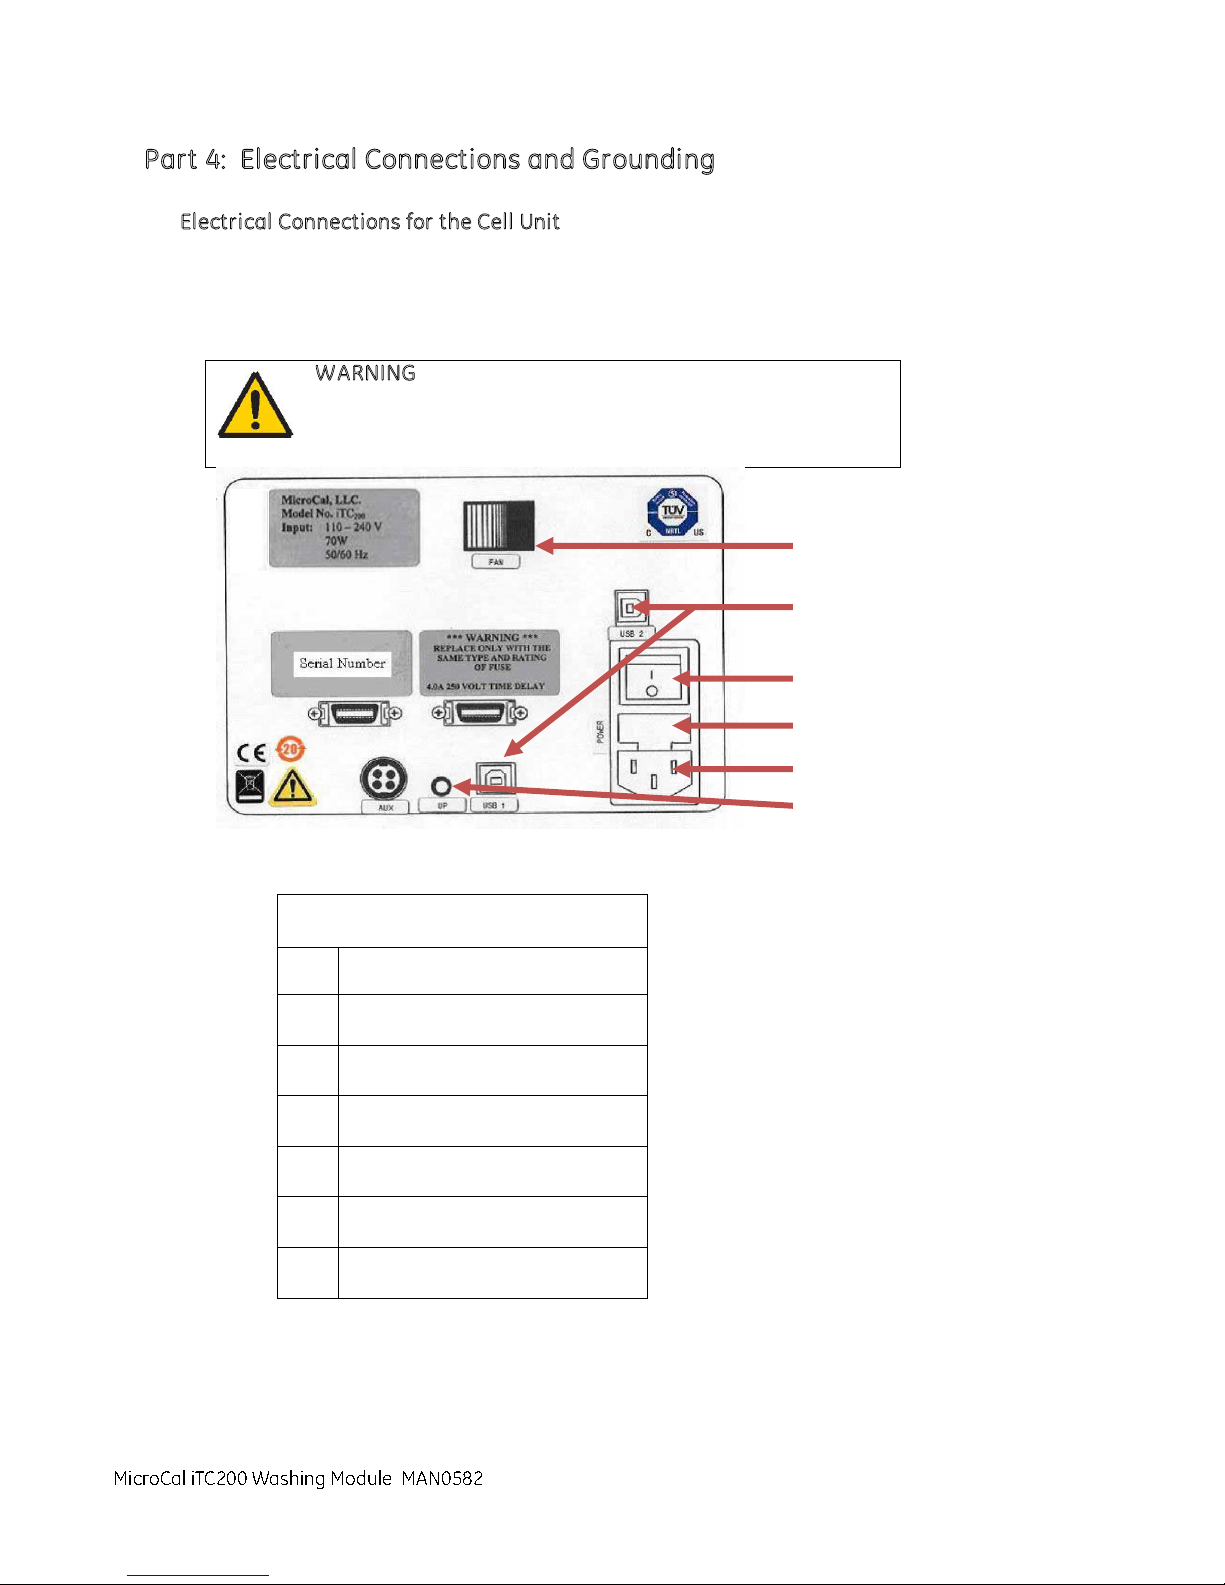
cell
Part
Function
1
Power main switch
2
Power fuses
3
IEC 320 inlet power receptacle
4
USB connectors
5
Fan
6
µP Activity Indicator
1
4
2
3
5
6
MicroCal iTC200 Washing Module
MAN0582
Electrical Connections for the Cell Unit
Connect the power cord to the IEC 320 inlet power receptacle ( see image below) on the back of the
cell unit. Connect the power plug to a main power supply receptacle with a 3-wire protective Earth
ground and a Ground Fault Circuit Interrupter (GFCI).
MicroCal iTC
Washing Module User Guide 17
200
Page 18
Electrical Connections for the Washing Module
WARNING
To enhance safety always plug the instrument into a
Ground Fault Circuit Interrupter (GFCI) device.
WARNING
Electrocution hazard
Multiple power sources. Disconnect all power sources
before servicing.
MicroCal iTC200 Washing Module
MAN0582
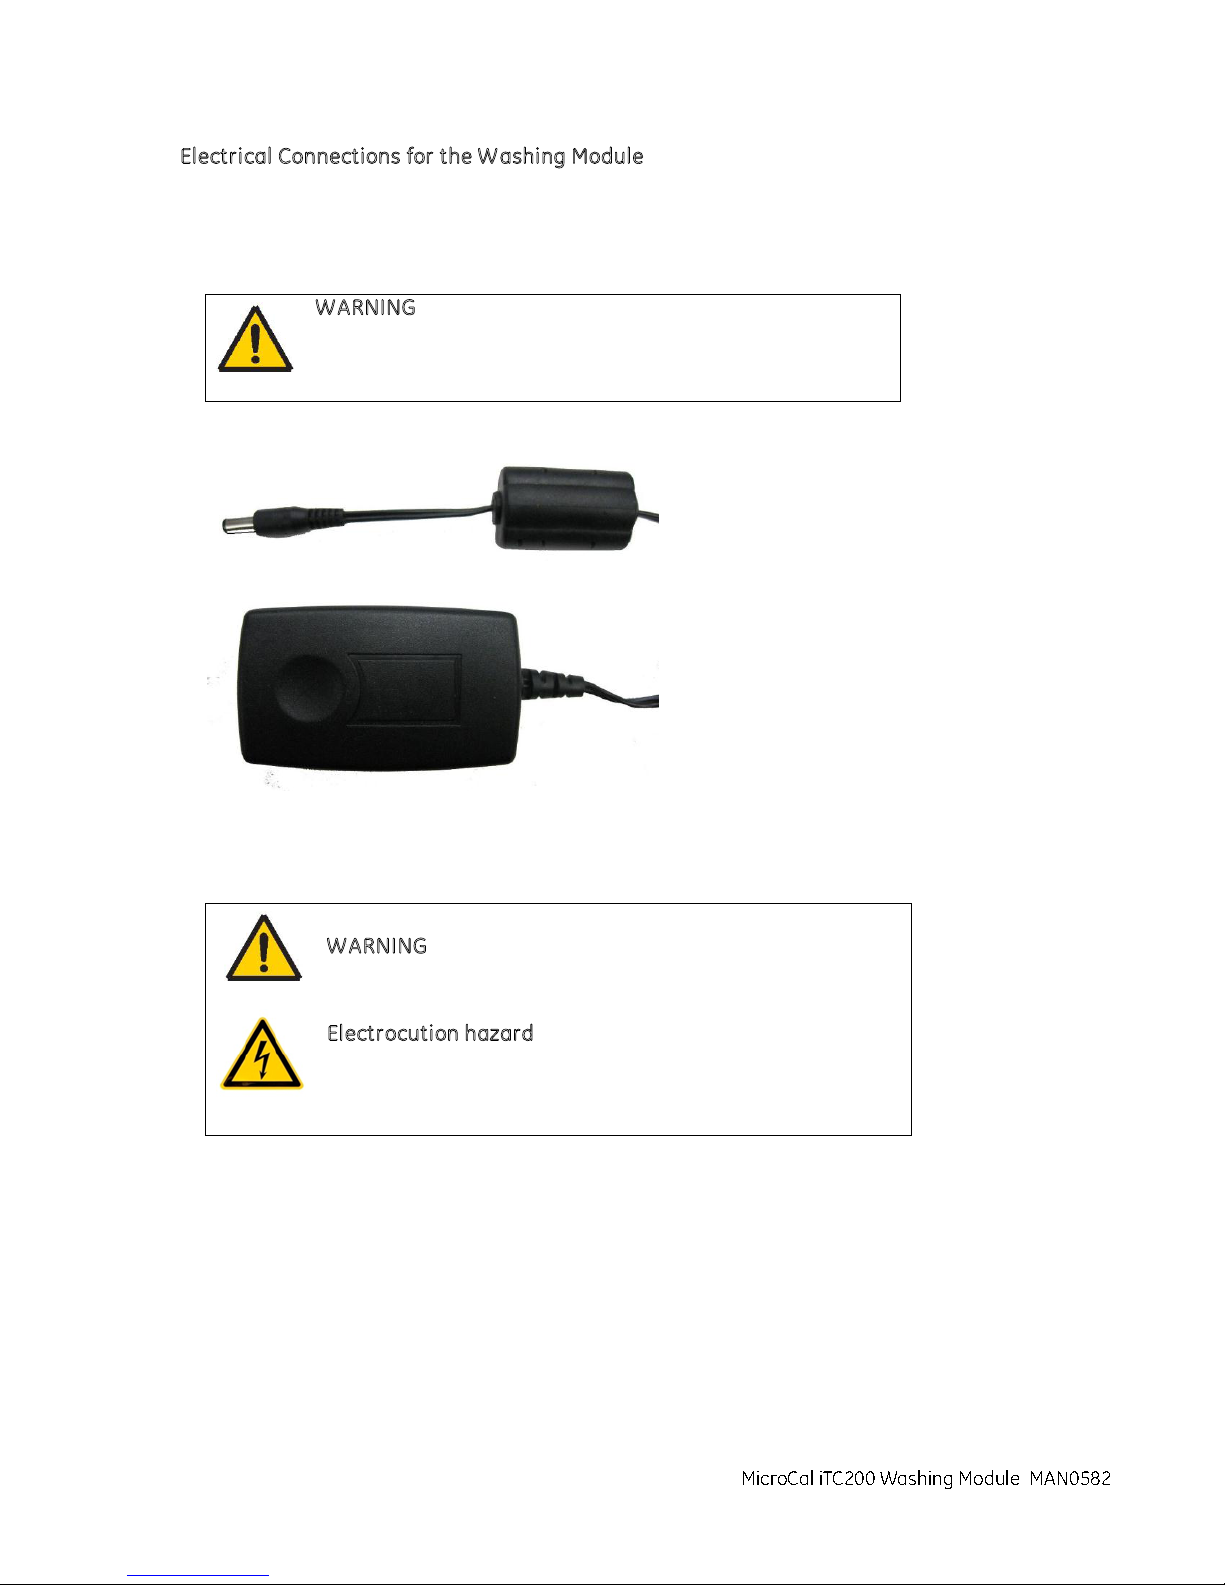
Connect the power cord from the power supply to the power receptacle on the rear of the washing
module. Connect the power supply to a main power supply receptacle with a 3-wire protective Earth
ground and a Ground Fault Circuit Interrupter (GFCI).
Washing module power supply unit
18 MicroCal iTC
Washing Module User Guide
200
Page 19
Part 5: Washing Module Basic Operation
MicroCal iTC200 Washing Module
MAN0582
Preparation
Before running an experiment, you may need to perform one or all of the following tasks:
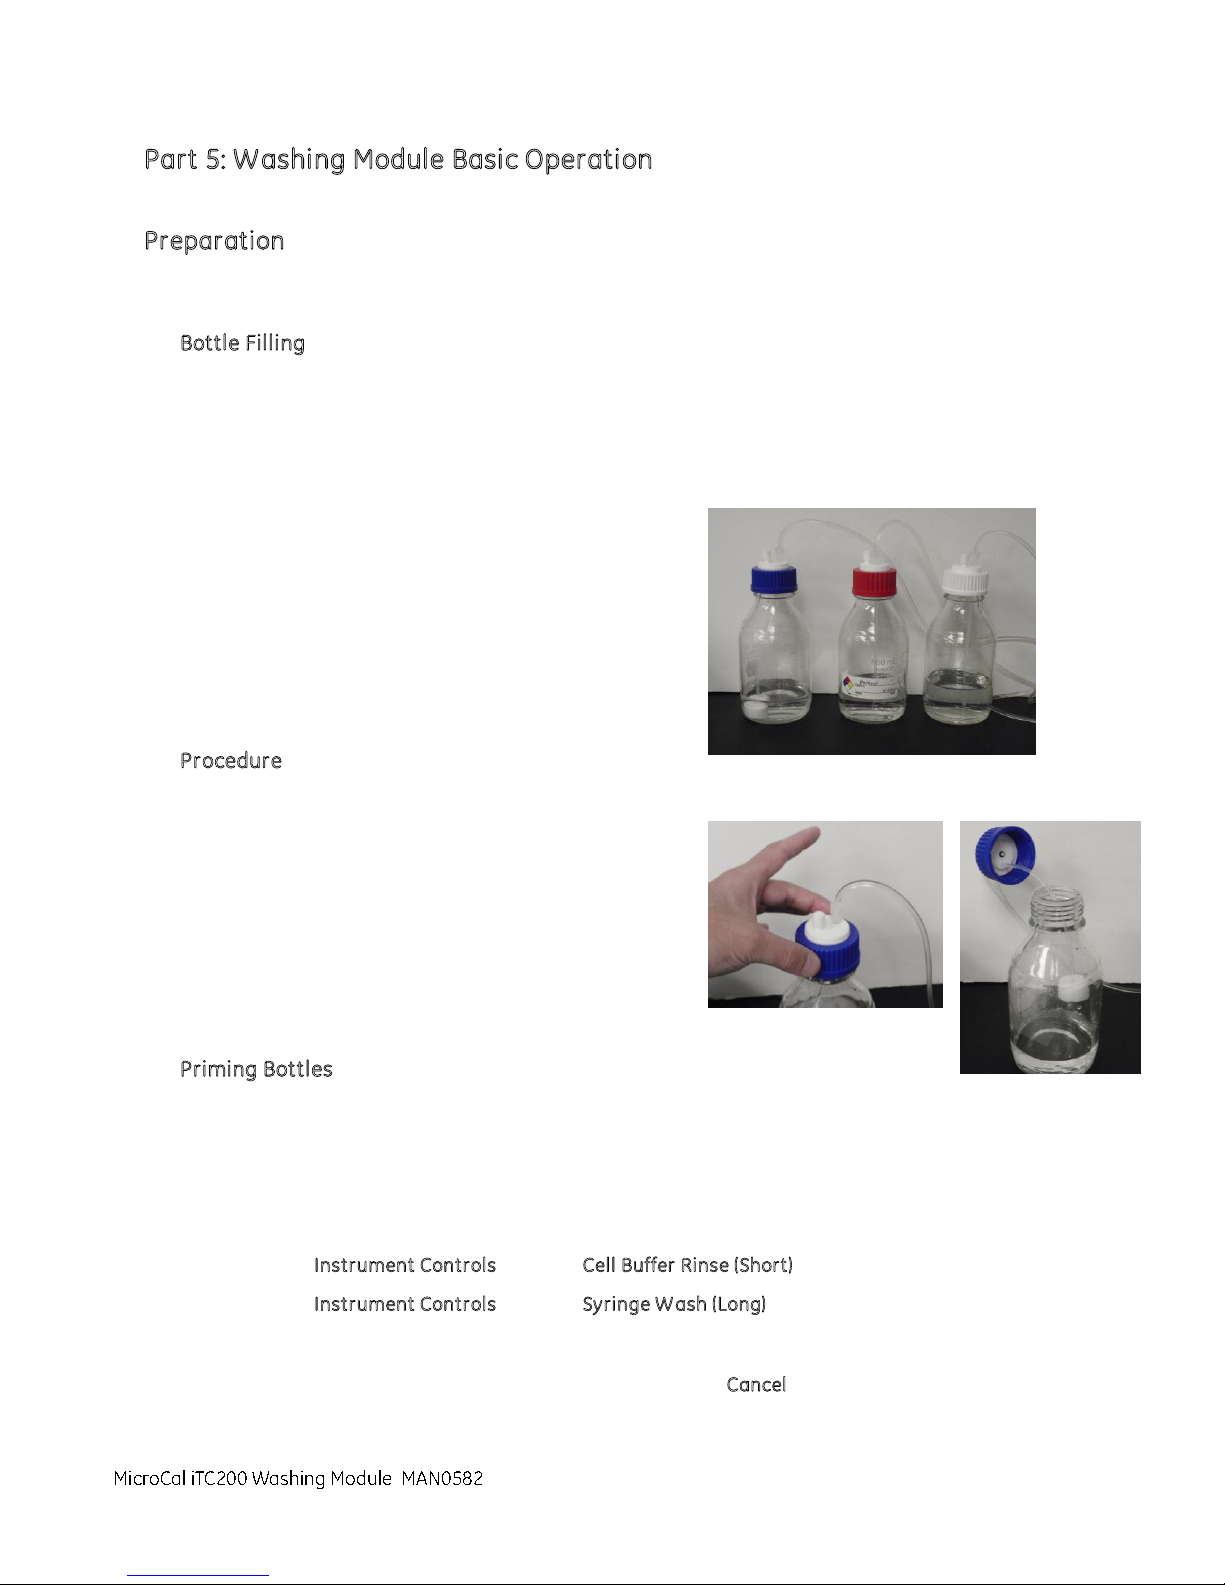
ottle Filling
B
Use this procedure to fill the bottles in preparation for using the washing module. Although the
bottles do not have to be full before you begin a procedure, you should ensure that there is
sufficient volume in each bottle to perform the required procedure. There are three bottles
that you must maintain:
Water: bottle with blue top
Methanol: bottle with red top
Buffer: bottle with white top
P
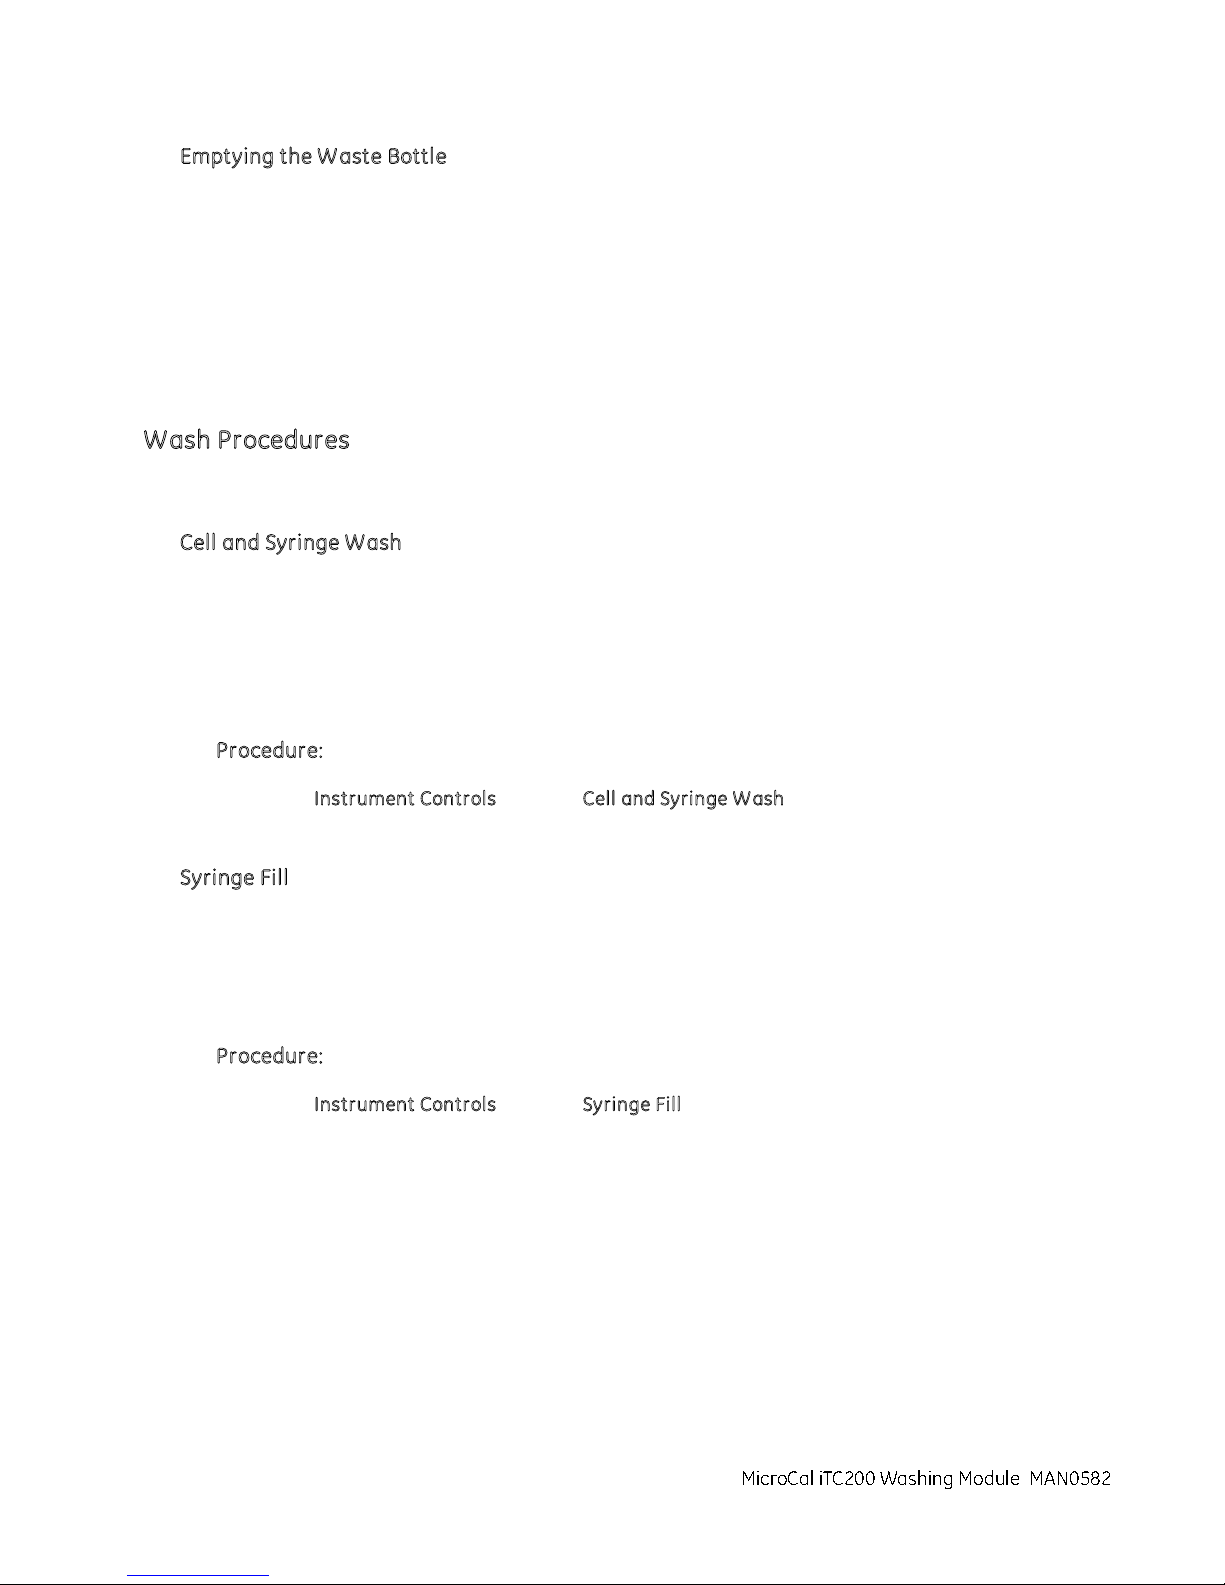
rocedure:
1. Verify that the system is in an idle state.
2. Unscrew the plastic cap of the bottle by turning it
counter-clockwise.
3. Fill bottle using standard lab procedures.
4. After filling, tighten the cap by turning clockwise
until snug.
P
riming Bottles
Use this procedure to prime the tubing from the bottles to the washing module to ensure that
the full volume is delivered. This procedure is required only if the tubes leading from the bottles
to the washing module have been drained of fluid and contain air.
1. Make sure all bottles have sufficient volume and all fluid lines are connected.
2. On the I
3. On the I
After lines are primed (visibly clear of air), the system uses the majority of the remaining
procedure time to dry the syringe. This occurs with approximately eight minutes remaining in
the procedure. You can let the procedure finish or click C
nstrument Controls tab, click Cell Buffer Rinse (Shor t).
nstrument Controls tab, click Syringe W ash (Long).
ancel at this time.
MicroCal iTC
Washing Module User Guide 19
200
Page 20
E
MicroCal iTC200 Washing Module
MAN0582
mptying the W aste Bottle
Use this procedure to empty the waste bottle.
1. Verify that the system is in an idle state.
2. Unscrew the grey cap of waste bottle by turning the lid counter-clockwise.
3. Empty the waste according to your laboratory waste handling procedures.
4. Reattach the cap by turning it clockwise until it is snug.
Wash Procedures
Use the following procedures as required.
C
ell and Syringe W ash
Use this procedure to perform a quick wash of the cell and the syringe to prepare for an
experiment.
Fluid requirement: Buffer, water, and methanol
Time requirement: 9.4 minutes
P
rocedure:
1. On the Instrument Controls tab, click Cell and Syringe Wash.
2. Follow the instructions on the screen.
Syr inge Fill
Use this procedure to fill the syringe with titrant before an experiment.
Fluid requirement: titrant in microcentifuge tube
Time requirement: 2.3 minutes
P
rocedure:
1. On the Instrument Controls tab, click Syringe Fi ll.
2. Follow the instructions on the screen.
20 MicroCal iTC
Washing Module User Guide
200
Page 21
C
MicroCal iTC200 Washing Module
MAN0582
ell Buffer Rinse (Short )
Use this procedure to rinse the cell with Buffer solution before a run.
Fluid requirement: Buffer
Time requirement: 0.8 minutes
rocedure:
P
1. On the Instrument Controls tab, click Cell Buffer Rinse (Short).
2. Follow the instructions on the screen.
Cell Water Rinse (Long)
Use this procedure to perform an extended water rinse of the cell.
Fluid requirement: water
Time requirement: 2.5 minutes
rocedure:
P
1. On the Instrument Controls tab, click Cell W at er Rinse (Long).
2. Follow the instructions on the screen.
Detergent Soak and Rinse (Long)
Use this procedure to clean the cells to ensure that no contamination exists from previous
experiments. Use this method when a more vigorous cleaning is required for any of the
following reasons:
The system is not operating within its normal performance specifications.
Large baseline drifting is occurring.
Non-repeatable control peaks occur during a water/water test.
An increase in short term noise has occurred.
As preventative maintenance, it is also a good idea to do this every few weeks. For heavily
used systems, you should consider running this
The MicroCal iTC
is manually loaded with detergent according to the online prompts.
200
procedure every few days.
During the soak, the temperature is set to 50 ºC for a 20 minute incubation period and then
the system cools for 6 minutes. The detergent then has to be manually removed from the
MicroCal iTC
. After the cell wash tool is inserted, a Cell Water Wash (long) is performed
200
automatically.
Fluid requirement: water and detergent (manually added to cell)
Time requirement: 39 minutes
MicroCal iTC
Washing Module User Guide 21
200
Page 22
P
MicroCal iTC200 Washing Module
MAN0582
rocedure:
1. On the Instrument Controls tab, click Detergent Soak and Rinse (Long).
2. Follow the instructions on the screen.
Syr inge Wash (Short)
Use this procedure to perform a basic syringe wash only.
Fluid requirement: water and methanol
Time requirement: 10.8 minutes
P
rocedure:
1. On the Instrument Controls tab, click Syringe W ash (Shor t).
2. Follow the instructions on the screen.
Syr inge Wash (Long)
Use this procedure to perform an extended rinse of the syringe.
Fluid requirement: water and methanol
Time requirement: 11.5 minutes
P
rocedure:
1. On the Instrument Controls tab, click Syringe W ash (Long).
2. Follow the instructions on the screen.
Dr y Syringe
Use this procedure to dry the syringe after the syringe has been cleaned manually and left
with methanol in it. In this case, the washing module pulls a vacuum through the syringe
for several minutes to dry it.
Fluid requirement: none
Time requirement: 5.8 minutes
rocedure:
P
1. On the Instrument Controls tab, click Cell and Syringe W ash.
2. Follow the instructions on the screen.
22 MicroCal iTC
Washing Module User Guide
200
Page 23
Part 6: Washing Module Maintenance
WARNING
Electrocution hazard
Multiple power sources. Disconnect all power sources before servicing.
MicroCal iTC200 Washing Module
MAN0582
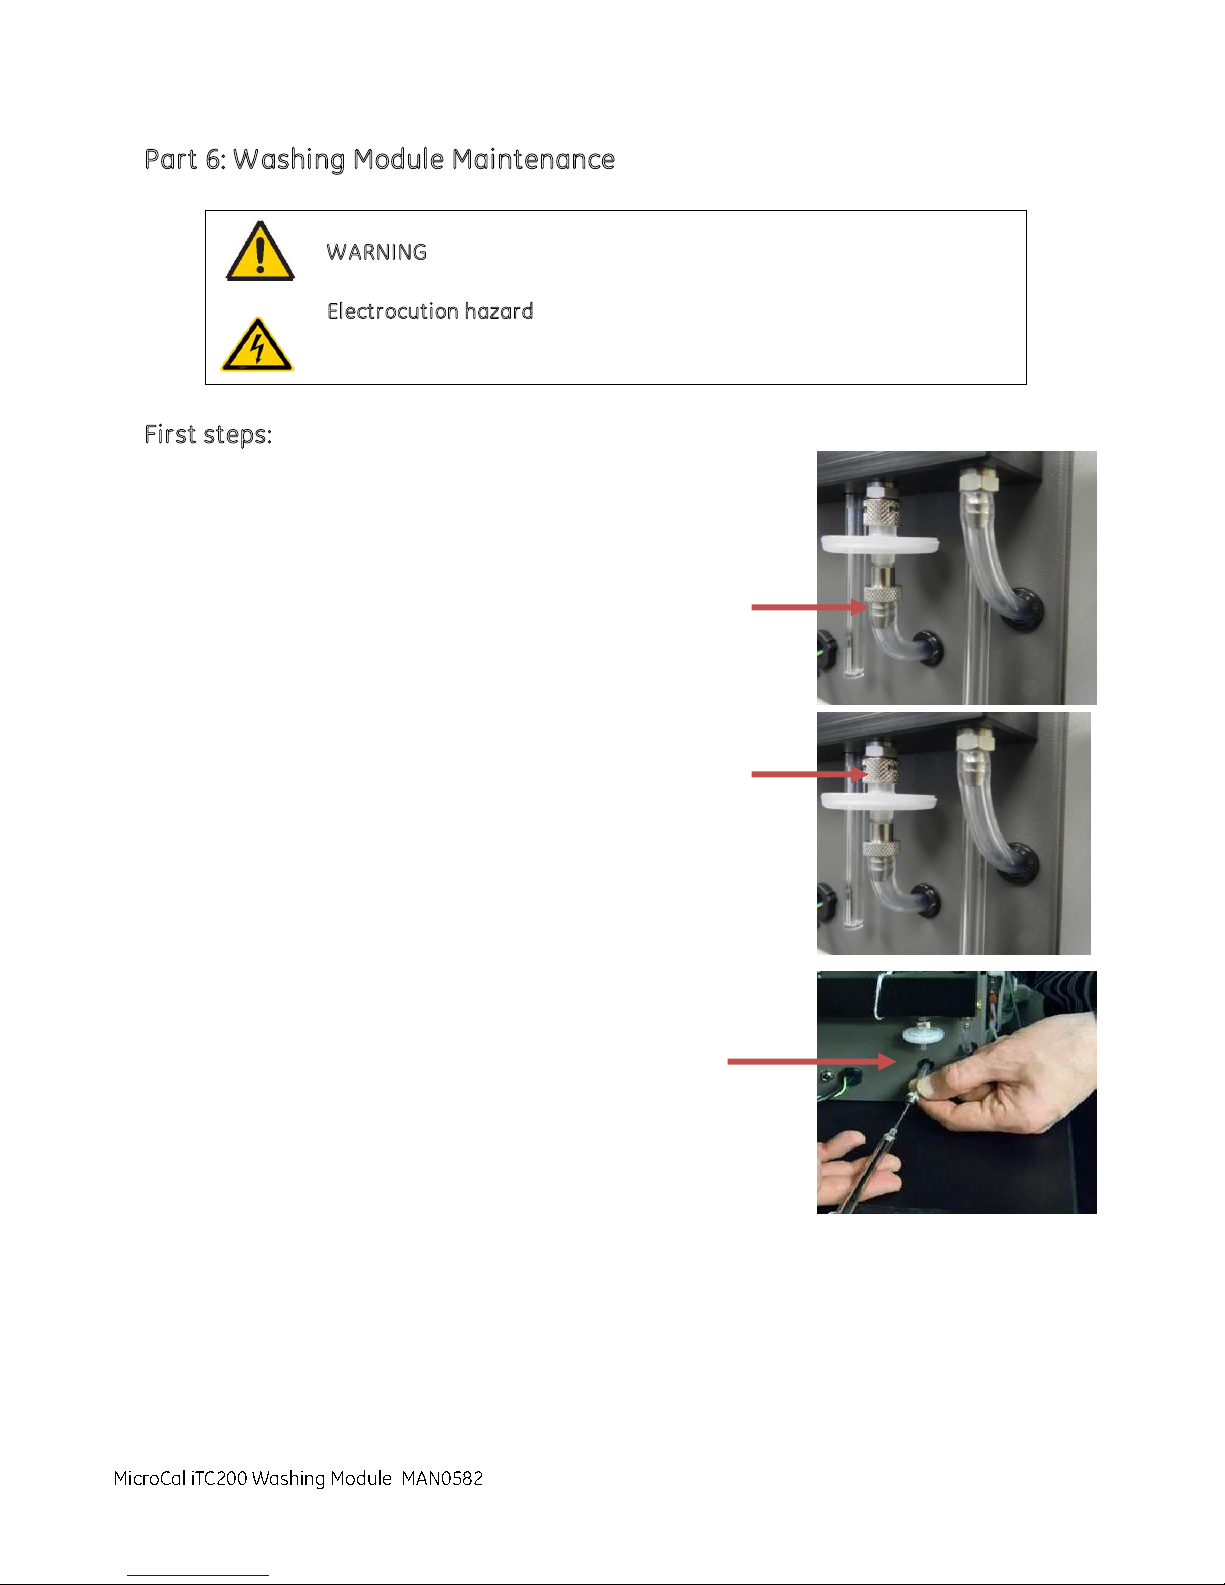
irst steps:
F
1. Disconnect power source from both MicroCal iTC
and Washing Module
2. Disconnect bottom tube.
Pull tubing from metal fitting.
200
3. Disconnect filter (bayonet fitting) from top tube.
Quick disconnect quarter turn.
4. Remove any liquid from tubes, using syringe.
5. Fit new filter and replace tubes.
6. Test that the Washing Module functions properly.
MicroCal iTC
Washing Module User Guide 23
200
Page 24
MicroCal iTC200 Washing Module
MAN0582
Bottle Removal
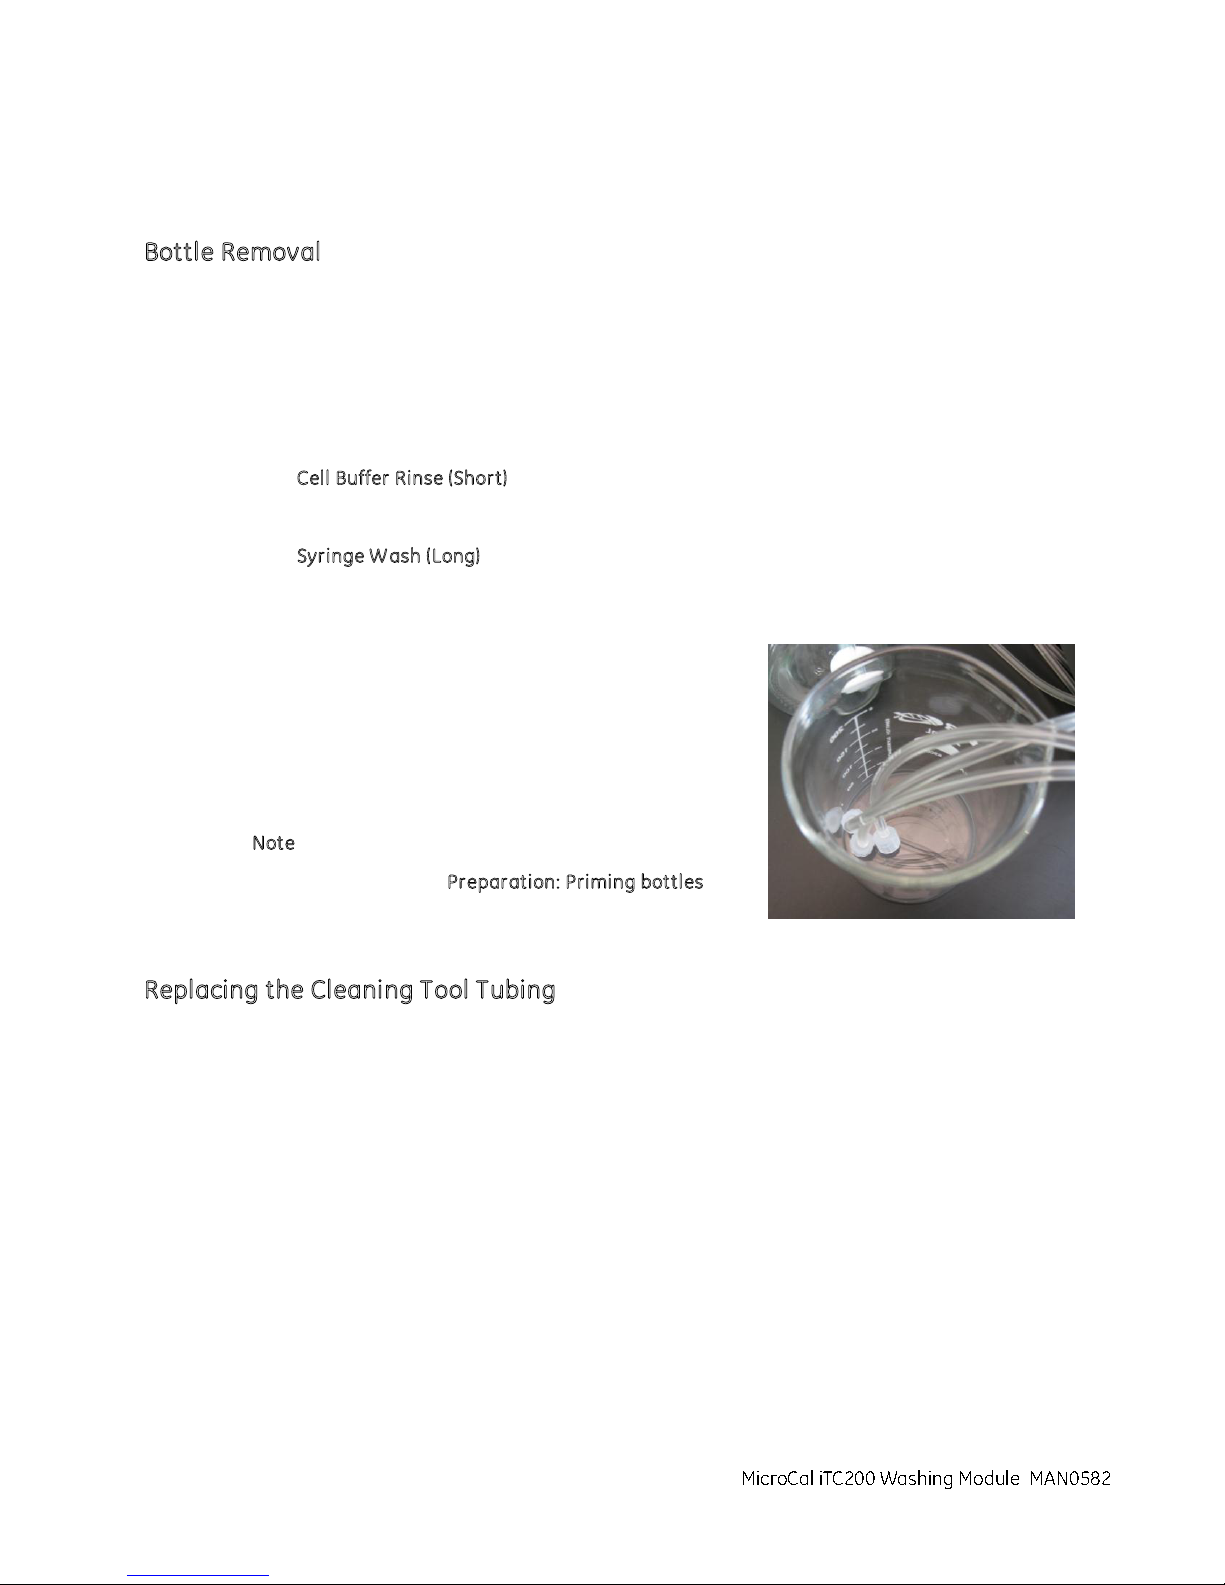
Use this procedure to remove the bottles for cleaning. The lines to the bottles need to be
evacuated before the tubing is disconnected from the bottles. This will ensure that no solution
leaks from the disconnected tubing.
1. Disconnect the tubing from the bottle while leaving the other end attached to the system and
place the disconnect ends in a clean, empty beaker.
2. Click C
3. Follow the instructions on the screen.
4. Click S
5. Follow the instructions on the screen.
6. Remove the tubing from the bottle(s) by twisting the lure
7. Perform the filling of the bottle(s).
8. Secure the bottle(s).
9. Install the tubing to the bottles by twisting the lure lock
10. Refer to the Procedure P
ell Buffer Rinse (Short ).
yringe W ash (Long).
lock fitting counterclockwise.
fitting clockwise.
ote: Do not over tighten.
N
repar ation: Priming bottles
before performing normal operations.
Replacing the Cleaning Tool Tubing
Use this procedure to replace the tubing connecting the cell cleaning tool and the syringe
washing tube if it has been contaminated or damaged. A kit (KIT020599), supplied as an
accessory, contains tubing for the cell wash tool, waste bottle, and the syringe washing tube.
The filling port adapter (ASY020506) and associated tubing can be ordered from Malvern
Instruments.
24 MicroCal iTC
Washing Module User Guide
200
Page 25
C
MicroCal iTC200 Washing Module
MAN0582
ell Cleaning Tool
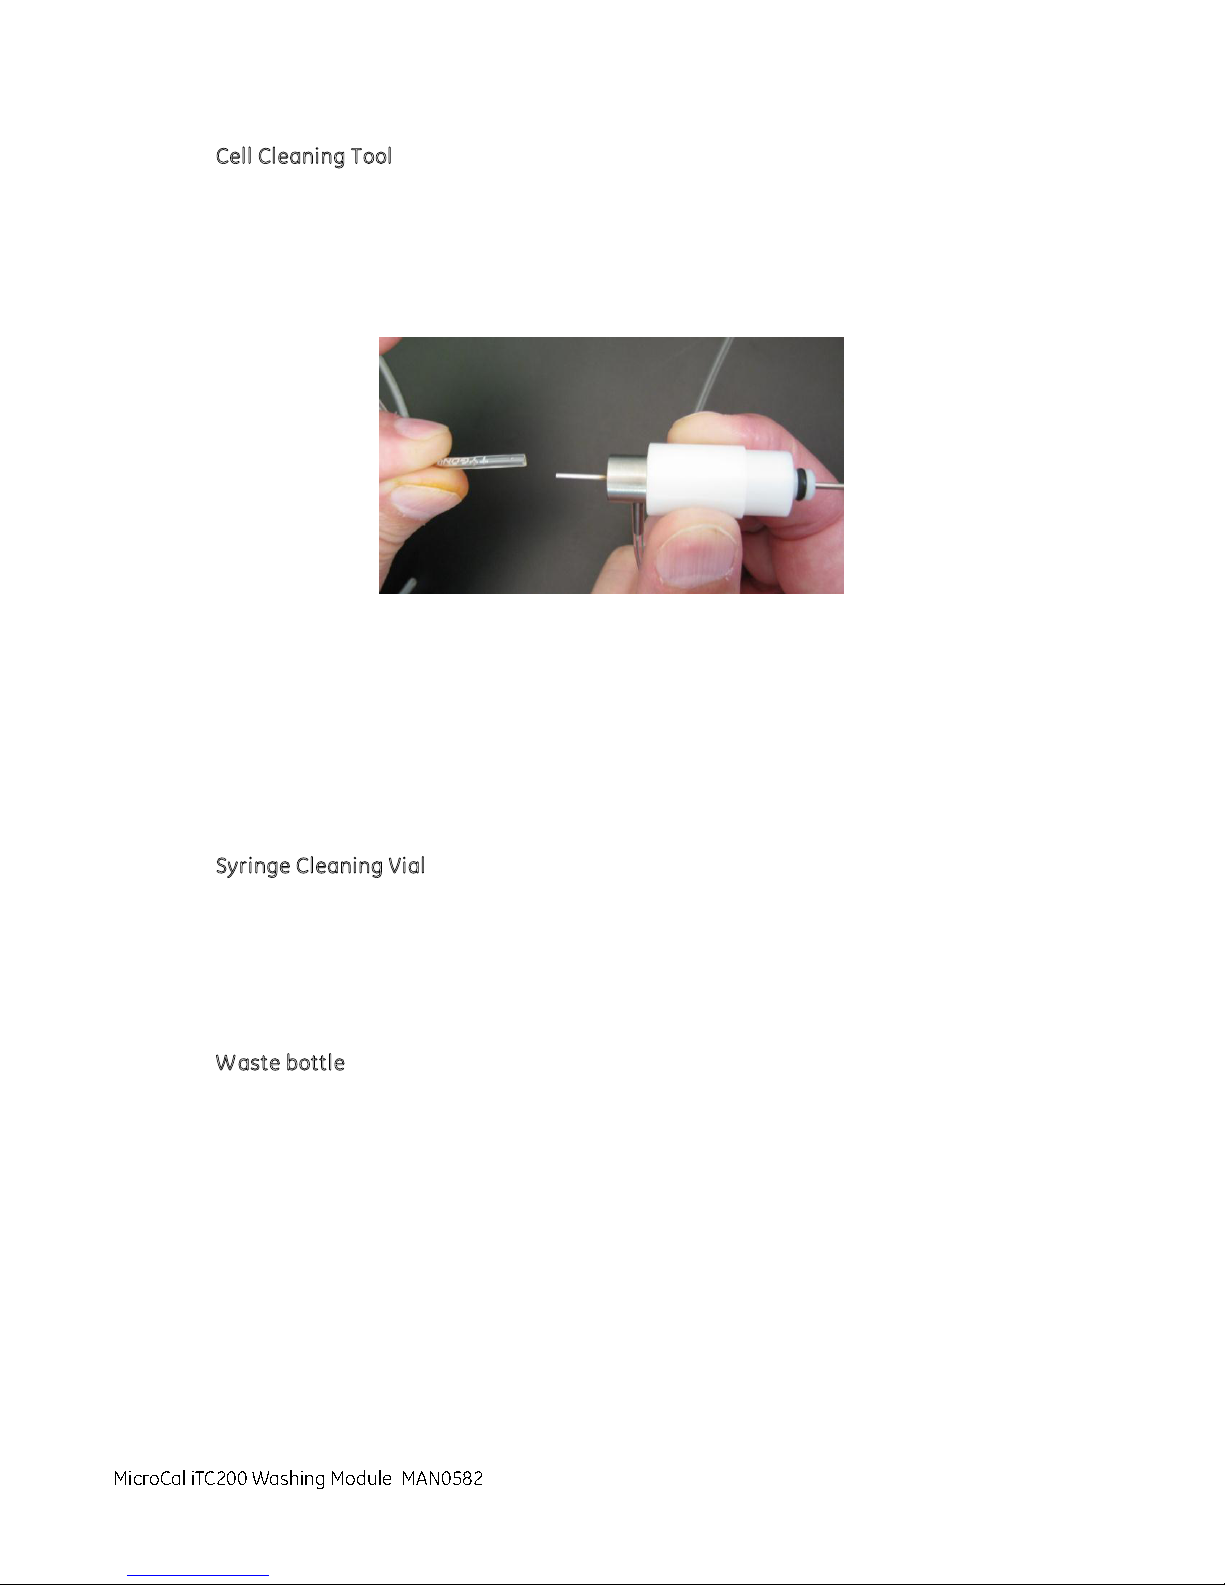
1. Remove the tubing from the Extra Tubing Kit and locate the three equal length pieces.
2. Set one tube aside for the syringe cleaning vial.
3. Remove the tube between the washing module and the top of the Cell Cleaning Tool.
This is the tube that extrudes vertically from the cell cleaning tool.
4. Install the replacement tube between the washing module and the top of the cell cleaning tool.
This replaces the tube you removed in the previous step.
5. Remove the tube between the washing module and the side of the Ccell cleaning tool. This is the
tube that extrudes horizontally from the cell cleaning tool.
6. Install the replacement tube between the washing module and the side of the cell cleaning tool .
This replaces the tube you removed in the previous step.
Syr inge Cleaning Vial
1. Locate the tube that was set aside above.
2. Remove the tubing from the syringe cleaning vial barb and washing module.
3. Attach a replacement tube to the syringe cleaning vial barb and washing module.
Waste bottle
1. Locate one of the two pieces of tubing with the hard plastic end. Select the one with the desired
length.
2. Remove the old tube from the waste bottle and washing module.
3. Attach the replacement tubing to the waste bottle and washing module.
MicroCal iTC
Washing Module User Guide 25
200
Page 26
Replacing Bot tle Filters
MicroCal iTC200 Washing Module
MAN0582
Use this procedure if the volume delivery has decreased due to a clogged filter. As a best
practice, you should follow this procedure for one bottle at a time.
1. Disconnect the tubing from the top of the bottle.
2. Unscrew the bottle cap.
3. Remove the filter at the end of the tubing by gently pulling the filter from the tube.
4. Install a new filter (MCH02167) at the end of the tubing.
5. Replace the bottle cap.
6. Reconnect the tubing to the bottle cap.
Replacing Cleaning Device O-Ring
Use this procedure if the o-ring appears worn or the tool fits loosely in the cell port. The
accessory kit contains a bag of replacement o-rings (ORG-0005V-010).
1. Locate the cell cleaning device o-ring.
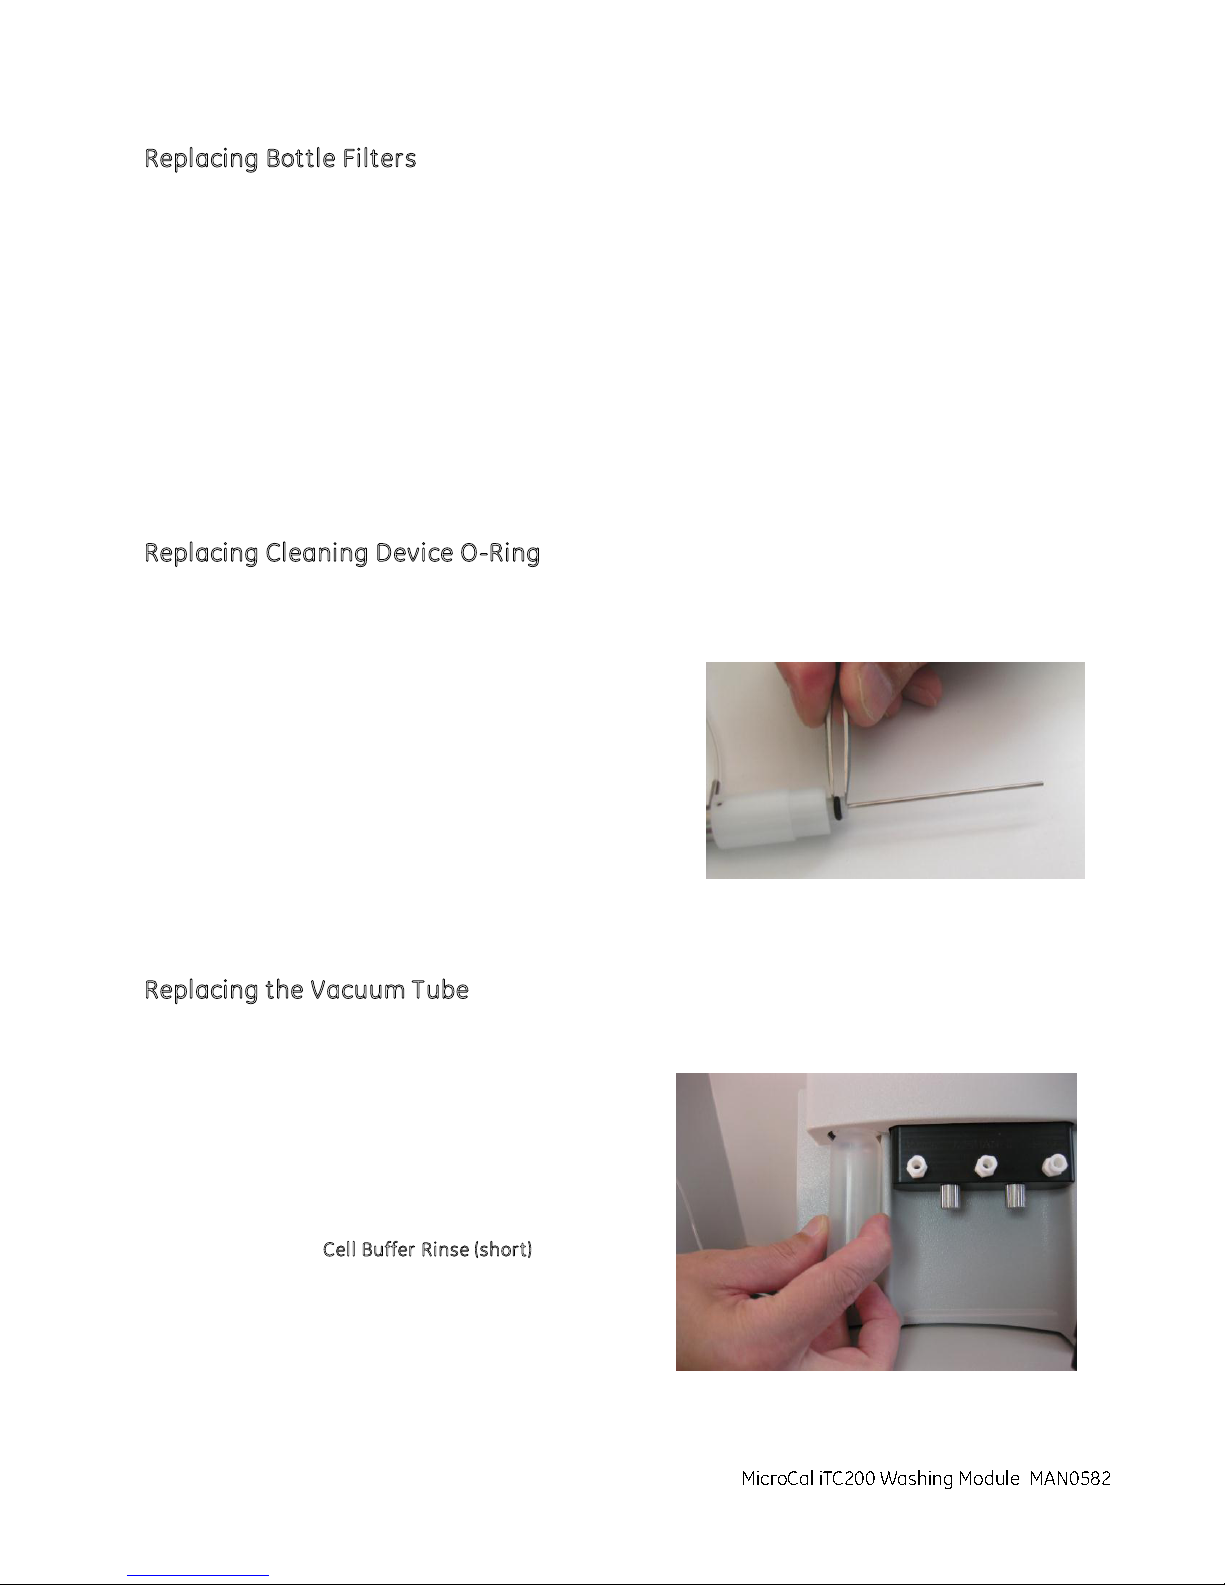
2. Use a pair of tweezers (not provided) to remove
the o-ring.
3. Install the new o-ring.
R
eplacing the Vacuum Tube
Use this procedure to remove contamination from the washing module vacuum tube.
1. Remove the vacuum tube from the washing
module by turning it counterclockwise
2. Install the vacuu m tube (Part # ASY020555)
into the washing module by turning it
clockwise until tight.
3. Run the C
verify proper operation.
ell Buffer Rinse (short ) procedure to
26 MicroCal iTC
Washing Module User Guide
200
Page 27
Part 7: Washing Module Troubleshooting
MicroCal iTC200 Washing Module
MAN0582
f washing module is not working proper ly:
I
Make sure reagent bottles are filled and fluid is available
Check that the waste bottle is empty
Verify FPA is properly attached, not too tight or too loose
Make sure cell cleaning device is properly seated
Make sure pipette is properly seated in cleaning station
Verify all red connectors are snug
I
f no wash module functions are working (no pump sounds):
Check USB and power connections
If Syringe filling works, but cell and syringe wash do not:
Replace filter (see maintenance section, part 6 on page 21)
If cell cleans but syringe does not:
Verify FPA is properly attached, not too tight or too loose
Check for broken or cracked syringe glass
Verify connection of tubing to side of syringe cleaning station
Verify all red connectors are snug on right side of wash modu le
Check black O-ring, should provide a snug fit to the pipette
Ensure waste bottle is tight
If syringe cleans but cell does not:
Verify all red connectors are snug on left side of wash module
Ensure waste bottle is tight
MicroCal iTC
Washing Module User Guide 27
200
Page 28
Malvern Instruments Limited
www.malvern.com
2
 Loading...