

MALUX INDUTEL IP Operating Manual

IP
Weatherproof telephone
www.malux.se
FHF BA 9605-03 04/14
Operating manual

2
www.malux.se
Note
Before installing the equipment, these operating instructions are to be read carefully.
It is to be checked that the contents of the packaging are complete.
Contents
General notes on operation ................................................................. 3
At the time of delivery ........................................................................... 4
Contents of the packaging................................................................................... 4
Default settings of the telephone ........................................................................ 4
Assembly and installation ................................................................... 5
Wall assembly .................................................................................................... 5
Connection of a separate DC voltage supply ..................................................... 5
Connection of the internal relay contact ............................................................. 5
Terminal configuration ........................................................................................ 5
Assembly of RJ45 connector............................................................................... 6
Operating elements .............................................................................. 6
Execution with keypad ........................................................................................ 6
Dimensions ........................................................................................... 7
Operation ............................................................................................... 8
Calling / taking call .............................................................................................. 8
Dialing ............................................................................................................................. 8
Speed dialing .................................................................................................................. 8
Re-dialing ......................................................................................................................... 8
Disconnecting................................................................................................................... 8
Web server ............................................................................................ 9
Authentication ................................................................................................................. 9
Menus ........................................................................................................................... 10
Info .............................................................................................................. 10
Info ..................................................................................................................... 10
About .................................................................................................................. 10
System Details ................................................................................................... 10
Configuration ............................................................................................................ 11
Network Settings ................................................................................................ 11
Phone Settings ................................................................................................... 12
Audio Settings .................................................................................................... 13
Speed Dial.......................................................................................................... 14
System Administration................................................................................. 16
Change Password .................................................................................. 16
Manual Upgrade..................................................................................... 16
General notes ...................................................................................... 17
Service ............................................................................................................. 17
Servicing and maintenance ........................................................................... 17
Warning and safety instructions ................................................................... 17
Technical data ..................................................................................... 18
Declaration of conformity ................................................................... 19
Directives ............................................................................................. 19
Disposal ............................................................................................... 19

3
General notes on operation
www.malux.se
1. The InduTel IP is the VoIP (Voice over Internet Protocol) version of the telephone
InduTel and is operated on a 10/100 BaseT Ethernet network. The connections are
established with the Session Initiation Protocol (SIP). The operation corresponds to
that of an analogue telephone.
2. The power supply takes place via Power over Ethernet (PoE) from the network or via a
separate direct current voltage source.
3. The programming and parameter setting are carried out solely via the web server of
the telephone. The web server can be reached via the standard web browser of a PC.
In order to access the web server, entering the username and the password is
necessary. The factory settings for the username and password are:
Username: admin
Password: fhf
The preset IP address is 192.168.0.77
4. The telephone has a handset rest with a magnetic contact as a hook switch. In order
to terminate an existing connection, the handset must be hung up. To interrupt an
existing connection, it is sufficient to press the cut-off key on the keypad.
5. The internal relay contacts only allow tensions of 30 VAC or 60 VDC to be switched.
The maximum permissible current depends on the mode of operation (see chapter
Technical Data)
6. The network connection (LAN) is established via a housing connector.
7. The handset of the telephone is fitted with a stray field coil for connection to hearing
aids. Those who wear a hearing aid with an inductive receiver can receive the signal of
the earphone capsule directly over the hearing aid.

4
IP address
Netmask
192.168.0.77
255.255.255.0
Announcement of the current
Dial *558800
Master Reset to Factory
Dial ** 314159265359
Username
admin
Password
fhf
Number redial memory
Empty
Speed dial memory
Empty
Relay function
Switched off
Tone call melody
2
Tone call volume
3
Handset volume
5
Microphone sensitivity
6
www.malux.se
At the time of delivery
Contents of the packaging
o Telephone InduTel IP
o These operating instructions
o LAN device connector plug
Default settings of the telephone
5
Assembly and installation
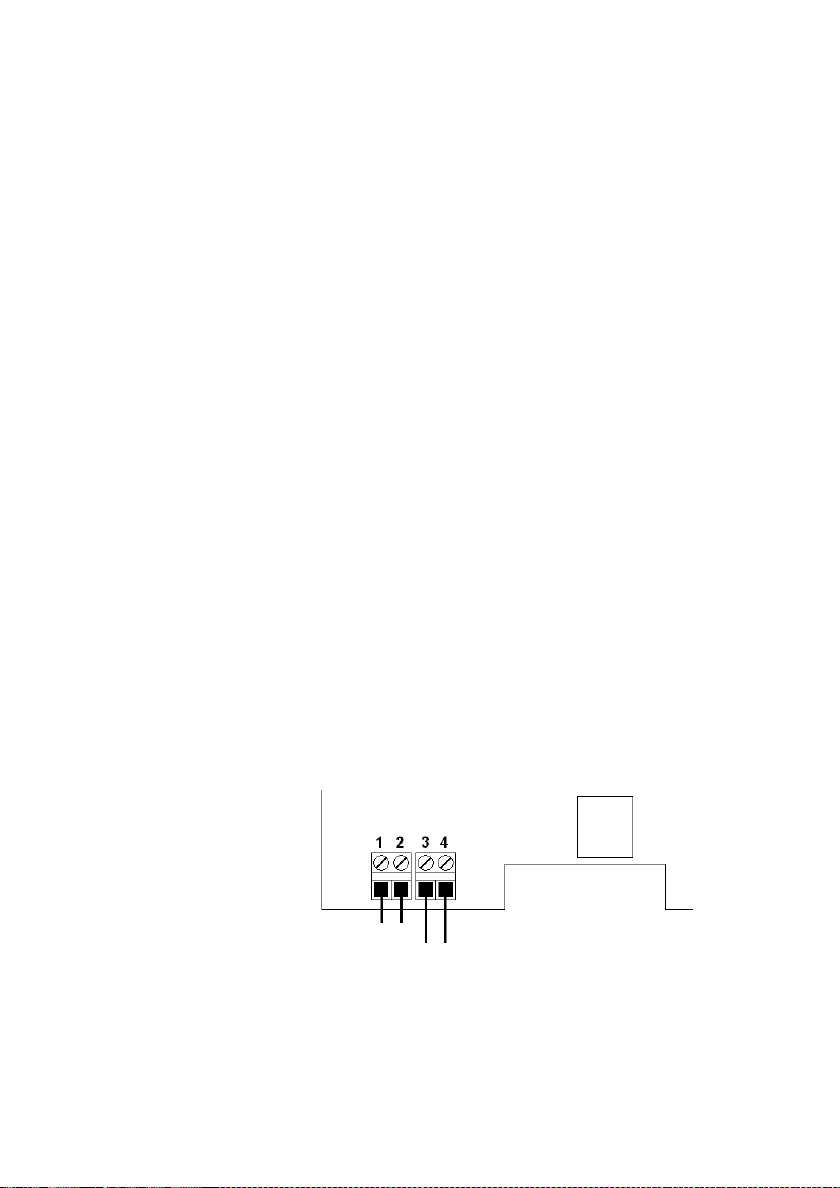
Relay
contact
DC voltage
supply
www.malux.se
Since all telephones have the same preset IP address, the network settings should be made
on the web server of the telephone before the telephone is assembled. The username and
password at the time of delivery should be changed for security reasons. The assembly of the
telephone should only be carried out by qualified specialist personnel.
Wall assembly
Assembly is carried out on a firm and even surface.
Fasten the telephone to the wall with four screws (of a size of up to Ø 8 mm).
Attach the LAN device connector plug provided to the LAN cable available onsite and connect
the device connector plug with the telephone.
Connection of a separate DC voltage supply
If a PoE supply is not available, the telephone can also be operated with a DC voltage of 24 V
to 48 V.
Take off the handset. Unscrew the keypad plate. Guide the supply line through the screwed
cable gland and put the two connecting leads onto the terminals 3 and 4 (any polarity). Fix the
supply line with the cable gland. Make sure that the cable connection to the keypad is plugged
in. Then place the keypad plate back onto the telephone and fasten it with four screws. Then
put the handset back.
Connection of the internal relay contact
Take off the handset. Unscrew the keypad plate. Guide the connection line through the
screwed cable gland and put the two connecting leads onto the terminals 1 and 2. Fix the
connection line with the screwed cable gland. Make sure that the cable connection to the
keypad is plugged in. Then place the keypad plate back onto the telephone and fasten it with
four screws. Then put the handset back.
Only use lines with a sheathing diameter of 5 mm to 9 mm, since the degree of protection
IP 66 is not ensured otherwise. If you wish to use a separate DC voltage supply and the relay
contact at the same time, you must use a four-core cable.
If a separate DC voltage supply and connection of the internal relay contact are not required,
it is to be ensured that the sealing element is in the screwed cable gland.
Terminal configuration
6
www.malux.se
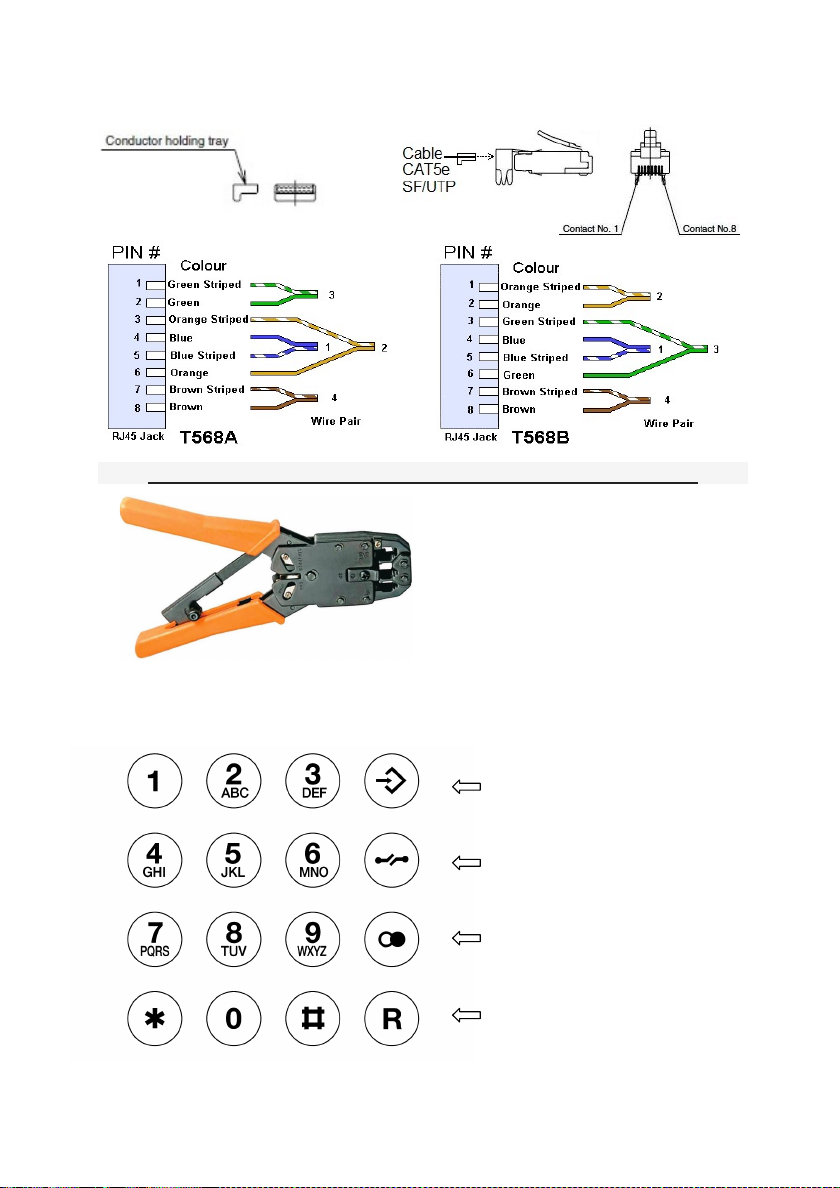
Assembly of LAN-Connector RJ45
PIN assignment depends on the condition of installation on site
recommended tool:
LogiLink Crimpzange Universal
WZ0003
Operating elements
Execution with keypad
Speed dialing (1st key)
Disconnect
Re-dialing
Consultation / toggling
________________________
Number keys
7
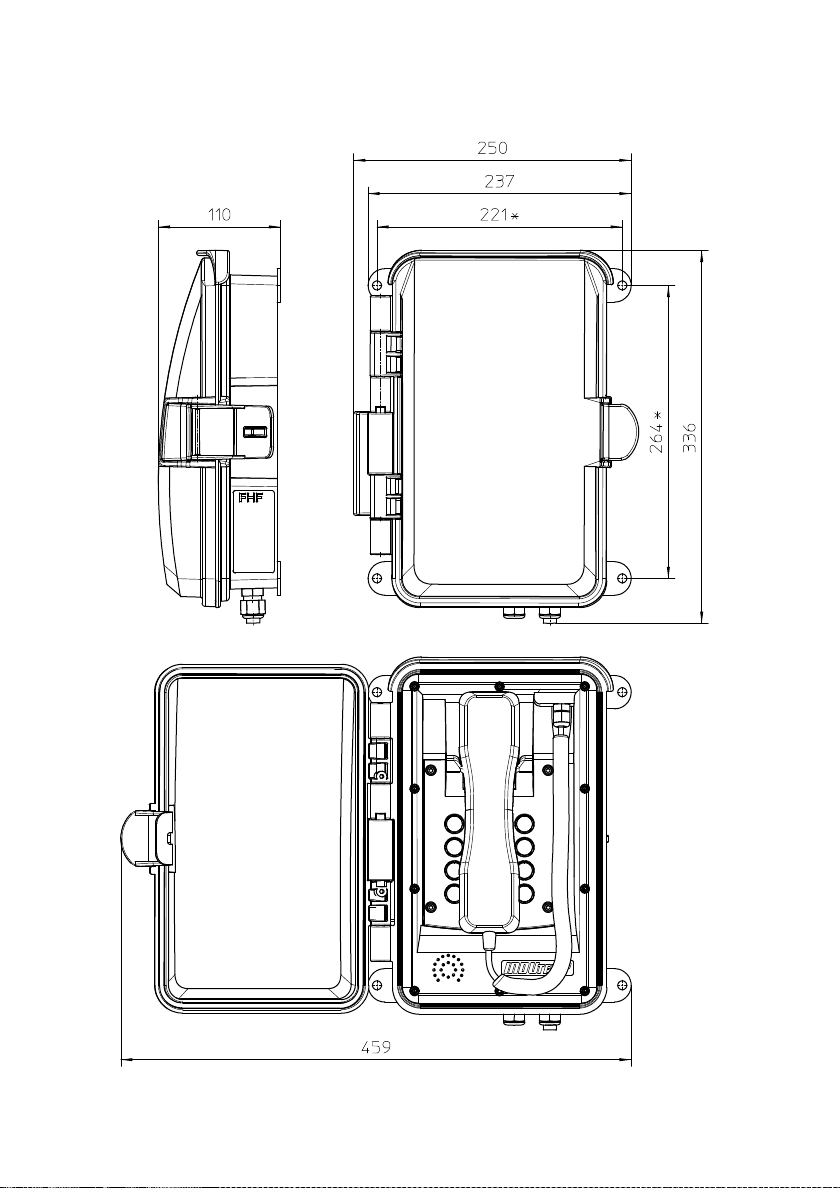
Dimensions * Drilling dimensions
www.malux.se

8
www.malux.se
Operation
Calling / taking call
If you take off the handset, you can take a call or dial the number of the person you wish to
speak to.
Dialing
You can enter the desired telephone number using the number keys. Once a connection has
been established, you can transmit tone dialing signals with the number keys and the star and
hash key.
Numbers are dialed in so-called block dialing. This means that the numbers must be entered
quickly one after the other. After a pause of a certain length, the numbers entered so far are
then dialed.
Speed dialing
With the key and then a number key you can dial telephone numbers you saved previously using the web server of the InduTel IP.
Re-dialing
After taking off the handset and pressing the redial key, the telephone number last entered will
be automatically dialed as long as the InduTel IP has not been restarted.
Disconnecting
If you want to end a conversation and start a new one straight away, you do not need to hang
up the handset but merely press the cut-off key. The old conversation will be terminated
through the connection being cut and after a short time you will hear the dial tone. You can
now enter the telephone number for the new conversation.
Announcement of the current IP address
The InduTel IP is able to announce the current IP address. For this purpose, the following
“telephone number” must be dialed:
IP announcement = *558800
The address will be announced on the telephone earpiece.
 Loading...