

Page 1

SED GPH-650R User Guide
- 1 -
GPH - 650R
User Guide
Page 2

SED GPH-650R User Guide
- 2 -
Chapter 1 Before Use.........................................................................................................................................................- 5 -
Caution.......................................................................................................................................................................- 5 -
Preparations before Using a Mobile Phone...............................................................................................................- 8 -
Chapter 2 Basic Functions...............................................................................................................................................- 10 -
Description of Icons in Status Bar...........................................................................................................................- 10 -
Notification Panel.................................................................................................................................................... - 11 -
Desktop.................................................................................................................................................................... - 11 -
Locking and Unlocking the Screen......................................................................................................................... - 12 -
Inputting Text...........................................................................................................................................................- 12 -
Chapter 3 Communication Related Functions.................................................................................................................- 12 -
Basic Call Functions................................................................................................................................................ - 12 -
GSM-R Functions....................................................................................................................................................- 16 -
Contacts....................................................................................................................................................................- 21 -
Messaging................................................................................................................................................................ - 22 -
Email........................................................................................................................................................................- 24 -
Chapter 4 GSM-R Related Application...........................................................................................................................- 25 -
Function Number.....................................................................................................................................................- 25 -
rWork....................................................................................................................................................................... - 27 -
GSMRDialer............................................................................................................................................................ - 30 -
GRP&BCT Dialer....................................................................................................................................................- 30 -
Voice Assistant.........................................................................................................................................................- 31 -
Chapter 5 Multimedia Application.................................................................................................................................. - 32 -
Camera..................................................................................................................................................................... - 32 -
Gallery......................................................................................................................................................................- 33 -
Music........................................................................................................................................................................- 34 -
FM radio...................................................................................................................................................................- 35 -
Browser....................................................................................................................................................................- 36 -
Chapter 6 Practical Application.......................................................................................................................................- 37 -
Notes........................................................................................................................................................................ - 37 -
Clock........................................................................................................................................................................- 37 -
Calender................................................................................................................................................................... - 38 -
Calculator.................................................................................................................................................................- 38 -
Page 3

SED GPH-650R User Guide
- 3 -
Profile Manager....................................................................................................................................................... - 38 -
File Explorer............................................................................................................................................................ - 39 -
Light.........................................................................................................................................................................- 39 -
SedBackup............................................................................................................................................................... - 39 -
Security.................................................................................................................................................................... - 40 -
System Update.........................................................................................................................................................- 41 -
GSMR Updater........................................................................................................................................................ - 41 -
Chapter 7 Use Skills........................................................................................................................................................ - 42 -
Use the SD card for system upgrading....................................................................................................................- 42 -
Chapter 8 Setting..............................................................................................................................................................- 43 -
GSM-R Setting........................................................................................................................................................ - 43 -
Universal setting...................................................................................................................................................... - 44 -
Page 4

SED GPH-650R User Guide
- 4 -
Statement
Copyright © 2015
Shenzhen SED Wireless Communication Technology Co., Ltd.
All rights reserved.
No part of this document may be reproduced or copied in any form or transmitted by any means by any units or
individuals without prior written consent of SED Wireless.
This manual is dedicated to SED GPH-650R. All descriptions of mobile phone features and functionality are for SED
GPH-650R. Contents of this manual may update irregularly due to product version upgrade or other reasons. Unless
otherwise specified, this manual is used only as a user guide, and all statements, information and suggestions in this
manual do not constitute any express or implied warranties.
The wireless device described in this manual is applicable to the GSM-R network. For more information about the
network, consult the service provider.
Your mobile phone is a low-powered wireless transmitter and receiver that receives and sends RF signals when in use.
When you use your mobile phone for communication, the system processing the call controls the transmit power level
of your phone.
Page 5
SED GPH-650R User Guide
- 5 -
Chapter 1 Before Use
Caution
Please read the following notes carefully to avoid danger or breaking the law.
Children:
Place the mobile phone in a safe place beyond the reach of a child. Do not allow a child to play with the mobile phone
or accessories. Improper operations by a child may damage the mobile phone or accessories, and may harm the child or
other persons. In addition, detachable parts of the mobile phone, such as the SIM card and battery, might be swallowed
by a child and could be dangerous.
Environmental Protection:
Do not discard the mobile phone or electronic accessories such as the charger, headset or battery along with household
waste. Please obey the local laws and follow local related departments to recycle them.
Traffic Safety:
Strictly obey laws and regulations on the use of mobile phones in the areas where you drive. If the local laws and
regulations allow you to use the mobile phone when driving, please follow the following notes: concentrate on driving
and pay attention to road traffic situations; use the hands-free mode; if driving conditions are poor, pull over your car by
the roadside before redialing or answering a call.
Do not place the mobile phone above the airbag or within an airbag deployment area. If the mobile phone is placed
within the airbag deployment area, the mobile phone might be impacted by the powerful external forces and cause
injury to occupants.
Check with your car manufacturer to confirm that the car's electronic devices are shielded from mobile phone RF wave
energy.
Public Places:
Turn off your mobile phone in any location where posted notices instruct you to do so.
Turn Off Your Mobile Phone on an Aircraft:
Please obey any related restriction regulations or rules. Using the mobile phone on the aircraft may cause interference to
the flight of the aircraft and even may violate the laws. Turn off your mobile phone before boarding.
Turn Off Your Mobile Phone at Explosion Risk Sites:
To avoid interference explosion, turn off your mobile phone at explosion sites or locations posted with signs "Turn off
two-way radio". Pay attention to related restrictions and obey any related restriction regulations or rules.
Page 6

SED GPH-650R User Guide
- 6 -
Turn Off Your Mobile Phone Near Hazardous Articles:
Turn off your mobile phone when you are in a gas station or near places with fuel and flammable chemicals.
Turn Off Your Mobile Phone in Hospitals:
Please obey any related restriction regulations or rules. Turn off your mobile phone when you are near medical facilities
where posted notice instruct you to do so.
Pacemaker:
The mobile phone interferes with an implanted cardiac pacemaker. Please follow the following instructions when using
a mobile phone nearby: Keep at least 15 cm away from the pacemaker when the mobile phone is turned on; do not place
the mobile phone in the breast pocket; answer a call using the ear further away from the pacemaker; if you have already
noticed interference, turn off the mobile phone.
Hearing Aid:
If you are a hearing aid user, check with your doctor and hearing aid manufacturer on whether the hearing aid device is
sensitive to the interference by a mobile phone.
Interference:
All mobile phones may be interfered, which affects the call performance.
Accessories and Battery:
Use specified accessories and battery only. Improper use of the battery might cause danger. Please use the charger
specified by our company to charge the battery.
Note: Do not remove the battery from your mobile phone during charging, and do not connect the mobile phone to the
charger when no battery is installed in the mobile phone. Otherwise, severe damage could be caused to the mobile
phone.
Do not cause a short circuit in a battery. If a metal object contacts an electrode exposed outside a battery, a short-circuit
may occur, and property loss or bodily injury may be caused. To prevent accidental electric leakage, place a charged
battery properly. Pay special attention to a battery placed in your pocket, wallet or other bags with metal objects inside.
RISK OF EXPLOSION IF BATTERY IS REPLACED BY AN INCORRECT TYPE. DISPOSE OF USED
BATTERIES ACCORDING TO THE INSTRUCTIONS
The working temperature of this device is from 0℃ to 35℃. And the depositing temperature of the device and its
accessories ranges from -10℃ to 55℃. When the temperature is lower or higher than this range, failures may arise.
Emergency Call:
If your phone is turned on and has network coverage, dial an emergency number in the dial pad and then press the
Answer key to make an emergency call. Inform the called party of your location. Do not end the call without
permission.
Page 7
SED GPH-650R User Guide
- 7 -
To prevent possible hearing damage, do not listen at high volume levles for long periods.
Fully understand user manual before use.
Ensure your player at low volume levels or power off before you leaving.
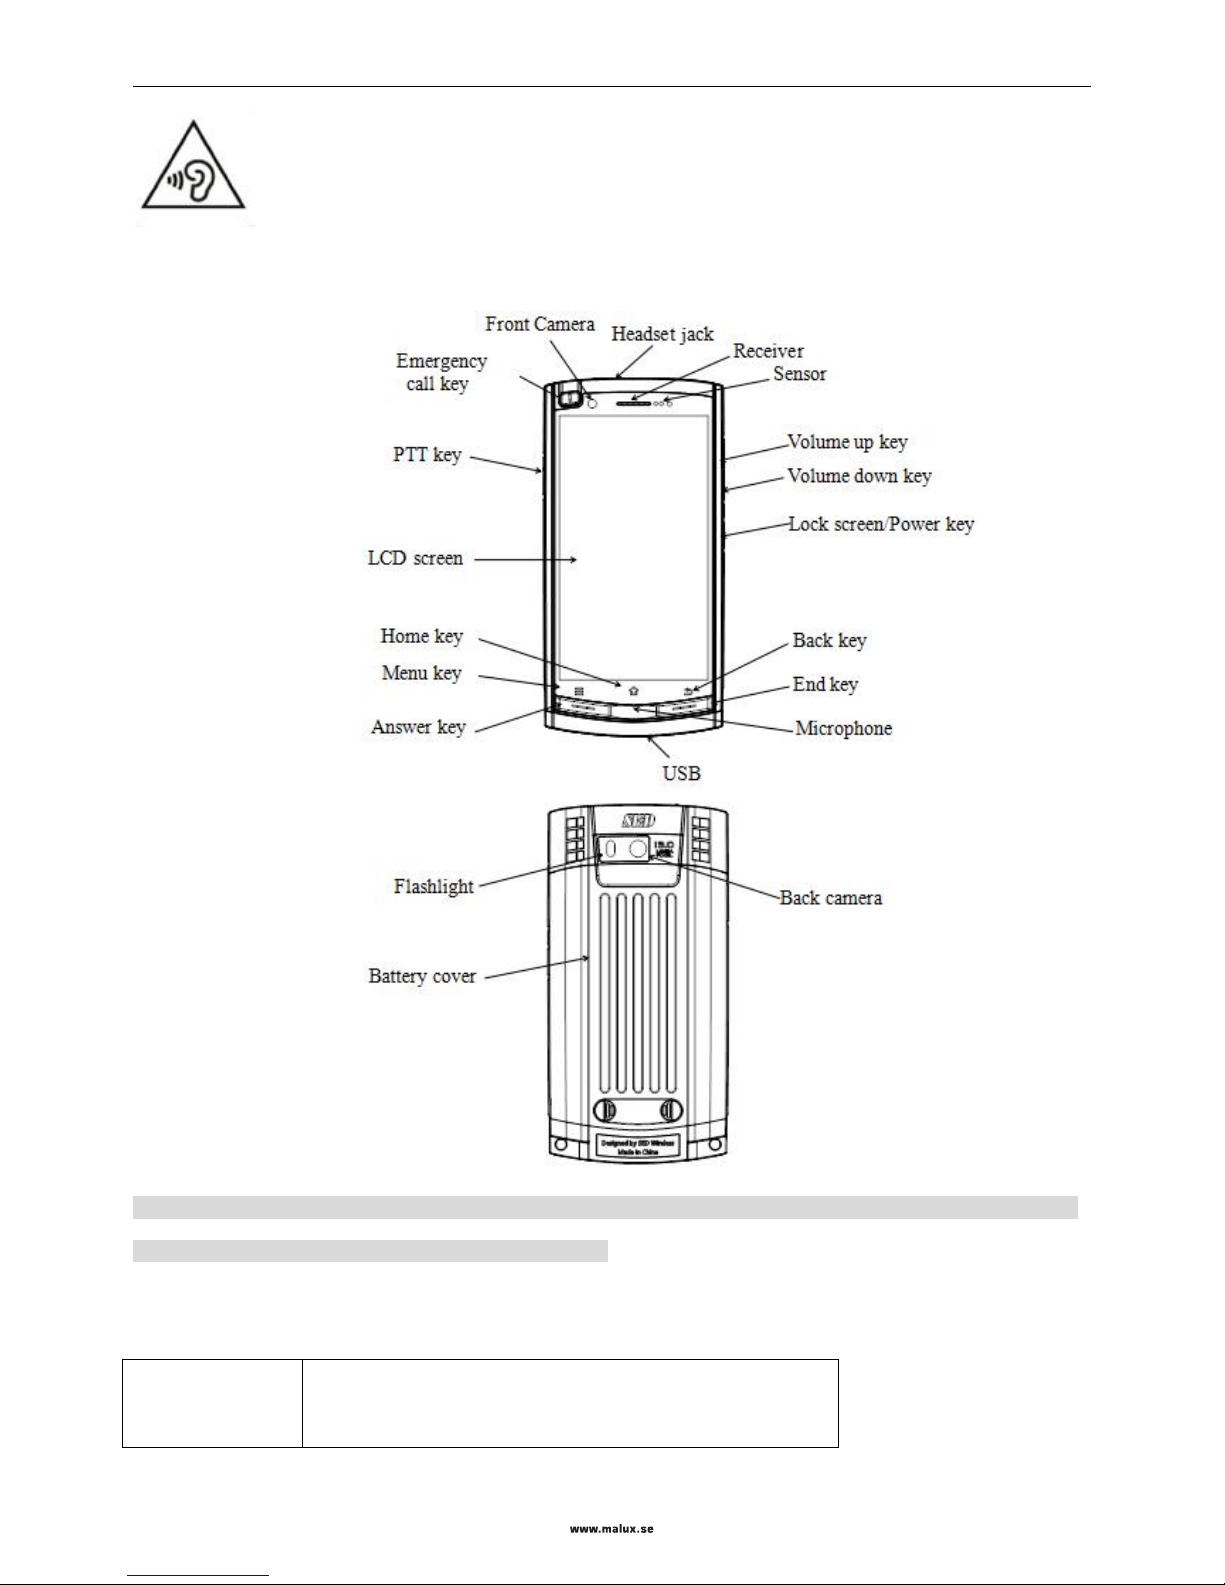
Your Mobile Phone
Note: Pictures used in this manual are for the purpose of functionality reference only and may differ from your mobile
phone. Detailed information about the real product prevails.
Key Functions
Power key
Press and hold to power on a mobile phone.
Press and hold the key on a faulty mobile phone for 8 seconds to
Page 8
SED GPH-650R User Guide
- 8 -
10 seconds to restart the mobile phone.
Press and hold the key to display an option menu on a standby
screen.
Press to lock a standby screen.
Menu key
Press to display the menu of the current screen.
Home key
Press to return to the home screen.
Press and hold to display the recently used apps list.
Back key
Press to go back to the previous screen.
Volume Up key
Press to turn up the volume.
Volume Down key
Press to turn down the volume.
Emergency call key
Press and hold to initiate a railway emergency call.
PTT key
Press to enter speak mode
Answer key
Press to rapidly answer a call.
End key
Press to rapidly end a call.
Preparations before Using a Mobile Phone
Before using a mobile phone, insert in a valid SIM card provided by the network service provider.
Note: Place the SIM card in a place beyond the reach of a child.
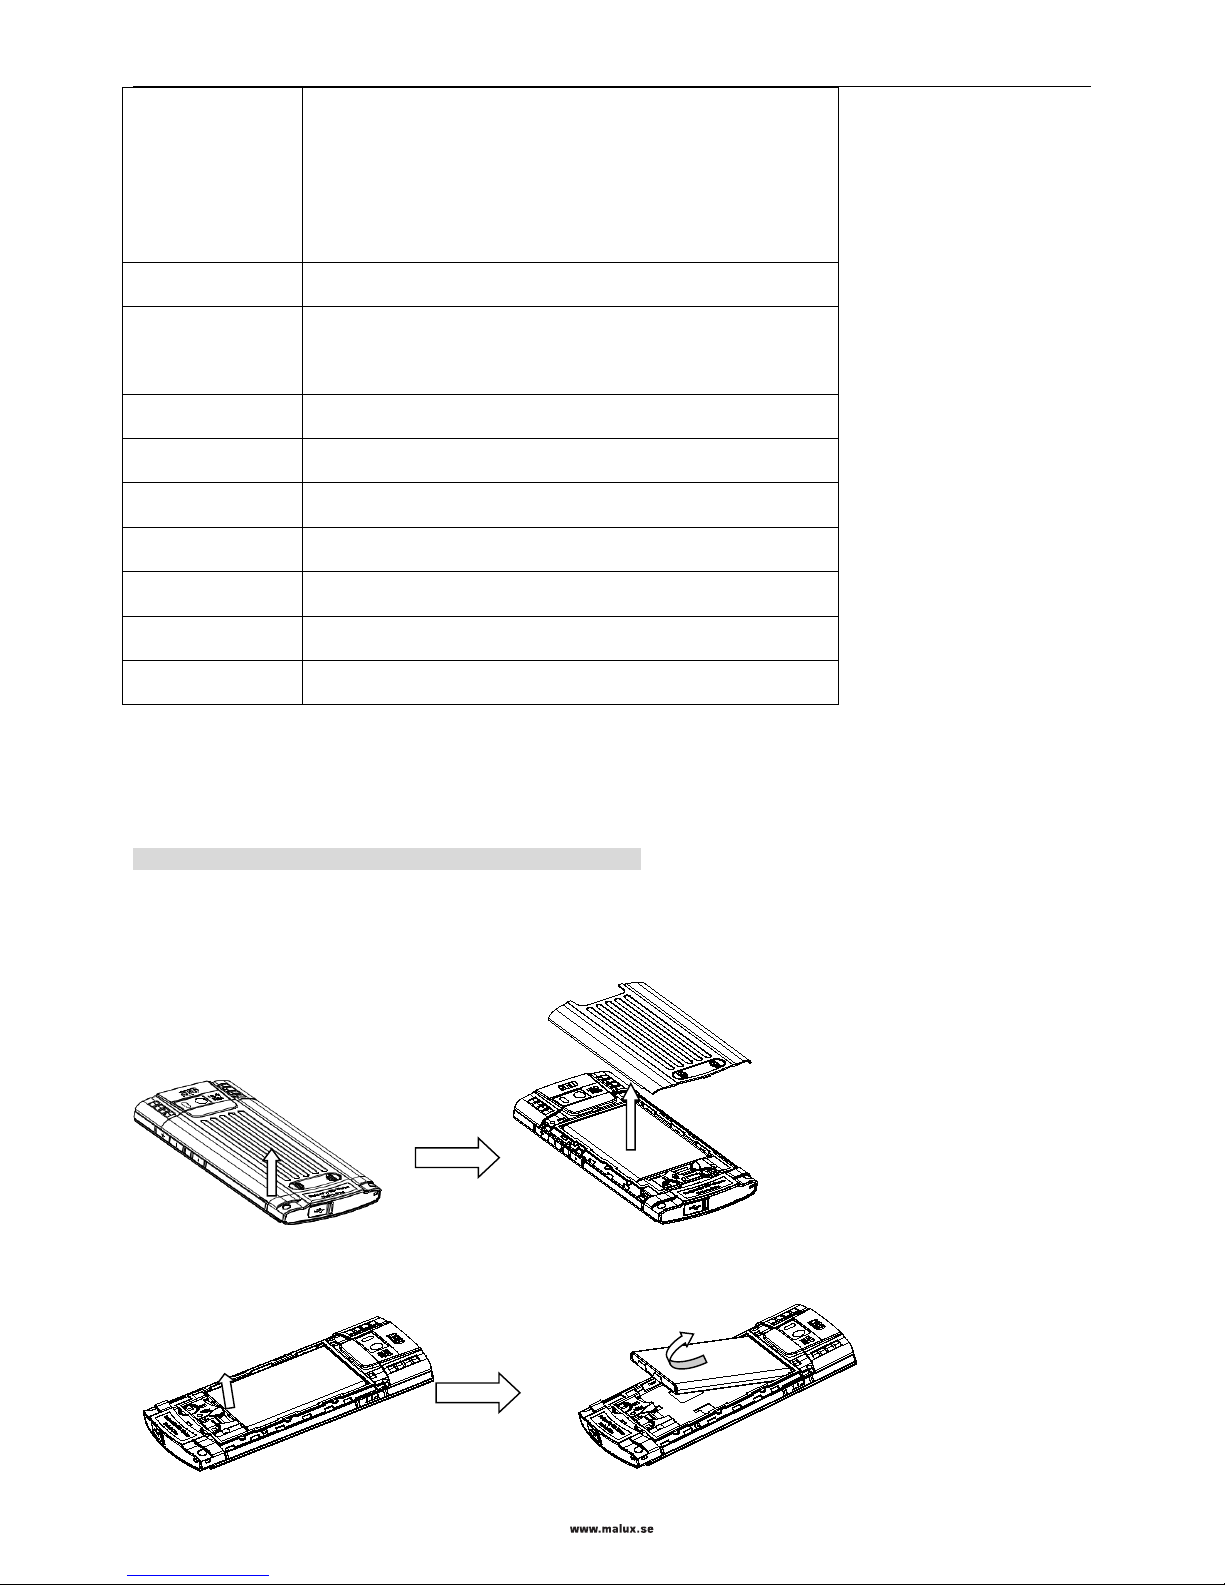
Installing a SIM Card and a Battery
1. Lift up the battery cover along the arrow and remove it.
2. Remove the battery.
Page 9

SED GPH-650R User Guide
- 9 -
Note: Before removing the battery, please turn off the mobile phone and disconnect it from other devices.
3. Ensure that the cuts of the SIM card are consistent with the cutting direction of the SIM card slot. Place the SIM
card in slot with the metal chip facing downwards.
Note: A SIM card and its contacts are prone to damage caused by scratches or bending. Therefore, take care when using,
inserting or removing a SIM card.
4. Align the end of the battery that is close to the phone head with the battery tray and then insert the other end. Ensure
that the metal contact of the battery faces against the contact of the mobile phone. Then, press down the battery until
fully locked into the battery tray.
5. Align the lower part on the back cover of the mobile phone with the cuts on the tail of the mobile phone, and then
press the back cover until no gaps exist around.
Charging the Battery
Connect the mobile phone to a travel charger to charge the battery:
Open the USB protection cover on the tail of the mobile phone, and then insert the USB plug into the tail jack in the
lower part of the mobile phone.
Page 10
SED GPH-650R User Guide
- 10 -
Chapter 2 Basic Functions
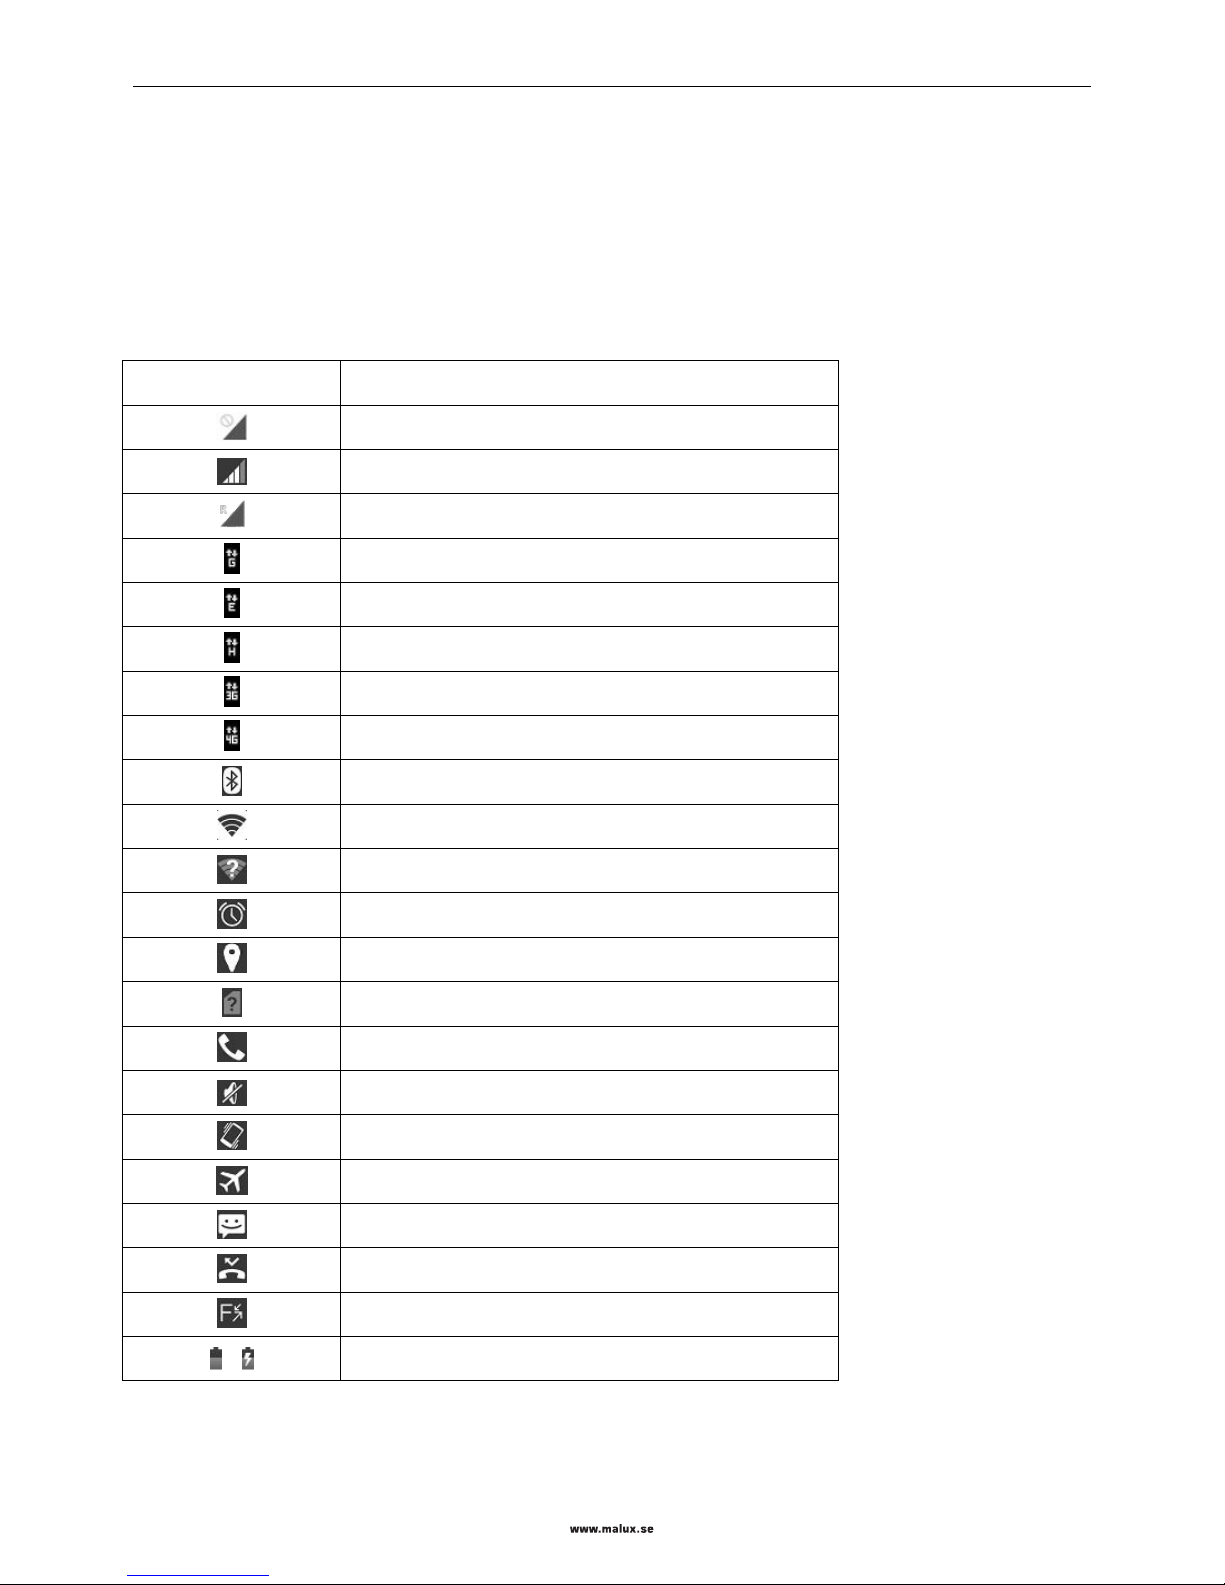
Description of Icons in Status Bar
The icon displayed on top of the screen indicates information about status of the mobile phone. The following are the
most common icons:
Icon
Meaning
No signal
Signal strength
in roaming
GPRS network connected
EDGE network connected
HSDPA network connected
UMTS network connected
LTE network connected
Bluetooth function enabled
WLAN connected
WLAN available
Alarm clock enabled
GPS positioning enabled
No SIM card
In calling
Mute mode enabled
Vibrating mode enabled
Airplane mode enabled
Unread message
Missed call
Synchronous function number needed
/
Battery level/in charging
Page 11
SED GPH-650R User Guide
- 11 -
Icon
Meaning
Enhanced emergency call status:
Red, unregistered
Yellow, registered, but not available (standby)
Green, currently available
Notification Panel
Pull down the status bar to open the notification panel in which the unprocessed events such as missed calls or unread
messages are displayed. To close the notification panel, drag up the bar at bottom of the screen.
Click in the notification panel to enter the quick setting panel which includes the following contents:
Brightness: press to display the brightness tuning bar.
Screen rotation: press to turn on or off screen automatic rotation.
WLAN: press to turn on or off WLAN; press and hold to enter the WLAN setting page.
Mobile data: press to enable or disable the mobile data function; press and hold to enter the data usage page.
Battery level: press to enter the battery usage page.
Airplane mode: press to enable or disable the airplane mode.
Bluetooth: press to enable or disable the bluetooth function; press and hold to enter the blue tooth setting page.
Positioning: press to enable or disable the positioning function; press and hold to enter the positioning setting page.
PrintScreen: screenshot.
Work alone mode: enable or disable the work alone mode.
Power saving mode: switch over the power mode.
Alarm clock: enter the alarm clock setting page.
Desktop
Adding a widget
Press and hold or click the Menu key on the screen to enter the overview view. Click to enter the widget list.
Select a widget in the list, press and hold it to drag it to a blank position on the desktop.
Note: Enough space is needed on the desktop to place widgets. If space is not enough, widgets adding will fail.
Adjusting a widget or icon position
On the desktop, press and hold the widget or icon to be moved until the widget or icon floats up, and then drag it to any
position on the desktop.
Page 12
SED GPH-650R User Guide
- 12 -
Deleting a widget or icon
On the desktop, press and hold the widget or icon to be deleted until appears on top of the screen, and then
drag the widget or icon on to the .
Notes: System apps cannot be deleted, and thus will not appear when you press and hold icons of system
apps.
Creating a folder
Save and archive application icons by their types for easy searching.
On the desktop, drag an icon on to another icon and integrate these two icons into a new folder. Open the folder, and you
can rename the folder.
Locking and Unlocking the Screen
Locking the screen can avoid error operation on an unused mobile phone.
Locking the screen
Manual locking: press the Power Key.
Automatic locking: the mobile phone will be locked automatically when not used for a period reaching the set sleep
period.
The sleep period can be set in Setting > Display > Sleep.
Unlocking the screen
Press the Power Key to wake up the screen. Press and hold and drag it to any direction to complete unlocking.
Inputting Text
Switching over the input method
1. Open for setting the input method.
2. Click the Language & input option, and check the input method to be used.
3. Click the Default option, and check the input method to be used.
Chapter 3 Communication Related Functions
Basic Call Functions
Dialing a call
Steps of call dialing are as follows:
1. When the screen is unlocked, click the mobile phone to enter the Dial Application.
Page 13
SED GPH-650R User Guide
- 13 -
2. On the dial pad, press number keys to input the called number, and select SIM 1 PTP Call or SIM 2 PTP Call for
calling.
3. If calling fails, prompt information: "Call fails." is displayed.
4. The dialed telephone numbers are saved in the communication records automatically. Select Dial Application when
the mobile phone is standby or press Answer Key to display and view the recent called number list.
International toll call
Input the country code, area code, and the telephone number (having no space), and select SIM 1 PTP Call or SIM 2
PTP Call for calling. If you need dial + when inputting the country code, press and hold the 0 Key.
Dialing a call using the directory
Choose the telephone number to dial in the directory, and select SIM 1 PTP Call or SIM 2 PTP Call for calling.
Redialing the most recently dialed number
In standby mode, press the Answer Key twice to dial the most recently dialed number. In standby mode, press the
Answer Key to enter the dialed telephone number list. Select a record in this list and click the Dial button on the right to
copy the telephone number to the dial pad. Select SIM 1 PTP Call or SIM 2 PTP Call for calling.
Answering a call
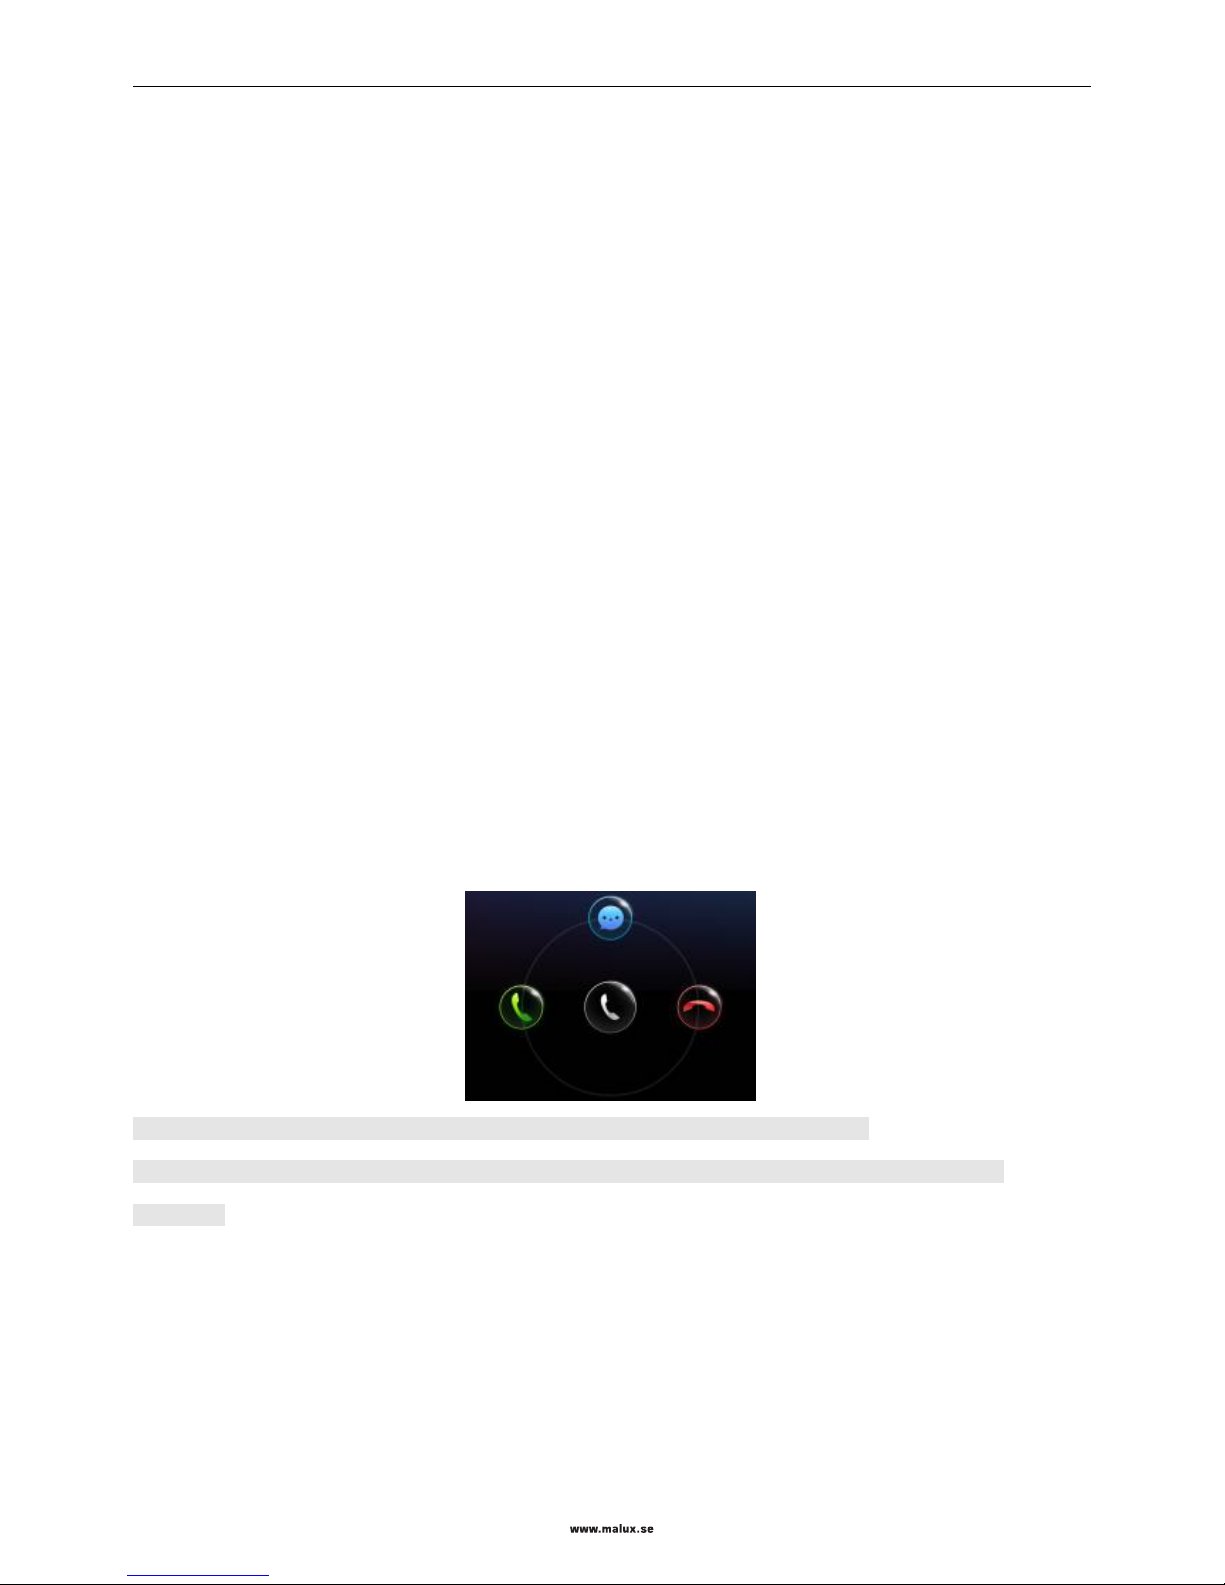
When there is an incoming call, a prompt is displayed. If you registers the caller number display function (consulting
the network service provider), the caller number is displayed on the screen of the mobile phone. Slide left for
answering or press the Answer Key for answering.
Note: The call with high priority, such as the emergency call will be answered automatically.
If there is a new incoming call when you use the mobile phone or operate the menu, your current operation is
interrupted.
Ending a call
To end a call, click the red button for hanging up a call or press the End key at the bottom of the call screen.
After the call ends, the duration of this call is displayed on the screen.
Page 14

SED GPH-650R User Guide
- 14 -
Refusing a call
When there is an incoming call, you can slide right or press the End key to refuse answering the call directly; or you
can slide up to refuse answering the call and reply back a short message rapidly.
Note: This needs the network supporting the short message service.
Tuning the volume
On the standby screen, the timing screen in talking status, or the inputting number screen during talking, you can tune
the volume by pressing the two Volume buttons on right side of the mobile phone. Press the Volumn Up key to enlarge
the volume, or press the Volumn Down key to reduce the volume until mute. You can also drag the volume bar to tune
the volume. Dragging the volume bar right to enlarge the volume, and left to reduce the volume.
Note: During talking, you cannot press the Volumn Down key to reduce the volume until mute.
Using hands-free mode during talking
On the timing screen during talking and dialing screen during dialing, you can click the Hands-free button to enter the
hands-free mode. The speaker will sound. Click the Hands-free button again to exit the hands-free mode. You can also
press the Answer Key to enter hands-free mode.
Note: During talking, the Answer Key can also be used as the Hands-free key.
Group calls with high priority are answered automatically with the hands-free mode enabled.
After entering the hands-free mode, the mobile phone speaker may sound very loud. Please do not use the mobile phone
near your ears in the hands-free mode.
Muting during talking
In the timing screen during talking, you can click the Mute Button to enter the mute mode, and then the peer cannot
hear your voice. Click the Mute Button to exit the mute mode.
Note: Muting is not allowed for the group call and broadcast service.
Call recording during talking
During talking, click More to expand the menu. Click Record, on the menu, and then a red dot and the recording time
prompt appears on the screen right to the talking time prompt. Recording of this call will be saved as a file into the
recording folder after the call ends.
Note:
The user can enter the talking menu again any time before the call ends, and click Record again to close the call
recording function.
Call memorandum during talking
During a PTP call talking, click the Memo to enter the memorandum for remarking. Click the Back key to return back
to the talking screen.
Page 15

SED GPH-650R User Guide
- 15 -
Adding calls during talking
During the PTP call talking, click Add to display the dial pad, and dial the number of the currently active card.
Note: To use this function, you may need to apply for registering the call holding service from the service provider.
Call holding during talking
During a PTP call talking, click Hold to hold the call in talking. At this time, you can add one call. Click Hold again to
return talking status.
Calling the emergency number
On the screen locking screen: click Emergency Call at bottom of the screen locking screen to enter the emergency
dialer, input the emergency number, and click the call button for calling.
In standby mode: open the Dialer application to enter the dial pad. Input the emergency number, select SIM 1 PTP
Call or SIM 2 PTP Call for calling.
Viewing missed calls
If you did not answer the incoming call in time, the unanswered call number will be saved into the call list. You can
enter the Dial application to view missed calls in the dial list. The missed call is marked by a red arrow besides. Number
of red arrows indicate the number of missed calls. When needed, you can directly press the Dial button to redial the
missed call number. Prompt and number of the missed calls are also displayed on the screen locking screen.
Details of talking
In the dial list, click a record to display call detailed information, including total number of you missing the call and the
time when the call is missed for recent three times. If needed, you can add the missed call into the Contacts or redial it.
Call settings
Call settings includes some call related settings such as incoming call ringtones of SIM 1 and SIM 2, voice mail setting,
incoming call forwarding, and call barring, Additional settings include the Call ID and incoming call waiting. You can
prepare the settings according to actual requirements.
Processing multiple calls
To use this function, you may need to apply for enabling this service from the service provider, and then enter the
Addtional settings screen from the Call settings menu, and check to select call waiting.
During talking or when one call is held, you can dial the second number.
When you dial the second number during talking, the first call is held and the second number is called. If the second call
is answers, the number in talking and the number held are displayed on the screen. You can press the Switch button for
switching between the current call and waiting call.
Page 16

SED GPH-650R User Guide
- 16 -
When a second call is incoming during a call talking, if you answer the second call, the first call will be held by default
or you can press the Menu key to enter the menu:
Hang up and answer: You can hang up the call in talking and answer the second call.
Hold and answer: You can hold the call in talking and answer the second call.
When multiple calls are incoming, if you receives multiple calls during talking, you can select to answer one of them
from the prompt list displayed on the screen.
Other operations
In the Dialer List, click the Menu key to display the following menu:
All call: to display all call records
Missed call: only to display missed calls
Filter (slot 1/slot 2): to select the card slot of the record to display
Delete calls: to delete call records
Call settings: to enter the call setting screen
GSM-R Functions
GSM-R functions are private functions developed on this type of mobile phone to be used by railway related users.
GSM-R functions need support by the GSM-R network and private SIM cards.
Description:
PTP call: point-to-point voice call.
Group call: a group call in which multiple users can answer a call, but only one user can speak at the same time.
The user needs to press the PTT Key to preempt the "speak right" and loose the PTT Key to release the "speak
right". The answering user can press the PTT Key to preempt the "speak right" when the "speak right" is idle, and
speak after the "speak right" preemption succeeds.
Broadcast: similar to the group call, but only the broadcast originator can speak and need not press the PTT Key;
other users can only answer the call but cannot preempt the "speak right".
Originating a PTP call
In the standby status, open the Dial application to enter the Dial pad. Input the called number, short number or function
number and select SIM 1 PTP call to originate a call; You can also view the Dialer List, directly click the Dial button
right to a call record, or enter Call details of this record to select the SIM 1 Button to originate the PTP call.
Refer to Basic call function - Call dialing.
Page 17
SED GPH-650R User Guide
- 17 -
Originating a group call
In the standby status, open the Dial application to enter the Dial pad. Input the group call number and select the VGCS
button to originate the group call; You can also view the Dial List, directly click the Dial button right to a group call
record, or enter Call details of this record to select the SIM 1 button to originate the group call.
Originating a broadcast
In the standby status, open the Dial application to enter the Dial pad. Input the broadcast number and select the VBS
button to originate the broadcast. You can also view the Dial List, directly click the Dial button right to a broadcast
record, or enter Call details of this record to select the SIM 1 button to originate the broadcast.
Note: If you input an incorrect or an inactivated group call/broadcast number, a prompt indicating the group call or
broadcast failure is displayed on lower part of the screen and you cannot originate this group call or broadcast.
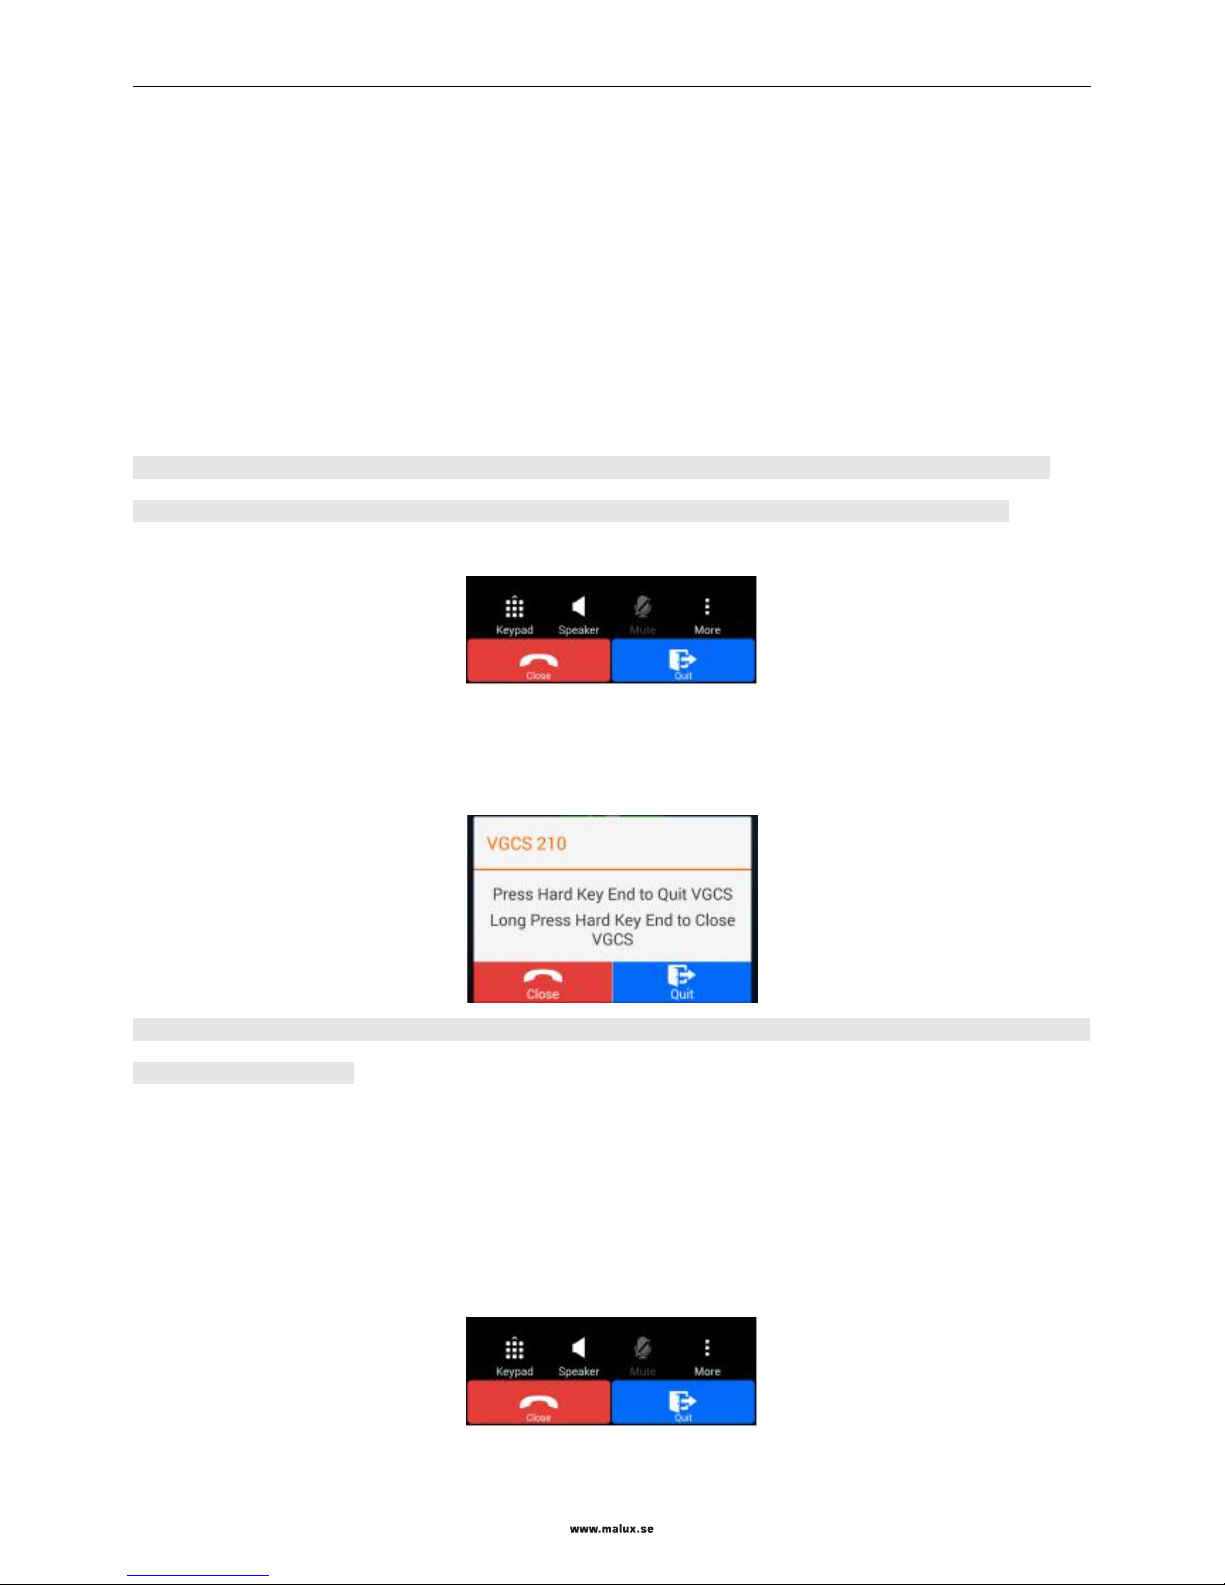
Ending a group call
The group call originator can end the group call as follows:
You can click the Close button at bottom of the screen, or press the End Key to select to close the group call according
to the prompt.
Note: The dispatcher can also end the group call; other users not originating the group call cannot end the group call but
can only exit the group call.
Ending a broadcast
The broadcast originator can click the Close button on the talking screen to end the broadcast, or directly press the End
Key to end the broadcast.
Exiting a group call
The group call originator can exit the group call as follow:
Exit a group call
Page 18
SED GPH-650R User Guide
- 18 -
During a group call, click the Exit button on the talking screen to end the group call, or press the End Key and click the
Exit key in the popped up prompt box, or press again the End Key to exit the group call.
The user did not originating the group call can click the red Close button or directly press the End Key to exit the group
call.
Note: A user cannot exit an emergency call.
Exiting a broadcast
The broadcast receiver click the red Close button in the talking screen during talking or directly press the End Key to
exit the broadcast.
Joining a group call/broadcast
You can join a group call/broadcast in the following ways:
You can select to join the group call/broadcast when receiving ringing of the group call/broadcast;
When knowing that the group call/broadcast is in speak model, you can input number of this group call/broadcast
on the dial pad and click VGCS or VBS. Then the mobile phone will automatically join this group call/broadcast;
In the existing group call list, you can query the group calls/broadcasts currently existing. Click the group
call/broadcast to join, and then the mobile phone will join this group call/broadcast.
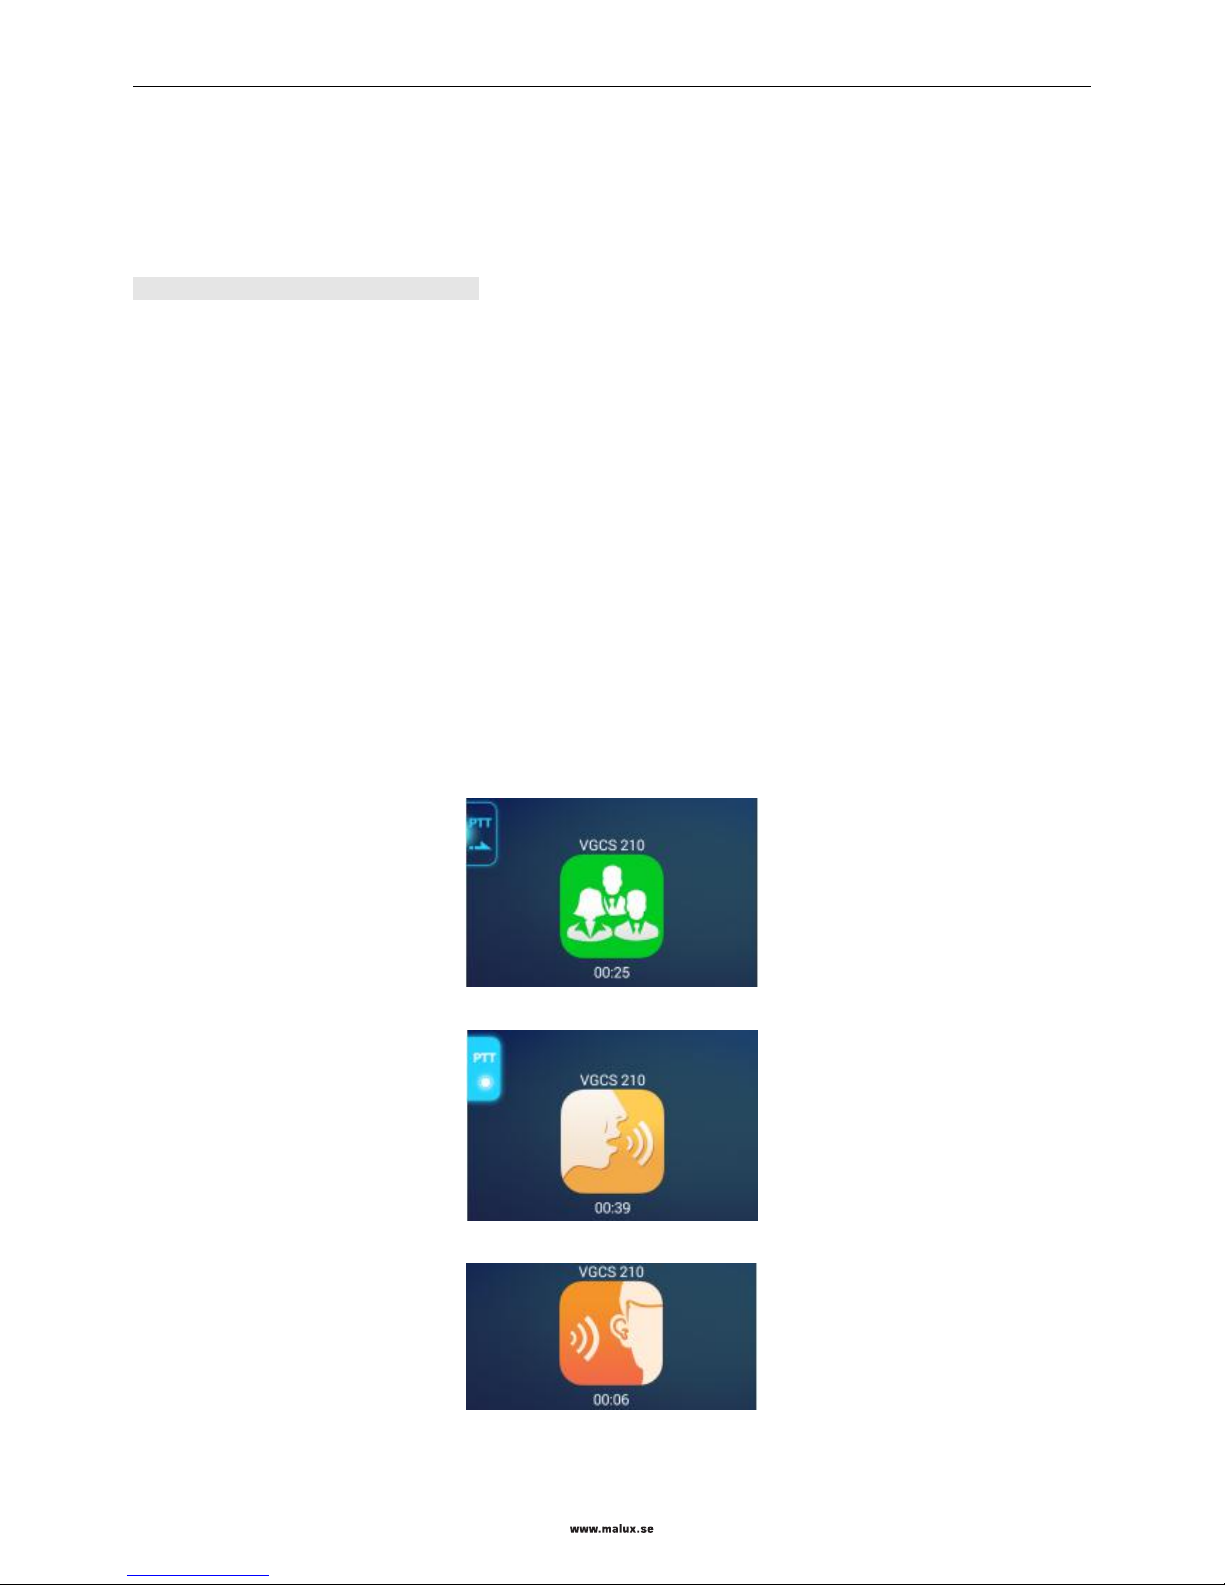
Preempting the uplink during a group call
Group call idle
Group call spreak model
Group call in answering
Page 19

SED GPH-650R User Guide
- 19 -
When a group call is in process and the "speak right" is idle, the idle image is displayed on the talking screen with the
PTT Key not highlighted. At this time, you can press the PTT Key to preempt the "speak right". If the preemption
succeeds, a prompt of speak available is displayed on the mobile phone screen, and then you can speak in the group call.
If loosening the PTT Key, you will return to the answering status.
If no prompt indicating that you can speak is displayed on the screen of the mobile phone, you are in answering status
and only can answer the group call.
Note: You cannot preempt the uplink when a broadcast is in process.
Receiving a PTP call during a group call/broadcast
When a PTP call is received when a group call/broadcast is in process, the mobile phone displays a prompt of a new
paging message. At this time, you can slide left on the screen or press the Answer Key to answer this PTP call.
If you are speaking in the group call, the "speak right" is released first and then the mobile phone exits this group
call.
If you are answering in the group call, the mobile phone exits this group call.
If you are the originator of the broadcast, the mobile phone ends this broadcast.
If you are the receiver of the broadcast, the mobile phone exits this broadcast temporarily.
After viewing the ringing message of the new PTP call, you can press the Answer Key to select to answer this PTP call
or press the End Key to refuse this PTP call.
After this PTP call is refused or the call talking ends, if the previous group call/broadcast has not ended, you will join
automatically to the previous group call/broadcast.
Note: If the time you waits for the new PTP call message times out, this PTP call talking is regarded as ended. If the
priority of the incoming PTP call priority is higher, the mobile phone automatically exits the current group call, or ends
the current broadcast and returns back to the standby screen to wait to answering this PTP call. At this time, you can
select to answer or refuse this PTP call. If the priority of the group call/broadcast in process reaches a certain level, you
cannot answer the PTP call.
Receiving a group call/broadcast during a group call/broadcast
When ringing of another group call/broadcast is received when a group call/broadcast is in process, you can select to
slide on the screen to answer or refuse the group call/broadcast, you can also directly press the End Key to refuse this
new group call/broadcast, or press the Answer Key to answer this new group call/broadcast. Before answering the new
group call/broadcast:
If you are talking in the previous group call, the mobile phone releases the uplink and then exits the previous group
call;
Page 20
SED GPH-650R User Guide
- 20 -
If you are answering the previous group call, the mobile phone exist the previous call;
If you are a receiver of the previous broadcast, the mobile phone exist the previous broadcast;
If you are the originator of the previous broadcast, the mobile phone ends the previous broadcast.
Receiving a group call/broadcast during a PTP call
When ringing of a new group call/broadcast is received when a PTP call is in process, you can press the End Key or
slide to refuse this new group call/broadcast, or press the Answer Key or Slide to answer this new group call/broadcast.
Before answering this new group call/broadcast, the mobile phone ends the previous PTP call.
Receiving another PTP call during a PTP call
Please refer to Basic Talking Functions - Processing multiple talking.
Receiving multiple calls during a call
If you receive multiple calls simultaneously during a call, you can select to answer one of them from the prompt list
displayed on the screen.
Automatically answering a call with high priority
If your mobile phone is in idle status and receives a call with a priority reaching the automatic answer priority, the
mobile phone automatically answers this call.
If you receive, during talking in a call, another call with a priority higher than the priority of the current call and
reaching the automatic answer priority, your mobile phone automatically answers this call.
Note: Before automatically answering another call with a high priority during talking in a call, the mobile phone handles
the previous call according to the type of your previous call and whether you are the originator of this call.
Railway emergency call
If the railway emergency call is allowed, you can press the Emergency call key and confirm to originate a railway
emergency call.
Note: The Emergency call button is used as a unique way to originate a railway emergency call.
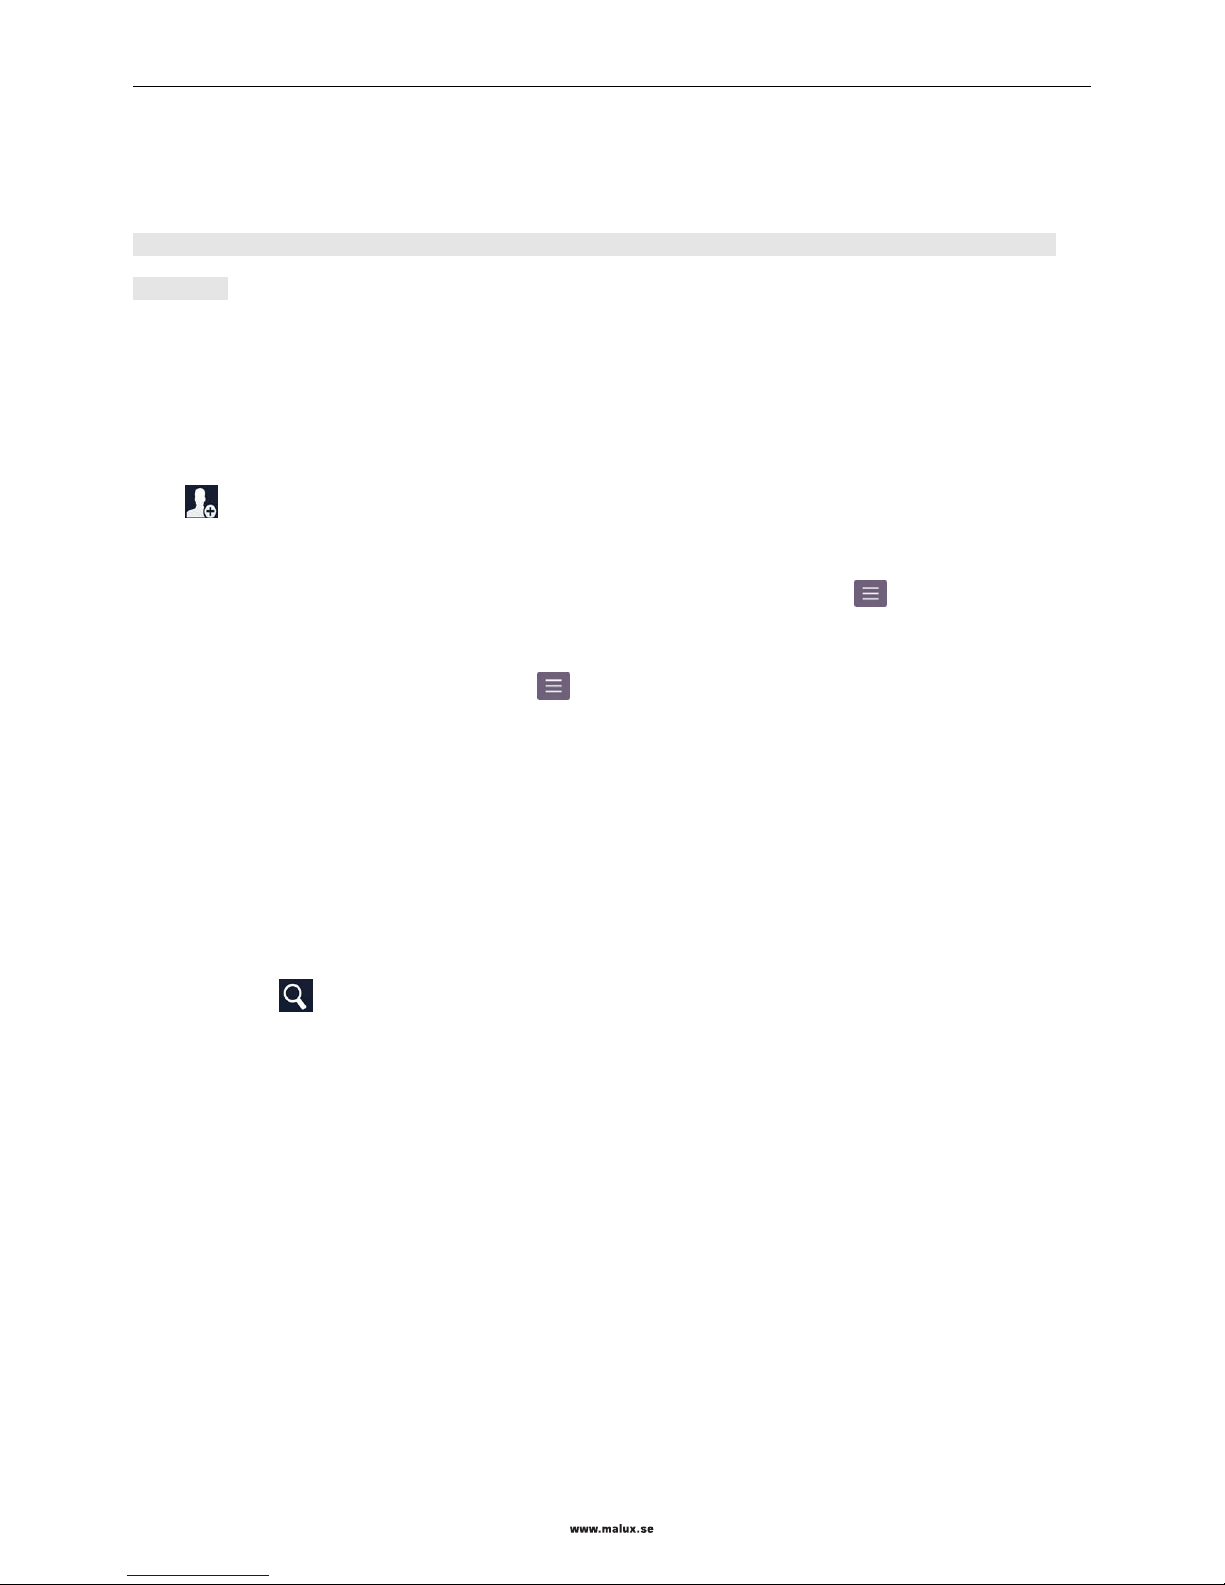
Activating and deactivating operations
Page 21
SED GPH-650R User Guide
- 21 -
On the talking details screen of the group call and broadcast, you can perform the activating and deactivating operations.
For the group call or broadcast in activated status, you can deactivate is; otherwise, you can activate the group call or
broadcast.
Note: Only the mobile phone with the SIM card having the activating and deactivating authority can be activated or
deactivated.
Contacts
Use this application to manage the contacts including their telephone numbers, e-mail boxes and others.
Creating a contact
Click and select the account to be used and input information of the contact.
Editing a contact
Select the contact to be edited and enter the screen of contact details. Click the Menu key , and click Edit.
Deleting a contact
On the contact details screen, click the Menu key , and click Delete; or press and hold the contact to be deleted on
the screen of all contacts and click Delete in the popped up menu.
Searching a contact
Use the following searching methods:
Sliding the contact list up or down;
Using the indexes left to the contact list and dragging your finger to slide quickly along these indexes to view the
contact list;
Clicking the searching button on left corner of the contact list, and inputting the searching criteria.
Select and press and hold a contact to carry out the following operations:
Deleting a contact;
Sharing a contact;
Combining contacts;
Copying the telephone number of a contact to the dial pad;
Creating a shortcut on the main screen.
Click a contact to enter the contact details screen and then you can carry out the following operations:
Adding this contact to the contact favorites folder;
Changing the head of this contact;
Dialing telephone number of this contact;
Page 22
SED GPH-650R User Guide
- 22 -
Sending short messages to this contact.
Note: The operation of changing the head of a contact can only change heads of the contacts saved in your mobile
phone.
Importing and exporting a contact
Importing a contact
Click Import/Export to select to import contacts from the SIM card or memory device of the mobile phone.
Exporting a contact
Click Import/Export to select to export to the SIM card or memory device of the mobile phone.
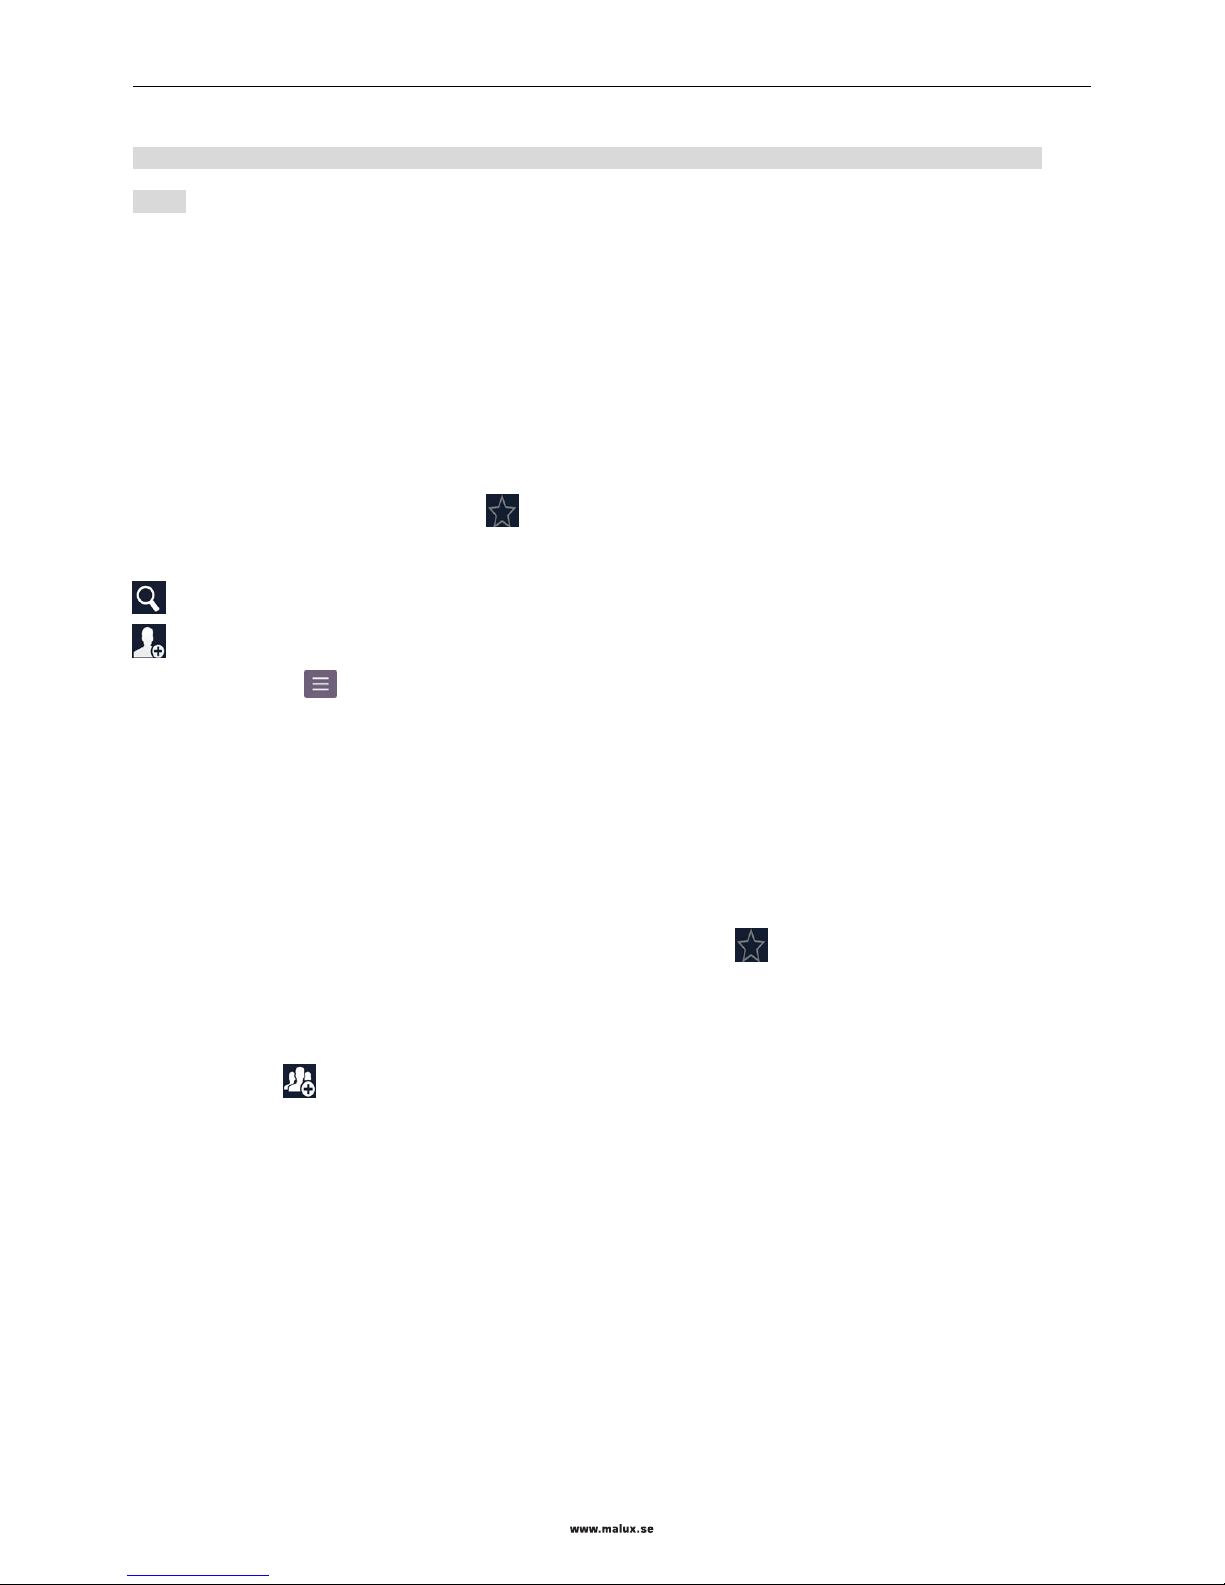
Adding a contact to favorites folder
Enter to the contact details screen and click to add a contact to the favorite folder.
On the screen of adding a contact to the favorite folder, you can:
search: searching a contact;
add: adding a contact.
Click the Menu key to carry out the following operation:
Deleting a contact;
Importing/exporting a contact;
Synchronizing the account;
Querying the storage status.
Note: This deleting operation will delete the contact but not remove it from the favorites folder. To remove a contact
from the favorites folder, click to enter the contact details screen, and click again to remove the star.
Managing a group
Click Group, and you can perform the following operation:
Create: click to create a new group;
Edit: click Group to edit the group name or add a group member.
Delete: click Menu, and click Delete group, and then click OK.
Adding a contact to a group
Select Group, and then click Add members, select the contact to be added, and then click OK.
Messaging
The message service is a network service. The network you are using may not support the short message service. For
details, consult the network operator. Contents of the short message are not limited to text. You can also add abundant
Page 23
SED GPH-650R User Guide
- 23 -
expressions and pictures and audio and video attachments to rich your short message.
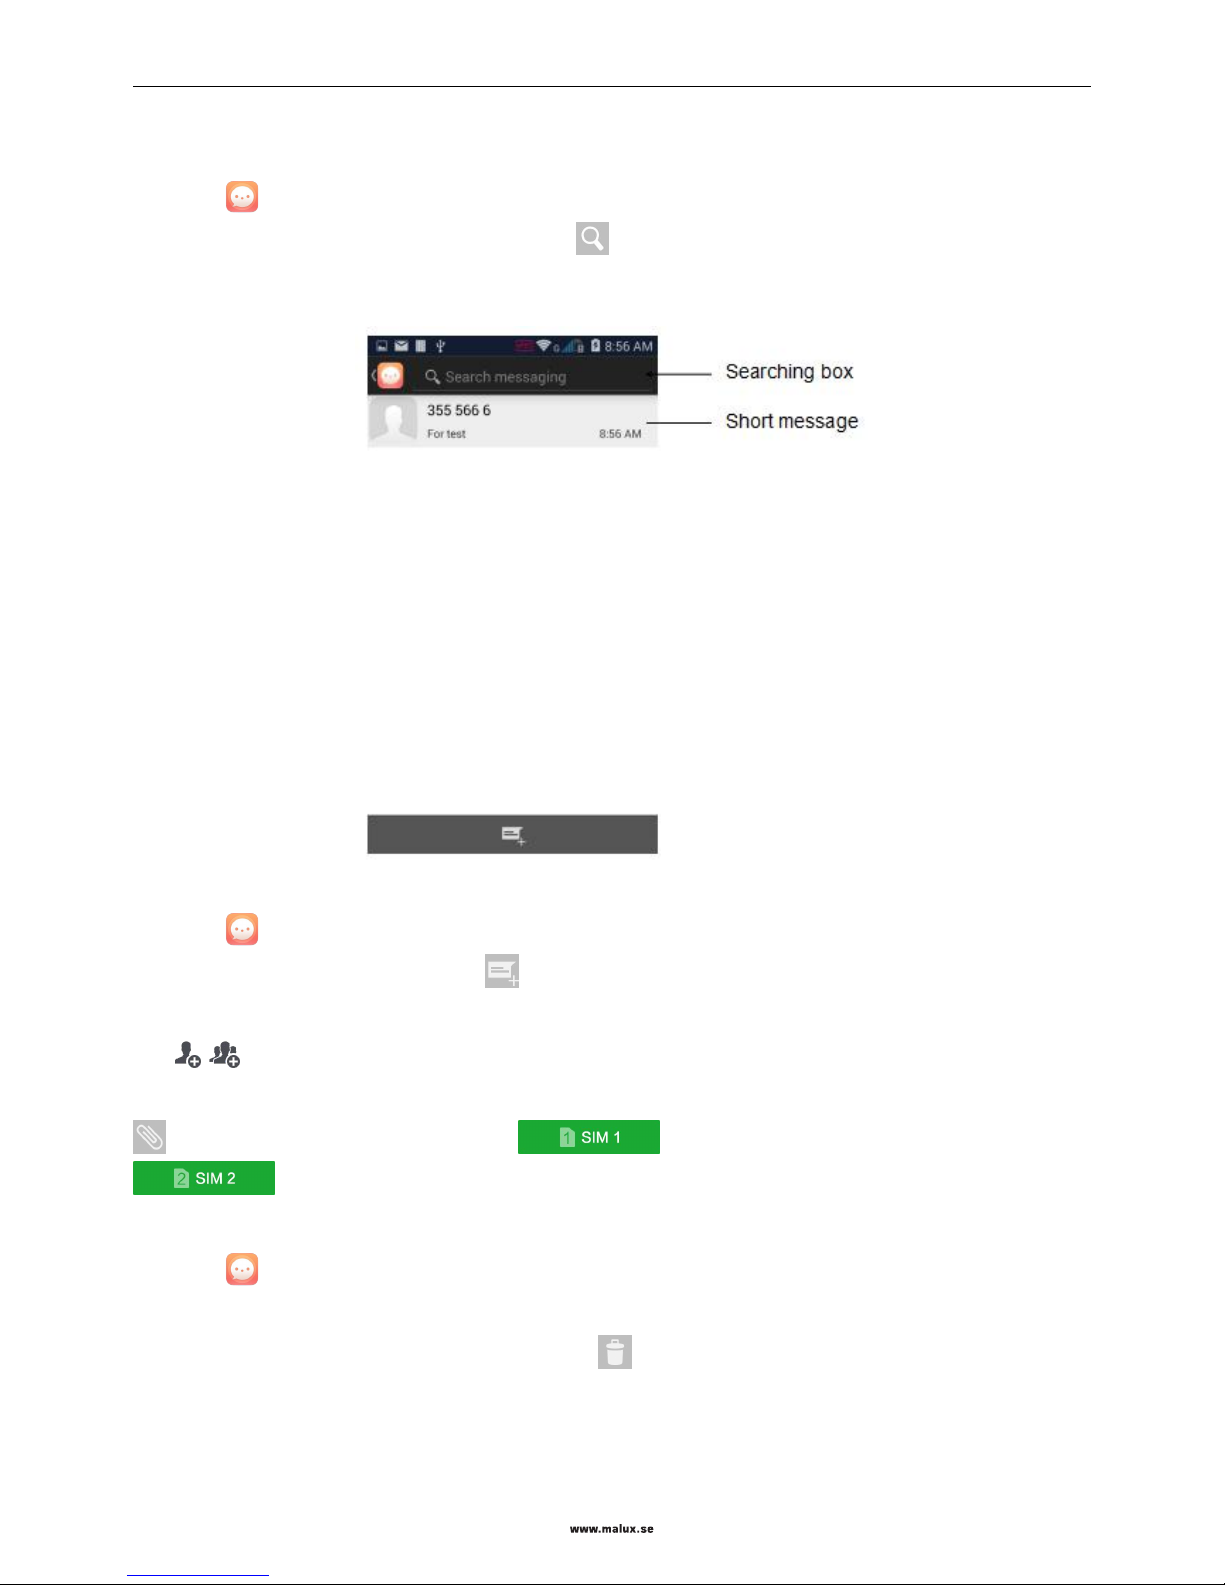
Viewing a short message
1. Click on the screen to list the short message list;
2. Slide the screen to view received messages. Click to display the search box at top of the screen to rapidly
search a short message.
Sending a short message
1. Click on the screen to list the short message list;
2. On the short message list screen, click ;
3. Click the short message receiver text box and input the mobile phone number or contact name. You can also
click / to enter the contact list and select a contact/group;
4. Click the short message text box and input contents; if you need to add pictures or audio/video attachments, click
to add them. After editing messages, click to send the short message using SIM 1 or click
to send the short message using SIM card 2.
Deleting a short message
1. Click on the screen to list the short message list;
2. On the short message list screen, press and hold a short message to enter the selecting mode;
3. Click the short message to be deleted, and then click to delete it.
Page 24
SED GPH-650R User Guide
- 24 -
Email
Use this application to send or view an email.
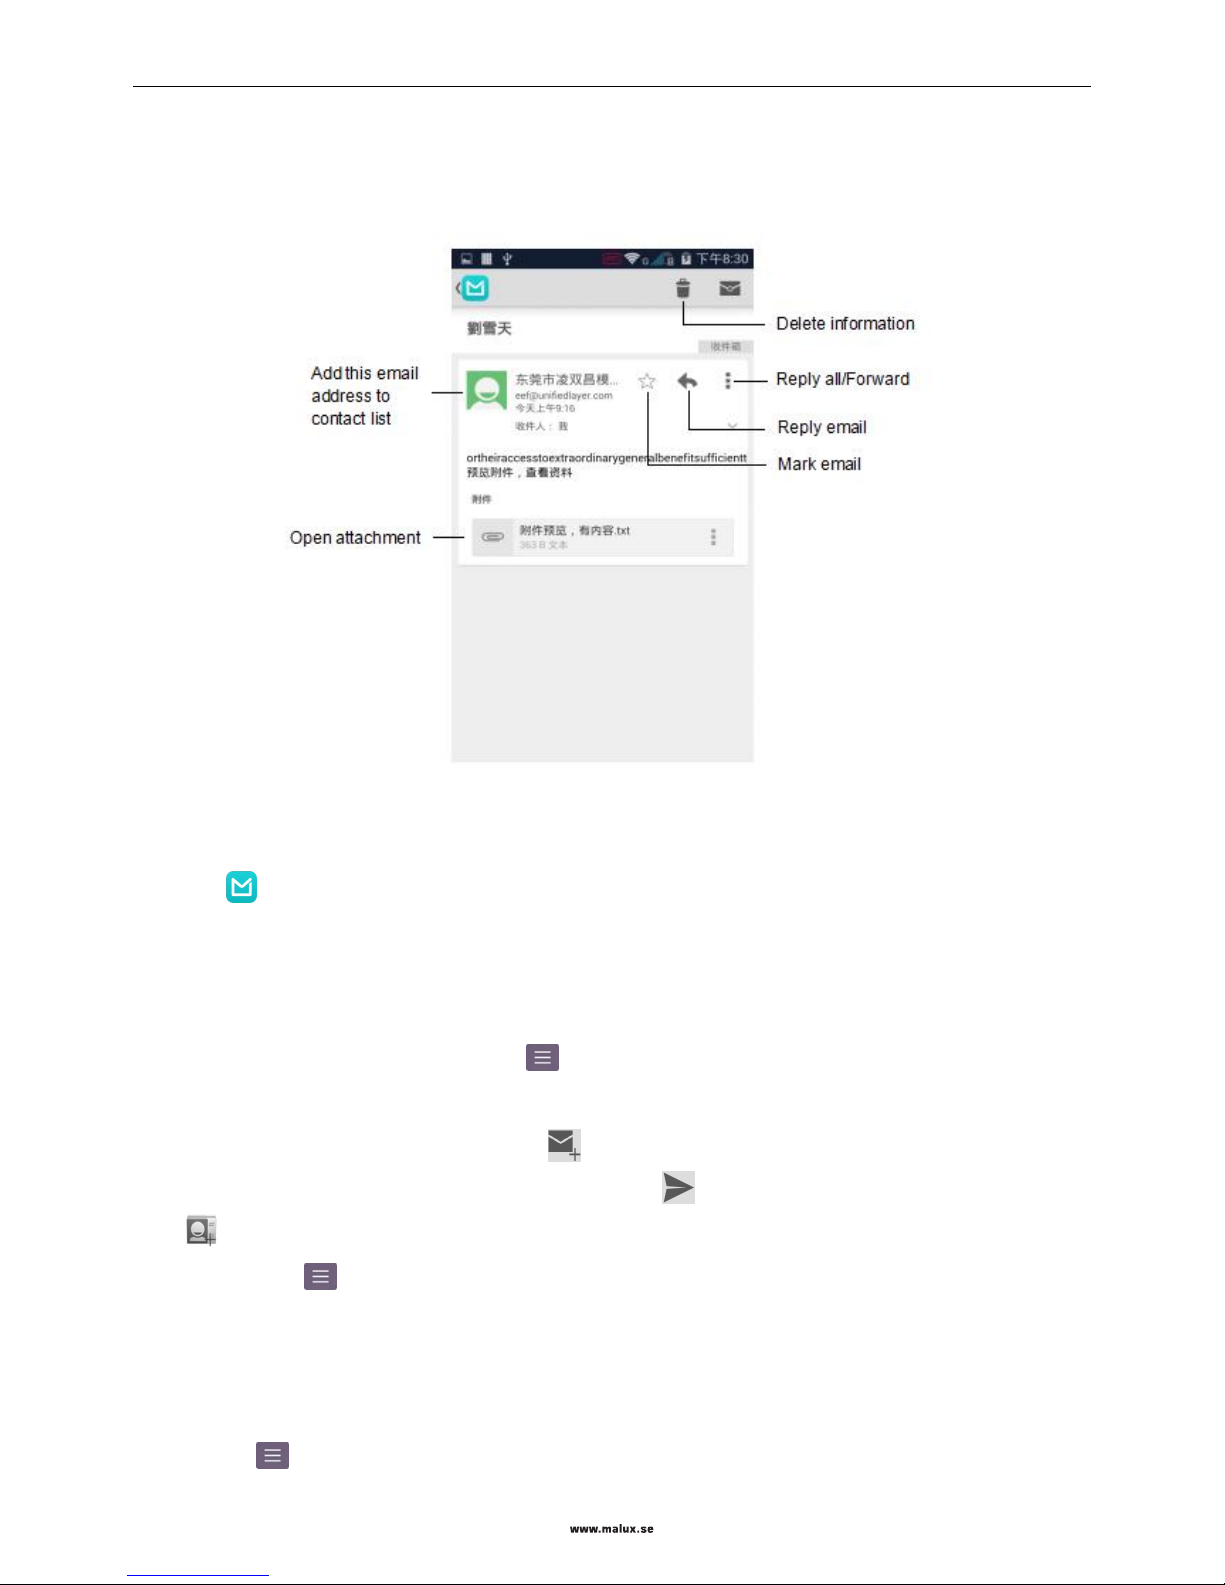
Application screen
Setting an email account
When opening an email for the first time, you need set the email account.
1. Click on the desktop to open an email;
2. Input the email address and password;
3. Set the type of the email account;
4. Complete the setting according to the prompt displayed.
To set other email accounts, click the Menu key -> Setting -> Add.
Sending an email
1. Select the email account to use, and then click at the top right corner on the screen;
2. Input the email receiver, subject and contents, and then click .
Click to add an email receiver from the contact list.
Click the Menu key to add audio/video attachments, pictures, and cc (carbon copy)/bcc (blind carbon copy) email
addresses.
Reading email information
Select the email account to be used to receive new email information. To manually receive new email information, click
the Menu key -> Refresh.
Page 25
SED GPH-650R User Guide
- 25 -
Chapter 4 GSM-R Related Application
Function Number
If your SIM card has the authority of function number, you can use the function number application to registering,
unregistering, querying, forced deregistration and switching over a function number. You can also directly input
character strings on the dial listing and press the PTP key of SIM 1 to originate applications for registering,
unregistering, querying, or forced deregister a function number.
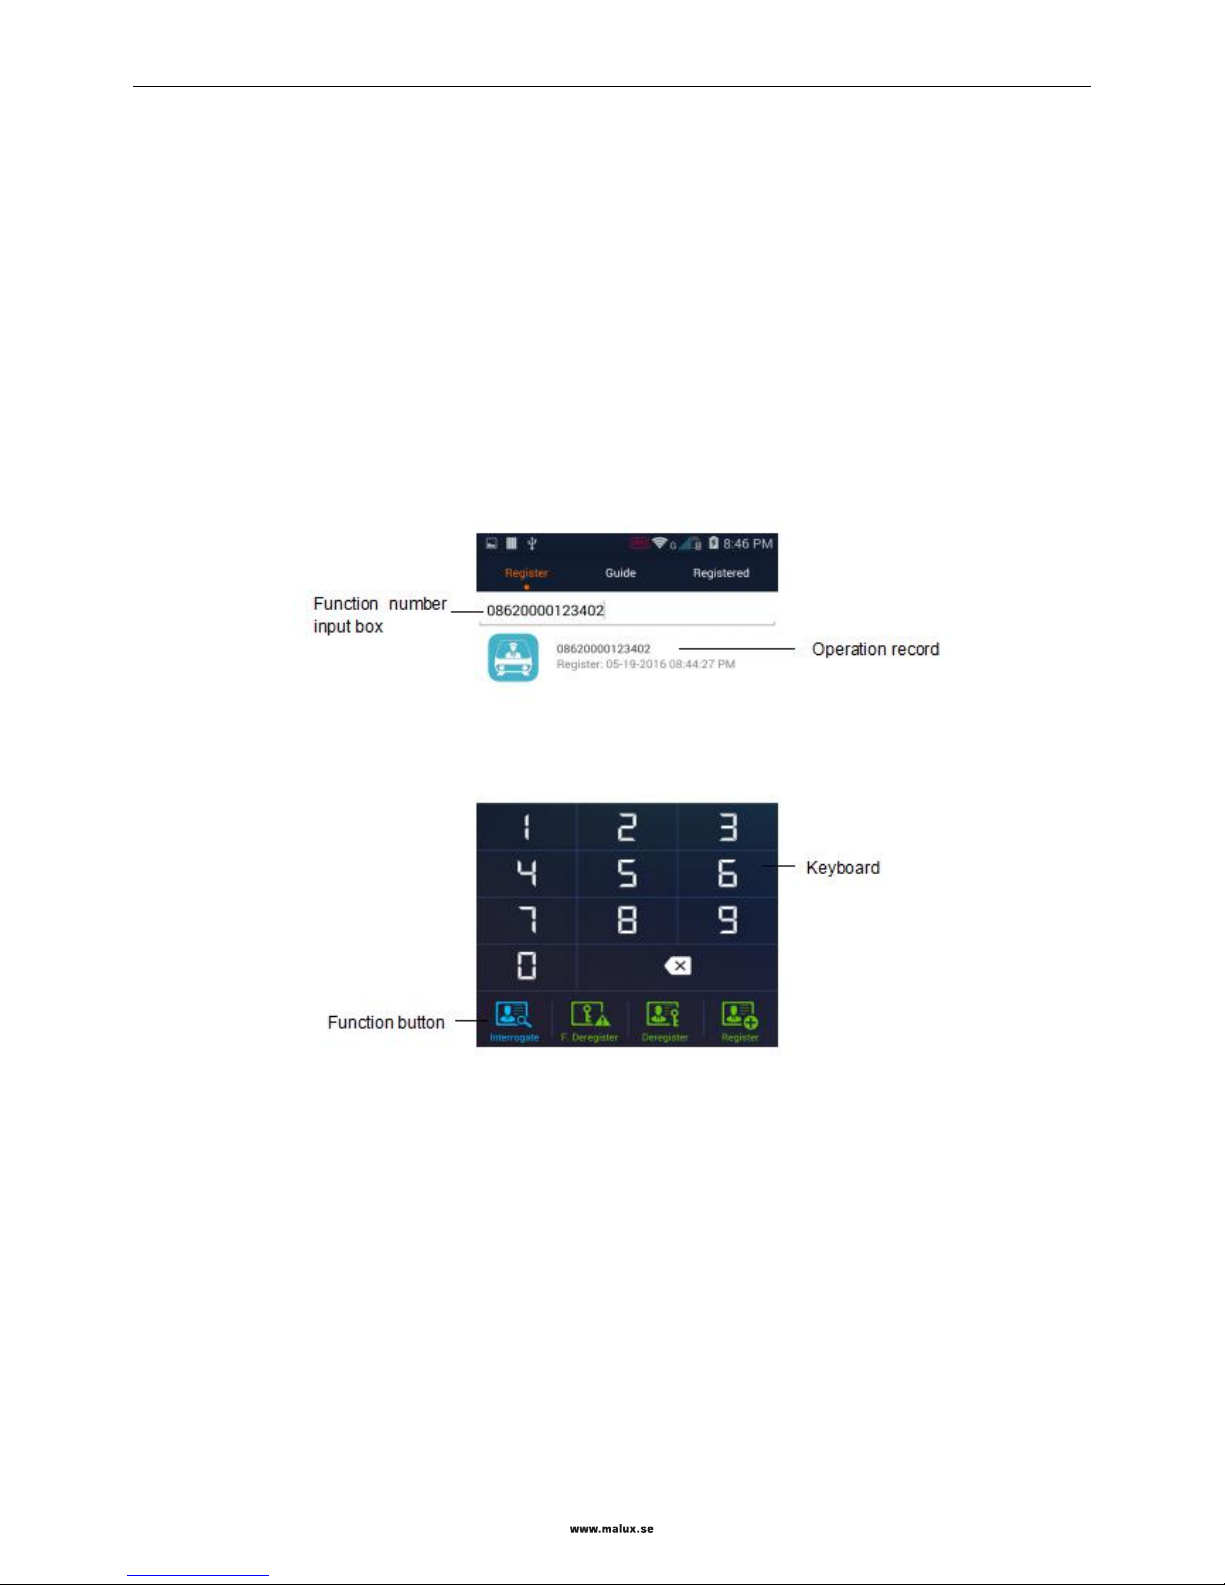
Register screen
On this screen, you can originate applications for Register, Deregister, Interrogate, or F.Deregister a function number
to the network.
Interrogate: to query current registration information of a certain function number. You can input the function
number to be queried in the input box and then press the Interrogate key. The popped-up menu displays a prompt
indicating the result of network querying.
F. Deregister: if you have authority of forcibly unregister the function numbers of other users, you can forcibly
register a function number of another user. The popped-up menu displays a prompt indicating the result of Forced
deregistering.
Deregister: to unregister a registered function number. You can input the function number to be unregistered in the
input box and then press the Deregister key. The popped-up menu displays a prompt indicating the unregistering result.
Register: to provide an input screen of the function number. You can input the function number to be registered in
Page 26
SED GPH-650R User Guide
- 26 -
the input box and then press the Register key. The mobile phone sends a registration application to the network. The
popped up box displays the registration result.
Operation record list: You can select needed function number in the operation record list for quick operation.
Note: The result of register, deregister, Interrogate, forced deregister a function number relates with whether the network
settings and the number input are legal.
Note: Forced deregister a function number may influence normal use by other users. Be careful on this operation.
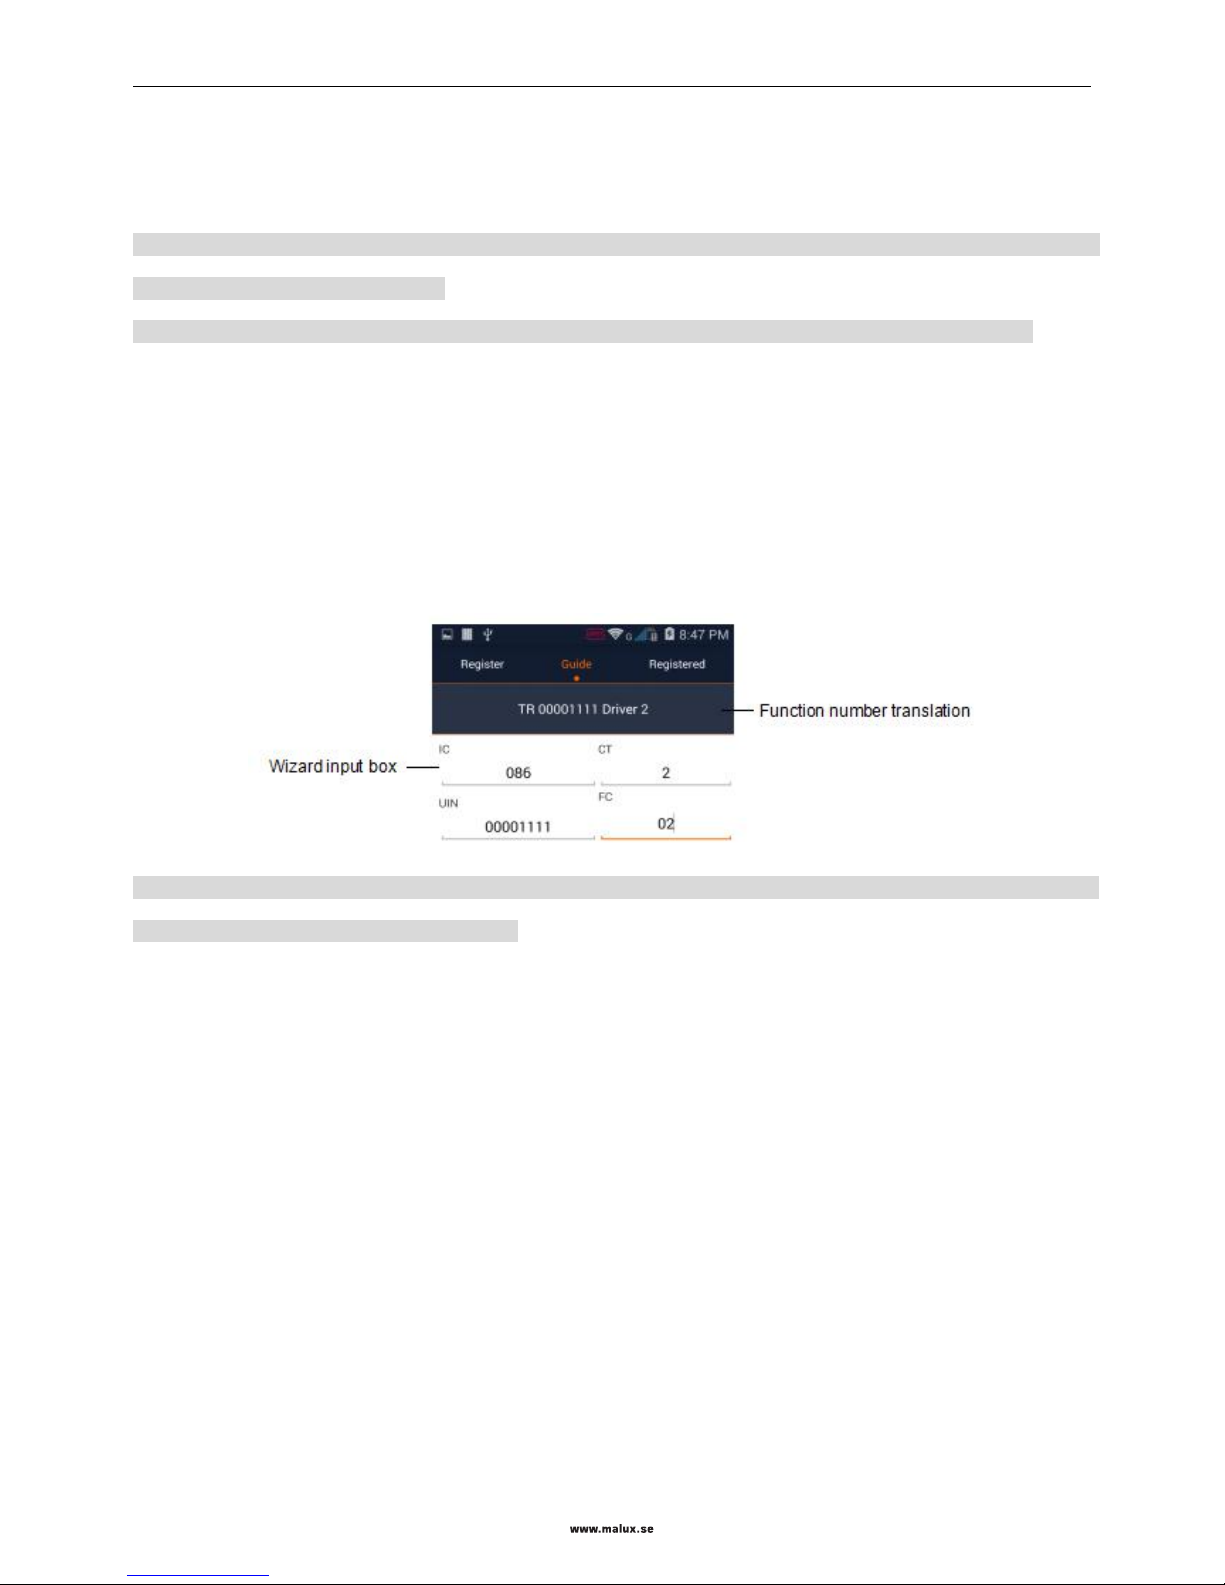
Guide screen
This screen provides registration guide for the train function number, engine function number, coach function number,
maintenance and shunting team members function numbers and train controllers function number. You can input to
TN,EN,CN,LN to be registered according to the prompt. According to prompts on the screen, input the function code
and press the Register, Deregister, Interrogate, F. Deregister, then the mobile phone sends application of function
number operations to the network. The operation results are displayed in the popped up prompt box.
Note: When inputting a function number, you can press the triangle key at right bottom corner of the input box to open
function number list to select a function number.
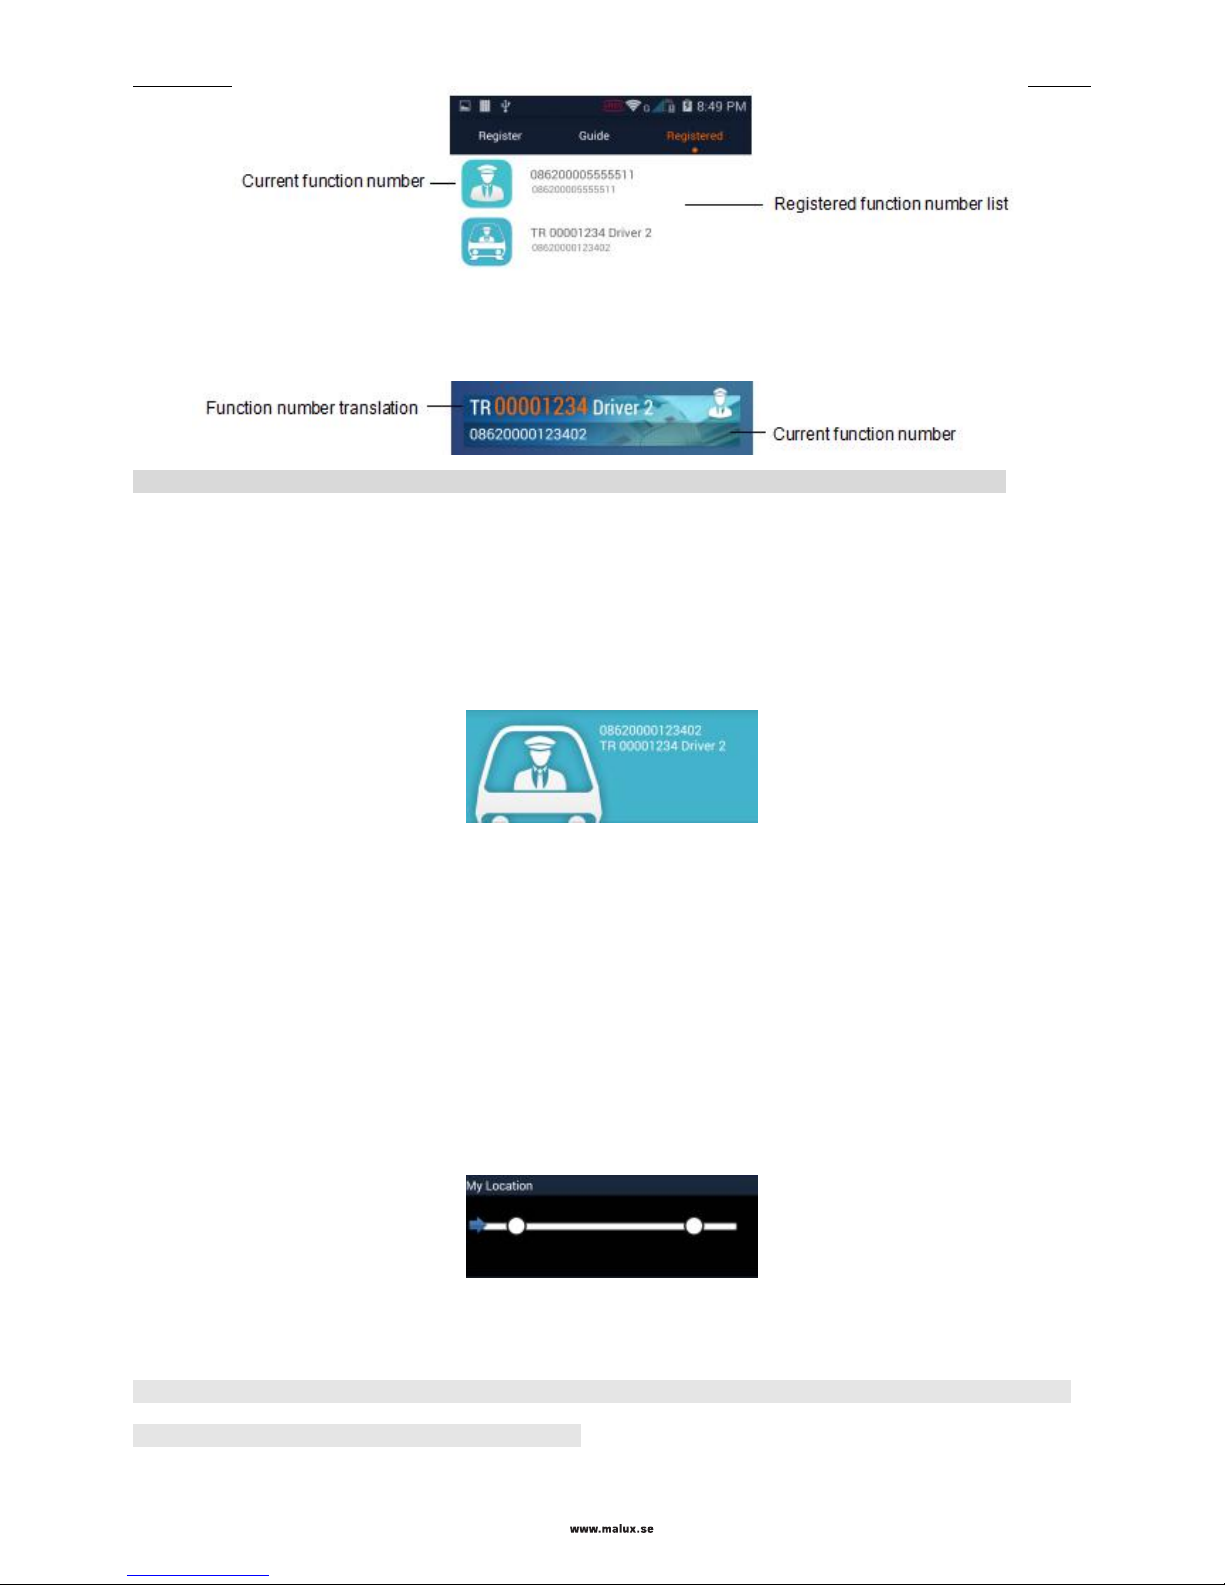
Registered function number screen
This screen displays the list of the function numbers already registered by the user. You can perform the following
operations:
Deregister: to unregister the selected function number;
Interrogate: to query the selected function number;
Switch over a function number: if multiple function numbers are registered, you can select one of them to be
displayed. The current function number is displayed in the first line in the registered function number list.
Deregister All: you can use this menu to unregister all registered function numbers.
Synchronize function numbers: if your function number is unregistered forcibly but the mobile phone did not
receive a network message, the status bar of the mobile phone displays an icon for function number synchronization. At
this time, you can use this menu to synchronize your function number with the network. The synchronization result is
displayed in the popped up prompt box.
Page 27
SED GPH-650R User Guide
- 27 -
Function number widget
It displays the registered current function number and the corresponding function number translation.
Note: The function number operation needs interworking with the network. You may need to wait for a while.
rWork
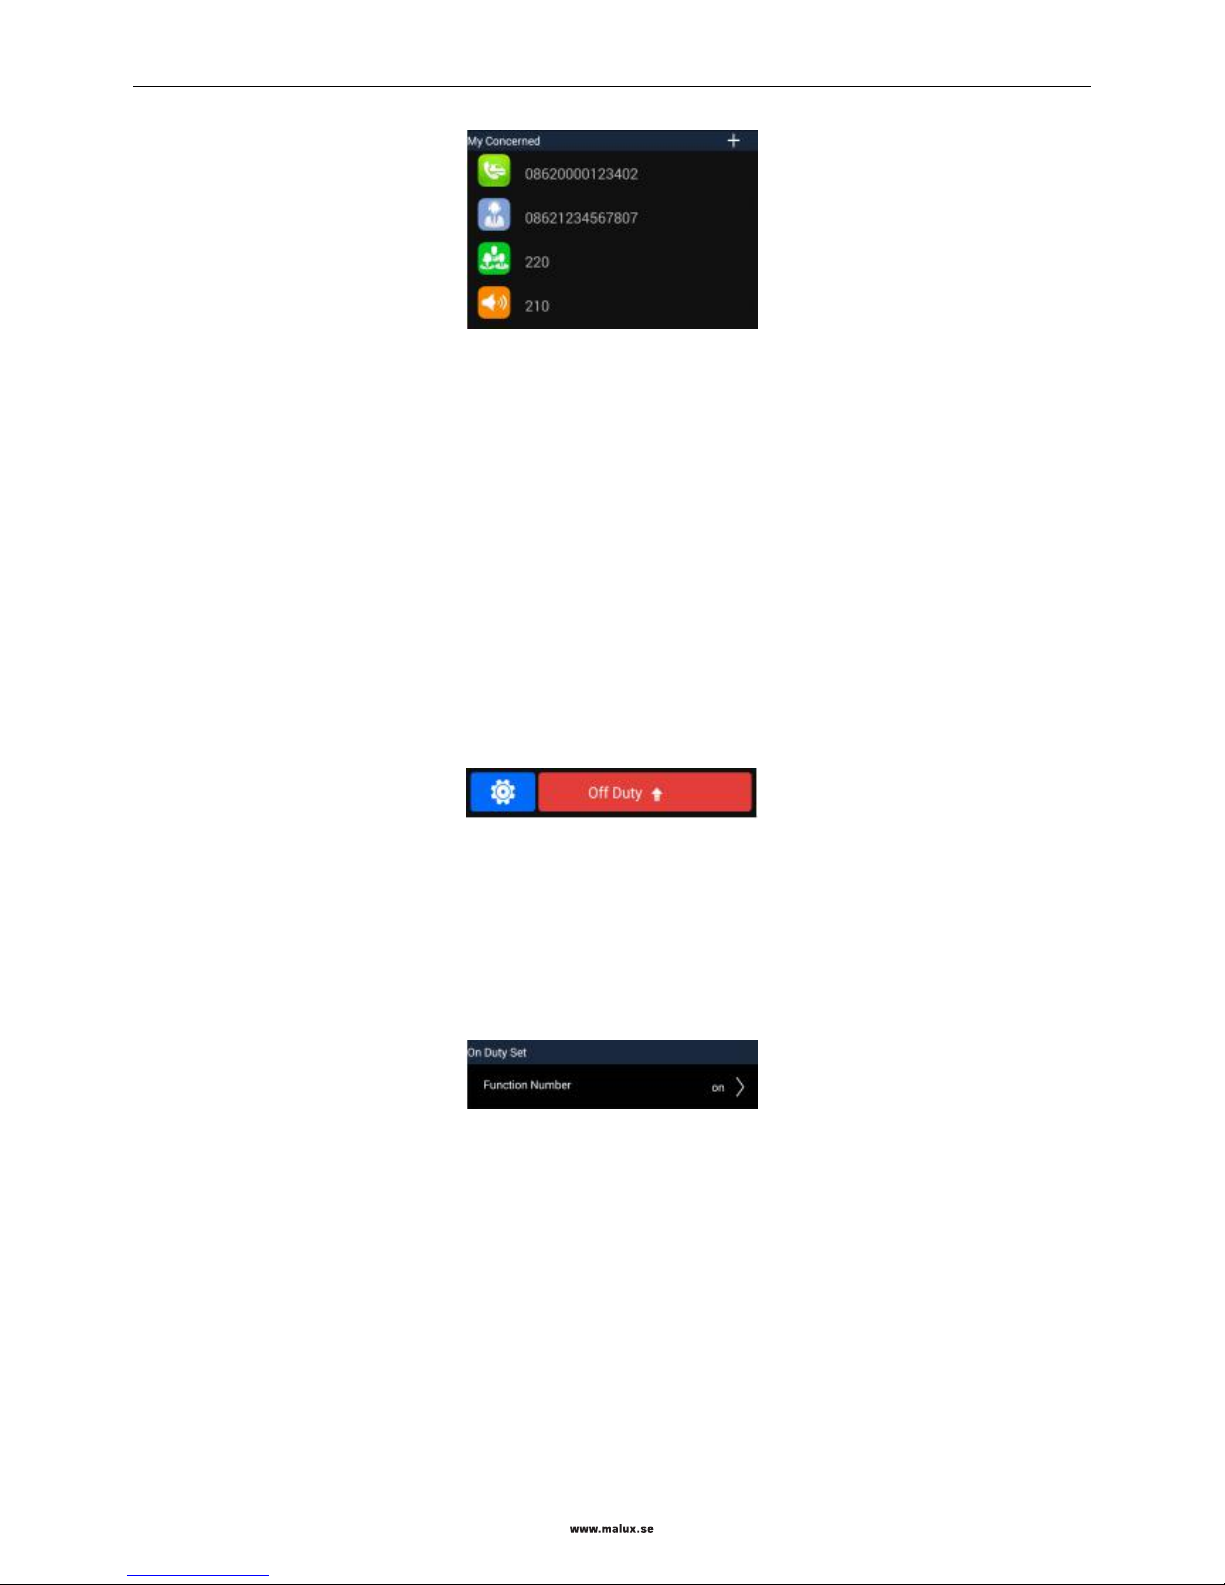
Displaying identity information
It displays the current identity information, including the current function number head, function number identity
translation, and R card MSISDN number.
Identity information bar
Location-in-trip bar
It displays the current train location based on the GPS and imported railway trip data. In the setting menu, import and
select the currently used railway trip.
Location-in-trip bar
Note: With this function, applications such as arrival reminding, function number unregistration on arrival and arrival
off duty can be added based on the location information.
Page 28
SED GPH-650R User Guide
- 28 -
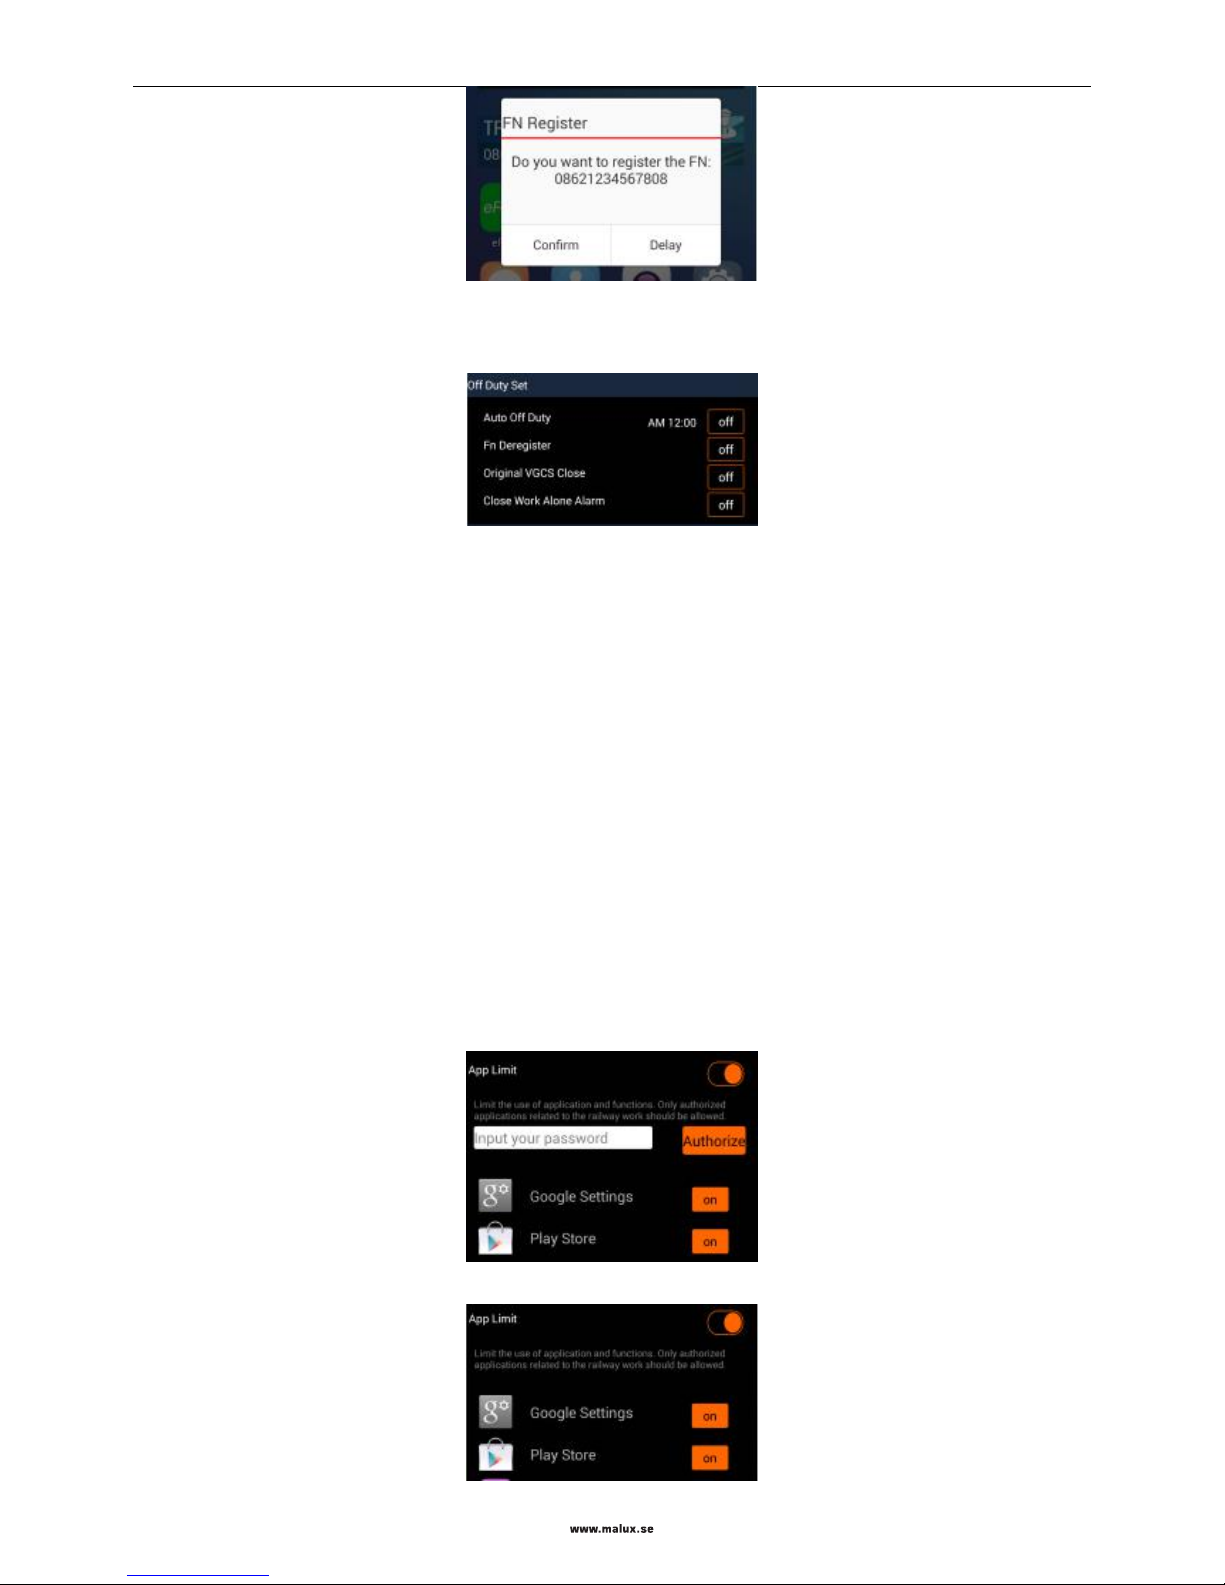
Quick call list bar
Quick call list bar
It displays commonly used group calls, broadcasts, function numbers or ordinary PTP call number list. Click the +
button to add the following items:
A group call: click the VGCS and select the group call number to be added from the group call list;
A broadcast: click the VBSand select the broadcast number to be added from the broadcast list;
Short number: click the Short Code and select the short number to be added from the short number list;
A function number: click the Function number and input a function number in the input box;
PTP call: input a call number in the input box.
Click a number already added to originate or delete a call. Click the function number for querying operation.
On Duty/Off Duty button
Button bar
There are setting buttons and On Duty/Off Duty buttons. The On Duty and Off Duty buttons are displayed with green
and red backgrounds respectively. Click Setting to enter the setting screen and switch over to and validate the On Duty
or Off Duty setting.
On Duty Set
On duty configuration
Function number setting: enter the setting screen, and click Function number to enter the function number
automatic registration screen. Click Add new, and then input the function number, preset the registration time and
enable this function. When the time is up and is an on duty time, an automatic registration prompt box is popped up. You
can perform registration, delay registration, or registration cancellation according to the prompt.
Page 29
SED GPH-650R User Guide
- 29 -
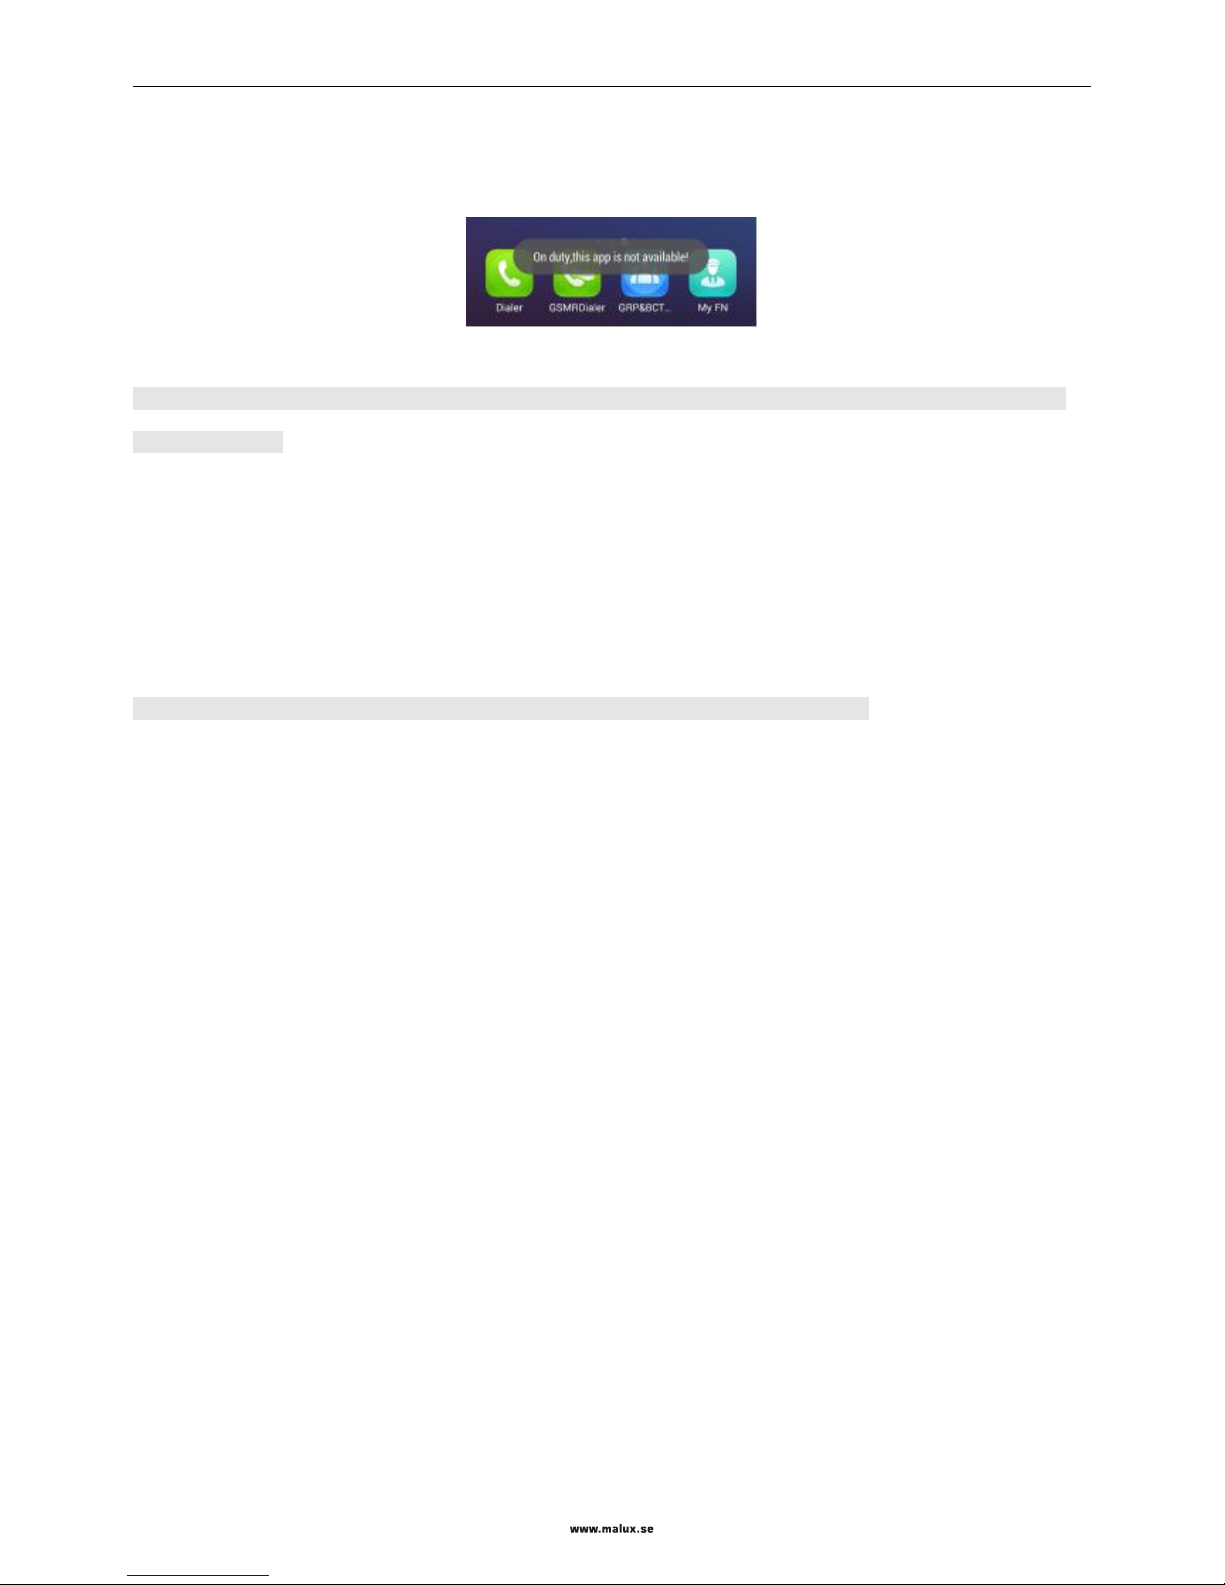
Function number registration prompt
Off Duty Set
Off Duty configuration
Auto Off Duty: enter the setting screen and click Auto off duty and preset a time. When the preset time is up, a
prompt of “Off duty” is displayed. Select Confirm to switch over the the off duty status.;
Fn Deregister: enter the setting screen and activate the Fn deregister switch. Then all function numbers are
unregistered when the user is off duty;
Original VGCS Close: enter the setting page and set the switch prompting the group call originator to Original
VGCS Close. Activate this switch and query whether there is a group call originated by your mobile phone. If yes, a
prompt is displayed to prompt you to close this group call.
Close Work Alone Alarm: enter the setting screen and set the switch of Close Work Alone Alarm. After this
switch is activated, the user will be queried about whether to close the independent working alarm when the user is off
duty.
Application software restriction
Application software restriction setting - unauthorized
Page 30
SED GPH-650R User Guide
- 30 -
Application software restriction setting - authorized
Enter the setting screen and click Application Limit. Activate the Application Limit button and set the specified
application to the close status. The application closed in the on duty status is not available.
Applications restricted on duty are not available
Note: If you need to restrict the authority, you can set a password. Then the software restriction can be modified only
with authorization.
Railway locating
Enter the setting screen, click Railway Line, and import the railway trip line and select the currently used trip line.
The railway trip line set to the top is the currently selected railway trip line. You can click the icon right to the selected
railway trip line to cancel or delete this line and press Add line to import a new trip line. Select a file from the memory
card to import the file .
Note: The trip line file lists the trip lines already imported. The trip line file is in .csv format.
GSMRDialer
Import a contact: click the Favourites label or slide to this screen, click the Menu key to pop up the Import or
Delete option, select Import, and add a contact according to the guide information;
Delete a contact: click the collecting label or slide to this screen, click the Menu key to pop up the Import or
Delete option, select Delete to enter the delete screen, check the contact to be deleted, and then click OK;
Service
Click the service number label or slide to this view, and then you can click the corresponding short number for calling.
Identity
Click the Identity label or slide to this view, and then input the function number and click the Dial button to dial the
function number.
Dialing help view
Click the dialing help label or slide to this view, and then select the dial type and originate a call by inputting a number
according to prompt displayed on the screen.
GRP&BCT Dialer
Quickly originates a group call dialing.
Page 31
SED GPH-650R User Guide
- 31 -
On the application screen, click the GRP&BCT Dialer.
GRP: You can select the group call ID activated by the current SIM card to originate a group call;
BCT: You can select the broadcast ID activated by the current SIM card to originated a broadcast;
On Going: You can select the group call/broadcast join currently in process to join in.
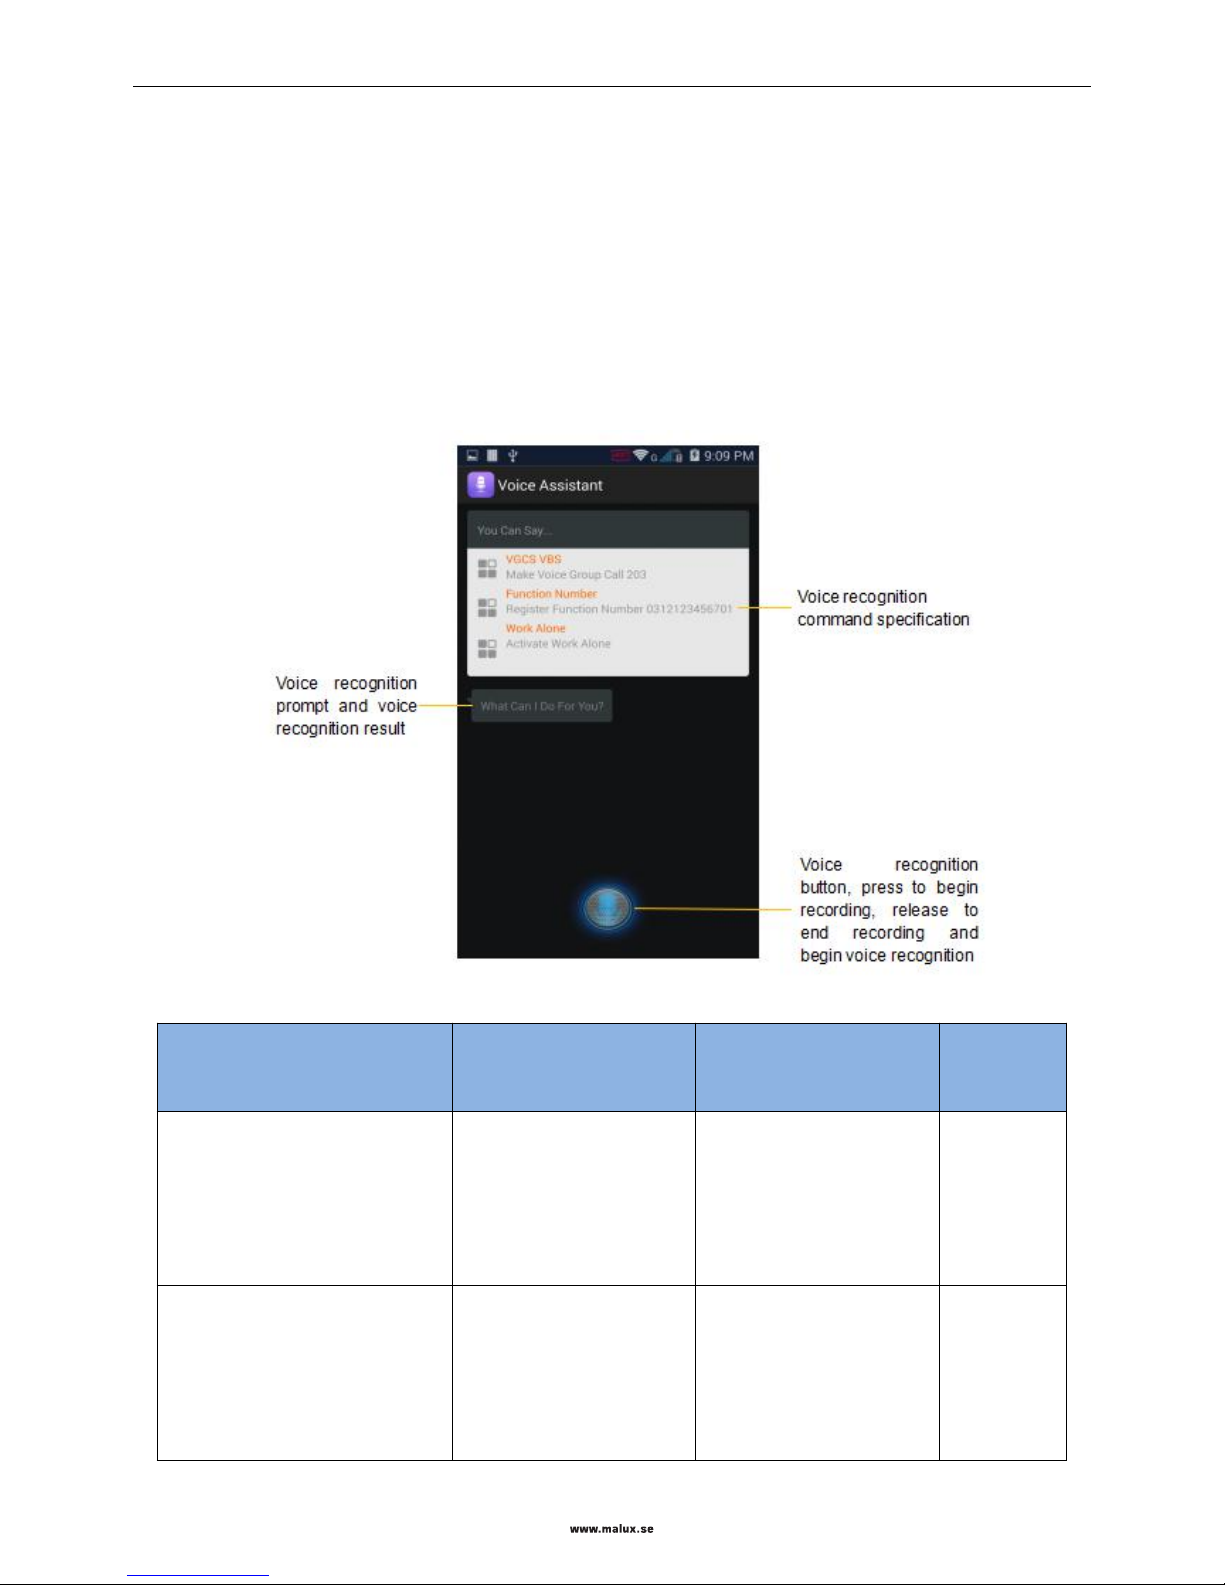
Voice Assistant
The voice assistant provides an off-line voice recognition function. You can use this function to perform GSM-R related
operations, such as originating a group call/broadcast or registering/unregistering a function number.
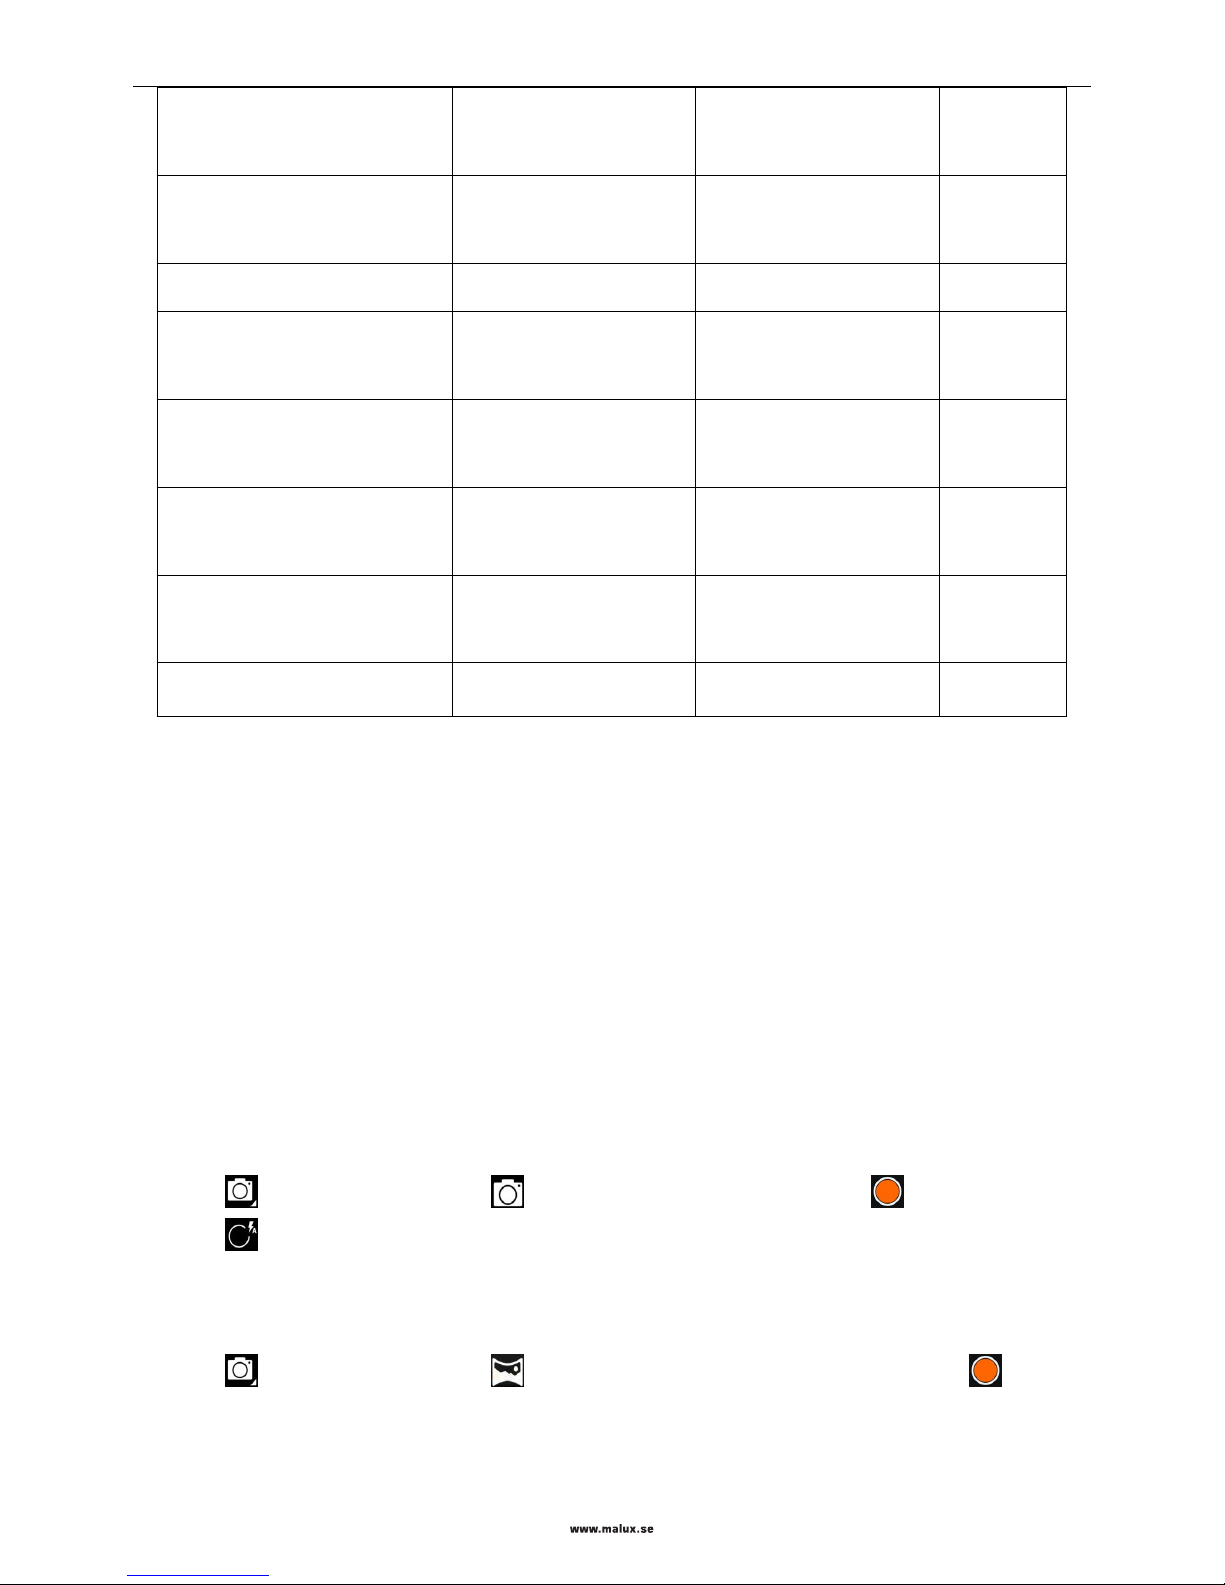
The voice assistant function supports the following commands:
GSMR Function
Command (Operation)
Command (Object)
Number of
digits
originating a group call/broadcast
make/initiate/originate
voice group call xxx
VGCS xxx
voice broadcast call xxx
VBS xxx
3
joining a group call/broadcast
join
voice group call xxx
VGCS xxx
voice broadcast call xxx
VBS xxx
3
Page 32
SED GPH-650R User Guide
- 32 -
originating railway/shunting
emergency call
make/initiate/originate
train emergency call
shunting emergency call
none
dialing a function number
dial/call
FN xxx
function number xxx
7 to 17
dialing a PTP call
dial/call
telephone number/name
3 to 14
registering/unregistering/querying
a function number
register/deregister/query/int
errogate/inquire
FN xxx
function number xxx
7 to 17
forced deregister a function
number
forced deregister
FN xxx
function number xxx
7 to 17
Synchronizing a function number
Synchronize
FN xxx
function number xxx
none
dialing a short number
PEC/PPC/PSC
dial/call
PEC/PPC/PSC
none
dialing a short number xxx
dial/call
short number xxxx
4
Chapter 5 Multimedia Application
Camera
Use this application to take a photo or record a video. Use the gallery to view the photos and videos taken by the camera
on your mobile phone.
After not being used for a period of time, the camera will be automatically closed by the mobile phone.
Be sure that the lens is clean. Otherwise, the camera may work abnormally in some modes needing high resolution.
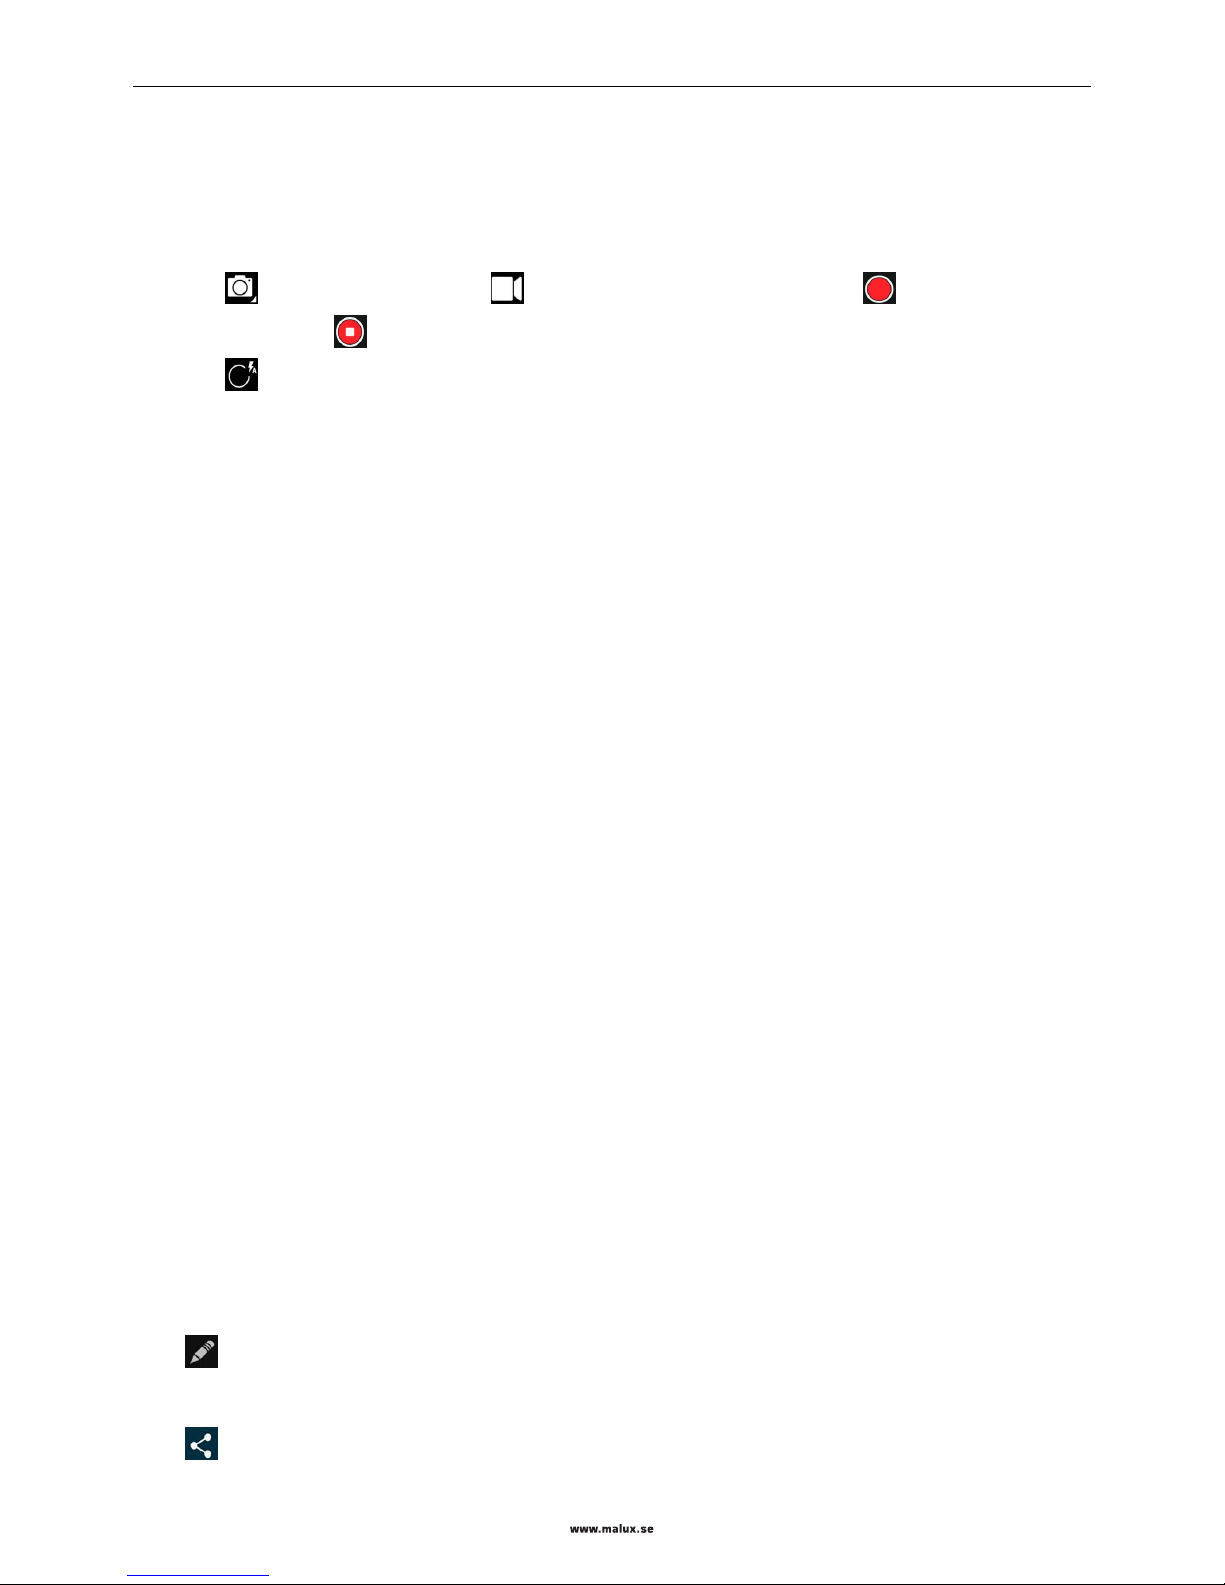
Taking a photo
1. Click to expand the menu. Select to enter the photo shooting mode and click to take a photo.
2. Click to change the photo shooting setting.
Panoramic photo shooting
Take one photo or a photo combined by multiple photos.
1. Click to expand the menu. Select to enter the panoramic photo shooting mode and click to take a
photo. Move the camera to one direction.
To obtain a best photo shooting effect, complies to the following tips:
Page 33
SED GPH-650R User Guide
- 33 -
Slowly moves the camera to one direction.
Put the viewfinder of the camera within the reference frame.
Avoid to take photo of a object within a unrecognized background, such as the empty sky or wall not decorated.
Recording a video
1. Click to expand the menu. Select to enter the video recording mode. Click to record the video. To
stop the recording, click .
2. Click to change settings of the video recording function.
Zooming in and zooming out
On the screen, open your two fingers to zoom in the object or closing these two fingers to zoom out the object.
Viewing photos and videos
To view photos and videos, you can switch over to the gallery using the following methods:
Click the shrunk diagram of the gallery on up right corner of your mobile phone.
Drag the screen to the left.
Exit the camera and open the gallery application.
Gallery
Use this application to view photos and videos.
Note: Some file formats are not supported depending on software installed on your mobile phone; some files cannot be
played normally according to the file encoding mode.
Viewing photos
In the photo folder, photos are displayed by dates when they were created. Select photos to be viewed in the full screen.
Slide left or right on the screen to view the next or last photo.
Zooming in and zooming out
Use the following methods to zoom in a photo:
Double clicking the photo.
Open your two fingers on the screen to zoom in a photo or close these two fingers to zoom out the photo, or double
click the screen to recover to normal size.
Editing a photo
Click to enter the editing mode.
Sharing a photo
Click to send a photo to others.
Page 34
SED GPH-650R User Guide
- 34 -
Playing videos
The video files are displayed as icons on preview. Select the video to be viewed and then click .
Trimming video segments
Select a video, and then click the Menu to select Trim. Move the start clip board to the needed start point, move the end
clip to the needed end point, and then save the video.
Menu operation
When viewing a photo, click Menu to use the following functions:
Delete: to delete a photo;
Slideshow: to begin to play photos in current folder in slide mode;
Edit: to enter the photo edit mode;
Rotate left: to rotate the photo anti-clockwise;
Rotate right: to rotate the photo clockwise;
Crop: to adjust the white box to be clipped and save photos in this box;
Set picture as: to set a photo as the wallpaper or contact head;
Details: to view detail information of photos;
Print: to connect to the printer through the WLAN.
Deleting a photo
Use the following methods to delete a photo:
In a folder, click Menu, select a photo, check this photo, and then click .
When viewing a photo, click Menu and select Delete.
Sharing a photo
Use the following method to share a photo:
In a folder, click Menu, select a photo, check this photo, and then click to send this photo to others.
When viewing a photo, click to send this photo to others.
Setting a photo as the wallpaper
When viewing a photo, click Menu and select to set this photo as the wallpaper or specify this photo to a contact.
Music
Use this application to play music.
Playing music
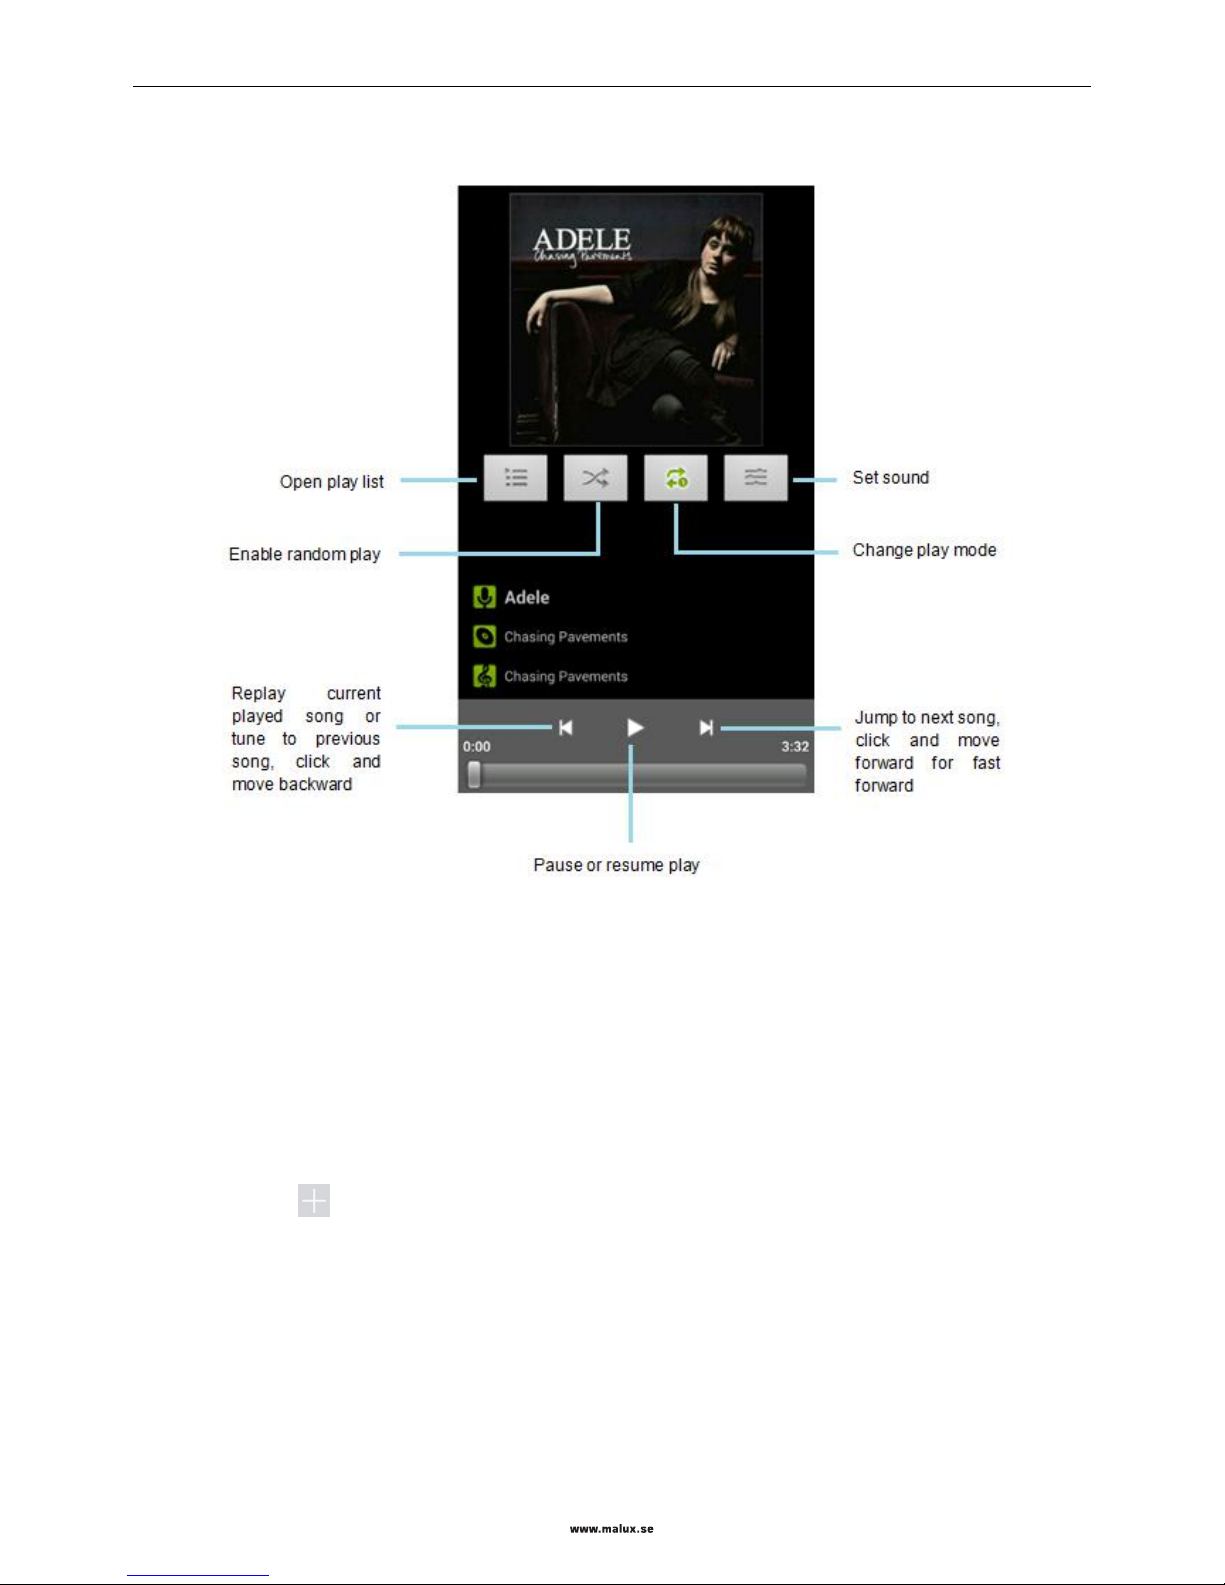
1. Enter the music play list;
Page 35
SED GPH-650R User Guide
- 35 -
2. Click the song to be played to play it.
FM radio
Use this application to listen to the radio.
Tuning the radio
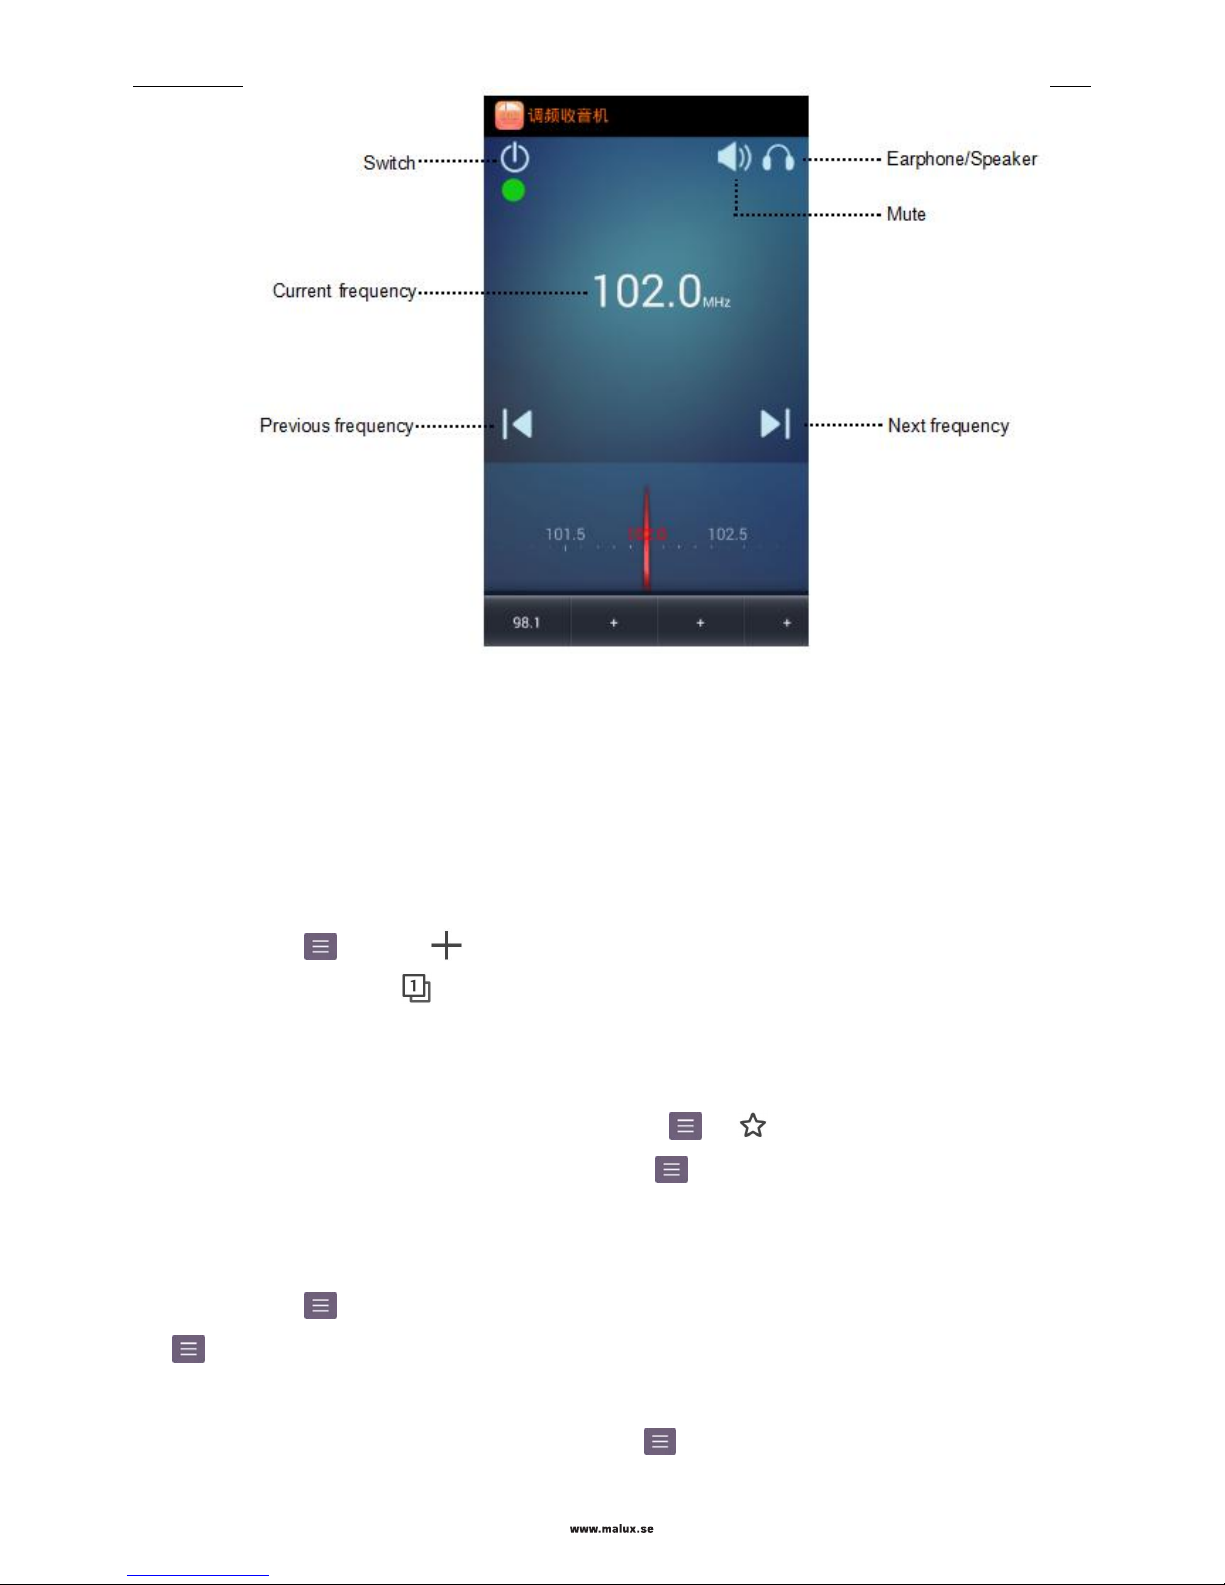
You can drag the red pointer to tune the frequency band.
Press and hold Current frequency and then input the frequency wanted in the text box to quickly tune to the
wanted frequency.
Press and hold at bottom of your mobile phone to save the current frequency.
Page 36
SED GPH-650R User Guide
- 36 -
Browser
Use this application to browse the Internet.
Viewing a web page
Click the address field, input the web address, and then click To.
Opening a new screen
Click the Menu key and press .
To go to another web page, click on the up right corner on the screen, slide up or down, and then click the screen
you selected.
Bookmark
To add the current web page to the bookmark, click the Menu key -> .
To open a web page added to the bookmark, click the Menu key -> Bookmark, and then select the web page you
want to open.
Historic records
Click the Menu key -> History to open a recently visited web page. To clear the historic records, click the Menu
key -> History -> Clear history.
Sharing a web page
To share a web page address with others, click the Menu key -> Share web page.
Page 37
SED GPH-650R User Guide
- 37 -
Chapter 6 Practical Application
Notes
You can use this application to record and save important information to facilitate future viewing.
Adding information
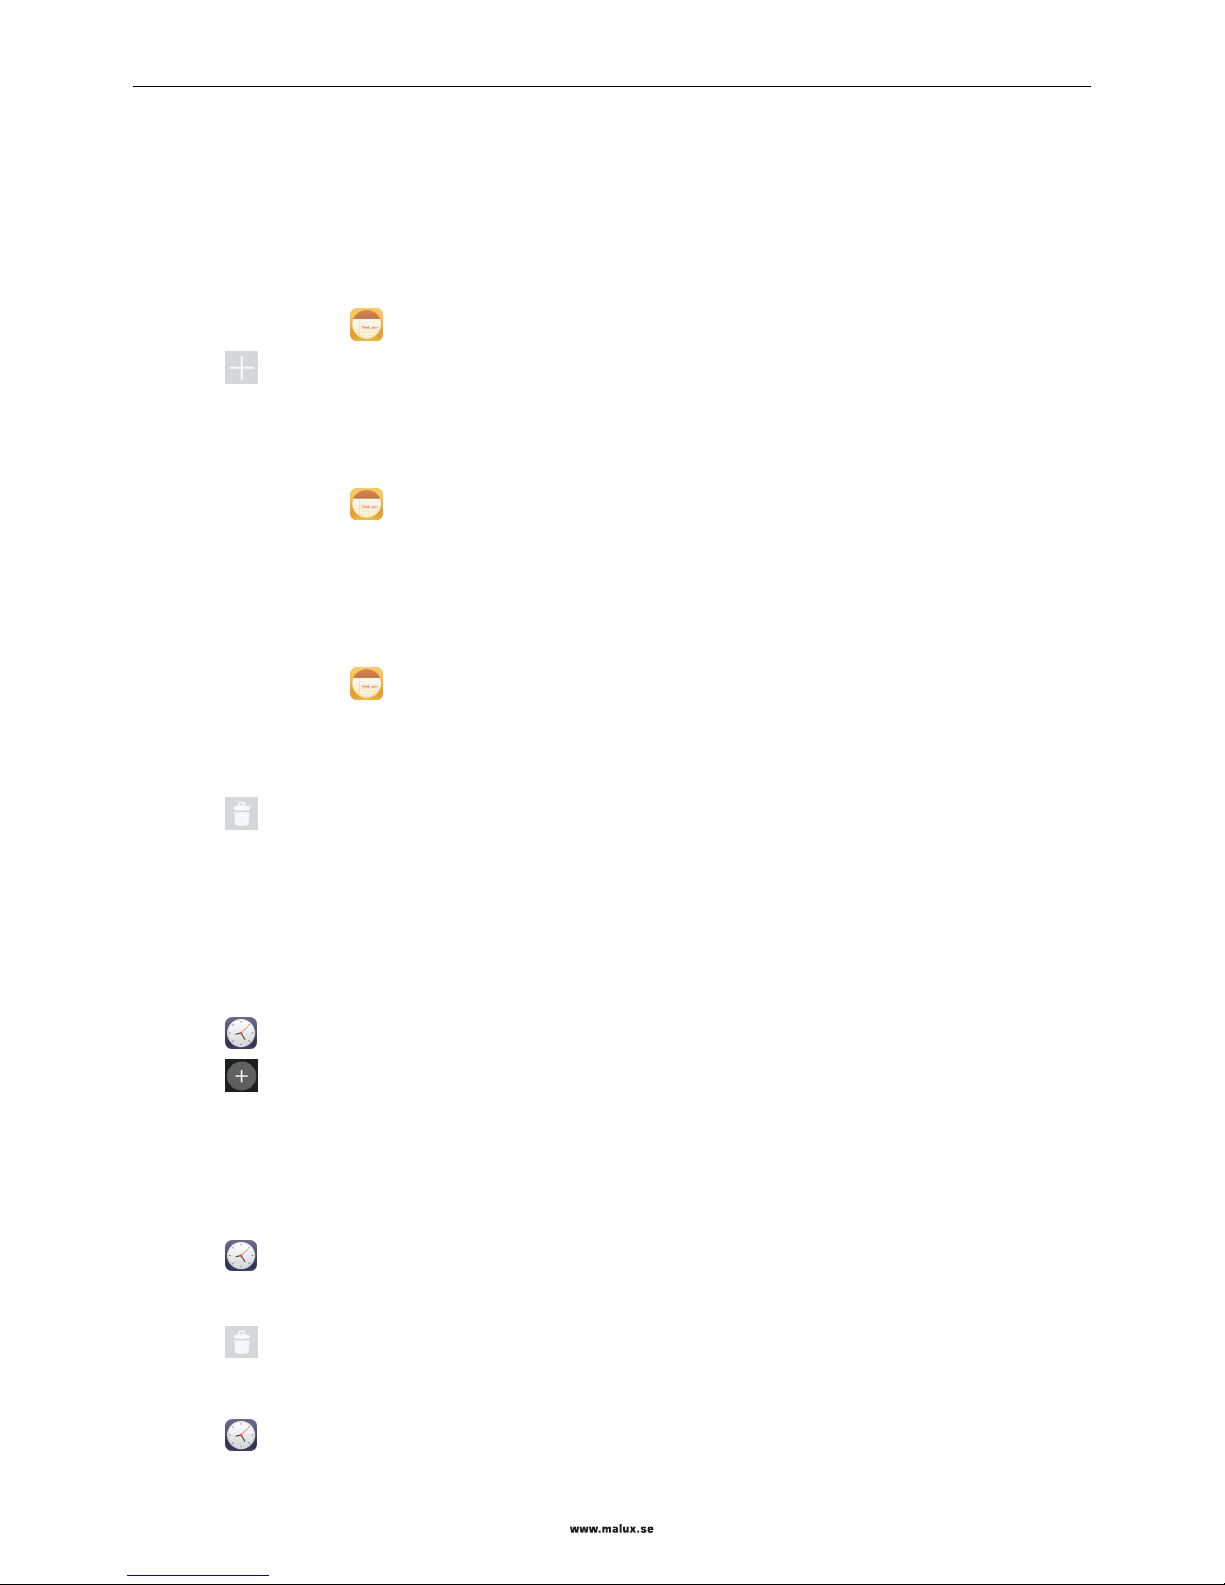
1. On the desktop, click to open the application;
2. Click to enter the edit screen;
3. Input the contents to be saved and click the Back key to save the information.
Modifying an existing record
1. On the desktop, click to open the application;
2. Click the record to be modified to enter the edit screen;
3. Input the contents to be saved and click the Back key to save the information.
Deleting information
1. On the desktop, click to open the application;
2. Press and hold the record to be deleted to enter the selecting mode. To delete multiple records, you can click to
select other records;
3. Click to delete information.
Clock
Use this application to set an alarm clock, view the world time, calculate the event duration, or set the timer.
Setting an alarm clock
1. Click to start the application;
2. Click to add a new alarm clock. Set the alarming time and then click Complete;
3. According to your personalized requirements, you can check Repeat and select dates to repeating the alarm, and
modify the ringing tone (whether to vibrate).
Deleting/stopping an alarm clock
1. Click to start the application;
2. Click the switch right to the alarm clock in the alarm clock list to enable/disable this alarm clock;
3. Click to delete this alarm clock.
Viewing the world time
1. Click to start the application;
Page 38
SED GPH-650R User Guide
- 38 -
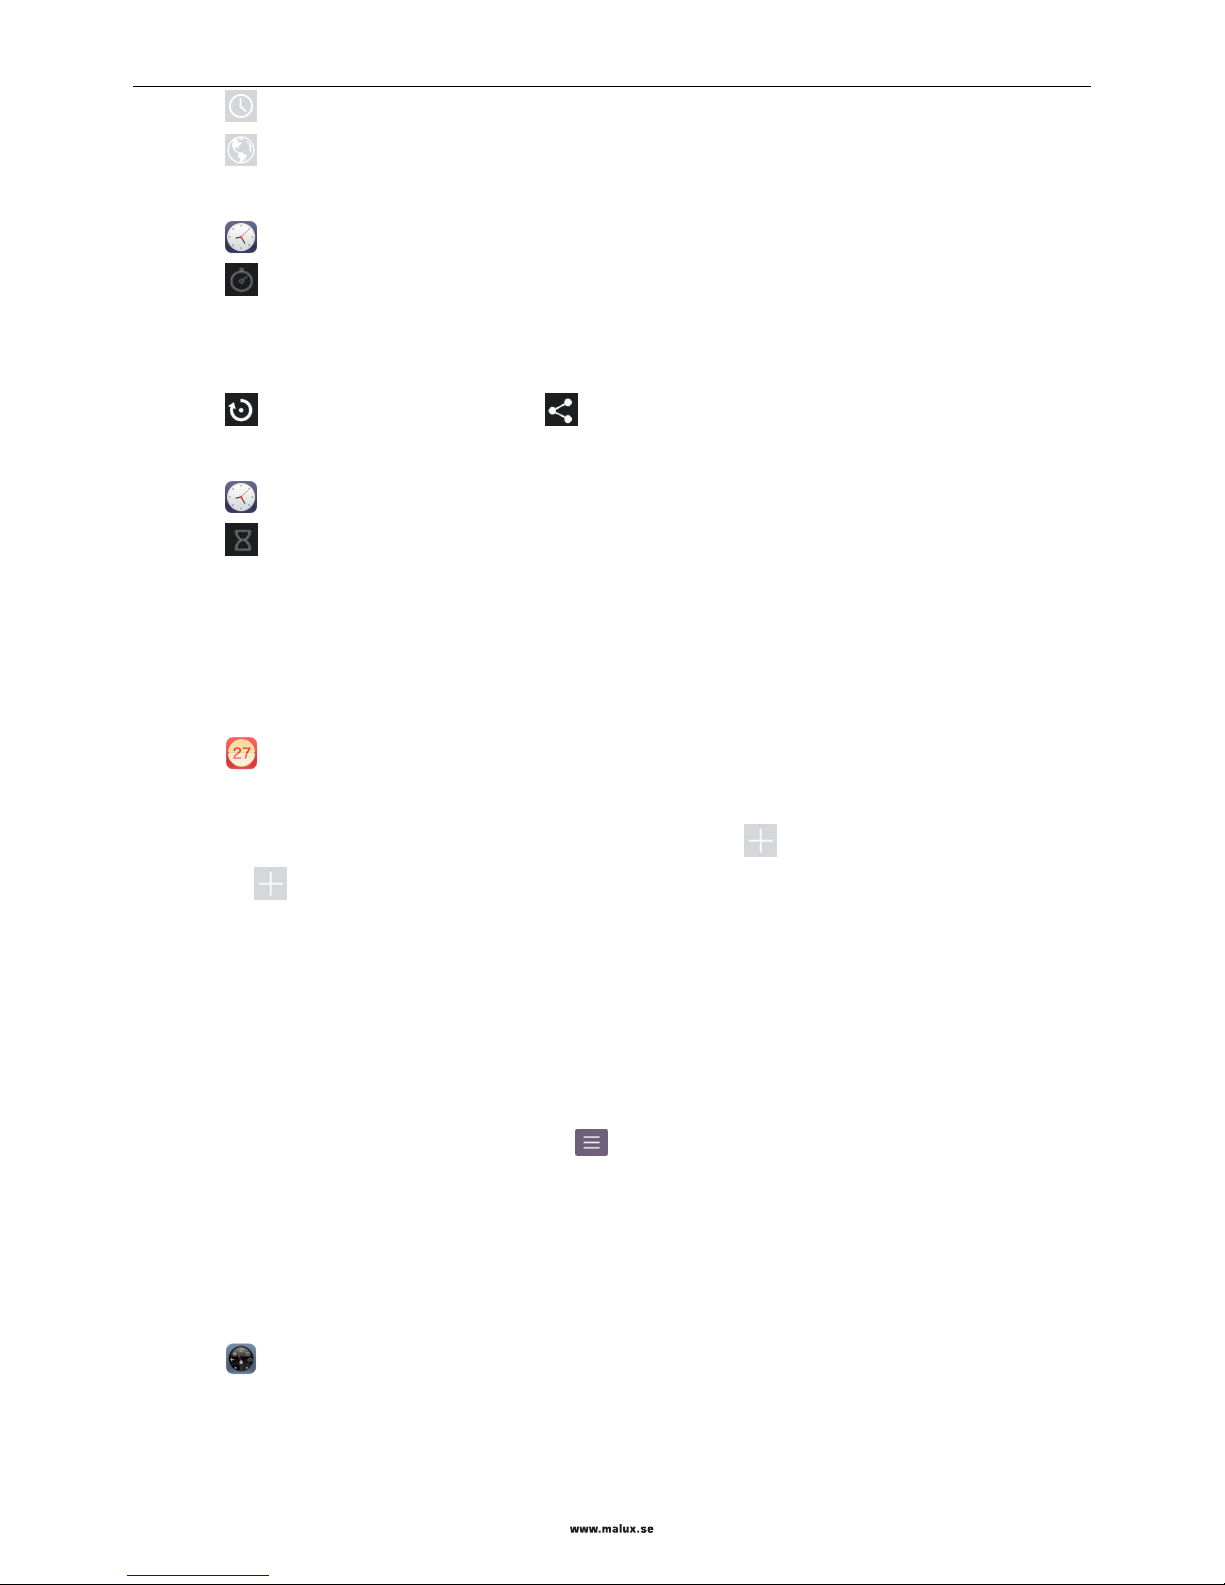
2. Click to enter the screen of the world time list;
3. Click , check the region to be viewed, and click the Back key to save the view results.
Stopwatch
1. Click to start the application;
2. Click to enter the stopwatch screen;
3. Click Start to begin the timing.;
4. Click Stop to stop the timing;
5. Click to clear the records. You can click to share a stopwatch.
Timer
1. Click to start the application;
2. Click to enter the countdown screen;
3. Set the duration. Click Start to start the countdown.
Calender
Adding an event
1. Click to start the application;
2. Click the drop-down box on up right corner of the screen, and then select Week;
3. According to the event reminding time, click the proper pane, and then appears;
4. Click the to edit the event details and then click Complete to save the event.
Calculator
Use this application to carry out simple arithmetic operations.
You can slide left or right to switch between the basic panel and high-level panel, or use the Menu key to set the
calculator.
Note: To clear the historic records click the Menu key and click Clear history in the popped up menu.
Profile Manager
Use this application for quick setting.
Editing an existing mode
1. Click to start the application;
2. Press and hold the mode to be edited and select Edit;
3. Edit the options and click Save after the editing operation is completed.
Page 39
SED GPH-650R User Guide
- 39 -
Adding a new mode
1. Click to start the application;
2. Click the Menu key and then click Create to create a new mode.
3. Edit the options and click Save after the adding operation is completed.
File Explorer
The file management application is used to visit all files (including music, pictures, videos, and documents) in the
mobile phone.
The Type list divides the files into music, video, picture, document, compressed package, installation package and
favorites folder. Click Type to view the current file types.
Click on a file to pop up the prompt of selecting the open mode. If you select the default open mode, the file will be
opened directly next time; for the application installation package, you can install the application again.
Press and hold a file to copy, cut, delete, share and collect, rename, or view detailed properties of the file.
Click Menu key to perform the following operations:
Creating a new folder;
Sorting the current files;
Displaying/hide the hidden file;
Viewing file properties.
Light
This application can open the flash and provide lighting for a period of time.
1. Click to enter the flashlight application;
2. After you enter application, the flashlight is automatically enabled and then the prompt “Your mobile phone cannot
be charged when the flashlight is enabled.” is automatically popped up.
When the flashlight is on, click any position on the screen to disable the flashlight and in the meantime, click any
position on the screen to enable the flashlight.
SedBackup
This application can back up contacts, short messages and GSM-R related settings according to your personalized
requirements. By backing up the file, you can recover the information saved before.
Backing up an object
1. Click on the desktop;
Page 40
SED GPH-650R User Guide
- 40 -
2. Click to enter the backing up screen;
3. Check the contents you need to back up, and then click the Start backing up button at bottom on the screen.
Recovering an object
1. Click on the desktop;
2. Click to enter the recovering screen;
3. Select the contents you need to recover, and then click the Start recovering button at bottom on the screen.
Deleting a backup file
1. Click on the desktop;
2. Click to enter the recovering screen;
3. Click directly behind the file you want to delete to delete it.
Security
This application is used to manage the authority in third-party application.
Authority management
1. Click on the desktop;
2. Click to enter the authority management screen:
a. Set a single authority: Click Authority, and select an authority to set this authority for an application; or
click to set all applications in batch.
b. Set the application authority: Click Application and select one application to enter the screen for setting
authority for an application independently. Setting this application according to your requirements.
Auto-start management
1. Click on the desktop;
2. Click to enter the application auto-start management screen;
3. Remove the check on the application for which you want to prohibit the auto-start function.
Installation control
1. Click on the desktop;
2. Click to enter the installation control screen;
3. Two options are included used for controlling the USB installation and Unknown source installation, Configure
these two options according to your requirements.
Page 41

SED GPH-650R User Guide
- 41 -
System Update
Use this application to upgrade the system.
Local upgrading
Before performing local upgrading, please confirm that an external SD card is inserted in your mobile phone and a valid
upgrading version is stored in the SD card.
1. On the application screen, click System upgrading.
2. Select Local upgrading.
3. According to the prompt, select an upgrading version stored in the SD card.
4. Wait for version checking. If the version passes the check, the mobile phone is restarted and enters the recovery
downloading screen.
Remote upgrading
Before the remote upgrading, please make sure that the mobile phone is connected to the Internet.
1. On the application screen, click System upgrading.
2. Select Remote upgrading.
3. Enter the version viewing screen. Click the up-to-date upgrading version and start remote downloading.
4. After downloading the upgrading version from the server, enter the version upgrading screen according to the
prompt.
5. Wait for version checking. If the version passes the check, the mobile phone is restarted and enters the recovery
downloading screen.
GSMR Updater
The GSMR system upgrading software is used to upgrade the software version of the GSMR modem. This software is
only used to upgrade the GSMR modem but is not used to upgrade the system.
Before upgrading the GSMR system, login to system for identity verifying. The initial password is 123.
Remote upgrading
Before remotely upgrading the GSMR system, please confirm that the mobile phone is connected to the Internet.
1. Click Remote upgrading.
2. Click the up-to-date version displayed in orange color, enter the version acquisition screen, and click Download.
3. After the new version is downloaded, click Confirm according to the prompt. Enter the upgrading screen.
4. Click Download to start the GSMR modem system upgrading.
5. After the downloading ends, click Complete.
Page 42

SED GPH-650R User Guide
- 42 -
6. Click Confirm to restart the mobile phone according to the prompt.
Local upgrading
When the mobile phone is installed with the up-to-date software version and you need not to obtain the version from the
server, select Local upgrading.
1. Verify whether the up-to-date software version is installed locally.
a) Confirm whether the com.sedwt.download folder exists.
b) Enter the com.sedwt.download folder and confirm whether the sed.s37 file and new folder exist.
2. Enter the new folder to confirm that the version file exists.
3. Click Local upgrading.
4. Click Download to start the GSMR modem system upgrading.
5. After the downloading ends, click Complete.
6. Click Confirm to restart the mobile phone according to the prompt.
Note: When your enable this application for the first time, the com.sedwt.download folder is created in the path: File
Explorer-> mobile phone memory -> Android -> data, and the sed.s37 file and new folder are also saved in this
directory.
Chapter 7 Use Skills
Use the SD card for system upgrading
Prerequisites of upgrading: an SD card that can be used normally; copying the upgrading package to the root directory
of the SD card.
The upgrading steps are as follows:
1. When the mobile phone is powered off, press the Power key and volume up key simultaneously on the mobile
phone to enter the recovery mode.
2. Select the Apply upgrade from sdcard option to enter the SD card directory (volume up/down tuning option,
Power key confirmation).
3. Select the updating package, such as update.zip and click Power Key to start the system upgrading.
4. After the downloading succeeds, select Reboot system now option to restart the mobile phone.
Page 43

SED GPH-650R User Guide
- 43 -
Chapter 8 Setting
GSM-R Setting
Use this application to configure GSM-R related parameters.
Network
Setting the mode in which the mobile phone searching the network.
Automatic select: automatically searching the network.
Preferred network type: view the preferred network on the current SIM card.
Manual select: manually search the network.
Sound
Set ringing tones for the group call, broadcast and other GSM-R related services.
GRP ringtone: the ringing tone of an incoming group call.
BCT ringtone: the ringing tone of an incoming broadcast.
Railway Emergency call ringtone: the ringing tone of an incoming railway emergency call.
Alone Work: the alarm sound of the buzzing phase of the local alarm.
Confirm Railway Emergency call sound: the ringing tone of confirmation of the railway emergency call
originating.
Off network play sound: the prompt tone played when the mobile phone is disconnected from the network.
End call play sound: the prompt tone played when the talking ends.
GRP&BCT
Activate/deactivate a group call/broadcast ID.
GRP ID: activate/deactivate the group call ID on the current SIM card.
BCT ID: activate/deactivate the broadcast ID on the SIM card.
PtP call
Set the priority of the point-to-point call.
PtP Call Priority: you can set the default priority or set the priority to 0 to 4.
Emergency Call
Set parameters related to the railway emergency call.
Railway Emergency call: activate/deactivate the railway emergency call.
Long Press Key Time: the time for pressing and holding the Emergency call key to pop up the emergency call
confirming screen.
Page 44

SED GPH-650R User Guide
- 44 -
• Confirm Time: the time for confirming the originating emergency call.
Function Number
Settings about function number.
Key Guard Display FN: whether to display the function number when the screen is locked.
Power On Deregister FN: whether to unregister the function number when the mobile phone is powered on.
Off Network Synchronize FN: whether to synchronize the function number.when the mobile phone is
disconnected from the network.
Register FN Force Deregister: whether to forcibly unregister a registered function number.
Work Alone
Enable or disable the work alone alarm.
More
Interrupt Call Send SMS: whether to send a short message when the call by SIM 2 is interrupted by SIM 1.
PTT Call Type: the call type originated by pressing the PTT key on the standby screen.
Fixed GRP: the group call ID originated when the PTT is set to a fixed group call.
Fixed BCT: the broadcast ID originated when the PTT is set to a fixed broadcast.
Reload GSM-R SIM data: read the SIM card data again.
Universal setting
Dual card setting
Set status of the switch of the corresponding card slot.
Sound
Change settings of various sounds on the mobile phone.
Volume: adjust ringing tones of all incoming calls, music and video, system sound and volume of notification..
Vibrate when ringing: enable/disable vibrating during ringing.
Phone ringtone: set ringing tones of the mobile phone incoming calls.
Default notification sound: set the prompt sound of an incoming notification.
Dial pad touch tones: set the sound of pressing the key on the dialing keyboard.
Touch sounds: enable/disable touch prompt sound.
Screen lock sound: enable/disable the prompt sound played during screen locking and unlocking.
Vibrate on touch: enable/disable vibrating when you touch the screen.
Page 45

SED GPH-650R User Guide
- 45 -
Display
Change the display setting.
Brightness: set the brightness of the display.
Screen color: set the color style of the display.
Wallpaper: set the background image of the main screen.
Auto-rotate screen rotation: set that the contents on the mobile phone rotate automatically.
Sleep: set the sleep time. When the sleep time is up, the mobile phone locks the screen automatically.
Daydream: set the background image of the display when the sleep time is up and the mobile phone is charged.
Font size: change the size of the font.
Cast screen: select the device to which the screen is projected.
Storage
Displays the use of the hard disk.
Battery
Display the battery consumption curve and the ranking of power consumption of applications.
Power saving mode
Set the power saving mode.
Apps
Downloaded: downloaded or mobile phone own third-party applications or services.
Running: applications or services in running.
All: all applications or services in running.
Location information
Change the settings of the location information authority.
Security
Change the settings to ensure the security of the mobile phone and SIM card.
Encrypting the mobile phone: set a password for the mobile phone to encrypt the data saved in the mobile phone.
You need to input the password each time when you power on the mobile phone.
Setting the SIM card lock: Locking the SIM card: start or cancel the PIN code locking function to ask for the PIN
code before using the mobile phone.
Changing the PIN code of the SIM card: change the PIN code used to access the SIM card data.
Device manager: view the device manager installed on the mobile phone.
Unknown source: select this option to install an application whose source is unknown.
Page 46

SED GPH-650R User Guide
- 46 -
Trusted credential: use the certificate and credential to ensure using various applications safely.
Install from SD card: install the certificate or credential from the SD card.
Language & input
Change setting of text inputting according to the selected language. Some options may be unavailable.
Reset
Recover the factory default settings: clear all data on the mobile phone.
Account
Add an account: add an email account or social association account.
Date & time
Automatic date & time: use the date and time provided by the network.
Automatic time zone: use the time zone provided by the network.
Set date: manually set the current date.
Set time: manually set the current time.
Select time zone: setting the local time zone.
Use 24-hour format: display time in 24 hour.
Choose date format: select the date format.
About phone
View mobile phone information.
 Loading...