

Page 1
MALONE
R
MALONE
R
DownLoaderDownLoader
TM
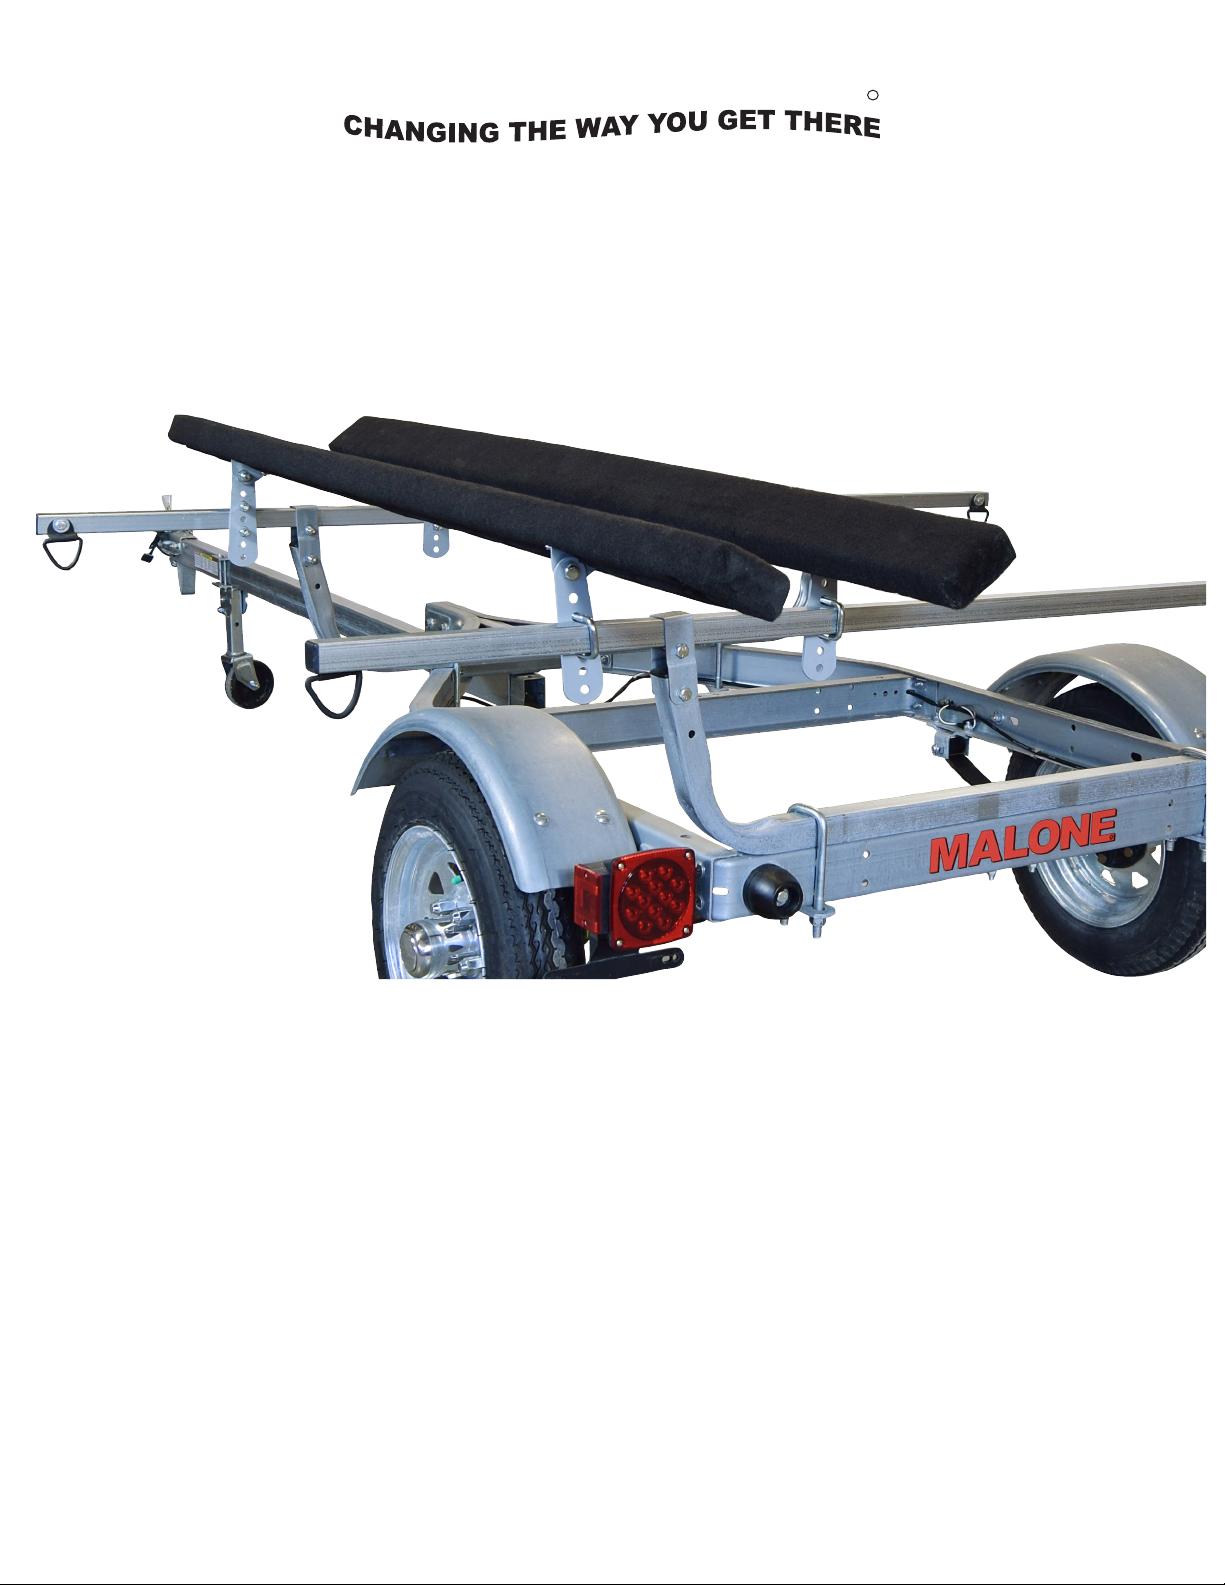
J-STYLE FOLDING KAYAK CARRIER
12’ Safety LinesJawz Universal Adapters Mounting BoltsKayak Carriers Load Straps T-Knobs
60mm
70mm
Installation & Loading Instructions - Please Read Before Beginning
Veuillez lire les instructions avant d’entreprendre l’installation et le chargement
Mounting Bolt Washers
MPG449 Bunk Kit
for your
TM
Malone MicroSport Trailer
Assembly & Installation Instructions
MPG449
1/2018
IMPORTANT WARNING: All vehicular transports are potentially hazardous. Any person(s) using Malone products are personally responsible for
following the given directions for use and/or installation and accepts full responsibility for any and all damages or injury of any kind including death,
which may result from their use and/or installation.
It is critical that all Malone racks and accessories be properly and securely attached to your vehicle. Improper attachment could result in a serious
accident, and could cause serious bodily injury or death to you or to others. You are responsible for securing the racks and accessories to your car,
checking the attachment’s prior to use, and periodically inspecting the products for adjustment, wear, and damage.
You must read and understand all of the instructions and cautions supplied with your Malone products(s) prior to installation or use. If you do not
understand all of the instructions and cautions, or, if you have no mechanical experience and are not thoroughly familiar with the installation
procedures, you should have the product installed by a professional installer.
MISE EN GARDE IMPORTANTE: Tout transport d’un chargement sur le toit d’un véhicule est potentiellement dangereux. Une personne qui
utilise les produits Malone doit suivre sans faute les instructions d’installation et d’utilisation fournies et assume l’entière responsabilité pour tout
dommage ou toute blessure, y compris un décès, pouvant résulter d’une telle installation ou utilisation.
Il est essentiel de xer correctement et solidement les supports et les accessoires à votre véhicule. Une mauvaise installation ou attache pourrait
provoquer un accident, entraîner des blessures corporelles graves à vous et aux autres et même causer la mort. Vous avez la responsabilité de
xer solidement les supports et les accessoires à votre véhicule, de vérier l’installation avant l’utilisation et d’inspecter périodiquement le produit
pour déceler tout signe d’usure ou de dommage ou tout problème d’ajustement.
Vous devez lire et comprendre les instructions et les mises en garde fournies avec les produits Malone avant l’installation et l’utilisation. Si vous
ne comprenez pas les instructions et les mises en garde ou si vous ne possédez pas d’expérience en mécanique et ne connaissez pas à fond les
procédures à suivre d’installation, vous devriez faire monter et poser le produit par un installateur professionnel.
Page 2

MALONE
R
Important Note
Product Warranty & Registration Form
All information is condential and used exclusively by MALONE only.
Dear Customer,
Thank you for your purchase of a Malone Product.
In order to be eligible for the Malone Warranty program, we ask that you contact us by email, telephone or
online at one of the following: With-in 30 days of purchase. You can also mail this letter back to the address at
the bottom.
• Online: www.maloneautoracks.com
• Tel: 1-207-774-9100 x215
• Email: [email protected]
We will require the information below.
Here is the information collected:
First Name:
Last Name:
Address:
Address2:
City:
State:
Zip:
Country:
Email:
Phone:
Product Description/Name:
Product MPG# or Serial #
Date Purchased:
Store Where Purchased:
Purchase Price:
Thank you for choosing Malone!
81 County Rd. Ste 1, Westbrook, ME 04092
P: 207.774.9100 F: 207.615.0551
E: [email protected] W: www.maloneautoracks.com
Page 3
MALONE
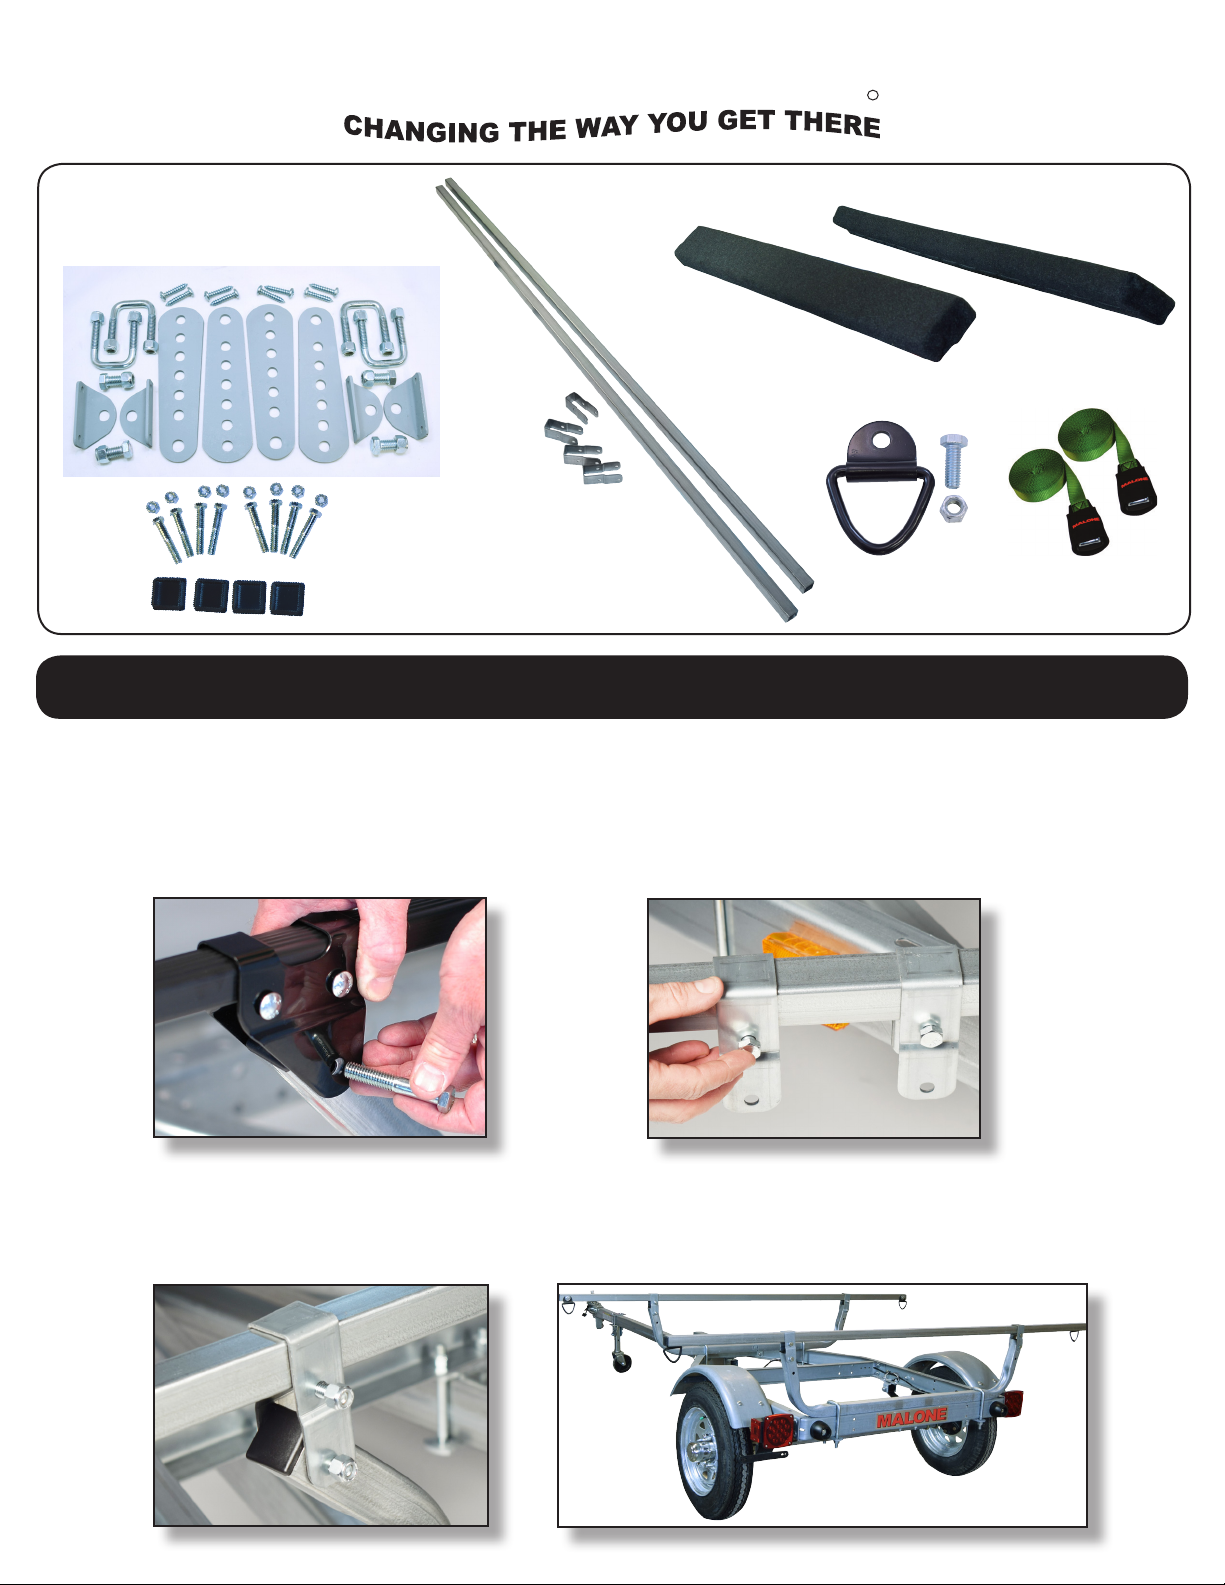
Hardware Kit (1)
Load Bars (2) and Brackets (4)
R
7’ Carpeted Bunks (2)
D-Rings (4)
Straps (2)
Load
Changing the load bars
1). Remove the bolts holding each black bracket to the support tube and remove Xbars from trailer.
See gure 1.
2). Slip the new load bar brackets over the new load bars (as shown) and loosely install the two
small bolts / nuts through each bracket trapping the load bars inside the brackets. See gure 2.
1 2
3). Install and hand tighten the bolts holding each bracket to the support tube. See gure 3.
4). Center the load bars to the trailer, then tighten all 8 bracket bolts. See gure 4.
3
4
Page 4
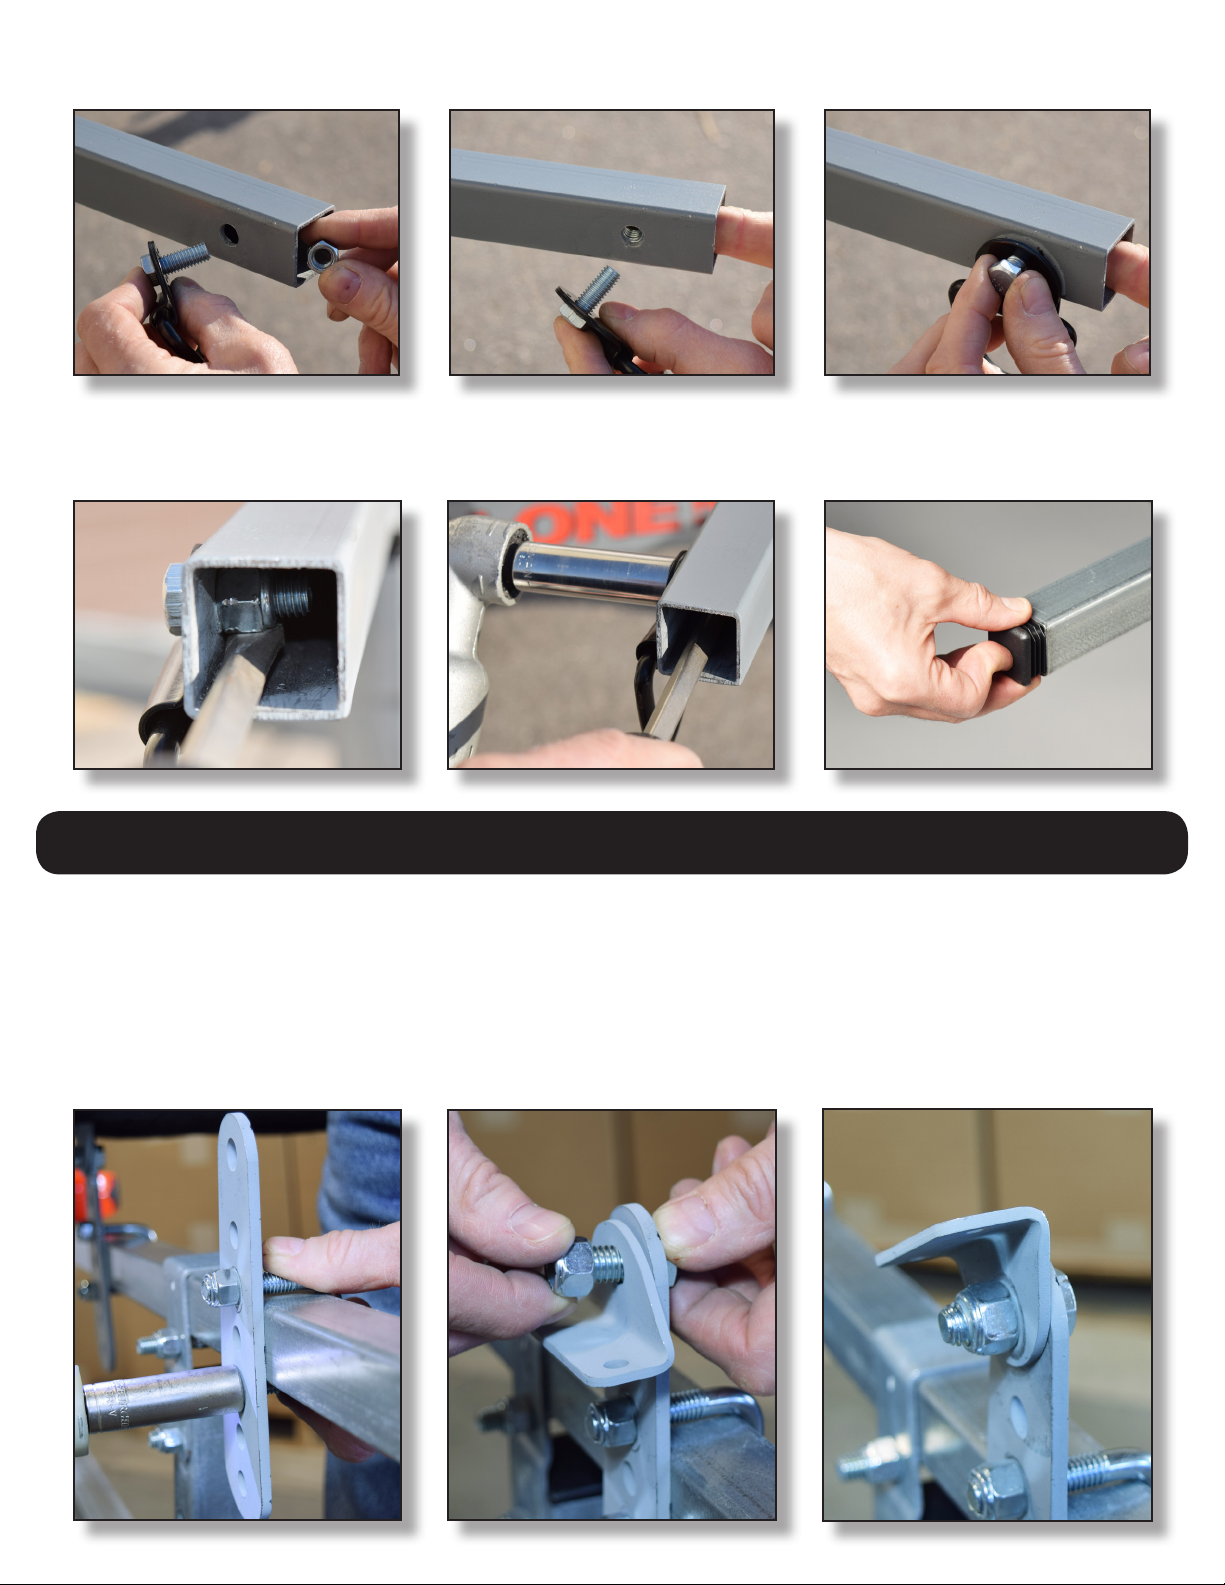
5). Install the D-Rings to the ends of the load bars. Slide a nylon lock nut into the open end of the
load bar and align with the hole. INSERT and hand tighten the bolt.
To secure, Slip a screwdriver under the nylon nut to hold it in place as you fully tighten the bolt with
a 9/16 socket wrench. Complete the cross bars with the new end caps.
Bunk Assembly
1). With the new load bars installed, use one U-bolt to hold the adjustable mounting plate in place.
Secure with the nylock nuts. See gure 1.
2). Add the swivel bracket to the top of the mounting plate, add nylock nut. Tighten until almost fully
tight. We’ll adjust this later to match the hull shape and then tighten fully. See gure 2,3. Repeat
steps 1 & 2 for the other mounting plate(s).
1 2 3
Page 5
Bunk Assembly Cont.
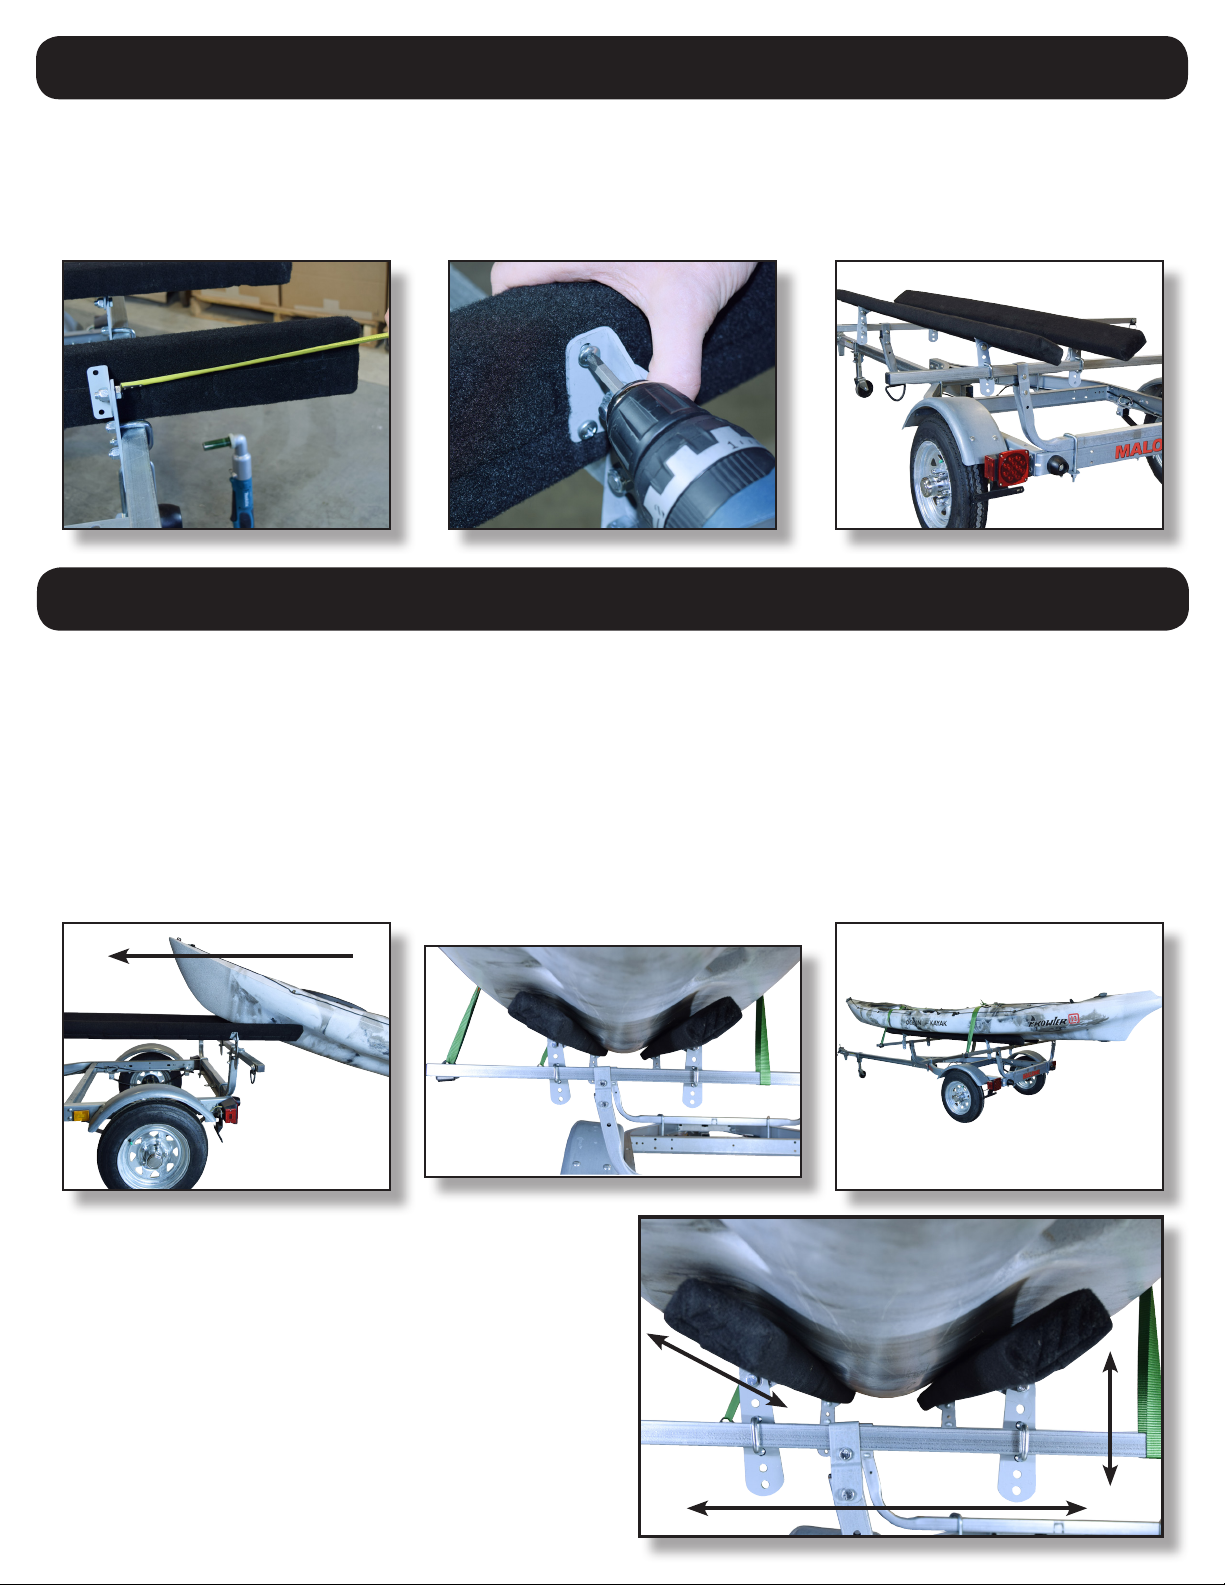
1). Place the carpeted bunk in place and measure the over-hang past the swivel bracket and make
the distance equal on both ends. See gure 4.
2). Use the wood screws and secure fully. See gure 5 & 6. Repeat for second bunk to complete
installation.
4 5
6
Loading & Bunk Adjustments
1). Gently place the bow of the kayak onto the bunks from the rear of the trailer. Continue to hold the
kayak to prevent slippage. See gure 1.
2). Walk back to the stern of the kayak. Lift the kayak and walk it forward sliding across the bunks.
Centering the kayak.
3). With the kayak now loaded onto the bunks, secure the kayak with the green load straps by
running them through the D-ring on the end of loadbar, over the kayak and then under/around the
loadbar. Thread the free end of each strap back up and through the buckles. Pull down to tighten.
1
NOTE: When loading the kayak for the rst time
we’ll need to make some nal adjustments so the
bunks match and capture the hull properly.
Look underneath and adjust the width, height &
swivel bracket as needed for your kayak. Make
sure to double check all nuts are now fully secure
and tight.
Every kayak scenario (hull shape) is different and
these are general guide lines for installation.
angle
height
width
Page 6

Limited Five (5) Year Warranty
The Malone Auto Racks (Malone) Limited 5 Year Warranty covers certain Malone-brand products that have been specifically
identified for inclusion in the program. This warranty is in effect for five (5) years, from the time of sale, for the original retail
purchaser of the product. This warranty is terminated after five years from the date of purchase, or, when the original retail
purchaser sells or otherwise transfers the product to any other person or entity during the five year warranty period.
Subject to the limitations and exclusions described in this warranty, Malone will remedy defects in materials and/or
workmanship by repairing or replacing, at its option, a defective product without charge for parts or labor. Malone may
elect, at its option, not to repair or replace a defective product but rather issue to the original retail purchaser a refund
equal to the purchase price paid for the product, or credit to be used toward the purchase of a replacement Malone
product.
This warranty does not cover, and no warranty is given for defects or problems caused by normal wear and tear, which
includes, but is not limited to, surface (aesthetic) metal corrosion, scratches, dents, deformities, accidents, unlawful
vehicle operation, or any modification of a product not performed or authorized in writing by Malone.
In addition, this warranty does not cover problems resulting from conditions beyond Malone’s control including, but not
limited to, theft, misuse, overloading, or failure to assemble, mount or use the product in accordance with Malone’s
written instructions or guidelines included with the product provided to the original retail purchaser.
No warranty is given for Malone products purchased outside of the continental United States, Canada and Mexico.
If the product is believed to be defective, the original retail purchaser should contact the Malone dealer from whom it
was purchased, who will give the original retail purchaser instructions on how to proceed. If the original retail purchaser is
unable to contact the Malone dealer, or the dealer is not able to remedy the defect, the original retail purchaser should
contact Malone by email at [email protected].
In the event that the product must be returned to Malone, a technician at the email address above will provide the
original purchaser with return shipping instructions. The original purchaser will be responsible for the cost of mailing
the product to Malone. In order to be eligible to receive any remedy under this warranty, a copy of the original
purchase receipt, a description of the defect and a return address must be provided.
Disclaimer of Liability
Repair or replacement of a defective product, or the issue of a refund or credit (as determined by Malone) is the original
retail purchaser’s sole and exclusive remedy under this warranty. Damage to original purchaser’s vehicle, cargo, or property,
and/ or to any other person or property is not covered by this warranty.
This warranty is expressly made in lieu of any and all other warranties, express or implied, including the warranties of
Malone’s sole liability to any purchaser is limited to the remedy set forth above. In no event will Malone be liable for any
direct, indirect, consequential, incidental, special, exemplary, or punitive damages , or, for any other damages of any
kind or nature (including but not limited to, lost profits, lost income or lost sales).
Some states do not allow the exclusion or limitation of incidental or consequential damages, so the above limitations may
not be applicable.
In addition, all vehicular transports are potentially hazardous. Any person(s) using Malone products are personally
responsible for following the given directions for use and/or installation and accepts full responsibility for any and all
damages or injury of any kind including death, which may result from their use and/or installation.
MALONE AUTO RACKS, 81 County Road, Westbrook, Maine 04092
Phone: 207-774-9100 Fax: 207-615-0551
Website: www.maloneautoracks.com Email: [email protected]
 Loading...