

Page 1
MALONE
R
TM
STAX PROSTAX PRO
VERTICAL FOLD-DOWN KAYAK C ARRIER
40mm
50mm
Stax Pro Kayak Carrier 12’ Load Straps
Installation & Loading Instructions - Please Read Before Beginning
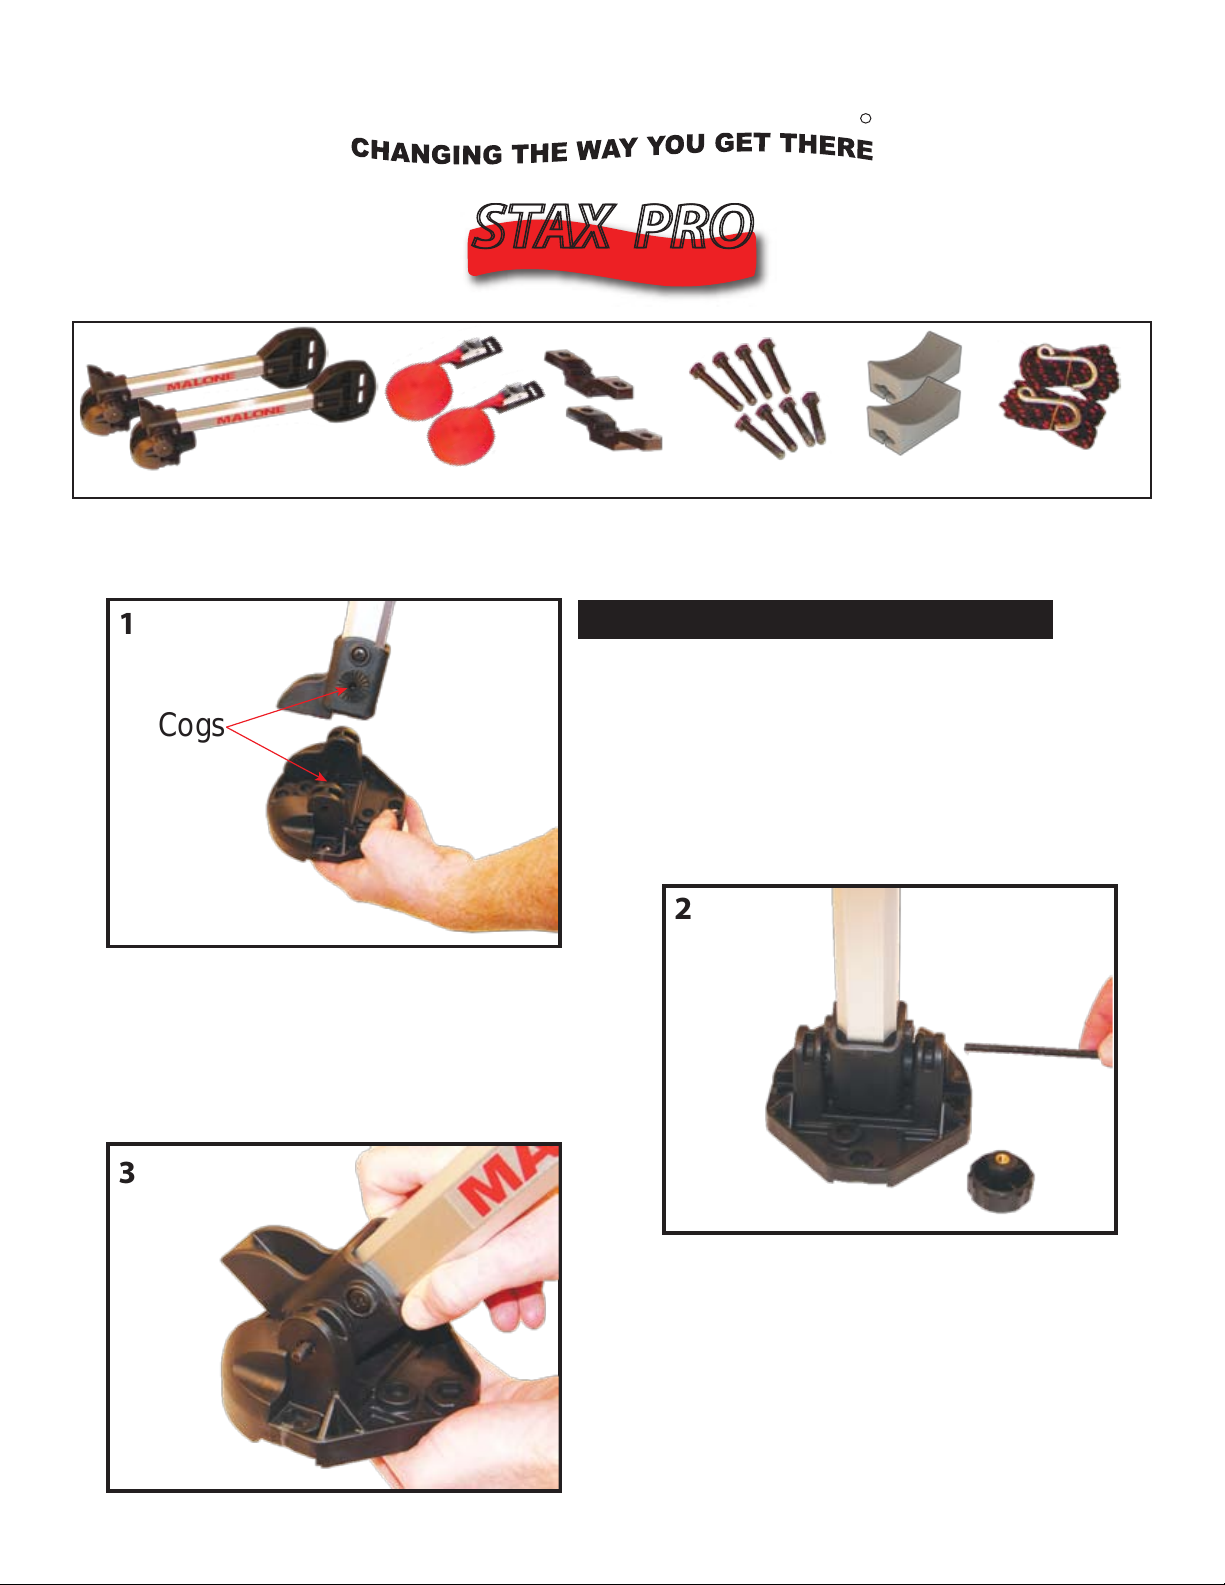
1
Cogs
. Insert a 100mm Bolt into the square
hole located in the top of the Base.
See image 2.
Foam Blocks
Step 1: Assembling the Stax Pro
12’ Bow & Stern LinesJawz Universal Adapters Mounting Bolts
TM
. Insert the bottom of the Post into the
top of the Base. Position so the cogs
on the Post are in contact with the
cogs on the Base. See image 1.
2
3
. With the holes in the Base and Post aligned,
push the bolt through the two assemblies
until the end of the bolt is exposed.
Note: Confirm that the head of the bolt is
fully seated in the Base. See image 3.
Page 2
Installation & Loading Instructions - MPG111MD Stax Pro
MALONE
R
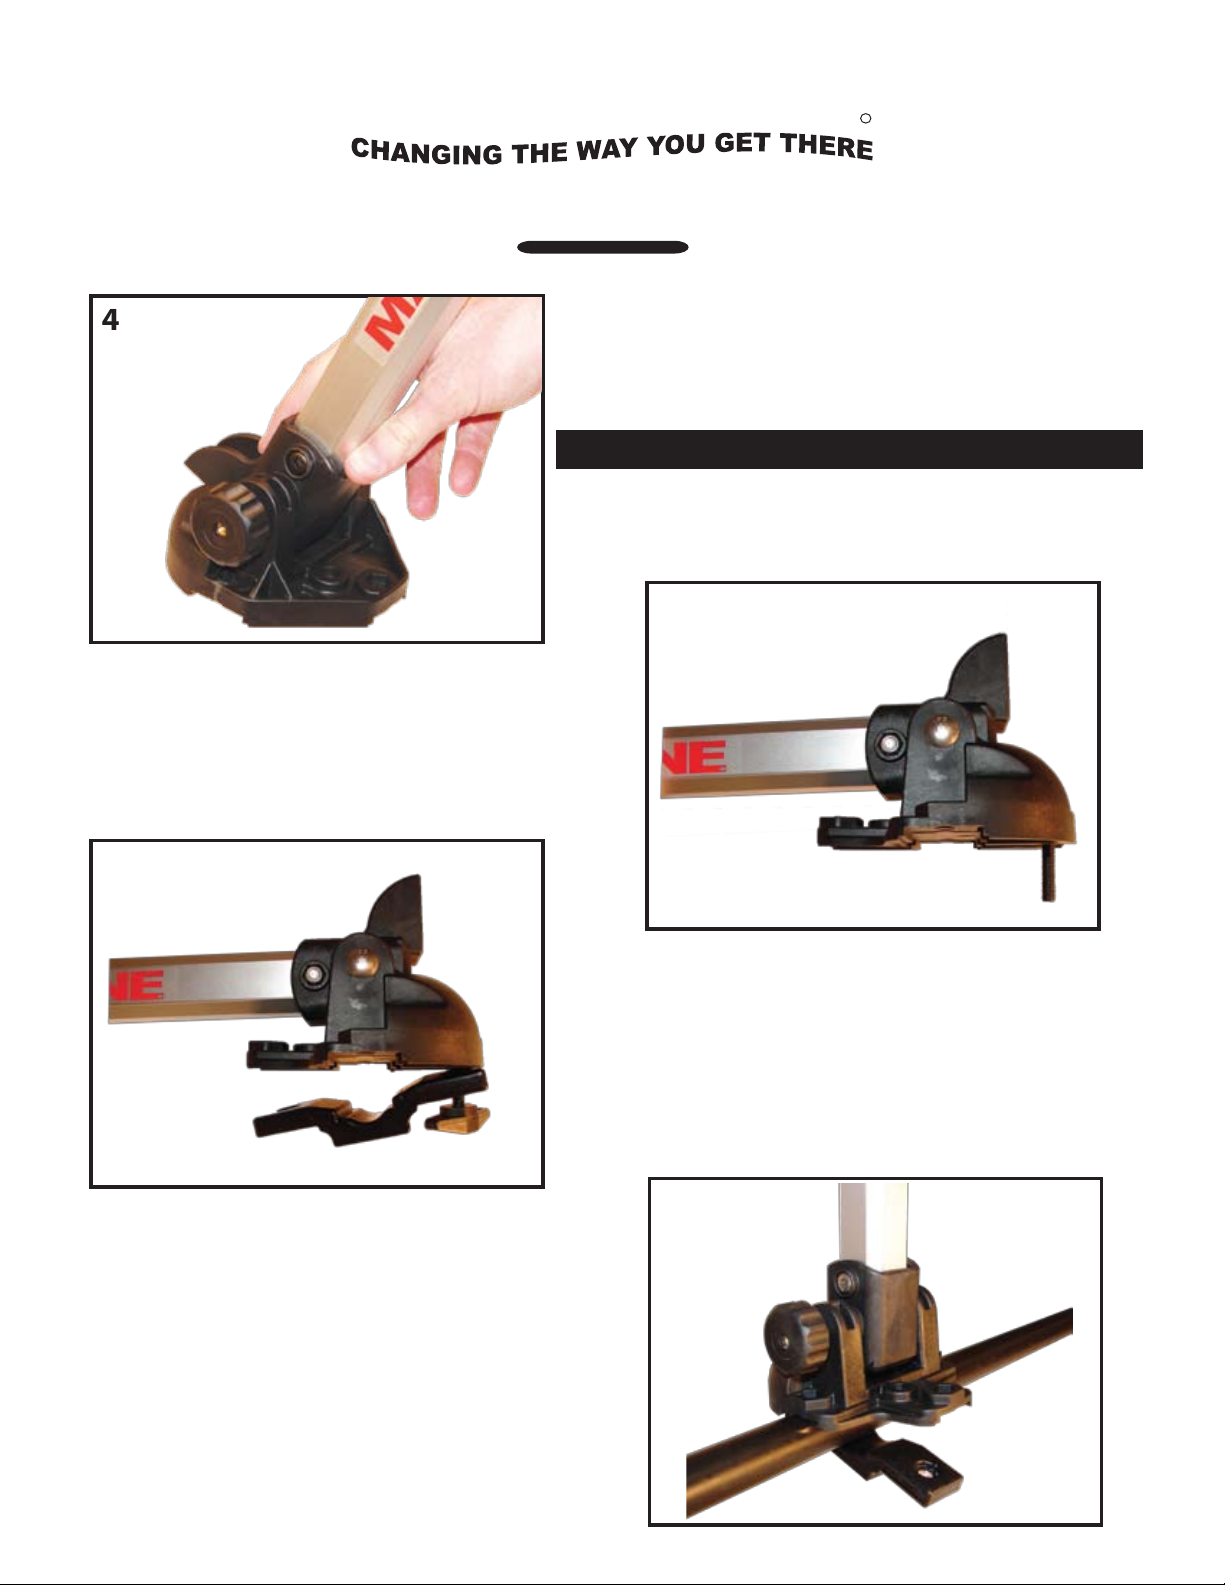
4
. Install a black round Tightening Knob onto
the exposed end of the bolt. See image 4.
Step 2: Installing Carriers to the Cross Rails
. Loosen the Tightening Knob and place
the carrier into the fold-down position.
Insert a Mounting Bolt into the forward
side hex hole. See image 5.
TM
5
6
. Raise the carrier into the upright
position. Place the carrier onto the
front cross bar with the oval side of
the carrier facing the front of the
vehicle. Swing the Jawz under the
cross bar as shown. See image 7.
. Insert Mounting Bolt through one hole of a
Jawz Mounting Adapter and loosely apply a
T-knob. See image 6.
7
Page 3

Installation & Loading Instructions - MPG111MD Stax Pro
MALONE
R
8
. Insert a mounting bolt into the rear side
hex hole and down through the Jawz
mounting adapter. See image 8.
. Apply a T-knob to the bolt and slightly
tighten until the carrier is secure on
the cross bar. Repeat for the second
carrier and rear cross bar. See image 9.
TM
9
10
. Raise the carriers to the up-position and
confirm carriers are in alignment. Firmly
tighten the T-knobs until both carriers are
securely fixed to the cross bars. Place foam
blocks onto the cross bars and next to the
carriers. See image 10.
Step 3: Loading a Single Kayak
. Route the free end of a 12’ load strap
through one strap slot in the top of the
carrier. Pull the free end back until
there is an even loop. Repeat for the
second carrier. See image 11.
11
Page 4

Installation & Loading Instructions - MPG111MD Stax Pro
MALONE
R
12
. Place the straps parallel to the carriers
with the front strap on the windshield
and the rear strap on the back of the
vehicle. Place the kayak up onto the
cross bar. See image 12.
. Place the kayak onto the foam blocks
and against the carriers. Dress the free
ends of the straps under the cross bar
and back up and through the buckles.
Pull down to tighten. See image 13.
TM
13
14
. Install the bow & stern safety lines
per the enclosed instructions.
See image 15.
. Confirm that the kayak is evenly seated in
the foam blocks and securely strapped to
the carriers. See image 14.
15
Page 5

Installation & Loading Instructions - MPG111MD Stax Pro
MALONE
R
TM
16
. Place the kayak onto the Foam Blocks
and against the carriers. Dress the free
ends of the straps under the cross bar
and back up and through the buckles.
Pull down to tighten. See image 17.
Step 4: Loading Two Kayaks
. Place a 2nd set of Foam Blocks (purchased
separately
12’ Load Straps (
the unused strap slots in the carriers. Loop
and place parallel to carriers. Load second
kayak. See image 16.
18
), on cross bar. Dress free ends of
purchased separately) through
17
. Always place the carriers in the fold down position when not transporting
kayaks . See image 19.
. Always check all safety lines and load
straps for proper and secure attachment
before transport. Use of this product
for any other applications other than
kayak transport voids warranty.
. Install the Bow & Stern Safety Lines (
separately
that the kayak is evenly seated in the Foam
Blocks and securely strapped to the carriers.
See image 18.
) per enclosed instructions. Confirm
19
Remove carriers before entering
an automatic car wash
purchased
Page 6

MPG370 BOW & STERN LINE KIT
MALONE
R
Attach hook to rope (steps A-D)
A B C D
Thread free end
of cord through
hook.
Create a “left
over right”
knot & tighten.
Create a “right
over left”
knot & tighten.
Pull to test for
knot strength.
Attach and dress rope to vehicle and boat (steps E-O)
Attach S-hook to vehicle
tow ring or other sturdy
body part.
Pass the loop through the
opening.
E
Keeping the rope tight and
S-hook in place, thread the
free end up and through a
strong point on the kayak
I
Pull to create a tight knot.
M
F
Make a loop in the rope
12” to 14” away
from the kayak or canoe.
J
Thread the free end of
the rope
through the loop.
N
G
K
Opening
Bend the loop over leaving
a large opening as shown.
Pull the free end up until
the rope
is sufficiently tight.
O
H
L
Hold the rope secure with
one hand.
Phone: (207) 774-9100 Fax: (207) 615-0551 Toll Free: (800) 295-0042
Website: www.maloneautoracks.com Email: sales@maloneautoracks.com
Form a knot with the free
81 County Road, Westbrook, Maine 04092
end and tighten. Form
second knot for
safety purposes.
MALONE AUTO RACKS
The line should be tight
and secure. Repeat for
second tie-down.
Page 7

MALONE
R
Limited Lifetime Warranty
The Malone Auto Racks (Malone) Limited Lifetime Warranty covers certain Malone-brand products that have been specically
identied for inclusion in the program and is eective for as long as the original retail purchaser owns the product. This
warranty is terminated when the original retail purchaser sells or otherwise transfers the product to any other person or entity.
Subject to the limitations and exclusions described in this warranty, Malone will remedy defects in materials and/or
workmanship by repairing or replacing, at its option, a defective product without charge for parts or labor. Malone may
elect, at its option, not to repair or replace a defective product but rather issue to the original retail purchaser a refund
equal to the purchase price paid for the product, or credit to be used toward the purchase of a replacement Malone
product.
This warranty does not cover, and no warranty is given for defects or problems caused by normal wear and tear which
includes but is not limited to surface (aesthetic) metal corrosion, scratches, dents, deformities, accidents, unlawful
vehicle operation, or any modication of a product not performed or authorized in writing by Malone.
In addition, this warranty does not cover problems resulting from conditions beyond Malone’s control including, but not
limited to, theft, misuse, overloading, or failure to assemble, mount or use the product in accordance with Malone’s
written instructions or guidelines included with the product available to the original retail purchaser.
No warranty is given for Malone products purchased outside of the United States, Canada and Mexico.
If the product is believed to be defective, the original retail purchaser should contact the Malone dealer from whom it
was purchased, who will give the original retail purchaser instructions on how to proceed. If the original retail purchaser
is unable to contact the Malone dealer, or the dealer is not able to remedy the defect, the original retail purchaser should
contact Malone by email at technical@maloneautoracks.com.
In the event that the product must be returned to Malone, a technician at the email address above will provide the
original purchaser with return shipping instructions. The original purchaser will be responsible for the cost of mailing
the product to Malone. In order to receive any remedy under this warranty, a copy of the original purchase receipt,
a description of the defect and a return address must be provided.
Disclaimer of Liability
Repair or replacement of a defective product, or the issue of a refund or credit (as determined by Malone) is the original
retail purchaser’s exclusive remedy under this warranty. Damage to original purchaser’s vehicle, cargo, or property, and/
or to any other person or property is not covered by this warranty.
This warranty is expressly made in lieu of any and all other warranties, express or implied, including the warranties of
merchantability and tness for a particular purpose.
Malone’s sole liability is limited to the remedy set forth above. In no event will Malone be liable for any direct, indirect,
consequential, incidental, special, exemplary, or punitive damages , or, for any other damages of any kind or nature
(including but not limited to, lost prots, lost income or lost sales).
Some states do not allow the exclusion or limitation of incidental or consequential damages, so the above limitations
may not be applicable. This warranty gives you specic legal rights and you may also have other rights which vary from
state to state.
In addition, all vehicular transports are potentially hazardous. Any person using MALONE products are personally
responsible for following the given directions for use, installation and accepts full responsibility for any and all damages
or injury of any kind including death, which may result from their use.
MALONE AUTO RACKS, 81 County Road, Westbrook, Maine 04092
Phone: 207-774-9100 Fax: 207-615-0551
Website: www.maloneautoracks.com Email: sales@maloneautoracks.com
 Loading...