

Page 1

FORM 1185 (Rev. A) 05/13
INSTALLATION INSTRUCTIONS
MAGNETIC BREAKERLESS
DISTRIBUTOR
This product is applicable to pre-1966 California and pre-1968 federally certified passenger cars. It is also applicable to
non-emission controlled trucks and similar vehicles. It is not applicable or intended for use on any emission controlled vehicles
operated on highways or roads, unless otherwise noted.
IMPORTANT: Before installing the Magnetic Breakerless Ignition System, make sure that the vehicle is equipped with an
ignition ballast resistor (or loom resistance wire) in the wire between the ignition switch and the coil (+) terminal. Check a
service manual for your vehicle to locate the ignition ballast resistor (or loom resistance wire). If your vehicle is not equipped
with an ignition ballast resistor, install a Mallory Ignition Ballast Resistor Part No. 700 in the wire between the ignition switch
and the coil (+) terminal. Failure to use an ignition ballast resistor will result in the eventual destruction of the Ignition Module.
Exception: If your vehicle is equipped with a HYFIRE® Electronic Ignition Control or similar aftermarket ignition control, use the
wiring procedures as stated in the instructions for the ignition control.
WARNING: Mallory’s Magnetic Breakerless Ignition System is not compatible with positive ground or
6-volt vehicle electrical systems.
Parts Included in this kit: 1 Magnetic Breakerless Distributor 1 Distributor Wire Harness
GENERAL INFORMATION
Advance Curve:
Most Magnetic Breakerless Distributors with part numbers that
end in 01 have 24˚ (crankshaft degrees) of mechanical advance
(between 3,000 and 3,200 RPM). Listed below are exceptions:
CHRYSLER SB V8 20 AT 3,000 RPM
FLAT HEAD FORD V8 16 AT 3,600 RPM
Ignition Coils:
The Magnetic Breakerless Ignition system is designed to
work with most stock ignition coils and aftermarket high
performance ignition coils. For optimum performance in
applications without a Mallory HyFire or comparable ignition, use a Mallory coil 29219, 29450 or 30450.
Spark Plug Gaps:
For street applications, use your engine
manufacturers specifications. For racing applications, start
with your engine manufacturers specifications, then experiment with and closely monitor various gaps to achieve
maximum performance.
Electric Welding:
Unplug the distributor wire harness before welding on the
vehicle.
Spark Plug Wires:
YOU MUST USE suppression type (carbon core;
spiral core; radio suppression core) spark plug wire. We
recommend spiral core ignition wire, such as Mallory PRO
SIDEWINDER® Ignition Wire. Suppression type spark plug
wires prevent false triggering and the possibility of
premature ignition or accessory failures. DO NOT USE
solid core (copper core; stainless steel core) spark plug
wire with any electronic ignition system or accessory.
Solid core spark plug wire causes radio frequency interference
(ignition noise; static). Radio frequency interference causes
false triggering (preignition; spark scatter) and premature
ignition or accessory failures.
CAUTION: Leaving the key on without the engine running will result
in damaging the Ignition Module and the coil. If you must have the
key on, unplug the distributor at the white connector first.
OLD DISTRIBUTOR REMOVAL
Step 1
Disconnect the trigger wire from the coil (ñ) terminal.
Step 2
Locate the spark plug wire on the original distributor cap that
the engine timing is set from. See a service manual for these
locations. Mark the distributor cap and the
distributor housing, in line with this spark plug wire position on
the distributor cap.
Step 3
Turn the engine crankshaft in the direction of rotation until
the timing mark lines up with the top dead center (TDC)
mark on the timing tab. See a service manual for these
locations.
NOTE: Removing the spark plugs may make it easier to turn the
crankshaft.
Step 4
Remove the distributor cap from the distributor. Do not
remove the spark plug wires or coil wire at this time. The
rotor blade should point to the mark made on the distributor
housing (from Step 2). If it is not, turn the engine crankshaft
in the direction of rotation one full turn (repeating Step 3)
until the timing mark lines up (again) with the TDC mark on
the timing tab.
NOTE: Once you are finished with Step 4, DO NOT turn the crankshaft until the new distributor is installed.
Step 5
Note the direction the rotor is pointing. If you are replacing
a vacuum advance distributor, note the direction the
vacuum chamber is pointing. Remove the distributor hold
down clamp and remove the distributor from the engine.
MALLORY IGNITION www.mallory-ignition.com
1
Page 2

MAGNETIC BREAKERLESS
DISTRIBUTOR INSTALLATION
Step 1
Prepare the distributor by removing the distributor cap.
Step 2
Place the distributor in the engine with the rotor pointing
in the same general direction as the original distributor.
If equipped with vacuum advance, place the
distributor in the engine with the rotor and vacuum
chamber pointing in the same general direction as the
original distributor.
RED WIRE: If you are using loom resistance wire, connect to the
coil (+) terminal.
If you are using a ballast resistor, connect to 12 volt
side of ballast resistor.
GREEN WIRE: Connect to the coil (-) terminal.
BROWN WIRE: Connect to engine block ground. Clean away any
grease, oil and paint from the mounting surface
before the connection is made.
NOTE: If a HYFIRE
®
Electronic Ignition Control or other
aftermarket ignition control is being used, connect the
distributor according to the instructions supplied with the
ignition control.
If the old distributor did not have a vacuum chamber
,
place the distributor in the engine with the rotor
pointing in the same general direction as the original
distributor did, and point the vacuum chamber in a
direction that will allow movement for timing purposes.
NOTE: The distributor must be fully seated into the engine.
It may be necessary to turn the oil pump drive, or turn the
engine crankshaft in the direction of rotation two full turns
until the timing mark lines up (again) with the TDC mark on
the timing tab, to allow the distributor to seat fully.
Step 3
Rotate the distributor housing in the opposite
direction of rotor rotation until the nearest tooth of the
reluctor is pointing directly at the center of the metal pole
on the magnetic pickup. This will generally put timing
close enough for starting purposes. Put the distributor
hold down clamp in place and tighten slightly, leaving it
loose enough to turn the distributor. Make a mark on the
distributor housing where the rotor points.
Step 4
Install the distributor cap. Remove the spark plug wire on
the original distributor cap that the engine timing is set
from, and install it onto the distributor cap post above
the mark on the distributor housing where the rotor had
pointed. Continue installing each remaining spark plug
wire, one at a time, from the original distributor cap to
the distributor cap in the same sequence.
NOTE: It may be necessary to purchase and install distributor boots and terminals for the spark plug wires to correctly
fit the distributor cap.
WIRING PROCEDURE
Make sure that your vehicle is equipped with an
ignition ballast resistor (or loom resistance wire) in the
wire between the ignition switch and the coil (+)
terminal. One easy way to find the ignition ballast
resistor is to check the service manual for your vehicle. Example: Vehicles with a Ford TFI or Delco HEI
require adding an ignition ballast resistor in the wire
from the ignition switch. If you find your vehicle is
not equipped with an ignition ballast resistor, install a
Mallory Ignition Ballast Resistor Part No. 700 in series
in the wire from the ignition switch. There are three
wires coming from the distributor that must be connected using the distributor wire harness furnished
(see Figures 1 and 2).
ADDITIONAL CONNECTIONS
Vacuum advance applications: Connect original
vacuum hose to the distributor vacuum chamber. Replace
hose if cracked, damaged, or if it is not long enough. If
the previous distributor was not equipped with vacuum
advance, connect a vacuum hose to a ported vacuum
outlet on the carburetor.
Tachometer operation: Connect wire or wires as
recommended by the actual tachometer manufacturer.
STARTING ENGINE
CAUTION: Be sure all tools, wires and miscellaneous objects
are clear of moving engine parts and extreme heat before
staring the engine.
Step 1
Recheck all wires and connections to make sure they
are correct. Check and clean, or replace spark plugs.
If replacing spark plugs, use types recommended by
the engine manufacturer.
Vacuum advance applications: Disconnect the
vacuum hose to distributor vacuum chamber at the
carburetor and temporarily plug this carburetor fitting.
Step 2
Connect a timing light. Find the area with the best view
of the timing marks.
Step 3
Start the engine. If it fails to start, rotate the
distributor in small increments clockwise or
counterclockwise until engine starts. Do not exceed
more than ten degrees of distributor housing rotation
in either direction.
Step 4
Set timing as recommended by engine manufacturer,
then tighten distributor hold down clamp. Make sure
timing
is still correct. If timing has moved, repeat this
procedure.
Step 5
Vacuum advance applications: Reconnect the
vacuum hose between the distributor vacuum
chamber and the carburetor.
2
www.mallory-ignition.com MALLORY IGNITION
Page 3
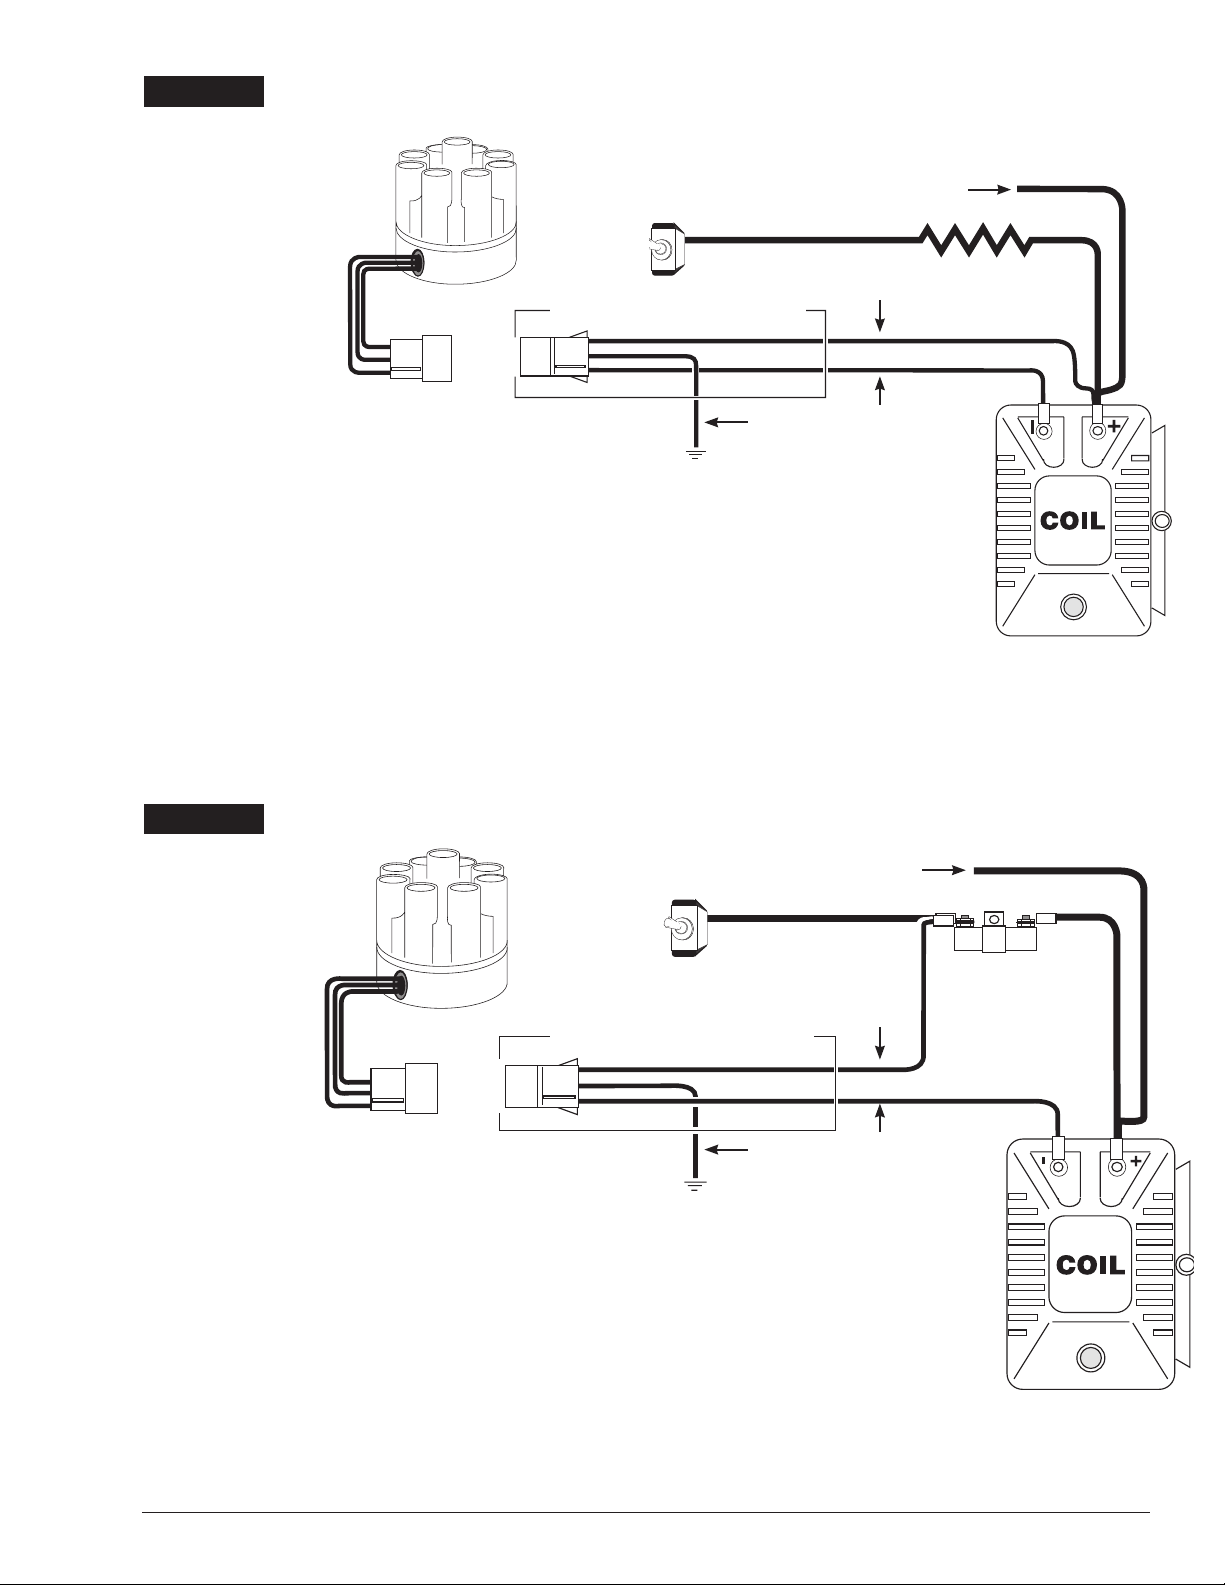
FIGURE 1
WIRING DIAGRAM USING OEM PRIMARY (LOOM) RESISTANCE WIRE
ALL OTHER WIRES ORIGINALLY CONNECTED TO THE COIL (+) TERMINAL
12V/IGNITION
SWITCH
LOOM RESISTANCE WIRE
DISTRIBUTOR WIRE HARNESS PART NO. 29349
RED
IGNITION MODULE
FEMALE CONNECTOR
NOTE: The purpose of resistance wire between the ignition
switch (12V) and the ignition coil positive terminal is to restrict
current flow through the ignition coil. Failure to use resistance
wire will eventually destroy the Ignition Module.
EXCEPTION: If your vehicle is equipped with a HYFIRE® Electronic
Ignition Control or similar aftermarket ignition control, use the
wiring procedures stated in the instructions included with the
ignition control.
NOTE: The Red wire from the distributor would prefer to see 12v
using a loom resistor makes that a little more difficult.
FIGURE 2
WIRING DIAGRAM USING IGNITION BALLAST RESISTOR
ALL OTHER WIRES ORIGINALLY CONNECTED TO THE COIL (+) TERMINAL
12V/IGNITION
SWITCH
ENGINE
GROUND
BROWN
GREEN
To prevent false triggering and possible
premature ignition failure, you must
use suppression type (carbon core,
spiral core, or radio suppression core)
spark plug wire.
Do not use solid core (copper core or
stainless steel core) spark plug wire
with any electronic ignition system.
IGNITION BALLAST RESISTOR
DISTRIBUTOR WIRE HARNESS PART NO. 29349
IGNITION MODULE
FEMALE CONNECTOR
NOTE: The purpose of an ignition ballast resistor between the
ignition switch (12V) and the ignition coil positive terminal is
to restrict current flow through the ignition coil. Failure to use
an ignition ballast resistor will eventually destroy the Ignition
Module.
EXCEPTION: If your vehicle is equipped with a HYFIRE®
Electronic Ignition Control or similar aftermarket ignition control,
use the wiring procedures stated in the instructions included
with the ignition control.
3
www.mallory-ignition.com MALLORY IGNITION
ENGINE
GROUND
BROWN
To prevent false triggering and possible premature ignition failure, you
must use suppression type (carbon
core, spiral core, or radio suppression
core) spark plug wire.
Do not use solid core (copper core or
stainless steel core) spark plug wire
with any electronic ignition system.
RED
GREEN
Page 4
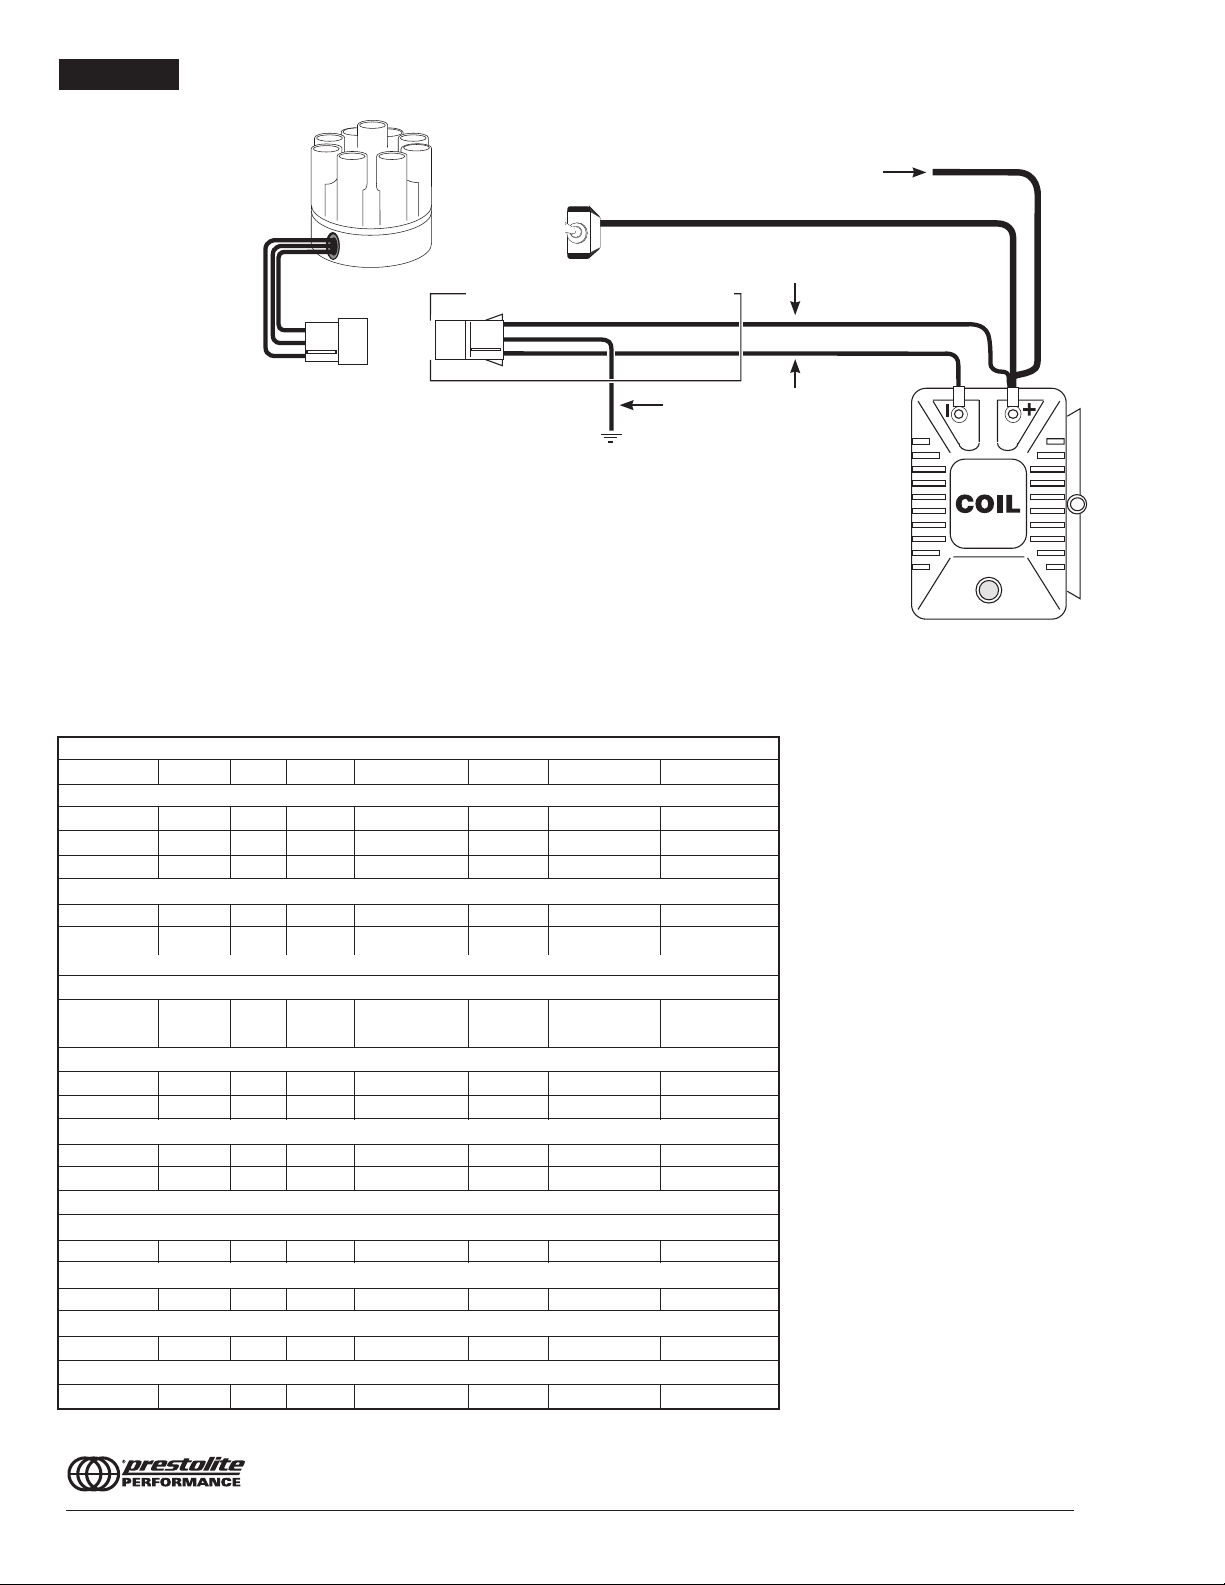
FIGURE 3
WIRING DIAGRAM USING MALLORY COIL 29219, 29450, 30450 ONLY
ALL OTHER WIRES ORIGINALLY CONNECTED TO THE COIL (+) TERMINAL
12V/IGNITION
SWITCH
DISTRIBUTOR WIRE HARNESS PART NO. 29349
IGNITION MODULE
FEMALE CONNECTOR
EXCEPTION: If your vehicle is equipped with a HYFIRE® Electronic
Ignition Control or similar aftermarket ignition control, use the wiring procedures and coil recommendation stated in the instructions
included with the ignition control.
ENGINE
GROUND
BROWN
To prevent false triggering and possible
premature ignition failure, you must use
suppression type (carbon core, spiral
core, or radio suppression core) spark
plug wire.
SPECIAL NOTE: When using this distributor with a Mallory HYFIRE®
or similar ignition system, you must follow the wiring diagram for
the ignition system. You should also use the correct coil as recommended by the ignition control manufacturer.
Do not use solid core (copper core or
stainless steel core) spark plug wire
with any electronic ignition system.
The diagrams shown above are for use when the vehicle is equipped
with just a distributor and coil.
AUTOMOTIVE DISTRIBUTOR SERVICE PARTS
Module Cap Rotor Cap/Rotor Kit Harness Vacuum Adv. Wire Retainer
8 Cylinder Applications With Standard Cap
42 Series 609 208M 307M 29349 29332 29314
50 Series 609 209M 309 2091M 29349
57 Series 609 209M 310 2091M 29349 29332
8 Cylinder Applications With Flat Cap
50 Series 609 221 318 29349
57 Series 609 221 318 29349 29332
(Note- 32-48 Ford- Use cap 221A instead)
8 Cylinder Applications With COMP 9000 Cap
87 Series 609 29745 29736 29349 29333-L (LH) 29744
29333-R (RH)
6 Cylinder Applications With Standard Cap (Except Semi-Even and Odd-Fire Engines)
50 Series 609 270 309 29349
57 Series 609 270 310 29349 29332
4 Cylinder Applications With Standard Cap (Except Mini Bowl)
50 Series 609 271 309 2094M 29349
57 Series 609 271 310 2094M 29349 29332
MARINE DISTRIBUTOR SERVICE PARTS
8 Cylinder Applications With Standard Cap
YLM Series 609 209D 309 29349
8 Cylinder Applications With Flat Cap
YLM Series 609 221B 318 29349
6 Cylinder Applications With Standard Cap (Except Semi-Even and Odd-Fire Engines)
YLM Series 609 270B 309 29349
4 Cylinder Applications With Standard Cap (Except Mini Bowl)
YLM Series 609 271B 309 29349
RED
GREEN
family of brands
4
MALLORY IS A TRADEMARK OF PRESTOLITE PERFORMANCE
10601 MEMPHIS AVE. #12, CLEVELAND, OH 44144
216.658-6416 FAX 216.688.8306
www.mallory-ignition.com MALLORY IGNITION
FORM 1185 (Rev A.)
05/13
 Loading...