

Page 1

INSTALLATION INSTRUCTIONS
®
HYFIRE® V ELECTRONIC
IGNITION CONTROL
PARTS INCLUDED:
1 HYFIRE® V Ignition Control
4 #10 Sheet Metal Screws
2 Wire Ties
2 Ring Terminals, Insulated
1 1-amp/100 volt Diode
2 1/4" Tab Terminals
FORM 1051 (REV. A) 10/01
PART NO. 585
5 1/4" Male Disconnects
5 1/4" Female Disconnects
1 Rubber Grommet
2 Cable Clamps
1 Magnetic Pickup Extension
Battery
The HYFIRE® V Series Ignition Control operates on any negative
ground, 12 volt electrical system with a distributor. It will also work
with 16 volt batteries and can withstand a momentary spike of 24 volts
in case of jump starts. This system delivers full voltage with a supply
of 10-18 volts, and operates with a supply voltage as low as 8 volts.
If your application does not use an alternator, allow at least 15 amp/
hour for every half hour of operation. If you crank the engine with the
same battery or other accessories, such as an electric fuel or water
pump, increase the amp/hour rating
Coils
For optimum performance with your HYFIRE® V Ignition Control, we
recommend Mallorys PROMASTER® Coil P/N 29440. Mallorys
PROMASTER® Coil P/N 29625 can also be used, as well as most
stock coils or aftermarket coils designed as stock replacements.
NOTE: Do not use Mallorys PROMASTER® Coil P/N 28880.
Tachometers
The yellow wire on the HYFIRE® V Ignition Control provides a trigger
signal for tachometers, shift lights, or other add-on RPM activated
devices. This wire produces a 12 volts square wave signal with a 20%
duty cycle.
Some vehicles with factory tachometers may require a tach adapter
to work with the HYFIRE® V Ignition Control. If your GM vehicle uses
an inline filter, it may cause the tach to drop to zero on acceleration. If
this occurs, bypass the filter. For more information on tachometers,
see page 4.
Spark Plugs
Using the correct spark plug and heat range is important for optimum
performance. Because there are so many variables to consider, we
suggest starting with your engine manufacturers spark plug recommendation. From there, you can experiment with small changes in
plug gap and heat range to obtain the best performance from your
engine. We also recommend non-resistor spark plugs.
Spark Plug Wires
High quality, spiral wound wire and proper routing are essential to the
operation of the HYFIRE® V Ignition Control. This type of wire provides a good path for the spark to follow while minimizing electromagnetic interference (EMI).
NOTE: Do not use solid core spark plug wires with the HYFIRE®V
Ignition Control.
Routing
Wires should be routed away from sharp edges, moving objects, and
heat sources. Wires that are next to each other in the engines firing
order should be separated. For example, in a Chevy V8 with a firing
order of 1-8-4-3-6-5-7-2, the #5 and #7 cylinders are positioned next
to each other on the engine as well as in the firing order. Voltage from
the #5 wire could jump to the #7 wire. This could cause detonation
and engine damage.
For added protection against cross-fire, Mallory offers PRO SHIELD
insulated sleeving. PRO SHIELD is a glass woven, silicone coated
protective sleeve that slides over your plug wires. It also helps reduce
damage from heat and sharp objects.
Foreign Vehicles
Because of modern fuel injection systems, some foreign vehicles may
require a tachometer/fuel injection adapter to work with the HYFIRE
V Ignition Control.
NOTE: Do not install the HYFIRE® V Ignition Control in any vehicle that is originally equipped with a CD ignition control.
®
1MALLORY TECHNICAL SUPPORT (775) 882-6600 [email protected]
Page 2

MISCELLANEOUS INFORMATION
WIRE FUNCTIONS
Sealing
Do not attempt to seal the HYFIRE® V Ignition Control. All of the circuits of a HYFIRE® V receive a conformal coating of sealant that protects the electronics from moisture. Sealing the HYFIRE® V will not
allow any moisture that seeps in through the grommets to drain and
may result in corrosion.
Welding
To avoid any damage to the HYFIRE® V Ignition Control when welding
on the vehicle, disconnect the positive (red) and negative (black) power
cables of the HYFIRE® V Ignition Control. It is also a good idea to
disconnect the tachometer ground wire as well.
Distributor Cap and Rotor
As with any high performance ignition system, we recommend installing a new distributor cap and rotor when installing the HYFIRE® V
Ignition Control. Be sure the cap is clean inside and out, especially the
terminals and rotor tip.
HYFIRE® V Diagnostic LED
On the end panel of your HYFIRE® V Ignition there is a small hole.
Behind this hole is a red LED indicator. The LED will flash when receiving a proper trigger signal from the vehicle. If, after a normal powerup, the LED doesnt flash when cranking the engine, you should check
your triggering circuit for problems. If the LED flashes when the engine is cranked, but there is still no spark, the problem lies somewhere else.
MOUNTING
The HYFIRE® V Ignition Control can be mounted in any position. If
you mount it in the engine compartment, keep it away from moving
objects and heat sources. Do not mount the unit in a closed area,
such as the glovebox.
When you find a suitable location to mount the unit, make sure all
wires of the ignition reach their connections. Hold the ignition in place
and mark the location of the mounting holes. Use a 1/8" drill bit to drill
the holes. Use the supplied self-tapping screws to mount the box.
WIRING
Wire Length
All of the wires of the HYFIRE® V Ignition Control may be shortened
as long as quality connectors are used or soldered in place. To lengthen
the wires, use one size larger gauge wire (12 gauge for power leads,
16 gauge for all others). Use the proper connectors to terminate all
wires. All connections must be soldered and sealed.
Power Leads
The two heavy gauge wires (14 gauge) that deliver battery voltage to
the ignition:
Heavy Red Connects directly to the battery positive (+) terminal
or to a positive battery junction. It could also be connected to the positive side of the starter solenoid.
NOTE: Never connect this wire to the alternator.
Heavy Black Connects to frame or chassis ground.
Trigger and Coil Leads
Small Red Connects to a switched 12 volt source, such as the
ignition key.
Orange Connects to the positive (+) terminal of the coil.
NOTE: This is the only wire that makes electrical contact with the coil positive (+) terminal.
Small Black Connects to the negative () terminal of the coil
NOTE: This is the only wire that makes electrical contact with the coil positive () terminal.
Trigger Wires Either of two circuits will trigger the HYFIRE® V Igni-
tion Control: a points circuit (white wire) or a magnetic pickup circuit (violet and green wires).
NOTE: The two circuits will never be used
together.
White Connects to points, electronic ignition amplifier out-
put or to the green wire of a Mallory timing accessory. When this wire is used, the magnetic pickup
connector is not used.
Violet/Green These wires are routed together in one harness to
form the magnetic pickup connector. The connector
plugs directly into a Mallory distributor or crank trigger. It will also connect to factory magnetic pickups
or other aftermarket pickups. The violet wire is positive (+) and the green is negative (). When these
wires are used, the white wire is not used. Consult
the chart that shows the polarity of other common
magnetic pickups
Yellow Connects to the tachometer pickup wire.
FIGURE 1
Grounds
A poor ground connection can cause many frustrating problems. When
a wire is specified to go to ground, connect it to the chassis. Always
connect a ground strap between the engine and chassis. Connect
any ground wires to a clean, paint-free metal surface.
Ballast Resistor
If your vehicle has a ballast resistor in line with the coil wiring, it is not
necessary to bypass it. This is because the HYFIRE® V Ignition Control receives its main power directly from the battery.
MALLORY IGNITION 550 MALLORY WAY, CARSON CITY, NV 897012
DIAGNOSTIC
LED
Page 3
ROUTING WIRES
Route all wires away from heat sources, sharp edges, and moving
objects. Route the trigger wires separate from the other wires and
spark plug wires. If possible, route them along a ground plane, such
as the block or firewall, which creates an electrical shield. The magnetic pickup wires should be routed separately and twisted together to
help reduce extraneous interference.
COMMON COLORS FOR MAG PICKUP WIRES
Distributor Mag + Mag
Mallory Crank Trigger Purple Green
Mallory Billet Competition Distributor,
Series Nos. 81 and 84 Orange Purple
Mallory COMP
Mallory Harness P/N 29040 Red Black
MSD Orange/Black Violet/Black
MSD Crank Trigger Orange/Black Violet/Black
Ford Orange Purple
Accel 46/48000 Series Orange/Black Violet/Black
Accel 51/61000 Series Red Black
Chrysler Orange/White Black
®
9000 Series Nos. 96-99 Orange Purple
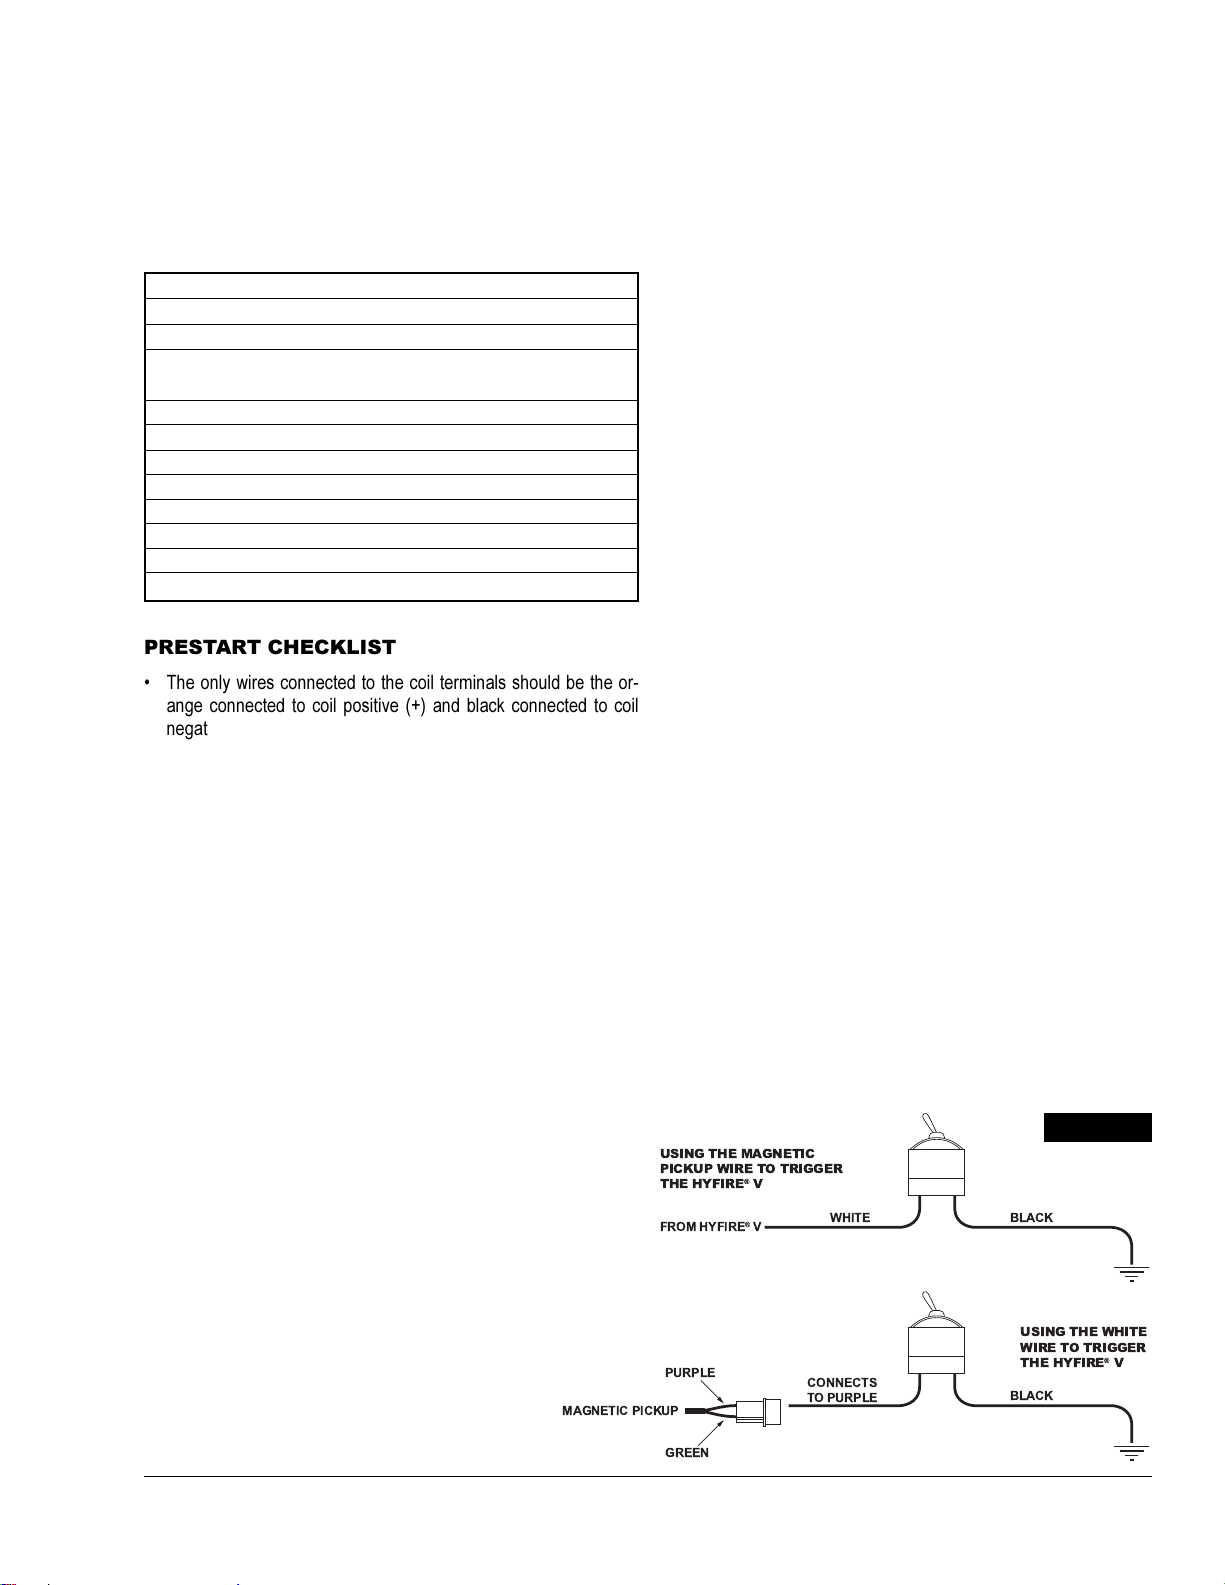
PRESTART CHECKLIST
The only wires connected to the coil terminals should be the or-
ange connected to coil positive (+) and black connected to coil
negative ().
The small red wire is connected to a switched 12 volts source,
such as the ignition key.
Power leads are connected directly to the battery positive and nega-
tive terminals.
If youre not using an alternator, the battery should be connected
and fully charged.
The engine is equipped with at least one ground strap to the
chassis.
THEFT DETERRENT
The HYFIRE® V Ignition Control provides an easy way to install a theft
deterrent kill switch. See Figure 2.
TROUBLESHOOTING
This section offers several tests and checks you can perform to ensure proper installation and operation of the HYFIRE® V Ignition Control. If you experience a problem with your HYFIRE® V, first check for
proper installation and poor connections. You can eliminate many problems by checking these items. If you have any questions concerning
your HYFIRE® V Ignition Control contact the Mallory Technical Service Department at 775-882-6600, Monday through Friday, 8:00 am
to 5:00 pm Pacific time.
Tach/Fuel Adapters
If your tachometer does not operate correctly, you probably need a
Mallory tach adapter. Consult the Tachometer Compatibility List at
right for common tachometers and compatible tach adapters.
No-Run on Foreign Vehicles
Some foreign vehicles with fuel injection systems may require a tachometer/fuel injection adapter to run with the HYFIRE® V Ignition
Control. Often, the same trigger source is used to operate an ignition,
tachometer, and fuel injection. This results in a voltage signal that is
too low to trigger the fuel injection. A tach/fuel injection adapter will
usually solve this problem.
Inoperative Tachometers
If your tachometer fails to operate with the HYFIRE® V installed, you
may need a Mallory tach adapter. Before purchasing a tach adapter,
try connecting your tachometer trigger wire to the yellow wire of the
HYFIRE® V Ignition Control. This output produces a 12 volt, square
wave. If the tach still does not operate, you will need a tach adapter.
Two different tach adapters are available:
PN 29078 If you are using the magnetic pickup connector (green
and violet wires) to trigger the HYFIRE® V, you will need
this adapter.
PN 29074 If your tach was triggered from the coil negative termi-
nal (voltage trigger) and you are using the white wire
to trigger the HYFIRE® V, you will need this adapter.
Ballast Resistor
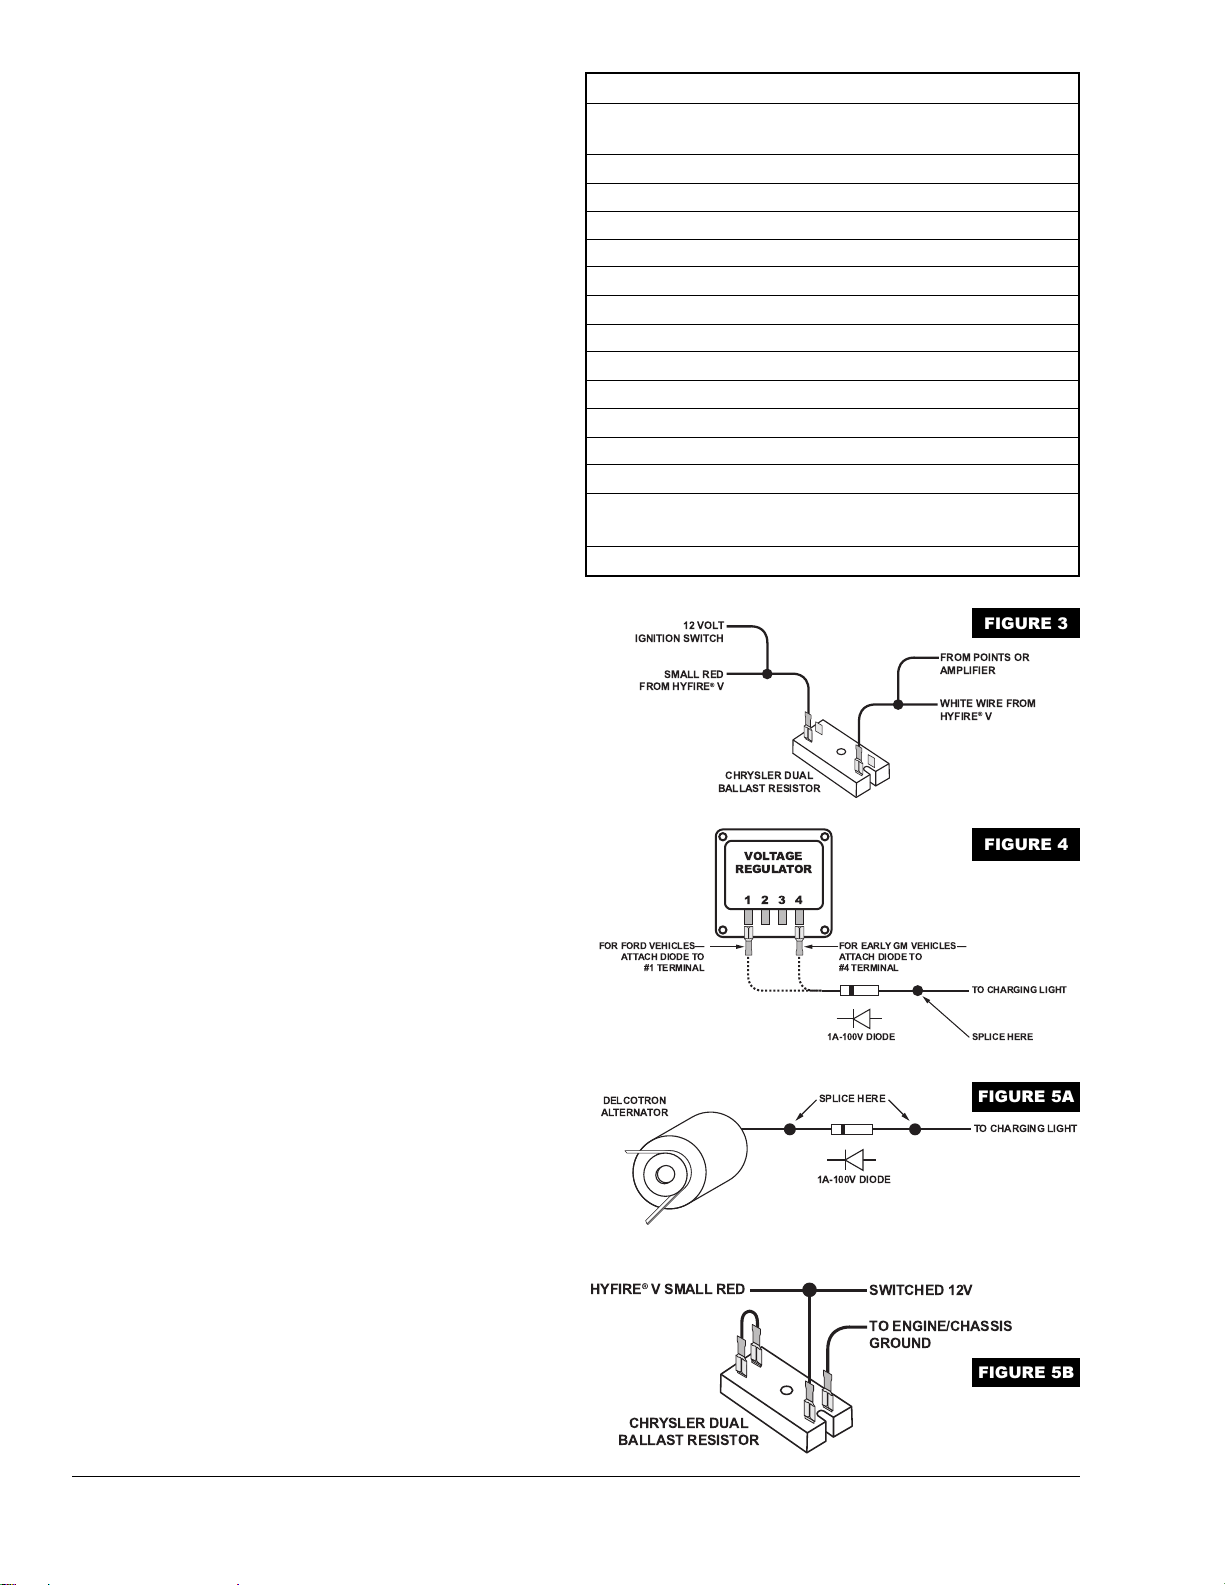
If you have a current trigger tach (originally connected to coil (+) positive) and use the white wire of the HYFIRE® V for triggering, you can
purchase a Chrysler Dual Ballast Resistor (1973-76 applications). Wire
it as shown in Figure 3.
White Wire Trigger
When using the white wire to trigger the HYFIRE® V Ignition Control,
install a switch across the magnetic pickup violet wire to ground. When
the violet wire is grounded, the vehicle will crank but will not start.
Magnetic Pickup Trigger
When using the mag pickup to trigger the HYFIRE® V Ignition Control,
install a switch to the white wire and the other side to ground. When the
white wire is grounded, the vehicle will crank but will not start.
MAGNETIC PICKUP
USING THE MAGNETIC
PICKUP WIRE TO TRIGGER
THE HYFIRE
FROM HYFIRE®V
PURPLE
GREEN
®
V
CONNECTS
TO PURPLE
WHITE
FIGURE 2
BLACK
USING THE WHITE
WIRE TO TRIGGER
THE HYFIRE
BLACK
®
V
3MALLORY TECHNICAL SUPPORT (775) 882-6600 [email protected]
Page 4
Engine Run-On
If your engine continues to run even when the ignition is turned off,
you are experiencing engine run-on. Usually, older vehicles with an
external voltage regulator are susceptible to this condition. Because
the HYFIRE® V Ignition Control receives power directly from the battery, it does not require much current to keep the unit energized. If you
are experiencing run-on, it is due to a small amount of voltage going
through the charging lamp indicator and feeding the small red wire
(even if the key is turned off).
Early Ford and GM: To solve the run-on problem, a diode is supplied
with the HYFIRE® V Ignition Control. By installing this diode in-line of
the wire that goes to the charging indicator, the voltage is blocked
from entering the HYFIRE® V Ignition Control. Figure 4 shows the
proper diode installation for early Ford and GM vehicles.
NOTE: Diodes are used to allow voltage to flow only one way.
Make sure the diode is installed facing the proper direction, as
shown in Figure 4.
Ford: Install the diode inline to the wire going to the #1 terminal.
GM: Install the diode inline to the wire going to the #4 terminal.
GM 1973-83 with Delcotron Alternators
GM Delcotron alternators use an internal voltage regulator. Install the
diode inline on the smallest wire exiting the alternator (see Figure 5A).
It is usually a brown wire.
Most other applications: To eliminate run-on, connect a Chrysler dual
ballas resistor as shown in Figure 5B.
Misses and Intermittent Problems
Experience has shown that if your engine is misfiring or hesitating at
higher RPM, it is usually not a HYFIRE® problem. Most common causes
include a coil or plug wire failure, arcing from the cap or boot plug to
ground or spark ionization inside the cap. Perform the following checks:
Inspect the plug wires at the cap and at the spark plug for a tight
connection. Visually inspect for cuts, abrasions, or burns.
Inspect the primary coil wire connections. Because the HYFIRE® V
Ignition Control receives a direct 12 volt source from the battery,
there will not be any voltage at the coil positive (+) terminal, even
with the key turned on. During cranking, or while the engine is running, very high voltage will be present and no test equipment should
be connected.
WARNING: Do not touch the coil terminals during cranking or
while the engine is running.
Make sure that the battery is fully charged and the connections are
clean and tight, especially if you are not running an alternator. If the
battery voltage drops below 10 volts during a race, the HYFIRE® V
Ignition Control output voltage will drop.
TACHOMETER COMPATIBILITY LIST
Aftermarket White Wire Magnetic Trigger
Tachometer Trigger Connector
Autogage 29074 29078
Autometer
Ford Motorsport
Moroso
Stewart 29074 29078
S.W. & Bi Torx
Sun 29074 29078
VDO 8910 29078
AMC (Jeep) 29074 29078
Chrysler 29074 29078
Ford (Before 1976) 29074 29078
Ford (After 1976) 29074 29078
GM Bypass in-lin Bypass in-line
filter filter
Imports 29074 29078
12 VOLT
IGNITION SWITCH
SMALL RED
FROM HYFIRE
FOR FORD VEHICLES
ATTACH DIODE TO
#1 TERMINAL
DELCOTRON
ALTERNATOR
®
V
CHRYSLER DUAL
BALLAST RESISTOR
VOLTAGE
REGULATOR
1 2 3 4
FOR EARLY GM VEHICLES
ATTACH DIODE TO
#4 TERMINAL
1A-100V DIODE
SPLICE HERE
1A-100V DIODE
FIGURE 3
FROM POINTS OR
AMPLIFIER
WHITE WIRE FROM
®
HYFIRE
V
FIGURE 4
TO CHARGING LIGHT
SPLICE HERE
FIGURE 5A
TO CHARGING LIGHT
Is the engine running lean? Inspect the spark plugs and the entire
fuel system.
Check all wiring connections for corrosion or damage. Remember
to use proper connections followed by soldering, then seal the connections completely.
If the items above are ok, use the procedure on Page 5 to test the
ignition for spark. Mallory also offers an Ignition Tester (PN 28357)
that allows you to check the entire ignition system while it is installed
in the vehicle. This tool can also be used to check RPM limiters, RPM
activated switches, and shift lights.
MALLORY IGNITION 550 MALLORY WAY, CARSON CITY, NV 897014
HYFIRE®V SMALL RED
CHRYSLER DUAL
BALLAST RESISTOR
SWITCHED 12V
TO ENGINE/CHASSIS
GROUND
FIGURE 5B
Page 5
CHECKING FOR SPARK
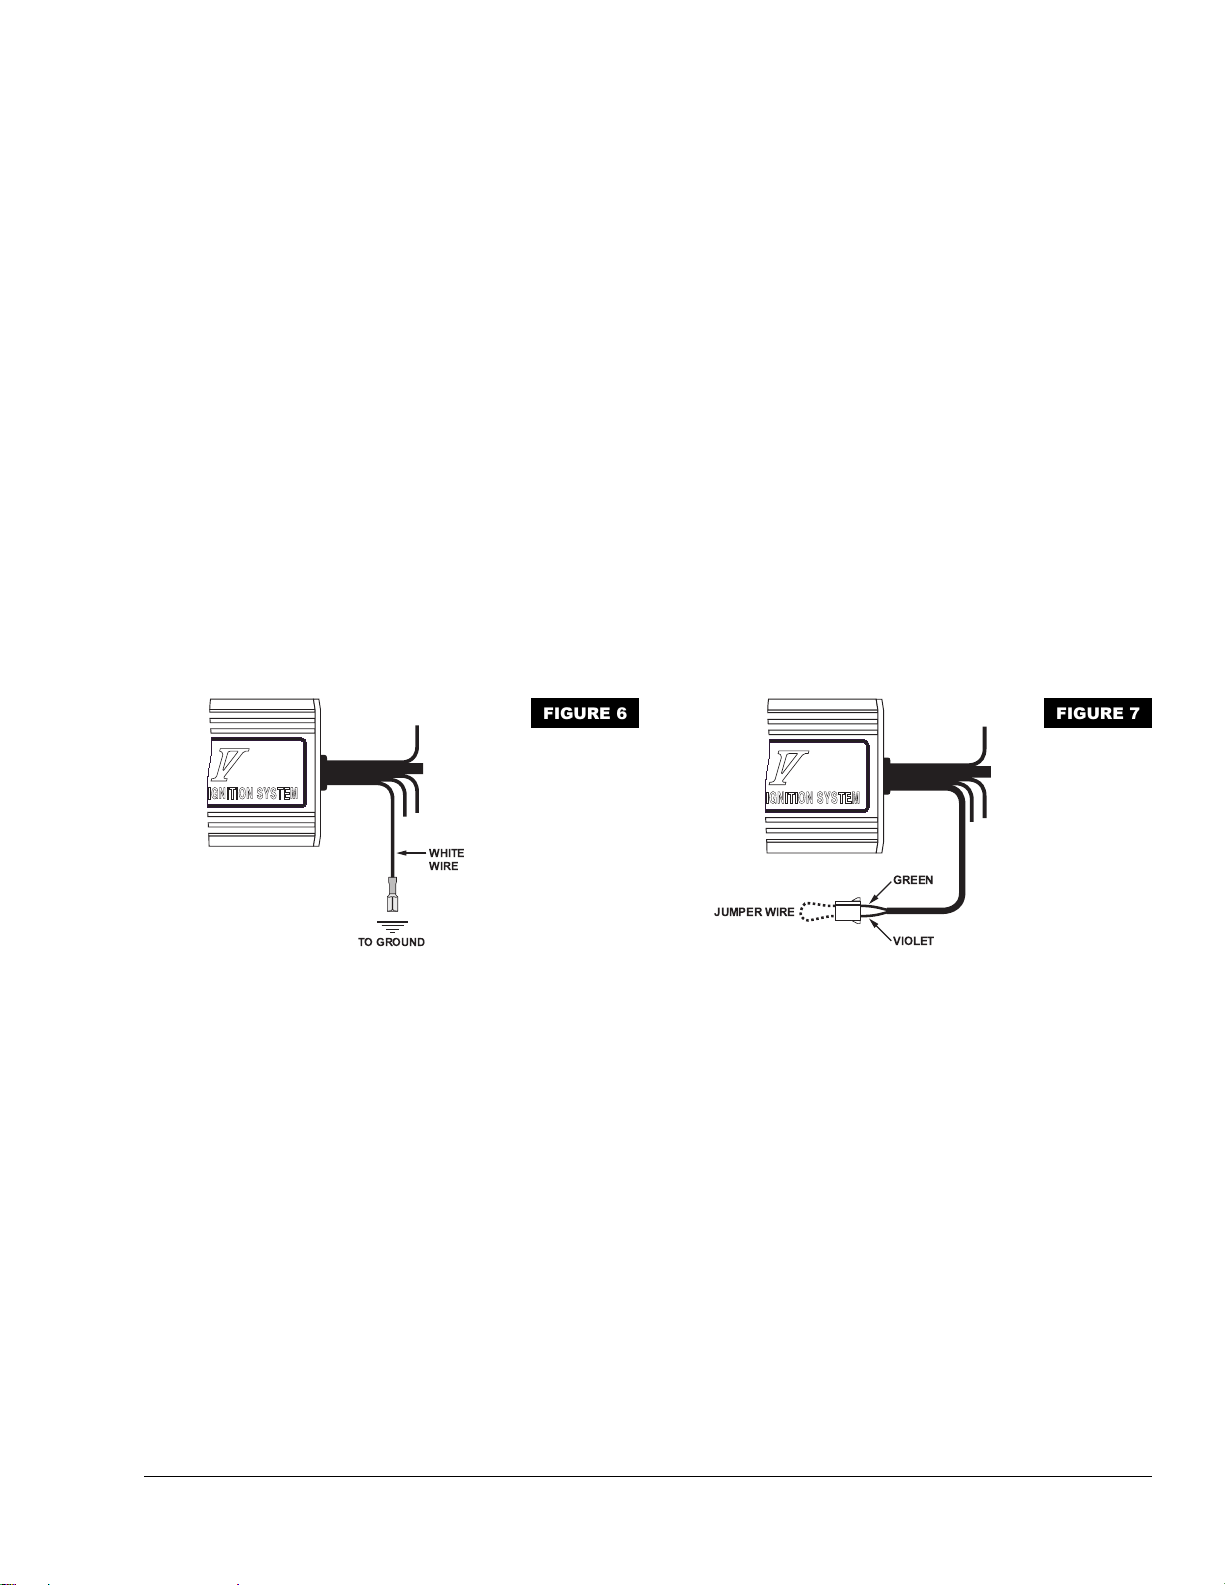
If triggering the ignition with the white wire:
(See Figure 6)
1. Make sure the ignition switch is in the OFF position.
2. Remove the coil wire from the distributor cap and set the terminal
approximately 1/4" from engine ground, such as the intake manifold.
3. Disconnect the HYFIRE® V Ignition Control white wire from the
distributors points or ignition amplifier.
4. Turn the ignition to the ON position. Do not crank the engine.
5. Tap the white wire to ground several times. Each time you pull the
wire from ground, a spark should jump from the coil wire to ground.
If spark is present, the ignition is working properly. If there is no
spark, skip to Step 6 below.
If Triggering With the Magnetic Pickup:
(See Figure 7)
1. Make sure the ignition switch is in the OFF position.
2. Remove the coil wire from the distributor cap and set the terminal
approximately 1/4" from engine ground, such as the intake manifold.
3. Disconnect the HYFIRE® V Ignition Control magnetic pickup wires
from the distributor.
4. Turn the ignition to the ON position. Do not crank the engine.
5. With a small jumper wire, short the HYFIRE® V Ignition Control
green and violet magnetic pickup wires together. Each time you
break this short, a spark should jump from the coil wire to ground.
If spark is present, the ignition is working properly. If there is no
spark skip to Step 6 below.
6. If there is no spark.
A. Inspect all of the wiring.
B. Substitute another coil and repeat the test. If there is now spark,
the coil is at fault.
C. If there is still no spark, check to make sure there is 12 volts on
the small red wire from the HYFIRE® V Ignition Control when
the key is in the ON position. If 12 volts is not present, find
another switched 12 volts source and repeat the test.
D. If, after following the test procedures and inspecting all of the
wiring, there is still no spark, the HYFIRE® V Ignition Control is
probably in need of repair. See the Warranty and Service section for information.
FIGURE 6
WHITE
WIRE
TO GROUND
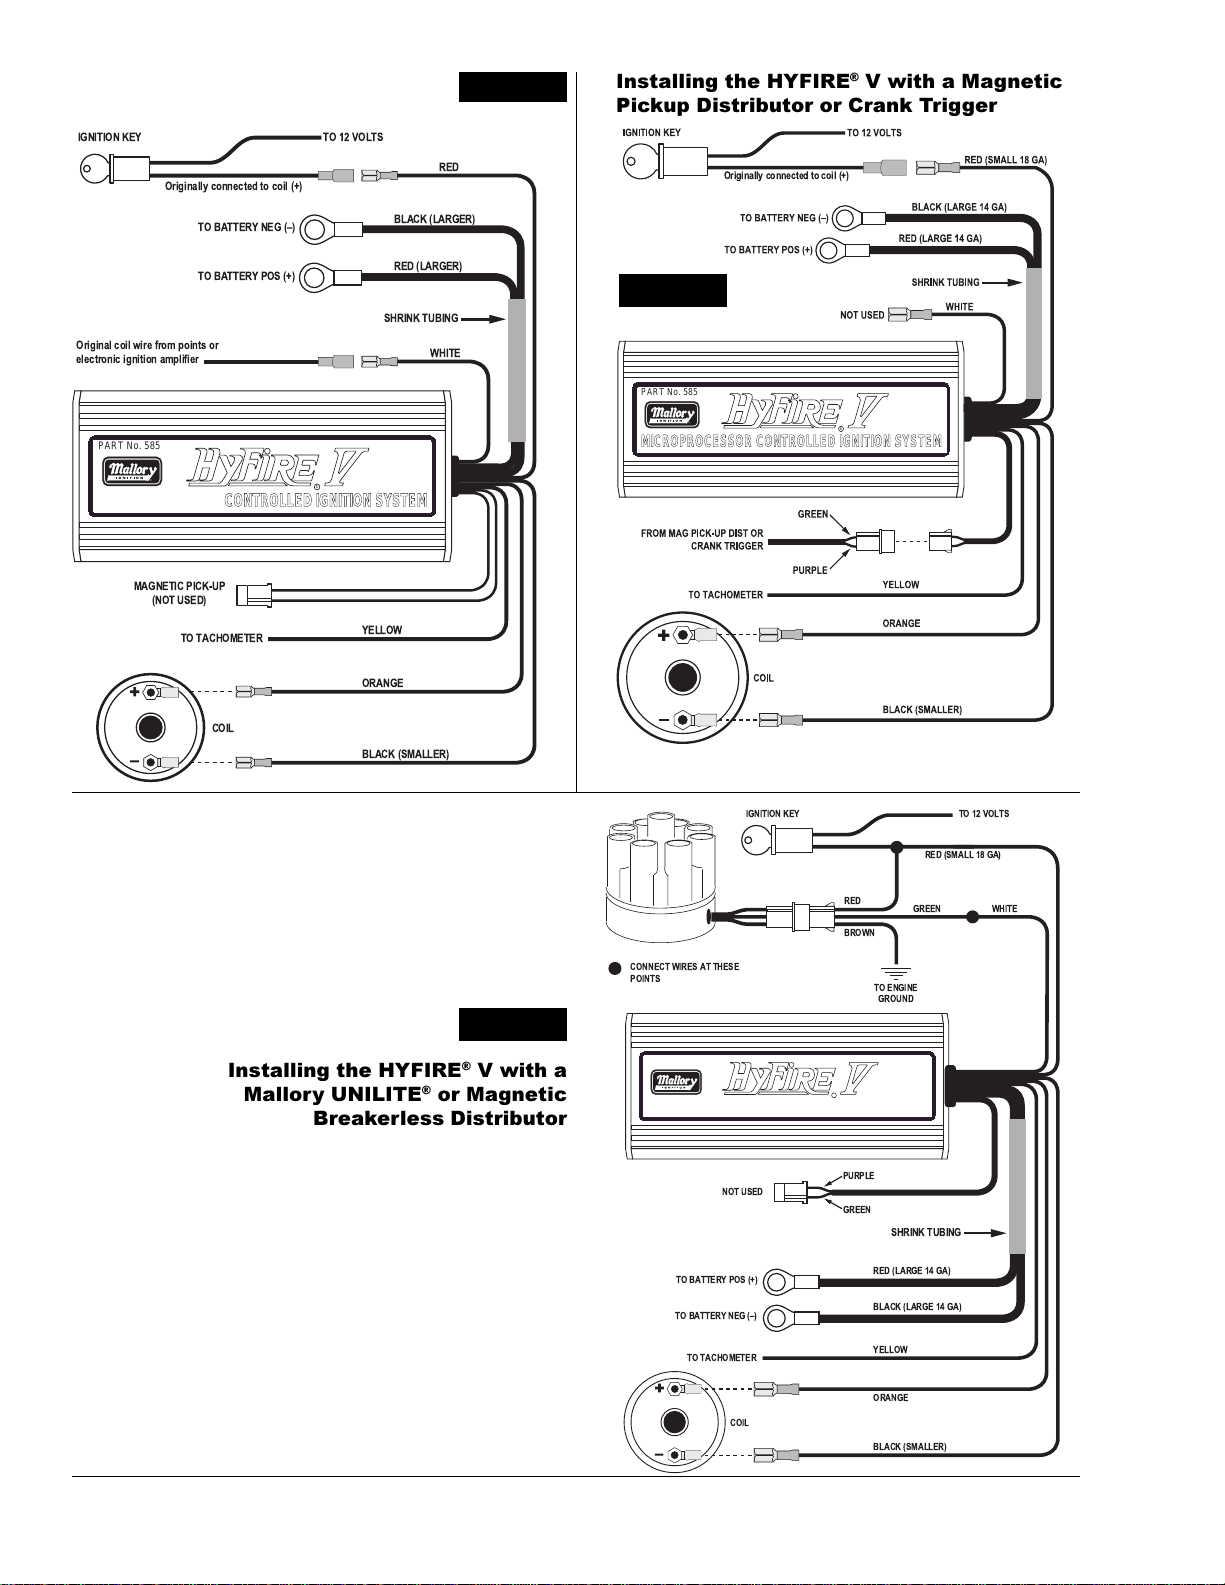
The illustrations on the following pages show the
best way to install the HYFIRE® V Ignition Control
on various applications. If you have any problems
or questions while installing this device on your
vehicle, contact the Mallory Technical Service
Department at (775) 882-6600, 8:00 AM to 5:00 PM
Pacific time, or email [email protected].
FIGURE 7
GREEN
JUMPER WIRE
VIOLET
5MALLORY TECHNICAL SUPPORT (775) 882-6600 [email protected]
Page 6
Installing the HYFIRE® V with a
Points/Amplifier Style Ignition
IGNITION KEY
Originally connected to coil (+)
TO BATTERY NEG ()
TO 12 VOLTS
BLACK (LARGER)
FIGURE 8
RED
Installing the HYFIRE® V with a Magnetic
Pickup Distributor or Crank Trigger
Originally connected to coil (+)
TO BATTERY POS (+)
Original coil wire from points or
electronic ignition amplifier
PART No. 585
®
R
RED (LARGER)
SHRINK TUBING
WHITE
MICROPROCESSOR CONTROLLED IGNITION SYSTEMMICROPROCESSOR CONTROLLED IGNITION SYSTEM
MAGNETIC PICK-UP
(NOT USED)
TO TACHOMETER
+
COIL
YELLOW
ORANGE
BLACK (SMALLER)
FIGURE 9
PART No. 585
®
R
MICROPROCESSOR CONTROLLED IGNITION SYSTEM
IGNITION KEY
TO 12 VOLTS
FIGURE 10
Installing the HYFIRE® V with a
Mallory UNILITE® or Magnetic
Breakerless Distributor
RED (SMALL 18 GA)
RED
BROWN
CONNECT WIRES AT THESE
POINTS
PART No. 585
®
MICROPROCESSOR CONTROLLED IGNITION SYSTEMMICROPROCESSOR CONTROLLED IGNITION SYSTEM
NOT USED
TO BATTERY POS (+)
TO BATTERY NEG ()
TO TACHOMETER
+
COIL
R
PURPLE
GREEN
TO ENGINE
GROUND
SHRINK TUBING
RED (LARGE 14 GA)
BLACK (LARGE 14 GA)
YELLOW
ORANGE
BLACK (SMALLER)
WHITEGREEN
MALLORY IGNITION 550 MALLORY WAY, CARSON CITY, NV 897016
Page 7
IGNITION KEY TO 12 VOLTS
TO BATTERY POS (+)
TO BATTERY NEG ()
PART No. 585
®
Originally connected to coil (+)
RED (LARGE 14 GA)
BLACK (LARGE 14 GA)
SHRINK TUBING
R
RED
PURPLE
GREEN
MICROPROCESSOR CONTROLLED IGNITION SYSTEMMICROPROCESSOR CONTROLLED IGNITION SYSTEM
NOT USED
TO TACHOMETER
+
COIL
WHITE
YELLOW
ORANGE
BLACK (SMALLER)
FIGURE 11
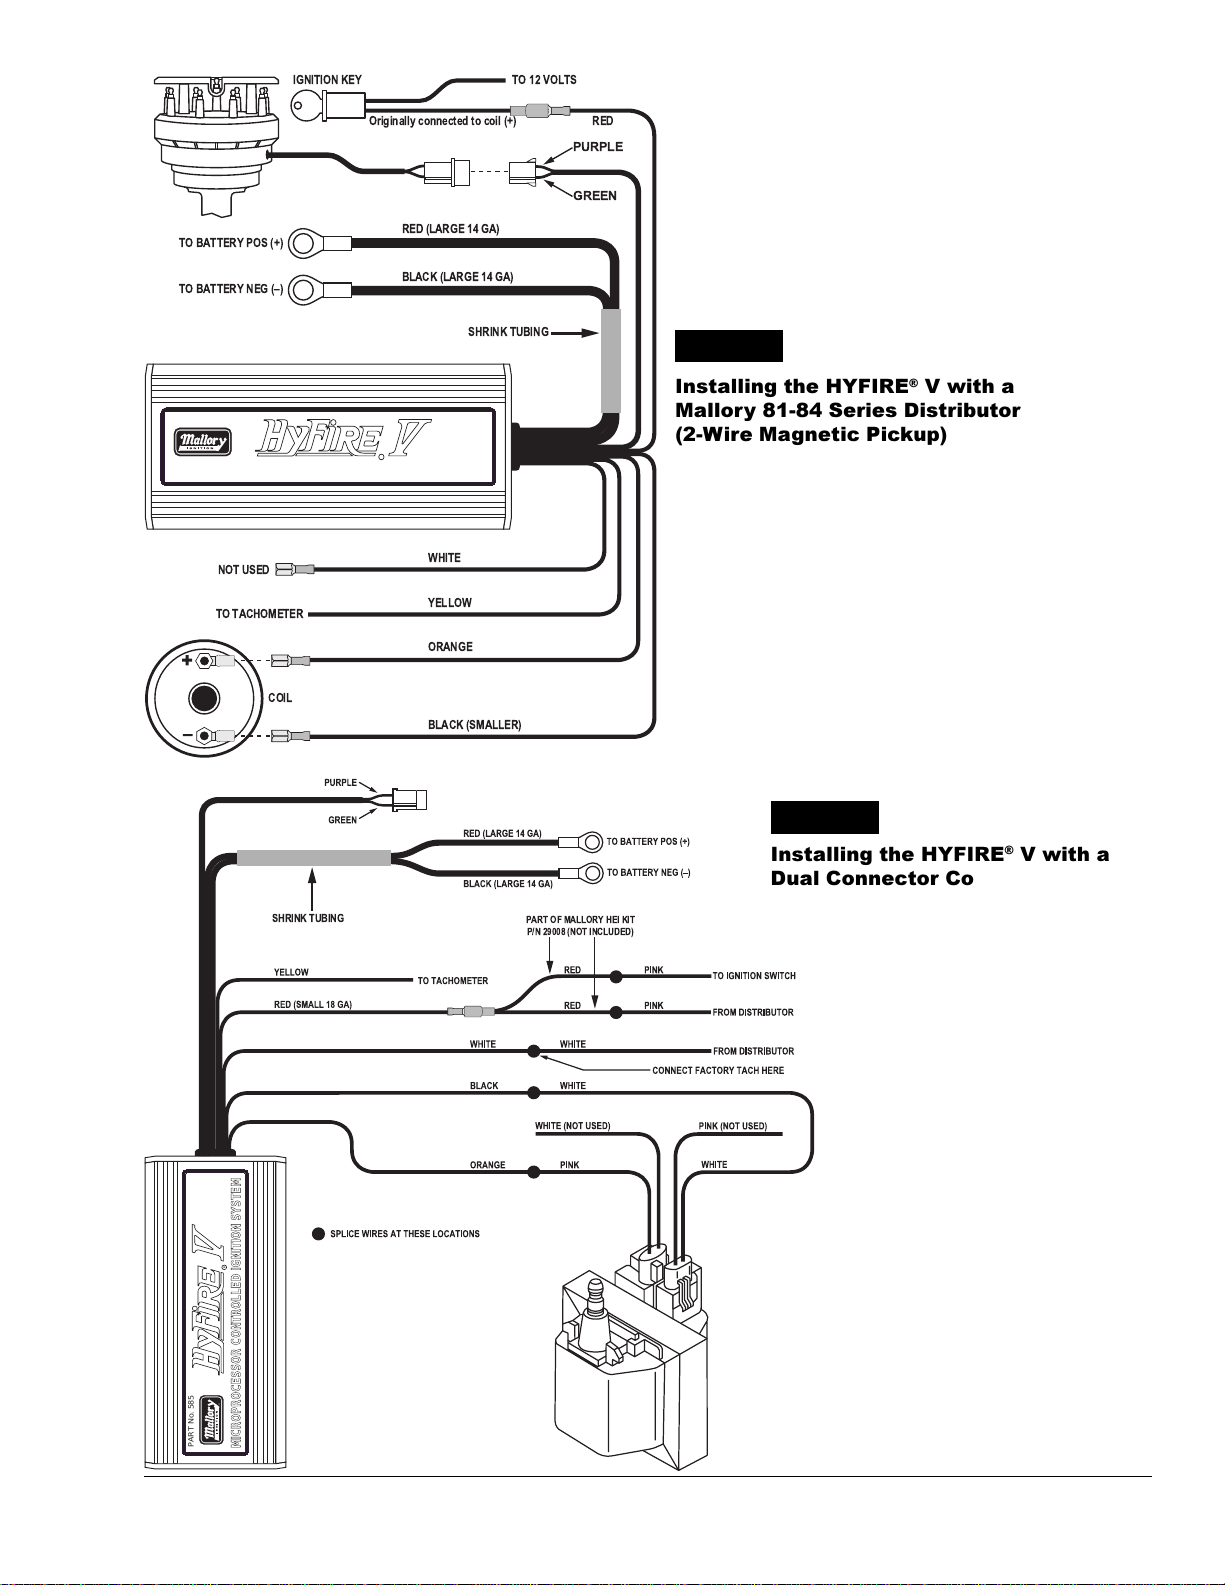
Installing the HYFIRE® V with a
Mallory 81-84 Series Distributor
(2-Wire Magnetic Pickup)
R
SHRINK TUBING
PART OF MALLORY HEI KIT
P/N 29008 (NOT INCLUDED)
FIGURE 12
Installing the HYFIRE® V with a
Dual Connector Coil HEI System
®
PART No. 585
MICROPROCESSOR CONTROLLED IGNITION SYSTEM
7MALLORY TECHNICAL SUPPORT (775) 882-6600 [email protected]
Page 8
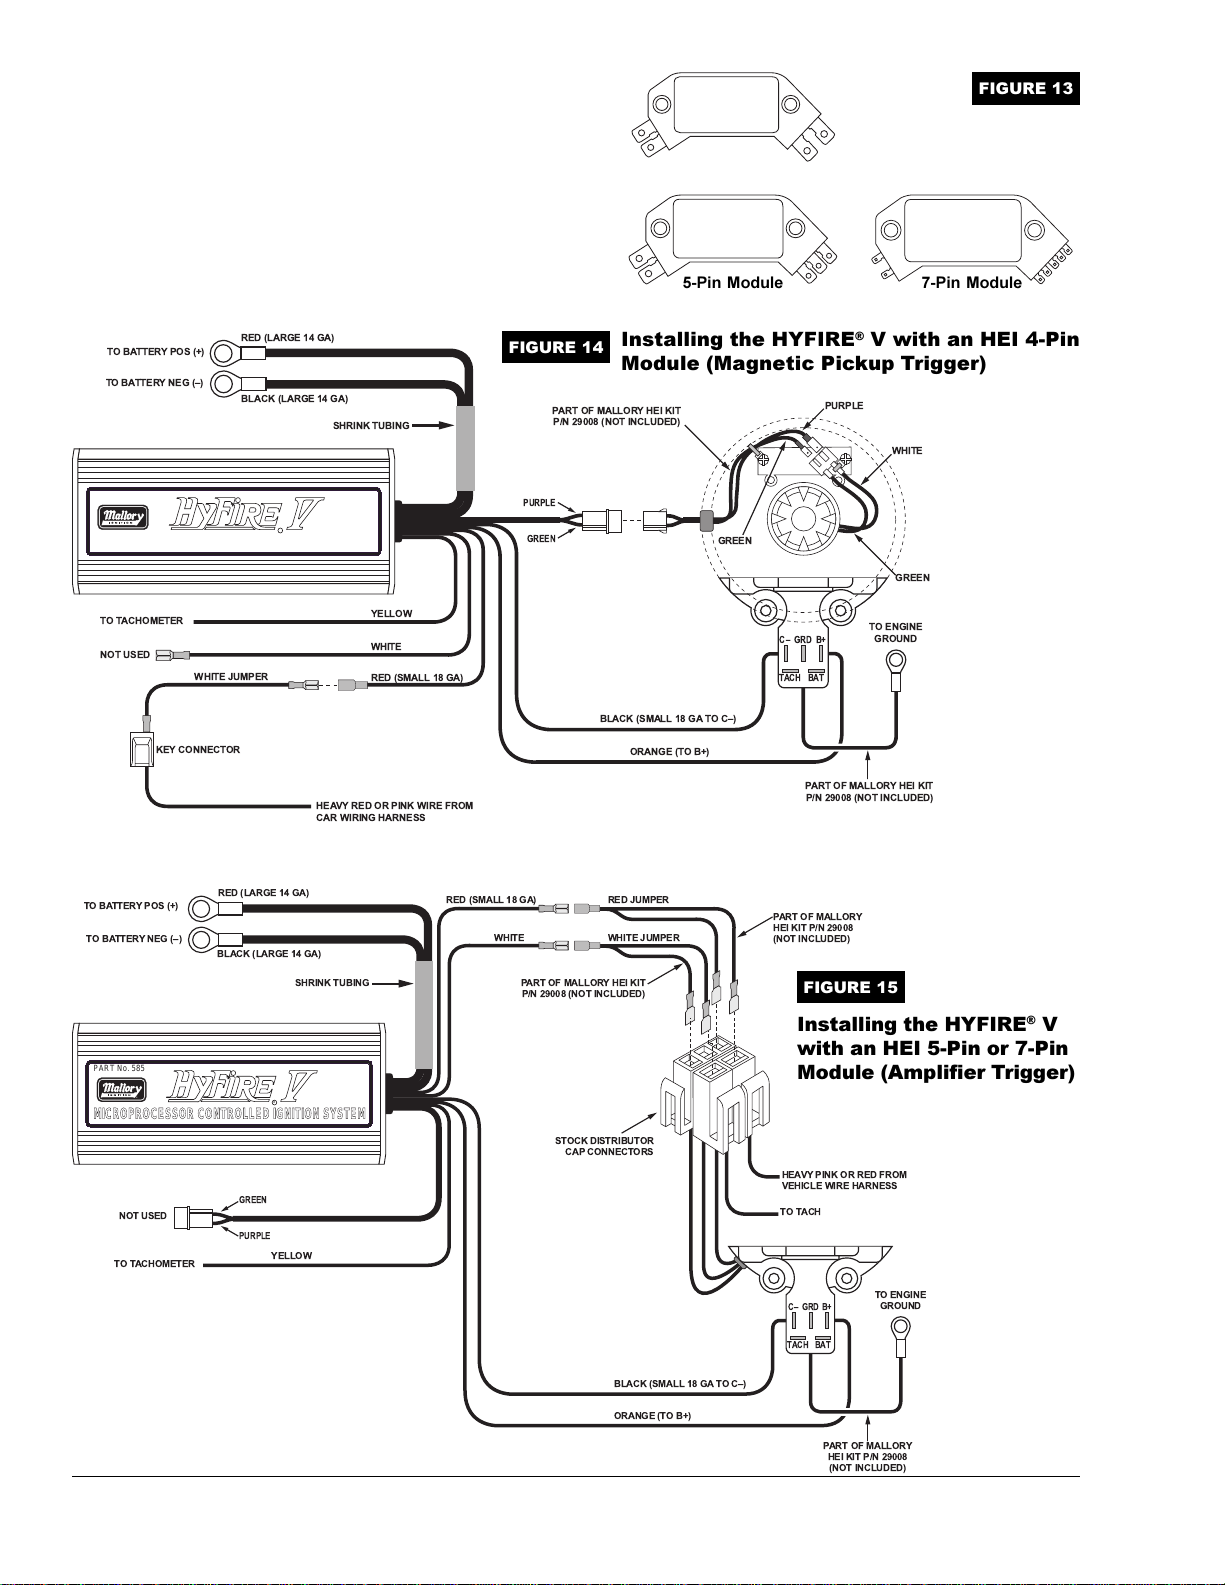
There are three different large cap HEI distributors. To identify which
of the following diagrams fit your specific application, remove the
distributor cap and rotor and locate the ignition module at the base
of the distributor. Count the number of terminals on both ends of
the module and follow the corresponding diagram. GM used 4, 5,
and 7-pin modules in these distributors.
NOTE: Some 5-pin modules may experience a hesitation or stall on
deceleration. If this occurs, contact the Mallory Technical Service
Department for the required bolt-in diode to correct the problem.
4-Pin Module
5-Pin Module
FIGURE 13
7-Pin Module
TO BATTERY POS (+)
TO BATTERY NEG ()
PART No. 585
®
MICROPROCESSOR CONTROLLED IGNITION SYSTEMMICROPROCESSOR CONTROLLED IGNITION SYSTEM
TO TACHOMETER
NOT USED
KEY CONNECTOR
TO BATTERY POS (+)
TO BATTERY NEG ()
PART No. 585
®
MICROPROCESSOR CONTROLLED IGNITION SYSTEMMICROPROCESSOR CONTROLLED IGNITION SYSTEM
NOT USED
TO TACHOMETER
RED (LARGE 14 GA)
BLACK (LARGE 14 GA)
WHITE JUMPER
RED (LARGE 14 GA)
BLACK (LARGE 14 GA)
GREEN
PURPLE
SHRINK TUBING
R
HEAVY RED OR PINK WIRE FROM
CAR WIRING HARNESS
SHRINK TUBING
R
YELLOW
YELLOW
WHITE
RED (SMALL 18 GA)
RED (SMALL 18 GA)
FIGURE 14
PART OF MALLORY HEI KIT
P/N 29008 (NOT INCLUDED)
PURPLE
GREEN
WHITE
PART OF MALLORY HEI KIT
P/N 29008 (NOT INCLUDED)
STOCK DISTRIBUTOR
CAP CONNECTORS
Installing the HYFIRE® V with an HEI 4-Pin
Module (Magnetic Pickup Trigger)
PURPLE
WHITE
GREEN
GREEN
TO ENGINE
GROUND
BLACK (SMALL 18 GA TO C)
ORANGE (TO B+)
RED JUMPER
WHITE JUMPER
C GRD B+
BATTACH
PART OF MALLORY HEI KIT
P/N 29008 (NOT INCLUDED)
PART OF MALLORY
HEI KIT P/N 29008
(NOT INCLUDED)
FIGURE 15
Installing the HYFIRE® V
with an HEI 5-Pin or 7-Pin
Module (Amplifier Trigger)
HEAVY PINK OR RED FROM
VEHICLE WIRE HARNESS
TO TACH
TO ENGINE
GRD
C
GROUND
B+
BATTACH
BLACK (SMALL 18 GA TO C)
ORANGE (TO B+)
PART OF MALLORY
HEI KIT P/N 29008
(NOT INCLUDED)
MALLORY IGNITION 550 MALLORY WAY, CARSON CITY, NV 897018
Page 9
MAGNETIC PICKUP
NOT USED
HEAVY PINK, ORANGE, OR RED WIRE
FROM DISTRIBUTOR
GREEN
PURPLE
PINK
BROWN
STOCK IGNITION
COIL CONNECTOR
NOT USED (TAPE END)
PART No. 585
®
R
MICROPROCESSOR CONTROLLED IGNITION SYSTEM
TO BATTERY POS (+)
TO BATTERY NEG ()
STOCK IGNITION
COIL CONNECTOR
SHRING TUBING
RED (LARGE 14 GA)
BLACK (LARGE 14 GA)
RED
GREEN
RED (SMALL 18 GA)
(SMALL
18 GA)
WHITE
RED (SMALL 18 GA)
ORANGEBLACK
WHITE JUMPER
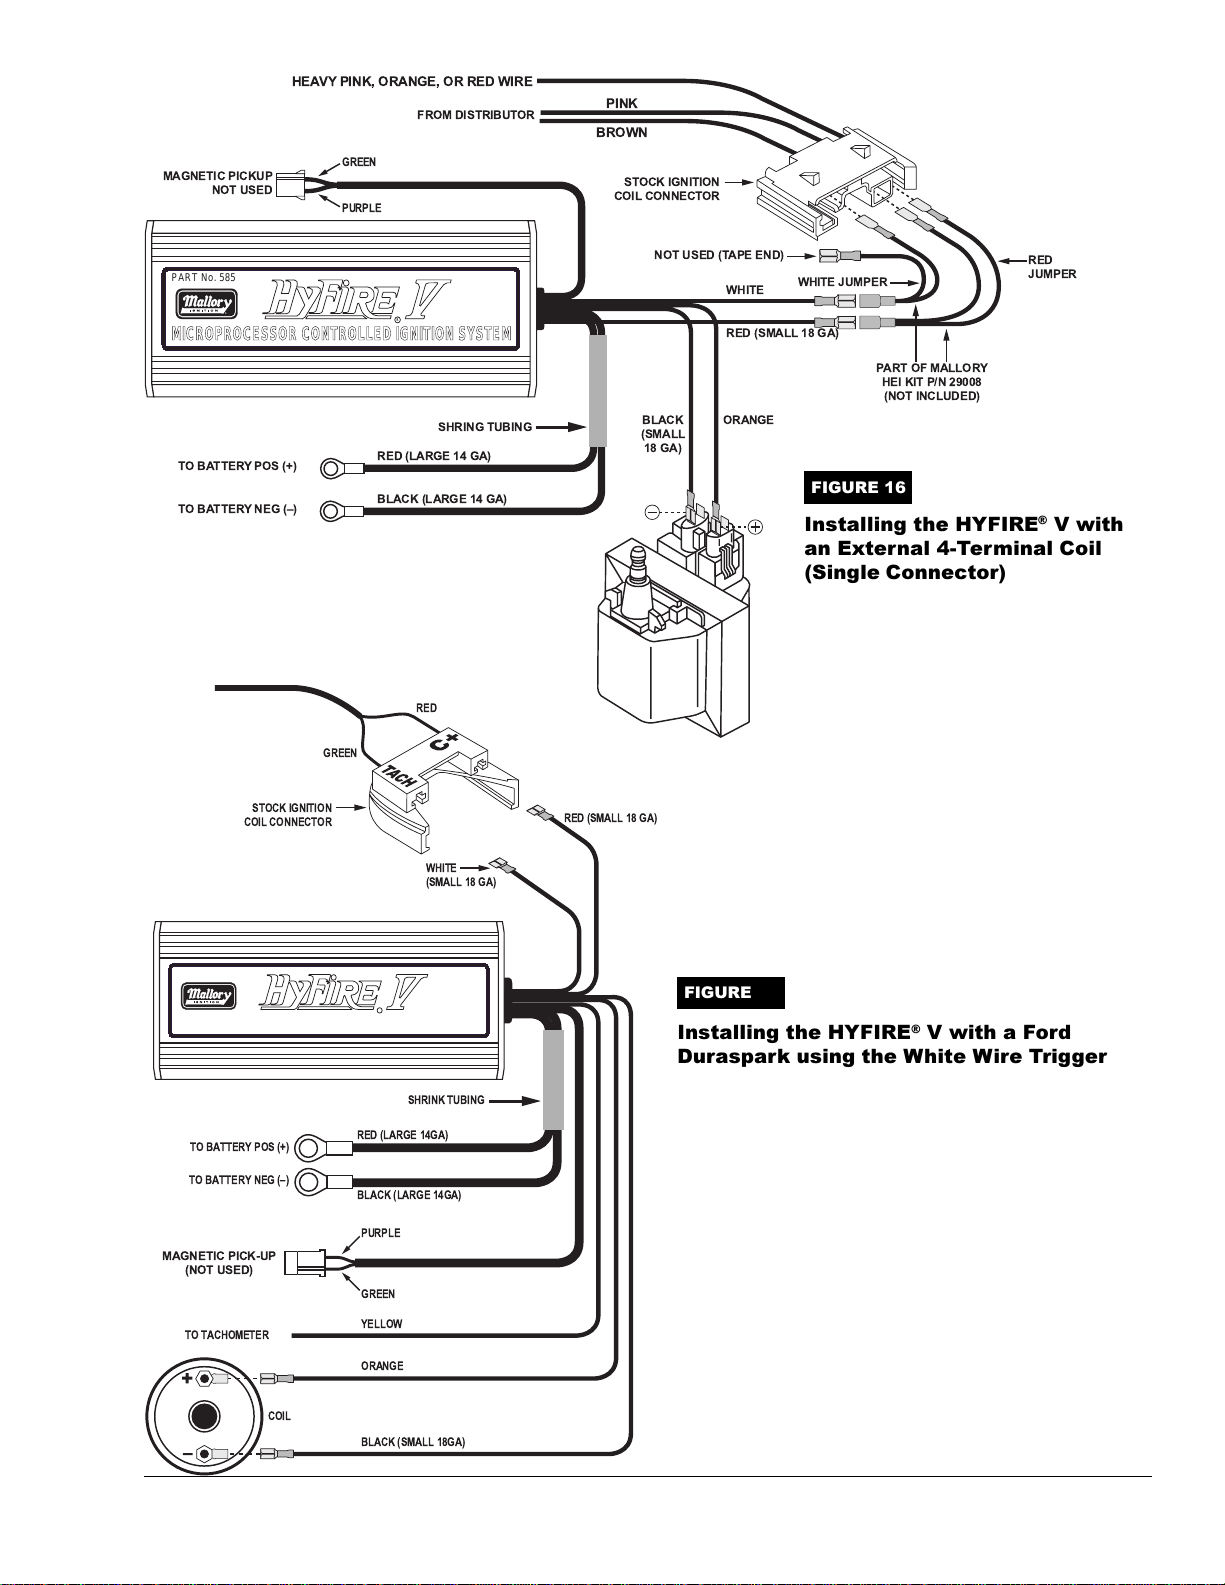
FIGURE 16
Installing the HYFIRE® V with
an External 4-Terminal Coil
(Single Connector)
PART OF MALLORY
HEI KIT P/N 29008
(NOT INCLUDED)
RED
JUMPER
WHITE
(SMALL 18 GA)
PART No. 585
®
R
MICROPROCESSOR CONTROLLED IGNITION SYSTEM
SHRINK TUBING
TO BATTERY POS (+)
TO BATTERY NEG ()
MAGNETIC PICK-UP
(NOT USED)
TO TACHOMETER
+
COIL
RED (LARGE 14GA)
BLACK (LARGE 14GA)
PURPLE
GREEN
YELLOW
ORANGE
BLACK (SMALL 18GA)
FIGURE 17
Installing the HYFIRE® V with a Ford
Duraspark using the White Wire Trigger
9MALLORY TECHNICAL SUPPORT (775) 882-6600 [email protected]
Page 10
STOCK IGNITION
COIL CONNECTOR
INSULATE UNUSED
ENDS OF JUMPERS
RED JUMPER
WHITE JUMPER
PART OF MALLORY
HEI KIT P/N 29008
(NOT INCLUDED)
TO BATTERY POS (+)
TO BATTERY NEG ()
PART No. 585
®
RED (LARGE 14GA)
BLACK (LARGE 14GA)
SHRINK TUBING
R
WHITE
RED (SMALL 18GA)
MICROPROCESSOR CONTROLLED IGNITION SYSTEMMICROPROCESSOR CONTROLLED IGNITION SYSTEM
TO TACHOMETER
ORANGE
BLACK (SMALL 18GA)
YELLOW
MAGNETIC PICK-UP
(NOT USED)
IGNITION COIL
PURPLE
GREEN
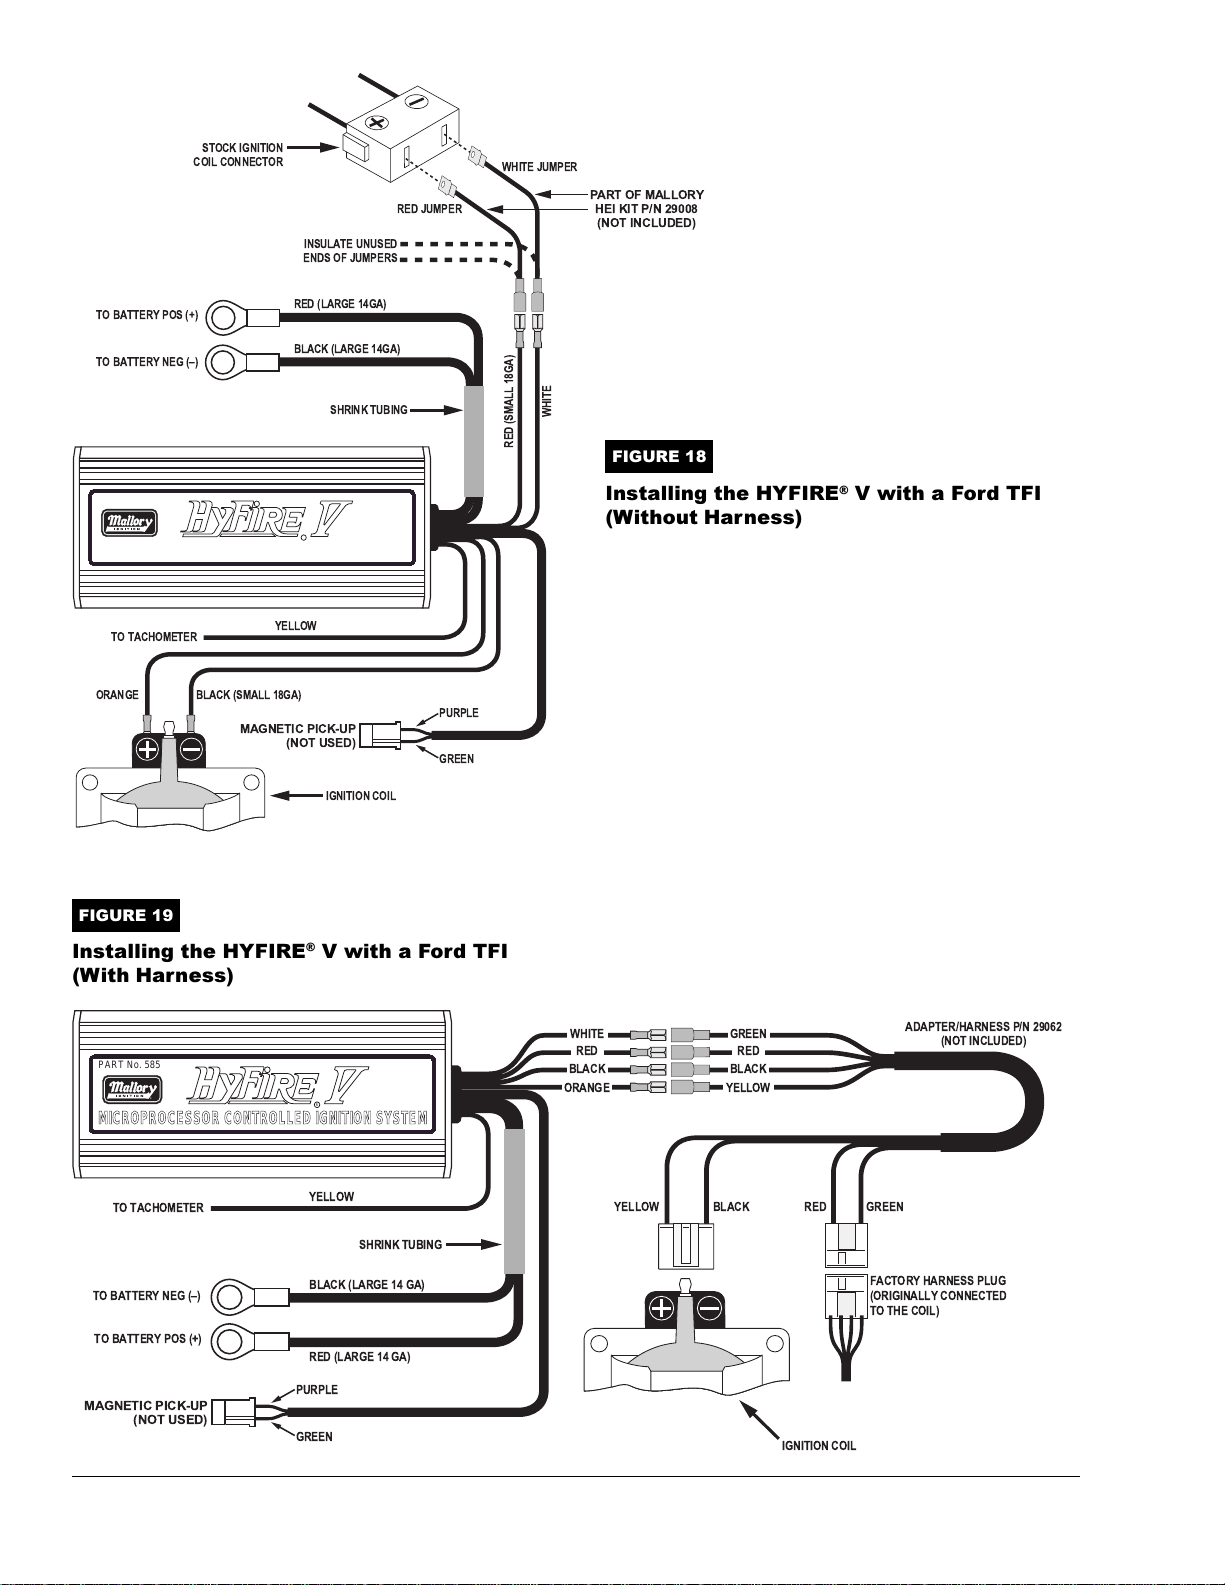
FIGURE 18
Installing the HYFIRE® V with a Ford TFI
(Without Harness)
FIGURE 19
Installing the HYFIRE® V with a Ford TFI
(With Harness)
PART No. 585
®
MICROPROCESSOR CONTROLLED IGNITION SYSTEM
TO TACHOMETER
TO BATTERY NEG ()
TO BATTERY POS (+)
MAGNETIC PICK-UP
(NOT USED)
R
YELLOW
SHRINK TUBING
BLACK (LARGE 14 GA)
RED (LARGE 14 GA)
PURPLE
GREEN
WHITE
RED
BLACK
ORANGE
YELLOW BLACK
GREEN
RED
BLACK
YELLOW
RED GREEN
IGNITION COIL
ADAPTER/HARNESS P/N 29062
(NOT INCLUDED)
FACTORY HARNESS PLUG
(ORIGINALLY CONNECTED
TO THE COIL)
MALLORY IGNITION 550 MALLORY WAY, CARSON CITY, NV 8970110
Page 11
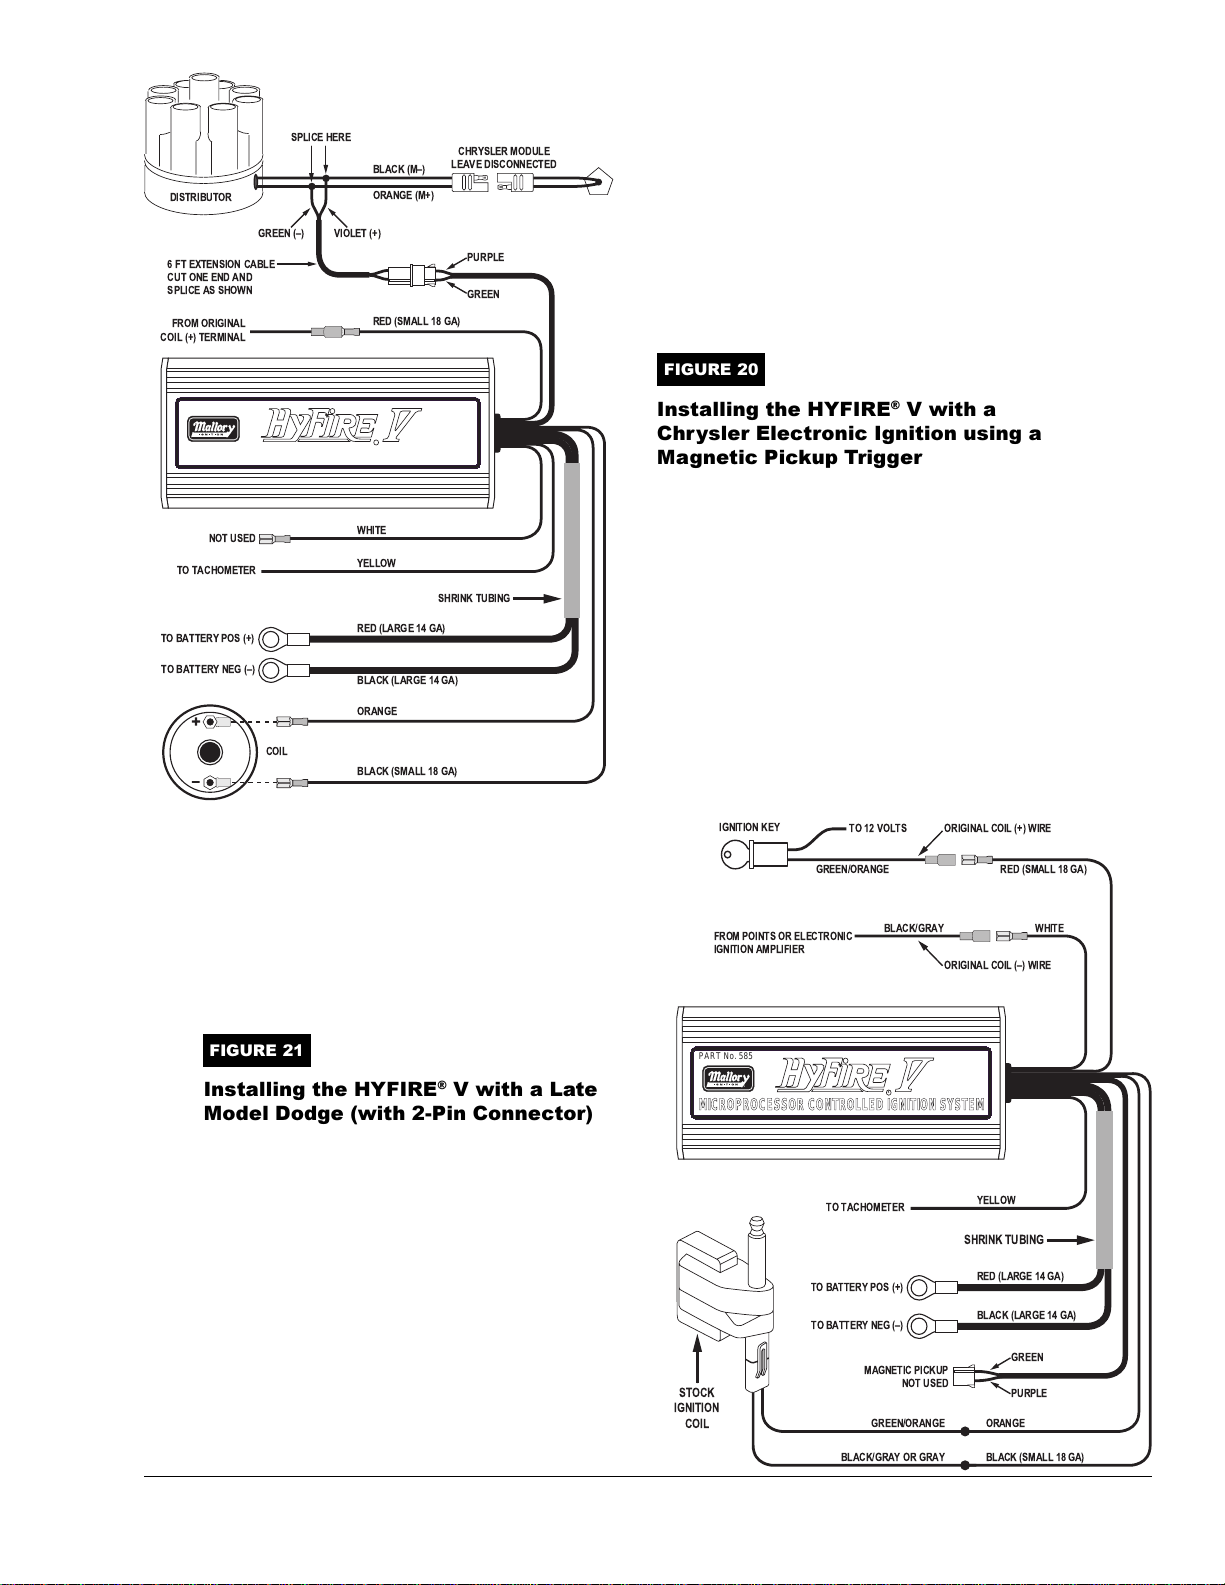
DISTRIBUTOR
6 FT EXTENSION CABLE
CUT ONE END AND
SPLICE AS SHOWN
FROM ORIGINAL
COIL (+) TERMINAL
SPLICE HERE
VIOLET (+)GREEN ()
BLACK (M)
ORANGE (M+)
RED (SMALL 18 GA)
CHRYSLER MODULE
LEAVE DISCONNECTED
PURPLE
GREEN
FIGURE 20
PART No. 585
®
MICROPROCESSOR CONTROLLED IGNITION SYSTEM
NOT USED
TO TACHOMETER
TO BATTERY POS (+)
TO BATTERY NEG ()
+
COIL
R
WHITE
YELLOW
SHRINK TUBING
RED (LARGE 14 GA)
BLACK (LARGE 14 GA)
ORANGE
BLACK (SMALL 18 GA)
Installing the HYFIRE® V with a
Chrysler Electronic Ignition using a
Magnetic Pickup Trigger
IGNITION KEY
FROM POINTS OR ELECTRONIC
IGNITION AMPLIFIER
TO 12 VOLTS
BLACK/GRAY
ORIGINAL COIL (+) WIRE
RED (SMALL 18 GA)GREEN/ORANGE
ORIGINAL COIL () WIRE
WHITE
FIGURE 21
Installing the HYFIRE® V with a Late
Model Dodge (with 2-Pin Connector)
PART No. 585
®
R
MICROPROCESSOR CONTROLLED IGNITION SYSTEMMICROPROCESSOR CONTROLLED IGNITION SYSTEM
YELLOW
SHRINK TUBING
RED (LARGE 14 GA)
BLACK (LARGE 14 GA)
GREEN
PURPLE
ORANGE
BLACK (SMALL 18 GA)
STOCK
IGNITION
COIL
TO TACHOMETER
TO BATTERY POS (+)
TO BATTERY NEG ()
MAGNETIC PICKUP
GREEN/ORANGE
BLACK/GRAY OR GRAY
NOT USED
11MALLORY TECHNICAL SUPPORT (775) 882-6600 [email protected]
Page 12
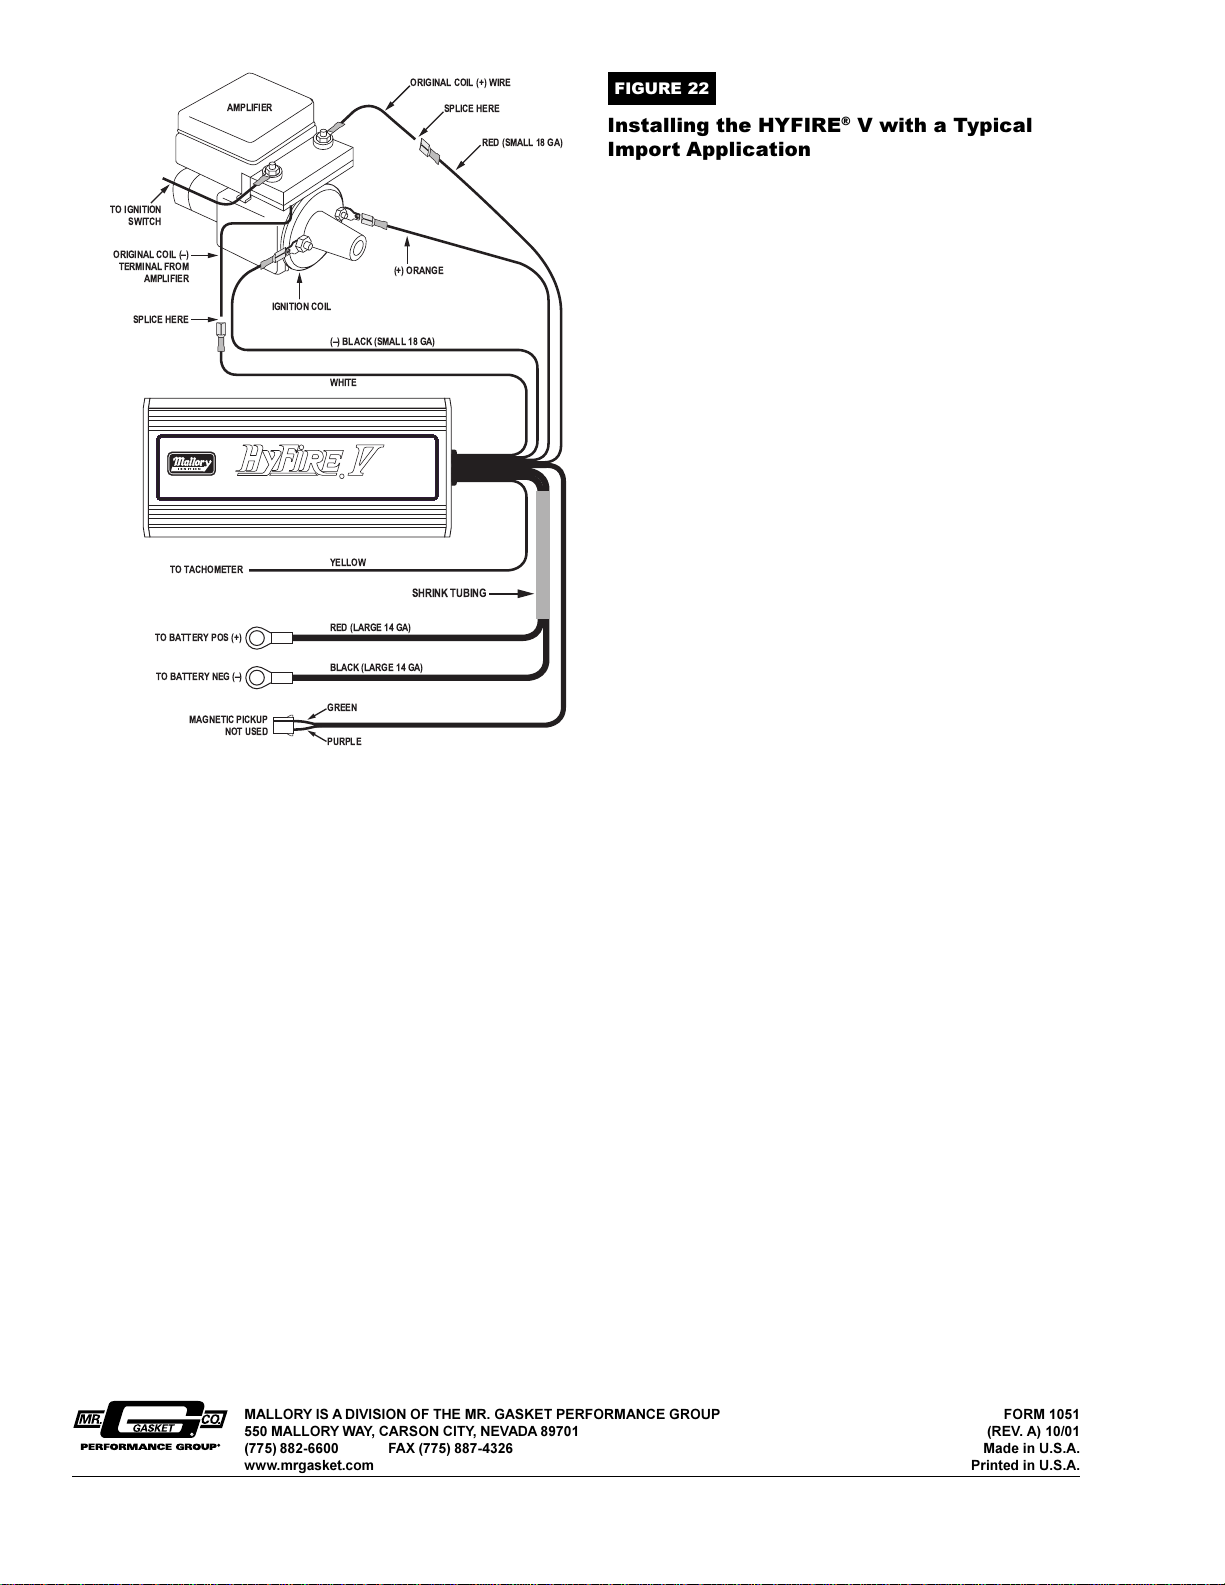
ORIGINAL COIL (+) WIRE
AMPLIFIER
TO IGNITION
SWITCH
ORIGINAL COIL ()
TERMINAL FROM
AMPLIFIER
SPLICE HERE
PART No. 585
®
MICROPROCESSOR CONTROLLED IGNITION SYSTEMMICROPROCESSOR CONTROLLED IGNITION SYSTEM
IGNITION COIL
() BLACK (SMALL 18 GA)
WHITE
R
SPLICE HERE
(+) ORANGE
RED (SMALL 18 GA)
FIGURE 22
Installing the HYFIRE® V with a Typical
Import Application
TO TACHOMETER
TO BATTERY POS (+)
TO BATTERY NEG ()
MAGNETIC PICKUP
NOT USED
YELLOW
SHRINK TUBING
RED (LARGE 14 GA)
BLACK (LARGE 14 GA)
GREEN
PURPLE
12
MALLORY IS A DIVISION OF THE MR. GASKET PERFORMANCE GROUP
550 MALLORY WAY, CARSON CITY, NEVADA 89701
(775) 882-6600 FAX (775) 887-4326
www.mrgasket.com
FORM 1051
(REV. A) 10/01
Made in U.S.A.
Printed in U.S.A.
 Loading...