


USER MANUAL
HƯỚNG DẪN SỬ DỤNG
WINE COOLER
TỦ RƯỢU
MODEL: MWC-46BG
MWC-180BG
Thanks for buying our Wine cooler, Hope our advanced product will give your Wine a
different joyful taste. Before use, please read and follow all safety rules and operating
instructions.
Cám ơn bạn đã sử dụng Tủ rượu của chúng tôi , hy vọng sản phẩm của chúng tôi sẽ đem lại
sự hài lòng cho quý khách hàng. Trước khi sử dụng, xin đọc và theo dõi tất cả hướng dẫn sử
dụng về an toàn và vận hành.
0

WARNING
The information in this document is subject to modifi cation without any prior notice. S ome
models are a vailable in dedicated countries only.
Offers no guarantee for our Wine cooler if it is be in g use d for any purpo se ot her tha n t hat for
which it was specifically de signed. We cannot be held responsible for any error in this
manual. is not responsible or liable for a ny spoilage or damage to Wine or any other contents
incidental or consequent ial to possible defects of the W ine c o ole r. Warranty applies to the
Wine cooler only a nd not to the content of the Wine cooler
This appliance can be used by children aged from 8 years and above and persons with
reduced physical, sensory or mental capabilities or lack of experience and knowledge if they
have been given supervision or instruction concerning use of the appliance in a safe way and
understand the hazards involved. Children shall not play with the appliance. Cleaning and
user maintenance shall no t be made by children without supervision.
Children should be supervised to ensure that they do not play with the appliance.
Do not store explosive substances such as aerosol cans with a flammable propellant in
this applia nce.
This applia nce is intended to be used in ho usehold and similar applica tions such as
– staff kitchen areas in shops, office s and other working enviro nments;
– farm houses and by clients in hotels, motels and other residential type environments;
– bed and breakfa st ty pe envir o nments;
– catering and similar non-retail applications.
DANGER: Risk of child entrapment. Before you throw away your old
Wine cooler:
- Take off the doors;
- Leave the humidor dra we r in place so that children may not easily climb inside;
- When disposing of the appliance, do so only at an authorized waste disposal centre.
1

R600a WARNINGS:
For your safe ty observe the following recommendations.
• This applia nce contains a small quantity of R600a refriger a n t whic h is
environmentally friendly, but flammable. It does not damage the ozone layer, nor
does it increase the gr eenhouse effect.
• During transportation and installation, ensure that the tubing of the refrigerant circuit
is not damaged.
• Avoid using or m anip ula t ing sha r p obj ec ts nea r by the appliances.
• Leaking refrigerant can ignite and may damage the eye s.
• In the event any damage does occur, avoid exposure to open fires and a ny device
which creates a spark. D isconnect the appliance from the mains power.
• Thoroughly ventilate the room in which the appliance is located for several minutes.
• Notify Customer Service f or necessary action and advice.
• The room f or installing the a ppliance must be at least 1 cubic metre per 8 grams of
refrigerant. The refrigerant quantity contained in this applia nce is listed above in
grams; it is a lso noted on the R ating Plate of the appliance.
It is hazardous for anyone other than an Authorised Service Person to carry out
servicing o r repairs to this appliance.
- WARNING: Keep ventilation openings in the appliance enclosure or in the built-in
structure clear of obstruction.
- WARNING: Do not use mechanical d evices or other means to accel erate the defr osting
process, other than those recommended by the manufacturer.
- WARNING: Do not damage the refrigera nt circuit.
- WARNING: Do not use electrical appliances inside the food storage compartments of
the appliance.
- WARNING: This appliance is not intended for use by persons (including children)
with reduced Physical, sensory or mental capabilities, or lack of experience and
knowledge, unless they have been given supervision or instruction concerning use
of the appliance by a person responsible for their safety;
- WARNING: Children should be supervised to ensure that they do not play with t he
appliance;
- WARNING:Do not use extension cords or ungrounded (two prong) adapters;
- WARNING:If the supply cord is damaged, it must be replaced by the manufacturer,
Its service agent or similar qualified person in order to avoid hazard.
Attention:
When the W ine cooler is at “OFF” condition:
- Please take out all of goods from Wine coole r ;
- Please keep Wine cooler clean
Allow 24 hours before switching on the Wine cooler. During this time we recommend
that you leave the door open to clear any residual odors.
2

BEFORE LOADING & PLUGGING IN THE WINE COO LER
Important: All models wit hout front venting (air opening) are strictly for free standing
only. (See technical chart)
Recommendations:
The location you have sele cted for your W ine cooler should:
- be unencumbered and well ventilated;
- be well away from any heat source and direct sunlight;
- not be too damp (laundry, pantry, bathroom etc.);
- have a flat floor;
- have a standard and reliable electricity supply (standard socket to country standards,
linked to the ground), it is NOT recommended to use a multi-socket or extension lead;
- have a surge protector fitted to the electr ical outlet;
- Away from the microwave oven. Certain m icrowave ovens do not have wave
interference shield. When placed with in 1 meter vicinity of the Wine cooler, they may
affect the operation of the Wine cooler.
Notes:
These models are Both built-in and free-standing type as per the drawings thereafter.
Wine cooler should be install at suitable ambient temperature (please refer the end of User
Manual). If the temperature is higher or lower the ambient temperature range, it will affect
temperatur e fluctuation and can’t reach c ooling performance.
Grounding instructions:
The Wine cooler must be grounded in case of wire leakage. Grounding reduces the risk of
electrical shock. The Wine cool er is e q uip pe d with a power cord having a grounding wire
and plug. The Wine cooler plug must be plugged into a properly a ffixed and grounded
electrical outlet.
Note: In locati ons where there is frequent lightning, it is advisable to u se surge protectors.
Improper use of the grounding plug can result in the risk of electric shock. Consult a
qualified electrician or service person if the grounding instructions are not completely
understood.
If the supply cord is damaged, it must be replaced by a qualified person in order to avoid
electrical hazard.
INSTALLING YOUR WINE COOLER
Unpack and remove all of the protection and adhesive strips from the packaging around and
inside the Wine cooler.
The Wine cooler must be positioned suc h that the plug is accessible. Release the power cord.
Move your Wine cooler to its final location. The Wine cooler should be in sta l led i n a
suitable place where the compressor wi ll not be subject to physical contact.
3
Leveling your Wine cooler: Wine cooler must be leveled BEFORE loading your Wine.
Your Wine cooler is equipped wi th 4 adjustable feet to facili tate easy leveling. recommends
that you tighten the back feet to the maximum and adjust the front feet to level the Wine
cooler.
INSTALLATION INSTRUCTIONS FOR BUILT IN WINE COOLER:
FRONT VENTING WINE COOLER ONLY.
1. “Built in” Wine c ooler are front ven tin g bu t are no t des i gne d t o be fully integrated behi nd
a joinery door.
2. Please foll ow the installation diagram when installin g built-in
Wine cooler. No less than the
minimum installation dimension.
3. Built-in Wine cooler draw air from right of ventilation frame and expel through left of
ventilation frame under the front door.
4. “Built in” Wine cooler have a power switch located on the control panel so power point
location is no t crit ical.
5. The Wine cooler requires a standard 240 volt/10 am p power point. (Or according to
different countries spe c ifications).
6. The power cord is 2.0m in length and is fixed on the right side at the back when looking
from front of cabinet.
7. As with most appliance s of today, the W ine cooler has sensitive electronic components
which are su sc eptible to da mage through lightning and e lectricity supply faults. I t is
therefore advised to use a power surge protector to avoid problem s of this nature.
8. Air vent on door must be provided for bu ilt-in Wine cooler w he n a wood do or in st al l ed.
In Hot climate zone, an air vent or grid, with a minimum ventilation size of 200mm x 40mm
MUST be cut out at the rear top of the back partitioning or at the top of either side o f the
partitioning, allowing cool fresh air full access to flow into the 30mm gap located at the rear
of the cabinet.
This air vent or grid must not be opened on the same side as other appliances such as ovens
or an area that is sealed and without access to fresh cool air. Failing to comply with the
above specific a tio n s co ul d resu lt in W AR RA N TY void.
INSTALLATION DRAWINGS FOR BUILT IN Wine cooler:
COLUMN) FRONT VENTING WINE COOLER ONLY.
(UNDERBENCH OR IN
4
Note: The appliance m ust be positioned so that the plug is accessible af t er installed.
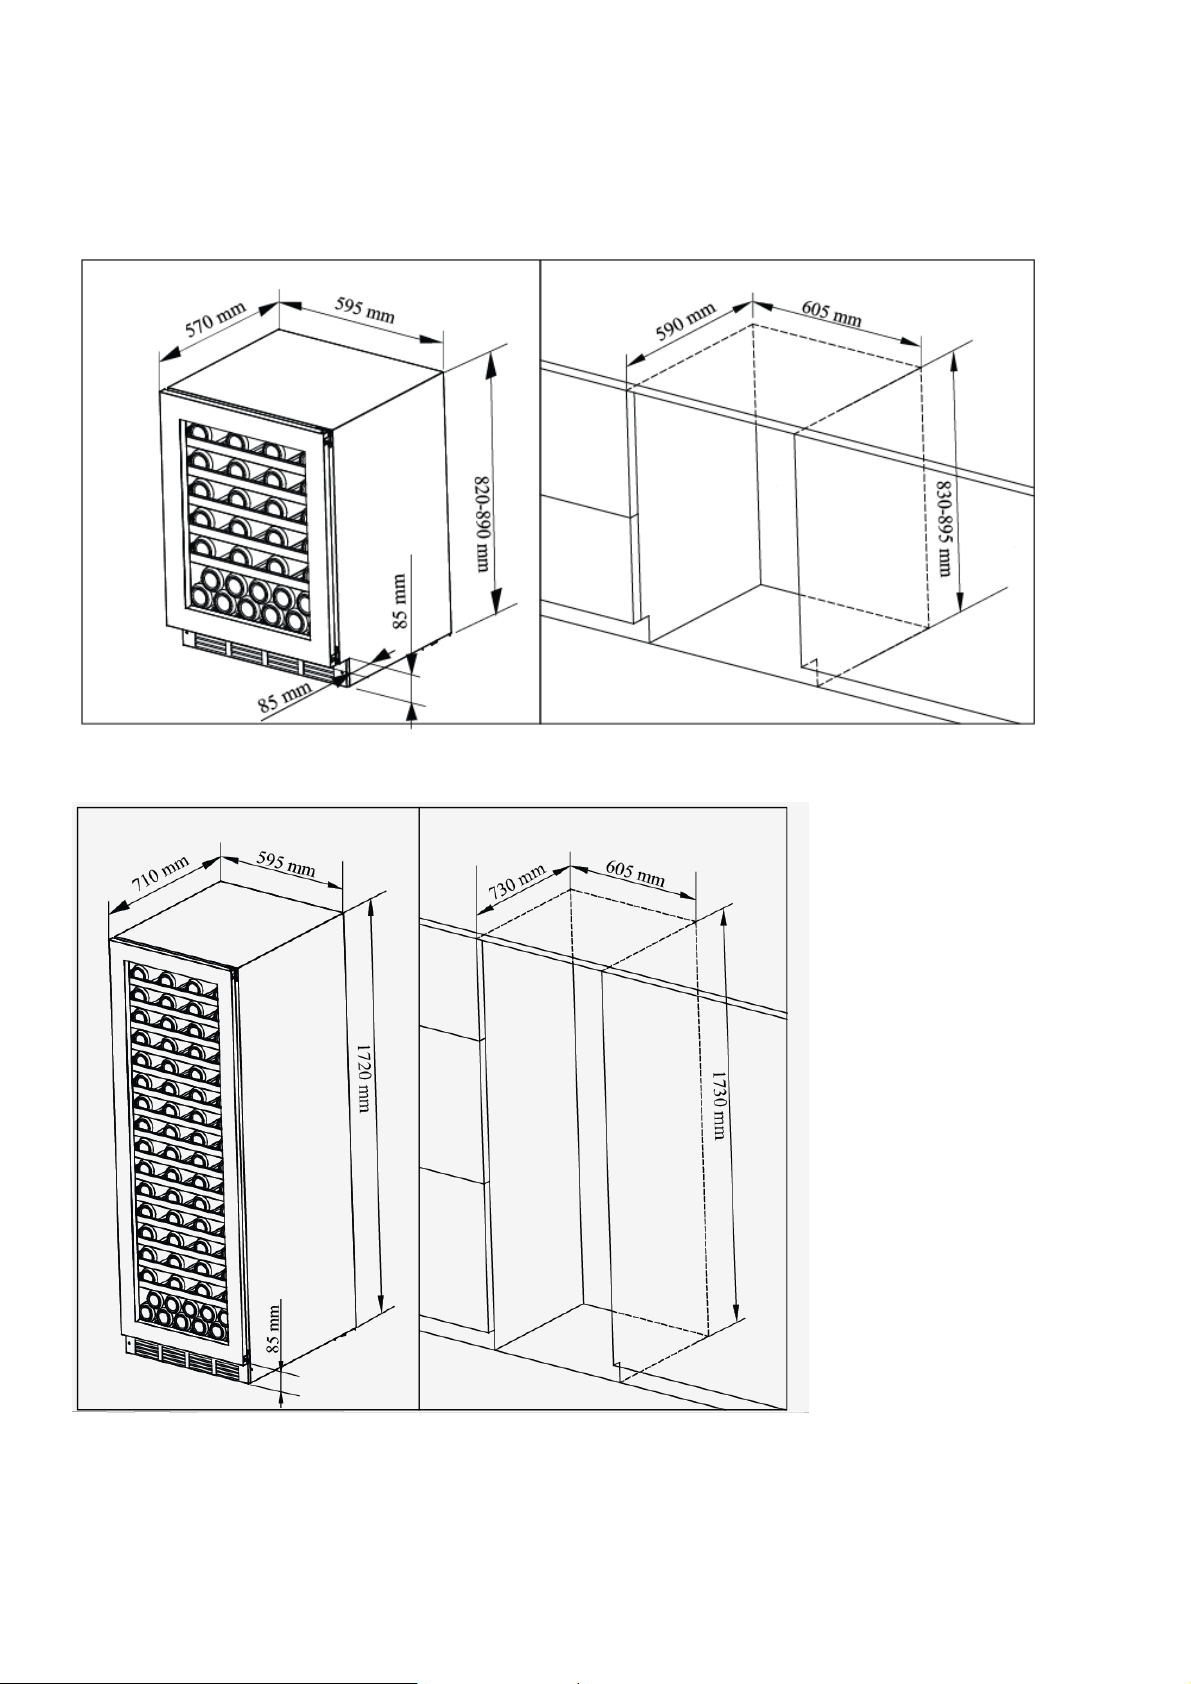
DIMENSIONAL DRAWINGS:
For MWC-46BG
For MWC-180BG
5
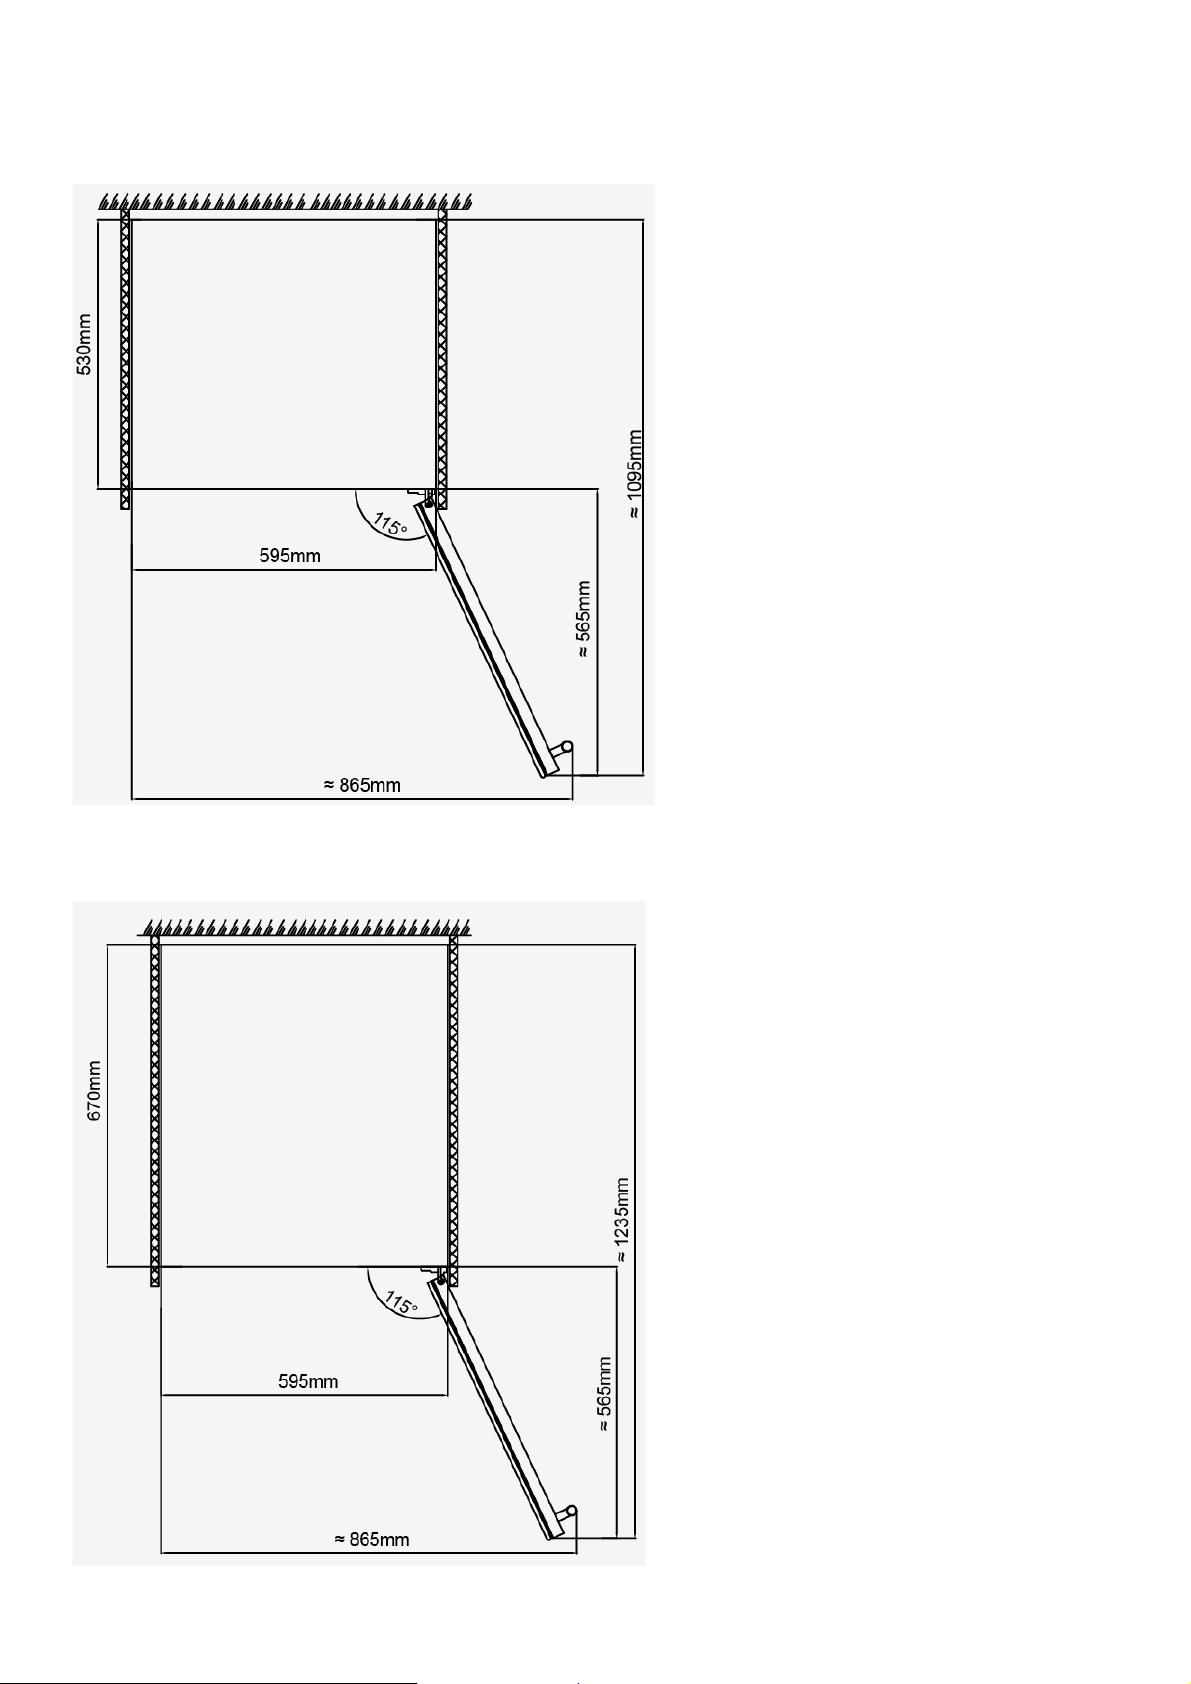
OPEN ANGLE SIZE DRAWINGS:
For MWC-46BG
For MWC-180BG
6
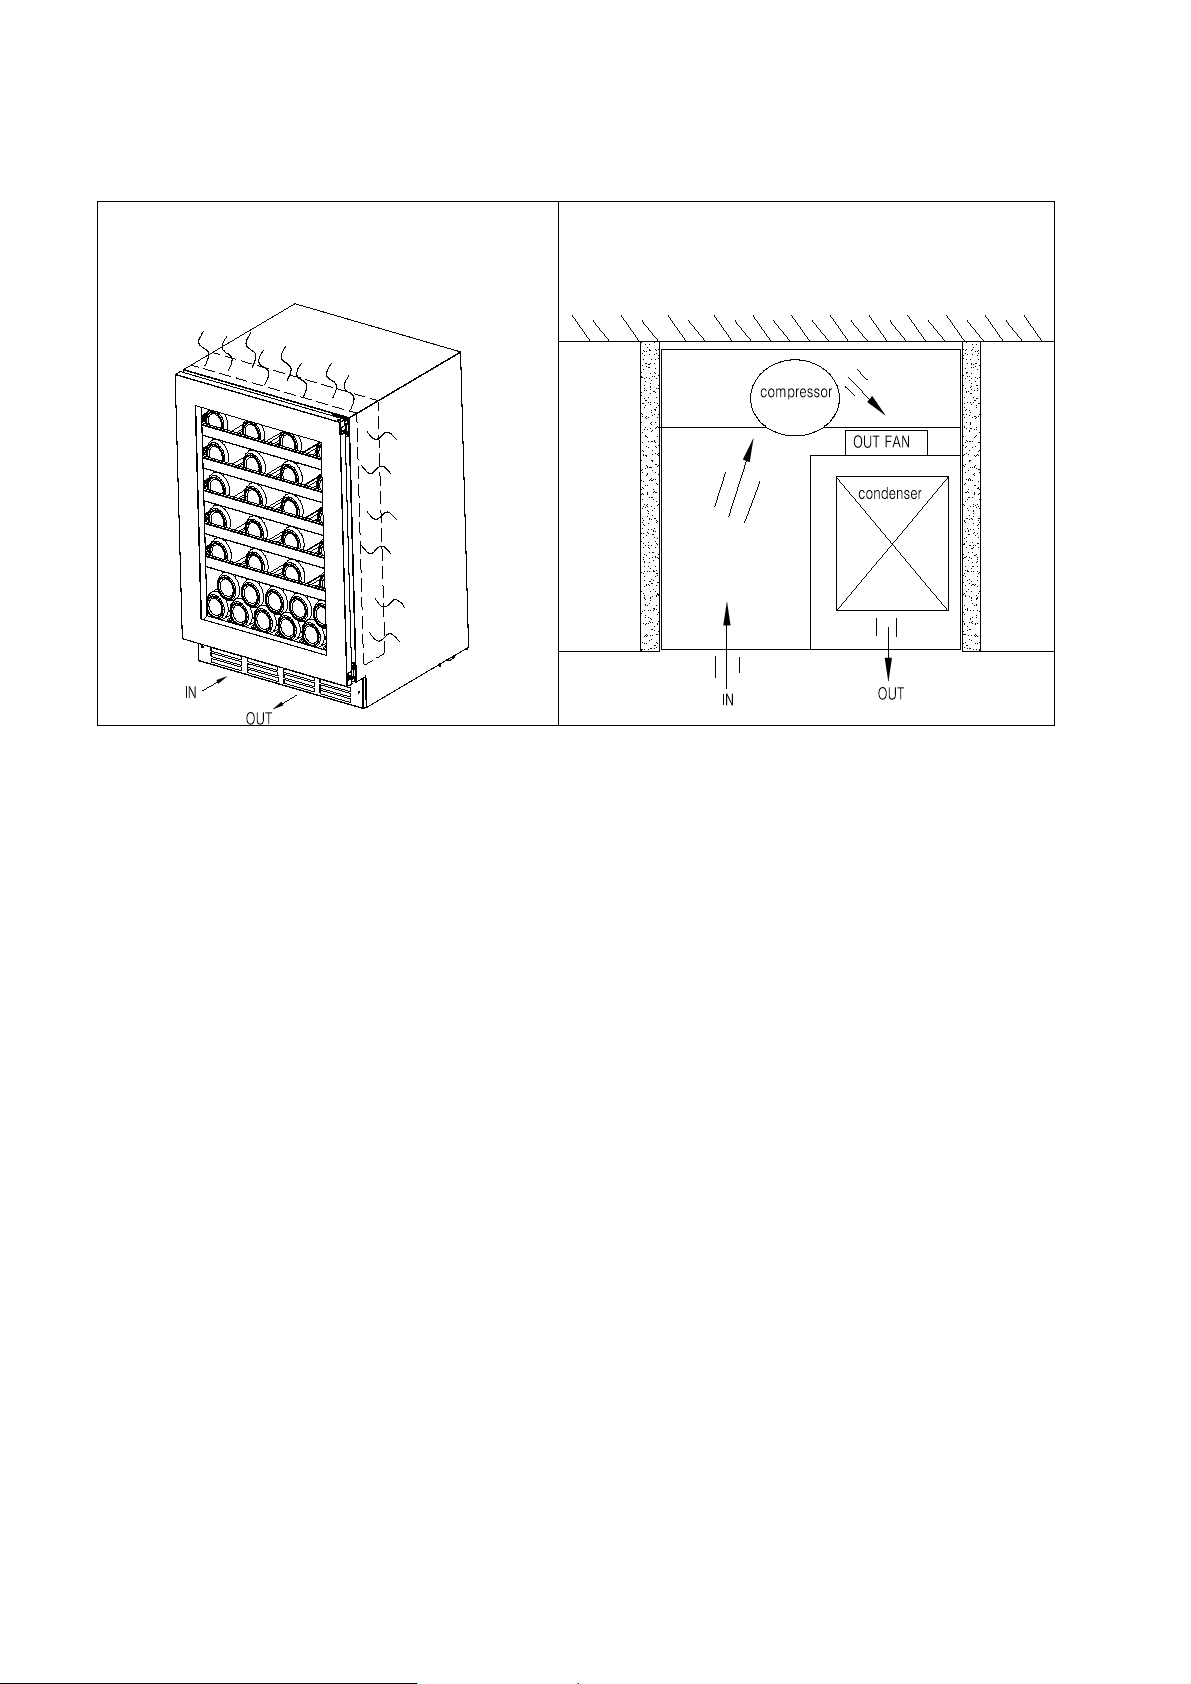
RADIATOR SYSTEM DESCRIPTION
These Models use side anti-dew tube and Independent cooling system:
TURNING ON YOUR WINE COOLER
Plug in and switch on the cellar by pressing on the power button for a few seconds.
When you use the Wine cooler for the first time (or restar t the Wine cooler after having it
shut off for a long time), there will be a fe w degrees variance between the temperature you
have selected and the one indicated on the LED readout. This is normal and it is due to the
length of the activation time. Once the Wine cooler is running for a few hours everything
will stabiliz e.
Important: If the unit is unplugged, power is lost, or turned off, wait 3 to 5 minutes before
restarting the unit. The Wine cooler will not start if you attempt to restart before this time
delay.
Operating Noises
To reach the desired temperature settings, Our Wine cooler, like all Wine cooler operating
with compre ssors and fans, may produce the following types of noises. These noises are
normal and may occur as fol lows:
- Gurgling sound - caused by the refrigerant flowing through the appliance’s coils.
- Cracking/popping sounds - resulting from the contraction and expansion of the refrigerant
gas to produce cold.
- Fan operat i ng so und - to circulate the air within the Wine cooler.
7
An individual’s percept ion of noise is directly linke d to the envir onment in whic h the Wine
cooler is locat ed, as we l l the spec i fic ty pe of models. Our Wine coole r a re in li ne w ith
international standards for such appli ance. We will always do its utmo st to sat is fy it s
customers b ut will not retake possession of the goods due to complaints based on normal
operating noi se oc cu rre nce s.
LOADING YOUR WINE COOLER
You may load your wine bottles in single or double ro ws while t aking not e of the follo wing:
if you do not have enough bottles to fill your Wine cooler, it is better to distribute the load
throughout the Wine cooler so as to avoid “all on top” or “ all below” type loads.
- Do remove or relocate adjustable wooden shelves to accommodate larger type of bottles or
increase the capacity of the cellar by stacking the bottles up when necessary. (See
removing shelves)
- Keep smalls gap between the walls and the bottles to allow air circulation. Like an
underground cellar air circulation is important to prevent mould and for a better
homogeneous temperatur e within the cellar.
- Do not over l oad your Wine cooler to facilitate air circulation.
- Do not stack more than 1.5 rows of standard 0.75L bottles per shelves to facilitate air
circulation
- Avoid obstructing the internal fans (located inside on the back panel of the Wine cooler).
- Do not slide the shelves outwards beyond the fixed position to prevent the bottles from
falling.
- Do not pull out more than one loaded shelf at a time as this may cause the Wine cooler to
tilt forwar d.
- Do not cover the wooden shelves with alloy foil or other materials, as it will obstruct air
circulation.
- Do not move your Wine cooler while it is loaded with wines. This might distort the body of
the Wine cooler and cause back injury .
TYPES OF REGULATION
Please note that depending on the loading and settings chosen it takes about 24 hours for the
Wine cooler to see the temperature stabilizing.
During this time LED seems to move erratically in particular,It is normal and this process
occurs whenever the setting is modified and/or whenever a large amount of bottles are added
to the cellar.
Designed to store and mature all wines: red, white and spa rkling. These Wine coolers
reproduce the ideal conditions for wine storage, at a constant recommended temperature of
12ºC. They c an also be set to provide ideal serving temperature for full e njoyment of the
wine’s qualities. Unless stated by the wine maker on the bottle, We recommends 7ºC for
8
your cham pagne, 12ºC for whites and 18ºC for reds. (Refer to “Wine Service Temperature”
C
F
+
-
ECO
3s 3s
1 2 3 4 5 6 7 8
recomme ndation chart)
TEMPERATURE SETTINGS
Important: The LED displays by default the actual inte rnal air temperature.
The temperature of the power, before all Settings will be resumed after the electricity to
power the pr eset temperature
The electrical board of all models comes with memory function.
It is important to understand that there is a difference between the air temperature inside the
Wine cooler and the actual temperature of the wine: You will nee d to wait app roxi mately 12
hours before noticing the effects of temperature adjustment due to the critical mass within a
full Wine cooler.
Once the temperature is set, it is strongly advised not to toy with it or adjust frequently. The
thermostat will maintain the temperature inside the Wine cooler within a +/- 2.5ºC range. But
the thermal inertia of the wine and the glass is such that within this temperature range, the
actual tempe rat ure of the w ine w ill only fluctuate 0.5ºC to 1ºC.
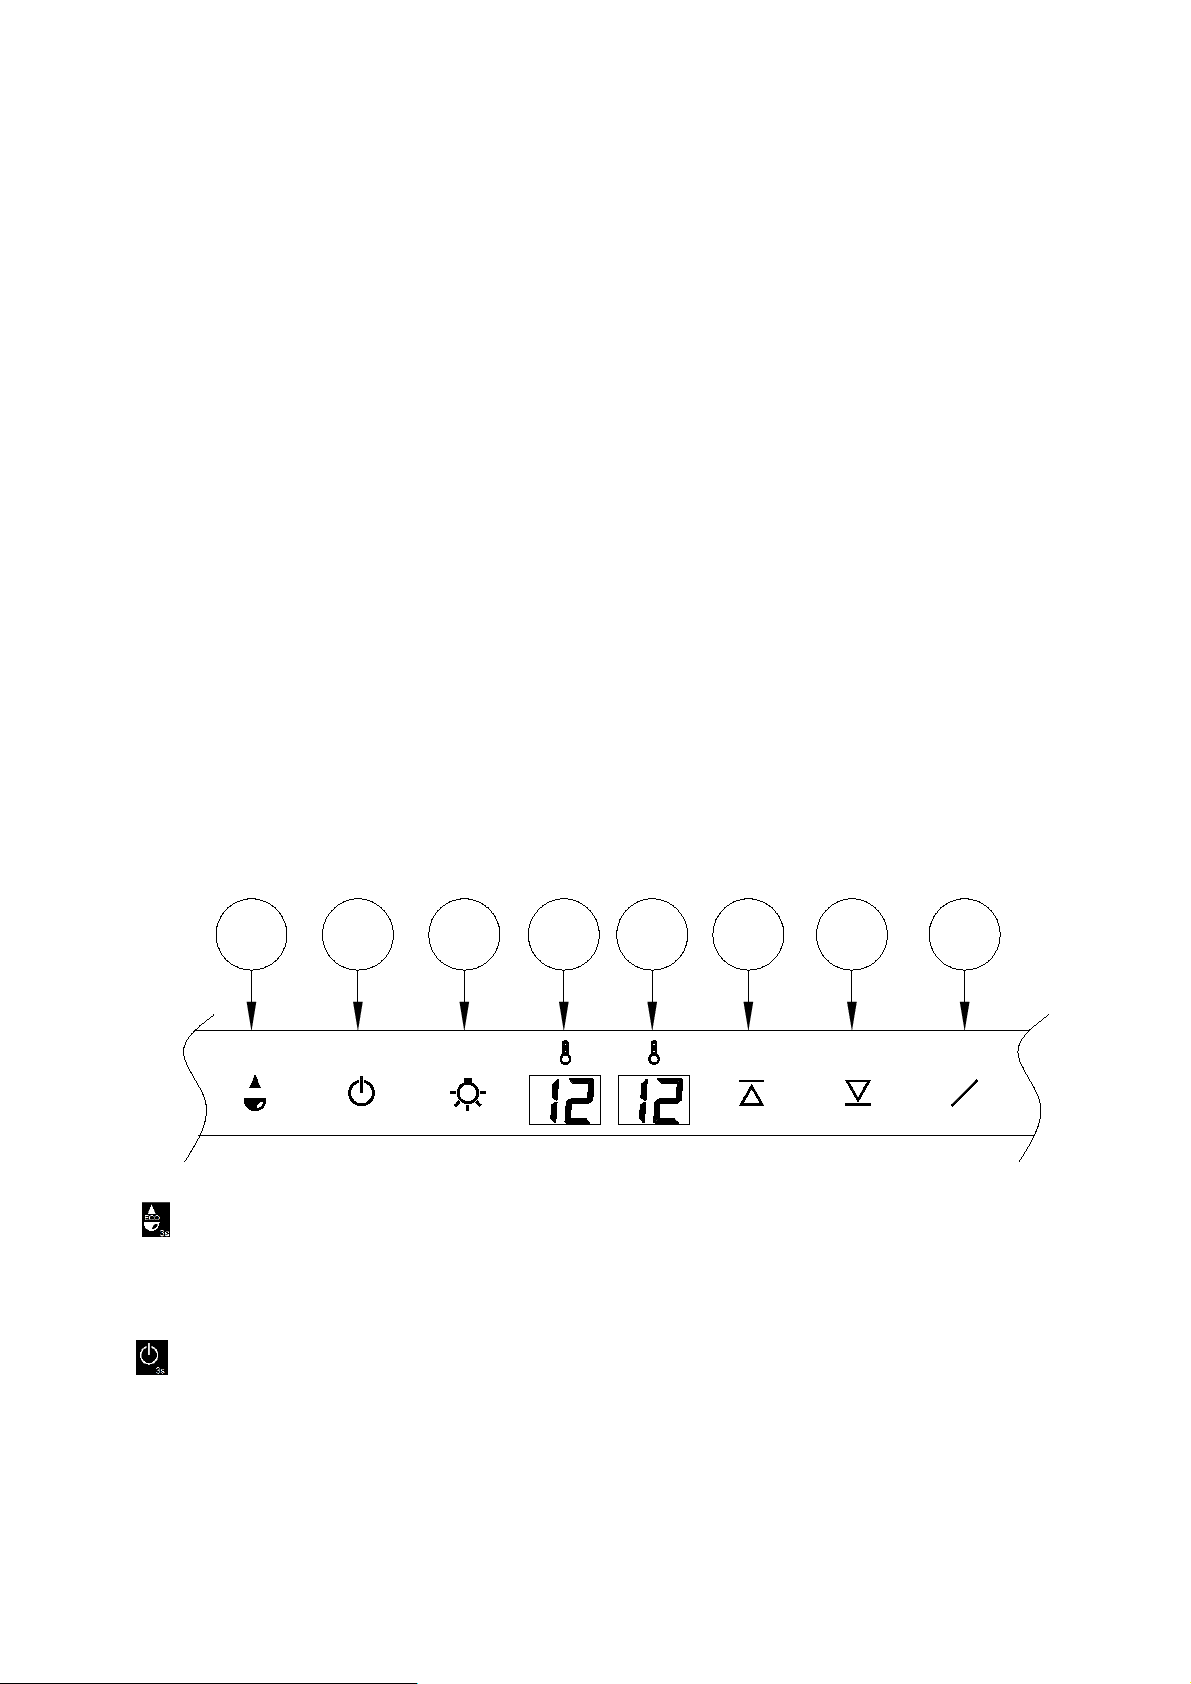
DISPLAY BOARD OPERATING INSTRUCTION:
For MWC-46BG
①
Energy Saving Mode
Press the bu tton for 3 seconds into the energy-saving mode, press ⑥⑦ out of energy-saving
mode
② ON/OFF the power button:
In the standby mode: press 3 seconds, the power is turned on, the whole machine start s
In the power-on state: press the power button, w indow 4 shows the countdown 3 2 1, the
power is turned off, the machine is turned off (show 3 2 1 pro cess, the hand cannot le ave the
button)
9
③ Lamp button:
①
②
③
④
Press the bu tton, lights on / off switch
④
Display Win dow:
Displays the setting temperature
⑤
Window:
Displays the actual temperature
⑥
Temperatur e set t ing up bu tt on :
Press one time, window ④ the set value will increase 1 degree Celsius in the o rigin al setting
temperatur e , the setting range accordin g to custome r requirements.
⑦
Temperature setting down button :
Press one time, win dow ④ the set value will reduce 1 degree Celsius in the original setting
temperatur e , the setting range accordin g to custome r requirements
⑧
C/F display conversion function keys:
Set the conversion degrees Celsius / Fahrenheit display, each press this button, the display
window will be into degree s Celsius or Fa hrenheit.
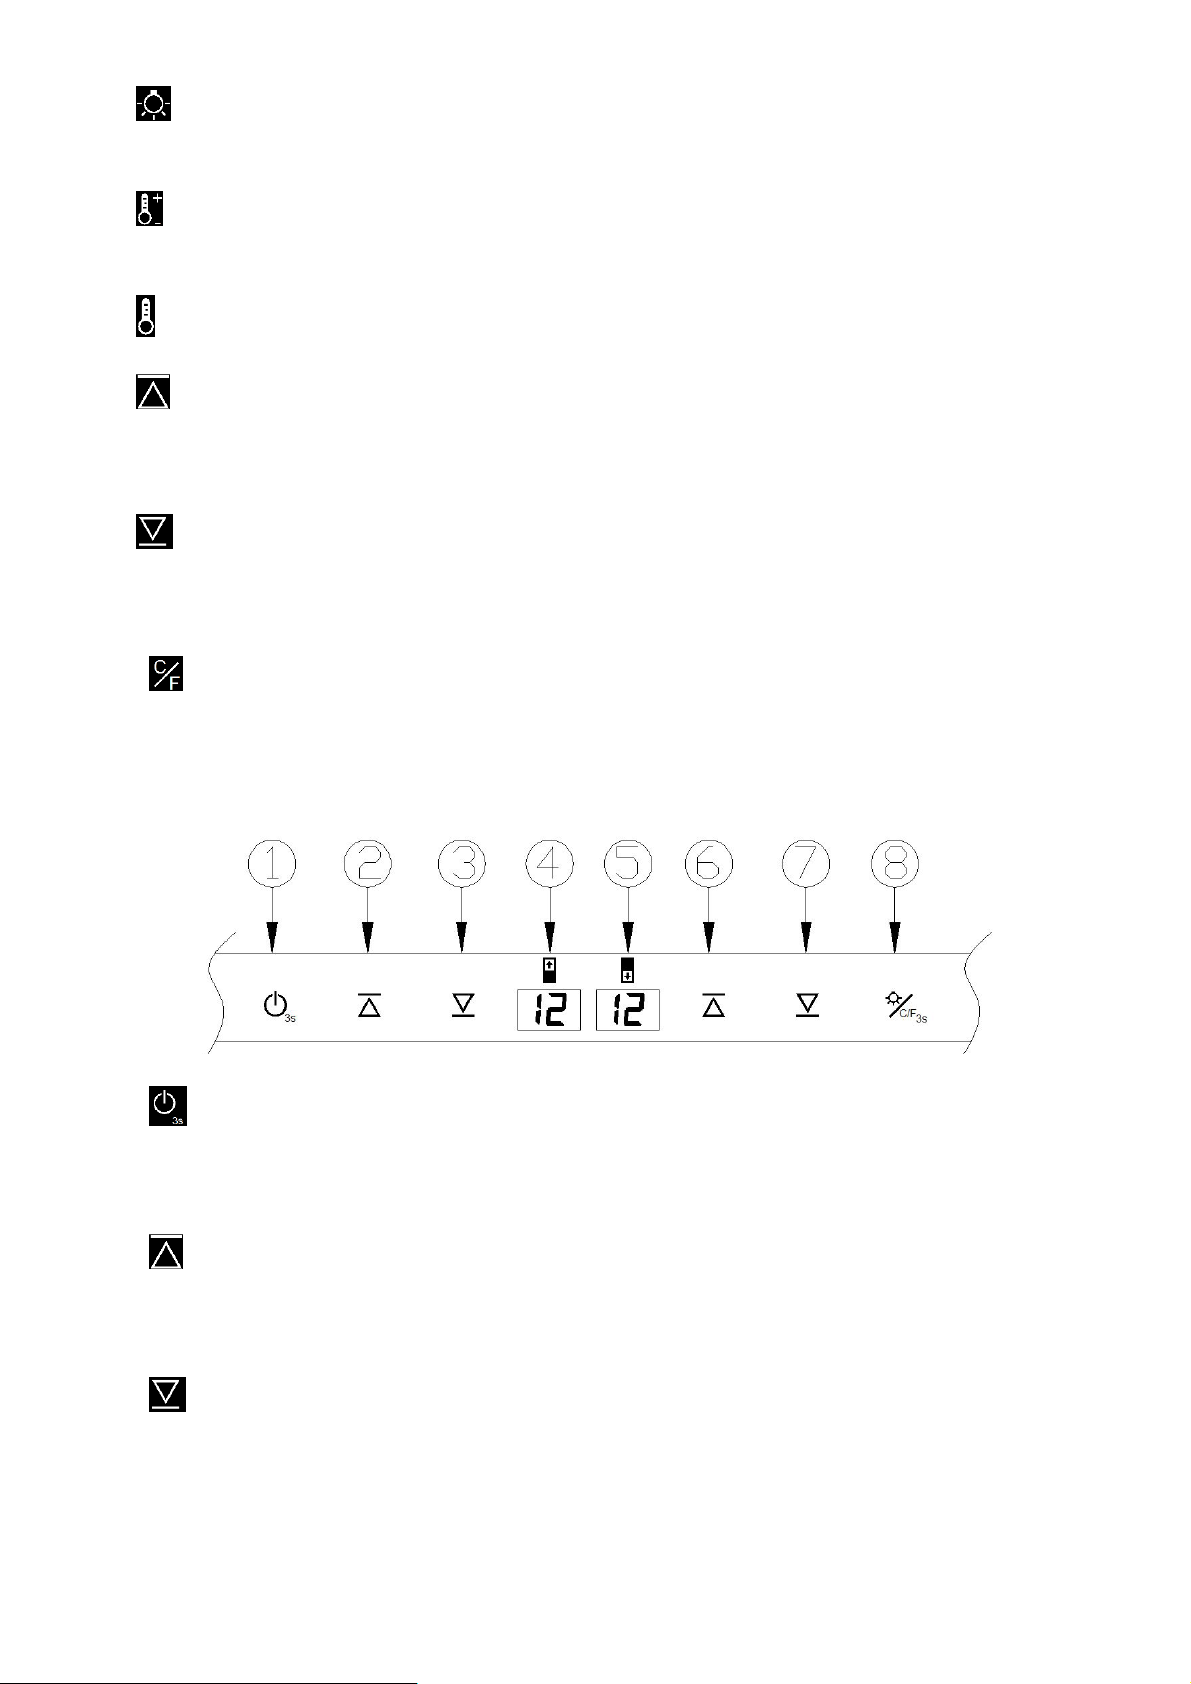
For MWC-180BG
“ON/OFF” the power button :
Press the button 3 seconds to power off (Window ④ digital countdown displays 3, 2, 1,).
Press again ( without delay), the power turns on.
Upper zone temperature setting up button:
Press one time, window ④ the set value will in crease 1 deg ree Celsius in the origina l setting
temperatur e , the setting range accordin g to custome r requirements.
Upper zone tem p erature setting down button :
Press one time, window
the set va lue will reduce 1 degree Celsi us in the original setting
temperatur e , the setting range accordin g to custome r requirements.
10
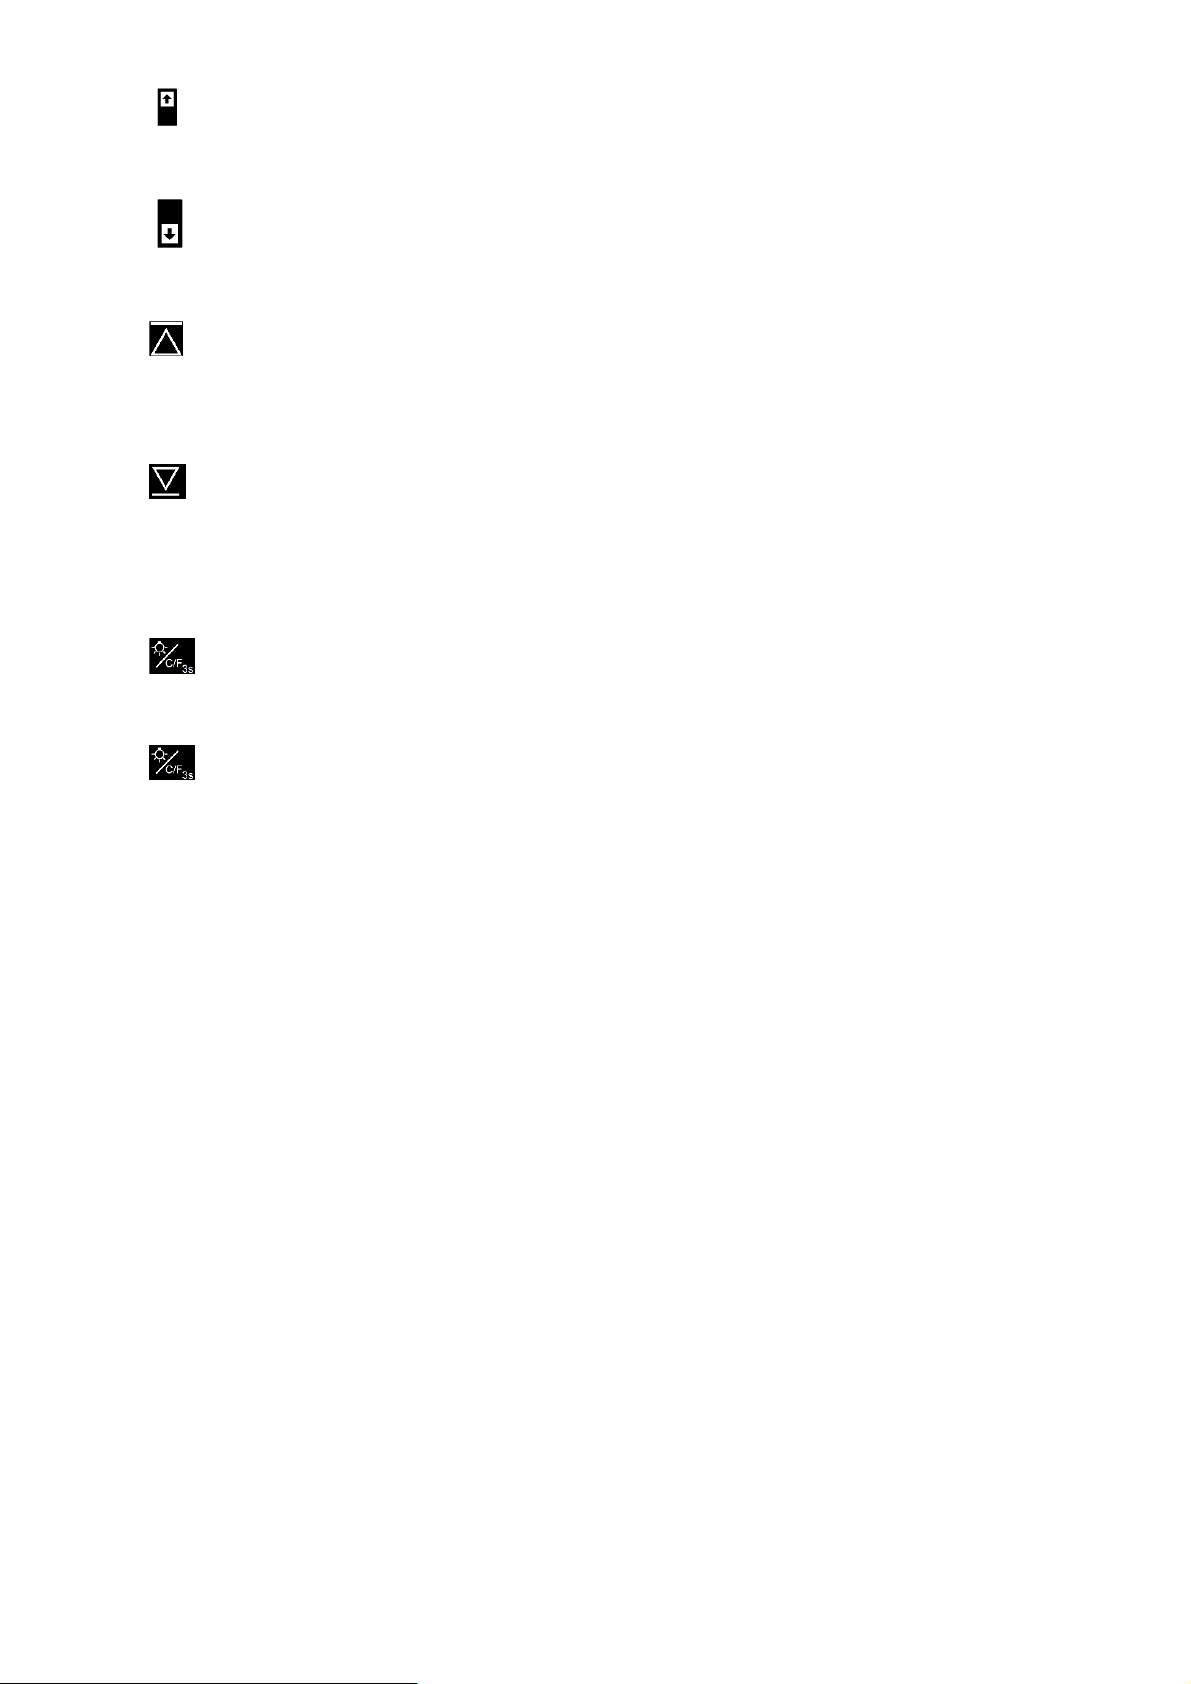
④
⑤
⑥
⑦
⑧
⑧
Window :
Display uppe r zone temperature.
Window:
Display lowe r zone temperature
Lower zone temperature setting up button:
press one time, window ⑤ the set value will increase 1 degree Celsius in the original setting
temperatur e , the setting range accordin gly to customer requirements.
Lower zone temperature setting down button:
press one time, window ⑤ the set value will reduce 1 degree Celsius in the original setting
temperatur e , the setting range accordin gly to customer requirements.
Lamp button:
Press the bu tton and the lamp turns on, the lamp will turn o ff once press again.
C/F display conversion fun ction keys:
Set the conversion degrees Celsius / Fahrenheit display, each press this button, the display
window will be into degree s Celsius or Fa hrenheit
WINE SERVING TEMPERATURE CHART
All wines mature at the same temperature, which is a constant temperature set between 12ºC
to 14ºC. The be low chart is an indicative temperature chart to indicate the best temperature
for drinking purposes.
Champagne NV, Sparkling, Spumante 6ºC
Dry White Semillon, Sauvignon Blanc 8ºC
Champagne Vintage, 10ºC
Dry White Chardonnay 10ºC
Dry White Gewürztraminer, Riesling, Pinot grigio 10ºC
Sweet White Sauternes, Bar sac, Montbazillac, Ice Wine, Late Harve st 10ºC
Beaujolais 13ºC
Sweet White Vintage: Sauternes… 14ºC
White Vinta ge Chardonnay 14ºC
Red Pinot Noir, 16ºC
Red Grenache, Syrah 16ºC
Red Vintage Pinot Noir 18ºC
Cabernet & Merlot: French, Australian, Ne w Zealand, 20ºC
Chilean, Italian, Spanish, California n, Argentinean…
Vintage Bor deaux … Room temperature not exc eeding 20ºC
11

IMPORTANT INFORMATION ABOUT TEMPERATURE
Your Wine cooler has been designed to guarantee optimum conditions for storing and/or
serving y our wines.
Fine wines require long and gentle developments and need specific conditions in which to
reach their full po te nt ial.
All wines mature at the same temperature, which is a constant temperature set between 12ºC
to 14ºC. Only the temperature of “dégustation” (wine appreciation) varies according to the
type of wines (see “Wine Serving Temperature Chart” above). This being said and as it is
for natural cellars used by wine producers for long period of storage, it is not the exact
temperature that is important, but its consistency. In other words, as long as the temperature
of your Wine cooler is constant (between 12ºC to 14ºC) your wines will be stored in perfect
conditions.
Not all wines will improve over the year s. Some should be consumed at an ea rly stage (2 to 3
years) while others have tremendous ageing capability (50 and over). All wines have a peak
in maturity. Do check with your wine me rchant to get the r elevant information.
DEFROSTING/CONDENSATION/ HYGROMETRY/ VENTILATION
Your Wine cooler is designed with “Auto-cycle” defrost system. During “Off-cycle” the
refrigerated surfaces of the Wine cooler defrost automatically. Defrost water from the Wine
cooler storage compartment drains automatically and part of it goes into a drainage
container, which is located at the back of the Wine cooler next to the compressor. The heat is
transferred from the compressor and evaporates any condensation that has collected in the
pan. Part of the remaining water is collected within the Wine cooler for humidity purposes.
This system enables the creation of the correct humidity level inside your Wine cooler
required by the natural c ork to maintain a long lasting seal.
Notes: The water collected by condensation, is therefore recycled. Under extremely dry
environmental conditions, you may have to add some water into the water container
provided with your Wine cooler.
All units are equipped with a double glazed glass door that has a third internal acrylic layer
to minimize condensation on the glass door.
The Wine cooler is not totally sealed; fresh air admission is permitted through the drainpipe.
Air is circu lated through the cellar by means of a fan/fans and the hollow shelves.
Notes: During the refrigerating cycle, heat is given off and disperses through the external
surfaces of the Wine cooler. Avoid touch ing the surfaces during those cycles.
12

ADJUSTABLE WOODEN SHELVES
For easy access to the storage content, you must pull the shelves approximately 1/3 of its
depth out of the rail compartment. These wine cabinets, however, are designed with a notch
on each side of the shelf tr ac ks to pre vent bottles from falli n g.
When removing any of these shelves out of the rail compartment, tilt the shelf as per the
diagram and simply pull out, or push in the shelf until i t sits on the su pport brackets securely.
Shelf install at ion a nd tak i ng ins tru c tio n :
Shelf taking: According to below instruction drawing to pull out the shelf to support bracket
① , press two sides of sliding ro ller buckles and pull out the shelf followin g the arrow mark
② .
Shelf installation: According to below instruction drawing to push in the shelf alignment
with two sides of sliding roller following the arrow mark ③ .
REVERSIBILITY OF THE DOOR
Warning: To avoid accidents during the process of changing the door, we recommend that
you get assi stance. The glass door is heavy and may cause injury if dropped.
- Depend ing on t o the model and the type of handle your wine cabinet is equipped with, you
may have to rotate the door through 180 degrees.
- Depending on the type of handle your wine cabinet is equipped with, the door may not be
reversible or may require that a left or right opening door be ordered to change the opening
side.
13

1.Decorative nail
2. Knife
3. Drop-proof device
4. M5 six angle
5. M5 six angle screwdriver
6. Door spindle core
7. Upper door hinge
8. Lower door hinge
9. Cross screwdriver
10. Door block pieces
11. Screws
1. To put the cabine t on op en o per a ti on pla c e, the door opened to the maximum angle
2. Use small kn ife(2) to take off the decorative nail (1) on opposite side (Drawing 1);
3. Use the inner six ang le scre w driver (Tool 5) to disassemble the screws(4) of drop-proof
device (3), the n rem ove the dro p-proof device .(Drawing 1)
4. Hold the door, use six angle screwdriver (Tool 5) to screw out the door shaft core(6) from
the two ends of the top of the doo r. T ake out th e door an d set asi de . (Drawing 2)
5. Discharge the upper and lower door hinge(7)(8) by M5 inner six angle screwdriver (Tool
5) , then to assemble the door hinge on the opposite side. (Drawing 3 and 4 )
6. Use a screwdriver to remove the Door block pieces (10) at the bottom of the door to the
top of the door. Install the top scr ews(11) at the bottom of the door.And rotate the door 180
degrees, then Install the door on the right side of the cabinet. (Drawing 5)
7. Finally, insta ll the de c ora ti ve na il a nd dr op-proof device at the opposite side. (Drawing 6)
14

Handle Instal l ati on M eth od
1. Take out handle from cabinet.
2. Pull open door seal from the side of door, then insert screws into the 2 handl e holes on
side of door, then put the screws alignm ent the hole of handle , tighten t he screws by
Phillips screw dr iver,then compr es s the do or seal.
If the screws holes of the handle don't match perfectly with the holes of the door ,please us
e the electric drill to drill the holes of the door a bit big ( in surface side) ,
in order to install the handle perfectly.
OPERATION ANOMALIES
Ensure that there is power to the electrical supply plug by connecting another electrical
appliance t o it. Check fuse, if any. Make sure that the door is closed properly.
If your Wine cooler appears to be malfunctioning, unplug it and contact your our after sales
service. Any intervention on the cold circuit should be performed by a refrigeration
technicia n who should carry out an inspection of the circuit sealing system. Similarly, any
intervention on the electrical circuit should be perfo rmed by a qualif ied electrician.
Notes: Any intervention performed by a non- authorized technician We will lead to the
warranty being considered as null and void.
POWER FAILURES
In the event of a power interruption, all previous temperature settings are automatically
preservation and it will revert to a preset tempera ture setting. (See preset chart)
15

PROBLEM
POSSIBLE CAUSE
Wine cooler does
Not plugged in.
The circuit breaker tripp ed or the fuse is broken.
Wine cooler is not
Check the temperature control setting.
The door gasket does not sea l properly.
Turns on and off
The room temperature is hotter than normal.
The door gasket does not sea l properly.
The light doe s not
Not plugged in.
The light button is “OFF”.
Vibrations.
Check to assure tha t t he Wine cooler is leve l.
The Wine cooler
The rattling noise may come from the flow of the refrigerant, which is
The Wine cooler is not level.
Most power failures are corrected within a short period of time. An hour or two’s loss of
power will not affect Wine cooler’s temperatures. To avoid sudden change of temperature
while the power is off, you should avoid opening the door. For longer period of power
failure, do take steps to protect your wine.
Irrespective of the cause, if you notice either abnormal temperature or humidity levels
inside your Wine cooler, be reassured that only long and frequent exposure to these
abnormal conditions can cause a detrime ntal effect on your wine.
TROUBLESHOOTING GUIDE
Common problems may easily be solved, saving you the cost of a possible service call.
Please read carefully the instruction manual and revert to troubleshooting guide c hart.
not operate.
cold enough.
frequently.
work.
The appliance is t urn ed off .
External e nvironment may require a higher setting.
The door is opened too of ten.
The door is n ot closed completely.
The door is o pened too often.
The door is n ot closed completely.
The temperature control is n ot set cor r ect ly.
The circuit breaker tripp ed or a blown fuse.
The bulb is out of order.
seems to make too
much noise.
normal.
As each cy c le ends, you may hear gurgling sounds caused by the flow
of refrigerant in your Wine cooler.
Contractio n and expansion of the inside walls may ca use popping and
crackling noises.
16

The door will not
close properly.
The Wine cooler is not level.
The shelves a r e out of position.
Standard fe atures:
Compressor ope r at ed : R600a
- Available in rated voltage/frequency (as per countr y' requirements):
220V/50/60Hz
- Automatic defrost
- Humidity : 65% RH +/-10% RH
- Black outer and inner finish
- Internal lig ht
- Adjustable feet x 4
- Triple layers glass door
- Full black glass door
The door was reversed and not properly installed.
The gasket is faulty. ( magnet or rubber is s poil ed )
17

CẢNH BÁO
Thiết bị này có thể được sử dụng bởi trẻ trên 8 tuổi và đối với người sử dụng có
khả năng về thể chất, tinh thần hoặc thiếu kinh nghiệm nếu được giám sát hoặc
được hướng dẫn sử dụng một cách an toàn và hiểu các mối nguy hiểm có tính liên
quan. Trẻ em không được chơi với thiết bị. Hướng dẫn sử dụng và vệ sinh sẽ
không được thực hiện bởi trẻ em nếu không có sự giám sát của người lớn.
Trẻ em nên được giám sát, chúng không được chơi với thiết bị.
Không để các chất nổ như bình xịt khí c ó chất dễ cháy trong tủ rượu.
Thiết bị này được sử dụng trong hộ gia đình và các khu vực tương tự như:
– các khu vực nhân viên nhà bếp tại các cửa hàng, văn phòng.
– nhà ở nông trại và các khách trong khách sạn, nhà nghỉ
NGUY HIỂM: nguy hiểm cho trẻ em. Trước khi bạn bỏ tủ rượu cũ.
- Gỡ bỏ cánh cửa;
- Để vật dụng hút ẩm ở nơi mà trẻ không dễ dà ng leo trèo vào bên trong;
- Khi vứt bỏ thiết bị, chỉ thực hiện tại trung tâm xử lý chất thải có thẩm quyền.
R600a CẢNH BÁO:
Vì sự an toàn của bạn, hãy quan sát các đề xuất sau đây:
• Thiết bị này chứa một lượng nhỏ chất làm lạnh R600a thân thiện với môi trường,
nhưng dễ cháy. Nó không làm thủng tầng ozon và không gây hiệu ứng nhà kính.
• Trong quá trình vận chuyển và lắp đặt, đảm bảo rằng ống của mạch làm lạnh
không bị hư hỏng.
• Tránh sử dụng hoặc thao tác các vật sắc gần thiết bị.
• Rò rỉ chất làm lạnh có thể gây cháy hoặc làm hại cho mắt.
• Trong trường hợp có sự cố xảy ra, tránh tiếp xúc với nhiệt và thiết bị tạo ra tia lửa.
Ngắt thiết bị khỏi nguồn điện.
• Thiết bị được đặt ở nơi hoàn toàn thông thoáng trong khoảng vài phút.
• Thông báo cho trung tâm chăm sóc khách hàng để nhận những lời khuyên và các
bước thực hiện cần thiết.
• Số lượng chất làm lạnh của thiết bị này được nêu ở trên bằng đơn vị gam, nó cũng
được lưu ý trên bảng đánh giá thiết bị.
- CẢNH BÁO: giữ các lỗ thông hơi trong vách ngăn của thiết bị hoặc cấu trúc bên
trong không bị cản trở.
- CẢNH BÁO: không sử dụng thiết bị cơ khí hoặc thiết bị khác để đẩy nhanh quá
trình rã đông, khác với những gì nhà sản xuất đề nghị.
18

- CẢNH BÁO: không làm hỏng mạch làm lạnh.
- CẢNH BÁO: không sử dụng thiết bị điện bên trong ngăn chứa của thiết bị.
- CẢNH BÁO: thiết bị không dành cho những người sử dụng (bao gồm trẻ em)
giảm khả năng về thể chất, cảm giác, tinh thần hoặc thiếu kinh nghiệm về kiến thức,
trừ khi họ được giám sát h oặc hướng dẫn sử dụng th iết bị bởi một người có trách
nhiệm với sự an toàn của họ.
- CẢNH BÁO: không sử dụng một ổ cắm mở rộng cho nhiều thiết bị hoặc thiết bị
không được nối đất (2 c hấu)
- CẢNH BÁO: nếu dây nguồn bị hỏng, nó phải được thay thế bởi nhân viên bảo trì,
đại lý hoặc người có tiêu chuẩn tương đương để t rá nh ng uy hiểm.
Chú ý:
Khi tủ tượu ở trạng thái “TẮT”:
- Hãy lấy ra tất cả vật dụng trong tủ rượu;
- Giữ cho tủ rượu sạch sẽ
24 giờ trước khi bật công tắc tủ rượu. Chúng tôi khuyến khích bạn để cửa tủ
mở vì lý do làm sạch và để tủ rượu bay hết những mù i c òn sót lại trong quá
trình sản xuất.
TRƯỚC KHI TẢI VÀ CẮM ĐIỆN CHO TỦ RƯỢU
Quan trọng: tất cả các mẫu mã không có lỗ thông hơi phía trước (thoát khí)
chỉ đứng độc lập. (xem biểu đồ kỹ thuật).
Khuyến nghị:
Vị trí bạn nên đặt tủ rượu:
- không bị cản trở và thông gió tốt;
- tránh xa nhiệt và ánh sáng trực tiếp;
- nơi không ẩm ướt (giặt ủi, phòng chứa thức ăn, phòng tắm v.v.);
- trên nền phẳng;
- có nguồn cung cấp điện tiêu chuẩn và đáng tin cậy (ổ cắm theo tiêu c huẩn quốc
gia, nối đất), KHÔNG nên sử dụng đầu cắm đa năng hoặc đầu nối mở rộng;
- có bộ phận chống sét cắm vào ổ cắm điện;
- tránh xa lò vi sóng. Một số lò vi sóng không có tấm chắn sóng nếu đặt trong
phạm vi gần khoảng 1 mét nó có thể gây ảnh hưởng đến tủ rượu.
Chú ý:
Tất cả các mẫu mã âm tủ hoặc đứng độc lập đều phải tuân theo bản vẽ của nó.
Tủ rượu nên được lắp đặt thích hợp với nhiệt độ môi trường xung quanh (xem
phần cuối hướng dẫn sử dụng). Nếu nhiệt độ cao hơn hoặc thấp hơn nhiệt độ môi
trường, nó sẽ ảnh hưởng đến dao động nhi ệt độ và không đạt được hi ệu suất làm
mát.
Hướng dẫn nối đất:
19

Tủ rượu phải được nối đất trong trường hợp rò rỉ điện. Nối đất làm giảm nguy cơ
bị điện giật. Tủ rượu được trang bị dây nguồn n ối đất và phích cắm. Phích cắm tủ
rượu phải được cắm đúng cách và nối đất.
Chú ý: ở những nơi có sét thường xuyên, nên sử dụng thiết bị chống sét.
Việc sử dụng phích cắm nối đất không đúng cách có thể gây ra điện giật. Tham
khảo ý kiến thợ điện hoặc nhân viên dịch vụ có trình độ nếu bạn chưa hiểu hoàn
toàn về hướng dẫn nối đất.
Nếu dây nguồn bị hỏng, phải được thay thế bởi nhân viên để tránh nguy hiểm về
điện.
20

LẮP ĐẶT TỦ RƯỢU CỦA BẠN
Tháo tất cả các lớp bảo vệ và băng dính xung quanh và bên trong tủ rượu.
Tủ rượu phải được đặt ở vị trí phích cắm thíc h hợp . Tủ rượu nên được lắp đặt ở nơi
thông thoáng, không để máy nén tiếp xúc trực tiếp với n guồn nhiệt.
Làm mát tủ rượu: làm lạnh tủ rượu ở nhiệt độ cân bằng TRƯỚC khi bạn để rượu
vào đó.
Tủ rượu của bạn được trang bị 4 chân điều chỉnh để dễ dàng định vị, khuyến khích
bạn xiết chặt chân sau đến mức tối đa và điều chỉnh các chân trước để nâng tủ
rượu.
HƯỚNG DẪN LẮP ĐẶT CHO TỦ RƯỢU ÂM:
CHỈ TỦ RƯỢU THOÁT HƠI PHÍA TRƯỚC
1. Tủ rượu “âm” thông hơi phía trước nhưng không được thiết kế để tích hợp
với phía sau cửa gỗ.
2. Hãy làm theo sơ đồ lắp đặt khi lắp đặt tủ rượu âm. Không nhỏ hơn kích
thước lắp đặt tối thiểu.
3. Tủ rượu âm trang bị sẵn hệ thống hút không khí bên phải và đẩy ra bên trái
của khung thông gió dưới cửa trước.
4. Tủ rượu “âm ” có công tắc nguồn đặt ở bảng điều khiển để điểm ngu ồn
không tới hạn.
5. Tủ rượu yêu cầu điểm nguồn 220V/1 0A . (hoặc the o các th ông số kỹ thuật
của các quốc gia khác nhau).
6. Dây nguồn có chiều dài 2.0m và được cố định ở mặt phải phía sau khi nhì n
từ phía trước tủ.
7. Giống như hầu hết các thiết bị gia dụng hiện nay, tủ rượu có linh kiện điện
tử rất nhạy, dễ bị thiệt hại do sét đánh và lỗi nguồn cung cấp điện. Vì vậy
nên sử dụng mạch điện chống sét để tránh các vấn đề về tính chất này.
8. Lỗ thông gió phải được cung cấp cho tủ rượu khi lắp đặt cửa gỗ.
21

Trong vùng khí hậu nón g, lỗ thông hơi hoặc lưới thông gió có kích thước 200mm x
40mm PHẢI được cắt ra ở vị trí phân chia phía sau hoặc phía trên, cho phép không
khí mát được thổi đều trong khoang 30mm đặt ở phía sau tủ.
Lỗ thông gió này không được lắp cùng các thiết bị khác như lò nướng hoặc khu
vực bị niêm phong và không th ô ng th oá ng. K hô ng tuâ n thủ t he o các yêu cầu nêu
trên có thể dẫn đến việc hạn chế được BẢO HÀNH.
22

BẢN VẼ LẮP ĐẶT ÂM cho tủ rượu: (DƯỚI GIÁ ĐỠ HOẶC TRONG TỦ) CHỈ TỦ
RƯỢU THOÁT HƠI PHÍA TRƯỚC
Chú ý: Thiết bị phải được đặt ở vị trí có thể cắm phích sau khi lắp đặt.
KÍCH THƯỚC BẢN VẼ:
Đối với MWC-46BG
Đối với MWC-180BG
23

BẢN VẼ KÍCH THƯỚC GÓC MỞ:
Đối với MWC-46BG
Đối với MWC-180BG
24

MÔ TẢ HỆ THỐNG BỘ TẢN NHIỆT
Các mô hình này áp dụng ống chống sương và hệ thống làm lạnh độc lập:
25

BẬT NGUỒN TỦ RƯỢU
Cắm phích và bật công tắc bằng cách nhấn vào nút nguồn t ron g và i gi ây.
Khi bạn sử dụng tủ rượu lần đầu tiên (hoặc khởi động lại tủ rượu sau kh i tắt trong
một thời gian dài), sẽ có sự khác biệt giữa nhiệt độ bạn chọn và mức chỉ thị trên
màn hình LED. Điều này bình thường và do thời gian kích hoạt. K hi tủ rượu khởi
động trong vài giờ mọi thứ sẽ ổn định.
Quan trọng: Nếu t hiết bị chưa được cắm điện, m ất điện hoặc tắt, chờ 3 đến 5
phút trước khi khởi động lại thiết bị. Tủ rượu sẽ không hoạt động nếu bạn cố
gắng khởi động lại trong thời gian tạm hoãn này.
Độ ồn hoạt động
Để đạt đến nhiệt độ cài đặt mong muốn, tủ rượu của chúng tôi giống như tất cả các
tủ rượu có máy nén và quạt, có thể tạo ra các tiếng ồn. Những tiếng ồn này bình
thường và nó có thể xảy ra như sau:
- Tiếng ùng ục – nguyên nhân vì các chất làm lạnh chảy qua cuộn dây của thiết bị.
- Tiếng nứt/nổ – do sự co giãn của khí gas để sản sinh ra hơi lạnh.
- Tiếng quạt hoạt động – để luân chuyển không khí bên trong tủ rượu.
Sự nhận thức về tiếng ồn của cá nhân liên quan trực tiếp đến môi trường đặt tủ
rượu, cũng như kiểu mô hình cụ thể. Tủ rượu của chúng tôi phù hợp với các tiêu
chuẩn quốc tế. Chúng tôi sẽ luôn nỗ lực hết mình để đáp ứng cho các khách hàng
của mình nhưng sẽ không nhận lại hàng hóa do khiếu nại dựa trên các sự cố tiếng
ồn hoạt động bình thường.
SẮP XẾP RƯỢU
Bạn có thể đặt các chai rượu hàng đơn hoặc hàng đôi và lưu ý những điều sau; nếu
bạn không để hết rượu đầy t ủ rượu, thì nên phân bố đều trong tủ rượu tránh “tất cả
phía trên” hoặc “tất cả phía dưới”.
- Loại bỏ hoặc di chuyển giá đỡ bằng gỗ có thể điều chỉnh để chứa loại chai lớn
hơn hoặc tăng công suất của khoang tủ bằng cách xếp chồng các chai khi cần thiết.
(xem tháo kệ)
- Giữ khoảng cách nhỏ giữa các khoang tủ và các chai cho phép không khí lưu
thông. Giống như sự lưu thông không khí ở khoang tủ là rất quan trọng để ngăn
ngừa nấm mốc và cho một nhiệt độ đồng nhất tốt hơn trong khoang tủ.
- Không nên để quá tải tủ rượu để cho không khí lưu thông.
26

- Không xếp chồng lên 1.5 hàng tiêu chuẩn chai 0.75L trên mỗi kệ để không khí
được lưu thông.
- Tránh làm tắc nghẽn quạt bên trong (nằm bên trong bề mặt của tủ rượu).
- Không trượt các kệ ra khỏi vị tr í cố định để ngăn chặn chai rơi.
- Không kéo ra n hiều hơn một kệ hàng trong một thời gian vì điều này có thể làm
tủ rượu nghiêng về phía trước.
- Không che k ệ gỗ bằng hợp kim hoặc vật liệu khác vì nó sẽ cản trợ sự lưu thông
không khí.
- Không di chuyển tủ rượu trong lúc tủ chứa rượu. Điều này có thể gây tổn thương
cho phần thân cũng như phía sau của tủ rượu.
CÁC ĐIỀU KHOẢN
Xin lưu ý tùy thuộc vào việc tải nhiệt và lắp đặt cần mất khoảng 24 giờ cho tủ rượu
ổn định nhiệt độ.
Trong thời gian này đèn LED dường như chuyển động bất thường. Điều này là
bình thường và nó xảy ra bất cứ khi nào thiết lập được sửa đổi hoặc bất cứ khi nào
một lượng lớn chai được thêm vào khoang tủ.
Được thiết kế để lưu trữ và làm lạnh tất cả loại rượu vang: vang đỏ, vang trắng và
vang nổ.Những tủ rượu này tạo ra điều kiện lý tưởng để bảo quản rượu, ở nhiệt độ
khuyến nghị 12ºC. Chúng cũng có thể được đặt để cung cấp nh iệt độ để phục v ụ lý
tưởng cho hương vị của rượu vang. Trừ khi nhà sản xuất ghi rõ trên chai, chúng tôi
khuyến khích 7ºC cho rượu champagne, 12ºC cho rượu trắng và 18ºC cho rượu
đỏ. (Tham khảo biểu đồ khuyến cáo “Nhiệt độ rượu”)
CÀI ĐẶT NHIỆT ĐỘ
Quan trọng: màn hình LED hiển thị nhiệt độ không khí bên trong.
Cài đặt nhiệt độ sẽ được đặt lại ở nhiệt độ đã cài đặt trước đó khi có điện.
Bảng điện của tất cả mô hình đi kèm với chức năng bộ nhớ.
Bạn phải hiểu rằng có sự khác biệt giữa nhiệt độ không khí bên trong và bên ngoài
của tủ rượu: bạn sẽ phải ch ờ khoảng 12 giờ trước khi nhận thấy sự ảnh hưởng của
việc điều chỉnh nhiệt độ do trong tủ chứa đầy rượu.
Một khi nhiệt độ được thiết lập, không nên nghịch hoặc điều chỉnh thường xuyên.
Bộ điều chỉnh nhiệt sẽ duy trì nhiệt độ bên trong tủ rượu trong phạm vi +/- 2.5ºC.
Nhưng quán tính nhiệt độ của rượu vang và thủy tinh trong phạm vi nhiệt độ này,
nhiệt độ thực tế của rượu chỉ dao động 0.5ºC đến 1ºC.
27

BẢNG HIỂN THỊ HƯỚNG DẪN HOẠT ĐỘNG:
C
F
+
-
ECO
3s 3s
1 2 3 4 5 6 7 8
Đối với MWC-46BG
①
Chế độ tiết kiệm năng lượng:
Nhấn phím trong vòng 3 giây cho c hế độ tiết kiệm năng lượng, nhấn phím⑥⑦ để
thoát khỏi chế độ tiết kiệm năng lượng
② ON/OFF phím nguồn:
Trong chế độ nghỉ: nhấn 3 giây, nguồn mở, toàn bộ máy bắt đầu
Trong trạng t hái bật: nhấn nút nguồn, cửa sổ 4 hiển thị đếm ngượng 3 2 1, nguồn
tắt, máy tắt (hiển thị 3 2 1, bàn tay không thể để lại nút)
③
Phím đèn:
Nhấn phím, công tắc tắt/mở đèn
④
Màn hình hiển thị:
Màn hình hiển thị nhiệt độ cài đặt
⑤
Màn hình hiển thị:
Màn hình hiển thị nhiệt độ thực tế
⑥
⑦
⑧
Phím cài đặt tăng nhiệt độ:
Nhấn một lần, màn hình ④ giá trị cài đặt sẽ tăng 1 độ C ở nhiệt độ cài đặt ban đầu,
phạm vi cài đặt theo yêu cầu của khách hàng.
Phím cài đặt giảm nhiệt độ:
Nhấn một lần, màn hình ④ giá trị cài đặt sẽ giảm 1 độ C ở nhiệt độ cài đặt ban đầu,
phạm vi cài đặt theo yêu cầu của khách hàng
C/F hiển thị các phím chức năng chuyển đổi:
Đặt mức độ chuyển đổi độ C/F, mỗi nút nhấn, màn hình sẽ hiển thị độ C hoặc độ F.
Đối với MWC-180BG
28

①
②
③
④
⑤
⑥
⑦
⑧
⑧
Phím nguồn “ON/OFF”:
Nhấn nút 3 giây để tắt nguồn (cửa sổ ④ màn hình kỹ thuật số đếm ngược 3 2 1).
Nhấn lại (không tạm hoãn), mở nguồn.
Nút cài đặt tăng nhiệt độ:
Nhấn một lần, cửa sổ ④ giá trị cài đặt sẽ tăng 1 độ C ở nhiệt độ cài đặt ban đầu,
phạm vi cài đặt theo yêu cầu của khách hàng.
Nút cài đặt giảm nhiệt độ:
Nhấn một lần, cửa sổ ④ giá trị cài đặt sẽ giảm 1 độ C ở nhiệt độ cài đặt ban đầu,
phạm vi cài đặt theo yêu cầu của khách hàng.
Màn hình:
Màn hình hiển thị nhiệt độ ngăn trên.
Màn hình:
Màn hình hiển thị nhiệt độ ngăn dưới.
Khu vực cài đặt tăng nhiệt độ:
Nhấn một lần, màn hình ⑤ giá trị cài đặt sẽ tăng 1 độ C ở nhiệt độ cài đặt ban đầu,
phạm vi cài đặt theo yêu cầu của khách hàng.
Khu vực cài đặt giảm nhiệt độ:
Nhấn một lần, màn hình ⑤ giá trị cài đặt sẽ giảm 1 độ C ở nhiệt độ cài đặt ban đầu,
phạm vi cài đặt theo yêu cầu của khách hàng.
Nút đèn:
Nhấn nút để mở đèn, đèn sẽ tắt nếu nhấn thêm lần nữa.
C/F hiển thị các phím chức năng chuyển đổi:
Đặt mức độ chuyển đổi C/F, mỗi nút nhấn, màn hình sẽ hiển thị độ C hoặc độ F.
29

BIỂU ĐỒ NHIỆT ĐỘ KHẨU PHẦN RƯỢU
Tất cả rượu trưởng thành ở cùng một nhiệt độ như nhau, đó là một nhiệt độ cố định
từ 12ºC đến 14ºC. Biểu đồ dưới đây là biểu đồ nhiệt độ tốt nhất cho mục đích sử
dụng rượu.
Champagne NV, Sparkling, Spumante 6ºC
Dry White Semillon, Sauvignon Blanc 8ºC
Champagne Vintage, 10ºC
Dry White Chardonnay 10ºC
Dry White Gewürztraminer, Riesling, Pinot grigio 10ºC
Sweet White Sauternes, Bar sac, Montbazillac, Ice Wine, Late Harve st 10ºC
Beaujolais 13ºC
Sweet White Vintage: Sauternes… 14ºC
White Vinta ge Chardonnay 14ºC
Red Pinot Noir , 16ºC
Red Grenache, Syrah 16ºC
Red Vintage Pinot Noir 18ºC
Cabernet & Me rlot: French, Australian, New Zealand, 20ºC
Chilean, Italian, Spanis h, Californian, Argentinean…
Vintage Bor deaux … Room tempera ture not excee ding 20ºC
THÔNG TIN QUAN TRỌNG VỀ NHIỆT ĐỘ
Tủ rượu của bạn được thiết kế với điều kiện tối ưu để lưu trữ hoặc phục vụ rượu
vang của bạn.
Rượu ngon yêu cầu sự phát triển lâu dài, nhẹ nhàng và điều kiện đặc biệt cần thiết
để đạt đến đầy đủ tiềm năng của nó.
Tất cả rượu vang trưởng thành ở cùng một nhiệt độ, nhiệt độ thiết lập dao động
khoảng 12ºC đến 14ºC. Ch ỉ có nhiệt độ “dégustation” (tăng giá rượu) thay đổi theo
loại rượu vang (xem “Biểu độ nhiệt độ phục vụ rượu v ang” ở trên). Điều này đã
được để cập và cho hầm tự nhiên sử dụng để chứa rượu trong thời gian dài, nhiệt
độ chính xác không quan trọng nhưng nó phải đồng nhất. Nói cách khác, nhiệt độ
tủ rượu không đổi (khoảng 12ºC đến 14ºC) rượu của bạn sẽ được lưu trữ trong thời
gian hoàn hảo nhất.
Không phải tất cả loại rượu vang được cải thiện qua nhiều năm. Một số cần được
tiêu thụ ở giai đoạn sớm (2 đến 3 năm) trong khi một số khác lại lão hóa lâu hơn
(50 hoặc hơn). Tất cả các loại rượu có độ trưởng thành cao. Hãy kiểm tra với người
bán rượu của bạn để có thông tin liên quan.
30

RÃ ĐÔNG/NGƯNG TỤ/ĐỘ ẨM/THOÁNG KHÍ
Tủ rượu của bạn được thiết kế với hệ thống rã đông “Auto-cycle”. Trong “Offcycle” bề mặt làm lạnh của tủ rượu rã đông tự động. Nước giải nhiệt từ khoang
chứa chất làm lạnh của tủ rượu sẽ tự động thoát ra và một ph ần của nó s ẽ chảy vào
khay chứa nước phía sau tủ rượu bên cạnh máy nén. Nhiệt được truyền từ máy nén
làm bay hơi bất kỳ hơi nước ngưng tụ nào thu được trong khay. Một phần nước
còn lại được thu thập trong tủ rượu cho m ục đích làm ẩm.
Hệ thống này cho phé p tạo ra độ ẩm phù hợp bên trong tủ rượu của bạn theo yêu
cầu của nút chai tự nhiên để duy trì hương vị l âu dà i.
Chú ý: Nước được thu hồi bằng cách ngưng tụ, do đó được tái chế. Trong những
điều kiện môi trường rất khô, bạn có thể th êm một ít nước trong khoang nước với
rượu của bạn.
Tất cả thiết bị được trang bị hai lớp kính lớp thứ ba bên trong là lớp acrylic để
giảm thiểu tối đa ngưng tụ trên cửa kính.
Tủ rượu không được bịt kín hoàn toàn; không khí đi qua ống thoát nước. Không
khí lưu thông qua khoang tủ bằng quạt và các giá đỡ rỗng.
Chú ý: Trong chu kỳ làm lạnh, nhiệt được thoát ra và phân tán qua các bề mặt
bên ngoài của tủ rượu. Tránh chạm vào các bề mặt này trong suốt các chu kỳ đó.
ĐIỀU CHỈNH KỆ GỖ
Để dễ dàng điều chỉnh khoang tủ, bạn phải kéo kệ r a khỏi 1/3 khoang. Tuy nhiên,
các tủ rượu này được thiết kế một vết rạn ở mỗi cạnh của các kệ để ngăn các chai
rơi xuống.
Khi tháo kệ ra khỏi khoang, hãy nghiêng kệ theo sơ đồ và chỉ cần kéo ra, hoặc đẩy
vào kệ cho đến khi nó nằm trên khung đỡ an toàn.
Lắp đặt và hướng dẫn lắp đặt kệ:
Tháo kệ: theo hướng dẫn dưới đây để kéo kệ ra khỏi vòng hỗ trợ① , nhấn hai bên
của khóa lăn trượt và kéo ra khỏi kệ sau m ũi tên ② .
Lắp đặt kệ: theo bản vẽ hướng dẫn bên dưới để đẩy k ệ vào vị trí với hai mặt ngay
sau m ũi tên ③ .
31

KHẢ NĂNG THUẬN NGHỊCH CỦA CỬA
Cảnh báo: để tránh tai nạn trong khi thay cửa, chúng tôi đề nghị bạn nên nhận sự
hỗ trợ. Cửa kính nặng và có thể gây thương tích nếu rơi xuống.
- Tùy thuộc vào mẫu mã và kiểu dáng tay cầm của tủ rượu của bạn, bạn có thể
xoay cửa qua 180 độ.
- Tùy thuộc theo loại tủ rượu được trang bị, cửa có thể không được đảo ngược hoặc
có thể yêu cầu phải mở qua bên phải hay bên trái để thay đổi phía mở cửa.
32

1. Móng trang trí
2. Dao
3. Thiết bị
ống trượt
4. Vít 6 góc
5. Tua vít 6 góc
6. Vít trục
lõi cửa
7. Bản lề cửa trên
8. Bản lề cửa
dưới
9. Tua vít
10. Ke giữ cửa
11. Ốc vít
1. Để đặt tủ ở ví trí mở, cửa mở ở góc tối đa.
2. Sử dụng dao (2) để lấy móng trang trí (1) ở phía đối diện (hình 1);
3. Sử dụng tua vít cho sáu góc bên trong (công cụ 5) để tháo rời các ốc vít (4) của
thiết bị ống trượt(3), sau đó tháo thiết bị chống trượt. (hình 1)
4. Giữ cửa, sử dụng tua vít cho sáu góc (công cụ 5) để vít trục lõi cửa (6) ra khỏi
hai đầu của cửa. Lấy cửa ra và đặt sa ng m ột bên. (hình 2)
5. Xoa y bản lề và cửa trên (7)(8) bằng tua vít sáu góc M5 (công cụ 5), sau đó lắp
bản lề cửa ở phía đối diện. (hình 3 và 4)
33

6. Sử dụng một tua vít để tháo cửa ra khỏi phần khối cửa (10) ở phần cuối cùng
cửa đến phần đầu của cửa. Lắp các ốc vít đầu (11) ở dưới cùng của cửa. Và xoay
cửa 180 độ, sau khi lắp đặt cửa bên phải của tủ (h ình 5)
7. Cuối cùng, lắp đặt các móng trang trí và thiết bị chống nhỏ giọt ở phía đối diện.
(hình 6)
Phương pháp lắp đặt thủ công
1. Lấy khoang ra.
2. Gỡ miếng bọc cửa từ bên hông, sau đó lắp 2 ốc vít vào tay nắm cửa, xiết ốc vít
cho thẳng hàng, xiết chặt vít bằng tua vít Phillips, ép đường viền cửa lại.
Nếu các lỗ vít của tay cầm không khớp với các lỗ vít của cửa, vui lòng sử dụng
khoan điện để khoan các lỗ của cửa lớn một chút (ở mặt bên), để lắp đặt thủ công
một cách hoàn thiện nhất.
VẬN HÀNH BẤT BÌNH THƯỜNG
Đảm bảo rằng có nguồn điện cho phích cắm điện bằng cách nối thiết bị khác với
nó. Kiểm tra cầu chì, nếu có. Đảm bảo cửa được đóng đúng cách.
Nếu tủ rượu của bạn có vẻ như bị hỏng, rút phích cắm và liên hệ với dịch vụ chăm
sóc khách hà ng của chúng tôi. Bất cứ hoạt động nào liên quan đến mạch lạnh phải
được thực hiện bởi kỹ thuật viên làm lạnh nên tiến hành kiểm tra hệ thống niêm
phong mạch. Tương tự, bất kì sự can thiệp nào đối với mạch điện phải được thực
hiện bởi thợ điện đủ tiêu chuẩn.
34

Chú ý: bất kỳ một sự c an thiệp nào được thực hiện bởi nhân viên không được ủy
quyền của chúng tôi sẽ xem như bảo hành bị vô hiệu hóa.
MẤT ĐIỆN
Trong trường hợp ngắt điện, tất cả các cài đặt nhiệt độ trước đó sẽ tự động được
bảo quản và nó sẽ trở lại cài đặt nhiệt độ đã đặt trước. (xem biểu đồ cài sẵn)
Hầu hết các lỗi điện đều được điều chỉnh trong một khoảng thời gian ngắn. mất
một hoặc hai giờ điện sẽ không làm ảnh hưởng đến nhiệt độ của tủ rượu. Để tránh
thay đổi nhi ệt độ đột n gột trong khi mất điện, bạn nên tránh mở cửa. Đối với thời
gian bị mất điện lâu hơn, làm các bước để bảo quản rượu của bạn.
Với bất kỳ lý do gì, nếu bạn nhận thấy nhiệt độ và độ ẩm của tủ rượu bất
thường, chính là do bạn để tủ rượu trong tình trạng mất điện quá lâu, điều
này sẽ gây ảnh hưởng xấu đến tủ rượu của bạn.
HƯỚNG DẪN KHẮC PHỤC SỰ CỐ
Các vấn đề thường gặp có thể được giải quyết, tiết kiệm chi phí của một cuộc gọi
dịch vụ. Vui lòng đọc k ỹ hướng dẫn sử dụng và trả về trạng thái ban đầu theo bảng
hướng dẫn khắc phục sự cố.
35

VẤN ĐỀ
NGUYÊN NHÂN
Tủ rượu không
Không cắm phích.
Bộ ngắt mạch bị ngắt hoặc hư cầu chì.
Tủ rượu không
Kiểm tra cài đặt điều khiển nhiệt độ.
Miếng đệm cửa không đóng kín.
Mở và tắt
Nhiệt độ phòng nóng hơn bình thường.
Miếng đệm cửa không đóng kín.
Đèn không hoạt
Không cắm nguồn.
Công tắc đèn “TẮT”.
Rung chấn.
Kiểm tra để đảm bảo rằng tủ rượu được đặt trên một mặt phẳng.
Tủ rượu dường
Tiếng kêu lạch cạch có thể đến từ dòng chảy của chất làm
Tủ rượu không nằm trên một mặt phẳng.
Cửa không
Tủ rượu không nằm trên một mặt phẳng.
Kệ rượu đặt lệch vị trí.
Các tính năng tiêu chuẩn:
Máy nén khí hoạt động: R600a
- Có điện áp/tần số định mức (theo tiêu chuẩn của từng quốc gia): 220V/50/60Hz
- Rã đông tự động
- Độ ẩm : 65% RH +/-10% RH
- Chất liệu bên trong và bên ngoài màu đen
- Ánh sáng bên trong
- Chân xoay x 4
- Cửa kính ba lớp
- Cửa kính đen hoàn toàn
hoạt động.
đủ lạnh.
thường xuy ên.
động.
Thiết bị tắt.
Nhiệt độ môi trường bên ngoài có thể cao hơn nhiệt độ cài đặt.
Cửa mở thường xuyên.
Cửa không được đóng hoàn toàn.
Cửa mở thường xuyên.
Cửa không được đóng hoàn toàn.
Điều khiển nhiệt độ không được cài đặt đúng cách.
Bộ ngắt mạch bị ngắt hoặc hư cầu chì.
Bóng đèn hỏng.
như ồn hơn.
được đóng
đúng cách.
lạnh, đó là bình thường.
Mỗi chu kỳ kết thúc, bạn có thể nghe tiếng ùng ục do dòng
chảy chất làm lạnh trong tủ rượu của bạn.
Sự co giãn của các bức tường bên trong.
Cửa đã được đảo ngược và lắp lại không đúng.
Miếng đệm bị hỏng (nam châm hoặc cao su bị hỏng).
36

MALLOCA VIETNAM COMPANY LIMITED
Showroom:
279 Nguyen Van Troi Street, Ward 10, Phu Nhuan District, HCM City
Tel: (84) 28 39975 893 / 94
Fax: (84) 28 38447 1 02 - (84) 28 38633 882
Email: info@malloca.com
Customer Care:
Hotline: 1800 12 12
Email: chamsockh@mallo ca.com
CÔNG TY TNHH MALLOCA VIỆT NAM
Showroom:
279 Đường Nguyễn Văn Trỗi, Phường 10, Quận Phú Nhuận, TP.HCM
Điện Thoại: (84) 28 39975 893 / 94
Fax: (84) 28 38447 1 02 - (84) 28 38633 882
Email: info@ malloca.com
Hệ thống chăm sóc khách hàng:
Hotline: 1800 12 12
Email: chamsockh@mallo ca.com
Trung tâm c hính
279 Đường Nguyễn Văn Trỗi, Phường 10, Quận Phú Nhuận, TP.HCM
SĐT: (028) 39975 893 / 94 – (028) 39975 294 / 95
Khu vực Bà Rịa Vũng Tàu
258-260A Lê Hồng Phong, Phường 4, TP. Vũng Tàu
SĐT: (0254) 385 94 99
Khu vực Tây Nguyên
331 Phan Đình Phùng, Phường 2, TP. Đà Lạt
SĐT: (0263) 3521 107 – 0918226362
Khu vực Nam Trung Bộ
08 Lê Hồng Phong, Phường Phước Hải, TP. Nha Trang
SĐT: (0258) 3875 488
Khu vực Miền Tây
180 Trần Hưng Đạo, Phường An Nghiệp, Quận Ninh Kiều, TP. Cần Thơ
SĐT: (0292) 373 2035
Khu vực Miền Trung
211 Nguyễn Văn Linh, Phường Vĩnh Trung, Quận Thanh Khuê, TP. Đà Nẵng
SĐT: (0236) 369 1906
Khu vực Miền Bắc
10 Chương Dương Độ, Phường Chương Dương, Quận Hoàn Kiếm, Hà Nội
SĐT: (024) 35376 288 – 093 462 92 98
37
 Loading...