

Steam Oven
INSTRUCTION MANUAL
MODEL : MST 35-IX03
1

CONTENTS
1、TECHNICAL SPECIFICATION ................................................................................................ 3
2、UNP ACKING AND INSTA LLATION ....................................................................................... 3
2.1 Before the installation ........ ... .. ... .............................. ... .. ... .. ............................... .. ... .. ... ........ 3
2.2 Installation ............................. .............................................................................................. 3
3、SAFETY PRECAUTION ........................................................................................................... 5
4、DISPOSE OF REJECTED PRODUCT ...................................................................................... 6
5、STRUCTURE OF DIAGRAM ................................................................................... ... .. ........... 6
6、DESCRIPTION OF FRONT PANEL CONTROLS ................................................................... 7
7、GET TO KNOW STEAM OVEN ............................................................................................... 8
7.1 Clock Setting .......... .. ............................... .. ... .. .............................. ... ... .. ............................... 8
7.2 W ater level .......................................................................................................................... 8
8、FUNCTIONS .............................................................................................................................. 8
8.1 Menu ......... ... .. ... .. ................................................................................................................ 8
8.2 Steam Functions .................................................................................................................. 9
8.3 Meat cooking (Automatically) ............................................................................................ 9
8.4 Fish cooking (Automatically) ................................................................... ... .. ..................... 9
8.5 Vegetables cooking (Automatically) .. .. ... .............................. .. ... .............................. ... .. ... . 10
8.6 Grill Functions (Steam Oven function) ............................................................................. 10
8.7 Pizza Function (Steam Oven function) ........................................... .. ... ... .......................... 10
8.8 Defrost Function(Edit Menu) ...................................................................................... 11
8.9 Reheating and Disinfecting Functions .............................................................................. 11
9、TIMED ...................................................................................................................................... 11
10、PAUSE DURING OF COOKING ....................... ... .. ... .. ......................................................... 12
10.1 Pause or Cancel Cooking ................................................................................................ 12
10.2 Modifying Parameters .... ................................................................................................. 12
10.3 Standby mode .................................................................................................................. 12
11、CLOSE OFF STEAM COOKING .......................................................................................... 12
11.1 End program with steam function. .................................................................................. 12
11.2 End program without steam function (grill and pizza) .................................................... 12
12、DEMON FUNCTION AND CHILD LOCK ..................................................... ..................... 12
12.1 Demon function ......................... ... ... .. ... .............................. .. ... .. ............................... .. .... 12
12.2 child lock ............................................ ... .. ... .. .............................. ... .. ... ............................. 13
12.3 Unlock ..... .............................. ... .. ... .............................. ... .. ... .............................. ... ........... 13
13、DESCALING .......................................................................................................................... 13
14、CLEANING AND MAINTENANCE ..................................................................................... 14
DISPLAY INFORMATION .................................................................................................... 14
15、
16、TROUBLE SHOOTING ......................................................................................................... 15
2

1、TECHNICAL SPECIFICATION
MODEL
CAPACITY (L)
VOLTAGE(V) 240
FREQUENCE(Hz)
CIRCUIT BREAKER(A) 15
POWER(STEAM)(W)
PRODUCT DIMENSION(mm)
PACKAGE SI ZE(mm)
GROSS/NET WEIGHT(Kg)
2、UNP ACKING AND INST ALLA TION
2.1
Before the installation
1、Machine shell to be checked without deformation caused by pressure or force.
2、Check that the oven door closes correctly and the inside of the door and front oven panel are not
damaged.
3、 Metal net of the oven door is not bend or out of shape.
4、 The power cord is broken or loose.
5、 The data on the oven nameplate is compliance with the relevant regulations.
6、 After unpacking the package. Separate the various packaging materials on type and send them
to the nearest separate disposal center.
When steam oven is damaged or operation is unmoral, unplug the steam oven to cut off
power supply.
Only authorized personnel should carry out servicing.
Installation
2.2
Only a qualified person in compliance with the instructions provided must install the
appliance .the manufacturer declines all responsibility for improper installation, which may harm
persons and animals and damage property.
Important: - The power supply to the appliance must be cut off before any adjustments or
maintenance work is done on it;
Air duct is supposed to use in Ventilation.
The ac power supply should be 240 V, 50 Hz, the minimum 15 A distribution circuit fuse,
or at least 15 a distribution circuit breaker
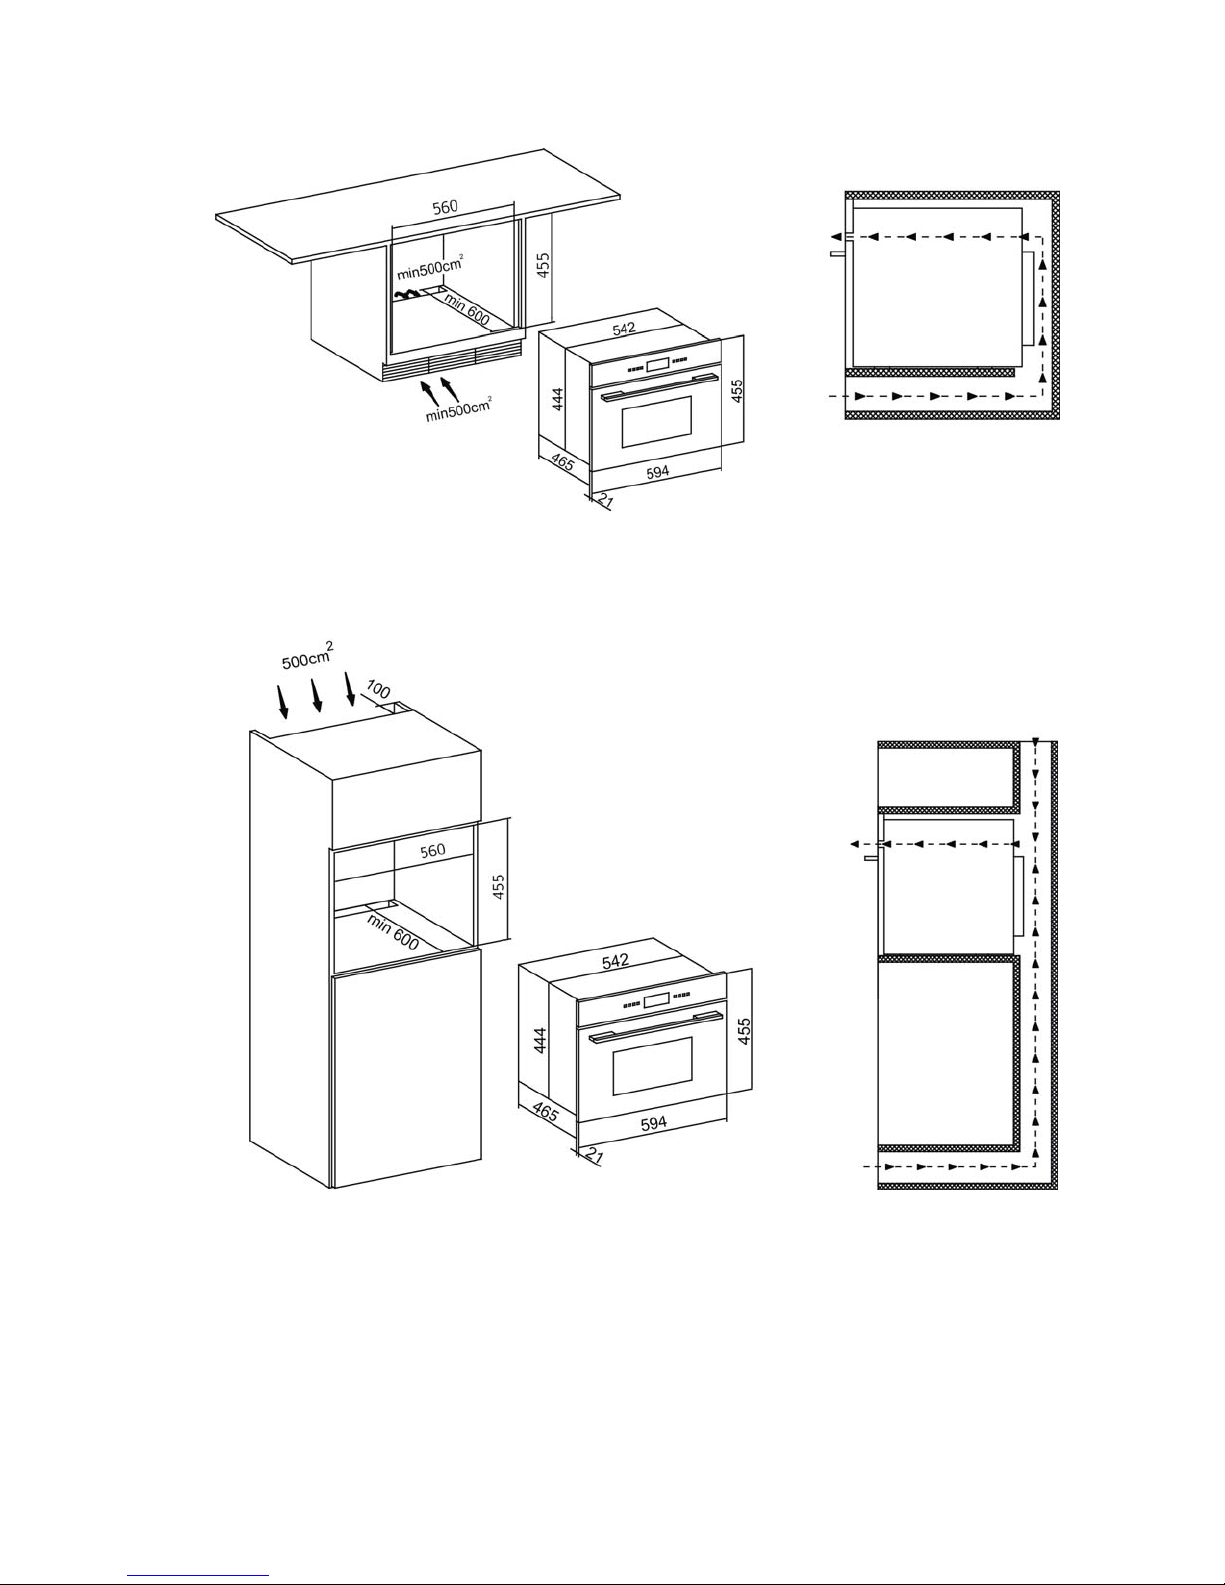
If we put the steam oven into cabinet, the cabinet material should be insulated, and the
clearance between the edge of the cabinet and the oven should be over 500mm for ventilation.
MST35-IX03
35L
50
1950
594×486×455
675×611×525
33.0/29.0
3
4
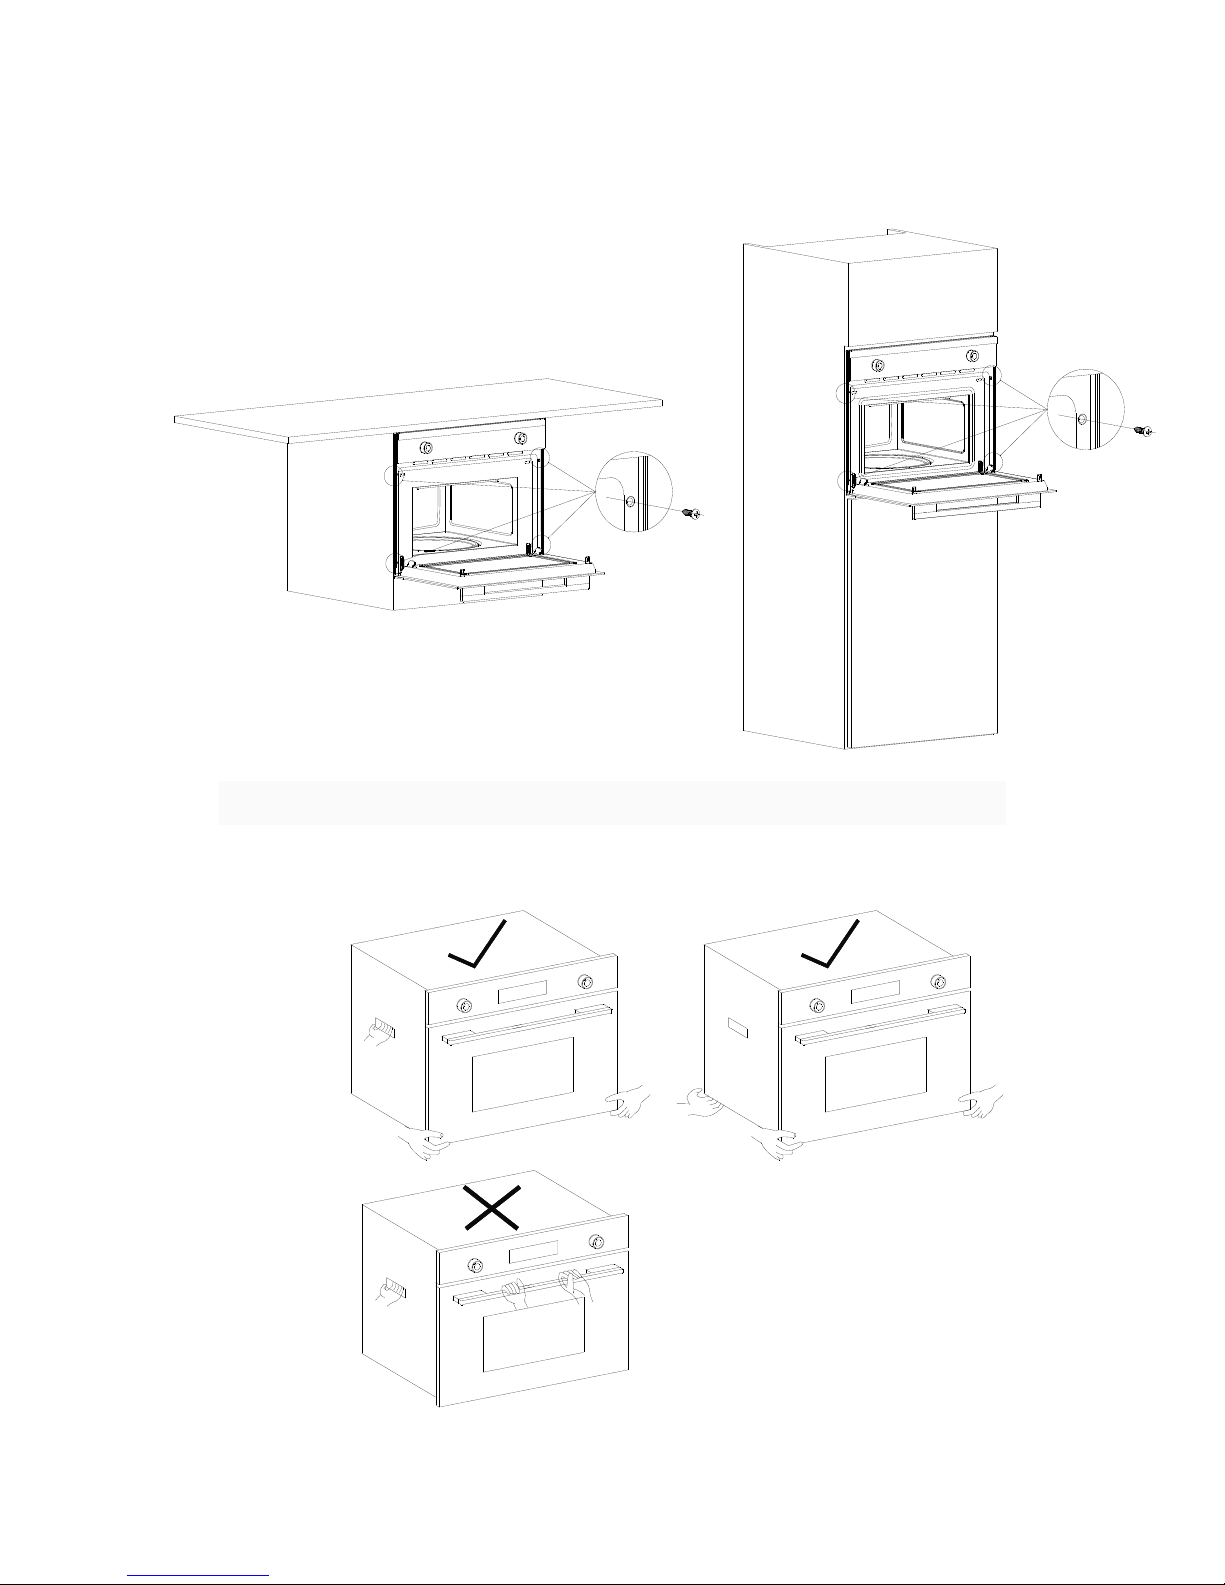
In order to fix the steam oven with cabinet, please open the steam oven door and insert four
wood screws into the four hole around frame and fix them.
Note: the installation and handling, please do not use the handle for stress point
5

3、SAFETY PRECAUTION
Warning:Only a qualified person can install ,repair and remove the oven,Please keep child
away.
Before you use the steam oven for the first time, turn the appliance on at highest temperature.
This will remove oils left on the appliance during manufacture.
Do not leave cooked food in steam oven for a long time to avoid too much condensation
generated on door.
Do not unplug the socket with wet hands.
Never cover the vents provided during heating.
Please unplug the socket, wait the steam oven to cool down before cleaning for your safety.
When cooking is finished, please keep a distance from oven door as there will be much hot
steam.
After cooking we recommend that you should clean food left in the steam oven and
condensation produced on the inner glass of the steam oven immediately.
After cooking, extra water would be back to water tank. Please empty the water tank.
Never use the steam oven for heating installation.
Calling the qualified staff to repair if the appliance does not work normally.
Do not use harsh abrasive cleaners or sharp metal scrapers to clean the oven door glass since
they can scratch the surface, which may result in shattering of the glass.
In order to ensure the food is delicious, we recommend that pour into fresh water before
cooking.
This appliance is not intended for use by persons (including children) with reduced physical
sensory or mental capabilities, or lack of experience and knowledge, unless they have been
given supervision or instruction concerning use of the appliance by a person responsible for
their safety.
This appliance is for household use and complies with the EEC directives currently in force.
The appliance is for cooking and heating food.
Dealers and users for failure to comply with the above instructions replace steam oven parts
and not use original accessories caused personal injury and property damage, the company
will not be responsible for any legal liability.
4、DISPOSE OF REJECTED PRODUC T
Our products are produced by environmental protection packaging materials, so you in
dealing with these packing materials should pay attention to packaging material recycle
utilization, protection and preservation of our environment. Don't discarded plastic packaging
to prevent children playing in the danger caused by asphyxia.
Please send your rejected productions to Environmental Conservation Organization or
authorized Electrical recycle bin, this will recycle useful materials and reduce the haza
rds of environment.
6

5、STRUCTURE OF DIAGRAM
1
2
3
4
5
6
7
A vailable Accessories
Perforated container:Cooking for fresh or refrigerant vegetables, meat and poultry.
1、 Control panel
2、 WaterBox
3、 SealRing
4、 Racks
5、 Pan
6、 Perforatedpan
7、 Door
Non-perforated container:Cooking for preserved fruit、dumplings.
Rack:Cooking for foods with small utensils ,Like: steam bun, sweetmeats.
6、DESCRIPTION OF FRONT PANEL CONTROLS
7

Standby function key
Cooking time setting(cooking time, delay time)
Function adjustment(temperature)
Clock setting(standby time)
Child lock
Modifying parameters(function, time, increase temperature)
Modifying parameters(function, time, decrease temperature)
Start/Pause
Functions Description
Steam Meat
Fish Vegetable
Defrost Disinfecting
Clock Child lock
Cooking duration Delay time
Descaling Water level (not lack of water)
Water level (lack of water) Temperature
7、 GET TO KNOW YOUR STEAM OVEN
7.1 Clock Setting
When the first use, display screen shows a flashing“0:00;it prompts to set current time, The
symbol of clock “
the hours; After setting hours press “
decrease the minutes and press “
keeping “
” always displays ;Press the button “ ” or “ ” to increase or decrease
” to set the minutes. Press “ ” or “ ” to increase or
” to confirm the current time.
” pressed for 3 seconds if you want to setting again.
Clock set range: 0:00 - 23:59.
7.2 Water level
Under initial state, you will hear a “beep” after positioning the water tank into position,
and water level indicator “
indicator “
” will light. Please add water to Max position. (Tank could load 1.2ml water in
” will light. If water in tank is not up to standard, lacking water
maximum. A tank full of water generally is able to cook for one time, about 60-70 minutes)
Note: 1、Please remove the water tank to add water. Please add water through the water injection
8

hole. Please wipe clean if water overflowed.
2、Add water when the oven is working Open the oven door for a while to co ol down the
water tank. Then remove the water tank to add water.
8、FUNCTIONS
8.1 Menu
selection mode, click add key “
shows the default cooking time and the corresponding preset parameter (program, temperature,
weight, etc.)
In standby state, Press the “
” standby function keys 1 second, enter the function menu
” and reduce the key “ ” selection function, on the screen
8.2 Steam Functions
-Choose steam function “ ” screen shows 10:00 minutes and 100 ℃.
-Press “
reduce the key “
-Press the “
parameter adjustment increase key “
temperature.:40-100℃.
-Press the “
“
display .
-The longest working time: 90:00
8.3 Meat cooking (Automatica lly)
-Choose steamed meat function “
temperature 100 ℃ and program C1 alternate cycle flicker
- Press the “ ” adjust function keys, screen flicker display program, then press the parameter
adjustment increase key “
- Press “
and reduce the key “
- Press the “
temperature icon “
“
Different meats have different temperature; you can refer to the following table
Program Type of meat
8.4 Fish cooking (Automatically)
-Choose steamed fish function “
80 ℃ and program b1 alternate cycle flicker
- Press the “
adjustment increase key “
- Press “
and reduce the key “
” the cooking time set key, then press the parameter adjustment increase key “ ” and
” , Can be installed cooking time:0:0090:00
” adjust function keys, switch to temperature setting mode, then press the
” and reduce the key “ ” , can be installed cooking
” start/pause button, cooking start, steam function icon “ ” and temperature icon
” scintillation display, work time icon “ ” and high water level icon “ ” long light
” screen shows 30:00 minutes and default cooking
” and reduce the key “ ” ,Can be setup C1-C5.
” the cooking time set key, then press the parameter adjustment increase key “ ”
” , Can be installed cooking time:0:0090:00
” start/pause button, cooking start, steam meat function icon “ ” and
” scintillation display, work time icon “ ” and high water level icon
” long light display .
Temperature
(℃)
Time(min)
Container Level
C1 Chicken Breast 100 30 Perforated 2
C2 Smoked Pork Loin 100 45 Perforated 2
C3 Turkey Escalope 100 20 Perforated 2
C4 Pork Filet Whole 100 25 Perforated 2
C5 Vienna Sausages 90 15 Perforated 2
” screen shows25:00 minutes and default cooking temperature
” adjust function keys, screen flicker display program, then press the parameter
” and reduce the key “ ” ,Can be setup b1-b5.
” the cooking time set key, then press the parameter adjustment increase key “ ”
” , Can be installed cooking time:0:0090:00
9

- Press the “ ” start/pause button, cooking start, steam fish function icon “ ” and temperature
icon “
” scintillation display, work time icon “ ” and high water level icon “ ” long light
display .
Different fish have different tempe ra tu re; you ca n refer to the follo win g tabl e
Program Type of fish
Temp erature
(℃)
Time(min)
Container Level
b1 Trout 80 25 Perforated 2
b2 Shrimp 90 15 Perforated 2
b3 Fish Filet 80 18 Perforated 2
b4 Mussels 100 25 Perforated 2
b5 Lobster 100 30 Perforated 1/2
8.5 Vegetables cooking (Automatically)
-Choose steamed vegetables function “
” screen shows20:00 minutes and default cooking
temperature 100 ℃ and program A1 alternate cycle flicker
- Press the “ ” adjust function keys, screen flicker display program, then press the parameter
adjustment increase key “
- Press “
” the cooking time set key, then press the parameter adjustment increase key “ ”
and reduce the key “
- Press the “
” start/pause button, cooking start, steam vegetables function icon “ ” and
temperature icon “
” long light display .
“
” and reduce the key “ ” ,Can be setup b1-b5.
” , Can be installed cooking time:0:0090:00
” scintillation display, work time icon “ ” and high water level icon
Different vegetables have different temperature; you can refer to the following table
Program Type of Vegetables
Temperature(℃) Time(min)
Container Level
A1 Broccoli 100 20 Perforated 2
A2 Carrots 100 25 Perforated 2
A3
Potatoes and Mixed
Vegetables
100 25 Perforated 2
A4 Snow Peas 100 15 Perforated 2
A5 Asparagus 100 25 Perforated 2
8.6 Defrost Function(Edit Menu)
- Choose defrost function “
-Press “
reduce the key “
- Press the “
icon “
” the cooking time set key, then press the parameter adjustment increase key “ ” and
” , Can be installed cooking time:0:0090:00
” start/pause button, cooking start, defrost function icon “ ” and temperature
” scintillation display, work time icon “ ” and high water level icon “ ” long light
” screen shows 10:00 minutes;
display.
Thaw means uses steam thawing, automatic temperature control in 50 ℃ - 60℃ (temperature not
displayed)
8.7 Reheating and Disinfecting Functions
-Choose steamed disinfecting function “
” screen shows 13:00 minutes and default cooking
temperature 100 ℃ and program r1 alternate cycle flicker .
- Press the “ ” adjust function keys, screen flicker display program, then press the parameter
adjustment increase key “
” and reduce the key “ ” ,Can be setup r1-r6.
10

- Press “ ” the cooking time set key, then press the parameter adjustment increase key “ ”
and reduce the key “
- Press the “
temperature icon “
” long light display .
“
” , Can be installed cooking time:0:0090:00
” start/pause button, cooking start, steam disinfecting function icon “ ” and
” scintillation display, work time icon “ ” and high water level icon
Different Disinfecting have different temperature; you can refer to the following table
Program Type of Food Temperature
(℃)
Time
(min)
Instructions Container Level
r1 Plate Dishes 100 13 Rack 2
r2 Ready-Made
Meals/Frozen
100 18 Remove lid from
Rack 2
Container and
Put on rake
r3 Beans 100 35 Disinfection:time
r4 Cherries 80 35 Rack 2
r5 Plums 90 35 Rack 2
And temperature
According to 1L
Rack 2
capacity
r6 Baby Bottles 100 12 Rack 2
9、DELAY
When set the baking time and function, then press “
function running. Display mark “
” light, flashing screen display the current clock and
display“AUTO” (automatic) . According to the parameter adjustment increase key “
reduce the key “
“
”,minutes a flickered on display, according to the parameters adjustment increase key “ ”
and reduce the key “
confirm delay start time, when in the second “
Then click on the baking time set key “
” to set up a time delay hour clock, then click on the baking time set key
” set the clock minutes position, press the “ ” start/pause button,
” start/pause button, prototype work directly.
” ,return to the current setting of the inter face .
” baking time set key, the time delay
” and
In the time delay standby process, screen flashing display was set delay co oking time and
now the clock time, and display“Auto”, if you want to cancel the choice of program function,
press “
” standby function keys 1 seconds.
10、P AUSE DURING OF COOKING
10.1 Pause or Cancel Co oking
You can stop the cooking process at any time by pressing “
”.
Open the door in the process of cooking to pause (not be recommended due to lots of vapors
may hurt you)
Long press “
” standby function key can cancel the program; you will hear soun d and the
process will be canceled.
Notice: Keep a certain distance when you open the appliance door due to lots of vapors may hurt
you.
10.2 Modifying Parameters
The operating parameters (time, temperature, weight) can only be modified when the cooking
process has been interrupted. Proceed as follows:
Press “
Press “
Press “
” to set cooking time, use “ ” and “ ” to set desired time.
” to switch to temperature setting mode .
” to continue cooking.
11

10.3 Sta ndby mode
Before choosing any a function, set up in good parameters, then no press “
confirmation before (cooking no open), keep press “
” standby function button to enter
standby state.
Press “
a long time, the screen will display PUMP; Press “
” after selecting any func tions to start cooking, when keeping “ ” pressed for
” and “ ” to select fun ction again.
11、CLOSE OFF STEAM COOKING
11.1 Close off the program wish steam function
” key
With steam function program end or long press “
” standby function key cancel the
program, DSP1 digital tube scintillation shows “PUMP IN”, electronic board buzzer in 5 minutes
every 30 seconds “drop, drop, drop” ring 3 sound; At this time DSP1 scintillation shows “PUMP
IN” said back extraction, automatic water PUMP the water tank water back to the boiler smoke,
screen flicker shows “PUMP OUT” said program automatically water in boiler smoke back to
water tank, back after the extraction automatically stop and return to standby state.
If in the boiler water temperature higher than 75 ℃, DSP1 and DSP2 has been scintillation
shows “PUMP HOT”, when the water temperature below 75 ℃, screen flicker shows “PUMP
OUT” said program automatically water in boiler smoke back to water tank, back after the
extraction automatically stop and return to standby state.
11.2 Close off the program wish out steam function
In a steam function after cooking, electronic board buzzer “drop, drop, drop” ring 3 sound,
screen shows “End” (End) scintillation display, in 5 minutes intervals of 30 seconds buzzer “drop,
drop, drop” ring 3 sound, screen shows “End” have been scintillation, 5 minutes prototype into
standby mode. When open the door or press “
” standby function key, prototype into standby
mode.
12、 DEMO FUNCTION
With the appliance in standby status, keep press “
“OFF SHO” appears on screen. This means that the show function is not actives, Press “
” to activate “ON SHO” or deactivate “OFF SHO” this function. To use the appliance
“
normally, set“OFF SHO”.After setting the parameter required, press “
” and “ ” pressed until the message
” and
” to return the oven to
the initial standby status. When activate “ON SHO” , screen will appear “ON SHO”.
13、CHILD LOCK
Lock: In waiting state, press “
into the children-lock state and “
” for 3 seconds, there will be a long "beep”, denoting entering
” indicator will light. No matter in any case after lock, screen
will always display “Block for 3 seconds, and then return to the previous interface
Unlock: Pressing “
current time and the symbol “
” for 3 seconds in the state of lock, you will hear “beep”. Screen shows the
” light go out.
14、 Descaling
Warning: In order to your safety, D escaling will take 45 minutes and can not be interrupted.
You can either open or close the oven door when you begin descaling,procedures are as follows:
In standby mode, and press the “
(scale removal function set), scale removal function icon “
want to go into the descaling function, and then click the cloc k Settings key “
” and “ ” appear on the display screen ENTR CAL
” long bright display (if don't
” ,return to
12

standby state).
Press “
” start/pause button, digital tube display “PUMP IN” said back extraction system
open
When “0.5L” appears, that shows you should add 0.5 L descaling solution to water box.
Press “
” start/pause button to start descaling function, it will take 30 minutes.
When “1.0L” appears, that shows you should add 1.0 L cold water to water box.
Press “ ” start/pause button to start program, when “CAL END” appears that shows
descaling function is end.
When open the door or press “
” start/pause button, prototype into standby mode.
Time interval of descaling depends on Hardness of water and frequency of use.If every week
use steam function 4 of x30 minutes, in order to extend our steam furnace life, we suggest you 6
months after a scale removal function.
Note: In the descaling function before water in boiler is empty to smoke; If the boiler inside still
withhold water inside, in the operation scale removal function of time, the program can't normally
open.
14、CLEANING AND MAINTENANCE
Before cleaning your oven or performing maintenance, please cut off the power supply.
In order to prol ong the service life of steam oven, please note the following points:
The enameled or stainless steel parts should be washed with lukewarm water without using
any abrasive powders or corrosive substances which cou ld ruin them ;Stainless steel could
get stained .If these stains are difficult to remove, use special products available on the
market. After cleaning, it is advisable to rinse thoroughly and dry.
The inside of the oven should preferably be cleaned immediately after use, when it is still
warm, with hot water and soap; the soap should be rinsed away and the interior dried
thoroughly. Avoid using abrasive detergents (for example cleaning powders, etc) and abrasive
sponges for dishes or acids (such as lime scale –remover, etc„) as these could damage the
enamel .If the grease spots and dirt are particularly tough to remove, use a special product for
oven cleaning, following the instruct ions provided on the packet. Never use a steam cleaner
for cleaning inside of oven.
Suitable for descaling of cleaner, such as liquid coffee machine descaling cleaner. Share not
with foam cleaner.
Avoid using grinding sand mold cleaner, such as wash mat, steel wire ball, etc, may damage
the surface
Important: please don't water tank in the di shwasher cleaning.
Replacing the oven lamp:
1)Disconnect the oven from the power supply by means of the Omni polar switch used to connect
the appliance to the electrical mains ;or unplug the appliance if the plug is accessible ;
2)Remove the glass cover of the lamp-holder ;
3)Remove the lamp and replace with a lamp resistant to high temperatures with the following
characteristic.
Voltage:220-240V
Wattage:25W
Type:E14
13

4)Replace the glass cover and reconnect the oven
To The mains Power supply.
15、DISPLAY INFORMATION
Display Description
Descaling
CAL
0.5L
1.0L
TAN
LOU
The appliance need to descale
Flash- decaling program starts
Add 0.5 liter descaling solution to water box
Add 1.0 liter cold water to water box
Water box
Installation errors
T ank water shortage in the work
Reduce vapor and water backflow
VRP
PUMP IN
PUMP OUT
Reduce vapor function is running
Tips are from the tank to the boiler pumping
Tips are from the boiler to the tank back pumping
warning
Hot
door
Err PUMP
Too high temperature
Door not installed
Flow meter sucking water the latter to get a small amount of water
16、TROUBLE SHOOTING
Warning: Maintenance should be done by a professional mechanic.
Circumstances that doesn’t need a professional mechanic
With no display!
-Check the time indicator on or off
With no response after press any button!
-Check if safety lock is on or not.
Steam oven doesn’t work!
-Check the plug plugged well
-Check the steam oven power connected or not。
-Make sure the oven door closed tightly and rightly.
-Ensure nothing caught between the door and front panel of the cavity.
Strange noise happens when steam oven is in operation!
- Cooking in the process of work noise, such as: steam generator of the pump.
- Cavity body cavity pressure of steam in the produce. (These are normal phenomenon).
The steam oven can’t heat o r heat very slowly!
-Choose cooking time and temperature set correctly.
- In the steam oven food block is too big or too cold.
After electrify interior light not bright!
-If other function normal operation, the likelihood is bulb out; Do not affect steam furnace use.
-If you want to discard the product, should be properly handled and/or in professional processing,
should not throw away, in order to avoid damage to the environment or cause other dangerous.
14

15
 Loading...