


INSTRUCTION MANUAL
HƯỚNG DẪN SỬ DỤNG
Model: MIR 593
To avoid the risk of accidents or damage to the appliance it is
essential to read these instructions before it is installed and used for
the first time.
Để tránh nguy cơ tai nạn hoặc thiệt hại cho thiết bị, quý khách cần đọc kỹ
hướng dẫn trước khi lắp đặt và sử dụng.

2
3
Fig. 1
Fig. 2
4
Fig.3
Fig.4
Fig.5
5
Fig.6
Fig.7

6
THIS APPLIANCE IS CONCEIVED FOR DOMESTIC USE ONLY. THE MANUFACTURER SHALL NOT IN ANY WAY BE HELD RESPONSIBLE FOR WHATEVER
INJURIES OR DAMAGES ARE CAUSED BY INCORRECT INSTALLATION OR BY
UNSUITABLE, WRONG OR ABSURD USE.
The manufacturer declares that this product meets all the essential requirements for low voltage
electrical material set out in European directive 2006/95/EEC of 12 December 2006 and for
electromagnetic compatibility as required by European directive 2004/108/EEC of 15 December
2004.
PRECAUTIONS
- When the hob is in use keep all magnetizable objects away (credit cards, floppy disks,
calculators and so on).
- Do not use any alluminium foil or place any foodstuffs wrapped in alluminium foil directly
on the hob - do not place any metal objects such as knives, forks, spoons and lids on the hob surface
as they will heat up.
- When cooking in a non-stick pan without seasoning, do not exceed 1-2 minutes’ pre-heating
time.
- When cooking food that may easily stick, start at a low power output level and then slowly
increase while regularly stirring.
- After cooking is finished, switch off using the control provided (turn down to “0”), and do
not rely on the pan sensor.
- If the surface of the hob is damaged, immediately disconnect the appliance from the mains
to prevent the possibility of electric shock.
- Never use a steam cleaner to clean the hob.
- The appliance and accessible parts may be hot during operation.
- Take care to avoid touching the heating elements.
- Children less than 8 years of age should be kept at a safe distance unless continuously
supervised.
- This appliance may be used by children aged 8 or over and by persons with reduced
physical, sensory or mental capabilities or lack of experience and knowledge, if they are supervised
and have received suitable instructions on safe use of the appliance and understand the dangers
involved. Children must not play with the appliance. User maintenance and cleaning should not be
carried out by children except under constant supervision.
- Cooking with grease or oil may be dangerous and cause a fire if left unattended. NEVER try
to extinguish a fire with water. Rather, disconnect the appliance and then cover the flames with a
cover or sheet, for example.
- Fire hazard: do not store elements on cooking surfaces.
- Only counter top protectors designed for use with the cooking appliance and listed in the
manufacturer’s instructions should be used as suitable protection for the counter top incorporated in
the appliance. Use of unsuitable protectors may cause accidents.
WARNING: Accessible parts will become hot when in use. To avoid burns and scalds children
should be kept away.
Insert in the fixed wiring a mean for disconnection from the supply mains having a contact
separation in all poles that provide full disconnection under overvoltage category III conditions, in
accordance with the wiring rules. The plug or omnipolar switch must be easily reached on the
installed equipment.
This appliance is not intended to be used via an external timer or a remote control system.
The manufacturers decline any responsibility in the event of non-compliance with what is

7
described above and the accident prevention norms not being respected and followed.
To avoid all risk, if the power cable becomes damaged, it must only be replaced by the
manufacturer, by an authorized service center, or by a qualified electrician.
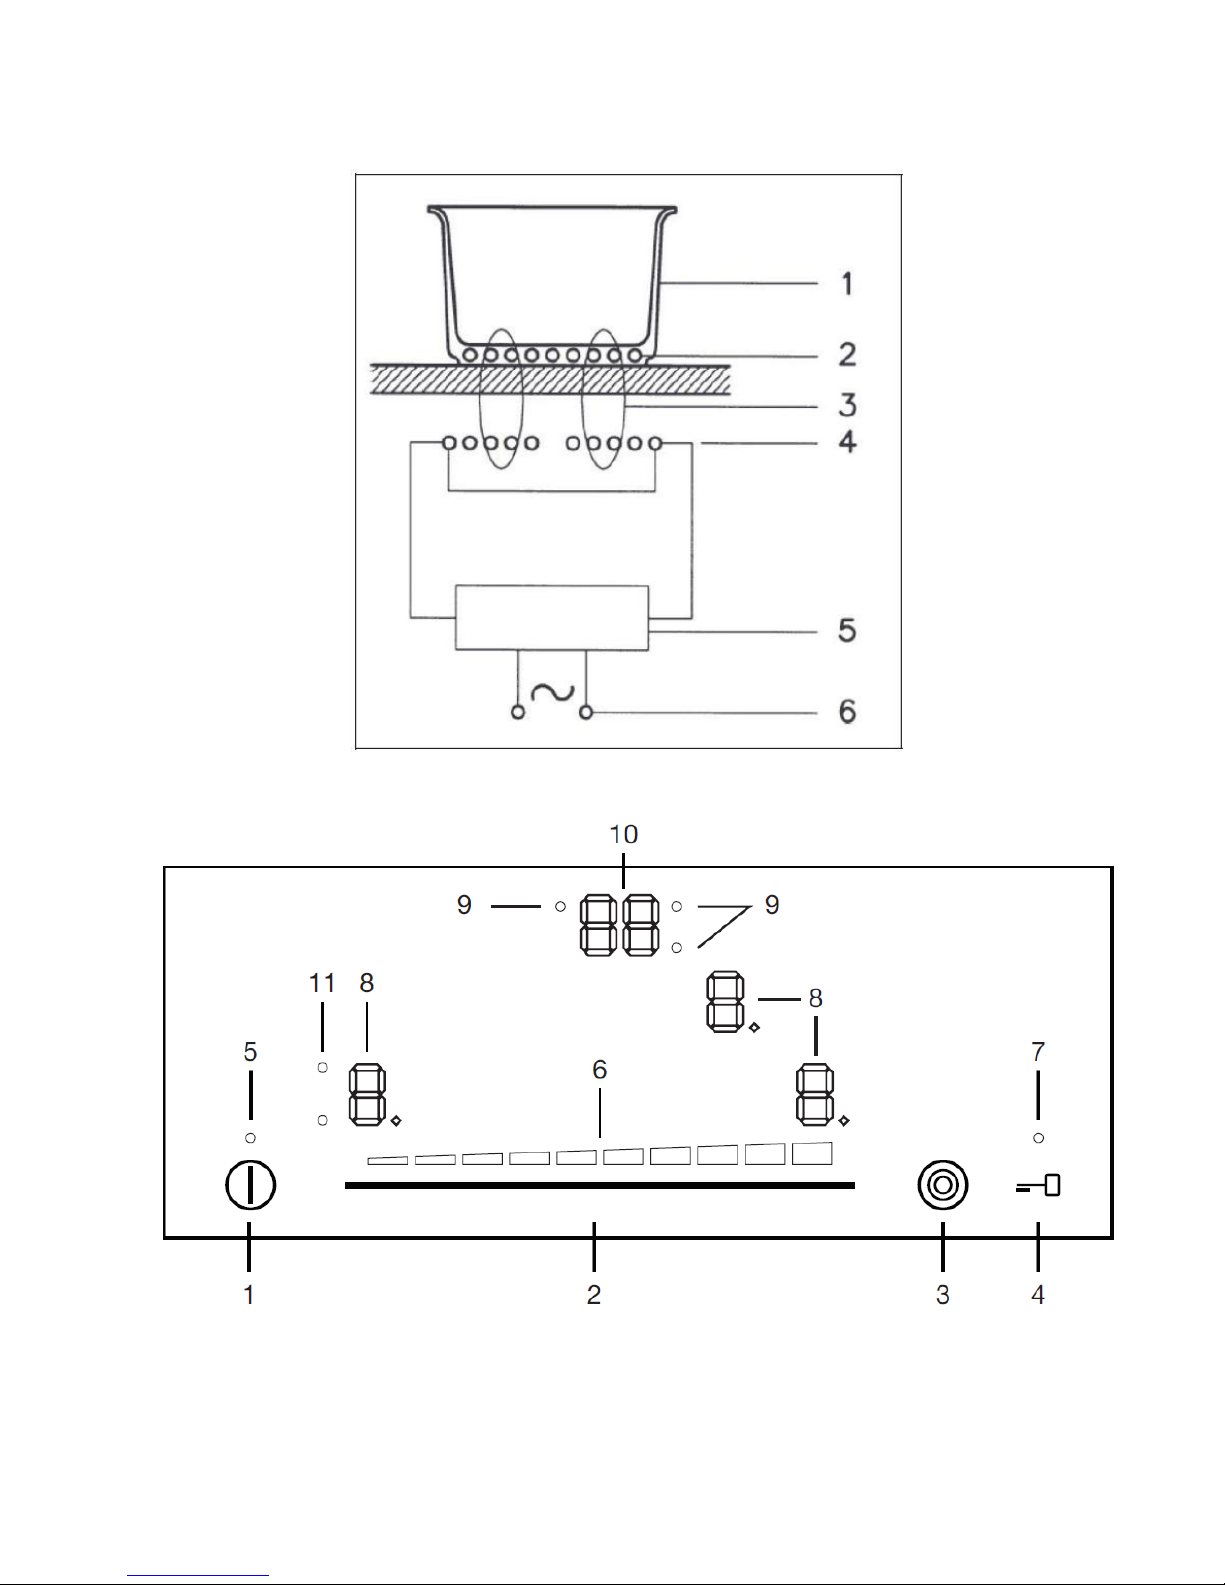
Operating principle (Fig.1)
It exploits the eletromagnetic properties of most cooking vessels.
The coil (inductor) which produces the eletromagnetic field is operated and controlled by the
electronic circuit.
The heat is transmitted to food by the cooking vessel itself. The cooking process takes place as
described below.
Loss of heat is minimum (high efficiency)
The system stops automatically when the vessel is removed or even just lifted from the hob.
The electronic circuit guarantees maximum flexibility and fine adjustments.
1.
Vessel
2.
Induced current
3.
Magnetic field
4.
Inductor
5.
Electronic circuit
6.
Power supply
User’s Instructions
Installation
All operations relative to installation (electric connection) should be carried out by skilled
personnel in conformity with the rules in force.
As for the specific instructions see part pertaining to ins- taller.
Use Function Slider TC (Fig.1)
Slider: Sensor technology of the novel Slider TC allow as well an adjustment of the cooking levels
(1-9) as the timer value (1-99) by touching and pulling the finger over the designated area. Pulling to
the right is increasing and to the left is decreasing accordant value.
Moever a direct selection of the designated value is possible the slider area.
1.
On/Off
2.
Slider sensor
3.
Double / Triple Circuit
4.
Lock Function
5.
On/Off LED
6.
Slider LED
7.
Lock LED
8.
Heating zone and Setting display
9.
Timer indicator zone
10. Timer
11. Double/ Triple Circuit LED
ON/OFF Touch Control
After connecting to the mains the Touch Control unit takes 1 second to prepare for operation. After
a reset all displays and LEDs flashes up for 1 second. After 1 second all displays and LEDs are
switched off again.
The touch control unit may now be switched on by pressing the ON/OFF key (1). Displays show a
steady “0”. Possible optic warnings for hot cooking zones “H” are displayed in alternation with “0”
and the synchronously display dot. The display dots on the cook top displays flashes up every second
(0.5 sec.off, 0.5sec.on). Electronics remains activated for 20 seconds. If there is no cooking level or
timer selection done in this period the electronics automatically resets to the off mode br releasing a

8
signal tone.
The Touch control may only be switched on by pressing the power key, the control unit is not
switched on.
In case of an active “Child Lock Function” when switching power on, all cooking zone displays
show “L” for Locked. Possible optic warnings for hot cooking zones [H] are displayed in alternation
with [L]
By pressing the ON/OFF key (1) of the control unit in ON-Mode, the Touch Control may be
switched off at any time.
Automatic Switch Off
When the control is ON it automatically switches-OFF after 20 seconds. After selecting a cooking
zone, the automatic off time is divided into 10 seconds, after wwhich the zone iss deselected and,
after another 10 seconds, the touch control switches off.
The Touch Control switches from Power On to Off after 20 seconds provided that no cooking
zoone is activated or a select key is pressed during that time.
In case of a selected cooking zone (with cooking stages is “0”) this Auto Power off time is
composed of a 10 seconds deselection time and 10 seconds power off time.
Switching a cooking zone ON and OFF
In case of on state of the Touch Control a cooking zone may be selected by touching the dedicated
display (Select Sensor (8)). The respective display changes to a steady display dot and “0” instead of
“H” – in case of a hot cooking zone. On all other cooking zone displays the dot expires.
That followed a cooking level maybe set by using the Slider area. End stops are “9” (right side)
and “0” (left side).
Switching a cooking zone off
A single cooking zone may be switched off by selecting and setting cooking level to “0”. In case of
an optic warning for hot cooking zones “H” this is displayed in alternation with “0” and the
synchronously display dot.
After the Touch control is switches off the display remains black respectively “H” is displayed for
an optic warning for hot cooking zone.
Switching-OFF all cooking zones
Immediately switching off all cooking zones is always possible by using the On/Off key. “H”
possibly appears on all hot cooking zones. All other cooking zone displays remain black.
Setting level
The cooking zone can be set to 9 levels that are indicated by the numbers “1” to “9” on the sevensegment LED display.
Residual heat indicator
It is meant to indicate to the user that the glass ceramic has a dangerous touch temperature in the
circumference of a cooking zone. The temperature will be determined following a mathematical
model and the remaining residual heat will be indicated by means of “H” on the corresponding
display.
Heating-up and cooling down will be calculated dependent on:
- The selected setting („0“ to „9“)
- The ON/OFF time.
After switching-OFF the cooking zone the respective display shows “H” until the assigned cooking
zone temperature is mathematically in a uncritical level (<60°C).
Automatic power OFF function (operating time limitation)
Dependent on the selected setting, every cooking zone will be switched-OFF after a defined
maximum operation time if no operation of the assigned cooking zone follows within this time
period. Every change of the cooking zone condition (by means of the PLUS+, MINUS-, or dual zone)
puts back the maximum operation time of this cooking zone to the initial value of the operating time
limitation.

9
Cài đặt thời gian
Protection against unintended switching-ON
The electronic system cuts off automatically in case of an identified permanent use of keys for
about 10 seconds. The control unit releases an audible signal for 10 seconds of the malfunction and
the error code “ER03” flashes on the display (0.5s ON, 0.5s OFF). If the permanent actuation exceeds
10 sec, alone the error code “ER03” keeps flashing as long as the malfunction occurs and is identified
as such. In case th cooking zone is at stage “hot” the [H] symbol altenates with error code.
Water sprinkled on the glass surface does not always lead to a key actuation and cannot be surely
detected.
If no cooking zone is activated within 20 sec after pressing POWER ON, the control unit is reset to
OFF mode (black displays).
Key lock
The actuation of the key lock key (4) in the wait or active mode locks the keyboard and the
assigned key-lock LED “7” is statically illuminated. Here, the actuation times of the key lock have to
be taken into account. The control continues to work in the set mode, but may no longer be operated
with any key, expect the key-lock key itself or the on/0ff key (1).
The switching off with the on/off key “1” is also possible in the locked condition. The assigned
key-lock LED “7” fades when switching off the control the key-lock function
Control of multiple circuits
When a dual/ triple cooking zone is activated, the 3 circuits are switched on at the same time. The
activation / deactivation of each circuit is done with button 4 and it is indicated with an illuminated
segment.
Sound signal (buzzer)
The following activities occurring during operation of the touch control unit are feedback audibly
via a buzzer :
- Short single tone for regular actuation of a key
- Longer, intermittent tone for permanent use of keys over a longer period of time (> 10 sec).
- Expiry of the timer
Maintenance
Any remains of aluminium foil, food, fat, sugar or food with high sugar content must be
immediately removed from the hob surface to prevent potential damage to the hob surface.
Subsequently clean the surface with some towel and appropriate product, rinse with water and dry
by means of a clean cloth. Under no circumstance should sponges or abrasive cloths be used; also
avoid using aggressive chemical detergents such as oven sprays and spot removers.
Timer function
The timer function is available in two types:
- Stand-alone-timer 1..99 min: This function can only be activated as long as no cooking zone is in
operation (all stages = 0). If the timer shall be used to cut off a cooking zone (see cooking zone
timer) then the control must first be switched off power sensor and switched on again.
- Cooking zone timer 1..99 min: This function can only be activated as long as a cooking is active
(stage > 0; display dot).
Setting a timer value:
By adjustment with the slider area. Primarily the adjustment of the first digit takes place and there
after the adjustment of the second digit.
In case of an active timer display the timer value may be set to [0] directly by pressing [0] on the
slider area (left side).
Switching off an active timer:
A timer can be switched of by setting its value to “0”.
A stand alone timer can be switched of by a double actuation of the power key “1”.
Timer Stand-alone:
If the control unit is switched on (all cooking zone displays show “0”), the stand-alone timer

10
may be activated by pressing the timer select key. The timer display show “00”. The timer is cut off
after 10 sec (black display) if no further settings are made. In case of a timer value is set with no
activation of a cooking zone within10 sec, the cooking zone displays are cut off (interposing relays
are also cut off). Possible optic warnings for hot cooking zone [H] are displayed permanently.
The setting range is 0-99 minutes in single steps by Slider area. Directly after the timer value is set
countdown starts with the last set value. After expiring of the set time an acoustic signal is given and
the timer display flashes “00”.
The acoustic signal is terminated
- After 2 min
- Actuating any key
Cooking zone specific timer programming
By actuating a cooking zone (Cooking zone stage > 0) followed by selecting the timer display (within
10 sec) a timer value may be assigned to the cooking zone as a cut-off function. The LED around the
timer “9” indicates which cooking zone the timer had been activated for.
As soon as the timer is selected the according LED is blinking. When switching from one cooking
zone to another, the timer display indicates the current timer value of the respective cooking zone.
Timer settings of other cooking zones stay active. Futher setting is like with the stand-alone timer.
In case of more than one active timer the display indicates the lowest timer value (after deselection
time).
After expiring of the set time an acoustic signal is given and the timer display flashes “00”. The
related timer LED is blinking synchronously. The programmed cooking zone is cut-off, a permanent
“0” is. After 10 sec (deselection time) a permanent “H” is displayed on a “hot” cooking zone.
Otherwise, the symbol “0” is indicated.
The acoustic signal and the blinking of the cooking zone timer LED is terminated.
- After 2 min
- Actuating any key
Installer’s Instructions
Installation
These Instructions are for the qualified technician, as a guide to installation, adjustment and
maintenance, according to the laws and standards in force. These operations must always be carried
out when the appliance has been disconnected from the electric system.
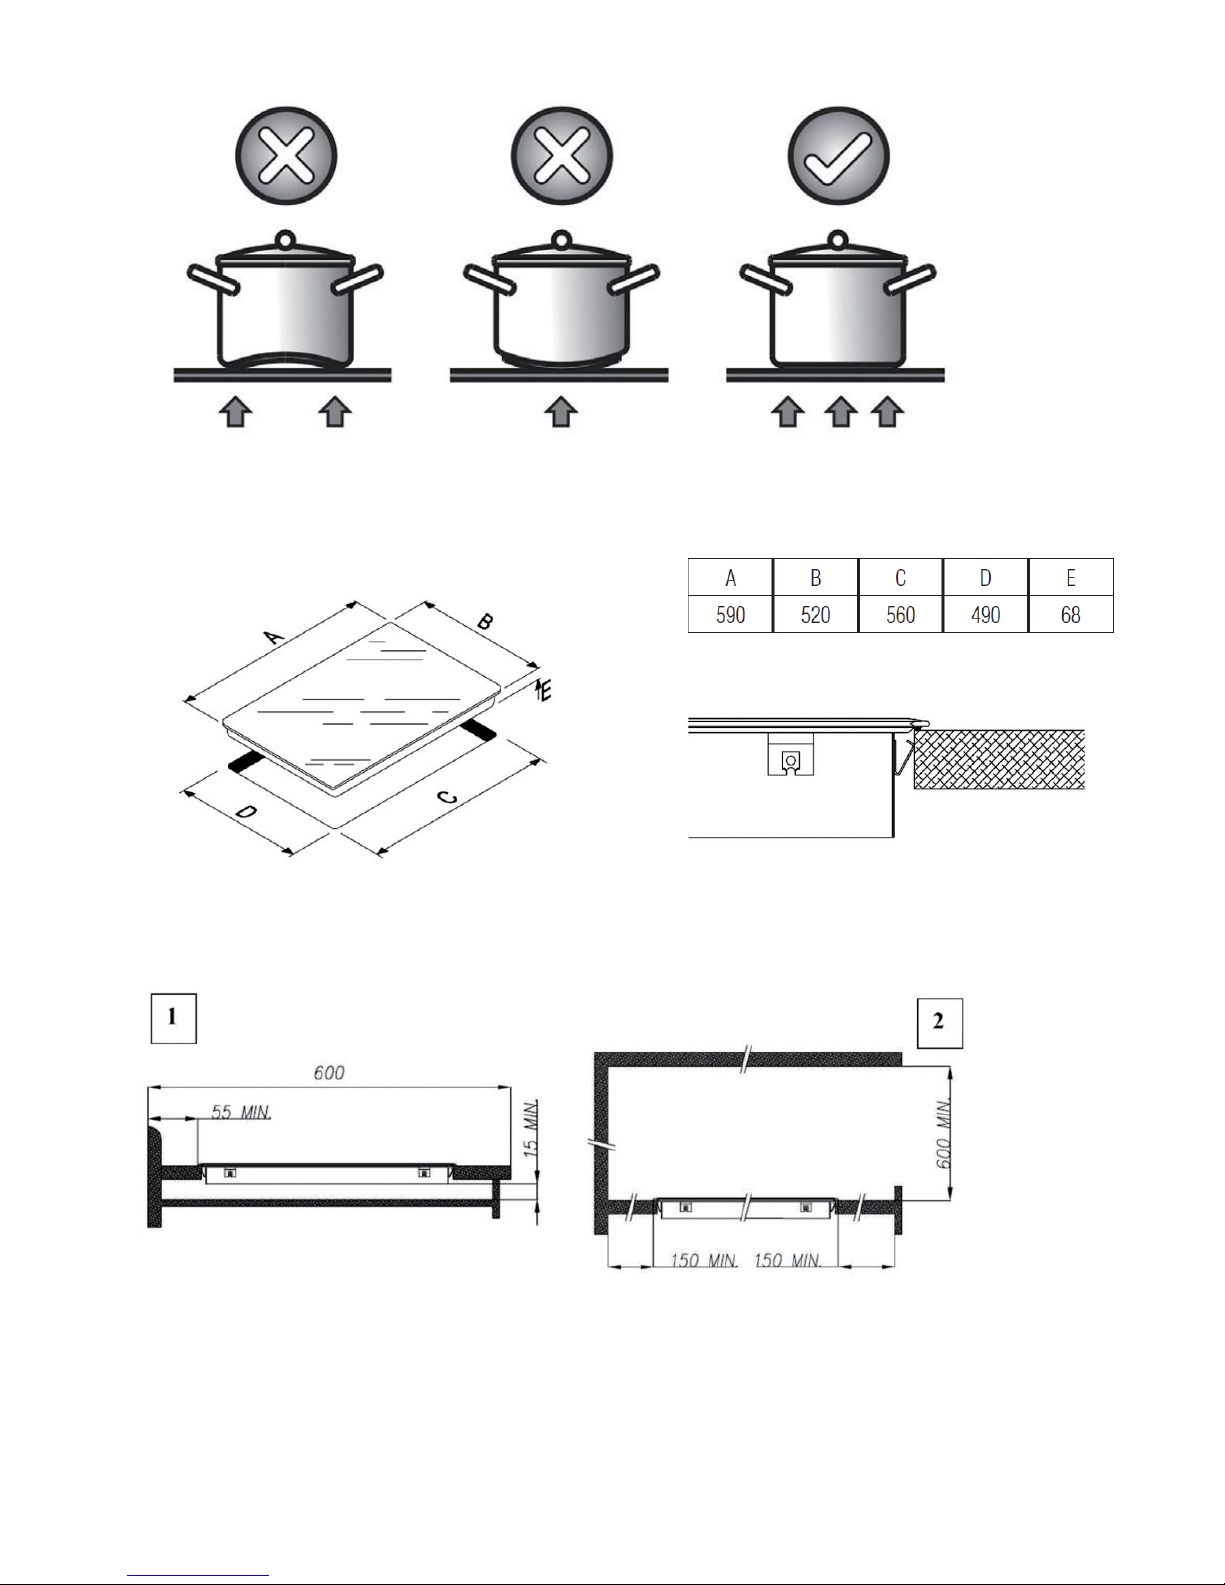
Positioning (Fig. 3,4)
1. Front view
2. Front side
The fixture is especially designed for fitting into a work-top as shown in the corresponding figure.
Place the supplied sealing agent along the hob perimeter.
Do not install the hob over an oven; in case you do, make sure of the following:
- the oven is equipped with an appropriate cooling system
- there is no warm-air leakage from the oven towards the hob
- Suitable air-inlets are provided as shown in the figure.
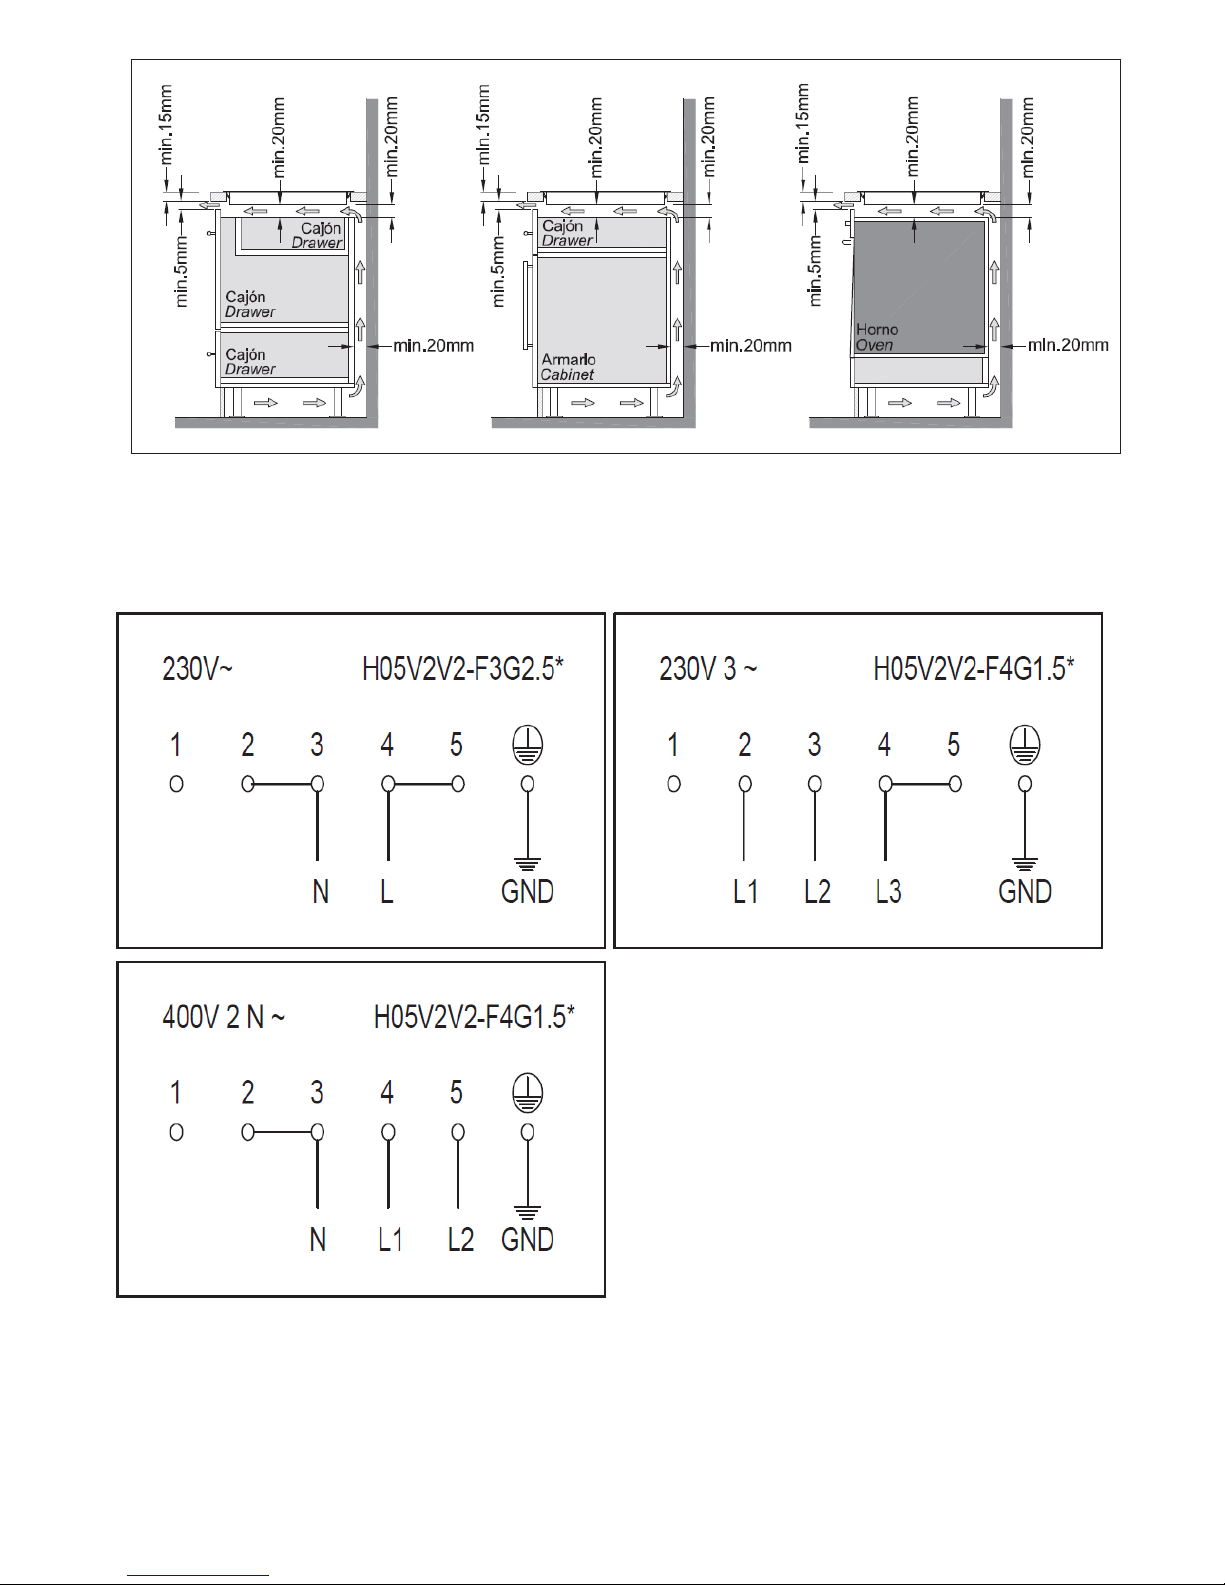
Electrical connection
Prior to carrying out the electrical connection, please ensure that:
The plant characteristics are such as to follow what is indicated on the matrix plate placed at
the bottom of the working area;
That the plant is fitted with an efficient earth connection, following the standards and law
provisions in force.
The earth connection is compulsory in terms of the law.
Should there be no cable and/or plug on the equipment, use suitable absorption material for the
working temperature as well, as indicated on the matrix plate. Under no circumstance must the cable
reach a temperature above 50°C of the ambient temperature.

11
Hình 1
Hình 2

12
Hình 3
Hình 4
Hình 5

13
Hình 6
Hình 7

14
THIẾT BỊ NÀY CHỈ ĐƯỢC SỬ DỤNG TRONG NƯỚC. NHÀ SẢN XUẤT KHÔNG CHỊU
BẤT CỨ TRÁCH NHIỆM NÀO VỀ THƯƠNG TÍCH HOẶC NGUY HIỂM DO LẮP ĐẶT
KHÔNG ĐÚNG, SỬ DỤNG KHÔNG HỢP LÝ HOẶC LÀ SỬ DỤNG SAI.
Nhà sản xuất công bố sản phẩm này đáp ứng đầy đủ yêu cầu cần thiết cho điện áp được quy định
trong 2006/95/EEC ngày 12 tháng 12 năm 2016. Cho khả năng tương tích điện áp theo tiêu chuẩn
Châu Âu 2004/108/EEC ngày 15 tháng 12 năm 2004.
BIỆN PHÁP PHÒNG NGỪA
-
Khi sử dụng bếp giữ các vật bị nhiễm từ ra xa (Thẻ tín dụng, thẻ ATM, đĩa mềm, máy tính
cầm tay,vv.. ).
-
Không được sử dụng bất cứ lá nhôm hoặc bọc bất cứ thức ăn bằng giấy bọc nhôm lên trên
bếp
-
Không đặt bất cứ vật kim loại bao gồm dao, nĩa, muỗng lên bề mặt của bếp, vì sẽ nóng gây
nguy hiểm.
-
Khi nấu ăn sử dụng chảo không dính, làm chảo nóng 1-2 phút rồi mới để thức ăn vào.
-
Khi nấu thức dễ dính, chảo nồi nên bắt đầu ở một mức công suất thấp và sau đó từ từ tăng
lên.
-
Sau khi nấu xong, nên tắt sử dụng bằng cách điều chỉnh công suất (chuyển xuống "0").
-
Nếu xảy ra các sự cố trên bề mặt bếp, ngay lập tức ngắt kết nối thiết bị với nguồn điện để
ngăn chặn khả năng bị điện giật.
-
Không được vệ sinh bếp bằng hơi nước.
-
Bếp và các bộ phận của bếp có thể nóng trong khi sử dụng.
-
Cẩn thận tránh chạm vào bộ phận đốt nóng
-
Trẻ em dưới 8 tuổi nên giữ khoảng cách an toàn trừ khi có sự giám sát của người lớn.
-
Trẻ em không nên chơi đùa với thiết bị. bảo trì và vệ sinh không nên được thực hiện bởi trẻ
em ngoại trừ dưới sự giám sát liên tục của người lớn.
-
Thiết bị có thể được sử dụng bởi trẻ em 8 tuổi và lớn hơn. Những người có khiếm tật vật lý,
cảm quan hoặc tâm thần hoặc không có kinh nghiệm hay kiến thức cần thiết, chỉ được sử dụng khi
được giám sát hoặc hướng dẫn trong việc sử dụng thiết bị bởi người chịu trách nhiệm cho sự an toàn
của họ.
-
Nấu ăn với dầu và mỡ có thể rất nguy hiểm và có thể bén lửa nếu không chú ý. Khi xảy ra sự
cố về lửa, nhanh chóng ngắt kết nối thiết bị và trùm ngọn lửa bằng khăn phủ.
-
Nguy cơ cháy: Không lưu trữ hoặc để các chất, vật dễ cháy lên trên bề mặt của bếp.
-
Chỉ sử dụng bề mặt từ bếp được thiết kế để sử dụng với các thiết bị nấu ăn và được liệt kê
trong danh sách ưu tiên của nhà sản xuất.
-
Sử dụng mặt đá không phù hợp có thể gây nguy hiểm, tại nạn khi sử dụng.
CẢNH BÁO: Các bộ phận của bếp có thể nóng trong khi sử dụng. Để tránh cháy hoặc bỏng nên
tránh xa tầm tay trẻ em.
- Thiết bị này không nên sử dụng thông qua bộ đếm thời gian hoặc một hệ thống điều khiển
từ xa.
- Nhà sản xuất từ chối bất kỳ trách nhiệm trong trường hợp không tuân thủ với những gì mô
tả ở bên trên và với các tiêu chí phòng chống tai nạn.
- Khi xảy ra sự cố về dây nguồn, hay các rủi ro khác, chỉ được sửa chữa bởi nhà sản xuất, đại
lý ủy quyền và nhân viên kỹ thuật.
Để tránh mọi rủi ro, nếu cáp điện bị hư hỏng, bạn nên thay thế bởi các nhà sản xuất,

15
bởi đại lý ủy quyền, hoặc bởi nhân viên kỹ thuật.
Hướng dẫn sử dụng
Lắp đặt
Tất cả các hoạt động có liên quan đến lắp đặt (kết nối điện) bởi người có kỹ năng được tiến hành
phù hợp với quy định hiện hành.
Sử dụng điều khiển cảm ứng (Hình 1)
1. Đóng/ mở
2. Trừ -
3. Cộng +
4. Hai / Ba vòng lửa
5. Hiển thị vùng nấu
6. Cài đặt hiển thị công suất
7. Đèn hiển thị hai vòng lửa
Công tắc điều khiển cảm ứng On/Off
Sau khi kết nối với nguồn điện đơn điều khiển cảm ứng mất 1 giây để chuẩn bị cho hoạt động. Sau
khi thiết lập lại tất cả các màn hình và đèn LED nhấp nháy lên trong 1 giây. Sau 1 giây tất cả các màn
hình và đèn LED được tắt một lần nữa.
Bộ điều khiển cảm ứng hiện nay có thể được bật lên bằng cách nhấn phím ON/OFF (1). Mà hình
hiển thị trạng thái"0. Cảnh báo quang có thể cho biết vùng nấu nóng và hình hiển thị "H" luân phiên
với “0” và dấu chấm. Bếp điện tử vẫn được bật trong vòng 20 giây, nếu không hoạt động nấu ăn hoặc
thực hiện hẹn giờ trong khoảng thời gian này, các thiết bị điện tử tự động chuyển sang chế độ tắt và
phát ra một âm thanh tín hiệu.
Việc kiểm soát cảm ứng chỉ có thể được bật lên bằng cách nhấn vào phím nguồn.Trong trường hợp
"Khóa chức năng trẻ em" các phím không có hiệu lực, tất cả các màn khu nấu ăn cho "L" cho đã bị
khoá. Cảnh báo quang có thể cho biết vùng nấu nóng và hiển thị [H] và [L] luân phiên.
Nhấn phím ON/OFF để điều khiển bật bếp, và có thể tắt bếp bất cứ lúc nào.
Chế độ tắt tự động
Khi bật bếp, sẽ tự động chuyển sang chế độ tắt sau 20 giây. Sau khi chọn một vùng nấu ăn, điều
khiển cảm ứng sẽ tắt. sẽ tự động tắt trong vòng 10 giây đối với vùng nấu đã được chọn, thêm 10 giây
nửa đối với vùng nấu không được chọn.
Tắt mở khu vực nấu
Trong trường hợp điều khiển cảm ứng của một vùng nấu có thể được lựa chọn bằng cách chạm vào
vị trí LED (Chọn cảm biến ở LED (8)). Khi một vùng nấu ăn nóng, màn hình hiern thị một dấu chấm
và “0” thay vì là “H”. Tùy theo công suất của bếp có thể thiết lập bằng cách sử dụng thanh trượt.
Công suất cao nhất là "9" (bên phải) và thấp nhất là "0" (bên trái).
Tắt bếp khu vực nấu
Một vùng nấu ăn duy nhất có thể được tắt bằng cách chọn và cài đặt công suất nấu ăn là "0". Trong
trường hợp của một cảnh báo cho biết vùng nấu ăn còn nóng, thì ký tự "H" này được hiển thị thay
đổi luân phiên với "0" và và dấu chấm.

16
Sau khi điều khiển cảm ứng tắt màn hình, thì ký tự "H" được hiển thị để cảnh báo cho vùng nấu ăn
còn nóng.
Tắt bếp tất cả khu vực nấu
Immediately switching off all cooking zones is always possible by using the On/Off key. “H”
possibly appears on all hot cooking zones. All other cooking zone displays remain black.
Nhấn On/Off (1) ở bấy kỳ thời gian sẽ ngay lập tức tắt các khu vực nấu. Thể hiện chế độ chờ “H”.
xuất hiện trên tất cả các khu vực nấu còn nóng. Tất cả các hiển thị khu vực nấu khác sẽ không hiển
thị (chiếu sáng).
Cài đặt công suất
Vùng nấu có thể cài đặt 9 mức công suất bằng hiển thị từ số 1 đến 9 trên led 7 đoạn.
Chỉ số nhiệt dư
Để báo cho người dùng rằng mặt kính bếp có một nhiệt độ nguy hiểm khi chạm trong chu vi của
một khu vực nấu ăn.
Nhiệt độ mặt bếp sẽ được tính toán và nhiệt dư sẽ thể hiện bằng chữ "H" trên màn hình hiển thị.
Đốt nóng và giảm xuống sẽ được tính toán phụ thuộc vào:
o Tăng giảm nhiệt đọ dựa vào ("0" đến "9")
o ON / OFF.
Chức năng tự động tắt công suất (thời gian hoạt động giới hạn) phụ thuộc vào các thiết lập được
lựa chọn, mỗi khu vực nấu ăn sẽ được chuyển sang chế độ tắt sau một thời gian hoạt động tối đa
được xác định, hoặc là không có hoạt động của khu vực nấu ăn sau trong khoảng thời gian này. Mỗi
sự thay đổi của các điều kiện khu vực nấu ăn cần được đặt lại, thời gian hoạt động tối đa của khu vực
nấu ăn này với giá trị ban đầu của giới hạn thời gian hoạt động.
Bảo vệ tự động mở bếp ngoài ý muốn
Cài đặt giờ được ưu tiên so với giới hạn thời gian hoạt động cho thiết lập giai đoạn nấu cao.
Hệ thống điều khiển điện tử tự động cắt trong trường hợp nhấn phím trong khoảng 10 giây. Bộ
điều khiển phát hành một tín hiệu âm thanh của sự cố trong 10 giây và mã lỗi "ER03" nhấp nháy trên
màn hình. Trong trường hợp vùng nấu bị "nóng" biểu tượng [H] cùng với mã lỗi luân phiên sáng.
Nước bị ướt lên bề mặt kính luôn luôn dẫn đến tình trạng không thể bật bếp được.
Nếu không kích hoạt vùng nấu trong vòng 20 giây sau khi nhấn bật bếp, thì điều khiển sẽ chuyển
sang chế độ tắt (màn hình tắt).
Khóa phím
Việc kích hoạt khóa phím (4) hoặc kích hoạt chế độ khóa bàn phím và đèn "7" được sáng lên.
Việc điều khiển sẽ tiếp tục làm ở chế độ thiết lập trước đó, và bất cứ phím nào cũng không có thể
điều khiển được, trừ phím tắt mwor nguồn ON/OFF (1).
Việc tắt phím ON / OFF "1" cũng có thể thực hiện trong tình trạng bị khóa. Đèn khóa phím "7"
được tắt khi tắt điều khiển khóa phím.
Bếp 3 vòng lửa
Khi một khu vực nấu nướng hai / ba vòng lửa được kích hoạt, 3 vòng lửa được bật lên cùng một
lúc. Việc kích hoạt / Chấm dứt hoạt của mỗi vòng lửa được thực hiện với phím (4) và nó được hiển
thị với một đoạn được chiếu sáng.

17
Tín hiệu âm thanh (còi)
Khi kiểm soát được các hoạt động sau đây sẽ được báo hiệu bằng còi:
o Âm ngắn với trường hợp phím nhấn
o Âm dài, giai điệu liên tục trong lúc nhấn phím liên tục trong một thời gian dài (>10 giây).
o Hết thời gian hẹn giờ
Bảo trì
Bất kỳ giấy nhôm, thực phẩm, chất béo, đường hoặc thực phẩm có hàm lượng đường cao còn lại
phải được ngay lập tức bị loại bỏ khỏi bề mặt bếp để ngăn chặn nguyên nhân tiềm năng gây thiệt hại
bề mặt bếp.
Sau khi rửa sạch với khăn và sản phẩm tẩy rửa thích hợp, rửa sạch lại bằng nước và lau khô bằng
một miếng vải sạch. Nên dùng bọt biển hoặc vải mềm. Tránh sử dụng các chất tẩy rửa mạnh như
bình sịt và tẩy nhanh.
Chức năng hẹn giờ
Chức năng hẹn giờ là có hai phương pháp :
- Hẹn giờ độc lập 1..99 phút : Chức năng này chỉ có thể được kích hoạt khi không có khu vực nấu ăn
đang hoạt động (tất cả các giai đoạn = 0). Nếu giờ được sử dụng để tắt một vùng nấu ăn (xem thời
gian hẹn giờ khu nấu ăn) sau đó đầu tiên phải tắt cảm biến công suất và bật lại.
- Hẹn giờ vùng nấu 1..99 phút: Chức năng này chỉ có thể được kích hoạt hẹn giờ khi vùng nấu ăn
đang hoạt động (giai đoạn> 0; hiển thị dấu chấm).
Cài đặt giá trị thời gian đếm :
- Bằng cách điều chỉnh với các thanh trượt. Trong trường hợp của một bộ đếm thời gian hiển thị
hoạt động giá trị bộ đếm thời gian có thể được thiết lập để [0] trực tiếp bằng cách nhấn [0] trên
khu vực trượt (bên trái).
Tắt một bộ đếm thời gian hoạt động:
- Hẹn giờ có thể được bật bằng cách thiết lập giá trị của nó là "0".
- Hẹn giờ độc lập có thể được bật bởi một phím nguồn "1".
Hẹn giờ độc lập:
Nếu đơn vị điều khiển đang được bật (tất cả các màn khu nấu ăn hiển thị "0"), bộ đếm thời gian độc
lập có thể được kích hoạt bằng cách nhấn các timer phím lựa chọn. Màn hình hiển thị chương trình
hẹn giờ "00". Các bộ đếm thời gian bị cắt sau 10 giây (màn hình đen) nếu không có cài đặt thêm được
thực hiện. Trong trường hợp của một giá trị đếm thời gian được thiết lập với không kích hoạt của một
khu vực nấu ăn within10 giây, hiển thị khu vực nấu ăn được tắt. Cảnh báo quang có thể cho khu vực
nấu ăn nóng [H] được hiển thị vĩnh viễn.
Phạm vi cài đặt là 0-99 phút trong các bước đơn theo khu vực trượt. Ngay sau khi giá trị bộ đếm thời
gian được thiết lập đếm ngược bắt đầu với giá trị đặt trước. Sau khi hết hạn của thời gian thiết lập
một tín hiệu âm thanh sẽ thông báo và các bộ đếm thời gian hiển thị nhấp nháy "00".
Các tín hiệu âm thanh được chấm dứt
- Sau 2 phút
- Gạt phím bất kỳ
Khu nấu hẹn giờ cụ lập trình
Bằng cách gạt một khu vực nấu ăn (giai đoạn khu vực nấu ăn> 0) theo sau bằng cách chọn hiển thị bộ
đếm thời gian (trong vòng 10 giây) một giá trị đếm thời gian có thể được giao cho các khu vực nấu ăn
như một chức năng tắt. Các đèn LED xung quanh bộ đếm thời gian "9" chỉ ra mà nấu ăn vùng hẹn giờ
đã được kích hoạt.

18
Ngay sau khi bộ đếm thời gian được chọn, đèn LED sẽ nhấp nháy. Khi chuyển từ một vùng nấu khác,
bộ đếm thời gian hiển thị chỉ ra giá trị bộ đếm thời gian hiện tại của vùng nấu tương ứng. Thiết lập
cài đặt thời gian giống như với bộ đếm thời gian độc lập.
Trong trường hợp có nhiều hơn một bộ đếm thời gian hoạt động màn hình chỉ ra giá trị bộ đếm thời
gian thấp nhất.
Sau khi kết thúc thời gian hẹn giờ thiết lập một tín hiệu âm thanh được phát ra và các bộ đếm thời
gian hiển thị nhấp nháy "00". Các bộ đếm thời gian có liên quan LED nhấp nháy đồng bộ. Vùng nấu
ăn theo chương trình sẽ được tắt. Sau 10 giây ký tự "H" được hiển thị trên vùng nấu ăn "nóng", nếu
vùng nấu ăn không nóng hiển thị “0”.
Các tín hiệu âm thanh và nhấp nháy của vùng nấu hẹn giờ LED được chấm dứt.
- Sau 2 phút
- Gạt phím bất kỳ
Hướng dẫn lắp đặt
Lắp đặt
Hướng dẫn lắp đặt dành cho các kỹ thuật viên kỹ thuật, thực hiện thay thế và bảo trì theo luật pháp
và các tiêu chuẩn hiện hành. Các hoạt động này phải luôn được thực hiện khi thiết bị đã kết nối được
với nguồn điện.
Vị trí (hình 4,5 và 6)
1. Mặt trước
2. Mặt trước
Bếp được thiết kế đặc biệt cho việc lắp vào rập cắt đá như thể hiện trong hình tương ứng. Đặt đại
lý niêm phong cung cấp dọc theo chu vi bếp nấu ăn. Trong trường hợp bạn lắp đặt, hãy chắc chắn
những điều sau đây:
-
Bếp được trang bị một hệ thống làm mát thích hợp
-
Không có rò rỉ không khí nóng từ lò nướng về phía bếp
Kêt nối điện (hình 7)
Trước khi thực hiện các kết nối điện, hãy đảm bảo rằng:
- Dây kết nối phải phù hợp theo tem thông số được đặt ở dưới đáy bếp.
- Bếp cần được trang bị với kết nối đất hiệu quả, theo các tiêu chuẩn và các quy định pháp
luật hiện hành.


BACH HOP KITCHEN APPLIANCES CO., LTD.
Showroom:
279 Nguyen Van Troi Street, Ward 10, Phu Nhuan District, HCM City
Tel: (84) 8 39975 893 / 94 Hotline: 1800 12 12
Fax: (84) 8 38447 102
Email: info@malloca.com
Customer Care:
Hotline: 1800 12 12
Email: chamsockh@malloca.com
CÔNG TY TNHH THIẾT BỊ NHÀ BẾP BÁCH HỢP
Showroom:
279 Đường Nguyễn Văn Trỗi, Phường 10, Quận Phú Nhuận, TP.HCM
Điện Thoại: (84) 8 39975 893 / 94 Hotline: 1800 12 12
Fax: (84) 8 38447 102
Email: info@malloca.com
Hệ thống chăm sóc khách hàng:
Hotline: 1800 12 12
Email: chamsockh@malloca.com
Trung tâm chính
279 Đường Nguyễn Văn Trỗi, Phường 10, Quận Phú Nhuận, TP.HCM
SĐT: (08) 39975 893 / 94 – (08) 39975 294 / 95
Khu vực Bà Rịa Vũng Tàu
258-260A Lê Hồng Phong, Phường 4, TP. Vũng Tàu
SĐT: (064) 385 94 99
Khu vực Tây Nguyên
331 Phan Đình Phùng, Phường 2, TP. Đà Lạt
SĐT: (063) 3521 107 – 0918226362
Khu vực Nam Trung Bộ
08 Lê Hồng Phong, Phường Phước Hải, TP. Nha Trang
SĐT: (058) 3875 488
Khu vực Miền Tây
180 Trần Hưng Đạo, Phường An Nghiệp, Quận Ninh Kiều, TP. Cần Thơ
SĐT: (0710) 373 2035
Khu vực Miền Trung
211 Nguyễn Văn Linh, Phường Vĩnh Trung, Quận Thanh Khuê, TP. Đà Nẵng
SĐT: (0511) 369 1906
Khu vực Miền Bắc
154 Thái Hà, Phường Trung Liệt, Quận Đống Đa, Hà Nội
SĐT: (04) 35376 288 – 093 462 92 98
 Loading...