

MallinCam All Sky User Manual
All Sky Camera
[Version 1.0]
Michael Burns
Rock Mallin
[All Sky User Manual]
This document will introduce you to the wonders of the MallinCam All Sky Camera. It
will include instructions on how to connect the All Sky to your computer along with
explanations of the camera’s various settings. Imaging techniques with the various
hardware and software options will be covered along with how to broadcast the
output of the All Sky camera on the Internet. The standard Composite Video output
will be discussed along with hints and suggestions on how to resolve any problems
that you encounter with this camera. Enjoy the adventure with Rock Mallin’s All Sky
Video camera, which will introduce you to the amazing field of Real Time All Sky
video imaging and broadcasting.
Revision Sheet
All Sky User Manual Page i

Version
Date
Revision Description
1.0
10/11/2014
Template Creation and All Sky Wired
Revision History
Revision Sheet
All Sky User Manual Page ii

Table of Contents
Contents
Revision History ................................................................................................................................... ii
Table of Contents .......................................................................................................................... 0
1. Introduction .......................................................................................................... 3
The Contents of the All Sky Package ..................................................................................... 4
MallinCam All Sky Deluxe Package ..................................................................................................... 4
The Camera (Just the Facts) ................................................................................................... 5
The Camera (its Anatomy) ....................................................................................................... 6
2. Making Connections ............................................................................................. 7
The All Sky Camera (Connection Diagram) ........................................................................... 7
Composite Video ................................................................................................................................... 7
Power ..................................................................................................................................................... 7
Connecting the All Sky to your Computer for Video ............................................................. 8
Software Requirements: ................................................................ ......................................................... 8
Hardware Requirements ......................................................................................................................... 8
Attaching the Video Cable to All Sky Camera ...................................................................................... 9
Checking out the All Sky for the First Time (Day Time) .................................................................... 10
3. Operating the All Sky ......................................................................................... 15
Imaging Methods: .................................................................................................................... 15
E. SHUTTER vs SENSE UP ................................................................................................... 26
Controlling the All Sky by Hand ............................................................................................ 27
The All Sky Camera OSD Settings ......................................................................................... 27
4. Understanding the OSD ..................................................................................... 32
On Screen Display (OSD) Menu ........................................................................................... 32
MENU MAIN ..................................................................................................................................... 32
EXPOSURE MAIN ............................................................................................................................ 32
LENS ............................................................................................................................................... 33
LEN -ELC ...................................................................................................................................33
E.SHUTTER ........................................................................................................................................... 33
BRIGHT ................................................................................................................................................. 34
HBLC/D-WDR ............................................................................................................................... 34
OFF ..............................................................................................................................................34
BLC ................................ ................................................................................................ ..............35
MANUAL ............................................................................................................................................... 36
AUTO ..................................................................................................................................................... 36
BLC WEIGHT .............................................................................................................................36
HLI ...............................................................................................................................................37
HBLC ..................................................................................................................................................... 37
D-WDR ........................................................................................................................................38

All Sky User Manual October 11, 2014
AGC ................................................................................................................................................. 39
3D DNR ........................................................................................................................................... 40
SENSE UP ....................................................................................................................................... 41
COLOR MAIN ................................................................................................................................... 42
WB MODE ...................................................................................................................................... 42
ATW ............................................................................................................................................42
MANUAL ................................ ................................ ................................................................ ....43
AWC>PUSH ................................................................................................................................43
AWC ............................................................................................................................................44
R-Y GAIN ....................................................................................................................................... 44
B-Y GAIN ....................................................................................................................................... 44
DAY&NIGHT MAIN ........................................................................................................................ 44
D&N MODE ................................................................................................................................... 45
BURST.........................................................................................................................................45
AUTO ..................................................................................................................................................... 45
DAY>NIGHT ..............................................................................................................................46
NIGHT>DAY ..............................................................................................................................47
DWELL TIME .............................................................................................................................47
C_SUP ............................................................................................................................................. 48
A_SUP ............................................................................................................................................. 48
FUNCTION MAIN ............................................................................................................................ 48
MIRROR ......................................................................................................................................... 49
SHARPNESS .................................................................................................................................. 49
MONITOR ...................................................................................................................................... 49
GAMMA ......................................................................................................................................... 50
USER ...........................................................................................................................................50
LSC ................................................................................................ ................................ .................. 50
LSC – ON ....................................................................................................................................51
MOTION MAIN ................................................................................................................................ 51
PRIVACY MAIN ............................................................................................................................... 52
SETUP MAIN .................................................................................................................................... 52
TITLE.............................................................................................................................................. 53
MANUAL DPC ............................................................................................................................... 53
AUTO DPC ..................................................................................................................................... 54
OLPF ............................................................................................................................................... 54
OSD COLOR .................................................................................................................................. 54
SYSTEM MAIN ................................................................................................................................. 55
EXIT MAIN ........................................................................................................................................ 55
FACTORY SET .............................................................................................................................. 56
SAVE&EXIT .................................................................................................................................. 56
EXIT ................................................................................................................................................ 56
All Sky User Manual Page 1

All Sky User Manual October 11, 2014
5. Appendix ........................................................................................................... 57
Appendix A – Installing the MCV ........................................................................................... 57
Appendix B Connecting to Night Skies Network ...................................................... 60
Appendix C – First Aid for the All Sky .................................................................................. 67
The Image from the All Sky is jumping all over the place .................................................................. 67
When I have my Video Software connect to my Mallincam through my MCV-1 adapter I only see a
Blue screen. .......................................................................................................................................... 67
My ALL SKY Camera is frozen, or the commands do not seem to be working correctly, the camera is
acting strangely. ................................................................................................................................... 67
Appendix D – Setting Template ............................................................................................. 68
Jack Huerkamp’s recommended Settings ............................................................................................ 69
Appendix E – Installing All Sky Camera Outside ................................................................ 70
Appendix F – Applications of All Sky Camera ………………………………….….……..72
Appendix G – Notes ................................................................................................................ 73
All Sky User Manual Page 2

All Sky User Manual October 11, 2014
1. Introduction
Welcome to the world imaging with the MallinCam All Sky Camera, a new
innovative designed camera that provides you a live video view of the entire sky.
Made by MALLINCAM, the main dome is multicoated and is UV protected
against turning yellow and provides a clear view of the sky rain or shine, 24 hours
per day, 7 days per week, 365 days of the year all from the comfort of your living
room.
The Mallincam All Sky Camera features a 5 way adjustable waterproof key
adapter to navigate through the camera’s zero confusing menu system allowing
you to make adjustments of the video camera. The All Sky Camera also allows
Extended Exposure to be set automatically from Day to Night thus proving live full
colour video without you having to adjust any settings on the camera.
Using the latest plastic CCD sensor from Sony, the Super HAD II 1/3" size sensor
has zero amp glow, and the camera is fully equipped with a built-in “no hot
pixel” removal software, offering unsurpassed image clarity day or night.
Your purchase will provide you with years of discovery and adventure as you
view, record, share, and broadcast the wonders of the entire Night or Day Sky.
The Mallincam All Sky Camera captures images that range from brighter Deep
Sky Objects to local Solar System favorites, from Meteors to Satellites, from Aurora
to Lightning this camera does it all and in near Real Time. You will discover that
this camera can be used in urban skies where light pollution normally prevents
you from viewing images the sky, to rural locations where you can pull out even
those faintest celestial wonders; this camera can do it all.
The All Sky Camera requires no software to install, you simply need only to mount
the camera, attached the video out to a monitor or your computer and then
then power-up the All Sky and enjoy the view the camera provides. If you have
video capture software, you can even record your adventure and take
snapshots or even broadcast live to the world 24 hours per every day of the year,
it’s up to you.
This manual is the work of the MallinCam All Sky users before me. I have
borrowed their ideas and even some of their documents and have placed them
in the manual so that we have everything is in one place. Special thanks to Jack
Huerkamp for all the preliminary work he has done with this camera.
So thank you for your purchase, and let the adventure begin
All Sky User Manual Page 3
All Sky User Manual October 11, 2014
The Contents of the All Sky Package
Depending upon the All Sky Model purchased, the contents may vary, but all All
Sky Deluxe cameras include the following standard equipment:
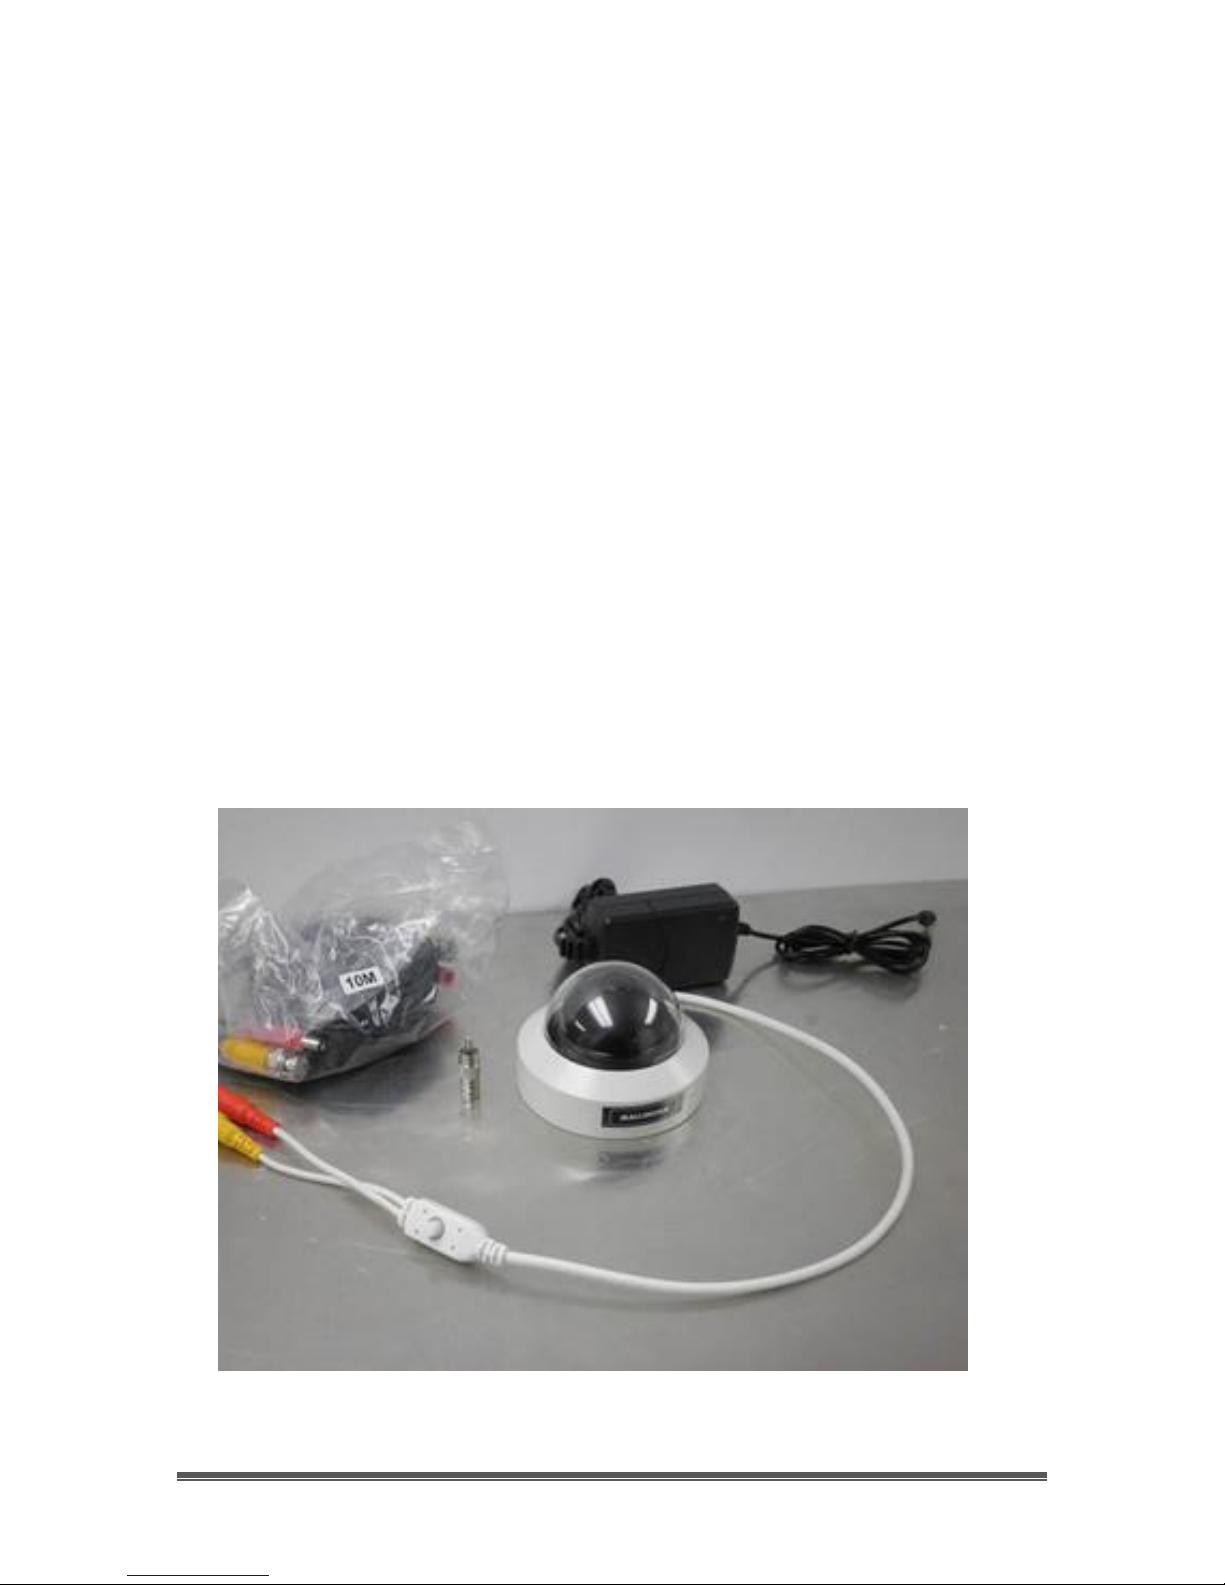
MallinCam All Sky Deluxe Package:
All Sky camera body fully enclosed in a metal jacket with a Lexan Dome
10 meter (32 feet) video/power cable
120 Volts AC to 12 Volts DC regulated power supply
BNC to RCA adapter
These attachments will provide you with the ability to connect the All Sky Video
camera to your telescope, power it using to a 120V AC power source, and
displaying your image on any device that accepts analog video via a
composite connection. The optional cables will allow you to control the All Sky
either through your computer. See the Appendix for a list of other accessories
available for the All Sky Camera.
All Sky User Manual Page 4

All Sky User Manual October 11, 2014
Model
All Sky
Image Sensor
Sony ICX638BKA HAD II plastic
CCD Pixels:
768 (H) × 494 (V) effective pixels
6.35μm (H) × 7.40μm (V) Pixel size
CCD Size:
1/3“ , 5.59mm (H) × 4.68mm (V)
Video Output Format:
NTSC or PAL
Composite Video
BNC Female Connector, with RCA adapter
Gain Control:
Auto/Manual
Exposure Control:
Auto/Manual
Auto Iris:
AES (Rolling Shutter), ALC
Fix Shutter
(seconds)
1/60, 1/100FLK, 1/120, 1/250, 1/500, 1/1000, 1/2000, 1/4000, 1/10000,
1/100000
Extended Shutter
(seconds)
1/32s, 1/16s, 1/8s, 1/4s, 1/2s, 1s, 2.1s, 4.2s, 8.4s, 17s
Gamma Selection
0.45 / 0.6 / 1.0
User Gamma
0.20, 0.25, 0.30, 0.35, 0.40, 0.45, 0.50, 0.55, 0.60, 0.65, 0.70, 0.75, 0.80, 0.85,
0.90. 0.95, 1.00
White Balance
-Automatic White Compensation Control (AWC)
-Auto Trace White Balance Control (ATW)
-Manual
Communication
Protocol
None
Operating
Temperature
-30oC to 60oC ( -22oF to 140oF)
Power Supply
12±1V DC at 1A
Dimensions
2.5 Inch tall, 3.68 inch wide (63.5 mm X 93.5 mm)
Weight
10.5 Ounces (300 grams)
The Camera (Just the Facts)
The MallinCam All Sky Camera is a video camera that provides near Real Time
images of brighter Deep Sky Objects, Planetary, Lunar, and Solar. This instrument
contains the following specifications:
All Sky User Manual Page 5
All Sky User Manual October 11, 2014
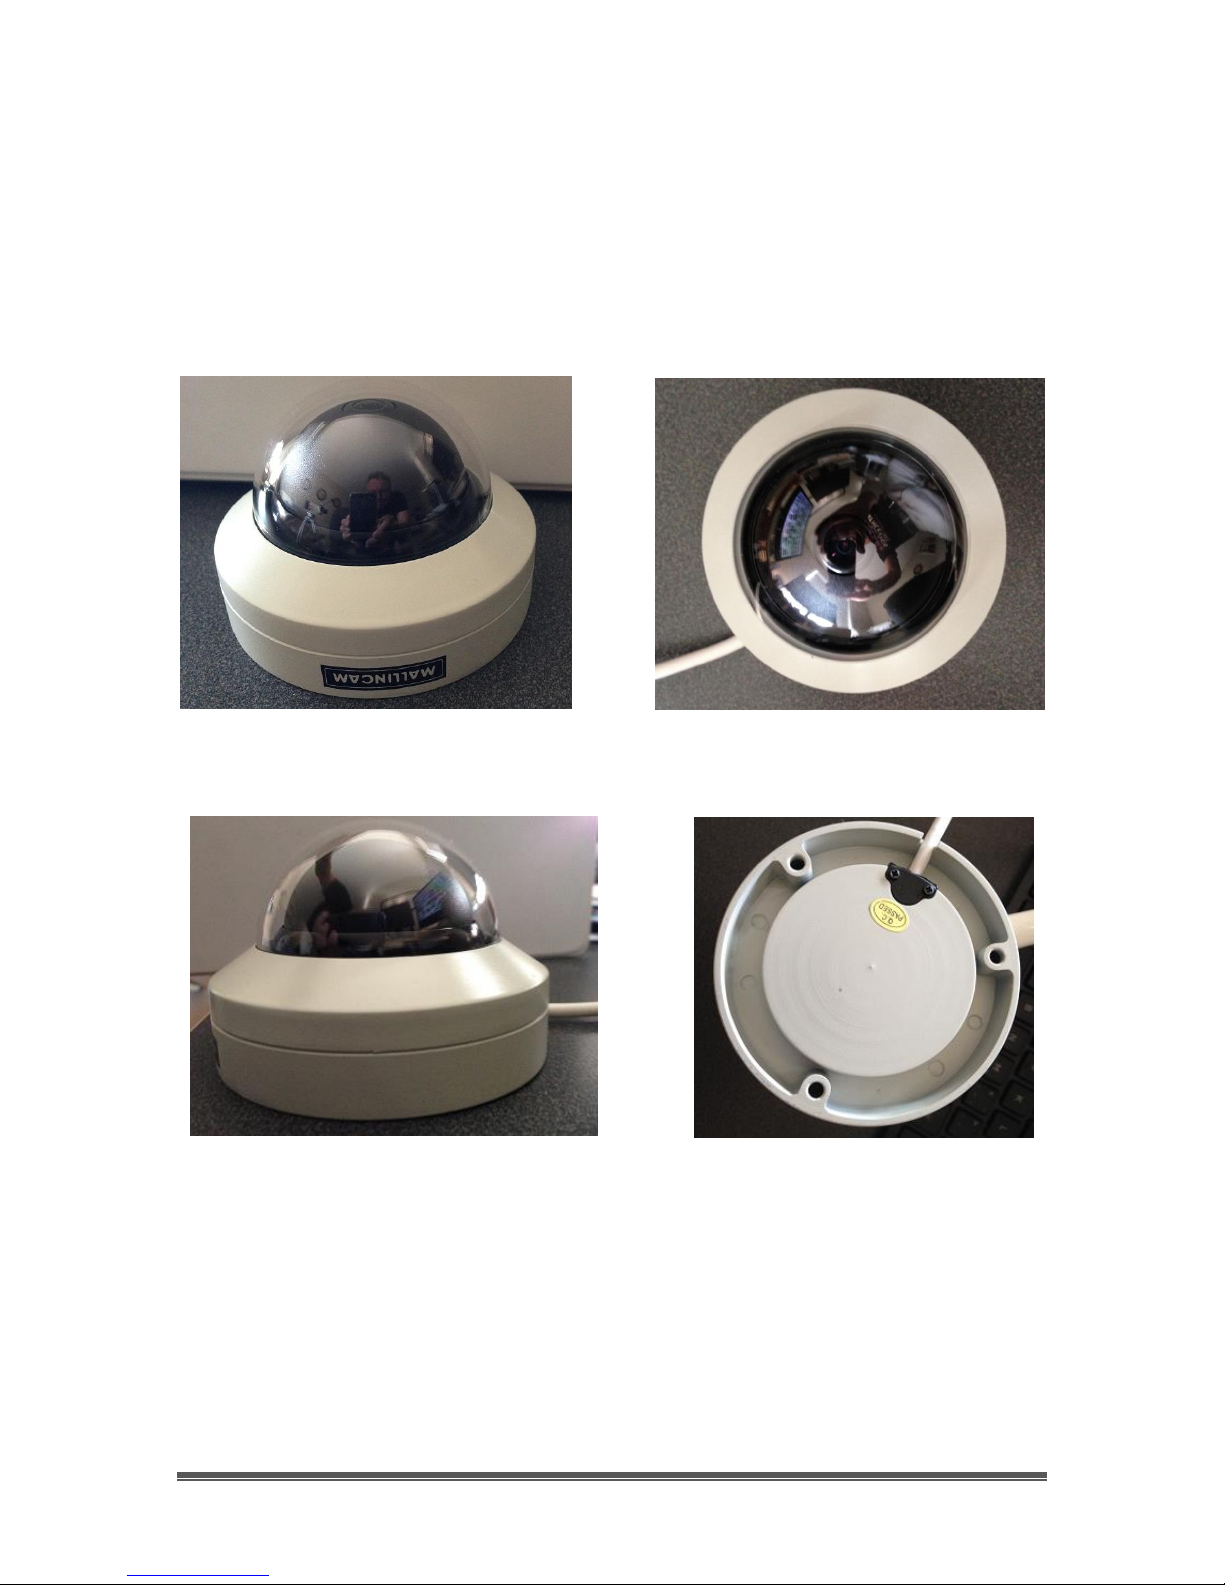
The Camera (its Anatomy)
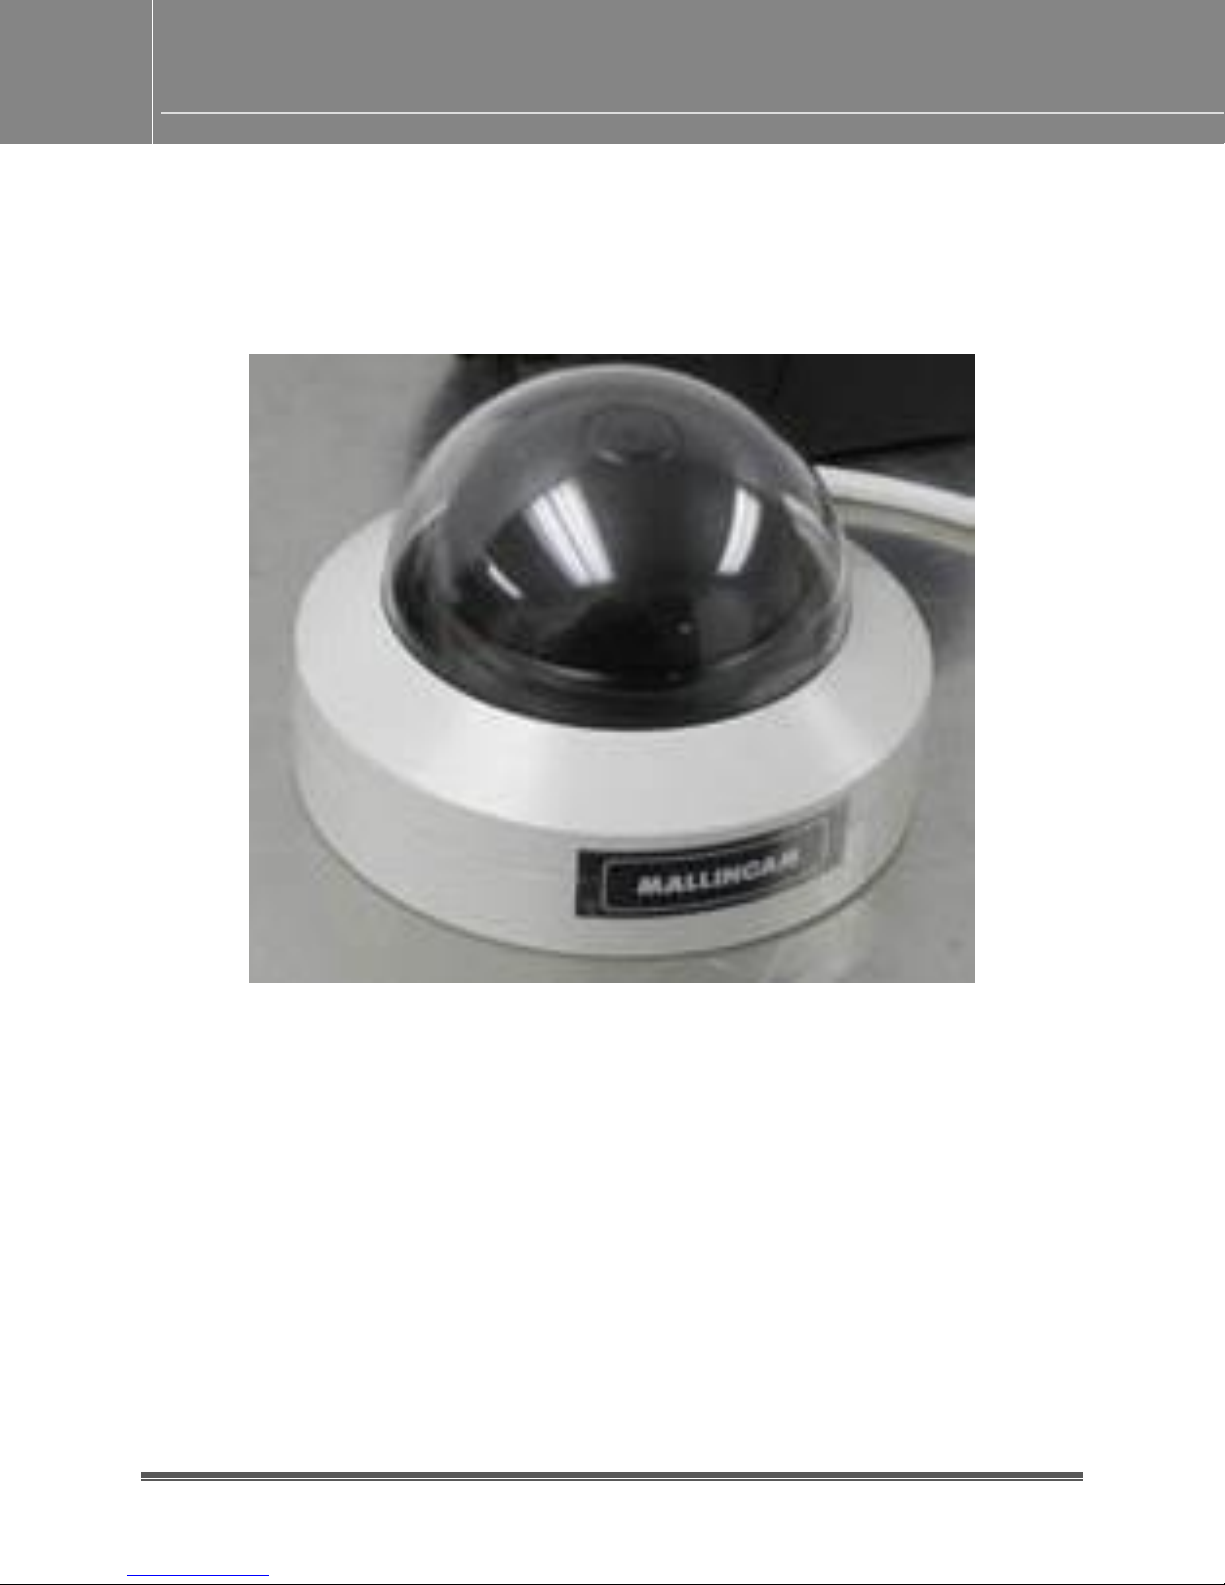
The Mallincam All Sky camera is a circular based camera with a transparent
dome on top. It has a radius of 3.68” and is 2.5” tall. The camera weighs in at
about 11.5 ounces (300 grams).
All Sky User Manual Page 6

All Sky User Manual October 11, 2014
1
Video Out (BNC)
2
12V Power in (12V)
3
Control Adapter
①
②
③
2. Making Connections
The All Sky Camera (Connection Diagram)
Connecting All Sky to Monitor
The MallinCam All Sky provides a BNC Video-Out
Adapter (yellow) that allow the video signal to be
distributed to Video monitors. This Video-Out
Adapter provides standard Composite video out by
the BNC connector on the back of the All Sky (1 on
the above Connection Diagram).
Composite Video
The Composite Signal is obtained by connecting the included 10m MallinCam
Video Cable from the Video-Out adapter of the All Sky to the Composite VideoIn Adapter on your monitor (since in most monitors, the Composite Video-In
connector is a RCA style, MallinCam provides a BNC to RCA adapter to
facilitated that connection).
To connect, just align the two little openings on the BNC cable (male) with the
two notches on the adapter’s BNC (female) connector, push and twist so the
notches slide into place. This locks the connector to the All Sky cable.
Power
The All Sky or All Sky Wired requires 12V 1amp power either from an AC to DC
converter or 12V DC power supply. Just connect power adapter into to Power In
port on the back of the All Sky or into the RED Power In connecter on the end of
the 10m cable on the All Sky Wired.
All Sky User Manual Page 7

All Sky User Manual October 11, 2014
Connecting the All Sky to your Computer for
Video
Requirements:
Computer with video display software such as AMCAP.
USB Video capture adapter such as MallinCam MCV.
Mallincam dual power/video cable.
All Sky AC to DC power adapter.
All Sky camera.
Software Requirements:
You will need any software package that can display an image from your video
capture device. Some suggestions are:
AMCAP
SharpCap
SplitCam
ManyCam
WebCamMax
Each software has its pros and cons, depending upon what you require the
software do. Using SplitCam, ManyCam, or WebCamMax will make it easier to
broadcast your images on Night Skies Network (see section Connecting the Night
Skies Network (NSN)) if that will be a direction you are thinking of taking.
Hardware Requirements
A USB Video Capture Device, such as MallinCam’s MCV. This device will
allow the output from the All Sky (composite) to be captured and
displayed by the software (see Installing the MCV in Appendix).
All Sky User Manual Page 8
All Sky User Manual October 11, 2014
To USB Port
Computer
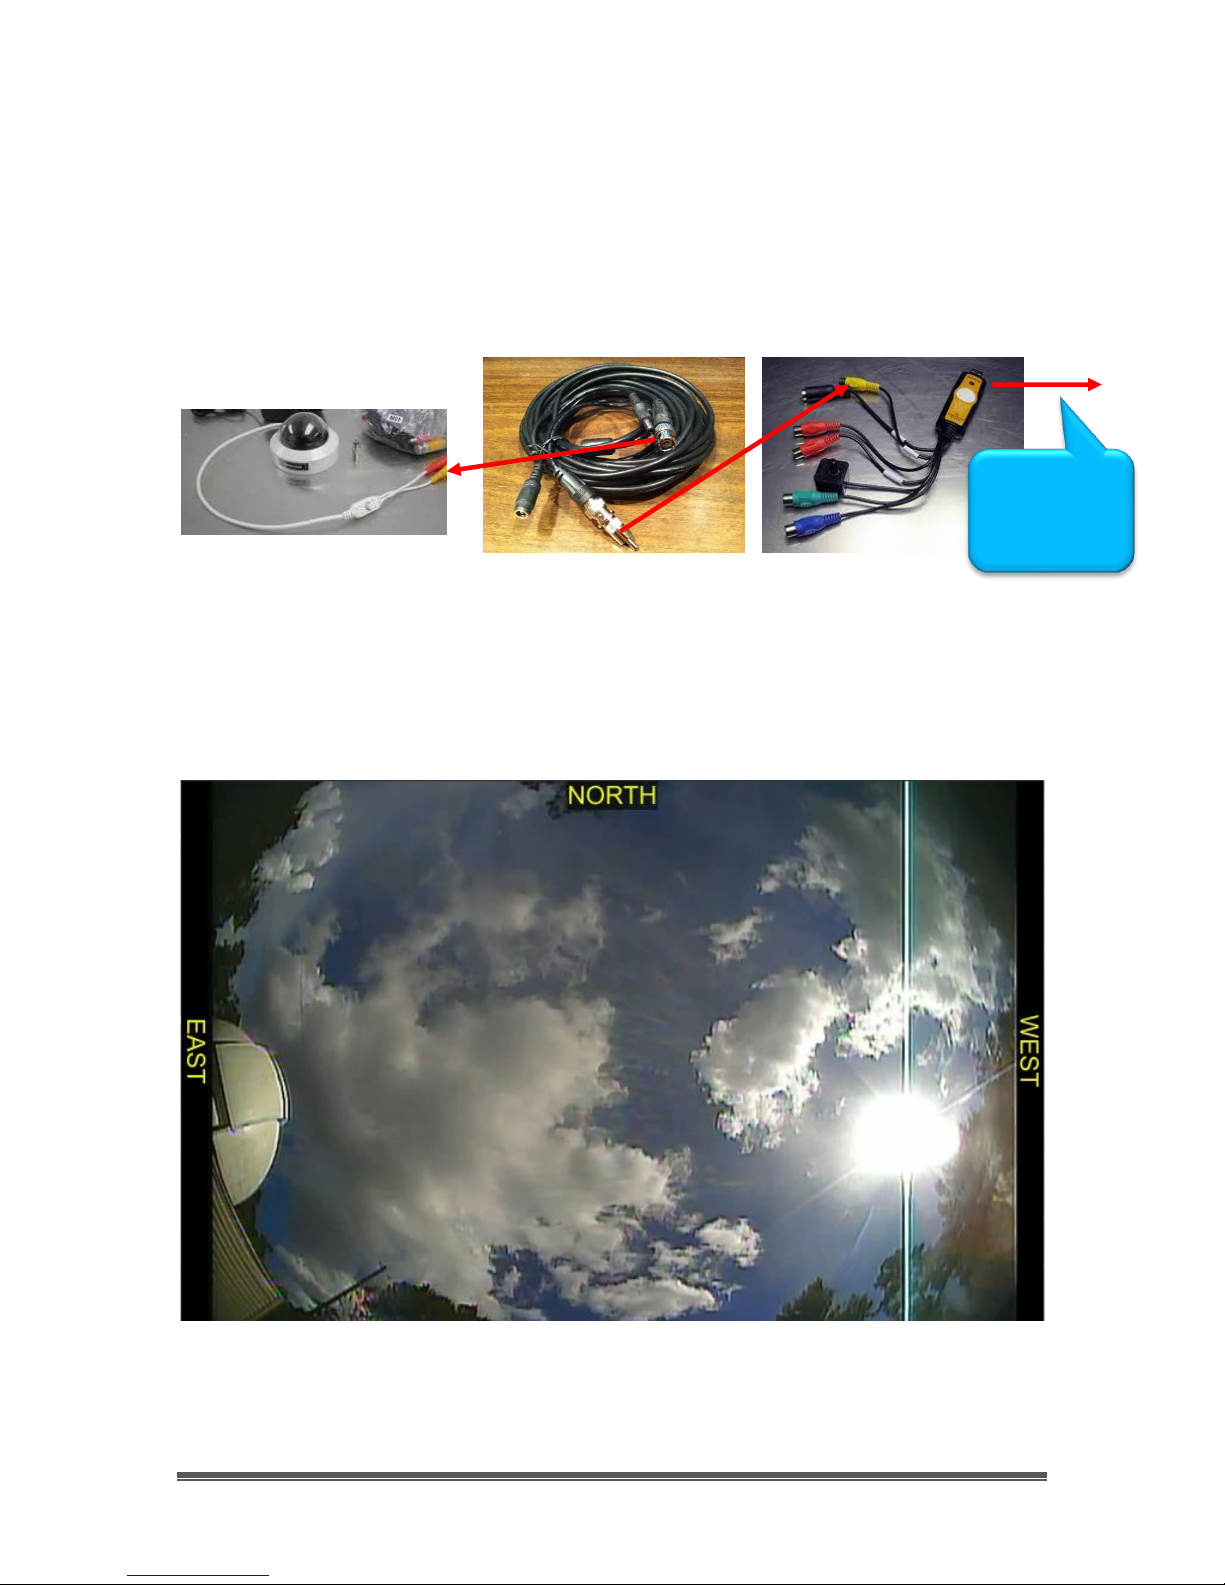
Attaching the Video Cable to All Sky Camera
Now you attach the All Sky 10m composite cable (RCA adapter attached) to
the USB Video Capture Device (MCV) that you are using for video input and
attach the other end of the 10m cable to the Yellow connecter (BNC) on the All
Sky Camera to allow for capture of the video signal.
Now all we need to do is start the video display software of your choice to
display the image. Remember what ever software choice you made to display
the image from the All Sky Camera, it will have an option that allows you to
choose the Video Capture Adapter’s driver (x2828 for MCV). Once you chosen
the driver, you should now see an image of what the All Sky Camera is capturing
in the video window of your software.
on
(The NORTH, EAST, WEST notations are part of a video display window)
All Sky User Manual Page 9
All Sky User Manual October 11, 2014
Note: There are two ways of fine tuning the brightness of the image. The first is using
the All Sky Camera Menu settings, and the second is using the brightness and
contrast controls on your monitor (or software controls in your video capture
software) the camera. I would start with your monitor and make any adjustments to
the brightness of the image if necessary.
The All SKY Camera Menu changes will revert back to the last time you
saved the settings. That is, when the On Screen Menu turns off (after 60
seconds), the control settings will revert back. To save the new settings
you will have to choose SAVE&EXIT from the main EXIT icon
Checking out the All Sky for the First Time (Day Time)
Now is the time to do a quick check of the All Sky Camera to see if you can
obtain a video signal. This walk through assumes you have a monitor with a
Composite input capabilities (or a Laptop with a Video Capture Device
attached and configured along with Video Display Software). Place your All Sky
Camera on a flat platform so that the Dome is facing upwards and power up
your All Sky Camera and monitor (start your Video Display Software if you are
using a Computer). It is best to check out your All Sky Camera in the daytime, so
you can more easily check out the connections.
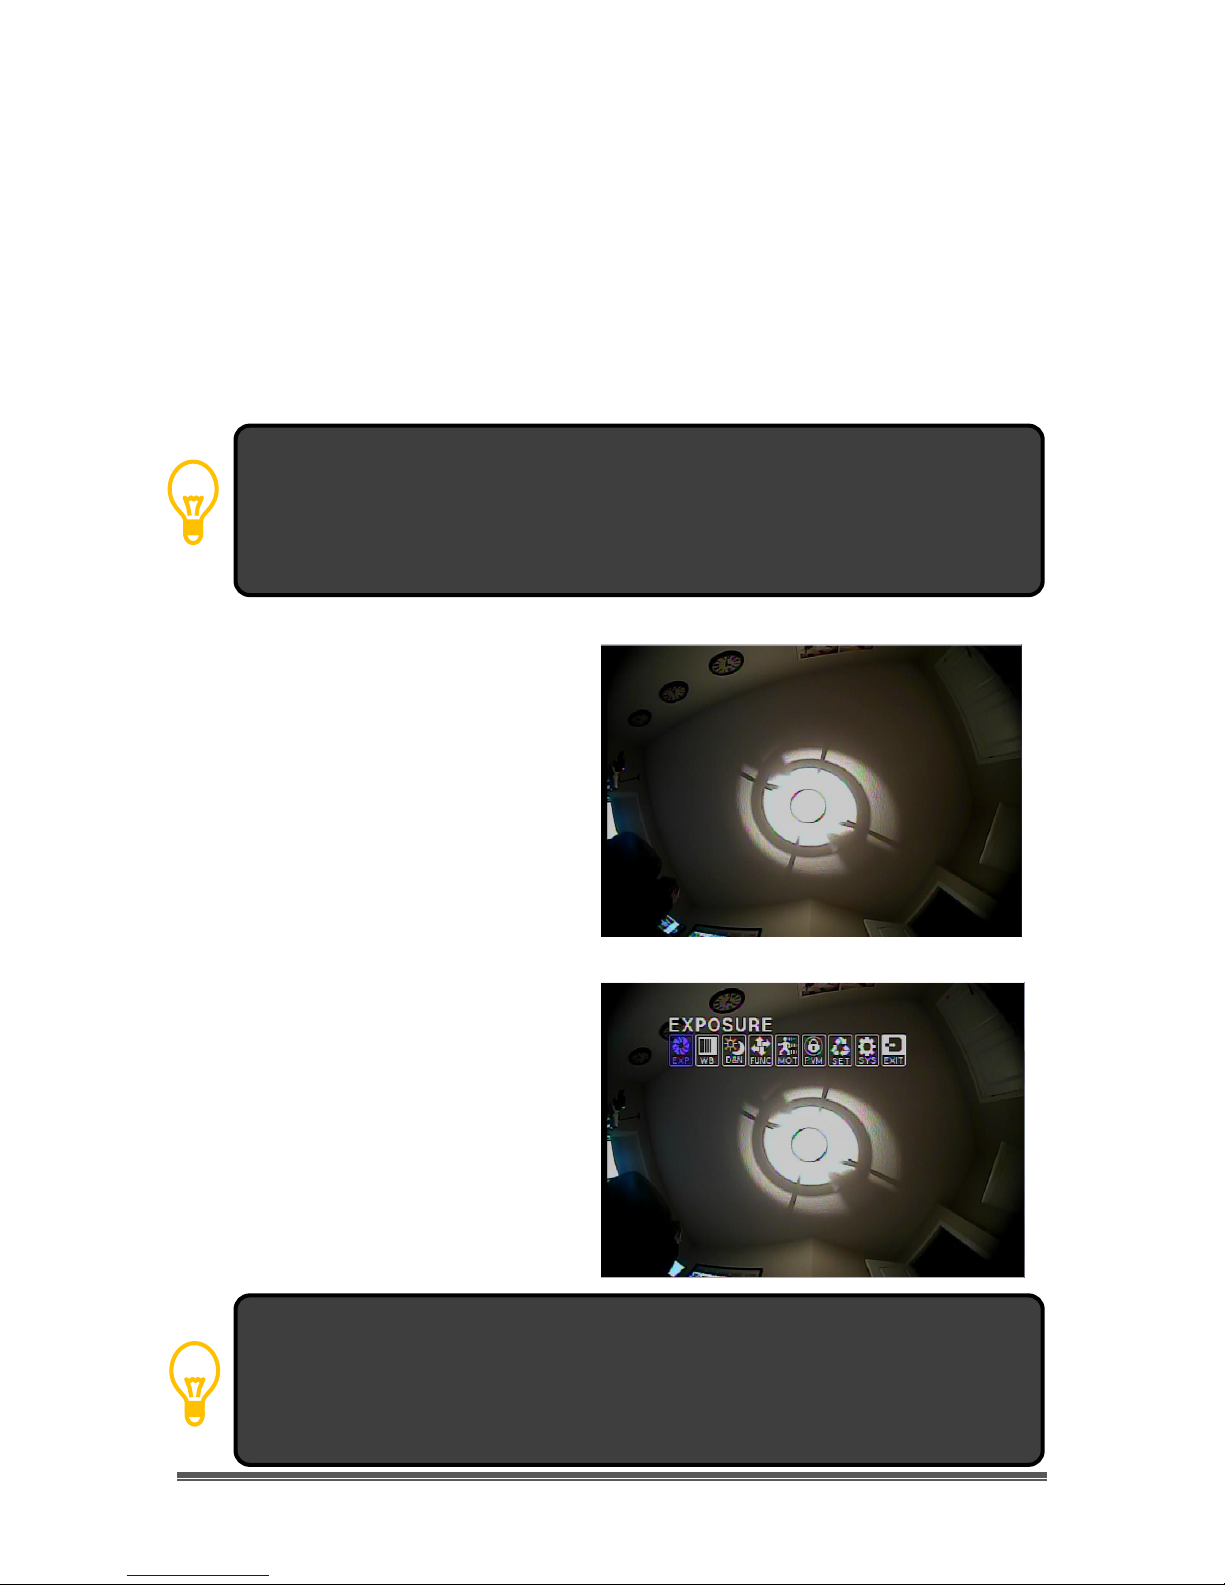
You should now be seeing a circular
image inside the square window of
your display. The panorama may be
too bright or too dim, but don’t worry
as this is normal since we have not yet
adjusted the settings for the camera.
Press and release the Centre Button
(③ on the Connection Diagram) on
the All Sky Camera’s white cable. If
everything is connected and
powered correctly, you should see
the camera’s On Screen Menu popup on top of your image with
EXPOSURE Highlighted.
All Sky User Manual Page 10
All Sky User Manual October 11, 2014
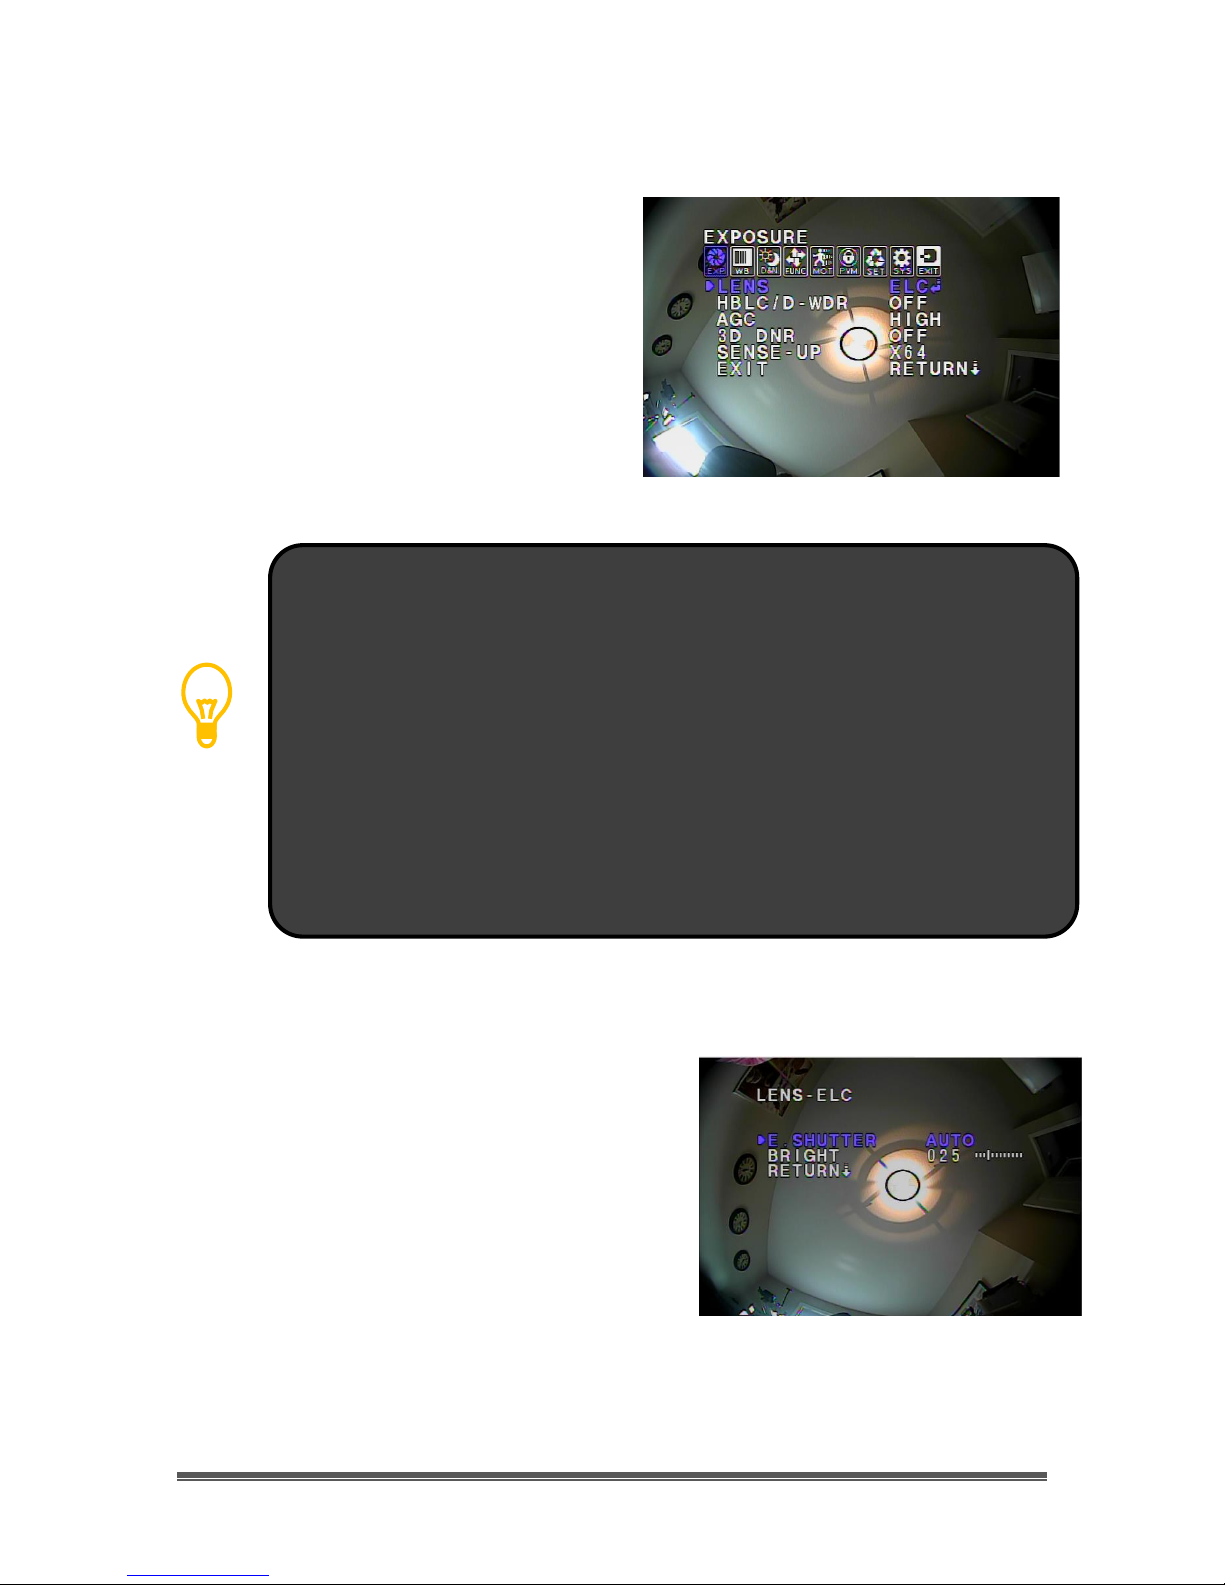
The highlighted option will indicate what you can adjust with the Knob (Control
Button). The arrow key choices will appear after the option’s current vale. For
example: in the last image, the LENS setting says ELC, and it has a DOWN LEFT
CURVY arrow after it. This indicates you can change the EXPOSURE settings by
either pressing the CENTRE button (which indicates there is a sub-menu in that
setting that you can access by hitting the CENTRE button ) or the pressing LEFT or
RIGHT on the button to scroll through other options. For our example on LENS, if
ELC was selected then pressing the RIGHT button will change its value to DC, and
pressing it again goes to the next option (which in this control is back to ELC). This
way you can use the LEFT button to go back to the ELC setting or press the RIGHT
button to go to the next value. If you pressed the CENTRE button when ELC was
selected, the second menu will appear that will allow you to adjust the ELC
parameters.
With the EXPOSURE selection highlighted
(icon is blue), press the Centre button on
the All Sky Camera control adapter and
the camera will display the Exposure
Settings. We will learn how to move
through the menu system to adjust the
Brightness and Exposure settings. The
Button Adapter has a Centre Knob which
when pressed inwards acts as a center
key. You can move this Knob left, right, up,
and down to move he highlighted regions
on the Display to select another option.
Now we want to adjust the BRIGHTNESS of the
image from the camera’s control. This is
located inside the ELC Menu, so with ELC
highlighted on the LENS Menu, press inward
with the Control Button to take us into the LENS-
ELC Menu subsystem. You should be presented
with a set of options that look something like
the ones on the right. Press DOWN on the
Control Button to select BRIGHT (it will now be
highlighted in Blue), then press LEFT or RIGHT on
the Control Button to adjust the values of the
Brightness. Notice how the brightness of the
image increases are the number goes up.
All Sky User Manual Page 11
All Sky User Manual October 11, 2014
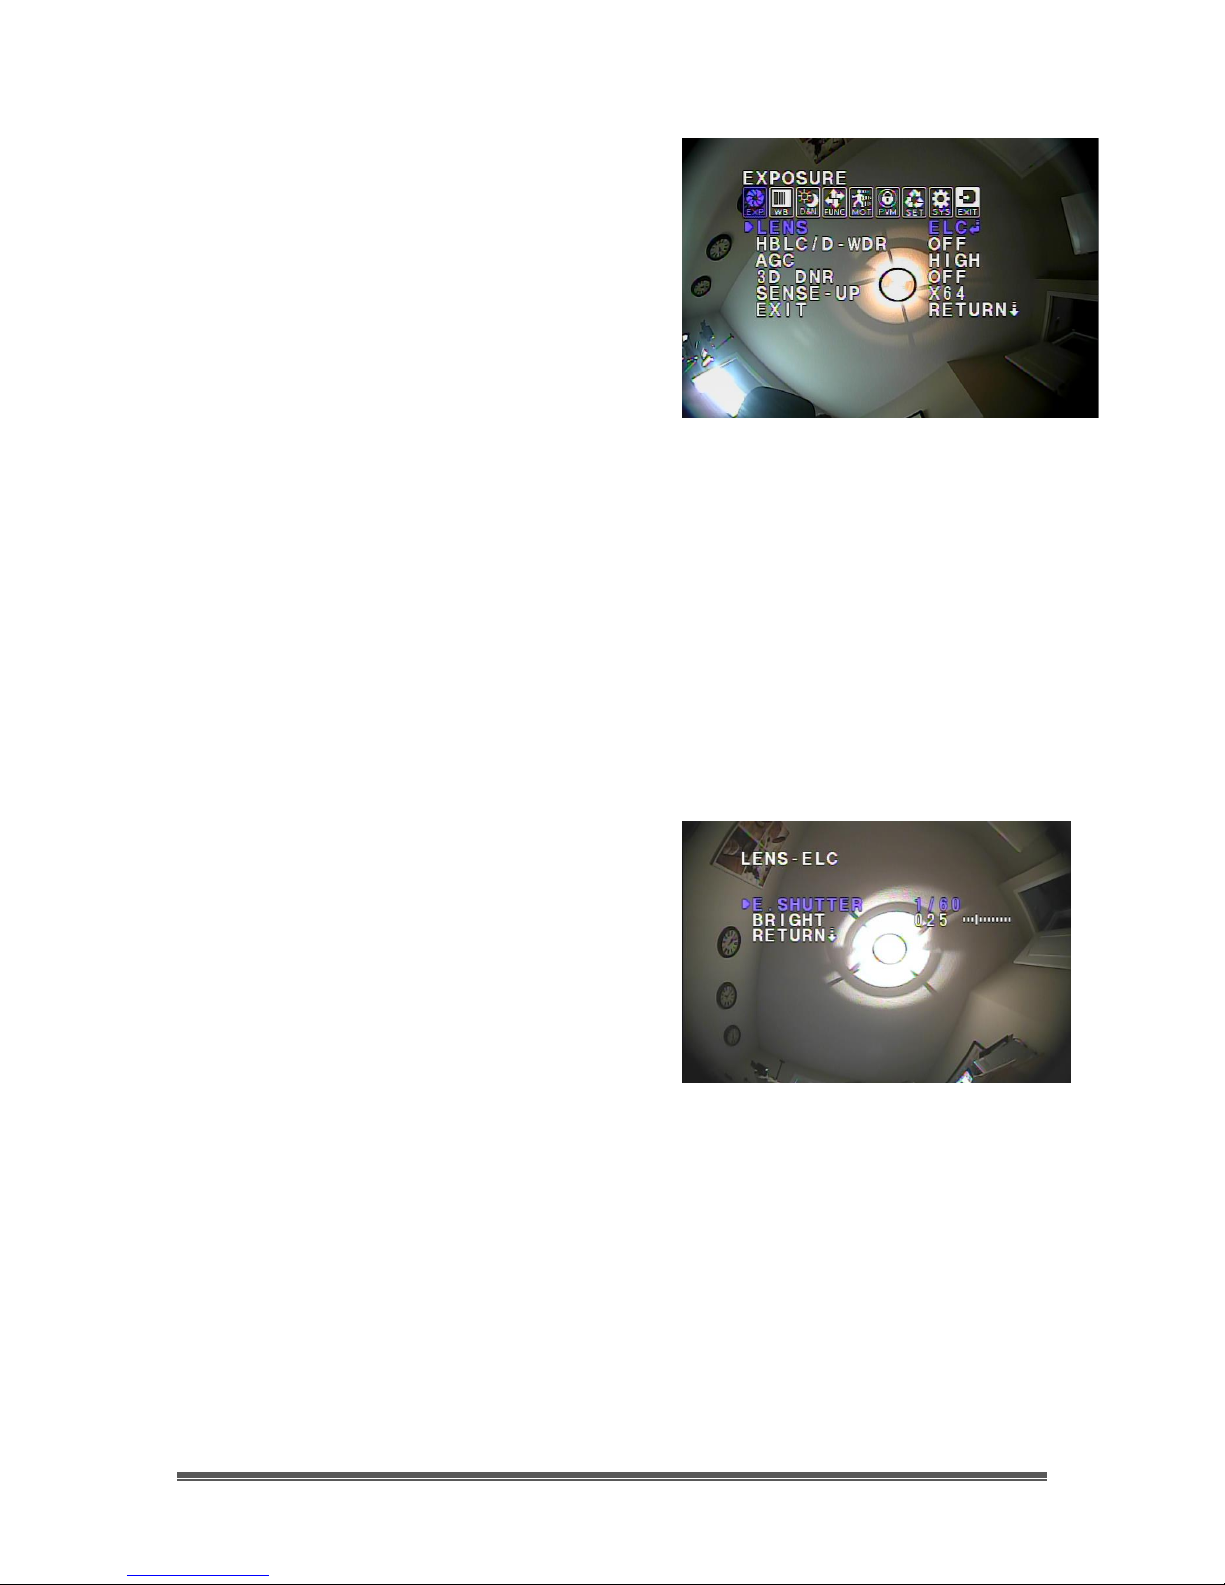
Once finished with adjusting the brightness, it
is time to return back to the Exposure Menu.
Using the DOWN button, select the RETURN
option and press the CENTRE button to close
the LENS-ELC settings Menu (the screen will
now return back up to the previous EXPOSURE
Menu system).
Since the above example just changes the brightness value from the camera,
there is another way to adjust the brightness, and that is by controlling the actual
exposure setting on the All Sky Camera. To do this, we will turns off the automatic
exposure control of the camera and turn it to manual, and then we can have
some fun adjusting the values to see how it affects our image.
From the current EXPOSURE Menu with LENS
highlighted, press inwards on the Control
Button to again go into the LENS Sub Menu.
With the E. SHUTTER control heighted (it should
say AUTO). Press the Control Button to the
RIGHT and its value should change to 1/60.
The image brightness will also change as we
have just told the camera to use 1/60 of a
second exposure. Press LEFT or RIGHT on the
Control Button to change the exposure (don’t
forget to watch your screen to see how the
brightness is affected). When finished
experimenting, return the E. SHUTTER value
back to AUTO and return back to the Main
EXPOSURE Menu by selecting RETURN and
activating the control by pressing INWARD on
the Control Button.
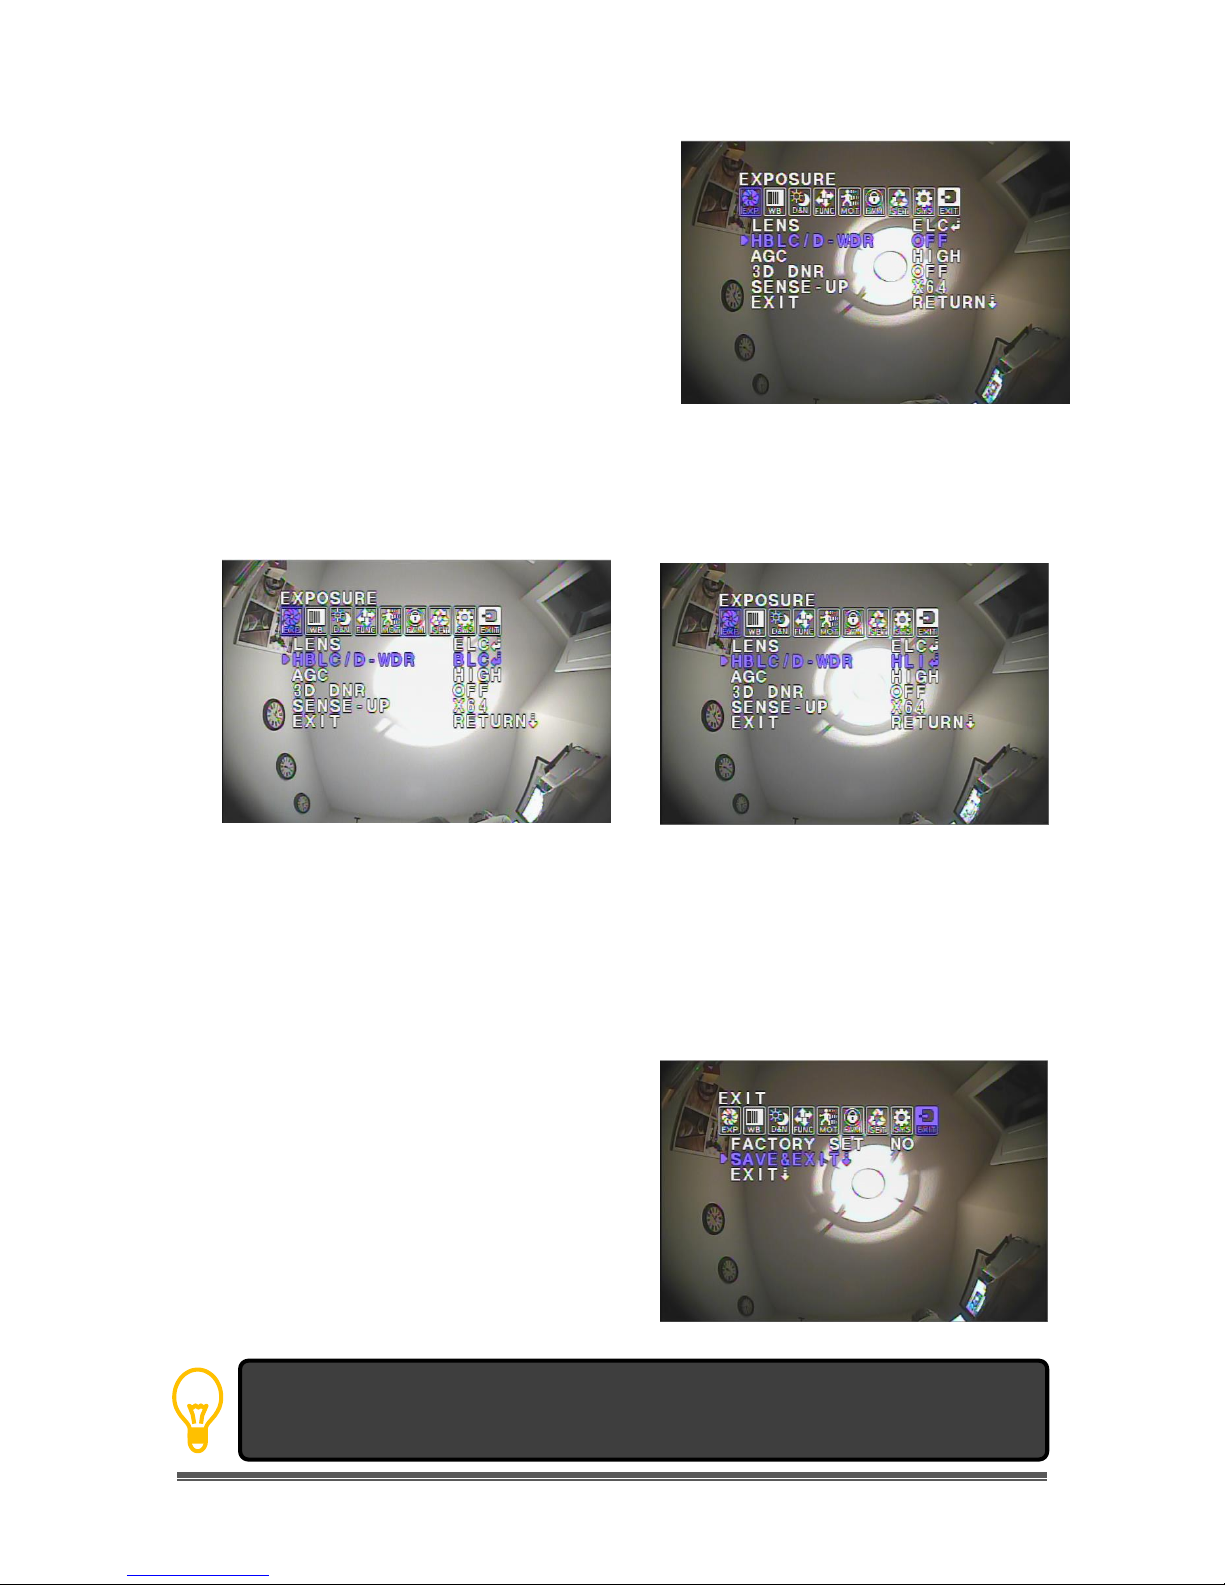
When imaging day time objects, sometimes a bright object may over-power the
rest of the image. The All Sky Camera has settings that allow you to help correct
or enhance the image from the background.
All Sky User Manual Page 12
All Sky User Manual October 11, 2014
If you select the EXIT rather than the SAVE&EXIT, the ICON menu will shut down, but
the All Sky Camera will reset itself to the last saved settings.
From the Exposure Menu, select the HBLC/D –
WRD control. The setting for this control should
say OFF. Press RIGHT on the Control Button
and the setting should change to BLC. Notice
how the image changes on your monitor.
Press RIGHT on the Control Button again and
the control setting should say HLI. Again
notice the change in the image on the
screen. Pressing RIGHT on the Control Button
once more will turn the HBLC/D –WRD control
back to OFF. Compare the image on the left
with the two images below to see how this
control adjusts the background brightness
when encountering a bright object.
We have experimented with a few different ways to adjust the image on the screen. Now
it is time to save the new settings and exit from the On Screen Menu. With the Main Icons
of the screen push LEFT or RIGHT on the Control Button to select EXIT icon. Press
INWARD on the Control Button to display the EXIT Menu.
Press DOWN on the Control Button to select
SAVE&EXIT. Press INWARD on the Control
Button to activate the control. The Menu will
turn off (you may see the word DONE flash
quickly at the bottom of the screen) and the
current settings will be saved on the camera for
the next time you use the camera.
All Sky User Manual Page 13

All Sky User Manual October 11, 2014
If you do not press any of the buttons on the All Sky for about 3 minutes, the ICON
menu will turn off, and the camera will return to the last SAVED settings.
These settings are just a starting point for your observations and you can adjust
the settings to match both your equipment and seeing conditions. The next step
in your learning should be to read the OSD MENU Chapter in this manual to get
an understanding what the settings do and how they react to each other. This
will save you hours of frustration when you are just adjusting the setting to try to
improve your image.
All Sky User Manual Page 14

All Sky User Manual October 11, 2014
3. Operating the All Sky
The MallinCam All Sky is an imaging camera whose capabilities are in the hands
of the user. As you will discover, when you become more confident with the
camera, that your images will be the result of the combination both artistic
prowess and scientific skill. Both of these attributes will become enhanced as
your journey progresses and suggestions and advice from fellow explorers
sharpen your skills and enrich your adventure.
One of the first pieces of advice we can offer you is that every environment
system is different, the variety of outside obstacles, and sky brightness combined
with the ever changing weather and seeing conditions makes it impossible to
determine the precise setting for the All Sky Camera. What we can do is provide
suggestions that will get you started in the right direction. We recommend that
you experiment and tweak the settings that we offer to see what works best for
you. Patience will be your best friend as you learn what the All Sky can do, and
what you can adjust. Do not be afraid to visit Night Skies Network or the
Mallincam Group on Yahoo and ask questions
Imaging Methods:
When you are using the All Sky the evening when the sky is dark, we need to
adjust the settings so that we can observe the stars and any object that happen
to pass in from of the camera such as meteors.
Based on the experience of other users, the following settings are a great place
to start.
ELC: AUTO
AGC: HIGH
3D-DNR: HIGH
SENSEUP: X64
W/B: ATW
D&N: AUTO
SHARPNESS:14
MONITOR MODE: 2
GAMMA: 0.6
LSC: ON
MAN DPC: OFF
AUTO DPC: AUTO
All Sky User Manual Page 15

All Sky User Manual October 11, 2014
Step 1
Step 2
Step 3
Step 4
So we will walk you through setting up your All Sky Camera to match the above
settings. Again keep in mind that this is just a starting point for the settings, you
may need to tweak these to match your sky conditions.
Connect your All Sky Camera to your Monitor (or computer) and place the
camera is a location (preferably outside), so that you can observe for the image
changes as you make the following setting adjustments.
Set ELC to AUTO
The ELC setting is located in the EXPOSURE ICON, so activate the
On Screen Menu by pressing INWARD on the Control Button. The
Main Menu Icons will appear over your image with EXPOSURE
being highlighted in Blue.
Press INWARD on the Command Button to activate the EXPOSURE
Menu.
With the LENS command highlighted in Blue press inward on the
Command Button to display the LENS-ELC Menu.
With the E. SHUTTER control selected, press LEFT or RIGHT on the
Control Button to change the setting value to AUTO
All Sky User Manual Page 16
All Sky User Manual October 11, 2014
Step 1
Step 2
Step 3
Step 1
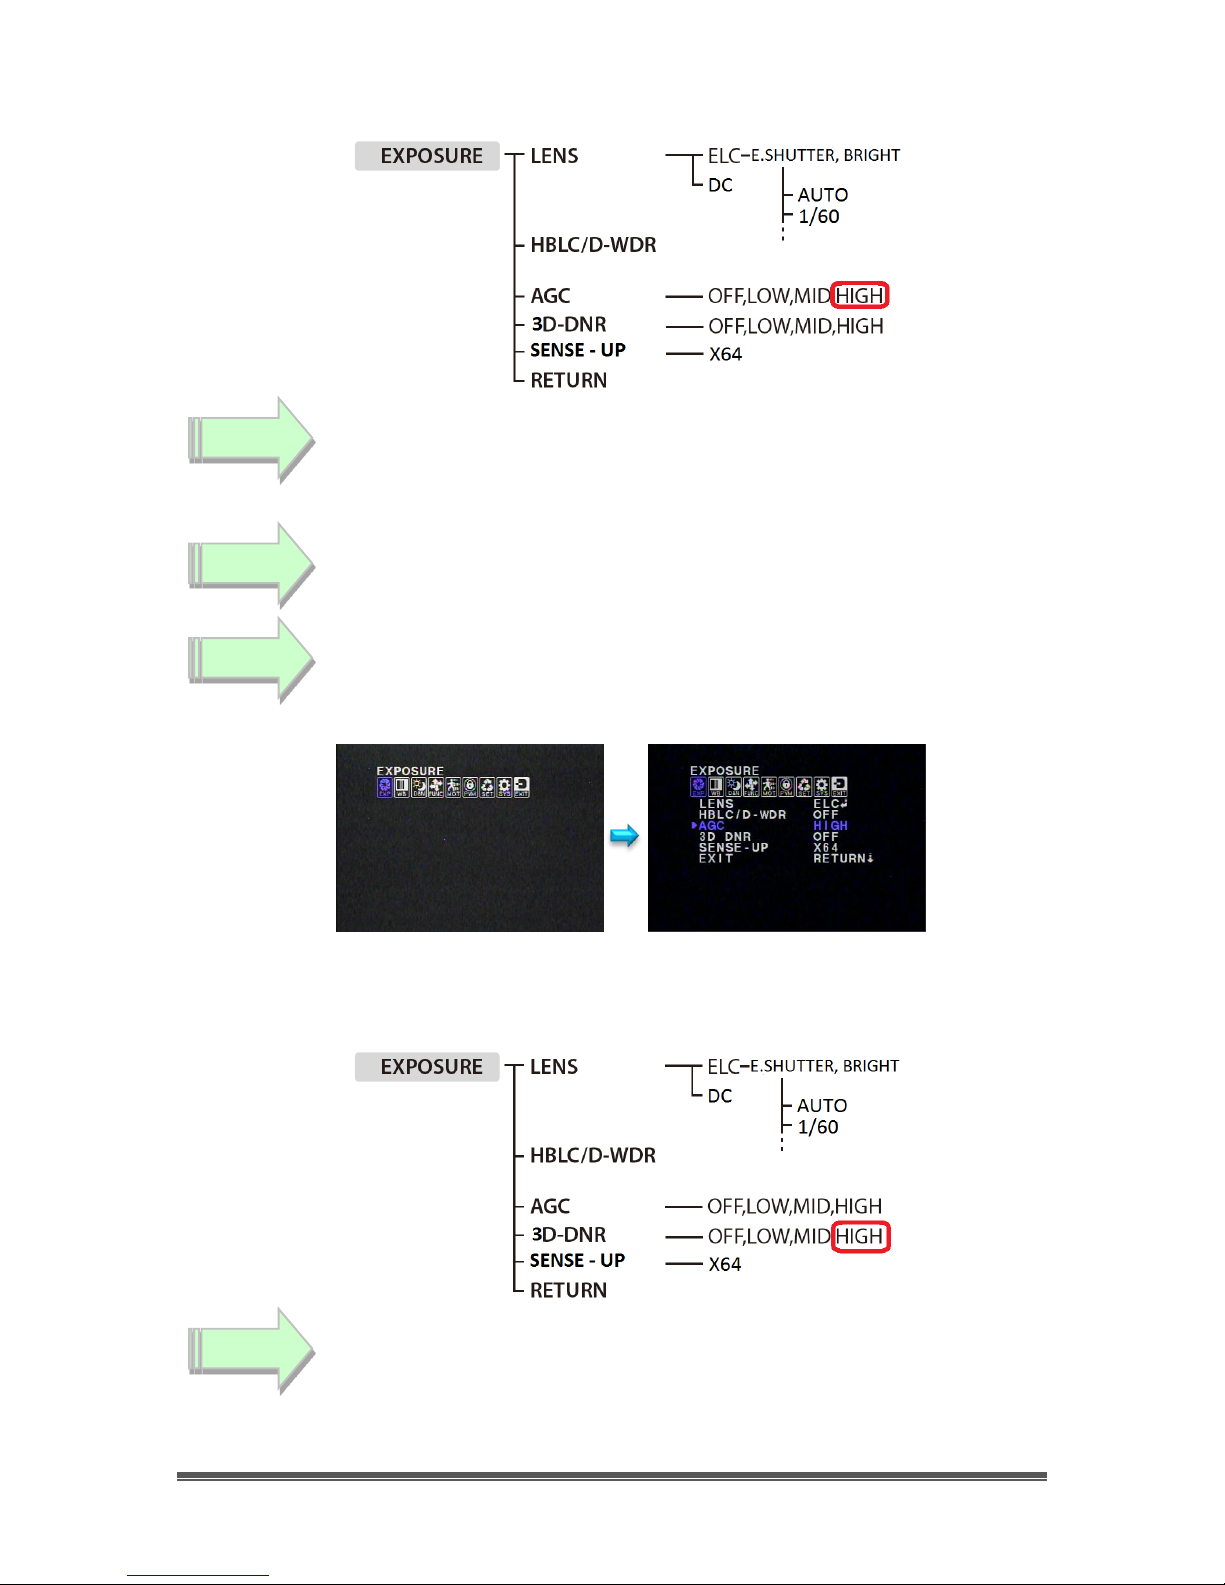
Set AGC to HIGH
The AGC setting is located in the EXPOSURE ICON, so activate the
On Screen Menu by pressing INWARD on the Control Button. The
Main Menu Icons will appear over your image with EXPOSURE
being highlighted in Blue.
Press INWARD on the Command Button to activate the EXPOSURE
Menu.
With the AGC command highlighted in Blue, press LEFT or RIGHT on
the Control Button to change the setting value to HIGH.
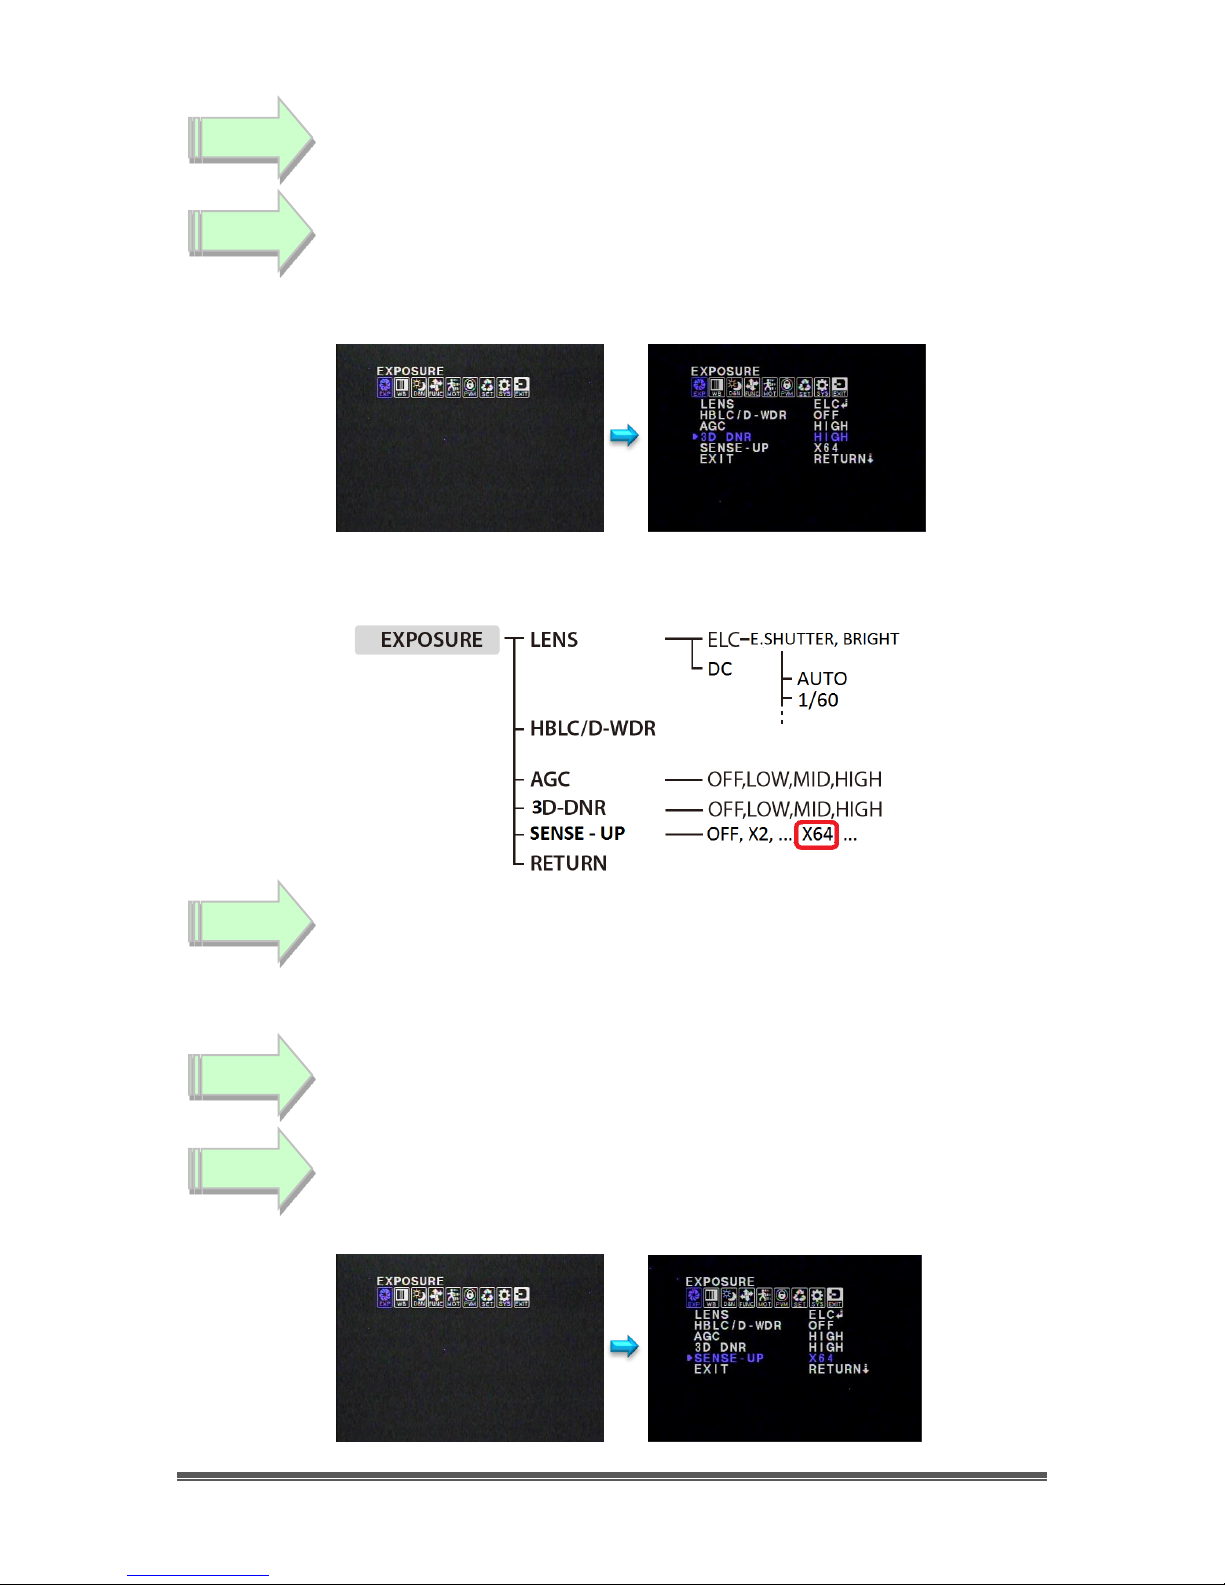
Set 3D-DNR to HIGH
The 3D-DNR setting is located in the EXPOSURE ICON, so activate
the On Screen Menu by pressing INWARD on the Control Button.
The Main Menu Icons will appear over your image with EXPOSURE
being highlighted in Blue.
All Sky User Manual Page 17
All Sky User Manual October 11, 2014
Step 2
Step 3
Step 1
Step 2
Step 3
Press INWARD on the Command Button to activate the EXPOSURE
Menu.
With the 3D-DNR command highlighted in Blue, press LEFT or RIGHT
on the Control Button to change the setting value to HIGH
Set SENSE-UP to X64
The 3D-DNR setting is located in the EXPOSURE ICON, so activate
the On Screen Menu by pressing INWARD on the Control Button.
The Main Menu Icons will appear over your image with EXPOSURE
being highlighted in Blue.
Press INWARD on the Command Button to activate the EXPOSURE
Menu.
With the SENSE-UP command highlighted in Blue, press LEFT or
RIGHT on the Control Button to change the setting value to X64.
All Sky User Manual Page 18
All Sky User Manual October 11, 2014
Step 1
Step 2
Step 3
Step 4
Step 1
Step 2
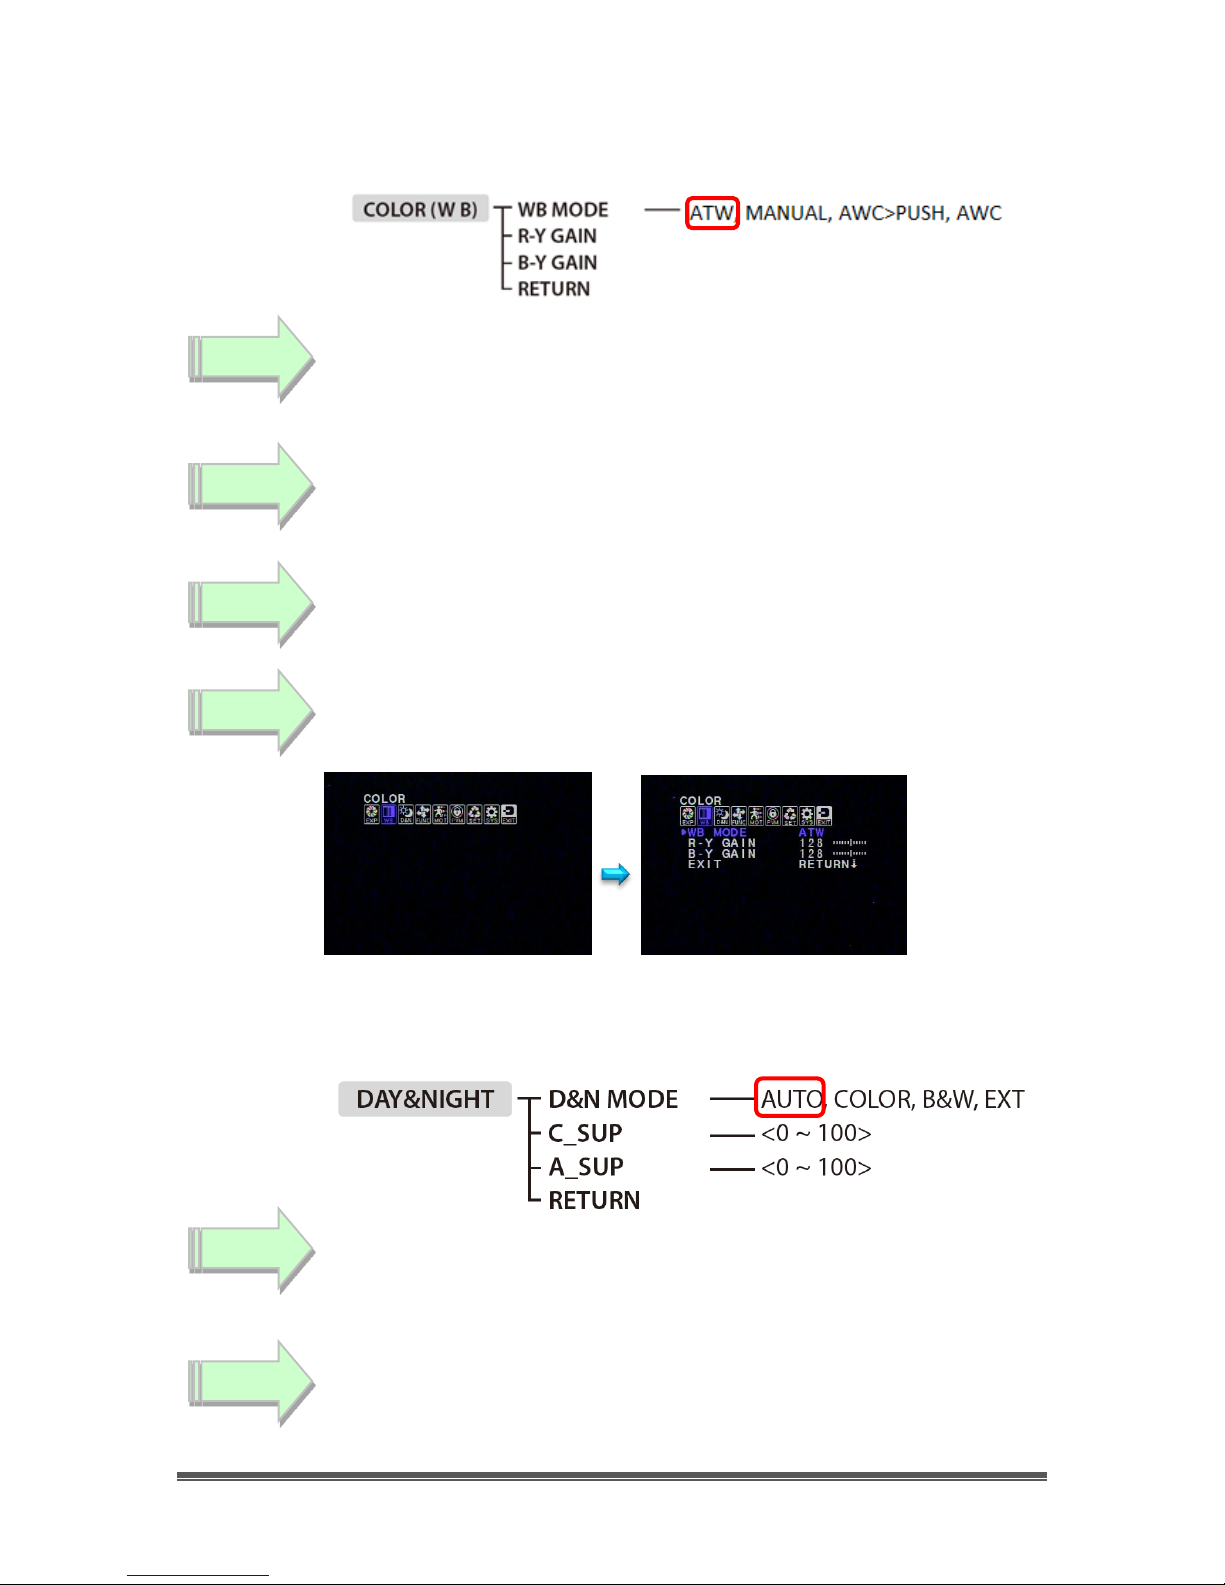
Set W/B to ATW
The W/B setting is located in the COLOR ICON, so activate the On
Screen Menu by pressing INWARD on the Control Button. The Main
Menu Icons will appear over your image with EXPOSURE being
highlighted in Blue.
With the Main Menu Icons on the screen, select the COLOR Icon
by pressing LEFT on the Control Button.
Once COLOR Icon is highlighted, press INWARD on the Command
Button to activate the COLOR Menu.
With the WB MODE control selected, press LEFT or RIGHT on the
Control Button to change the setting value to ATW.
Set D&N to AUTO
The D&N Mode setting is located in the D&N ICON, so activate the
On Screen Menu by pressing INWARD on the Control Button. The
Main Menu Icons will appear over your image with EXPOSURE
being highlighted in Blue.
With the Main Menu Icons on the screen, select the D&N Icon by
pressing LEFT on the Control Button.
All Sky User Manual Page 19
All Sky User Manual October 11, 2014
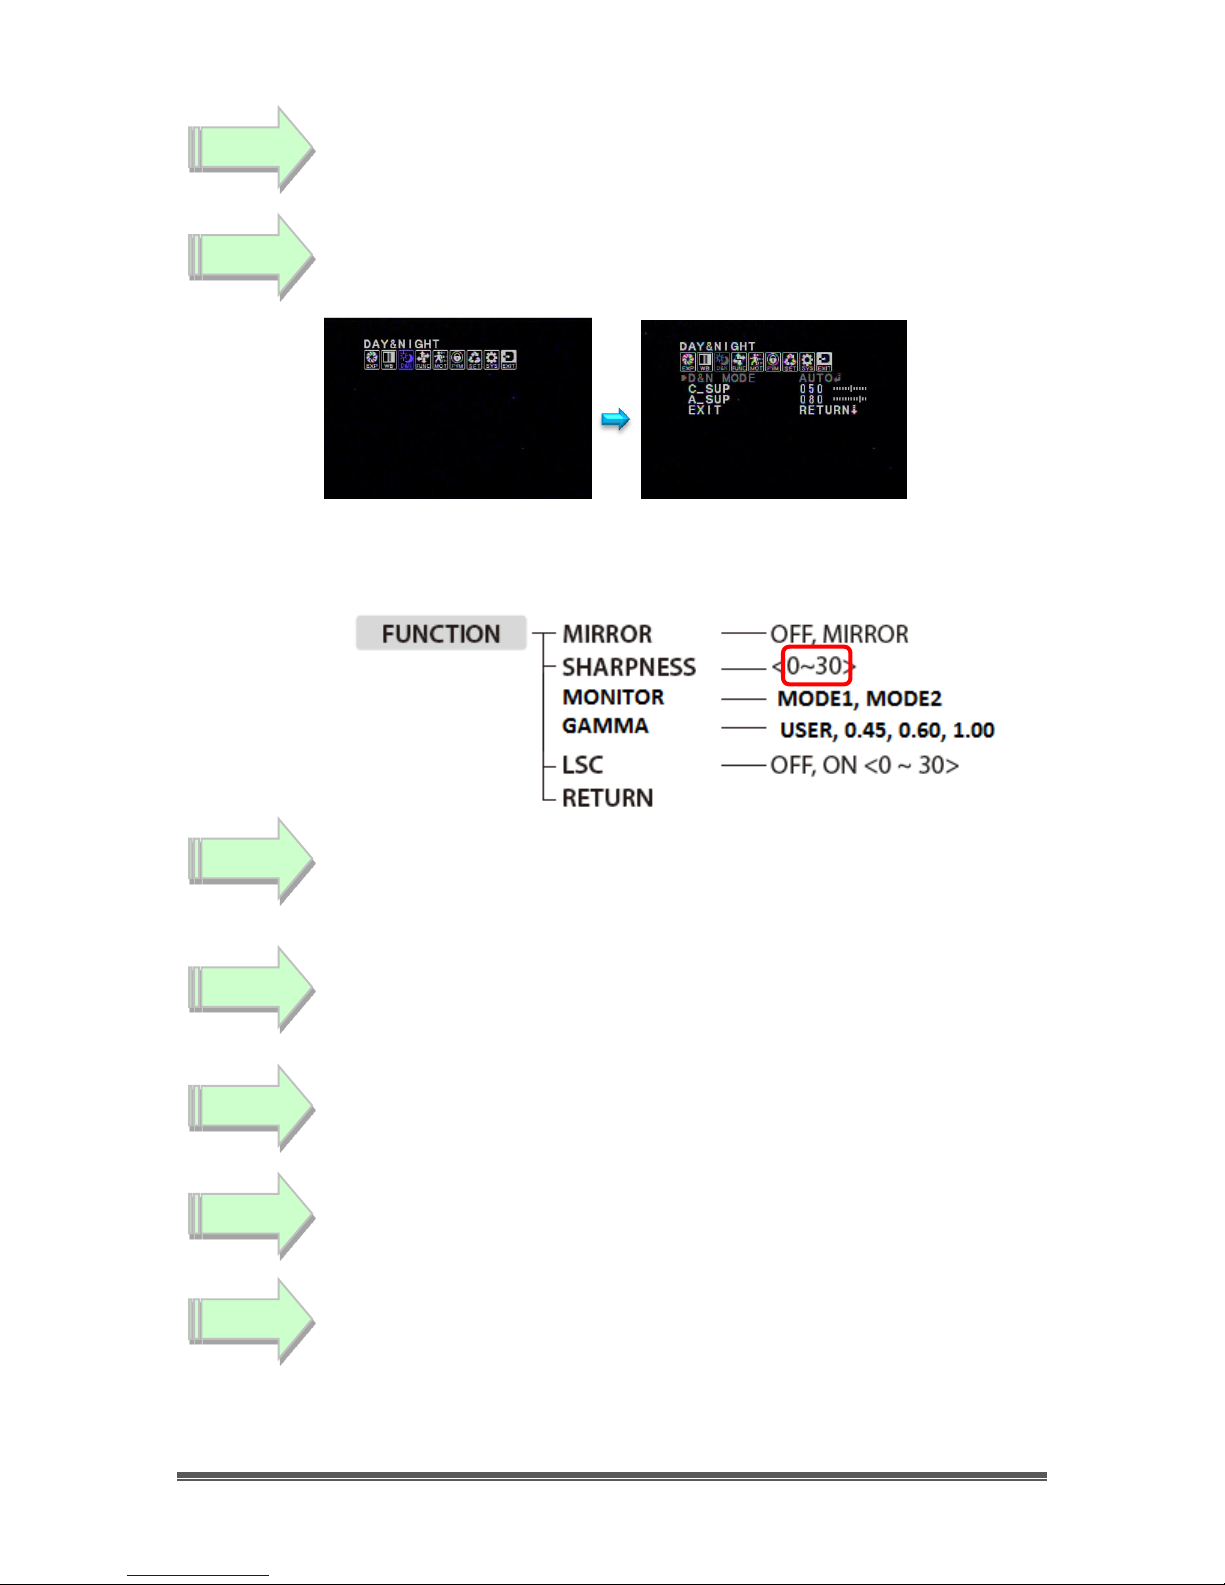
Step 3
Step 4
Step 1
Step 2
Step 3
Step 4
Step 5
Once D&N Icon is highlighted, press INWARD on the Command
Button to activate the DAY&NIGHT Menu.
With the D&N MODE control selected, press LEFT or RIGHT on the
Control Button to change the setting value to AUTO.
Set SHARPNESS to 14
The SHARPNESS setting is located in the FUNCTION ICON, so
activate the On Screen Menu by pressing INWARD on the Control
Button. The Main Menu Icons will appear over your image with
EXPOSURE being highlighted in Blue.
With the Main Menu Icons on the screen, select the FUNCTION
Icon by pressing LEFT on the Control Button.
Once FUNCTION Icon is highlighted, press INWARD on the
Command Button to activate the FUNCTION Menu.
With the FUNCTION control selected, press DOWN on the Control
Button to select the SHARPNESS Control.
With the SHARPNESS Control selected, press LEFT or RIGHT on the
Control Button to change the SHARPNESS value to 14.
All Sky User Manual Page 20
All Sky User Manual October 11, 2014
Step 1
Step 2
Step 3
Step 4
Step 5
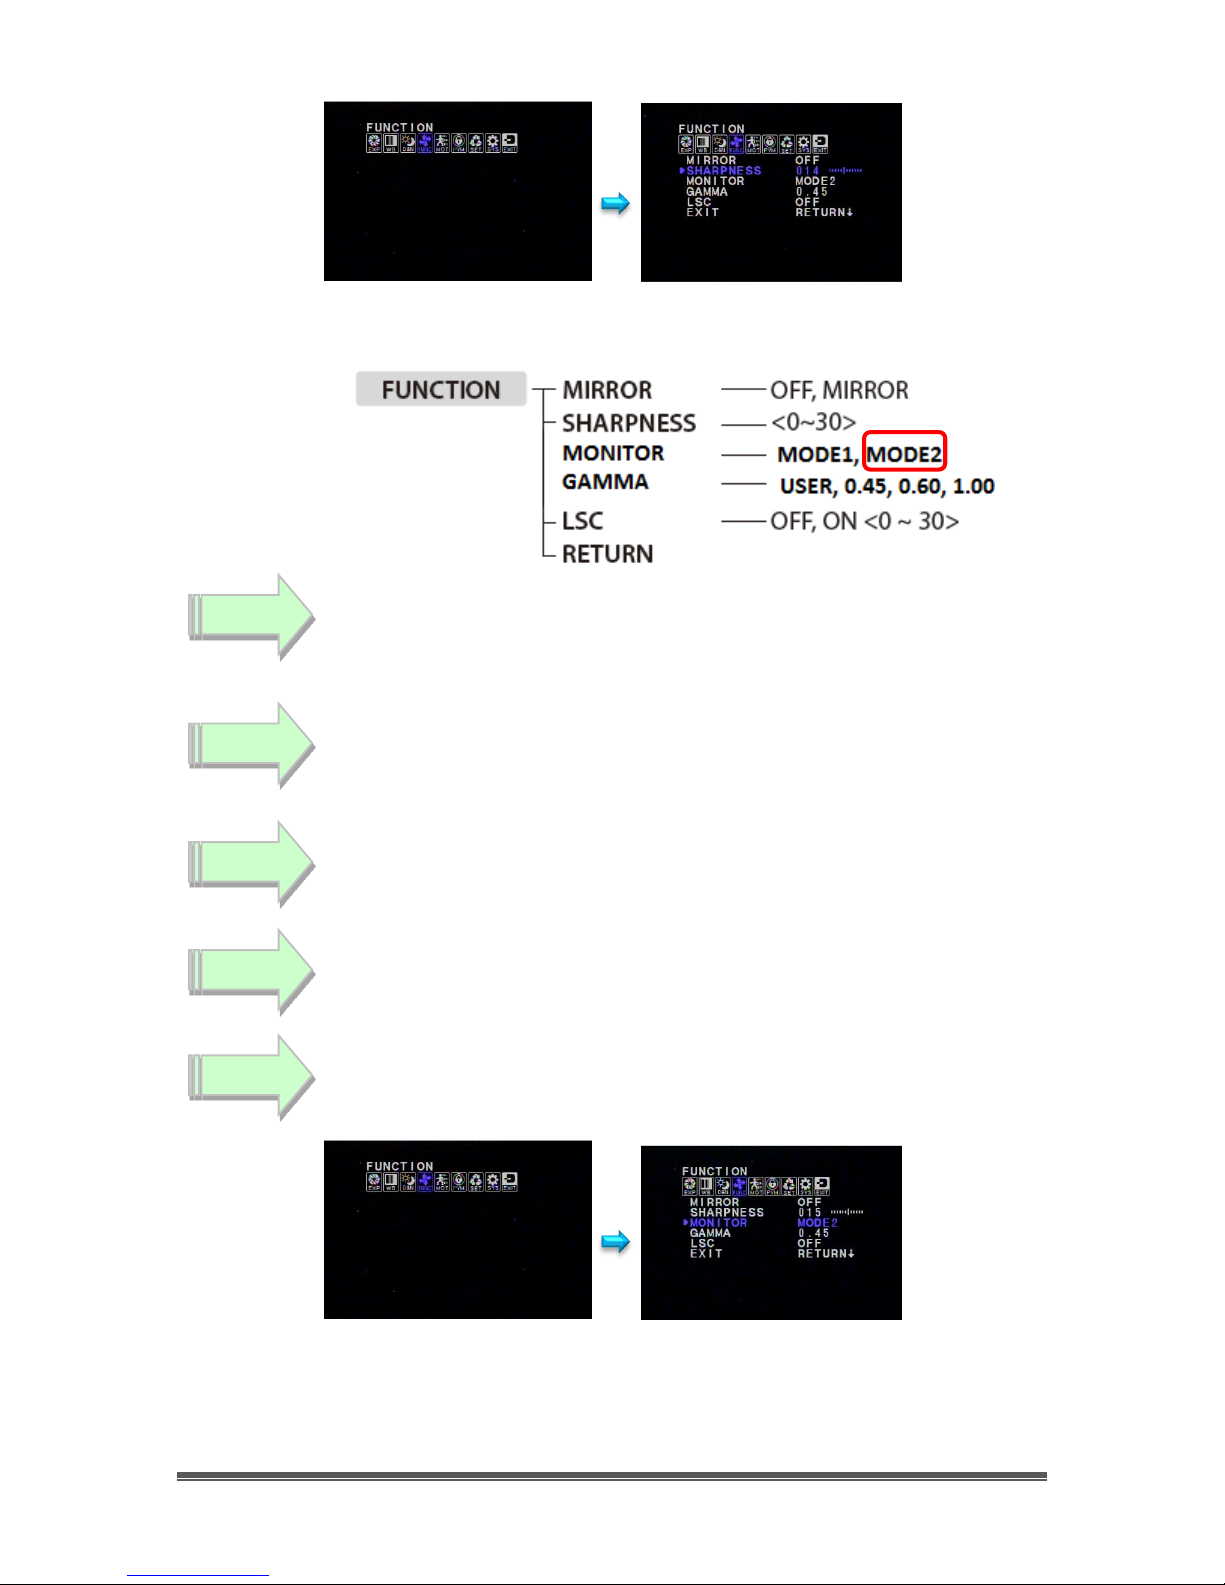
Set MONITOR to MODE2
The MONITOR setting is located in the FUNCTION ICON, so activate
the On Screen Menu by pressing INWARD on the Control Button.
The Main Menu Icons will appear over your image with EXPOSURE
being highlighted in Blue.
With the Main Menu Icons on the screen, select the FUNCTION
Icon by pressing LEFT on the Control Button.
Once FUNCTION Icon is highlighted, press INWARD on the
Command Button to activate the FUNCTION Menu.
With the FUNCTION control selected, press DOWN on the Control
Button to select the MONITOR Control.
With the MONITOR Control selected, press LEFT or RIGHT on the
Control Button to change the MONITOR value to MODE2.
All Sky User Manual Page 21
 Loading...