

MallinCam AG1.2C User Manual
Revision Sheet
SkyRaider AG1.2C User Manual Page i
SKYRAIDER AG1.2C
[Version 1.0]
Michael Burns
Rock Mallin
[SkyRaider AG1.2C User Manual]
This document will quickly introduce you to the wonders of the MallinCam SkyRaider
AG1.2C Camera. It will include instructions on how to install the Software and Drivers
and how connect the SkyRaider to your computer along with explanations of the
camera’s major settings. The purpose of this guide is to quickly get you up and
running with the SkyRaider Camera so that you can image.

Revision Sheet
SkyRaider AG1.2C User Manual Page ii
Revision History
Version
Date
Revision Description
1.0
12/29/2016
Template Creation

SkyRaider AG1.2C User Manual December 29, 2016
SkyRaider Quick Guide Page 1
Table of Contents
Contents
Revision History ................................................................................................................................... ii
Table of Contents
.......................................................................................................................... 1
1. Introduction
............................................................................................................................ 5
The Contents of the SkyRaider-AG1.2C Package ............................................................... 6
Specifications: ........................................................................................................................................ 6
System Requirements: ........................................................................................................................... 7
In the Box............................................................................................................................................... 7
2. Installing Driver and Software ............................................................................................... 8
System Requirements ................................................................................................................ 8
Installing the Software ............................................................................................................... 8
3. Connecting the SkyRaider .................................................................................................... 12
Connecting the SkyRaider-AG1.2C to your Computer ........................................................ 12
Connecting the AutoGuider Cable to the SkyRaider-AG1.2C ............................................ 14
4. Using MallincamSky Software ............................................................................................. 15
The MallincamSky Window .................................................................................................... 15
SkyRaider Quick Setup and Pictorial Work-Flow................................................................ 16
Live Stack Pictorial Work-Flow ............................................................................................. 17
Dark Field Pictorial Work-Flow ............................................................................................. 18
Histogram Pictorial Work-Flow ............................................................................................. 19
ROI Pictorial Work-Flow ........................................................................................................ 20
Save Image Pictorial Work-Flow ............................................................................................ 21
Record Video Pictorial Work-Flow ........................................................................................ 22
Batch Record Pictorial Work-Flow ........................................................................................ 23
Auto Capture Pictorial Work-Flow ........................................................................................ 24
Save Sequence of Images Pictorial Work-Flow (Trigger Mode) ......................................... 25
More Detailed Work-Flow Procedure .................................................................................... 26
Quick Workflow for MallincamSky .................................................................................................... 26
Detailed Workflow of Video Imaging Planetary Objects .................................................................... 29
Detailed Workflow of Video Imaging Deep Sky Objects ................................................................ .... 34

SkyRaider AG1.2C User Manual December 29, 2016
SkyRaider AG1.2C User Manual Page 2
5. The SkyRaider Software Controls ........................................................................................ 43
Top Menu Line ......................................................................................................................... 44
File ....................................................................................................................................................... 44
Open Image ...................................................................................................................................... 44
Open Video ...................................................................................................................................... 45
Save .................................................................................................................................................. 46
Save As … ........................................................................................................................................ 47
Batch Save… .................................................................................................................................... 50
Paste as New File ............................................................................................................................. 51
Recent Files ...................................................................................................................................... 51
Exit ................................................................................................................................................... 52
Edit ....................................................................................................................................................... 52
Cut .................................................................................................................................................... 53
Copy ................................................................................................................................................. 53
Paste ................................................................................................................................................. 53
Paste Shortcut ................................................................................................................................... 53
Delete ............................................................................................................................................... 53
Image Select ..................................................................................................................................... 53
Select All .......................................................................................................................................... 54
Select None ...................................................................................................................................... 54
View ..................................................................................................................................................... 54
Browse.............................................................................................................................................. 54
Sidebar.............................................................................................................................................. 55
Grids ................................................................................................................................................. 56
Best Fit ............................................................................................................................................. 59
Actual Size ....................................................................................................................................... 59
Full Screen ....................................................................................................................................... 59
Track ................................................................................................................................................ 59
Reticules ........................................................................................................................................... 60
Browse ................................................................................................................................................. 61
Sort ................................................................................................................................................... 61
Icons ................................................................................................................................................. 61
Refresh ............................................................................................................................................. 61
Properties .......................................................................................................................................... 61
Open Record Folder ........................................................................................................................ 62
Open Image Folder .......................................................................................................................... 62
Setup .................................................................................................................................................... 62
Start/Pause ........................................................................................................................................ 62
View Properties… ............................................................................................................................ 62
ST4 Test… ....................................................................................................................................... 63
Capture ................................................................................................................................................. 64
Capture Image .................................................................................................................................. 64
Auto Capture .................................................................................................................................... 64
Start Record… .................................................................................................................................. 65
Batch Record ................................................................ ................................................................ .... 66
Image ................................................................................................................................................... 68
Mode ................................................................................................................................................ 68
Adjust ............................................................................................................................................... 69
Rotate ............................................................................................................................................... 74
Crop .................................................................................................................................................. 75
Scale… ............................................................................................................................................. 76
Histogram ......................................................................................................................................... 77
Process ................................................................................................................................................. 79
Image Stacking ................................................................................................................................. 82
Options ................................................................................................................................................. 84

SkyRaider AG1.2C User Manual December 29, 2016
SkyRaider AG1.2C User Manual Page 3
Window ................................................................................................................................................ 89
Close All ........................................................................................................................................... 89
Reset Window Layout ...................................................................................................................... 90
Windows… ...................................................................................................................................... 90
About ................................................................................................................................................... 91
MallincamSky Toolbar ............................................................................................................ 92
Open ..................................................................................................................................................... 92
Save ...................................................................................................................................................... 93
Browse ................................................................................................................................................. 93
Target ................................................................................................................................................... 94
Auto Capture ........................................................................................................................................ 95
Batch Record ........................................................................................................................................ 95
Pause Video Capture ............................................................................................................................ 95
Pause Video Capture ............................................................................................................................ 95
Zoom .................................................................................................................................................... 96
Image Select ......................................................................................................................................... 96
Track .................................................................................................................................................... 96
Histogram............................................................................................................................................. 97
Reticule ................................................................................................................................................ 97
ST4 Test .......................................................................................................................................... 98
ST4 Test ............................................................................................................................................... 99
Stitch ............................................................................................................................................... 99
Panorama Straighten: ..................................................................................................................... 100
Projection Type: ............................................................................................................................. 100
Seam Finder: .................................................................................................................................. 101
Exposure Compensation: ................................................................................................................ 101
Bundle Adjust:................................................................................................................................ 101
Preferences ......................................................................................................................................... 103
6. Controlling the SkyRaider .................................................................................................. 104
Camera List ............................................................................................................................ 104
Capture and Resolution ......................................................................................................... 105
Resolution .......................................................................................................................................... 105
Snap ................................................................................................................................................... 105
Record ................................................................................................................................................ 106
Gain .................................................................................................................................................... 107
Exposures ........................................................................................................................................... 107
Video Mode .................................................................................................................................... 107
Trigger Mode.................................................................................................................................. 110
Bit Depth ................................................................................................................................. 112
Color Balance ......................................................................................................................... 112
White Balance .................................................................................................................................... 113
Color Adjustment ................................................................................................................... 113
Hue ..................................................................................................................................................... 114
Saturation ................................................................................................ ................................ ........... 114
Brightness .......................................................................................................................................... 114
Contrast .............................................................................................................................................. 114
Gamma ............................................................................................................................................... 115
Frame Rate ............................................................................................................................. 115
Color/Gray .............................................................................................................................. 116
Flip ........................................................................................................................................... 116
Sampling ................................................................................................................................. 117

SkyRaider AG1.2C User Manual December 29, 2016
SkyRaider AG1.2C User Manual Page 4
ROI .......................................................................................................................................... 117
Histogram ............................................................................................................................... 119
Dark Field Correction ........................................................................................................... 121
Live Stack................................................................................................................................ 123
Cooling .................................................................................................................................... 125
Parameters .............................................................................................................................. 126
7. Installing Optional Software .............................................................................................. 128
Installing DirectShow Driver ................................................................................................ 130
Installing WDM Driver ......................................................................................................... 131
Installing Mallincam ASCOM Driver .................................................................................. 133
8. AutoGuiding with SkyRaider .............................................................................................. 135
Guiding with MaximDL and Mallincam ASCOM .............................................................. 135
Guiding in PHD2 with Mallincam ASCOM Driver ............................................................ 139
Running PHD2 with WDM Driver + ToupST4 Driver ...................................................... 143
9. Appendix ............................................................................................................................. 148
Imaging in SharpCap ............................................................................................................. 148
Start SharpCap ................................................................................................................................... 148
Chose Cameras .................................................................................................................................. 148
SharpCap will start the imaging process ............................................................................................ 150
How Do I … ............................................................................................................................ 151
How do I get rid of the Green Exposure Rectangle? .......................................................................... 151
How do I Select a part of the Image and Zoom in? ............................................................................ 151
How do I automatically save 1 image every 30 seconds? .................................................................. 152
How do I adjust the brightness in my monochrome SkyRaider? ....................................................... 152
How do I Broadcast my image onto Night Skies Network (NSN)? ................................................... 152
Can I Use MallincamSky with One SkyRaider and Auto-Guide with another? ................................ 152
How Do I Pause the Video? ............................................................................................................... 153
How do I Undo an Operation? ........................................................................................................... 153
How do I make my ROI the whole Image Again? ............................................................................. 153
How do I Turn Off Dark Field correction? ........................................................................................ 153
My ROI Window is Black? ................................................................................................................ 153
First Aid for the SkyRaider Series ....................................................................................... 154
Dark Field Explanation ......................................................................................................... 155
Dark Frame vs Dark Field .................................................................................................................. 155
Dark Frame Subtraction ................................................................................................................. 155
Dark Field Correction ..................................................................................................................... 155
Setting up to Broadcast on Night Skies Network ................................................................ 158
Focal Reducers ....................................................................................................................... 165
MFR-8 Mk II Focal Reducer ............................................................................................................. 165
User Notes ............................................................................................................................... 166

SkyRaider AG1.2C User Manual December 29, 2016
SkyRaider AG1.2C User Manual Page 5
1. Introduction
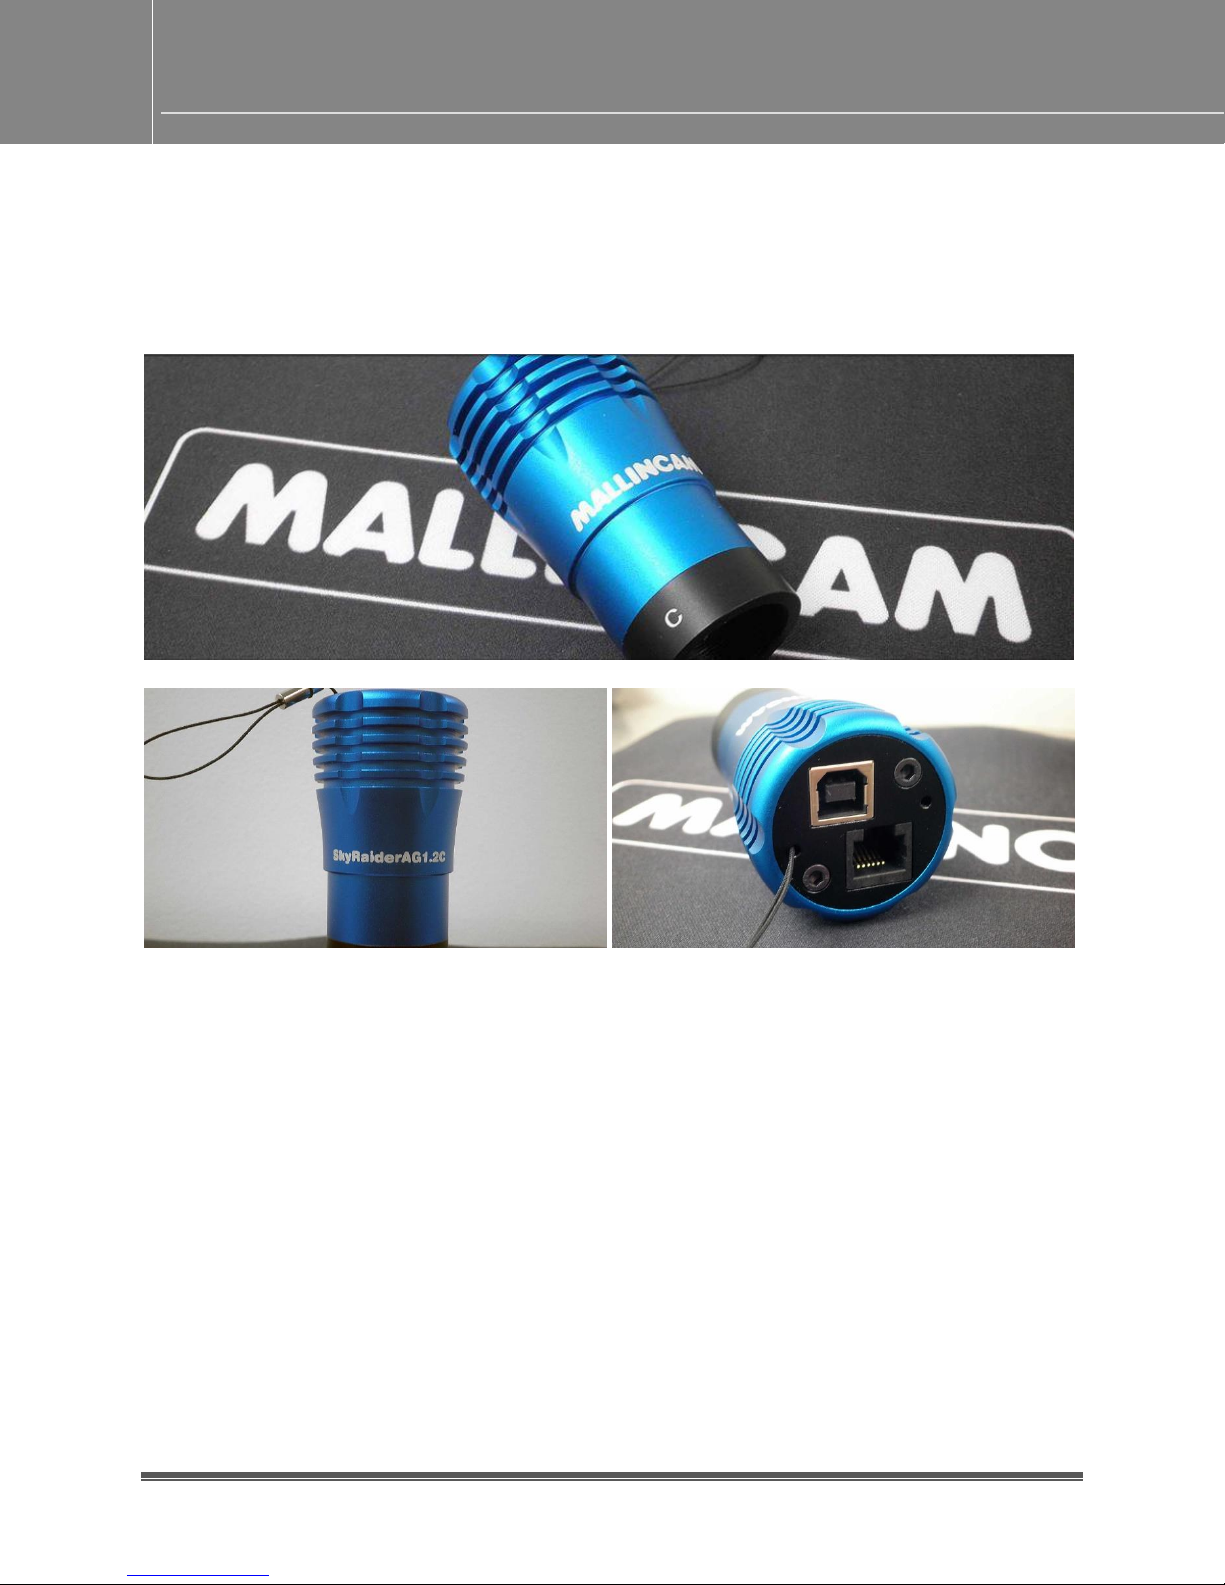
The New SkyRaider AG1.2c Imager-Guider is the most affordable camera in its
class. Packed with stunning features such as the IMX224 sensor, it can perform
very well as an imager. The camera can be used as a guider or an imager for
Lunar, Planets, Solar and Deep sky objects or as a video EAA. Using the highly
acclaimed IMX224 CMOS sensor, the camera deliver sharp images and provides
superb accuracy when used as an auto-guider.
The New SkyRaider AG1.2c is the most affordable astronomical camera ever
offered and it is a MALLINCAM design.
Fully ST-4 compatible, Native WDM drivers for easy connection with 3rd party
guiding software. By utilizing the MALLINCAMSKY Software Application Dark
Frame Correction feature, an internal Peltier cooler (TEC) is not needed. This
results in the use of only a single cable from the camera to the computer's USB
2.0 port. The Dark Field Correction feature removes all hot pixels, warm pixels,
amp glow and most dark current noise on the fly making this premier astronomy
camera the idea choice in the field or in an observatory. The dark field
correction technology has been implemented by MallinCam for all their
SkyRaider Series of camera eliminating the need of a Peltier cooler.
Special thanks to Jack Huerkamp and Rock Mallin whose expertise and
experience are way beyond my capabilities.
So thank you for your purchase, and let the adventure begin.
SkyRaider AG1.2C User Manual December 29, 2016
SkyRaider AG1.2C User Manual Page 6
The Contents of the SkyRaider-AG1.2C Package
Specifications:
Live Stacking on the Fly
Live Star Registration, Ideal for all Motorized Alt-Az mounted telescopes
Passive Sensor Cooling
Carefully Selected Sony IMX224 CMOS sensor
Sensor Sensitivity: 2350 mv
3.75X3.75 pixels size
1280 X 960 resolution and 640X480 resolution mode
1.2 Mp sensor, 1/3" size (6 mm)
Protective sealed Window with Double-sided AR coatings
All Aluminum CNC construction for durability
Exposure up to 16+ minutes
MALLINCAMSKY Software Included
1.25" threaded adapter included
ST4 guiding cable included
15 feet USB cable (5 meters)
Aluminum CNC housing with built-in passive sensor cold finger
offering thermal heat transfer from the sensor to camera body
Dedicated astrophotography software to support live video, imaging,
image stacking, and more
MallinCam unique Dark Field Correction (No Peltier Cooler needed)
Built-in ST4 auto-guider port
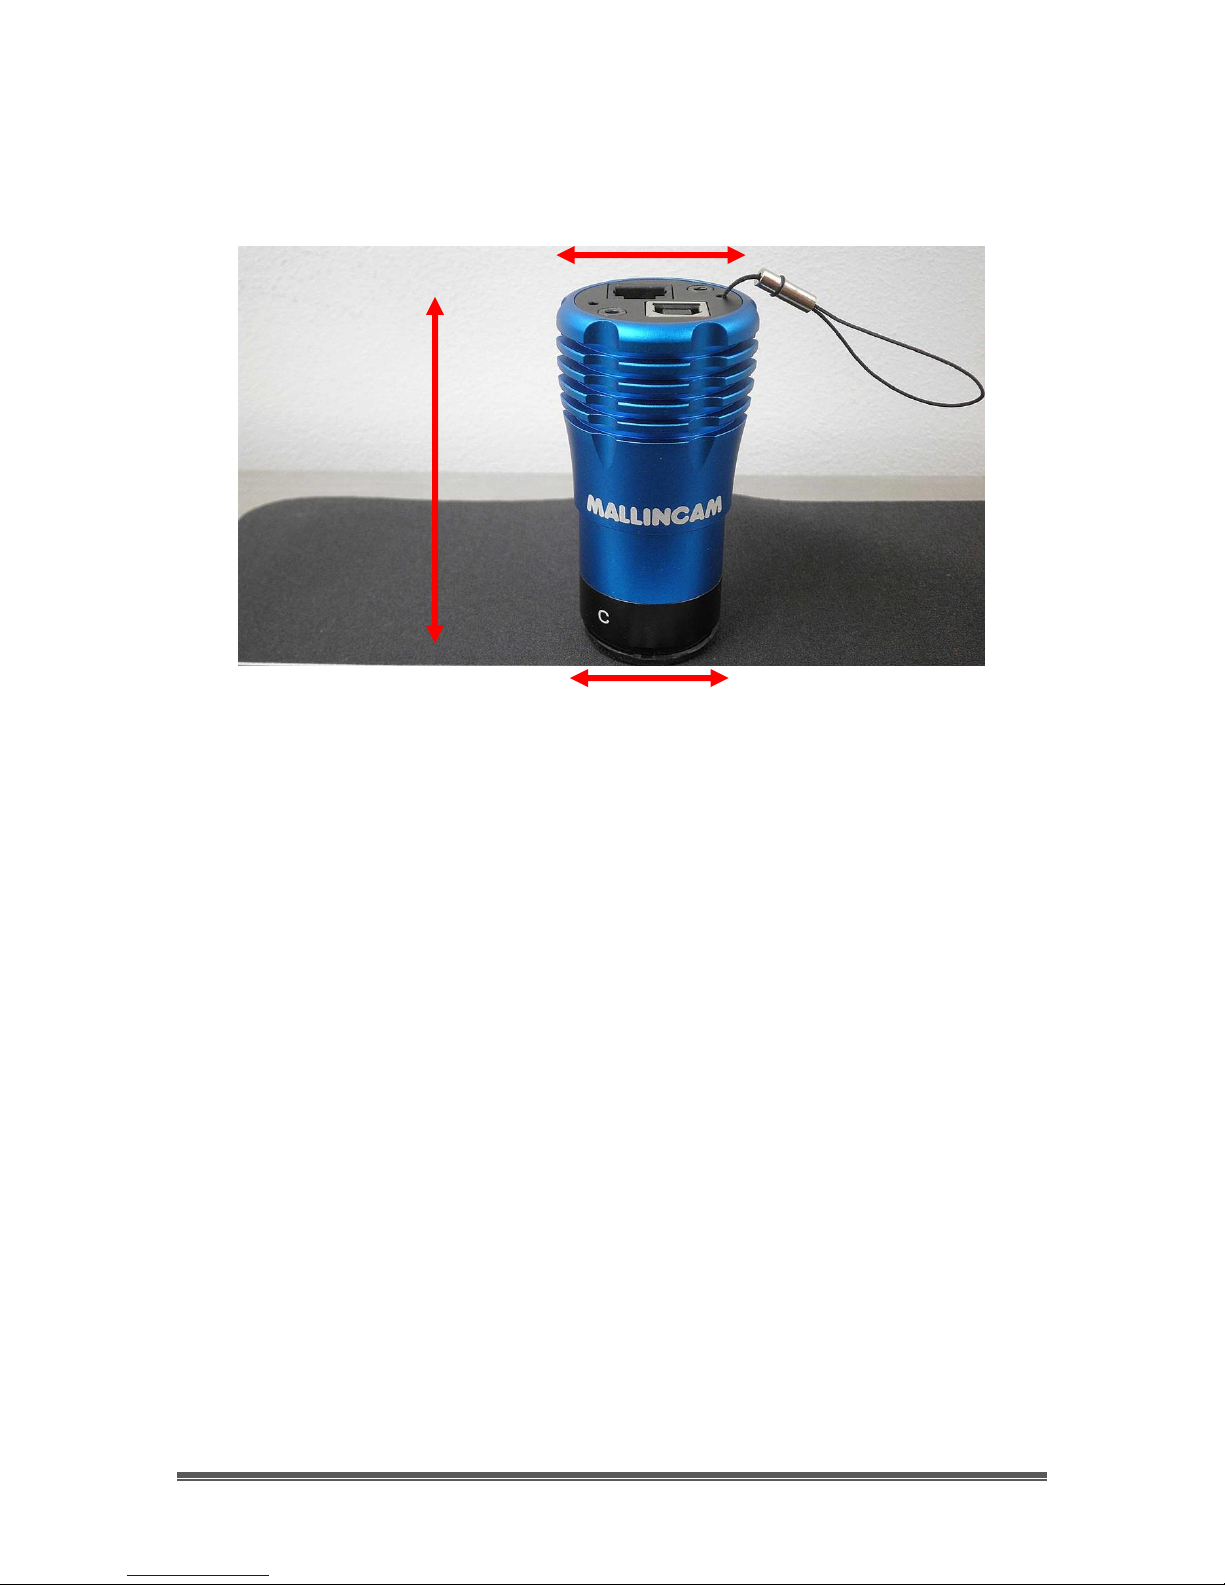
2.2 oz (65 grams)
2.5 Inches long
SkyRaider AG1.2C User Manual December 29, 2016
SkyRaider AG1.2C User Manual Page 7
System Requirements:
Equal to Intel Core2 2.8GHz or Higher
Memory: 4GB or More
USB port: USB 2.0 Port
Display: 17" or Larger Recommended
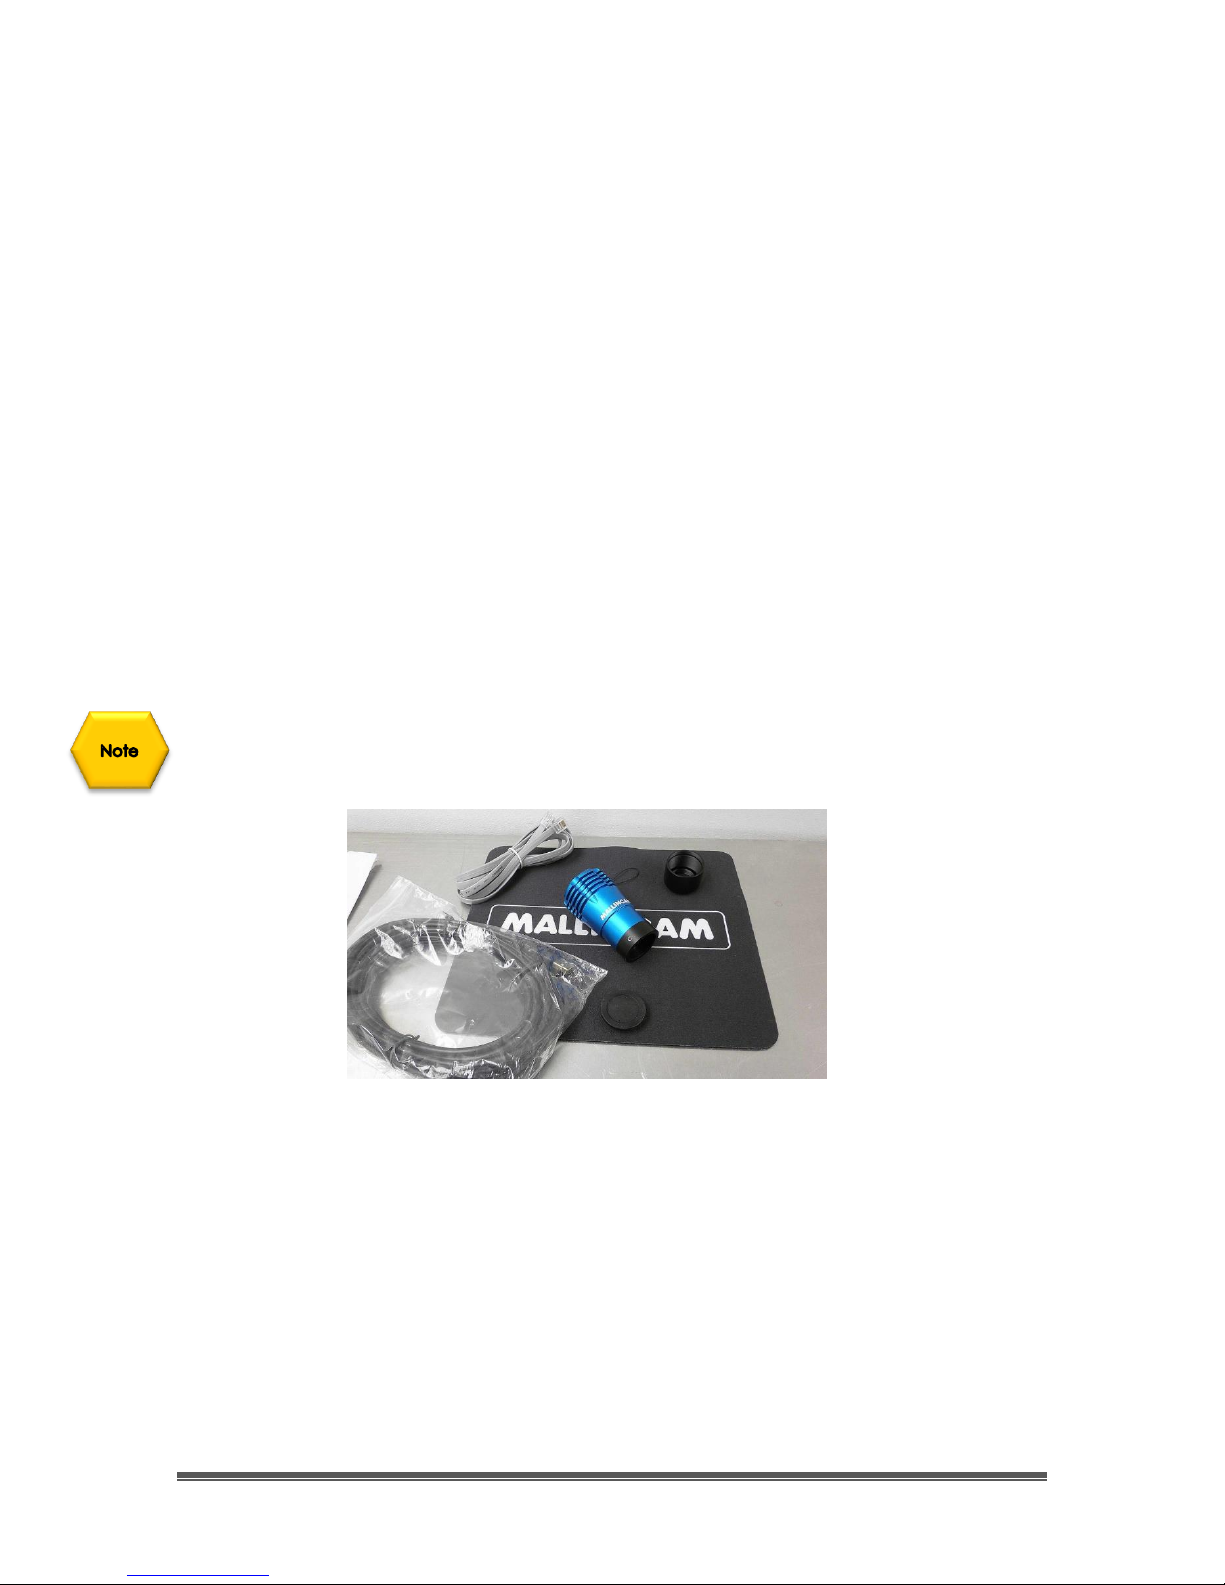
In the Box
The SkyRaider AG1.2C Plus includes the following standard equipment:
MALLINCAM SkyRaider-AG1.2C Camera
Mallincam SkyRaider CCD with Software
High Precision 1.25" Eyepiece Adapter
5-meter long. (15.5 feet long) USB 2.0 high grade cable
SkyRaider-AG1.2C also includes a 2 meter ST4 Guider cable.
Updated Software and Drivers can be down-loaded at the Software Downloads
Window located in the Support Tab at www.mallincam.net
SkyRaider AG1.2C User Manual December 29, 2016
SkyRaider AG1.2C User Manual Page 8
2. Installing Driver and Software
System Requirements
PC running either Windows ® (32-bit & 64-bit) XP, Vista, 7, 8, 8.1, 10, Mac, Linux
Performance is not guaranteed if the following specification cannot be reached.
DirectX 9.0 or later installed
2.8GHz processor (Recommend dual core 2.8GHz or more)
USB 2.0 Port
4GB RAM (Recommend 4GB or more)
200MB Free HDD
Installing the Software
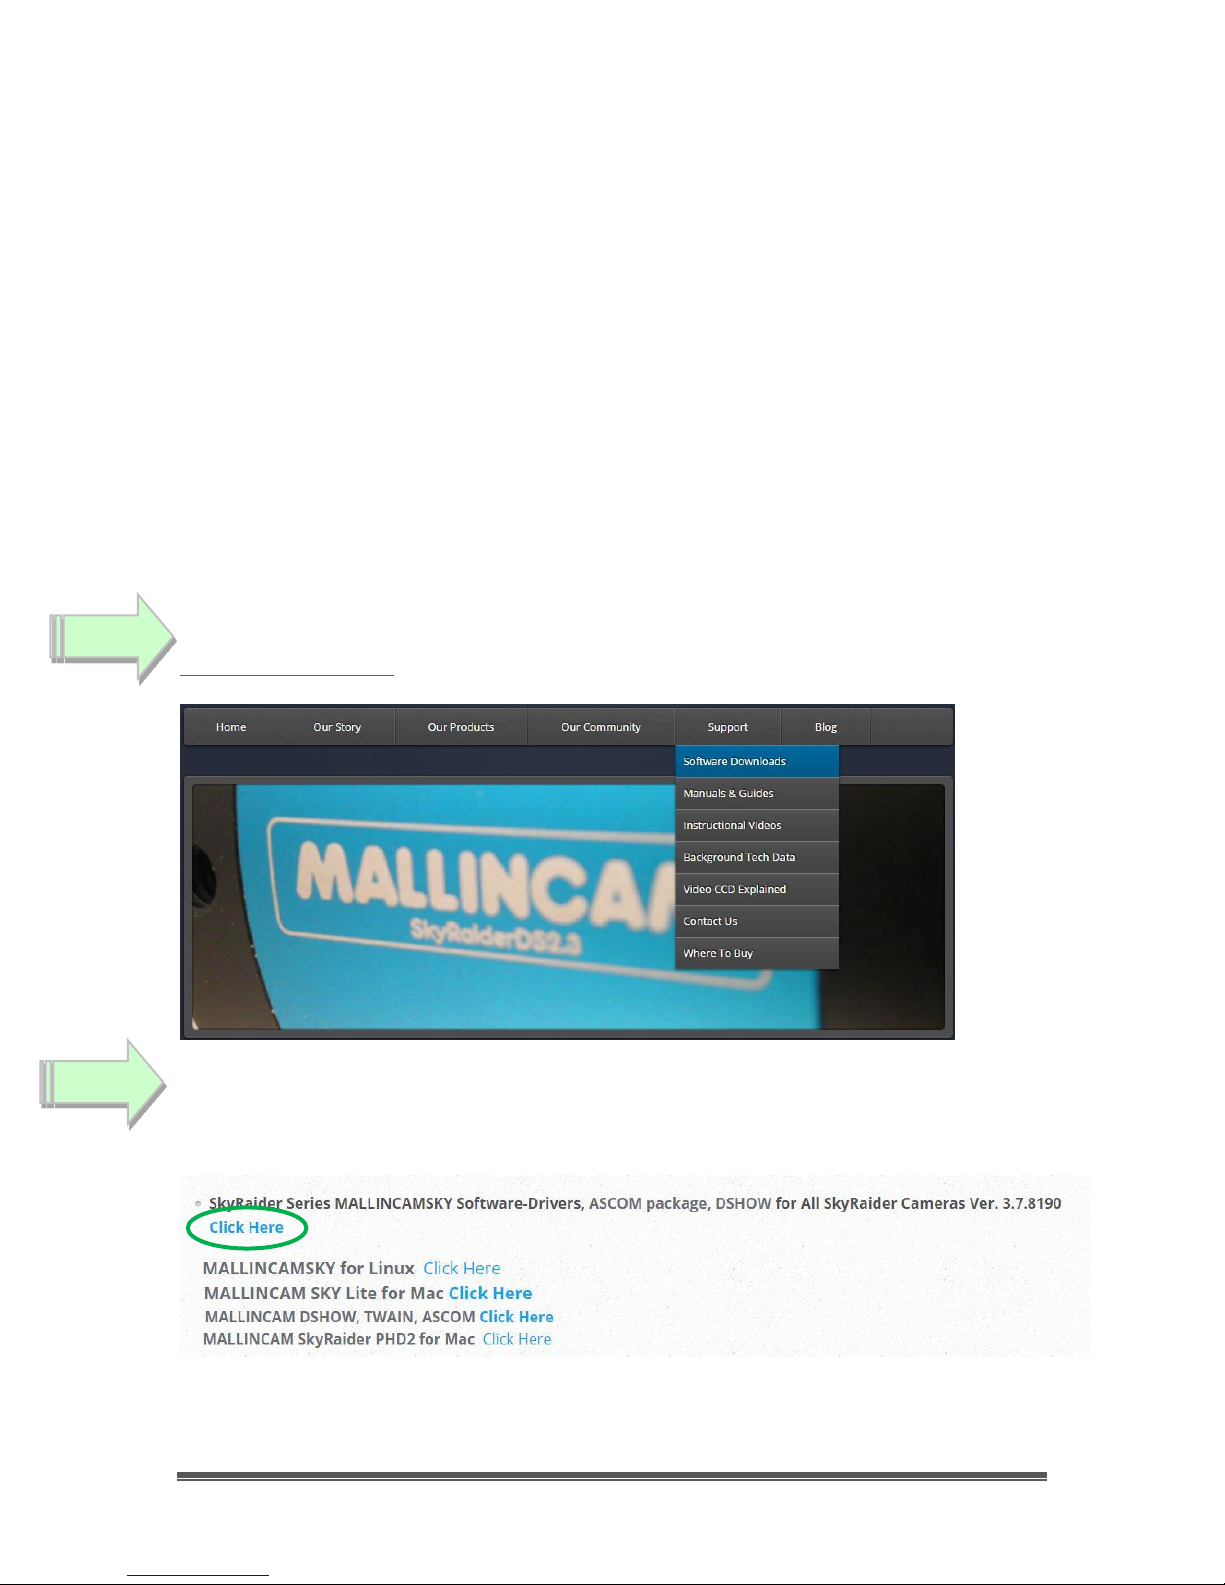
Visit the Software Downloads Page in the Support Tab located on the website:
www.mallincam.net
Select the Blue Click Here Button to download the Drivers and MallincamSky
Software for a Windows PC (there is a Click Here that contains a ASCOM drivers
as well as DSHOW and TWAIN Drivers).
After you have clicked on the Blue Click Here indicator, a zipped file will be
downloaded onto your computer.
Step 1
Step 2
SkyRaider AG1.2C User Manual December 29, 2016
SkyRaider AG1.2C User Manual Page 9
If you have a Mac, or Linux computer, just choose the appropriate download
form the download page. The following instruction will represent a Windows
Computer.
Make sure that the SkyRaiderAG1.2C is not plugged into the computer before
completing the next step.
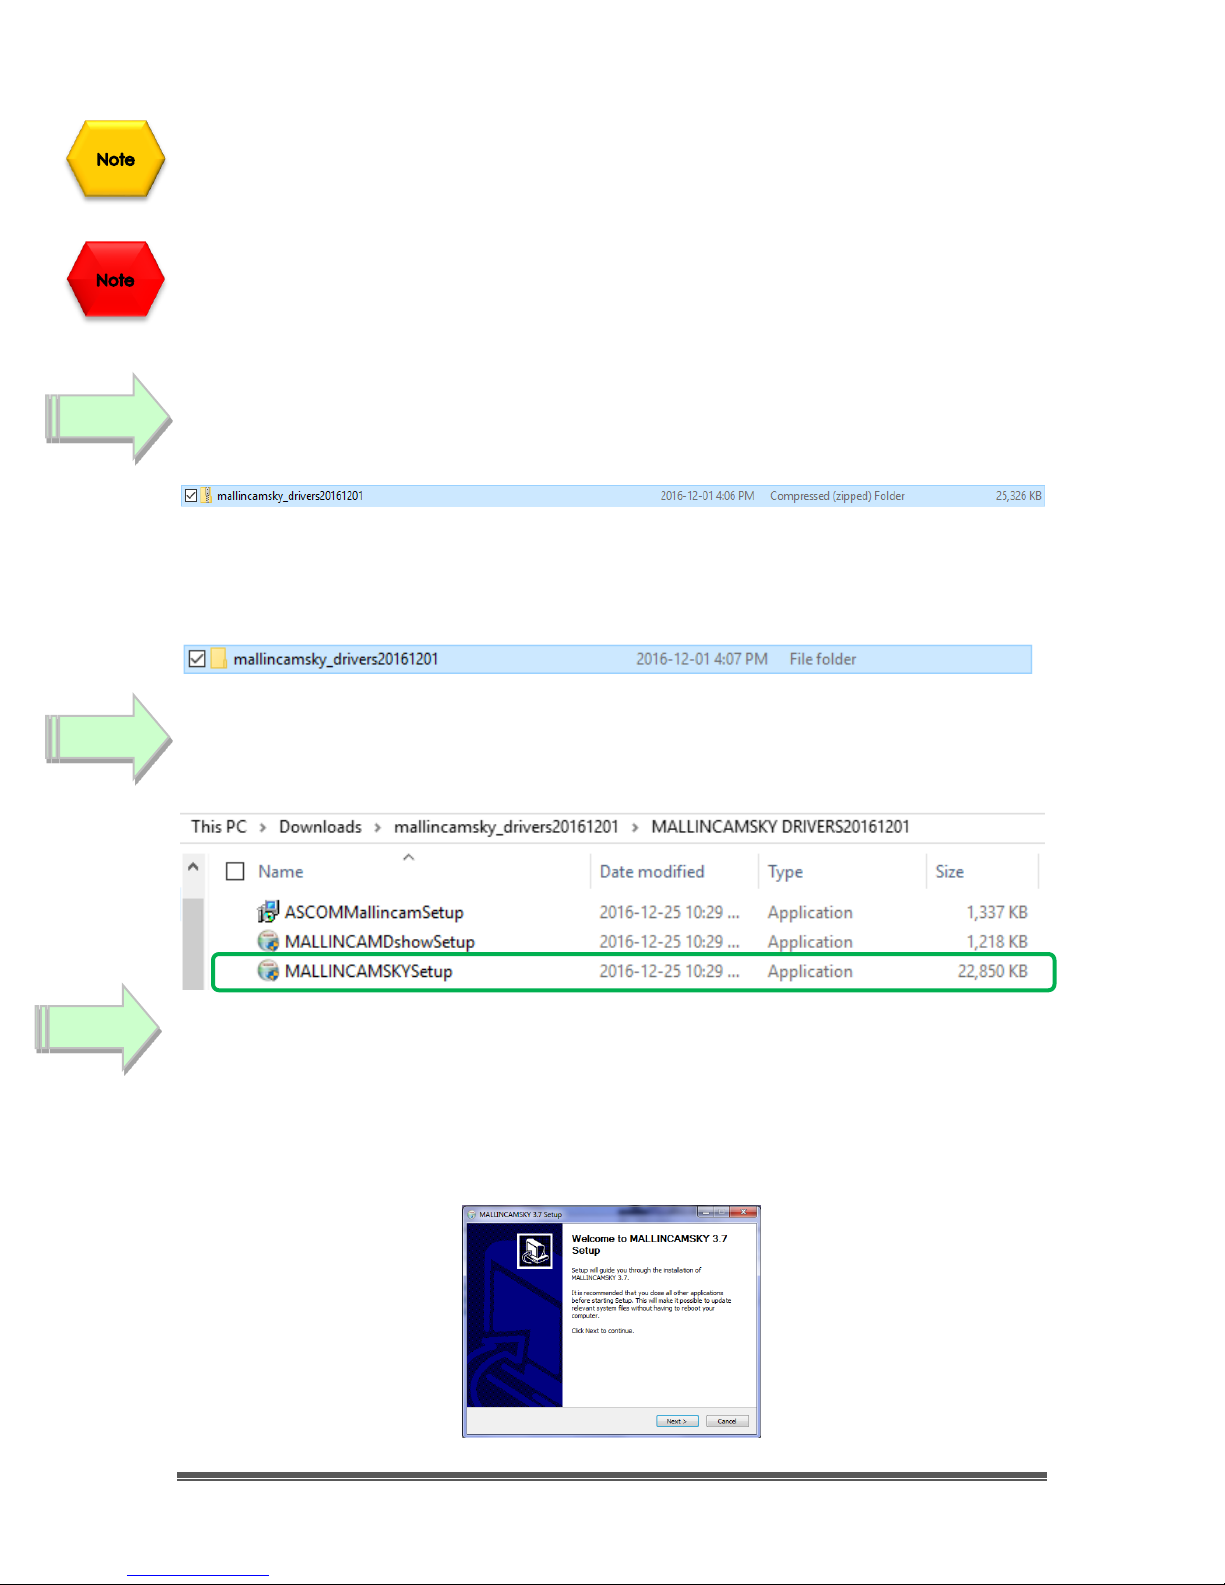
Place your mouse on the zipped file, Right-Click to pop-up an Action Window,
and choose Extract All …
A Select Destination and Extract Files Window will open-up. Just Click on the
Extract button to accept destination location. The Destination Folder will now
open-up the actual folder that contains the software to install.
Double-Click on the folder to open it up, revealing the MALLINCAMSKYSetup
program it contains.
Double-Click on the MALLINCAMSKYSetup File
Windows may display a warning asking for permission to run the program, if it
does, select YES.
The following MallincamSky Setup Screen will then appear:
Step 3
Step 4
Step 5
SkyRaider AG1.2C User Manual December 29, 2016
SkyRaider AG1.2C User Manual Page 10
Click on Next to start the installation process.
The installation program now wants to know where you would like to install the
software. Either choose your own location, or select the default.
Click on Install to proceed.
Windows may again ask for permission to install the device software.
Click on Install to accept.
The MallincamSky Software will take about a minute to be installed. When
completed, the following screen will appear:
Step 6
Step 7
Step 8
SkyRaider AG1.2C User Manual December 29, 2016
SkyRaider AG1.2C User Manual Page 11
Click on Finish, and the MallincamSky program will start-up and its window
appear on your screen.
Now you can plug in the SkyRaiderAG1.2C into your computer (see the next
Chapter called “Connecting the SkyRaider” for more details). It will take a
moment for Windows to attach the drivers to the port, then you are ready to start
imaging.
You can determine is MallincamSky recognizes the camera (and thus the drivers)
by noticing the SkyRaiderAG1.2C name in the Camera List Tab (see Chapter 3 for
detailed instructions).
Step 9
Hint
SkyRaider AG1.2C User Manual December 29, 2016
SkyRaider AG1.2C User Manual Page 12
3. Connecting the SkyRaider
Connecting the SkyRaider-AG1.2C to your Computer
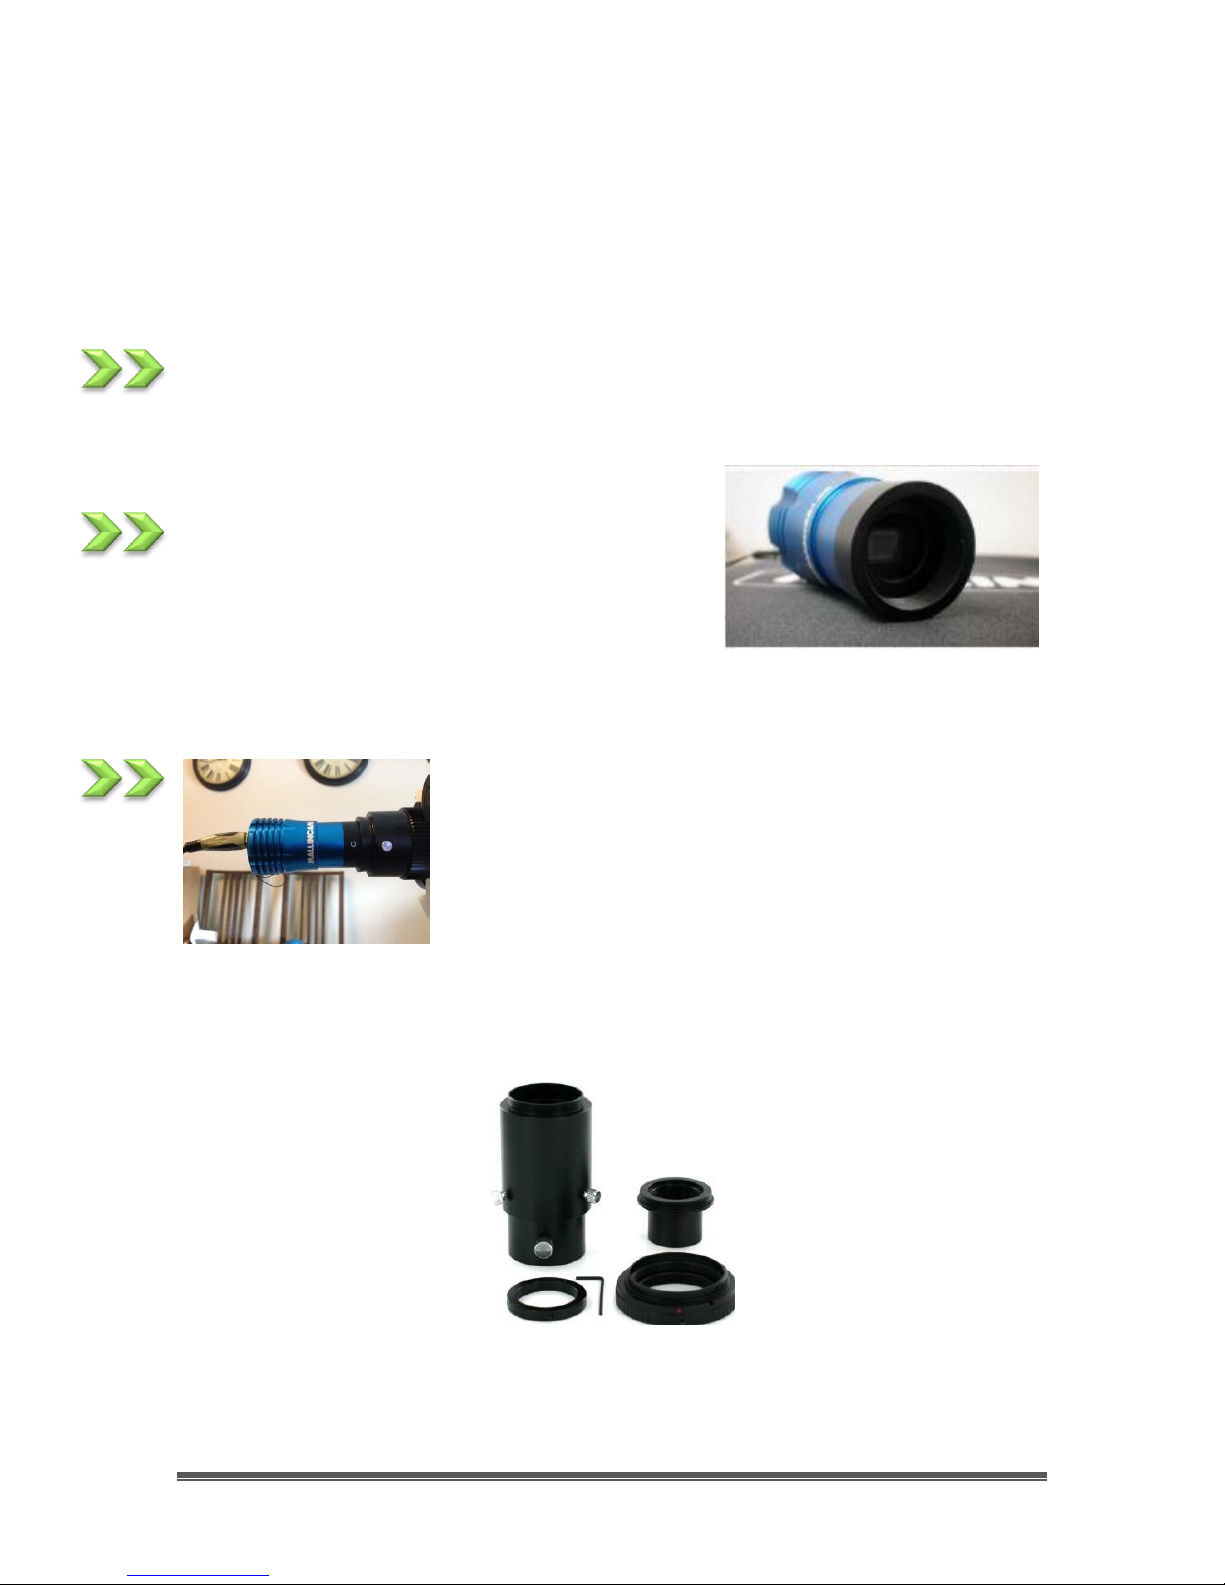
Remove the rubber dust cover from the front of the SkyRaider-AG1.2C camera
(place it back in the box for safe keeping).
Screw in any focal reducers (if using) to the 1.25”
adapter to the front of the SkyRaider-AG1.2C.
Insert the SkyRaider-AG1.2C (with adapter attached)
into the 1.25” eyepiece adapter on your Telescope.
Depending upon the telescope, you may need extenders so that you can reach
focus with your telescope. It is recommended that you set this up in the daytime
so you can see what you are doing (plus can aim at an easy to find tree or
telephone pole).
SkyRaider AG1.2C User Manual December 29, 2016
SkyRaider AG1.2C User Manual Page 13
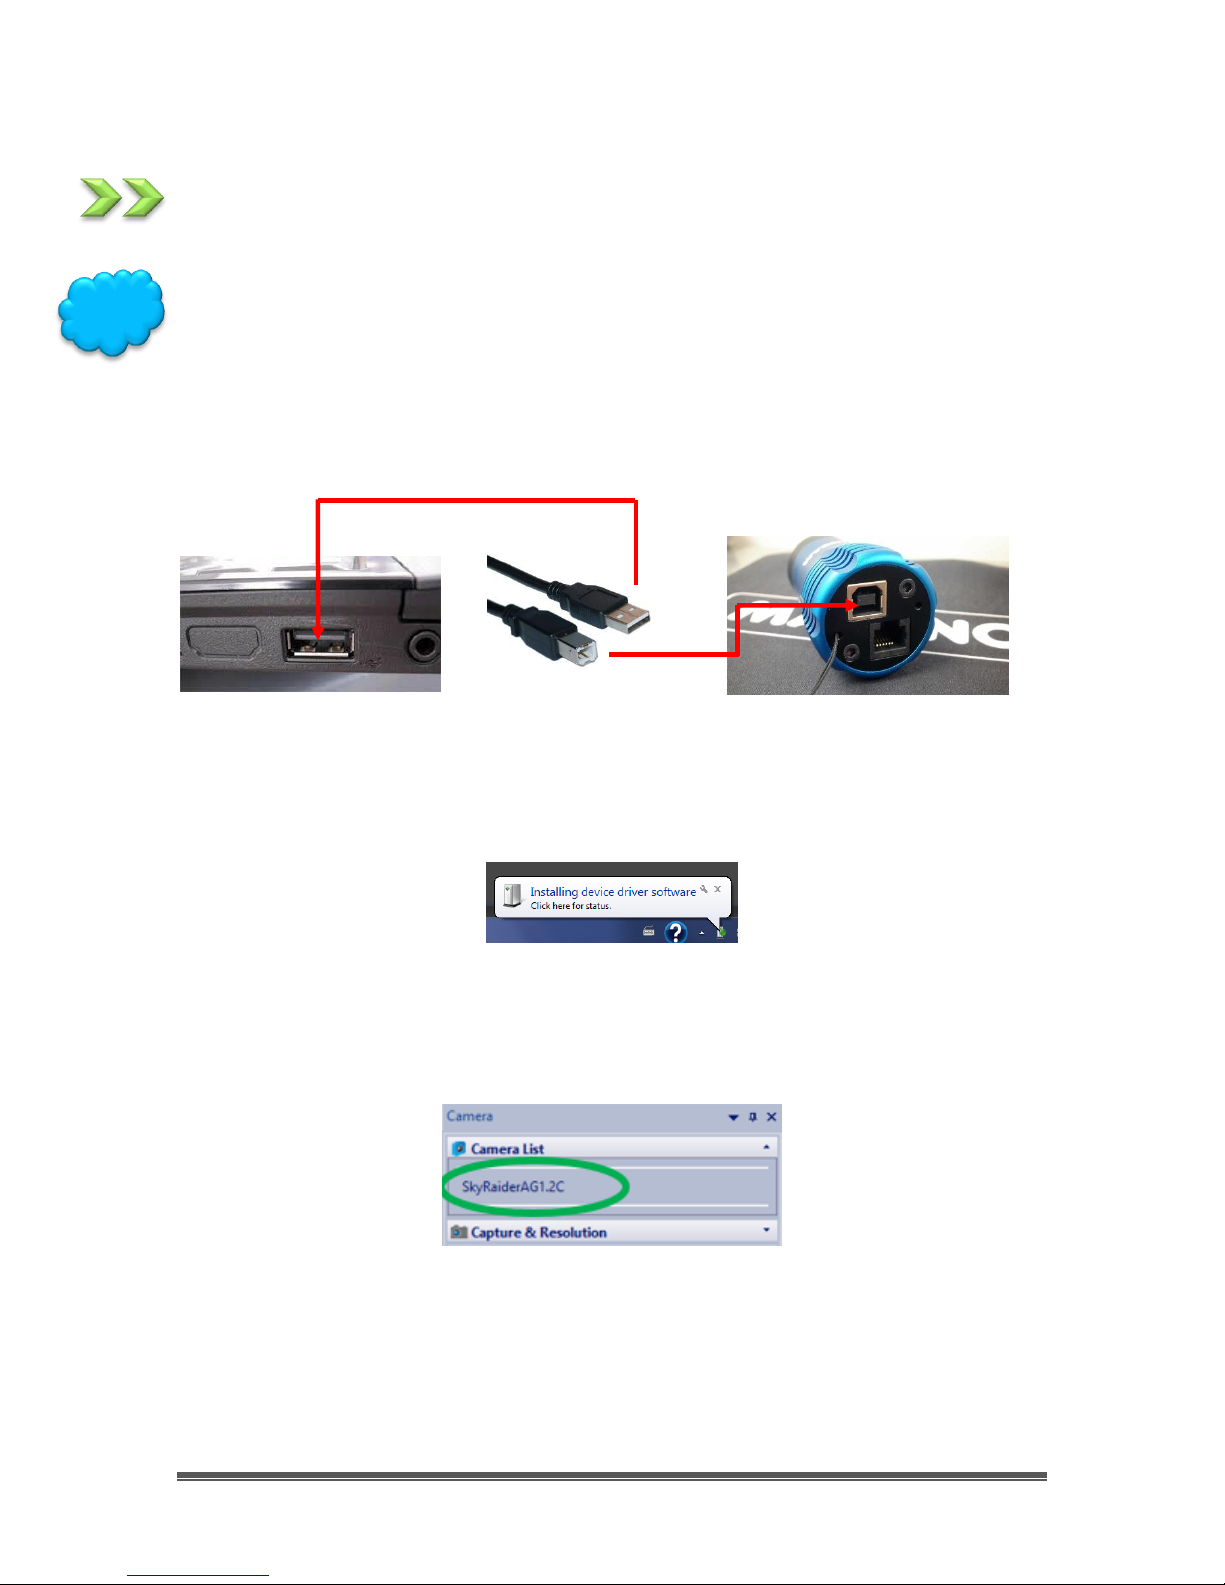
Attach the 5 meter USB 2.0 Cable from the back of the SkyRaider AG1.2C to a
free USB 2.0 port on your computer.
The SkyRaider AG1.2C has some strict power and thru-put requirements, and not
all computers are created equal. If you find you are having difficulties with the
following steps, it maybe the USB 2.0 port on your computer. If that is the case,
one option to try is; connected a Powered USB 2.0 Hub to your USB 2.0 port on
your computer. This simple step, can improve, both thru-put, power and distance
between your computer and the SkyRaider AG1.2C camera.
Windows will then automatically load the correct SkyRaider Camera Driver onto
your computer.
Once the driver has been successfully loaded, you will see the name of the
SkyRaiderAG1.2C Camera in the MallincamSky Camera List on the upper left of
the Window. You can install more than one SkyRaider Camera to your computer,
but the software can only control one SkyRaider Camera at a time.
Hint
SkyRaider AG1.2C User Manual December 29, 2016
SkyRaider AG1.2C User Manual Page 14
Connecting the AutoGuider Cable to the SkyRaiderAG1.2C
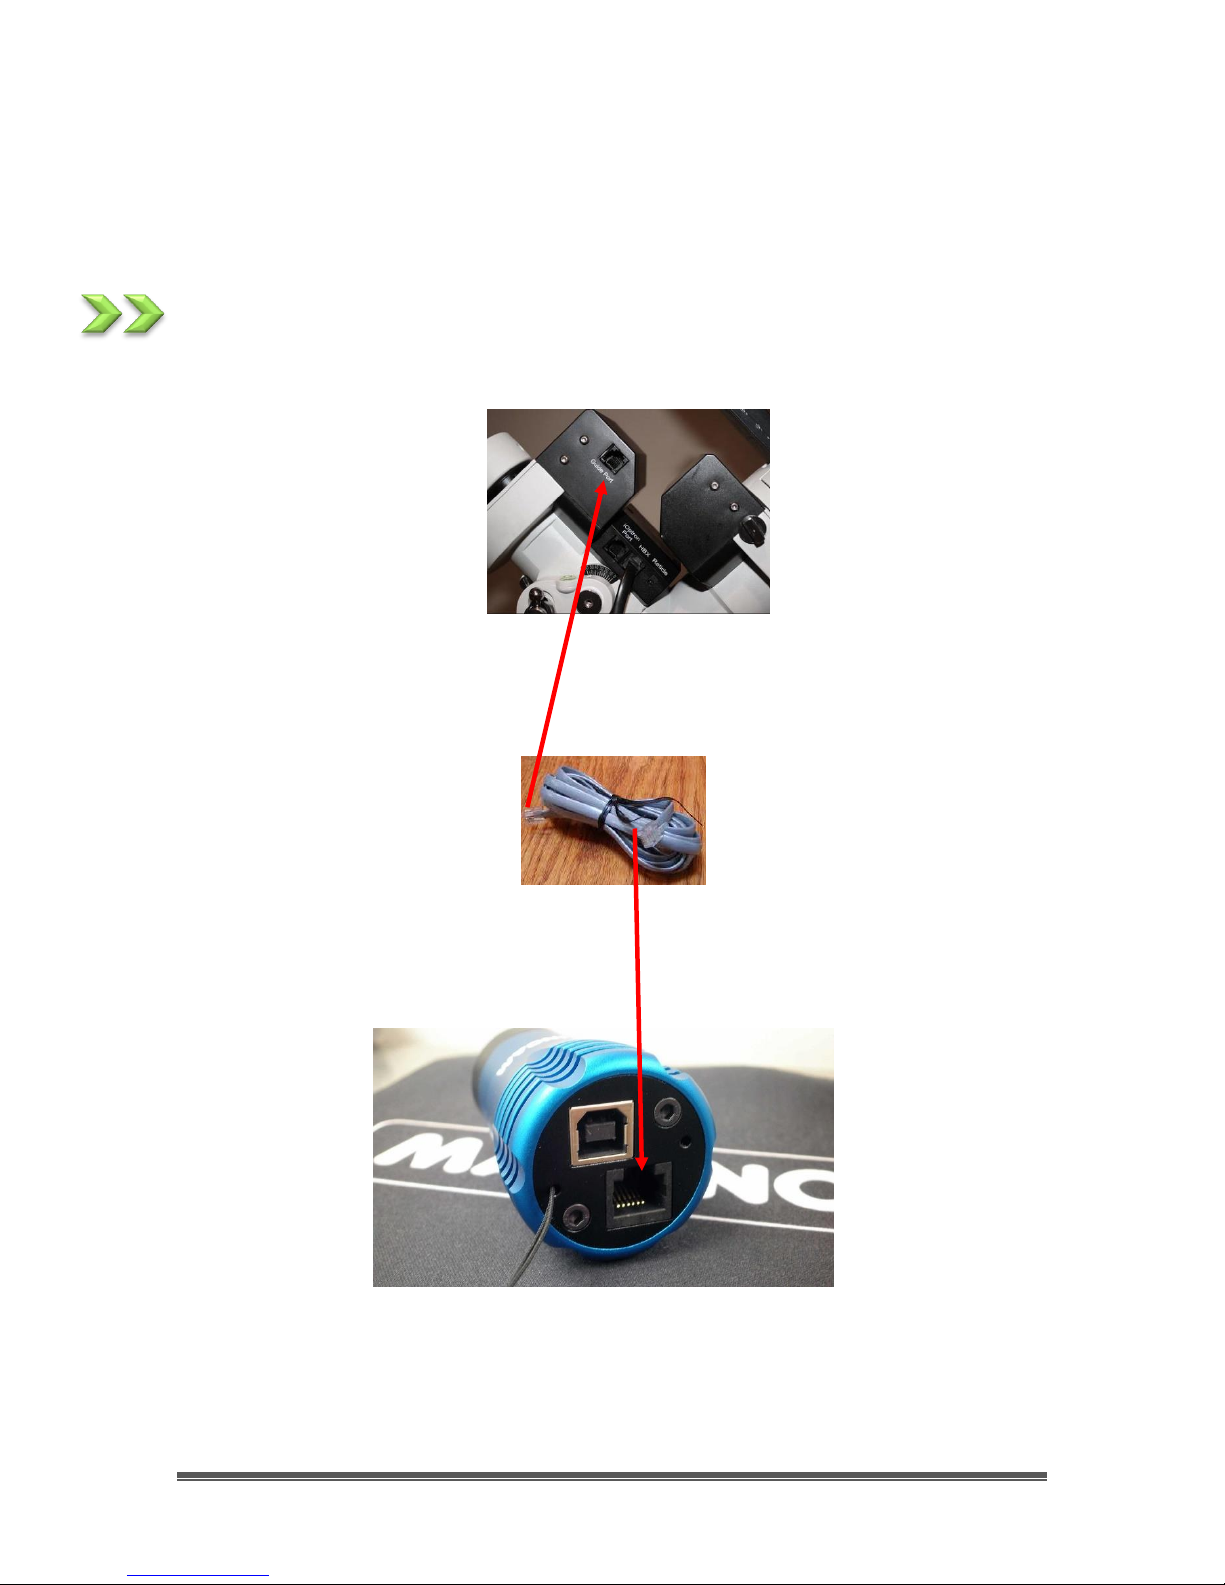
If you are going to use your SkyRaider AG1.2C as an Autoguider, then you will
need to attach the provided ST4 cable.
Attach one end of the ST4 cable into the ST4 slot on the back of the SkyRaider-
AG1.2C, and the other end into the ST4 port on your Telescope Mount.
SkyRaider AG1.2C User Manual December 29, 2016
SkyRaider AG1.2C User Manual Page 15
4. Using MallincamSky Software
The MallincamSky Window
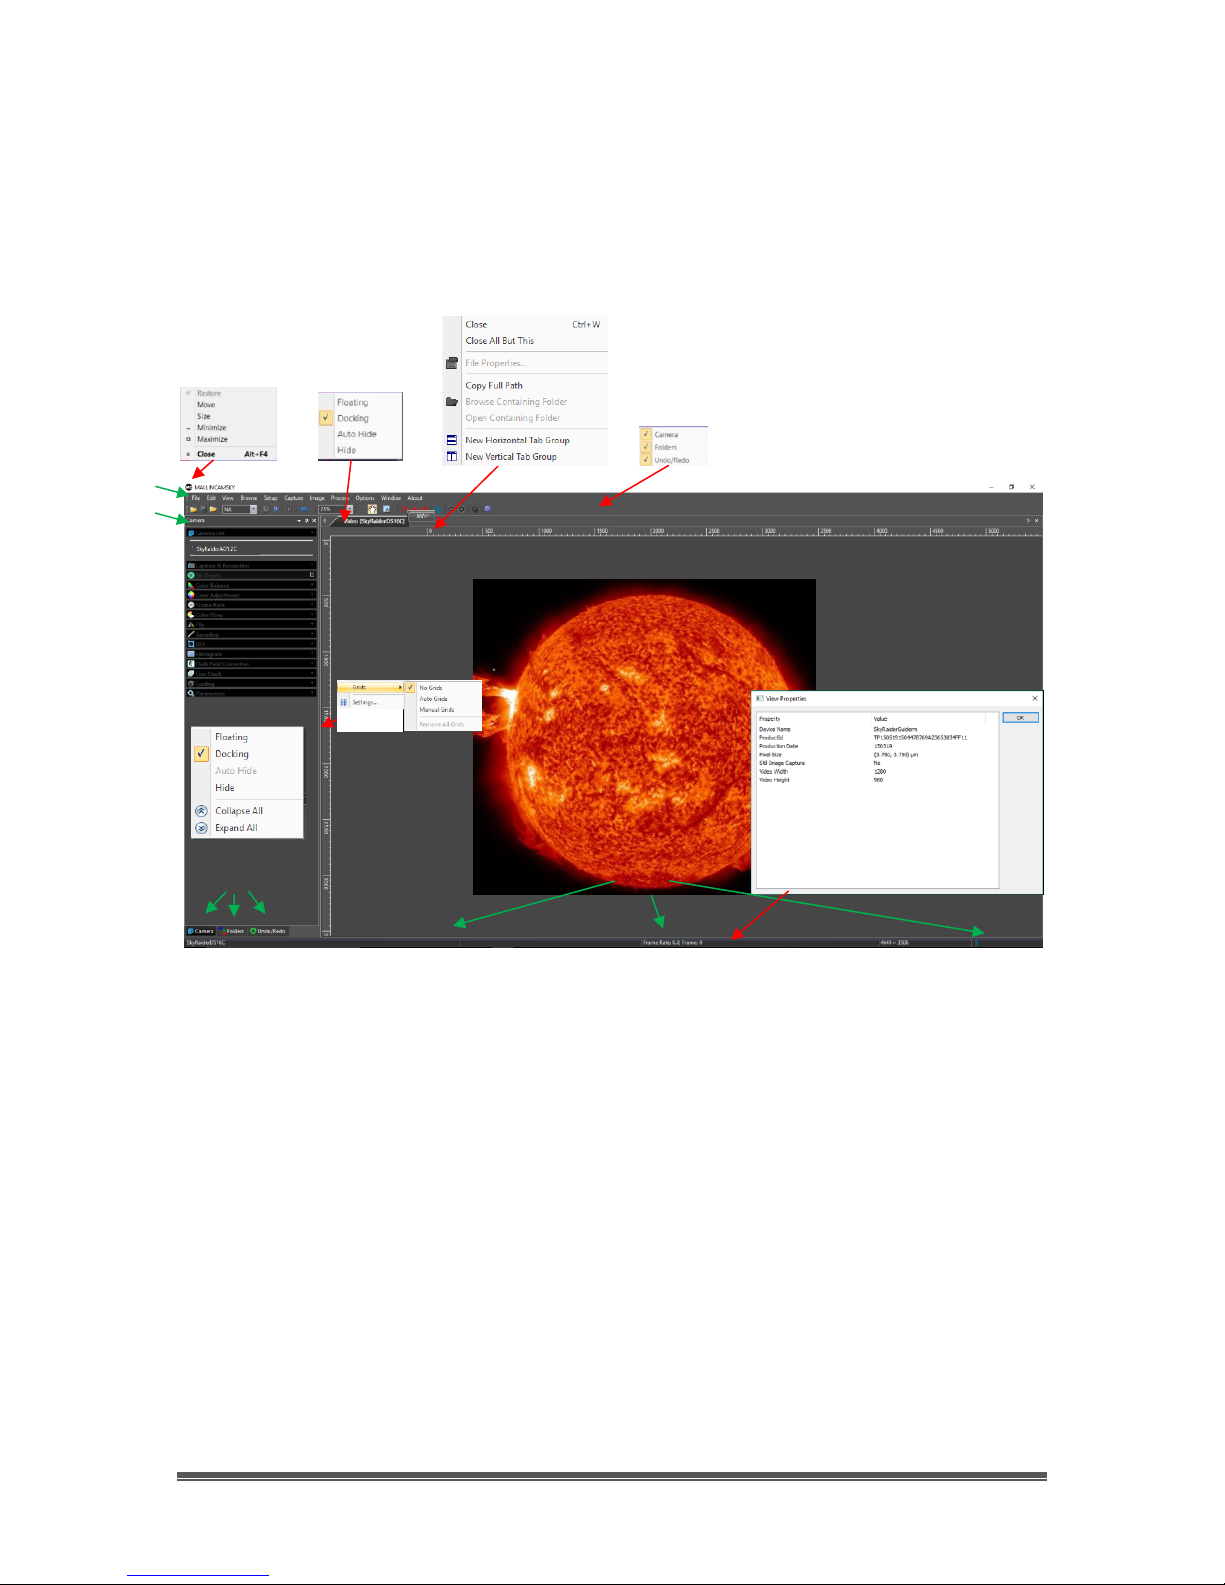
The MallincamSky Software Window is segmented into a few regions to make
viewing and adjusting the SkyRaider camera easy and intuitive.
① The Top Menu Line provides dropdown menus and icons to allow you to
make major settings of the software
② The MallincamSky Left SideBar provides the simple click activation and
selection capabilities to control all aspects of the image and camera.
③ The Left SideBar Base provides selection options for Camera, Folders, or Undo.
Left Clicking on the selection choice will fill the Left SideBar with its options.
④ The Video Window will contain the display image from the SkyRaider
Camera. It is here that you will see the live video, or images.
⑤ The Information Line will indicate the current camera, current frame rate,
number of frames displayed, resolution, information about captures, etc.
①
②
③
④
⑤

SkyRaider AG1.2C User Manual December 29, 2016
SkyRaider AG1.2C User Manual Page 16
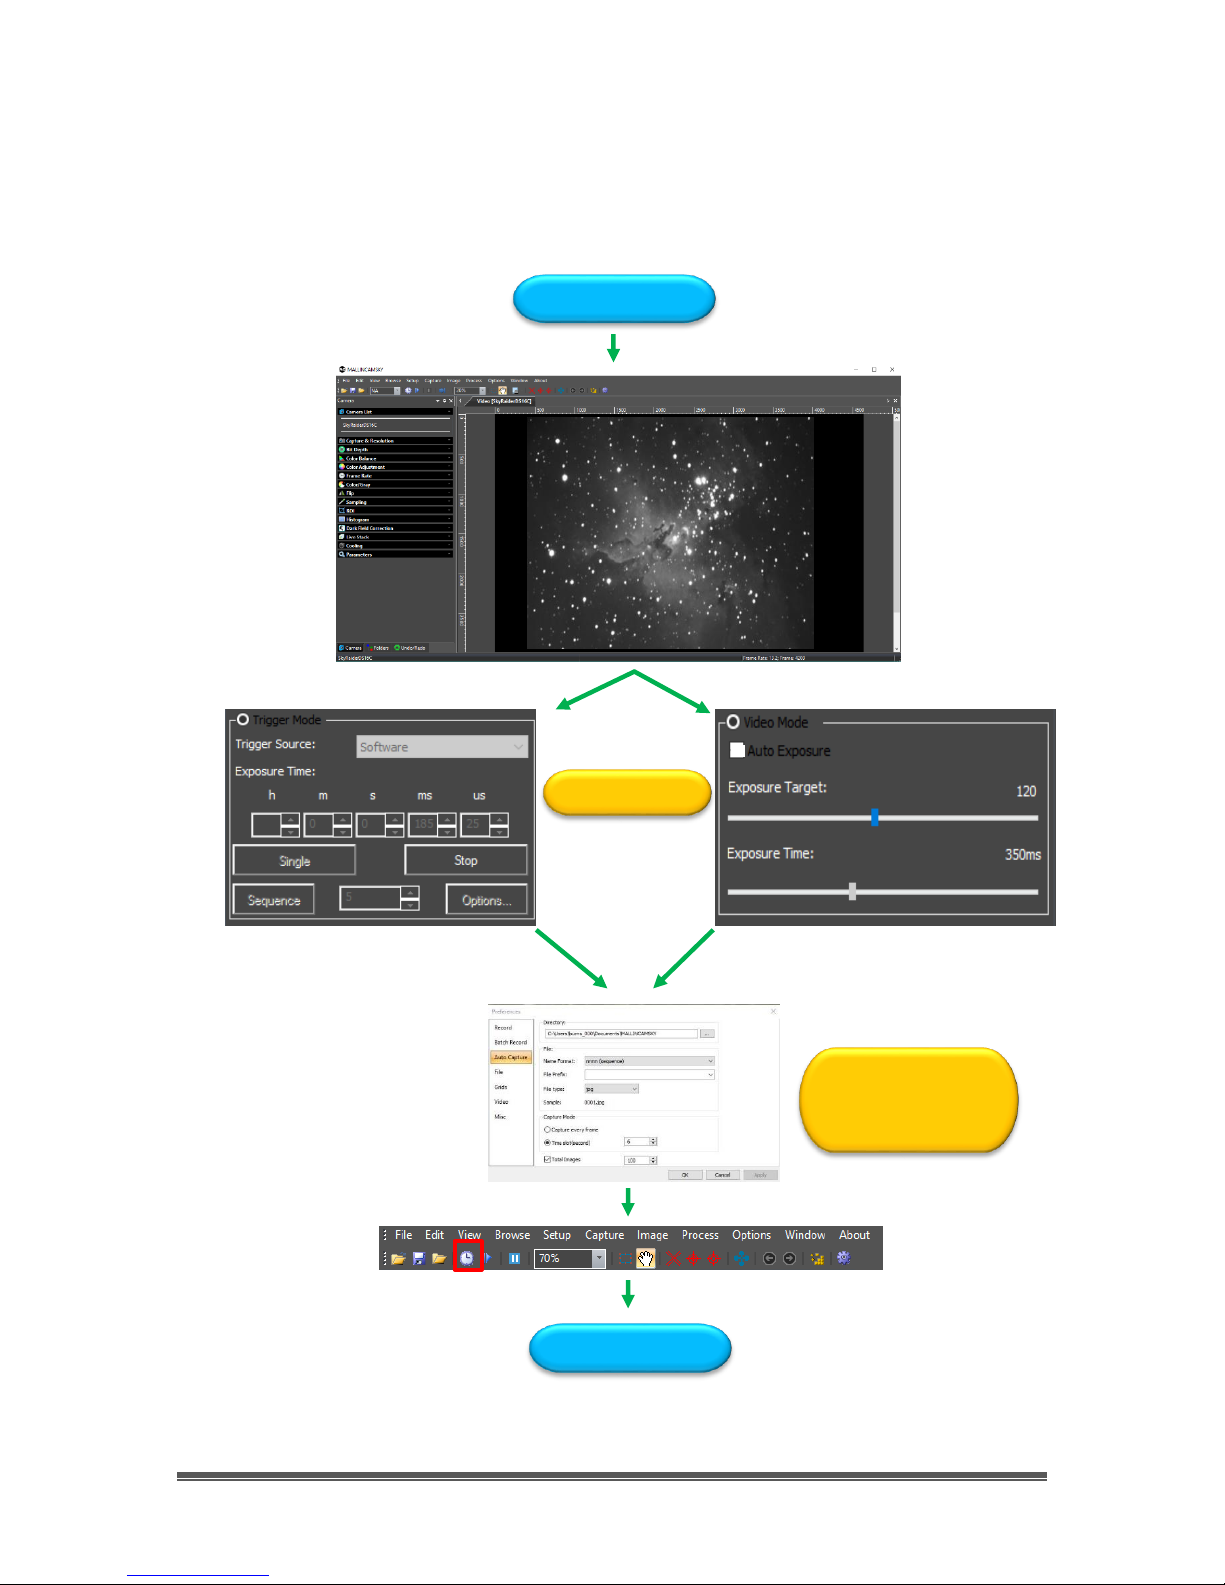
SkyRaider Quick Setup and Pictorial Work-Flow
A typical workflow when using the SkyRaider AG1.2C with MallincamSky.
Start Mallincam
Deep Sky Object
Planetary
Take Dark Field
Trigger Mode to Image
Activate Dark Field
Video Mode to Focus
Adjust Image
Save and Record
Exit Mallincam
Exit Mallincam
Save and Record
Adjust Image
Video Mode to Image
Live Stack
SkyRaider AG1.2C User Manual December 29, 2016
SkyRaider AG1.2C User Manual Page 17
Live Stack Pictorial Work-Flow
A typical workflow when Live-Stacking with MallincamSky.
Expose Object
Choose and Activate Video
Mode or Trigger Mode
Live Stack
Adjust Image
Save and Record
Choose type of Stacking
SkyRaider AG1.2C User Manual December 29, 2016
SkyRaider AG1.2C User Manual Page 18
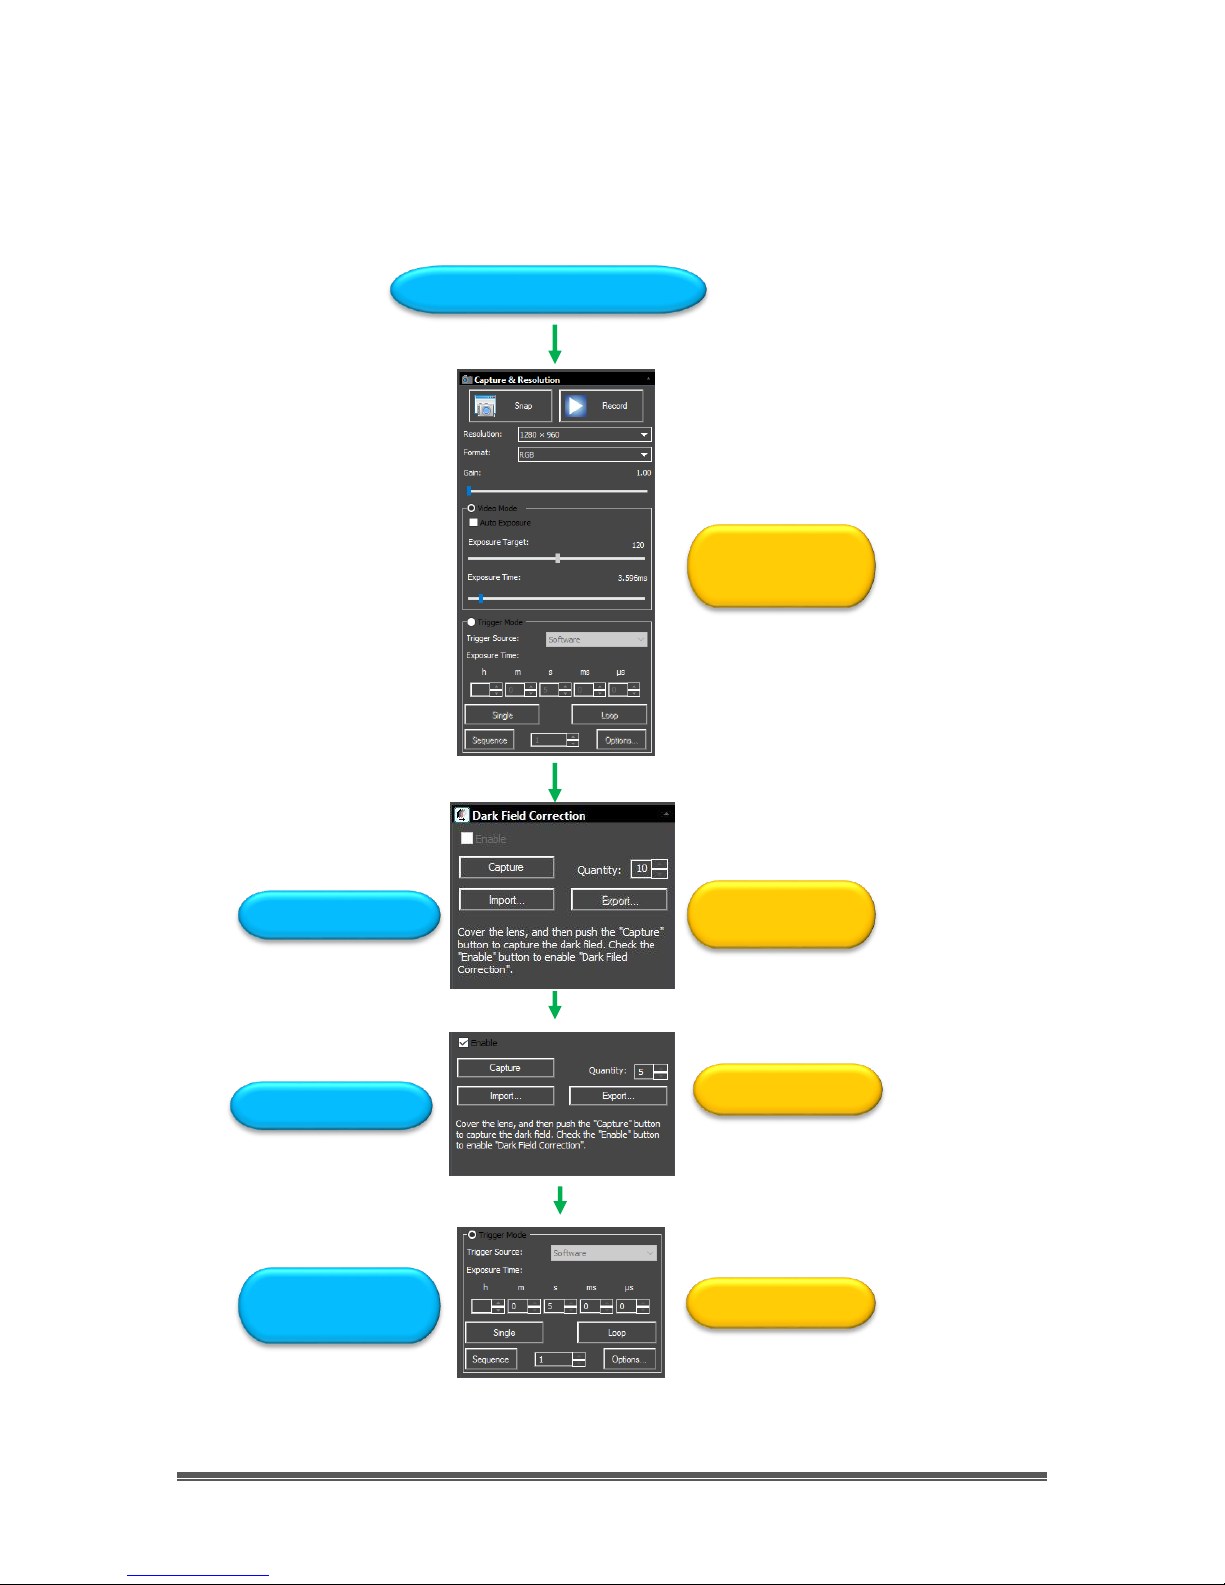
Dark Field Pictorial Work-Flow
A typical workflow when taking a Dark Field with MallincamSky.
Determine Maximum Exposure
Choose and Activate Video
Mode or Trigger Mode with
Maximum Exposure
Dark Field
Dark Field
Capture and
Choose Quantity and Click
Capture to Take
Check Enable Box
Capture images

SkyRaider AG1.2C User Manual December 29, 2016
SkyRaider AG1.2C User Manual Page 19
Histogram Pictorial Work-Flow
A typical workflow when using the Histogram Command with MallincamSky.
Expose Object
Increase Left number
or Move Left Bar in
Darkens
Increase Right number
or Move Right Bar in
Brightens
Select Histogram
Select Exposure
Decrease Exposure
Increase Exposure
Histogram Moves to
Left
Histogram Moves to
Right
SkyRaider AG1.2C User Manual December 29, 2016
SkyRaider AG1.2C User Manual Page 20
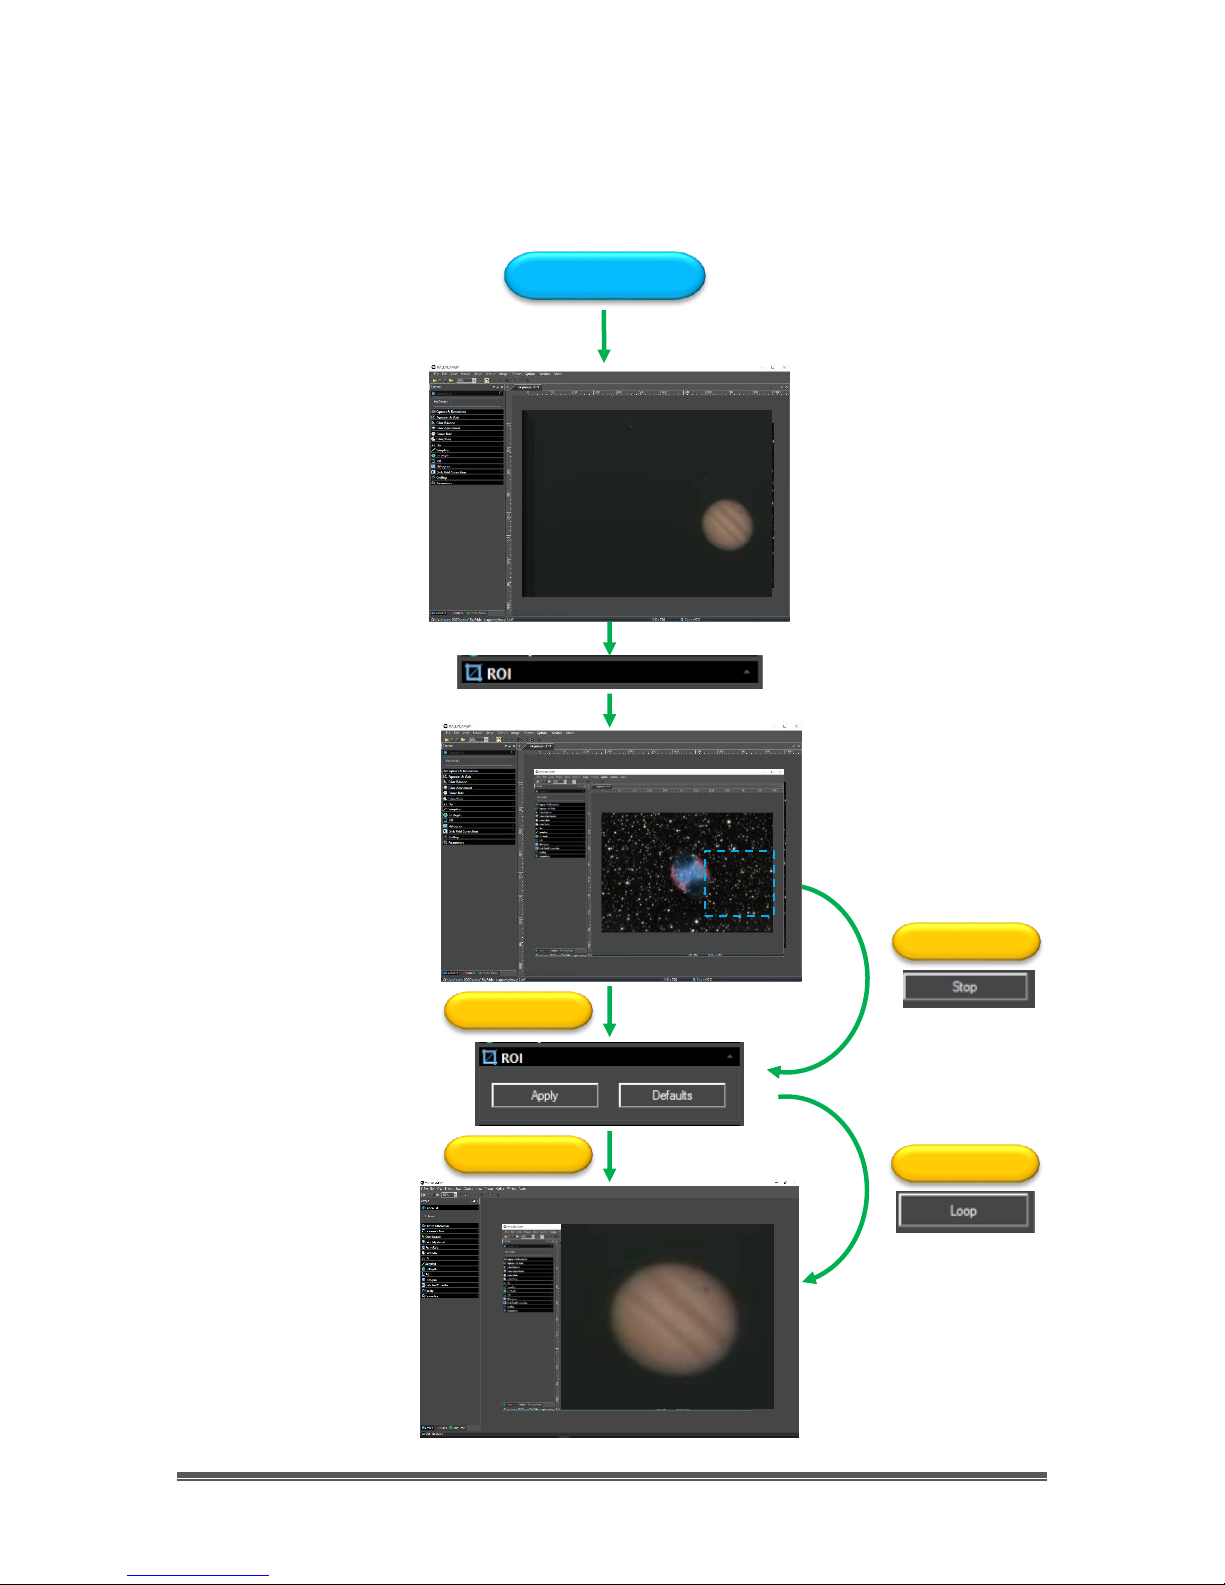
ROI Pictorial Work-Flow
A typical workflow when using the ROI Command with MallincamSky.
Expose Object
Trigger Mode
Trigger Mode
Video Mode
Video Mode
SkyRaider AG1.2C User Manual December 29, 2016
SkyRaider AG1.2C User Manual Page 21
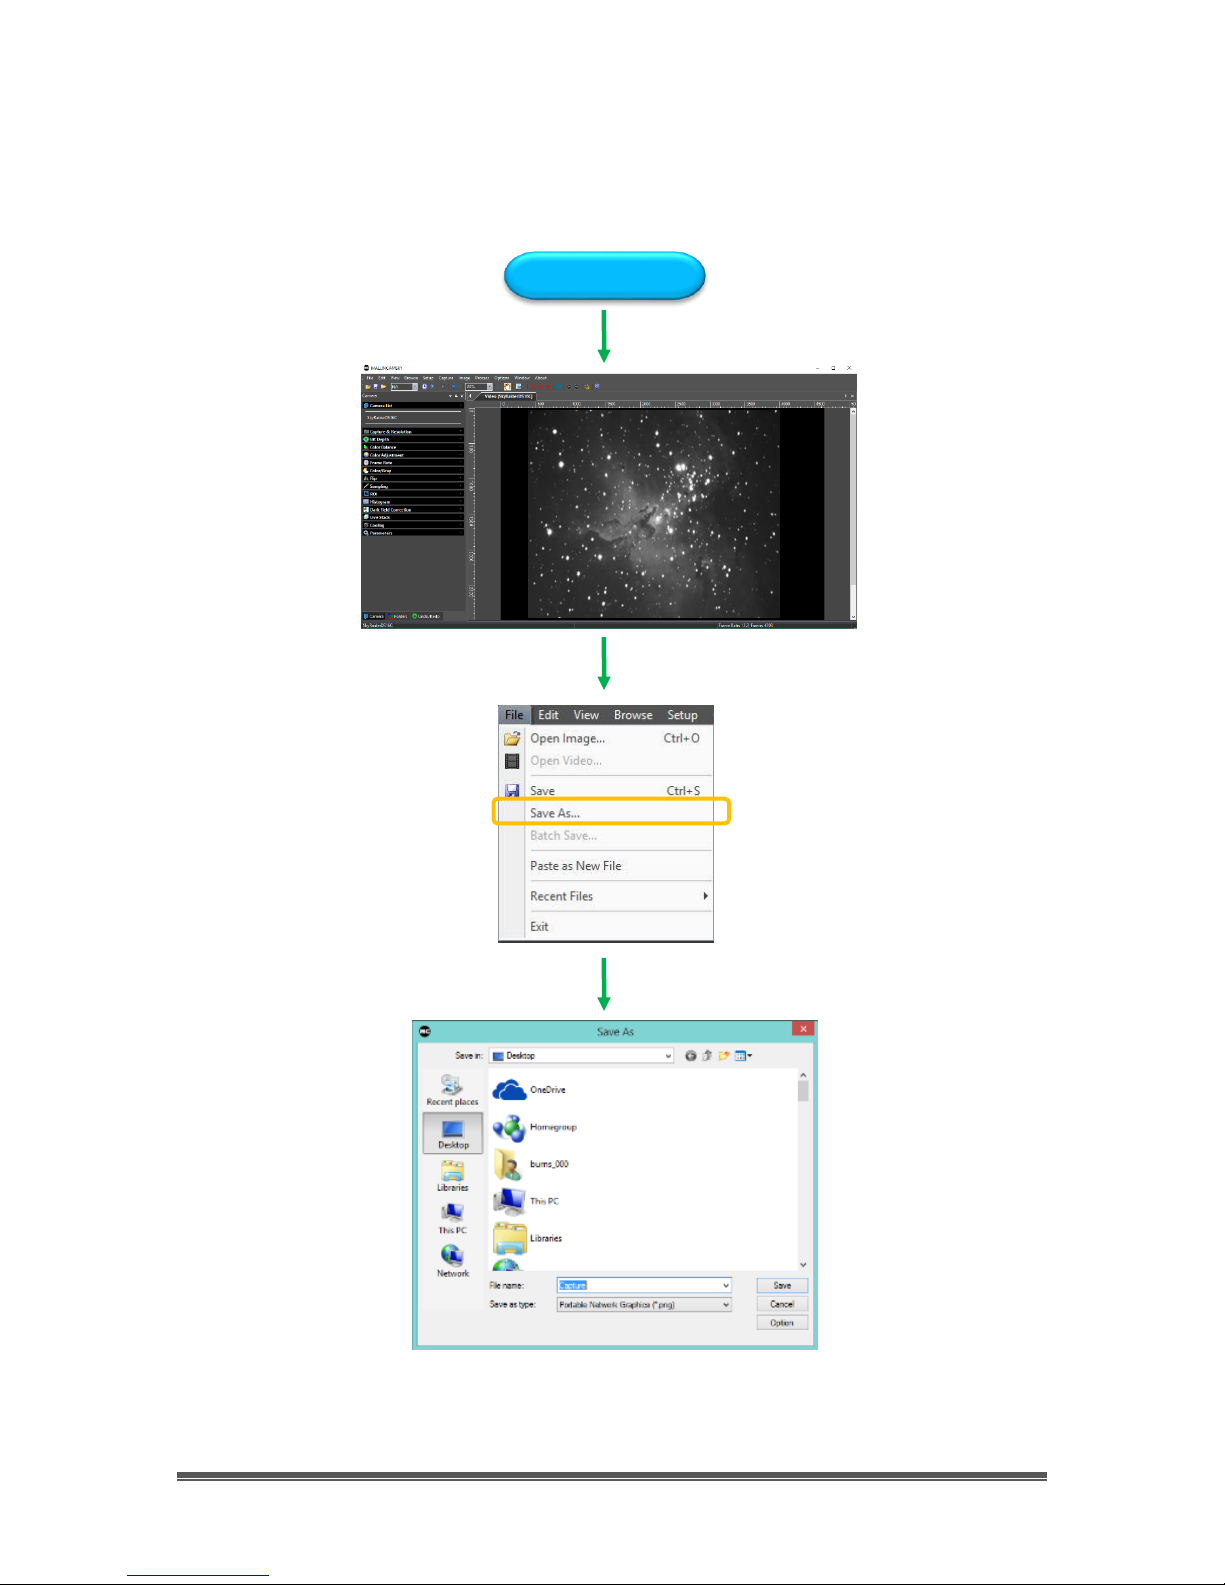
Save Image Pictorial Work-Flow
A typical workflow on how to Save an Image with MallincamSky.
Expose Object
SkyRaider AG1.2C User Manual December 29, 2016
SkyRaider AG1.2C User Manual Page 22
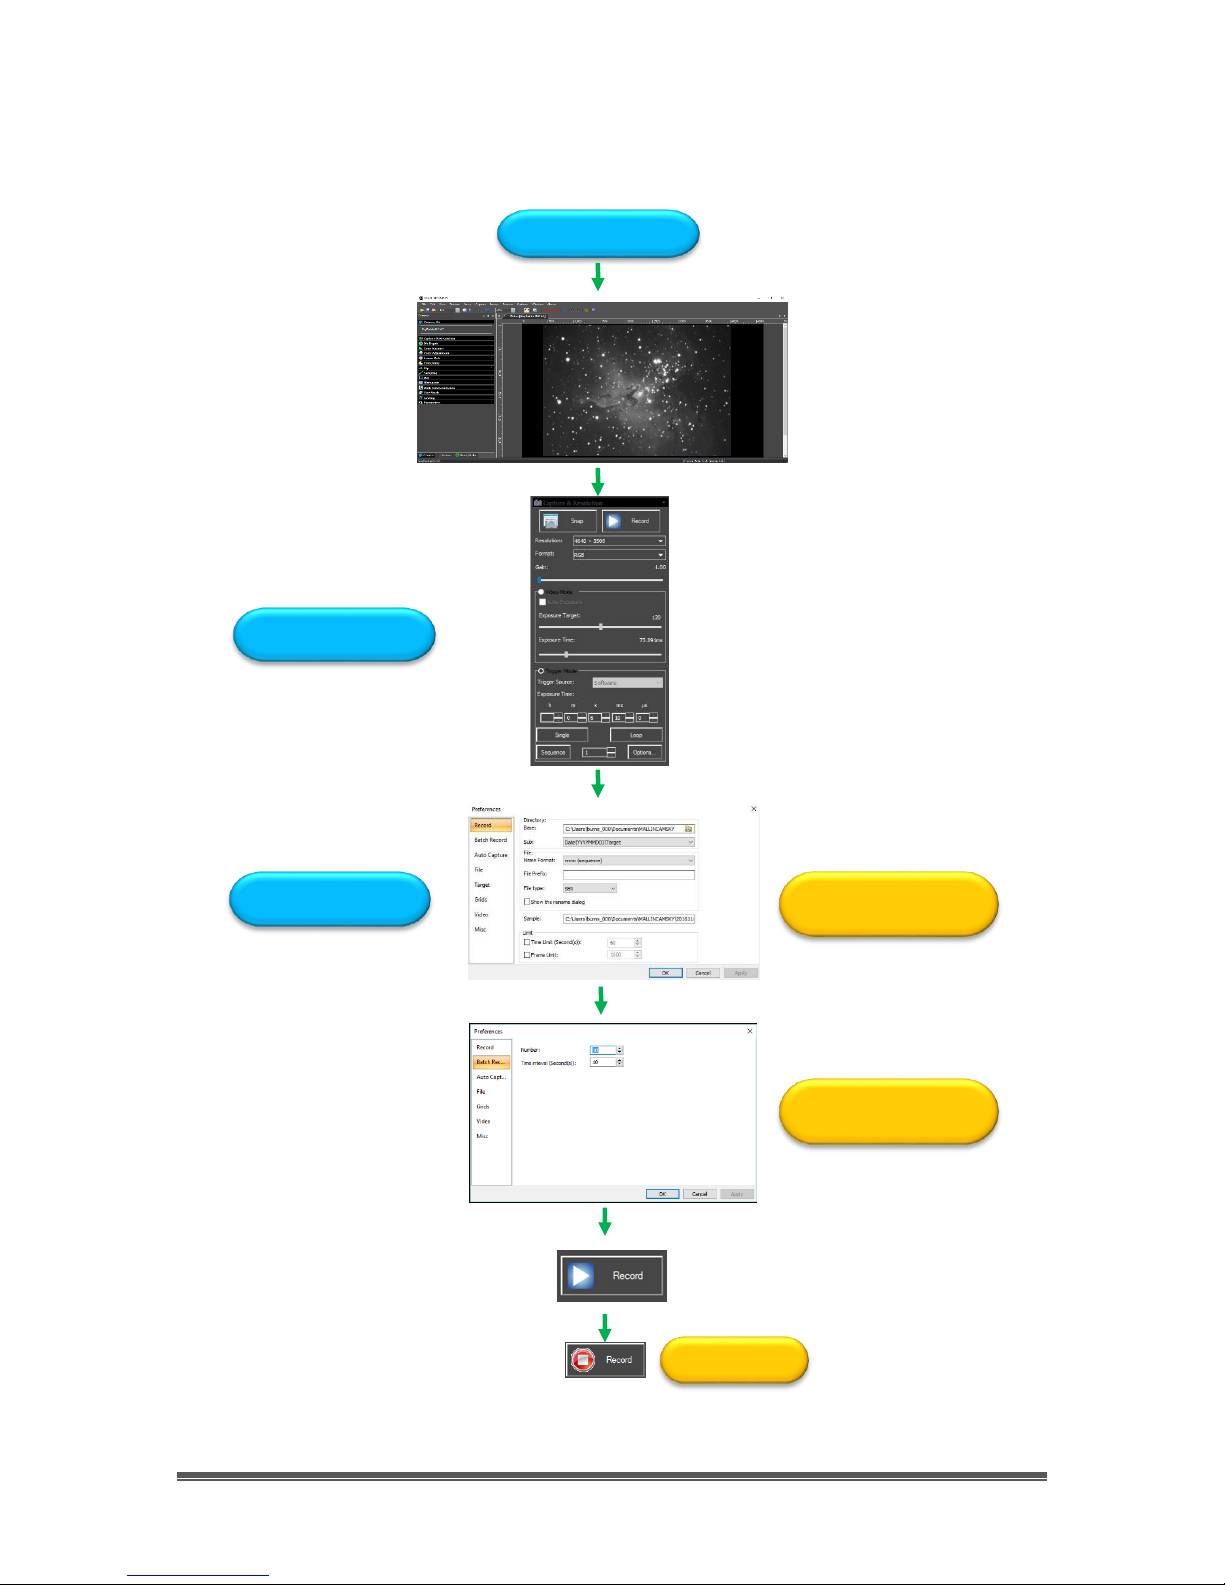
Record Video Pictorial Work-Flow
A typical workflow on how Record a Video with MallincamSky.
Expose Object
If No Time Limit Set
Enter File Location, Format,
Prefix, Type, Number of Seconds
Number of Videos, Time between
each Video
Video Mode to Image
Options->Preferences…

SkyRaider AG1.2C User Manual December 29, 2016
SkyRaider AG1.2C User Manual Page 23
Batch Record Pictorial Work-Flow
A typical workflow on how to Batch Record a series of Videos with a single Click.
Expose Object
Enter File Location, Format,
Prefix, Type, Number of Seconds
Number of Videos, Time between
each Video
Done
SkyRaider AG1.2C User Manual December 29, 2016
SkyRaider AG1.2C User Manual Page 24
Auto Capture Pictorial Work-Flow
A typical workflow on how to Auto Capture a series of Images with a single Click.
Expose Object
Enter File Location, Format,
Prefix, Type, Capture Mode,
Total number of Images from :
Options/Preferences
Done
Choose Exposure Time
SkyRaider AG1.2C User Manual December 29, 2016
SkyRaider AG1.2C User Manual Page 25
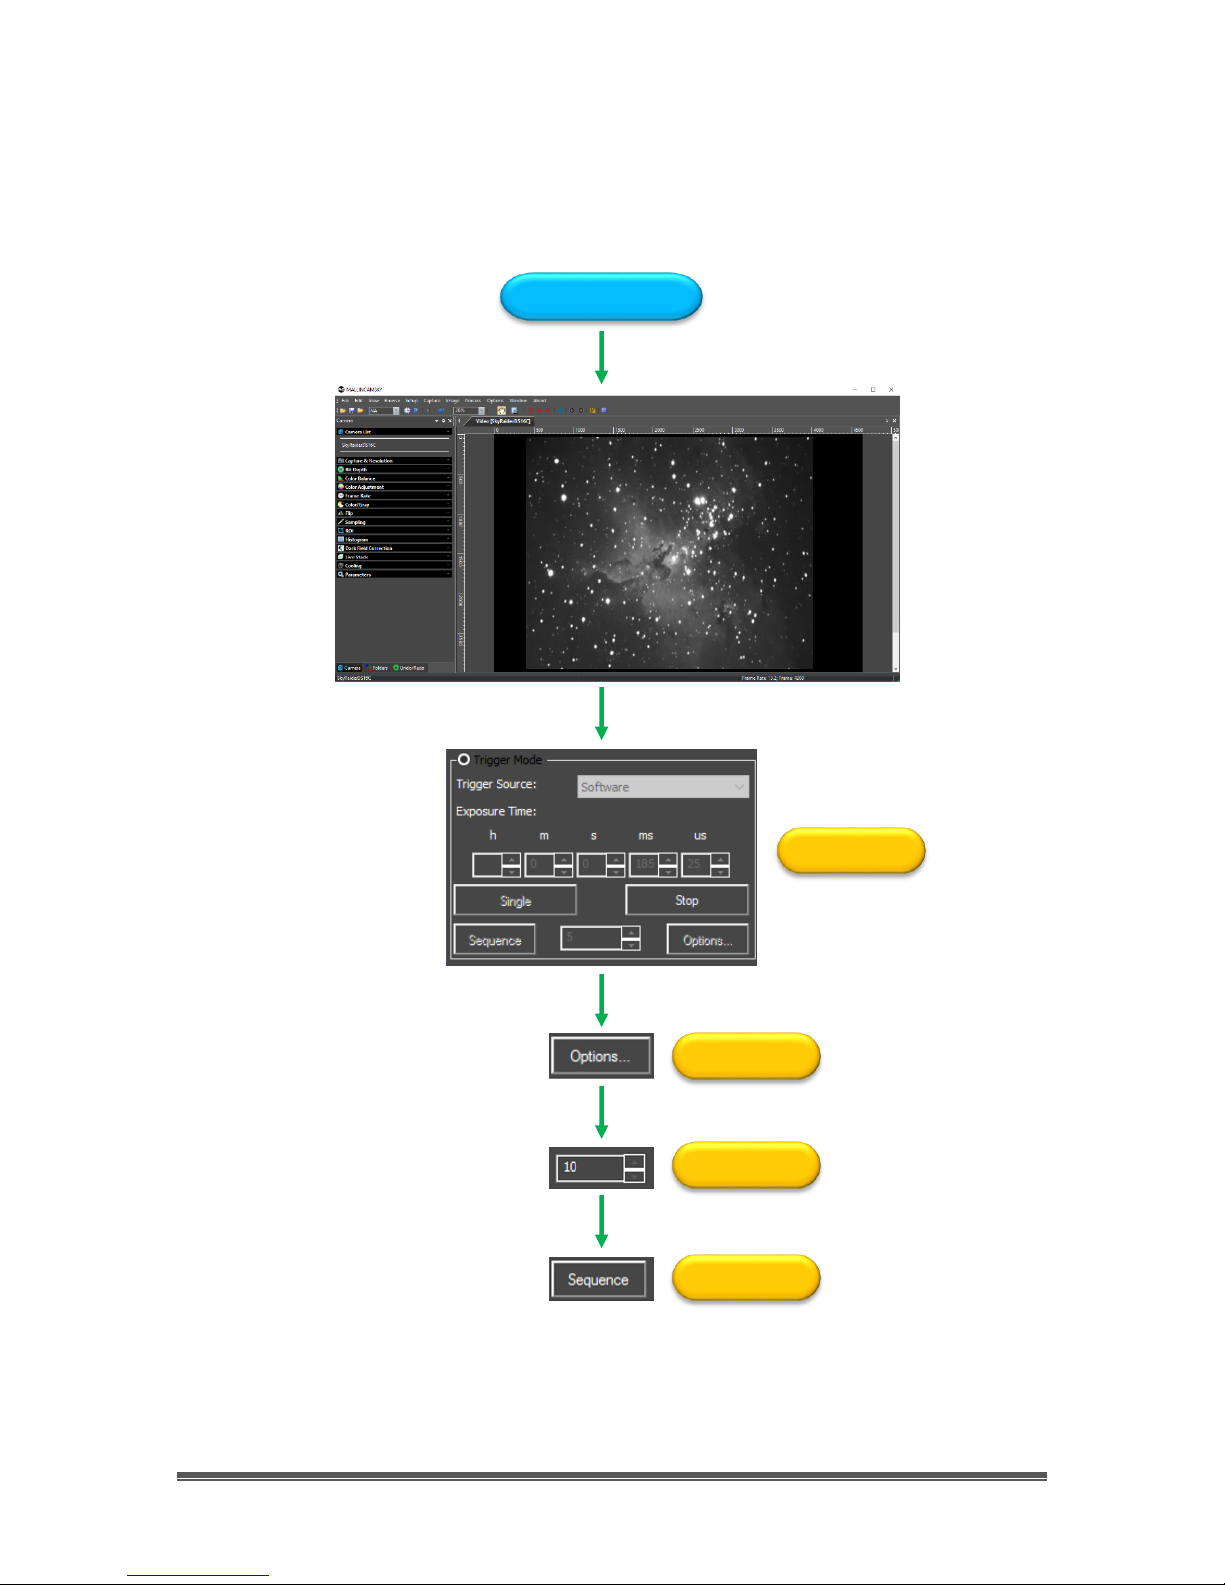
Save Sequence of Images Pictorial Work-Flow (Trigger Mode)
A typical workflow on an alternative method to Save a Sequence of Images with
the Sequence Command in Trigger Mode with MallincamSky.
Expose Object
Stop Looping
Choose Location
Select Number
Start Sequencing
SkyRaider AG1.2C User Manual December 29, 2016
SkyRaider AG1.2C User Manual Page 26
More Detailed Work-Flow Procedure
Quick Workflow for MallincamSky
So, you don’t like to read manuals, and you just want to just jump right into
imaging. Then this section gives you a Quick and Dirty method to get going.
Then, I follow this section with an even more detailed section on Planetary
Imaging Workflow, and finally a more detailed section on Workflow on Imaging
Deep Sky Objects.
The Mallincam SkyRaider AG1.2C Cameras provide a processing technique
called Dark Field Correction (see the Section Dark Field Explanation in the
Appendix for a complete description of Dark Field Correction).
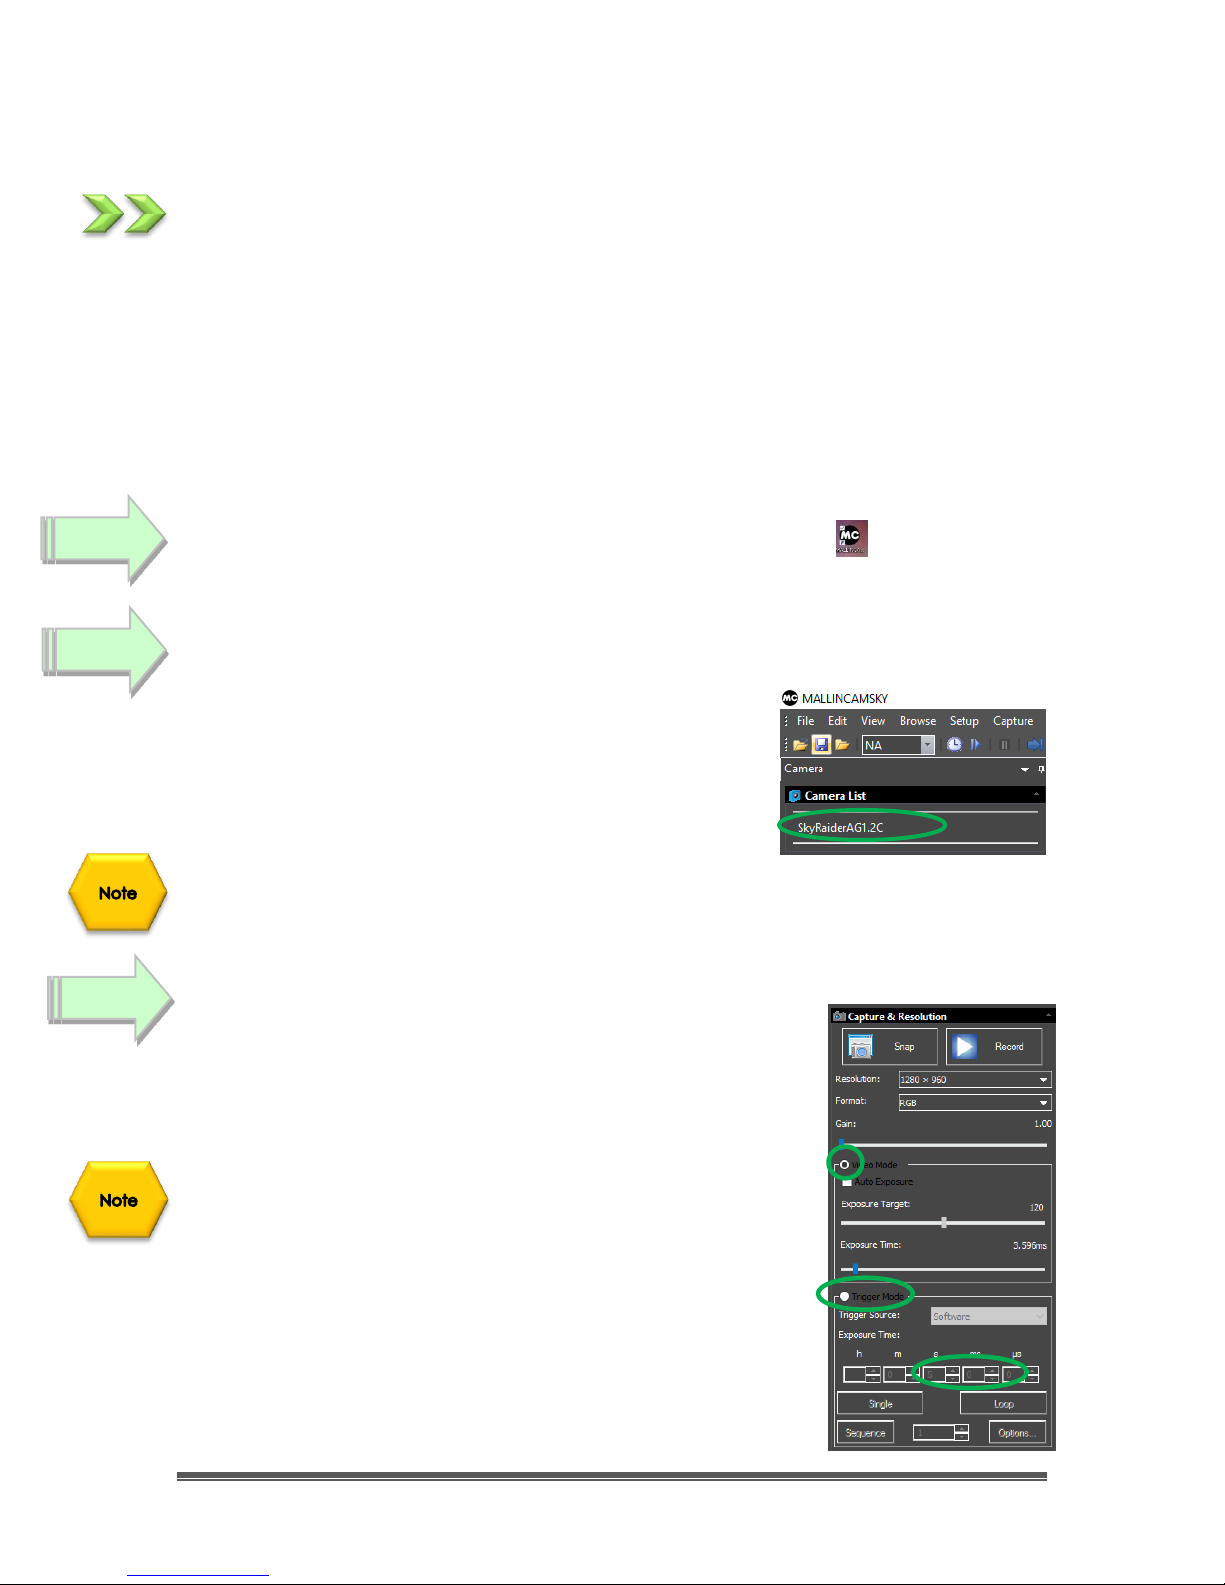
Double Click on the MallincamSky Icon to start the program.
Select the SkyRaiderAG1.2C from the Camera List in the Camera Tab.
With the Camera Tab selected on the Left SideBar,
Left-Click on the SkyRaiderAG1.2C (between lines in
Camera Heading). Once the SkyRaider is selected, a
black rectangle (with SkyRaider Camera name) will
appear in the Video Window of the MallincamSky
Software along with the Horizontal and Vertical Rulers.
If you are imaging planetary objects, jump to Step 6.
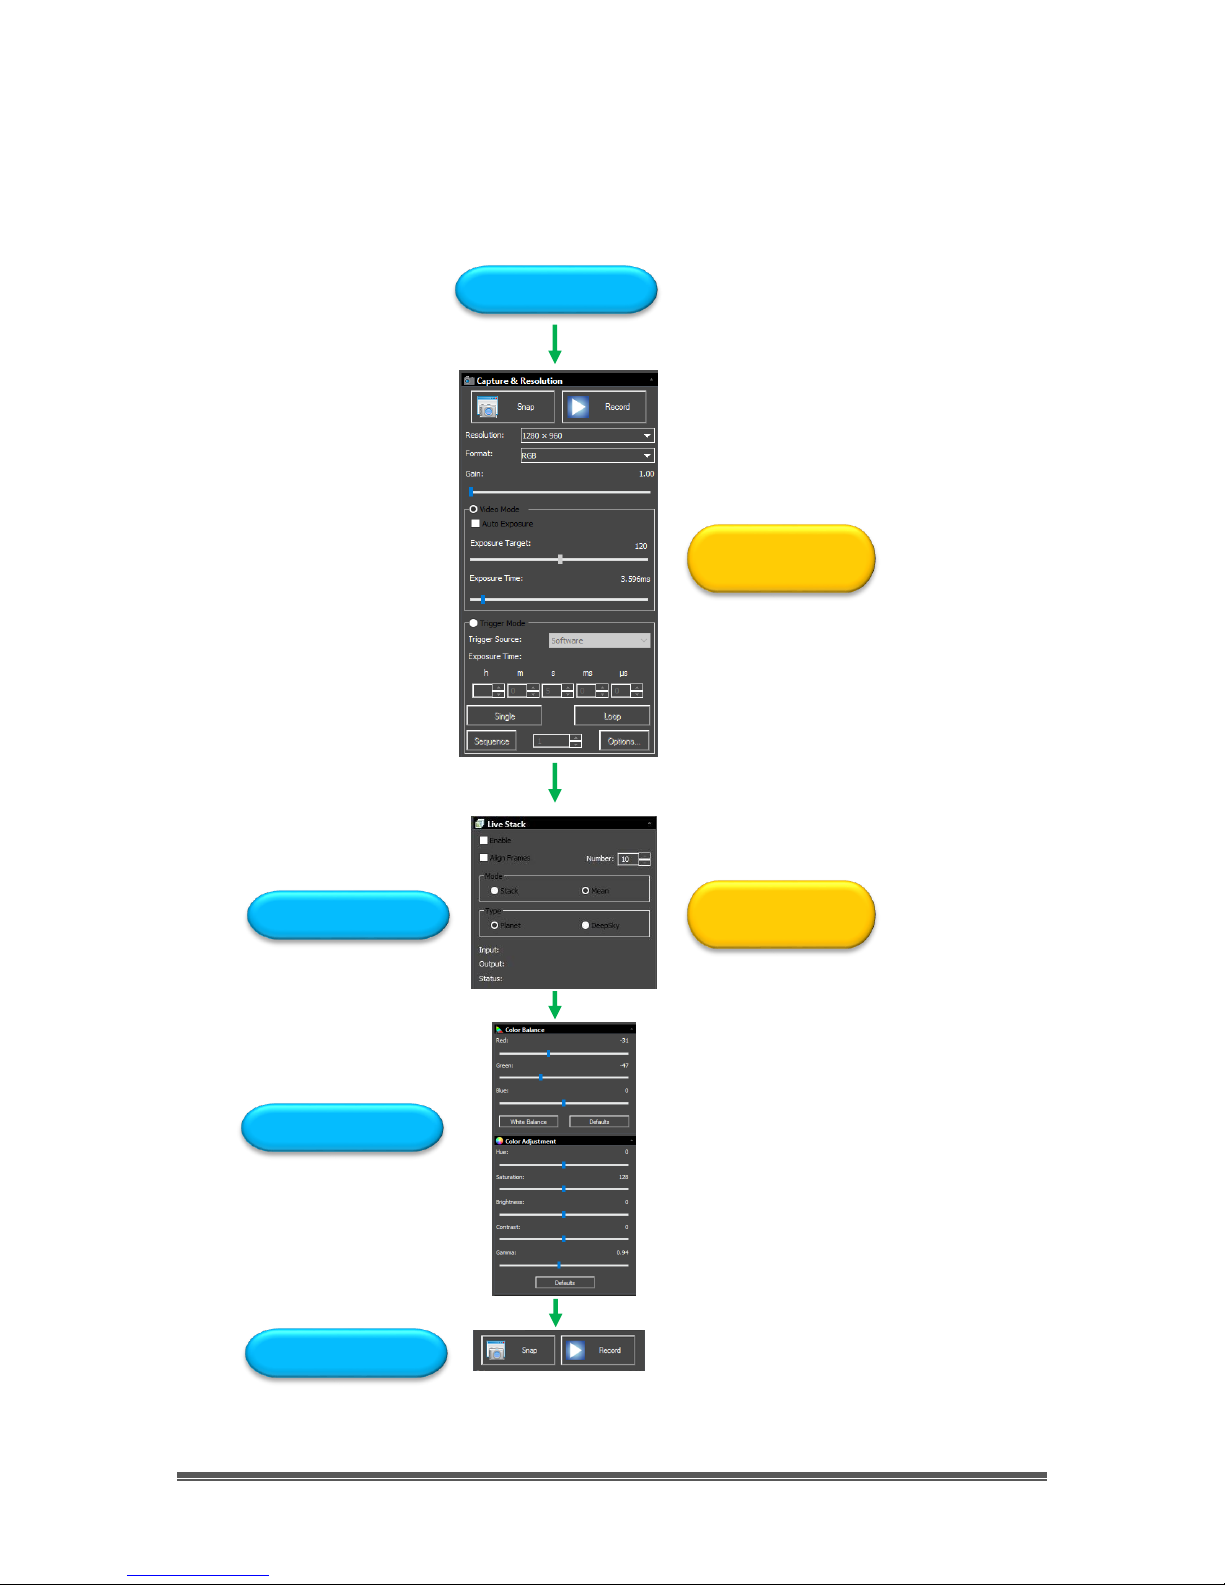
Select an Exposure Time for Dark Field Correction
With the Camera Tab selected on the Left SideBar, LeftClick on the Capture & Resolution. The Exposure & Gain
Window will expand select the exposure time for the Dark
Field.
You must determine what you believe will be the
maximum exposure for this session. As, you will create Dark
Field’s with this time (or close to it).
If you are taking a maximum exposure under 5s, then
select Video Mode, but since most Deep Sky Objects will
require an exposure of over 5s, choose Trigger Mode.
Either enter in the time into the appropriate boxes, or use
the up and down arrows beside the chosen Exposure time
unit to set your maximum time.
Step 3
Step 1
Step 2
SkyRaider AG1.2C User Manual December 29, 2016
SkyRaider AG1.2C User Manual Page 27
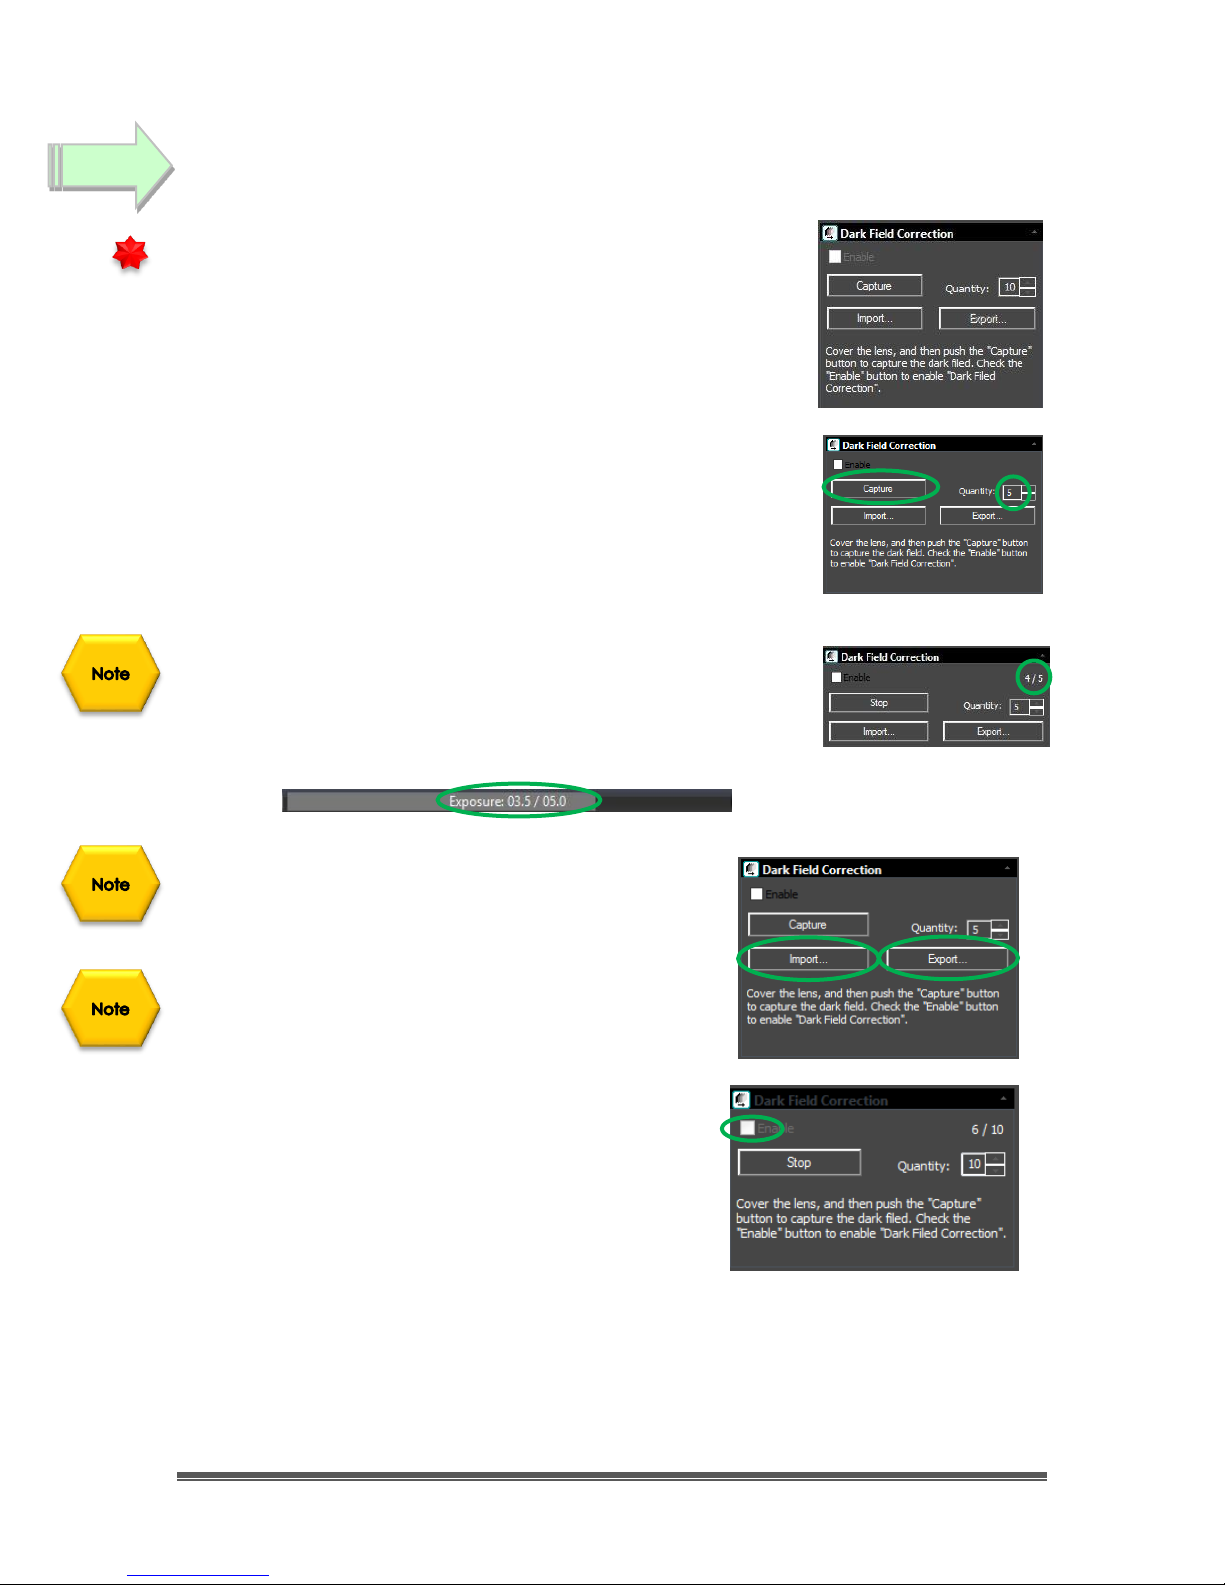
Take Dark Field Correction
Ensure that the Lens Cover is either on the SkyRaider
Camera or the Telescope itself is Covered (Cap is on),
then Left-Click on the Dark Field Correction Line.
The Dark Field Correction Line will open up allowing you to
select the Quantity of Dark Fields and the option to start
the Dark Field Capture process.
Select up to 99 for the Quantity (Start with 5 exposures to
get a feel of the process). Then Left-Click on the Capture
Button. The Software will display its progress above the
selected Quantity. Remember, it is beneficial to set the
Dark Field exposure time greater than the longest time you
will be imaging at, and try to match the gain settings you
will be using
As the Dark Fields are being exposed, you can watch the
exposure counter in the Dark Field Correction Tab go up,
and located on the bottom right side of the MallincamSky
window, you will see a counter letting you know how long
is left in that particular exposure.
Once the Dark Fields have been taken, you have
the option of saving (so you can use then again
on another night) them with the Export button in
the Dark Field Correction Tab.
You can import previously saved Dark Fields by
using the Import Button.
Now, Left-Click in the Enable check box in the
Dark Field Correction’s box to have Dark Fields
applied in real time to your images.
Step 4
SkyRaider AG1.2C User Manual December 29, 2016
SkyRaider AG1.2C User Manual Page 28
Reduce Exposure Time to Align Telescope
As you will most likely use the camera to align your Telescope, now is the time to
reduce the Exposure Time to 1 or 2 seconds, and if not already attached to the
Telescope, remove the lens cap from the SkyRaider Camera and insert the c-
mount on front end of the camera and slide camera into eyepiece holder of
telescope. The shorter exposure will make it easier for you to align and focus your
telescope.
Left-Click on the STOP button in the Trigger Mode screen, and now select Video
Mode. Move the slider (or enter the time) to some value less than 5 seconds
(note that the units are in milliseconds, so 1 second = 1000 ms), and align and
focus your telescope. In Video Mode, images are continuously taken.
Increase Exposure Time to Image
Now is the time to expose some Deep Sky Objects or Planetary Objects. So, go
back into Trigger Mode (if you are imaging Deep Sky Objects, else remain in
Video Mode if imaging Planetary Objects) and adjust the Exposure Time to
match the current target and the equipment you are using.
If you have enabled the Dark Field Corrections for this session (Dark Fields are
stored directly in the SkyRaider Camera and will be deleted when the camera is
turned off), the SkyRaider will automatically apply the best Dark Field Correction
to your image when Dark Field Correction is enabled.
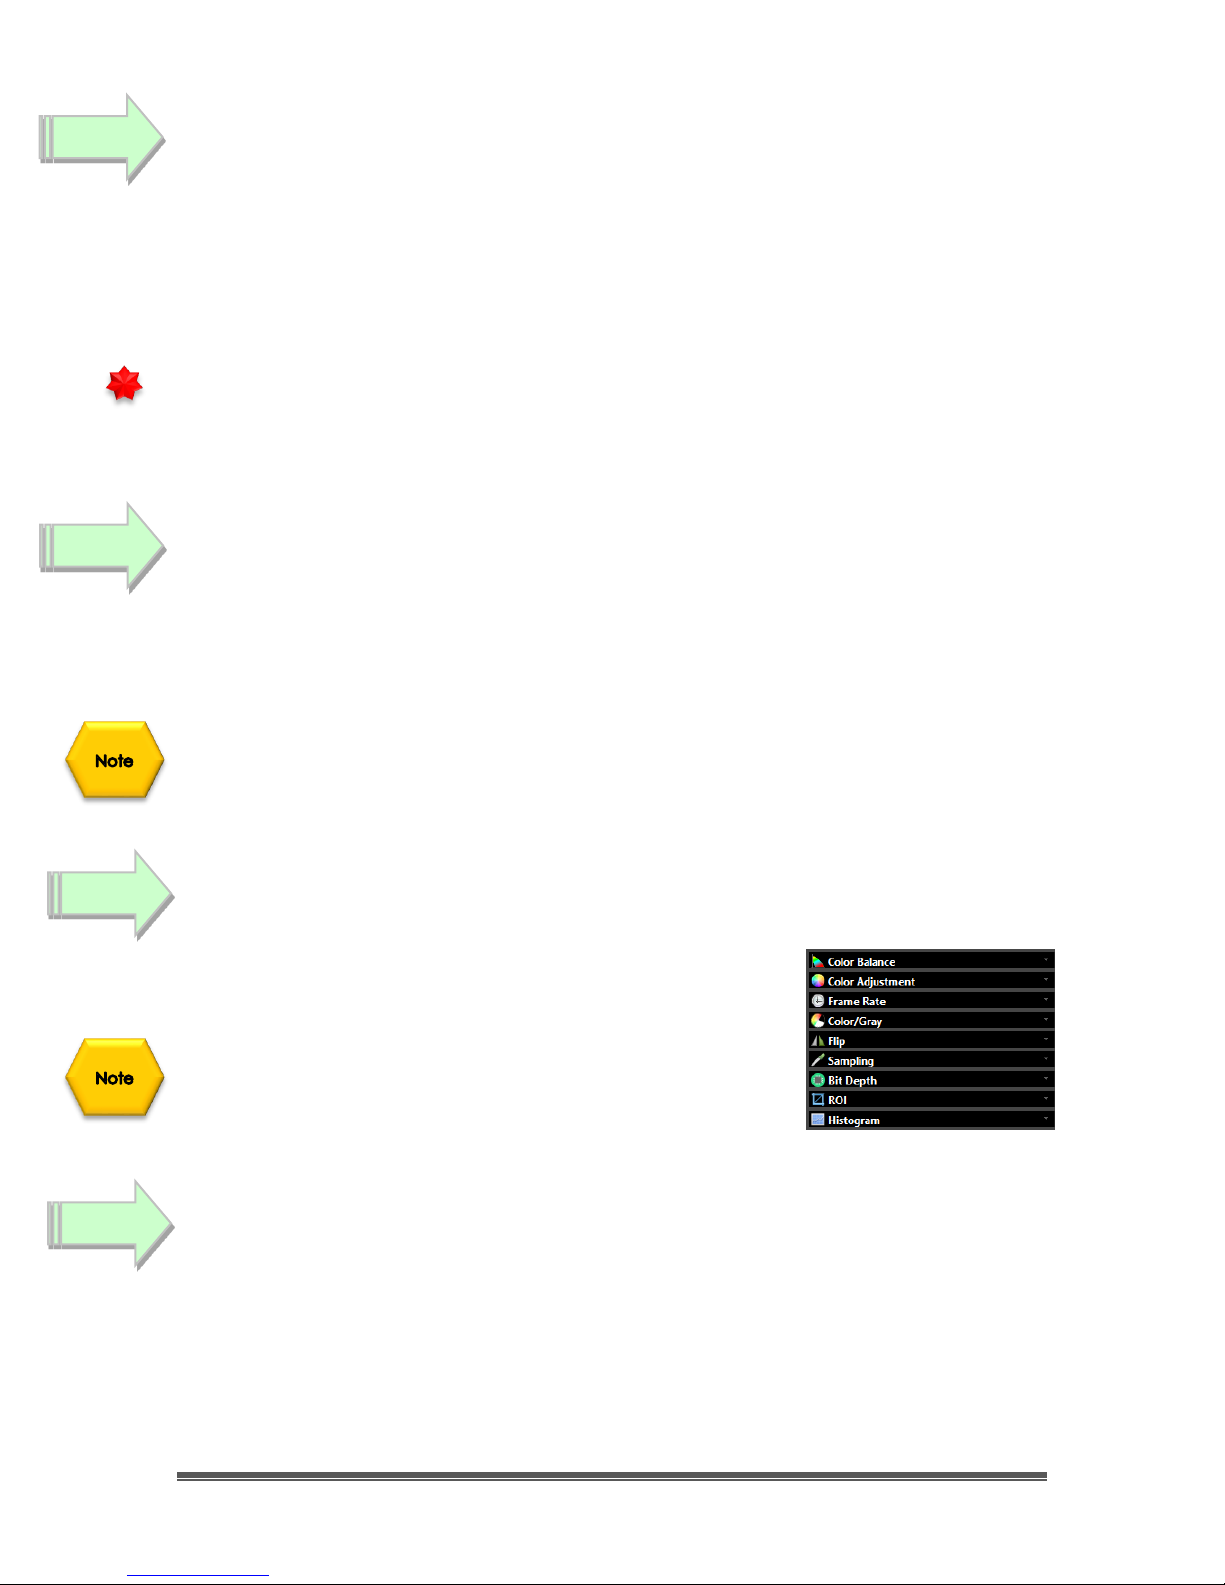
Adjust the Parameters
Choose a parameter from the Camera Tab on the Left
SideBar and see what you can adjust, and how it affects
your image.
You will have to wait until the next image is exposed to
see how your adjustments look (keep an eye at the
bottom of the screen to see when the next adjusted
image will appear).
Have Fun and Experiment
You can now spend some time to become more comfortable with the
MallincamSky Software. The SkyRaider AG1.2C User Manual will go into more
detail about all the options and adjustment you can perform with the SkyRaider
series of cameras. But, don’t be afraid to experiment.
Step 5
Step 6
Step 7
Step 8
 Loading...