

Page 1
dot2 XL-F
XL-B
core
F-wing
B-wing
Quick
MAnual
XVII.04 deutsch / english
Art. Nr. 1280M 00163
Page 2

M A
LIGHTING
Page 3
2
dot2
Daten
Transport
Sicherheit
Betriebsgrenzen
Quickstart
Connect
Quickstart
ON / OFF
Wartung
Konformität
dot2 ist eine simple und clevere Lösung – the best of both worlds.
MA Lighting Professionalität und ein einfaches, schnelles Bedienkonzept. Das dot2 –
System ist speziell für Projekte mittlerer Größe zugeschnitten. Auch mit wenig Erfahrung in
der Programmierung und der Installation schnell einsetzbar.
Kostengünstig und einfach zu bedienen – und trotzdem eröffnet das dot2-System fast die
gesamte Palette kreativer Lichttechnik.
dot2 ist die Lösung für Projekte mittlerer Größe im Theater, Konzert oder Studio. Ein
System das sich schnell erlernen lässt, übersichtlich in der Bedienung und in der
Installation.
Page 4
3
dot2
Daten
Transport
Sicherheit
Betriebsgrenzen
Quickstart
Connect
Quickstart
ON / OFF
Wartung
Konformität
Bestimmungsgemäßer Gebrauch
Die gesamte dot2 Produktpalette ist für die Steuerung aller Arten von Lichttechnik bestimmt. U.a. für
konventionelles Licht, bewegte Lampen, LED, Video und ähnliche Medien durch Steuerung mit DMX
Signalen. Und darf ohne schriftliche Zustimmung der MA Lighting Technology GmbH nicht zu anderen
Zwecken verwendet werden.
Transport, Betrieb und Wartung dürfen nur von Personen ausgeführt werden, die für die jeweilige
Tätigkeit qualifiziert sind. Die Sicherheitshinweise und die Betriebsgrenzen müssen immer eingehalten
werden.
Die dot2 Produktpalette besteht aus folgenden Komponenten, die einzeln oder auch innerhalb eines
Ethernet -Netzwerks betrieben werden können:
dot2 XL-F dot2 XL-B dot2 core dot2 F-wing dot2 B-wing
Standardzubehör: Staubschutzhülle
Optional: Flightcase (robuster Transportkoffer), Soft Bag, beschreibbare Magnetfolie
Hersteller: MA Lighting Technology GmbH
Dachdeckerstraße 16
D – 97297 Waldbüttelbrunn
Mehr Informationen und ein detailliertes Manual für die Konsolen unter: www.malighting.com
Die häufigsten gestellten Fragen (FAQ) finden sie auf www.malighting.com, oder schicken Sie uns eine
E-Mail mit Ihren Kontaktdaten und Ihrer Anfrage an support@ma-dot2.com Dieser E-Mail-Service ist
während der regulären Geschäftszeiten in Deutschland erreichbar.
In dringenden Notfällen nehmen Sie bitte Kontakt zu Ihrem nächsten Distributor auf.
Page 5
4
dot2
Daten
Transport
Sicherheit
Betriebsgrenzen
Quickstart
Connect
Quickstart
ON / OFF
Wartung
Konformität
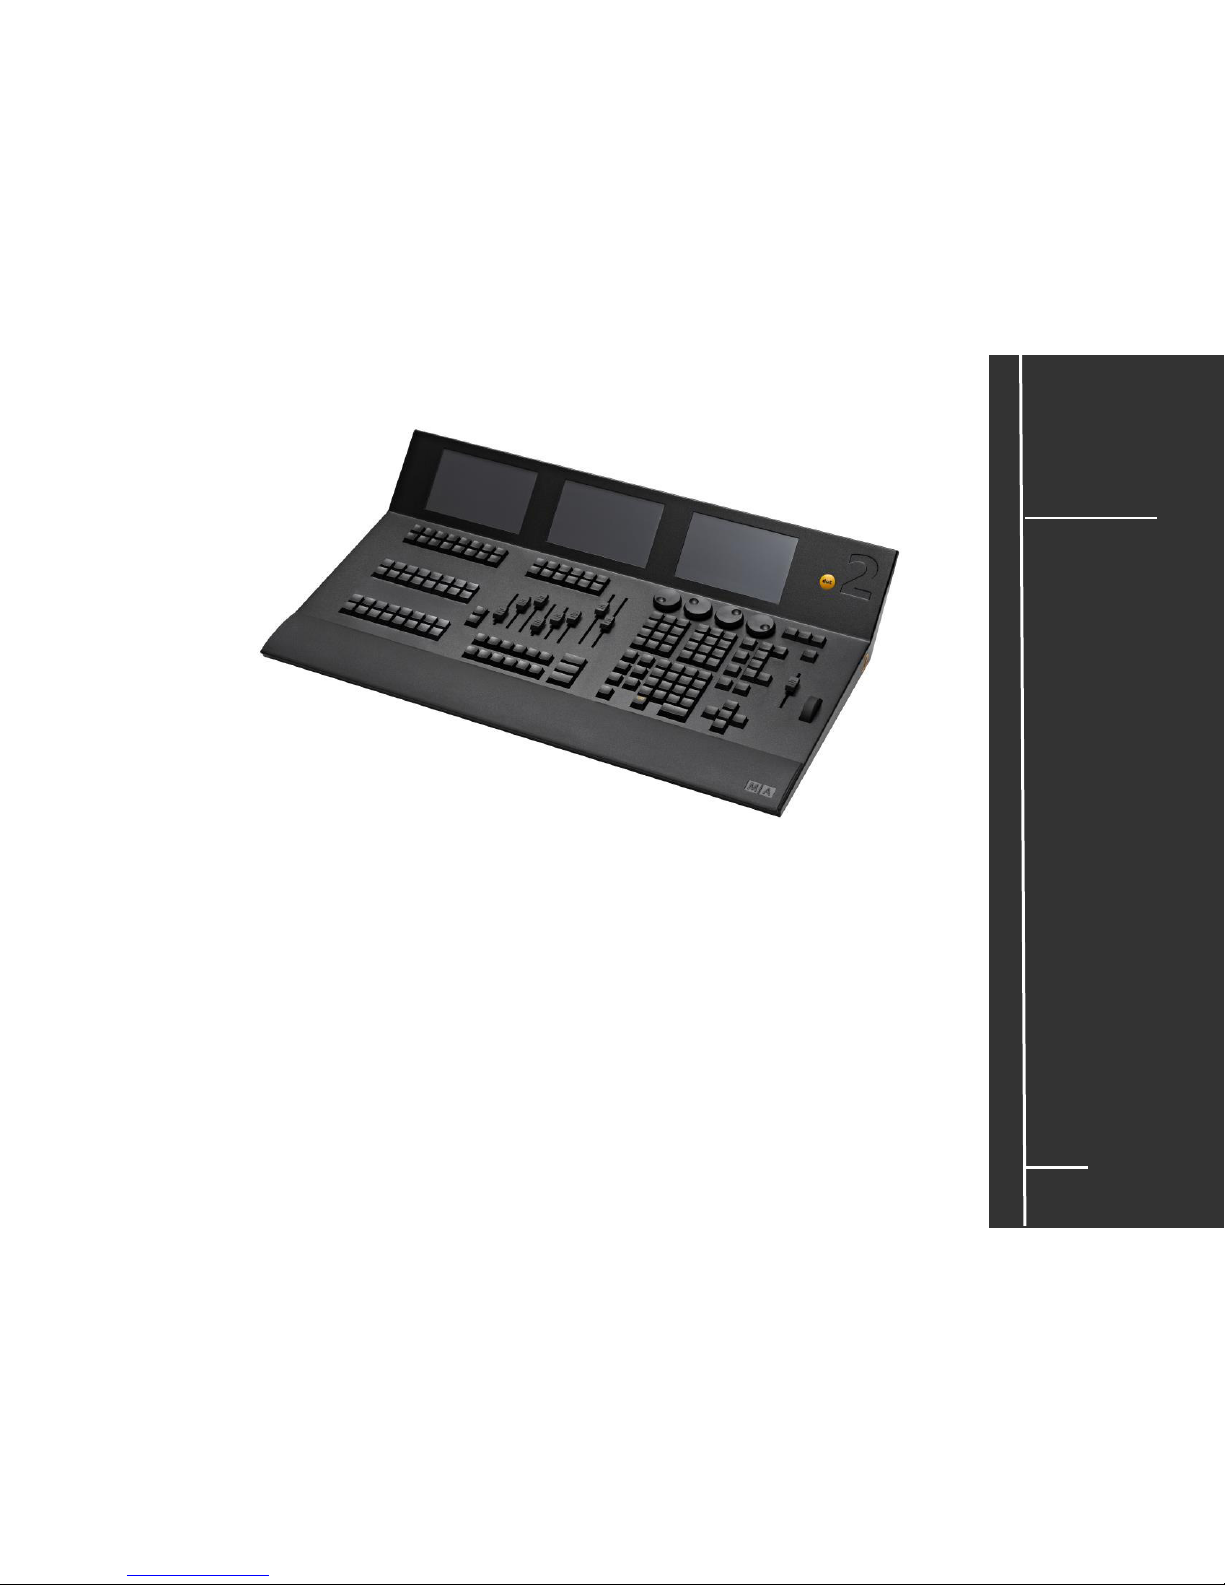
Spezifikation
dot2 XL-F
Gewicht: ca. 9,1 kg / 20 pounds
Abmessungen: 427 x 736 x 161 mm / 16.8 x 29.0 x 6.4 inch
4 DMX – OUT (XLR 5 pin)
DMX IN (XLR 5 pin)
LTC IN (XLR 3 pin)
Analog Remote IN 15 pin
Midi IN / OUT (Midi Timecode / Midi-Note)
3x 7” Touchscreen mit 800 x 480 Pixel Auflösung.
Alle Tasten mit dimmbarer Hintergrundbeleuchtung
4x Encoder Wheels
14x Fader (60mm) + 42 Executor Buttons / 14 Button Executor
2x A/B Fader (100mm)
Grandmaster –Fader (60mm)
Page 6
5
dot2
Daten
Transport
Sicherheit
Betriebsgrenzen
Quickstart
Connect
Quickstart
ON / OFF
Wartung
Konformität
Spezifikation
dot2 XL-B
Gewicht: ca. 9,1 kg / 20 pounds
Abmessungen: 427 x 736 x 161 mm / 16.8 x 29.0 x 6.4 inch
4 DMX – OUT (XLR 5 pin)
DMX IN (XLR 5 pin)
LTC IN (XLR 3 pin)
Analog Remote IN 15 pin
Midi IN / OUT (Midi Timecode / Midi-Note)
3x 7” Touchscreen mit 800 x 480 Pixel Auflösung.
Alle Tasten mit dimmbarer Hintergrundbeleuchtung
4x Encoder Wheels
6 x Fader (60mm) + 18 Executor Buttons / 54 Button Executor
2x A/B Fader (100mm)
Grandmaster –Fader (60mm)
Level –Wheel
Page 7

6
dot2
Daten
Transport
Sicherheit
Betriebsgrenzen
Quickstart
Connect
Quickstart
ON / OFF
Wartung
Konformität
Spezifikation
dot2 core
Gewicht: ca. 7,0 kg / 15.5 pounds
Abmessungen: 427 x 546 x 161 mm / 16.8 x 21.5 x 6.4 inch
4 DMX – OUT (XLR 5 pin)
DMX IN (XLR 5 pin)
LTC IN (XLR 3 pin)
Analog Remote IN 15 pin
Midi IN / OUT (Midi Timecode / Midi-Note)
2x 7” Touchscreen mit 800 x 480 Pixel Auflösung.
4x Encoder Wheels
6x Executor Fader (60mm) + 18 Executor Buttons / 6 Button Executor
Alle Tasten mit dimmbarer Hintergrundbeleuchtung
2x A/B Fader (100mm)
Grandmaster –Fader (60mm)
Level –Wheel
Page 8
7
dot2
Daten
Transport
Sicherheit
Betriebsgrenzen
Quickstart
Connect
Quickstart
ON / OFF
Wartung
Konformität
Spezifikation
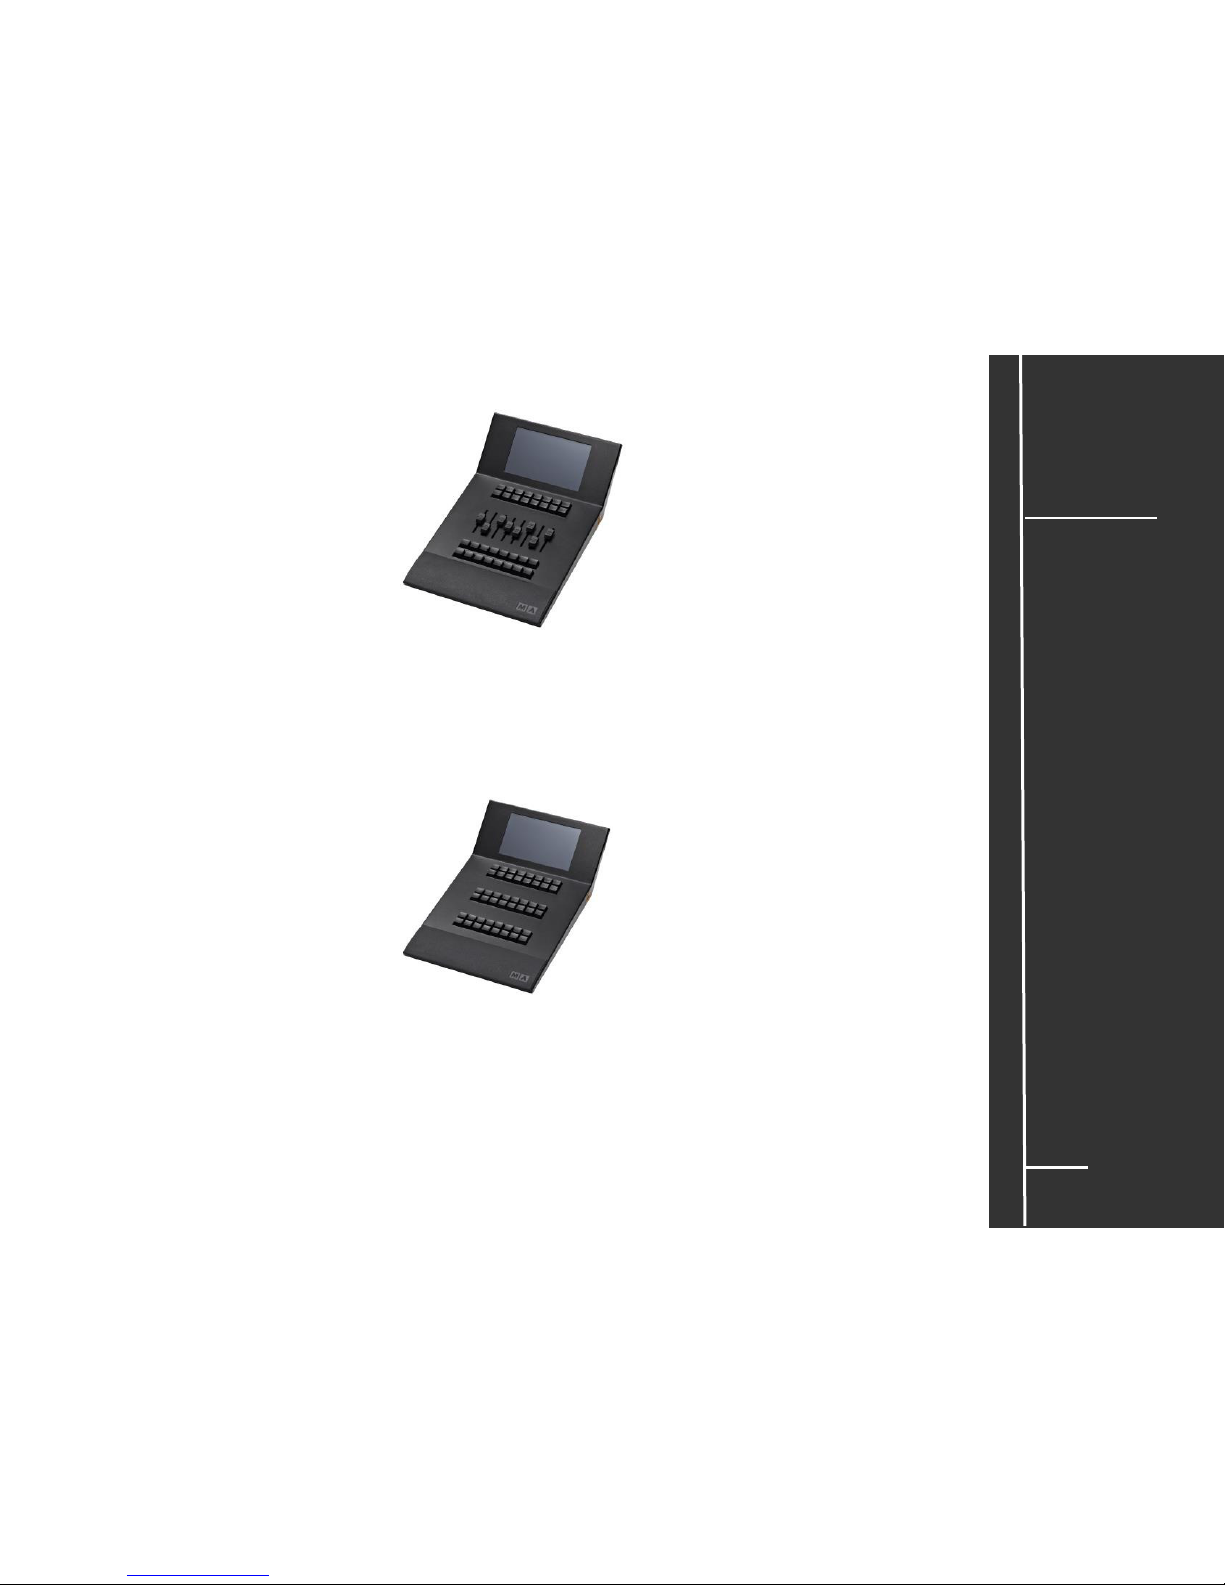
dot2 F-wing
Gewicht: ca. 3,4 kg / 7.5 pounds
Abmessungen: 427 x 263 x 161 mm / 16.8 x 10.4 x 6.4 inch
7” Touchscreen mit 800 x 480 Pixel Auflösung.
8x Executor Fader (60mm) + 24 Executor Buttons / 8 Button Executor
Alle Tasten mit dimmbarer Hintergrundbeleuchtung
dot2 B-wing
Gewicht: ca. 3,3 kg / 7.3 pounds
Abmessungen: 427 x 263 x 161 mm / 16.8 x 10.4 x 6.4 inch
7” Touchscreen mit 800 x 480 Pixel Auflösung.
48 Button Executor
Alle Tasten mit dimmbarer Hintergrundbeleuchtung
Page 9
8
dot2
Daten
Transport
Sicherheit
Betriebsgrenzen
Quickstart
Connect
Quickstart
ON / OFF
Wartung
Konformität
Daten
Spannung: 230 V ~ 50HZ / 120V~ 60Hz (USA, Canada)
Weitbereichsnetzteil, schaltet automatisch um!
Erforderlicher Kupplungstyp: „Kaltgerätestecker“ C13
(an der Rückseite) Stromkabel: Nur ausreichend isolierte und geschützte Kabel
verwenden (min. Ø = 3 x 1,0mm²). Kabel und Stecker sind im
Lieferumfang nicht enthalten.
Erforderlicher Steckertyp: Abhängig vom technischen Standard des jeweiligen Einsatzortes.
(Stromversorgung) Sicherheitshinweis: Die Montage des Steckers darf nur durch
Fachpersonal ausgeführt werden!
Anschlussleistung: dot2 XL-F max. 100 VA
dot2 XL-B max. 100VA
dot2 core max. 100 VA
dot2 F-wing max. 40 VA
dot2 B-wing max. 40 VA
Erforderlicher Steckertyp (Ethernet): Passend zur RJ 45 -Buchse
Erforderliches Kabel (Ethernet): Ethernetkabel der Kategorie CAT-5e oder höher
Empfohlene Länge des Kabels: maximal 75m
Erforderlicher Steckertyp (DMX) 5-Pol XLR Type nach USITT DMX-512/1990
Erforderliches Kabel (DMX) : DMX 5 Pol Kabel
Empfohlene Länge des Kabels: bis zu 350 m (bei idealen
Bedingungen)
Monitor: 7” Touchscreen mit 800 x 480 Pixel Auflösung.
Die Monitore der dot2 Konsolen unterliegen den Bedingungen der Fehlerklasse 2 (ISO 9241-
307) Folgende Pixelfehler sind als tolerierbar anzusehen.
Fehlertyp: Zulässige Fehler (pro 1 Mio Pixel):
Ständig leuchtende Pixel
max 2 (min Abstand zwischen den leuchtenden Pixel ≥ 15mm
)
Ständig leuchtende benachbarte Pixel max 1
Ständig schwarze Pixel max 5 (min Abstand zwischen den schwarzen Pixel ≥ 15mm)
Ständig schwarze benachbarte Pixel max 1
Gesamt ständig leuchtende und
ständig schwarze Pixel max 5
Leichte Kratzer auf den Monitoren sind technisch bedingt und deshalb unvermeidbar.
Page 10
9
dot2
Daten
Transport
Sicherheit
Betriebsgrenzen
Quickstart
Connect
Quickstart
ON / OFF
Wartung
Konformität
Transport
Bitte das Gewicht des Gerätes beachten. Vorsichtig transportieren; bei Nichtbeachten können
Personen- oder Sachschäden entstehen.
Gewichte: ohne Transportbehälter, Verpackung, Schutztasche oder Koffer
dot2 XL-F ca. 9,1kg
dot2 XL-B ca. 9,1kg
dot2 core ca. 7,0kg
dot2 F-wing ca. 3,4kg
dot2 B-wing ca. 3,3kg
Vor dem Transport alle Kabel / USB -Speichersticks entfernen.
Verwenden Sie nur das original MA- flight case für Lagerung und Transport oder eine
vergleichbar sichernde und schützende Transportvorrichtung.
Stellen Sie sicher, dass während des Transportes oder Lagerung kein Druck auf die Screens
ausgeübt wird. Die Screens können brechen – dann darf die Konsole nicht mehr benutzt werden.
Stellen Sie die Geräte nicht auf Oberflächen, die aus Stabilitätsgründen dafür nicht geeignet
sind. Ein Verwinden des Gehäuses unbedingt vermeiden!
Beim Transport Temperaturen und Luftfeuchte beachten!
Die zulässigen Werte dem Kapitel „Betriebsgrenzen“
entnehmen.
Für den Transport und die Wahl des geeigneten
Transportmittels ist ausschließlich der Anwender
verantwortlich; bei Nichtbeachten können Personen- oder
Sachschäden entstehen.
Nach jedem Transport und vor jeder Benutzung das Gerät
auf Schäden kontrollieren! Bei Schäden am Gehäuse
(Beulen, verbogene oder abgebrochene Teile), Tasten,
Steckern oder Screens das Gerät nicht anschließen!
Unsere Service-Hotline hilft Ihnen weiter.
Vorsicht
Page 11
10
dot2
Daten
Transport
Sicherheit
Betriebsgrenzen
Quickstart
Connect
Quickstart
ON / OFF
Wartung
Konformität
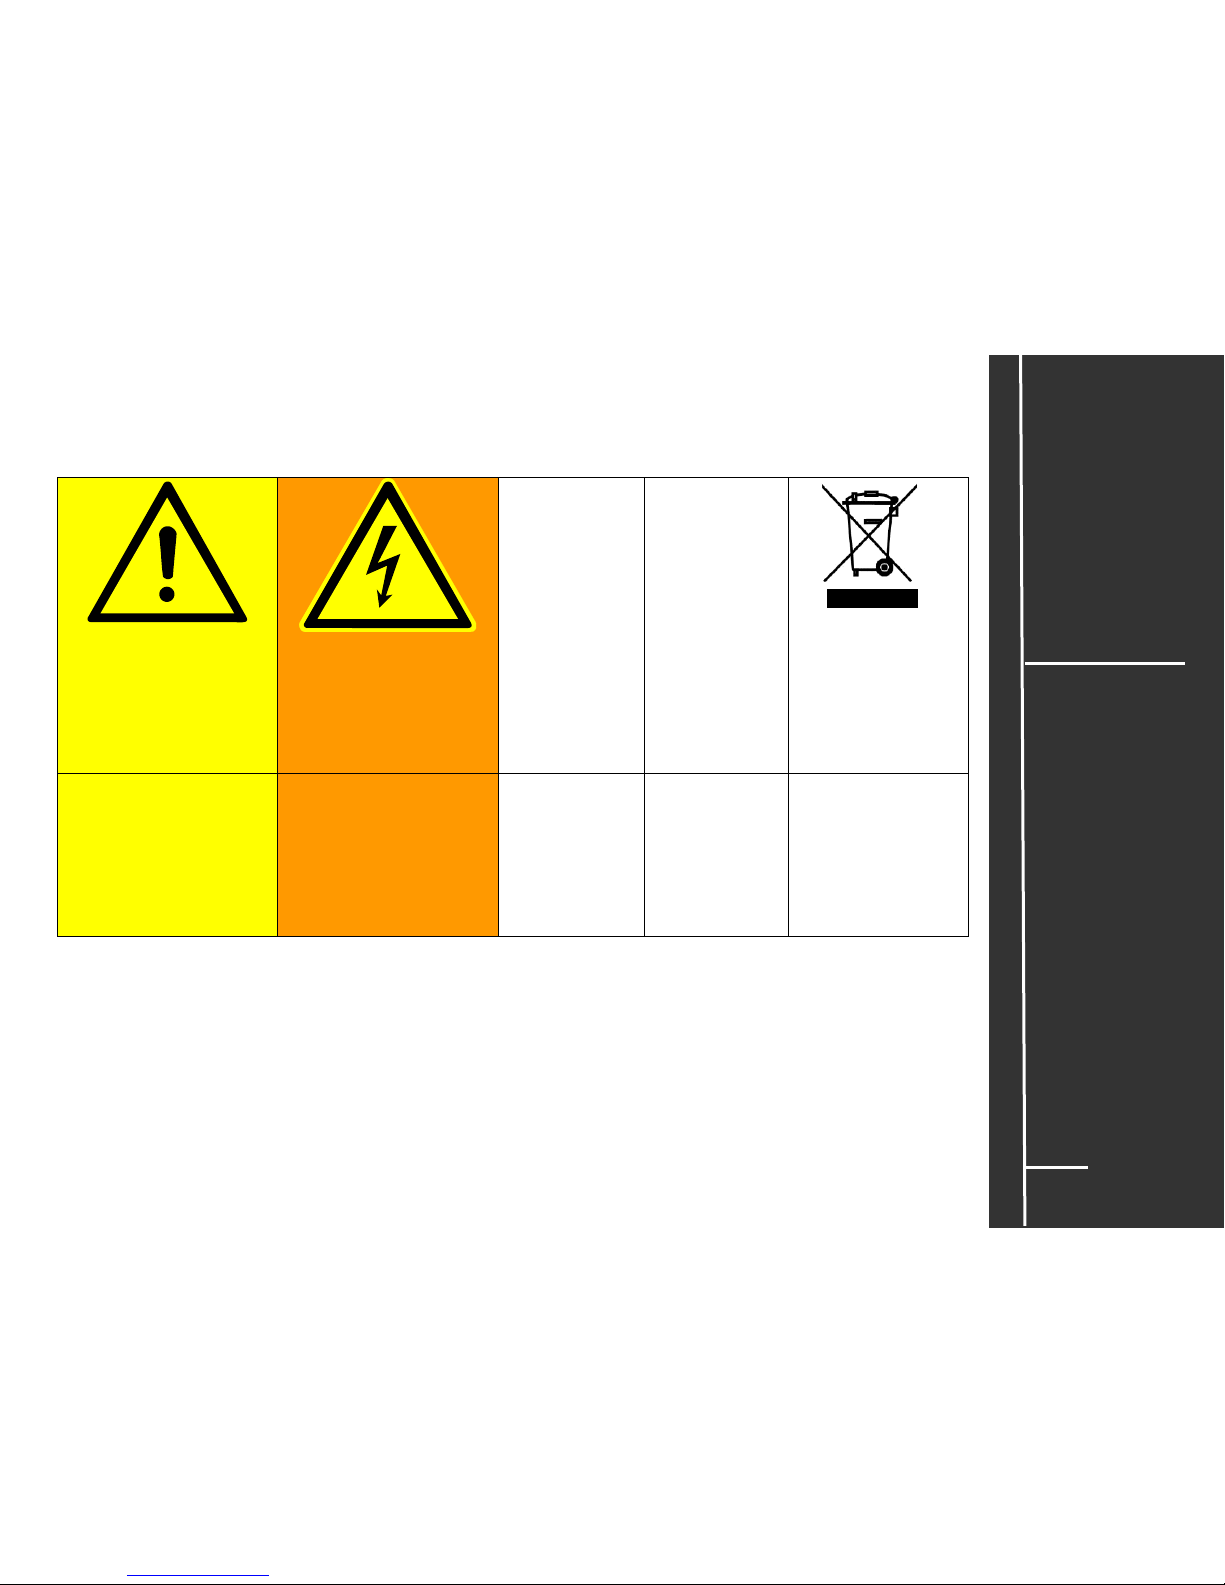
Symbole und Warnzeichen
I 0
~
Vorsicht
Warnung vor einer
Gefahrenstelle
Warnung
Warnung vor
Gefährlicher
elektrischer Spannung
Hauptschalter
Wechsel-
strom (AC)
Hinweis
Entsorgung
Befolgen Sie alle
Maßnahmen, die mit
dem Gefahrenzeichen
gekennzeichnet sind,
um Verletzungen zu
vermeiden.
Gerät nicht öffnen!
AN / AUS
Das Gerät muss
separat entsorgt
werden.
Die örtlichen
Vorschriften
beachten!
Page 12
11
dot2
Daten
Transport
Sicherheit
Betriebsgrenzen
Quickstart
Connect
Quickstart
ON / OFF
Wartung
Konformität
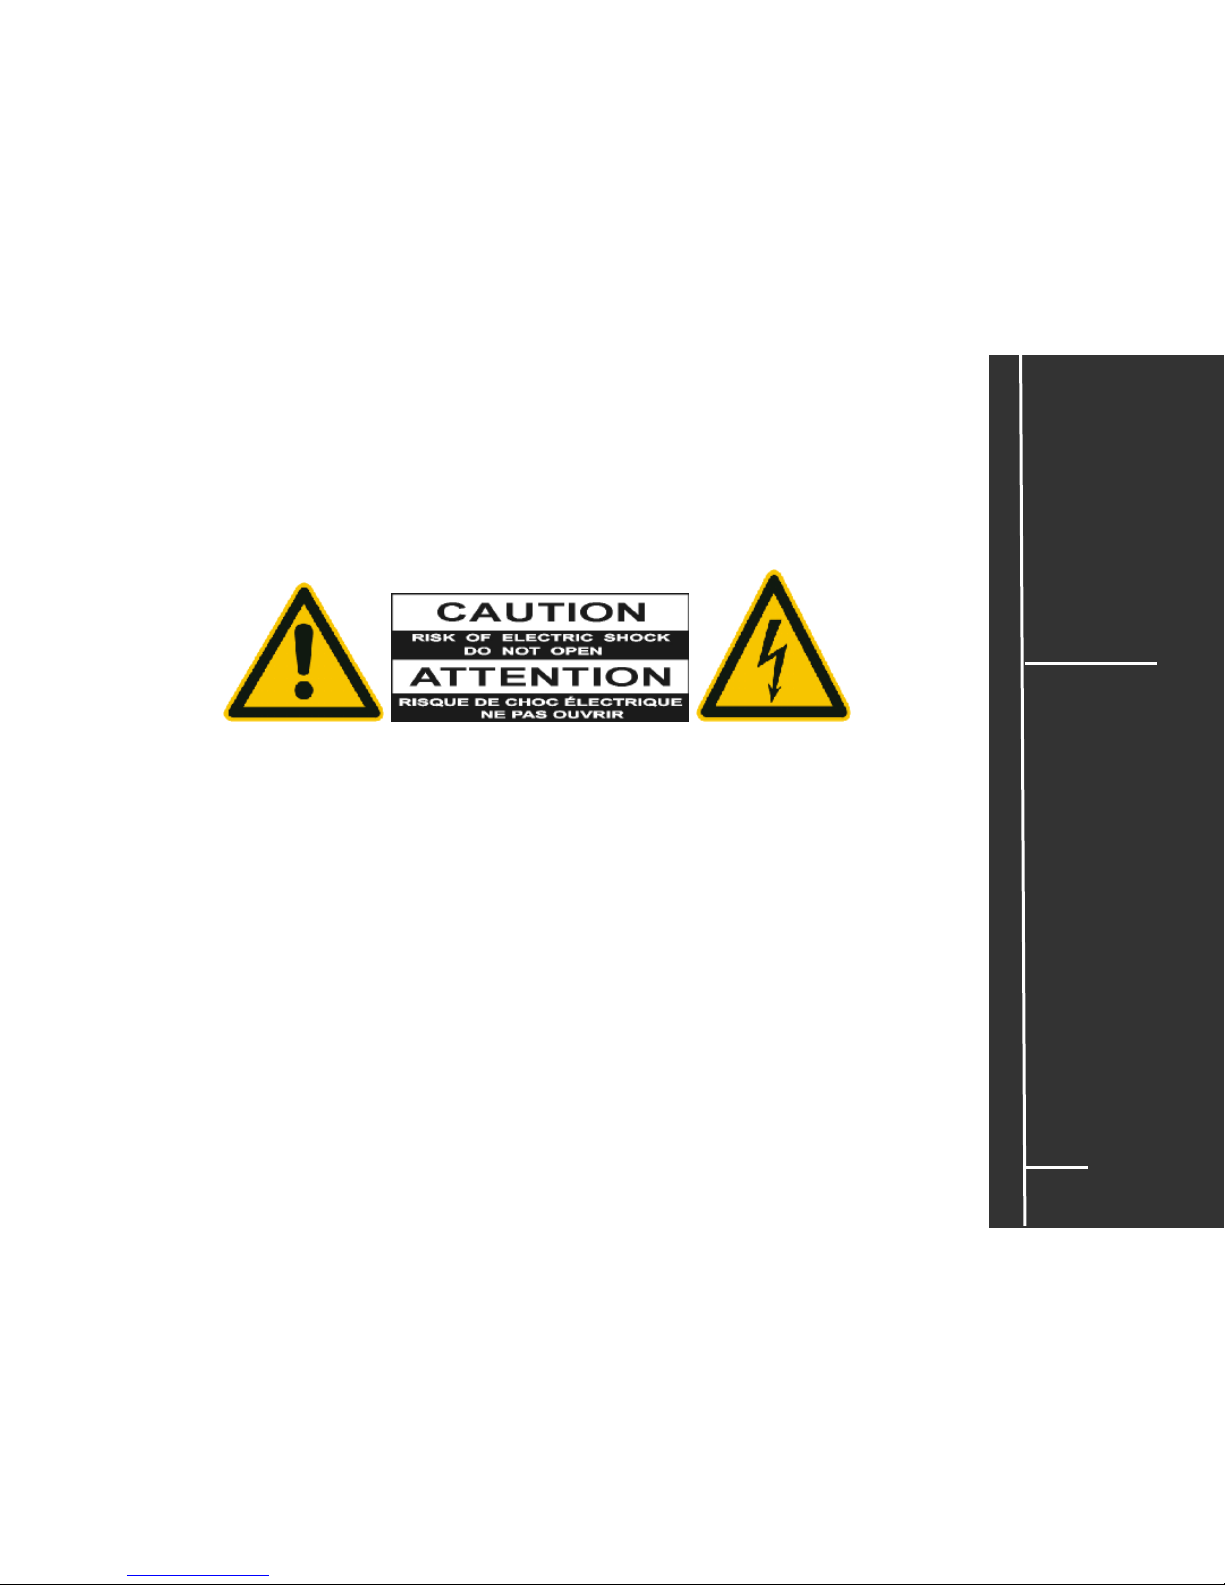
Warnhinweise
Die Wartung des Gerätes darf ausschließlich durch geschultes Personal durchgeführt werden, da
beim Öffnen und / oder Entfernen von Abdeckungen spannungsführender Teile freigelegt werden.
Neben anderen Risiken besteht hierbei die Gefahr eines elektrischen Schlages.
Page 13
12
dot2
Daten
Transport
Sicherheit
Betriebsgrenzen
Quickstart
Connect
Quickstart
ON / OFF
Wartung
Konformität
Sicherheitsvorschriften
Lesen Sie vor dem Gebrauch alle Anweisungen der
Bedienungsanleitung. Achten Sie hierbei speziell auf die
Sicherheitshinweise.
Bewahren Sie die Bedienungsanleitung für den späteren Gebrauch
auf.
Befolgen Sie alle auf dem Gerät vermerkten Warnhinweise und
Anweisungen.
Vor dem Reinigen des Gerätes ist der Netzstecker aus der
Steckdose zu ziehen. Verwenden Sie keine Flüssig- oder
Sprühreiniger. Reinigen Sie die Konsole lediglich mit einem
trockenen Tuch.
Betreiben Sie das Gerät nicht in unmittelbarer Wassernähe. Setzen
Sie es keiner Feuchtigkeit aus. Verschütten Sie keine Flüssigkeit
über dem Gerät.
Ziehen Sie den Netzstecker vor einem Gewitter oder wenn das
Gerät längere Zeit nicht benutzt wird.
Im Gehäuse befinden sich Schlitze zur Belüftung. Diese Öffnungen
dürfen nicht blockiert oder abgedeckt werden, da sie das Gerät vor
Überhitzung schützen und den zuverlässigen Betrieb sicherstellen.
Installieren Sie das Gerät nur dann in eine Einbauvorrichtung, wenn
eine ausreichende Belüftung sichergestellt ist.
Führen Sie keine Gegenstände irgendwelcher Art durch die
Gehäuseschlitze in das Gerät ein, da diese spannungsführende
Teile berühren oder Kurzschlüsse verursachen können. Dies kann
zu Bränden und elektrischen Schlägen führen.
Stellen Sie das Gerät nicht auf eine instabile Unterlage. Es könnte
herunterfallen und dabei stark beschädigt werden.
Das Gerät ist mit einem Schutzkontaktstecker ausgestattet. Dieser
Stecker eignet sich nur für Schutzkontaktsteckdosen. Dies ist eine
Schutzmaßnahme, die unbedingt eingehalten werden muss. Sollte
der Stecker nicht in die Steckdose passen (z.B. bei veralteten
Steckdosen), muss die Dose von einem Fachmann ausgetauscht
werden.
Stellen Sie keine Gegenstände auf das Netzkabel und achten Sie
darauf, dass niemand auf das Kabel treten kann.
Wird ein Verlängerungskabel benutzt, muss sichergestellt werden,
dass die Summe der Nennleistungen der an das Kabel
angeschlossenen Geräte die Nennleistung des
Verlängerungskabels nicht überschreitet.
Ist das Netzkabel oder ein Stecker beschädigt, so sollten
Sie diese umgehend durch eine Fachkraft austauschen
lassen.
Es dürfen nur Netzkabel mit Sicherheitsprüfzeichen
verwendet werden.
Das Gerät sollte ausschließlich durch geschultes Personal
gewartet werden, da beim Öffnen und/oder Entfernen von
Abdeckungen spannungsführende Teile freigelegt werden;
neben anderen Risiken besteht hierbei die Gefahr eines
elektrischen Schlages.
Alle Wartungsarbeiten dürfen ausschließlich von
qualifizierten Kundendiensttechnikern durchgeführt
werden.
In unmittelbarer Nähe des Gerätes darf kein Funkgerät mit
starker Leistung, Mobiltelefon o.ä. betrieben werden.
Tritt eine der nachstehend aufgeführten Bedingungen auf:
Stromzuführung abschalten bzw. den Netzstecker ziehen
und den Kundendienst rufen!
- Netzkabel oder Stecker ist/sind beschädigt
oder durchgescheuert.
- Flüssigkeit wurde in das Gerät verschüttet.
- Das Gerät war Regen (oder Feuchtigkeit in
anderer Form) ausgesetzt.
- Das Gerät arbeitet bei Einhaltung der
Bedienungsanweisungen nicht einwandfrei.
Nur die in den Anweisungen erwähnten
Steuerelemente einstellen, da eine falsche
Einstellung anderer Steuerungen zu
Beschädigungen führen kann.
- Das Gerät ist zu Boden gefallen oder das
Gehäuse wurde beschädigt.
Bitte beachten Sie, dass die Basis dieses Lichtmischpultes
eine überaus komplexe Software ist. Wie Sie sicherlich aus
leidvollen Erfahrungen mit Computersystemen wissen,
kann man nicht ausschließen, dass ein solches System
einmal abstürzt. Wir versichern Ihnen jedoch, dass wir
unser Möglichstes tun, um diese Abstürze zu vermeiden.
Page 14
13
dot2
Daten
Transport
Sicherheit
Betriebsgrenzen
Quickstart
Connect
Quickstart
ON / OFF
Wartung
Konformität
Betriebsgrenzen
Temperatur
Betrieb:
0°C bis +40°C / 32°F bis 104°F
Höhere Temperaturen können das Kühlsystem des Gerätes
überfordern und zum Ausfall von elektrischen Komponenten führen.
Lagerung / Transport:
-10°C bis +50°C / 14°F bis 122°F
Luftfeuchte
Betrieb: 20% bis 90% relative Luftfeuchtigkeit (keine Betauung)
Lagerung / Transport: 10% bis 90% relative Luftfeuchtigkeit (keine
Betauung)
Umgebung
Bitte alle Sicherheitshinweise beachten.
Das Gerät nur innerhalb der Betriebsgrenzen betreiben.
Das Gerät nur in geschlossenen Räumen betreiben.
Die Umgebungsluft muss staubfrei und frei von gefährlichen und
explosiven Stoffen sein.
Das Gerät ist nicht gegen Spritzwasser geschützt, deshalb nicht in
der Nähe von Wasser betreiben.
Das Gerät nicht im Regen oder Nebel betreiben.
Page 15
14
dot2
Daten
Transport
Sicherheit
Betriebsgrenzen
Quickstart
Connect
Quickstart
ON / OFF
Wartung
Konformität
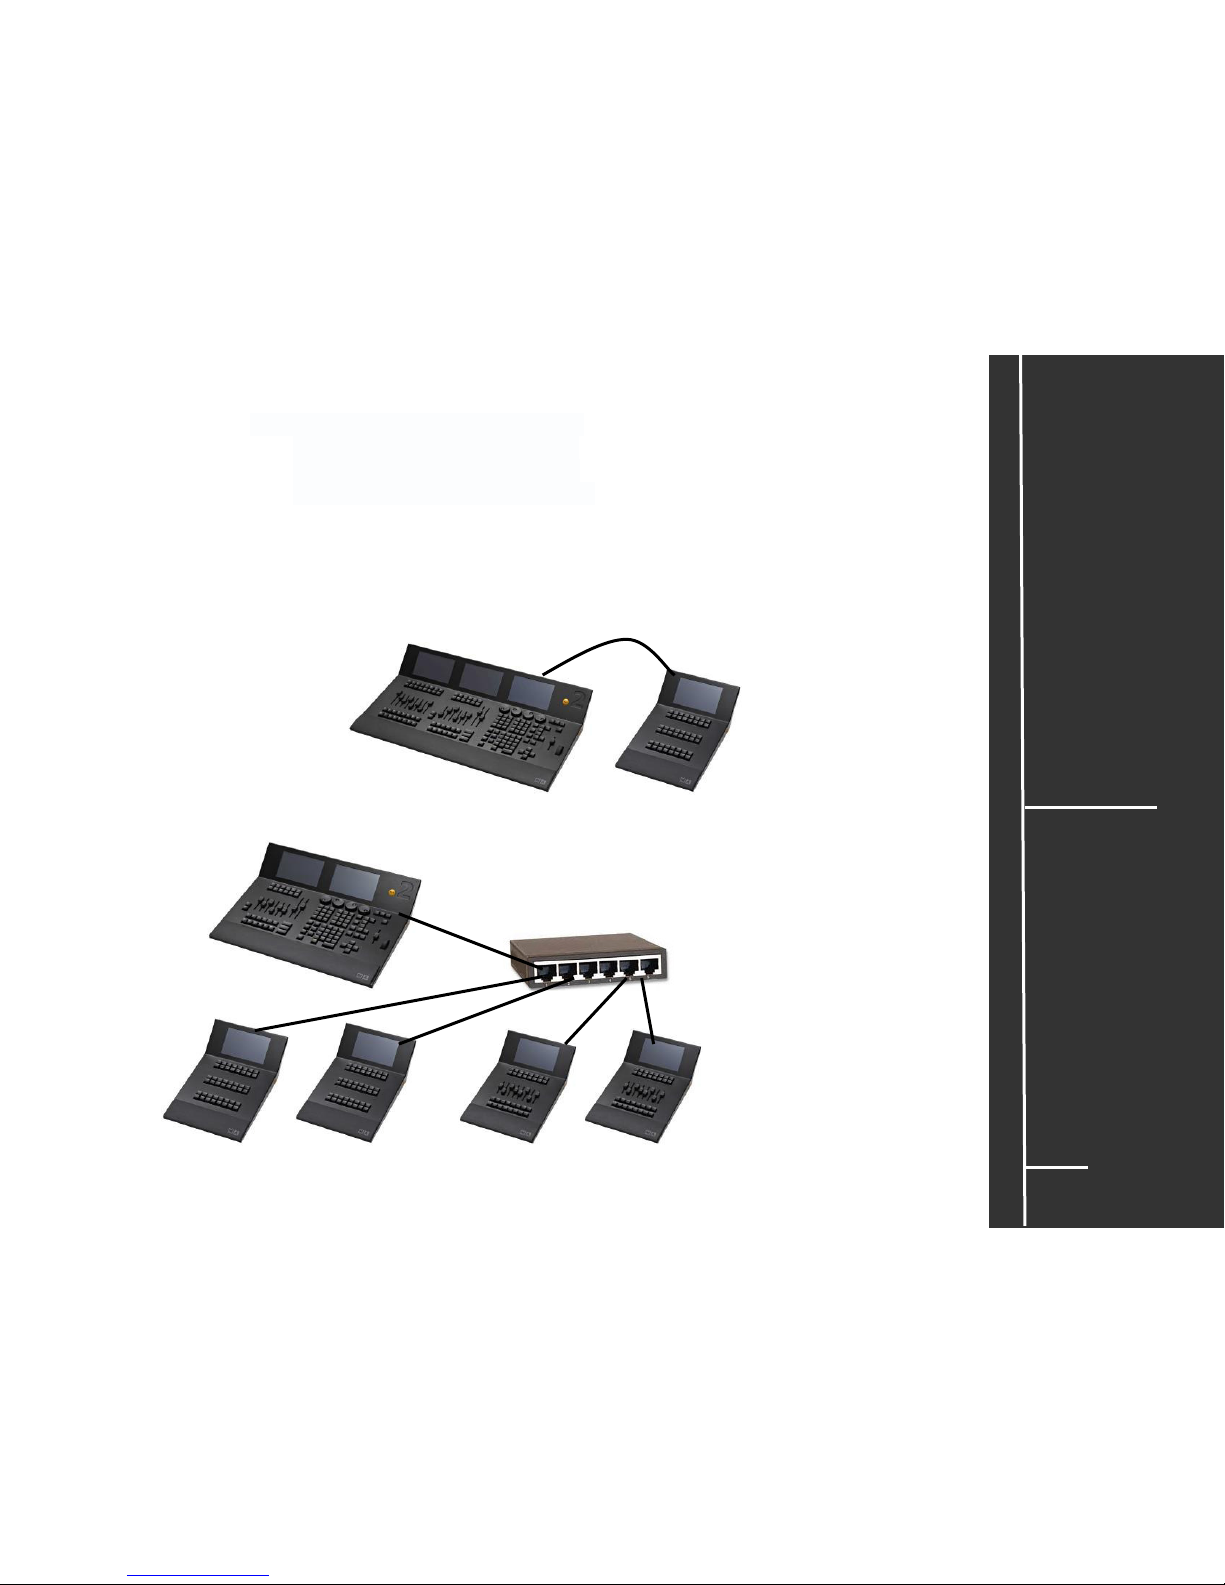
Connect / Limits..wie viele dot2-wings kann ich an eine Konsole anschließen?
Z.B. dot2 core: 2 F-wings + 2 B-wings
dot2 XL-F: 1 F-wing + 2 B-wings
dot2 XL-B: 2 F-wings + 1 B-wing
dot2 onPC: 2 F-wings + 2 B-wings
Direkt ist 1 Gerät möglich - mit einem Switch können maximal 6 „Module“ zu einer Einheit kombiniert
werden. „Modul“ = Screen, also einfach die Screens zählen. HINWEIS: Es können immer nur maximal 2
wings der gleichen Bauart – also immer max 2 F-wings und max 2 B-wings - angeschlossen werden.
Die angeschlossenen wings können im Menü SETUP / dot2 Wings identifiziert und in diesem Menü auch
assigned werden.
z.B. dot2 XL-F + dot2 B –wing (4 Screens)
z.B. dot2 core + 2 dot2 B-wings + 2 dot2 F-wings (6 Screens = Maximum)
Page 16

15
dot2
Daten
Transport
Sicherheit
Betriebsgrenzen
Quickstart
Connect
Quickstart
ON / OFF
Wartung
Konformität
Connect / Limits..wie viele dot2 Konsolen kann man miteinander verbinden?
Maximal lassen sich 5 Einheiten in einem Netzwerk miteinander verbinden. Eine Einheit kann z.B. eine
einzelne Konsole (z.B. dot2 XL-F) sein oder eine Kombination aus einer Konsole mit wings (z.B. eine
dot2 core, zwei 2 dot2 B-wings und zwei dot2 F-wings). Eine Einheit – in der Grafik unten eingekreist besteht also immer aus einer Konsole sowie allen an dieser Konsole angeschlossenen wings (auch
hier die Faustregel: 1 Einheit besteht aus maximal 6 Screens).
Als größtes dot2 -Netzwerk ist also eine Kombination aus 5 Konsolen mit 20 wings möglich. Das dot2
–System ist also auch gerüstet für größere Aufgaben.
Page 17
16
dot2
Daten
Transport
Sicherheit
Betriebsgrenzen
Quickstart
Connect
Quickstart
ON / OFF
Wartung
Konformität
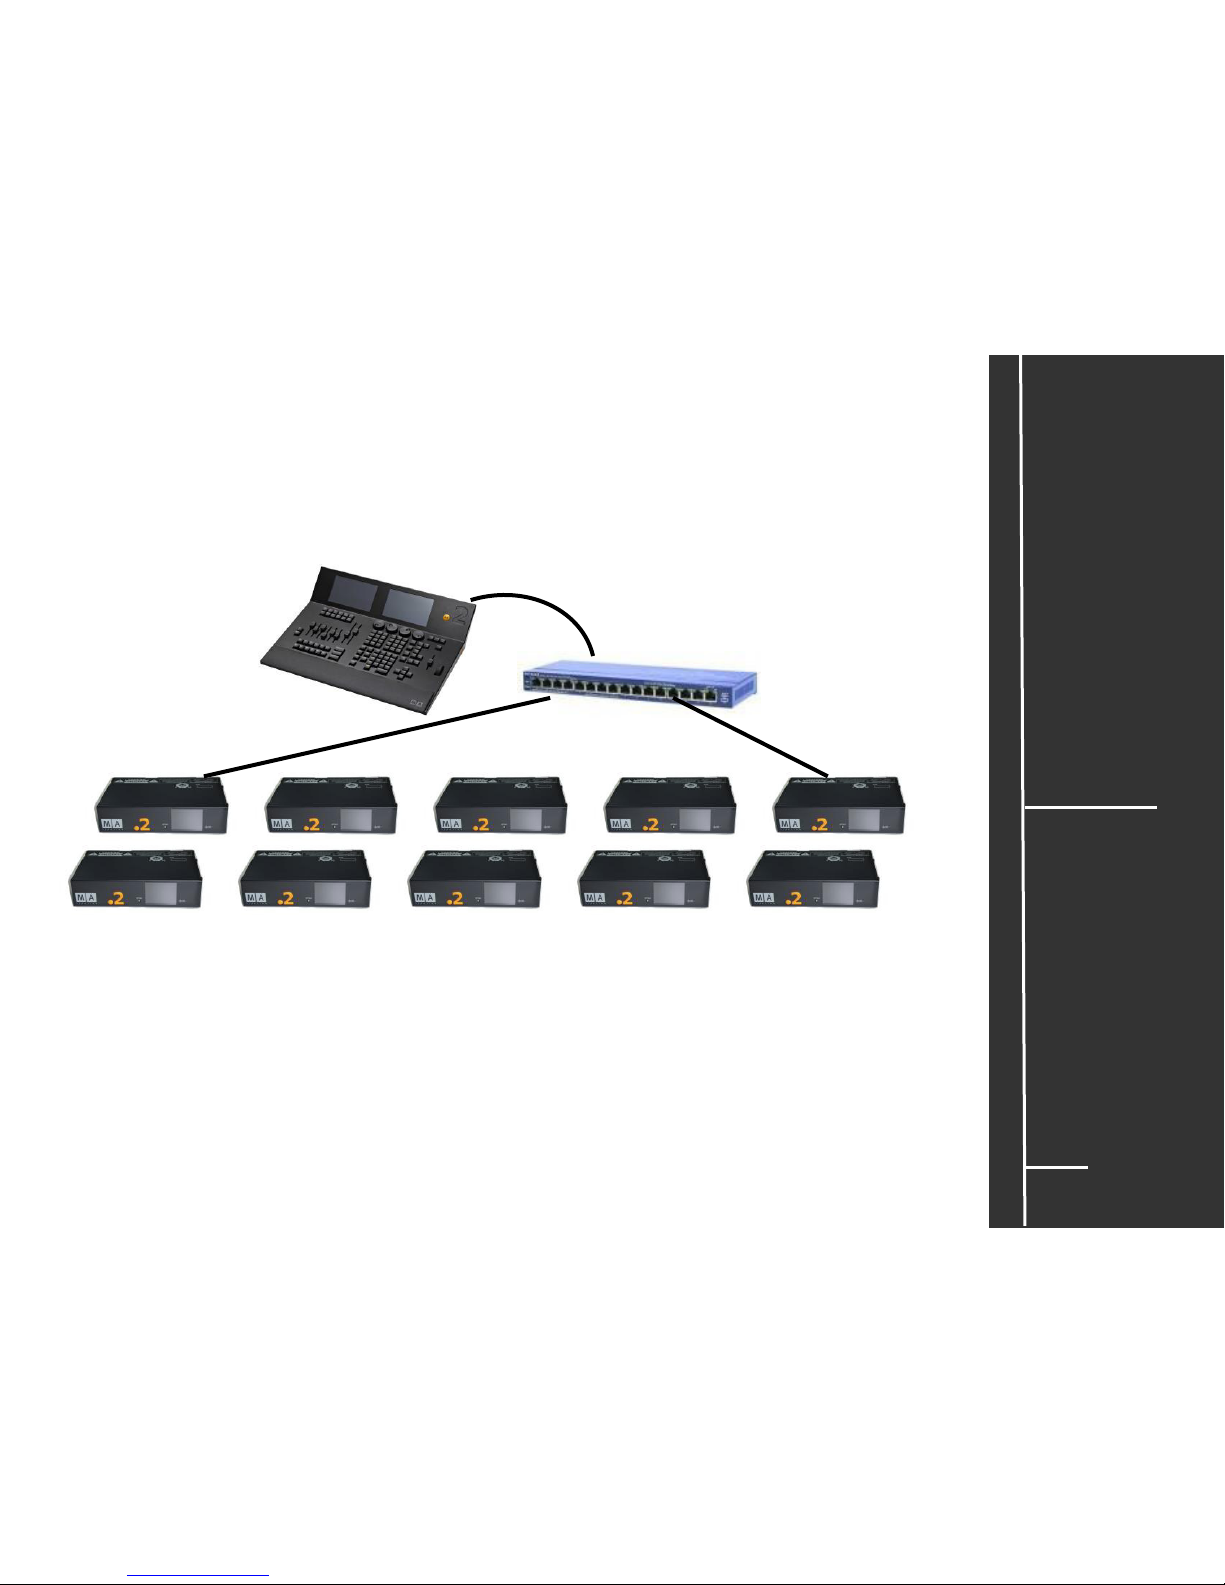
Connect / Limits..wie viele dot2-Nodes kann ich an eine Konsole anschließen?
Bis zu 10 dot2 Node4 können über einen Switch an eine Konsole angeschlossen werden. So lässt sich
die Zahl der DMX-Out Ports vergrößern und es ist vorteilhaft, um längere Strecken mit Ethernetkabel zu
überbrücken anstatt mit DMX-Kabeln.
+ + + +
+ + + + +
Z.B. dot2 core + bis zu 10x dot2 Node4
HINWEISE:
Natürlich kann eine dot2 Konsole mit allen Geräten der dot2 –Familie kombiniert werden.
Page 18
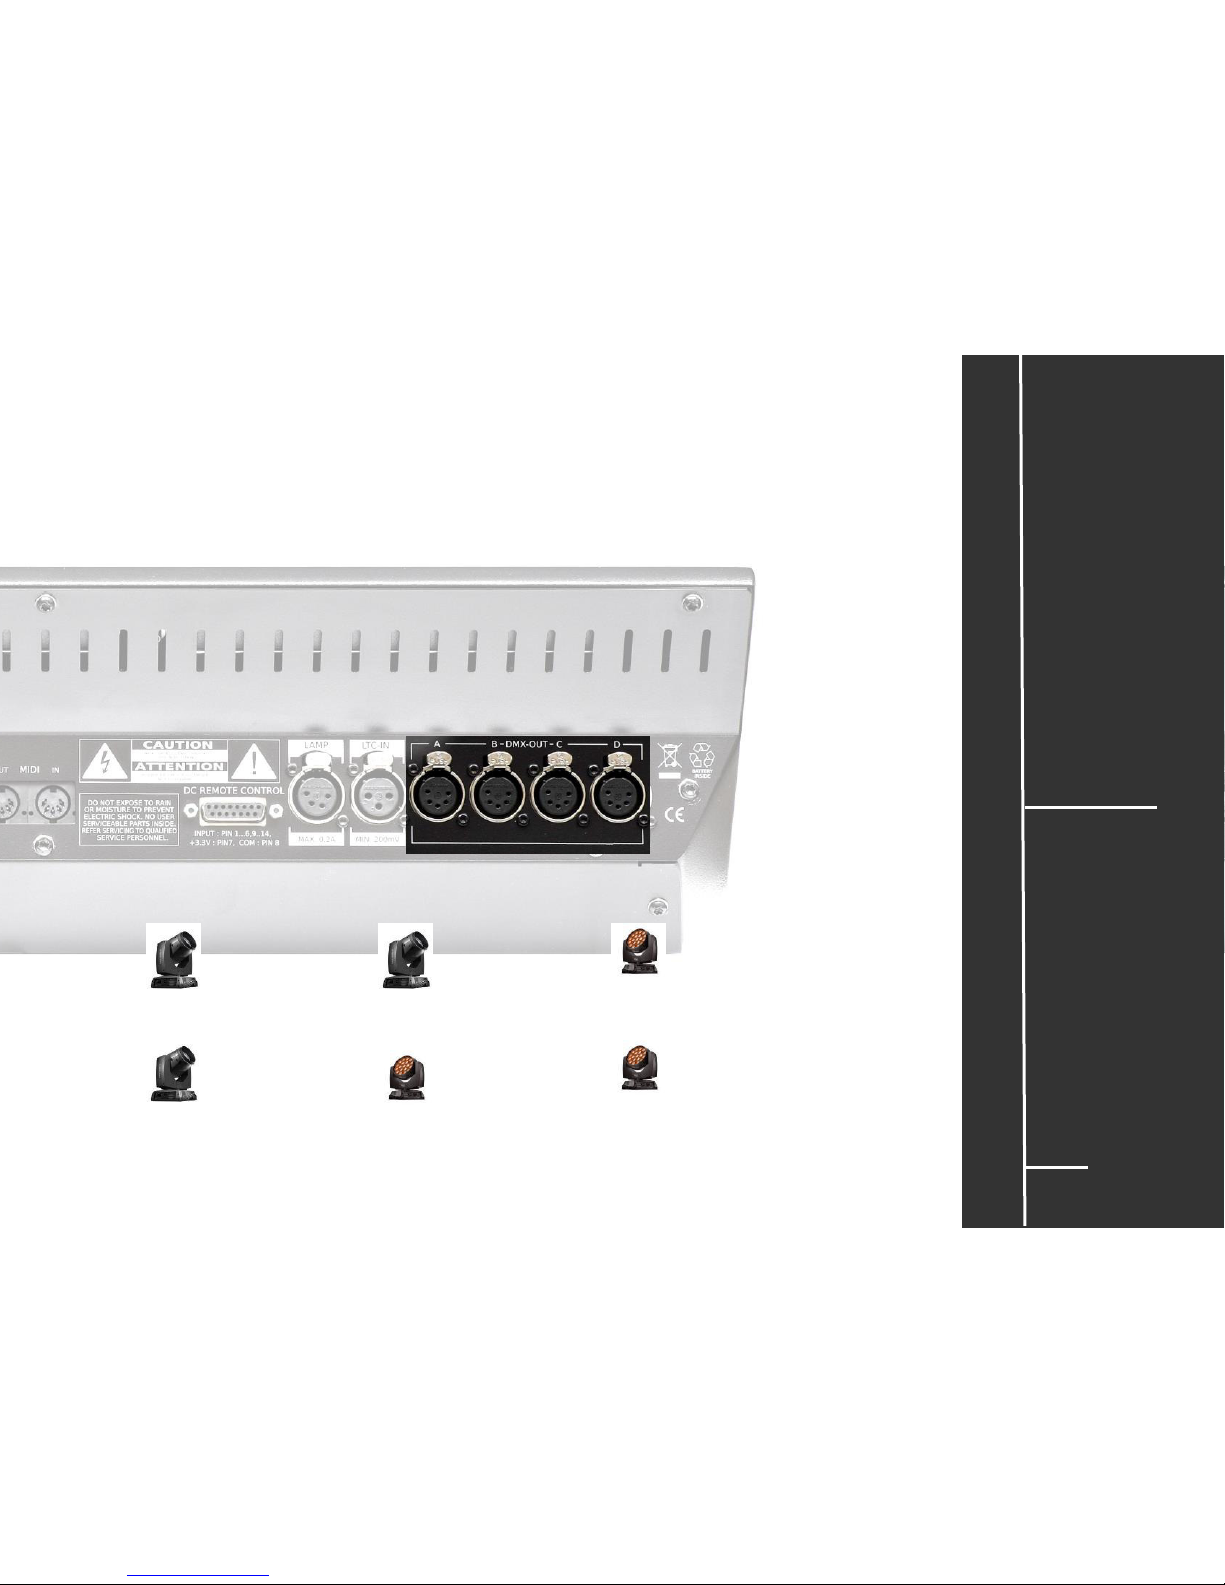
Connect / Limits ….Patchnummer? – Universnummer? – DMX Out?
Damit sich die Konsole mit den Leuchten „unterhalten“ kann, braucht jede Leuchte eine individuelle Adresse.
Diese besteht aus der Universnummer und der Startnummer. Die Startnummer - der Start Patch - muss im
SETUP-Menü in der Konsole jedem Fixture „zugeteilt“ werden.
Dieser Startnummer muss auch an jedem Scheinwerfer eingestellt werden. Startnummer –das ist der für diese
Leuchte reservierte erste Channel. Im unteren Beispiel hat ein Fixture 31 Channels, dann hat die erste
Leuchte den Start Patch 1.001 und die folgende Leuchte den Start Patch1.032. Das zweite Fixture im Beispiel
hat nur 15 Channels. Die folgende Leuchte hat dann z.B. im DMX OUT C den Start Patch 3.016. Die erste
Ziffer ist die Nummer des jeweiligen Univers, in der sich das Fixture befindet.
Die Universen (werden beim Patchen im SETUP-Menü festgelegt) werden immer mit Ziffern gekennzeichnet.
Diese Univers-Ziffer muss nicht an der Leuchte eingegeben werden – die Leuchte muss aber am richtigen
Port angeschlossen sein.
Hinweis: Die Universen 5,6,7 und 8 können nur verwendet werden, wenn ein oder mehrere zusätzliche Geräte
innerhalb eines Netzwerkes installiert sind, z.B. ein MA dot2 Node4. Die dazu notwendigen DMX Out –Ports E,
F, G und H werden dann auf die (physikalischen) DMX Out-Ports der anderen Geräte gelegt
DMX Out A DMX Out B DMX Out C DMX Out D
Universe 1 Universe 2 Universe 3 Universe 4
dot2
Daten
Transport
Sicherheit
Betriebsgrenzen
Quickstart
Connect
Quickstart
ON / OFF
Wartung
Konformität
17
Patch 1.001
Am Fixture eingestellt: 001
Patch 1.032
Am Fixture eingestellt: 032
Patch 2.001
Am Fixture eingestellt: 001
Patch 2.032
Am Fixture eingestellt: 032
Patch 3.001
Am Fixture eingestellt: 001
Patch 3.016
Am Fixture eingestellt: 016
Page 19

18
dot2
Daten
Transport
Sicherheit
Betriebsgrenzen
Quickstart
Connect
Quickstart
ON / OFF
Wartung
Konformität
Connect / Limits ..wie viele Channels kann ich mit dem dot2 –System ausgeben?
Die dot2 XL-F, die dot2 XL-B und die dot2 core Konsolen können jeweils maximal 4096 Channels
verarbeiten, jeder DMX OUT-Port kann 512 Channels ausgeben. Der dot2 F-wing und der dot2 B-wing
können selbst keine Channels ausgeben. Durch die Kombination mehrerer Geräten der dot2 – Familie in
einem Netzwerk (nennt sich Session) lässt sich das Maximum der Channels nicht erhöhen.
dot2 XL-F mit 4x DMX OUT -Port = 4 x 512 (jeder DMX OUTPort kann 512 Channels ausgeben) = möglich sind max 2048
Channels direkt über die DMX OUT -Ports.
Zusätzlich max 2048 Channels z.B. mit …..
+ +
… 1x dot2 XL-F + 2x dot2 Node4 mit gesamt 12
DMX OUT -Ports, über Ethernet in einer Session
verbunden - bleibt aber bei max. 4096
Channels über die DMX OUT -Ports.
Page 20

19
dot2
Daten
Transport
Sicherheit
Betriebsgrenzen
Quickstart
Connect
Quickstart
ON / OFF
Wartung
Konformität
Connect / Limits …wie viele Leuchten kann ich mit einer dot2 Konsole ansteuern?
Antwort: kommt darauf an……Die dot2 Konsolen (dot2 XL-F, dot2 XL-B und dot2 core) können über ihre 4 DMX OutAusgänge jeweils 2048 Channels (Kanäle) ausgegeben – können aber im Verbund mit zusätzlichen Geräten der
dot2 Familie maximal 4096 Channels verarbeiten und ausgeben. Die dot2 F-wing und die dot2 B-wing können selbst
keine Channels ausgeben.
Also einfach die zur Verfügung stehenden Channels durch die maximale Zahl der Channels der Scheinwerfer teilen =
die maximale Anzahl der Scheinwerfer, die angeschlossen werden können
.
Wieviele Channels hat ein Scheinwerfer?
Das hängt ab von der Bauart des Scheinwerfers. Kurz gesagt: je mehr Funktionen ein
Scheinwerfer hat, je mehr Channels braucht er um diese Funktionen anzusteuern.
Warum kann der selbe Scheiwerfer unterschiedliche Kanalzahlen (Channels) haben?
Bei einigen Scheinwerfern kann die Auflösung (wie fein gestuft ein veränderlicher Wert digital dargestellt werden
kann) gewählt werden, und somit kann sich die Zahl der Channels pro Scheinwerfer ändern.
z.B. Dimmer in 8bit Auflösung (256 Stufen - normal) = 1 Channel
Dimmer in 16bit Auflösung (65536 Stufen - fein) = 2 Channels
max
17 x
max
Page 21
Quick-Connect
120/230V
50/60Hz
oder
dot2
Daten
Transport
Sicherheit
Betriebsgrenzen
Quickstart
Connect
Quickstart
ON / OFF
Wartung
Konformität
20
oder
oder
Page 22

21
dot2
Daten
Transport
Sicherheit
Betriebsgrenzen
Quickstart
Connect
Quickstart
ON / OFF
Wartung
Konformität
Connect „Software“ (über Ethernet / Switch)
Hinweis: alle Geräte der dot2 Familie nutzen das IPv6 –System - d.h. es muss in einem Netzwerk
nicht für jedes Gerät eine eigene IP-Adresse erstellt werden. Wenn ein PC / Laptop oder ein Switch
über ein Netzwerk an ein MA dot2 Gerät angeschlossen wird, muss er ebenfalls das IPv6 - System
nutzen können.
+ PC (mit IPv6) +
dot2 Konsole und PC / Laptop mit dot2 onPC
Z.B. zum Übertragen einer Show, die im onPC programmiert wurde, auf die Konsole.
+ PC (mit IPv6) +
dot2 Konsole und PC / Laptop mit dot2 3D
Zur Visualisierung einer Show, die auf der Konsole programmiert wurde.
HINWEIS: Bei programmierbaren Switches ist die IPV6 –Funktion im Defaultzustand oft deaktiviert.
Diese Funktion muss aktiviert werden.
Page 23

22
dot2
Daten
Transport
Sicherheit
Betriebsgrenzen
Quickstart
Connect
Quickstart
ON / OFF
Wartung
Konformität
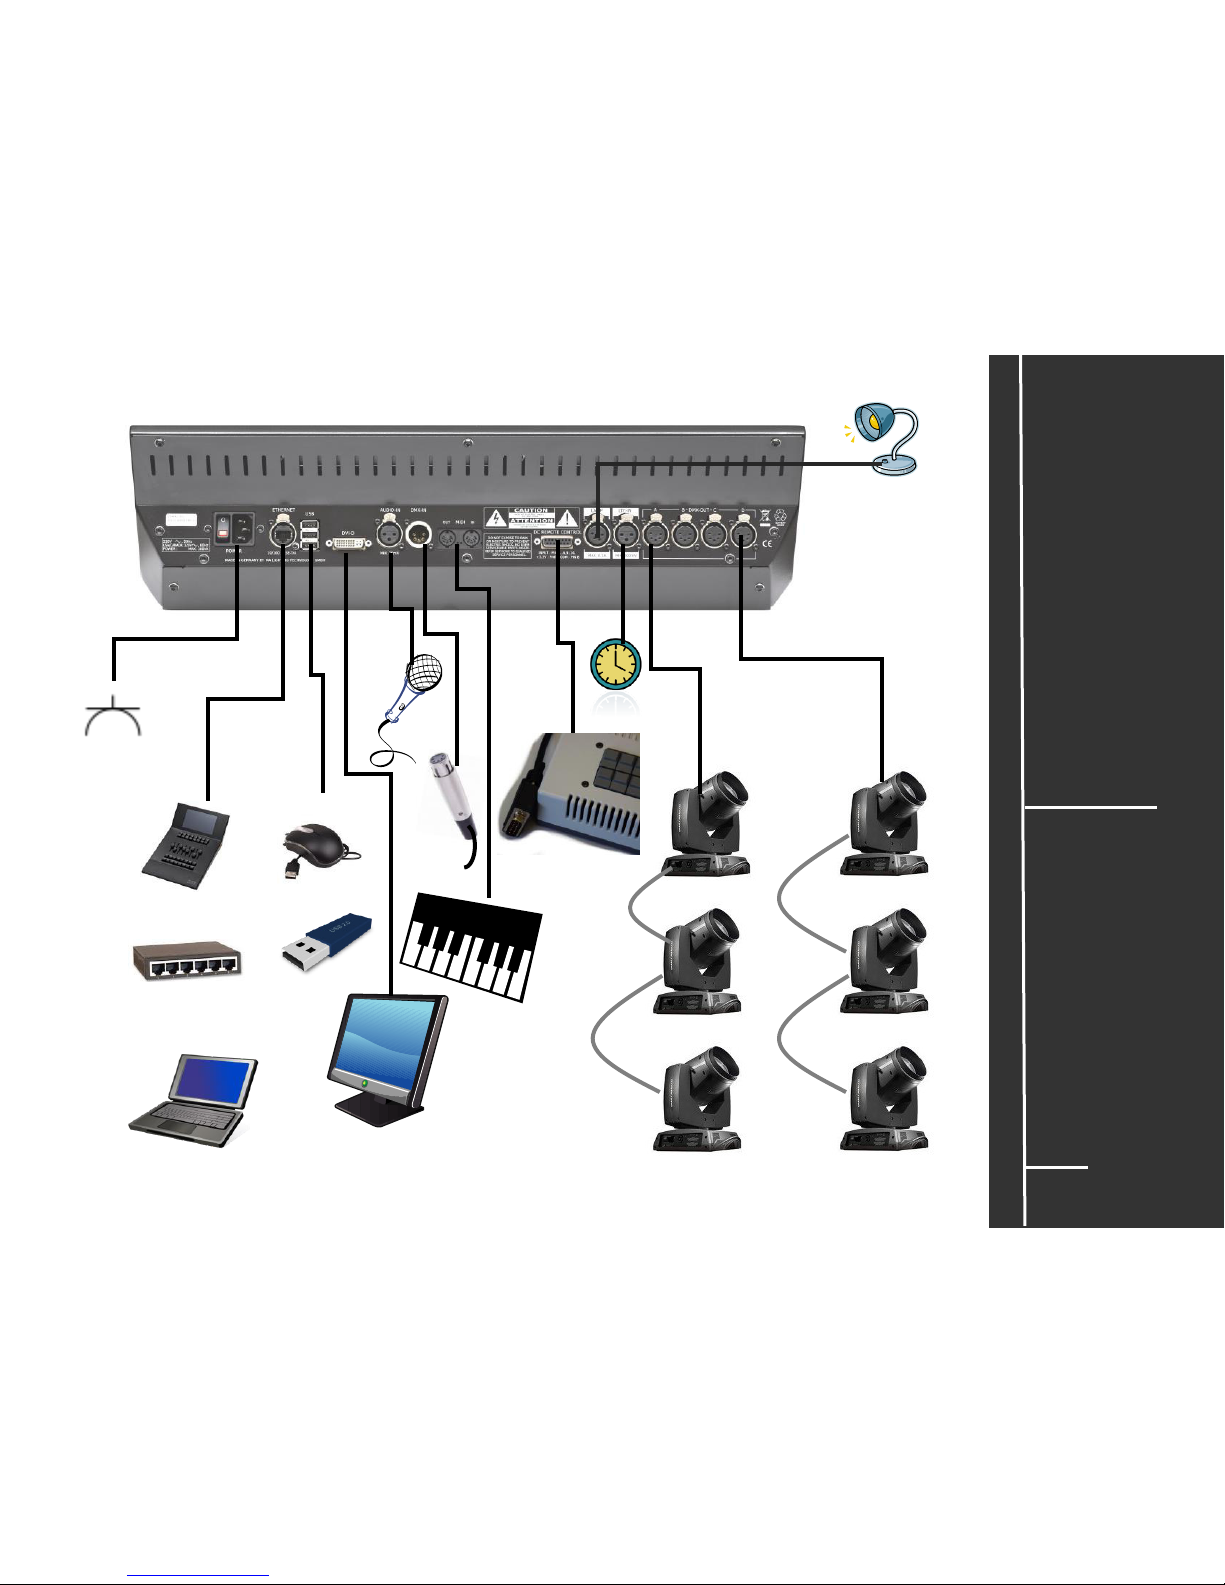
Quick Connect
1 2 3 4 5 6 7 8 9 10 11
1 Hauptschalter AN/AUS (0) und Kaltgeräteeinbaustecker (C14) 120 V ~, 60 Hz (USA, Canada) –
230 V ~ ,50 Hz Das Netzteil schaltet automatisch um. Ein Kabel mit einer Kaltgerätekupplung (C13)
und einem Schutzkontaktstecker entsprechend dem Standard des Einbauortes verwenden.
2 RJ45 Ethernet Anschlussmöglichkeit z.B. für MA dot2 F- wing oder MA dot2 B- wing (kein
CrossOver-Kabel verwenden)
3 3x USB Anschlussmöglichkeit für externes Keyboard, Mouse, Speicherstick …
4 DVI –D Anschlussmöglichkeit für einen externen Monitor
5 AUDIO IN (min 20mV)
6 DMX – IN (XLR 5 pin)
7 Midi –Out / Midi –In
8 Anschluss nur für Analog Remote Control
HINWEIS: diesen Anschluss nicht für andere externe Geräte verwenden!
9 LAMP Anschluss für eine Pultleuchte (max 0,2A)
10 LTC – Timecode – IN (XLR 3 pin)
11 4x DMX OUT (XLR 5 pin)
Page 24

Quick Connect
23
dot2
Daten
Transport
Sicherheit
Betriebsgrenzen
Quickstart
Connect
Quickstart
ON / OFF
Wartung
Konformität
1 2 3 4 5 6 7 8 9 10 11
1 Hauptschalter AN/AUS (0) und Kaltgeräteeinbaustecker (C14) 120 V ~, 60 Hz (USA, Canada) –
230 V ~ ,50 Hz Das Netzteil schaltet automatisch um. Ein Kabel mit einer Kaltgerätekupplung (C13)
und einem Schutzkontaktstecker entsprechend dem Standard des Einbauortes verwenden.
2 RJ45 Ethernet Anschlussmöglichkeit z.B. für MA dot2 F- wing oder MA dot2 B- wing wing
(kein CrossOver-Kabel verwenden)
3 3x USB Anschlussmöglichkeit für externes Keyboard, Mouse, Speicherstick …
4 DVI –D Anschlussmöglichkeit für einen externen Monitor
5 AUDIO IN (min 20mV)
6 DMX – IN (XLR 5 pin)
7 Midi –Out / Midi –In
8 Anschluss für Analog Remote Control.
Hinweis: Diesen Anschluss nicht für andere externe Geräte verwenden!
9 LAMP Anschluss für eine Pultleuchte (max. 0,2A)
10 LTC – Timecode – IN (XLR 3 pin)
Page 25

24
dot2
Daten
Transport
Sicherheit
Betriebsgrenzen
Quickstart
Connect
Quickstart
ON / OFF
Wartung
Konformität
Quick Connect
1 Hauptschalter AN (I) / AUS (O)
2 Kaltgeräteeinbaubuchse (C14) 120 V ~ , 60 Hz (USA, Canada) – 230 V ~ ,50 Hz –
Das Netzteil schaltet automatisch um. Ein Kabel mit einer Kaltgerätekupplung (C13) und
einem Schutzkontaktstecker entsprechend dem Standard des Einbauortes verwenden.
3 Ethernetbuchse RJ 45 10/100 Base T/X
Zum Verbinden des Wing mit der MA dot2 Konsole (kein Crossover-Kabel verwenden).
1 3 2
Page 26

25
dot2
Daten
Transport
Sicherheit
Betriebsgrenzen
Quickstart
Connect
Quickstart
ON / OFF
Wartung
Konformität
EIN / AUS – Schalten
Anschließen
Das Gerät mit dem Stromnetz verbinden. Das Gerät stellt sich automatisch ein (120 -230V /
50–60Hz).
Fixture, Dimmer usw. mit DMX Kabel je nach Bedarf anschließen.
LTC / Audio / Midi bei Bedarf anschließen.
Externen Monitor bei Bedarf an die DVI-D Buchse anschließen. Ein externer Monitor ist sinnvoll
wenn z.B. dot2 F-wings oder dot2 B-wings angeschlossen werden.
Optionale Geräte (dot2 F-wing, dot2 B-wing oder ein dot2 node) anschließen. Direkt über ein
Ethernet-Kabel (wenn nur ein Gerät angeschlossen wird) oder über einen Switch (wenn mehrere
Geräte angeschlossen werden).
Einschalten
Den Hauptschalter an der Rückseite auf Position „I“ stellen.
Die Gerät bootet kurze Zeit und ist danach betriebsbereit.
HINWEIS: dot2 F-wing und dot2 B-wing lassen sich nur in Verbindung mit einer dot2 XL-F, dot2
XL-B oder dot2 core bedienen.
KEINE IP Adressierung nötig – die IP-Adressierung erfolgt automatisch. Alle verbundenen und
eingeschalteten Geräte werden im SETUP –Menü dargestellt.
Ausschalten
HINWEIS: Speichern der Show nicht vergessen! Wenn der Schalter an der Rückseite auf „0“
gestellt wird, dann wird die Konsole sofort ausgeschaltet. Nicht gespeicherte Daten gehen
verloren. Da die Konsolen der dot2 –Familie keine Pufferbatterien besitzen, schalten sich die
Geräte auch nach Abziehen eines Stromkabels sofort ab. Nicht gespeicherte Daten gehen
ebenfalls verloren.
Den Hauptschalter an der Rückseite auf Position „O“ stellen.
Wird das Gerät längere Zeit nicht gebraucht, alle Kabel abziehen.
Page 27

26
dot2
Daten
Transport
Sicherheit
Betriebsgrenzen
Quickstart
Connect
Quickstart
ON / OFF
Wartung
Konformität
dot2 Software Update
Alle dot2 Konsolen können mit einem kostenlosen Update auf den neuesten Software-Stand gebracht werden.
Das Update findet sich auf unserer Homepage www.malighting.com Mit diesem einen Update können alle
Geräte der dot2 Familie, Konsolen und Nodes, aktualisiert werden – der dot2 F- wing und der dot2 B- wing
brauchen kein Update.
ÜBER SETUP mit Standard USB-stick
Die MA Lighting Homepage öffnen und im „dot2“ -Bereich die Software für die dot2 Familie auswählen – mit
ihr kann man die gesamte dot2 Familie updaten.
Die Software auf die root – directory eines Standard - USB stick laden. Beachten, dass nur ein Update – file
auf der root-directory gespeichert ist.
Den USB stick mit der neuen Software in einen der USB –Ports an der Rückseite einsetzen
Die Konsole starten und im SETUP in der Spalte CONSOLE auf SOFTWARE UPDATE drücken
Im Menü erscheint SOFTWARE UPDATE via USB
Den button UPDATE drücken
Auswählen, ob die aktuelle Show gespeichert werden soll oder nicht – mit CANCEL den ganzen Vorgang
abbrechen, dann wird weder gespeichert noch das Update gestartet.
Ein paar Sekunden warten, bis das Update beendet ist.
Mit REBOOT NOW die Konsole neu starten, damit ist das Update abgeschlossen.
Mit einem LINUX USB-stick und MA STICKMAKER
Die MA Lighting Homepage öffnen und im „dot2“ -Bereich die Software für die dot2 Familie auswählen – mit
ihr kann man die gesamte dot2 Familie updaten.
Das dot2*imgz – file und den MA STICKMAKER downloaden.
Den MA STICKMAKER auf einem PC installieren – den Anweisungen des Software folgen.
Einen leeren USB-stick mit dem PC verbinden und mit dem desctop icon den MA STICKMAKER starten.
Den USB-stick selektieren, auf die drei Punkte clicken und die Datei dot2*imgz starten.
Den jetzt formatierten USB-stick, einen externen Monitor und ein Keyboard mit der Konsole verbinden.
Den Power-Button der Konsole drücken und die Taste F10 auf dem Keyboard mehrmals drücken bis die
Passworteingabe auf dem Monitor erscheint.
Mit ENTER bestätigen, den USB-stick selektieren und mit ENTER bestätigen.
Im POP-UP den FACTORY RESET selektieren – die danach startet das Reset und die Konsole rebootet.
Mit dem Bestätigen des LICENSE AGREEMENT ist das Reset beendet und die Konsole …ready to be used.
Page 28

27
dot2
Daten
Transport
Sicherheit
Betriebsgrenzen
Quickstart
Connect
Quickstart
ON / OFF
Wartung
Konformität
dot2 Trouble Shooting
Wenn das Gerät mal nicht macht was es soll – hier ein paar Tipps…
Screens bleiben
schwarz
Stromversorgung in Ordnung?
Gerät eingeschaltet?
Kühlöffnungen im Gehäuse frei?
Stromquelle und Kabel prüfen
Hauptschalter auf „I“ stellen
Öffnungen reinigen und Kühlung
sicherstellen
Konsole neu starten – bei wiederholtem
Auftreten MA Service kontaktieren
Konsole fährt nicht in
den Betriebsmodus
und/oder bleibt beim
Booten „stecken“
Konsole neu starten – bei wiederholtem
Auftreten MA Service kontaktieren
Screens reagieren
nicht auf Berührung
Schaden in der Hardware
MA Service kontaktieren
Screens reagieren
falsch auf Berührung
Screens sind nicht korrekt kalibriert
Die Screens neu kalibrieren (im SetupMenü).
Fixture reagieren
nicht auf die Konsole
Richtig gepatched?
DMX-Kabel in Ordnung?
Universen und Patch im „Setup“ prüfen
Richtiger DMX OUT –Port?
Kabel und Stecker prüfen
Fixture reagieren
nicht auf
angeschlossene
Wings
Verbindung zwischen Wing und
Konsole in Ordnung?
Kabel und Stecker prüfen
Konsole neu starten – bei wiederholtem
Auftreten MA Service kontaktieren
Angeschlossene
wings verbinden sich
nicht
Im SETUP im Menü „WINGS“ Verbindung
herstellen
Fixture reagieren
plötzlich nicht mehr
auf Fader, Buttons
und CommandLine
Master-Fader geschlossen?
Blind- oder Freeze-Funktion
eingeschaltet?
Alle Fader „öffnen“
Auf Playback stellen
Auf die Symbole rechts neben der
Befehlszeile achten – die Symbole geben
Hinweise auf eine evtl. Fehlbedienung
….und sehr viel ausführlicher auf www.ma-dot2.com oder http://forum.ma-dot2.com
Page 29

28
dot2
Daten
Transport
Sicherheit
Betriebsgrenzen
Quickstart
Connect
Quickstart
ON / OFF
Wartung
Konformität
dot2 Help
Die Bedienungsanleitung / Manual unterliegt einer ständigen Anpassung und Verbesserung. Um
immer eine aktuelle Version zur Verfügung zu stellen, steht das Manual auch online zur Verfügung.
In unserer Homepage befindet sich immer die neueste Variante. Das Manual in der Konsole kann
immer nur den Stand der zuletzt upgedateten Software darstellen.
Manual öffnen in der Konsole
HELP- Taste gedrückt halten
Die Taste oder das Window im Screen drücken zu dessen Funktion man eine Erklärung braucht.
Manual öffnen in unserer Homepage
Die MA Homepage öffnen - www.www.ma-dot2.com
Am Ende der Homepage das dot2 Online Manual öffnen
Im Manual blättern und suchen
Das Manual in der Homepage oder in der Konsole (Taste HELP drücken) öffnen.
- Die Software -Version der Konsole wählen (nur in der Homepage möglich).
Mit dem Symbol
oder dem Softkey „Language“ die gewünschte Sprache wählen
In der Übersichtsspalte links das gewünschte Thema mit einem Click öffnen.
oder
Mit dem Symbol oder dem Feld „Search“ die Suchfunktion öffnen. Hier den gesuchten Begriff
eingeben und mit ENTER bestätigen. Danach erscheint eine Übersicht aller Seiten mit diesem Begriff.
Mit den Tasten
und oder den Tasten NEXT / PREVIOUS im Manual blättern.
Mit „ < ESC“ das Help-Menü in der Konsole schließen.
Page 30

29
dot2
Daten
Transport
Sicherheit
Betriebsgrenzen
Quickstart
Connect
Quickstart
ON / OFF
Wartung
Konformität
Reinigung
Geräte der dot2 -Familie benötigen nur ein Mindestmaß an Pflege. Vor dem Reinigen das Gerät von
der Stromversorgung trennen. Die Oberfläche nur mit einem trockenen, nicht fusselnden Tuch
reinigen. Keine flüssigen Reiniger oder Druckluft verwenden. Lediglich die elastische Handauflage
darf mit einem milden Reinigungsmittel und einem feuchten Tuch gereinigt werden. Keinerlei
Lösungsmittel oder scharfe Reiniger verwenden. Darauf achten, dass die Öffnungen für die Kühlluft
frei sind.
Je nach Umgebungsbedingung ist es ratsam, das Gerät alle 2 – 5 Jahre durch einen autorisierten
Service reinigen zu lassen.
Wartung
Das Gerät bedarf keiner regelmäßigen Wartung, deshalb ist es auch nicht notwendig das Gerät zu
öffnen.
HINWEIS: Vor jeder Reparatur das Gerät stromlos machen. Eine Reparatur des Gerätes darf
ausschließlich durch geschultes Personal durchgeführt werden, da beim Öffnen und / oder Entfernen
von Abdeckungen spannungsführende Teile freigelegt werden. Neben anderen Risiken besteht
hierbei die Gefahr eines elektrischen Schlages.
Page 31

12
dot2
Daten
Transport
Sicherheit
Betriebsgrenzen
Quickstart
Connect
Quickstart
ON / OFF
Wartung
Konformität
Konformitätserklärung
Name des Herstellers: MA Lighting Technology GmbH
Anschrift des Herstellers: Dachdeckerstraße 16
D-97297 Waldbüttelbrunn
Deutschland
Erklärt, dass die Produkte
Produktkategorie: Kontrollgerät
Produktnamen: dot2 XL-F
dot2 XL-B
dot2 core
dot2 F-wing
dot2 B-wing
den folgenden Richtlinien sowie den harmonisierten Normen entsprechen:
Sicherheit: EN60065, EN60950-1
LVD 2014/35/EU
EMV (EMC): 2014/30/EG
EN55103-1:2009 sowie EN55103-2:2009
ROHS (II) 2011/65/EU
Zusätzliche Informationen: DMX512, Ethernet, USB, LTC, Audio IN, Midi und analoge
Eingänge müssen geschirmt sein und der Schirm muss mit der
Masse bzw. dem Gehäuse des entsprechenden Steckers
verbunden sein.
Waldbüttelbrunn, 07.11.2016
Dipl. Ing. Michael Adenau
Page 32

31
dot2
Daten
Transport
Sicherheit
Betriebsgrenzen
Quickstart
Connect
Quickstart
ON / OFF
Wartung
Konformität
Die komplette dot2 Familie
dot2 XL-F dot2 XL-B dot2 core
dot2 F-wing dot2 B-wing dot2 Node4
Die dot2 XL-F und XL-B sowie ihre kleineren Geschwister. Für alle Bereiche in der Beleuchtung –
konventionelles Licht, Moving Lights, LEDs, Video usw. Ausgestattet mit zukunftsweisender
Technologie und einigen Spezialitäten (z.B. Touch Command Screen) ist die dot2 Serie besonders
für kleine und mittlere Projekte in der Licht-Szene gerüstet. Alle Kommandotasten haben innerhalb
der dot2 Serie die gleiche Position, das macht das Arbeiten mit den verschiedenen
„Familienmitgliedern“ sehr einfach. Und das intuitive und flexible Programmieren mit einer nahezu
unendlichen Anzahl von Presets, Cues, Pages und Sequenzen ist Familientradition und braucht
eigentlich nicht extra erwähnt zu werden
Page 33

32
dot2
Daten
Transport
Sicherheit
Betriebsgrenzen
Quickstart
Connect
Quickstart
ON / OFF
Wartung
Konformität
dot2 onPC
Dieses Software – Tool beinhaltet alle Funktionen einer „echten“ dot2 Konsole, ist netzwerkfähig
und bietet dem User alle Möglichkeiten zum Üben, Lernen oder OffLine-Programmieren am
Laptop oder PC. Eine Show, die mit dot2 onPC erstellt wurde, kann jederzeit auf eine dot2
Konsole übertragen werden.
Mit der dot2 3D - Software kann es zum perfekten Designstudio ergänzt werden.
Die dot2 onPC und dot2 3D Software stehen auf unserer Homepage www.malighting.com
kostenfrei zum Download.
Dort finden sich auch die Systemvoraussetzungen, die für den Betrieb auf einem Computer oder
Laptop notwendig sind.
Page 34

dot2
Data
Transport
Safety
Instructions
Limitation
Quickstart
Connect
Quickstart
ON / OFF
Maintenance
Conformity
33
dot2 is a full featured lighting control solution with all the advantages of MA Lighting control
solutions. Its full feature set is based on the expertise of the MA developers in creating a
multipurpose lighting control board to fulfill nearly all lighting jobs out there in the field. At
the same time dot2 creates a much easier access to most needed lighting features.
dot2 is the right solution for midsized jobs regardless if it is a theatre style, concert touring
style or TV style project. Therefore it is the best investment for rental companies in the
midsized markets. Straight forward, easy to use, perfect work horses for most of the jobs.
Consoles, that every facility manager or trainee or even a band leader himself could operate
after short instructions.
dot2 is the simple and clever solution – the best of both worlds. It is lightweight, small but
still a full console, it comes with a full feature set and with all connectivity onboard!
Page 35

dot2
Data
Transport
Safety
Instructions
Limitation
Quickstart
Connect
Quickstart
ON / OFF
Maintenance
Conformity
34
Intended Use
The complete dot2 family is intended for control of all kinds of lighting genres such as conventionals,
moving lights, LEDs, video and other media via DMX signal. And may not be used for any other purpose
without the written consent of MA Lighting Technology GmbH.
Transport, operation and maintenance must be performed only by persons who are qualified for the
respective activity. The safety and operating limitations must always be respected.
The 2 dot product range consists of the following components, which can be operated individually or
within an Ethernet network:
dot2 XL-F dot2 XL-B dot2 core dot2 F-wing dot2 B-wing dot2 Node
Accessories included: dustcover, desk lamp, magnetic plate for labeling,
locking IEC cord with bare ends
Manufacturer: MA Lighting Technology GmbH
Dachdeckerstraße 16
Germany D – 97297 Waldbüttelbrunn
For more information and detailed manuals see: www.ma-dot2.com. Please check our Frequently Asked
Questions (FAQ), that you can find online at http://forum.ma-dot2.com/. If there are any questions left,
just send us an e-mail with your contact details and subject information to support@ma-dot2.com . This
E-Mail Service is monitored during MA Lightings regular business hours in Germany. For emergency
services please contact your local distributor.
Page 36

dot2
Data
Transport
Safety
Instructions
Limitation
Quickstart
Connect
Quickstart
ON / OFF
Maintenance
Conformity
35
Specification
dot2 XL-F
Weight: approx. 9,1 kg / 20 pounds
Dimensions: 427 x 736 x 161 mm / 16.8 x 29.0 x 6.4 inch
4 DMX – OUT (XLR 5 pin)
DMX IN (XLR 5 pin)
LTC IN (XLR 3 pin)
Analog Remote IN 15 pin
Midi IN / OUT (Midi Timecode / Midi-Note)
3x 7” Touchscreen, resolution 800 x 480
All keys with dimmable backlight
4x Encoder Wheels
14x Fader (60mm) + 28 Executor Buttons / 28 Button Executor
2x A/B Fader (100mm)
Grandmaster –Fader (60mm)
Page 37

dot2
Data
Transport
Safety
Instructions
Limitation
Quickstart
Connect
Quickstart
ON / OFF
Maintenance
Conformity
36
Specification
dot2 XL-B
Weight: approx. 9,1 kg / 20 pounds
Dimensions: 427 x 736 x 161 mm / 16.8 x 29.0 x 6.4 inch
4 DMX – OUT (XLR 5 pin)
DMX IN (XLR 5 pin)
LTC IN (XLR 3 pin)
Analog Remote IN 15 pin
Midi IN / OUT (Midi Timecode / Midi-Note)
3x 7” Touchscreen, resolution 800 x 480
All keys with dimmable backlight
4x Encoder Wheels
6 x Fader (60mm) + 12 Executor Buttons / 60 Button Executor
2x A/B Fader (100mm)
Grandmaster –Fader (60mm)
Level –Wheel
Page 38

dot2
Data
Transport
Safety
Instructions
Limitation
Quickstart
Connect
Quickstart
ON / OFF
Maintenance
Conformity
37
Specification
MA dot2 core
Weight: approx. ca. 7,0 kg / 15.5 pounds
Dimensions: 427 x 546 x 161 mm / 16.8 x 21.5 x 6.4 inch
4 DMX – OUT (XLR 5 pin)
DMX IN (XLR 5 pin)
LTC IN (XLR 3 pin)
Analogue Remote IN 15 pin
Midi IN / OUT (Midi Timecode / Midi-Note)
2x 7” Touchscreen, resolution 800 x 480
All keys with dimmable backlight
4x Encoder Wheels
6x Executor Faders (60mm) + 12 Executor Buttons / 12 Button Executors
2x A/B Fader (100mm)
Grandmaster –Fader (60mm)
Level –Wheel
Page 39

dot2
Data
Transport
Safety
Instructions
Limitation
Quickstart
Connect
Quickstart
ON / OFF
Maintenance
Conformity
38
Specification
dot2 F-wing
Weight: approx. 3,4 kg / 7.5 pounds
Dimensions: 427 x 263 x 161 mm / 16.8 x 10.4 x 6.4 inch
7” Touchscreen, resolution 800 x 480
All keys with dimmable backlight
8x Executor Fader (60mm) + 16 Executor Buttons / 16 Button Executor
dot2 B-wing
Weight: approx. 3,3 kg / 7.3 pounds
Dimensions: 427 x 263 x 161 mm / 16.8 x 10.4 x 6.4 inch.
7” Touchscreen, resolution 800 x 480
All keys with dimmable backlight
48 Button Executor
Page 40

dot2
Data
Transport
Safety
Instructions
Limitation
Quickstart
Connect
Quickstart
ON / OFF
Maintenance
Conformity
39
Data
Current: 230 V ~ 50Hz / 120V ~ 60Hz (USA, Canada)
Automatic operation, no switching necessary!
Required plug connector: IEC connector C13
(at the rear panel) Power cable: Only adequately protected cables may be used
(min. Ø = 3 x 1,0mm²). Cable and socket are not included in
delivery.
Required plug connector: Must meet the standard in the respective country.
(Power supply) The socket should be serviced by qualified personnel only!
Power input: dot2 XL-F max. 100 VA
dot2 XL-B max. 100 VA
dot2 core max. 100 VA
dot2 F- wing max. 40 VA
dot2 B- wing max. 40 VA
Required connector type (Ethernet): Suitable for socket RJ 45
Required cable type (Ethernet): Ethernet cable Category CAT-5e or higher
Recommended lenght: max 75m
Required connector type (DMX)
5-Pol XLR Type USITT DMX-512/1990
Required cable type (DMX) : DMX 5 Pol cable
Recommended lenght: up to 350 m (under ideal conditions)
Screen(s): 7” Touchscreen with a resolution: 800 x 480 pixel
The screens of MA dot2 series are subject to pixel fault class II (ISO 9241-307).
Following conditions are considered acceptable and within limits:
ITEMS: ACCEPTABLE COUNTS (per 1 000 000 pixels):
Permanent bright dots max 2 (minimum distance between bright dots ≥ 15mm)
2 dots adjacent permanent bright max 1
Permanent dark dots max 5 (minimum distance between dark dots ≥ 15mm)
2 dots adjacent permanent dark max 1
Total bright and dark dots max 5
Some slight scratches on the surface of the screens due to technical reasons.
Page 41

dot2
Data
Transport
Safety
Instructions
Limitation
Quickstart
Connect
Quickstart
ON / OFF
Maintenance
Conformity
40
Transport
Please be aware of the weight of the product. Be careful when moving it; otherwise you may injure
your back or other parts of your body.
Weight: without cover, packaging, case
dot2 XL-F approx. 9,1kg / 20.0 pounds
dot2 XL-B approx. 9.1kg / 20.0 pounds
dot2 core approx. 7.0kg / 15.5 pounds
dot2 F- wing approx. 3.4kg / 7.5 pounds
dot2 B- wing approx. 3.3kg / 7.3 pounds
Remove all cables or USB -devices prior to transport.
Use original MA-Case for transport and storage or a comparable transport device.
Make sure that no stress is exerted on the screens during transport or storage. The screen can break
- then the console may not be used.
Do not place the console on surfaces, vehicles, cabinets or tables that are for reasons of strength or
stability unsuitable for this purpose. Do not twist the body.
Please be aware of temperature and humidity during
transport. Limits see chapter “Safety and Environment”.
The user is responsible for securely fastening the
products for the means of transport and for observing
the safety regulations of the manufacturer when using
means of transport. Non-compliance can result in
personal injury or material damage.
Check the apparatus after transport before installation!
If body of the apparatus is damaged (bent or broken), or
the screen is broken or keys or faders are damaged do
not connect the apparatus to power!
Call our hotline for technical support.
Caution
Page 42

dot2
Data
Transport
Safety
Instructions
Limitation
Quickstart
Connect
Quickstart
ON / OFF
Maintenance
Conformity
41
Symbols and warning labels
I 0
~
Caution
Danger Area
Warning
Danger of electric
shock
Supply
Voltage
Alternating
current
(AC)
Reference to
orderly disposal
Follow any
instructions that are
marked with the
danger signs to
avoid injury.
Do not open the device!
ON/OFF
Dispose of as
hazardous
waste.
Follow the local
applicable
regulations!
Page 43

dot2
Data
Transport
Safety
Instructions
Limitation
Quickstart
Connect
Quickstart
ON / OFF
Maintenance
Conformity
42
Electric shock warning
The unit should be serviced by qualified personnel only, as live parts may be exposed when
opening and /or removing coverings; besides harm to others, you run the risk of suffering an electric
shock.
Page 44

dot2
Data
Transport
Safety
Instructions
Limitation
Quickstart
Connect
Quickstart
ON / OFF
Maintenance
Conformity
43
Safety Instructions
Read all the instructions in the user’s manual, especially the
safety requirements.
Follow all instructions. Keep the user’s manual for future use.
Follow all cautions and warnings indicated on the unit.
Disconnect the mains plug before cleaning the unit; do not
use any liquid or spray cleanser. Clean with a dry cloth.
Do not use the unit near water. Do not expose it to a humid
environment. Do not spill any liquid over the unit.
Unplug this device during lightning storms or when unused for
long periods of time.
Do not block or cover any ventilation slots in the housing they are necessary for the essential airflow within the unit and
protect it against overheating. Do not install the unit into a
frame unless sufficient ventilation is guaranteed. Install in
accordance with the manufacturer’s instructions.
Do not insert any objects through the slots of the unit, as
these could get in contact with live parts or could cause short
circuits. This could cause a fire and/or an electric shock.
Do not place the unit on unstable surfaces. It may fall and
become damaged.
Do not place any objects on the power cord. Protect it from
being walked on or pinched particularly at the plugs and the
point where they exit from the apparatus.
If using an extension cord, make sure the rated output of all
units connected in aggregate does not exceed the maximum
rated output of the extension cord.
If the power cord or the mains plug is damaged, let a qualified
technician replace it immediately.
Only use power cords which are safety-marked for purpose.
All service work should be exclusively performed by qualified
service technicians.
Do not use any high-power walkie-talkies or cellular phones
near the unit.
The unit is provided with a safety plug. This plug can only be
used with safety sockets. These precautions should by all
means be followed. If the plug should not fit into a given
socket (e.g. the case with old sockets), the socket should be
replaced by an electrician.
Do not ignore the safety purpose of the grounding-type
plug. A grounding type plug has two blades and a third
grounding connection. The third connection is provided
for your safety. If the provided plug does not fit into
your outlet, consult an electrician for replacement with
an appropriate outlet.
As with all industrially manufactured goods, the use of
substances that induce an allergic reaction such as
aluminium cannot be generally excluded. If you
develop an allergic reaction (such as a skin rash,
frequent sneezing, red eyes or respiratory difficulties),
consult a physician immediately to determine the
cause.
Refer all servicing to qualified service personnel.
Servicing is required when the apparatus has been
damaged in any way, such as power-supply cord or
plug is damaged, liquid has been spilled or objects
have fallen into the apparatus, the apparatus has been
exposed to rain or moisture, does not operate normally,
or has been dropped. Besides potential harm to others,
you run the risk of suffering an electric shock.
If one of the following conditions occurs, please
disconnect the mains plug and call your dealer or
technical support!
- Power cord or mains plug is damaged or worn.
- Liquid penetrated the unit.
- The device was exposed to rain or high ambient
humidity.
- The device does not function properly, even when
following all the instructions in the manual. Only
manipulate the controls as stated in the manual,
wrong settings on the controls may damage the
device.
- The device has fallen and the housing damaged.
WARNING: TO REDUCE THE RISK OF FIRE OR
ELECTRIC SHOCK, DO NOT EXPOSE THIS
APPARATUS TO RAIN OR MOISTURE
Page 45

dot2
Data
Transport
Safety
Instructions
Limitation
Quickstart
Connect
Quickstart
ON / OFF
Maintenance
Conformity
44
Operating limits
Temperature
Operation:
0°C up to + 40°C / 32°F up to + 104°F
Higher temperature can over-stress the cooling system of the
apparatus and destroy hardware components.
Storage / Transport:
-10°C up to + 50°C / 14°F up to + 122°F
Humidity
Operation: 20% up to 90% relative humidity (no condensation)
Storage / Transport: 10% up to 90% relative humidity (no
condensation)
Environment
Follow all the IMPORTANT SAFETY INSRUCTIONS.
Only use the device within the environment operating limits.
Only use the device indoors.
Air must be free of dust and any hazardous or explosive
substances.
Avoid vibrating support and extreme loud environments.
This device is not protected against splash water. Do not use
this device near water.
Do not use the device in rain or moisture.
Page 46

dot2
Data
Transport
Safety
Instructions
Limitation
Quickstart
Connect
Quickstart
ON / OFF
Maintenance
Conformity
-
45
Connect / Limits.. how many dot2-wings can I connect to a console?
e.g. dot2 core: 2 F-wings + 2 B-wings
dot2 XL-F: 1 F-wing + 2 B-wings
dot2 XL-B: 2 F-wings + 1 B-wing
dot2 onPC: 2 F-wings + 2 B-wings
Direct 1 device is possible - with a switch to a maximum of 6 "modules" are combined into a single unit.
„Modul“ = Screen, simply count the screens. NOTE: There can only connected ever a maximum of 2
wings of the same type - that is always max 2 F-wings and max 2 B-wings.
The connected wings can be identified in the SETUP / dot2 Wings menu and assigned in this menu.
z.B. dot2 XL-F + dot2 B –wing (4 Screens)
z.B. dot2 core + 2 dot2 B-wings + 2 dot2 F-wings (6 Screens = Maximum)
Page 47

dot2
Data
Transport
Safety
Instructions
Limitation
Quickstart
Connect
Quickstart
ON / OFF
Maintenance
Conformity
46
Connect / Limits.. how many dot2 consoles can connect with each other?
A maximum of 5 units can be interconnected in a network. A unit may e.g. be a single console (e.g. dot
2 XL-F), or a combination of a console with wings (e.g. a dot2 core, two 2 dot2 B-wings and two dot2
F-wings). One unit - circled in the diagram below - is therefore always consists of a console and any
wings attached to this console (again, the rule of thumb: 1 unit consists of a maximum of 6 screens).
As the largest network dot2 ie a combination of 5 consoles with 20 wings is also possible. The dot2
system is so well equipped for bigger tasks.
Page 48

dot2
Data
Transport
Safety
Instructions
Limitation
Quickstart
Connect
Quickstart
ON / OFF
Maintenance
Conformity
47
Connect / Limits.. how many dot2 nodes can I connect to a console?
Up to 10 dot2 Node4 can be connected via a switch to a console. This allows to increase the number of
DMX Out ports and it is advantageous to bridge long distances with Ethernet cable instead of using DMX
cables.
.
+ + + +
+ + + + +
e.g. dot2 core + up to 10x dot2 Node4
NOTE:
Of course, a dot2 console with all appliances dot2 the family can be combined.
Page 49

dot2
Data
Transport
Safety
Instructions
Limitation
Quickstart
Connect
Quickstart
ON / OFF
Maintenance
Conformity
Connect / Limits ….Patch number? – Unives number? DMX-Out?
This means that the console can "talk" with the lights, each light needs a unique address. This consists
of the Univers number and the starting number. The starting point - the start Patch - must be "allocated"
to the console every fixture in the SETUP menu. This start-number must be set on each fixture. Start –
number - this number is reserved for the fixtures first channel. In the example below has a fixture 31
channels, then the first fixture has announced the start patch 1.001 and following fixture the start
Patch1.032. The second fixture in the example has only 15 channels. The following fixture then e.g. with
DMX OUT C has start Patch 3.016. The first digit is the number of the Univers, in which the fixture is
located.
The universes (set when patching in the SETUP menu) are always marked with numbers. Univers-digit
must not be entered on the fixture but the lamp must be connected to the correct port.
NOTE: The universes 5,6,7and 8 can be used only if one or more additional devices are installed in a
network, e.g. an dot2 Node4. The required DMX Out ports E, F, G and H are then placed on the
(physical) DMX out ports of the other devices.
DMX Out A DMX Out B DMX Out C DMX Out D
Universe 1 Universe 2 Universe 3 Universe 4
48
Patch 1.001
Setting at Fixture: 001
Patch 1.032
Setting at Fixture: 032
Patch 2.001
Setting at Fixture: 001
Patch 2.032
Setting at Fixture: 032
Patch 3.001
Setting at Fixture: 001
Patch 3.016
Setting at Fixture: 016
Page 50

dot2
Data
Transport
Safety
Instructions
Limitation
Quickstart
Connect
Quickstart
ON / OFF
Maintenance
Conformity
49
Connect / Limits .. how many channels I can output with the dot2 system?
The dot2 XL-F, the dot2 XL-B and the dot2 core consoles can handle a maximum of 4096 channels,
each DMX OUT port can output 512 channels. The dot2 F-wing and dot2 B-wing can not output
channels themselves. By combining multiple devices dot2 - Family in a network (called session itself)
can not increase the maximum of Channels.
dot2 XL-F with 4x DMX OUT port = 4 x 512 (each DMX OUT
port can output 512 Channels) = max 2048 channels are
possible directly via the DMX OUT ports.
Additionally max 2048 channels such as with …..
+ +
… 1x dot2 XL F + 2x dot2 Node4 with total 12
DMX OUT ports connected via Ethernet in one
session - but stays at max. 4096 channels on
the DMX OUT ports.
Page 51

dot2
Data
Transport
Safety
Instructions
Limitation
Quickstart
Connect
Quickstart
ON / OFF
Maintenance
Conformity
50
Connect / Limits … how many fixtures can I control with a dot2 console?
Answer: depends on …… Each dot2 console (dot2 XL-F, dot2 XL-B and dot2 core) can output (channels) via their 4
DMX Out's 2048 Channels – but together with additional devices of the dot2 family up to 4096 channels can be
processed and output. The dot2 F-wing and the dot2 B-wing can not output channels themselves.
So just the available channels divided by the maximum number of channels of the fixture = the maximum number of
fixtures, which can be connected.
How many channels has a fixture?
That depends on the type of the fixture. In short, the more functions a fixture has the more
channels it needs to control these functions.
Why can have the same fixture different channels?
In some fixtures resolution (such as finely graded a variable value can be represented digitally) can be selected, and
thus the number of channels per fixture may change.
e.g. Dimmer with 8bit resolution (256 steps - normal) = 1 Channel
Dimmer with 16bit resolution (65536 steps - fine) = 2 Channels
max
17 x
max
Page 52

Quick-Connect
120/230V
50/60Hz
dot2
Data
Transport
Safety
Instructions
Limitation
Quickstart
Connect
Quickstart
ON / OFF
Maintenance
Conformity
51
or
or
or
Page 53

dot2
Data
Transport
Safety
Instructions
Limitation
Quickstart
Connect
Quickstart
ON / OFF
Maintenance
Conformity
52
Connect „Software“ (over Ethernet / Switch)
NOTE: all units of the dot2 family use the IPv6 system - ie, it must not create a separate IP address
for each device on a network. If a PC / laptop or a switch is connected over a network to a MA dot2
device, it must also IPv6 - use system.
+ PC (with IPv6) +
dot2 Konsole and PC / Laptop with dot2 onPC
E.g. for transmitting a show that was programmed in onPC to the console.
+ PC (with IPv6) +
dot2 Konsole and PC / Laptop with dot2 3D
E.g. to visualize a show that has been programmed on the console.
NOTE: With programmable switches the IPv6 feature is often disabled in the default state. This
function must be activated.
Page 54

dot2
Data
Transport
Safety
Instructions
Limitation
Quickstart
Connect
Quickstart
ON / OFF
Maintenance
Conformity
53
Quick Connect dot2 XL-F and dot 2 XL-B (rear side)
1 2 3 4 5 6 7 8 9 10 11
1 Mains switch ON / OFF(0) and connector (C14) 230 V ~ 50Hz / 120V ~ 60Hz (USA, Canada)
Automatic operation, no switching necessary!
Use a cable with an inlet socket (C13) and a safety plug according to the standard of installation
location
2 RJ45 Ethernet Connection for e.g.dot2 F- wing or dot2 B- wing (do not use CrossOver-cable)
3 3x USB Connection for extern Keyboard, Mouse, storage device …
4 DVI –D Connection for an external monitor
5 AUDIO IN (min 20mV)
6 DMX – IN (XLR 5 pin)
7 Midi –Out / Midi –In
8 Connector only for Analog Remote Control
NOTE: This connector is not used for other external devices!
9 LAMP Connection for a desk lamp (max 0,2A)
10 LTC – Timecode – IN (XLR 3 pin)
11 4x DMX OUT (XLR 5 pin)
Page 55

dot2
Data
Transport
Safety
Instructions
Limitation
Quickstart
Connect
Quickstart
ON / OFF
Maintenance
Conformity
54
Quick Connect dot2 core (rearside)
1 2 3 4 5 6 7 8 9 10 11
1 Mains switch ON / OFF(0) and connector (C14) 230 V ~ 50Hz / 120V ~ 60Hz (USA, Canada)
Automatic operation, no switching necessary!
Use a cable with an inlet socket (C13) and a safety plug according to the standard of installation
location
2 RJ45 Ethernet Connection for e.g.dot2 F- wing or dot2 B- wing (do not use CrossOver-cable)
3 3x USB Connection for extern Keyboard, Mouse, storage device …
4 DVI –D Connection for an external monitor
5 AUDIO IN (min 20mV)
6 DMX – IN (XLR 5 pin)
7 Midi –Out / Midi –In
8 Connector for Analog Remote Control NOTE: This connector is not used for other external devices!
9 LAMP Connection for a desk lamp (max 0,2A)
10 LTC – Timecode – IN (XLR 3 pin)
11 4x DMX OUT (XLR 5 pin)
Page 56

dot2
Data
Transport
Safety
Instructions
Limitation
Quickstart
Connect
Quickstart
ON / OFF
Maintenance
Conformity
55
Quick Connect dot2 F-wing and dot2 B-wing (rear side)
1 Mains switch ON (I) / OFF (O)
2 Connector (C14) 120 V ~ , 60 Hz (USA, Canada) – 230 V ~ ,50 Hz – The power
supply automatically switches. Use a cable with an inlet socket (C13) and a safety plug
according to the standard of installation location.
3 Ethernet connector RJ 45 10/100 Base T/X
For connecting this wing with dot2 console (do not use Crossover-cable).
Page 57

dot2
Data
Transport
Safety
Instructions
Limitation
Quickstart
Connect
Quickstart
ON / OFF
Maintenance
Conformity
56
ON / OFF
Connect
Connect the device to the mains. The device adjusts itself automatically (120 -230V / 50–
60Hz).
Connect fixtures, dimmers and so on with a DMX cable.
Connect LTC / Audio / Midi etc. (if required).
Connect extern monitor to the DVI-D connector (if required).
Connect optional devices (dot2 F-wing and/or dot2 B-wing) via Ethernet cable and – if required -
switch.
Switch ON
Set the mains switch on the rear side to „I“ position
The device boots short time and is then ready for operation.
NOTE: dot2 F-wing and dot2 B-wing can be operated only connected with a dot2 XL-F, dot2 XL-B
or dot2 core console.
NOTE: NO IP addressing required - IP addressing is done automatically. All connected and
powered devices are represented in the SETUP menu.
Switch OFF
NOTE: Don´t forget to save your show! When the mains switch on the rear side is set to „O”,
console will immediately shut down. Any unsaved data will be lost! Since the console of the dot2
family do not have backup batteries, the devices switch off immediately after disconnecting the
power cord. Any unsaved data will be lost also.
Set the mains switch on the rear side to „O“ position.
For longer non-use disconnect all cables.
Page 58

dot2
Data
Transport
Safety
Instructions
Limitation
Quickstart
Connect
Quickstart
ON / OFF
Maintenance
Conformity
57
dot2 Software Update
All dot2 consoles can be updated to the latest software version with a free update.
The update can be found on our website www.malighting.com With this one can update all units of
the dot2 family, consoles and nodes to be updated - the dot2 F wing and the wing dot2 B need no
update.
Way to update your console via SETUP
Open the MA Homepage and select the software for the dot2 family in the "dot2" – area.
Download the dot2*.update file.
Copy the content into the root directory via a USB stick. Make sure there is only one file in the
root directory.
Insert the USB stick with the new software into one of the USB ports on the back.
Start CONSOLE, press SETUP and tap SOFTWARE UPDATE in the column CONSOLE.
The menu SOFTWARW UPDATE VIA USB opens.
Press button UPDATE.
Select whether the current show should be saved or not - CANCEL will abort the whole process,
then will be stored or start the update.
Wait a few seconds until the update is complete.
Start with REBOOT NOW the new console, so the update is complete.
Way to update your console via LINUX USB-stick
Das dot2*imgz – file und den MA STICKMAKER downloaden.
Install MA STICKMAKER on your PC – follow the installation guide.
Insert an empty USB-stick into your PC and double-click the desctop icon to start MA
STICKMAKER.
Select USB-stick, click on the three dots, select dot2*imgz and click on START.
Insert the now formatted USB-stick, connect an external monitor and an keyboard to your console
Press the Power-Button on the back of the console and press F10 on the keyboard several times
until the password request appears on the external monitor.
Press ENTER, select your USB-stick and press ENTER.
An POP-UP opens, select FACTORY RESET– after that the console resets and start rebooting.
Agree to LICENSE AGREEMENT to compete the Reset, The console is…ready to be used.
Page 59

dot2
Data
Transport
Safety
Instructions
Limitation
Quickstart
Connect
Quickstart
ON / OFF
Maintenance
Conformity
58
dot2 Trouble Shooting
If the device does not do what it should - here are a few tips ...
Screens remain
black
Power supply is OK?
Turned on?
Cooling holes free in the housing?
Check the power source and cables
Set the main switch to "I"
Clean the holes and ensure cooling
Restart the console – if this occurs
repeatedly contact MA Service
Console does not
move to the
operating mode and
/ or remains stuck at
boot mode
Restart the console – if this occurs
repeatedly contact MA Service
Screens do not
respond to touch
Hardware damage
Contact your nearest MA Service
Screens respond
incorrectly to touch
Screens are not calibrated
correctly
Recalibrate the screen (Setup menu).
Fixture not respond to
the console
Properly patched?
DMX cable right?
Check universes and patch in the "Setup"
Proper DMX OUT port?
Check cables and connectors
Fixture not respond to
the connected Wings
Connection between Wing and
console right?
Check cables and connectors
Restart the console – if this occurs
repeatedly contact MA Service
Connected wings do
not react
Connect wings in SETUP in the "WINGS"
menu
Fixture suddenly no
longer respond to
faders, buttons and
Command Line
Master fader closed?
Switched Freeze or Blind function?
"Open" All faders
Set to Playback
Note the icons to the right of the command
line - the symbols provide clues to a
possible faulty operation
…. and in much more detail on: www.ma-dot2.com or http://forum.ma-dot2.com
Page 60

dot2
Data
Transport
Safety
Instructions
Limitation
Quickstart
Connect
Quickstart
ON / OFF
Maintenance
Conformity
59
dot2 Help
The user guide / manual is subject to continuous adaptation and improvement. In order to provide a more
current version available, the manual is also available online. In our home page there is always the latest
version. The manual in the console can always represent only the state of the last new updated software.
Use the manual in the console
Press and hold HELP- button
Press button or the window on the screen of the function you need an explanation.
Use the manual in our homepage
Open MA Homepage - www.malighting.com
Open „Support“ area and open the MA dot2 manual.
Searching and browse the manual
Open manual in the MA homepage or in the console (press button HELP).
- Select Software -Version (only possible in the homepage).
Select your desired language with symbol
or soft key „Language“.
In the overview column to the left select the theme with one click
or
Open search function with or soft key „Search“. Type in your desired term and confirm with
ENTER. Then an overview of all pages appears with this term.
Browse the manual with
and buttons or “NEXT / PREVIOUS” buttons.
To close HELP –menu press soft key „ < ESC“ on the console.
Page 61

dot2
Data
Transport
Safety
Instructions
Limitation
Quickstart
Connect
Quickstart
ON / OFF
Maintenance
Conformity
60
Cleaning
Devices of the dot2 family only requires minor attention. Disconnect electric power supply prior to
cleaning. Clean the surface only with dry soft cloth. Do not use any liquid cleaner or compressed air.
Do not use any solvent. Only the elastic wrist rest may be cleaned with a mild detergent and a damp
cloth. Check ventilation holes are clear.
Depending on the environment we recommend to clean the device professionally every 2 – 5 years.
Maintenance
The unit requires no regular maintenance, so it is not necessary to open the device.
NOTE: Before any repair, disconnect the device from the mains. The unit should be serviced by
qualified personnel only, as live parts may be exposed when opening and/or removing coverings;
besides others, you run the risk of suffering an electric shock.
Page 62

dot2
Data
Transport
Safety
Instructions
Limitation
Quickstart
Connect
Quickstart
ON / OFF
Maintenance
Conformity
61
Declaration of Conformity
Manufacturer’s name: MA Lighting Technology GmbH
Manufacturer’s address: Dachdeckerstraße 16
D-97297 Waldbüttelbrunn
Germany
declares that the products
Product category: Control unit
Name of products: dot2 XL-F
dot2 XL-B
dot2 core
dot2 F-wing
dot2 B-wing
complies with the following product specifications and harmonized standards :
Safety: EN60065, EN60950-1
LVD (Low Voltage Directive) 2014/35/EU
EMV (EMC): 2014/30/EG
EN55103-1:2009 as well EN55103-2:2009
ROHS (II) 2011/65/EU
Additional information: DMX512, Ethernet, USB, LTC, Audio IN, Midi and analogue
input must be shielded and the shielding must be connected
to the earthing resp. to the housing of the corresponding plug.
Waldbüttelbrunn, November 11, 2016 Dipl. Ing. Michael Adenau
Page 63

MA dot2
Node4 1k
dot2
...and the other members of the dot2 family
dot2 XL-F dot2 XL-B dot2 core
dot2 F-wing dot2 B-wing
The dot2 XL-F and XL-B as well as their smaller siblings for all aspects of
lighting - conventional lighting, moving lights, LEDs, video, etc. Equipped with
cutting edge technology and some specialties (e.g. Touch Command Screen)
the dot2 series is particularly suitable for small and medium-sized projects in the
light scene. All command buttons have within the series dot2 the same position,
which makes working with the various "family members" very easy. And the
intuitive and flexible programming with an almost infinite number of presets,
cues, pages and sequences is a family tradition and really needs not to be
specially mentioned.
62
Page 64

dot2
63
dot2 onPC
This software tool incorporates all functions of a „real“ dot2 console. It communicates with dot2
consoles via MA-Net2 over Ethernet and it can be used for running, programming or offline
programming a show. Furthermore it is expandable to a complete design studio by connecting it to
dot2 3D.
The dot2 onPC and dot2 3D software can be downloaded free of charge at www.malighting.com
There you will find the relevant system requirements as well.
Page 65

dot2
Gerätetyp / model:… … dot2 XL-F
… dot2 XL-B
… dot2 core
… dot2 F- wing
… dot2 B- wing
Optionen / options:…………………………………………….
Seriennummer / serial number:…………………………….
Baujahr / year of manufacture:……………………………
Distributor:
Page 66

dot2
Notizen/notes:………………………………………………………………………………
…………………………………………………………………………………………………
…………………………………………………………………………………………………
…………………………………………………………………………………………………
…………………………………………………………………………………………………
…………………………………………………………………………………………………
…………………………………………………………………………………………………
…………………………………………………………………………………………………
…………………………………………………………………………………………………
…………………………………………………………………………………………………
…………………………………………………………………………………………………
…………………………………………………………………………………………………
…………………………………………………………………………………………………
Page 67

47x
 Loading...