

Malem MO22 Operation Manual
IMPORTANT
Please read this instruction
sheet before use
Malem
™
Vibro-Watch ‘S’
Operation Manual
· press S to end and display normal time,
date and day of week or seconds
· press S to toggle day of week or seconds
Please note that you can not activate
both alarm systems at the same time.
Malem Medical reserve the right to
change the specifications without
prior notice.
Malem Medical, 10 Willow Holt, Lowdham, Nottingham NG14 7EJ, England, UK
Tel: + 44 (0)115 966 4440 Fax: + 44 (0)115 966 4672, E-mail: malem@malem.co.uk
Web: www.malem.co.uk Web: www.malemmedical.co.uk
Malem Medical Ltd
10 Willow Holt
Lowdham
Nottingham
NG14 7EJ
England, UK
Tel: + 44 (0)115 966 4440
Fax: + 44 (0)115 966 4672
E-mail: malem@malem.co.uk
Web: www.malem.co.uk
Web: www.malemmedical.com
© Malem Medical 2014
Malem Medical Ltd reserves the right to
change the specifications without prior
notice.
MO22/007/14
1 23456
7 89101
1
12
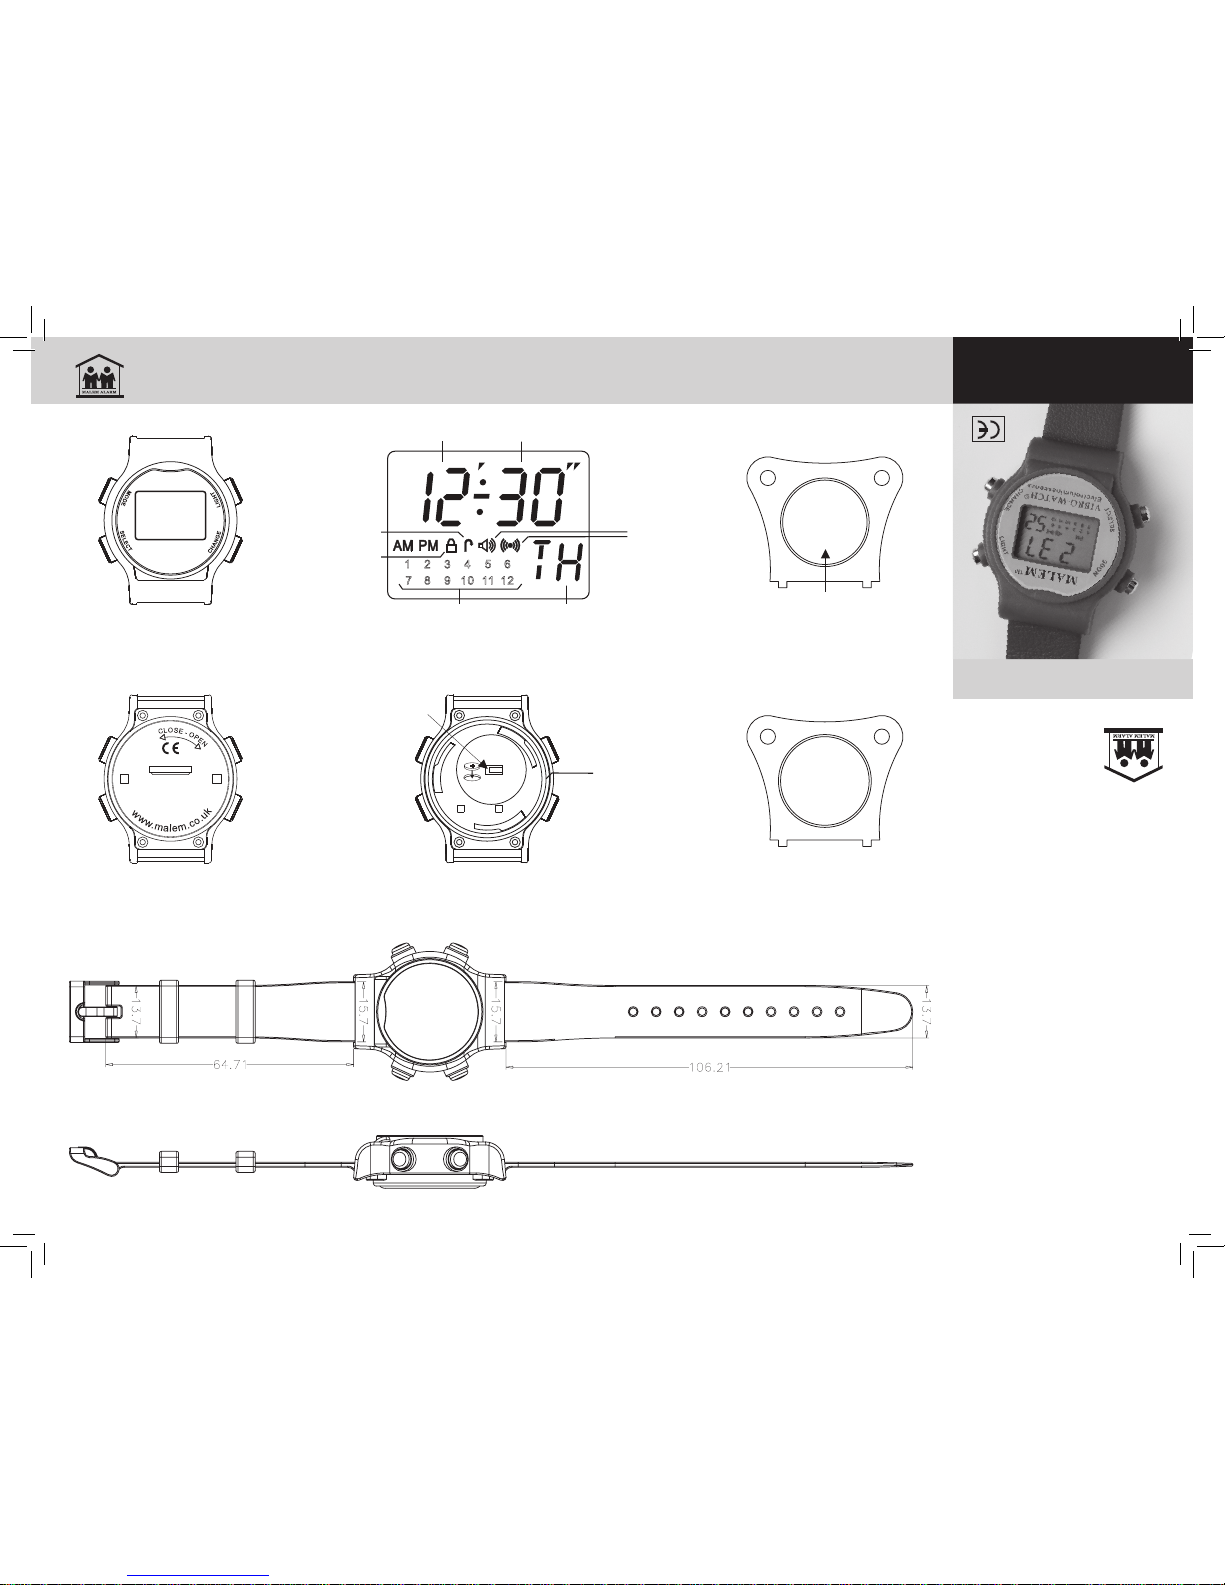
LCD Display
Month/Hour
Date/Minute
Day/Second
12-Alarms
Repeat
Timer
Lock
Battery Door
Opener
CR-1632
Lithium
Battery
Compartment
Label
Electroluminescence
Front View
VIBRO-WATCH
©
Sound
Vibration
MALEM
TM
Alarm Format
For
Professional
Use Only
Model
MO22
Battery Door
Opener
and
Battery Holder
1 234 5 6
7 89101
1
12
LCD Display
Month/Hour
Date/Minute
Day/Second
12-Alarms
Repeat
Timer
Lock
Battery Door
Opener
CR-1632
Lithium
Battery
Compartment
Label
LITHIUM
BATTERY
CR-1632
Battery
Compartment
Label
+
Serial Number
Electroluminescence
Front View
VIBRO-WATCH
©
Back View
Model MO22
MALEM
TM
CR-1632
▼
●
●
Sound
Vibration
Lift metal tab slightly
when replacing battery
Open/Close
Indicator
MALEM
TM
Alarm Format
To avoid damage use
a watch repair shop
‘O’Ring
(Do not lose)
Malem™ Vibro-Watch ‘S’ Operation Manual
All measurements are show in millimeters
Model
MO22
Malem™ Vibro-Watch ‘S’ Operation Manual
A. Features
•Real Time display in Hour, Minute, Second
•Date Display when (C) key is pressed
•Stopwatch
•Repeat Countdown Timer Alarm with
Start/Stop time period setting
•12 Specific Time Alarms
•Specific Time Alarm and Countdown Timer
can be operated simultaneously
•Memory stores all settings when replacing
battery. No need to re-programme
•15 seconds vibration and/or sound alarm
format can be selected individually
•Different alarm sounds for Specific Time
Alarm and Countdown Timer
•Key Tone Response when operating keys
•Displays Electroluminescence Backlight
•Lock Setting function to avoid accidental
change
B. Key Function
• Mode Key (M) - toggle the key to move
between modes sequentially
• Select Key (S) - gently press and release
key to alter Second and Week-day display
mode or select the desired item in setting
mode
• Change Key (C) - gently press and release
key to show Date or change setting
• Light Key (L) - press once to light up the
display for 3 seconds
• Alarm Stop - press any key to stop the
active alarm
C. Operating Procedures
1. To set the Date and Time ‘ TE ’
• Gently press (S) Key and hold for
3 seconds until the Second digit flash
• Press (C) Key once to set the digit to zero
• Press (S) Key once Minute digit flash
• Press (C) Key to set correct minute
• Press (S) Key once Hour digit flash
• Toggle (M) Key to select AM/PM or 24 hour
format (Military Time)
• Press (C) Key to set correct hour
• Press (S) Key once The Month digit
flashes
• Press (C) Key to set correct Month
• Press (S) Key once The Day digit flashes
• Press (C) Key to set the correct Day
• Press (S) Key once The Weekday
wording flashes
• Press (C) Key to set the correct Weekday
• Press (S) Key once to go back to the Real
Time display TE
2. Stopwatch ‘ WA ’
(i) Normal Counting
• Press (M) Key once to enter Stopwatch
mode
•Wording WA displays and then goes into
Stopwatch mode
• Press (S) Key once to start the counting
• Press (S) Key again to stop the counting
• Press (C) Key to set reading zero
• Press (M) Key once to go back to the Real
Time display TE
(ii) Sectional Counting
• Press (M) Key once to enter Stopwatch
mode
• Wording WA display and then goes into
Stopwatch mode
• Press (S) Key to start the counting
• Press (C) Key once to read the first
sectional time
• Press (C) Key once to recover the time
running
• Press (C) Key again to read the second
sectional time
• Sectional count can be repeated until
the (S) Key is pressed to terminate
• Press (C) Key to set to zero
• Press (M) Key once to go back to the Real
Time display TE
3. Periodic Auto-Repeat Alarm
(Countdown Timer) ‘ PA ’
(i) To set the Countdown Timer
• Press (M) Key twice to enter the
Countdown Timer setting mode PA
• Wording PA displays and then sets
page automatically
• Gently press and hold (S) Key for 3
seconds until the minute digit flashes
• Press (C) Key to set countdown
period in minute range 0 to 59
• Press (S) Key once and the hour digit will
flash
• Press (C) Key to set countdown period
hour range 0 to 23
• Press (S) Key once, to set the start Time,
‘St’ will be displayed (Minutes flash)
• Press (C) Key to set the start countdown
time in Minutes (Minutes will flash)
• Press (S) Key once, starting time Hour
flash, wording ‘St’ shown
• Press (C) Key to set the start countdown
time in Hours
• Press (S) Key once to set the end time, the
wording ‘En’ will then be displayed (Minutes
will flash)
• Press (C) Key to set the countdown end
time in Minutes
• Press (S) Key once, to ending time Hour
flash, wording ‘En’ will then be displayed
• Press (C) Key to set the countdown end
time in Hours
• Press (S) Key to confirm and starting
countdown
• Counting activation is valid within the
starting and ending time only
• Maximum countdown time is 23 hours 59
minutes
• Press (M) Key once to go back to the Real
Time display TE
• Countdown time can be restarted
(Synchronised) by gently pressing the
(C) Key for 3 seconds
Note: If the Start Time and End Time are
identical, countdown activation function will
be continuous.
(ii) To Activate or Terminate the
Count down Alarm PA
• Press (M) Key twice to enter the Countdown
Timer setting mode
• Wording PA display and then set page
automatically
• Toggle (C) Key to select the alarm format,
icon means sound only, icon means
vibration only, both icons displayed means
both vibration and sound are activated
• Both icons hidden means the Countdown
Timer has been terminated, but the setting
remains saved in the memory
• Press (M) Key once to go back to the Real
Time display TE
• Icon will be shown on display if the
alarm had been activated
• When Icon flashes this indicates the timer
is counting. Countdown activation is valid
within the starting and ending time only
(iii) View the Setting
• Press (M) Key twice to enter the PA
Countdown Timer setting mode
• Wording PA display and then to setting page
automatically
• Display showing the countdown status
• Press (S) Key once to show countdown
period setting
1 23456
7 89101
1
12
LCD Display
Month/Hour
Date/Minute
Day/Second
12-Alarms
Repeat
Timer
Lock
Battery Door
CR-1632
Lithium
Battery
Compartment
Label
Sound
Vibration
Alarm Format
Real Time
Stopwatch
Alarm Set
Timer Set
TE WA
PA AL
Repeat
Specific
Mode (M) Light (L)
Change (C)Select (S)
• Press (S) Key again to show the start
countdown time
• Press (S) Key again to show the countdown
end time
• Press (M) Key once to go back to the Real
Time display
(iv) Restart (Synchronised) PA Countdown
Timer
• Press (M) Key twice
• Wording PA displays and then goes to
setting page automatically
• Gently press and hold (C) Key 3 seconds
• The timer resets and counts from the
beginning again
• Press (M) Key once to go back to the Real
Time display
4. Specific Time Alarm ‘ AL ’
(i) To Set Alarm Time
• Press (M) Key 3 times to enter Specific Time
Alarm Setting mode AL
• Wording AL and setting page displays
• Press (S) Key to alter alarm number 1 to 12
until desired number displays
• Gently press and hold (S) Key 3 seconds
until minute digit flashes
• Press (C) Key to set the desired minute
• Press (S) Key once alters to the hour digit
flash
• Press (C) Key to set the desired hour
• Press (S) Key to confirm the setting
• Press (C) Key to select the alarm format and
activate the alarm sound and/or vibration
• Press (S) Key to select another alarm
number if necessary adjust as above
• Repeat the above process to set another
alarm time
• Press (M) Key once to go back to the Real
Time display
(ii) To Activate or Terminate the Specific
Time Alarm
• Press (M) Key 3 times to enter Specific Time
Alarm Setting mode
• Wording AL and setting page display
• Press (S) Key to alter number 1 to 12 until
desired number displays
• Toggle (C) Key to select the alarm format,
icon means sound only, icon means
vibration only, both icons displayed means
both vibration and sound are activated
• If both icons are blank this means this alarm
has been terminated but the time setting
would not be lost. The settings will be saved
in the memory.
• Press (S) Key again to select another alarm
number if necessary
• Repeat the above process to activate or
terminate another alarm
• Press (M) Key once to go back to the Real
Time display
• The activated Alarm Number will be shown
on the Time Display
5. Date, Time Display
• Press (C) Key once
• Time display alter to Date and Weekday
display
• Display recover to Time display automatically
after 5 seconds
• If press and hold the (C) Key, Date and Week day display will be maintain until C
key released
6. Weekday and Second Display
Mode Alteration
• Press (S) key once
• The running second digit will alter to
weekday display mode
• Press (S) Key again
• The weekday digit will alter back to second
display mode
7. Display Back Lighting
• Press (L) Key once
• LCD display lights up for 3 seconds
8. Lock and Unlock Settings
• Press (S) and (M) Key simultaneously
to lock all functions
• Icon will be shown on the display
• All setting and functions will be locked
• Press (S) and (M) Key simultaneously once
again to unlock all functions
• The icon will then disappear
D. Battery Replacement
TO PREVENT DAMAGE PLEASE USE
A PROFESSIONAL WATCH REPAIR SHOP
Battery: CR-1632 (Battery life about three months
when new). Use supplied key to open battery
compartment. Please do not damage or lose
the rubber ‘O’ underneath the battery cover.Lift
metal contact slightly before inserting fresh new
battery. Please observe correct polarity.
E. Guarantee
The MalemTM Vibro-Watch ‘S’ guarantee covers
manufacturing defects for one year from date of
purchase. It does NOT cover battery, glass, strap
discolouration or damage caused by wear and
tear, water, abuse or misuse.
F. Disclaimer
Please note that the MalemTM Vibro-Watch ‘S’
is designed as a helpful and discreet vibration
reminder. It is not intended to replace human
care or supervision and the manufacturer, Malem
Medical, is not responsible for any consequences
resulting from watch use, misuse or failure.
Date/Minute
CR-1632
Lithium
Battery
Sound
Vibration
Alarm Format
CR-1632
Lithium
Battery
Sound
Vibration
Alarm Format
Date/Minute
CR-1632
Lithium
Battery
Sound
Vibration
Alarm Format
Date/Minute
CR-1632
Lithium
Battery
Sound
Vibration
Alarm Format
Date/Minute
CR-1632
Lithium
Battery
Sound
Vibration
Alarm Format
CR-1632
Lithium
Battery
Sound
Vibration
Alarm Format
Date/Minute
CR-1632
Lithium
Battery
Sound
Vibration
Alarm Format
Date/Minute
CR-1632
Lithium
Battery
Sound
Vibration
Alarm Format
 Loading...