


Alarms cure by speeding up the natural process
Malem Medical, 10 Willow Holt, Lowdham
Nottingham NG14 7EJ, England, UK
Tel: + 44 (0)115 966 4440 Fax: + 44 (0)115 966 4672
E-mail: malem@malem.co.uk
Web: www.malem.co.uk Web: www.malemmedical.co.uk
FCC Certified. © Malem Medical 2009 MM160109
Malem Enuresis Wireless
Alarm Instruction Booklet
Best Results are obtained when:
1. Child is motivated and wants to be dry.
2. Child wakes up to the alarm when activated.
3. Parents/Guardians help to wake up the
child when the alarm sounds especially
at the early stages of treatment.
4. The receiver must be in the same room with the
child so that the child can wake up and reset it.
5. No lifting, no nappies and no withholding
fluids.
IMPORTANT
Please read instruction booklet before use
Model MO12

2
Malem Enuresis Wireless Alarm
Instructions: Please read
1. Select a pair of close fitting cotton underpants.
2. Attach the small transmitter (Tx) to the outside of the underpants
waistband using the magnetic clip. See page 12.
3. Lift the Easy-Clip© lever, remove and dispose of the white plastic
insulator (if present). Keep lever up.
4. Attach the Easy-Clip© sensor to the outside of the underpantsʼ, at
the location most likely to get wet first (boy or girl), by folding and
inserting the material inside the sensor jaws at the front. Lower the
lever to lock onto the material. See diagram below.
5. Switch on the receiver (Rx). Red LED will flash.
6. Place the receiver away from the bed but in the same room if treating
Enuresis (bedwetting).
7. Upon waking to the alarm sound, remove the Easy-Clip© sensor by
lifting the lever. Stop the alarm sound by pressing the reset button on
the top of the receiver. Do not switch off the receiver. Use the lavatory
to completely empty the bladder.
8. Replace the transmitter and the Easy-Clip© sensor onto a clean and
dry pair of underpants as before.
Lock the Easy-Clip
onto the material by
pressing down the lever.
IMPORTANT:
Regularly CLEAN Easy-Clip
Sensor in soapy water, rinse
and shake dry.
IMPORTANT: DO NOT PLACE
ANY MATERIAL UNDER THE
SECURING LEVER.
Place underwear material into mouth
(jaws) at the front of the Easy-Clip .

3
Malem Enuresis Wireless Alarm
Important: Rapid awakening upon hearing the alarm is vital for
success. Most children, including non-bedwetters, tend to sleep
soundly and heavily when at home. Better results are obtained if the
parents/guardians help to wake the child upon hearing the alarm. The
child must wake up sufficiently to be able to recall the event in the
morning.
●
Motivation is vital. The child must want to be dry before using the
alarm. You cannot help a child that does not want to help his or
herself. Try and find out why they donʼt want to be helped. It could be
some other problem.
●
The child should be allowed to drink as much as they need even
before going to sleep. Fruit juice or water is ideal. Avoid fizzy drinks,
tea and coffee.
●
No nappies or pull-ups.
●
No lifting of the child (to empty the bladder) before the parents go
to bed.
●
Use a progress chart. Great encouragement is delivered by seeing
a steady improvement.
●
Always praise the child for a dry night. Never scold or chastise for a
wet night.
●
To avoid relapses use the alarm for a minimum of two weeks after
dryness has been achieved.
●
Regularly clean the Easy-Clip© sensor in soapy water. Rinse and
shake dry to prevent ʻfluffʼ and urine accumulation inside the jaws.
●
Always test the alarm by lowering the Easy-Clip© lever
(without material). The Tx LED should glow and the receiver
should sound.
●
When not in use never leave the Easy-Clip© lever down as
this will activate the transmitter and discharge the battery.
●
Always remove the batteries and clean the Easy-Clip© sensor if the
alarm is not going to be used for a long period of time.
4
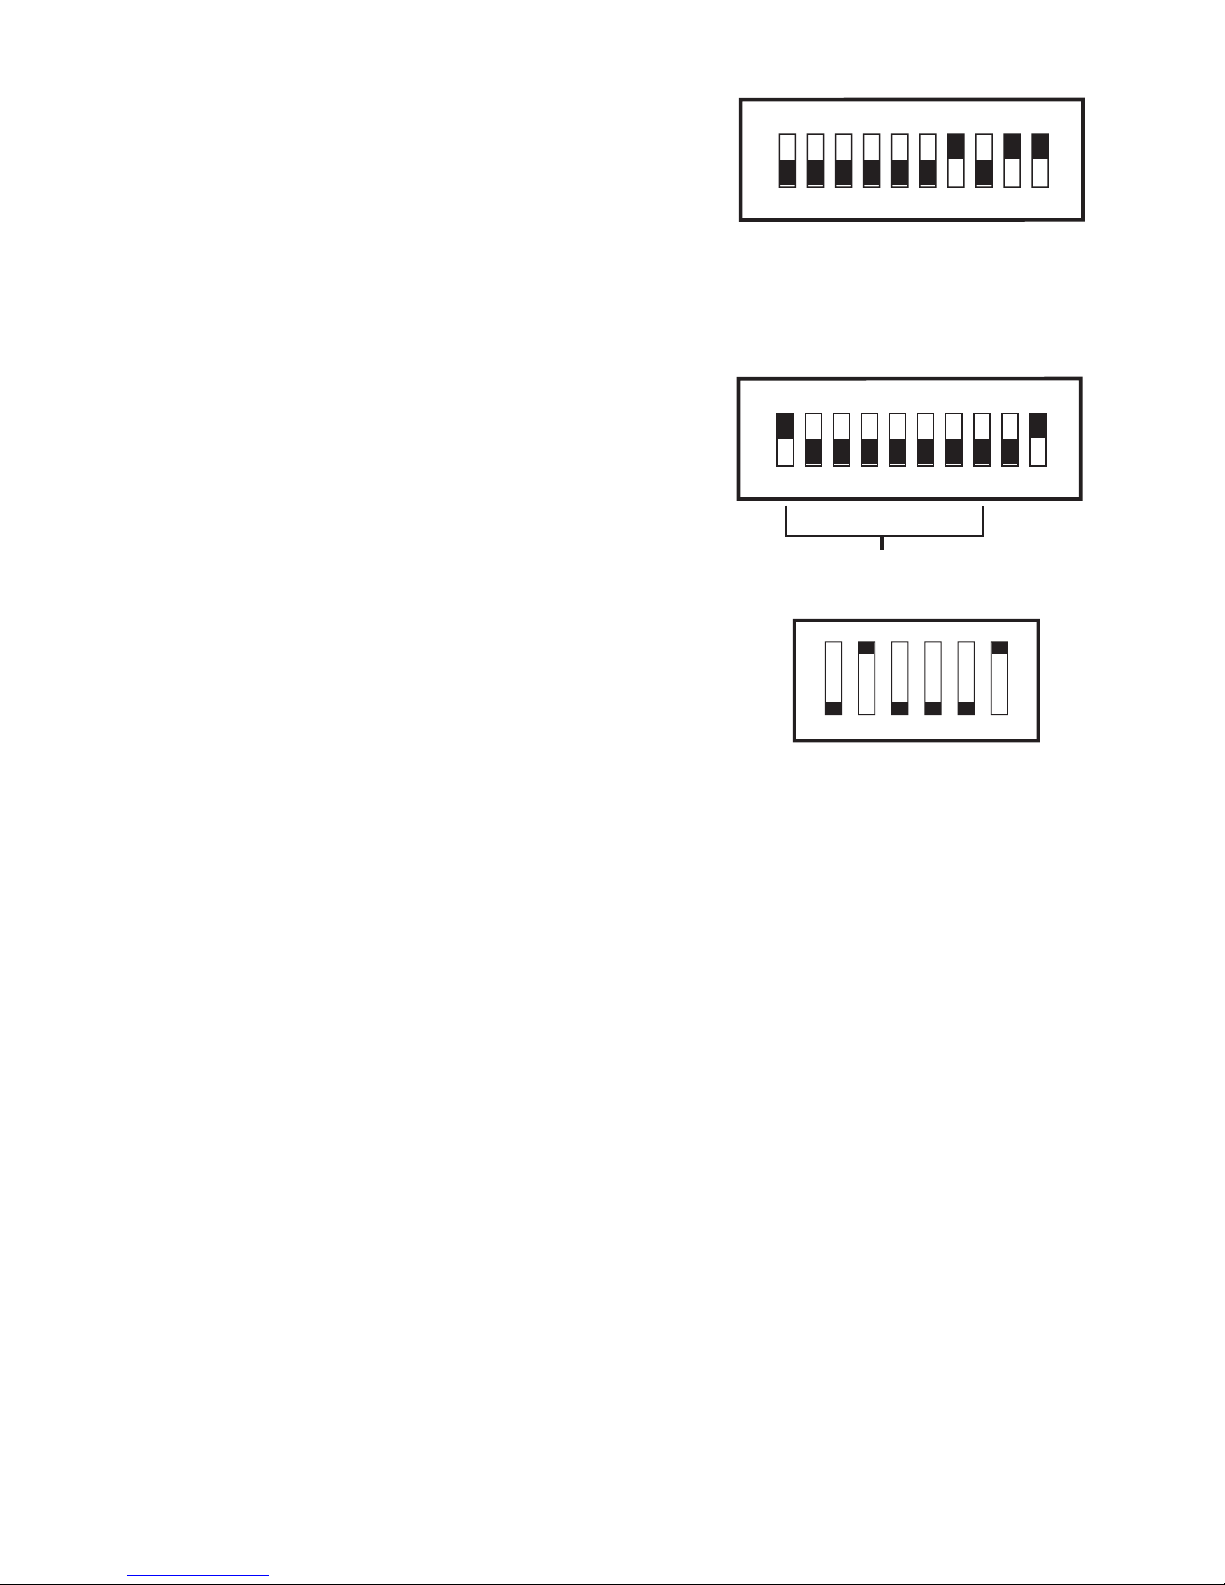
Settings
Sound selection: See page 9
The Malem wireless alarm is set
to 8 random sounds. If you wish
to change to a single sound, remove
receiver battery cover, slide all the
switches from 1 to 9 to off (leave 10 on).
Select any of the sounds from 1 to 8 by
sliding the switch to ʻOnʼ. Sliding switch
10 to ʻOffʼ will disable all sounds.
Only the LED will be activated.
Channel selection: See page 11
The Malem wireless alarm consists of a
matched pair of a transmitter and receiver.
To avoid interference from other wireless
equipment, you can change the channel.
A choice of 64 settings is possible.
Remove the back of the transmitter by using a
slotted screwdriver. Twist to open.
Change the setting of the code selection switch by moving any of the
switches in any of the 64 combinations.
Replace the back of the transmitter. Avoid disturbing the water-seal ring.
Re-tuning (Pairing) the receiver: See page 9
Push once then remove the straight end of a paper clip into the small hole
at the back of the receiver under the green LED. The green LED will glow.
Lower the lever of the Easy-Clip© (without material), the green LED will
flash and the alarm will sound. Lift the lever of the Easy-Clip© and press
the reset button on the top of the receiver.
The receiver and the transmitter are now automatically re-tuned again.
To prevent interference, use the same procedure when using more than
one pair of alarms in the same location.
Alternatively, you can tune several receivers to the same transmitter. This is
ideal if parents/guardians want an additional receiver in their bedroom.
1 2 3 4 5 6 7 8 910
1 2 3 4 5 6
Sound selection switch
setting for 8 random sounds
Channel Selection Switch
On
Off
1 2 3 4 5 6 7 8 9 10
For single sound selection
Select any one (1 - 8) to ʻonʼ
On
Off

5
Fault Finding
●
Alarm does not sound:
Switch on the receiver (Rx). Red LED light will flash.
Replace batteries with new Alkaline ones (2 x AA). Observe correct
battery orientation and make sure contacts inside the alarm are clean
and free of any deposits.
Does the transmitter red LED glow when the Easy-Clip© lever is
lowered? If not, replace battery (Alkaline 23AE 12v) observe
correct polarity and clean contacts.
If all the above fail, re-tune Rx and Tx, see pages 4 and 9.
●
Alarm does not reset:
Clean Easy-Clip© sensor by lifting lever, wash in soapy water, rinse
under the tap and shake dry.
Make sure Easy-Clip© lever is up.
Make sure that underpantsʼ material is not too thin or wet.
Replace receiver batteries (2 x AA Alkaline).
Transmitter is damaged or flooded.
●
Sound level is too low:
Adjust sound level with volume control.
Guarantee
Under normal use the Malem Wireless Alarm is guaranteed for a period of
three months from purchase. This excludes batteries, flooding, misuse,
physical or accidental damage. If the alarm should malfunction during this
period, please contact us BEFORE RETURNING. Please remove batteries
and decontaminate the unit/sensor before returning. DO NOT return
flooded or contaminated alarms.
Repairs
If your alarm requires repair, we will exchange it for a new one at a special
discount. (Repairs are not undertaken for hygiene reasons). Please contact
us by telephone, fax, e-mail or in writing for the cost of this service. Please
decontaminate the unit before returning.

6
Cleaning
Alarm units:
Wipe clean using a damp cloth and mild detergent.
Dry thoroughly. Never immerse in water.
Easy-Clip© Sensor:
Lift lever and clean in soapy water, rinse under the tap and shake dry.
Specifications: Transmitter (Tx)
Colour: Green
Dimensions: 4.4cm x 4.2cm x 1.9cm
Weight: 40g including battery and sensor
Battery: Alkaline 23AE 12v. Observe correct polarity when
replacing
Range: Approximately 25m depending on nature of the
structure and state of the battery. For treatment of
Enuresis (bedwetting), receiver (Rx) must be in the
same room as the transmitter (Tx).
Sensor: Easy-Clip©. Keep lever up when not in use. Clean
sensor regularly.
Clip: Magnetic to secure Tx on outside of underpants along
waistband (see diagram on page 12).
LED: Internal red in colour. Glows when sensor detects
wetness or if lever is lowered without dry material
between the jaws in the front of the Easy-Clip©
sensor
Frequency: 433MHZ
Model: MO12 (Tx)
The normal fuction of the product may be disturbed by Strong Electro
Magnetic Interference. If so, simply reset the product to resume normal
operation by following the instruction manual. In case the function could not
resume, please use the product in another location.

7
Specifications: Receiver (Rx)
Colour: Green
Dimensions: 7.4cm x 7.6cm x 2.5cm
Weight: 95g including batteries
On/Off: Sliding switch on side
Volume: Volume control wheel on the side. Turn up to
increase and down to decrease.
Reset: Button on the top. Will not reset if Tx is active.
Red LED: Flashes every 3 seconds when Rx is ready for use.
Green LED: Glows only during automatic tuning.
Tuning Point: Small hole below green LED. Depress with the end of
a paper clip. Green LED will glow. Activate the
transmitter (Tx), the green receiver (Rx) LED will
flash. The alarm will then sound to indicate that
re-tuning (pairing) is successful.
Battery: 2 x Alkaline AA. Observe correct polarity and clean
contacts when replacing.
Sound Selection
Switch: Under battery cover. For single sound: Slide to ʻOnʼ
any switch between 1 and 8. Other switches apart
from 10 must be ʻOffʼ.
Important: Tx and Rx must be in the same room for treatment of
Enuresis (bedwetting). If Tx and Rx are not to be
used for a long period of time, then it is advisable to
remove the batteries from both.
DC Input: 3v DC input on the side if required. Model: MO12 (Rx)
Standards: FCC Certified.
Malem Medical reserves the right to change specification without prior notice. © 2009 Malem Medical.
+

Vol ume Control
MALEM
©
Wireless Alarm
Receiver
(Rx)
Use Alkaline batteries ONLY
Malem Enuresis Alarm
WIRELESS ALARM
RECEIVER (Rx)
Buzzer
Volume Control
8
Reset Button
LED Flash once
every 3 seconds:
Ready for use
Fast Flash when
alarm is activated
DC in 3V DC
Power
Switch
Off
On
+
-

AL
K
AL
I
NE
2
xA
A
OPEN
1 2 3 4 5 6 7 8 9 10
Use Alkaline batteries ONLY
Malem Enuresis Alarm
WIRELESS ALARM RECEIVER (Rx)
9
Reset Button
On
Off
Sound Selection
Correct setting for
8 random sounds
(only one sound is
activated each time
alarm is triggered)
123456 78910
Channel
Re-tuning
(Pairing)
Press through the
hole with a thin
wire - such as a
paper clip end to
activate tuning.
The green LED
will glow. While
glowing activate
Tx by lowering
Easy-Clip© lever.
The green LED
will flash then
stop. The pairing
is then complete.
Receiver is
automatically
tuned to the
transmitter.
Lift Easy-Clip©
lever and press
reset button on
Rx to stop alarm
sound.
Sound selection switch
Slide cover down to
access batteries
and sound selection
switch.
Green Pairing
LED
On
Off
8 random sounds
setting
Pairing
Tuning Hole
For single sound:
Select any one
between 1 - 8.
9 must be ʻOffʼ
10 must be ʻOnʼ

MALEM
©
Wireless Alarm
Transmitter
(Tx)
Use Alkaline batteries ONLY
Malem Enuresis Alarm
WIRELESS ALARM
TRANSMITTER (Tx)
The red LED light will glow when
transmitter (Tx) sensor is wet, also if the
Easy Clip© sensor lever is down and
there is no dry material between jaws.
The battery will drain if the LED light is
left on when not in use.
10
Clear band holder
Use slotted screw
driver, twist to
open back cover
for replacing
battery or changing
the channel code
Magnetic
clip

ALKALINE
Battery Type
ALKALINE 23AE 12V
1 2 3 4 5 6
Use Alkaline batteries ONLY
Malem Enuresis Alarm
WIRELESS ALARM
TRANSMITTER (Tx)
11
REPLACE BATTERY
if red LED light does
not glow. Make sure
contacts are clean
when replacing the
battery.
Observe correct
battery orientation.
Channel code
selection switch
64 channel choices.
If selection switch
setting is changed
then the receiver (Rx)
must be re-tuned to
the transmitterʼs (Tx)
new code.
On
Off
Lift lever to open
jaws, push down to
shut jaws
Place underpant
material between
the jaws.
Jaws
Easy-Clip© sensor
(Leave lever lifted up
when not in use)
Clean regularly in
soapy water, rinse
and shake dry.
Tx back off

MALEM
©
Wireless Alarm
Transmitter
(Tx)
Use Alkaline batteries ONLY
Malem Enuresis Alarm
WIRELESS ALARM
TRANSMITTER (Tx)
Set up position on underpants
12
 Loading...