

Page 1
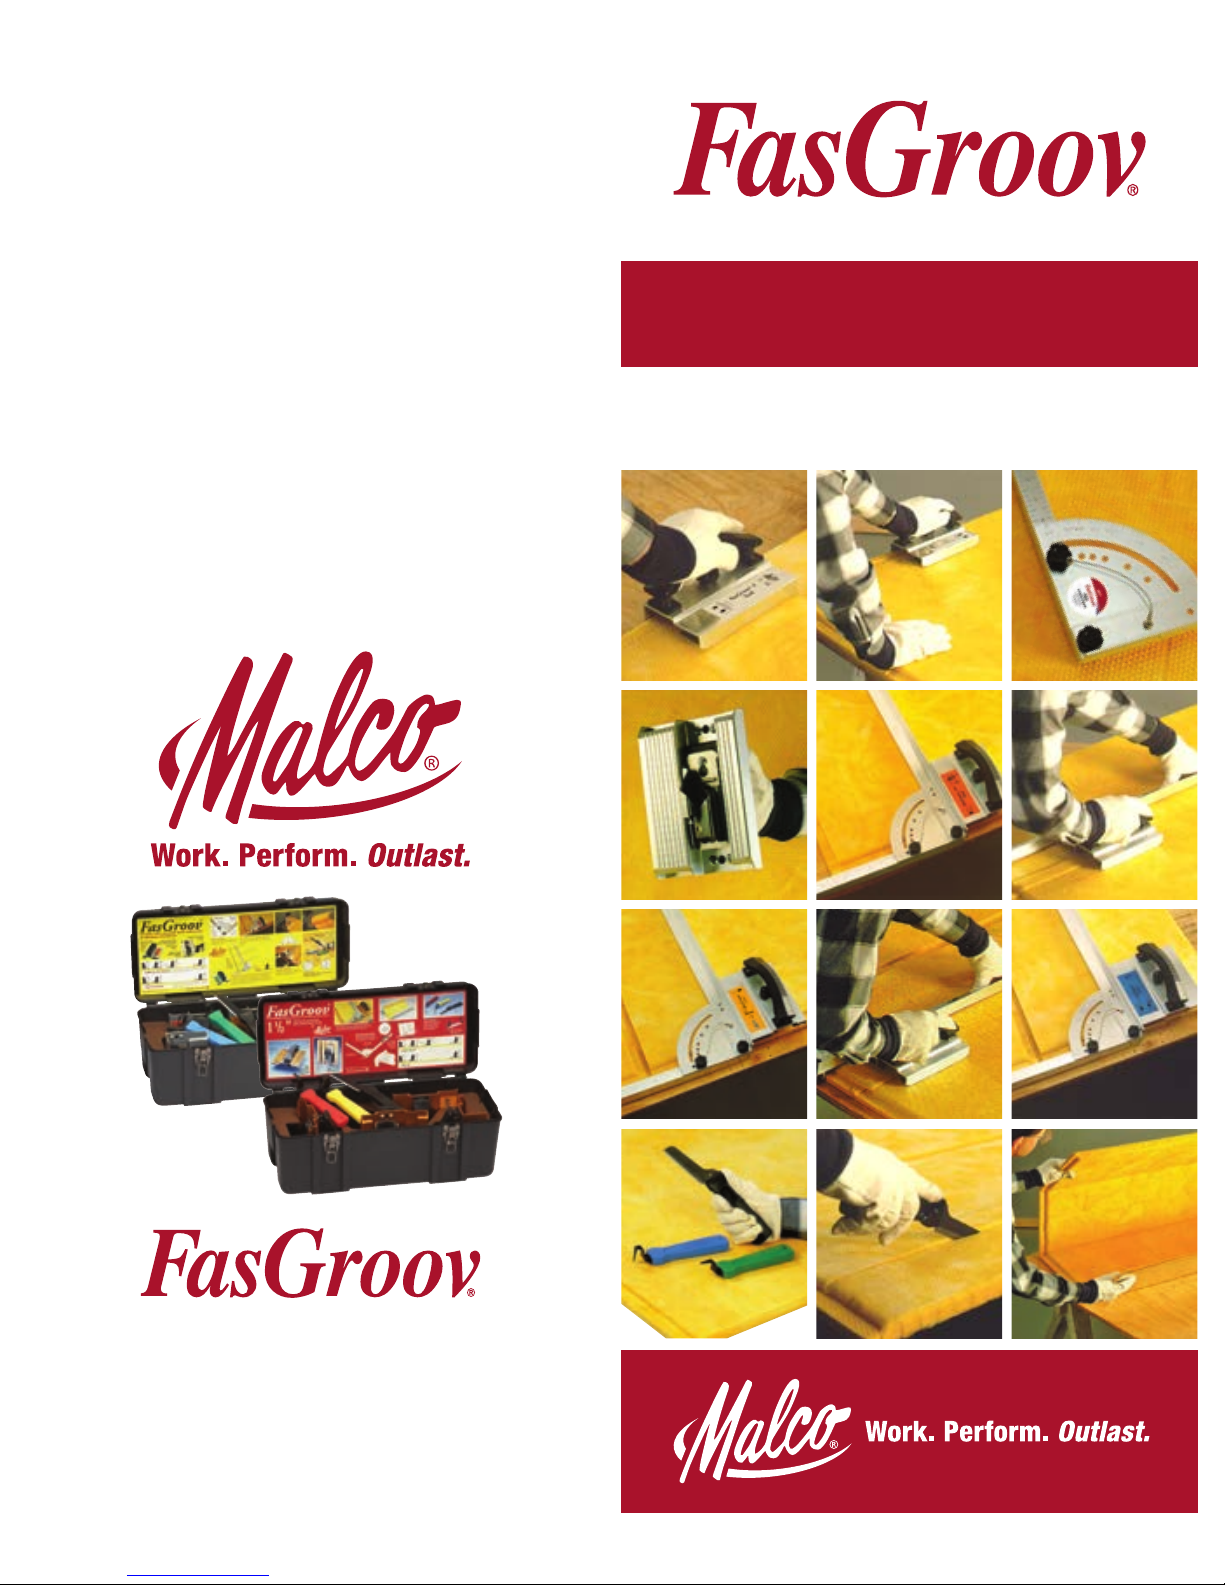
Tools for Safe, Fast, Accurate Fabrication of
1 in. and 1-1/2 in. Fiberglass Ductboard
We’ll Show you
Step-by-Step!
FABRICATING SYSTEM
FABRICATING SYSTEM
MALCO PRODUCTS INC. • 14080 HWY 55 NW • PO Box 400
Annandale, MN 55302 •
www.malcotools.com
• Engineered for Superior Performance / Limited Lifetime Warranty
• Conçu pour fournir des performances exceptionnelles / Garantie limitée à vie
• Diseñado para un desempeño superior / Garantía de vida útil limitada
SL17156A
Page 2
2 3
VEE-GROOVE KITS
SHIPLAP KITS
Introduction .......................................................4
SETTING UP TOOLS
Adjusting FasGroov Square ............................... 9
Hand Tool blade height adjustment ................. 10
Blade removal / replacement .......................... 14
Shiplap Fabrication ......................................... 16
Vee-Groove Fabrication ................................... 20
Related Tools and Accessories ........................ 24
The duct fabrication procedures outlined in this manual
pertain to two common methods of one-piece duct construction in standard 1” OR 1-1/2” ductboard. For applications requiring ductwork larger than that which can be
constructed from a single piece of ductboard, consult
the NAIMA Fibrous Glass Duct Construction Standards
Manual or your ductboard manufactures fabrication
manual for information on the two-piece “U”, two piece
“L”, and four-piece construction methods.
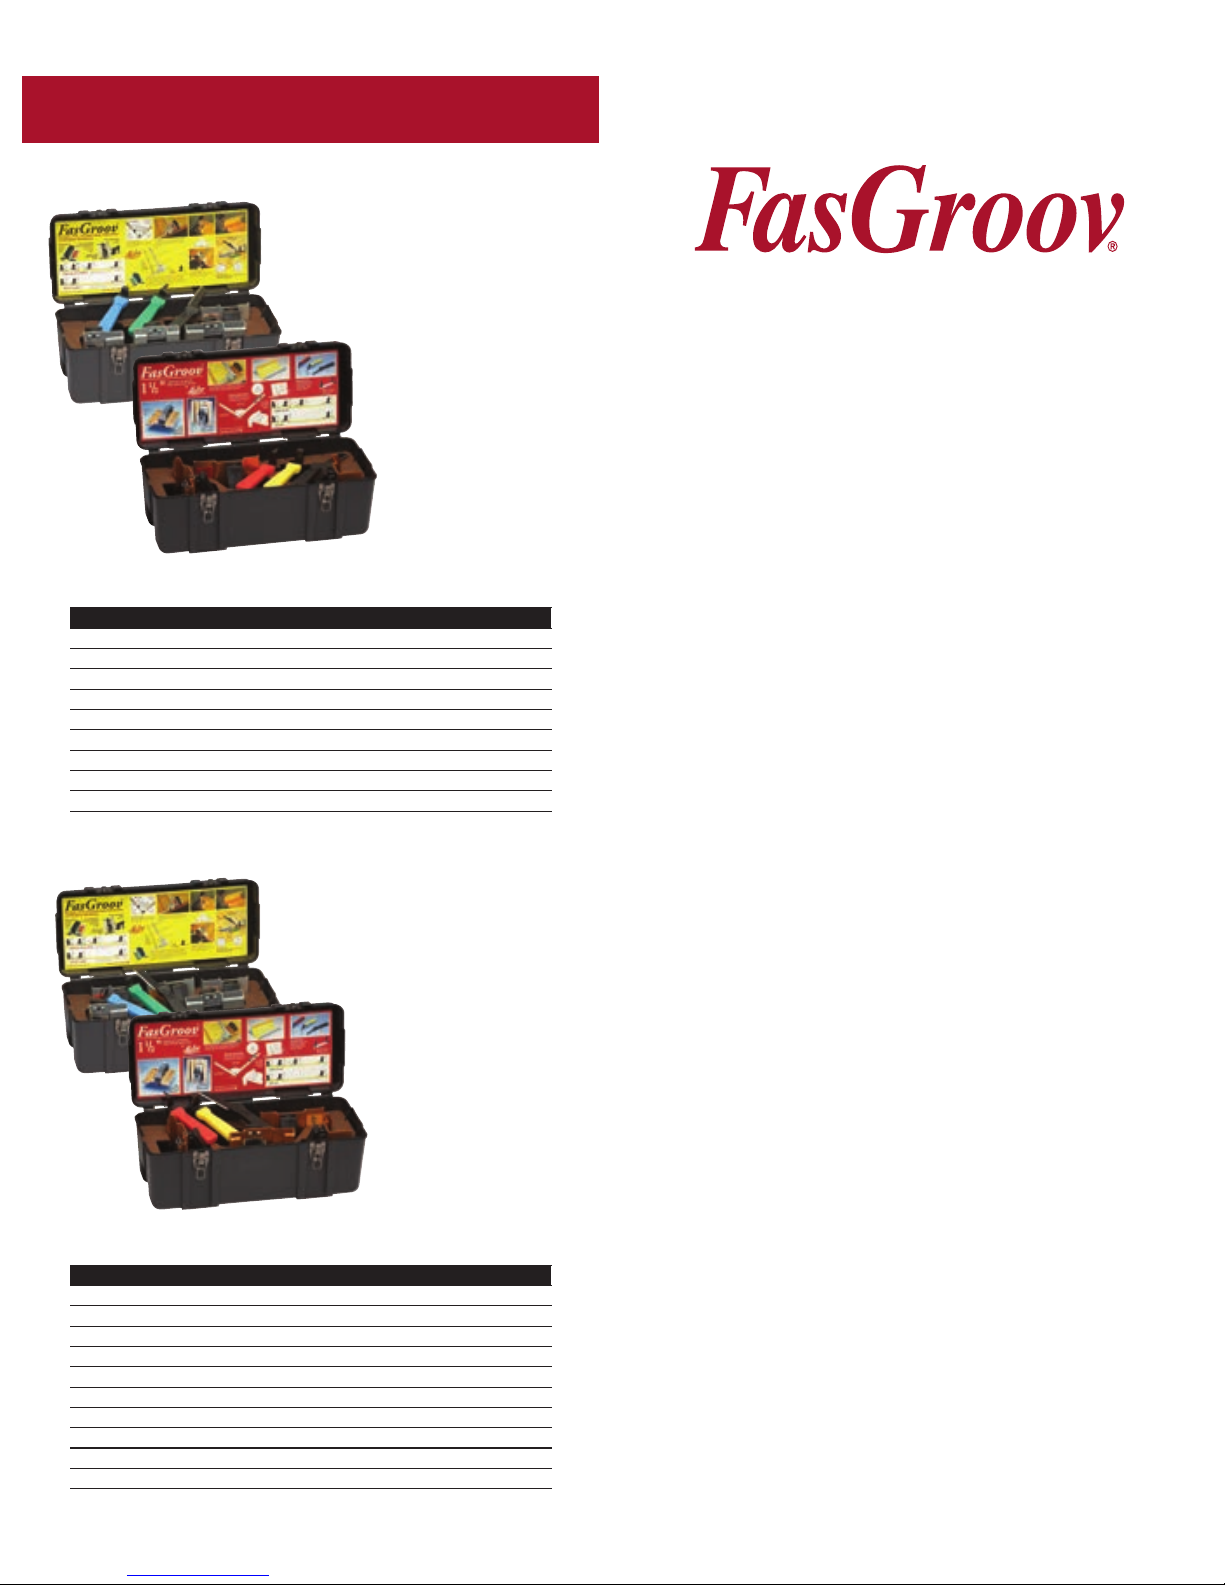
KIT CONTENTS
FGVK
Vee Kit for
1 in. (25.4 mm)
Ductboar
d
Silver Tools
FGVKL
Vee Kit for
1-1/2 in. (38.1 mm)
Ductboar
d
Gold Tools
FGSLK
Shiplap Kit for
1 in. (25.4 mm) Ductboard
Silver Tools
FGSLKL
Shiplap Kit for
1-1/2 in. (38.1 mm)
Ductboar
d
Gold Tools
FABRICATING SYSTEM
1 inch Kit 1-1/2 inch Kit
Cat. No. Cat No. Description
FGVK FGVKL Vee-Groove Kit with following:
FGV1 FGL1 #1 Tool
FGV FGLV Vee Tool
FGV5 FGL5 #5 Tool
FGV6 — #6 Tool
FGS FGS Square
FGK FGK Duct Knife
FGM FGML Male Shiplap Knife
FGF FGFL Female Shiplap Knife
FGC FGC Tool Case
1 inch Kit 1-1/2 inch Kit
Cat. No. Cat No. Description
FGSLK FGSLKL Shiplap Kit with following:
FGV1 FGL1 #1 Tool
FGV24 FGL24 #2/4 Tool
FGV3 FGL3 #3 Tool
FGV5 FGL5 #5 Tool
FGV6 — #6 Tool
FGS FGS Square
FGK FGK Duct Knife
FGM FGML Male Shiplap Knife
FGF FGFL Female Shiplap Knife
FGC FGC Tool Case
Page 3
INTRODUCTION
Shiplap Method
Vee-Groove Method
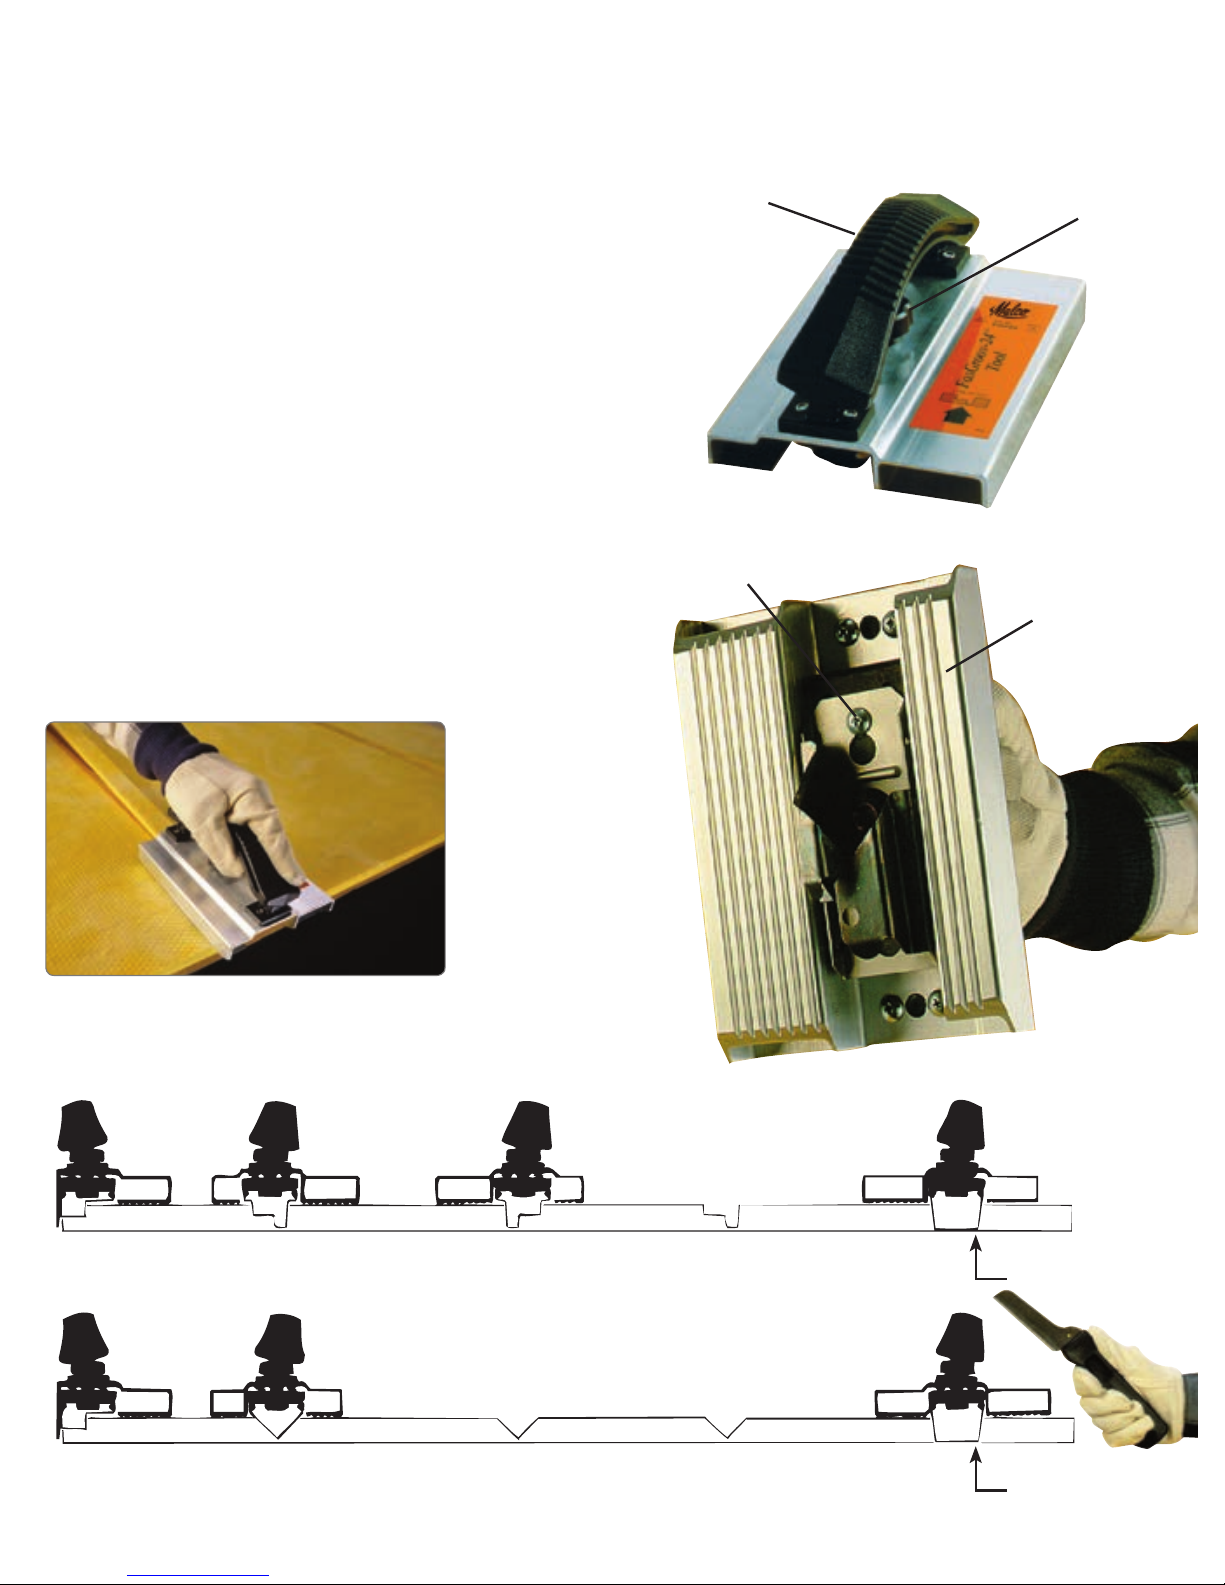
Tool Features:
• FasGroov Tool identification incorporates
both the numbering system of fabrication
machines and the traditional hand tool color
coding system. FasGroov Tools are available for
both shiplap and vee-groove fabrication methods.
• Easy, turn-the-knob, blade height adjustment.
Scrap lifts cleanly out of groove. Blades are also
easily removed without removing screws.
• Molded plastic handles are ergonomically
designed to fit angle of grip and reduce arm
and hand fatigue on-the-job.
• Extruded, anodized, aluminum body is
durable and lightweight. Grooved surface on
sled bottom facilitates easy sliding.
#1
GRAY
#2/4
DARK
ORANGE
#3
ORANGE
#5
BLUE
#1
GRAY
VEE
RED
#5
BLUE
Sled glides
easily and
cleanly removes
scrap piece out
of groove.
Molded handles
ergonomically
designed to
reduce arm
and hand
fatigue.
Blades remove
without removing
screws.
Grooved sled
bottom facilitates
easy sliding.
Patent No’s.
5,040,297
5,077,899
Easy turn-the-knob
blade height adjustment
compensates for thickness
variations in standard
1 and 1-1/2 inch board.
4 5
CUT FLAP
CUT FLAP
Page 4
Use #6 Tool
to shorten
length of
duct section,
by measuring
from outside
edge of material
to be scrapped.
Use knob under
handle to raise
or lower blade
and adjust
depth of cut.
• 1” FasGroov kits also include a #6 tool (Tan color
coded FGV6) for creating duct sections less than
standard 4 foot lengths. The #6 replaces a shiplap
knife for making a shiplap groove at fitting end
prior to closure of duct section. The #6 may also
be used for two-piece and four-piece ductboard
fabrication.
1/2”
FGV6
FGV6
Easy one-piece layout:
• FasGroov Square permits fast and accurate
layout without marking cuts or calculating
add-on dimensions. Lay out ductboard as you
cut. Simply align dimension on FasGroov Square
with right edge of previous cut and move across
the board. Square is also easily adjustable for
angled cuts.
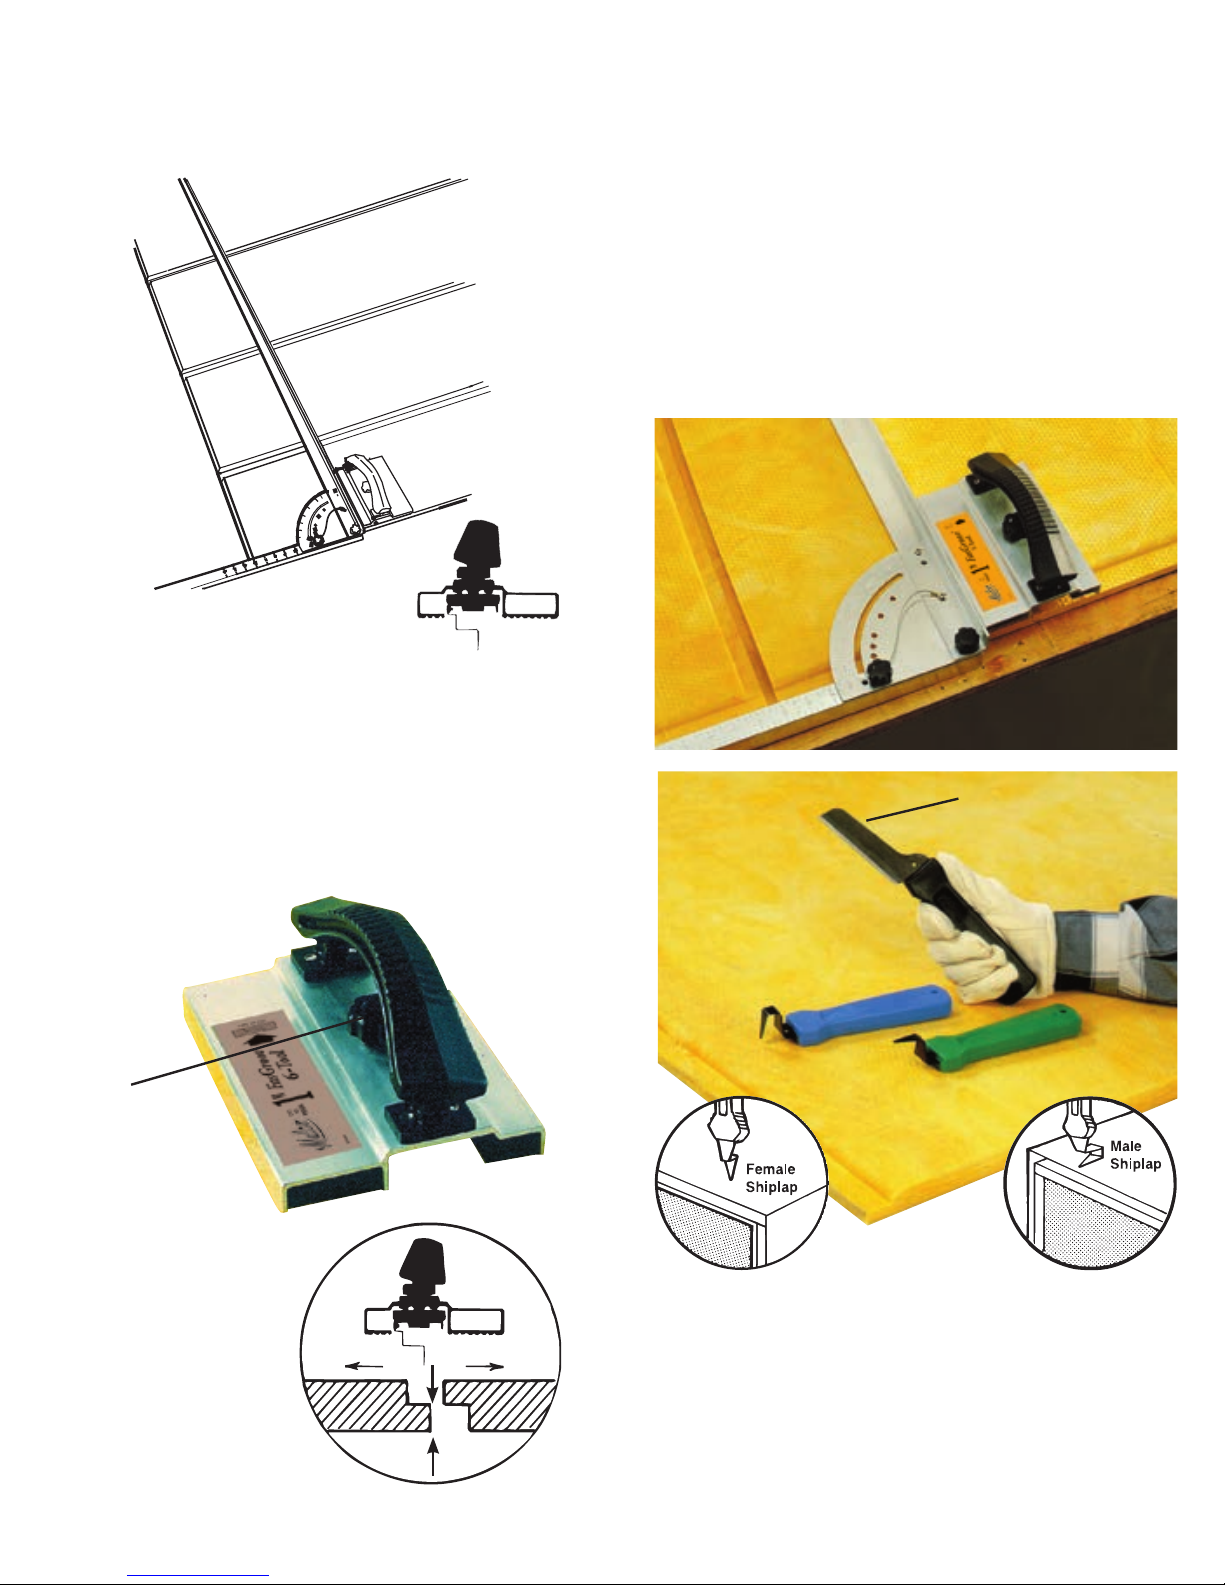
Single blade knives:
• Single blade FasGroov Knives are safer to
use and also feature comfortable molded
handles. Male and Female Shiplap Knives can
be used on closed duct sections.
FGK
Duct Knife
use this point to
cut fiberglass without
tearing ductboard skin.
6 7
Page 5
For right or left hand use:
• Right hand orientation of 1” kits is easily changed
by converting #5 Tool and FasGroov Square for left
hand fabrication. Tool handles may also be turned
around to provide left hand grip angle.
Right hand
operation.
Left hand
operation.
CONVERTING FASGROOV
SQUARE FOR LEFT HAND USE.
1. Remove the angle adjustment knob and the end pivot knob.
2. Position the ruler stamped leg so that the 3 holes are to
your left. (Rule reads left to right.)
3. Remove the protractor for the “L” shaped leg by removing
the two screws.
4. Flip the protractor over and install on the opposite end of the
“L” shaped leg.
5. Place the “L” leg/protractor assembly on top of the ruled leg.
6. Align the pivot knob holes and install the pivot knob.
7. Install the angle adjustment knob in any of the fixed positions
or the sliding position.
8. After converting your square for left hand use, double check
the accuracy in the fixed 90° position with a roofing square.
Built-in manufacturing hole tolerances will allow you
to true the square.
Note: 1-1/2” Kits cannot be converted for left hand use.
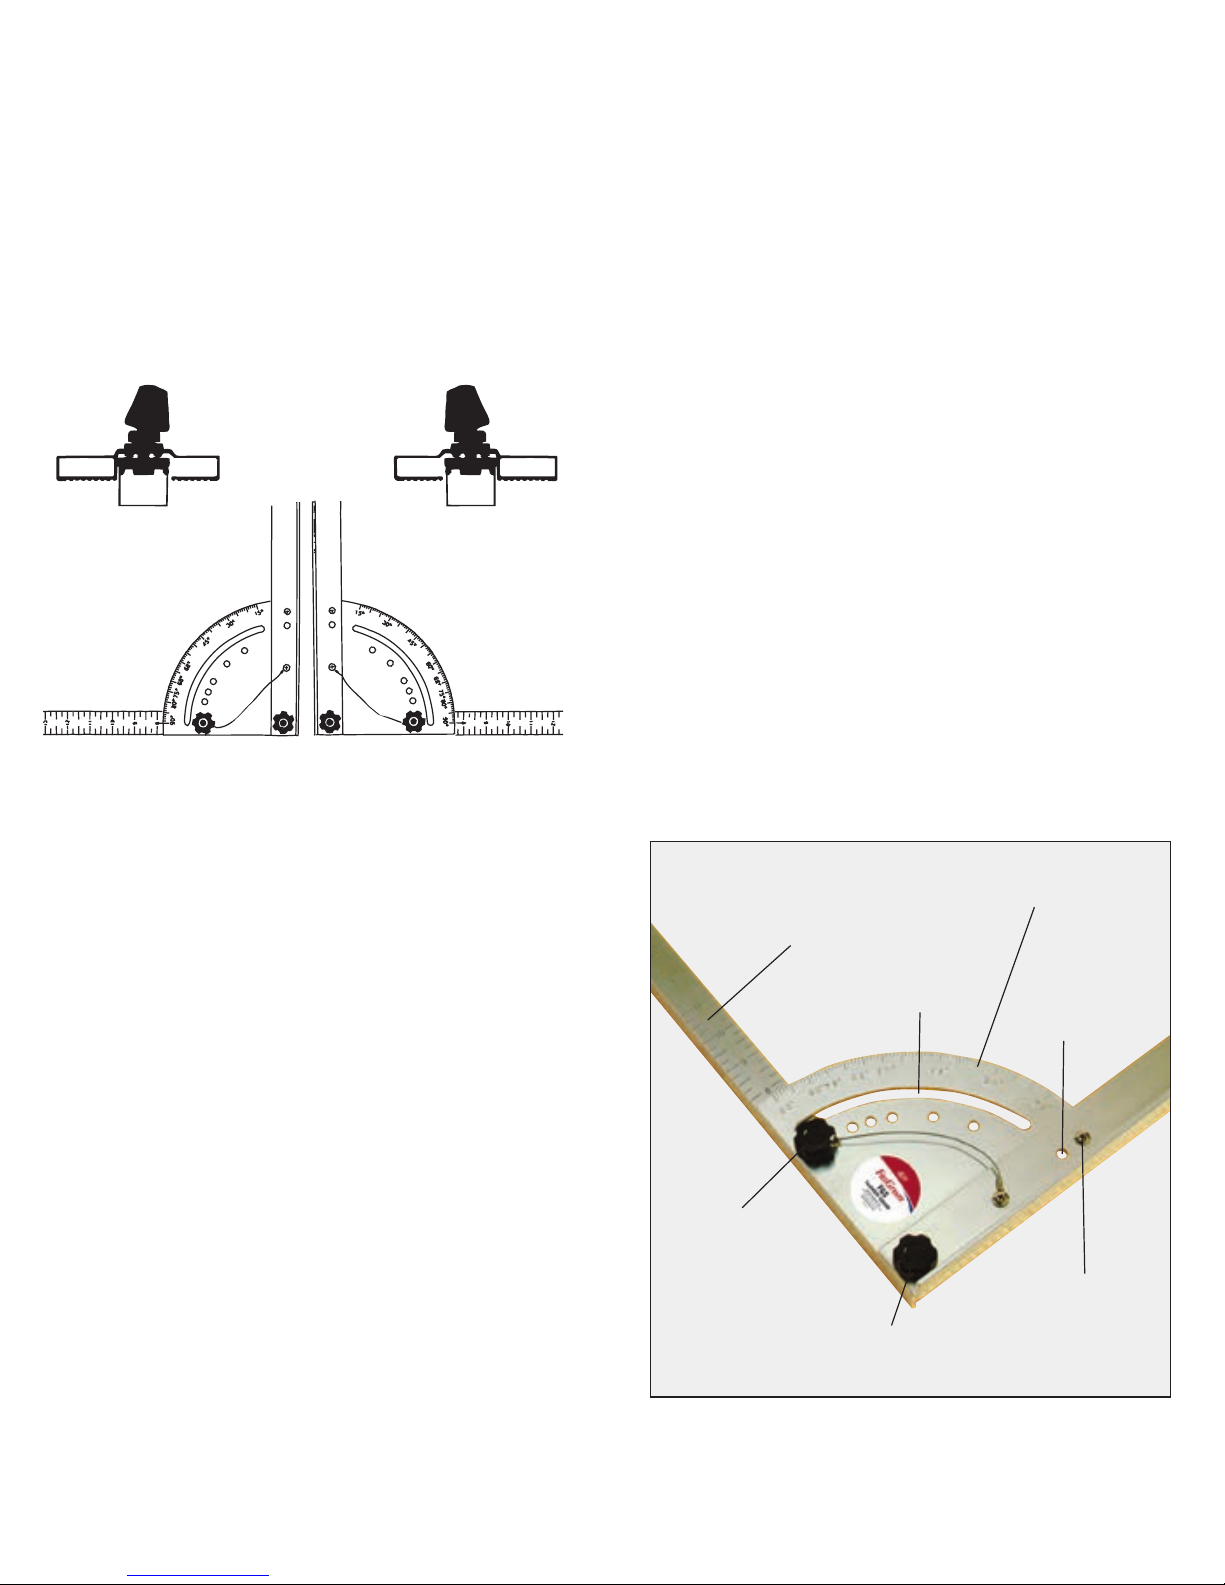
SETTING UP TOOL
Adjusting Fasgroov Square:
PREDETERMINED SETTINGS
Place adjustment knob into hole corresponding
to most used angles.
OTHER ANGLES
Place adjustment screw into protractor
adjustment slot and tighten at desired angle.
STORAGE
Step 1:
Remove angle adjustment knob and
fold ends of FasGroov Square together.
Step 2:
Place angle adjustment knob into the
storage hole and tighten.
Ruler stamped leg.
Pivot knob.
Angle adjustment
knob shown here in
90° predetermined
hole setting.
Adjustment slot
for other angles.
Storage Hole
for angle
adjustment knob.
Screws holding
protractor to “L”
shaped leg.
Protractor scale etched 2 sides
for right or left hand use.
8 9
Page 6
Hand Tool blade
height adjustment:
FASGROOV #1 TOOL
Push the FasGroov #1 Tool along the left edge of a test
piece of ductboard. Measure the depth of cut of the
female shiplap groove, it should be half the thickness
of the ductboard (see illustration).
If adjustment is needed: (1) Turn the blade adjustment
knob counterclockwise to lower the blade for a deeper
cut or (2) Turn the blade adjustment knob clockwise to
raise the blade for a shallower cut. Repeat adjustment
until the proper depth of cut is achieved.
FASGROOV #2/4 and #3
TOOLS
Push the FasGroov #2/4 Tool and FasGroov #3 Tool
through a test piece of ductboard. Measure the amount
of fiberglass remaining between the foil backing and
the deepest part of the shiplap cut (see illustration).
If adjustment is needed: (1) Turn the blade adjustment
knob counterclockwise to lower the blade for a deeper
cut or (2) Turn the blade adjustment knob clockwise to
raise the blade for a shallower cut.
Repeat adjustment until the proper depth of cut
is achieved.
#1 TOOL
FGV1
FGL1
Adjustment
knob
Blade
1”
1-1/2”
1/2”
3/4”
1/16”
FGV24
1/16”
FGV3
1/8”
FGL24
1/8”
FGL3
1”
1-1/2”
1”
1-1/2”
#2/4 TOOL #3 TOOL
#1 #2/4 #3 #2/4
#1
10 11
Page 7

FGV
1-3/4”
FGLV
2-5/8”
1”
1-1/2”
VEE TOOL
FASGROOV-VEE TOOL
Push the FasGroov-Vee Tool through a test piece of
ductboard.
Measure the amount of fiberglass remaining between
the foil backing and the deepest part of the vee-groove
cut. There should be 1/8” of fiberglass remaining (see
illustration for width of cut.)
If adjustment is needed: (1) Turn the blade adjustment
knob counterclockwise to lower the blade for a deeper
cut or (2) Turn the blade adjustment knob clockwise to
raise the blade for a shallower cut.
Repeat adjustment until the proper depth of cut is
achieved.
FASGROOV #5 TOOL
Push the FasGroov #5 Tool through a test piece of
ductboard.
The blade should cut deep enough to skin all of
the fiberglass off the foil backing. By using more
pressure on the FasGroov #5 Tool, any remaining
fiberglass may be cleaned off the foil.
If adjustment is needed: (1) Turn the blade adjustment knob counterclockwise to lower the blade for
a deeper cut or (2) Turn the blade adjustment knob
clockwise to raise the blade for a shallower cut.
Repeat adjustment until the proper depth of cut is
achieved.
Note: It is important to use this tool according to the
direction arrows on the label.
#5 TOOL
Use FGK Knife
to cut staple flap.
VEE VEE VEE #5
#5
12 13
Page 8

Blade removal, replacement:
Since the blade adjustment mechanism is the same for
all FasGroov Tools, this procedure applies to any tool
requiring blade removal/replacement.
BLACK PLASTIC SUPPORT
BLADE ASSEMBLY
SCREWS
Loosen Screws
Slide and remove worn blade assembly.
Place new blade into the black plastic support and
retighten screws.
Note: Initial cutting friction may be realized due to
rust prevention factory finish on the blade.
Blades remove
without removing
screws.
14 15
Page 9

SHIPLAP FABRICATION
#1
GRAY
#2/4
DARK
ORANGE
#2/4
DARK
ORANGE
FGK
Duct Knife
#3
ORANGE
#5
BLUE
W1
H1
W2
H2
Work left to right facing the factory-made female
shiplap edge as your base edge for a standard
4-foot deep ductboard section.
Set the FasGroov Square on top of the ductboard.
Place the ruled edge of the square flush against the
base edge of the board.
Locate your desired inside duct width dimension (W1)
on the ruled edge of square and move the square
along the board base to align your width dimension
with the right edge of the previous cut made with the
#1 Tool. Place the left side of the FasGroov #2/4 Tool
flush against the arm of the square and push the #2/4
tool along the arm’s length to produce a right hand
shiplap groove.
Place the FasGroov #1 Tool flush against the left
edge of the ductboard. Push the tool along length of
left edge to produce a female shiplap groove.
#1 TOOL
#2/4 TOOL
16 17
CUT
FLAP
Locate your desired inside duct height dimension
(H1) on the ruled edge of the FasGroov Square and
move square to the right along base of ductboard to
align your height dimension with the right edge of the
previous cut made with the #2/4 Tool. Place the left
side of the FasGroov #3 Tool flush against the arm of
the square and push the #3 tool along arm’s length to
produce a left hand shiplap groove.
#3 TOOL
Page 10

Insert the FGK FasGroov Duct Knife into the
right edge of the staple flap cut made with the
#5 Tool. Cut completely through the foil to finish
the grooving process.
Fold the duct Section together. Staple and tape the
flap, join duct sections and install take-offs with
manufacturer-approved products.
18 19
SHIPLAP FABRICATION
#1
GRAY
#2/4
DARK
ORANGE
#2/4
DARK
ORANGE
#3
ORANGE
#5
BLUE
W1
H1
W2
H2
Move the square to the right again to align your width
dimension (W2) with the right edge of the previous cut
made with #3 Tool. Place the left side of the FasGroov
#2/4 Tool flush against the arm of the square and push
the #2/4 along arm’s length to produce a second right
hand shiplap groove.
Move the square one last time to align your height
dimension (H2) with the right edge of the previous
cut made with #2/4 Tool. Place the left side of the
FasGroov #5 Tool flush against the arm of the square
and push the #5 along arm’s length to produce a staple
flap groove.
#5 TOOL
FGK
Duct Knife
CUT
FLAP
Page 11

VEE-GROOVE FABRICATION
#1
GRAY
VEE
RED
VEE
RED
VEE
RED
#5
BLUE
W1
H1
W2
H2
CUT FLAP
Work left to right facing the factory-made female
shiplap edge as your base edge for a standard
4-foot deep ductboard section.
Set the FasGroov Square on top of the ductboard.
Place the ruled edge of the square flush against the
base edge of the board.
Locate your desired inside duct width dimension (W1) on
the ruled edge of square and move the square along the
board base to align your width dimension with the right
edge of the previous cut made with the #1 Tool. Place
the left side of the FasGroov-Vee Tool flush against the
arm of the square and push the Vee Tool tool along the
arm’s length to produce a vee groove.
Place the FasGroov #1 Tool flush against the left
edge of the ductboard. Push the tool along length of
left edge to produce a female shiplap groove.
#1 TOOL
VEE TOOL
VEE TOOL
20 21
Locate your desired inside duct height dimension
(H1) on the ruled edge of the FasGroov Square and
move square to the right along base of ductboard to
align your height dimension with the right edge of the
previous cut made with the Vee Tool. Again place
the left side of the Vee Tool flush against the arm of
the square and push the tool along arm’s length to
produce a vee groove.
FGK Duct Knife
Page 12

VEE-GROOVE FABRICATION
22 23
#1
GRAY
VEE
RED
VEE
RED
VEE
RED
#5
BLUE
W1
H1
W2
H2
Move the square to the right to align your width dimension (W2) with the right edge of the previous cut. Place
the left side of the Vee Tool flush against the arm of the
square and push the tool along arm’s length to produce
a third vee groove.
Move the square one last time to align your height
dimension (H2) with the right edge of the last cut made
with Vee Tool. Place the left side of the FasGroov #5
Tool flush against the arm of the square and push the
#5 along arm’s length to produce a staple flap groove.
#5 TOOL
Insert the FGK FasGroov Duct Knife into the right edge
of the staple flap cut made with the #5 Tool. Cut completely through the foil to finish the grooving process.
Fold the duct section together. Staple and tape the
flap, join duct sections and install take-offs with
manufacturer-approved products.
FGK
Duct Knife
CUT
FLAP
Page 13

24 25
For use with wire-reinforced fiberglass ductboard walls
to restrict duct wall deflection on positive pressure supply
ducts. The volcano profiled reinforced washer seats flush
to the ductboard surface. A 1/8-inch (3.18 mm) diameter
hole accepts 12-gauge wire.
Use for fastening sheet metal components to
fiberglass ductboard. The volcano profiled reinforced
washer seats flush to the ductboard. A 7/32-inch
(5.56 mm) hole accepts a #8 screw.
Galvanized Volcano
Reinforcement Washers
Hole Cutter for
Fiberglass Ductboard
Cat. No.
FLW
Dimensions in. (mm) 2 ½ x 2 ½ x .030 (64 x 64 x 0.76)
Hole Dia. In. (mm) 1/8 (3.18)
Cat. No.
RW732
Dimensions in. (mm) 2 ½ x 2 ½ x .030 (64 x 64 x 0.76)
Hole Dia. in. (mm) 7/32 (5.56)
Fasloop
Washer
Reinforcing
Washer
FLW
FG1
RW732
Cuts 4 to 20” (102 to 508 mm)
diameter holes in both
1” (25.4 mm) and
1-1/2” (38.1 mm)
fiberglass duct.
Operation is fast
and easy.
Supplied with a standard utility knife blade that
safely stores in handle. Hole Cutter can also use
the KBHC replacement blade for cutting
1-1/2” ductboard.
Cat. No. Description Net Weight oz. (g)
FG1 Fiberglass Duct Hole Cutter 7-1/2 (213)
REPLACEMENT 1-1/2” BLADE
KBHC 1-1/2” Blade for FG1 Hole Cutter
KBHC Blade
for 1-1⁄ 2” board.
12045
12761
12047
Page 14

Double edged blade
cleanly pierces duct,
cuts both directions.
Built-in wire cutter
completes the job by
severing wire rib coil.
Cat. No.
FDC1
Length of Cut in. (mm) 4 (102)
Tool Length in. (mm) 11-7/8 (302)
Net Weight oz. (g) 11 (312)
26 27
DK6S
Fine Honed Stainless
Steel Double Edged
Knife Blade
Compound
Leverage
Wire Cutter
Comfortable
Contour
Vinyl Gripped
Handles
FDC1
Ergonomic
cushioned
handle offers
comfortable,
sure grip.
Serrated edge aids cutting
“flex” fiberglass wool duct.
Cuts Ductboard and
Flex Duct!
It also cuts the wire rib coil!
Puncture resistant nylon
sheath included with DK6S
cushion gripped knife.
For cutting flexible fiberglass
wool duct and ductboard.
Double edge blades are ideal
for blind cuts in “flex” duct.
Duct Knife
Flex Duct Cutter
Cat. No.
DK6S
Blade Length in. (mm) 6 (152)
Net Weight oz. (g) 7 (199)
Double edged blade cleanly pierces through outer
skin and fiberglass wool insulation and cuts in
either direction around the duct circumference.
Use the handy built-in wire cutter to cut the
hardened wire rib coil.
U.S. Patent No. 5,225,237
Page 15

The shear’s pointed bottom blade easily pierces duct
to start the cut. The handy wire cutter is located
away from the scissor blade edges. And a thumboperated latch ensures that the blade edges stay
closed when not in use. Double edged blade cleanly
pierces through outer skin and fiberglass wool insulation and cuts in either direction around the duct
circumference. Use the handy built-in wire cutter to
cut the hardened wire rib coil.
Double edged blade cleanly pierces through outer
skin and fiberglass wool insulation and cuts in either
direction around the duct circumference. Use the
handy built-in wire cutter to cut the hardened wire
rib coil. Use the tie tensioning mechanism to install
a nylon tie strap that secures flex to a take-off collar.
Use the wire cutter to cut excess nylon tie tail.
A knife, wire cutter & tie tool!
Multi-Purpose
Flex Duct Tool
Cat. No.
FDC2
Length of Cut in. (mm) 4-3/8 (111)
Tool Length in. (mm) 12-1/4 (311)
Net Weight oz. (g) 13 (369)
Cat. No.
FDC3
Length of Cut in. (mm) 4 (102)
Tool Length in. (mm) 11-7/8 (302)
Net Weight oz. (g) 14 (397)
Thumb
operated
latch
Thumb operated latch ensures that
sharpened blade edges on the FDC2
stay closed when not in use.
Wire Cutter
FDC2
FDC3
Use wire cutter to cut duct’s
rib coil and trim nylon tie tail.
Tie tensioning
mechanism
Thumb
operated
latch
28 29
Scissor action plus wire cutter!
Flex Duct Shear
Page 16

30 31
Gripped TY4G and Un-Gripped TY4 Manual Cut-Off
Models feature comfortable handle openings and
reduced pinch-point. These long-life tools also feature a unique, non-slip, notched gripper to ratchet
and set thick and thin nylon ties.
TY6 Model with Automatic Cut-Off can be set to
engage blade and cut off the nylon tie tail when
desired tension is reached. Designed for continuous
use on thick ties, the TY6 features contoured cushion
gripped handles and a long-life notched gripper.
Non-slip, notched gripper!
Features Automatic Cut-Off!
Manual Cut-Off
Tensioning Tools
Adjustable
High Leverage
Tensioning Tool
Cat. No.
TY4 / TY4G (Gripped)
Tool Length in. (mm) 6 (152)
TY4 — Net Weight oz. (g) 10 (284)
TY4G — Net Weight oz. (g) 11 (312)
Cat. No.
TY6
Tool Length in. (mm) 8-1/2 (216)
Net Weight oz. (g) 15 (425)
U.S. Patent No. 5,048,575 U.S. Patent No. 5,048,575
Cutter
Handles
T Y4
Cutter
Handles
T Y4G
T Y6
Adjustment Knob
Excess Tie
Cutting
Blade
Features hardened steel stampings with
weather resistant nickel chrome finish.
Page 17

Quickly installs on 4-inch to 16-inch diameter flexible
fiberglass wool duct to support a 90° elbow support.
Reduces energy consumption by eliminating air
flow restrictions and increasing air flow efficiency.
Lightweight, 100% recycled polymer construction.
Use with 36-inch and 48-inch nylon ties (Malco TY34
and TY48).
These Outdoor Rated UV Resistant Ties are made of 100% Nylon.
A one-piece adjustable, self-locking design makes them easy to
install for a multitude of outdoor applications.
These Indoor Rated Ties are made of 100% Nylon. A one-piece adjust-
able, self-locking design makes them easy to install for a multitude of
indoor applications. Uses include securing HVAC duct take-offs and
securing/bundling heavy tubing, hoses and cables.
Cat. No.
FDS1
Nom. Dimensions in. (mm) 15 x 11-1/4 x 3 (38.1 x 28.6 x 7.6)
Net Weight oz. (g) 3 (85)
Supports 90°
Flex Duct Elbow!
Flex Duct
Support
32 33
TY11 TY24
Overall Length in. (mm) 11 (279) 24 (610)
Width in. (mm) 3/16 (4.57) 3/8 (9.5)
Thickness in. (mm) 3/64 (1.32) 3/32 (2.29)
Min. Tensile Strength lbs. 50 175
Max. Adjustable Dia. in. (mm) 3-1/16 (78) 7-3/16 (179)
Color Black Black
For Malco Tie Tools TY4, TY4G TY4, TY4G, TY6
TY34 TY48
Overall Length in. (mm) 36 (914) 48 (1219)
Width in. (mm) 3/8 (9.5) 3/8 (9.5)
Thickness in. (mm) 3/32 (2.29) 3/32 (2.29)
Min. Tensile Strength lbs. 175 175
Max. Adjustable Dia.In. (mm) 11 (279) 14-1/2 (368)
Color Natural Gray
For Malco Tie Tools TY4, TY4G, TY6 TY4, TY4G, TY6
T Y11
TY24
UV
UV Resistant
Adjustable Nylon Ties
Jumbo Heavy-Duty
Adjustable Nylon Ties
TY34
TY48
 Loading...