

MALA Easy Locator Pro User Manual

MALÅ Easy Locator Pro
HDR Series User Manual

2
MALÅ Easy Locator Pro
HDR Series User Manual
!
Guide!for!Operating!the!MALÅ!Easy!Locator!Pro!!
HDR!Ground!Penetrating!Radar!
!
!
!
!
Our!Thanks...!
!
Thank you for choosing MALÅ Geoscience as your Ground Penetrating Radar solution
provider.
The very core of our corporate philosophy is to provide our users with the very best products,
support and services. Our development team is committed to providing you with the most
technologically advanced and easy-to-use GPR products with the capability to meet your
needs for efficiency and productivity now, and into the future.
Whether this is your first MALÅ Geoscience product, or addition to the MALÅ collection, we
believe that small investment of your time to familiarize yourself with the product by reading
this manual will be rewarded with a significant increase in productivity and satisfaction.
At MALÅ Geoscience, we welcome comments concerning the use and experience with our
products, as well as the contents and usefulness of this manual.
MALÅ!Geoscience!team!
!
!

3
!
MALÅ Geoscience
Under the copyright laws, this manual may not be copied, in whole or in part, without the
written consent of MALÅ Geoscience. Your rights to the software are governed by the
accompanying software license agreement. The MALÅ Geoscience logo is a trademark of
MALÅ Geoscience, registered in the Sweden and other countries.
The product described in this document is subject to continuous developments and
improvements. All particulars of the product and its use contained in this document are given
by MALÅ Geoscience in good faith. However, all warranties implied or expressed, including
but not limited to implied warranties or merchantability, or fitness for purpose, are excluded.
This document is intended only to assist the reader in the use of the product and every effort
has been made to ensure that the information in this manual is accurate. MALÅ Geoscience
shall not be liable for any loss or damage arising from the use of any information in this
document, or any error or omission in such information, or any incorrect use of the product.
MALÅ Geoscience, the MALÅ Geoscience logo, are trademarks of MALÅ Geoscience,
registered in Sweden and other countries. Other company and product names mentioned
herein are trademarks of their respective companies. Mention of third-party products is for
informational purposes only and constitutes neither an endorsement nor a recommendation.
MALÅ Geoscience assumes no responsibility with regard to the performance or use of these
products.
MALÅ Geoscience
MALÅ Geoscience AB
Skolgatan 11
SE-920 70 Malå Sweden
www.malags.com
!
!
!
Release!Date:!16th!October!2014!
Version:!2.0!

4
Table of Contents
Preface 5
About this Manual 5
Additional Resources 5
Feedback 5
Safety and Compliance Notices 6
Get Ready. Set up. Go 7
MALÅ HDR Features 7
Accessories and Optional Features 8
Unpack. Inspect. Register 9
Repacking and Shipping 10
Registering MALÅ HDR 10
System Assembly and Set Up 11
Hardware Assembly 11
Connecting it all up 14
Antenna LED Indicators 16
Battery Maintenance and Charging 16
Charging the Batteries 17
User!Interface!! ! ! ! ! ! ! ! ! 18!
Main Display Window 19
Navigating the Menus and Options (Navigator) 19
Main Menu 20
Zoom Function 21
Main Menu Icons 21
Measurement Parameter Menu 23
Acquisition Parameters Menu 25
Wheels Edit and Calibration Menu 26
Wheels Edit Options 27
Display Parameters Menu 28
Operating!Instructions! ! ! ! ! ! ! ! 29!
2D Project 30
3D Grid Project 32
Creating a 3D Project 32
3D Project Settings Menu 37
Object Mapper Project 39
Creating an Object Mapper Project 39
Object Mapper Measurements with Baseline 41
Object Mapper with GPS 43
Continuing an Object Mapper Measurements Project 44
System Menu 44
GPS Options and Settings 46
Maintenance!and!Troubleshooting! ! ! ! ! ! 48
Troubleshooting - Frequently Answered Questions 48
Service and Repairs 48
Technical Support 48
Glossary ! ! ! ! ! ! ! ! ! ! 49

5
Preface!
!
About!this!Manual!
!
This manual is written for the end user of the product and explains how to set up and
configure the product, as well as providing detailed instruction on its use. Basic theory for
Ground Penetration Radar is outlined to help the operator understand the underlining
technology. References for thorough discussions of this topic and applications for the
technology are also presented.
Known issues and limitations, precautions, best practices and tips are also presented so that
the most efficient and productive use can be achieved.
!
Additional!Resources!
!
GPR Training www.malags.com/Support/Training
GPR Applications www.malags.com/Resources/Applications
GPR Case Studies www.malags.com/Resources/Case-Studies
GPR White Paper www.malags.com/Resources/White-Papers
GPR FAQ www.malags.com/Support/FAQ
!
Feedback!
!
Feedback regarding the contents of this manual or the product may be sent using any of the
following channels.
Phone (Sweden) +46 953 34550
Phone (USA) +1 843 852 5021
Phone (China) +86 108 225 0728
Phone (Malaysia) +60 (0) 3 6250 7351
Phone (Australia) +61 438 278 902
Web www.malags.com/feedback
!
!
!
!
!
!
!

6
Safety!and!Compliance!User!Notices!
This GPR-device is certified according to FCC, subpart 15, IC RSS-220 and ETSI EN 302
066-1&2.
According to the regulations stated in ETSI EN 302 066-1 (European
Telecommunication Standards Institute):
The control unit should not be left ON when leaving the system unintended. It should always
be turned OFF when not in use.
The antennas should point towards the ground, walls etc. during measurement and not
towards the air.
The antennas should be kept in close proximity to the media under investigation.
Canadian and US regulations states that whenever GPR-antennas are in use the
following notes apply:
This Ground penetrating Radar device shall be operated only when in contact with or within 1
m of the ground.
Only law enforcement agencies, scientific research institutes, commercial mining companies,
construction companies and emergency rescue or firefighting organizations shall use this
Ground Penetrating Radar Device.
This device complies with Industry Canada license-exempt RSS standards. Operation is
subject to the following two conditions: (1) This device may not cause interference and (2)
this device must accept any interference, including interference that may cause undesired
operation of the device.
French translations:
Cet instrument de Géoradar se devra d’être opéré seulement en contact à même le sol ou en
deça d’un mètre du sol.
Cet instrument de Géoradar se devra d’être utilisé seulement par les agences chargées de
l’application de la loi, les instituts de recherches scientifiques, les compagnies minières à
buts lucratifs, les compagnies de construction et les organisations responsables pour le
sauvetage et la lutte contre les incendies.
Cet instrument répond aux exigences de la licence avec Industrie Canada- exempt des
standards RSS. L ‘opération est sujette aux deux conditions suivantes : (1) Cet
instrument ne peut pas causer une interférence et (2) cet instrument se doit d’accepter
quelque interférence que ce soit, incluant une interférence qui pourrait causer une opération
non-souhaitable de l’instrument.
7
Get!Ready.!Set!up.!Go!
This section walks through the steps for getting ready, setting up and basic operation of your
new MALÅ GX HDR. Information is also available on what to do in case the equipment may
have been damaged during shipment.
!
Note:!If a defect in the equipment is discovered, make sure to contact MALÅ Geoscience prior to use
and follow the instructions for Repacking and Shipping in this section.
MALÅ!Easy!Locator!Pro!HDR!Features!
The HDR-series (High Dynamic Range) is the latest addition to MALA’s versatile product
range. It is a completely new design, based on patented cutting edge technology. These new
antennas are not just an upgrade of earlier designs; they represent a leap in GPRtechnology, not seen in the past 15 years.
Advantages!compared!to!conventional!GPR!technology!
Real-time sampling technology – HDR enabled
Significantly faster data acquisition rates
Greater signal-to-noise ratio
Increased bandwidth
Unprecedented dynamic range and resolution
32 bit data output
Greater depth penetration
Better detection capabilities

8
Accessories!and!Optional!Extras!
!
Additional Battery and battery charger
Additional Li-ion Battery Pack 12 V (3.5 Hour) for the MALÅ Easy Locator Pro.
!
!
!
!
Additional MALÅ Li-ion Battery Charger!
!
!
!
! !
9
Unpack.!Inspect.!Register!
!
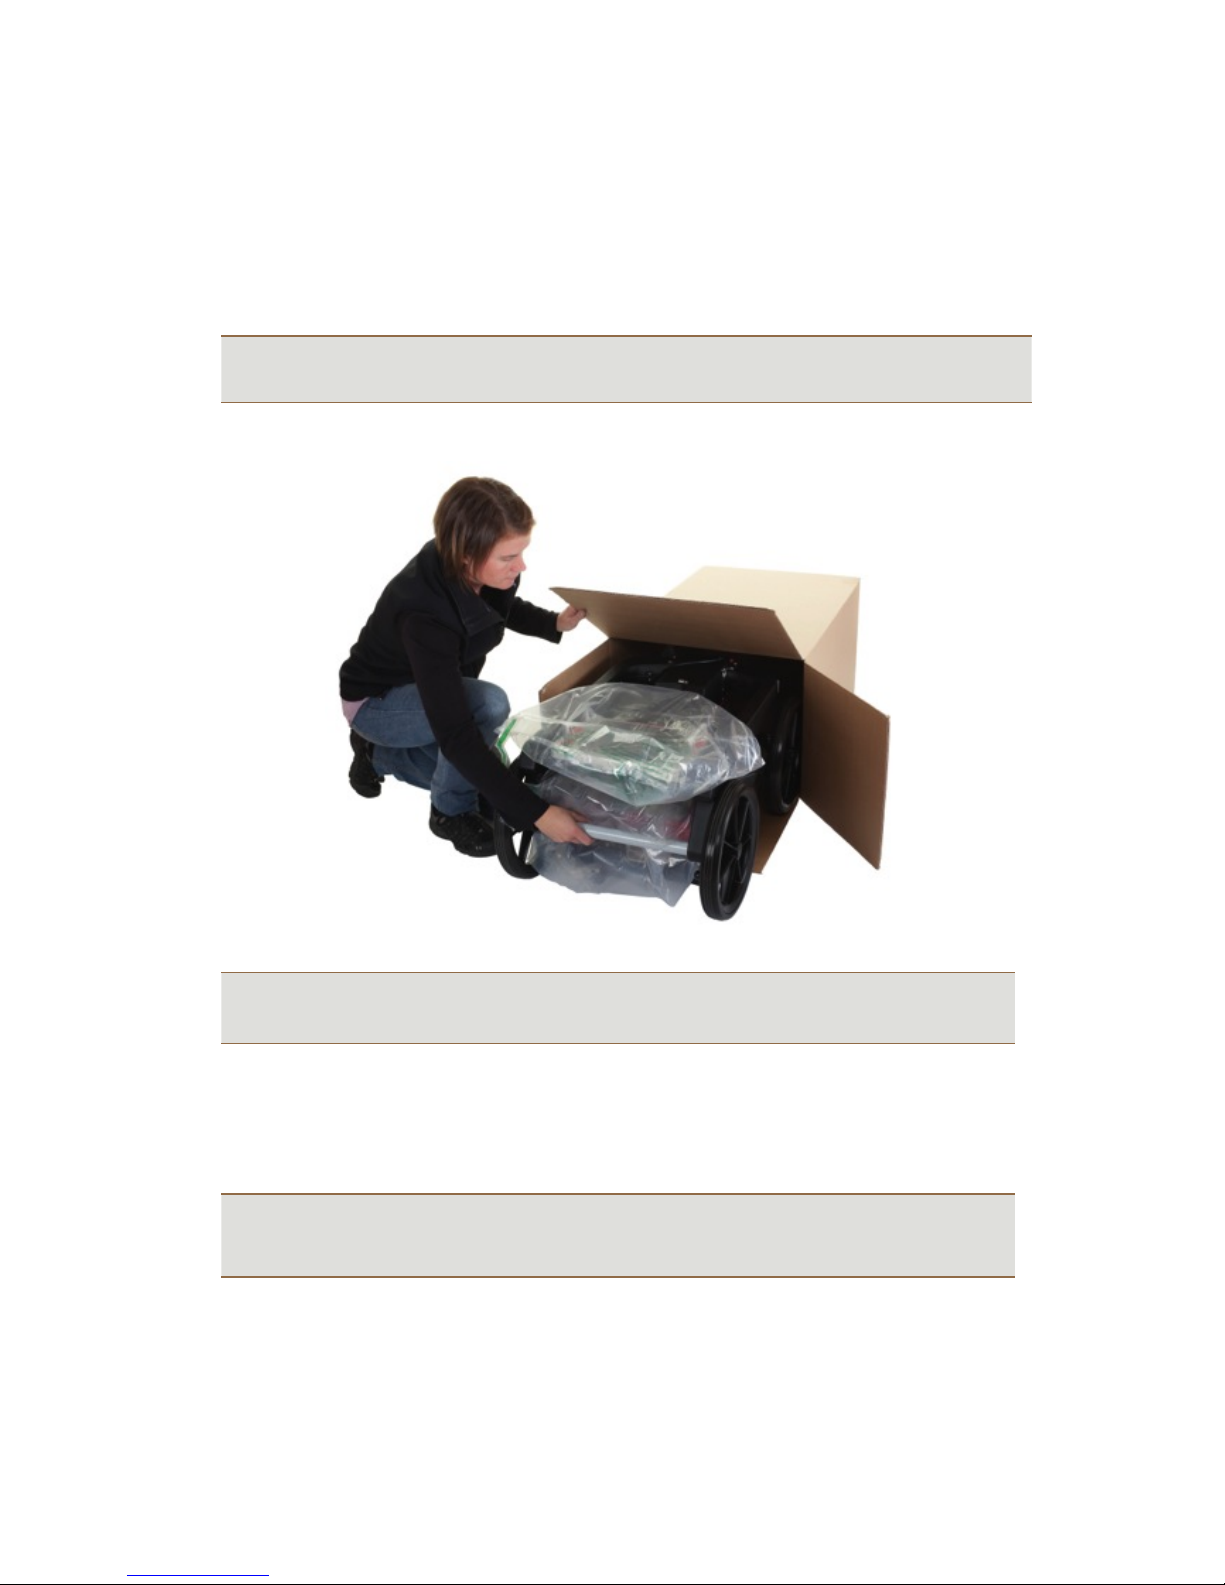
Great care should be taken when unpacking the equipment. Be sure to verify the contents
shown on the packing list and inspect the equipment and accessories for any loose parts or
other damage.
Note:!The packing list that is included with the shipment should be read careful and any discrepancy
should be reported to our sales department at www.malags.com/corporate/contact
!
!
Note:!All packing material should be kept in the event that any damage occurred during shipping.
File any claim for shipping damage with the carrier immediately after discovery of the
damage and before the equipment is put into use. Any claims for missing equipment or parts
should be filed with MALÅ Geoscience within fourteen (14) business days from the receipt of
the equipment.
Note:!Two serial numbers are attached to the equipment, (1) on the underside of the monitor and
(2) on top of the antenna.

10
Repacking!and!Shipping!
!
The MALÅ Geoscience packing kit is specially designed for shipping MALÅ Easy Locator Pro
HDR. The packing kit should be used whenever shipping is necessary. If original packing
materials are unavailable, pack the instrument in a box that is large enough to allow at least
80mm of shock absorbing material to be placed all around the instrument. This includes top,
bottom and all sides.
Warning:!Never use shredded fibres, paper or wood wool, as these materials tend to pack down
and permit the instrument to move inside its packing box.
Please read our shipping instructions before returning instruments to MALÅ Geoscience.
These instructions can be found on our website at:
www.malags.com/Support/Service-Repairs.
Registering!MALÅ!Easy!Locator!Pro!HDR!
!
By registering your equipment, you ensure that you receive up-to-date documentation,
software upgrades and product information, which all helps to optimize the utilization of the
equipment and realize the maximum return on your investment.
To register your equipment, simply visit – www.malags.com/Support/Product-Registration
on our website and submit the registration form.
11
System!Assembly!and!Set!Up!
!
MALÅ Easy Locator Pro is an integrated system, consisting of an Easy Locator controller and
HDR antenna, linked through a single data/power cable.
!
!
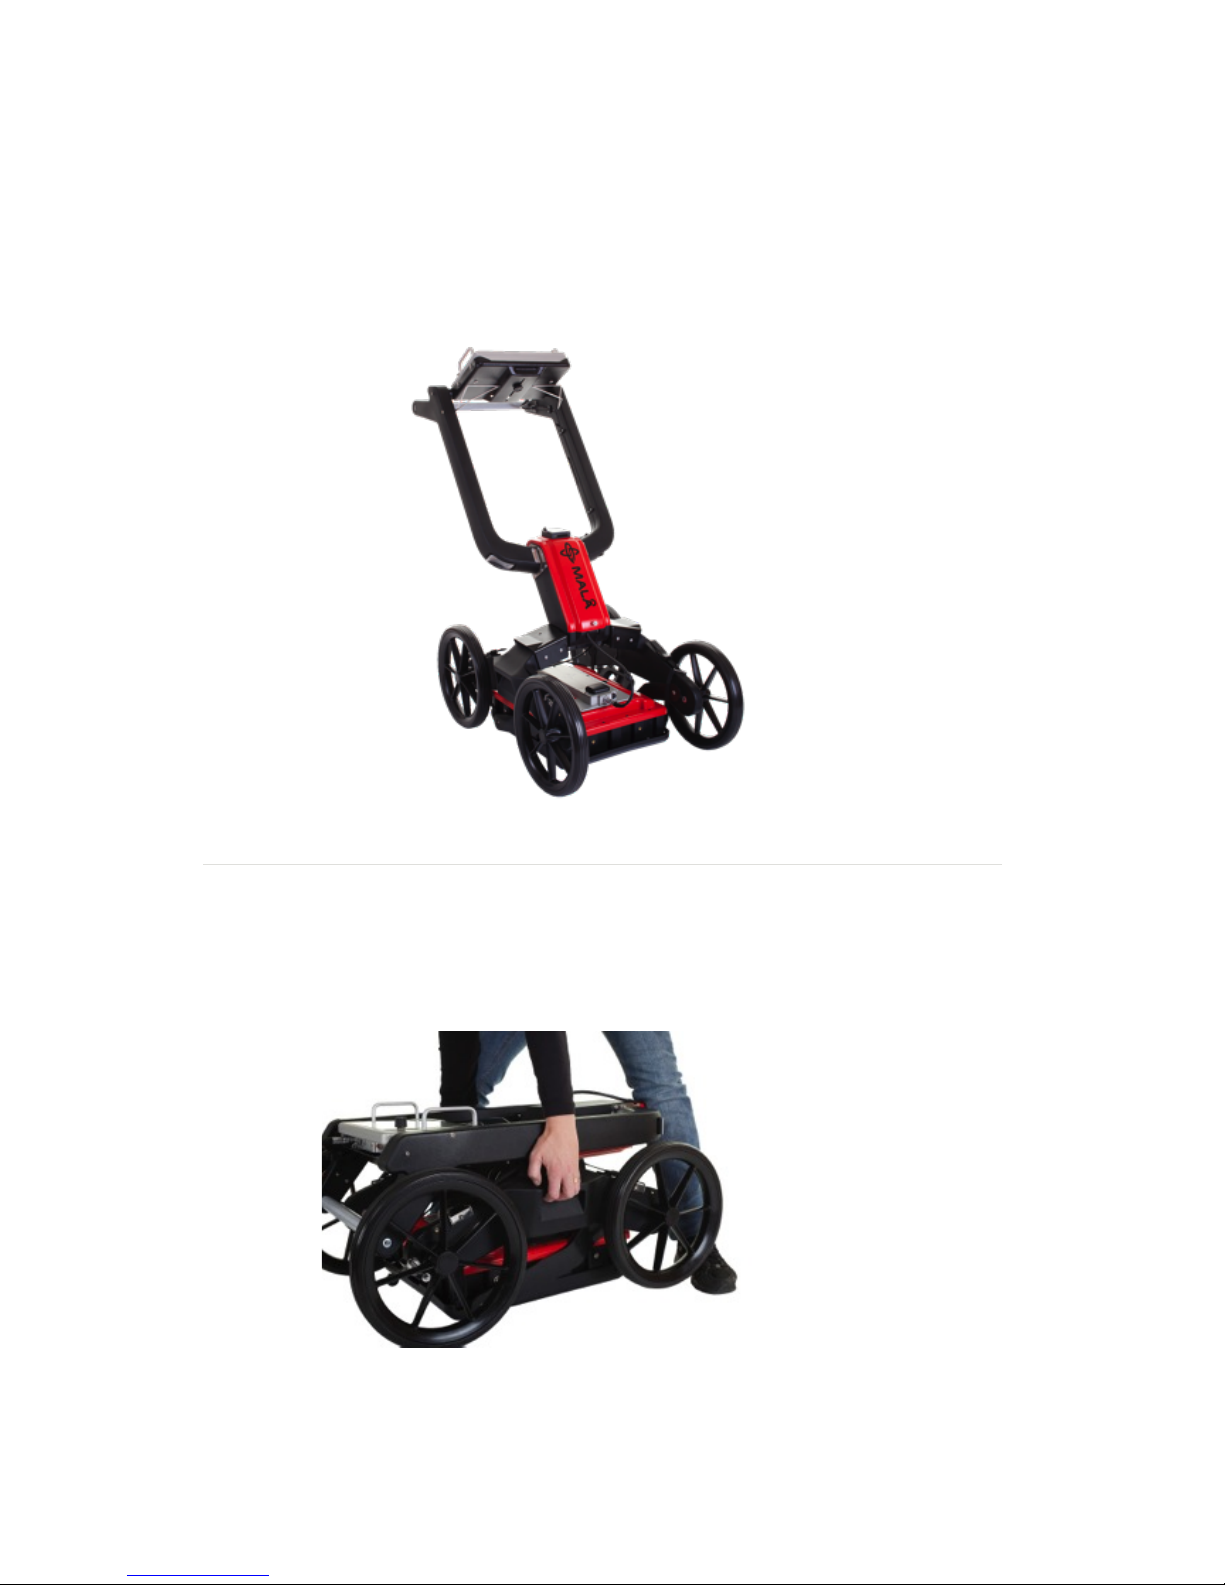
Hardware!Set!Up
Convenient hand recesses enable easy lifting of the Easy Locator Pro HDR
!
!
!
!
!
12
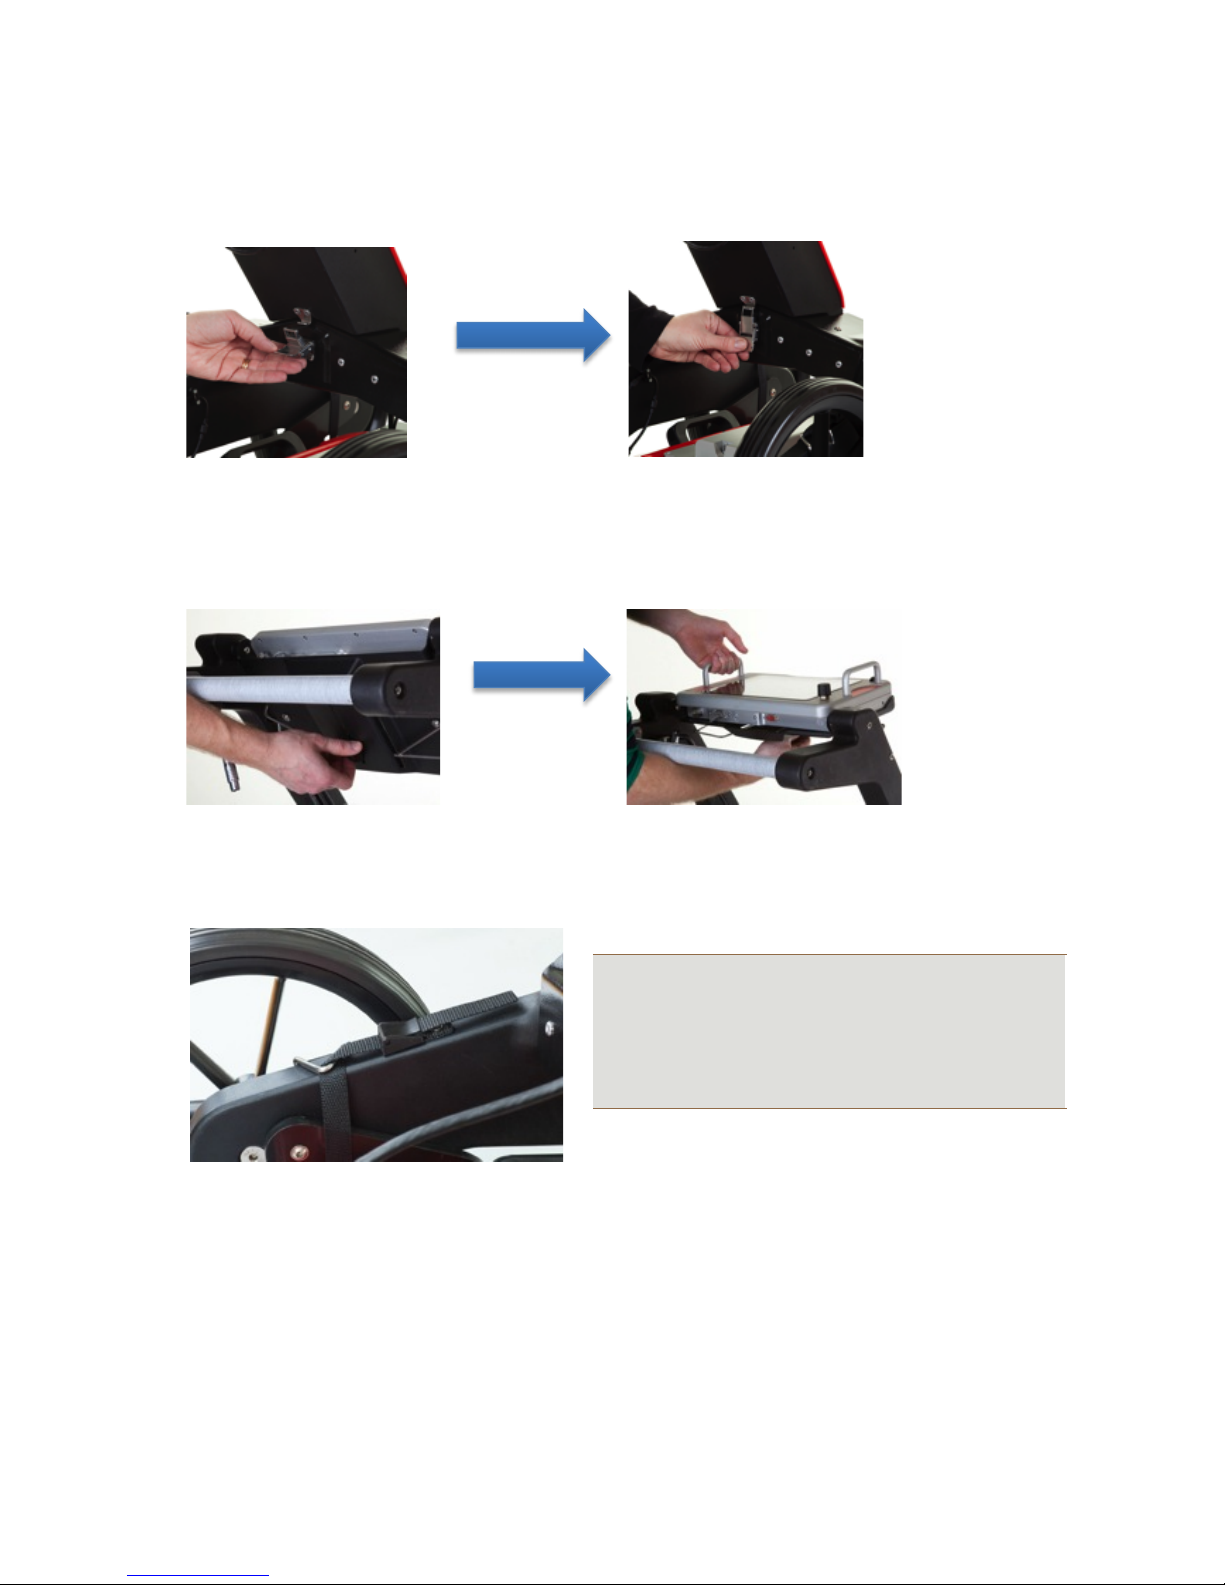
Raise!the!Handle!
!
1 Release the main handle assembly clamp !
!
!
!
!
!
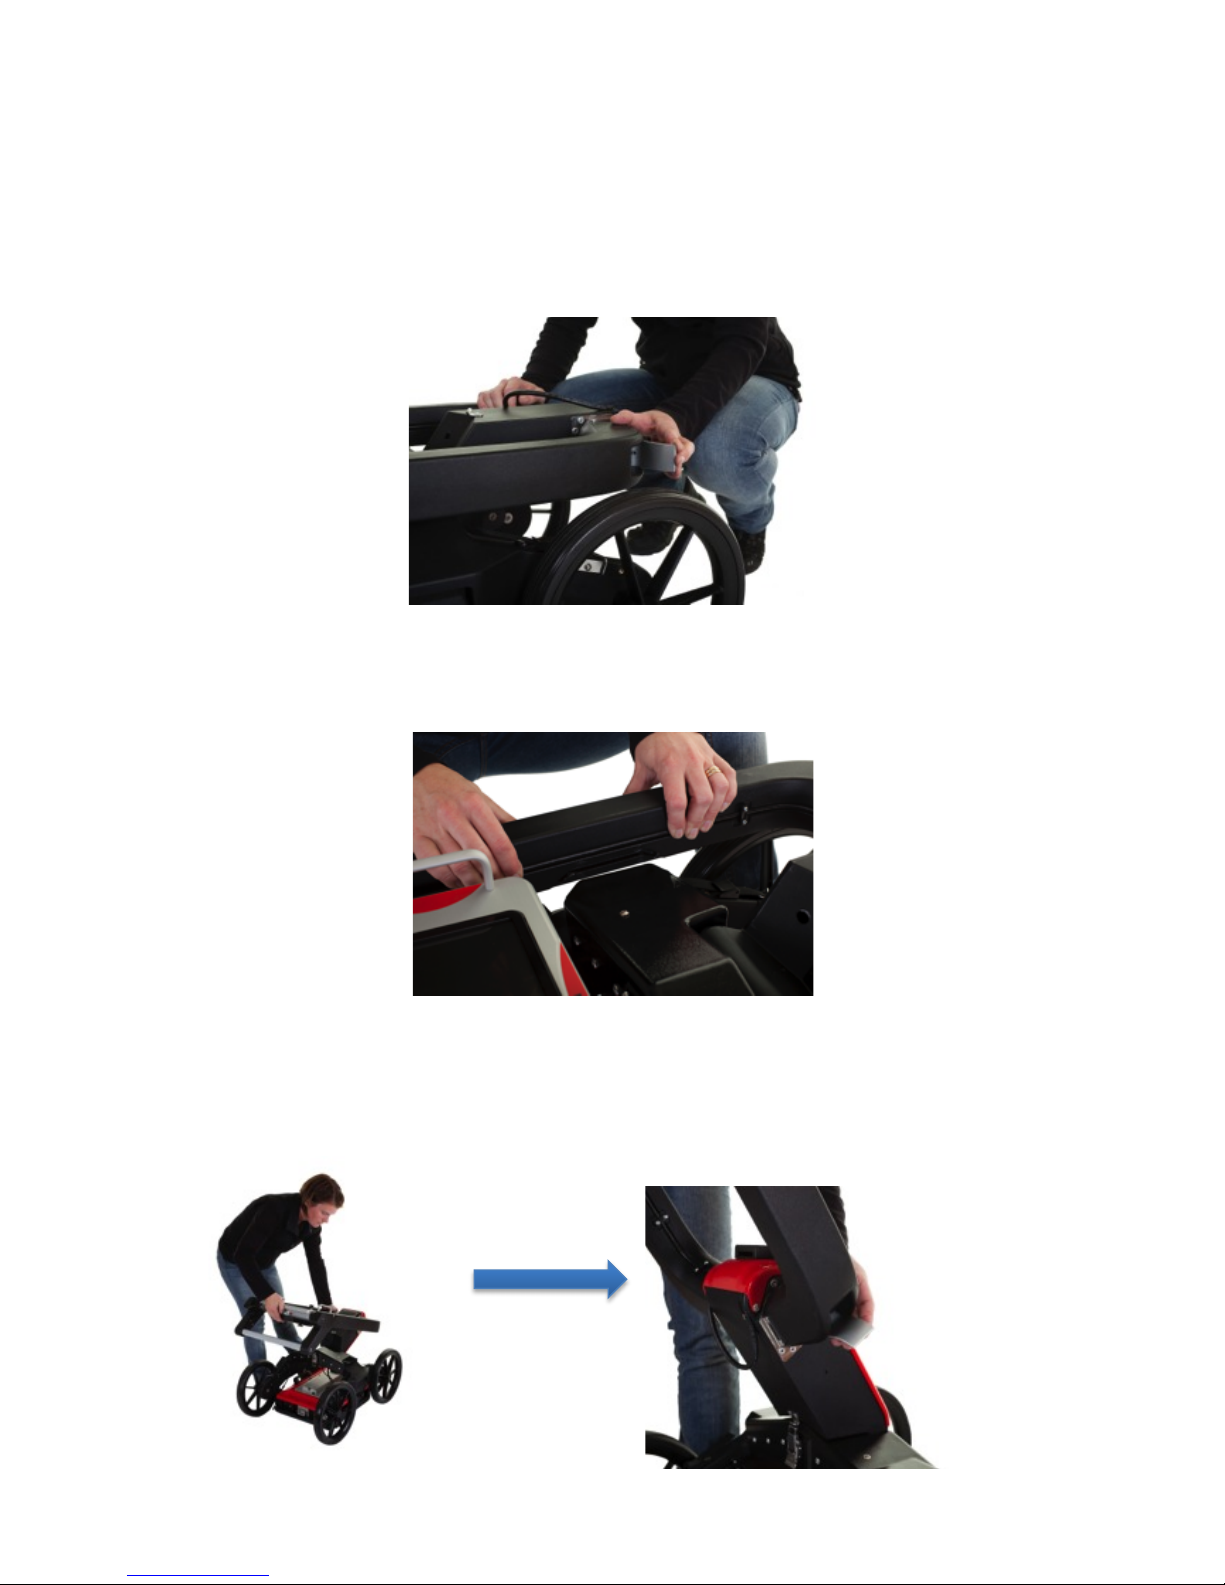
2 Pull one side of the handle assembly out of out of its fixed position. Once
released, do the same on the opposite side.!
!
!
!
!
!
3 Using the handlebar, raise the handle assembly into the upright position and
move the clamp into the locked position!
!!!!!
!
13
Note: Under normal conditions, the antenna should be
kept in contact with the ground where possible. Position
the Easy Locator on the surface to be surveyed and
then adjust the straps so there is a small amount of
slack. This will compensate for any undulations along
the survey line.
4 Fasten the clasp on the rear of the handle assembly
!
!
!
!
5 Slacken the bolt on the rear of the controller, raise the controller to the desired
viewing angle and re-tighten the bolt.
!
!
!
6 Adjust the four straps to raise or lower the antenna to the required height!
!
!
! !
! !

14
!
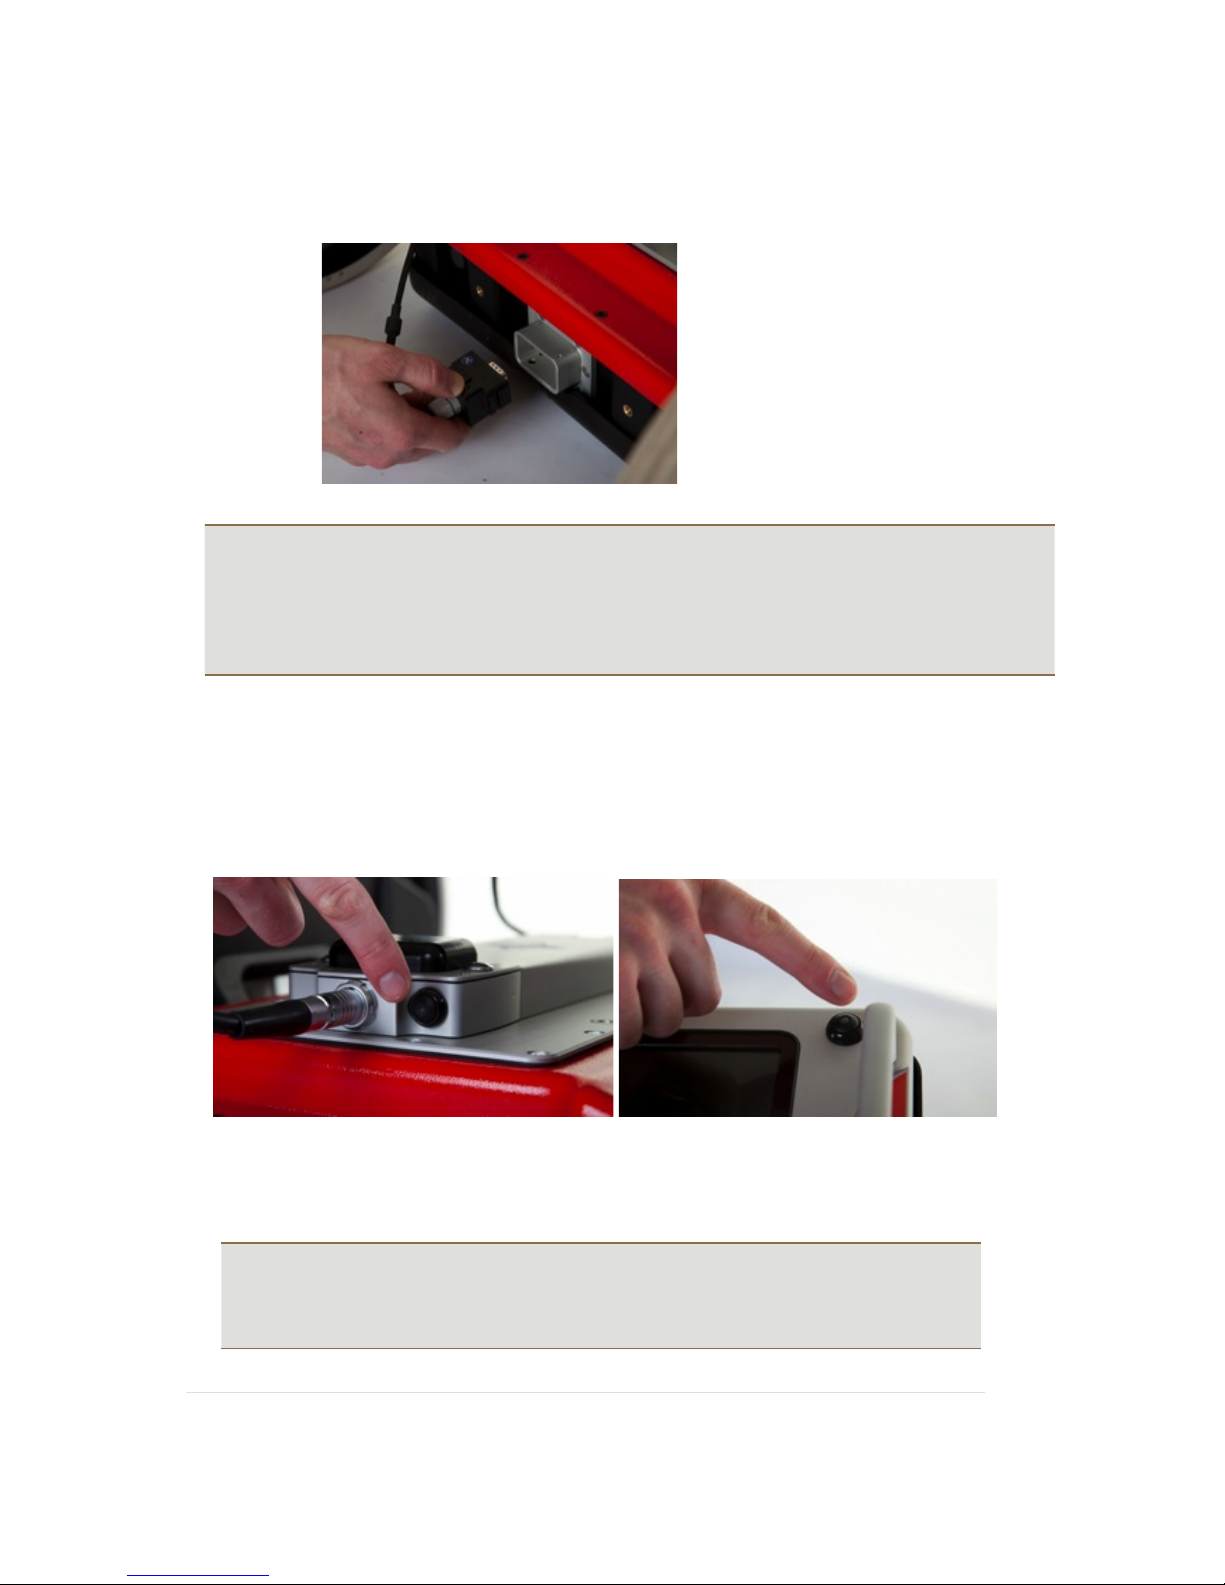
Connecting!it!all!up!
1 Connect the data cable to the Easy Locator Pro controller
Note:!Look for the countersink in the power cable and place it towards the mark on the connection. Push
lightly. If you have it in the correct position it will go in its position smoothly. To disconnect, pull out
holding the metal part of the connection.
2 Connect the data cable to the antenna
3 Raise the battery hatch and connect the batteries
15
4 Connect the encoder cable from the wheel to the antenna.
Note:!The precision of the encoder wheel depends on several factors, such as; the condition of
measurement surface, the pressure applied on the wheel and possible wear.
!
Warning:!When using MALÅ Easy Locator, the wheel calibration must be changed to the appropriate
wheel, enter the Settings!Menu!on the Easy Locator Controller and change the Acquisition!Parameters!
to the correct wheel.
5 Power up
Start the Easy Locator Pro by pressing the power button on both the HDR antenna and the Easy
Locator Controller.
To turn the antenna and monitor off, first select QUIT from the Main Menu, confirm the action by
selecting YES then push the power button on the monitor and release quickly.
Note:!The antenna will automatically turn off when the monitor is powered down.
Note:!If a power cable is accidentally pulled out, the Easy Locator Pro components will start
automatically when reconnected.
!
! !
16
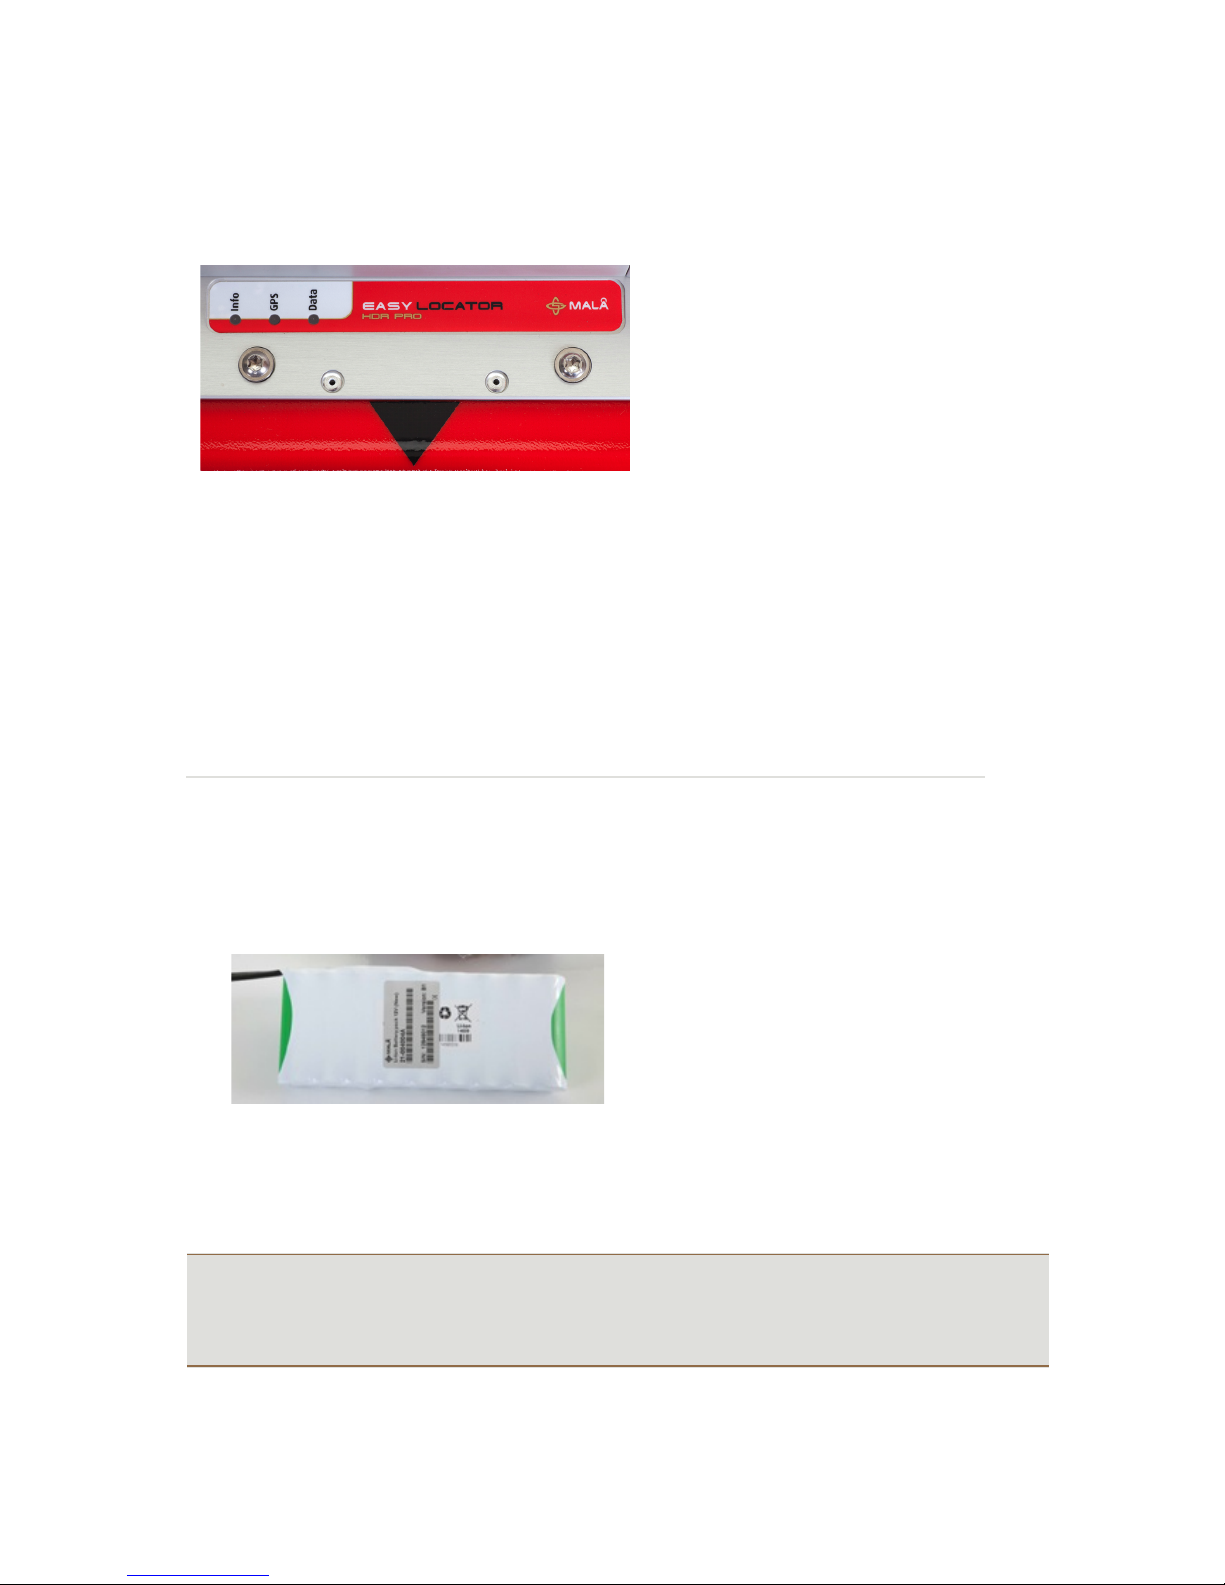
Antenna!LED!Indicators
Three LED-indicators are mounted beneath
the antenna product label.
DATA: Continuous flashing light indicates the unit is working properly and ready for data collection.
Irregular flashing on this LED means erroneous antenna configuration or possible software version
issue. The LED switches to continuous illumination when the unit enters data collection.
GPS: Flashing light mean that the GPS option is installed and that the internal computers are
successfully communicating with the GPS-unit. This LED switches to continuous light whenever
there’s 4 or more satellites available.
INFO: This LED indicates a serious system Error, whenever active. Please contact your local MALÅ
representative.!
Battery!Maintenance!and!Charging
Easy Locator Pro Battery
A 12V/8.7Ah Li-ion battery pack is shipped with the MALÅ Easy Locator Pro HDR Antenna and is the
recommended power source for the antenna. Under normal operating and handling conditions, this
battery is capable of up to 3.5 hours of continuous operation. MALÅ Easy Locator Pro HDR antenna will
automatically turn itself off when the battery voltage drops below 10V. A meter showing the remaining
battery capacity is displayed on the Controller.
Tip: If storing the battery for long periods of time, discharge the battery to approximately 50%, this will
maximise the life of the battery. Use the battery level indicator on the Controller to estimate 50%, wait
until the indicator enters the yellow section, power down and remove the battery. This also applies to
the internal battery in the Controller.
 Loading...