

Page 1

INSTRUCTION MANUAL
WARNING:
For your personal safety, READ and UNDERSTAND before using.
SAVE THESE INSTRUCTIONS FOR FUTURE REFERENCE.
ENGLISH
Circular Saw
MODEL MT581
005337
DOUBLE
INSULATION
Page 2

2
SPECIFICATIONS
•Due to our continuing programme of research and development, the specifications herein are subject to change
without notice.
•Note: Specifications may differ from country to country.
SYMBOLS
END201-1
The following show the symbols used for the tool. Be
sure that you understand their meaning before use.
...................Read instruction manual.
...................DOUBLE INSULATION
Intended use
The tool is intended for performing lengthways and
crossways straight cuts and mitre cuts with angles in
wood while in firm contact with the workpiece.
Power supply
The tool should be connected only to a power supply of
the same voltage as indicated on the nameplate, and
can only be operated on single-phase AC supply. They
are double-insulated in accordance with European
Standard and can, therefore, also be used from sockets
without earth wire.
Model MT581
Blade diameter 185 mm
Max. cutting depth
at 90° 64 mm
at 45° 42 mm
No load speed (min-1)
4,700
Overall length 299 mm
Net weight 3.4 kg
Safety class
/II
Page 3

3
GENERAL SAFETY RULES ENA100-1
WARNING:
Read all instructions. Failure to follow all instructions listed below may result in
electric shock, fire and/or serious injury. The term “power tool” in all of the
warnings listed below refers to your mains operated (corded) power tool or battery
operated (cordless) power tool.
SAVE THESE INSTRUCTIONS
Wor k a rea
1. Keep work area clean and well lit. Cluttered and
dark areas invite accidents.
2. Do not operate power tools in explosive atmos-
pheres, such as in the presence of flammable
liquids, gases or dust. Power tools create sparks
which may ignite the dust or fumes.
3. Keep children and bystanders away while oper-
ating a power tool. Distractions can cause you to
lose control.
Electrical safety
4. Power tool plugs must match the outlet. Never
modify the plug in any way. Do not use any
adapter plugs with earthed (grounded) power
tools. Unmodified plugs and matching outlets will
reduce risk of electric shock.
5. Avoid body contact with earthed or grounded
surfaces such as pipes, radiators, ranges and
refrigerators. There is an increased risk of electric
shock if your body is earthed or grounded.
6. Do not expose power tools to rain or wet condi-
tions. Water entering a power tool will increase the
risk of electric shock.
7. Do not abuse the cord. Never use the cord for
carrying, pulling or unplugging the power tool.
Keep cord away from heat, oil, sharp edges or
moving parts. Damaged or entangled cords
increase the risk of electric shock.
8. When operating a power tool outdoors, use an
extension cord suitable for outdoor use. Use of a
cord suitable for outdoor use reduces the risk of
electric shock.
Personal safety
9. Stay alert, watch what you are doing and use
common sense when operating a power tool. Do
not use a power tool while you are tired or under
the influence of drugs, alcohol or medication. A
moment of inattention while operating power tools
may result in serious personal injury.
10. Use safety equipment. Always wear eye protec-
tion. Safety equipment such as dust mask, non-skid
safety shoes, hard hat, or hearing protection used
for appropriate conditions will reduce personal injuries.
11. Avoid accidental starting. Ensure the switch is
in the off position before plugging in. Carrying
power tools with your finger on the switch or plugging in power tools that have the switch on invites
accidents.
12. Remove any adjusting key or wrench before
turning the power tool on. A wrench or a key left
attached to a rotating part of the power tool may
result in personal injury.
13. Do not overreach. Keep proper footing and balance at all times. This enables better control of the
power tool in unexpected situations.
14. Dress properly. Do not wear loose clothing or
jewellery. Keep your hair, clothing, and gloves
away from moving parts. Loose clothes, jewellery
or long hair can be caught in moving parts.
15. If devices are provided for the connection of
dust extraction and collection facilities, ensure
these are connected and properly used. Use of
these devices can reduce dust related hazards.
Power tool use and care
16. Do not force the power tool. Use the correct
power tool for your application. The correct
power tool will do the job better and safer at the rate
for which it was designed.
17. Do not use the power tool if the switch does not
turn it on and off. Any power tool that cannot be
controlled with the switch is dangerous and must be
repaired.
18. Disconnect the plug from the power source and/
or the battery pack from the power tool before
making any adjustments, changing accessories,
or storing power tools. Such preventive safety
measures reduce the risk of starting the power tool
accidentally.
19. Store idle power tools out of the reach of children and do not allow persons unfamiliar with
the power tool or these instructions to operate
the power tool. Power tools are dangerous in the
hands of untrained users.
20. Maintain power tools. Check for misalignment or
binding of moving parts, breakage of parts and
any other condition that may affect the power
tools operation. If damaged, have the power tool
repaired before use. Many accidents are caused
by poorly maintained power tools.
Page 4
4
21. Keep cutting tools sharp and clean. Properly
maintained cutting tools with sharp cutting edges
are less likely to bind and are easier to control.
22. Use the power tool, accessories and tool bits
etc. in accordance with these instructions and in
the manner intended for the particular type of
power tool, taking into account the working conditions and the work to be performed. Use of the
power tool for operations different from those
intended could result in a hazardous situation.
Service
23. Have your power tool serviced by a qualified
repair person using only identical replacement
parts. This will ensure that the safety of the power
tool is maintained.
ADDITIONAL SAFETY RULES FOR TOOL ENB036-4
1. Wear hearing protection.
2. Keep Guards In Place and In Working Order.
Never wedge or tie lower guard open. Check
operation of lower guard before each use.
Don’t use if lower guard does not close briskly
over saw blade.
CAUTION: If saw is dropped, lower guard may
be bent, restricting full return.
3. Do not use blades which are deformed or
cracked.
4. Do not use blades made of high speed steel.
5. Do not stop the blades by lateral pressure on
the saw blade.
6. Keep Blades Clean and Sharp.
Sharp blades minimize stalling and kickback.
7. DANGER:
Keep Hands Away From Cutting Area.
Keep hands away from blades. Don’t reach
underneath work while blade is rotating. Don’t
attempt to remove cut material when blade is
moving.
CAUTION: Blades coast after turn off.
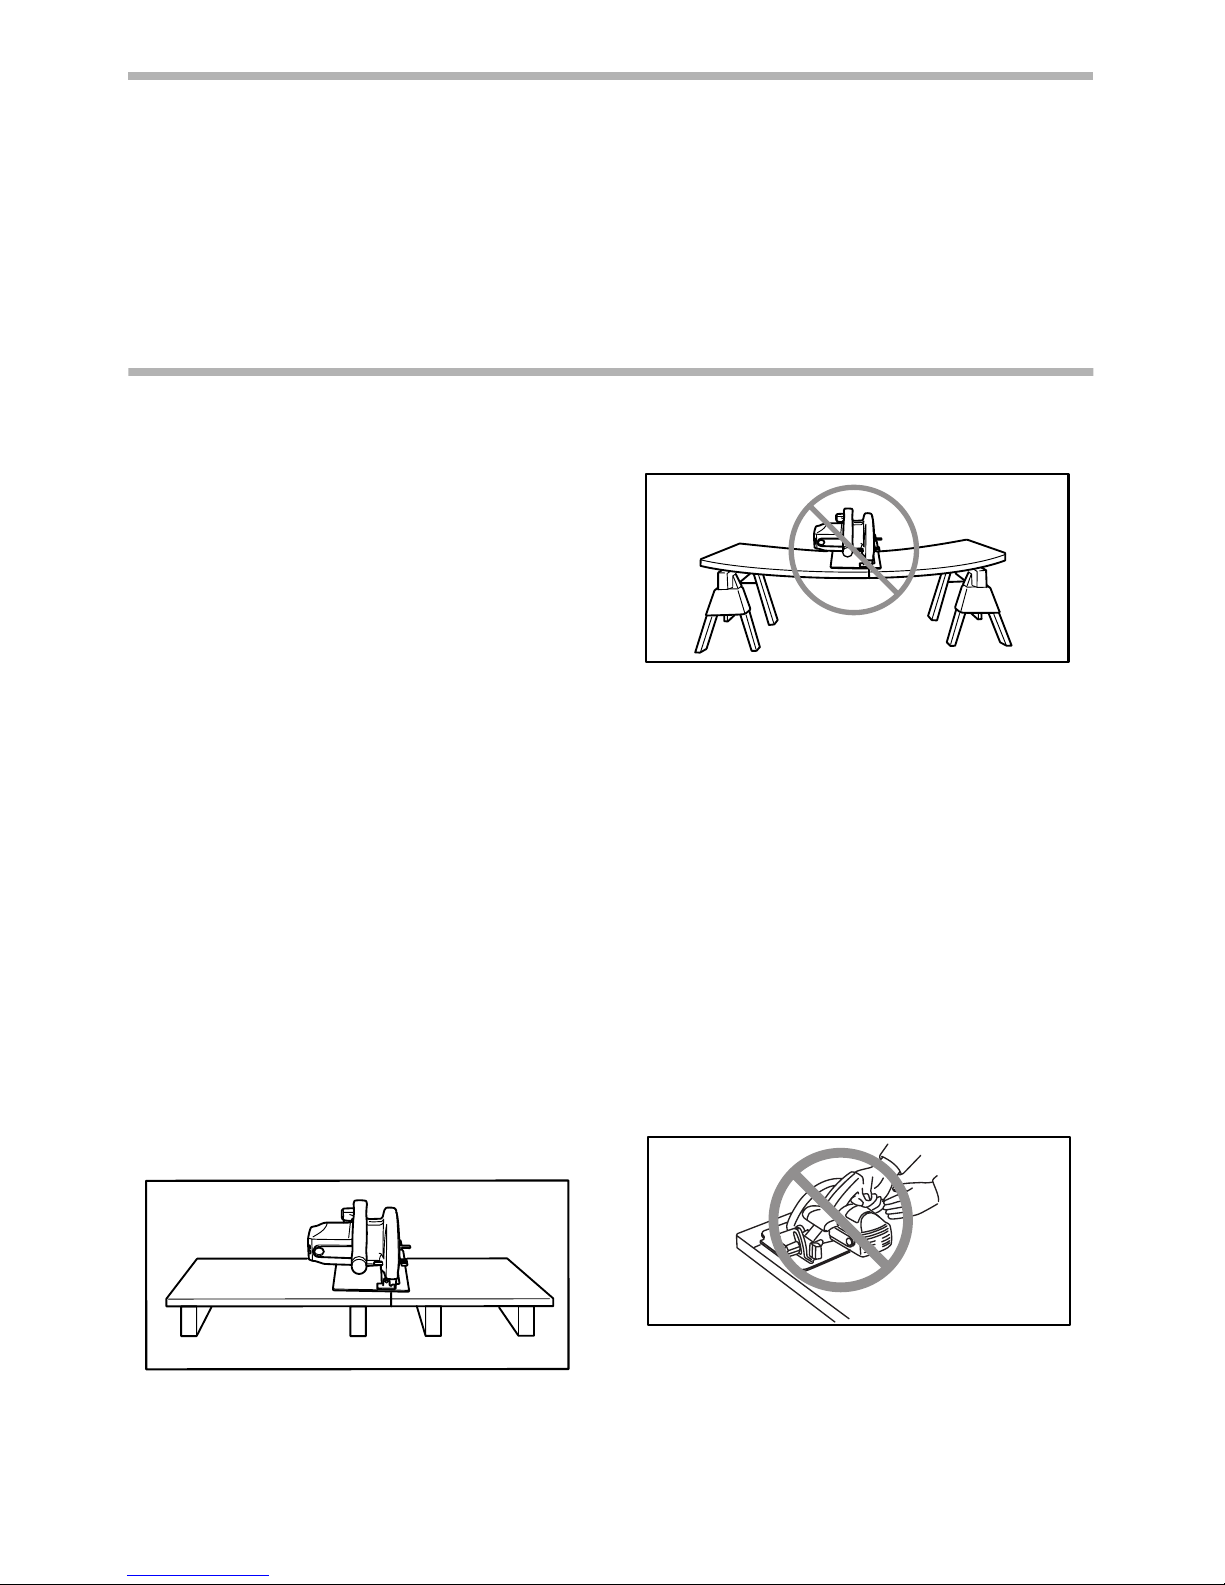
8. Support Large Panels (Fig. 1 & 2).
Large panels must be supported as shown in
Fig. 1 to minimize the risk of blade pinching and
kickback.
When cutting operation requires the resting of
the saw on the workpiece, the saw shall be
rested on the larger portion and the smaller
piece cut off.
9. Use Rip Fence.
Always use a fence or straight edge guide when
ripping.
10. Guard Against Kickback. (Fig. 1 & 3)
Kickback occurs when the saw stalls rapidly and
is driven back towards the operator. Release
switch immediately if blade binds or saw stalls.
Keep blades sharp. Support large panels as
shown in Fig. 1.
Use fence or straight edge guide when ripping.
Don’t force tool. Stay alert-exercise control.
Don’t remove saw from work during a cut while
the blade is moving.
NEVER place your hand or fingers behind the
saw. If kickback occurs, the saw could easily
jump backwards over your hand, possibly causing severe injury.
11. Lower guard should be retracted manually only
for special cuts such as “Compound Cuts”.
Raise lower guard by Retracting Lever. As soon
as blade enters the material, lower guard must
Fig. 1
To avoid kickback, do support board or panel near the
cut.
Fig. 2
Do not support board or panel away from the cut.
Fig. 3
Page 5
5
be released. For all other sawing, the lower guard
should operate automatically.
12. Adjustments.
Before cutting be sure depth and bevel adjustments are tight.
13. Use Only Correct Blades In Mounting.
Don’t use blades with incorrect size holes.
Never use defective or incorrect blade washers
or bolts.
14. Avoid Cutting Nails.
Inspect for and remove all nails from lumber
before cutting.
15. When operating the saw, keep the cord away
from the cutting area and position it so that it
will not be caught on the workpiece during the
cutting operation. Operate with proper hand
support, proper workpiece support, and supply
cord routing away from the work area.
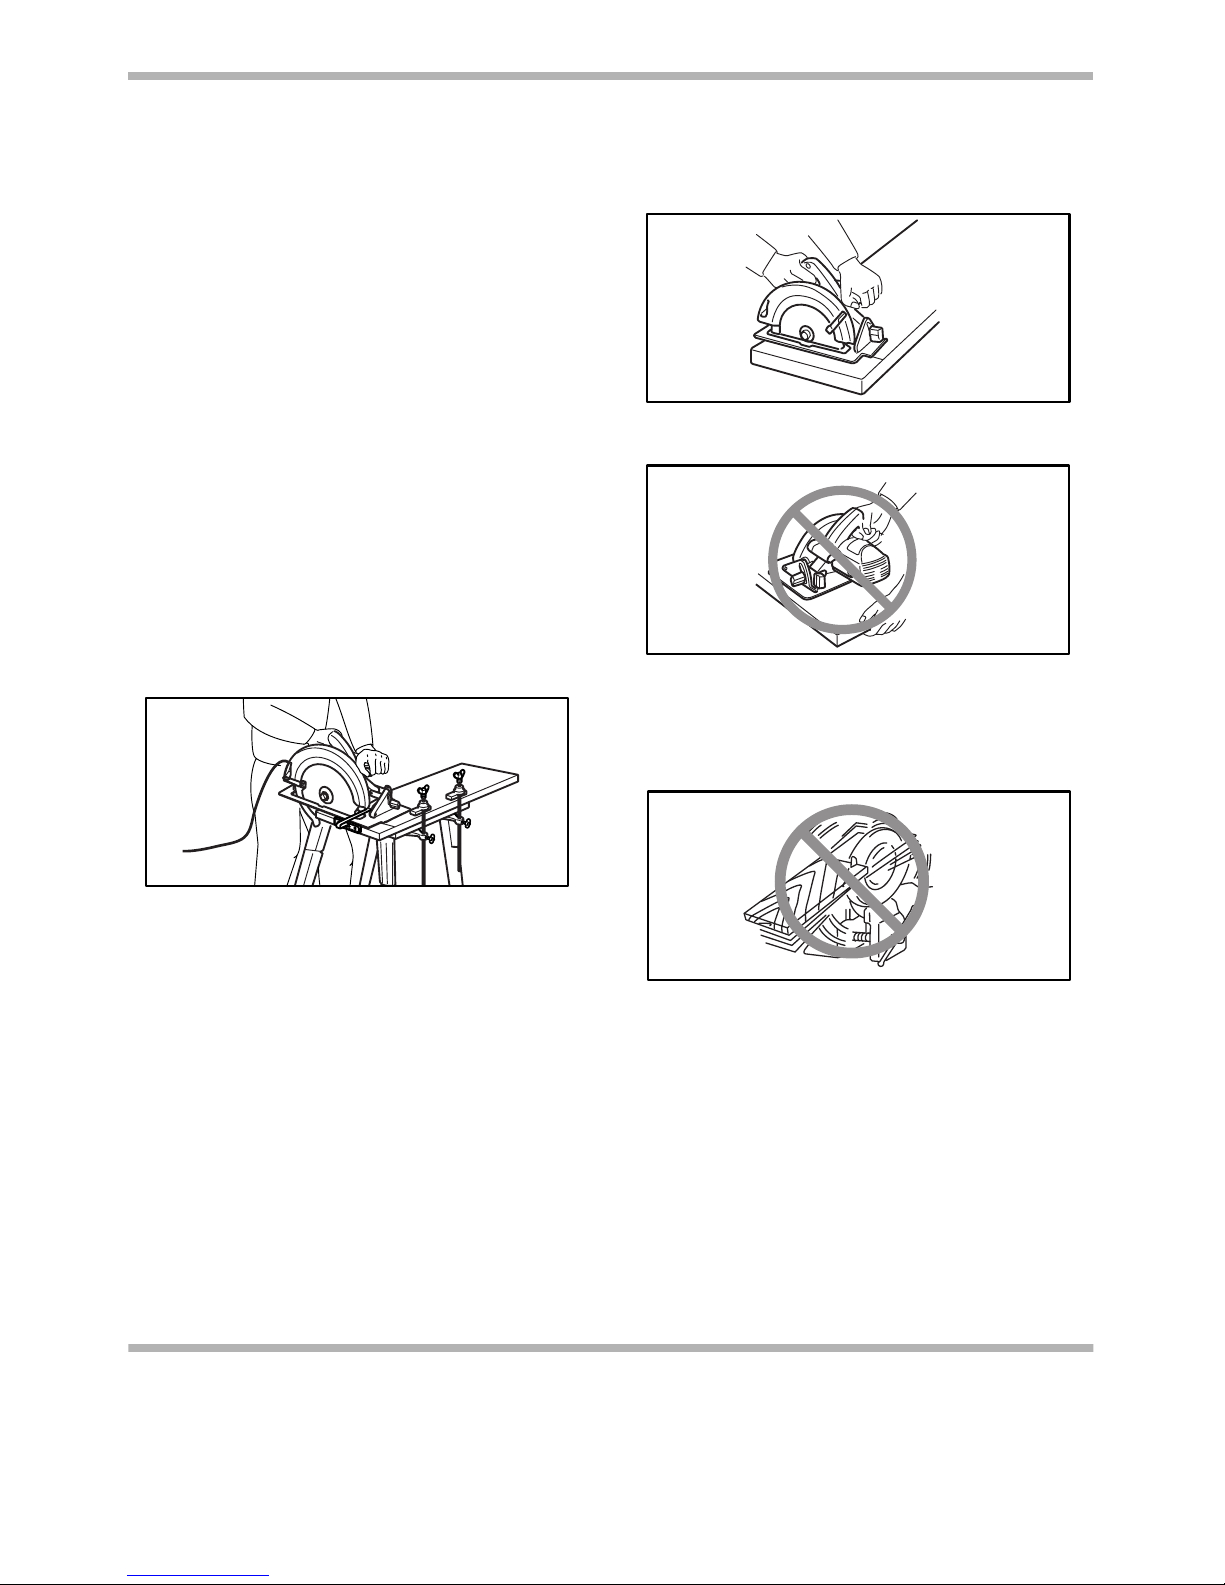
WAR NING:
It is important to support the workpiece properly
and to hold the saw firmly to prevent loss of
control which could cause personal injury. Fig. 4
illustrates typical hand support of the saw.
16. Place the wider portion of the saw base on that
part of the workpiece which is solidly supported, not on the section that will fall off when
the cut is made.
As example, Fig. 5 illustrates the RIGHT way to
cut off the end of a board, and Fig. 6 the WRONG
way. If the workpiece is short or small, clamp it
down. DON’T TRY TO HOLD SHORT PIECES BY
HAND! (Fig. 6)
17. Never attempt to saw with the circular saw held
upside down in a vise. This is extremely dangerous and can lead to serious accidents. (Fig. 7)
18. Before setting the tool down after completing a
cut, be sure that the lower (telescoping) guard
has closed and the blade has come to a complete stop.
19. Using manufacturer data
• Ensure that the diameter, thickness and
other characteristics of the saw blade are
suitable for the tool.
• Ensure that the saw blade is suitable for the
spindle speed of the tool.
20. Do not use any abrasive wheel.
SAVE THESE INSTRUCTION
Fig. 4
A typical illustration of proper hand support, workpiece
support, and supply cord routing.
Fig. 5
Fig. 6
Fig. 7
Page 6
6
FUNCTIONAL
DESCRIPTION
CAUTION:
• Always be sure that the tool is switched off and unplugged before
adjusting or checking function on the tool.
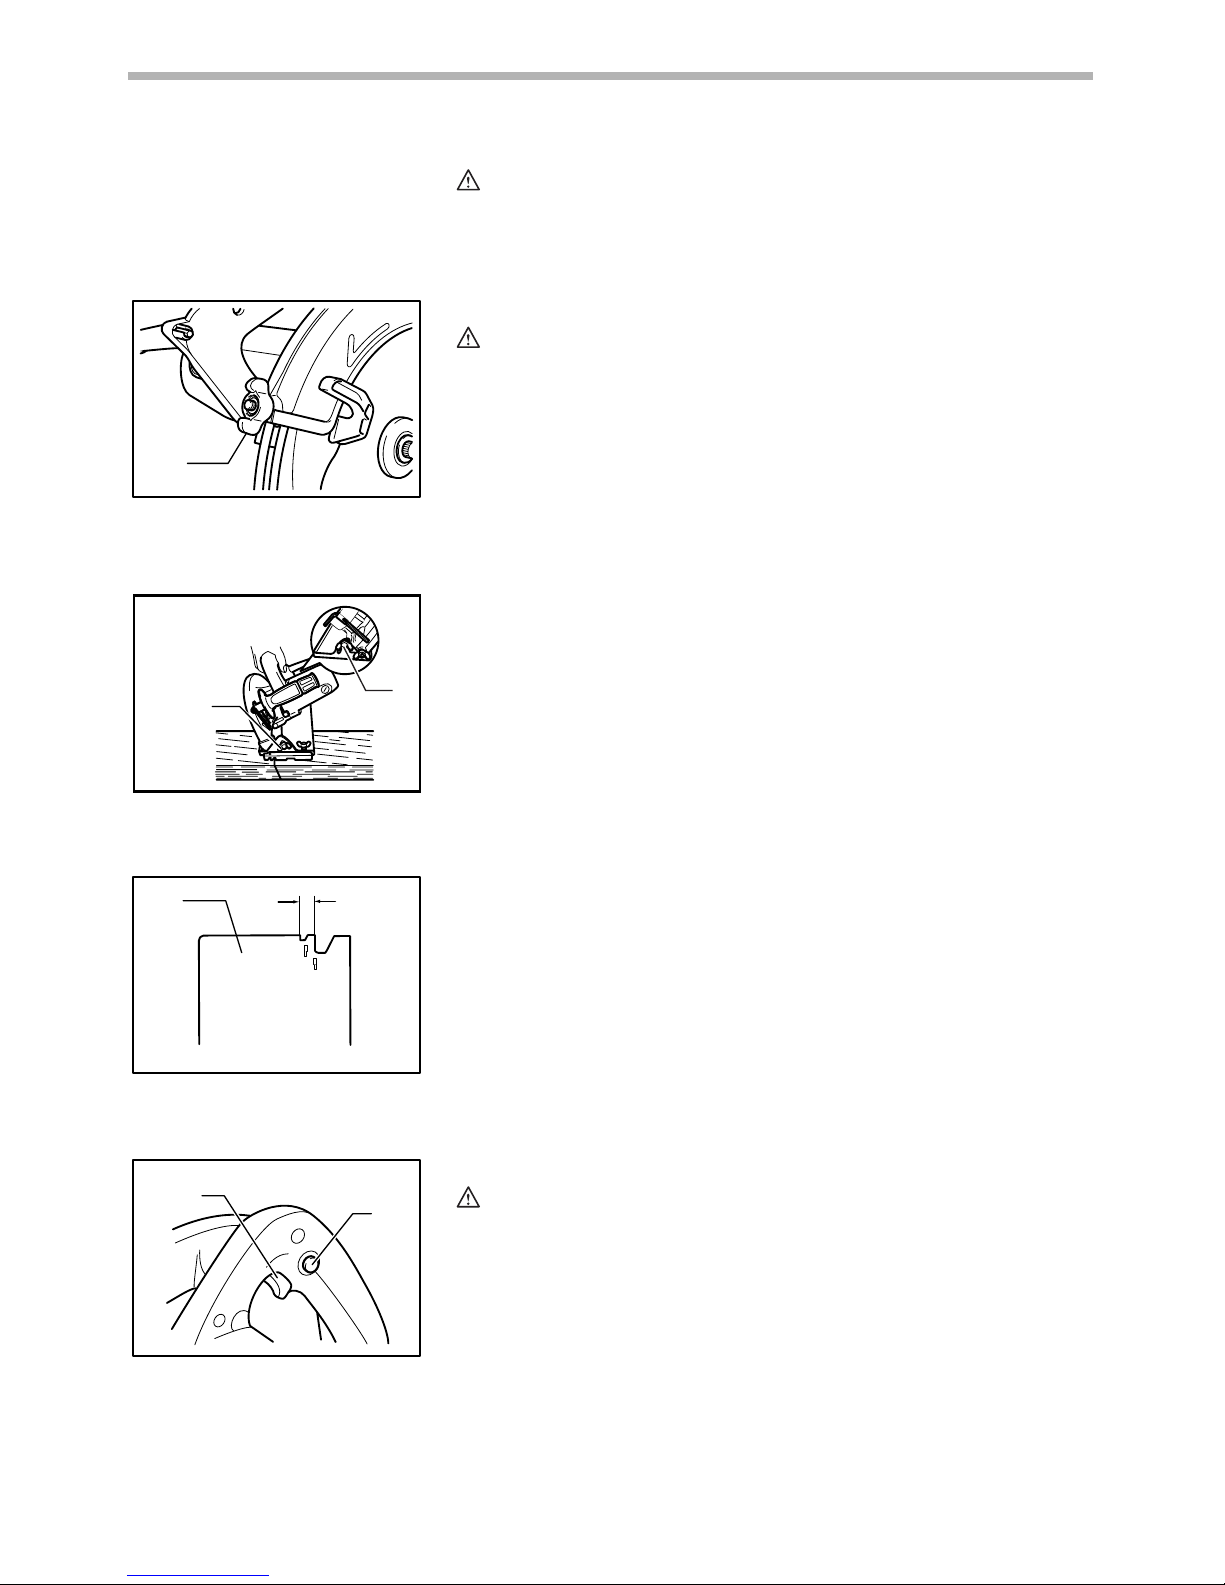
Adjusting depth of cut
CAUTION:
• After adjusting the depth of cut, always tighten the clamping screw
securely.
Loosen the clamping screw on the depth guide and move the base up or
down. At the desired depth of cut, secure the base by tightening the clamping
screw.
For cleaner, safer cuts, set cut depth so that no more than one blade tooth
projects below workpiece. Using proper cut depth helps to reduce potential for
dangerous KICKBACKS which can cause personal injury.
Bevel cutting
Loosen two clamping screws on the bevel scale plates on the front and back of
the base. Set for the desired angle (0° - 45°) by tilting accordingly, then tighten
the clamping screws securely.
Sighting
For straight cuts, align the A position on the front of the base with your cutting
line. For 45° bevel cuts, align the B position with it.
Switch action
CAUTION:
• Before plugging in the tool, always check to see that the switch trigger
actuates properly and returns to the “OFF” position when released.
For tool with lock button
To s t a r t t h e t o ol , s i m pl y p u ll t h e s w it c h t r i gg er. R el e a se t h e s wi t c h t r ig g er t o
stop.
For continuous operation, pull the switch trigger and then push in the lock button.
To s to p t h e t o ol f r o m t h e l o ck e d p o si t i o n, p u l l t h e sw it ch t ri gg e r f u l l y, t h en
release it.
1. Clamping screw
1
004027
1. Clamping screw
1
1
005338
1. Base plate
1
BA
005278
1. Switch trigger
2. Lock button
1
2
004030
Page 7
7
For tool without lock button
To s t a r t t h e t o ol , s i m pl y p u ll t h e s w it c h t r i gg er. R el e a se t h e s wi t c h t r ig g er t o
stop.
ASSEMBLY
CAUTION:
• Always be sure that the tool is switched off and unplugged before
carrying out any work on the tool.
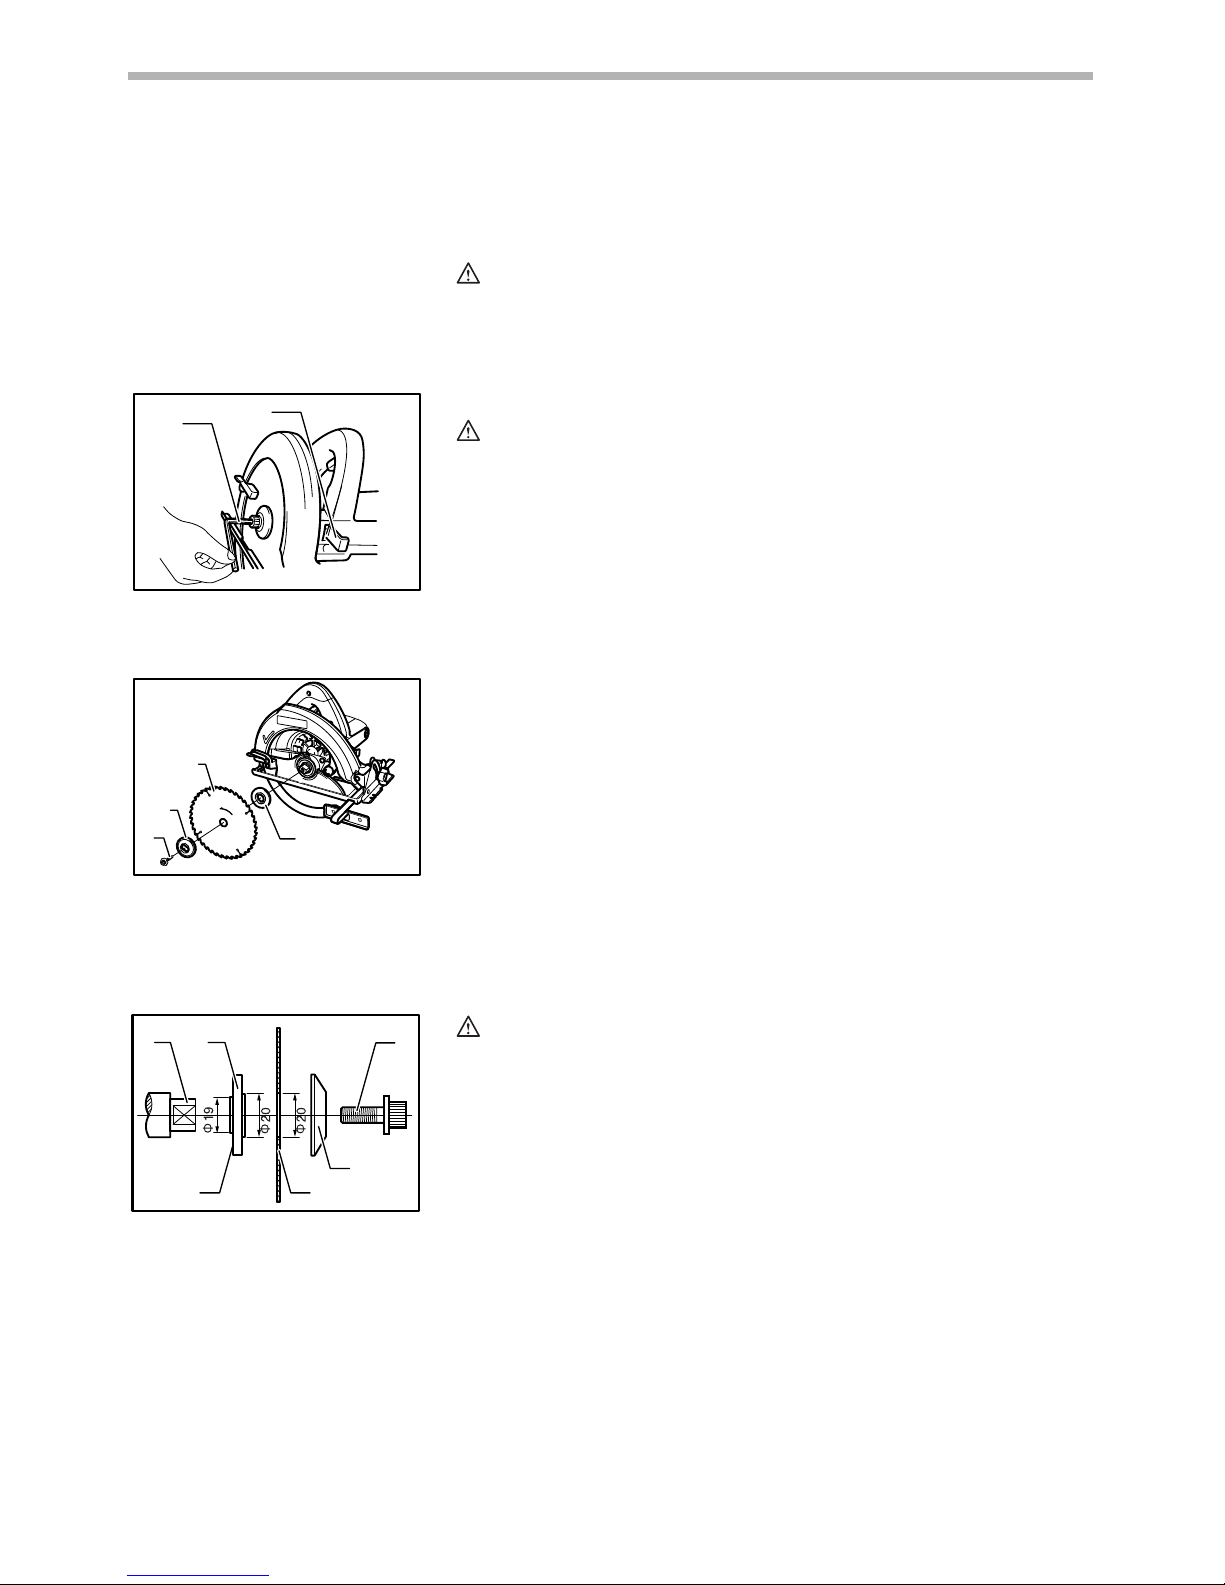
Removing or installing saw blade
CAUTION:
• Be sure the blade is installed with teeth pointing up at the front of the
tool.
• Use only the Makita wrench to install or remove the blade.
To re m o ve t he b la d e , p r e ss t he s ha f t l o ck s o th a t t h e b l ad e ca n no t rev ol v e a n d
use the wrench to loosen the hex bolt counterclockwise. Then remove the hex
bolt, outer flange and blade.
To i n s ta l l t h e b l ad e, f ol l o w t h e r e m ov a l p r o ce d u re i n r e ve r s e. B E S UR E T O
TIGHTEN THE HEX BOLT CLOCKWISE SECURELY.
When changing blade, make sure to also clean upper and lower blade guards
of accumulated sawdust. Such efforts do not, however, replace the need to
check lower guard operation before each use.
CAUTION:
• The inner flange has a 20 mm diameter on one side and a 19 mm
diameter on the other. The side with 19 mm diameter is marked by “19”.
Use the correct side for the hole diameter of the blade you intend to use.
Mounting the blade on the wrong side can result in the dangerous
vibration.
1. Hex wrench
2. Shaft lock
1
2
004031
1. Hex bolt
2. Outer flange
3. Saw blade
4. Inner flange
1
2
3
4
004032
1. Mounting shaft
2. Inner flange
3. 19mm marking
4. Saw blade
5. Outer flange
6. Hex bolt
12
34
5
6
004033
Page 8
8
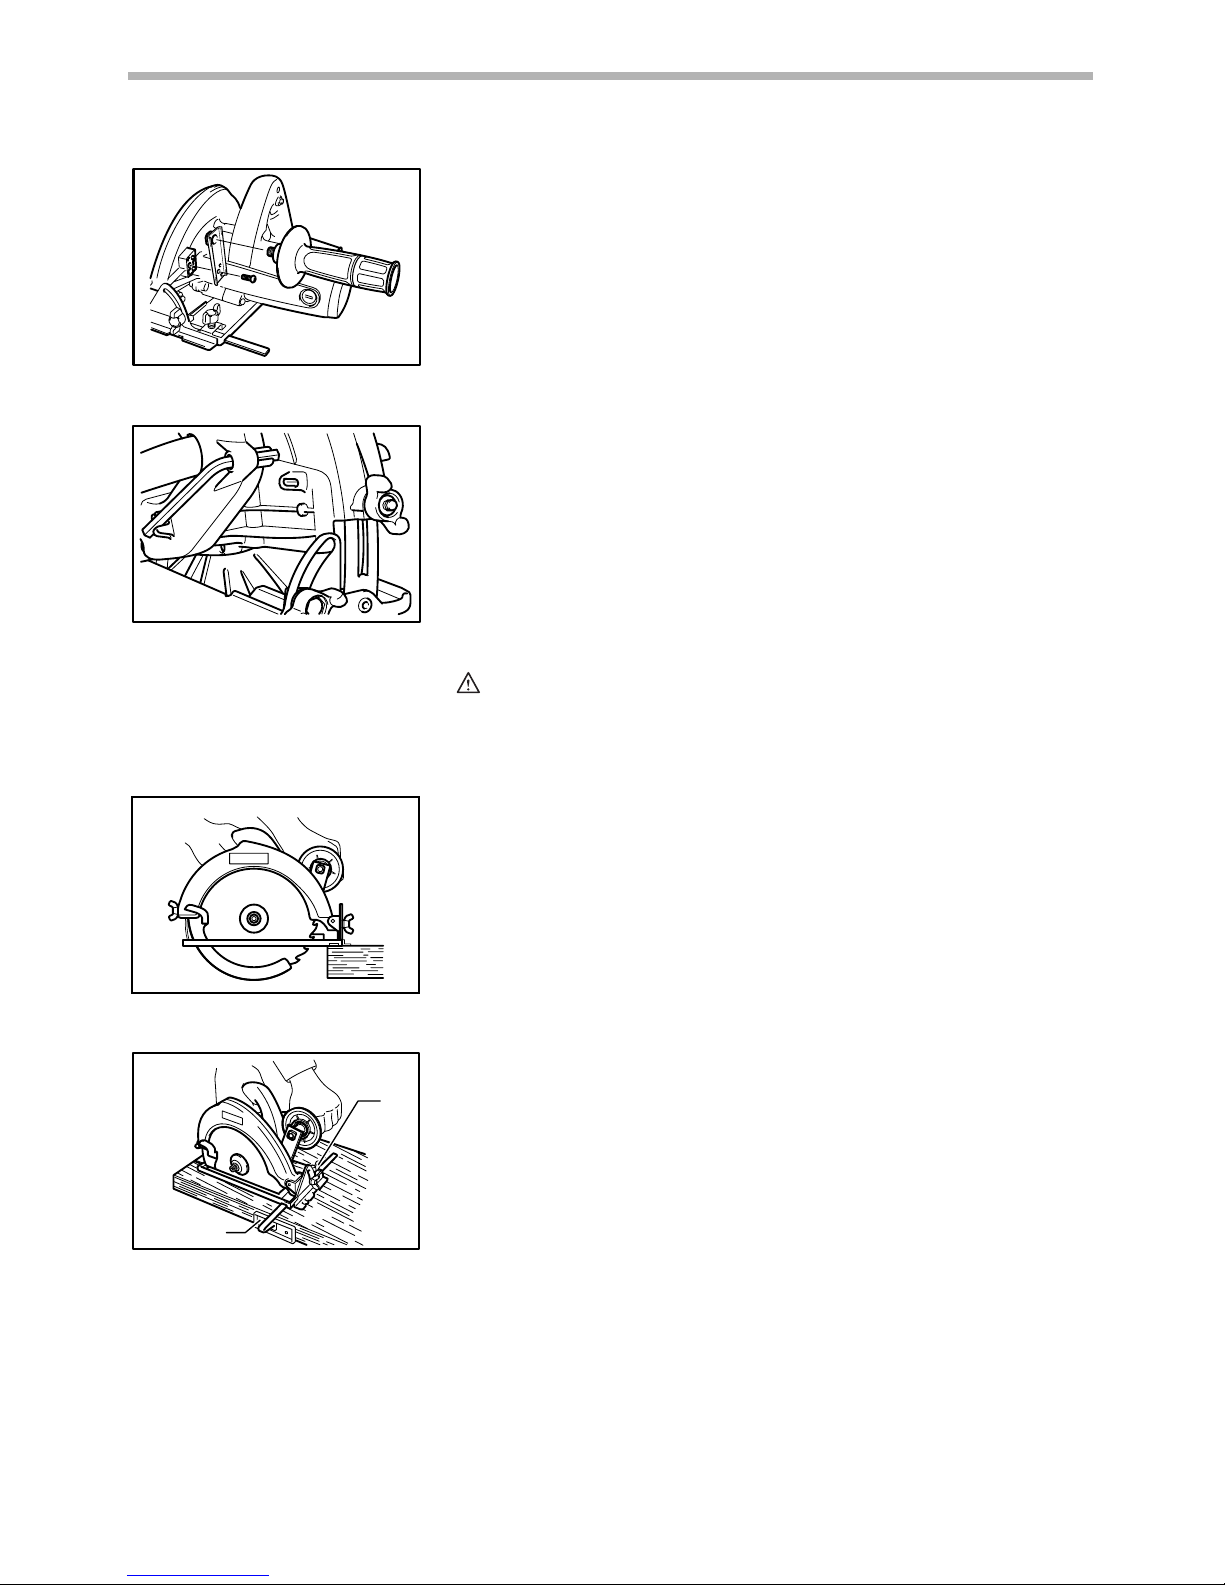
Side grip (auxiliary handle) (Accessory)
Align the hole in the grip holder with the hole in the blade case (upper blade
guard) and secure the grip holder onto the blade case using the screw as
shown in the figure. Securely screw the side grip clockwise into the hole in the
grip holder.
Hex wrench storage
When not in use, store the hex wrench as shown in the figure to keep it from
being lost.
OPERATION
CAUTION:
• Be sure to move the tool forward in a straight line gently. Forcing or
twisting the tool will result in overheating the motor and dangerous
kickback, possibly causing severe injury.
Hold the tool firmly. Set the base plate on the workpiece to be cut without the
blade making any contact. Then turn the tool on and wait until the blade attains
full speed. Now simply move the tool forward over the workpiece surface,
keeping it flat and advancing slowly until the sawing is completed. To get clear
cuts, keep your sawing line straight and your speed of advancing uniform.
Rip fence (Guide rule)
The handy rip fence allows you to do extra-accurate straight cuts. Simply slide
the rip fence up snugly against the side of the workpiece and secure it in position with the screw on the front of the base. It also makes repeated cuts of uniform width possible.
004034
004035
005339
1. Screw
2. Rip fence
1
2
005340
Page 9
9
MAINTENANCE
CAUTION:
• Always be sure that the tool is switched off and unplugged before
attempting to perform inspection or maintenance.
Replacing carbon brushes
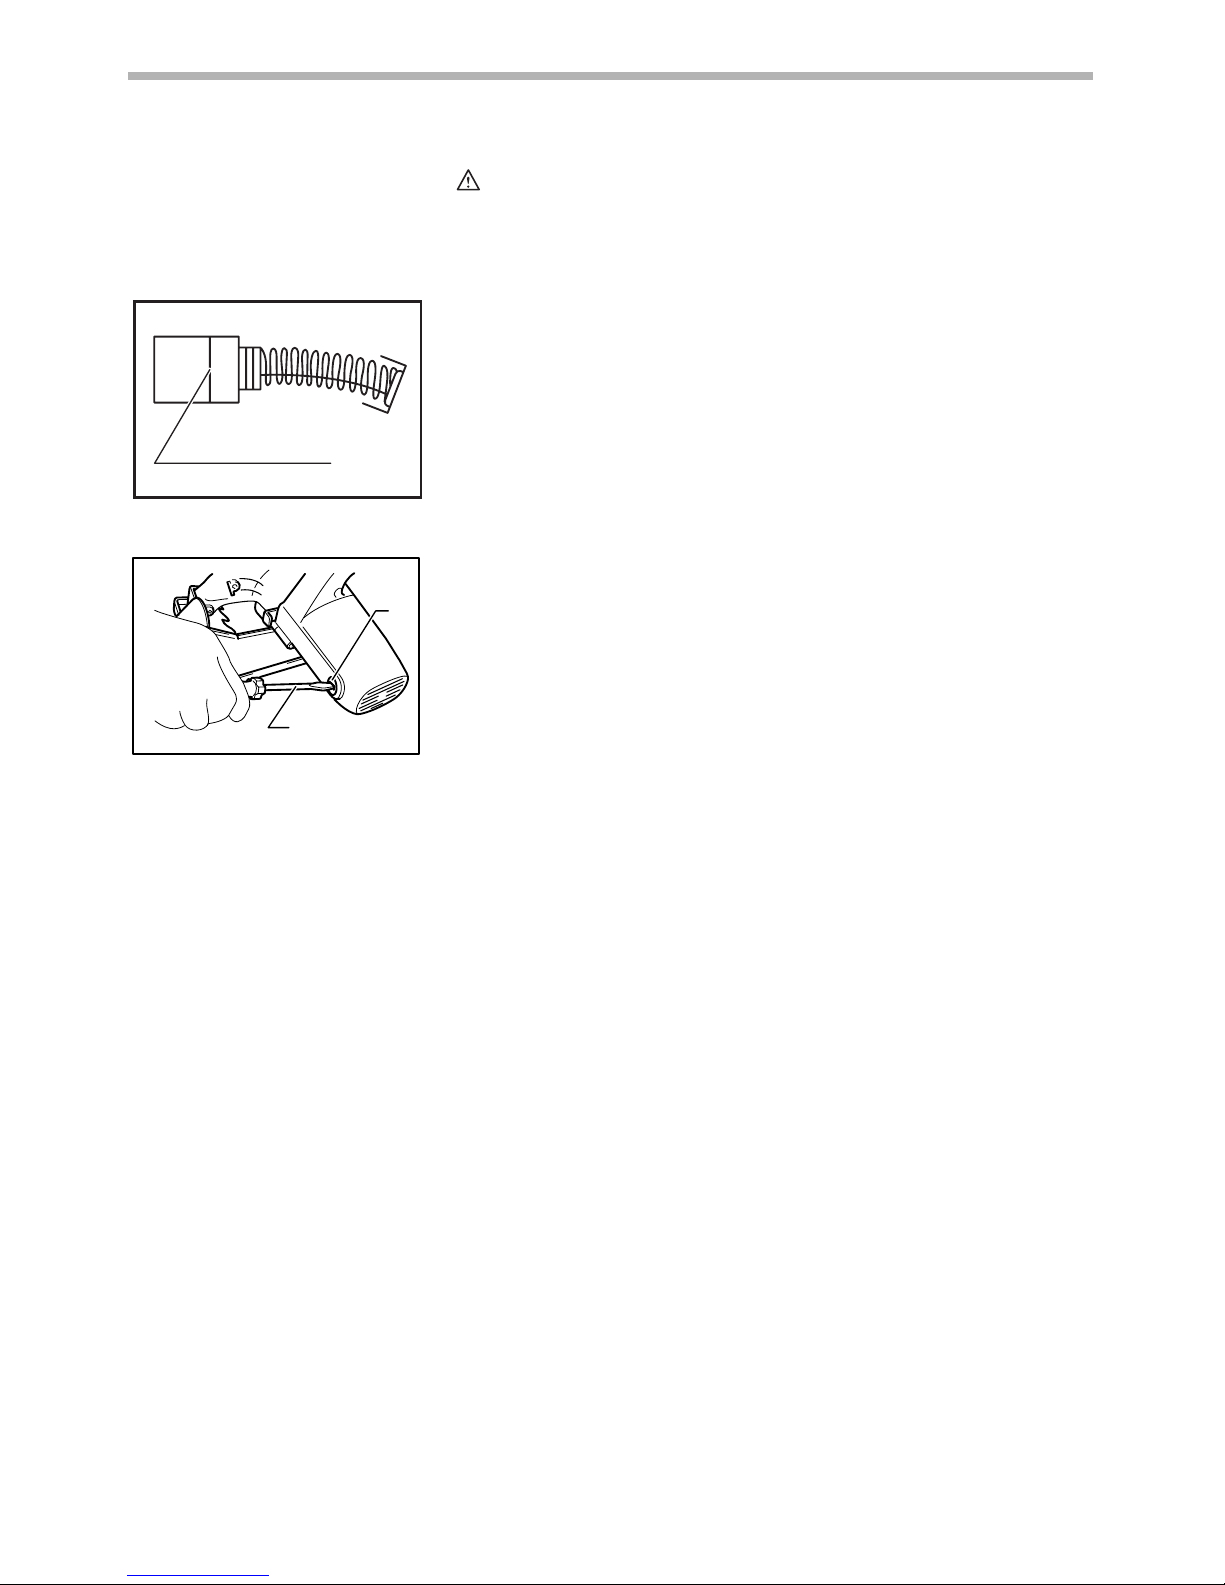
Remove and check the carbon brushes regularly. Replace when they wear
down to the limit mark. Keep the carbon brushes clean and free to slip in the
holders. Both carbon brushes should be replaced at the same time. Use only
identical carbon brushes.
Use a screwdriver to remove the brush holder caps. Take out the worn carbon
brushes, insert the new ones and secure the brush holder caps.
To m ai n t ai n p r o du c t S AF E T Y a n d R E L IA B IL I T Y, r e p ai r s, a n y o t h er m ai n t enance or adjustment should be performed by Makita Authorized Service Centers, always using Makita replacement parts.
1. Limit mark
1
001145
1. Brush holder cap
2. Screwdriver
1
2
004038
Page 10

Memo
10
Page 11

Memo
11
Page 12

Makita Corporation
884537A3
 Loading...