

Page 1
ENGLISH (Original instructions)
INSTRUCTION MANUAL
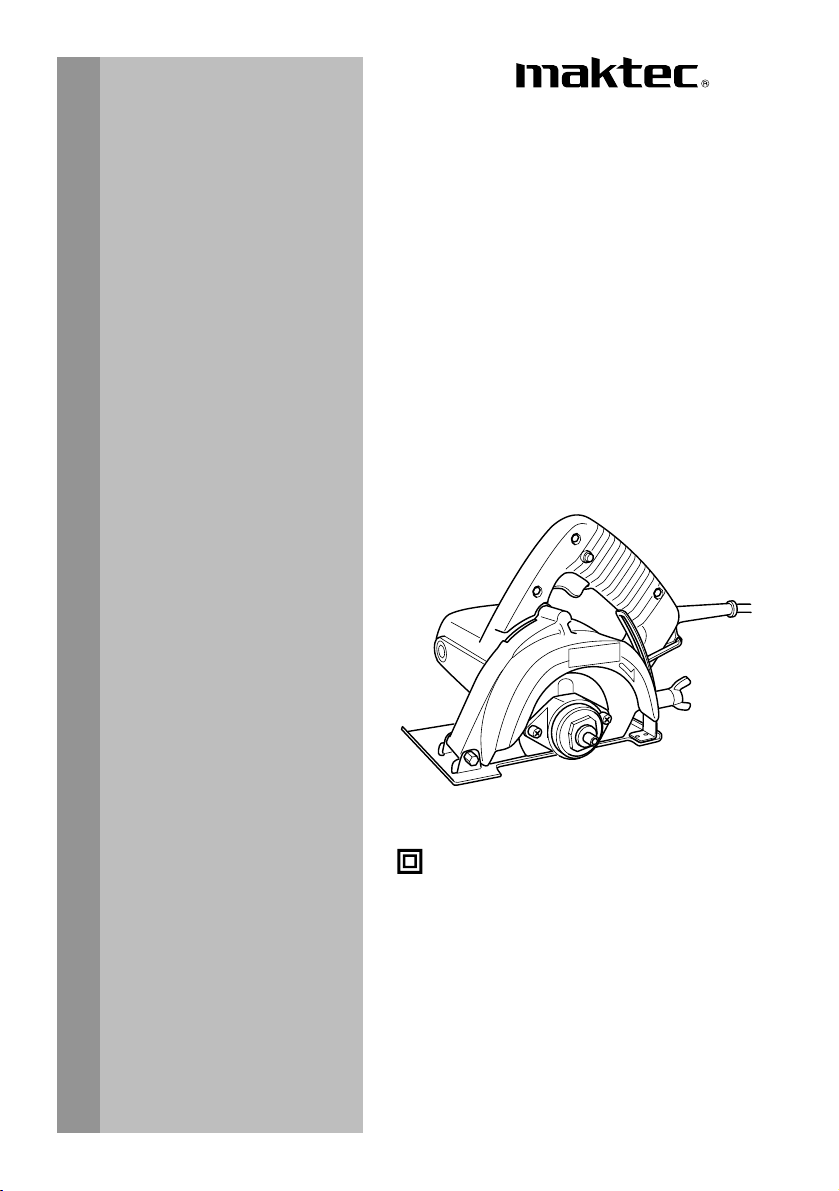
Cutter
MT410
IMPORTANT: Read Before Using.
001671
DOUBLE INSULATION
1
Page 2

ENGLISH (Original instructions)
SPECIFICATIONS
Model MT410
Blade diameter 110 mm
Hole diameter 20 mm
Max. cutting capacity 32 mm
No load speed (min-1) 13,000
Overall length 226 mm
Net weight 3.0 kg
• Due to our continuing program of research and development, the specifications herein are subject to change without notice.
• Specifications may differ from country to country.
• Weight according to EPTA-Procedure 01/2003
Symbols
The following show the symbols used for the equipment.
Be sure that you understand their meaning before use.
Read instruction manual.
DOUBLE INSULATION
Only for EU countries
Intended use
The tool is intended for cutting in brick, concrete and
stone.
Power supply
The tool should be connected only to a power supply of
the same voltage as indicated on the nameplate, and
can only be operated on single-phase AC supply. They
are double-insulated and can, therefore, also be used
from sockets without earth wire.
General Power Tool Safety
Warnings
WARNING Rea d all sa fety warnings and all
instructions. Failure to follow the warnings and
instructions may result in electric shock, fire and/or
serious injury.
Safety class II
END201-5
Save all warnings and
instructions for future reference.
The term "power tool" in the warnings refers to your
mains-operated (corded) power tool or battery-operated
(cordless) power tool.
Work area safety
1. Keep work area clean and well lit. Cluttered or
Do not dispose of electric equipment
together with household waste material!
In observance of European Directive
2002/96/EC on waste electric and
electronic equipment and its
implementation in accordance with
national law, electric equipment that
have reached the end of their life must
be collected separately and returned to
an environmentally compatible
recycling facility.
ENE023-2
ENF002-2
GEA005-3
dark areas invite accidents.
2. Do not operate power tools in explosive
atmospheres, such as in the presence of
flammable liquids, gases or dust. Power tools
create sparks which may ignite the dust or fumes.
3. Keep children and bystanders away while
operating a power tool. Distractions can cause
you to lose control.
Electrical safety
4. Power tool plugs must match the outlet. Never
modify the plug in any way. Do not use any
adapter plugs with earthed (grounded) power
tools. Unmodified plugs and matching outlets will
reduce risk of electric shock.
5. Avoi d b ody c onta ct with earthed or grou nded
surfaces such as pipes, radiators, ranges and
refrigerators. There is an increased risk of
electric shock if your body is earthed or grounded.
6. Do not expose power tools to rain or wet
conditions. Water entering a power tool will
increase the risk of electric shock.
7. Do not abuse the cord. Never use the cord for
carrying, pulling or unplugging the power tool.
Keep cord away from heat, oil, sharp edges or
moving parts. Damaged or entangled cords
increase the risk of electric shock.
8. When operating a power tool outdoors, use an
extension cord suitable for outdoor use. Use of
a cord suitable for outdoor use reduces the risk of
electric shock.
2
Page 3

9. If operating a power tool in a damp location is
unavoidable, use a residual current device
(RCD) protected supply. Use of an RCD reduces
the risk of electric shock.
10. Use of power supply via a RCD with a rated
residual current of 30mA or less is always
recommended.
Personal safety
11. Stay alert, watch what you are doing and use
common sense when operating a power tool.
Do not use a power tool while you are tired or
under the influence of drugs, alcohol or
medication. A moment of inattention while
operating power tools may result in serious
personal injury.
12. Use personal protective equipment. Always
wear eye protection. Protective equipment such
as dust mask, non-skid safety shoes, hard hat, or
hearing protection used for appropriate conditions
will reduce personal injuries.
13. Prevent unintentional starting. Ensure the
switch is in the off-position before connecting
to power source and/or battery pack, picking
up or carrying the tool. Carrying power tools
with your finger on the switch or energising power
tools that have the switch on invites accidents.
14. Remove any adjusting key or wrench before
turning the power tool on. A wren ch o r a key left
attached to a rotating part of the power tool may
result in personal injury.
15. Do not overreach. Keep proper footing and
balance at all times. This enables better control
of the power tool in unexpected situations.
16. Dress properly. Do not wear loose clothing or
jewellery. Keep your hair, clothing, and gloves
away from moving parts. Loose clothes,
jewellery or long hair can be caught in moving
parts.
17.
If devices are provided for the connection of
dust extraction and collection facilities, ensure
these are connected and properly used.
dust collection can reduce dust-related hazards.
Power tool use and care
18. Do not force the power tool. Use the correct
power tool for your application. The correct
power tool will do the job better and safer at the
rate for which it was designed.
19. Do not use the power tool if the switch does
not turn it on and off. Any power tool th at ca nnot
be controlled with the switch is dangerous and
must be repaired.
20. Disconnect the plug from the power source
and/or the battery pack from the power tool
before making any adjustments, changing
accessories, or storing power tools. Such
Use of
preventive safety measures reduce the risk of
starting the power tool accidentally.
21. Store idle power tools out of the reach of
children and do not allow persons unfamiliar
with the power tool or these instructions to
operate the power tool. Power tools are
dangerous in the hands of untrained users.
22. Maintain power tools. Check for misalignment
or binding of moving parts, breakage of parts
and any other condition that may affect the
power tool’s operation. If damaged, have the
power tool repaired before use. Many accidents
are caused by poorly maintained power tools.
23. Keep cutting tools sharp and clean. Properly
maintained cutting tools with sharp cutting edges
are less likely to bind and are easier to control.
24. Use the power tool, accessories and tool bits
etc. in accordance with these instructions,
taking into account the working conditions
and the work to be performed. Use of the power
tool for operations different from those intended
could result in a hazardous situation.
Service
25. Have your power tool serviced by a qualified
repair person using only identical replacement
parts. This will ensure that the safety of the power
tool is maintained.
26. Follow instruction for lubricating and
changing accessories.
27. Keep handles dry, clean and free from oil and
grease.
CUTTER SAFETY WARNINGS
1. Read all safety warnings, instructions,
illustrations and specifications provided with
this power tool. Failure to follow all instructions
listed below may result in electric shock, fire
and/or serious injury.
2. Always use guard provided with the tool. The
guard must be securely attached to the power
tool and positioned for maximum safety, so
the least amount of wheel is exposed towards
the operator. The guard helps to protect operator
from broken wheel fragments and accidental
contact with wheel.
3. Use only diamond cut-off wheel for your
power tool. Just because the accessory can be
attached to your power tool, it does not assure
safe operation.
4. The rated speed of the wheel must be at least
equal to the maximum speed marked on the
power tool. Wheels running faster than their
rated speed can break and fly apart.
3
GEB025-2
Page 4

5. Always use undamaged wheel flanges that are
of correct diameter for your selected wheel.
Proper wheel flanges support the wheel thus
reducing the possibility of wheel breakage.
6. The outside diameter and the thickness of
your wheel must be within the capacity rating
of your power tool. Incorrectly sized wheels
cannot be adequately guarded or controlled.
7. The arbour size of wheels and flanges must
properly fit the spindle of the power tool.
Wheels and flanges with arbour holes that do not
match the mounting hardware of the power tool
will run out of balance, vibrate excessively and
may cause loss of control.
8. Do not use damaged wheels. Before each use,
inspect the wheels for chips and cracks. If
power tool or wheel is dropped, inspect for
damage or install an undamaged wheel. After
inspecting and installing the wheel, position
yourself and bystanders away from the plane
of the rotating wheel and run the power tool at
maximum no load speed for one minute.
Damaged wheels will normally break apart during
this test time.
9. Wear personal protective equipment.
Depending on application, use face shield,
safety goggles or safety glasses. As
appropriate, wear dust mask, hearing
protectors, gloves and shop apron capable of
stopping small abrasive or workpiece
fragments. The eye protection must be capable
of stopping flying debris generated by various
operations. The dust mask or respirator must be
capable of filtrating particles generated by your
operation. Prolonged exposure to high intensity
noise may cause hearing loss.
10.
Keep bystanders a safe distance away from
work area. Anyone entering the work area must
wear personal protective equipment.
of workpiece or of a broken wheel may fly away and
cause injury beyond immediate area of operation.
11. Hold power tool by insulated gripping
surfaces only, when performing an operation
where the wheel may contact hidden wiring or
its own cord. Wheel contacting a "live" wire may
make exposed metal parts of the power tool "live"
and shock the operator.
12. Position the cord clear of the spinning wheel.
If you lose control, the cord may be cut or
snagged and your hand or arm may be pulled into
the spinning wheel.
13. Never lay the power tool down until the wheel
has come to a complete stop. The spinning
wheel may grab the surface and pull the power
tool out of your control.
Fragments
14. Do not run the power tool while carrying it at
your side. Accidental contact with the spinning
wheel could snag your clothing, pulling the wheel
into your body.
15. Regularly clean the power tool's air vents. The
motor's fan will draw the dust inside the housing
and excessive accumulation of powdered metal
may cause electrical hazards.
16. Do not operate the power tool near flammable
materials. Sparks could ignite these materials.
17. Never attempt to cut with the tool held upside
down in a vise. This can lead to serious
accidents, because it is extremely dangerous.
18. Some material contains chemicals which may
be toxic. Take caution to prevent dust
inhalation and skin contact. Follow material
supplier safety data.
Kickback and related warnings
Kickback is a sudden reaction to a pinched or snagged
rotating wheel. Pinching or snagging causes rapid stalling
of the rotating wheel which in turn causes the uncontrolled
power tool to be forced in the direction opposite of the
wheel's rotation at the point of the binding.
For example, if a wheel is snagged or pinched by the
workpiece, the edge of the wheel that is entering into the
pinch point can dig into the surface of the material causing
the wheel to climb out or kick out. The wheel may either
jump toward or away from the operator, depending on
direction of the wheel's movement at the point of pinching.
The wheels may also break under these conditions.
Kickback is the result of power tool misuse and/or
incorrect operating procedures or conditions and can be
avoided by taking proper precautions as given below.
1. Maintain a firm grip on the power tool and
position your body and arm to allow you to
resist kickback forces. Always use auxiliary
handle, if provided, for maximum control over
kickback or torque reaction during start-up.
The operator can control torque reactions or
kickback forces, if proper precautions are taken.
2. Never place your hand near the rotating wheel.
Wheel may kickback over your hand.
3. Do not position your body in line with and
behind the rotating wheel. Kickback will propel
the tool in direction opposite to the wheel's
movement at the point of snagging.
4. Use special care when working corners, sharp
edges etc. Avoid bouncing and snagging the
wheel. Corners, sharp edges or bouncing have a
tendency to snag the rotating wheel and cause
loss of control or kickback.
5. Do not attach a saw chain woodcarving blade
or toothed saw blade. Such blades create
frequent kickback and loss of control.
4
Page 5
6. Do not "jam" the wheel or apply excessive
pressure. Do not attempt to make an
excessive depth of cut. Overstressing the wheel
increases the loading and susceptibility to twisting
or binding of the wheel in the cut and the
possibility of kickback or wheel breakage.
7.
When wheel is binding or when interrupting a
cut for any reason, switch off the power tool
and hold the power tool motionless until the
wheel comes to a complete stop. Never attempt
to remove the wheel from the cut while the
wheel is in motion otherwise kickback may
occur.
Investigate and take corrective action to
eliminate the cause of wheel binding.
8. Do not restart the cutting operation in the
workpiece. Let the wheel reach full speed and
carefully reenter the cut. The wheel may bind,
walk up or kickback if the power tool is restarted in
the workpiece.
9. Support panels or any oversized workpiece to
minimize the risk of wheel pinching and
kickback. Large workpieces tend to sag under
their own weight. Supports must be placed under
the workpiece near the line of cut and near the
edge of the workpiece on both sides of the wheel.
10.
Use extra caution when making a "pocket cut"
into existing walls or other blind areas.
protruding wheel may cut gas or water pipes,
electrical wiring or objects that can cause kickback.
The
SAVE THESE INSTRUCTIONS.
WARNI NG:
DO NOT let comfort or familiarity with product
(gained from repeated use) replace strict adherence
to safety rules for the subject product. MISUSE or
failure to follow the safety r ules stated in this
instruction manual may cause serious personal
injury.
OPERATING INSTRUCTIONS
Removing or installing diamond wheel
(optional accessory)
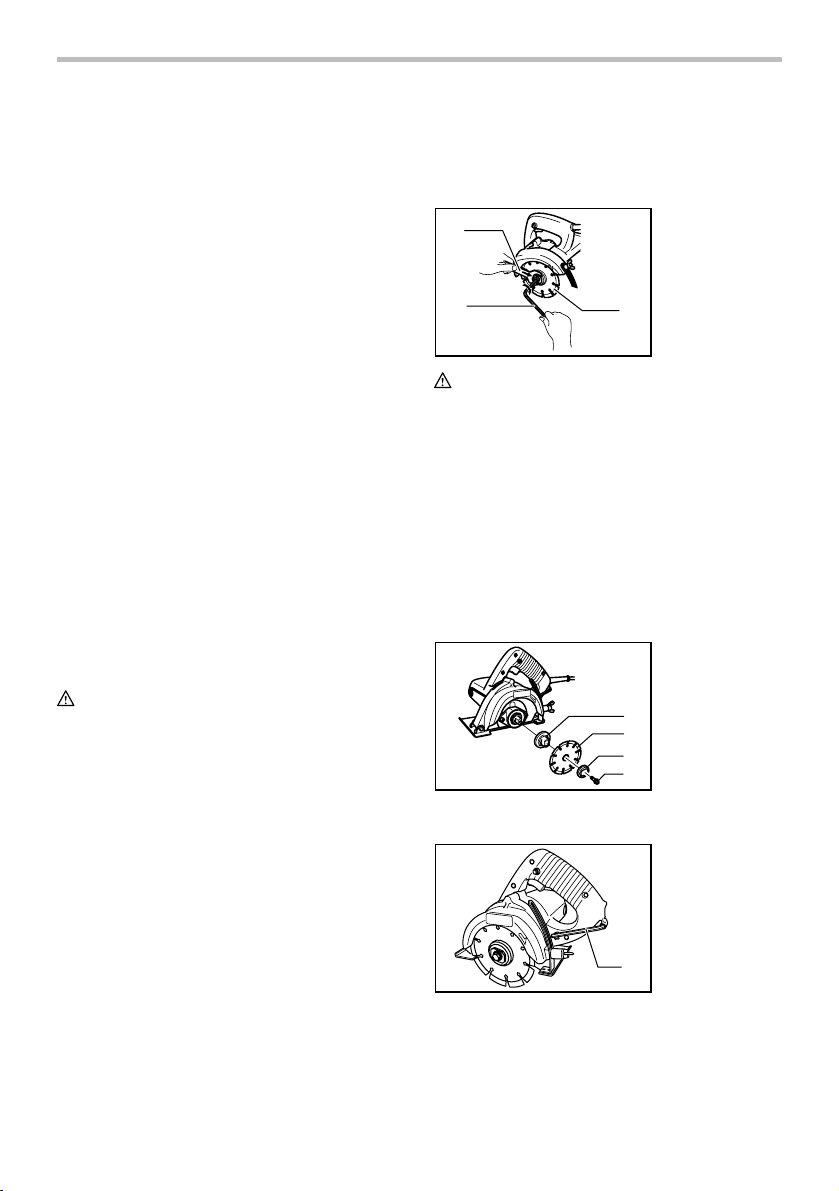
1
2
001676
CAUTION:
• Always be sure that the tool is switched off and
unplugged before installing or removing the wheel.
• Use only the Makita wrench to install or remove the
wheel.
To re mo v e t he w h ee l , h ol d t he o ut e r f la n ge w it h t he
wrench and loosen the hex bolt clockwise with the hex
wrench. Then remove the hex bolt, outer flange and
wheel.
To i ns t al l t h e w he e l, f o l lo w t he r e mo v al p ro c ed u r e i n
reverse. Always install the wheel so that the arrow on
the wheel points in the same direction as the arrow on
the blade case. BE SURE TO TIGHTEN THE HEX
BOLT COUNTERCLOCKWISE SECURELY.
001677
Hex wrench storage
1. Wrench
2. Hex wrench
3. Diamond wheel
3
1. Inner flange
2. Diamond wheel
3. Outer flange
4. Hex bolt
1
2
3
4
1. Hex wrench
001678
When not in use, store the hex wrench as shown in the
figure to keep it from being lost.
5
1
Page 6
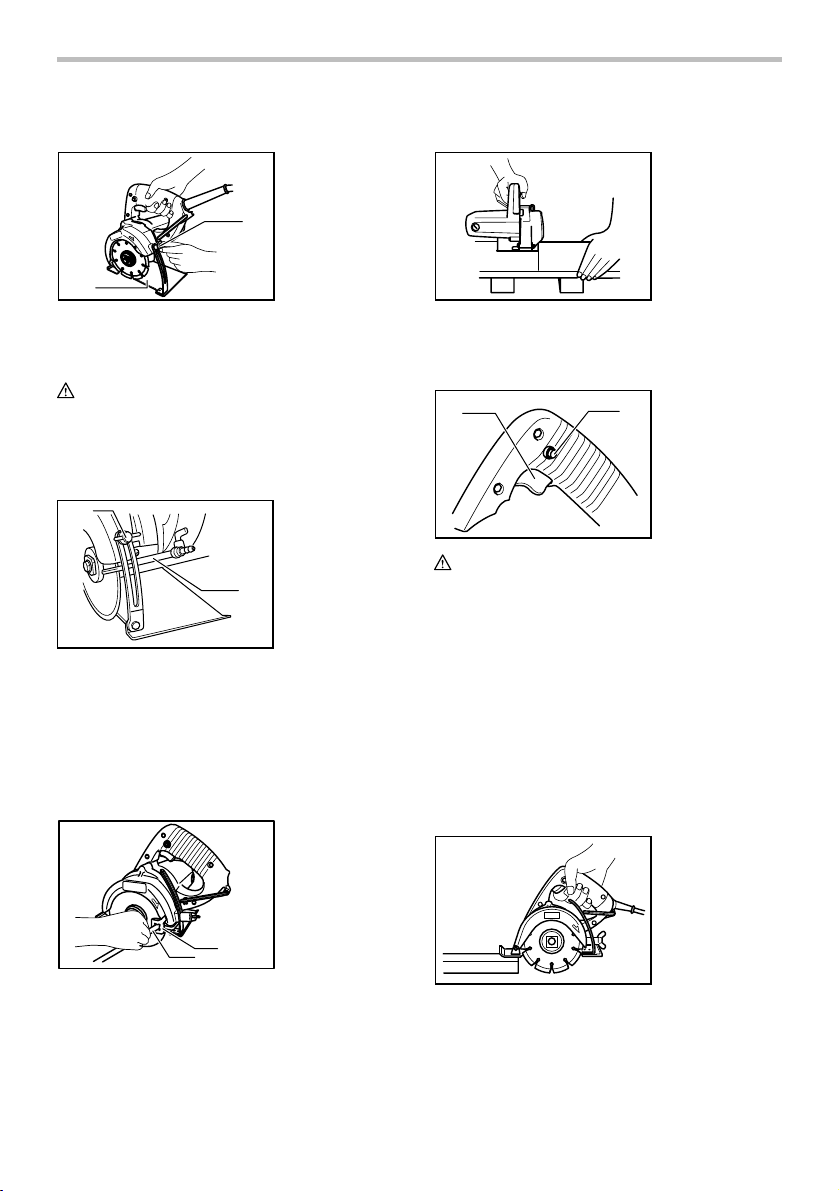
Adjusting depth of cut
1
1. Wing bolt
2. Base
Sighting
2
001672
Loosen the wing bolt on the depth guide and move the
base up or down. At the desired depth of cut, secure the
base by tightening the wing bolt.
CAUTION:
• After adjusting depth of cut, always tighten the
wing bolt securely.
Water flow (Opti onal accessory)
Only for tool with a water pipe
1
007717
First, unplug the tool. Loosen the wing bolt on the depth
guide and move the base down. Install the water pipe on
the blade case using the screw.
Attach the vinyl tube onto the water pipe and attach the
adapter on the vinyl tube to a faucet of water mains
pressure. Adjust the amount of water flow by simply
adjusting the water cock.
Only for tool with a vinyl tube
1. Wing bolt
2. Water pipe
2
1. Tube holder
2. Vinyl tube
001674
Align the edge of the front of the base with your cutting
line on the workpiece.
Switch action
1. Switch trigger
1
001673
CAUTION:
• Before plugging in the tool, always check to see
that the switch trigger actuates properly and
returns to the "OFF" position when released.
For tool with lock button
To s ta r t th e t o ol , s im p ly p u ll t h e sw i tc h t r ig g er . R el e as e
the switch trigger to stop. For continuous operation, pull
the switch trigger and then push in the lock button. To
stop the tool from the locked position, pull the switch
trigger fully, then release it.
For tool without lock button
To s ta r t th e t o ol , s im p ly p u ll t h e sw i tc h t r ig g er . R el e as e
the switch trigger to stop.
2
2. Lock button
OPERATION
1
012825
2
Put the vinyl tube into the tube holder just like screwing
in so that used diamond wheel cannot be obstructed or
interrupted.
001675
Hold the tool firmly. Set the base plate on the workpiece to
be cut without the wheel making any contact. Then turn
the tool on and wait until the wheel attains full speed.
Now simply move the tool forward over the workpiece
surface, keeping it flat and advancing smoothly until the
cutting is completed. Keep your cutting line straight and
6
Page 7
your speed of advance uniform.
CAUTION:
•
This tool should only be used on horizontal surfaces.
• Be sure to move the tool forward in a straight line
and gently. Forcing and exerting excessive
pressure or allowing the wheel to bend, pinch or
twist in the cut can cause overheating of the motor
and dangerous kickback of the tool.
MAINTENANCE
CAUTION:
•
Always be sure that the tool is switched off and
unplugged before carrying out any work on the tool.
• Never use gasoline, benzine, thinner, alcohol or
the like. Discoloration, deformation or cracks may
result.
After use
Blow away dust from the inside of the tool by running the
tool at an idle for a while. Brush off accumulation of dust
on the base. Accumulation of dust in the motor or on the
base may cause a malfunction of the tool.
Replacement of carbon brushes
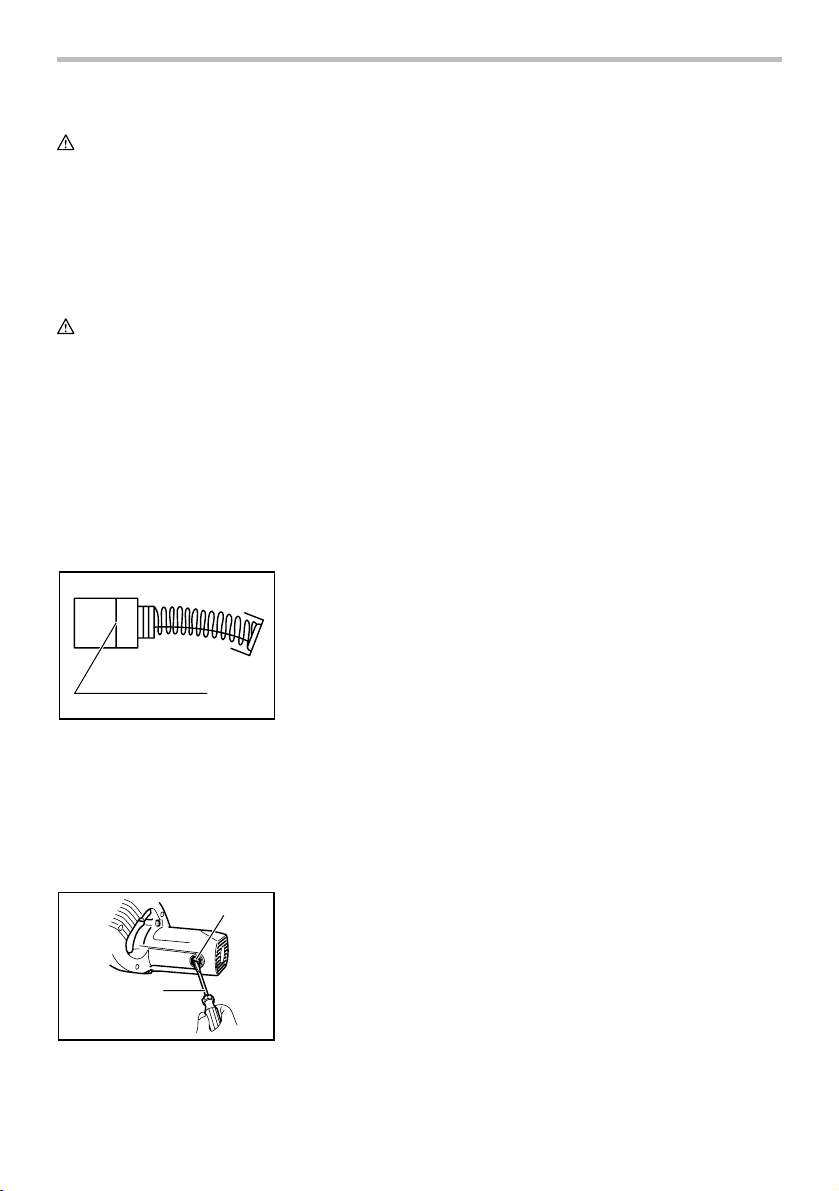
1. Limit mark
1
001145
Remove and check the carbon brushes regularly.
Replace when they wear down to the limit mark. Keep
the carbon brushes clean and free to slip in the holders.
Both carbon brushes should be replaced at the same
time. Use only identical carbon brushes.
Use a screwdriver to remove the brush holder caps.
Ta ke o u t t h e wo r n ca r bo n b ru s h es , in s er t t he n e w o n e s
and secure the brush holder caps.
1. Brush holder
1
cap
2. Screwdriver
To m a i nt a in p r od u ct s a fe t y a n d r e l ia b il i t y, r ep a ir s ,
maintenance or adjustment should be carried out by an
Makita Authorized Service Center.
001679
2
7
Page 8

884432G7
Makita Corporation
www.makita.com
8
 Loading...