

MAKSIWA RBB.1000 Instruction Manual
1
RBB.1000
____________________________________________________________________
INSTRUCTION MANUAL
____________________________________________________________________
ATTENTION: READ THIS MANUAL BEFORE USING YOUR MACHINE.
Edge Trimmer Machine
2
INSTRUCTION MANUAL
Important information you should know:
The images in this manual are illustrative and are
meant to demonstrate the correct operation of your
product, there may be small changes in relation to the
images.
ALWAYS USE PROPER PROTECTIVE
EQUIPMENTS TO OPERATE THIS
MACHINE.
Important Safety Instructions
WARNING: When working with machines,
always follow the safety precautions to reduce
the risk of fire, electric shock and injury, including the
following:
READ ALL INSTRUCTIONS
CAUTION: WHEN DOING MAINTENANCE,
REPLACE ONLY WITH IDENTICAL PARTS.
Repair or replace damaged wiring.
SAFETY INSTRUCTIONS
FOR ALL EQUIPMENTS
Keep a clean work surface. Cluttered areas and work
surfaces are invite accidents.
Do not use the Edge Trimmer in hazardous
environments. Do not use machine in damp or wet
locations or exposed to rain. Keep well clean work
area.
Keep children away. Visitors should be kept at a safe
distance from work area.
Do not force tool. It will perform the job better and
safer for the intended use.
Use appropriate equipment. Do not wear loose
clothing, gloves, chains, rings, bracelets or other
accessories that could get caught in moving parts.
It is recommended wearing shoes with non-slip soles.
Use protection for the hair in order to hold them.
Always wear safety glasses. Also use hearing
protection.
Do not overreach on the equipment. Maintain
balance and feet in comfortable position at all times.
Keep all tools in order. Keep tools sharp and clean
for better and safer performance. Follow the
instructions for lubricating and changing accessories.
Unplug the machine before servicing or changing
accessories such as scissors, cutters etc.
Reduce the risk of unintentional starting. Ensure
that the switch is in the "OFF" position (off) before
connecting the wire to the plug.
Use recommended accessories. See the instruction
manual to check recommended accessories. Improper
use of accessories may cause risk of injury to persons.
Never step on the machine. May occur serious
accident if the machine is dented or if parts are
accidentally touched.
Check for damaged parts. Before continuing the use
of Edge Trimmer, a guard or other part that is
damaged should be examined carefully to determine
its proper operation and perform its function properly.
Check the alignment of moving parts, breakage of
parts, mounting and any other condition that may
affect its operation. Any part that is damaged should
be repaired or replaced immediately. Do not use the
tool if the switch does not turn on or off.
Never leave a running tool unattended. Turn off the
ignition key.
The engine of this machine can emit sparks, and
explode flammable gases.
Extension cables. Make sure your extension cord is
in good condition. When using an extension, be sure
of their ability to transmit the electrical current used by
your product. An undersized cord will cause drop in
voltage resulting in loss of power and overheating. The
following table shows the correct size to be used
depending on the cable diameter and amperage rate.
If in doubt, use a cable with a higher level of capacity.
IMPORTANT: Do not use an extension cord with
length above 20 meters
Cable 2 wires
Cable 3 wires
Ø (mm2)
Amperage
Ø (mm2)
Amperage
0,5 9 0,5 8 1,0
13
1,0
12
1,5
16,5
1,5
15
2,5
23
2,5
20

3
Additional safety rules for Edge Trimmer:
CAUTION: FAILURE TO ATTEND THESE
WARNINGS MAY RESULT IN PERSONAL
INJURY AND SERIOUS DAMAGE TO THE MACHINE.
Protect the electric power supply line with at least a
20 amp fuse or a circuit breaker switch.
Make sure the advance is turning in the right direction.
Make sure that the knobs and screws are properly
tightened and safe before starting any operation.
Keep sharp tools.
Keep vents free of chips or dirty engines.
Keep hands away from moving or sharp parts.
Turn off the machine and unplug the power cord
before maintenance or adjustments of the tool.
Support long pieces with a clamping device for wood.
Do not attempt to operate the machine in another
voltage beyond designated.
Do not use larger or smaller tools than recommended.
Do not apply lubricant to the tools during use.
Do not operate without some parts of the machine.
Do not put your hands less than 4in from the shaft.
Do not put your hands in closed parts of the machine
unless it is turned off and unplugged.
Do not use lubricants or cleaners (particularly sprays
and aerosols) in the vicinity of the plastic guard. The
polycarbonate material used in the guard is sensitive
to certain chemicals.
WARNING: Some dust created by the act of sanding,
cutting, grinding, drilling and other construction-related
activities contains chemicals that can cause cancer, birth
defects or other reproductive harm. Some examples of
these products are: Lead-based paint; crystal silica
bricks, concrete and other masonry products; and
arsenic and chromium from chemically treated wood.
CAUTION: Do not connect the unit to the power
outlet until all instructions have been read and
understood. Always tighten the adjustment tabs before
using the machine. Think: "I can prevent accidents".
Do not operate the machine unless the guards are in
their proper places. Always use protective ears and
goggles.
Electrical connection
To avoid burning risk, check the voltage of your outlet
before starting the machine. If necessary make the
change of your power with the help of a specialist.
Ensure that your power supply is in accordance with the
designated on the board. A 10% decrease in voltage or
more will cause loss of power and overheating. All
equipment MAKSIWA are tested at the factory. If this
machine does not work, check the electricity supply.
Check the compatibility of your outlet and plug the
machine. Do not do patches and adaptations.
To avoid electrical shock and damage to the equipment
always ground the machine.
Familiarization
Put the machine on a smooth and flat surface. Check
the pictures and watch the descriptions to familiarize
yourself with its components. The next section will deal
with the necessary adjustments for the proper
functioning of the machine. You should know these parts
and will need to know where they are.
Especifications
Power
550 W
Tape Thickness
Until 1,0 mm
Max. Height of Workpiece
60 mm (2 3/8’’)
Table Lenght
1.000 mm (39’’)
Adjust of Table Width
155 to 410 mm (6’’ to 16’’)
Speed
32.000 RPM
Tools Collets
6mm and ¼’’
Net Weight
19 Kg (41,9 pounds)
Installation
For packaging purposes, the machine is not fully
assembled.
If you notice any damage caused by transportation,
while you open the package, notify your supplier
immediately. Do not operate the machine.
Dispose the packaging in a friendly way
with the environment.
The Edge Trimmer is designed to operate indoors and
should be placed on a firm, stable and level surface.
CAUTION: To prevent the machine from moving and
causing lack of precision, ensure that the base where it
is supported is not uneven.
4
UNPACKING AND ASSEMBLY
UNPACKING
Due to modern mass production techniques, it is unlikely
that Edge Trimmer RBB.1000 MAKSIWA is faulty or
have parts missing. If you find anything wrong, do not
use the machine until the parts are replaced or the fault
is corrected. Doing this you are avoiding serious injury.
1. You will receive your machine packed.
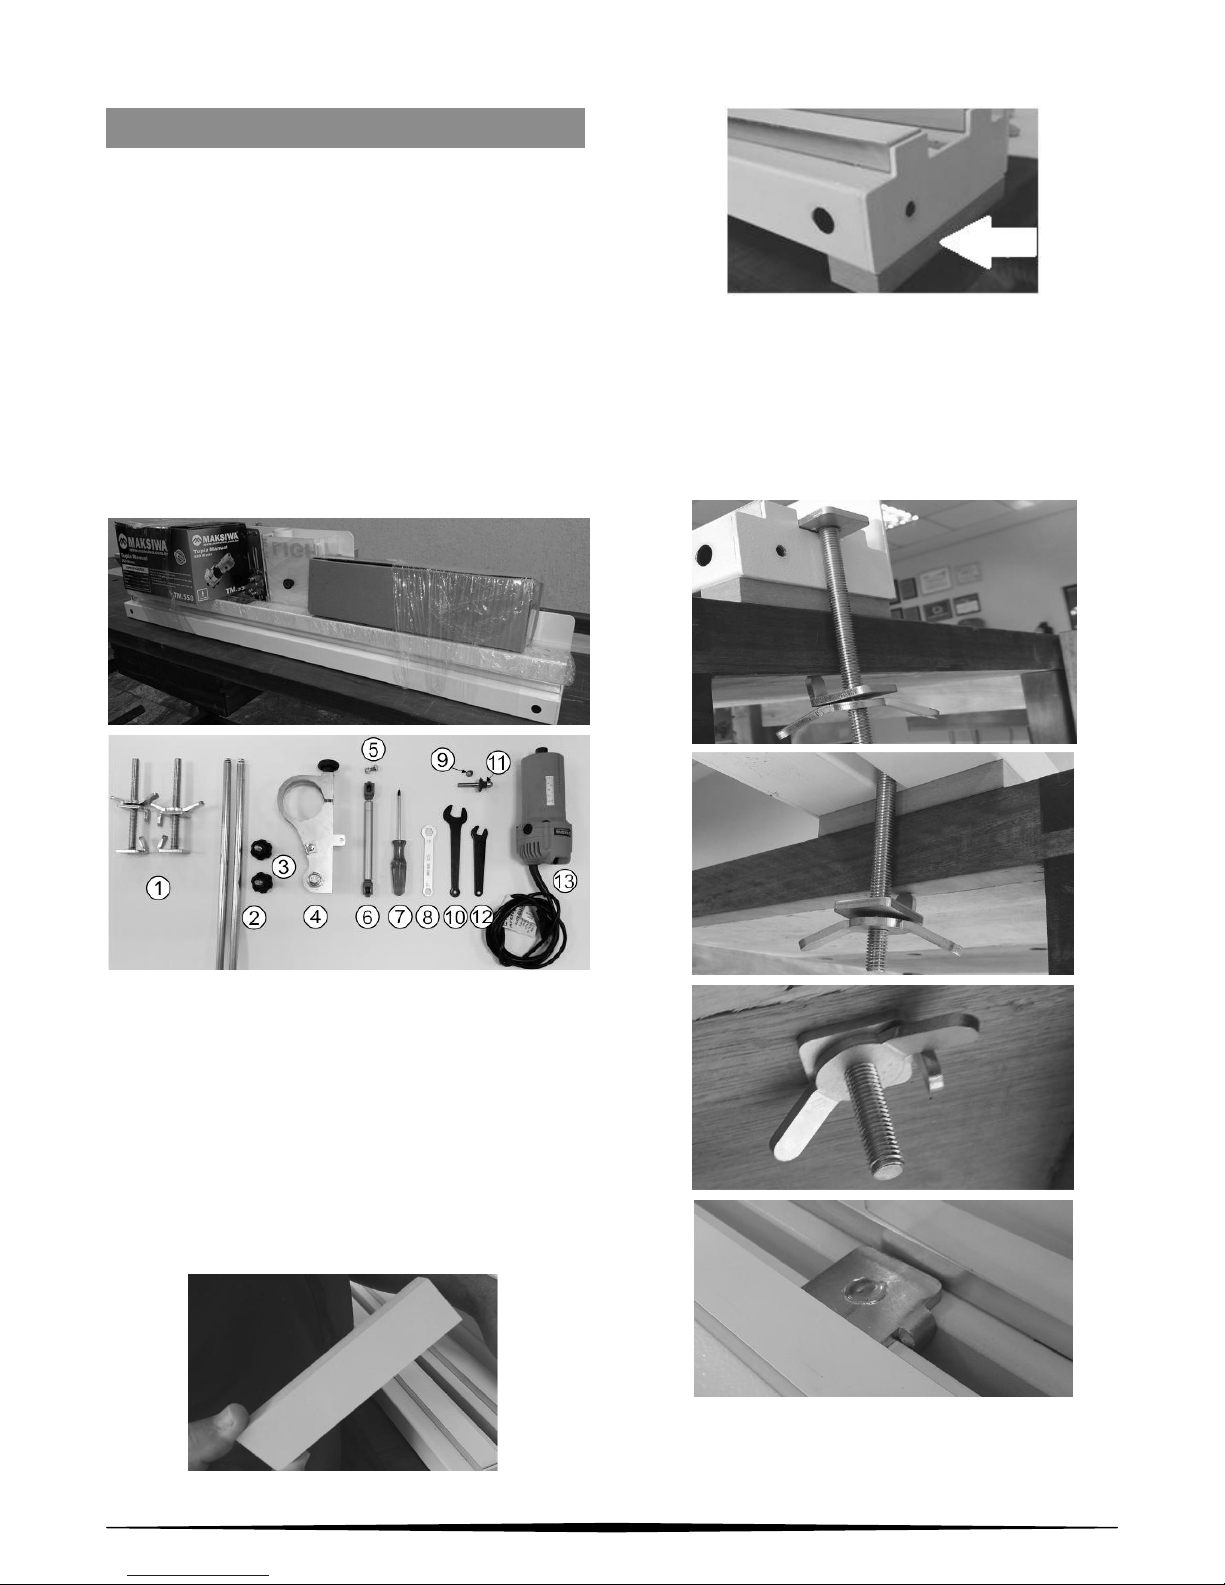
2. Remove the machine from the packed with all the
parts and accessories that go with it. For ease
assembly, place it on a bench. Note the pieces that
came with your equipment:
1. Clamps 8. Hex Hey 10/13
2. Adjustable Guide 9. Collet ¼
3. Knobs 10. Hex Key 17
4. Swinging Support 11. Cutter
5. Bolt M6x16 12. Hex Key 10
6. Piston 13. Trimmer / Router
7. Phillips Key
ASSEMBLY
1. Prepare two pieces approximately with 35x15x135mm
(1 3/8’’x 5/8’’ x 5 3/8’’) to serve as a spacer between the
setting surface and the base of the equipment:
2. Choose a table or a bench for installation. Defining its
position, considering that the two clamps (1) allows its
fixing in any point of the center of the base or outer ends
of the equipment. Note the figures below that you can
also perform this setting by the side of the tables and / or
benches:
 Loading...