

Makro Detector Kruzer, multi Kruzer User Manual

WARNINGS
READ CAREFULLY BEFORE OPERATION OF THE DEVICE
LEGAL DISCLAIMERS
►
Comply with applicable laws and regulations governing use of metal detectors
while using this detector. Do not use the detector without authorization in protected or
archeological sites. Do not use this detector around unexploded ordnance or in restricted
military zones without authorization. Notify appropriate authorities with details of any
historical or culturally significant artifacts you find.
WARNINGS
►
Kruzer is a state-of-the-art electronic device. Do not assemble or operate the device
before reading the user manual.
►
Do not store the device and search coil under extremely low or high temperatures for
extended periods. (Storage Temperature: - 20°C to 60°C / - 4°F to 140°F)
►
The device has been designed with IP68 rating as a waterproof unit up to 5 meters
(except for the wireless headphones!).
►
Pay attention to the items below after using the device especially under salty water:
1. Wash the system box, shaft and the coil with tap water and be sure no salt water is left
in the connectors.
2. Do not use any chemicals for cleaning and/or for any other purposes.
3. Wipe the screen and the shaft dry with a soft, non-scratch cloth.
►
Protect the detector against impacts during normal use. For shipping, carefully place
detector in original carton and secure with shock resistant packaging.
►
Kruzer metal detector may only be disassembled and repaired by Makro Authorized
Service Centers. Unauthorized disassembly/intrusion into the metal detector control
housing for any reason voids the warranty.
►
Do not use the device indoors. The device may constantly give target signals indoors
where there are many metals present. Use the device outdoors, in open fields.
►
Do not let another detector or an electromagnetic device come in close proximity (10m
(30ft.)) to the device.
IMPORTANT
Do not carry any metal objects while using
the device. Keep the device away from your
shoes while walking. The device may detect
the metals on you or inside your shoes as
targets.
For Consumers within the European Union: Do not dispose
of this equipment in general household waste. The crossed
wheeled bin symbol on this equipment indicates this unit
should not be disposed of in general household waste, but
recycled in compliance with local government regulations
and environmental requirements.

TABLE OF CONTENTS
ASSEMBLY..........................................................................................................................................
INTRODUCTION TO THE DEVICE.....................................................................
BATTERY INFORMATION..............................................................................................
HEADPHONE INFORMATION...............................................................................
DISPLAY..................................................................................................................................................
CORRECT USE...............................................................................................................................
QUICK GUIDE................................................................................................................................
GROUND BALANCE.............................................................................................................
TARGET ID..........................................................................................................................................
SEARCH MODES (MODE)............................................................................................
SETTINGS.............................................................................................................................................
OPTIONS...............................................................................................................................................
EXTRA UNDERGROUND DEPTH (E.U.D.).............................................
PINPOINT.............................................................................................................................................
TARGET DEPTH...........................................................................................................................
LARGE OR SHALLOW TARGETS.........................................................................
FALSE SIGNALS AND REASONS........................................................................
MAGNETIC MINERALIZATION INDICATOR......................................
ROCKS AND SEARCHING IN ROCKY TERRAINS........................
TRACKING AND EFFECTS OF ROCKS........................................................
METALS UNDER ROCKS................................................................................................
DETECTION ON THE BEACH AND UNDERWATER................
MESSAGES.........................................................................................................................................
SOFTWARE UPDATE...........................................................................................................
TECHNICAL SPECIFICATIONS...............................................................................
1
2
3-4
4
5
6
7
8-11
11-12
13-14
15-20
20-22
23
23-24
24
24
24-25
25
25-26
26
26-27
27
28
28
29

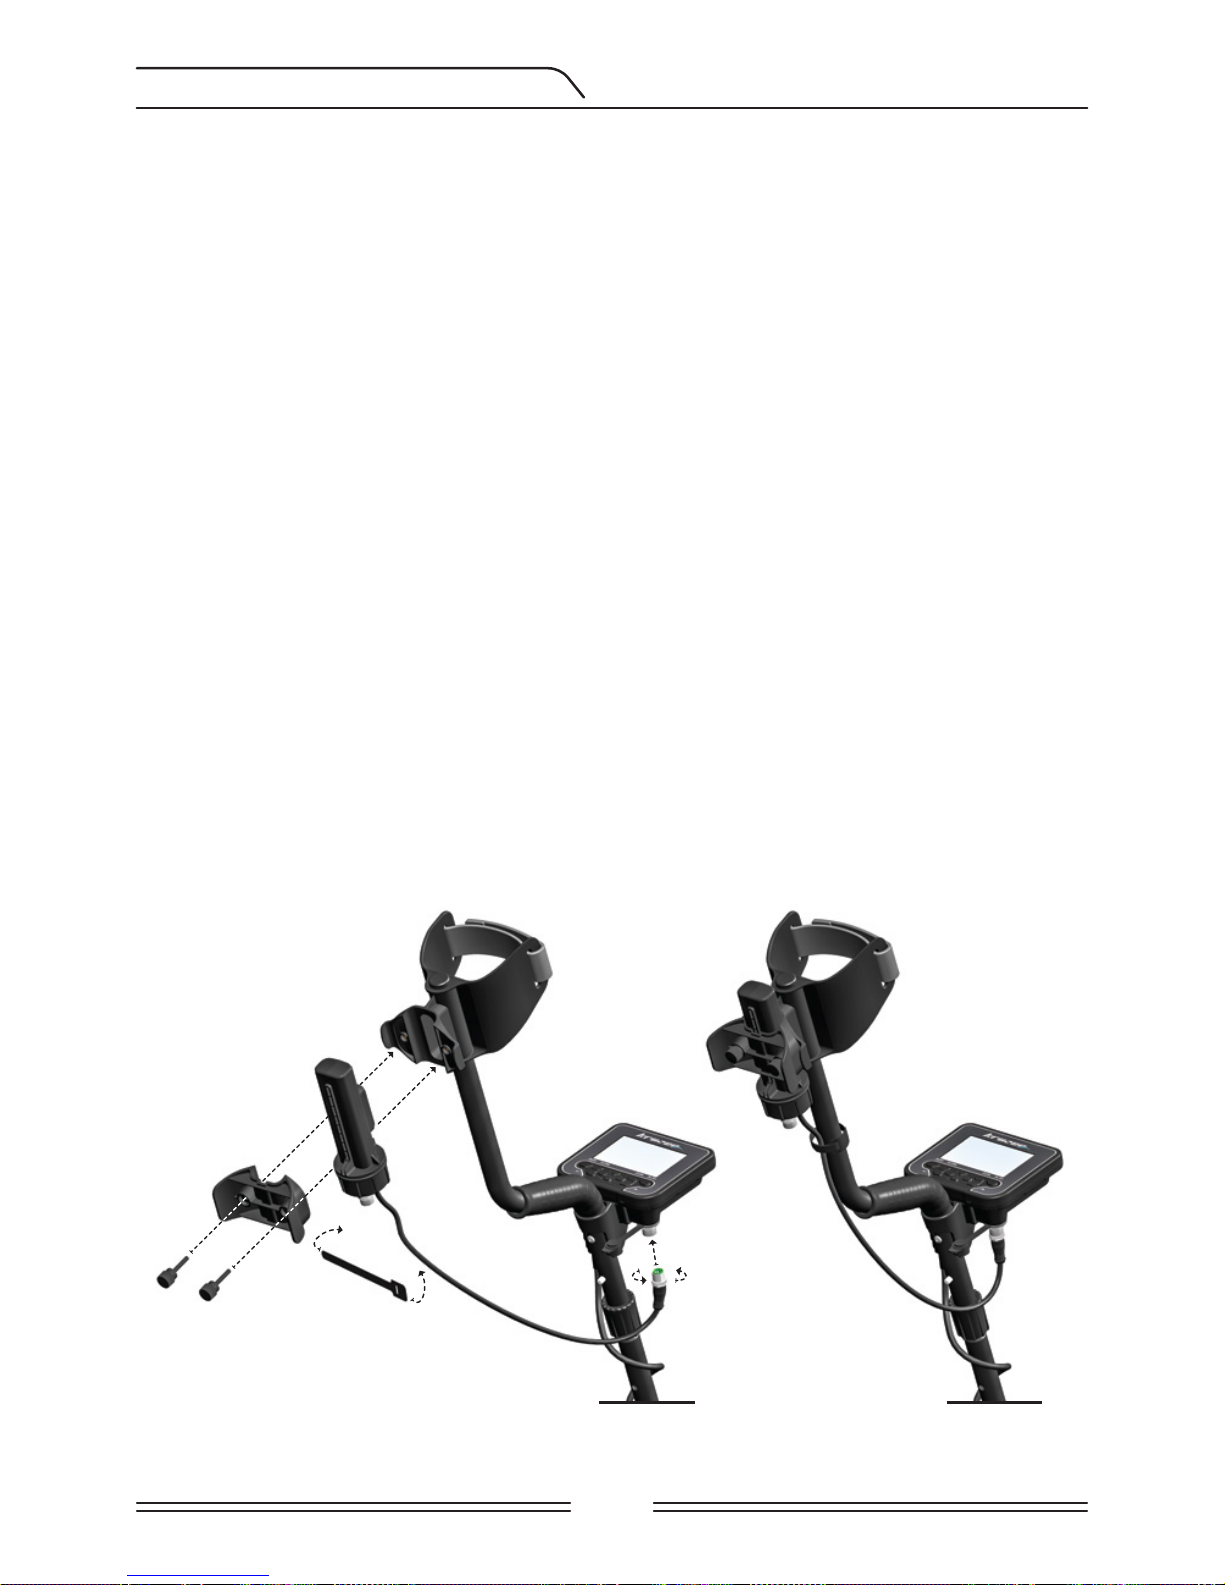
(1) To attach the middle rod with the upper S-rod,
loosen the twistlock. Press down the pin and engage
the pieces together and tighten the twist lock after
the pin is clicked into the hole.
(2) After inserting the washers on the lower shaft,
place the lower shaft in its location on the search
coil. Secure by tightening the screw and nut. Do not
overtighten.
(3) Loosen the twist lock to adjust the length of the
device to your height. Adjust the length of the shaft
by keeping the pin located on the rear pressed down
and clicking the pin in any of the holes. Secure by
tightening the twist lock.
(4) Wind the search coil cable on the shaft without
stretching too much. Then, plug the connector to the
search coil input socket on the system box and secure
by tightening the nut. While tightening, you may hear
clicks indicating that the connector is secured.
(5) Loosen the screw inside the armrest to adjust it to
your comfort. Slide the armrest up or down to align
the screw to one of the three holes on the S-rod.
Secure by tightening the screw.
(6) Insert the armrest strap as shown in the picture and
adjust it to your arm size and tighten.
1
2
3
4
5
6
Page 1
ASSEMBLY
Page 2
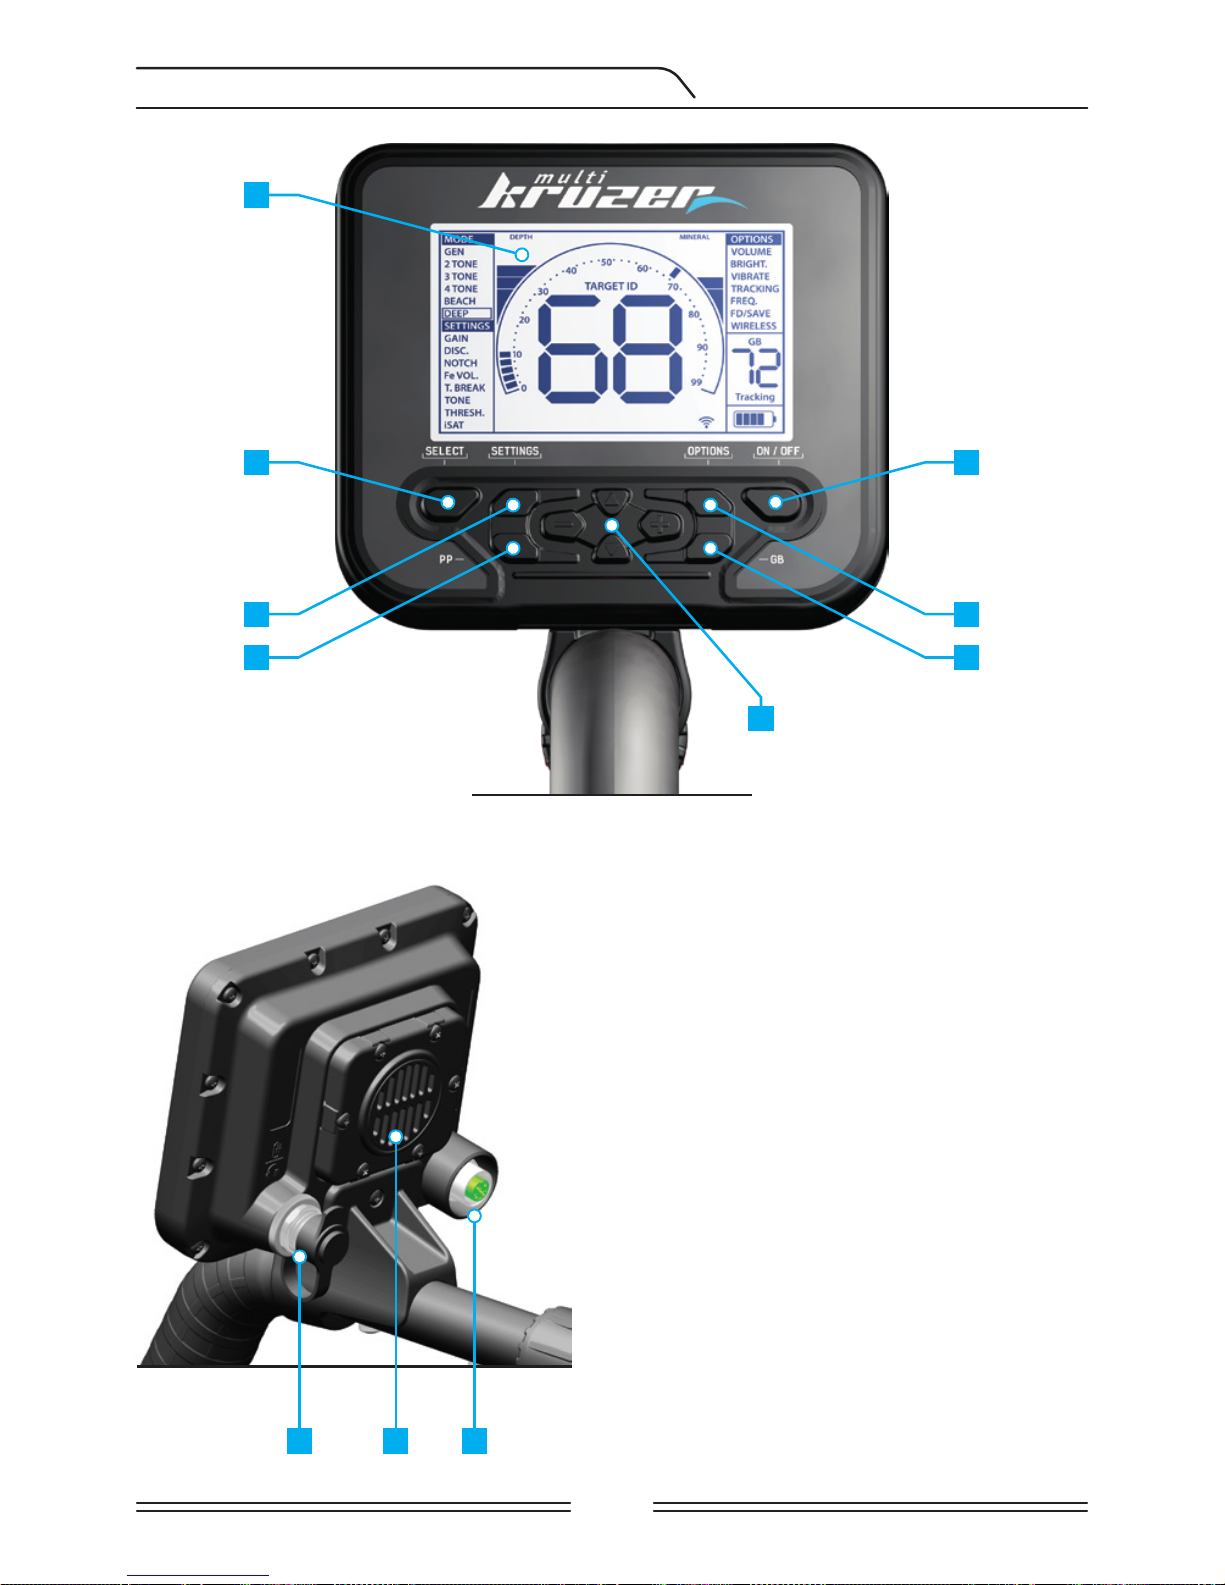
INTRODUCTION TO THE DEVICE
2
3
4
6
7
5
1
8
9 1110
(1) LCD Display
(2) Select / Extra Underground Depth (E.D.U)
(3) SETTINGS button to access the basic
settings
(4) Pinpoint button
(5) Keypad for navigation among menu options
and changing the device settings
(6) On / Off button
(7) OPTIONS button to access extra settings
(8) Ground balance button
(9) Wired headphones / charger / optional
battery pack input
IMPORTANT! When the connectors are not in
use, keep them closed with the plastic cap! When
putting the plastic cap on, make sure that you let
the air out! Otherwise, the cap may pop off.
(10) Speaker
(11) Search coil input socket
Page 3
Kruzer has an internal 3700mAh Lithium Polymer battery.
Battery life is approximately 14-19 hours for the Kruzer and 9-19 hours for the multi Kruzer.
Battery life will be less in 5kHz compared to other frequencies on the multi Kruzer. Other
factors such as usage of speaker or wired/wireless headphones will also affect battery life
for each model.
Charging
Charge the Kruzer before initial use. Charging will take approximately 4-6 hours.
To charge the battery, insert one of the ends of the cable supplied with the charger to the
wired headphones / charger input socket and the other end to the charging adapter.
IMPORTANT! Do not use a different charging adapter other than the one supplied with your
device!
Operating with a Powerbank
You can also power and charge the battery with a powerbank. To do this, just insert one of
the ends of the cable supplied with the charger to the wired headphones / charger input
socket and the other end to the powerbank. Please note that you will not be able to attach
wired headphones to the device when a powerbank is attached to the device.
IMPORTANT! Do NOT use the detector underwater while connected to a power bank.
OPTIONAL WATERPROOF BATTERY PACK
You can purchase the optional battery pack and use it when the device's internal battery is
dead and you cannot charge it.
You can attach the battery pack easily to the back of the armrest as shown in the pictures.
The battery pack takes 4 AA Alkaline or rechargeable NiCd or NiMH batteries.
BATTERY INFORMATION

The battery pack does not come with the device, it is an optional accessory and it does not
include the 4 AA batteries.
Because the input socket for the wired headphones cannot be used when the optional
battery pack is attached to the device, you can attach your wired headphones to the input
socket on the battery pack.
IMPORTANT! Optional battery pack cannot be recharged and 2 optional battery packs
cannot be attached back to back to the device. When you want to charge the internal battery of the device, do not forget to disconnect the optional battery pack! Do not attempt
to attach the charging adapter to the connector on the optional battery pack. This input is
for wired headphones only!
Low Battery Level
Battery icon on the display shows the battery life status. When the charge decreases, the
bars inside the battery icon decrease, too. "Lo" message appears on the display when the
batteries are depleted.
When the optional battery is low, the device will display the low battery warning ''Lo'' on the
screen just like the internal battery. In such a case, the batteries need to be replaced or the
internal battery must be used. If you want to switch to using the internal battery, remove the
optional battery case cable and turn the device off and on again. Otherwise, the device will
continue to display the Lo battery warning.
BATTERY WARNINGS:
Do not expose the device to extreme temperatures (for example a car's trunk or glove
compartment)
Do not charge the battery in temperatures over 35° C (95° F) or below 0° C ( 32° F).
The Kruzer battery can only be replaced by Makro Detectors or its authorized service centers.
The Kruzer comes with 2.4 GHz wireless headphones. The wireless headphones are NOT
waterproof.
The wireless connection will work as long as the system box of the device is not submerged
in the water. In other words, you can use your wireless headphones while searching in
shallow water with the coil submerged underwater. Please remember though that the
wireless headphones should not contact with water.
IMPORTANT! Do not use a different charging adapter other than the one supplied with
your device to charge the wireless headphones!
In case of the system box being submerged underwater, the wireless connection will not
work. In this case, you need to purchase our optional waterproof headphones for land and
underwater use.
For land use only, you can also purchase our optional headphones adapter should you want
to use the Kruzer with your own wired headphones.
Page 4
INFORMATION ABOUT HEADPHONES
BATTERY INFORMATION
Page 5
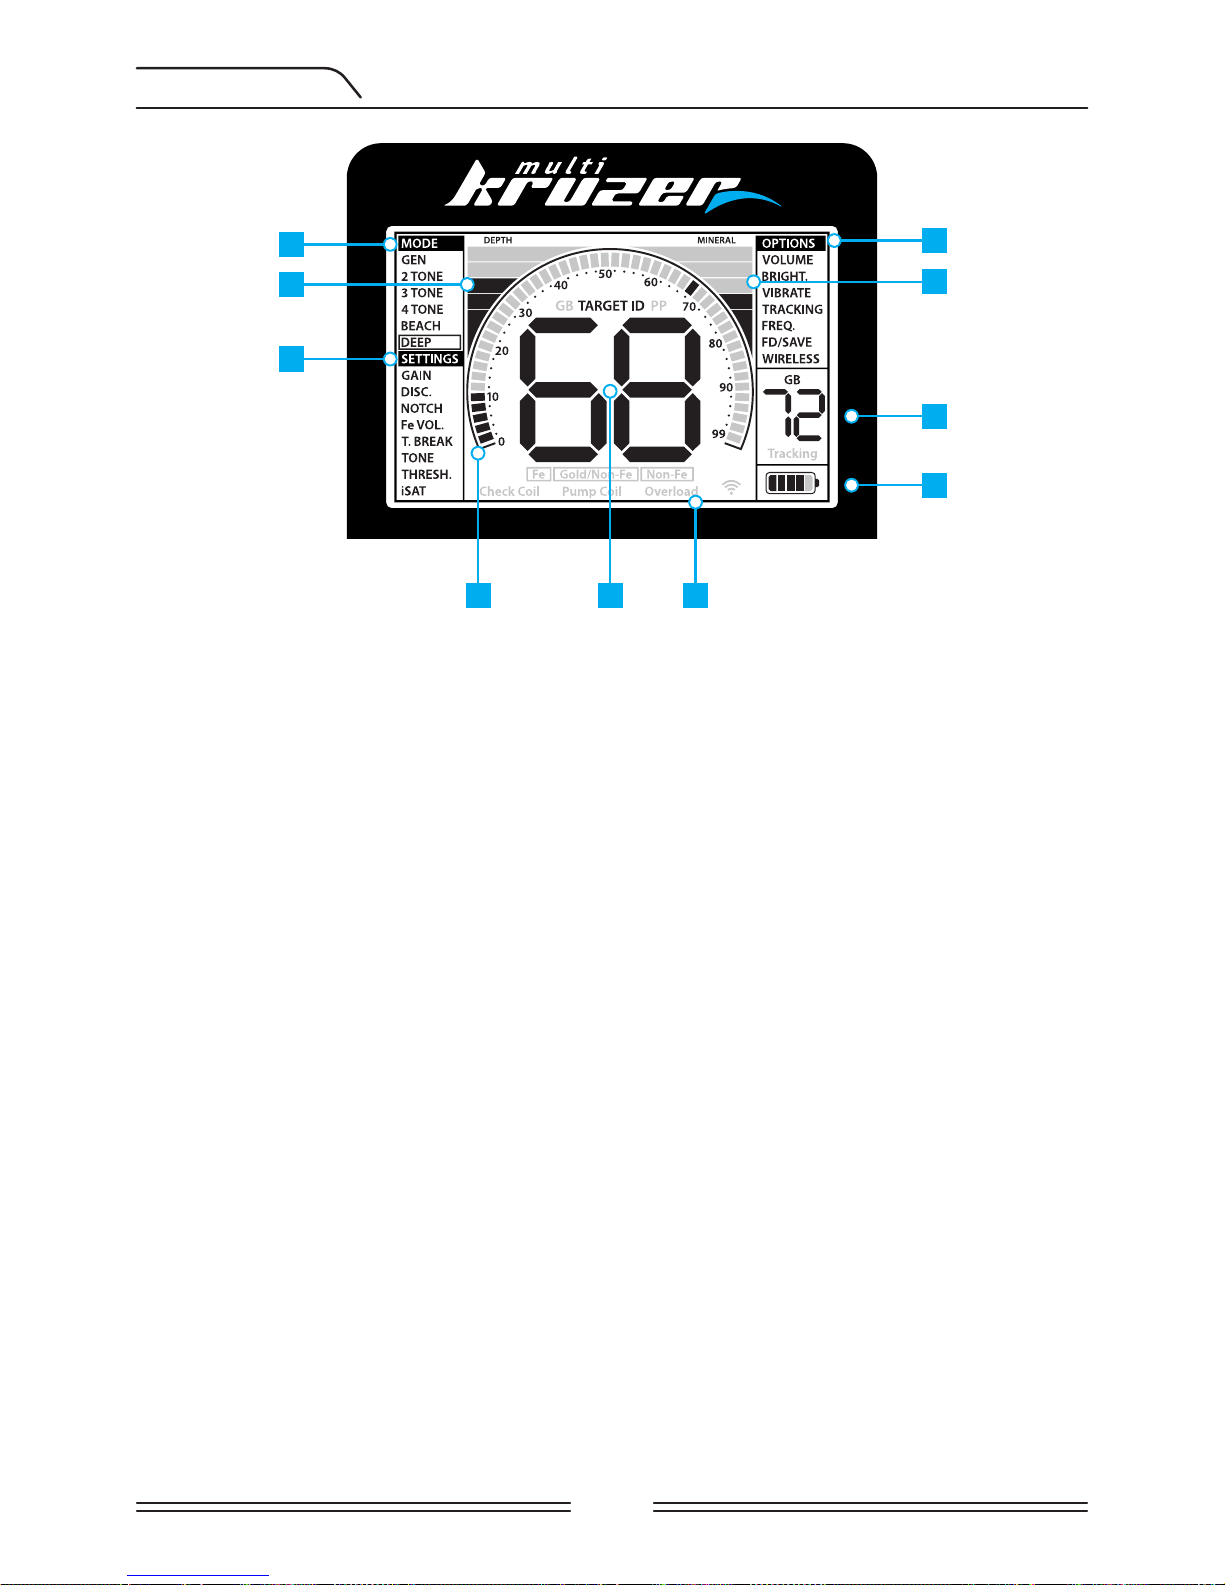
DISPLAY
1
2
7
8
9
10
3
4 5 6
(1) Search Modes.
(2) Instant Depth Meter.
(3) Settings.
(4) Target ID scale.
Shows the ID of the detected target on the ID scale. It also indicates the IDs filtered by Disc.
and Notch settings as well as the tone breakpoints.
(5) Section which shows the Target ID upon target detection, the ground balance whole
number value during ground balancing (GB) and the estimated target depth (PP) in the
pinpoint mode. In addition, the numeric value of any setting selected from the menu is
displayed in this field.
(6) Section which shows the warning messages.
(7) Options.
(8) Magnetic mineralization indicator.
(9) Section which shows the fine tuning value during ground balance adjustment and
current ground balance value during search.
(10) Battery level indicator.
Page 6
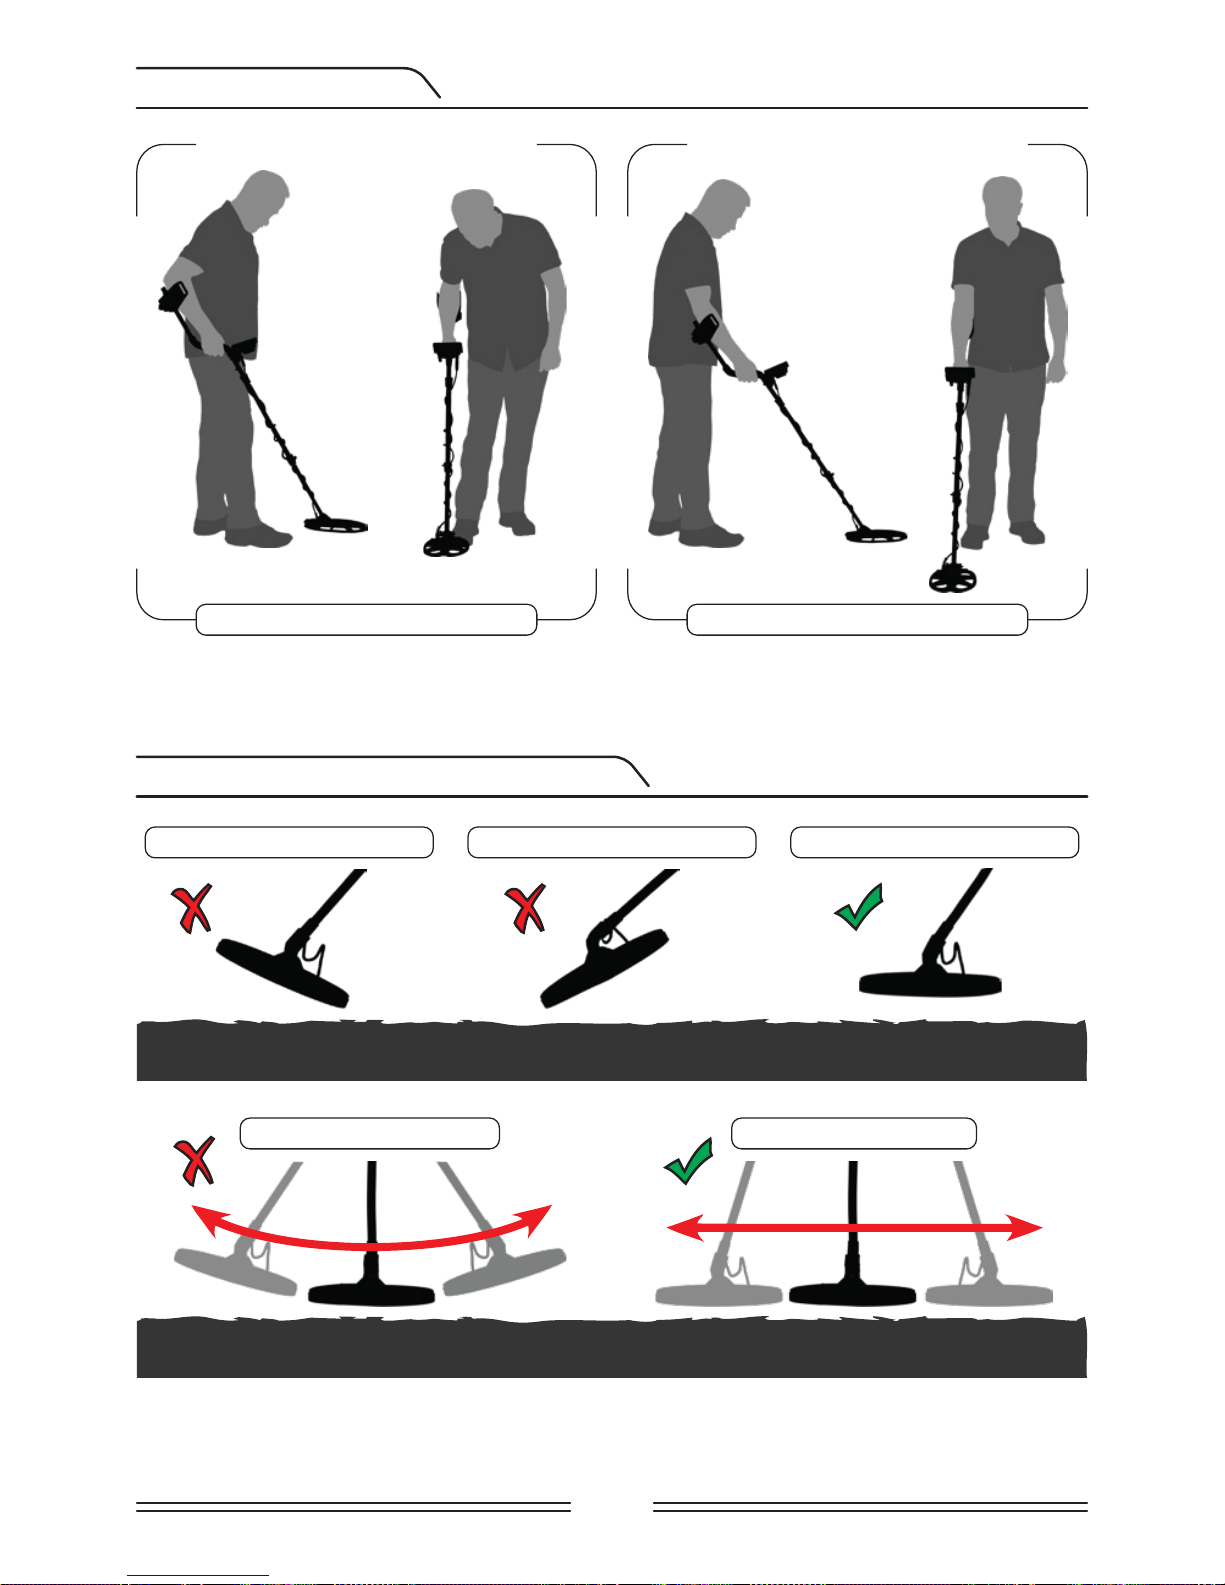
CORRECT USE
CORRECT WAY OF SWEEPING
Shaft height is wrong Shaft height is correct
It s very mportant to adjust the shaft to your
heght correctly to be able to search wthout
dscomfort and fatgue.
Adjust the heght of the shaft so that you are
standng n an uprght poston, your arm s
relaxed and the search col s approxmately
5cm (~2'') above the ground.
It s mportant to keep the search col
parallel to the ground n order to get
accurate results.
The search col must be parallel to the
ground at all tmes.
Wrong search coil angle Wrong search coil angle Correct search coil angle
Incorrect way of sweeping Correct way of sweeping

Page 7
QUICK GUIDE
1) Assemble the device as per the instructions on page 1.
2) Push the on/off button to turn on the device.
3) When the device is turned on, it will start in the 2 TONE mode and 14kHz operating
frequency. You can change the mode based on ground conditions. For instance, if you
are detecting on wet beach sand, you may want to select the BEACH mode. You can also
change the frequency of the device on the multi Kruzer model. You can find more details
on search modes and frequencies further in this manual.
4) To ground balance, push and hold the GB button and pump the search coil up and down
to 3cm (1.2'') above the ground until a “beep” sound is heard.
5) You can increase the GAIN if needed. Increasing the gain will offer you greater depth.
However, if the surroundings or the ground cause excessive noise in the device, you need
to lower the gain setting.
6) Testing the device with various metals would be helpful for getting familiar with the
sounds produced by the device.
7) Based on the IDs of the metals you don't want to detect, you can adjust the DISC. setting
and ignore those metals. For instance, if you don’t want to detect ferrous metals with 00-05
ID in the 2 TONE mode, you can set the DISC. to 5.
8) If you are detecting in a very trashy area and the device is getting too many iron signals,
instead of DISC. you can use the Fe Vol. to lower or completely turn off the iron audio. This
will provide more depth.
9) You can filter out certain Target IDs using the NOTCH and enable the device to ignore
these metals during searching or to provide an iron audio for them.
10) If you wish, you can adjust the tone break points of the device with the T.BREAK feature and
change the frequency of the tones using the TONE setting.
11) You can now start searching.
12) Since your device operates with the motion principle, swing the search coil right and
left maintaining 5cm (2") distance above the ground. If the search coil does not move, the
device will not provide any audio responses even if the coil is over a metal target.
13) When a target is detected, the ID of the target and its position on the ID scale will be
displayed on the screen. The device will also produce an audio response according to the
search mode selected.
14) Upon target detection, you can pinpoint the exact location of the target by pressing and
holding the PP button. The audio volume will increase and the audio pitch will also increase
as you approach the target.
Ground balance can be performed in three ways with the Kruzer: Automatic, Manual and
Tracking.
When the GB button is pushed while performing automatic or manual ground balance,
the device will switch to the General Search (GEN) mode automatically on the background
without any indication to the user, regardless of the selected search mode.
Upon completion of ground balance, current ground balance value is shown in the Ground
Balance (GB) box on the right side of the display.
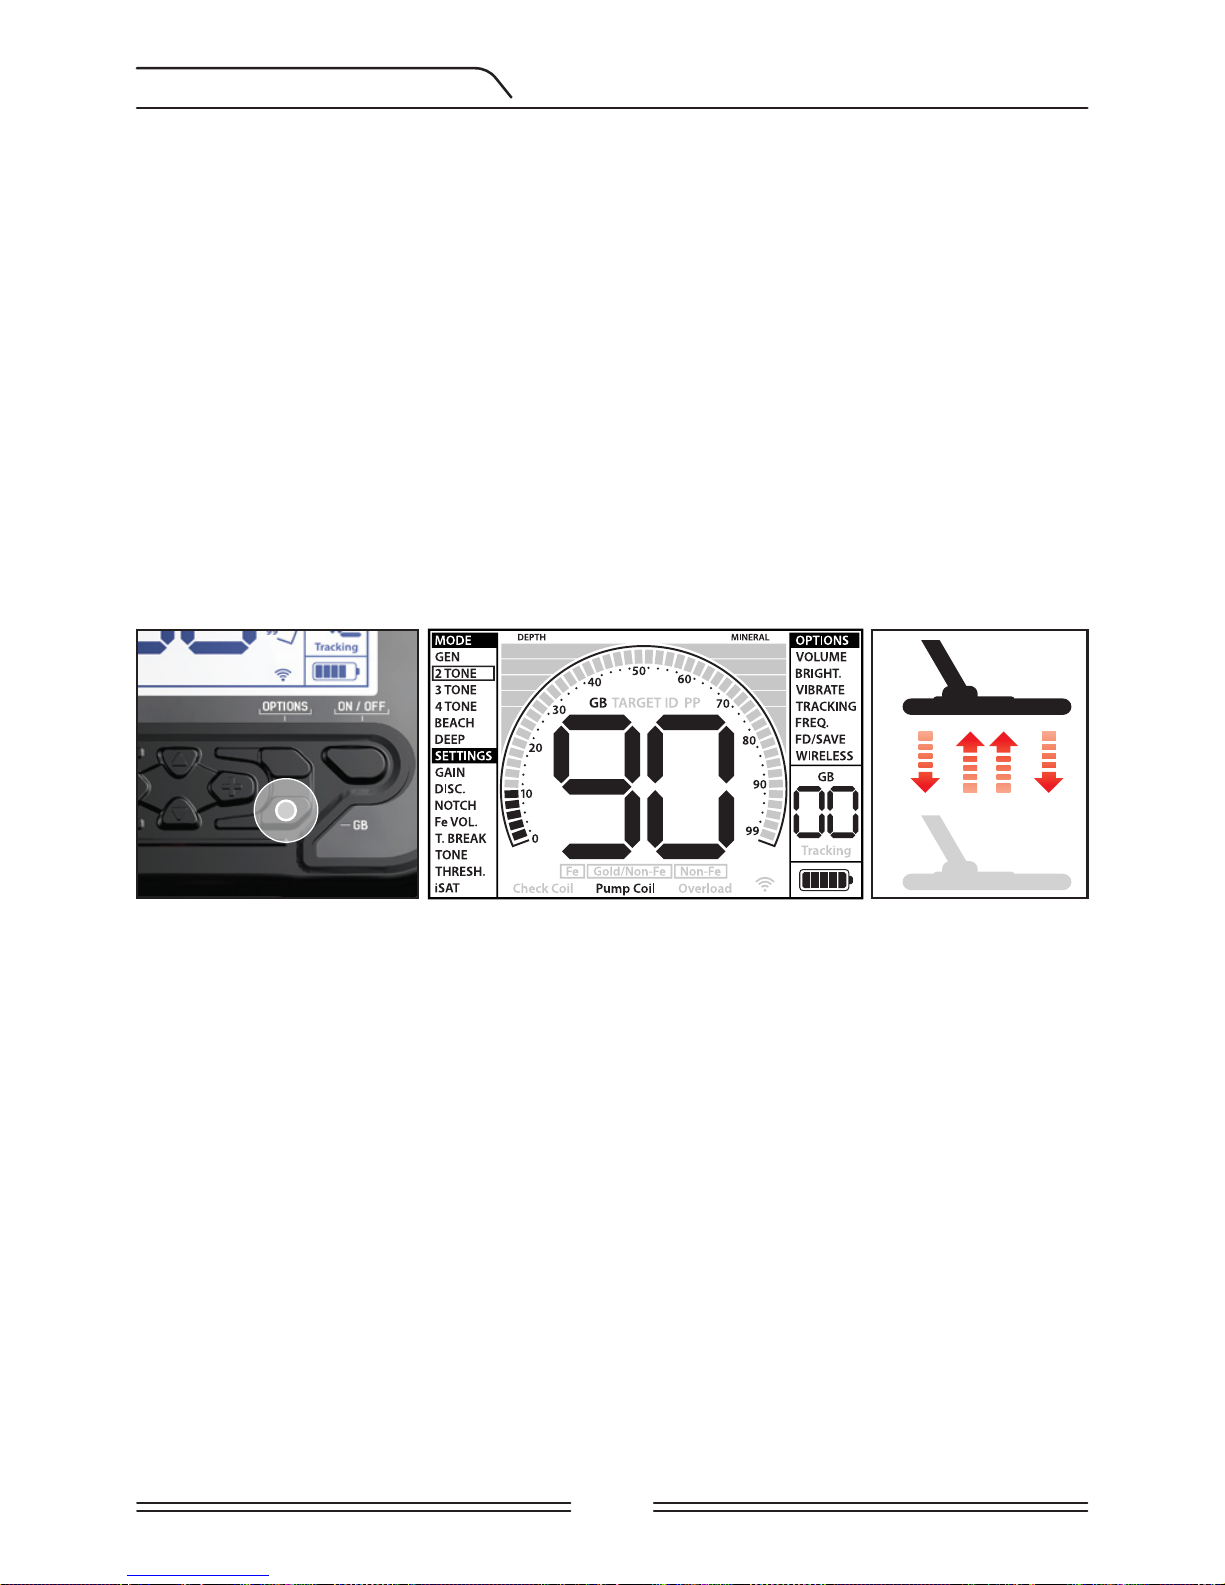
Automatic Ground Balance
Automatic ground balance is performed as follows in all search modes:
1) Find a spot where there is no metal.
2) Push and hold the GB button down (GROUND BALANCE value and “Pump Coil” warning
message will be shown on display) and start pumping the search coil up and down from
about 15-20 cm (~6''- 8'') above the ground down to 3 cm (~1'') off the ground with smooth
movements and keeping it parallel to the ground.
3) Continue until a beep, indicating the completion of ground balance, is heard. Based on
ground conditions, it usually takes about 2-4 pumps for the ground balance to be completed.
4) Upon completion of the ground balance, ground balance value is shown on the display
(GB). The device continues to ground balance and produce a beep sound as long as you keep
the GB button pushed down and pump the coil. In order to ensure that the ground balance is
proper, ground balance at least 2-3 times and check the ground balance values on the display.
In general, the difference between the values shall not be higher than 1-2 numbers.
5) If you cannot ground balance, in other words, if no beep sound is produced, it means that
either the ground is too conductive or not mineralized or there is a target right below the
search coil. In such a case, retry ground balance at a different spot. If you still cannot ground
balance, read the section titled ''Important Details Concerning Ground Balance''.
When the ground balance button is released, the device continues to operate in the GEN
mode for a short period of time and the ground balance value stays on display. This makes
it possible to manually fine tune the automatic ground balance value. Refer to the following
"Manual Ground Balance" section for further information regarding this feature. If this is
not desired, press the PP button once to return to the main screen.
NOTE: If the iSAT value is set high, the device may not auto ground balance. In such a case,
lower the iSAT value first. After ground balancing, set the iSAT back to its original position.
Page 8
GROUND BALANCE
 Loading...