

Page 1
Management
Home
Company
Search
•
•
MN_CMS0001_MK_A4
Page 2

Page 2 of 45 Central Management System
Page 3

Glossary Contents
Central Management System Page 3 of 45
1 Introduction 5
2 Registration & Login 7
3 Home 9
3.1 Anatomy of the Left Main Menu 9
3.2 Status Icons 9
3.3 'Click' Convention 9
3.4 Anatomy of the Header Bar 10
4 Selection 11
4.1 Selection >Search 11
4.2 Selection >My Makos 11
4.3 Selection >My Client's Makos 11
4.4 List Filtering 12
4.5 Seeing a CPE's Information Window 12
5 Configure 13
5.1 Configure > Internet >ISP Setup 13
5.2 Configure >Internet > Secondary ISP Setup >Cellular Failover 16
5.3 Configure > Internet >Alerts 17
5.4 Configure > Internet >IP Range 18
5.5 Configure > Network >LAN 1 18
5.6 Configure > Network >Port Setup 21
5.7 Configure > Network >VLAN Setup 22
5.8 Configure > Network > WiFi LAN >Basic 22
5.9 Configure > Network > WiFi LAN >Advanced 23
5.10 Configure > Network >DHCP Leases 24
5.11 Configure > Network >Static Routes 24
5.12 Configure >Firewall 25
5.13 Configure > Firewall >Inbound, Outbound, Intranet, VPNs 25
6 VPN 29
6.1 VPN > ... >Manage Access 29
6.2 VPN > ... > Invitation >Send Invitation 30
6.3 VPN > ... > Invitation >Send Invitation 30
6.4 VPN > ... >Add Third Party Device 31
6.5 VPN > ... >Delete Third Party Device 31
6.6 VPN > Remote Access >Manage Access 31
6.7 VPN > Remote Access >Add VPN User 32
6.8 VPN > Remote Access >PPTP Settings 32
7 Services 33
7.1 Services > QoS >Basic 33
7.2 Services > QoS >Advanced 33
7.3 Services >PCI DSS 34
7.4 Services >Mako Guardian 34
7.5 Services >Mako Failover 34
7.6 Services >Dynamic DNS 34
7.7 Configure >Location 35
7.8 Configure > Access >Access 35
7.9 Configure > Access >Email Settings 36
8 Management 37
8.1 Management >Home 37
8.2 Management > Company >Search 37
8.3 Management > Company >New Company 37
8.4 Management > Company >Manage [Your Company] 37
8.5 Management > Company > Manage [Your Company] >Licences 38
8.6 Management > ... > Manage [Your Company] ... >Email Settings 38
8.7 Management > ... Manage [Your Company] > ... >Customise Reports 38
8.8 Management > ... Manage [Your Company] > ... >Manage Images 38
8.9 Management > User >Search 38
8.10 Management > User >New User 38
8.11 Management > User >[User Name] 38
8.12 Management > User > [User Name] >Events 39
9 Help 40
9.1 Help >Help Contacts 40
9.2 Help >Documentation 40
10 Troubleshooting 41
A ISP Plan Request 42
B Overview 43
C Glossary 46
D MakoScope 52
E Connectivity information 54
11 Warranty 55
Contents
Page 4

Should Someone Else Be Reading This?What's wrong with this IP address: 202.12.324.4?
Page 4 of 45 Central Management System
Page 5
Glossary Contents
Central Management System Page 5 of 45
1 Introduction
Congratulations on choosing the Mako System. The Mako System oers a cloud-managed, turnkey
solution to create and manage broadband networks for small sites. With anytime, anywhere access, the
Mako System oers real-time management, reporting and proactive security in one solution.
The Mako System is focused on providing businesses with a standard of information security that meets
the Payment Card Industry Data Security Standard (PCI DSS).
This manual will complement your chosen Mako appliance, also known as the Customer Premise
Equipment (CPE).
Your CPE is managed remotely by Mako via a web server, using your standard Internet connection and
the Central Management System (CMS). The CMS uses a web browser for personal conguration and
reporting.
The CMS is always used with a CPE to provide reporting and conguration options via the hosted
servers. Your CPE, CMS and the hosted management servers are referred to as the Mako System.
Internet
Your CPE
Mako
CMS
Your Mako
PCI LAN
Your Mako
Public LAN
System Overview
Your CPE checks in with the
Central Management Server/
System (CMS) every 2 minutes.
It sends its raw datalogs for
processing, and receives any
required updates.
Your CPE applies these updates to
congure your network: rewalls,
lters, email, users, VPNs, etc.
PCIDSS trac goes to your secure
network.
PCIDSS trac does NOT go to
your public network, but your
System allows you to lter access
to your public network, should
you require it.
1.0.1 What Isn't Covered
This is a guideline for using the CMS to congure and manage your CPE in a standard environment. This
manual doesn't cover the reporting aspects of the CMS and connected devices, deployment, nor certain
services such as Mako Guardian or Mako Mail. These options are covered in dierent manuals.
Page 6

Are You Overpaid?What is the weight of the Earth?
Page 6 of 45 Central Management System
1.0.2 Manual Conventions
For navigation, we use this format: Main Tab > Sub-tab > ... > ... >Function. This is shorthand, asking
you to click on the rst level menu level and click on successive levels until you nd the appropriate
page.
An explanatory note. Usually not critical for the normal operation of the system.
A settings note. The note requires your attention, but due to the dierence in browsers or
conguration might not apply for the operation or conguration of the system.
A warning note. The note requires your attention and will aect the way you and other
approved users will use your system.
A danger note. The note requires your full attention and may signicantly aect your system's
integrity, cause electrical damage, data corruption or even a health and safety-related injury.
1.0.3 CMS Conventions
The CMS uses a number of user feedback and help tools to assist you in managing your network:
Hover Help ( ) Hovering over these icons provide extra info on that specic option.
Error/Warning Area If an error or warning is generated by a conguration option, the page
you've attempted to save settings on re-appears with a highlighted
message above the main body of the page.
Save when nished The interface uses a mix of dynamic data entry (for example, automatically
updated input when you click a radio button) and non-dynamic data
entry (for example, text eld entry will not be updated until you click a
Save or Add button). Some pages may have Save buttons scrolled o your
screen.
When you enter text in data elds you will not be automatically prompted
to save changes. This means navigating away from a screen without
saving changes will result in no change to your system.
Save buttons are generally in the bottom right of a page, and may also be
called Add [...], Update [...] or some other relevant call-to-action.
1.0.4 Who is this Document For?
This is the eternal question for a manual: What level of detail is comfortable for you? Too little, and this
manual might as well not exist, or you might feel inadequate to the task. Too much, and attention wanes
from important details, or you may feel we're insulting your intelligence.
The line we drew separates Action from Knowledge, or, things we want you to do, and things we
want you to know. The main body of this manual is all about what you should do to operate the CMS
safely and competently. It tells you where to nd operations or settings, and even briey expands
the enormous number of acronyms used in the Network IT industry. But it does NOT give you best
practice advice, in-depth troubleshooting, or many worked examples on how to deploy ideal or specic
congurations for your network.
There are two reasons for this.
1) Providing specic examples is a security risk to your system. Even if we recommend or indicate
ways to do specic operations (how to create a password, what to name your devices, examples of usual
IP address settings, etc.) we would be subconsciously (or even explicitly) imposing patterns on you that
hackers and other unethical types can take advantage of.
However, we do provide some examples that are fairly basic that everyone in the IT Industry knows or
should know.
2) Use the Glossary. A glossary is about as close as we can come to economically explain what many
terms in this manual mean. If background information was placed behind every option available to you
you'd never get through a site conguration.
Page 7
Glossary Contents
Central Management System Page 7 of 45
2 Registration & Login
When your account is set up, the CMS emails you your accounts details, along with a link to log you into
your network.
The CMS has been tested against several versions of the popular browser software products. It's likely
that, due to dierent browser products, versions and settings, your view of the interface may vary
slightly from the ones illustrated in this guide.
While accessing the CMS, your browser will use a secure communication protocol, known as SSL (Secure
Socket Layer) https://, in which trac between the browser and the Central Management Servers is
encrypted.
Your browser must accept cookies and must have JavaScript enabled to access the CMS
website. These properties are set in your browser preferences and are normally enabled
by default.
2.0.1 Registration
Registration is a one-time process that activates the account created for you by your reseller on the CMS.
You'll be sent an email with a link. New user registration is done when you follow the link, either by
clicking it or pasting the link into your web browser's address window.
Home >New User Registration
n Enter the appropriate details.
You will be asked to read and acknowledge the End User License Agreement (EULA)
before you can start using your system.
Page 8
Did You Google This?The top-left section dies on a common 7-part LED digit. What numbers can still be made?
Page 8 of 45 Central Management System
2.0.2 Login
n Click the link, or open your Web browser and navigate to your Mako Management CMS.
n Click the Customer Login button, top right of the window. If you're operating in a PCI environment you
will need to provide the reCAPTCHA login details.
n If your login is incorrect you'll be asked to re-enter your information.
Logins and passwords are your last line of protection for ensuring your system remains
robust. Never give you login or password out to anyone else.
If your system has a PCI template, it has the ability to handle 2 sets of internet trac: PCI-compliant
(usually for credit card transactions), and non-PCI-compliant (for general internet trac).
If you don't have a PCI template, you have two still have two separate trac routes with our entry-level
appliances. For example, one could be used for a public, general access pipe (often called a DMZ) for a
web server. Our higher capacity appliances provide up to 4 LANs simultaneously.
While you may run separate LANs, each CPE runs on only one CMS. Only one login/
password is assigned to a user, but one user may be set up to manage several CPEs.
PCI-compliant trac requires you to change your password every 90 days. If you have
congured a non-PCI network then security is more forgiving, allowing you to maintain
or change your password as you see t.
2.0.3 Forgotten/Expired Passwords
If you forget your password, or your password has expired:
n In the Customer Login window click Forgotten/Expired password?
n Your email notication or reseller will supply you with the necessary steps to re-enter your system.
Page 9
Glossary Contents
Central Management System Page 9 of 45
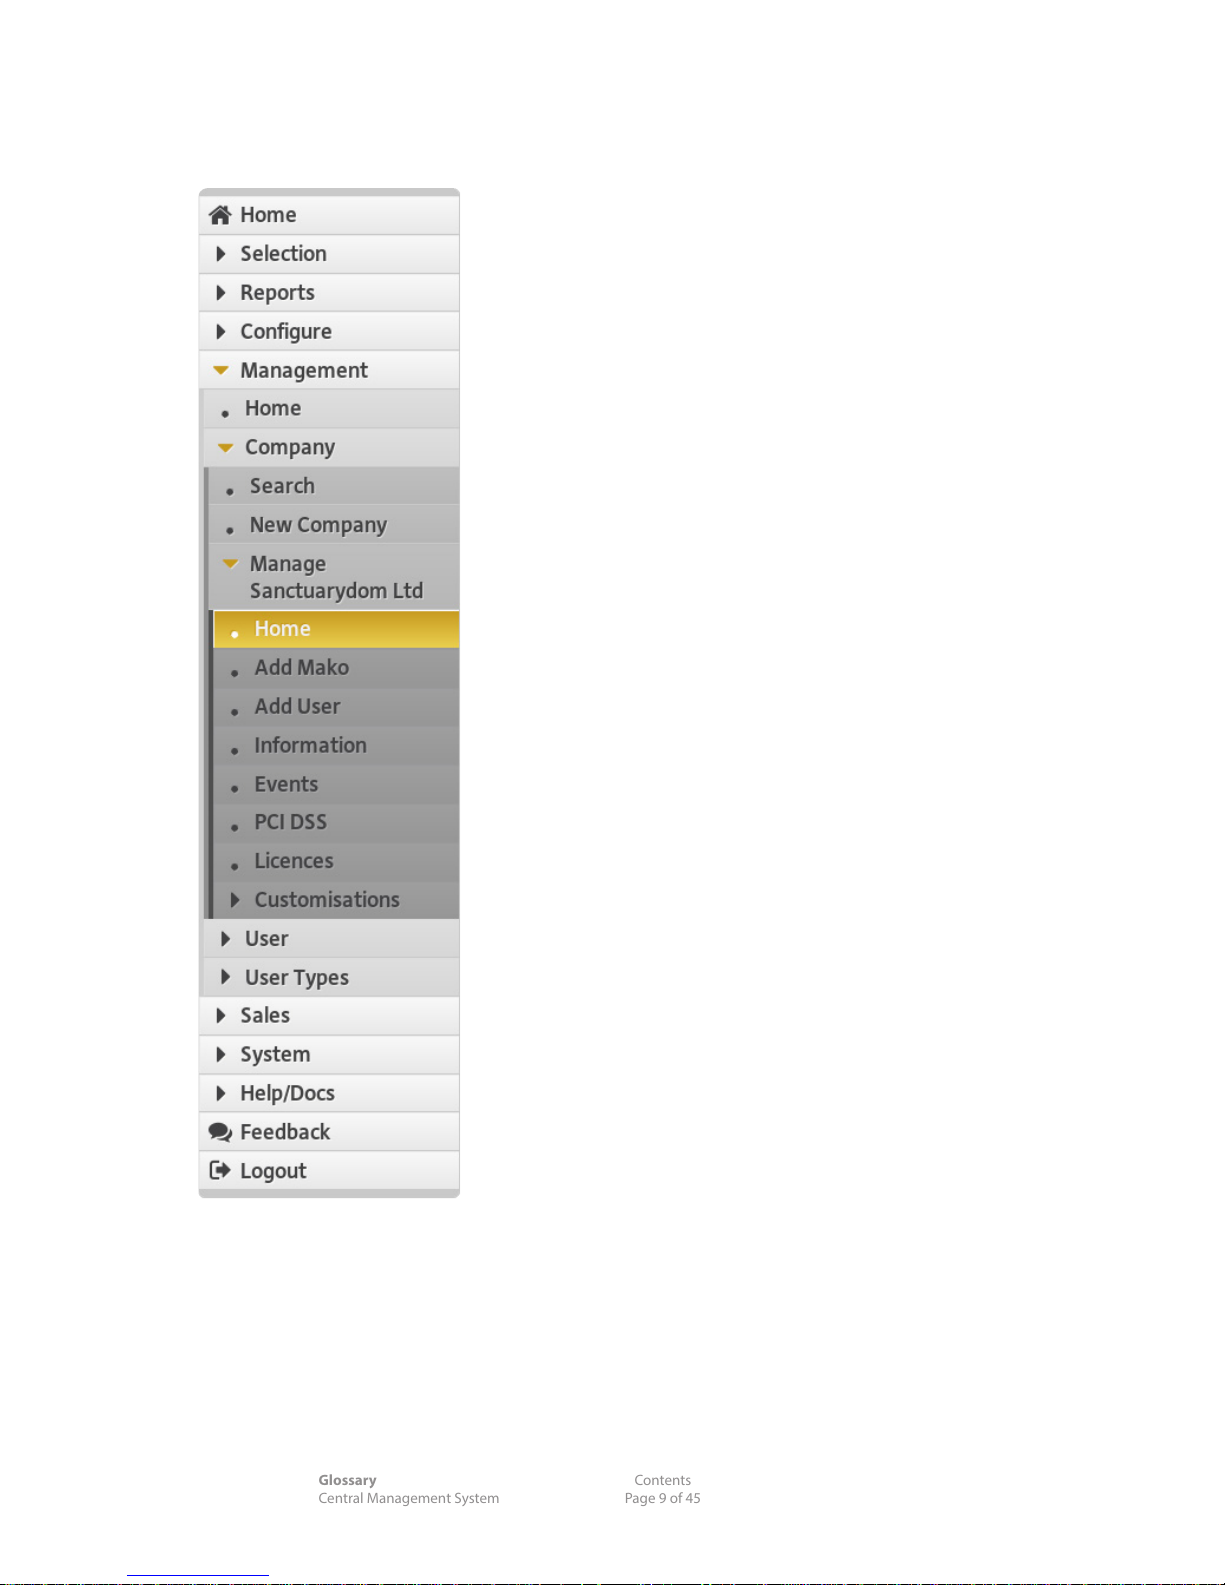
3 Home
The Home window is the starting point for administration and monitoring of your CPEs and users.
3.1 Anatomy of the Left Main Menu
n Reveal triangles ( ) show more options are within that
menu. Dark triangles indicate collapsed options, coloured
triangles indicate revealed options.
n Dotted menu options indicate no submenus are within
this option.
n Lighter buttons sit at the topmost level. As you drill down
into the submenus the shade gets darker and the options
get indented slightly on the left.
n The highlighted menu item is the open option. Once
selected, the menu item on the left highlights, reveals the
submenu items or content in the main screen (right).
3.2 Status Icons
Your system uses a small set of status icons to present
instruction and data consistently:
Help
Information hovertext
Warning/Important
Allow trac/Active
H
Deny Trac
N
Default Mode
Edit DHCP settings
Awaiting Connection
3.3 'Click' Convention
Navigation through menu screens uses this convention:
Main Menu Item > Submenu >Function
means 'Click the Main Menu button, then the Submenu
Button, to nd this page of options'.
Page 10

Are You Prepared?You're lost in dense bush. As dark approaches, you have only one match to light a kerosene lamp, kindling and a signal are. What should you light rst?
Page 10 of 45 Central Management System
3.4 Anatomy of the Header Bar
The header gives you an immediate overview of your account, access history and general info.
The top line gives you the user access details, time and company you're operating under for this session.
Also here is:
"Head Oce" The name of the selected CPE.
Information. Click this for this CPE's conguration prole.
Access History The list of CPEs recently accessed for conguration or use. Also, you
can search for other CPEs using their ID and section numbers, or get
information details on the CPEs in this list with their respective buttons.
Page 11
Glossary Contents
Central Management System Page 11 of 45
4 Selection
The Selection menu allows you to select an individual CPE in your network and interrogate it.
Large sections of the CMS are inoperable if you don't have an appliance selected.
Let's get a list of CPEs to choose from.
4.1 Selection >Search
n Enter a company and/or name location eld
Search when nished.
n Click your target CPE's radio button from this list.
The default selection will be the topmost CPE.
4.1.1 Advanced Search
Your network can be searched using each CPE's ID text.
n Advanced Search > Enter your ID
Search when nished.
4.2 Selection >My Makos
n Select a CPE's radio button. Within 5 seconds the Header should update.
4.3 Selection >My Client's Makos
If you're managing or monitoring several networks:
n Select a Client... from the dropdown menu.
n Select a CPE's radio button.
Following any one of the methods above, you should have a selection of CPEs to choose from.
Page 12
Are you a Problem Solver or Problem Starter?You have a shotgun. 9 ducks sit on a fence, 10 m away. You shoot 1. How many are left?
Page 12 of 45 Central Management System
Once you've clicked a CPE's radio button, several details appear for your attention:
n At the top of the page, your login, location, time and CPE details appear in the Header bar.
n The CPE's Status, Info and History shortcuts also appear in the Header bar.
n 2 features, Reports and Congure, appear in the main menu (if your user prole has been given access
to these sections). The Report section is covered in a dierent manual.
In your use of the Mako CMS, you'll nd other ways to select a CPE. Always remember:
The CPE you are working with is listed in the Header bar of each page.
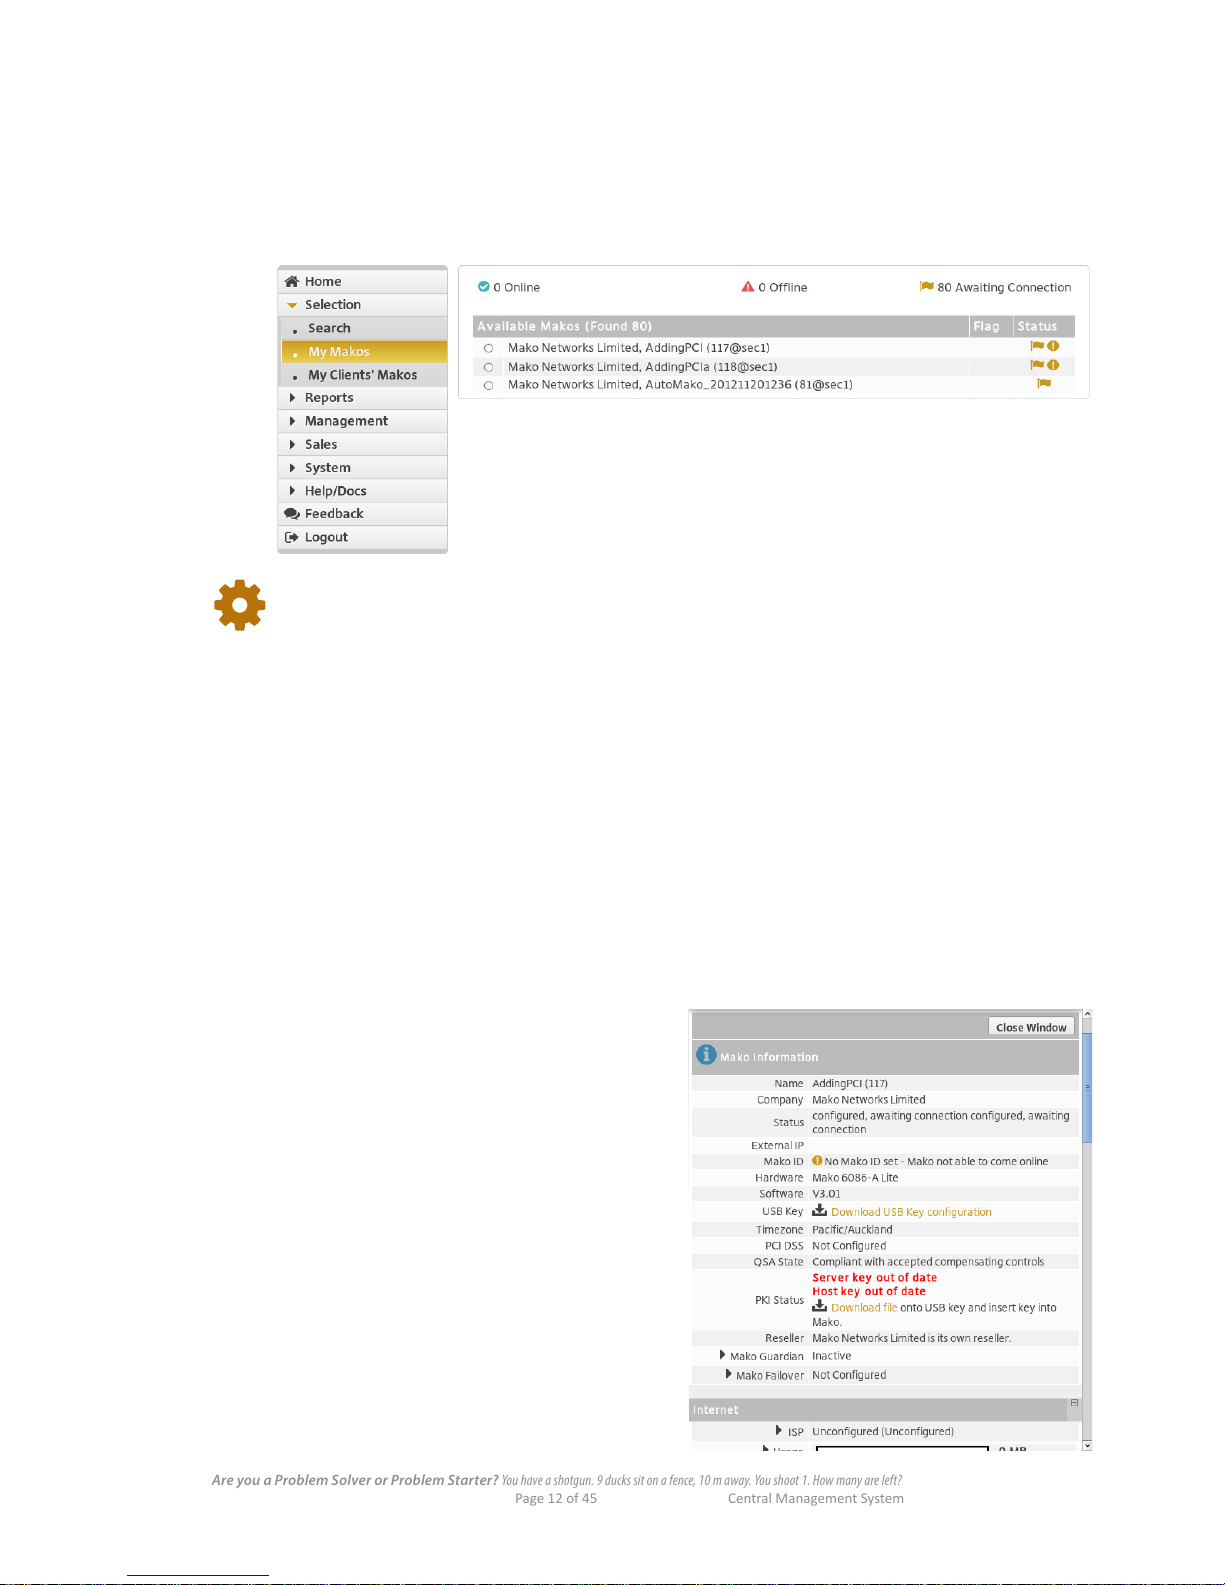
4.4 List Filtering
To lter your results by Online, Oine or Awaiting Connection status categories:
n In the CPE Status Summary above the list, click , or to lter the results by connection status.
4.5 Seeing a CPE's Information Window
Either:
n Click on the icon in the header bar
OR:
n Click on any individual status icon of a CPE on
the right of the list ( , or )
CPE is operating
CPE is oine
CPE is awaiting connection
If you click the Show More Detail link at the
bottom of the Status column you will also see
the amount of data that CPE has handled in the
last month [Usage], and the CPE's internet [IP]
address.
The Information Window also contains shortcut
links ( ) to change various parameters within
the main menu. These parameters are explained
in dierent sections of this manual.
Page 13
Glossary Contents
Central Management System Page 13 of 45
5 Configure
The default settings, pre-congured by your reseller, will usually be ne for your network. But from time
to time you may require new features and functionality. Your reseller can advise on the appropriate
changes as your requirements change.
Most ISP plans have been pre-congured and the only entry required is selecting the appropriate plan.
Be aware that re-conguring these functions can disable critical operations of your
Mako appliance — care should be taken to ensure that conguration changes do not
compromise your oce network security or its access to the Internet. If a conguration
option is missing, this will be highlighted by .
Once you've selected a CPE in the Selection menu, you may change its parameters.
Your ability to congure CPEs may be restricted. Please consult your reseller if you
encounter any diculties.
The over-arcing process behind setting up a CPE follows 7 general areas, shown in the navigation strip:
Selection, Reports, Congure, Management, Sales, System, Help/Docs. These areas may or may not
have visibility due to an individual user's prole.
The options that appear within these areas may change depending on your CPE model, method of
connectivity, level of access and use. The following covers all options you might encounter, but it's
unlikely you'll see, or even need to change, all of them.
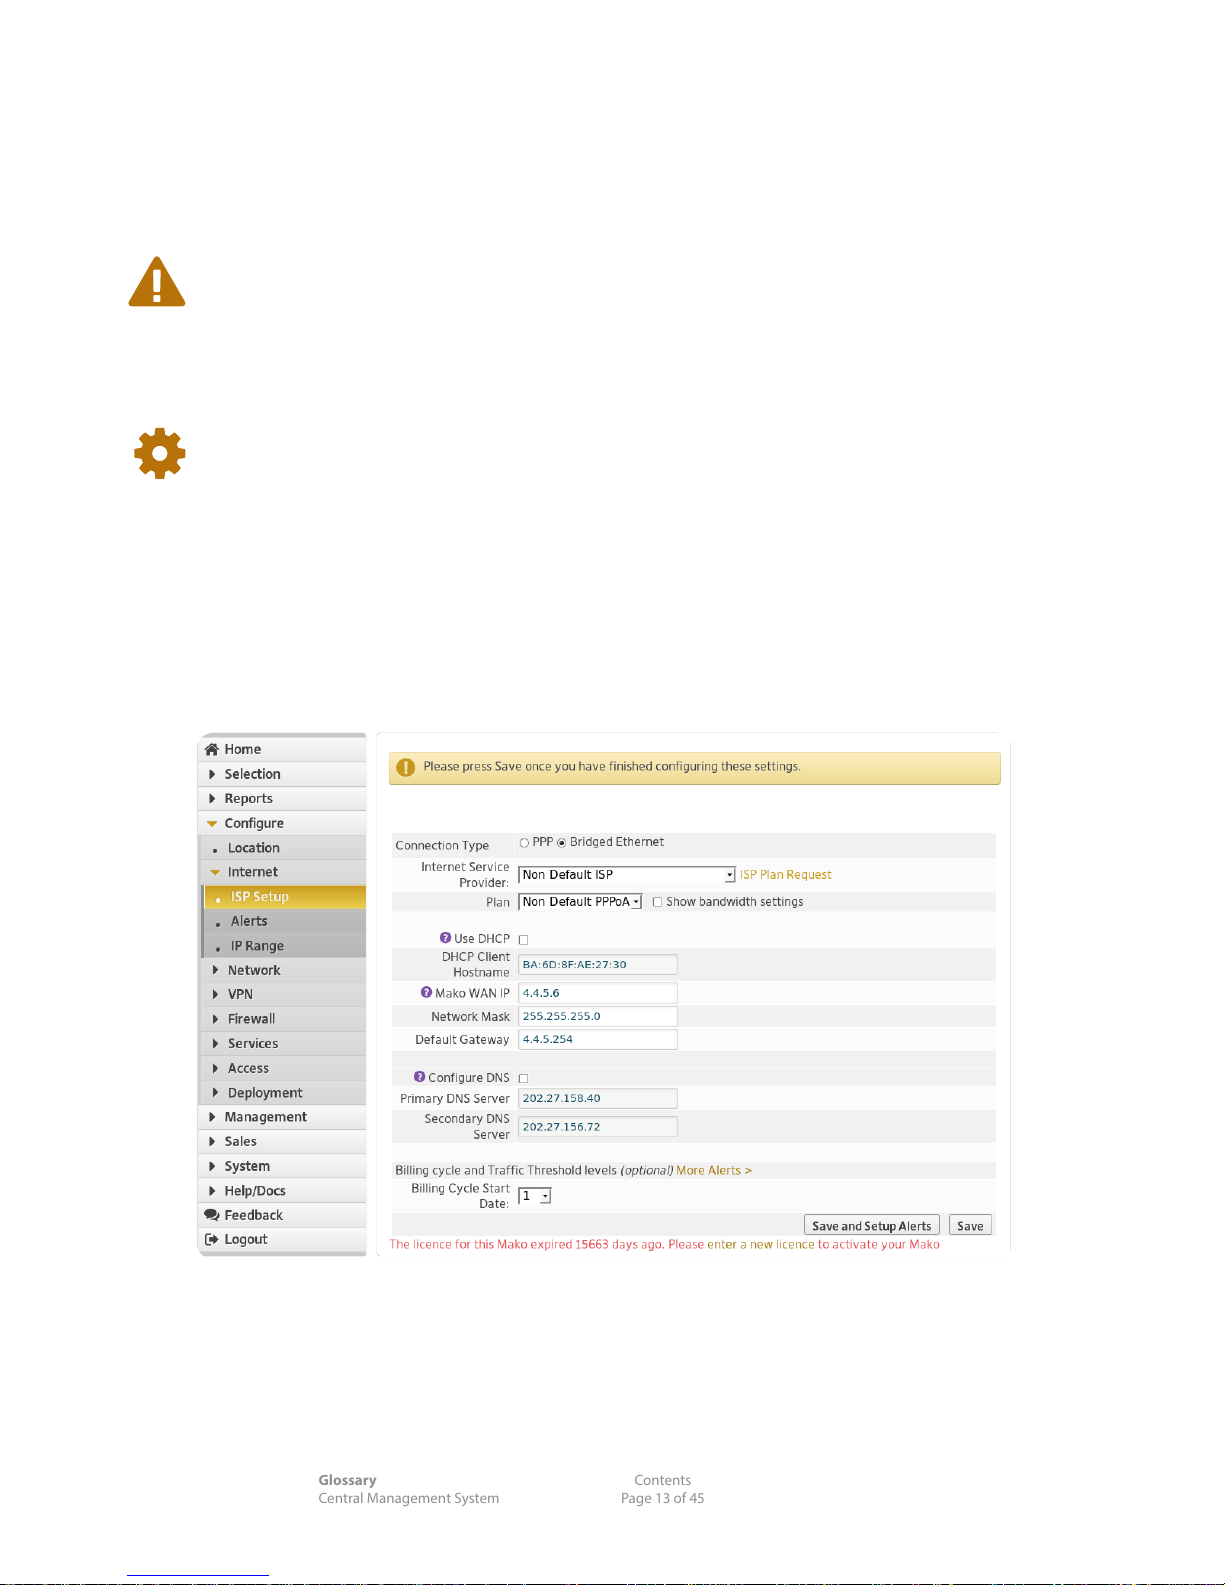
5.1 Configure > Internet >ISP Setup
This section congures your CPE to connect to your ISP.
Connection Type: Options are dependent on:
n the CPE model you've selected
n the connect type–PPP, IP, Bridged Ethernet, ADSL, Cellular
n and your ISP plan.
Page 14

Checked Your Electrics?If a simple DC circuit uses 6 V at 2 mA, what's its resistance?
Page 14 of 45 Central Management System
Bridged Ethernet should only be used if required by your ISP. It's used when Ethernet
frames are to be sent and received directly over the DSL connection.
If either IP or Bridged Ethernet are selected, the DHCP, WAN IP, Network Mask and
Default Gateways must be congured.
IP is only available on Ethernet-connected CPEs, and conguration follows 'DHCP
Settings'.
Internet Service Provider: The CMS provides you with a list of ISPs and common plans. If your ISP and/
or plan aren't listed, click the ISP Plan Request to choose the connection
type (connection types are limited to the selected CPE).
Plan: Your plan is normally tied to your ISP, but you can re-assign it here.
5.1.1 Cellular Settings
The following options apply if you are using a cellular network for connectivity, or your CPE allows for a
cellular failover solution.
If 'Cellular' is chosen as the primary connection, WAN/Internet failover is not available.
SIM Card PIN: Enter your PIN.
SIM Card PIN Again: It's important you re-type this manually, rather than attempt to copy and
paste this eld. This check helps reveal discrepancies.
Access Point Name: Enter your APN (your ISP plan selection may have lled this in for you). It
tells your carrier what type of network gateway your system should use.
5.1.2 PPP Account Settings
The following options apply if your CPE is connected via PPP. PPP is used for an ADSL conguration, and
mainly used to establish a direct connection between two networking nodes.
Username: Enter your username.
Password: Enter your password.
Conrm Password: It's important you re-type this manually, rather than attempt to copy and
paste this eld. This check helps reveal discrepancies.
5.1.3 DHCP Settings
If your WAN IP address is dynamically allocated via DHCP, check the DHCP checkbox.
DHCP Client Hostname: This should be provided by your reseller and rarely needs to change. When
installing new CPEs on the network, this hostname stays the same.
Mako WAN IP: With an Ethernet model conguration, this IP address is the external
address allocated to the CPE.
Network Mask: If DHCP is disabled, enter the Network Mask here. A network mask identies
which part of an address is to be used for an operation, such as making a
TCP/IP connection.
Default Gateway: If DHCP is disabled, enter the Default Gateway address here. The Gateway
Address (or Default Gateway) is a router interface connected to the local
network used to send packets out of the local network. Often the default
gateway is a reserved range of IP numbers, such as 10.1.x.x, or 192.168.x.x
5.1.4 DNS Settings
The following options congure a gateway to resolve domain name addresses like www.address.com to
numerical IP addresses.
Page 15

Glossary Contents
Central Management System Page 15 of 45
Congure DNS: Check to change your DNS addresses.
Primary DNS Server: Enter the address of your primary DNS server.
Secondary DNS Server: Enter the address of your secondary DNS server.
5.1.5 Billing Settings
The following options concern your billing cycle and monthly trac thresholds.
This facility is not available where your ISP Connection Plan does not impose a traccharging threshold. Threshold alerts are not visible until an ISP Plan has been selected
for your CPE.
Billing Cycle Start Date: Day of the month your ISP's bills are due.
Warning Threshold: A percentage of your bandwidth allowance for the month – useful when on
a limited bandwidth ISP plan.
Absolute Threshold: A percentage of your bandwidth allowance for the month. (This is often
higher than the plan arranged with your ISP to handle high trac.)
An Absolute Threshold is necessary if your ISP has imposed trac limits on your
account. If this is selected, and the threshold is reached your Internet connection will be
cut o when this threshold is reached. It can be reactivated with manual intervention
but your connection will remain disabled until then.
5.1.6 Saving ISP Setup Changes
Save and Setup Alerts, or Save, when nished.
5.1.7 Considerations
n If you wish to change your ISP Password you must be sure to also change it with your ISP. Take special
care to ensure that the password is entered exactly the same at both places (your reseller and your ISP).
n Don't forget to click Save to save your changes before exiting this page.
n Select a plan similar to the one you have, or if your plan doesn't match the ISP oerings, click on the
ISP Plan Request link next to the Internet Service Provider drop menu. This form provides various
conguration options for this plan. It isn't necessary to provide all the details, as this is a suggestion
request, not an actual conguration. It's better to provide as many known details as possible to ensure
that the requested plan meets the requirements of your ISP oering.
You'll nd a full explanation of the ISP Plan Request in the Appendices.
Page 16
When did PCI REALLY Start?What form of modern nancial service did the Knights Templar of the 12th Century create?
Page 16 of 45 Central Management System
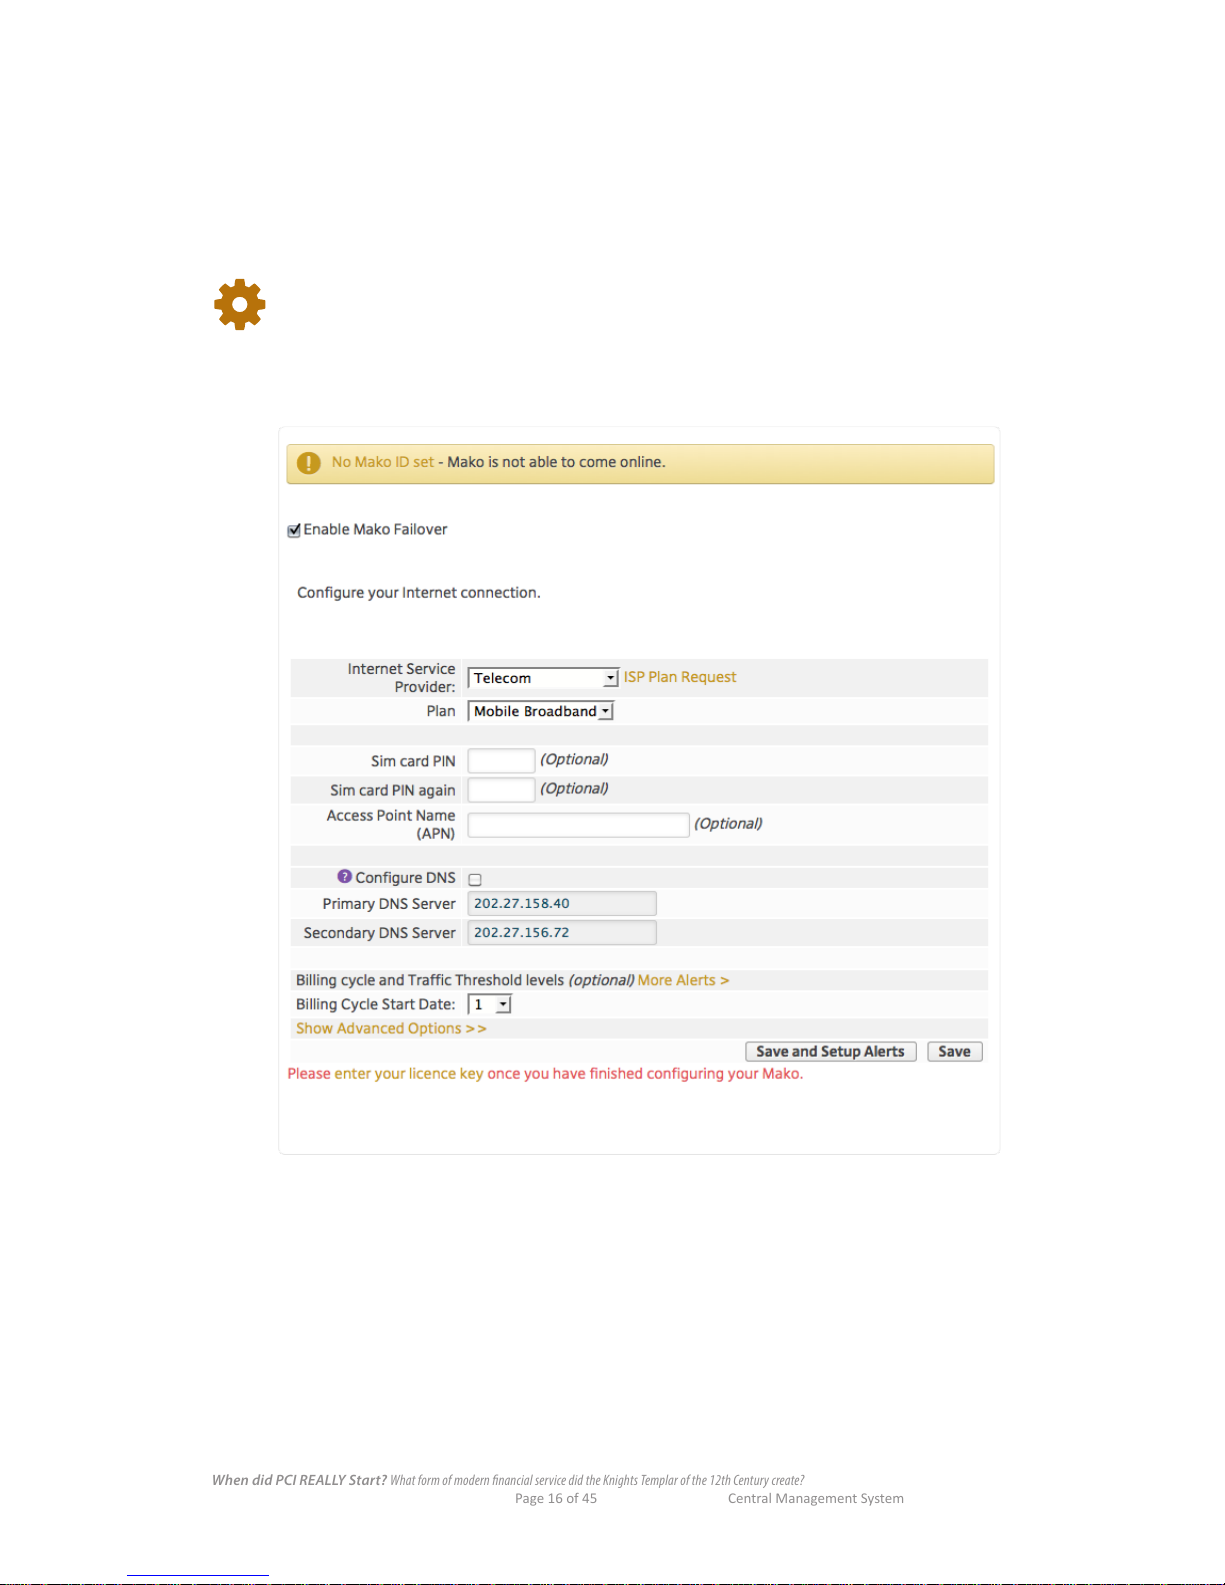
5.2 Configure >Internet > Secondary ISP Setup >Cellular Failover
Failover is a network 'safety net'. If your main network connection (PPTP, Ethernet, etc) is interrupted,
cellular-capable Mako systems are able to switch to a cellular network for continued operation. Naturally,
this option is only available if you're using cellular-capable CPEs. If cellular failover is required, ensure
that the CPE has an active SIM card inserted into the slot and is within your provider's coverage area.
We recommend testing this failover ability occasionally outside of your business hours.
To congure cellular failover for your CPE, 'Cellular' cannot be used as the primary ISP
mode.
n Check the Enable Cellular Failover box.
Once enabled, the CMS presents the following options.
Internet Service Provider: Your cellular carrier (this might not be the same as your primary provider).
Plan: Your cellular plan type.
SIM Card PIN: Enter the SIM card details. This is optional, since not all SIM cards are
secured this way. Note that these elds are not a facility for assigning a PIN
to your SIM; this can be congured on most mobile phones.
SIM Card PIN Again: Conrm the SIM PIN.
Access Point Name (APN): This should already be populated from the ISP selection. This can be
changed if instructed by your cellular provider.
Save, or Save and Setup Alerts, when nished.
Page 17
Glossary Contents
Central Management System Page 17 of 45
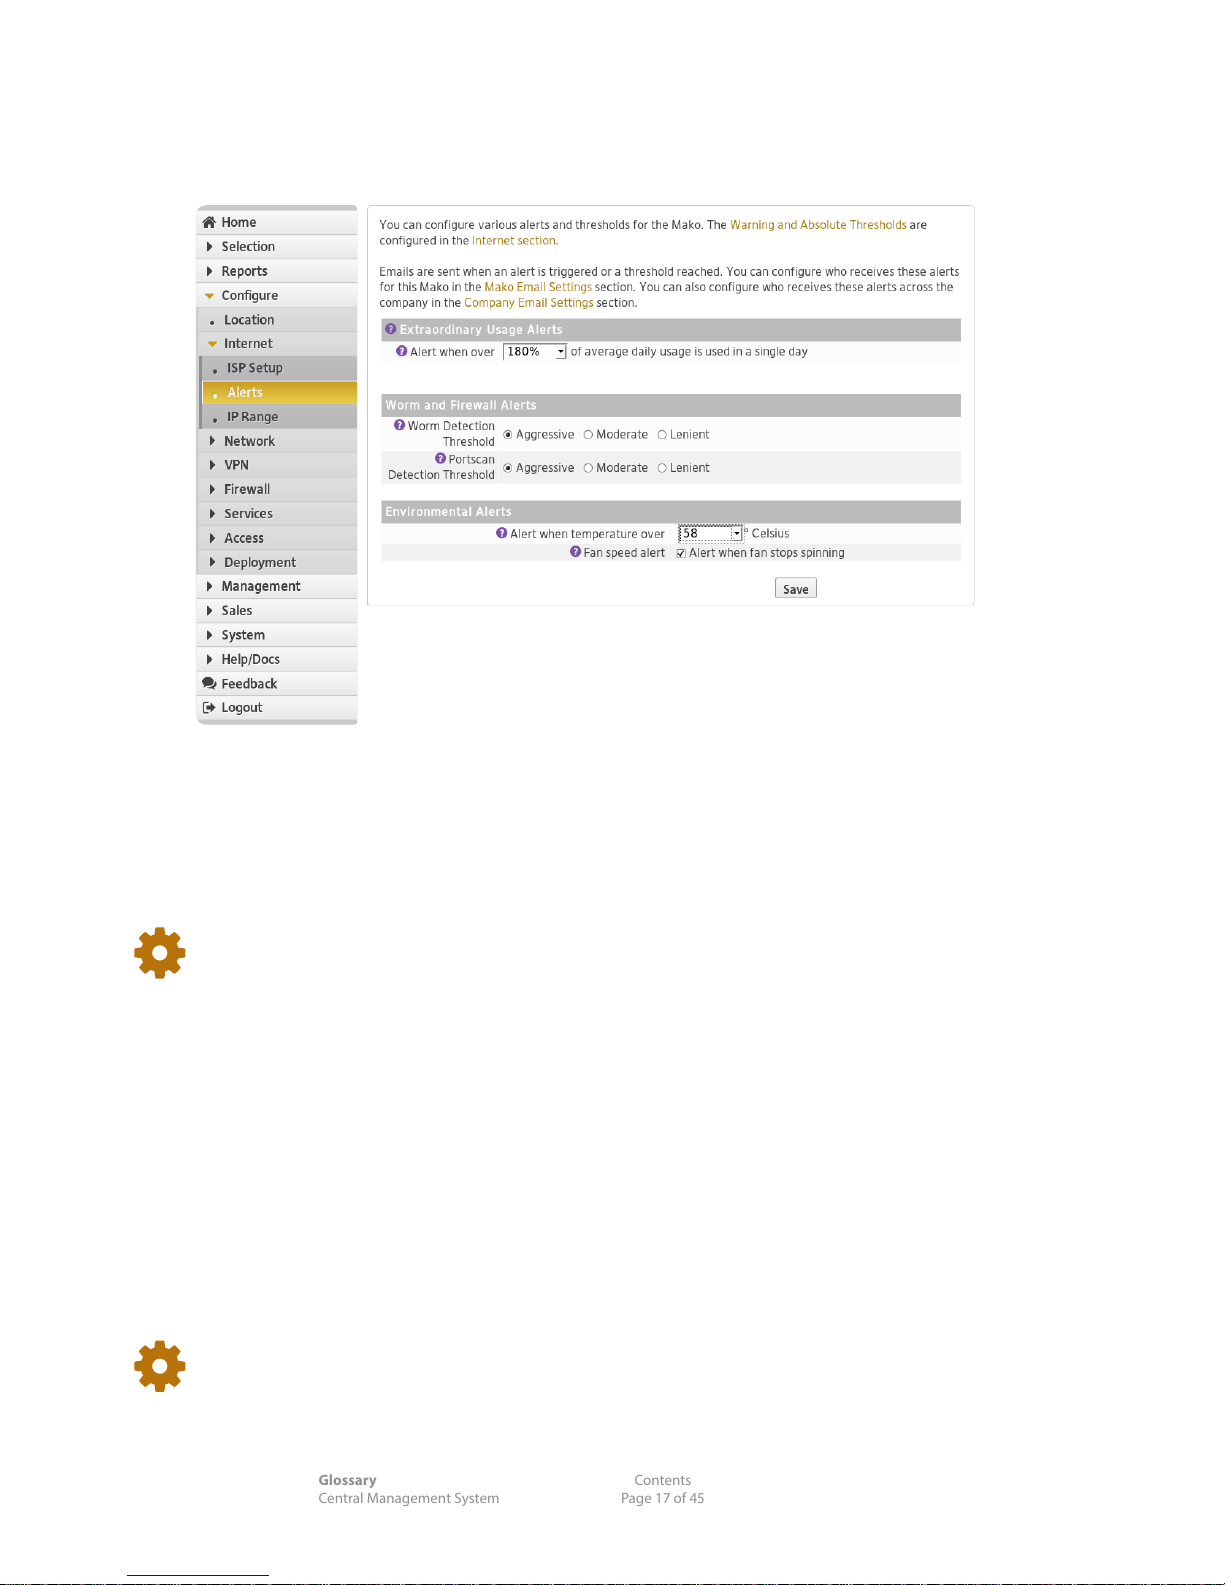
5.3 Configure > Internet >Alerts
The Mako system monitors daily trac thresholds, detects potential network attacks, or overheating:
basically, the general health of your CPE. Be aware that links in the text take you directly to that
conguration item.
5. 3.1 Extraordinary Usage Alerts
Over time, the Mako System builds a prole for the usual trac patterns of your Internet connection.
Extraordinary usage is outside the norm for your CPE's internet connection. You can set threshold alerts
to trigger when the volume of extraordinary trac is attained.
Alert when over (%): A percentage of your bandwidth allowance for the day. Useful when on a
limited bandwidth ISP plan.
This threshold alert helps manage your DAILY trac, while the ISP Setup page will
contain MONTHLY threshold warnings.
5.3.2 Worm Alerts
Your CPE automatically detects PCs on your network that are infected with worms (self-replicating
malware computer programs) and stops the infected PCs from accessing the Internet. Choose your level
of detection sensitivity.
n Worm Detection Threshold: Aggressive | Moderate | Lenient
5.3.3 Firewall Alerts
Your CPE detects unapproved probes scanning your network for vulnerable or open IP ports. Choose
your level of detection sensitivity.
n Portscan Detection Threshold: Aggressive | Moderate | Lenient
Alert threshold levels relate to the number of connections detected per 10-minute
period. The scores for Aggressive, Moderate and Lenient are 1000, 1800 and 3000
connections respectively. More intense threshold levels may impact on your CPE's
connection speeds.
Page 18

Do You Know Your Cables?Are two ends of a common USB cable male, female or one of each?
Page 18 of 45 Central Management System
5.3.4 Environmental Alerts
Your CPE monitors its temperature, which can be aected by an external heating or cooling source.
Alert when temperature over: Set your upper level operating temperature.
Fan speed alert: High-capacity models contain an internal fan. Check if internal cooling fans
require monitoring.
Save when nished.
5.4 Configure > Internet >IP Range
This page allows you to review your Public IP address settings if your ISP provides you with more than
one. The information on this window will be set by your reseller and in most cases will not require
modication.
If your ISP doesn't provide you with multiple IP addresses, this page won't be available.
5. 4 .1 Existing IP Ranges:
IP Range: The subnet mask of allowable addresses in CIDR notation.
Start / End Address: The rst 3 signicant numbers of the network system are used for the main
address.
Option: Click to delete an entry in this table.
5.4.2 Add IP Range:
Public IP Address: Enter a new range here, or click Single IP Mask for a single address.
5.4.3 Public IP Address:
Public Address: Default, or select an appropriate address from the drop-down menu.
5.5 Configure > Network >LAN 1
Your network conguration settings are pre-congured by your reseller, therefore changes shouldn't be
necessary. But if conguration changes are necessary, we recommend keeping a record of the existing
settings so you can go back to them if the new settings don't work.
Changes to any conguration settings are to be done carefully as you could disable
communications with the Internet.
Page 19

Glossary Contents
Central Management System Page 19 of 45
5.5.1 LAN Network Configuration
You're able to rename each LAN on your system and this name will be reected in the left menu
navigation of the CMS. We suggest you choose a name more meaningful to you (eg. LAN 2 --> 'Public') if
necessary.
We have a number of Help tips ( ) available to assist you through this section.
When making changes to any of these conguration options, click Save to update the
details. There are no save prompts when leaving this page and all unsaved changes will
be lost.
Name: Rename your network to something more meaningful to you (such as
Secure Network, Oce Network, DMZ, etc.)
Allow Ping: 'Allow' lets the CPE respond to 'ping' trac on the LAN. Ping is used to test
the 'reachability' of a host using Internet Control Message Protocol (ICMP).
The default is Deny and should only be enabled for troubleshooting.
Mako Ethernet IP address: The selected LAN port must be given a xed IP address on your network.
This is set to a default value (of 192.168.1.254 for your rst network,
192.168.2.254 for your second, etc.). It can be changed to suit the private
address architecture used on your networks. It must not be set to a public IP
address (ie. Your external IP).
Each network should be given a unique address scheme if VPN communications are to
be congured.
Subnet mask: Change the subnet mask here.
NAT: Network Address Translation (NAT) On/O. If you've been issued with
a public IP network by your ISP and you wish to use this public network
on your network port without the CPE performing a NAT function, check
O. With this disabled, PCs connected to this LAN will use real-world
IP addressing. Firewall rules still need to be created in order to access
these devices. Disabling NAT should only be used with publicly routable
IPaddresses.
Changing the NAT status will erase any Firewall rules.
Page 20

How's Your Google-Fu?Which is heavier: a pound of gold or a pound of tummy fat?
Page 20 of 45 Central Management System
DHCP On, O and Relay: DHCP allows IP addresses in a network to be assigned automatically to a
connected PC on power-up.
On: This enables the automatic assigning of local IP addresses to
connected devices.
O: New devices will require manual assignment of an IP address in the
DHCP Leases page before it can communicate with the network.
When DHCP is O, DHCP lease pools, WINS and DNS server options will be unavailable.
DHCP Relay: This disables the DHCP functionality on the CPE and pushes the capabilities
to an external DHCP server to handle the DHCP lease assignment for
the connected network devices. A VPN connection to the external DHCP
server is required. The IP address of one or 2 remote DHCP servers must
be specied in the address elds that are enabled when the relay option is
selected
DHCP Lease Pool: The CPE itself is designated as the DHCP server.
Start: The lowest address for use.
End: The highest address for use.
Dening this pool isn't mandatory and if left blank the CPE will start from
the beginning of the IP range. The reason for dening a pool is that you
may desire some addresses to be congured by DHCP and have the rest
available for static IP allocation.
The IP range will be limited by the dened subnet mask. The range is also dependent on
the dened Mako Ethernet IP address, if entered incorrectly or the wrong range is used,
this will create an error alert.
WINS Server IP (Optional): Specify a Windows Internet Name Service (WINS) server's IP here.
Internal DNS server: Primary/Secondary: Specify any internal DNS servers.
These are dierent from the public DNS server addresses specied in the Internet
conguration section.
5.5.2 Configuration-Dependent Options
Depending on the CPE being congured and your reseller or administrator's settings, other options will
be available to you on this page.
Ports Included: Displays an illustration of the rear ports of the selected CPE and highlights
the selected port in red. Click Ports Included to congure the LAN's
available ports.
VLAN Trunk: A VLAN Trunk is a port that handles trac for all congured VLANs. VLAN
Trac going across the Trunk is tagged with the 802.1q VLAN ID in the
Ethernet frame. To enable VLAN Trunk on this port, check the VLANTrunk
checkbox. This port will then be the dedicated main line for all VLAN trac.
VLANs Included: Once VLAN trunk is selected the Included VLANs will be listed here with
links to their conguration options. It includes VLANs congured in the
VLAN Setup page as well as regular LANs with a VLAN ID set.
VLAN ID: A VLAN ID is tagged onto the start of a VLAN Frame to identify which
VLAN it is from. All routers and switches that are part of the VLAN must be
congured to use the same VLAN ID.
Page 21

Glossary Contents
Central Management System Page 21 of 45
VLAN Trunk can only be assigned to one LAN port.
Regular LANs with a VLAN ID set only have the VLAN ID tagged when going through the
VLAN Trunk. That is, they are untagged on their normal ports.
DHCP Attributes: If DHCP has been enabled for this LAN port.
Type: currently only one type is available, Trivial File Transfer Protocol
(TFTP). Enter the Value for the DHCP attribute, for example the IP or
hostname of the TFTP server and click Add to bind this DHCP attribute to
the port.
Save when nished.
5.5.3 Other considerations
Please take careful note of all caution messages. These messages will vary depending on the situation.
You need to be aware of these messages and amend the situation if possible.
5.6 Configure > Network >Port Setup
Here you congure how you would like your networks distributed across the various ports.
The following diagrams are for illustrative purposes, and may dier from your specic CPE.
You can also merge the separated ports to operate as a bridged network, creating one logical LAN with 2
ports.
The Port Setup page is only visible if your CPE model has more than 1 port available for
conguration.
Merging, separating or rearranging LAN ports will remove the settings for each LAN
included in the change.
Page 22

Are You Reading Or Faking It?Does MAC ltering allow you to manage a specic brand of computer separately?
Page 22 of 45 Central Management System
Ports and routing options are dierent from model to model. The following one is designed to operate
as a 1-4 port switch with up to 4 separate networks. In this CPE the 4-port switch conguration is the
default.
5.7 Configure > Network >VLAN Setup
VLANs are normally congured by your reseller and changes shouldn't be necessary.
VLANs will not be useable until a VLAN trunk has been setup. Navigate to the LAN that is to be
congured as a VLAN trunk and check the VLAN option.
Setting up a VLAN is nearly identical to setting up a physical LAN.
Existing VLANs: This section lists the VLANs in scope for your system. If you have the
appropriate permissions, you're able to delete all, delete or edit details of
each VLAN by clicking the appropriate Option icon.
New VLAN Conguration: Enter details for a new VLAN, and be sure to click Add New VLAN when
nished.
VLAN Name: Provide a brief, meaningful name. It must be at least 3 characters in length.
VLAN ID: Enter a unique ID for the new VLAN. It might be a good idea to use the IP
address to reference this, i.e. 10.0.160.0 use an ID of 160.
A VLAN ID is tagged onto the start of a VLAN Frame to identify which VLAN
it is from. All routers and switches that are part of the VLAN must be
congured to use the same VLAN ID.
Trunk Ports: If a VLAN Trunk is congured, enter your port info here.
Add New VLAN when nished.
5.8 Configure > Network > WiFi LAN >Basic
If your CPE supports WiFi the WiFi LAN page will be available to you.
Bridged WiFi LANs: Other LANs with which your CPE may share data. Standard options exist for
reference, deletion and re-conguration, if permitted.
Standalone WiFi LANs: WiFi LANs your CPE might use, access permitting, with similar reference
data.
Page 23

Glossary Contents
Central Management System Page 23 of 45
5. 8.1 Basic Wireless LAN Configuration
Setting up a Wireless LAN is similar to setting up a physical LAN.
Some options may or may not be available to your CPE depending on make, permissions or precongured function. Some options aren't explained, as they're covered in the glossary.
Wireless Network Name (SSID): The name of the Wireless LAN. Users will see this name when
selecting what network to join, so be cautious about including companysensitive labels, like names, locations, operating systems etc.
Security Type: Open security has no password, and anyone can join the network. WPA2 is
high security for all networks dealing with sensitive information.
Security Key: (WPA2 Only) Species the password to protect the Wireless LAN.
Hide Network: Species if users are able to see this Wireless LAN when searching for
networks, or if they have to know the name of the network before they can
join. Hidden networks oer additional security and are recommended for
internal WiFi networks. Hidden networks aren't recommended for public
networks like cafés or libraries.
MAC Filtering: MAC ltering species if only approved devices with a hard-coded MAC
address (most computing/communications devices) can connect to the
Wireless LAN.
Bridging: Extends the LAN over a Wireless network.
If you're adding a Wireless LAN, Add Wireless LAN when nished.
5.9 Configure > Network > WiFi LAN >Advanced
Enabled: To use Wireless LAN, this should be Enabled. When disabled, all WiFi
networks will be unavailable and the Wireless LAN uncongurable.
Channel: A channel is a sub-band of the Wireless LAN signal range. Setting the
channel number appropriately provides one way to avoid sources
of Wireless interference. Auto: The best channel will be selected
Page 24

You Didn't Waste Paper Printing This, Did You?In the CMYK printing system, why is K used to stand for Black?
Page 24 of 45 Central Management System
(recommended). For optimal performance, the channel should be 3
channels away from other Wireless networks in the area. For 2.4GHz
networks, this means channels 1, 6 and 11 typically oer the least
interference.
Power: Determines the signal strength, and thus the range of the Wireless network.
When using secure networks, you may wish to reduce the power output to
limit the range of the Wireless LAN.
Protocol: Specify the type of 802.11 protocol to use; b/g/n or just b/g.
802.11 protocol
Release Year
Freq (GHz)
Bandwidth (MHz)
Indoor Range (m)
b 1999 2.4 20 35
g 2003 2.4 20 38
n 2011 2.4 20/4 0 70
Once connected, the congured Wireless LAN will be listed in the connected Wireless LAN tables, and
have the usual options listed earlier in this chapter. Help tips will also provide links to a 'best practice'
guide on setting up a Wireless network.
5.10 Configure > Network >DHCP Leases
DHCP leases are normally congured by your reseller and changes shouldn't be necessary. When
enabled, the CPE's DHCP server issues IP information to all new PCs connected to the network.
5.10.1 Adding a DHCP Lease (Manual Method)
n Enter all the details in the lower table.
Add when nished.
The entry will appear in the table above as a static IP address.
The Mako Add DHCP Lease table will only have the Brand, Model, Serial Number and
Purchase Date elds if PCI networks have not been dened for the LAN port.
5.10.2 Adding a DHCP Lease (Auto-Detect Method)
n Plug the CPE into the network port and power it up.
The Mako system will automatically identify this device and allocate the next available IP address to it. In
the Name column it will be referred to as "allocated by system."
n Click the . Congure the necessary settings
Save when nished.
5.10.3 Edit/Delete a DHCP lease
n Click the appropriate icon, or , to change or delete the lease.
Save when nished.
5.11 Configure > Network >Static Routes
You may enter routes to other networks that have routers on one of your LANs. Devices attempting to
reach this network through the CPE will be sent an ICMP redirect message which advertises the correct
gateway to use. Devices dishonoring or ignoring ICMP redirects may require static routes for access.
Page 25

Glossary Contents
Central Management System Page 25 of 45
Normally this is congured by your reseller and changes shouldn't be necessary.
Currently Installed
Static Routes: Lists all currently installed static routes. The routes can be deleted or edited.
Add Static Route
Remote Network: Enter the IP address and subnet mask here. You can open the Network
Helper window by clicking F.
Gateway: Enter the appropriate gateway address here. Click on the DHCP Lookup F
to list devices by their DHCP leases, on your network.
Route name: Enter a user-dened name for this route (max. 32 characters).
Add when nished.
5.12 Configure >Firewall
The default security conguration for a CPE is to block all communications initiated from the Internet
from entering your networks, while all communications initiated from the oce network can access the
Internet. You can call out, but they can't call in.
This means that users on your Mako-protected networks can send and receive their email, browse the
World Wide Web, and access all other Internet-based services, while the rewall ensures that none of
their PCs are visible to the Internet.
This default is a very secure conguration of your CPE and should not be changed except in cases of
specic need.
n Changes to permissions which deny access tend to improve network security.
n Changes which allow access tend to weaken network security.
Changes to permissions should therefore specify the permitted access as narrowly as possible to
minimise risk of unapproved intrusion.
5.12.1 Rule Hierarchy
The CMS allows you to set up rules that allow inbound and outbound trac to your system. You can set
several rules and occasionally these rules might conict, which is why the CMS allows you to impose
a hierarchy on the rules. Rules at the top of a list have precedence: the top-most rule is applied rst,
followed by the next highest, and so on.
5.12.2 Delete, Edit, View or Promote an Option
n In Existing Rules section, click , , or .
5.13 Configure > Firewall >Inbound, Outbound, Intranet, VPNs
These CMS pages relate to the rewall rules that permit communications to be initiated from the
Internet into your local networks by a remote host computer.
It is important to understand that for Inbound access – whether it's for general Inbound trac from
the Internet, intranet or even from internal Mako-to-Mako trac – the rules place some responsibility
for security of the network onto the target local network PC or server. The rewall will permit all
communications matching the access rules.
Other than this, Inbound, Outbound, Intranet and VPN trac all use near-identical features in setting
rules: they are provided in separate pages for ease of use.
Page 26

Are You Old Enough For This Doc?Solve the following equation: 7 - 3 x 0 + 4 ÷ 2 = ?
Page 26 of 45 Central Management System
If the local PC or server is not itself secure, then other PCs in the oce network can be
exposed to unapproved access.
Each CPE has at least 2 isolated LANs built-in, but these LANs can be bridged to share
networks. To help keep systems as secure as possible, ensure that targeted PCs on the
designated LAN have the appropriate security related updates applied to their software.
5.13.1 Basic Default Settings
Inbound Security is by default set to Deny All Access initiated by hosts from the Internet.
Outbound Security relates to the rewall rules that allow PCs in your oce network to remote-host
systems on the Internet. A rewall will ensure that communications are only initiated by PCs on the CPE's
local network, however once established these communications are bi-directional.
By default, Outbound trac is set to Allow.
Intranet Security relates to CPEs having multiple LAN ports. The Intranet rewall enables you to control
access between the local networks. The default setting is to Deny any communication between them.
The Intranet Firewall rules allow or deny trac between 2 or more Mako-protected networks.
On the Intranet page, both Inbound and Outbound trac are considered the same.
It isn't recommended to modify the default settings, as you could reduce the security
provided by having separate networks.
There are a few occasions when an Internet-based host needs to initiate communications with a PC on
the oce network. A common example is when a mail server is located in the oce network, inside the
rewall. It's often necessary for the mail server to receive incoming connections from mail hosts on the
Internet, and this requires an access path through the rewall to be congured.
This is a Basic page for Intranet. In terms of function, this diers from Inbound and Outbound Basic
screens only in the addition of the Source Network and 'or network' elds.
Page 27

Glossary Contents
Central Management System Page 27 of 45
If your ISP provides you with multiple public IP addresses you may specify a public IP address that the
inbound rule refers to. This is useful if you want to have multiple rules to the same port on dierent
internal PCs.
If your ISP doesn't provide you with multiple public IP addresses you will not see the
Target IP address drop-down. This is likely to be the case for most ISPs.
5.13. 2 Add a Basic Rule
n Select Inbound / Outbound / Intranet Basic / VPN– the area in which you're creating the rule.
n Enter your page-specic setup details.
Inbound requires your Internal IP Address
Outbound requires your Source networked appliance (PC, CPE, EFTPOS terminal, printer, etc): IP
Address or network, and a Destination address (or leave this blank for 'All Networks').
Intranet requires your Source Network and your Destination: IP Address or network.
n Select the Service Type. The F will present a Search window to nd types by description, name or
port. The Service denes exactly which internet protocol is permitted to communicate through the rule.
A broad selection of the most frequently found protocols is available from the drop-down menu under
Service Type. Where an additional protocol is required, simply email a request for this using the address
shown and it will be scheduled for addition.
n Intranet Only: Set your Action to Allow or Deny.
n Enter a Comment to describe the rule.
Add when nished.
Refresh to update your Firewall rules.
5.13. 3 Advanced
The Advanced sections allows you to congure more complex rules for Inbound, Outbound or Intranet
trac.
Advanced rules cover the Source (or External) IP address, the Destination (or Internal) IP address, the
External Service and the Internal Service. These values specify the networ device that is initiating
communications, the internet protocol that the device may use in its communications, as well as the
permissions of the device on the oce network.
5.13.4 Add an Advanced Rule
n Enter the IP Addresses, Masks and their corresponding Services in the lower section of the page.
Add when nished.
The option of declaring IP addresses as "any" permits any Internet-based host to open
communications with the targeted local device. Just leave the Source IP address/Mask
elds empty.
You may specify a public IP address that the rule refers to. This is useful if you want to have multiple rules
to the same port on dierent internal devices.
5.13. 5 Trace Logging
Trace logging is not recommended, but you may log debugging information when a connection
through an inbound rule is attempted, if absolutely required. The Trace Logging checkbox, when
checked, enables the recording of debugging information, which is then made available to your Reseller
in the Syslogs Report section of the website. The Trace Logging option is also available in the Outbound
Advanced and Intranet Advanced sections.
Page 28

What Are You Telling Other People?Are email addresses case-sensitive?
Page 28 of 45 Central Management System
The optional Comments eld can be used to label or describe the rule.
Here, one of the rules operating on the rewall is shown as having been created on the Inbound Rules >
Advanced page.
5.13.6 VPN Specifics
Before you can add rules to a Virtual Private Network rewall, you must create the VPN in the separate
VPN Section. VPNs have a specic name and trac direction.
Page 29

Glossary Contents
Central Management System Page 29 of 45
6 VPN
A Virtual Private Network is a secure network that allows private data transmission between CPEs. Mako
appliances have 3 types of VPNs available: Mako to Mako, Remote Access and Third Party Device.
6.1 VPN > ... >Manage Access
If you have 2 or more CPEs, use this window to set up VPNs between each pair of Mako-protected
networks. The CPEs have to be online and operating and congured with a WAN address.
For the sake of distinction, the CPE you currently have selected is the Home CPE, and the CPE you're
creating a VPN to is the Destination CPE.
n Pick the Destination CPE to congure with the 'Mako' drop menu.
n Choose access rights over the VPN link with the radio buttons.
1)
$
The PCs connected to the Destination CPE can see those PCs connected to your Home CPE, but
not the reverse.
2)
!
Your Home CPE PCs can see the Destination CPE PCs and vice versa.
3)
#
The PCs locally connected to the Selected CPE can see those at the other CPE, but not the
reverse.
Add when nished.
6.1.1 Delete, View/Edit VPNs
n Congure > VPN > Manage Access
n In the Options column, click the icon of the VPN.
You may only delete or edit VPNs to which you have administrative access.
n Click or to delete or view/edit VPNs.
6.1.2 Considerations
As a default, each Mako has their own local private network IP address. For example, the Auckland, LAN 1
may use the address range: 192.168.1.xxx, while Head Oce LAN 1 would be 192.168.3.xxx (where xxx
is the range of addresses used at each network).
Page 30

Are You 'The One'?What English capital letters have reective, rotational and point symmetry? (Tip: Read carefully.)
Page 30 of 45 Central Management System
The signicant element is the highlighted '192.168.1.' and '192.168.3.' — these must be dierent at the
2 ends of the VPN link. Please contact your reseller if you have any questions regarding the best choice
of private IP addressing schemas for your oces.
The corresponding changes to the secure prole of the CPE at the other end of the VPN link will be made
automatically. It isn't necessary to update both congurations. This makes it straightforward to set up or
remove a secure link between your Mako appliances.
6.2 VPN > ... > Invitation >Send Invitation
If you wish to have a Mako to Mako VPN between your CPE and a Mako that belongs to another
company, you can do so with Mako VPN Invitations.
To create a VPN between a CPE you administer and one you cannot, you need to know the email address
of the other Mako's administrator.
n Select which LAN you want to be your part of the VPN.
n Choose the direction of the VPN.
n Enter the email address of the Destination Mako's Administrator, and, if you wish, a comment.
n By default the invitation expires after 7 days. If you wish, change this.
n By default, the Require Reconrmation box is checked. This adds an extra layer of security to the
invitation process: you will receive a conrmation email with another key in it that you will need to
accept before the VPN is established. If you remove the check from Require Reconrmation, this process
is skipped and the VPN is established once the invited party accepts.
6.3 VPN > ... > Invitation >Send Invitation
n Open the Accept Invitation page, copy and paste the emailed key sequence and click Continue.
If the Require Reconrmation box was checked by the invitation Sender, then the Sender will need to
complete this process. If unchecked, the VPN will be established immediately.
Once the VPN is established it will appear in the Mako to Mako VPN Manage Access list. Either party may
delete the VPN at any time.
Page 31

Glossary Contents
Central Management System Page 31 of 45
6.4 VPN > ... >Add Third Party Device
If you use a non-Mako router to connect to the Internet at a remote site, you can create a VPN
connection between your CPE and the third-party device. Both the CPE and the third-party device
should have static public IP addresses in order that the VPN be kept alive for any length of time.
The third-party device must support:
n IPSec ESP VPNs.
n 3DES or AES-128 encryption algorithm.
n MD5 or SHA1 message digest algorithm.
n Die-Hillman 1024 Public Key algorithm.
n Support for Pre-Shared Key Authentication.
Mako-to-Mako VPNs have enhanced security by making use of Perfect Forward Secrecy.
This is enabled by default for third-party VPNs but can be disabled.
6.4.1 Connect to a Third Party device
n Enter the third party device's Location, Public IP Address and Network Address details.
n Enter a Secret Key (must be at least 7 characters), or have the CMS randomly generate one for you by
clicking [random]
If the security of this network isn't as important to you, you can leave this eld blank.
Add, or Add and Create VPN when nished.
If you click Add and Create VPN this will take you back to the Mako to Mako VPN page, and you can
continue setting up the VPN.
The third party device will appear in Congure > VPN > Manage Access page.
6.5 VPN > ... >Delete Third Party Device
n Select the device to be deleted from the VPN.
Delete when nished.
6.6 VPN > Remote Access >Manage Access
Your reseller oers 2 types of Remote VPN connection: IPSec and PPTP.
IPSec is more complicated to set up and generally requires additional software on the client but is very
secure. PPTP is less secure but most operating systems support PPTP natively and it's easier to setup.
For security reasons, the PPTP option is disabled for CPEs that have licensed the PCI DSS add-on. Please
see separate Documentation on client setup for each type of Remote Access VPN.
For security reasons, you must create VPN-Only username and password combinations
in the Add Users section in order to access Remote VPNs. Usernames and Passwords that
are already used to access your reseller's website cannot access Remote VPNs.
Page 32

Are You Think Enough To Smart?How many 4-digit PIN numbers are there?
Page 32 of 45 Central Management System
Any user recorded in the subsequent Add User section can have their network access enabled and
disabled as appropriate. We recommend that users are permitted access only while they need to use the
oce network. At other times, their access should be disabled.
6.6.1 Enable, Disable or Edit VPN Users
n Click the H icon (disabled) to enable a VPN user.
n Click the icon (enabled) to disable a VPN user.
n Click the icon to edit details of a VPN user.
6.6.2 Considerations
The remote VPN user is aected by the way in which they connect to the Internet, and the software
package they must use to provide a secure wrapping for their link to your oce network.
See the Help documentation on how to use Remote VPN for specic IPSec or PPTP VPN Client software.
6.7 VPN > Remote Access >Add VPN User
The Add VPN User page provides an area to record details of a user.
n Fill in the details presented on screen.
Add when you've nished.
Usernames will automatically have the .vpn extension appended to identify them as a VPN user and not
an administrator. Once a user is congured their access can be enabled or disabled at any time.
6.8 VPN > Remote Access >PPTP Settings
n Select On.
n Select the Network to congure.
n Set a range of LAN IP addresses that will be issued to PPTP VPN users when they connect to the CPE. You
have the option of issuing an internal DNS Server and WINS Server IP to the PPTP VPN users.
Save when nished.
You can only enable PPTP access to one LAN.
Page 33

Glossary Contents
Central Management System Page 33 of 45
7 Services
All CPEs handle several optional services. Please check our support address for the latest available.
Documentation for Services that require an additional licence can be downloaded in PDF format from
the Help/Docs section of the CMS.
7.1 Services > QoS >Basic
n Select a QoS Prole setting
OK when nished.
Quality of Service (QoS) comes standard with all CPEs. This feature allows you to prioritise dierent types
of Internet trac and specify minimum outbound bandwidth allocations. QoS can be used to improve
the quality of such services as Voice over IP trac, by ensuring there is always bandwidth reserved for it,
and that it has priority over less demanding services such as web browsing.
The Mako default setting is recommended for most users. This setting allocates bandwidth reservations
to the most common Internet applications and trac types.
The VoIP Enhanced setting guarantees VoIP trac approximately 33% of your upstream bandwidth. Use
this setting if you require enhanced VoIP quality and reliability.
7.2 Services > QoS >Advanced
The QoS Advanced section is recommended for experienced users only. Please consult
your IT Provider if you are uncertain about these settings.
Page 34

Is This Doc Your Problem?4 Canadians, 3 Brazilians, 2 Texans and a Hawaiian walk into a bar. How many of these people are Americans?
Page 34 of 45 Central Management System
The following notes are repeated on-screen for your assistance.
The upstream bandwidth is broken into 6 segments, called bins. The percent value for each of the above
bins indicates the minimum guaranteed upstream bandwidth to be shared by all the services using that
bin. If some upstream bandwidth is unused, it can be temporarily borrowed from other bins until the bin
needs the bandwidth.
All services that belong to a particular bin share its bandwidth. Important or high priority services
should be placed in a bin with no more than two other services to ensure the bandwidth for the bin is
not shared between too many services.
Services that are not allocated to a bin use the last bin by default.
The total bandwidth allocation across all bins adds up to 100%.
Adding too many bins can seriously degrade performance.
Please ensure you have a large upstream capacity before exceeding 10 bins.
Services that are not allocated to a bin use the last bin by default.
7.2 .1 Show Advanced Bandwidth Settings
By placing a tick in the Show advanced bandwidth settings box you can allocate upstream bandwidth
percentages across the bins
7.3 Services >PCI DSS
To activate the Mako PCI DSS service, you must rst purchase a licence from your reseller. The Mako
system is a certied PCI DSS Level 1 Networking and Security Service, which allows you to easily
overcome the issues of PCI DSS compliance. The Mako series features network segregation. The isolated
network can be congured to run the compliant PCI DSS network on either LAN1 or LAN2; the noncompliant network can run on the other LAN port. The PCI DSS LAN is used for payment terminals.
Please refer to the Mako PCI Conguration documentation for a detailed overview on the PCI
functionality and conguration for your Mako under the Help/Docs > Documentation page.
7.4 Services >Mako Guardian
Mako Guardian is an active web content ltering and laundering service that gives you total control
over the web content that is allowed into your network. With Mako Guardian you can meet the legal
requirements to control access to objectionable or inappropriate websites.
To activate Mako Guardian, you must rst purchase a licence from your reseller.
If you have Guardian enabled, refer to the Mako Guardian manual for details on using this add on. This
can be found under the Help/Docs > Documentation page once logged into the CMS.
7.5 Services >Mako Failover
Mako Failover provides redundancy and automatic failover capabilities between 2 CPEs using an
Ethernet interface for communication between the 2 devices.
If you have Failover enabled, refer to the Mako Failover manual for details on using this add on. This can
be found under the Help/Docs > Documentation page once logged into the CMS.
7.6 Services >Dynamic DNS
All Mako appliances support Dynamic DNS. Dynamic DNS requires a free subscription to one of two
third-party Dynamic DNS providers, DynDNS.org or no-ip.com
Page 35

Glossary Contents
Central Management System Page 35 of 45
Your reseller neither endorses nor guarantees the services provided by either of these
parties. We provide the Dynamic DNS service as a convenience to the users of its
products.
7.7 Configure >Location
The Location section allows you to update and view the non-technical details of your CPE.
n Click Edit. A pop-up window allows you to edit your CPE's details.
Save when nished.
7.8 Configure > Access >Access
The Access page displays a list of users that have VPN access to this CPE. You can change access rights to
Restricted Users.
At least 2 users must be assigned to a CPE via VPN before any user options will appear.
Page 36

Call Yourself a Guru?Support networks often use a web-based tool called Jira to raise bugs or tasks. Where does the word 'Jira' come from?
Page 36 of 45 Central Management System
7.9 Configure > Access >Email Settings
The Email Settings page lets you choose which users receive email reports from the Mako System.
n Select your report type.
n Click on the or H icon to allow or deny this report respectively.
n Repeat this process for the relevant reports.
Page 37

Glossary Contents
Central Management System Page 37 of 45
8 Management
The management section focuses on managing pre-existing or pre-congured Makos, users, companies,
VPNs and systems, rather than setting up systems. Once set, your network administrators will manage
the network through these pages.
8.1 Management >Home
The Management section is for administering User and Company information. By default, your own User
and Company are selected and shown in the header section.
The page's links give you alternate navigation through the Management section. For this section we
continue to use the left-menu navigation convention.
8.2 Management > Company >Search
n Enter a Company name here to list the CPEs you can administer.
Search when nished.
8.3 Management > Company >New Company
This page provides all necessary elds for creating a company and at least one CPE you can assign to it.
n Go through the page and ll in the necessary details.
Add, or Add and Congure when nished.
All asterisked elds are necessary for company creation.
8.4 Management > Company >Manage [Your Company]
This section gives you company-specic access to functions already covered in the Congure section.
Page 38

Where's The Real Power in IT?On average, which has more caene: a freshly-brewed cup of coee, or a freshly-brewed cup of black tea?
Page 38 of 45 Central Management System
8.5 Management > Company > Manage [Your Company] >Licences
Resellers and high-level administrators create time-based permissions for users of a Mako system. This
gives your system an ability to maintain current security checks.
This page creates reports for the Company or users under the company's Mako system.
n Select the company, scope and format for your report
Search when nished.
8.6 Management > ... > Manage [Your Company] ... >Email Settings
Like Email Settings for CPE reports, this page sets mail settings for Company-based reports.
n Select your report type.
n Click on the or H icon to allow or deny this report respectively.
n Repeat this process for the relevant reports.
8.7 Management > ... Manage [Your Company] > ... >Customise Reports
This page allows you to customise the look of 4 reports: Company-wide Summary, End of Month,
Sharknet IDS Report and PCI DSS Information.
n Select the report you wish to customise. You'll be presented with Header, Footer, End Note and an
image-select elds.
n Enter appropriate information in the elds.
n Press Load or the Image link to take you to the Manage Images page.
Save when nished.
8.8 Management > ... Manage [Your Company] > ... >Manage Images
This page allows you to load logos for report and branding uses throughout the site.
n Click the Browse... button and navigate your way to your locally-stored logo.
Upload Logo when nished.
8.9 Management > User >Search
The User section collates features similar to company-specic features detailed earlier.
n Enter a Company name here to list the users you can administer.
Search when nished.
8.10 Management > User >New User
n Go through the page and ll in the necessary details.
Add when nished.
8.11 Management > User >[User Name]
This sub-section collates the current user's information to create user-specic preferences.
Page 39

Glossary Contents
Central Management System Page 39 of 45
Information: An overview of a user's current settings.
Access Control: Password and governance controls over the user. You cannot change your
own Access level, only the Users you have created. You may only grant
other users access equal to or less than your own access.
Change Password: Takes you to the Change Password page. Enter a new password twice, and
Update Password when nished.
Delete User: Remove the user from the system.
Change Username: Enter a new username. Change Username when nished.
The Company section lists the companies to which the user account is aliated. You can add an existing
user to a dierent pre-dened company in the system.
n Click Add. In the resulting pop-up window, enter a company name, or partial company name, for the
search.
n Select the appropriate company from the resulting list.
8.12 Management > User > [User Name] >Events
A log of changes that have been made to your Company is available here.
Set the number of events you wish to display, and click the links for log specics.
Page 40

Are You The Oce Fire Hazard?In all country's exible cable wiring codes, what color is NOT permitted for 'live' mains power?
Page 40 of 45 Central Management System
9 Help
This section provides access to the people, products and documentation for your network.
9.1 Help >Help Contacts
This page contains the technical contact details for your company and its IT provider(s).
9.2 Help >Documentation
This page contains downloadable PDF documentation and product literature on nearly every aspect of
the Mako System.
Page 41

Glossary Contents
Central Management System Page 41 of 45
10 Troubleshooting
The website provides you with detailed help on obtaining reports about your trac, updating the
conguration of your CPE, and updating your customer details.
It is vital that you take great care of your password.
n If you lose the password you are unable to obtain help from the website, obtain trac reports, or update
your Firewall conguration.
n If the password is exposed to a third party, your computer network is insecure and at risk.
n You must follow the Forgot Password? link on the Mako CMS to create a new password for your account.
A temporary access code is issued to your email address to conrm your request. You must contact your
reseller if you have changed email addresses.
Page 42

Are You A Follower Or A Leader?What's a Sheetbend used for?
Page 42 of 45 Central Management System
A ISP Plan Request
Select an ISP: Choose an ISP that you want modied from this list.
Add an ISP Plan: Select a pre-existing plan from the drop down menu to base this new plan
on, or click the New button and enter a new plan name in the Plan Name
eld.
Free usage: Enter the allocated usage in MB, i.e. if it a 10GB plan enter 10 000 here. If it's
a at rate plan, leave this at 0.
VPI: The VPI tells the switches where to route the packet of information, or what
path to take. [A VPI of 0 indicates that this is a Virtual Channel Connection
(VCC). A non-zero value indicates that this is a Virtual Path Connection
(VPC)].
VCI: The Virtual Channel Identier (VCI), used in conjunction with the VPI,
indicates where an Asynchronous Transfer Mode (ATM) cell is to travel over
a network.
AuthType: Choose the authentication type from the drop down menu: Password
Authentication Protocol (PAP), 2-way handshake or Challenge Handshake
Authentication Protocol (CHAP), 3-way handshake.
PPTP Type: Choose the type of Point-to-Point Tunneling Protocol (PPPT) used for this
plan from the drop down menu, Asynchronous Transfer Mode (ATM) or
Ethernet.
MRU: The Maximum Receive Unit (MRU) is the size of the largest packet the
CPE will accept. Increasing the MRU means larger incoming packets,
which in turn increases transmission errors as the whole packet must be
retransmitted. The recommended minimum is 250 and maximum is 1500.
Encapsulation: Choose the encapsulation type from the drop down menu, Virtual
Concatenation (VC) or Logic Link Control (LLC).
Plan Realm: Enter the URL of the ISP here.
IP Range Support: Check this box for IP Range Support.
Domain Prexing: Check this box for Domain Prexing.
Business plan: Check this box for Business Plan.
Page 43

Glossary Contents
Central Management System Page 43 of 45
B Overview
The Mako System oers a cloud-managed, turnkey solution to create broadband networks for small
sites. With anytime, anywhere access, the Mako System oers real-time management, reporting and
proactive security in one solution.
The Mako System is a combination of 2 parts: a network appliance (the CPE) and cloud-based Central
Management System (CMS). These components work together to provide a complete network
connectivity and management service, enabling you to connect, protect and control your network(s).
B.1 Mako Appliances
Mako appliances oer the choice of WAN interfaces including Cellular, Ethernet and ADSL2+. There is
a CPE to suit any small site's requirements, and Mako Virtual Private Network (VPN) concentrators can
link them back to a central or corporate network (see separate hardware appliance specications for
specic details). Mako appliances ship with proprietary software incorporating a default conguration,
which enables them to connect to the Internet, communicate with the CMS and retrieve their customerspecic conguration. Once online, CPEs connect directly to the Internet and communicate regularly
with the CMS using a patented communication method.
B.2 The Unique Central Management System
The Mako CMS is accessed via a secure website that users log into to manage their network(s). A user's
login gives them access to all their CPEs around the world, providing a central place from which to
manage their complete network.
You or your designated IT Professional have 24-hour secure remote control over your connection(s) to
the Internet or connections between sites with this CMS. The CMS allows you to modify rewall rules,
connect sites via VPNs, check usage patterns and even change your network's IP addressing.
B.3 Patented Communication Method
Mako appliances make it possible to have a hosted, cloud-based management system that receives
trac information from individual Mako appliances and then analyses, interprets and reacts to
that information. The communication method eliminates the need for on-site conguration, with
authenticated users accessing the CMS via the Internet to interact with their Mako appliances.
Unlike traditional management platforms, communication with the management system is initiated by
the end-point, thus negating the need for static IP addresses and individually pre-congured appliances.
Every 2 minutes, each Mako appliance checks with the management system if there is a need for
conguration changes or rmware updates. The appliance also transmits raw trac logs to the CMS for
automatic interpretation and analysis.
B.4 Robust Security
Your networks are always updated and guarded through automatic software updates and patches, while
intrusion attempts are managed in real time. The stateful inspection rewall performs a comprehensive
analysis of all trac entering and leaving your networks to uphold your network's integrity.
B.5 Firewall
Your rewall, a key security item, guards against unwanted information from entering or leaving your
network. YourCPEs stateful packet inspection rewall not only examines packets of information, but
makes decisions based upon information derived from multi-layered communications and other
applications, providing comprehensive, enterprise-level protection.
With the CMS you have authoratitive control over trac entering and leaving your networks.
Page 44

Irate about Pirates?Under the Berne Convention, how long does copyright exist on a photograph?
Page 44 of 45 Central Management System
B.6 PCI Compliance
The Mako System is powered by Mako Networks Ltd, a certied Payment Card Industry Data Security
Standard (PCI DSS) Level 1 Networking and Security Service Provider. This means that you can easily
meet the requirements of PCI DSS compliance.
The PCI DSS rules have been designed to protect banks, merchants and cardholders from falling victim
to credit card fraud. PCI DSS outlines how a merchant should protect their point of sale network and
ensures security is maintained on an ongoing basis.
The Mako System lowers the cost and complexity of PCI DSS compliance by automating network
security and nearly every other process of a merchant's PCI DSS compliance.
With proactive alerts, merchants using the Mako System cannot mistakenly put themselves at risk of
non-compliance. Any attempt to inappropriately modify the network conguration will generate a
warning and require the user to conrm the modication by entering an authorising password.
Through Mako Networks, Mako provides a QSA-designed website which can deal with almost all
remaining aspects of merchant PCI DSS (documentation, policy and process), leaving the merchant only
having to take care of physical security.
The Mako system is the solution for card-present merchants transacting over IP, providing peace of mind
to cardholders, merchants and their banks. The Mako System enables a merchant to more easily comply
with all of their PCI DSS obligations. Many merchants lack the technical knowledge required to correctly
implement the PCI DSS requirements and buying in that experience is expensive using traditional
solutions.
B.7 VPN
Virtual Private Networks allow you to assign secure remote access to your networks over the Internet.
You can link 2 Mako-protected networks together using the CMS in seconds, using only 3 mouse-clicks!
Linking 3 or more Mako-protected networks is just as easy. The CMS allows this to happen without static
IP Addresses. In the same way you can also allow specied users remote access to your Mako-protected
networks with the Remote VPN feature – A useful feature for accessing your networks whether you're
home or away.
B.8 Proactive Alerts
The Mako CMS automatically provides proactive alerts for extraordinary usage, unit oine, worm
detection and hardware triggers such as fan speed and CPU temperature. The CMS also sends monthly
reports on usage, intrusion attempts and easy-to-read companywide summaries for end-users with
multiple sites.
B.9 Logging/Reporting
While all trac from your CPE goes directly out onto the Internet, your CPE sends trac information
securely to the CMS. This analysis gives you the ability to monitor and control your Internet usage, using
any PC from any worldwide location. Simply log onto the CMS to see how your business's broadband
Internet connection is being used, by whom and whether this was for personal or business use, monitor
where PCs on your network have been going and much more.
B.10 24-Hour Remote Control
Because your CPE uses the CMS, you or your designated IT Professional have 24-hour secure remote
control over your connection to the Internet. Via the CMS you can modify rewall rules, create and
disable VPNs, check usage patterns and even change your networks IP Addressing.
B.11 Automatic Updates
Mako automated software and rmware upgrades mean that new services and increased functionality
are added to the platform on an ongoing basis. Mako software is proactively patched and updated
immediately upon authentication and availability, providing unparalleled reliability and security without
Page 45

Glossary Contents
Central Management System Page 45 of 45
manual intervention. You can be assured that your Mako appliance will continue to be current as long as
it has a current licence.
A 1.1 Diagnostics
Mako Diagnostics gives support personnel the ability to remotely resolve network and connectivity
issues without the need for onsite visits or technically literate users.
Mako Diagnostics reduces support costs by allowing the helpdesk to very quickly identify and resolve
problems all the way to the Mako appliance level.
B.12 Optional Feature Enhancements
The Mako System has facilities for incorporating optional feature enhancements such as Advanced
Content Filtering, Email laundering, spam and virus protection. New features and options are
implemented when necessary through automatic updates.
Make sure you keep up to date by regularly logging into your CMS.
Page 46

Page 46 of 51 Central Management System
C Glossary
ADSL
Asymmetric Digital Subscriber Line. A group of technologies used to transmit high speed (broadband)
data across a non-digital telephone circuit, with the channel capacity towards the subscriber being
several times greater than that from the subscriber. Typical bandwidths are in megabits per second.
Browser
A software application that displays HTML formatted text and facilitates access to websites. Examples
are Internet Explorer, Safari and Firefox. The application provides the web browsing service, based on
the HTTP protocol.
CMS
The SecureME Central Management System is simple to use and takes the normally complex tasks of
network management and makes them easy. The CMS essentially takes trac information across your
network gateway, analyses it, automatically xes any issues and then reports to you what was wrong.
Any issues that require your intervention can be simply addressed online.
The types of things that a business will be alerted to are:
n Extraordinary usage
n Worms
n Broadband data usage
n Broadband trac limit reached
n Licence expiry
n Dynamic DNS activity
n CPE temperature
CPE
The SecureME appliance may also be referred to as the Customer Premise Equipment (CPE).
DHCP
Dynamic Host Conguration Protocol. This system allows IP addresses in a network to be assigned
automatically on machine power up. The IP address may change from one network session to the next.
DMZ
Demiliterized Zone. A term taken from the armed forces, a DMZ in network context is a separate
network zone that is intended to provide limited external access to internal services without exposing
the core network to risk from attack. For example, if you have a local publicly accessible web server, it
should be placed in a DMZ rather than residing on the oce network.
DNS
Domain Name Service. This service resolves host names to IP addresses.
A DNS service provides your network a 'xed' address on the Internet without the need for a static IP
address. Once you have an account with either of our 2 support Dynamic DNS providers, they will give
you a domain name. The CPE will then update the provider with its current public IP address so the
domain name references the correct address. This way the domain name remains static and has the IP
address it references updated automatically by the SecureME System.
Page 47

Glossary Contents
Central Management System Page 47 of 51
Page 47 of 51 Central Management System
To sign up to one of these services, follow the instructions and documentation on the provider's website.
You'll receive a username and password from your Dynamic DNS provider. Enter these in the appropriate
section on the SecureME Networks Dynamic DNS screen. Once entered, each time your CPE changes its
public IP address, it will update your Dynamic DNS provider.
Email
A software application for the construction and transmission of SMTP messages. Examples are
MSOutlook, Thunderbird and Apple Mail.
Ethernet
Ethernet is the most widely installed local area network (LAN) technology. Specied in
a standard, IEEE 802.3, Ethernet was originally developed by Xerox and then developed
further by Xerox, DEC, and Intel. An Ethernet LAN typically uses special grades of twisted
pair wires such as CAT5 or CAT5e.
Firewall System
A rewall prevents unwanted Internet services from coming into or leaving the oce network.
It's a technological barrier designed to prevent unapproved or unwanted, possibly destructive,
communications between computer networks or servers and hosts. A rewall lters the information
coming through the Internet connection into your private network or between computer systems in an
internal network. If an incoming packet of information is agged by the lters, it is not allowed through.
In short, it provides a strong, rst line of defence from the following types of attacks:
n Remote login
remotely control your computer and access sensitive les.
n Application backdoors
a hacker capitalises on the aws with remote access in some applications.
n SMTP session hijacking
gaining access to your email contacts and using these for the purposes of spam.
n Operating system bugs
similar to application backdoors, but through the operating system in this case.
n (Distributed) Denial of Service (DDoS)
essentially crippling your oce system or server by sending a multitude of bogus requests for nonexistent connections.
n E-mail bombs
Thousands of emails are sent to your inbox, incapacitating your email system.
n Macros
A macro is usually used to simplify tasks by bundling a series of commands into one action. However
hackers have exploited these, using them to perform a series of malicious commands on your computer.
n Viruses
A well-known threat that is self-replicating and can spread throughout your network causing minor to
major damage.
n Spam
More of a hindrance than a threat, however some can contain links to malicious websites.
n Redirect bombs
Hackers can redirect the path information takes by sending it to a dierent router. A method used for
denial of service attacks.
n Source routing
Generally information (packets) moves through the Internet and local networks with the aid of routers.
However the specic route is randomly determined by the source. Hackers mimic this behaviour to make
Page 48

Page 48 of 51 Central Management System
the information appear as though it originated from a trusted source. To resolve this problem, source
routing is disabled by your rewall.
FTP
File Transfer Protocol. This is a service for bulk data transfer over the Internet.
Gateway
A gateway is a network point that acts as an entrance to another network. On the Internet, a node or
stopping point can be either a gateway node or a host (end-point) node. Both the computers of Internet
users and the computers that serve pages to users are host nodes. The computers that control trac
within your company's network or at your local Internet service provider (ISP) are gateway nodes.
GRE Tunnel
Generic Routing Ecapsulation Tunnel. A secure way for IP trac to be carried through a network,
typically used for VPN connections.
HTML
Hyper Text Markup Language. A standard that denes how to format text, graphics, etc., on a web page
for display on a Browser.
HTTP
Hyper Text Transfer Protocol. The service which transfers HTML formatted web pages to a Browser.
Hub
In general, a hub is the central part of a wheel where the spokes come together.
In data communications, a hub is a place of convergence where data arrives from
one or more directions and is forwarded out in all directions (along all the spokes).
This extends the connectivity of an Ethernet LAN (local area network) to provide
for additional computer connections. This concept is ne in smaller LANs but may
cause congestion in larger LANs, where a switch (which directs the trac) would be
more applicable.
IPsec
An standard protocol for establishing secure virtual private networks (VPNs) Over IP networks .
ICMP
Internet Control Message Protocol. An integral part of the Internet Protocol suite that handles error and
control messages. Specically, routers and hosts use ICMP to send reports of problems about datagrams
back to the original source that sent the datagram. ICMP also includes an echo request/reply used to test
whether a destination is reachable and responding.
IP
The Internet Protocol (IP) is the method or protocol by which data is sent from one computer to
another on the Internet. Each computer (known as a host) on the Internet has at least one IP address
that uniquely identies it from all other computers on the Internet. When you send or receive data (for
example, an e-mail note or a Web page), the message gets divided into chunks called packets. Each
of these packets contains both the sender's Internet address and the receiver's address. Any packet is
sent rst to a gateway computer that understands a small part of the Internet. The gateway computer
reads the destination address and forwards the packet to an adjacent gateway that in turn reads
the destination address and so forth across the Internet until one gateway recognises the packet as
Page 49

Glossary Contents
Central Management System Page 49 of 51
Page 49 of 51 Central Management System
belonging to a computer within its immediate neighbourhood or domain. That gateway then forwards
the packet directly to the computer whose address is specied.
IP Address
In the most widely installed level of the Internet Protocol today (IPv4), an IP address is a 32-bit number
that identies each host on the Internet. When you request an HTML page or send e-mail, the Internet
Protocol part of TCP/IP includes your IP address in the message (actually, in each of the packets if more
than one is required) and sends it to the IP address that is obtained by looking up the domain name in
the Uniform Resource Locator you requested or in the e-mail address you're sending a note to. At the
other end, the recipient can see the IP address of the Web page requestor or the e-mail sender and can
respond by sending another message using the IP address it received.
An IP address has 2 parts: the identier of a particular network on the Internet and an identier of the
particular device (which can be a server or a workstation) within that network. On the Internet itself, that
is, between the router that move packets from one point to another along the route only the network
part of the address is looked at.
LAN
A local area network is a group of computers and associated devices that share a common
communications line or Wireless link. Typically, connected devices reside in a small geographic area (for
example, within an oce building). A LAN may serve as few as 2 or 3 users (for example, in a home or
small oce network) or as many as thousands of users.
MAC address
Media Access Control. The unique hardware address of a machine's connection to a local area network.
Each NIC has a unique MAC.
NAT
Network Address Translation, an Internet standard that enables a LAN to use one set of IP addresses for
internal trac and a second set of addresses for external trac.
NIC
Network Interface Card. The component of a computer that allows connection to a LAN (local area
network).
Packet
A packet is the unit of data that is routed between an origin and a destination on the Internet or any
other packet-switched network. When any le (e-mail message, HTML le, Graphics Interchange Format
le, Uniform Resource Locator request, and so forth) is sent from one place to another on the Internet,
the Transmission Control Protocol (TCP) layer of TCP/IP divides the le into "chunks" of an ecient size
for routing. Each of these packets is separately numbered and includes the Internet address of the
destination. The individual packets for a given le may travel dierent routes through the Internet. When
they have all arrived, they are reassembled into the original le (by the TCP layer at the receiving end).
Port
The number that identies a specic channel for communications relating to a specic Service. Ports
greater than 1024 are called ephemeral ports—these are for assignment to proprietary or special
purpose applications.
PPTP
The Point-to-Point Tunnelling Protocol is a method for implementing virtual private networks. PPTP uses
a control channel over TCP and a GRE tunnel operating to encapsulate PPP packets. PPTP has been the
subject of many security analyses and serious security vulnerabilities have been found in the protocol.
Page 50

Page 50 of 51 Central Management System
Router
A communications device connected between 2 (or more) dierent networks, which maps (routes/
directs) trac between the IP addresses on each network.
Service
Services comprise 3 elements—a pair of communicating software applications; the denition of the
data structures which the applications exchange; and the denition of the protocols by which the
applications exchange data structures. Established services include FTP, Telnet, HTTP, SMTP, etc. There are
also proprietary or special purpose services.
SMTP
Simple Mail Transfer Protocol. The service for encapsulating and sending messages to another person on
the Internet, known as Email.
SSH
Secure shell. A special program providing a secure communications channel between SSH client and
SSH server processes.
Switch
An Ethernet connectivity device, similar to but more advanced than a Hub, which
partitions trac between connected computers to lessen congestion.
On an Ethernet LAN a switch determines from the physical device MAC address in each
incoming message frame, to which output port it is forwarded.
TCP/IP
TCP/IP (Transmission Control Protocol/Internet Protocol) is the basic communication language or
protocol of the Internet. It can also be used as a communications protocol in a private network (either an
intranet or an extranet).
Telnet
A service which provides remote terminal login to a multi-user host.
VLAN
VLAN's provide a function for separating users into groups through network segments. This is done
virtually and eliminates the need for physical hardware changes and congurations. This means that
only one switch can be used for creating separate "virtual" LANs on this one physical hardware device.
For instance, on a 24-port switch, you can create 3 isolated VLANs of 8 users each.
VLANs can also span over multiple switches, i.e. 2 users on one switch and 3 users on another using
VLAN Trunking.
VLAN Trunking
More sophisticated devices can mark packets through tagging, so that a single interconnect (trunk) may
be used to transport data for various VLANs.
Grouping computers located in disparate locations by VLAN can simplify a network design. A VLAN is
essentially the same as a local area network (LAN), but it allows for easier grouping of computers even if
they're not on the same network switch.
VLAN memberships are congured through a software interface, as opposed to physically moving cables
on switches. Most enterprise-level networks today use the concept of VLANs.
Without VLANs, a switch considers all interfaces on the switch to be in the same broadcast domain.
Page 51

Glossary Contents
Central Management System Page 51 of 51
Page 51 of 51 Central Management System
VPN
A virtual private network (VPN) is a network that uses a public telecommunication infrastructure, such as
the Internet, to provide remote oces or individual users with secure access to their network. A virtual
private network can be contrasted with an expensive system of owned or leased lines that can only be
used by one company. The goal of a VPN is to provide the company with the same capabilities, but at a
much lower cost.
Web, or World Wide Web
The World Wide Web is a system of interlinked documents, images and other media hosted by multiple
servers across the Internet and accessed via web browsers.
MRU: The Maximum Receive Unit (MRU) is the size of the largest packet the
CPE will accept. Increasing the MRU means larger incoming packets,
which in turn increases transmission errors as the whole packet must be
retransmitted. The recommended minimum is 250 and maximum is 1500.
Encapsulation: Choose the encapsulation type from the drop down menu, Virtual
Concatenation (VC) or Logic Link Control (LLC).
Plan Realm: Enter the URL of the ISP here.
IP Range Support: Check this box for IP Range Support.
Domain Prexing: Check this box for Domain Prexing.
Business plan: Check this box for Business Plan.
Bandwidth (Kbits/sec) Down: Leave this at 0 to let the CPE automatically decide this. To manually
override this enter the value here.
Kbps Up: Leave this at 0 to let the CPE hardware automatically decide this. To
manually override this enter the value here.
Cellular: Check this box if the ISP provides Cellular services.
Page 52

Page 52 of 54 Central Management System
D MakoScope
D.1 Overview
MakoScope is the browser-based feedback system. By browsing to the IP address of your CPE, you can
get real time information on its status. This is optional, but useful for diagnostics.
From your internal network, type the IP address of your CPE ( eg. http://192.168.1.254 ) into a browser.
D.2 System Information
Mako ID The unique identier of your CPE.
Software ID Software version number, this is often useful to helpdesk sta.
Failover Status Shows whether the failover is active or not.
Last Mako Server The last time your CPE communicated with the CMS.
Contacted
Page 53

Glossary Contents
Central Management System Page 53 of 54
Should Someone Else Be Reading This?What's wrong with this IP address: 202.12.324.4?
Page 53 of 54 Central Management System
Last User Change The last user modication to your CPE's conguration.
Firewall Status Shows whether the rewall is loaded or not.
Mako Guardian Status Shows whether the Content Filter is active or not.
Temperature Displays the internal temperature of the CPE.
Page 54

Page 54 of 54 Central Management System
E Connectivity information
The text for the connectivity information is colour coded, green for active (on) and red for disabled/
disconnected (o). This applies to the ADSL, PPP and LAN information.
ADSL Status If it is red then this indicates that the ADSL circuit is faulty or that the CPE is
still booting. Receive and send are the maximum ADSL speeds in Kbps.
Bridge This will only be visible when the CPE is in PPPoE mode and indicates the
VPI VCI virtual circuit ID.
PPP Status If it is red then this could be an indication that:
n Your username and password are not being accepted by your ISP;
n The CPE is still booting;
n PPP cannot yet authenticate because the ADSL is not up.
LAN Status eth1 is that status of LAN 2 and eth0 is the status of LAN 1. Displays red
when no Ethernet connection is detected and green when the Ethernet
port is successfully connected to a switch/hub or a PC. It also displays the
status of the DHCP server and the port speed in Mb/s.
E.1 System Logs
n Syslogs Scrolls status information of what the CPE is doing. Information such as DHCP issues, Firewall
reloads etc. In this example the 16 (1) refers to the date, day of the month. (2) Refers to the time in 24hr
UTC format.
Page 55

11 Warranty
1) Standard Limited Warranty. If the produc ts purchased hereunder are resold by a distributor or reseller to an end-user (customer)
pursuant to the terms hereof in their original, unmodied, unused condition, Purchaser shall pass on to its customers, or keep as
applicable for internal use, the MAKO NETWORKS LTD. standard limited warranty for the products, as summarized in documentation
supplied with the product and including provisions and limitations set forth below. The Manufacturer warrants the Mako Appliance
for one (1) year. The Warranty begins on the date of purchase as shown on your providers invoice.
2) Express End-user Limited Warranty. Each MAKO NETWORKS LTD. product purchased hereunder is warranted against defect in
material and workmanship and will substantially conform to MAKO NETWORKS LTD. product documentation for the period set forth
in the documentation supplied with the product following deliver y to end-user (the “Warranty Period”). This warranty extends only
to end-user and will not extend to, nor may it be assigned to, any subsequent user, Purchaser or user of a MAKO NETWORKS LTD.
produc t, whether such MAKO NETWORKS LTD. product is alone or incorporated into end-user’s product.
3) Exclusions. The express warranty set forth above is contingent upon the proper use of a MAKO NETWORKS LTD. product in the
application for which it was intended and will not apply to any MAKO NETWORKS LTD. product that has been (i) damaged during
shipping, (ii) modied or improperly maintained or repaired by a party other than MAKO NETWORKS LTD. or its designees, or (iii)
subjected to unusual physical or electrical stress. This includes operation of the product outside the Operating Specications of the
product.
4) Limitation of Remedy. In the event a MAKO NETWORKS LTD. product fails to per form as warranted, MAKO NET WORKS LTD. sole
and exclusive liability and end-user’s only remedies for breach of this warranty shall be, at MAKO NETWORKS LTD.’s option to repair,
replace or credit an amount not exceeding the Purchaser’s purchase price of each produc t found to be defective, provided that:
4.1) End-user complies with the rejection and warranty procedures contained in Section 5 below and returns the MAKO
NETWORKS LTD. product that the end-user considers defective for examination and testing.
4.2) MAKO NETWORKS LTD. shall not be liable under this warranty if testing and examination by MAKO NETWORKS LTD.
discloses that the MAKO NETWORKS LTD. product has been modied or altered in any manner aer it was shipped by MAKO
NE TWO RK S LTD.
4.3) MAKO NETWORKS LTD. shall not be liable under this warranty if testing and examination by MAKO NE TWORKS LTD. discloses
that the alleged defect in the MAKO NETWORKS LTD. product does not exist or was caused by end-user or any third person’s
misuse, neglect, improper installation or testing, unauthorized attempts to repair or any other cause beyond the range of
intended user, or by accident, re or other hazard.
4.4) MAKO NETWORKS LTD. shall not be liable under any warranty under this Agreement with respect to any MAKO NETWORKS
LTD. product that is not returned in its original shipping container or a functionally equivalent container.
4.5) If MAKO NETWORKS LTD. testing and examination does not disclose a defect warranted under this Agreement: MAKO
NETWORKS LTD. shall so advise Purchaser and dispose of such MAKO NETWORKS LTD. product in accordance with Purchaser’s
instructions on behalf of end-user and at Purchaser’s cost.
2013 Mako Networks Limited. Some Rights Reserved - http://creativecommons.org/licenses/by-nc-sa/3.0/
The Mako logo is a registered trademark of Mako Networks Limited.
Other product and company names mentioned herein can be trademarks and/or registered trademarks of their
respective companies.
Information in this document is subject to change without notice and does not represent a commitment on the part
of Mako Networks Limited.
This document should be read in conjunction with the Mako Networks Terms and Conditions available from the Mako
Networks website (http://www.makonetworks.com).
Mako Networks, its parent or associate companies may have patents, patent applications, trademarks, copyrights,
or other intellectual property rights covering subject matter in this document. Except as expressly provided in any
written licence agreement from Mako Networks, its parent or associate companies, the furnishing of this document
does not give you any rights or licence to these patents, trademarks, copyrights, or other intellectual property.
Page 56

Support
support@makonetworks.com
Web site
www.makonetworks.com
 Loading...