

Page 1
INSTRUCTION MANUAL
MANUAL DE INSTRUCCIONES
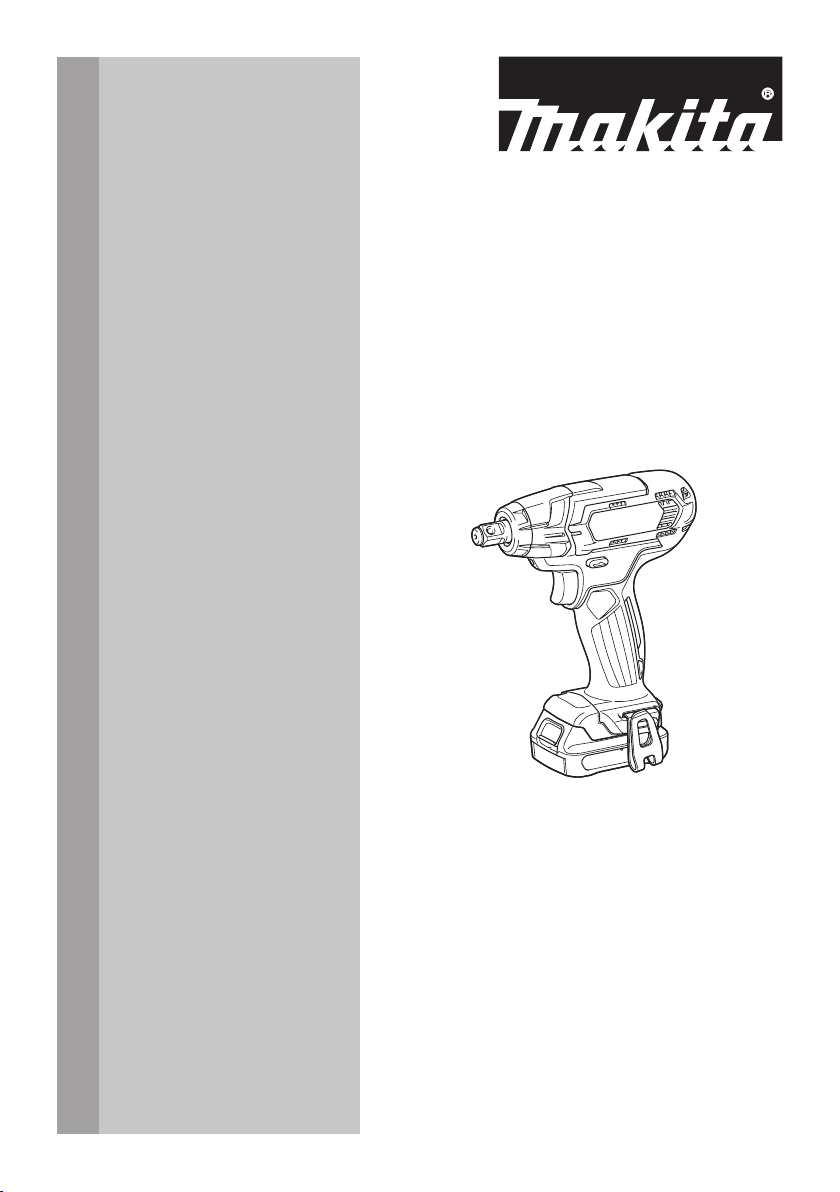
Cordless Impact Wrench
Llave de Impacto Inalámbrica
WT03
IMPORTANT: Read Before Using.
IMPORTANTE: Lea antes de usar.
Page 2
ENGLISH (Original instructions)
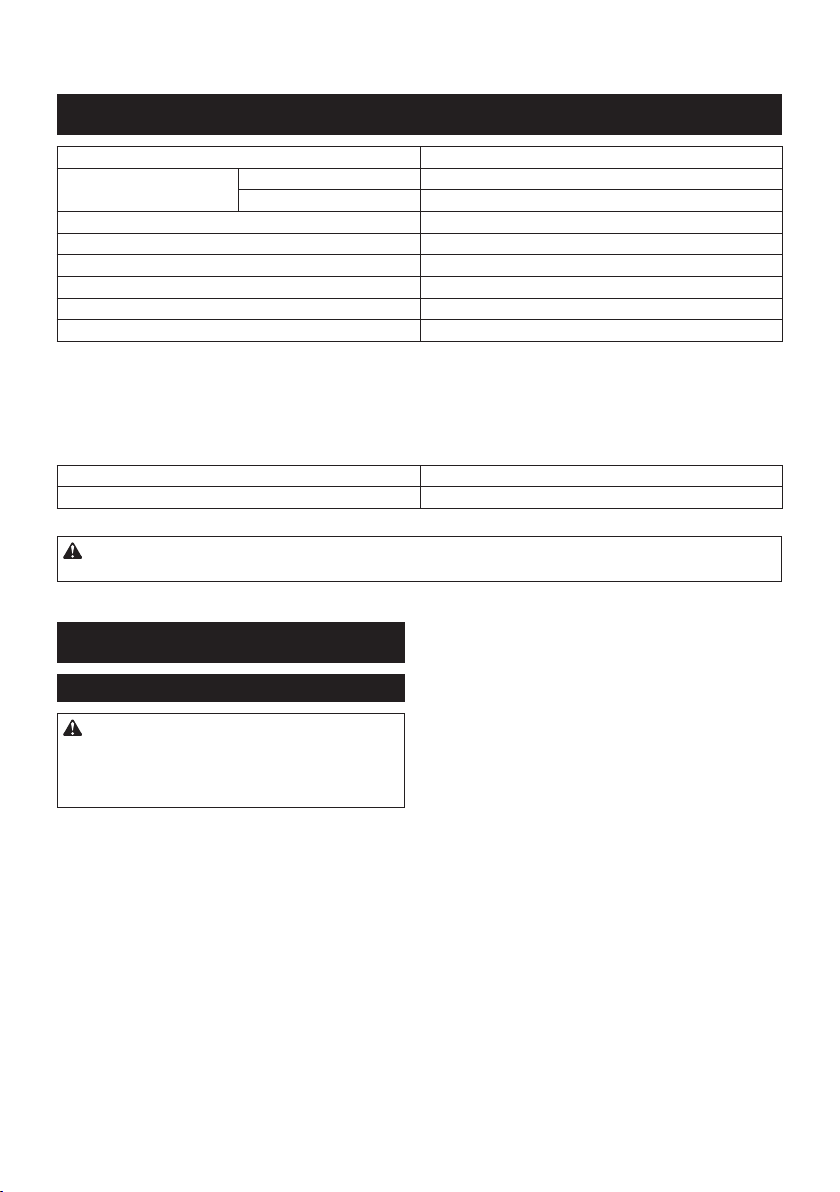
SPECIFICATIONS
Model: WT03
Fastening capacities Standard bolt M8 - M16 (5/16″ - 5/8″)
High tensile bolt M6 - M12 (1/4″ - 1/2″)
Square drive 12.7 mm (1/2″)
No load speed (RPM) 0 - 2,600 /min
Impacts per minute 0 - 3,200 /min
Overall length 168 mm (6-5/8″)
Rated voltage D.C. 10.8 V - 12 V max
Net weight 1.1 - 1.2 kg (2.4 - 2.7 lbs)
•
Due to our continuing program of research and development, the specications herein are subject to change without notice.
• Specications may differ from country to country.
• The weight may differ depending on the attachment(s), including the battery cartridge. The lightest and heavi-
est combination, according to EPTA-Procedure 01/2014, are shown in the table.
Applicable battery cartridge and charger
Battery cartridge BL1016 / BL1021B / BL1041B
Charger DC10SB / DC10WD / DC18RE
•
Some of the battery cartridges and chargers listed above may not be available depending on your region of residence.
WARNING: Only use the battery cartridges and chargers listed above. Use of any other battery cartridges
and chargers may cause injury and/or re.
SAFETY WARNINGS
General power tool safety warnings
WARNING: Read all safety warnings, instruc-
tions, illustrations and specications provided
with this power tool. Failure to follow all instructions
listed below may result in electric shock, re and/or
serious injury.
Save all warnings and instructions for future reference.
The term "power tool" in the warnings refers to your
mains-operated (corded) power tool or battery-operated
(cordless) power tool.
Work area safety
1. Keep work area clean and well lit. Cluttered or
dark areas invite accidents.
2. Do not operate power tools in explosive atmo-
spheres, such as in the presence of ammable
liquids, gases or dust. Power tools create sparks
which may ignite the dust or fumes.
3. Keep children and bystanders away while
operating a power tool. Distractions can cause
you to lose control.
Electrical Safety
1. Power tool plugs must match the outlet. Never
modify the plug in any way. Do not use any
adapter plugs with earthed (grounded) power
tools. Unmodied plugs and matching outlets will
reduce risk of electric shock.
2. Avoid body contact with earthed or grounded
surfaces, such as pipes, radiators, ranges and
refrigerators. There is an increased risk of elec-
tric shock if your body is earthed or grounded.
3. Do not expose power tools to rain or wet conditions. Water entering a power tool will increase
the risk of electric shock.
4. Do not abuse the cord. Never use the cord for
carrying, pulling or unplugging the power tool.
Keep cord away from heat, oil, sharp edges
or moving parts. Damaged or entangled cords
increase the risk of electric shock.
5.
When operating a power tool outdoors, use an
extension cord suitable for outdoor use. Use of a cord
suitable for outdoor use reduces the risk of electric shock.
6. If operating a power tool in a damp location is
unavoidable, use a ground fault circuit interrupter (GFCI) protected supply. Use of a GFCI
reduces the risk of electric shock.
7.
Power tools can produce electromagnetic elds
(EMF) that are not harmful to the user. However,
users of pacemakers and other similar medical
devices should contact the maker of their device and/
or doctor for advice before operating this power tool.
2 ENGLISH
Page 3

Personal Safety
1. Stay alert, watch what you are doing and use
common sense when operating a power tool.
Do not use a power tool while you are tired or
under the inuence of drugs, alcohol or medication. A moment of inattention while operating
power tools may result in serious personal injury.
2. Use personal protective equipment. Always
wear eye protection. Protective equipment such
as dust mask, non-skid safety shoes, hard hat, or
hearing protection used for appropriate conditions
will reduce personal injuries.
3. Prevent unintentional starting. Ensure the
switch is in the off-position before connecting
to power source and/or battery pack, picking
up or carrying the tool. Carrying power tools with
your nger on the switch or energising power tools
that have the switch on invites accidents.
4. Remove any adjusting key or wrench before
turning the power tool on. A wrench or a key left
attached to a rotating part of the power tool may
result in personal injury.
5. Do not overreach. Keep proper footing and
balance at all times. This enables better control
of the power tool in unexpected situations.
6. Dress properly. Do not wear loose clothing or
jewellery. Keep your hair, clothing and gloves
away from moving parts. Loose clothes, jewel-
lery or long hair can be caught in moving parts.
7. If devices are provided for the connection of
dust extraction and collection facilities, ensure
these are connected and properly used. Use of
dust collection can reduce dust-related hazards.
8.
Do not let familiarity gained from frequent use
of tools allow you to become complacent and
ignore tool safety principles. A careless action can
cause severe injury within a fraction of a second.
9. Always wear protective goggles to protect
your eyes from injury when using power tools.
The goggles must comply with ANSI Z87.1 in
the USA.
It is an employer's responsibility to enforce the
use of appropriate safety protective equipment
by the tool operators and by other persons in
the immediate working area.
Power tool use and care
1. Do not force the power tool. Use the correct
power tool for your application. The correct
power tool will do the job better and safer at the
rate for which it was designed.
2. Do not use the power tool if the switch does
not turn it on and off. Any power tool that cannot
be controlled with the switch is dangerous and
must be repaired.
3. Disconnect the plug from the power source
and/or remove the battery pack, if detachable,
from the power tool before making any adjustments, changing accessories, or storing power
tools. Such preventive safety measures reduce
the risk of starting the power tool accidentally.
4. Store idle power tools out of the reach of children and do not allow persons unfamiliar with
the power tool or these instructions to operate
the power tool. Power tools are dangerous in the
hands of untrained users.
5.
Maintain power tools and accessories. Check for
misalignment or binding of moving parts, breakage of parts and any other condition that may
affect the power tool’s operation. If damaged, have
the power tool repaired before use. Many accidents
are caused by poorly maintained power tools.
6. Keep cutting tools sharp and clean. Properly
maintained cutting tools with sharp cutting edges
are less likely to bind and are easier to control.
7.
Use the power tool, accessories and tool bits etc.
in accordance with these instructions, taking into
account the working conditions and the work to be
performed. Use of the power tool for operations different
from those intended could result in a hazardous situation.
8.
Keep handles and grasping surfaces dry, clean
and free from oil and grease. Slippery handles and
grasping surfaces do not allow for safe handling and
control of the tool in unexpected situations.
9.
When using the tool, do not wear cloth work gloves
which may be entangled. The entanglement of cloth work
gloves in the moving parts may result in personal injury.
Battery tool use and care
1. Recharge only with the charger specied by
the manufacturer. A charger that is suitable for
one type of battery pack may create a risk of re
when used with another battery pack.
2. Use power tools only with specically desig-
nated battery packs. Use of any other battery
packs may create a risk of injury and re.
3. When battery pack is not in use, keep it away
from other metal objects, like paper clips,
coins, keys, nails, screws or other small metal
objects, that can make a connection from one
terminal to another. Shorting the battery termi-
nals together may cause burns or a re.
4.
Under abusive conditions, liquid may be ejected
from the battery; avoid contact. If contact accidentally occurs, ush with water. If liquid contacts eyes, additionally seek medical help. Liquid
ejected from the battery may cause irritation or burns.
5.
Do not use a battery pack or tool that is damaged or
modied. Damaged or modied batteries may exhibit unpredictable behaviour resulting in re, explosion or risk of injury.
6. Do not expose a battery pack or tool to re or
excessive temperature. Exposure to re or temperature above 130 °C may cause explosion.
7. Follow all charging instructions and do not
charge the battery pack or tool outside the
temperature range specied in the instructions. Charging improperly or at temperatures
outside the specied range may damage the
battery and increase the risk of re.
Service
1.
Have your power tool serviced by a qualied repair
person using only identical replacement parts. This
will ensure that the safety of the power tool is maintained.
2. Never service damaged battery packs. Service
of battery packs should only be performed by the
manufacturer or authorized service providers.
3. Follow instruction for lubricating and chang-
ing accessories.
4. Do not modify or attempt to repair the appliance or the battery pack except as indicated in
the instructions for use and care.
3 ENGLISH
Page 4
Cordless impact wrench safety
warnings
1. Hold the power tool by insulated gripping
surfaces, when performing an operation
where the fastener may contact hidden wiring.
Fasteners contacting a "live" wire may make
exposed metal parts of the power tool "live" and
could give the operator an electric shock.
2. Wear ear protectors.
3. Check the impact socket carefully for wear,
cracks or damage before installation.
4. Hold the tool rmly.
5. Keep hands away from rotating parts.
6. Do not touch the impact socket, bolt, nut or the
workpiece immediately after operation. They
may be extremely hot and could burn your skin.
7. Always be sure you have a rm footing.
Be sure no one is below when using the tool in
high locations.
8. The proper fastening torque may differ
depending upon the kind or size of the bolt.
Check the torque with a torque wrench.
SAVE THESE INSTRUCTIONS.
WARNING: DO NOT let comfort or familiarity
with product (gained from repeated use) replace
strict adherence to safety rules for the subject
product.
MISUSE or failure to follow the safety rules stated
in this instruction manual may cause serious
personal injury.
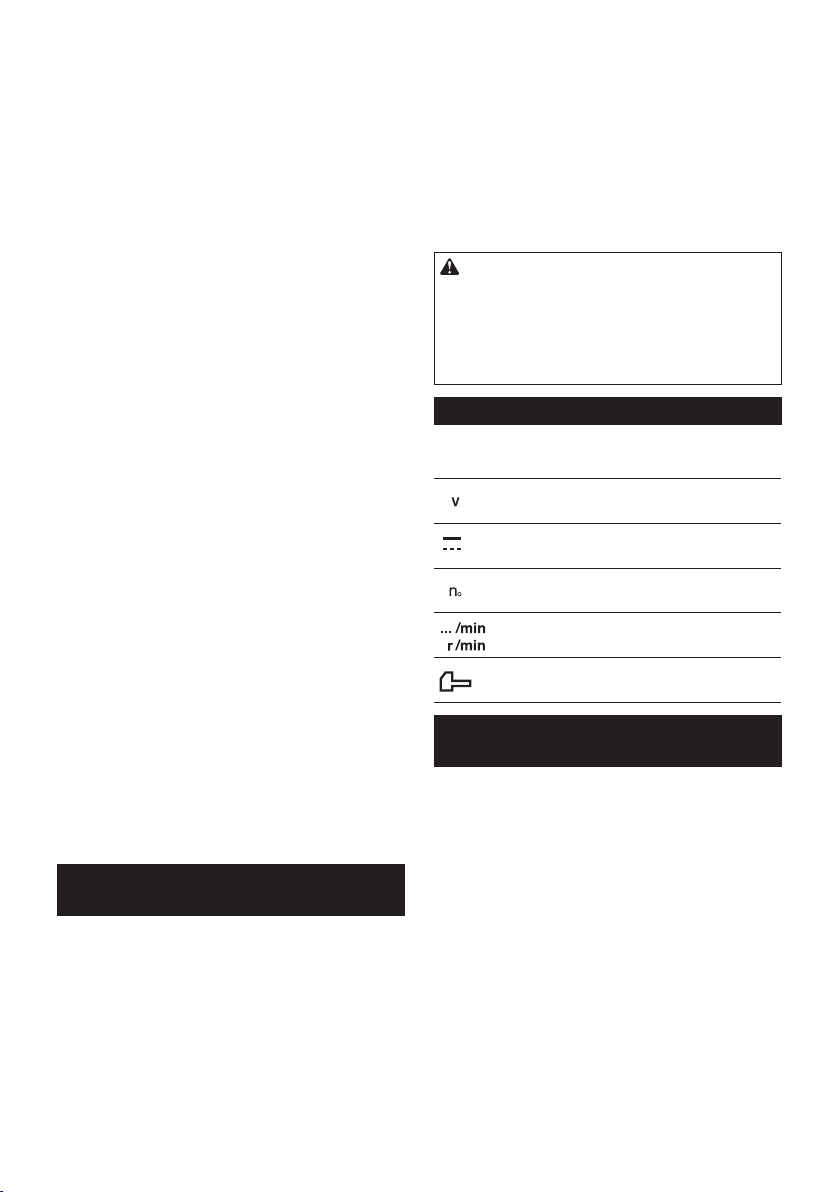
Symbols
The followings show the symbols used for tool.
volts
direct current
no load speed
revolutions or reciprocation per minute
number of blow
Important safety instructions for
battery cartridge
1. Before using battery cartridge, read all instructions and cautionary markings on (1) battery
charger, (2) battery, and (3) product using
battery.
2. Do not disassemble battery cartridge.
3. If operating time has become excessively
shorter, stop operating immediately. It may
result in a risk of overheating, possible burns
and even an explosion.
4.
If electrolyte gets into your eyes, rinse them out
with clear water and seek medical attention right
away. It may result in loss of your eyesight.
5. Do not short the battery cartridge:
(1) Do not touch the terminals with any con-
ductive material.
(2) Avoid storing battery cartridge in a con-
tainer with other metal objects such as
nails, coins, etc.
(3) Do not expose battery cartridge to water
or rain.
A battery short can cause a large current
ow, overheating, possible burns and even a
breakdown.
6. Do not store the tool and battery cartridge in
locations where the temperature may reach or
exceed 50 °C (122 °F).
7. Do not incinerate the battery cartridge even if
it is severely damaged or is completely worn
out. The battery cartridge can explode in a re.
8. Be careful not to drop or strike battery.
9. Do not use a damaged battery.
10. The contained lithium-ion batteries are subject
to the Dangerous Goods Legislation requirements.
For commercial transports e.g. by third parties,
forwarding agents, special requirement on packaging and labeling must be observed.
For preparation of the item being shipped, consulting an expert for hazardous material is required.
Please also observe possibly more detailed
national regulations.
Tape or mask off open contacts and pack up the
battery in such a manner that it cannot move
around in the packaging.
11. Follow your local regulations relating to dis-
posal of battery.
12. Use the batteries only with the products
specied by Makita. Installing the batteries to
non-compliant products may result in a re, excessive heat, explosion, or leak of electrolyte.
SAVE THESE INSTRUCTIONS.
CAUTION: Only use genuine Makita batteries.
Use of non-genuine Makita batteries, or batteries that
have been altered, may result in the battery bursting
causing res, personal injury and damage. It will
also void the Makita warranty for the Makita tool and
charger.
Tips for maintaining maximum
battery life
1. Charge the battery cartridge before completely
discharged. Always stop tool operation and
charge the battery cartridge when you notice
less tool power.
2. Never recharge a fully charged battery cartridge. Overcharging shortens the battery
service life.
3. Charge the battery cartridge with room temperature at 10 °C - 40 °C (50 °F - 104 °F). Let
a hot battery cartridge cool down before
charging it.
4 ENGLISH
Page 5
FUNCTIONAL
DESCRIPTION
CAUTION: Always be sure that the tool is
switched off and the battery cartridge is removed
before adjusting or checking function on the tool.
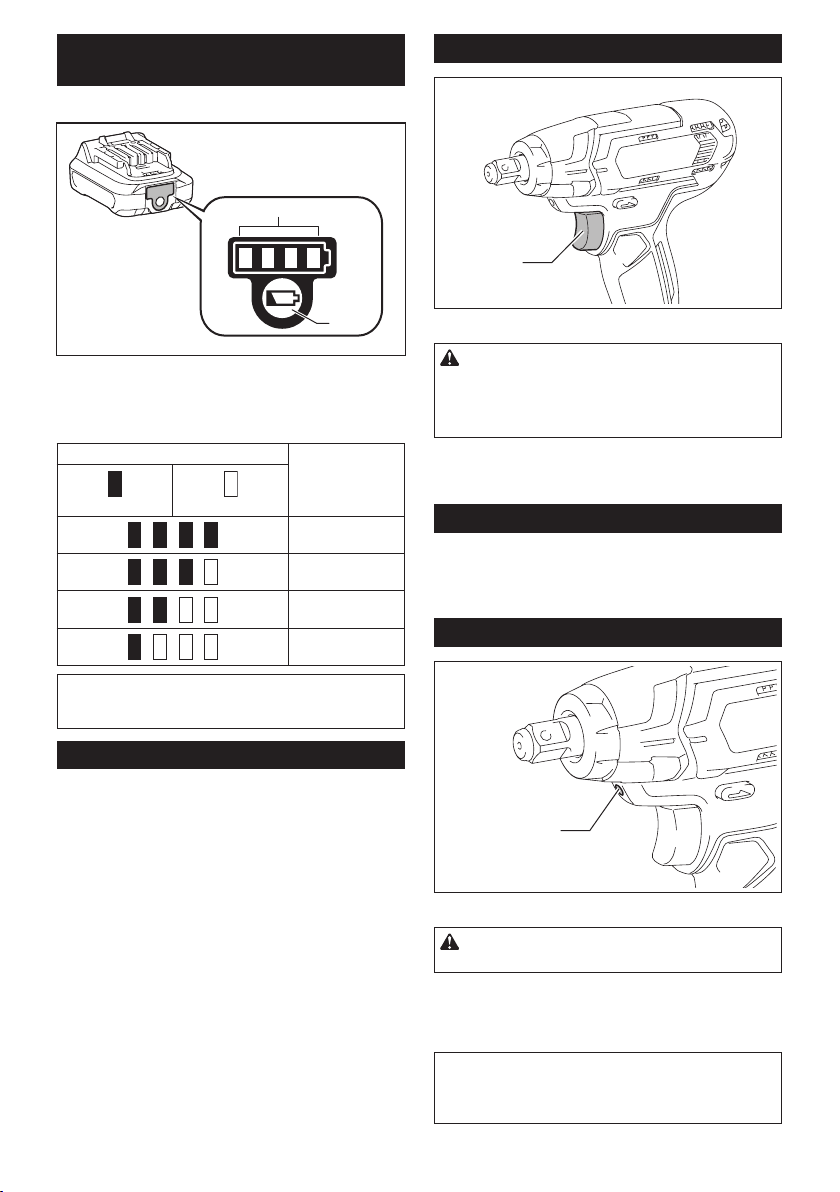
Indicating the remaining battery
capacity
Only for battery cartridges with the indicator
Installing or removing battery
cartridge
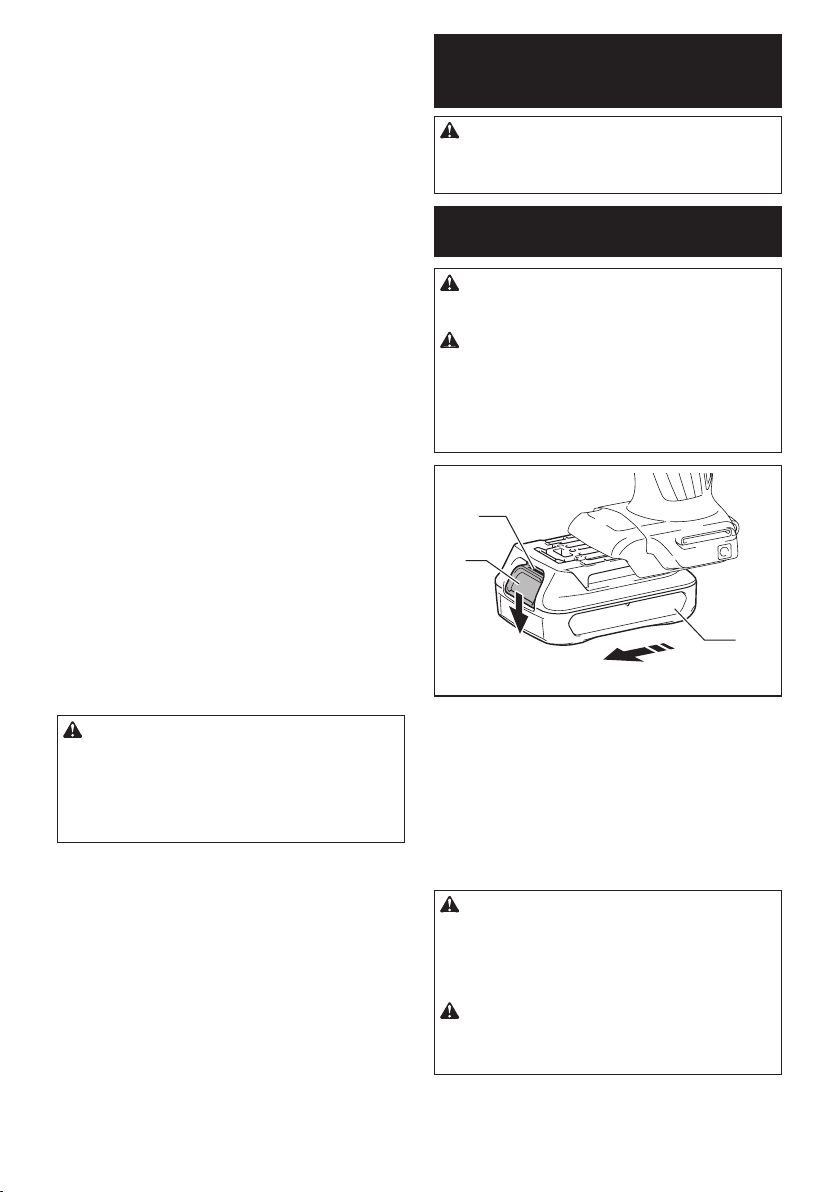
CAUTION: Always switch off the tool before
installing or removing of the battery cartridge.
CAUTION: Hold the tool and the battery car-
tridge rmly when installing or removing battery
cartridge. Failure to hold the tool and the battery
cartridge rmly may cause them to slip off your hands
and result in damage to the tool and battery cartridge
and a personal injury.
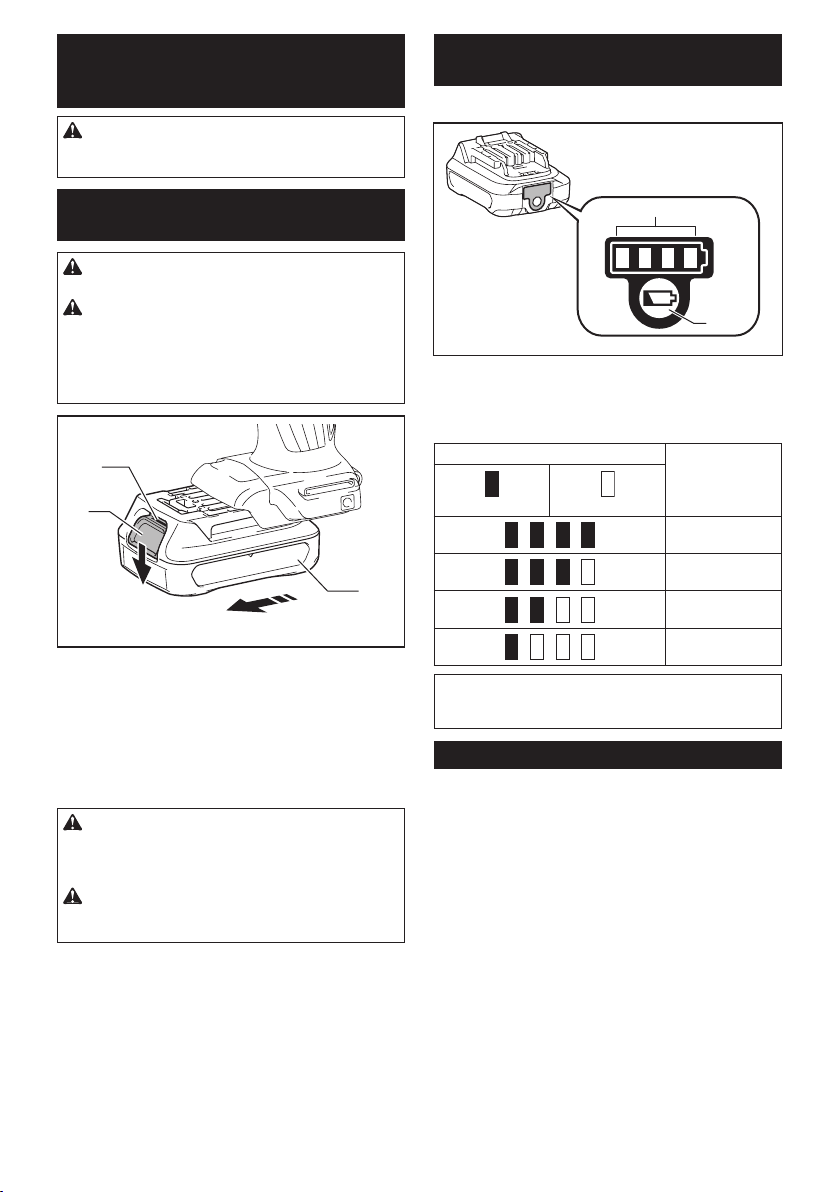
1
2
3
► 1. Red indicator 2. Button 3. Battery cartridge
To remove the battery cartridge, slide it from the tool
while sliding the button on the front of the cartridge.
To install the battery cartridge, align the tongue on the
battery cartridge with the groove in the housing and slip
it into place. Insert it all the way until it locks in place
with a little click. If you can see the red indicator on the
upper side of the button, it is not locked completely.
CAUTION: Always install the battery cartridge
fully until the red indicator cannot be seen. If not,
it may accidentally fall out of the tool, causing injury to
you or someone around you.
CAUTION: Do not install the battery cartridge
forcibly. If the cartridge does not slide in easily, it is
not being inserted correctly.
1
2
► 1. Indicator lamps 2. Check button
Press the check button on the battery cartridge to indicate the remaining battery capacity. The indicator lamps
light up for a few seconds.
Indicator lamps Remaining
Lighted Off
NOTE: Depending on the conditions of use and the
ambient temperature, the indication may differ slightly
from the actual capacity.
capacity
75% to 100%
50% to 75%
25% to 50%
0% to 25%
Battery protection system
The tool is equipped with a battery protection system.
This system automatically cuts off power to the motor to
extend battery life.
The tool will automatically stop during operation if the
tool and/or battery are placed under one of the following
conditions:
Overloaded:
The tool is operated in a manner that causes it to draw
an abnormally high current.
In this situation, turn the tool off and stop the application
that caused the tool to become overloaded. Then turn
the tool on to restart.
If the tool does not start, the battery is overheated. In
this situation, let the battery cool before turning the tool
on again.
Low battery voltage:
The remaining battery capacity is too low and the tool
will not operate. If you turn the tool on, the motor does
not run or the motor runs again but stops soon. In this
situation, remove and recharge the battery.
5 ENGLISH
Page 6
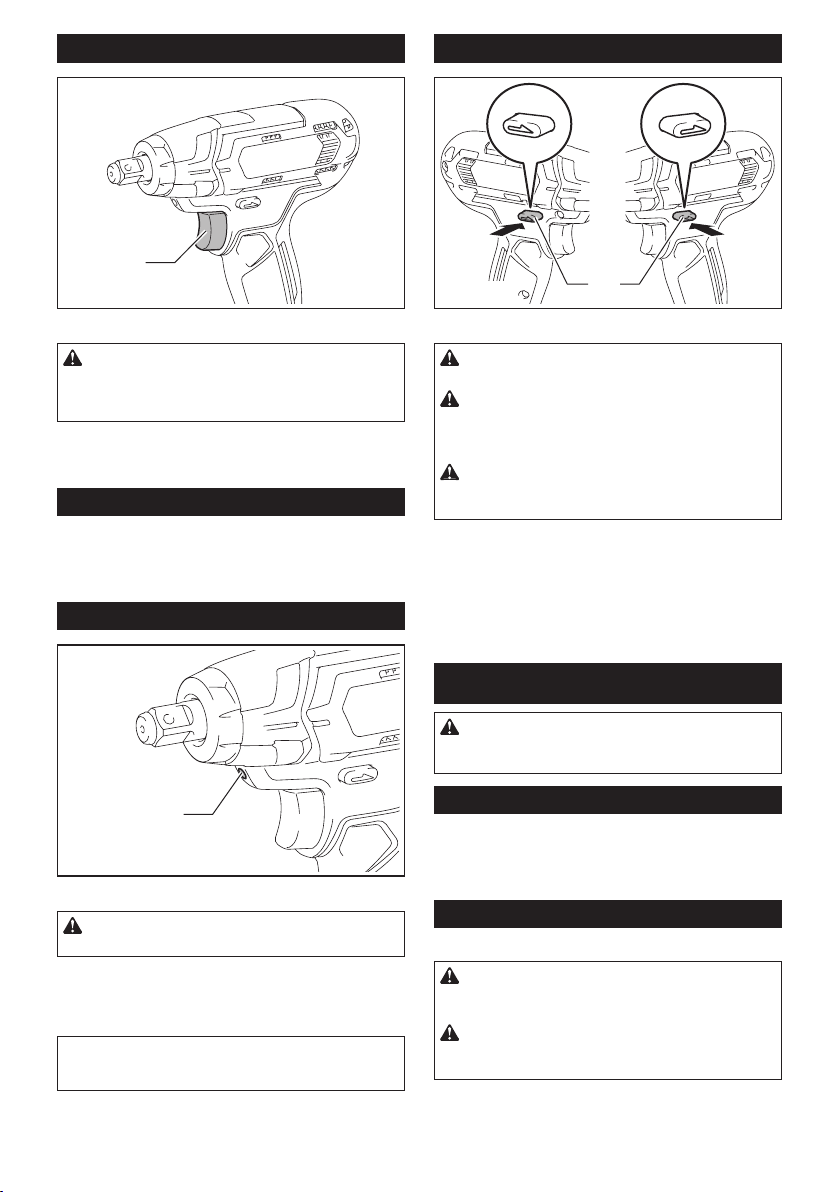
Switch action
AB
1
► 1. Switch trigger
Reversing switch action
1
► 1. Reversing switch lever
CAUTION: Before installing the battery car-
tridge into the tool, always check to see that the
switch trigger actuates properly and returns to
the "OFF" position when released.
To start the tool, simply pull the switch trigger. Tool
speed is increased by increasing pressure on the switch
trigger. Release the switch trigger to stop.
Electric brake
This tool is equipped with an electric brake. If the tool
consistently fails to quickly stop after the switch trigger
is released, have the tool serviced at a Makita service
center.
Lighting up the front lamp
1
► 1. Lamp
CAUTION: Do not look in the light or see the
source of light directly.
Pull the switch trigger to light up the lamp. The lamp
keeps on lighting while the switch trigger is being pulled.
The lamp goes out approximately 10 seconds after
releasing the switch trigger.
NOTE: Use a dry cloth to wipe the dirt off the lens of
the lamp. Be careful not to scratch the lens of lamp, or
it may lower the illumination.
CAUTION: Always check the direction of
rotation before operation.
CAUTION: Use the reversing switch only after
the tool comes to a complete stop. Changing the
direction of rotation before the tool stops may damage the tool.
CAUTION: When not operating the tool,
always set the reversing switch lever to the neutral position.
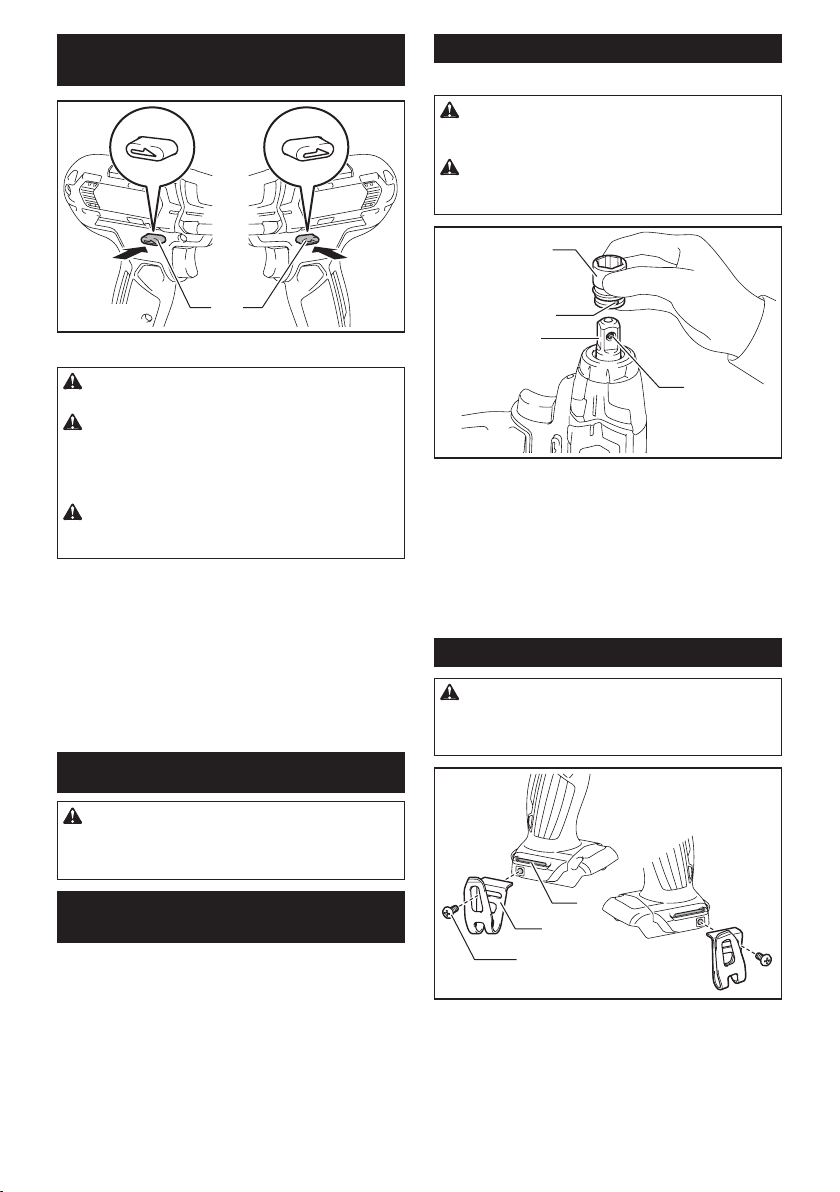
This tool has a reversing switch to change the direction
of rotation. Depress the reversing switch lever from the
A side for clockwise rotation or from the B side for counterclockwise rotation.
When the reversing switch lever is in the neutral position, the switch trigger cannot be pulled.
ASSEMBLY
CAUTION: Always be sure that the tool is
switched off and the battery cartridge is removed
before carrying out any work on the tool.
Selecting correct impact socket
Always use the correct size impact socket for bolts and
nuts. An incorrect size impact socket will result in inaccurate and inconsistent fastening torque and/or damage
to the bolt or nut.
Installing or removing impact socket
Optional accessory
CAUTION: Make sure that the impact socket
and the mounting portion are not damaged before
installing the impact socket.
CAUTION: After inserting the impact socket,
make sure that it is rmly secured. If it comes out,
do not use it.
6 ENGLISH
Page 7
1
13
2
3
4
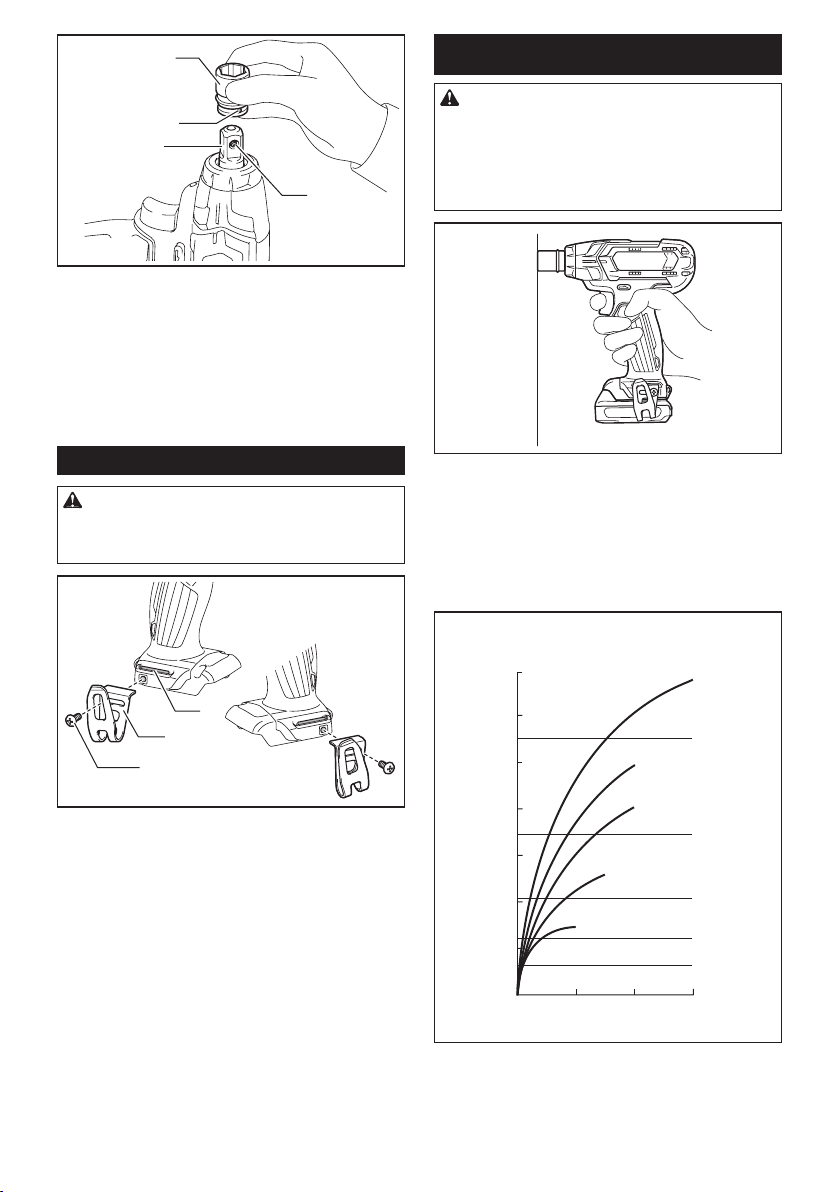
► 1. Impact socket 2. Hole 3. Square drive 4. Detent
pin
Align the hole in the side of the impact socket with the
detent pin on the square drive and push the impact
socket onto the square drive until it locks into place. Tap
it lightly if required.
To remove the impact socket, simply pull it off. If it is
hard to remove, depress the detent pin while pulling the
impact socket.
Installing hook
CAUTION: When installing the hook, always
secure it with the screw rmly. If not, the hook
may come off from the tool and result in the personal
injury.
1
2
3
► 1. Groove 2. Hook 3. Screw
The hook is convenient for temporarily hanging the tool.
This can be installed on either side of the tool. To install
the hook, insert it into a groove in the tool housing on
either side and then secure it with a screw. To remove,
loosen the screw and then take it out.
OPERATION
CAUTION: Always insert the battery cartridge
all the way until it locks in place. If you can see the
red indicator on the upper side of the button, it is not
locked completely. Insert it fully until the red indicator
cannot be seen. If not, it may accidentally fall out of
the tool, causing injury to you or someone around
you.
Hold the tool rmly and place the impact socket over
the bolt or nut. Turn the tool on and fasten for the proper
fastening time.
The proper fastening torque may differ depending upon
the kind or size of the bolt, the material of the workpiece
to be fastened, etc. The relation between fastening
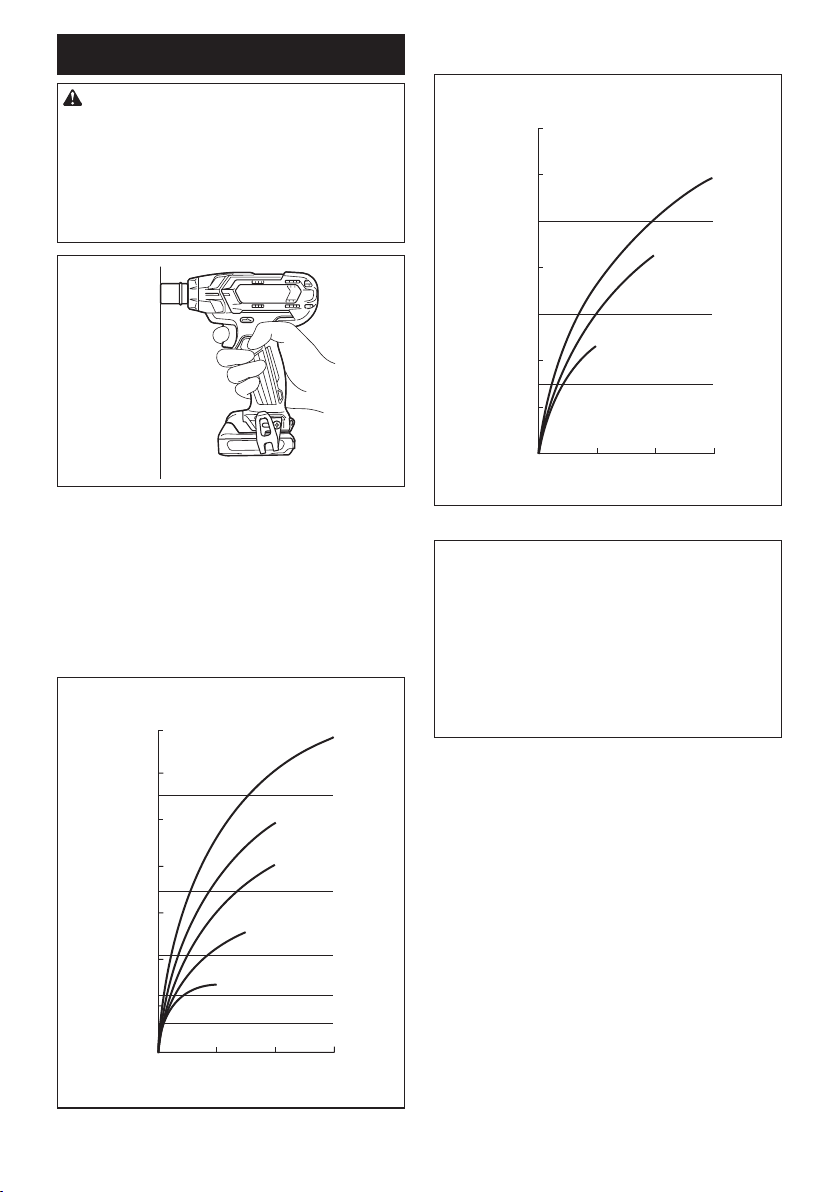
torque and fastening time is shown in the gures.
Proper fastening torque for standard bolt
N•m
(ft•lbs)
140
(100)
120
(90)
100
(70)
80
2
(60)
60
(40)
40
(30)
20
(10)
M10 (3/8″)
M8 (5/16″)
M16 (5/8″)
M16 (5/8″)
M14 (9/16″)
M12 (1/2″)
M14 (9/16″)
M12 (1/2″)
M10 (3/8″)
M8 (5/16″)
0
2
1
1. Fastening time (second) 2. Fastening torque
7 ENGLISH
Page 8
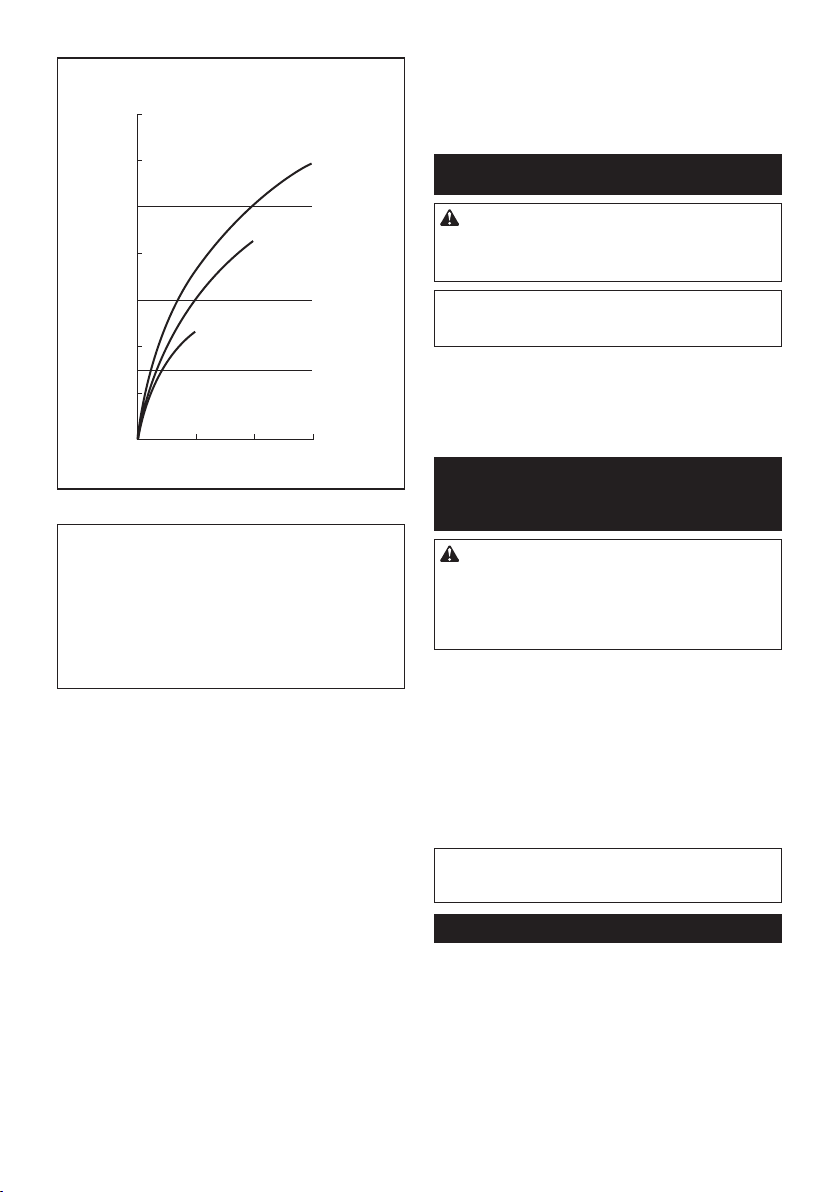
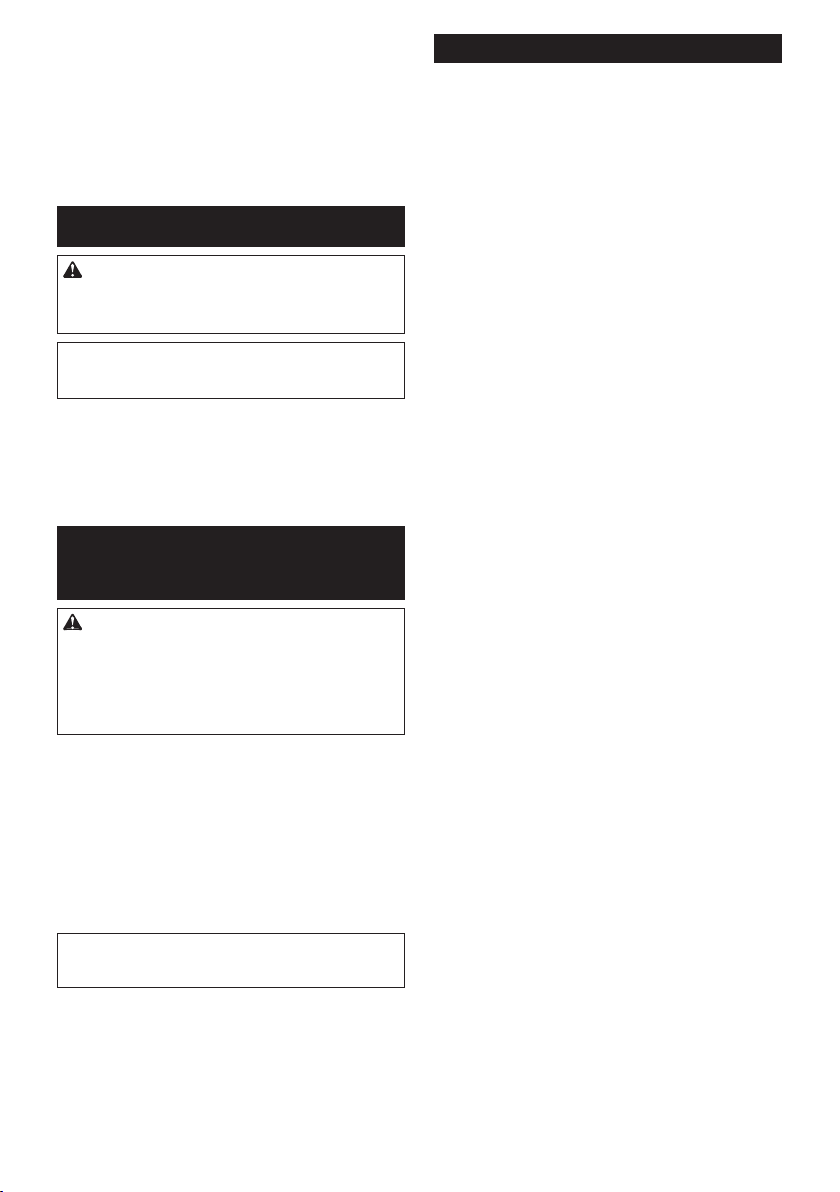
Proper fastening torque for high tensile bolt
03
N•m
(ft•lbs)
140
(100)
120
(90)
100
(70)
80
2
(60)
60
(40)
40
(30)
20
(10)
M8 (5/16″)
21
M12 (1/2″)
M12 (1/2″)
M10 (3/8″)
M10 (3/8″)
M8 (5/16″)
1
1. Fastening time (second) 2. Fastening torque
NOTE: Hold the tool pointed straight at the bolt or nut.
NOTE: Excessive fastening torque may damage the
bolt/nut or impact socket. Before starting your job,
always perform a test operation to determine the
proper fastening time for your bolt or nut.
NOTE: If the tool is operated continuously until the
battery cartridge has discharged, allow the tool to rest
for 15 minutes before proceeding with a fresh battery
cartridge.
The fastening torque is affected by a wide variety of
factors including the following. After fastening, always
check the torque with a torque wrench.
1. When the battery cartridge is discharged almost
completely, voltage will drop and the fastening
torque will be reduced.
2. Impact socket
• Failure to use the correct size impact socket
will cause a reduction in the fastening torque.
• A worn impact socket (wear on the hex end
or square end) will cause a reduction in the
3. Bolt
4. The use of the universal joint or the extension
fastening torque.
• Even though the torque coefcient and the
class of bolt are the same, the proper fastening torque will differ according to the diameter of bolt.
• Even though the diameters of bolts are the
same, the proper fastening torque will differ
according to the torque coefcient, the class
of bolt and the bolt length.
bar somewhat reduces the fastening force of the
impact wrench. Compensate by fastening for a
longer period of time.
5. The manner of holding the tool or the material
of driving position to be fastened will affect the
torque.
6. Operating the tool at low speed will cause a reduction in the fastening torque.
MAINTENANCE
CAUTION: Always be sure that the tool is
switched off and the battery cartridge is removed
before attempting to perform inspection or
maintenance.
NOTICE: Never use gasoline, benzine, thinner,
alcohol or the like. Discoloration, deformation or
cracks may result.
To maintain product SAFETY and RELIABILITY,
repairs, any other maintenance or adjustment should
be performed by Makita Authorized or Factory Service
Centers, always using Makita replacement parts.
OPTIONAL
ACCESSORIES
CAUTION: These accessories or attachments
are recommended for use with your Makita tool
specied in this manual. The use of any other
accessories or attachments might present a risk of
injury to persons. Only use accessory or attachment
for its stated purpose.
If you need any assistance for more details regarding these accessories, ask your local Makita Service
Center.
• Impact socket
• Hook
• Extension bar
• Universal joint
• Socket bit adapter
• Plastic carrying case
• Makita genuine battery and charger
NOTE: Some items in the list may be included in the
tool package as standard accessories. They may
differ from country to country.
MAKITA LIMITED WARRANTY
Please refer to the annexed warranty sheet for the
most current warranty terms applicable to this product.
If annexed warranty sheet is not available, refer to the
warranty details set forth at below website for your
respective country.
United States of America: www.makitatools.com
Canada: www.makita.ca
Other countries: www.makita.com
8 ENGLISH
Page 9
ESPAÑOL (Instrucciones originales)
ESPECIFICACIONES
Modelo: WT03
Capacidades de apriete Perno estándar 8 mm - 16 mm (5/16″ - 5/8″)
Perno de alta resistencia 6 mm - 12 mm (1/4″ - 1/2″)
Adaptador cuadrado 12,7 mm (1/2″)
Velocidad sin carga (RPM) 0 r/min - 2 600 r/min
Impactos por minuto 0 ipm - 3 200 ipm
Longitud total 168 mm (6-5/8″)
Tensión nominal 10,8 V c.c. - 12 V c.c. máx.
Peso neto 1,1 kg - 1,2 kg (2,4 lbs - 2,7 lbs)
• Debido a nuestro continuo programa de investigación y desarrollo, las especicaciones aquí incluidas están
sujetas a cambio sin previo aviso.
• Las especicaciones pueden variar de país a país.
• El peso puede variar en función de los accesorios, incluido el cartucho de batería. En la tabla se muestra la
combinación de peso más ligero y más pesado conforme al procedimiento 01/2014 de EPTA.
Cartucho de batería y cargador aplicables
Cartucho de batería BL1016 / BL1021B / BL1041B
Cargador DC10SB / DC10WD / DC18RE
• Algunos de los cartuchos de batería y cargadores enumerados arriba podrían no estar disponibles dependiendo de su área de residencia.
ADVERTENCIA: Use únicamente los cartuchos de batería y los cargadores indicados arriba. El uso de
cualquier otro cartucho de batería y cargador podría ocasionar una lesión y/o un incendio.
ADVERTENCIAS DE
SEGURIDAD
Advertencias generales de seguridad
para herramientas eléctricas
ADVERTENCIA: Lea todas las advertencias
de seguridad, instrucciones, ilustraciones y espe-
cicaciones suministradas con esta herramienta
eléctrica. El no seguir todas las instrucciones indi-
cadas a continuación podría ocasionar una descarga
eléctrica, incendio y/o lesiones graves.
Conserve todas las advertencias
e instrucciones como referencia
en el futuro.
En las advertencias, el término “herramienta eléctrica” se
reere a su herramienta eléctrica de funcionamiento con
conexión a la red eléctrica (con cableado eléctrico) o herramienta eléctrica de funcionamiento a batería (inalámbrica).
Seguridad en el área de trabajo
1. Mantenga el área de trabajo limpia y bien iluminada. Las áreas oscuras o desordenadas son
propensas a accidentes.
2. No utilice las herramientas eléctricas en
atmósferas explosivas, tal como en la presen-
cia de líquidos, gases o polvo inamables. Las
herramientas eléctricas crean chispas que pueden
prender fuego al polvo o los humos.
3. Mantenga a los niños y curiosos alejados
mientras utiliza una herramienta eléctrica. Las
distracciones le pueden hacer perder el control.
Seguridad eléctrica
1. Las clavijas de conexión de las herramientas
eléctricas deberán encajar perfectamente en la
toma de corriente. No modique nunca la clavija de conexión de ninguna forma. No utilice
ninguna clavija adaptadora con herramientas
eléctricas que tengan conexión a tierra (puesta
a tierra). La utilización de clavijas no modica-
das y que encajen perfectamente en la toma de
corriente reducirá el riesgo de que se produzca
una descarga eléctrica.
2.
Evite tocar con el cuerpo supercies conectadas
a tierra o puestas a tierra tales como tubos, radiadores, cocinas y refrigeradores. Si su cuerpo es
puesto a tierra o conectado a tierra existirá un mayor
riesgo de que sufra una descarga eléctrica.
3. No exponga las herramientas eléctricas a la
lluvia ni a condiciones húmedas. La entrada de
agua en una herramienta eléctrica aumentará el
riesgo de que se produzca una descarga eléctrica.
9 ESPAÑOL
Page 10

4. No maltrate el cable. Nunca utilice el cable
para transportar, jalar o desconectar la herramienta eléctrica. Mantenga el cable alejado del
calor, aceite, objetos cortantes o piezas móviles. Los cables dañados o enredados aumentan
el riesgo de sufrir una descarga eléctrica.
5.
Cuando utilice una herramienta eléctrica en
exteriores, utilice un cable de extensión apropiado para uso en exteriores. La utilización de un
cable apropiado para uso en exteriores reducirá el
riesgo de que se produzca una descarga eléctrica.
6. Si no es posible evitar usar una herramienta
eléctrica en condiciones húmedas, utilice un
alimentador protegido con interruptor de circuito de falla a tierra (ICFT). El uso de un ICFT
reduce el riesgo de descarga eléctrica.
7.
Las herramientas eléctricas pueden producir campos electromagnéticos (CEM) que no son dañinos
para el usuario. Sin embargo, si los usuarios tienen
marcapasos y otros dispositivos médicos similares,
deberán consultar al fabricante de su dispositivo y/o a
su médico antes de operar esta herramienta eléctrica.
Seguridad personal
1. Manténgase alerta, preste atención a lo que
está haciendo y utilice su sentido común
cuando opere una herramienta eléctrica. No
utilice una herramienta eléctrica cuando esté
cansado o bajo la inuencia de drogas, alcohol o medicamentos. Un momento de distracción
mientras opera las herramientas eléctricas puede
terminar en una lesión grave.
2. Use equipo de protección personal. Póngase
siempre protección para los ojos. El equipo
protector tal como máscara contra el polvo, zapa-
tos de seguridad antiderrapantes, casco rígido y
protección para oídos utilizado en las condiciones
apropiadas reducirá el riesgo de lesiones.
3.
Impida el encendido accidental. Asegúrese de
que el interruptor esté en la posición de apagado antes de conectar a la alimentación eléctrica y/o de colocar el cartucho de batería, así
como al levantar o cargar la herramienta. Cargar
las herramientas eléctricas con su dedo en el inte
rruptor o enchufarlas con el interruptor encendido
hace que los accidentes sean comunes.
4. Retire cualquier llave de ajuste o llave de
apriete antes de encender la herramienta. Una
llave de ajuste o llave de apriete que haya sido
dejada puesta en una parte giratoria de la herra-
mienta eléctrica puede ocasionar alguna lesión.
5.
No utilice la herramienta donde no alcance.
Mantenga los pies sobre suelo rme y el equilibrio
en todo momento. Esto permite un mejor control de
la herramienta eléctrica en situaciones inesperadas.
6.
Use una vestimenta apropiada. No use ropa suelta
ni alhajas. Mantenga el cabello, la ropa y los guantes alejados de las piezas móviles. Las prendas de
vestir holgadas, las alhajas y el cabello largo suelto
podrían engancharse en estas piezas móviles.
7. Si dispone de dispositivos para la conexión
de equipos de extracción y recolección de
polvo, asegúrese de conectarlos y utilizarlos
debidamente. Hacer uso de la recolección de
polvo puede reducir los riesgos relacionados con
el polvo.
8.
No permita que la familiaridad adquirida debido
al uso frecuente de las herramientas haga que se
sienta conado e ignore los principios de seguridad de las herramientas. Un descuido podría oca-
sionar una lesión grave en una fracción de segundo.
9. Utilice siempre gafas protectoras para prote-
ger sus ojos de lesiones al usar herramientas
eléctricas. Las gafas deben cumplir con la
Norma ANSI Z87.1 en EUA.
Es responsabilidad del empleador imponer
el uso de equipos protectores de seguridad
apropiados a los operadores de la herramienta
y demás personas cerca del área de trabajo.
Mantenimiento y uso de la herramienta eléctrica
1. No fuerce la herramienta eléctrica. Utilice la
herramienta eléctrica correcta para su aplicación. La herramienta eléctrica adecuada hará un
mejor trabajo y de forma más segura a la velocidad para la que ha sido fabricada.
2.
No utilice la herramienta eléctrica si el interruptor no la enciende y apaga. Cualquier herra-
mienta eléctrica que no pueda ser controlada con
el interruptor es peligrosa y debe ser reemplazada.
3.
Desconecte la clavija de la fuente de alimentación y/o retire la batería de la herramienta eléctrica, en caso de ser removible, antes de realizar
ajustes, cambiar accesorios o almacenar las
herramientas eléctricas. Tales medidas de segu-
ridad preventivas reducirán el riesgo de poner en
marcha la herramienta eléctrica de forma accidental.
4. Guarde la herramienta eléctrica que no use
fuera del alcance de los niños y no permita
que las personas que no están familiarizadas
con ella o con las instrucciones la operen. Las
herramientas eléctricas son peligrosas en manos
de personas que no saben operarlas.
5.
Dé mantenimiento a las herramientas eléctricas
y los accesorios. Compruebe que no haya piezas
móviles desalineadas o estancadas, piezas rotas
y cualquier otra condición que pueda afectar
al funcionamiento de la herramienta eléctrica.
-
10 ESPAÑOL
Si la herramienta eléctrica está dañada, haga
que la reparen antes de utilizarla. Muchos de los
accidentes son ocasionados por no dar un mantenimiento adecuado a las herramientas eléctricas.
6.
Mantenga las herramientas de corte limpias y
losas. Si recibe un mantenimiento adecuado y tiene
los bordes alados, es probable que la herramienta
se atasque menos y sea más fácil controlarla.
7.
Utilice la herramienta eléctrica, los accesorios y
las brocas de acuerdo con estas instrucciones,
considerando las condiciones laborales y el
trabajo a realizar. Si utiliza la herramienta eléctrica
para realizar operaciones distintas de las indicadas,
podrá presentarse una situación peligrosa.
8.
Mantenga los mangos y supercies de asimiento secos, limpios y libres de aceite o grasa.
Los mangos y supercies de asimiento resbalosos
no permiten una manipulación segura ni el control
de la herramienta en situaciones inesperadas.
9. Cuando vaya a utilizar esta herramienta, evite
usar guantes de trabajo de tela ya que éstos
podrían atorarse. Si los guantes de trabajo de
tela llegaran a atorarse en las piezas móviles,
esto podría ocasionar lesiones personales.
Page 11
Uso y cuidado de la herramienta a batería
1. Recargue sólo con el cargador especicado
por el fabricante. Un cargador que es adecuado
para un solo tipo de batería puede generar riesgo
de incendio al ser utilizado con otra batería.
2. Utilice las herramientas eléctricas solamente
con las baterías designadas especícamente
para ellas. La utilización de cualquier otra batería
puede crear un riesgo de lesiones o incendio.
3.
Cuando no se esté usando la batería, manténgala
alejada de otros objetos metálicos, como sujetapapeles (clips), monedas, llaves, clavos, tornillos
u otros objetos pequeños de metal los cuales
pueden actuar creando una conexión entre las
terminales de la batería. Originar un cortocircuito en
las terminales puede causar quemaduras o incendios.
4.
En condiciones abusivas, podrá escapar líquido de
la batería; evite tocarlo. Si lo toca accidentalmente,
enjuague con agua. Si hay contacto del líquido con los
ojos, busque asistencia médica. Puede que el líquido
expulsado de la batería cause irritación o quemaduras.
5. No utilice una herramienta ni una batería que
estén dañadas o hayan sido modicadas. Las
baterías dañadas o modicadas podrían ocasionar una situación inesperada provocando un
incendio, explosión o riesgo de lesiones.
6.
No exponga la herramienta ni la batería al fuego ni a una
temperatura excesiva. La exposición al fuego o a una tem-
peratura superior a los 130 °C podría causar una explosión.
7.
Siga todas las instrucciones para la carga y
evite cargar la herramienta o la batería fuera del
rango de temperatura especicado en las instrucciones. Una carga inadecuada o a una tempe-
ratura fuera del rango especicado podría dañar la
batería e incrementar el riesgo de incendio.
Servicio
1. Haga que una persona calicada repare la
herramienta eléctrica utilizando sólo piezas de
repuesto idénticas. Esto asegura que se man-
tenga la seguridad de la herramienta eléctrica.
2.
Nunca dé servicio a baterías que estén dañadas. El
servicio a las baterías solamente deberá ser efectuado
por el fabricante o un agente de servicio autorizado.
3. Siga las instrucciones para la lubricación y
cambio de accesorios.
4. No modique ni intente reparar el aparato ni el
paquete de baterías salvo como se indique en
las instrucciones para el uso y cuidado.
Advertencias de seguridad para la
llave de impacto inalámbrica
1.
Sujete la herramienta eléctrica por las supercies
de agarre aisladas al realizar una operación en
la que el sujetador pueda entrar en contacto con
cables ocultos. Si el sujetador entra en contacto con
un cable con corriente, las piezas metálicas expuestas de la herramienta eléctrica se cargarán también
de corriente y el operario puede recibir una descarga.
2. Póngase protectores de oídos.
3. Revise cuidadosamente el dado de impacto
para ver que no haya desgaste, grietas o
daños antes de la instalación.
4. Sujete la herramienta con rmeza.
5.
Mantenga las manos alejadas de las piezas giratorias.
6.
No toque el dado de impacto, el perno, la tuerca
o la pieza de trabajo inmediatamente después
de la operación. Podrían estar extremadamente
calientes y causarle quemaduras en la piel.
7.
Asegúrese siempre de que pisa sobre suelo rme.
Asegúrese de que no haya nadie debajo
cuando utilice la herramienta en lugares altos.
8.
La torsión de apriete apropiada puede variar en
función del tipo o tamaño del perno. Compruebe
el par de apriete con una llave de torsión.
GUARDE ESTAS INSTRUCCIONES.
ADVERTENCIA: NO DEJE que la comodidad
o familiaridad con el producto (a base de utilizarlo
repetidamente) evite que siga estrictamente las
normas de seguridad para dicho producto.
El USO INCORRECTO o el no seguir las normas
de seguridad indicadas en este manual de instrucciones puede ocasionar lesiones graves.
Símbolos
A continuación se muestran los símbolos utilizados
para la herramienta.
volts o voltios
corriente directa o continua
velocidad sin carga
revoluciones o alternaciones por minuto,
frecuencia de rotación
número de percusiones
Instrucciones importantes de
seguridad para el cartucho de batería
1.
Antes de utilizar el cartucho de batería, lea todas
las instrucciones e indicaciones de precaución
en el (1) el cargador de batería, (2) la batería, y (3)
el producto con el que se utiliza la batería.
2. No desarme el cartucho de batería.
3. Si el tiempo de operación se ha acortado en
exceso, deje de operar de inmediato. Podría
correrse el riesgo de sobrecalentamiento,
posibles quemaduras e incluso explosión.
4. En caso de que ingresen electrolitos en sus
ojos, enjuáguelos bien con agua limpia y consulte de inmediato a un médico. Esto podría
ocasionar pérdida de visión.
5. Evite cortocircuitar el cartucho de batería:
(1) No toque las terminales con ningún mate-
rial conductor.
(2) Evite guardar el cartucho de batería en un
cajón junto con otros objetos metálicos,
tales como clavos, monedas, etc.
(3) No exponga el cartucho de batería al
agua o la lluvia.
11 ESPAÑOL
Page 12
Un cortocircuito en la batería puede causar
un ujo grande de corriente, sobrecalentamiento, posibles quemaduras e incluso una
descompostura.
6. No guarde la herramienta ni el cartucho de
batería en lugares donde la temperatura pueda
alcanzar o exceder los 50°C (122°F).
7. Nunca incinere el cartucho de batería incluso
en el caso de que esté dañado seriamente o
ya no sirva en absoluto. El cartucho de batería
puede explotar si se tira al fuego.
8. Tenga cuidado de no dejar caer ni golpear la
batería.
9. No use una batería dañada.
10. Las baterías de ión de litio están sujetas a los
requisitos reglamentarios en materia de bienes peligrosos.
Para el trasporte comercial, por ej., mediante
terceros o agentes de transporte, se deben tomar
en cuenta los requisitos especiales relativos al
empaque y el etiquetado.
Para efectuar los preparativos del artículo que se
va a enviar, se requiere consultar a un experto
en materiales peligrosos. Si es posible, consulte
además otras regulaciones nacionales más detalladas.
Pegue o cubra con cinta adhesiva los contactos
abiertos y empaque la batería de manera que ésta
no pueda moverse dentro del paquete.
11. Siga las regulaciones locales relacionadas al
desecho de las baterías.
12. Utilice las baterías únicamente con los pro-
ductos especicados por Makita. Instalar las
baterías en productos que no cumplan con los
requisitos podría ocasionar un incendio, un calen-
tamiento excesivo, una explosión o una fuga de
electrolito.
GUARDE ESTAS
INSTRUCCIONES.
PRECAUCIÓN: Utilice únicamente baterías
originales de Makita. El uso de baterías no origina-
les de Makita, o de baterías alteradas, puede ocasionar que las baterías exploten causando un incendio,
lesiones personales y daños. Asimismo, esto invalidará la garantía de Makita para la herramienta y el
cargador Makita.
Consejos para alargar al máximo
la vida útil de la batería
1. Cargue el cartucho de batería antes de que
se descargue completamente. Pare siempre la operación y cargue el cartucho de
batería cuando note menos potencia en la
herramienta.
2. No cargue nunca un cartucho de batería que
esté completamente cargado. La sobrecarga
acortará la vida de servicio de la batería.
3. Cargue el cartucho de batería a una temperatura ambiente de 10 °C - 40 °C (50 °F - 104 °F).
Si un cartucho de batería está caliente, déjelo
enfriar antes de cargarlo.
DESCRIPCIÓN DEL
FUNCIONAMIENTO
PRECAUCIÓN: Asegúrese siempre de que la
herramienta esté apagada y el cartucho de batería
haya sido extraído antes de realizar cualquier
ajuste o comprobación en la herramienta.
Instalación o extracción del
cartucho de batería
PRECAUCIÓN: Apague siempre la herra-
mienta antes de colocar o quitar el cartucho de
batería.
PRECAUCIÓN: Sujete la herramienta y el car-
tucho de la batería con rmeza al colocar o quitar
el cartucho de batería. Si no se sujeta con rmeza la
herramienta y el cartucho de batería, puede ocasio-
nar que se resbalen de sus manos causando daños
a la herramienta y al cartucho de batería, así como
lesiones a la persona.
1
2
3
► 1. Indicador rojo 2. Botón 3. Cartucho de batería
Para quitar el cartucho de batería, deslícelo de la herra-
mienta mientras desliza el botón sobre la parte delantera del cartucho.
Para colocar el cartucho de batería, alinee la lengüeta
sobre el cartucho de batería con la ranura en la carcasa
y deslice en su lugar. Inserte por completo hasta que
se je en su lugar con un pequeño clic. Si puede ver el
indicador rojo del lado superior del botón, esto indica
que no ha quedado jo por completo.
PRECAUCIÓN: Introduzca siempre com-
pletamente el cartucho de batería hasta que
el indicador rojo no pueda verse. Si no, podría
accidentalmente salirse de la herramienta y caer al
suelo causando una lesión a usted o alguien a su
alrededor.
PRECAUCIÓN: No instale el cartucho de
batería a la fuerza. Si el cartucho no se desliza al
interior fácilmente, se debe a que no está siendo
insertado correctamente.
12 ESPAÑOL
Page 13
Indicación de la capacidad restante
de la batería
Únicamente para cartuchos de batería con el indicador
1
Accionamiento del interruptor
1
2
► 1. Luces indicadoras 2. Botón de vericación
Oprima el botón de vericación en el cartucho de la batería
para que indique la capacidad restante de la batería. Las
luces indicadoras se iluminarán por algunos segundos.
Luces indicadoras Capacidad
Iluminadas Apagado
NOTA: Dependiendo de las condiciones de uso y
la temperatura ambiente, la indicación podrá diferir
ligeramente de la capacidad real.
restante
75% a 100%
50% a 75%
25% a 50%
0% a 25%
Sistema de protección de batería
La herramienta está equipada con un sistema de protección de
batería. Este sistema corta en forma automática el suministro
de energía al motor para prolongar la vida útil de la batería.
La herramienta se detendrá automáticamente durante
el funcionamiento si la herramienta y/o la batería se
someten a una de las siguientes condiciones:
Sobrecarga:
La herramienta se está utilizando de una manera que causa
que consuma una cantidad de corriente inusualmente alta.
En este caso, apague la herramienta y detenga la aplicación que causó que la herramienta se sobrecargara.
Luego encienda la herramienta para reiniciarla.
Si la herramienta no arranca, signica que la batería se
sobrecalentó. En este caso, espere a que la batería se
enfríe antes de volver a encender la herramienta.
Bajo voltaje de la batería:
La capacidad restante de la batería es demasiado baja
y la herramienta no funcionará. Si enciende la herra-
mienta, el motor no se pone en marcha o se pone en
marcha nuevamente pero al poco tiempo se detiene. En
este caso, retire la batería y vuelva a cargarla.
► 1. Gatillo interruptor
PRECAUCIÓN: Antes de insertar el cartucho
de batería en la herramienta, compruebe siempre y cerciórese de que el gatillo interruptor se
acciona debidamente y que vuelve a la posición
“OFF” (apagado) cuando lo suelta.
Para poner en marcha la herramienta, simplemente apriete el
gatillo interruptor. La velocidad de la herramienta aumenta incrementando la presión en el gatillo. Para detenerla, suelte el gatillo.
Freno eléctrico
La herramienta está equipada con un freno eléctrico. Si
la herramienta falla constantemente en detenerse tras
soltar el gatillo interruptor, lleve la herramienta a mantenimiento a un centro de servicio Makita.
Iluminación de la luz delantera
1
► 1. Luz
PRECAUCIÓN: No mire a la luz ni vea a la
fuente de luz directamente.
Jale el gatillo interruptor para encender la luz. La luz
continúa iluminándose mientras se está jalando el
gatillo interruptor. La luz se apaga aproximadamente 10
segundos tras haber liberado el gatillo interruptor.
NOTA: Utilice un paño seco para quitar la suciedad
de la lente de la lámpara. Tenga cuidado de no rayar
la lente de la lámpara ya que la iluminación podría
disminuir.
13 ESPAÑOL
Page 14
Accionamiento del conmutador de
AB
inversión de giro
Instalación o extracción del dado de impacto
Accesorio opcional
PRECAUCIÓN: Asegúrese de que el dado de
impacto y la pieza de montaje no estén dañados
antes de instalar el dado de impacto.
PRECAUCIÓN: Después de insertar el dado
de impacto, asegúrese de que éste quede rmemente asegurado. Si se llega a salir, no lo utilice.
1
1
► 1. Palanca del interruptor de inversión
PRECAUCIÓN: Conrme siempre la direc-
ción de rotación antes de la operación.
PRECAUCIÓN: Utilice el conmutador de
inversión solamente después de que la herramienta haya parado completamente. Si cambia
la dirección de rotación antes de que la herramienta
haya parado podría dañarla.
PRECAUCIÓN: Cuando no esté utilizando la
herramienta, ponga siempre la palanca del conmutador de inversión en la posición neutral.
Esta herramienta tiene un conmutador de inversión
para cambiar la dirección de rotación. Presione la
palanca del conmutador de inversión desde el lado A
para una rotación en sentido de las manecillas del reloj
o desde el lado B, para una rotación en sentido inverso
al de las manecillas del reloj.
Cuando la palanca del conmutador de inversión esté
en la posición neutral, no se podrá jalar el gatillo
conmutador.
ENSAMBLADO
PRECAUCIÓN: Asegúrese siempre de que la
herramienta esté apagada y el cartucho de batería
haya sido extraído antes de realizar cualquier
trabajo en la misma.
2
3
4
► 1. Dado de impacto 2. Oricio 3. Adaptador cua-
drado 4. Pasador de retención
Alinee el oricio en el lado del dado de impacto con el pasador de retención en el adaptador cuadrado y empuje el dado
de impacto en el adaptador cuadrado hasta que quede asegurado en su lugar. Golpéelo ligeramente de ser necesario.
Para quitar el dado de impacto, simplemente jálelo
hasta retirarlo. Si cuesta trabajo quitarlo, presione el
pasador de retención mientras jala el dado de impacto.
Instalación del gancho
PRECAUCIÓN: Cuando instale el gancho,
siempre asegúrelo rmemente con el tornillo. De
lo contrario, el gancho podría desprenderse de la
herramienta y ocasionar lesiones personales.
Selección del dado de impacto
correcto
Utilice siempre el dado de impacto de tamaño correcto
para pernos y tuercas. El utilizar un dado de impacto de
tamaño incorrecto dará como resultado una torsión de
apriete imprecisa e inconsistente y/o daños al perno o
a la tuerca.
► 1. Ranura 2. Gancho 3. Tornillo
El gancho resulta útil para colgar temporalmente la herramienta. Se puede instalar en cualquiera de los lados de
la herramienta. Para instalar el gancho, insértelo en una
ranura del alojamiento de la herramienta de cualquiera
de los lados y después sujételo con dos tornillos. Para
quitarlo, aoje los tornillos y después sáquelo.
14 ESPAÑOL
3
1
2
Page 15
OPERACIÓN
13
03
Torsión de apriete apropiada para un perno de alta
resistencia
PRECAUCIÓN: Siempre inserte completa-
mente el cartucho de batería hasta que quede
asegurado en su lugar. Si puede ver el indicador
rojo del lado superior del botón, esto indica que no
ha quedado completamente asegurado. Insértelo
por completo hasta que el indicador rojo no pueda
verse. De lo contrario, podría salirse accidentalmente
de la herramienta y ocasionarle lesiones a usted o a
alguien a su alrededor.
Sujete rmemente la herramienta y ponga el dado de impacto
sobre el perno o la tuerca. Ponga en marcha la herramienta y
apriete durante el tiempo de apriete apropiado.
La torsión de apriete adecuada podrá variar dependiendo del tipo o tamaño del perno, el material de la
pieza de trabajo que se va a apretar, etc. La relación
entre la torsión de apriete y el tiempo de apriete se
muestra en las guras.
Torsión de apriete apropiada para un perno
estándar
N•m
(ft•lbs)
140
N•m
2
(100
120
(90
100
(70
80
(60
60
(40
40
(30
20
(10
ft•lbs
N•m
ft•lbs
N•m
ft•lbs
N•m
ft•lbs
N•m
ft•lbs
N•m
ft•lbs
N•m
ft•lbs
)
)
)
)
)
)
)
0
10 mm
(3/8″)
8 mm (5/16″)
2
14 mm
(9/16″)
12 mm
(1/2″)
16 mm
(5/8″)
16 mm
(5/8″)
14 mm
(9/16″)
12 mm
(1/2″)
10 mm
(3/8″)
8 mm
(5/16″)
1
1. Tiempo de apriete (segundos) 2. Torsión de apriete
N•m
(ft•lbs)
140
N•m
(100
ft•lbs
)
120
N•m
ft•lbs)
(90
100
N•m
ft•lbs
)
(70
80
N•m
(60
60
(40
40
(30
20
(10
ft•lbs
N•m
ft•lbs
N•m
ft•lbs
N•m
ft•lbs
)
)
)
)
2
10 mm (3/8″)
8 mm (5/16″)
21
1
1. Tiempo de apriete (segundos) 2. Torsión de apriete
NOTA: Sujete la herramienta orientada en línea recta
al perno o tuerca.
NOTA: Una torsión de apriete excesiva puede dañar
el perno/tuerca o el dado de impacto. Antes de
comenzar su trabajo, realice siempre una operación
de prueba para determinar el tiempo de apriete apropiado para el perno o la tuerca que quiere apretar.
NOTA: Si la herramienta se opera de forma continua
hasta descargarse la batería, permita que la herramienta descanse unos 15 minutos antes de continuar
con una batería recargado.
La torsión de apriete se ve afectada por una amplia variedad
de factores incluyendo los siguientes. Después del apriete,
compruebe siempre la torsión con una llave de torsión.
1. Cuando el cartucho de batería esté casi completamente descargado, caerá la tensión y se reducirá
la torsión de apriete.
2. Dado de impacto
•
Si no se utiliza un dado de impacto del tamaño
correcto, la torsión de apriete se verá reducida.
• Si se utiliza un dado de impacto desgastado
(desgaste en el extremo hexagonal o en el
extremo cuadrado), la torsión de apriete se
3. Perno
15 ESPAÑOL
verá reducida.
•
Incluso si el coeciente de torsión y la clase de
tornillo son los mismos, la adecuada torsión de
apriete variará en función del diámetro del tornillo.
• Incluso si el diámetro del tornillo o perno
es el mismo, la torsión de apriete correcta
variará de acuerdo con el coeciente de
torsión, la clase y la longitud del perno o
tornillo.
12 mm
(1/2″)
12 mm
(1/2″)
10 mm
(3/8″)
8 mm
(5/16″)
Page 16
4. El uso de una junta universal o de una barra de
extensión reduce de alguna manera la fuerza de
apriete de la llave de impacto. Compense esto
alargando el tiempo de apriete.
5. La forma de sostener la herramienta o el material
en la posición a apretar afectará a la torsión.
6. La operación de la herramienta a baja velocidad
ocasionará una reducción de la torsión de apriete.
MANTENIMIENTO
PRECAUCIÓN: Asegúrese siempre de que la
herramienta esté apagada y el cartucho de batería
extraído antes de intentar realizar una inspección
o mantenimiento.
AVISO: Nunca use gasolina, bencina, diluyente
(tíner), alcohol o sustancias similares. Puede que
esto ocasione grietas o descoloramiento.
Para mantener la SEGURIDAD y FIABILIDAD del producto, las reparaciones, y cualquier otra tarea de mantenimiento o ajuste deberán ser realizadas en centros
de servicio autorizados o de fábrica Makita, empleando
siempre repuestos Makita.
ACCESORIOS
OPCIONALES
GARANTÍA LIMITADA DE MAKITA
Ésta Garantía no aplica para México
Consulte la hoja de la garantía anexa para ver los
términos más vigentes de la garantía aplicable a este
producto. En caso de no disponer de esta hoja de
garantía anexa, consulte los detalles sobre la garantía
descritos en el sitio web de su país respectivo indicado
a continuación.
Estados Unidos de América: www.makitatools.com
Canadá: www.makita.ca
Otros países: www.makita.com
PRECAUCIÓN: Estos accesorios o aditamen-
tos están recomendados para utilizarse con su
herramienta Makita especicada en este manual.
El empleo de cualquier otro accesorio o aditamento
puede conllevar el riesgo de lesiones personales.
Utilice los accesorios o aditamentos solamente para
su n establecido.
Si necesita cualquier ayuda para más detalles en
relación con estos accesorios, pregunte a su centro de
servicio local Makita.
• Dado de impacto
• Gancho
• Barra de extensión
• Junta universal
• Adaptador de punta de dado
• Estuche de transporte de plástico
• Batería y cargador originales de Makita
NOTA: Algunos de los artículos en la lista pueden
incluirse en el paquete de la herramienta como acce-
sorios estándar. Éstos pueden variar de país a país.
16 ESPAÑOL
Page 17

171819
Page 18

Page 19

Page 20

< USA only >
www.makita.com
WARNING
Some dust created by power sanding, sawing, grinding, drilling, and other
construction activities contains chemicals known to the State of California
to cause cancer, birth defects or other reproductive harm. Some examples
of these chemicals are:
• lead from lead-based paints,
• crystalline silica from bricks and cement and other masonry products, and
• arsenic and chromium from chemically-treated lumber.
Your risk from these exposures varies, depending on how often you do this
type of work. To reduce your exposure to these chemicals: work in a well
ventilated area, and work with approved safety equipment, such as those
dust masks that are specially designed to filter out microscopic particles.
< Sólo en los Estados Unidos >
ADVERTENCIA
Algunos polvos creados por el lijado, aserrado, esmerilado, taladrado y
otras actividades de la construcción contienen sustancias químicas
reconocidas por el Estado de California como causantes de cáncer, defectos
de nacimiento y otros peligros de reproducción. Algunos ejemplos de estos
productos químicos son:
• plomo de pinturas a base de plomo,
• sílice cristalino de ladrillos y cemento y otros productos de albañilería, y
• arsénico y cromo de maderas tratadas químicamente.
El riesgo al que se expone varía, dependiendo de la frecuencia con la que
realice este tipo de trabajo. Para reducir la exposición a estos productos
químicos: trabaje en un área bien ventilada y póngase el equipo de seguridad
indicado, tal como las máscaras contra polvo que están especialmente
diseñadas para filtrar partículas microscópicas.
Makita Corporation
3-11-8, Sumiyoshi-cho,
Anjo, Aichi 446-8502 Japan
885703-942
WT03-1
EN, ESMX
20190201
 Loading...