

Makita MR051 Instruction Manual

GB Rechargeable battery Instruction manual
Cordless Radio
F Radio de chantier sans fil Manuel d’instructions
avec batterie rechargeable
D Akku-Baustellenradio Betriebsanleitung
I Radio a batteria ricaricabile Istruzioni per l’uso
NL Draagbare oplaadbare- Gebruiksaanwijzing
accuradio
E Radio Inalámbrico con Manual de instrucciones
Batería Recargable
MR051
2
1
23
4
2
1
3
10
12
131415161718
9
4 5 6 78
11
19
20
15
3
5
67
8
43567 9
10
8
11
1
4
ENGLISH (Original instructions)
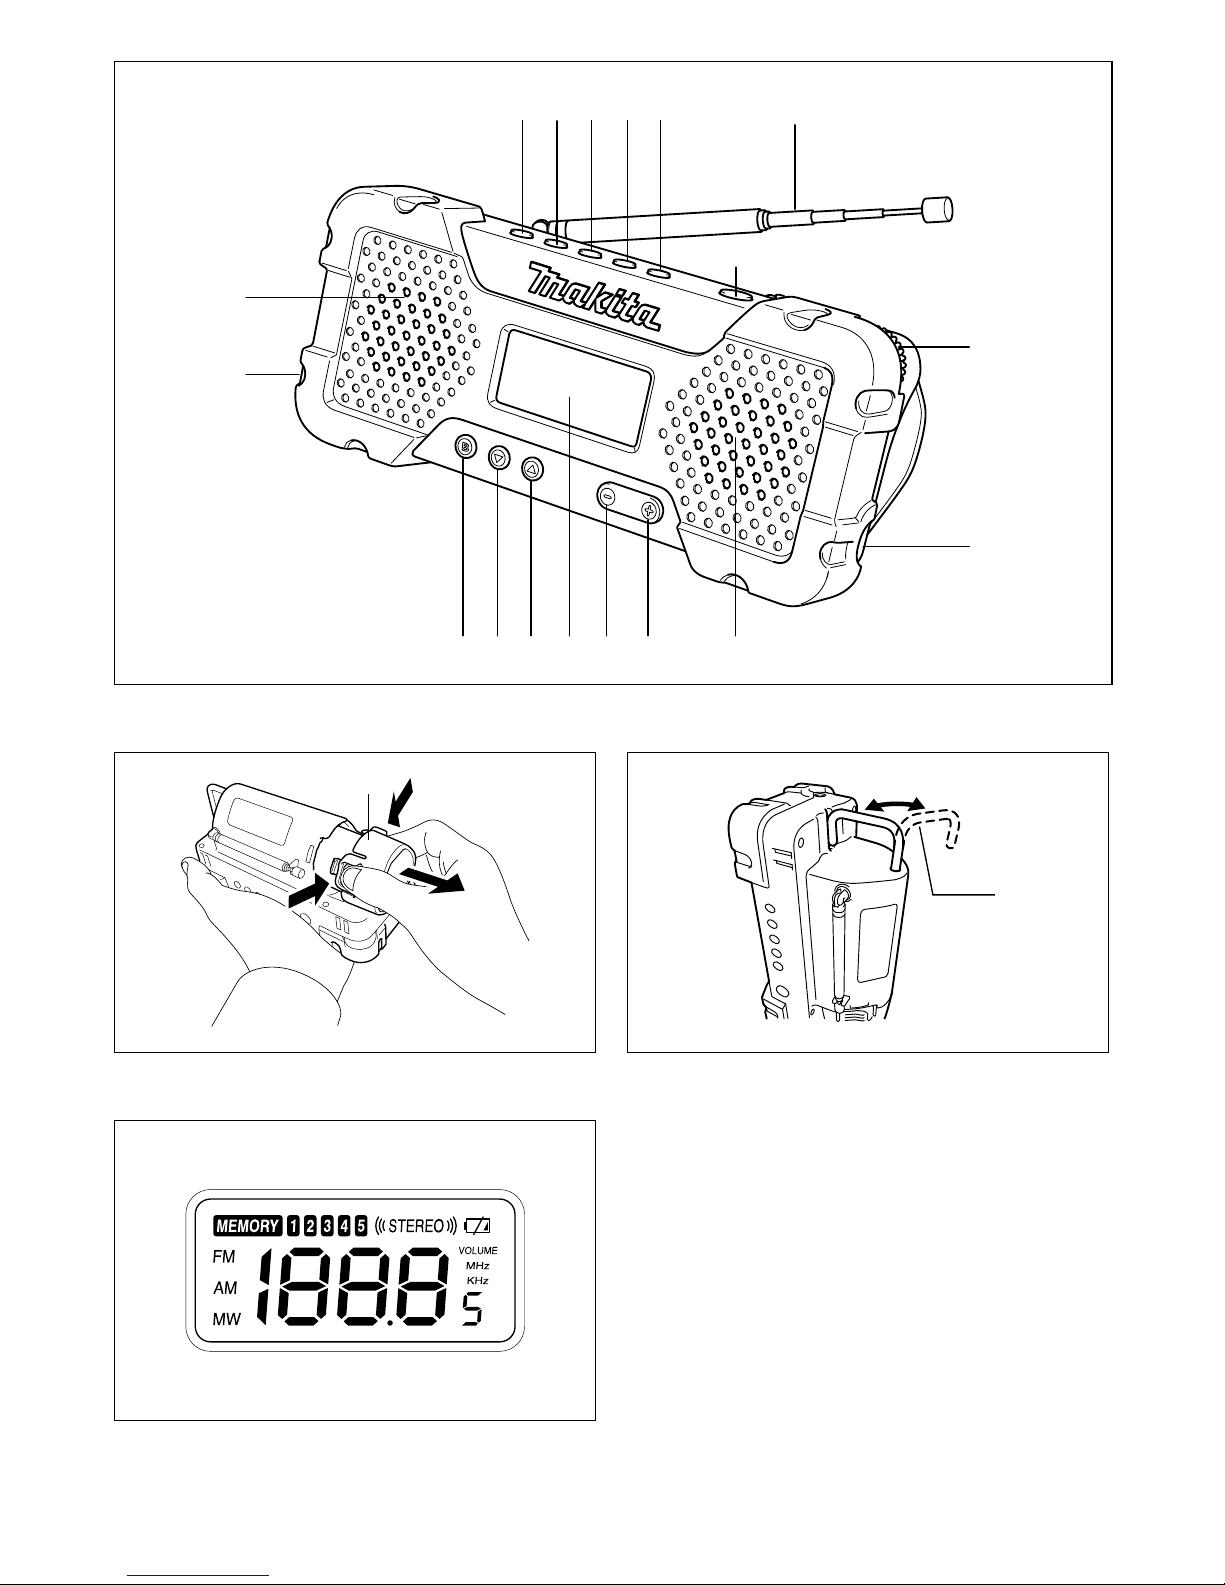
LOCATION OF CONTROLS (Fig. 1)
Explanation of general view
Symbols
The following show the symbols used for the equipment.
Be sure that you understand their meaning before use.
......... Read instruction manual.
.................. Always recycle batteries
................... Only for EU countries
Do not dispose of electric equipment
or battery pack together with
household waste material!
In observance of European Directive
2002/96/EC on waste electric and
electronic equipment, 2006/66/EC on
batteries and accumulators and
waste batteries and accumulators
and their implementation in
accordance with national laws,
electric equipment and battery pack
that have reached the end of their life
must be collected separately and
returned to an environmentally
compatible recycling facility.
IMPORTANT SAFETY
INSTRUCTIONS
WARNING:
When using electric tools, basic safety precautions should
always be followed to reduce the risk of fire, electric
shock, and personal injury, including the following:
1. Read this instruction manual and the charger
instruction manual carefully before use.
2. Clean only with dry cloth.
3. Do not block any ventilation opening. Install in
accordance with the manufacturer’s instruction.
4. Do not install near any heat sources such as radiators,
heat registers, stoves, or other apparatus (including
amplifiers) that produce heat.
5. Only use attachments/accessories specified by the
manufacturer.
6. Unplug this apparatus during lighting storms or when
unused for long periods of time.
7. A battery operated radio with integral batteries or a
separate battery pack must be recharged only with the
specified charger for the battery. A charger that may
be suitable for one type of battery may create a risk of
fire when used with another battery.
8. Use battery operated radio only with specifically
designated battery packs. Use of any other batteries
may create a risk of fire.
9. When battery pack is not in use, keep it away from
other metal objects like: paper clips, coins, keys, nails,
screws, or other small metal objects that can make a
connection from one terminal to another. Shorting the
battery terminals together may cause sparks, burns,
or a fire.
10. Avoid body contact with grounded surfaces such as
pipes, radiators, ranges and refrigerators. There is an
increased risk of electric shock if your body is
grounded.
CAUTION:
Danger of explosion if battery is incorrectly replaced.
Replace only with the same or equivalent type.
Batteries shall not be exposed to excessive heat such as
sunshine, fire or the like.
For a Portable Sound System, a warning that excessive
sound pressure from earphones and headphones can
cause hearing loss.
SAVE THESE INSTRUCTIONS.
Features:
1) Digital Tuning AM/FM Stereo Receiver
2) LCD Display with white color backlight
3) Power On/Off Switch
4) Band Selector (AM/FM)
5) Automatic Broadcasting Searching (Search Up/Down)
6) Digital Volume Control (Volume Up/Down)
7) Preset Memories (5 for AM, 5 for FM)
8) Rotary Tuning Knob
9) Loudspeaker ø36 mm 2pcs
10) Earphones Jack
11) Auxiliary Input Jack
12) FM Telescopic Antenna
13) Built-in AM Antenna
14) Operated by 10.8 V Rechargeable Li-ion battery
cartridge
15) Low Battery Indication
16) Low Battery Protection
17) Accessories: Shoulder Strap
1. AUXILIARY INPUT JACK
2. LEFT LOUDSPEAKER
3. PRESET MEMORY 1
4. PRESET MEMORY 2
5. PRESET MEMORY 3
6. PRESET MEMORY 4
7. PRESET MEMORY 5
8. TELESCOPIC ANTENNA
9. POWER
10. TUNING KNOB
11. EARPHONE JACK
12. RIGHT LOUDSPEAKER
13. VOLUME UP
14. VOLUME DOWN
15. LCD DISPLAY
16. SEARCH UP
17. SEARCH DOWN
18. BAND
19. Battery cartridge
20. Hook
Li-ion

5
General Specification
FUNCTIONAL DESCRIPTION
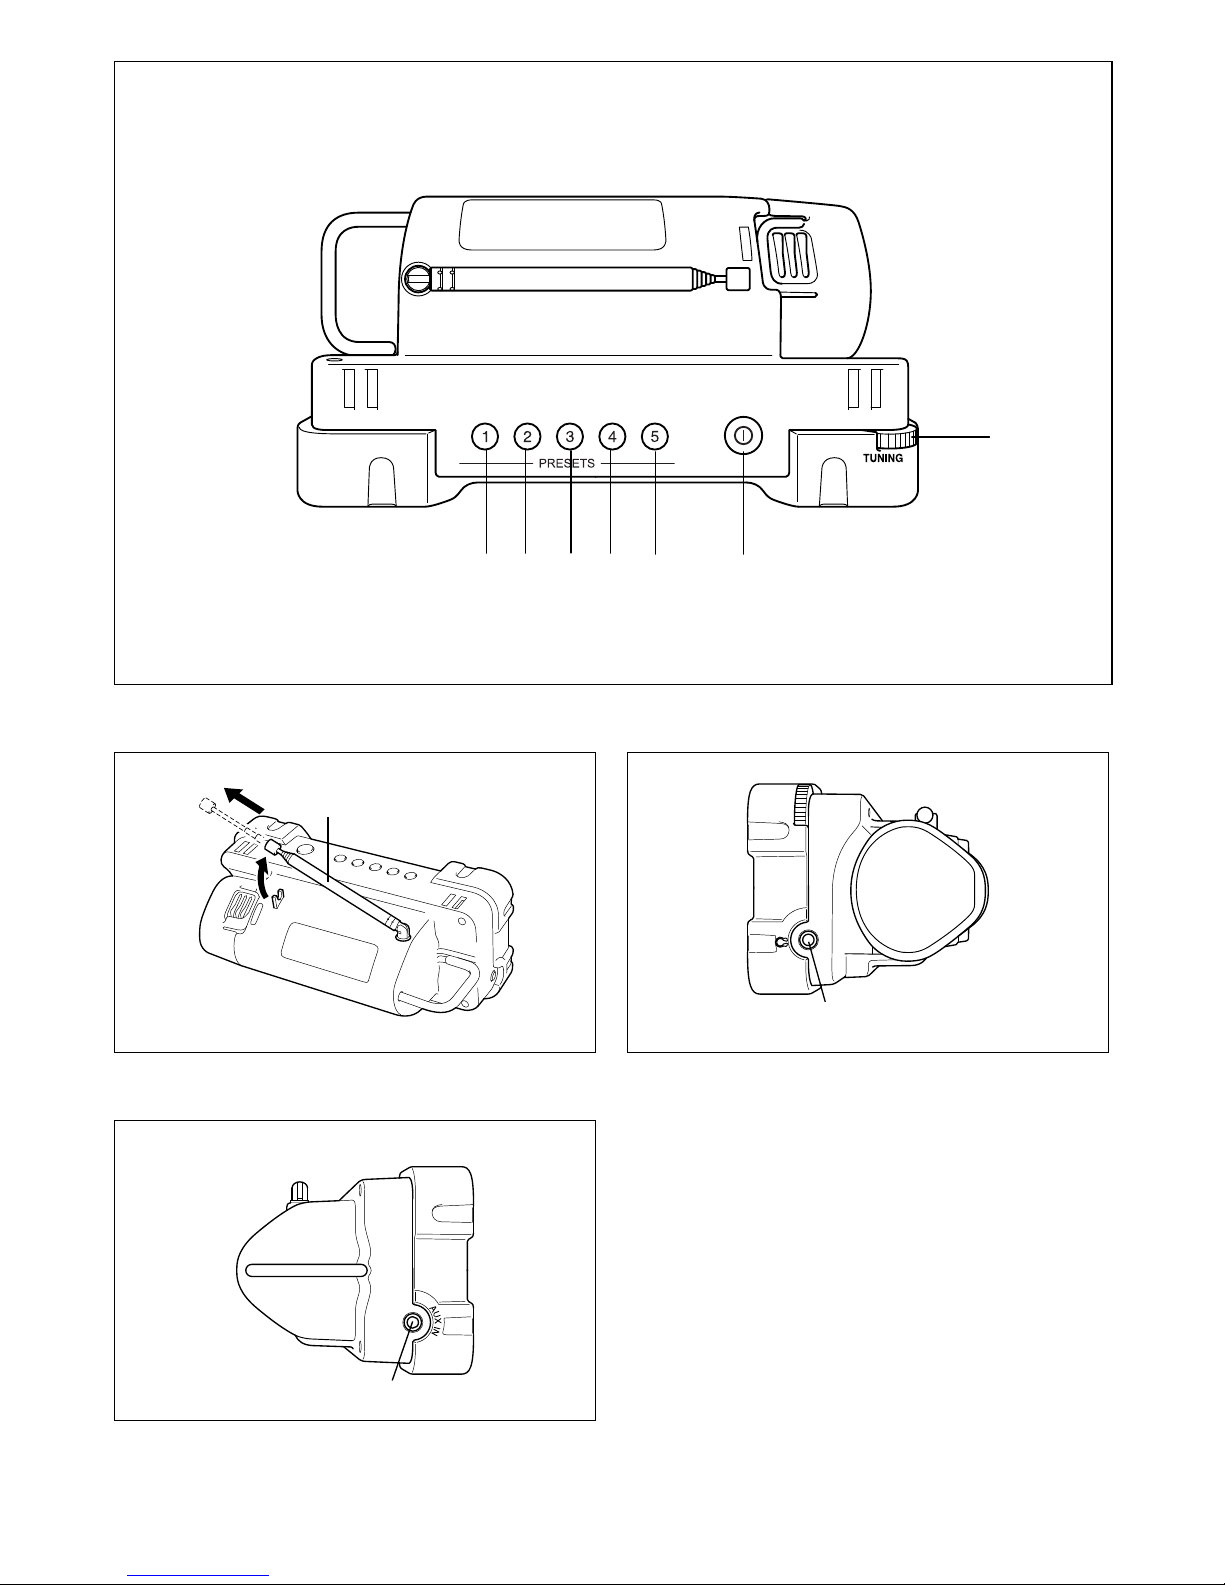
Installing or removing battery cartridge
(Fig. 2)
• To remove the battery cartridge, withdraw it from the
Cordless Radio while pressing the buttons on both
sides of the cartridge.
• To insert the battery cartridge, hold it so that the battery
cartridge front shape fits to that of the battery
installment opening and slip it into place.
Always insert it all the way until it locks in place with a
little click. If not, it may accidentally fall out of the
Cordless Radio, causing injury to you or someone
around you.
• Do not use force when inserting the battery cartridge. If
the cartridge does not slide in easily, it is not being
inserted correctly.
Hook (Fig. 3)
The hook is convenient for hanging the Cordless Radio
temporarily.
OPERATION
HOW TO LISTEN RADIO BROADCASTING
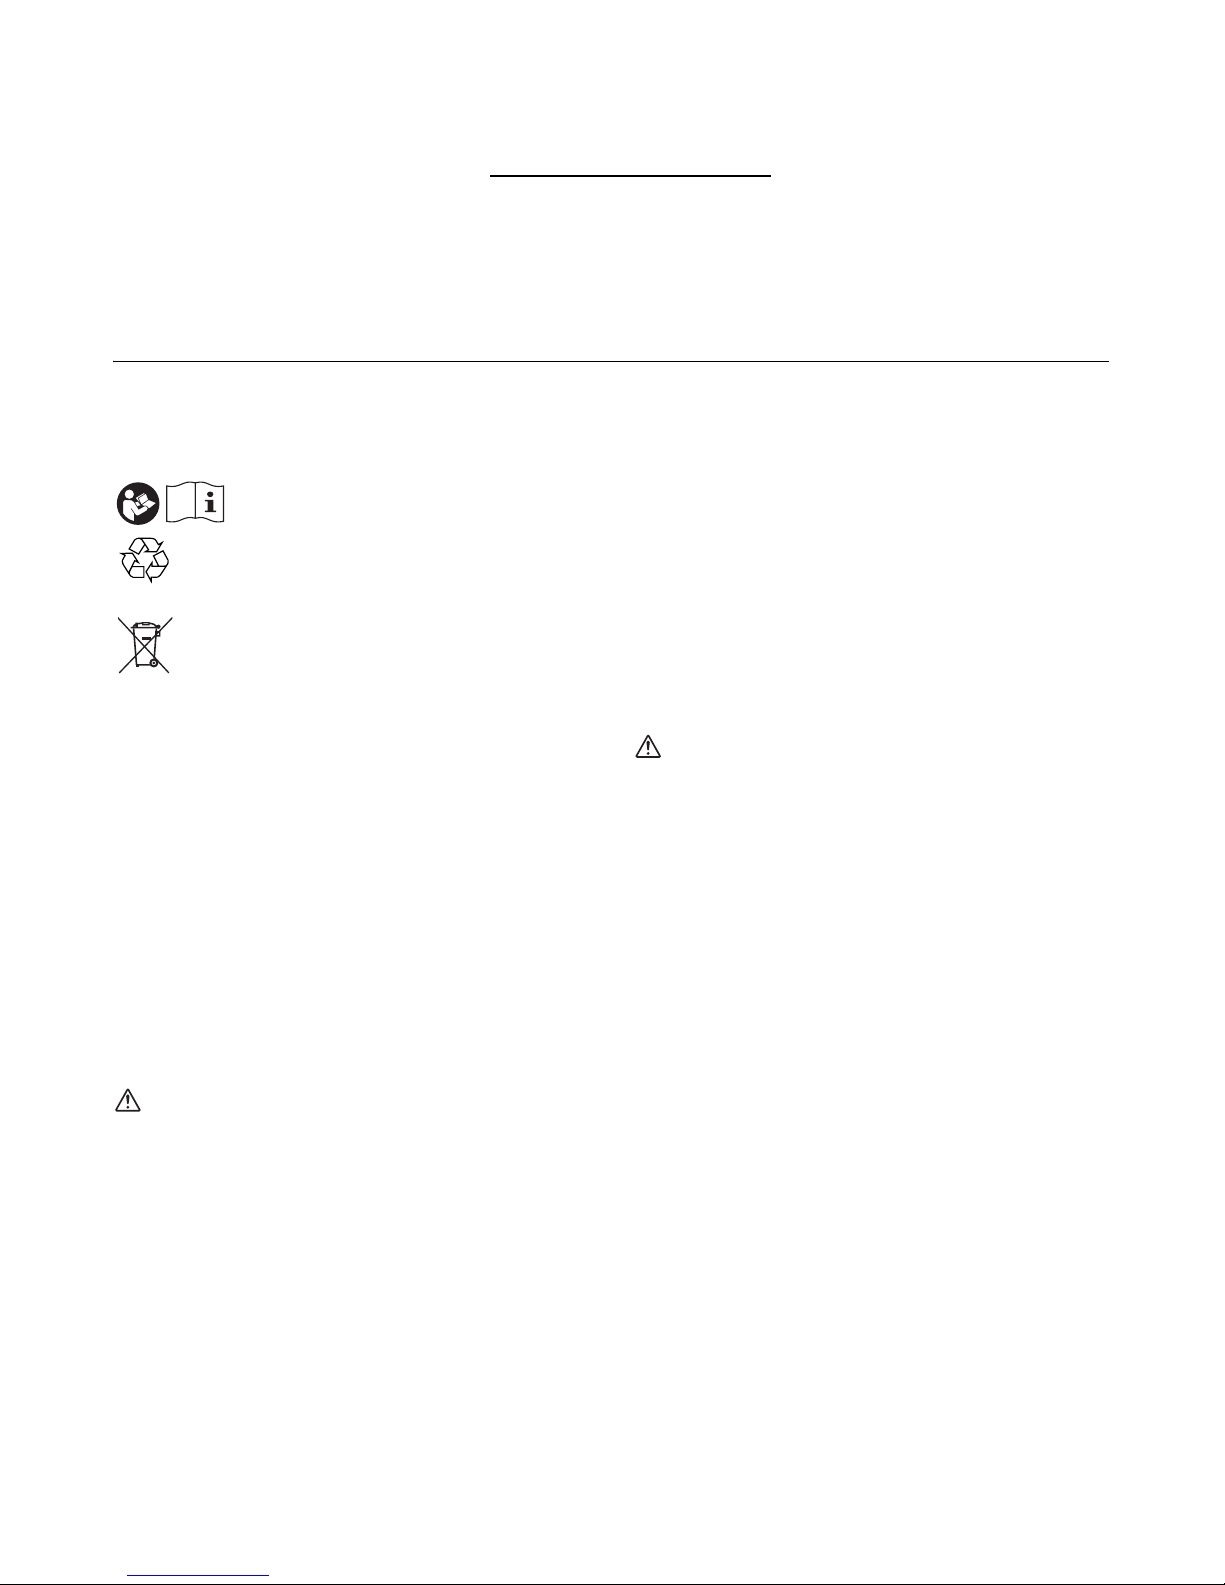
1. Press POWER (9) button to switch on the radio unit.
(Fig. 1 & 5) The receiving frequency is showed on
LCD DISPLAY (15). (Fig. 1 & 4)
2. Press BAND (18) button to select FM or AM band.
(Fig. 1)
3. For FM broadcasting listening, extract out the
TELESCOPIC ANTENNA (8) fully and rotate the
direction of it to have a better performance of
reception. For AM broadcasting listening, as the AM
antenna is built-in the radio, rotate the direction of
radio unit to get a better performance of reception.
(Fig. 1 & 6)
4. For manual tuning, press SEARCH UP (16) or
SEARCH DOWN (17) button once to tune up or tune
down the receiving frequency by one step, or rotate
the TUNING KNOB (10) to have a faster tune up/
down. (Fig. 1 & 5)
5. For automatic tuning, press and hold the SEARCH UP
(16) or SEARCH DOWN (17) button for 3 seconds,
the receiving frequency increases or decreases by
one step automatically. When broadcasting is
Item Standard
Applicable Battery Type BL1013
Power Source DC 10.8 V
Current Consumption 450 mA max
Cut Off Voltage
(Low Voltage Protection)
7.9 ± 0.4 V
Tuning Frequency Range
AM
522 to 1,620 KHz
9KHz Step
FM
87.5 to 108 MHz
100 KHz Step
FM Usable Sensitivity
(30 dB S/N)
20 dBµV
AM Usable Sensitivity
(20 dB S/N)
62 dBµV
No. of Preset Memory
AM 5
FM 5
Speaker Output Power per channel 1.2 W max
Earphone Output Power per channel 20 mW max
AUX Input Impedance 22 K ohm 150 mVrms (L&R channel)
AM Antenna Ferrite bar ø8 x 100 mm
FM Telescopic Antenna
(L) 340 mm
(fully extended)
Speaker ø36 mm 16 ohm 2 W, 2 pieces
LCD Display TN type, view area 45 x 20 mm
LCD Backlight
White color LED; light up for 20 seconds if any keys is
pressed or tuning knob is tuned
Applicable Environment Indoor use
Operating Time Approx. 2.5 hours (BL1013)
Dimensions (L) 169 x (l) 83 x (H) 74 mm
Net Weight (with battery cartridge) 0.49 kg

6
received, the searching stops 5 seconds for short
listening and then restart searching. If you want to
listen the broadcasting, press any buttons (except for
power button) once to stop searching. (Fig. 1)
6. In FM band, if stereo broadcasting is received, the
“STEREO” icon is displayed. Under poor reception
circumstance, to reduce the reception noise by
switching off the stereo function. Press and hold the
BAND (18) button for 3 seconds to enter FM Stereo
setting mode. Then press BAND (18) button again to
switch “Stereo On” or “Stereo Off”. (Fig. 1 & 4)
7. Press VOLUME UP (13) or VOLUME DOWN (14)
button to adjust the sound level. (Fig. 1)
8. To listen the radio by earphones (not included), plug a
diameter 3.5 mm earphone’s plug into EARPHONE
JACK (11) completely. The built-in speakers are
disconnected automatically and no sound is output.
(Fig. 1 & 7)
9. When the battery is soon used up, low battery
indicator appears on the LCD DISPLAY (15). (Fig. 4)
10. To turn off the radio, press POWER (9) button once.
(Fig. 1 & 5)
11. The radio unit integrates with memory IC, all settings
(volume level, last receiving frequency and preset
memories) are saved automatically before the battery
is removed.
HOW TO STORE THE PRESET
MEMORY
1. Choose the receiving frequency that to be stored.
2. Press and hold one of the PRESET MEMORY (3) –
(7) buttons for 3 seconds, the chosen frequency is
stored into that memory location. The “MEMORY” icon
and the chosen memory location no. are shown on the
display. (Fig. 1 & 4)
3. There are 5 preset memories location for each AM
and FM band.
4. To recall the preset memory, simply press one of the
PRESET MEMORY buttons once.
HOW TO PLAY MUSIC THROUGH
AUXILIARY JACK
1. Press POWER (9) button to switch on the radio unit.
(Fig. 1 & 5)
2. Prepare an audio signal cable (not included), both
ends with diameter 3.5 mm stereo plug.
3. One end of cable is plugged into the earphone jack of
your play device, another end is inserted into the
AUXILIARY INPUT JACK (1) of the radio unit. (Fig. 1
& 8)
4. When the jack is plugged, the letters “AU” are
displayed on LCD DISPLAY (15) and the radio unit
switches to AUX mode automatically.
5. Adjust the volume of play device and the volume
control of the radio unit for a suitable output sound
level.
7
FRANÇAIS (Instructions d’origine)
EMPLACEMENT DES COMMANDES (Fig. 1)
Descriptif
Symboles
Les symboles utilisés pour cet appareil sont indiqués cidessous. Assurez-vous d’avoir bien compris leur
signification avant d’utiliser la radio.
......... Reportez-vous au manuel
d’instructions.
.................. Les batteries doivent toujours être
recyclées.
................... Uniquement pour les pays de l’Union
européenne
Ne jetez pas les appareils électriques
et les batteries dans les ordures
ménagères !
Conformément à la directive
européenne 2002/96/CE relative aux
déchets d’équipements électriques
ou électroniques (DEEE) et à la
directive 2006/66/CE relative aux
batteries, aux accumulateurs ainsi
qu’aux batteries et accumulateurs
usagés et à leur transposition dans la
législation nationale, les appareils
électriques et les batteries doivent
être collectés à part et être soumis à
un recyclage respectueux de
l’environnement.
CONSIGNES DE SÉCURITÉ
IMPORTANTES
AVERTISSEMENT :
Lors de l’utilisation des outils électriques, vous devez
toujours prendre des précautions élémentaires en matière
de sécurité pour réduire les risques d’incendie, de choc
électrique et de blessure. Ces précautions sont
notamment les suivantes :
1. Avant d’utiliser l’appareil, lisez attentivement son
manuel d’instructions et celui du chargeur.
2. Nettoyez avec un chiffon doux uniquement.
3. N’obstruez pas les ouvertures d’aération. Procédez à
l’installation conformément aux instructions du
fabricant.
4. N’installez pas l’appareil près de sources de chaleur,
telles que des radiateurs, des bouches de chaleur,
des poêles ou d’autres dispositifs (notamment des
amplificateurs) émetteurs de chaleur.
5. Utilisez uniquement des pièces complémentaires/
accessoires spécifiés par le fabricant.
6. Débranchez cet appareil en cas d’orage ou lorsque
vous ne l’utilisez pas pendant une période prolongée.
7. Les batteries utilisées pour les radios, qu’elles soient
intégrées ou séparées, doivent être rechargées
uniquement à l’aide du chargeur de batterie spécifié.
Un chargeur qui convient à un type de batterie peut
créer un risque d’incendie s’il est utilisé avec une
autre batterie.
8. Les radios fonctionnant à l’aide de batteries doivent
être utilisées uniquement avec les batteries
désignées. L’utilisation d’autres batteries peut créer
un risque d’incendie.
9. Lorsque vous n’utilisez pas la batterie, conservez-la à
l’écart d’autres objets métalliques, tels que : des
trombones, pièces de monnaie, clés, clous, vis ou
autres petits objets métalliques susceptibles d’établir
une connexion d’une borne à l’autre. Court-circuiter
les bornes de la batterie peut provoquer des
étincelles, des brûlures ou un incendie.
10. Évitez tout contact corporel avec les surfaces mises à
la terre, telles que les tuyaux, radiateurs, cuisinières et
réfrigérateurs. Le risque de choc électrique augmente
si votre corps est mis à la terre.
ATTENTION:
Il y a risque d’explosion si la batterie n’est pas remise en
place correctement.
Remplacez la batterie par une batterie identique ou d’un
type équivalent uniquement.
Les batteries ne doivent pas être exposées à une chaleur
excessive telle que les rayons du soleil, un feu ou autre.
En cas de système audio portable, une pression sonore
excessive des oreillettes et du casque d’écoute peut
entraîner une perte auditive.
CONSERVEZ CES
INSTRUCTIONS.
Caractéristiques :
1) Récepteur stéréo AM/FM à syntonisation numérique
2) Écran LCD avec rétroéclairage blanc
3) Interrupteur marche/arrêt
4) Sélecteur de bandes (AM/FM)
5) Recherche automatique de stations (recherche vers le
haut/bas)
6) Commande de volume numérique (augmentation/
diminution du volume)
1. PRISE D’ENTRÉE AUXILIAIRE
2. HAUT-PARLEUR DE GAUCHE
3. MÉMOIRE DE PRÉSÉLECTION 1
4. MÉMOIRE DE PRÉSÉLECTION 2
5. MÉMOIRE DE PRÉSÉLECTION 3
6. MÉMOIRE DE PRÉSÉLECTION 4
7. MÉMOIRE DE PRÉSÉLECTION 5
8. ANTENNE TÉLESCOPIQUE
9. MARCHE/ARRÊT
10. BOUTON DE SYNTONISATION
11. PRISE POUR OREILLETTE
12. HAUT-PARLEUR DE DROITE
13. AUGMENTATION DU VOLUME
14. DIMINUTION DU VOLUME
15. ÉCRAN LCD
16. RECHERCHE VERS LE HAUT
17. RECHERCHE VERS LE BAS
18. BANDE
19. Batterie
20. Crochet
Li-ion

8
7) Mémoires de présélection (5 pour AM, 5 pour FM)
8) Bouton rotatif de syntonisation
9) 2 haut-parleurs de ø 36 mm
10) Prise pour oreillettes
11) Prise d’entrée auxiliaire
12) Antenne télescopique FM
13) Antenne AM intégrée
14) Fonctionne à l’aide d’une batterie rechargeable au
lithium-ion de 10,8 V
15) Indication de batterie faible
16) Protection en cas de batterie faible
17) Accessoire : bandoulière
Spécifications générales
DESCRIPTION DU
FONCTIONNEMENT
Installation et retrait de la batterie (Fig. 2)
• Pour déposer la batterie, retirez-la de la radio de
chantier sans fil en appuyant sur les boutons situés de
chaque côté de la batterie.
• Pour insérer la batterie, tenez-la de sorte que la forme
de l’avant de la batterie s’ajuste à celle de l’ouverture
aménagée de la batterie et faites-la glisser en position.
Insérez-la toujours bien à fond, jusqu’à ce qu’elle se
verrouille en émettant un léger clic. Sinon, la batterie
risque de tomber accidentellement de la radio de
chantier sans fil, en vous blessant ou en blessant une
personne se trouvant près de vous.
• N’appliquez pas une force excessive lors de l’insertion
de la batterie. Si la batterie ne glisse pas aisément,
c’est qu’elle n’est pas insérée correctement.
Crochet (Fig. 3)
Le crochet est pratique pour suspendre temporairement la
radio de chantier sans fil.
FONCTIONNEMENT
COMMENT ÉCOUTER DES
PROGRAMMES RADIO
1. Appuyez sur le bouton MARCHE/ARRÊT (9) pour
allumer la radio. (Fig. 1 et 5) La fréquence de
Élément Norme
Type de batterie à utiliser BL1013
Alimentation 10,8 V C.C.
Consommation électrique 450 mA au max.
Tension de coupure
(Protection contre les basses tensions)
7,9 ± 0,4 V
Plage de fréquence de syntonisation
AM
522 à 1 620 KHz
Incréments de 9 KHz
FM
87,5 à 108 MHz
Incréments de 100 KHz
Efficacité utile FM
(signal/bruit 30 dB)
20 dBµV
Efficacité utile AM
(signal/bruit 20 dB)
62 dBµV
Nombre de mémoires de présélection
AM 5
FM 5
Puissance de sortie du haut-parleur par canal 1,2 W au max.
Puissance de sortie de l’oreillette par canal 20 mW au max.
Entrée AUX Impédance de 22 K ohms 150 mVrms (canaux G et D)
Antenne AM Barre en ferrite de ø 8 x 100 mm
Antenne télescopique FM
(G) 340 mm
(entièrement déployée)
Haut-parleurs ø 36 mm 16 ohms 2 W (2 haut-parleurs)
Écran LCD Type TN, zone d’affichage 45 x 20 mm
Rétroéclairage LCD
DEL blanche, qui reste allumée pendant 20 secondes
lorsque vous appuyez sur une touche ou tournez le bouton
de syntonisation
Environnement recommandé Utilisation en intérieur
Durée de fonctionnement Environ 2,5 heures (BL1013)
Dimensions (L) 169 x (P) 83 x (H) 74 mm
Poids net (avec la cartouche de batterie) 0,49 kg
 Loading...