

Page 1
Rechargeable Flashlight
ML702/ML901/ML902/ML903
ML702/902
ML901
ML903
SPECIFICATIONS
Model ML702 ML901 ML902 ML903
Bulb.............................7.2 V 0.55 A 9.6 V 0.5 A 9.6 V 0.5 A 9.6 V 0.5 A
Dimensions
(L x W x H) ..................283 x 67 x 71 mm 254 x 67 x 96 mm 325 x 67 x 71 mm 254 x 77 x 98 mm
Net weight ...................0.22 kg (0.49 lbs) 0.23 kg (0.51 lbs) 0.25 kg (0.55lbs) 0.23 kg (0.51lbs)
(11-1/8” x 2-5/8” x 2-13 /16”) (10” x 2-5/8” x 3-3/4” ) (12-13/16” x 2-5/8” x 2-13/16”) (10” x 3” x 3-7/8”)
• Due to our continuing programme of research and development, the specifications herein are subject to
change without notice.
• Note: Specifications may differ from country to country.
Symbols
The following show the symbols used for the tool. Be sure that you understand their meaning before use.
❏ Read instruction manual.
❏ Do not touch the bulb which is hot in use or immediately after putting on light. You may get burnt.
❏ Always recycle batteries.
❏ Do not discard batteries into garbage can or the like.
Page 2
1
2
1
2
12
3
2
1
34
8
56
7
78
2
Page 3

ENGLISH
Explanation of general view
1 Set plate
2 Battery cartridge
3Screw
IMPORTANT SAFETY INSTRUCTIONS
WARNING:
When using electric tools, basic safety precautions should always be followed to reduce the risk of fire, electric shock,
and personal injur y, including the following:
READ ALL INSTRUCTIONS.
1. Read this instruction manual and the charger instruction manual carefully before use.
2. This flashlight is not water-proof. Do not use it in damp or wet locations. Do not expose it to rain or snow.
Do not wash it in water.
3. A short-circuit can cause a large current flow, overheating, possible burns and even a breakdown.
(1) Do not touch the inside of the flashlight head with tweezers, metal tools, etc.
(2) Do not touch the battery terminals with any conductive material.
(3) Avoid storing the battery cartridg e in a container with any metal objects such as nails, coins, etc.
4. Never expose the battery cartridge to flames, fire or great heat. Breakage may cause release of injurious
material.
5. If electrolyte gets into your eyes, rinse them out with clear water and seek medical attention right away.
It may result in loss of your eyesight.
6. If operating time has become excessively shorter, stop operating immediately. It may result in a risk of
overheating, possible burns and even an explosion.
7. Be careful not to drop, shake or strike battery.
8. When the tool is not in use, always switch off and remove the battery cartridge from the tool.
9. Do not store the tool and battery cartridge in locations where the temperature may reach or exceed 50°C
(122°F).
10. Do not give the tool a shock by dropping, striking, etc.
11. Do not expose the light to eyes continuously. It may hurt them.
12. Do not cover or clog the lit tool with cloth or carton, etc. It may create a risk of fire.
13. Switch off the light immediately when the lamp gets dark in use. If you leave the lamp switched on,
the battery cartridge capacity may decrease .
14. Do not disassemble the charger or battery cartridge; take it to a qualified serviceman when service or
repair is required. Incorrect reassembly may result in a risk of electric shock or fire.
15. If any problem develops, consult your nearest Makita Service Centre or dealer. To maintain product safety
and reliability, repairs, maintenance or adjustment should be carried out by a Makita Authorized Service
Centre.
SAVE THESE INSTRUCTIONS.
4Ring
5 Bulb holder
6 Reflector
7 Shoulder strap
8 Switch
OPERATING INSTRUCTIONS
Charging
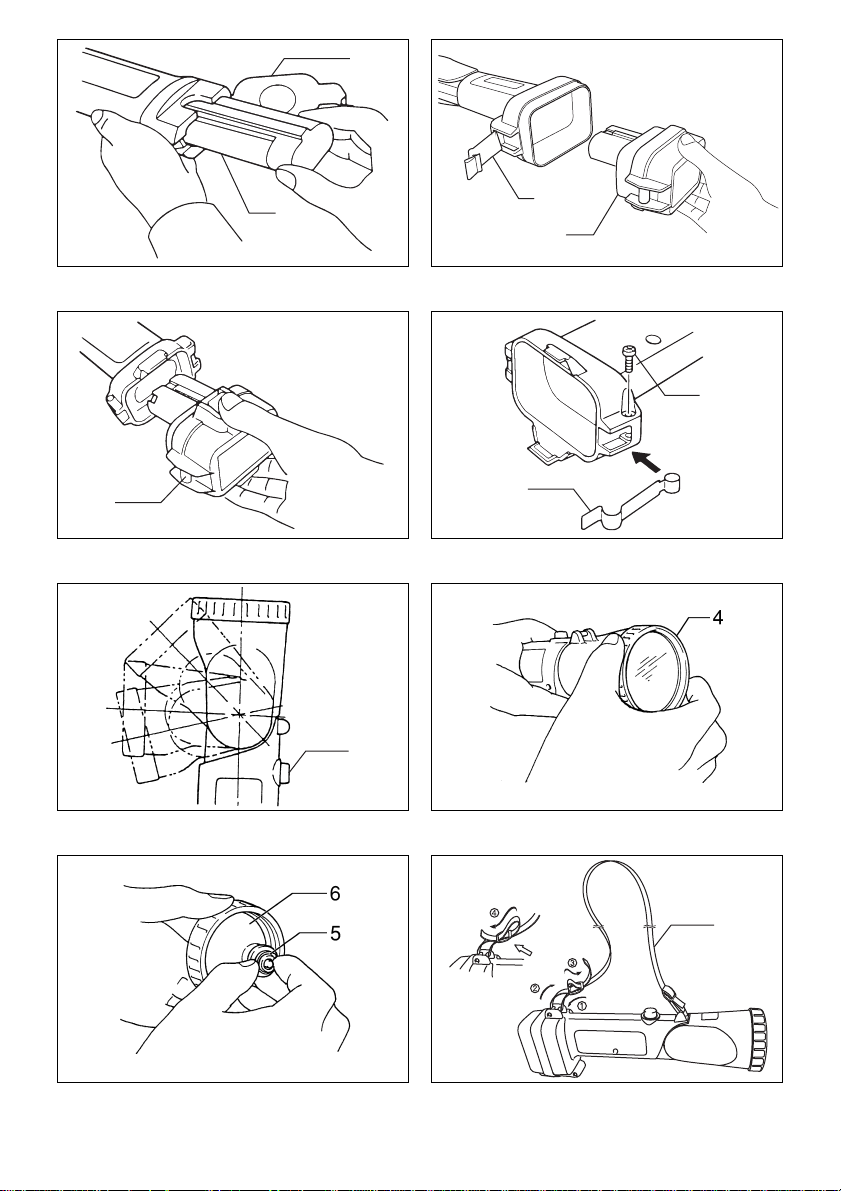
For ML702 (Fig. 1), ML902 (Fig. 1) and ML901 (Fig. 2)
Charge the battery cartridge with the Makita charger before use. To remove the battery cartr idge, pull out the set plate
on the torch/flashlight and grasp both sides of the cartridge while withdrawing it from the torch/flashlight. After charging, insert the battery car tridge into the torch/flashlight and snap the set plate back into place.
For ML903 (Fig. 3)
Charge the batter y cartridge with the Makita charger before use. To remove the battery cartridge, withdraw it from the
torch/flashlight while pressing the buttons on both sides of the cartridge. After charging, insert the battery cartr idge
into the torch/flashlight all the way until it locks in place with a little click.
NOTE:
Battery car tridge 9100, 9102, 9100A and 9102A can be used on ML903 if you install the set plate. Install the set plate
on ML903 with the screw provided as shown in Fig. 4.
The following tables indicate the charging time and operating time on a single charge.
3
Page 4

ML702
Voltage Battery cartridge Operating time Charger
7000 Approx. 140 min.
7.2 V
ML901/ML903
Voltage Battery cartridge Operating time Charger
9.6 V
(Note)
If you use a power checking battery on Model ML901/ML903, the power checking battery will not indicate the remaining battery capacity properly.
ML902
Voltage Battery cartridge Operating time Charger
9.6 V
7002 Approx. 210 min.
7033 Approx. 240 min.
9100, 9100A, 9120 Approx. 160 min.
9102, 9102A, 9122 Approx. 230 min.
9133 Approx. 260 min.
9134 Approx. 310 min.
9135, 9135A Approx. 360 min.
9000 Approx. 160 min.
9002 Approx. 230 min.
9033 Approx. 260 min.
DC7100, DC9710, DC9711,
DC1201, DC1411, DC1439,
DC1470, DC1422, DC1801
DC9711, DC1201, DC1411,
DC1439, DC1422, DC1801
DC9711, DC1411, DC1439,
DC1422, DC1801
DC9710, DC9711, DC1201,
DC1411, DC1439, DC1470,
DC1422, DC1801
DC9711, DC1201, DC1411,
DC1439, DC1422, DC1801
DC9711, DC1411, DC1439,
DC1422, DC1801
DC9710, DC9711, DC1201,
DC1411, DC1439, DC1470,
DC1422, DC1801
DC9711, DC1201, DC1411,
DC1439, DC1422, DC1801
DC9711, DC1411, DC1439,
DC1422, DC1801
Storing battery cartridge
Always charge the Nickel Metal Hydride battery car tridge before storing it when you do not use it for more than six
months.
Head angle (Fig. 5)
The head angle can be adjusted in four stages. Adjust as desired.
Replacing bulb (Fig. 6 & 7)
CAUTION:
The bulb is very hot immediately after operation. Wait until the bulb cools off before attempting to replace it.
First, turn the ring counterclockwise and remove the reflector. Remove the bulb holder by turning it counterclockwise.
Then replace the bulb.
Shoulder strap (Fig. 8)
Install the strap on the tool.
MAINTENANCE
To maintain product safety and reliability, repairs, maintenance or adjustment should be carried out by a Makita Authorized Service Centre.
Makita Corporation
Anjo, Aichi, Japan
Made in China
884052D7
 Loading...