

Page 1
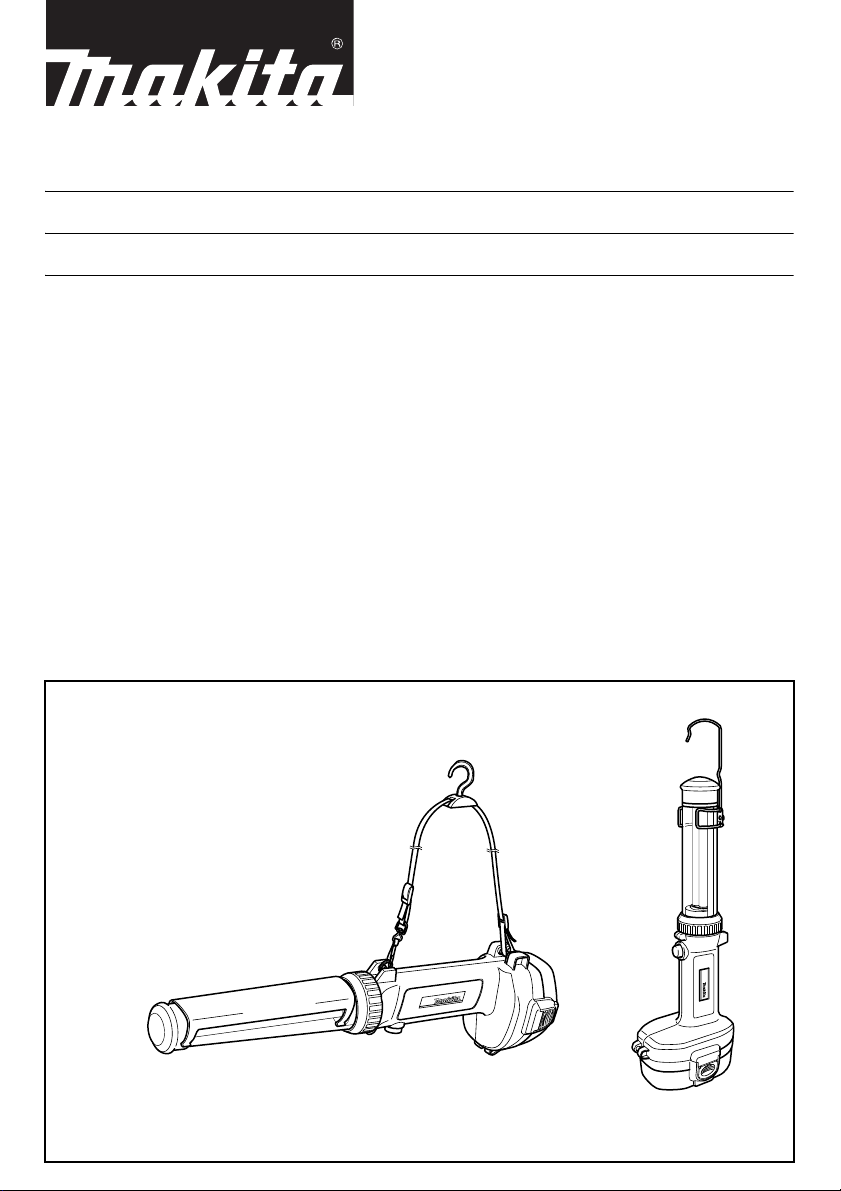
Rechargeable Job Site Light Instruction manual
Lampe torche de travail rechargeable Manuel d'instructions
Linterna fluorescente recargable Manual de instrucciones
ML142
ML143
ML183
ML142
ML143/183
Page 2
ML142
2
3
7
8
1
5
4
6
12
9
10
11
4
5
12
3
3
ML142
13
14
ML142
14
13
13
14
45
ML143/ML183
2
15
6
Symbols
The following show the symbols used for the equipment. Be sure that you understand their meaning before use.
Symboles
Les symboles utilisés pour l’appareil sont indiqués ci-dessous. Assurez-vous d’avoir bien compris leur signification avant l’utilisation.
Símbolos
Se utilizan los siguientes símbolos para el equipo. Asegúrese de que comprende su significado antes del uso.
❏ Read instruction manual.
❏ Veuillez lire le manuel d’instructions.
❏ Lea el manual de instrucciones.
2
Page 3

ENGLISH
Diagram Legend
1. Battery
2. Reflector (ML142 only)
3. Fluorescent Tube
4. Lamp Cover
5. Screw Ring
6. Switch
7. Strap Hook (ML142 only)
8. Strap (ML142 only)
9. Loosen
10. Tighten
11. Connecting Ring
12. Fluorescent Tube Cap
13. Rings for Strap Clip Attachment
14. Metal Strap Clip
15. Metal Hang Hook
(ML143/183 only)
SPECIFICATIONS
Model ML142 ML143 ML183
Power Source D.C. 14.4 V D.C. 14.4 V D.C. 18 V
Fluorescent Tube Compact FL13 W Compact FL13 W Compact FL13 W
Hook Deployed
411 mm x 94 mm x 116 mm
Dimensions
(L x W x H)
Net Weight 0.35 kg (0.77 lbs) 0.37 kg (0.81 lbs) 0.37 kg (0.81 lbs)
• Due to our ongoing research and development, the specifications herein are subject to change without notice.
• Note: Specifications may differ from country to country.
347 mm x 94 mm x 116 mm
(13-5/8” x 3-11/16” x 4-9/16”)
(16-1/4” x 3-11/16” x 4-9/16”)
Hook Not Deployed
350 mm x 94 mm x 116 mm
(13-3/4” x 3-11/16” x 4-9/16”)
Hook Deployed
411 mm x 95 mm x 129 mm
(16-1/4” x 3-3/4” x 5-1/8”)
Hook Not Deployed
350 mm x 95 mm x 129 mm
(13-3/4” x 3-3/4” x 5-1/8”)
IMPORTANT SAFETY INSTRUCTIONS
WARNING:
When using electric tools, basic safety precautions should always be followed to reduce the risk of fire, electric
shock, and personal injury. Some basic safety precautions are as follows:
READ ALL INSTRUCTIONS.
1. Read this instruction manual and the charger instruction manual carefully before use.
2. This Job site light is not waterproof. Do not use it in damp or wet locations. Do not expose it to rain or snow.
Do not wash it in water.
3. A short-circuit can cause a large current flow, overheating, possible burns and even damage.
(1) Do not touch the inside of the Job site light with tweezers, metal tools, etc.
(2) Do not touch the battery terminals with any conductive materials.
(3) Avoid storing the battery in a container with any metal objects such as nails, coins, etc.
4. Never expose the battery to flames, fire or significant heat. Breakage may cause release of dangerous
material.
5. If battery chemicals get into your eyes, rinse them out with water and seek medical attention right away. It
may result in loss of your eyesight.
6. If operating time has become excessively shorter, stop operating immediately. It may result in a risk of
overheating, possible burns and even an explosion.
7. Be careful not to drop, shake or strike the battery.
8. When the tool is not in use, always switch off and remove the battery from the tool.
9. Do not store the tool and battery in locations where the temperature may reach or exceed 50°C (122°F).
10. Do not give the tool a shock by dropping, striking, etc.
11. Do not expose the light to eyes continuously. It may hurt them.
12. Do not cover or clog the lit tool with cloth or carton, etc. It may create a risk of starting a fire.
13. Switch off the light immediately when the lamp light is low. If you leave the lamp switched on, the battery
capacity may decrease.
14. Do not disassemble the charger or battery; take it to a qualified serviceman when service or repair is required.
Incorrect reassembly may result in a risk of electric shock or fire.
15. If any problem develops, consult your nearest Makita Service Center or dealer. Maintenance or repairs should
be carried out by Makita Authorized Service Centers to maintain product safety and reliability.
16. If you notice that the tool is hot or is not functioning correctly, consult your nearest Makita Service Center or
dealer.
3
Page 4
For Model ML142/143 only
When the switch is turned “ON”, the handle of the tool may become slightly hot, even if the fluorescent tube is
not installed or is not lighted. This is a normal condition and does not indicate problem.
SAVE THESE INSTRUCTIONS.
OPERATING INSTRUCTIONS
Charging
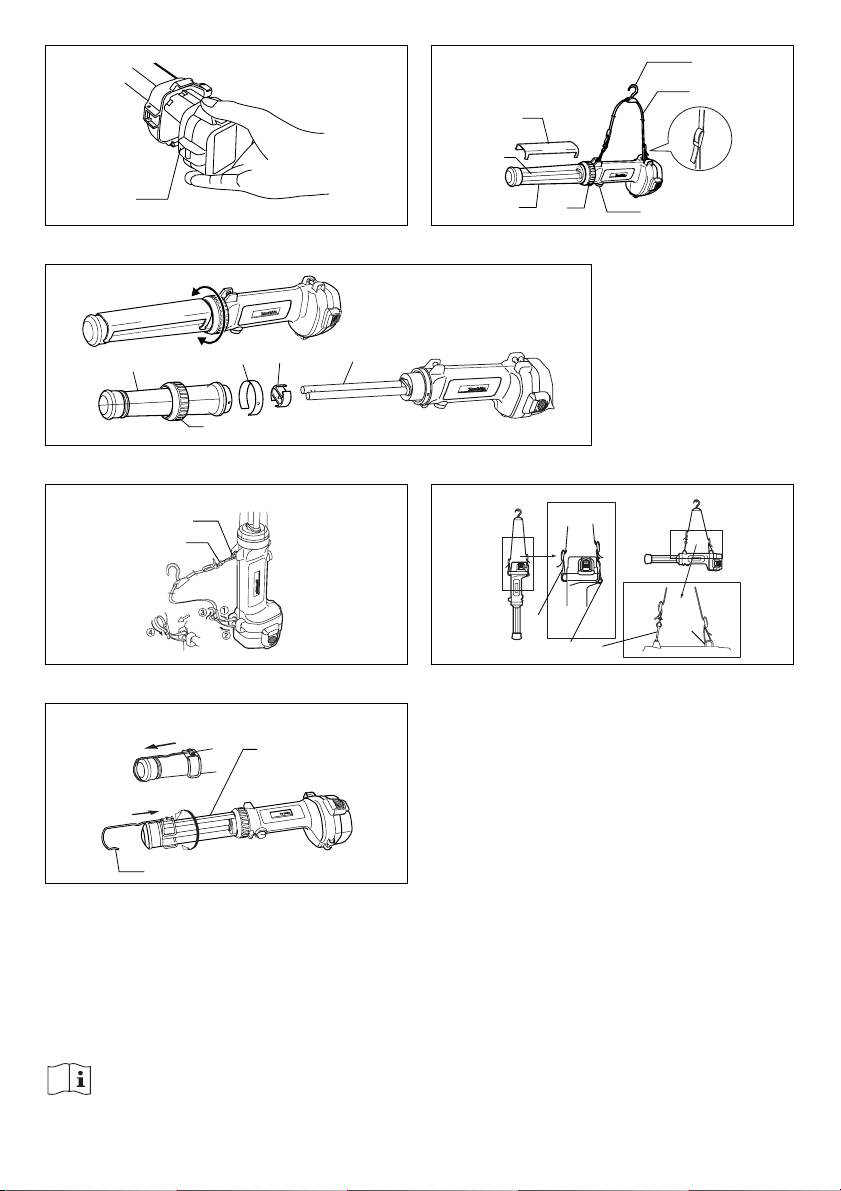
Charge the battery with the Makita charger before use. To remove the battery, press the buttons on both sides of the
battery and withdraw the battery from the tool. After charging, insert the battery into the tool all the way until it locks in
place with a little click. (Fig. 1)
The following table indicates the operating time on a single charge.
Voltage Battery Operating Time Charger
1420 Approx. 120 min.
14.4 V
18 V
1422 Approx. 180 min.
1433 Approx. 200 min.
1434 Approx. 240 min.
1435 Approx. 280 min.
1822 Approx. 180 min.
1833 Approx. 200 min.
1834 Approx. 240 min.
1835 Approx. 280 min.
Storing the Battery
Always charge the Nickel Metal Hydride battery before storing it when you do not use it for more than six months.
Switch Action
To turn on the light, depress the switch. Depress the switch once again, the light is turned off.
Replacing the Fluorescent Tube (Fig. 2 & 3)
CAUTION:
• Do not give the fluorescent tube a shock or mar it. It may cause the glass to break and result in a serious personal
injury.
• Do not touch the fluorescent tube while it is in use or immediately after putting out light. You may get burned.
• Always be sure that the battery is removed before replacing the fluorescent tube or performing other maintenance.
1) Loosen the screw ring fully and slide it aside so that the connecting ring appears.
2) Remove the connecting ring.
3) Pull the lamp cover straight out of the main unit.
4) Remove the cap from the fluorescent tube.
5) Pull out the fluorescent tube.
Then replace with a new Makita fluorescent tube.
Follow the procedure below to reassemble the lamp.
1) Insert the cap into the top of a new fluorescent tube.
2) Insert the lamp cover so that the slits on the lamp cover fit into the protrusion on the tool.
3) Insert the connecting ring so that two small projecting pins on the connecting ring fit into the holes in the lamp cover
and the tool that are overlapped.
4) Tighten the screw ring firmly.
Strap for Model ML142 (Fig. 4 & 5)
Install the strap on the tool by following the numbered steps in Figure 4.
The Job Site light can hang from the strap in two basic positions, upside down or horizontal. To hang the light in the
upside down position, attach the metal clip of the strap to the rung at the bottom of the grip. To hang the light in the
horizontal position, attach the metal clip of the strap to the rung at the top of the grip. (Fig. 5)
DC1470, DC1411, DC1413, DC1414, DC1422,
DC1801, DC1803, DC1804, DC1822, DC1439
DC1411, DC1413, DC1414, DC1801, DC1803,
DC1804, DC1822, DC1439, DC1422
DC1801, DC1803, DC1804, DC1822
4
Page 5

Metal Hang Hook for Model ML143/183 (Fig. 6)
CAUTION:
• Do not shake the tool when the hook is pulled out. The hook can catch something accidentally.
• Do not use the hook except when you hang the tool. This may result in a risk of breakage of the tool.
The hook can be turned, slid and stored around the lamp cover. (Fig. 6)
The hook also can be removed when you do not use it.
MAINTENANCE
To maintain product safety and reliability, repairs and maintenance should be carried out by a Makita Authorized Service
Center.
ACCESSORIES
CAUTION:
These accessories or attachments are recommended for use with your Makita tool specified in this manual. The use of
any other accessories or attachments might present a risk of injury to persons. The accessories or attachments should be
used only in the proper and intended manner.
• Fluorescent tube
5
Page 6

FRANÇAIS
Légende du schéma
1. Batterie
2. Réflecteur (ML142 uniquement)
3. Tube fluorescent
4. Couvercle de lampe
5. Bague filetée
6. Interrupteur
7. Crochet de bandoulière (ML142
uniquement)
8. Bandoulière (ML142 uniquement)
9. Desserrer
10. Serrer
11. Bague de connexion
12. Capuchon de tube fluorescent
13. Anneaux de l'attache de
bandoulière
14. Attache de bandoulière
métallique
15. Crochet métallique
(ML143/183 uniquement)
SPÉCIFICATIONS
Modèle ML142 ML143 ML183
Source d'alimentation C.C. 14,4 V C.C. 14,4 V C.C. 18 V
Tube fluorescent Compact FL13 W Compact FL13 W Compact FL13 W
Crochet engagé
Dimensions
(L x P x H)
Poids net 0,35 kg (0,77 lb) 0,37 kg (0,81 lb) 0,37 kg (0,81 lb)
• Étant donné la recherche et le développement en cours, les spécifications contenues dans ce manuel sont sujettes à
modification sans préavis.
• Note : Les spécifications peuvent varier suivant les pays.
347 mm x 94 mm x 116 mm
(13-5/8" x 3-11/16" x 4-9/16")
411 mm x 94 mm x 116 mm
(16-1/4" x 3-11/16" x 4-9/16")
Crochet non engagé
350 mm x 94 mm x 116 mm
(13-3/4" x 3-11/16" x 4-9/16")
Crochet engagé
411 mm x 95 mm x 129 mm
(16-1/4" x 3-3/4" x 5-1/8")
Crochet non engagé
350 mm x 95 mm x 129 mm
(13-3/4" x 3-3/4" x 5-1/8")
CONSIGNES DE SÉCURITÉ IMPORTANTES
AVERTISSEMENT :
Lors de l'utilisation d'outils électriques, il faut toujours prendre des précautions élémentaires de sécurité pour
réduire les risques d'incendie, de choc électrique et de blessure. Voici quelques-unes de ces précautions
élémentaires de sécurité :
LISEZ TOUTES LES INSTRUCTIONS.
1. Lisez attentivement ce manuel d'instructions et celui du chargeur avant l'utilisation.
2. Cette lampe torche de travail n'est pas imperméabilisée. Ne l'utilisez pas dans les endroits humides ou
mouillés. Ne l'exposez ni à la pluie ni à la neige. Ne la lavez pas dans l'eau.
3. Un court-circuit peut causer un fort courant, une surchauffe, parfois des brûlures et même des dommages à
l'outil.
(1) Ne touchez pas l'intérieur de la lampe torche de travail avec des brucelles, des outils métalliques, etc.
(2) Ne touchez les bornes de la batterie avec aucun matériau conducteur.
(3) Évitez de ranger la batterie dans un conteneur avec tout objet métallique tel que des clous, des pièces de
monnaie, etc.
4. N'exposez jamais la batterie à des flammes, à un feu ou à une chaleur considérable. En éclatant la batterie
risquerait de libérer des substances dangereuses.
5. Si des produits chimiques de la batterie pénètrent dans vos yeux, rincez-les avec de l'eau et consultez
immédiatement un médecin. Il y a risque de perte de la vue.
6. Cessez immédiatement l'utilisation si le temps de fonctionnement devient excessivement court. Il y a risque
de surchauffe, de brûlures, voire d'explosion.
7. Évitez d'échapper, secouer ou heurter la batterie.
8. Après l'utilisation, mettez toujours l'outil hors tension et retirez la batterie.
9. Ne rangez pas l'outil ou la batterie dans des endroits où la température risque d'atteindre ou de dépasser
50 °C (122 °F).
10. Éviter de faire subir un choc à l'outil en l'échappant, en le heurtant, etc.
11. N'exposez pas les yeux à la lumière de manière continue. Il y a risque de brûlure aux yeux.
12. Évitez de recouvrir ou de boucher l'outil allumé avec un linge, une boîte de carton, etc. Cela risquerait de
déclencher un incendie.
6
Page 7

13. Éteignez l'outil immédiatement lorsque la lumière de la lampe devient faible. La capacité de la batterie risque
de diminuer si vous laissez la lampe allumée.
14. Ne démontez ni le chargeur ni la batterie ; apportez-les chez un réparateur agréé lorsqu'elles ont besoin
d'entretien ou d'une réparation. Un remontage incorrect peut entraîner un choc électrique ou un incendie.
15. Si un problème quelconque survient, informez-vous auprès du centre de service Makita le plus près ou de
votre détaillant. L'entretien et les réparations doivent être effectués par un centre de service agréé Makita
pour assurer le fonctionnement sûr et fiable du produit.
16. Si vous constatez que l'outil chauffe ou ne fonctionne pas correctement, informez-vous auprès de votre
centre de service Makita le plus près ou de votre détaillant.
Pour le modèle ML142/143 uniquement
Lorsque l'interrupteur est en position de marche ("ON"), la poignée de l'outil peut devenir un peu chaude même
si le tube fluorescent n'est pas installé ou allumé. Cela est normal et n'indique aucun problème de
fonctionnement.
CONSERVEZ CE MODE D'EMPLOI.
INSTRUCTIONS D'UTILISATION
Charge
Avant l'utilisation, chargez la batterie au moyen du chargeur Makita. Pour retirer la batterie, appuyez sur les boutons des
deux côtés de la batterie et enlevez la batterie de l'outil. Une fois la batterie chargée, insérez-la à fond dans l'outil jusqu'à
ce qu'elle se mette en place avec un léger bruit sec. (Fig. 1)
Le tableau suivant indique le temps de fonctionnement par charge.
Tension Batterie Temps de fonctionnement Chargeur
1420 Environ 120 min
14,4 V
18 V
1422 Environ 180 min
1433 Environ 200 min
1434 Environ 240 min
1435 Environ 280 min
1822 Environ 180 min
1833 Environ 200 min
1834 Environ 240 min
1835 Environ 280 min
Rangement de la batterie
Chargez toujours la batterie à hydrure métallique de nickel avant de la ranger si elle doit rester inutilisée pendant plus de
six mois.
Interrupteur
Pour allumer la lumière, enfoncez l'interrupteur. Enfoncez à nouveau l'interrupteur pour éteindre la lumière.
Remplacement du tube fluorescent (Fig. 2 et 3)
ATT ENTI O N :
• Ne pas frapper ou casser le tube fluorescent. Le verre risquerait de causer une grave blessure en éclatant.
• Ne touchez pas le tube fluorescent pendant son utilisation ou juste après l'avoir éteint. Vous pourriez vous brûler.
• Assurez-vous toujours que la batterie est retirée avant de remplacer le tube fluorescent ou d'effectuer tout autre travail
d'entretien.
1) Desserrez complètement la bague filetée et glissez-la sur le côté pour faire apparaître la bague de connexion.
2) Retirez la bague de connexion.
3) Tirez droit sur le couvercle pour le retirer de la lampe.
4) Retirez le capuchon du tube fluorescent.
5) Sortez le tube fluorescent.
Remplacez-le ensuite par un tube fluorescent neuf Makita.
Suivez la procédure ci-dessous pour remonter la lampe.
1) Insérez le capuchon sur le dessus du tube fluorescent neuf.
2) Insérez le couvercle de lampe de sorte que les fentes du couvercle de lampe s'adaptent à la partie saillante de l'outil.
DC1470, DC1411, DC1413, DC1414, DC1422,
DC1801, DC1803, DC1804, DC1822, DC1439
DC1411, DC1413, DC1414, DC1801, DC1803,
DC1804, DC1822, DC1439, DC1422
DC1801, DC1803, DC1804, DC1822
7
Page 8

3) Insérez la bague de connexion de sorte que ses deux broches saillantes pénètrent dans les orifices alignés du
couvercle de la lampe et de l'outil.
4) Serrez fermement la bague filetée.
Bandoulière pour modèle ML142 (Fig. 4 et 5)
Installez la bandoulière sur l'outil en suivant les étapes numérotées de la Figure 4.
La lampe torche de travail peut être accrochée à la bandoulière en deux positions de base : tête en bas ou
horizontalement. Pour accrocher la lampe torche la tête en bas, attachez la fixation métallique de la bandoulière à
l'anneau qui se trouve au bas de la poignée. Pour accrocher la lampe torche horizontalement, attachez la fixation
métallique de la bandoulière à l'anneau qui se trouve au haut de la poignée. (Fig. 5)
Crochet métallique pour modèle ML143/183 (Fig. 6)
ATT ENTI O N :
• N'agitez pas l'outil lorsque le crochet est sorti. Le crochet risquerait d'accrocher quelque chose accidentellement.
• N'utilisez le crochet que pour accrocher l'outil. Autrement vous risqueriez de casser l'outil.
Il est possible de tourner, glisser et ranger le crochet autour du couvercle de lampe. (Fig. 6)
Vous pouvez aussi retirer le crochet si vous ne l'utilisez pas.
ENTRETIEN
Pour assurer le fonctionnement sûr et fiable du produit, les réparations et l'entretien doivent être effectués par un centre
de service agréé Makita.
ACCESSOIRES
ATT ENTI O N :
Ces accessoires et fixations sont recommandés pour l'utilisation avec l'outil Makita spécifié dans ce manuel. L'utilisation
de tout autre accessoire ou fixation peut comporter un risque de blessure. Les accessoires et fixations doivent être utilisés
uniquement de la manière adéquate prévue.
• Tube fluorescent
8
Page 9

ESPAÑOL
Leyenda del diagrama
1. Batería
2. Reflector (sólo en modelo ML142)
3. Tubo fluorescente
4. Cubierta de la linterna
5. Anillo de rosca
6. Interruptor
7. Correa para gancho (sólo en
modelo ML142)
8. Correa (sólo en modelo ML142)
9. Aflojar
10. Apretar
11. Anillo conector
12. Tapa del tubo fluorescente
13. Anillos para aditamento de
broche de la correa
14. Broche metálico de la correa
15. Gancho metálico para colgar
(sólo para modelos ML143 y
ML183)
ESPECIFICACIONES
Modelo ML142 ML143 ML183
Fuente de suministro
eléctrico
Tubo fluorescente FL13 W compacto FL13 W compacto FL13 W compacto
Dimensiones
(La x An x Al)
Peso neto 0,35 kg (0,77 lbs) 0,37 kg (0,81 lbs) 0,37 kg (0,81 lbs)
• Debido a nuestra investigación y desarrollo constante, las especificaciones aquí dadas están sujetas a cambios sin
previo aviso.
• Nota: Las especificaciones pueden ser diferentes de país a país.
14,4 V de corriente directa 14,4 V de corriente directa 18 V de corriente directa
347 mm x 94 mm x 116 mm
(13-5/8” x 3-11/16” x 4-9/16”)
Gancho colocado
411 mm x 94 mm x 116 mm
(16-1/4” x 3-11/16” x 4-9/16”)
Gancho no colocado
350 mm x 94 mm x 116 mm
(13-3/4” x 3-11/16” x 4-9/16”)
Gancho colocado
411 mm x 95 mm x 129 mm
(16-1/4” x 3-3/4” x 5-1/8”)
Gancho no colocado
350 mm x 95 mm x 129 mm
(13-3/4” x 3-3/4” x 5-1/8”)
INSTRUCCIONES IMPORTANTES DE SEGURIDAD
AVI SO :
Cuando utilice herramientas eléctricas, deberá siempre tomar las precauciones básicas para reducir el riesgo de
incendios, descargas eléctricas y lesiones personales. Entre algunas de las precauciones básicas de seguridad
se incluyen:
LEA TODAS LAS INSTRUCCIONES
1. Lea este manual de instrucciones y el manual de instrucciones del cargador con cuidado antes de usar.
2. Esta linterna para uso en el sitio de trabajo no es a prueba de agua. No la use en lugares húmedos ni
mojados. No la exponga a la lluvia ni a la nieve. No la lave en el agua.
3. Un cortocircuito puede provocar un elevado flujo de corriente, sobrecalentamiento, posibles quemaduras e
incluso una avería.
(1) No toque el interior de la linterna para uso en el sito de trabajo con pinzas, herramientas de metal, etc.
(2) No toque las terminales de la batería con cualquier material conductor.
(3) Evite guardar la batería en algún cajón junto con cualquier otro objeto metálico, como clavos, monedas,
etc.
4. Nunca exponga la batería a llamas, fuego ni a altas temperaturas. Si se rompe, pueden liberarse materiales
dañinos.
5. En caso de que las sustancias químicas de la batería entren en contacto con sus ojos, enjuáguelos bien con
agua y consulte de inmediato a un médico. Esto podría ocasionar la pérdida de la visión.
6. Si el tiempo uso del cartucho de batería se acorta demasiado, deje de usarlo inmediatamente. Podría resultar
en un riesgo de sobrecalentamiento, posibles quemaduras e incluso una explosión.
7. Tenga cuidado de no dejar caer la batería, así como tampoco que sufra golpes ni estrujamientos.
8. Cuando no utilice la herramienta, siempre apáguela y extraiga la batería.
9. No guarde la herramienta ni la batería en lugares donde la temperatura pueda alcanzar o exceder los 50°C
(122°F).
10. No propine un impacto a la herramienta dejándola caer, golpeándola, etc.
11. No exponga la luz de manera continua a los ojos. Esto podría lastimarlos.
12. No cubra ni tape la herramienta encendida con trapos, cartones, etc. Puede provocar el riesgo de incendio.
9
Page 10

13. Apague la herramienta inmediatamente cuando la luz sea baja. Si la deja encendida, la capacidad de la batería
puede reducirse.
14. No desarme el cargador o la batería; acuda a un técnico de servicio calificado cuando se requiera de servicio
o reparación. Un ensamblado incorrecto podría resultar en riesgo de descarga eléctrica o incendio.
15. Si surge cualquier problema, acuda a su Centro de Servicio o Distribuidor Makita. El mantenimiento y
reparación deben llevarse a cabo por centros de servicio autorizados por Makita para mantener la seguridad
y fiabilidad del producto.
16. Si nota sobrecalentamiento en la herramienta, o ésta no funciona correctamente, consulte a su distribuidor o
centro de servicio Makita más cercano.
Sólo para los modelos ML142 y ML143
Cuando el interruptor está encendido ("ON"), puede que la empuñadura de la herramienta se caliente levemente,
incluso si el tubo fluorescente no está puesto o iluminado. Esto es una condición normal y no indica algún
problema.
GUARDE ESTAS INSTRUCCIONES.
INSTRUCCIONES DEL FUNCIONAMIENTO
Recargado
Recargue la batería con el cargador Makita antes de usar. Para quitar la batería, presione los botones en ambos lados de
la batería y retírela de la herramienta. Después de recargar, inserte la batería completamente en la herramienta hasta
que se fije en su lugar con un pequeño clic. (Fig. 1)
La tabla a continuación indica el tiempo de operación en una sola carga.
Voltaje Batería Tiempo de operación Cargador
1420 Aprox. 120 min.
14,4 V
18 V
1422 Aprox. 180 min.
1433 Aprox. 200 min.
1434 Aprox. 240 min.
1435 Aprox. 280 min.
1822 Aprox. 180 min.
1833 Aprox. 200 min.
1834 Aprox. 240 min.
1835 Aprox. 280 min.
Almacenamiento de la batería
Siembre recargue el cartucho de batería de hidruro metálico de níquel antes de almacenarla cuando no lo utilice durante
más de seis meses.
Acción del interruptor
Para encender la luz, presione el interruptor. Vuelva a presionarlo para apagar la luz.
Reemplazo del tubo fluorescente (Fig. 2 y 3)
PRECAUCIÓN:
• No someta el tubo fluorescente a golpes ni lo estropee. El cristal podría romperse y se podrían ocasionar graves
lesiones personales.
• No toque el tubo fluorescente mientras esté en uso o inmediatamente después de haberse apagado. Puede
quemarse.
• Asegúrese siempre que la batería haya sido extraída antes de reemplazar el tubo fluorescente o al realizar cualquier
operación de mantenimiento.
1) Afloje el anillo de rosca y deslícelo a un lado de tal forma que surja el anillo conector.
2) Retire el anillo conector.
3) Jale la cubierta de la linterna directamente hacia afuera de la unidad principal.
4) Retire la tapa del tubo fluorescente.
5) Saque el tubo fluorescente.
Luego reemplace con un tubo fluorescente nuevo de Makita.
Siga el procedimiento a continuación para volver a ensamblar la linterna.
1) Inserte la tapa en la partes superior del nuevo tubo fluorescente.
10
DC1470, DC1411, DC1413, DC1414, DC1422,
DC1801, DC1803, DC1804, DC1822, DC1439
DC1411, DC1413, DC1414, DC1801, DC1803,
DC1804, DC1822, DC1439, DC1422
DC1801, DC1803, DC1804, DC1822
Page 11

2) Inserte la cubierta de la lámpara de tal forma que las hendiduras en ésta encajen en las protuberancias en la
herramienta.
3) Inserte el anillo conector de tal forma que las dos clavijas pequeñas que se proyectan en éste encajen en los orificios
en la cubierta de la lámpara y la herramienta para que queden superpuestos.
4) Apriete firmemente el anillo de rosca.
Correa para el modelo ML142 (Fig. 4 y 5)
Instale la correa en la herramienta siguiendo los pasos numerados en la Figura 4.
En el sitio de trabajo, la luz puede colgarse de la correa en dos posiciones básicas: de cabeza u horizontalmente. Para
colgar la luz de cabeza, coloque el broche metálico de la correa al anillo en la parte inferior de la agarradera. Para colgar
la luz en posición horizontal, coloque el broche metálico de la correa al anillo en la parte superior de la agarradera.
(Fig. 5)
Gancho metálico para colgar para los modelos ML143 y ML183 (Fig. 6)
PRECAUCIÓN:
• No agite la herramienta cuando el gancho esté fuera. El gancho podría engancharse en algo accidentalmente.
• No use el gancho excepto cuando vaya a colgar la herramienta. Esto podría ocasionar un riesgo de avería de la
herramienta.
El gancho puede girarse, deslizarse y almacenarse alrededor de la cubierta de la linterna. (Fig. 6)
El gancho también puede quitarse si no lo utiliza.
MANTENIMIENTO
Para mantener la seguridad y fiabilidad del producto, la reparación y el mantenimiento deben llevarse a cabo por un
centro de servicio autorizado por Makita.
ACCESORIOS
PRECAUCIÓN:
Estos accesorios o acoplamientos están recomendados para utilizarse con su herramienta Makita especificada en este
manual. El empleo de cualquier otro accesorio o aditamento puede conllevar el riesgo de lesiones personales. Los
accesorios o aditamentos deben solamente ser utilizados para el propósito con el que fueron hechos.
• Tubo fluorescente
11
Page 12

Makita Corporation
884430-948
 Loading...