

Page 1
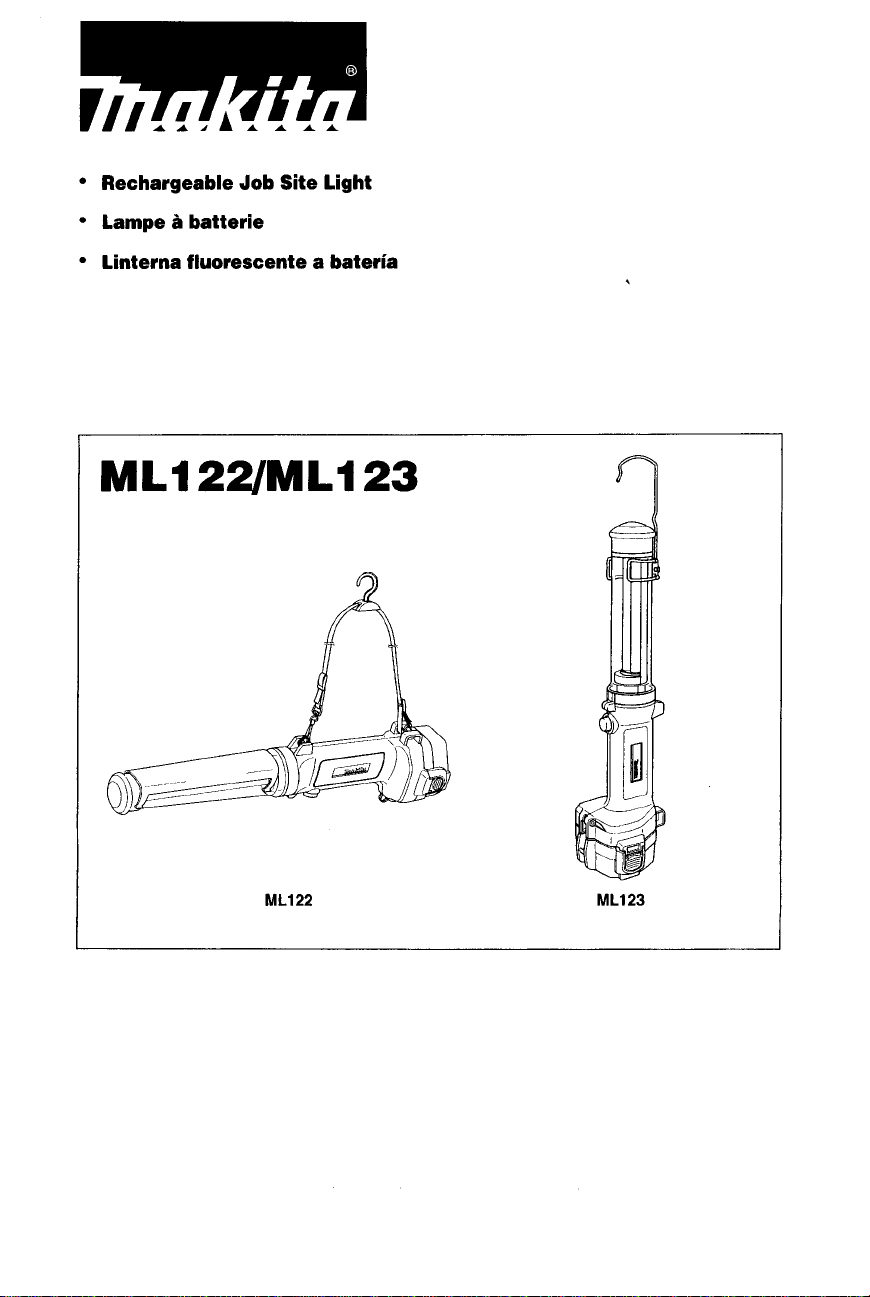
Rechargeable Job Site Light
Lampe a batterie
Linterna fluorescente a bateria
,
ML122 ML123
Page 2
1
ML122
~
2
3
4
MLi22
5
9-JlOJ
-11
I
6
ML122
2
Page 3
ML12
7
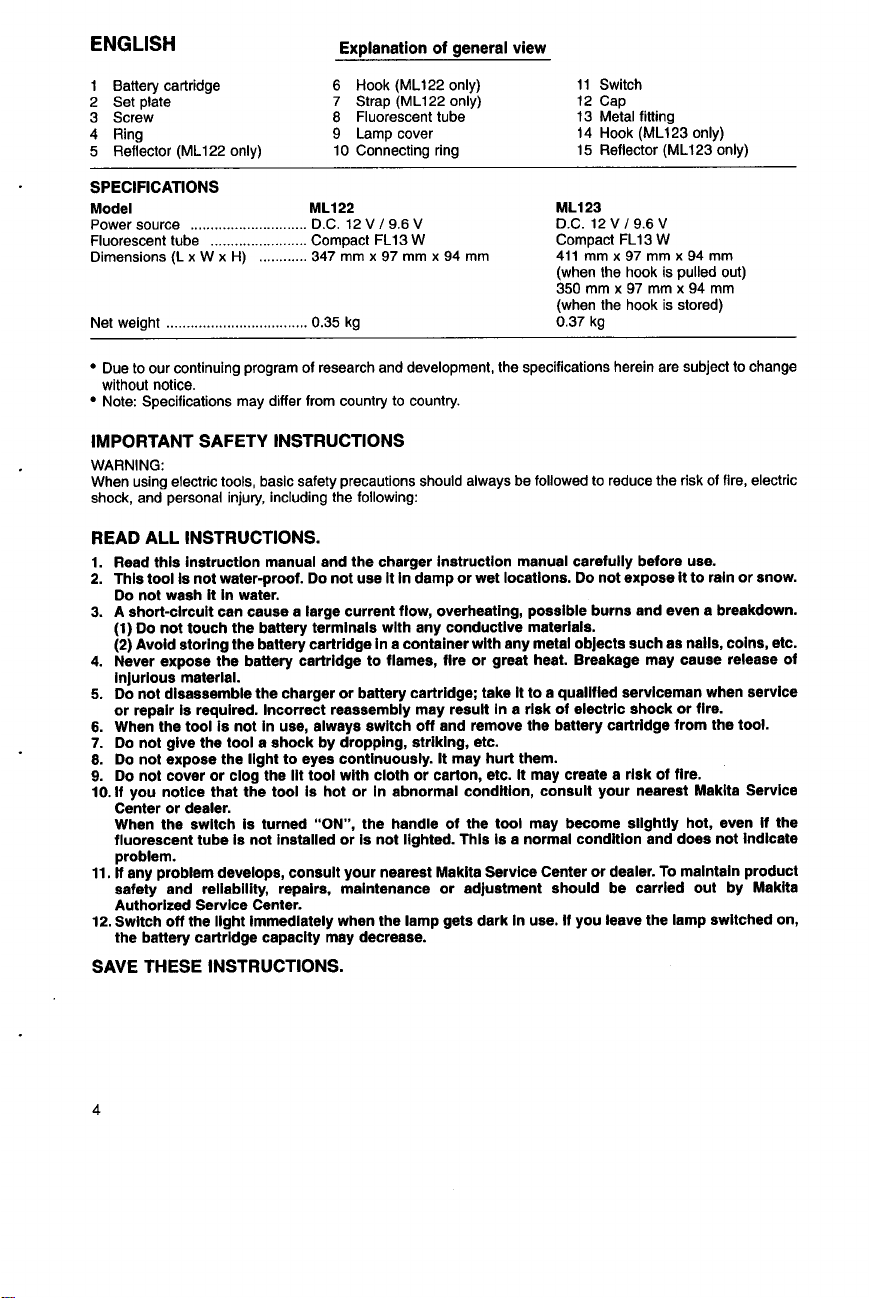
Symbols
The following show the symbols used for the tool, Be sure that
Symboles
Nous
donnons ci-dessous les symboles utilises pour I'outil. Assurez-vous que vous en avez bien compris la
signification avant d'utiliser I'outil.
Sfmbolos
A continuacion se muestran
significado antes de usarla.
0
Read instruction manual.
0
Lire le mode d'emploi.
0
Lea
0
Do
I
rl
not touch the fluorescent tube which is hot in use or immediately after putting
may get burnt.
0
Ne pas toucher I'ampoule en cours d'utilisation
chaude et vous risqueriez de vous brcler.
ON0
toque la bombilla mientras este siendo usada ni inmediatamente despues de haberla
apagado porque estara caliente. Podria quemarse
10s
simbolos utilizados con esta herramienta. Asegurese de que entiende
el
manual de instrucciones
you
understand their meaning before use.
out
ou
immbdiatement apres I'avoir eteinte. Elle est
light.
su
You
3
Page 4
ENGLISH
1
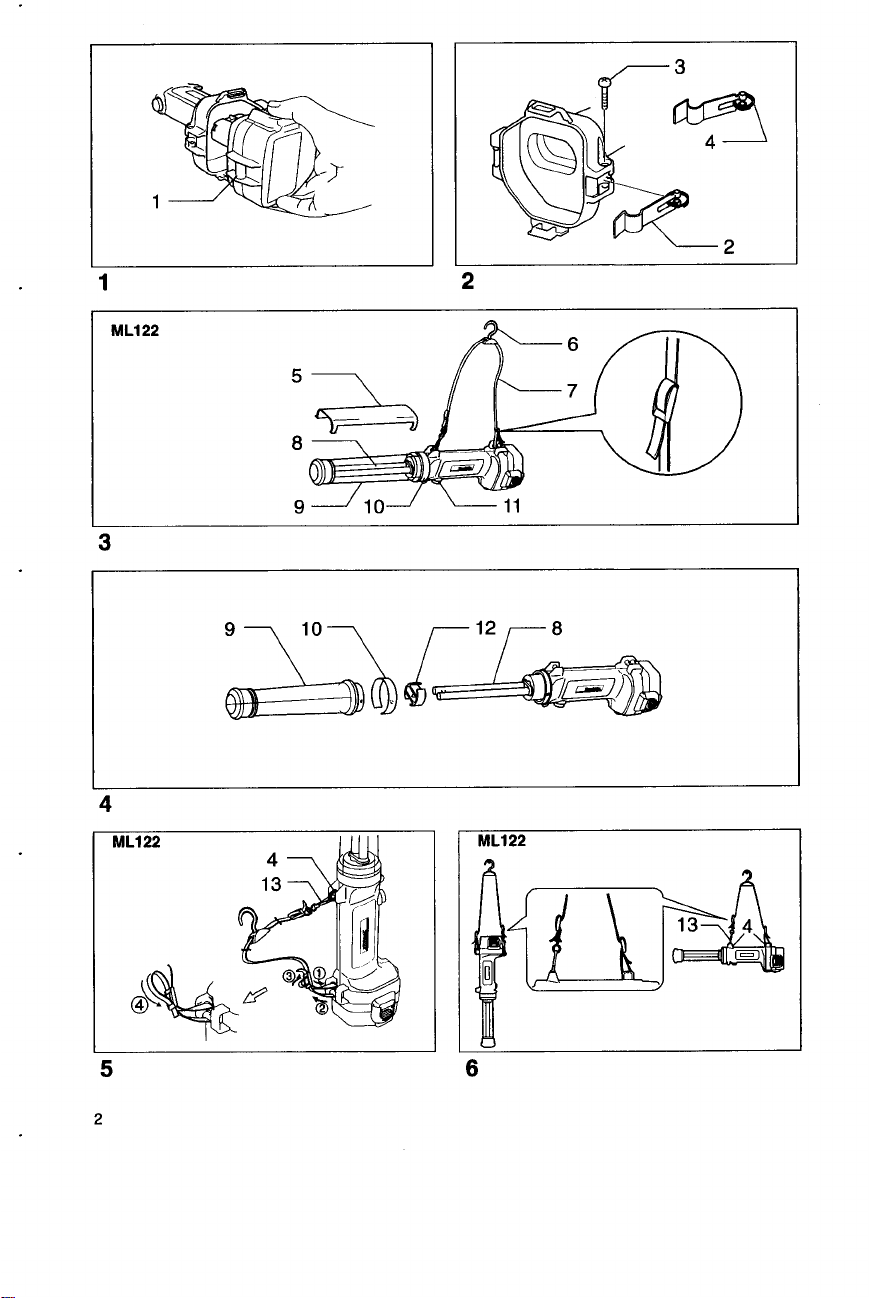
Battery cartridge
2 Set plate
3
Screw
4 Ring 9 Lamp cover
5
Reflector (ML122 only)
SPECIFICATIONS
Model ML122 ML123
Power source
Fluorescent tube
Dimensions
Net weight
.............................
........................
(L
x W x
H)
............
...................................
Exdanation
6
Hook (ML122 only)
7 Strap (ML122 only)
8
Fluorescent tube
10
Connecting ring
D.C. 12
V
Compact FL13
347 mm x 97 mm x 94 mm 411 mm x 97 mm x 94 mm
0.35
kg
of
general
view
11
12 Cap
13
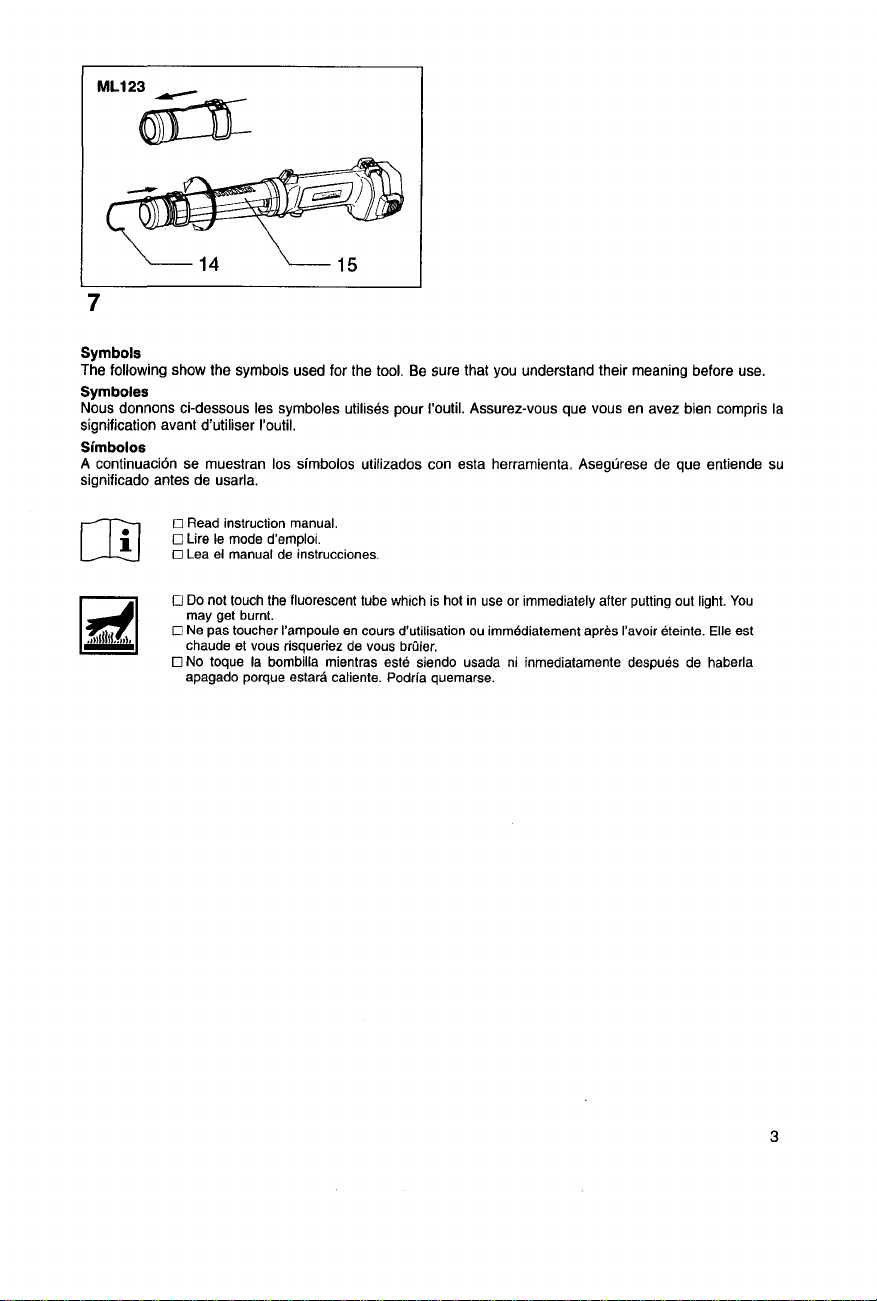
14 Hook (ML123 only)
15
/
9.6
V
W
D.C. 12 V 19.6
Compact FL13 W
(when the hook is pulled
350
mm x 97 mm x 94 mm
(when the hook is stored)
0.37 kg
Switch
Metal fitting
Reflector (ML123 only)
V
out)
Due to our continuing program of research and development, the specifications herein are subject
without notice.
Note: Specifications may differ from country
to
country.
to
change
IMPORTANT SAFETY INSTRUCTIONS
WARNING:
When using electric
shock, and personal injury, including the following:
tools,
basic safety precautions should always be followed to reduce the risk of fire, electric
READ ALL INSTRUCTIONS.
1.
Read this instruction manual and the charger instruction manual carefully before use.
2. This tool is not water-proof.
Do
not wash
3.
A short-circuit can cause a large current flow, overheating, possible burns and even a breakdown.
Do
(1)
(2) Avoid storing the battery cartridge in a container with any metal objects such as nails, coins, etc.
4.
Never expose the battery cartridge to flames, fire or great heat. Breakage may cause release of
injurious material.
5.
Do
not disassemble the charger or battery Cartridge; take
or repair is required. Incorrect reassembly may result
6.
When the tool is not
7.
Do
not give the tool a shock by dropping, striking, etc.
8.
Do
not expose the light to eyes continuously.
9.
Do
not cover or clog the
10. if you notice that the tool is hot or In abnormal condition, consult your nearest Maklta Service
Center or dealer.
When the switch is turned
fluorescent tube is not instailed or is not lighted. This is
problem.
11.
If
any problem develops, consult your nearest Makita Service Center or dealer. To maintain product
safety and reliability, repairs, maintenance or adjustment should be carried out by Makita
Authorized Service Center.
12. Switch
the battery cartridge capacity may decrease.
it
in
water.
not touch the battery terminals with any conductive materials.
off
the light immedlately when the lamp gets dark
Do
not use
it
in
in
use, always switch
lit
tool with cloth or carton, etc.
“ON”,
the handle of the tool may become slightly hot, even if the
damp or wet locations.
it
in
may
a risk of electric shock or fire.
hurt
a
off
and remove the battery cartridge from the tool.
It
in
Do
not expose
to a qualified serviceman when service
them.
It
may create a risk of fire.
normal condition and does not indicate
use. if you leave the lamp switched on,
it
to rain or snow.
SAVE THESE INSTRUCTIONS.
4
Page 5

For
U.S.A
only
Recycling the Battery
The only way to dispose
prohibits any other method
To
recycle the battery:
1. Remove the battery from the tool.
2. a) Take the battery
b) Take the battery
designated as a Makita battery recycling location.
Call your nearest Makita Service Center
battery recycling. See your local Yellow Pages under "Tools-Electric".
of
a Makita battery
01
disposal.
to
your nearest Makita Factory Service Center
to
your nearest Makita Authorized Service Center or Distributor that has been
is
to recycle it. The law
or
or
Distributor
to
I
Ni-Cd
determine the location that provides Makita
OPERATING INSTRUCTIONS
Charging
Charge the battery cartridge with the Makita charger before use. To remove the battery cartridge, withdraw it
from the
tool
into the
NOTE:
Battery cartridges 9100, 9102, 9102A, 9120, 9122, 9133, 9135, 1200, 1202, 1200A, 1202A can be used on
ML122/ML123
The following tables indicate the operating time on a single charge.
while pressing the buttons on both sides of the cartridge. After charging, insert the battery cartridge
tool
all the way until it locks in place with a little click.
if
you install the set plate. Install the set plate on ML122/ML123 with the screw.
Voltage
12
v
9.6
V
Battery cartridge
1200, 1200A, 1220
1202, 1202A, 1222
1235
9100, 9120
9102, 9102A, 9122
91 33
91 34
91 35
Approx.
Approx. 130 min.
Approx. 190 min.
Approx.
Approx. 130 min.
Approx. 140 min.
Approx. 170 min.
Approx. 190 min.
(Fig.
1)
Operating time Charger
80
80
min.
min.
DC1470, DC1201, DC1411,
DC1422, DC1439, DC1801
DC1201, DC1411, DC1422,
DC1439. DC1801
DC9710, DC9711, DC1470,
DC1201, DC1411, DC1422,
DC1439, DC1801
DC1201, DC1411, DC1422,
DC1439, DCl80l
-
DC9711, DC1411, DC1422,
-
DC1439, DC1801
(Fig.
2)
(Note)
If
you use a power checking battery on Model ML122/ML123. the power checking battery will not indicate the
remaining battery capacity properly.
Storing battery cartridge
Always charge the Nickel Metal Hydride battery cartridge before storing it when you
six months.
do
not use it for more than
Switch action
To turn on the light, depress the switch. Depress the switch once again, the light is turned
off
5
Page 6

Replacing fluorescent tube
CAUTION:
1,
Do
not give the fluorescent tube a shock or mar it. It may result in a risk of breakage of the glass and a
serious personal injury.
2.
Do
not touch the fluorescent tube which is hot in use or immediately after putting out light. You may get
burnt.
3.
Always be sure that the battery cartridge is removed before replacing the fluorescent tube or maintenance.
Remove the connecting ring and pull the lamp cover straight out to remove it. Then remove the cap and pull
the tube to replace the tube.
To install the lamp cover, place the cap on the tube. Then insert the lamp cover
tool fits into the groove on the lamp cover. And insert the connecting ring
fits into the groove on the lamp cover.
Strap
and
hook
(Fig.
3
&
4)
so
so
that the protrusion on the
that the pin on the connecting ring
Install the strap on the tool.
When storing the tool, hang the metal fitting of the strap on the ring of the
CAUTION
The hook can be turned, slid and stored around the lamp cover.
The hook also can be removed when you do not use it.
To
Authorized Service Center.
:
Do
not shake the tool when the hook is pulled out. The hook can catch something accidentally.
Do
not use the hook except when you hang the tool. This may result
maintain product safety and reliability, repairs, maintenance
(Flg.
5)
tool.
(Fig.
6)
in
a risk of breakage
(Fig.
7)
or
adjustment should be carried out by a Makita
of
the
tool.
ACCESSORIES
CAUTION:
These accessories or attachments are recommended for use with your Makita tool specified in this manual. The
of
any other accessories or attachments might present a risk of injury
use
attachments should be used only
Fluorescent tube
in
the proper and intended manner.
to
persons. The accessories or
Page 7

FRANCAIS
1 Batterie
2 Plaque de fixation (ML122 uniquement)
3 Vis
4 Anneau
5
Reflecteur
(ML122 uniquement)
6
7 Bandouliere 13 Raccord metallique
8
9 Couvercle de lampe 15 Reflecteur
10 Anneau de raccordement
Descrlptlf
Crochet 11 lnterrupteur
(ML122 uniquement)
Tube fluorescent (ML123 uniquement)
12 Coiffe
14
Crochet
(ML123 uniquement)
SPECIFICATIONS
Modble ML122 ML123
Alimentation
Tube fluorescent
Dimensions (L x P
Poids net
Etant donne I’evolution constante de notre programme de recherche et de developpement, les spbcifications
contenues dans ce manuel sont sujettes a modification sans preavis.
Note : Les spbcifications peuvent varier suivant les pays.
................................
.........................
x
H)
...............
.....................................
12 V/9,6 V CC
Compact FL13
347
mm
x
97
035
kg
W
mm
x
94
mm
12 V/9,6
V
Compact FL13
411 mm x 97
(lorsque le crochet est tire)
350
(lorsque le crochet est range)
0,37
CC
mm
x
97 mm x 94 mm
kg
W
mm
x
94
mm
CONSIGNES DE SECURITE IMPORTANTES
AVERTISSEMENT
Lors de I’utilisation d’outils Blectriques, des precautions Blbmentaires de sbcurite doivent &re prises afin de
reduire les risques dincendie, de choc Blectrique et de blessure, dont les suivantes
:
:
VEUILLEZ LIRE TOUTES LES INSTRUCTIONS.
1.
Avant I’utllisatlon, veulllez lire attentivement ce mode d’emplol et celui du chargeur.
2. Cet outil n’est pas h I’dpreuve de I’eau. Ne I’utlllsez pas dans les endroits humldes
I’exposez pas h la plule
3.
Un court-circuit peut entrainer
volre une panne de courant.
(1)
Ne touchez les bornes de batterle avec aucun mat6rlau conducteur.
(2) Evltez de ranger la batterie dans un contenant avec des objets m6talllques tels que des clous,
des pieces de monnale, etc.
4.
N’exposez jamals la batterie aux flammes, au feu
causer I’bchappement de matdrlaux nocifs.
5.
Ne demontez pas le chargeur
ou
la reparation est necessaire. Un remontage incorrect peut entrainer un risque de choc Blectrlque
ou
d’incendle.
6.
Lorsque I’outil n’est pas utllise, mettez-le toujours hors tension et retirez la batterle.
7.
Evltez tout choc
8.
N’exposez pas les yeux a la lumiere de fapon continue.
9.
Ne recouvrez pas
peut entrainer un risque d‘incendle.
IO.
Si
vous notez que I’outil est chaud
le
plus
prbs
Lorsque I’lnterrupteur est
m&me
aucun problhme.
11.
Si
un
revendeur. Afln de malntenir la s6curite et la flabilite du produit, les reparations, I’entretien
ajustements doivent stre effectues par un Centre de Services Maklta agree.
12. Etelgnez la lumlere imm6diatement lorsque le thoin devlent fond pendant I’utilisatlon. Si vous
lalssez le temoln allum6, la capaclte de la batterie peut diminuer.
ou
SI
le tube fluorescent n’est pas instalie
probit” quelconque survient, consultez le Centre de Services Makita le plus pres
ou
B
la nelge. Ne le nettoyez pas dans I’eau.
un
grand
debit
de courant, une surchauffe, d’eventuelles briilures,
ou
h
ou
la batterle ; conflez-les a un technicien quailfie lorsque I’entretien
I’outil en I’echappant, en le frappant, etc.
ou
ne bouchez pas I’outll avec
ou
votre revendeur.
mls
sous
dans un Qat anormal, contactez le Centre de Services Maklta
tension, la polgnee de I’outil peut devenlr legerement chaude
ou
un
allum6.
une chaleur Intense. Le brls de la batterle peut
I1
y a risque de blessure.
chiffon
ou
du carton lorsqu’il est allumb.
I1
s’agit dun Qat normal qui n’lndique
ou
moullles.
ou
Cela
votre
ou
Ne
les
CONSERVEZ CES INSTRUCTIONS.
7
Page 8

Pour les Etats-Unis uniquement
Recyclage de la batterie
Cunlque facon de mettre au rebut une batterie Maklta est I'utllisatlon
de recyclage. La
Pour mettre la batterie au recyclage
1.
Retirez la batterie de I'outil.
2. a) Apportez la batterie au centre de services de I'usine Makita la plus pres
b)
Apportez la batterie B un centre de services ou distributeur Makita agr66 et design6 comme lieu de
recyclage des batteries Makita.
Contactez le centre de services
le recyclage des batteries Makita.
MODE
D'EMPLOI
Charge
Avant I'utilisation, veuillez charger la batterie B I'aide du chargeur Makita. Pour eniever la batterie, retirez-la de
I'outil en appuyant sur les boutons des deux c6tes de la cartouche. Aprbs la charge, ins6rez la batterie
dans I'outil, jusqu'B ce qu'elle se verrouille en place en Bmettant un IBger dBclic. (Fig.
NOTE
:
Si
vous installez ia plaque de fixation, les batteries 9100, 9102, 9102A, 9120, 9122, 9133, 9135, 1200, 1202,
1200A et 1202A peuvent &re utilisBes sur ML122/ML123. lnstallez ia plaque de fixation sur ML122/ML123
I'aide de la vis. (Fig.
Le tableau suivant indique le temps de fonctionnement avec une charge simple.
Tenslon
I
I
I
A,..,
IZ
-
I
lo1
interdlt toute autre forme de mise au rebut.
ou
"outi/s-~Iectflques.lecrrisues':
2)
I
1
1200,1200A, 1220
I
I
1202, 1202A. 1222
v
1233
1234
1235
19100, 9120
Batterle
:
ou
distributeur Makita le plus pr&s pour connaitre le lieu
RBfBrez-vous
I
Dur&
1
Environ
I
1
Environ 130 mn
Environ 140 mn
Environ 170 mn
Environ 190 mn
I
Environ
aux Pages James locales
de
fonctionnement
80
mn
80
mn
dun
service
Ni-Cd
sous
1)
I
__
DC1470,
I
DC1422. DC
^^*^^*
ULlZUl,
I
nC14.19
DC1411, DC1422, DC1439,
DC1801
DC9710, DC9711, DC1470,
DC1201, DC1411, DC1422,
I
nridao
Chargeur
~~
--1201,
DC
1439, DC1801
--1411, DC1422,
UL
DC
nriani
ou
s'effectue
la rubrique
B
DC1411.
fond
B
I
I
I
9,6
V
/9102,9102A, 9122
9133 Environ 140 mn
9134 Environ
9135 Environ 190 mn
(Note)
Si vous utilisez une batterie B contrbleur de charge sur le modele ML12UML123, la charge restante de la
batterie ne sera pas correctement indiquee.
Rangement de la batterie
Chargez toujours la batterie B hydrure de metal nickel avant de la ranger lorsqu'elle doit rester inutilisee
pendant plus de six mois.
lnterrupteur
Pour allumer la lumibre, appuyez sur I'interrupteur. Appuyez de nouveau sur I'interrupteur pour Bteindre la
lumlbre.
8
Environ 130 mn
170
mn
1801
DC9711, DC1411, DC1422,
DC1439, DC1801
Page 9

Remplacement du tube fluorescent
ATTENTION
1.
Ne faites pas subir de choc
causer une blessure grave.
2.
Ne touchez pas le tube fluorescent pendant I’utilisation
et risquerait de vous br0ler.
3.
Assurez-vous toujours que la batterie est retiree avant de remplacer le tube fluorescent ou de proceder
I’entretien.
Retirez I’anneau de raccordement et tirez bien droit sur le couvercle de lampe pour le retirer. Retirez ensuite
la coiffe et tirez sur le tube pour le remplacer.
Pour installer le couvercle de lampe. placez la coiffe sur le tube. lnserez ensuite le couvercle de lampe de facon
que la saillie sur I’outil s‘aligne sur la rainure du couvercle de lampe. Puis, inserez I’anneau de raccordement
afin que la tige de I’anneau s’aligne sur la rainure du couvercle de lampe.
:
(Fig.
3
et 4)
ou
de dommages au tube fluorescent. Le verre risquerait de se casser et de
ou
juste aprbs avoir Bteint la lumibre.
I1
est chaud
Bandouliere et crochet
1
lnstallez la bandouliere sur
Lorsque vous rangez I’outil, accrochez le raccord metallique de la bandouliere sur l’anneau de I’outil.
ATTENTION
N’agitez pas I’outil lorsque le crochet est tire. Le crochet pourrait accrocher quelque chose accidentellement.
N’utilisez le crochet que lorsque vous accrochez
Le crochet peut &re tourn6, glisse et range autour du couvercle de lampe.
Le crochet peut Bgalement &re retire lorsque vous ne I’utilisez pas.
Pour maintenir la securite et la fiabilite du machines, les reparations, I’entretien
effectues par le Centre d’Entretien Makita.
:
I’outil.
(Fig.
5)
I’outil.
Autrement, vous risqueriez de briser I’outil.
(Fig.
7)
ou
les rbglages doivent &re
(Fig.
ACCESSOIRES
ATTENTION
Ces accessoires
Cutilisation d’autres accessoires
fixations ne devront &re utilisbs que dans le but et de la maniere prevus.
Tube fluorescent
:
ou
ces fixations sont recommandes pour I’utilisation de I’outil Makita spbcifie dans ce manuel.
ou
fixations peut prbsenter
un
risque de blessures. Les accessoires ou les
6)
9
Page 10

ESPANOL
1
Cartucho de bateria 6 Gancho (ML122 solamente)
2
Chapa de fijacion
3 Tornillo
4
Anilia
5
Reflector (ML122 solamente)
ESPECIFICACIONES
Modelo
Fuente de alimentacidn
Tubo flouroscente
Dlmensiones (La x An x AI)
Peso net0
a cambios sin previo aviso.
....................................
Debido a un programa continuo de investigacibn y desarrollo, las especificaciones aqui dadas esthn sujetas
Nota: Las especificaciones pueden ser diferentes de pais a pais.
..............
.......................
........
ExDlicaci6n
7 Correa (ML122 solamente) 12 Tapbn
8
Tubo fluorescente 13 Enganche methlico
9 Tapa de la llmpara 14 Gancho (ML123 solamente)
10
Anillo de conexi6n 15 Reflector (ML123 solamente)
ML122 ML123
12 V/9,6 V C.C.
Compacto FL13
347 x 97 x 94 mm
0.35 kg
W
de
10s
dibuios
11
lnterruptor
12 V/9,6
V
Compacto FL13
411
(cuando el gancho este en el exterior)
350 x 97 x 94 mm
(cuando el gancho est6 guardado)
0,37 kg
C.C.
x
97 x 94 mm
W
INSTRUCCIONES DE SEGURIDAD IMPORTANTES
ADVERTENCIA:
Cuando utilice herramientas ei6ctricas. para reducir el riesgo de incendios, descargas electricas
personales, deberh tomar siempre precauciones bhsicas, incluidas las indicadas a continuacibn.
y
lesiones
LEA TODAS LAS INSTRUCCIONES
1.
Lea atentamente este manual de instrucciones y
utilizar la herramienta.
2.
Eata herramienta no
exponga a la lluvia
3.
Un cortocircuito puede producir una gran circulacion de corriente,
quemaduras
(1)
No
toque
(2) Evlte guardar el cartucho de bateria en
clavos, monedas, etc.
4.
No
exponga nunca
cartucho podria liberar sustancias pellgrosas.
5.
No
desarme
cuando necesiten servicio
descarga elktrica
6.
Cuando la herramienta no est6 siendo usada, tengaia siempre apagada y con el cartucho de bateria
sacado de ella.
7.
No
dB
8.
9.
1O.Si nota que la herramienta est& caliente o no esth en buenas condiclones, consulte a
11.
12.Apague inmediatamente
golpes a la herramlenta dejandola caar o goipeandoia contra aigo, etc.
No
exponga
No
cubra
Incendio.
servicio Makita
Cuando el Interruptor se ponga en
tubo fluorescente no est6 instalado
ningun problema.
SI
mantener
reallzados en
encendida la Idmpara, la capacidad del cartucho de bateria podrh reducirse.
ni
surgiera algun problema, consulte al distribuidor o Centro de servicio Makita mas cercano. Para
el
es
a prueba de agua.
ni
a la
nleve.
No
la lave con agua.
e
incluso estropear la herramienta.
10s
bornes de la bateria con ningun material conductor.
el
cartucho de bateria a ilamas, al fuego
el
cargador
10s
ojos
arrope la herramlenta encendida con un trapo o cartbn, etc. Podrh correr un riesgo de
mds
o
incendio.
a ia
cercano
ni
el
cartucho de bateria; lllvelos a un tecnico de servicio cualificado
o
reparacidn. Un montaje incorrecto podra acarrear
luz
de la herramienta de forma continuada. Podria daiiarlos.
o
a
su concesionario.
“ON”,
o
no est6 encendido. Esta
product0 seguro y fiable, ias reparaclones,
un
Centro de servicio autorizado por Makita.
la
luz
cuando la lampara
el
manual de instrucciones del cargador antes de
No
la utilice en lugares muy humedos o mojados.
un
recaientamlento, posibles
un
caj6n Junto con otros objatos metdlicos tales como
ni
a
un
calor fuerte. Una rotura del
un
su
el asa de la herramlenta
el
se
se
calentard un poco, aunque el
es
una condlci6n normal y no indica
mantenimiento y
vuelva oscura durante el
10s
ajustes deberdn ser
USO.
riesgo de
centro de
Si
GUARDE ESTAS INSTRUCCIONES.
No
deja
la
10
Page 11

Para Estados Unidos solamente
Reciclaje de la bateria
La unica forma de tirar una bateria Makita es reciclhndola. La ley prohibe
tirarla de cualquier otra forma.
Para reciclar la bateria:
1.
Extraiga la bateria de la herramienta.
2. a) Lleve la bateria a la fabrica
b) Lleve la bateria
designado como lugar de reciclaje de baterias Makita.
Llame a/ Centro de senlicio o distribuidor autorizado por Makita para hallar el lugar
de/ recic/aje de /as baterias Makita. Busque en /as Paginas amari//as bajo “Too/s-€/ectric”
(Herramientas-el6ctricas).
al
Centro de servicio o distribuidor autorizado por Makita mas cercano que haya sido
INSTRUCCIONES PARA
o
Centro de servicio Makita mas cercano
EL
FUNCIONAMIENTO
0
Ni-Cd
que
se encargue
Carga
Cargue el cartucho de bateria con el cargador Makita antes de utilizarlo. Para retirar el cartucho de bateria,
saquelo de la herramienta mientras presiona
cartucho de bateria, ins6rtelo en la herramienta empujhndolo a tope hasta que encaje en posicibn produciendo
un chasquido. (Fig.
NOTA:
Si instala la chapa de fijacibn. podra utilizar
9135, 1200, 1202, 1200A y 1202A en la herramienta ML122/ML123. lnstale la chapa de fijacibn en
ML122/ML123 con el tornillo. (Fig.
En las tablas siguientes se indica el tiempo que la bateria puede usarse con una sola carga.
1)
2)
10s
botones a ambos lados del cartucho. Despu6s de cargar el
10s
cartuchos de bateria 9100, 9102, 9102A, 9120, 9122, 9133,
DC1411, DC1422, DCI439,
la
(Nota)
Si utiliza una bateria que tenga comprobacion de carga en el modelo ML122/ML123, dicha bateria no indicara
correctamente la capacidad restante de la misma.
Almacenamiento del cartucho de bateria
Cargue siempre el cartucho de bateria de niquel-metal de hidruro antes de almacenarlo cuando
utilizar durante mas de seis meses.
no
lo
vaya a
11
Page 12

Accionamiento
Para encender la
Reemplazo del
PRECAUC16N:
1.
No
golpee el tubo fluorescente ni
2.
No
toque el
Es
posible que se queme.
3.
Asegurese siempre de que el cartucho de bateria haya sido extraido antes de reemplazar el tubo
fluorescente
Extraiga el anillo de conexion y quite la tapa de la lampara tirando de ella en linea recta. Luego extraiga el
tapon y saque el tubo para reemplazarlo.
Para instalar la tapa de la lampara, ponga
que el resalte de la herramienta encaje en la ranura de la tapa de la lampara. Por ultimo inserte el anillo de
conexidn de forma que el pasador de dicho anillo encaje en la ranura de la tapa de la lampara.
Correa y gancho
del
interruptor
Iuz,
presione el interruptor. Presione el interruptor otra vez para apagarla.
tub0
fluorescente (Fig.
tubo
fluorescente que est6 caliente durante el
o
hacer mantenimiento.
3
y
4)
lo
daiie. Podria ocasionar la rotura del crista1 y una lesion personal grave.
el
tapdn en el tubo. Luego inserte la tapa de la lampara de forma
us0 o inmediatamente despues de apagar la
luz.
1-
lnstale la correa en la herramienta.
Cuando guarde la herramienta, cu6lguela de las anillas de la herramienta con
correa.
(Flg.
6)
(MLi231
PRECAUCI~N:
No sacuda la herramienta cuando el gancho est6 en el exterior. El gancho podria engancharse a algo por
accidente.
No
utilice el gancho si no es para colgar la herramienta. De
estropee.
El
gancho puede girarse, deslizarse y guardarse alrededor de la tapa de la lampara.
El
gancho tambi6n puede quitarse cuando no
Para mantener la seguridad
ser realizados por un Centro de Servicio Autorizado de Makita.
ACCESORIOS
PRECAUC16N:
Estos
accesorios o acoplamientos estan recomendados para usar con la herramienta Makita especificada en
este manual. Con el
heridas a personas. Los accesorios o acoplamientos deberhn usarse solamente de la manera apropiada y para
la que ha sido designados.
Tubo fluorescente
us0
de cualquier otro accesorio o acoplamiento se pcdria correr el riesgo de producir
(Fig.
5)
lo
contrario se corre el riesgo de que Bsta se
lo
utilice.
y
fiabilidad del producto, las reparaciones, el mantenimiento y
10s
enganches metalicos de la
(Fig.
7)
10s
ajustes deberhn
Makita
Corporation
 Loading...