

Page 1
INSTRUCTION MANUAL
MANUEL D'INSTRUCTION
MANUAL DE INSTRUCCIONES
Cordless Vacuum Cleaner
Aspirateur Sans Fil
Aspiradora Inalámbrica
LXCV01
LXCV02
IMPORTANT: Read Before Using.
IMPORTANT: Lire avant usage.
IMPORTANTE: Leer antes de usar.
011111
1
Page 2

ENGLISH (Original instructions)
SPECIFICATIONS
Model LXCV01 LXCV02
Capacity
Continuous use
Overall length 403 mm
Net weight 2.1 kg 2.2 kg
Rated voltage D.C. 14.4 V D.C. 18 V
Standard battery cartridges BL1430, BL1415 BL1830, BL1815
• Due to our continuing programme of research and development, the specifications herein are subject to change without notice.
• Specifications and battery cartridge may differ from country to country.
• Weight, with battery cartridge, according to EPTA-Procedure 01/2003
IMPORTANT
SAFETY
INSTRUCTIONS
When using an electrical appliance, basic
precautions should always be followed, including
the following:
READ ALL INSTRUCTIONS
BEFORE USING THIS
APPLIANCE.
WARNING
To reduce the risk of fire, electric shock or injury:
1. Do not leave appliance when battery fitted.
Remove battery from appliance when not in
use and before servicing.
2. Do not expose to rain. Store indoors.
3. Do not allow to be used as a toy. Close
attention is necessary when used by or near
children.
4. Use only as described in this manual. Use only
manufacturer's recommended attachments.
5. Do not use with damaged battery. If appliance
is not working as it should, has been dropped,
damaged, left outdoors, or dropped into water,
return it to a service center.
6. Do not handle appliance with wet hands.
7. Do not put any object into openings. Do not
use with any opening blocked; keep free of
Volume 3.0 L
Max. Air volume 3.3 m3/min. 3.4 m3/min.
HIGH Approx. 10 min. (with BL1430) Approx. 13 min. (with BL1830)
LOW Approx. 20 min. (with BL1430) Approx. 26 min. (with BL1830)
USA019-2
dust, lint, hair, and anything that may reduce
air flow.
8. Keep hair, loose clothing, fingers, and all parts
of body away from openings and moving
parts.
9. Turn off all controls before removing the
battery cartridge.
10. Use extra care when cleaning on stairs.
11. Do not use to pick up flammable or
combustible liquids, such as gasoline, or use
in areas where they may be present.
12. Use only the charger supplied by the
manufacturer to recharge.
13. Do not pick up anything that is burning or
smoking, such as cigarettes, matches, or hot
ashes.
14. Do not use without dust bag in place.
15. Do not charge the battery outdoors.
16. Use power tools only with specifically
designated battery packs. Use of any other
battery packs may create a risk of injury and fire.
17. When battery pack is not in use, keep it away
from other metal objects, like paper clips,
coins, keys, nails, screws or other small metal
objects, that can make a connection from one
terminal to another. Shorting the battery
terminals together may cause burns or a fire.
18. Under abusive conditions, liquid may be
ejected from the battery; avoid contact. If
contact accidentally occurs, flush with water.
If liquid contacts eyes, additionally seek
medical help. Liquid ejected from the battery may
cause irritation or burns.
2
Page 3

SAVE THESE
INSTRUCTIONS.
This appliance is intended for commercial use.
ADDITIONAL SAFETY RULES
1. Read this instruction manual and the charger
instruction manual carefully before use.
2. Do not pick up the following materials:
− Hot materials such as lit cigarettes or
spark/metal dust generated by
grinding/cutting metal
− Flammable materials such as gasoline,
thinner, benzine, kerosene or paint
− Explosive materials like nitroglycerin
− Ignitible materials such as Aluminum, zinc,
magnesium, titanium, phosphorus or
celluloid
− Wet dirt, water, oil or the like
− Hard pieces with sharp edges, such as
wood chips, metals, stones, glasses, nails,
pins or razors
− Powder to clot such as cement or tonor
− Conductive dust such as metal or carbon
− Fine particle like concrete dust
Such action may cause fire, injury and/or
property damage.
3. Stop operation immediately if you notice
anything abnormal.
4. If you drop or strike the cleaner, check it
carefully for cracks or damage before
operation.
5. Do not bring close to stoves or other heat
sources.
6. Do not block the intake hole or vent holes.
7. When using the cleaner as a blower
• always use protective goggles, a cap and
mask while operating;
• always be sure that the cleaner is switched
off and the battery cartridge is removed
before clearing a blockage;
• always be sure of your footing on slopes;
• walk, never run;
• never point the nozzle at anyone in the
vicinity;
• Keep all nuts, bolts and screws tight to be
sure the cleaner is in safe working
condition;
• Store the cleaner only in a dry place;
• The operator or user is responsible for
accidents or hazzards ocurring to other
people or their property.
USB103-1
SAVE THESE INSTRUCTIONS.
USD305-1
Symbols
The followings show the symbols used for tool.
・ volts
・ direct current
ENC007-6
IMPORTANT SAFETY
INSTRUCTIONS
FOR BATTERY CARTRIDGE
1. Before using battery cartridge, read all
instructions and cautionary markings on (1)
battery charger, (2) battery, and (3) product
using battery.
2. Do not disassemble battery cartridge.
3. If operating time has become excessively
shorter, stop operating immediately. It may
result in a risk of overheating, possible burns
and even an explosion.
4. If electrolyte gets into your eyes, rinse them
out with clear water and seek medical
attention right away. It may result in loss of
your eyesight.
5. Do not short the battery cartridge:
(1) Do not touch the terminals with any
conductive material.
(2) Avoid storing battery cartridge in a
container with other metal objects such as
nails, coins, etc.
(3) Do not expose battery cartridge to water
or rain.
A battery short can cause a large current flow,
overheating, possible burns and even a
breakdown.
6. Do not store the tool and battery cartridge in
locations where the temperature may reach or
exceed 50 ゚ C (122 ゚ F).
7. Do not incinerate the battery cartridge even if
it is severely damaged or is completely worn
out. The battery cartridge can explode in a fire.
8. Be careful not to drop or strike battery.
9. Do not use a damaged battery.
SAVE THESE INSTRUCTIONS.
Tips for maintaining maximum battery life
1. Charge the battery cartridge before
completely discharged.
Always stop tool operation and charge the
3
Page 4
battery cartridge when you notice less tool
power.
2. Never recharge a fully charged battery
cartridge.
Overcharging shortens the battery service life.
3. Charge the battery cartridge with room
temperature at 10 ゚ C - 40 ゚ C (50 ゚ F - 104 ゚ F).
Let a hot battery cartridge cool down before
charging it.
FUNCTIONAL DESCRIPTION
CAUTION:
• Always be sure that the cleaner is switched off and
the battery cartridge is removed before adjusting or
checking function on the cleaner.
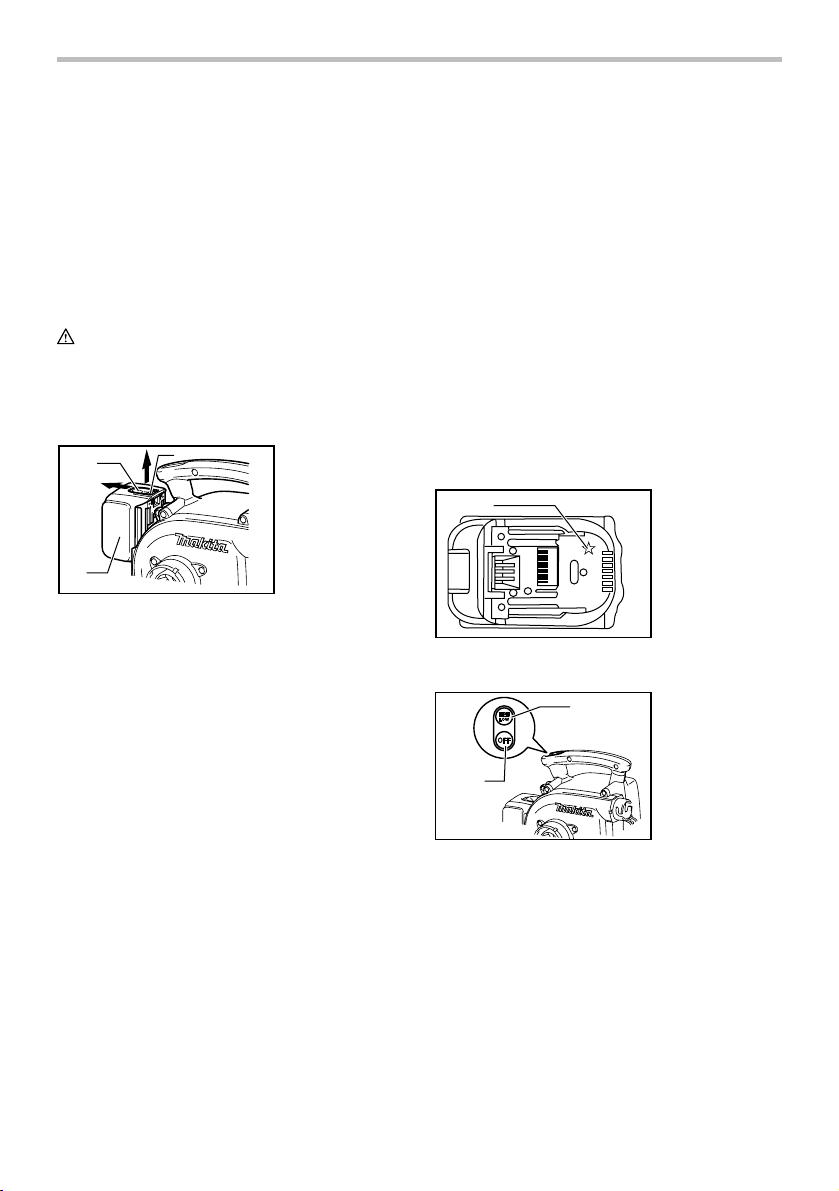
Installing or removing battery cartridge
2
1
1. Red part
2. Button
3. Battery
cartridge
• When the cleaner is overloaded:
•
• When the remaining battery capacity gets low:
NOTE:
• This temperature-sensitive protection is applied
At this time, press the "OFF" button and
remove causes of overload and then press
the "HIGH/LOW" button again to restart.
When battery cells get hot: (refer to the note below.)
If any operation of the "HIGH/LOW" button
and the "OFF" button, the motor will remain
stopped. At this time, stop use of the cleaner
and cool or charge the battery cartridge after
removing it from the cleaner.
If any operation of the "HIGH/LOW" button
and the "OFF" button, the motor will remain
stopped. At this time, remove the battery
cartridge from the cleaner and charge it.
only when the cleaner is used with a battery
cartridge with a star mark.
1
1. Star mark
3
01111 2
Always switch off the cleaner before insertion or
•
removal of the battery cartridge.
• To remove the battery cartridge, withdraw it from
the cleaner while sliding the button on the front of
the cartridge as shown in the figure.
• To insert the battery cartridge, align the tongue on
the battery cartridge with the groove in the housing
and slip it into place. Always insert it all the way
until it locks in place with a little click. If you can
see the red part on the upper side of the button, it
is not locked completely. Insert it fully until the red
part cannot be seen. If not, it may accidentally fall
out of the cleaner, causing injury to you or
someone around you.
• Do not use force when inserting the battery
cartridge. If the cartridge does not slide in easily, it
is not being inserted correctly.
Battery protection system
The cleaner is equipped with the protection system,
which automatically cuts off the output power for its long
service life.
The cleaner stops during operation when the cleaner
and/or battery are placed under the following situation.
This is caused by the activation of protection system and
does not show the cleaner trouble.
011389
Switch action
1
2
0111 21
To start the cleaner, simply press the "HIGH/LOW"
button. To switch off, press the "OFF" button. To change
the cleaner speed, press the "HIGH/LOW" button. The
first press on this button is for high speed and the
second press for low speed and then each press on this
button repeats the high/low speed cycle alternatively.
1. HIGH/LOW
button
2. OFF button
4
Page 5
ASSEMBLY
CAUTION:
• Always be sure that the cleaner is switched off and
the battery cartridge is removed before carrying
out any work on the cleaner.
• Any work with the battery cartridge being installed
on the cleaner may cause a personal injury or
damage to the objects around the cleaner.
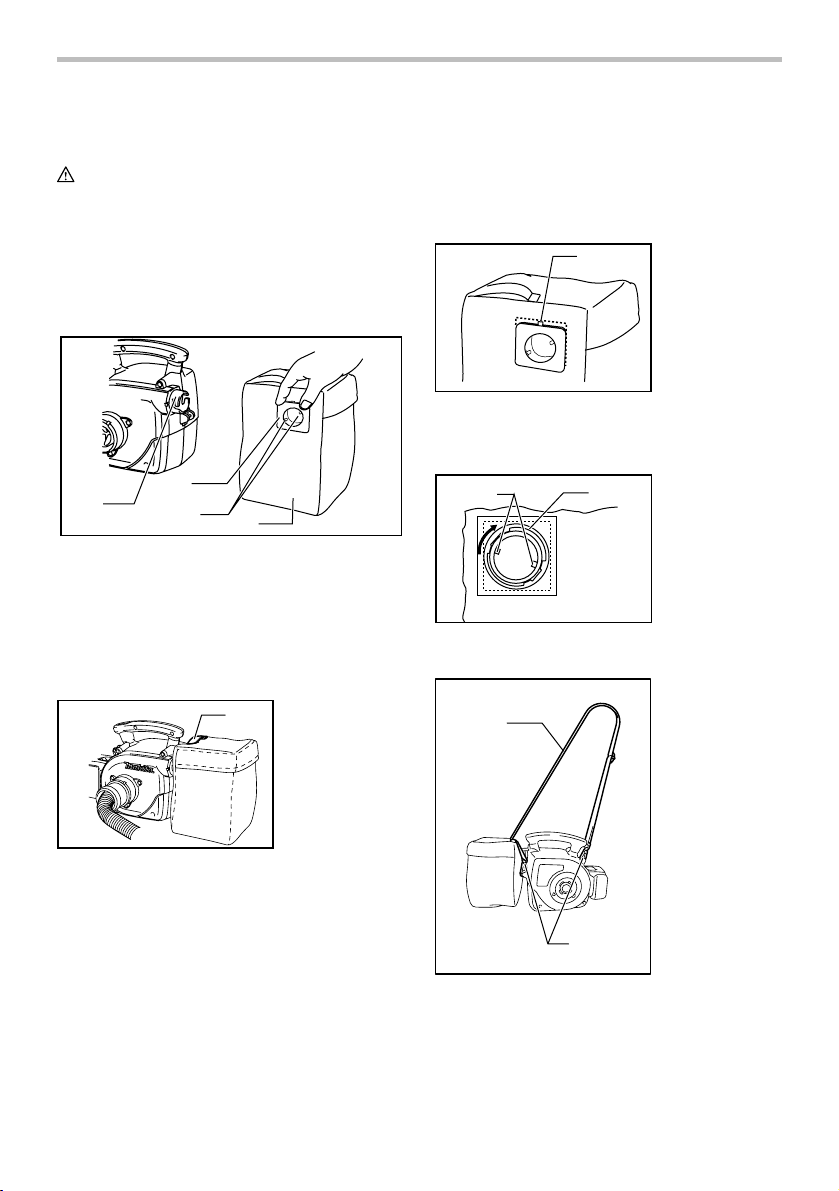
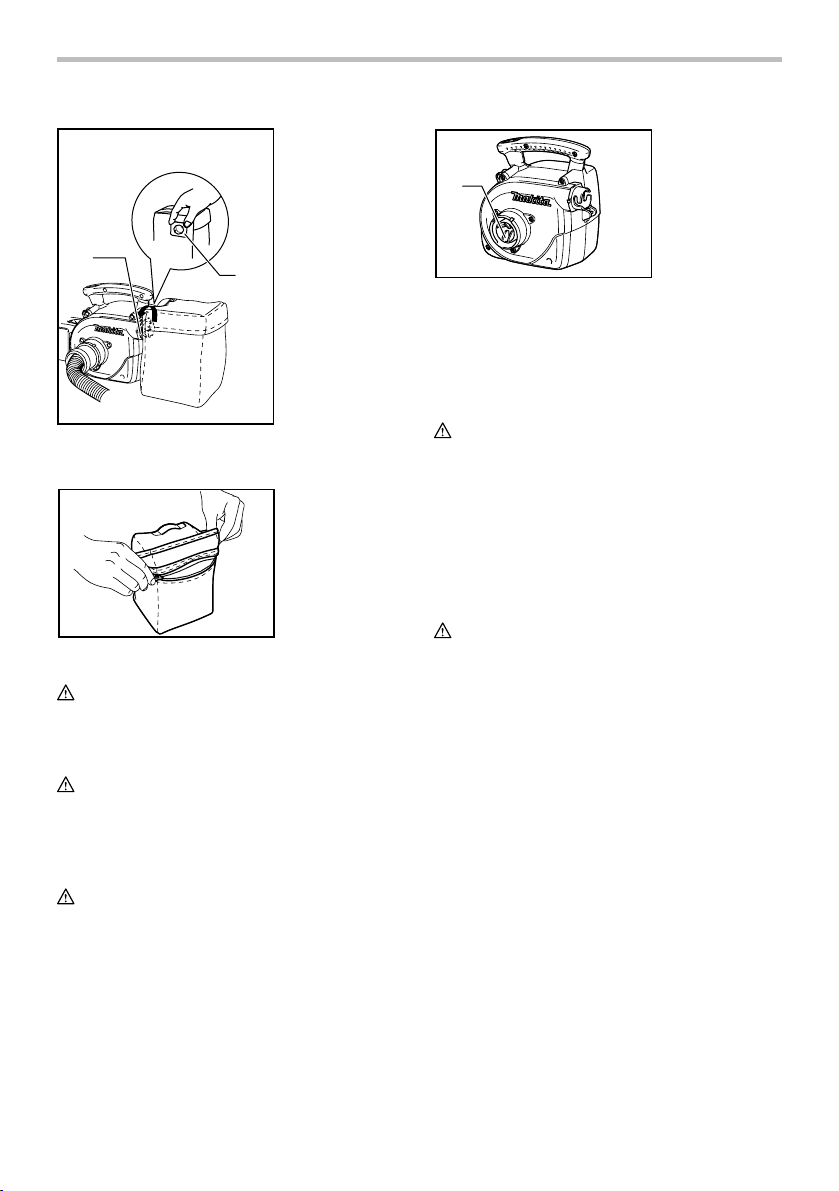
Installing dust bag
NOTE:
• When the dust bag joint and the ring inside the
dust bag come off, install as follows.
(1) Align the dust bag joint with the seam of the
dust bag and install it so that its protrusion
faces upward.
1
1. Protrusion
1
1. Dust outlet
2. Dust bag joint
3. Pins
4. Dust bag
01111 3
Hold the square section of the dust bag joint and fit the
pins inside the dust bag joint to the notches in the dust
outlet of the cleaner and then insert and turn it clockwise
all the way until it stops.
01111 4
At this time, make sure that the fastener part on the dust
bag faces upward.
2
3
4
1. Hook
1
01111 5
(2) Tighten the ring inside the dust bag firmly so
that the pins and the ring are positioned as
shown in the figure.
1
2
1. Pins
2. Ring
01111 6
Installing the shoulder strap
1
2
01111 7
Attach one end hook of the shoulder strap onto the ring
in the front of the cleaner and thrust the other end of the
strap through the band of the dust bag and then attach
the other end hook as shown in the figure.
5
1. Shoulder strap
2. Two hooks
Page 6

Adjusting the shoulder strap
1
3
2
1. Pull out
2. For shortening
3. For extending
Replacing the front cuff
Change the front cuff of the hose according to the dust
outlet size of a power tool you use.
1. Front cuff
1
3
2. Hose
3. Remove
4. Install
01111 8
To adjust the length of the shoulder strap, pull it out to
your desired length and pull the strap in the direction of
arrow as shown in the figure.
Connecting the hose
CAUTION:
• Do not force the hose to bend it and/or stamp it.
Forcing and/or stamping the hose may cause
deformation or damage to the hose.
• Do not pull the hose to carry the cleaner. Pulling
the hose may cause deformation or damage to the
hose.
B
1
2
1. Dust outlet
2. Power tool
01111 9
Insert the "A" end of the hose to the suction opening of
the cleaner and turn it clockwise all the way until it locks.
Attach the cuff on the "B" end of the hose and then
connect it to the dust outlet of an power tool.
A
0111 20
2
To remove the front cuff, hold the hose and turn it
counterclockwise.
To mount the front cuff, turn it clockwise and then
screw it in until it stops.
4
OPERATION
WARNING:
• Do not use the shoulder strap when working in a
high place.
• When using the cleaner as a stationary cleaner,
place it on a flat and stable surface
Vacuum Cleaner
0111 22
When using the cleaner as a portable cleaner,
cross-hanging the shoulder strap before the breast is
difficult to drop the cleaner.
6
Page 7
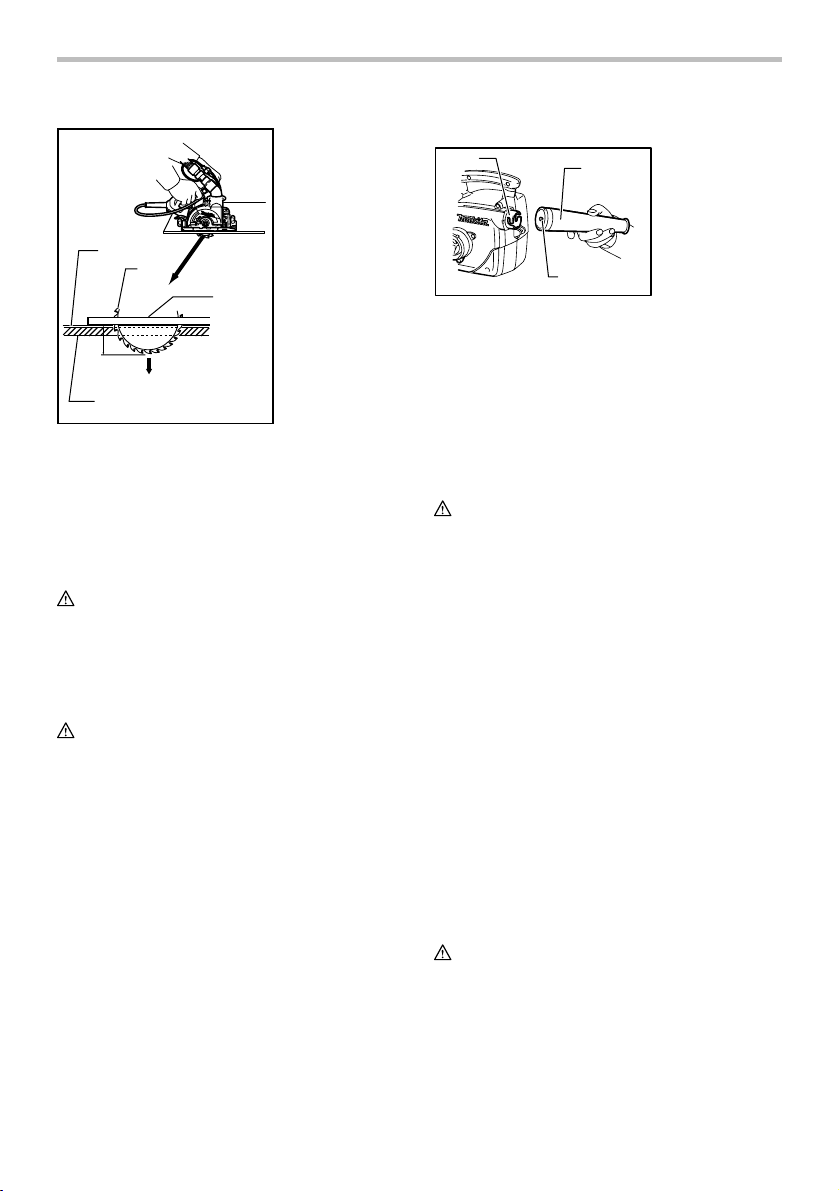
1. Decorative
paper
2. Saw blade
3. Base
4. Cutting depth
5. Plaster board
1
2
3
4
5
0111 23
NOTE:
• Long cut-off decorative paper that may be
produced by plaster board cutting work depending
on the conditions of workpiece to be cut and that
may be stuffed inside the hose may cause the
hose suction blocking. When this occurs, change
the cutting depth setting of power tool to deeper
depth, which will relieve the hose suction blocking.
CAUTION:
• When the dust bag is just new, dust may come out
of its surface. Using it a few times will minimize the
dust leak from the surface.
Operation of the cleaner with a nozzle or a
dust bag being installed
WARNING:
• Always be sure that the cleaner is switched off
and the battery cartridge is removed before
installing or removing the nozzle or any other
attachment on the cleaner. Failure to switch off
and remove the battery cartridge may result in
serious personal injury.
NOTE:
• Before the blower mode operation immediately
after the cleaner mode operation, remove all
remaining dust from the cleaner due to possible
blow out of dust .
Using as a blower
1
2
1. Outlet (air vent)
2. Nozzle
3. Pin
3
0111 24
Install the nozzle onto the outlet (air vent) without fail.
To install the nozzle, fit the pin protruding from the inside
of nozzle to one of the cleaner notches and then turn
the nozzle clockwise securely.
To remove the nozzle, turn counterclockwise and pull it
out.
Direct the top point of the cleaner and then switch on.
Emptying the dust bag
WARNING:
• Always be sure that both the cleaner and a
connected power tool are switched off and the
battery cartridge is removed and the power
tool, if corded tool, is unplugged before
installing or removing the dust bag on the
cleaner and emptying the dust bag( made of
cloth). Failure to switch off, remove the battery
cartridge and unplug the connected power tool
may result in electric shock and serious personal
injury.
• When the dust bag is about half full, remove the
dust bag from the cleaner and pull the fastener out.
Empty the dust bag of its contents, tapping it lightly
so as to remove particles adhering to the insides
which might hamper further collection.
NOTE:
• For the time to empty the dust bag, use a guide
line that the dust bag becomes full when
drilling about 450 holes with 6.5 mm diameter
and 40 mm depth on the concrete. A dust bag
clogged with the built up particles may reduce the
dust collection power and cause damage to the
cleaner motor.
CAUTION:
• Attach the dust bag (made of cloth) to the dust
bag joint securely and close the fastener
completely before use. Failure to attach the dust
bag securely and close its fastener completely may
cause blow-out of dust and result in serious
personal injury.
7
Page 8
1. Dust bag joint
2. Square section
1. Filter area
1
1
2
0111 25
Pick up the square section of the dust bag joint firmly,
turn it counterclockwise and then remove the dust bag.
0111 26
Open the fastener and dispose of the dust.
CAUTION:
• Remove all particles adhering to the fastener area.
MAINTENANCE
WARNING:
• Always be sure that the cleaner is switched off and
the battery cartridge is removed before attempting
to perform inspection or maintenance.
Cleaning the filter area
CAUTION:
• Do not pick up materials other than dust , such as
stone, wood chip and the like since this cleaner is
intended for dust collection. Picking up stone,
wood chip and the like may cause damage to the
fan and the cleaner.
0111 27
Check and clean up the filter area in the suction inlet
regularly. Remove foreign objects which will obstruct
suction.
Cleaning
From time to time wipe off the outside (cleaner body) of
the cleaner using a cloth dampened in soapy water.
CAUTION:
• Never use gasoline, benzine, thinner, alcohol or
the like. Discoloration, deformation or cracks may
result.
To maintain product SAFETY and RELIABILITY, repairs,
any other maintenance or adjustment should be
performed by Makita Authorized or Factory Service
Centers, always using Makita replacement parts.
ACCESSORIES
CAUTION:
• These accessories or attachments are
recommended for use with your Makita cleaner
specified in this manual. The use of any other
accessories or attachments might present a risk of
injury to persons. Only use accessory or
attachment for its stated purpose.
If you need any assistance for more details regarding
these accessories, ask your local Makita Service Center.
• Nozzles
• Dust bags
• Hoses
• Front cuffs
• Shoulder straps
• Various type of Makita genuine batteries and
chargers
8
Page 9

MAKITA LIMITED ONE YEAR WARRANTY
Warranty Policy
Every Makita tool is thoroughly inspected and tested
before leaving the factory. It is warranted to be free of
defects from workmanship and materials for the period
of ONE YEAR from the date of original purchase.
Should any trouble develop during this one year period,
return the COMPLETE tool, freight prepaid, to one of
Makita’s Factory or Authorized Service Centers. If
inspection shows the trouble is caused by defective
workmanship or material, Makita will repair (or at our
option, replace) without charge.
This Warranty does not apply where:
repairs have been made or attempted by others:
repairs are required because of normal wear and
tear:
the tool has been abused, misused or improperly
maintained:
alterations have been made to the tool.
IN NO EVENT SHALL MAKITA BE LIABLE FOR ANY
INDIRECT, INCIDENTAL OR CONSEQUENTIAL
DAMAGES FROM THE SALE OR USE OF THE
PRODUCT. THIS DISCLAIMER APPLIES BOTH
DURING AND AFTER THE TERM OF THIS
WARRANTY.
MAKITA DISCLAIMS LIABILITY FOR ANY IMPLIED
WARRANTIES, INCLUDING IMPLIED WARRANTIES
OF "MERCHANTABILITY" AND "FITNESS FOR A
SPECIFIC PURPOSE," AFTER THE ONE YEAR TERM
OF THIS WARRANTY.
This Warranty gives you specific legal rights, and you
may also have other rights which vary from state to
state. Some states do not allow the exclusion or
limitation of incidental or consequential damages, so
the above limitation or exclusion may not apply to you.
Some states do not allow limitation on how long an
implied warranty lasts, so the above limitation may not
apply to you.
EN0006-1
9
Page 10

FRANÇAIS (Mode d’emploi original)
SPÉCIFICATIONS
Modèle LXCV01 LXCV02
Capacité
Utilisation continue
Longueur totale 403 mm
Poids net 2,1 kg 2,2 kg
Tension nominale C.C. 14,4 V C.C. 18 V
Batteries standard BL1430, BL1415 BL1830, BL1815
• Étant donné l'évolution constante de notre programme de recherche et de développement, les spécifications contenues dans ce
manuel sont sujettes à modification sans préavis.
• Les caractéristiques techniques et la batterie peuvent varier suivant les pays.
• Poids, batterie comprise, conforme à la procédure EPTA de 01/2003
IMPORTANT
CONSIGNES DE
SÉCURITÉ
Lors de l'utilisation d'un appareil électrique, vous
devez toujours prendre des précautions de base,
dont les suivantes:
LISEZ TOUTES CES CONSIGNES
AVANT D'UTILISER L'APPAREIL.
AVERTISSEMENT
pour réduire les risques d'incendie, de choc
électrique et de blessure:
1. Ne quittez pas l'appareil alors que la batterie y
est insérée. Retirez la batterie de l'appareil
après l'utilisation et avant de le faire réparer.
2. Ne l'exposez pas à la pluie. Rangez-le à
l'intérieur.
3. Ne laissez pas les enfants l'utiliser comme
jouet. Une attention particulière est nécessaire
lors de l'utilisation par les enfants ou à
proximité des enfants.
4. Utilisez l'outil uniquement de la façon décrite
dans ce manuel. Utilisez uniquement les
accessoires recommandés par le fabricant.
5. Ne l'utilisez pas avec une batterie
endommagée. Si l'appareil ne fonctionne pas
Volume 3,0 l
Volume d’air max. 3,3 m3/min. 3,4 m3/min.
Grande
Bas
Environ 10 min. (avec modèle BL 1430) Environ 13 min. (avec modèle BL 1830)
Environ 20 min. (avec modèle BL 1430) Environ 26 min. (avec modèle BL 1830)
USA019-2
bien, s'il a été échappé, endommagé, laissé à
l'extérieur ou échappé dans l'eau, retournez-le
à un centre de service après-vente.
6. Ne manipulez pas l'appareil lorsque vous avez
les mains mouillées.
7. Ne mettez rien dans les ouvertures. N'utilisez
jamais l'outil si une des ouvertures est
bouchée ; gardez ces dernières exemptes de
poussières, charpies, cheveux ou tout objet
pouvant réduire la circulation de l'air.
8. Gardez les cheveux, les vêtements amples, les
doigts et toute autre partie du corps à l'écart
des ouvertures et des pièces en mouvement.
9. Mettez toutes les commandes hors tension
avant de retirer la batterie.
10. Soyez tout particulièrement prudent lorsque
vous nettoyez sur les marches d'un escalier.
11. Ne l'utilisez pas pour aspirer des liquides
inflammables ou combustibles tels que
l'essence, ou dans des zones où de tels
liquides peuvent être présents.
12. Utilisez uniquement le chargeur fourni par le
fabricant pour recharger la batterie.
13. N'aspirez aucun objet qui brûle ou dégage de
la fumée, comme par exemple des cigarettes,
des allumettes ou des cendres encore
chaudes.
14. N’utilisez pas l’appareil si le sac à poussières
n’est pas installé.
15. Ne chargez pas la batterie à l'extérieur.
16. N'utilisez un outil électrique qu'avec le
bloc-piles conçu spécifiquement pour cet outil.
Il y a risque de blessure ou d'incendie si un autre
bloc-piles est utilisé.
17. Lorsque vous n'utilisez pas le bloc-piles,
rangez-le à l'écart des objets métalliques tels
10
Page 11

que trombones, pièces de monnaie, clés,
clous, vis ou autres petits objets métalliques
qui risquent d'établir une connexion entre les
bornes. La mise en court-circuit des bornes de
batterie peut causer des brûlures ou un incendie.
18. Dans des conditions d'utilisation inadéquates
de la batterie, il peut y avoir fuite d'électrolyte;
évitez tout contact avec ce liquide. En cas de
contact accidentel, rincez avec beaucoup
d’eau. Si le liquide pénètre dans vos yeux, il
faut aussi consulter un médecin. L'électrolyte
qui s'échappe de la batterie peut causer des
irritations ou des brûlures.
CONSERVEZ CE
MODE D'EMPLOI.
Cet appareil est destiné à un usage commercial.
RÈGLES DE SÉCURITÉ
SUPPLÉMENTAIRES
1. Lisez attentivement ce guide et le guide du
chargeur avant d'utiliser l'appareil.
2. N’utilisez pas l’appareil pour aspirer les
matériaux suivants :
− Des matières chaudes comme les
cigarettes allumées ou la poussière
d’étincelles/de métal provoquée par le
meulage/la coupe de métal
− Des matières inflammables comme
l’essence, le solvant, la benzine, le
kérosène ou la peinture
− Des matières explosives comme la
nitroglycérine
− Des matières inflammables comme
l’aluminium, le zinc, le magnésium, le
titane, le phosphore ou le celluloïd
− Des poussières humides, de l’eau, de
l’huile ou autres produits similaires
− Des objets durs ayant des bords coupants
comme les copeaux de bois, des pièces
de métal, des pierres, du verre, des clous,
des broches ou lames de rasoir
− Des poudres qui s’amalgament comme le
ciment ou le toner
− Les poussières conductrices comme
celles de métal ou de carbone
− Les particules fines comme la poussière
de béton
Ces applications pourraient être à l’origine
d’un incendie, de blessures ou de dommages
matériels.
USB103-1
3. Arrêtez immédiatement votre outil dès que
vous observez quelque chose d'anormal.
4. Si vous échappez ou cognez l'aspirateur,
examinez-le avec soin avant de l'utiliser à
nouveau pour vérifier s'il a été endommagé.
5. Ne l'approchez pas du four ni de toute autre
source de chaleur.
6. N'obstruez pas le trou d'admission ou les
trous d'évent.
7. Lorsque vous utilisez l’aspirateur en guise de
souffleur
• portez toujours des lunettes de protection,
un casque et un masque antipoussières;
• assurez-vous toujours que l’aspirateur est
éteint et que la batterie est retirée avant de
débloquer l’appareil;
• sur une pente, assurez-vous toujours
d’avoir un bon équilibre;
• marchez, ne courez jamais;
• ne pointez jamais l’embout en direction
d’une personne à proximité;
• assurez-vous que tous les écrous, les
boulons et les vis sont bien serrés pour
garantir un fonctionnement sécuritaire;
• rangez toujours l’aspirateur dans un
endroit sec;
• l’opérateur ou l’utilisateur est responsable
en cas d’accident ou de dommages
provoqués à d’autres personnes ou à leurs
biens.
CONSERVEZ CE MODE
D'EMPLOI.
USD305-1
Symboles
Les symboles utilisés pour l'outil sont indiqués
ci-dessous.
・ volts
・ courant continu
ENC007-6
CONSIGNES DE SÉCURITÉ
IMPORTANTES
POUR LA BATTERIE
1. Avant d'utiliser la batterie, lisez toutes les
instructions et précautions relatives (1) au
chargeur de batterie, (2) à la batterie, et (3) à
l'outil utilisant la batterie.
2. Ne démontez pas la batterie.
11
Page 12

3. Cessez immédiatement l'utilisation si le temps
de fonctionnement devient excessivement
court. Il y a risque de surchauffe, de brûlures,
voire d'explosion.
4. Si l'électrolyte pénètre dans vos yeux,
rincez-les à l'eau claire et consultez
immédiatement un médecin. Il y a risque de
perte de la vue.
5. Ne court-circuitez pas la batterie :
(1) Ne touchez les bornes avec aucun
matériau conducteur.
(2) Évitez de ranger la batterie dans un
conteneur avec d'autres objets
métalliques, par exemple des clous, des
pièces de monnaie, etc.
(3) Évitez d'exposer la batterie à l'eau ou à la
pluie.
Un court-circuit de la batterie pourrait
provoquer un fort courant, une surchauffe,
parfois des brûlures et même une panne.
6. Ne rangez pas l'outil ou la batterie dans des
endroits où la température risque d'atteindre
ou de dépasser 50 ゚ C (122 ゚ F).
7. Ne jetez pas la batterie au feu même si elle est
sérieusement endommagée ou complètement
épuisée. La batterie peut exploser au contact
du feu.
8. Prenez garde d'échapper ou de heurter la
batterie.
9. N'utilisez pas une batterie si elle est
endommagée.
CONSERVEZ CE MODE
D'EMPLOI.
Conseils pour obtenir la durée de service
maximale de la batterie
1. Rechargez la batterie avant qu'elle ne soit
complètement déchargée.
Arrêtez toujours l'outil et rechargez la batterie
quand vous remarquez que la puissance de
l'outil diminue.
2. Ne rechargez jamais une batterie
complètement chargée.
La surcharge réduit la durée de service de la
batterie.
3. Rechargez la batterie à une température
ambiante comprise entre 10 ゚ C et 40 ゚ C (50 ゚
F - 104 ゚ F). Si la batterie est chaude, laissez-la
refroidir avant de la recharger.
DESCRIPTION DU
FONCTIONNEMENT
ATT EN TI ON :
• Assurez-vous toujours que l’aspirateur est éteint et
que la batterie a été retirée avant de régler ou de
vérifier une fonction.
Installation ou retrait de la batterie
2
3
01111 2
Mettez toujours l’aspirateur hors tension avant
•
d’insérer ou de retirer la batterie.
• Pour retirer la batterie, sortez-la de l’aspirateur tout
en faisant glisser le bouton qui se trouve à l’avant
de la batterie, comme illustré.
•
Pour insérer la batterie, alignez sa languette sur la
rainure pratiquée dans le boîtier, et glissez la
batterie en place. Insérez-la toujours à fond
jusqu’à ce que vous entendiez un clic. Si vous
pouvez voir la pièce rouge située sur le dessus du
bouton, la batterie n’est pas complètement
verrouillée. Insérez-la à fond jusqu’à ce que vous
ne puissiez plus voir la pièce rouge. Dans le cas
contraire, la batterie pourrait tomber
accidentellement de l’aspirateur et entraîner des
blessures.
• N'appliquez pas une force excessive lors de
l'insertion de la batterie. Si la batterie ne glisse pas
aisément, c'est qu'elle n'est pas insérée
correctement.
1
Système de protection de la batterie
L’aspirateur est équipé du système de protection qui
coupe automatiquement la puissance de sortie pour lui
assurer une longue durée de service.
L’aspirateur s’arrête pendant l’utilisation lorsque l’outil
et/ou la batterie sont dans la situation suivante. Cela est
dû à l’activation du système de protection et n’indique
pas un problème de l’aspirateur.
• Lorsque l’aspirateur est surchargé:
Lorsque cela se produit, appuyez sur le
bouton d’arrêt «OFF» et supprimez les
causes de surcharge, puis appuyez de
nouveau sur le bouton de mise en marche
«HIGH/LOW» pour redémarrer.
1. Partie rouge
2. Bouton
3. Batterie
12
Page 13

• Lorsque la batterie devient trop chaude: (consultez
la note ci-dessous.)
Si vous actionnez le bouton «HIGH/LOW» et
le bouton d’arrêt «OFF», le moteur ne
démarrera pas. À ce moment, cessez
l’utilisation de l’aspirateur et laissez-le
refroidir, ou encore rechargez la batterie
• Lorsque la batterie est presque vide :
NOTE:
• Ce système de protection contre la surchauffe ne
après l’avoir retirée de l’aspirateur.
Si vous actionnez le bouton «HIGH/LOW» et
le bouton d’arrêt «OFF», le moteur ne
démarrera pas. Retirez alors la batterie de
l’aspirateur et rechargez-la.
fonctionne que lorsque l’aspirateur est alimenté
par une batterie marquée d’une étoile.
ASSEMBLAGE
ATT EN TI ON :
• Assurez-vous toujours que l’aspirateur est éteint et
que la batterie a été retirée avant toute opération
d’entretien sur l’aspirateur.
•
Tout travail d’entretien réalisé pendant que la
batterie est en place sur l’aspirateur peut
provoquer des blessures ou endommager les
objets autour.
Installation du sac à poussières
1
011389
1. Étoile
Interrupteur
1
2
0111 21
Pour démarrer l’aspirateur, appuyez simplement sur le
bouton de mise en marche «HIGH/LOW». Pour
l’éteindre, appuyez sur le bouton d’arrêt «OFF». Pour
changer la vitesse, appuyez sur le bouton «HIGH/LOW».
Lorsque vous appuyez sur ce bouton pour la première
fois, vous actionnez la vitesse supérieure. La deuxième
fois que vous l’appuyez, vous actionnez la vitesse
inférieure. Par la suite, chaque fois que vous appuyez
sur ce bouton, vous alternez entre la vitesse supérieure
et la vitesse inférieure.
1. Bouton de mise
en marche
HIGH/LOW
2. Bouton d’arrêt
«OFF»
1
1. Sortie des poussières
2. Joint du sac à poussières
3. Tiges d’accouplement
4. Sac à poussières
01111 3
Tenez la partie carrée du joint du sac à poussières et
insérez les tiges d’accouplement à l’intérieur du joint
dans les encoches de la prise de sortie des poussières
de l’aspirateur. Insérez le sac en place et faites tourner
dans le sens horaire jusqu’au fond.
01111 4
Vérifiez si la fixation du sac à poussières est bien
tournée vers le haut.
13
2
3
4
1. Crochet
1
Page 14

NOTE:
• Si le joint du sac à poussières et la bague à
l’intérieur du sac se détachent, procédez de la
manière suivante pour les remettre en place.
(1) Placez le joint du sac à poussières en ligne
avec les coutures du sac, et installez-le de
manière à ce que la saillie soit tournée vers le
haut.
1
1. Saillie
du sac à poussières, puis fixez le crochet de l’autre
extrémité, comme illustré.
Réglage de la bandoulière.
1
3
1. Retirer
2. Pour raccourcir
3. Pour allonger
2
01111 5
(2) Serrez fermement la bague à l’intérieur du
sac à poussières, de manière à ce que les
tiges d’accouplement et la bague se trouvent
dans la position illustrée.
1
01111 6
2
1. Tiges
d’accouplement
2. Bague
Installation de la bandoulière.
1. Bandoulière
2. Deux crochets
1
2
01111 7
Fixez le crochet de l’une des extrémités de la
bandoulière sur l’anneau à l’avant de l’aspirateur. Faites
passer l’autre extrémité de la bandoulière dans la bande
01111 8
Pour régler la longueur de la bandoulière, tirez une
mesure de la longueur désirée, puis tirez sur la
bandoulière dans la direction des flèches, comme
illustré.
Connexion du tuyau
ATT EN TI ON :
• Ne forcez pas le tuyau pour le plier et/ou ne
l’écrasez pas. Si vous forcez ou écrasez le tuyau,
vous pourriez le déformer ou l’endommager.
• Ne transportez pas l’aspirateur en le tirant par
le tuyau. Si vous tirez sur le tuyau, vous pourriez
le déformer ou l’endommager.
B
1
2
1. Sortie des poussières
2. Outil électrique
01111 9
Insérez l’extrémité « A » du tuyau dans la bouche
d’aspiration de l’aspirateur et faites-le tourner dans le
sens des aiguilles d’une montre jusqu’à ce qu’il
s’enclenche.
Fixez le manchon à l’extrémité « B » du tuyau, puis
branchez-le à la prise de sortie des poussières d’un outil
électrique.
A
14
Page 15

Remplacement du manchon
f
Changez le manchon du tuyau en fonction de la
dimension de la prise de sortie des poussières de l’outil
électrique que vous utilisez.
1. Manchon
1
3
2. Tuyau
3. Retirer
4. Installer
1. Papier décorati
2. Lame
3. Base
4. Profondeur de
coupe
5. Panneau de
plâtre
1
2
3
0111 20
2
4
Pour retirer le manchon, tenez le tuyau et faites-le
tourner dans le sens inverse des aiguilles d’une montre.
Pour monter le manchon, faites-le tourner dans le sens
des aiguilles d’une montre, et vissez-le jusqu’au fond.
UTILISATION
AVERTISSEMENT:
• N’utilisez pas la bandoulière si vous travaillez dans
une position surélevée.
• Lorsque vous utilisez l’aspirateur en guise
d’aspirateur fixe, placez-le sur une surface plane et
stable.
Aspirateur
0111 22
Lorsque vous utilisez l’aspirateur comme aspirateur
portable, portez la bandoulière en travers de votre
poitrine pour faire en sorte qu’il soit difficile d’échapper
l’aspirateur.
4
5
0111 23
NOTE:
• Lors de la coupe de panneaux de plâtre, il peut se
former, selon l’état de la pièce à couper, de
longues bandes de papier décoratif qui risquent de
s’accumuler à l’intérieur du tuyau et de provoquer
un blocage. Si cela se produit, réglez l’outil à une
profondeur de coupe supérieure. Ceci permettra
de dégager le blocage du tuyau.
ATT EN TI ON :
• Lorsque vous utilisez un nouveau sac à poussières,
il est possible que la poussière s’échappe par la
surface du sac. Après quelques utilisations, cette
fuite de poussières devrait s’atténuer.
Utilisation de l’aspirateur avec un embout ou
un sac à poussières
AVERTISSEMENT:
• Assurez-vous toujours que l’aspirateur est
éteint et que la batterie a été retirée avant
d’installer ou de retirer l’embout ou tout autre
accessoire de l’aspirateur. Si l’appareil n’est pas
éteint et que la batterie est toujours en place, vous
risquez de provoquer des blessures graves.
NOTE:
• Avant d’utiliser le mode souffleur, si vous venez
tout juste d’utiliser le mode aspirateur, enlevez
toute la poussière restante de l’aspirateur pour
éviter un brusque jaillissement de la poussière qui
pourrait survenir.
15
Page 16

Utilisation en guise de souffleur
1
2
1. Sortie (évent)
2. Buse
3. Broche
3
0111 24
Installez sans faute l’embout sur la sortie (évent).
Pour installer l’embout, insérez la tige d’accouplement
qui ressort à l’intérieur de l’embout sur l’une des
encoches de l’aspirateur, puis tournez fermement
l’embout dans le sens des aiguilles d’une montre.
Pour retirer l’embout, faites-le tourner dans le sens
inverse des aiguilles d’une montre et extrayez-le.
Dirigez le point supérieur de l’aspirateur, puis
allumez-le.
Vider le sac à poussières
AVERTISSEMENT:
• Assurez-vous toujours que l’aspirateur et
l’outil électrique sont tous deux éteints et que
la batterie a été retirée et, dans le cas de l’outil
électrique, s’il s’agit d’un outil avec cordon,
que celui-ci soit débranché, avant d’installer ou
de retirer le sac à poussières de l’aspirateur et
de le vider (s’il s’agit d’un sac en tissu). Si les
appareils ne sont pas éteints, que la batterie n’est
pas retirée et que l’outil n’est pas débranché, il y a
risque de décharge électrique et de blessures
graves.
•
Quand le sac à poussières est plein jusqu’à la
moitié environ, retirez-le de l’aspirateur et tirez sur
la fixation. Videz le contenu du sac à poussières et
tapotez dessus doucement pour détacher les
particules qui auraient adhéré aux parois internes
et qui pourraient empêcher un bon
fonctionnement.
NOTE:
•
Pour évaluer à quel moment il convient de
vider le sac à poussières, considérez que le
sac est plein lorsque vous percez environ 450
trous d’un diamètre de 6,5 mm et d’une
profondeur de 40 mm dans le ciment.
Les
particules qui s’accumulent dans le sac à
poussières peuvent réduire la puissance
d’aspiration et endommager le moteur de
l’aspirateur.
ATT EN TI ON :
• Fixez fermement le sac à poussières (de tissu)
sur le joint du sac à poussières et fermez la
fixation complètement avant d’utiliser
l’appareil. Si vous ne fixez pas fermement le sac à
poussières à l’appareil et ne fermez pas sa fixation
complètement, la poussière pourrait jaillir
brusquement et entraîner des blessures graves.
1. Joint du sac à
poussières
2. Partie carrée
1
2
0111 25
Tenez fermement la partie carrée du joint du sac à
poussières, faites-la tourner dans le sens inverse des
aiguilles d’une montre, puis retirez le sac à poussières.
0111 26
Ouvrez la fixation et jetez la poussière.
ATT EN TI ON :
• Éliminez toutes les particules qui adhèrent à
proximité de la fixation.
ENTRETIEN
AVERTISSEMENT:
• Assurez-vous toujours que l’aspirateur est éteint et
que la batterie est retirée avant d’inspecter
l’appareil ou d’effectuer une opération d’entretien.
16
Page 17

Nettoyage de la zone du filtre
A
À
A
ATT EN TI ON :
• Puisque cet aspirateur est conçu pour la poussière,
ne l’utilisez pas pour aspirer des matériaux autres,
comme des pierres, copeaux de bois, etc. Si vous
l’utilisez pour recueillir des pierres, des copeaux de
bois, etc., vous pourriez endommager l’hélice et
l’aspirateur.
1. Zone du filtre
1
0111 27
Vérifiez la zone du filtre dans la prise d’aspiration et
nettoyez-la régulièrement. Retirez tout corps étranger
qui pourrait obstruer l’aspiration.
Nettoyage
Essuyez régulièrement l'extérieur (le corps) de
l'aspirateur avec un chiffon imprégné d'eau savonneuse.
ATT EN TI ON :
• N'utilisez jamais d'essence, de benzine, de solvant,
d'alcool ou d'autres produits similaires. Une
décoloration, une déformation, ou la formation de
fissures peuvent en découler.
Pour maintenir la SÉCURITÉ et la FIABILITÉ du produit,
les réparations, tout autre travail d'entretien ou de
réglage doivent être effectués dans un centre de service
Makita agréé ou un centre de service de l'usine Makita,
exclusivement avec des pièces de rechange Makita.
ACCESSOIRES
ATT EN TI ON :
• Ces accessoires et fixations sont recommandés
pour être utilisés avec l’aspirateur Makita spécifié
dans le présent manuel. L’utilisation de tout autre
accessoire ou fixation peut comporter un risque de
blessure. Utilisez l’accessoire ou la fixation
uniquement pour la fonction pour laquelle il a été
conçu.
Si vous désirez obtenir plus de détails concernant ces
accessoires, veuillez contacter le centre de service
après-vente Makita le plus près.
• Embouts
• Sacs à poussières
• Tuyaux
• Manchons
• Bandoulières
• Les divers types de batteries et chargeurs Makita
authentiques
GARANTIE LIMITÉE D’UN AN MAKITA
Politique de garantie
Chaque outil Makita est inspecté rigoureusement et
testé avant sa sortie d’usine. Nous garantissons qu’il
sera exempt de défaut de fabrication et de vice de
matériau pour une période d’UN AN à partir de la date
de son achat initial. Si un problème quelconque devait
survenir au cours de cette période d’un an, veuillez
retourner l’outil COMPLET, port payé, à une usine ou à
un centre de service après-vente Makita. Makita
réparera l’outil gratuitement (ou le remplacera, à sa
discrétion) si un défaut de fabrication ou un vice de
matériau est découvert lors de l’inspection.
Cette garantie ne s’applique pas dans les cas où:
des réparations ont été effectuées ou tentées par
un tiers:
des réparations s’imposent suite à une usure
normale:
l’outil a été malmené, mal utilisé ou mal entretenu:
l’outil a subi des modifications.
MAKITA DÉCLINE TOUTE RESPONSABILITÉ POUR
TOUT DOMMAGE ACCESSOIRE OU INDIRECT LIÉ À
LA VENTE OU À L’UTILISATION DU PRODUIT. CET
VIS DE NON-RESPONSABILITÉ S’APPLIQUE À LA
FOIS PENDANT ET APRÈS LA PÉRIODE COUVERTE
PAR CETTE GARANTIE.
MAKITA DÉCLINE TOUTE RESPONSABILITÉ QUANT
TOUTE GARANTIE TACITE, INCLUANT LES
GARANTIES TACITES DE “QUALITÉ MARCHANDE”
ET “ADÉQUATION À UN USAGE PARTICULIER”
PRÈS LA PÉRIODE D’UN AN COUVERTE PAR
CETTE GARANTIE.
Cette garantie vous donne des droits spécifiques
reconnus par la loi, et possiblement d’autres droits, qui
varient d’un État à l’autre. Certains États ne permettant
pas l’exclusion ou la limitation des dommages
accessoires ou indirects, il se peut que la limitation ou
exclusion ci-dessus ne s’applique pas à vous. Certains
États ne permettant pas la limitation de la durée
d’application d’une garantie tacite, il se peut que la
limitation ci-dessus ne s’applique pas à vous.
EN0006-1
17
Page 18

ESPAÑOL (Instrucciones originales)
ESPECIFICACIONES
Modelo LXCV01 LXCV02
Capacidad
Uso continuo
Longitud total 403 mm
Peso neto 2,1 kg 2,2 kg
Tensión nominal 14,4 V c.c. 18 V c.c.
Cartuchos de batería estándar BL1430, BL1415 BL1830, BL1815
• Debido a nuestro programa continuo de investigación y desarrollo, las especificaciones aquí dadas están sujetas a cambios sin
previo aviso.
• Las especificaciones y el cartucho de la batería pueden variar de país a país.
• Peso de acuerdo al procedimiento de EPTA-01/2003 incluyendo el cartucho de la batería
IMPORTANTE
INSTRUCCIONES
DE SEGURIDAD
Al usar cualquier aparato eléctrico, siempre deben
seguirse las precauciones básicas, incluyendo las
siguientes:
LEA TODAS LAS
INSTRUCCIONES ANTES DE
USAR ESTE APARATO.
ADVERTENCIA
Para reducir el riesgo de incendio, descarga
eléctrica o lesión:
1. No deje el aparato con la batería puesta. Retire
la batería del aparato cuando no lo use y antes
de hacer algún mantenimiento.
2. No exponga el aparato a la lluvia. Almacene en
interiores.
3. No permita que sea utilizado como un juguete.
Se requiere de una supervisión cuidadosa
durante el uso al haber niños cerca.
4. Use solamente como se describe en este
manual. Sólo use aditamentos recomendados
por el fabricante.
5. No use con batería dañada. Si el aparato no
está funcionando como debiera, se ha dejado
Volumen 3,0 L
Volumen de aire máximo 3,3 m3/min. 3,4 m3/min.
Alta Aprox. 10 min. (con BL1430) Aprox. 13 min. (con BL1830)
Baja Aprox. 20 min. (con BL1430) Aprox. 26 min. (con BL1830)
USA019-2
18
caer, se ha dañado, se ha dejado a la
intemperie o ha caído sobre el agua, llévelo a
un centro de servicio.
6. No maneje el aparato con las manos mojadas.
7. No coloque ningún objeto sobre las hendijas
de ventilación. No use cuando cualquiera de
las hendijas esté bloqueada; mantenga libre
de polvo, hilachas, cabello y cualquier otra
cosa que pudiera reducir el flujo de aire.
8. Mantenga el cabello suelto, la ropa holgada,
las uñas y todas las partes del cuerpo alejadas
de las rendijas y las partes móviles.
9. Apague todos los controles antes de retirar el
cartucho de la batería.
10. Tenga especial cuidado al estar limpiando
sobre escaleras.
11. No use para recoger líquidos combustibles
como gasolina, o para usarse en áreas donde
éstos puedan estar presentes.
12. Use solo el cargador que se proporciona por
el fabricante para recargar.
13. No recoja nada que esté quemándose o
expidiendo humo, como cigarrillos, fósforos o
cenizas calientes.
14. No utilizar sin la bolsa recolectora de polvo en
su lugar.
15. No recargue la batería en la intemperie (al aire
libre).
16. Utilice las herramientas eléctricas solamente
con las baterías designadas específicamente
para ellas. La utilización de cualquier otra batería
puede crear un riesgo de heridas o incendio.
17. Cuando no se esté usando el cartucho de la
batería, manténgalo alejado de otros objetos
metálicos, como sujetapapeles (clips),
monedas, llaves, clavos, tornillos u otros
Page 19

objetos pequeños de metal los cuales pueden
actuar creando una conexión entre las
terminales de la batería. Cerrar el circuito las
terminales de la batería puede causar
quemaduras o incendios.
18. En condiciones abusivas, podrá escapar
líquido de la batería; evite tocarlo. Si lo toca
accidentalmente, enjuague con agua. Si hay
contacto del líquido con los ojos, acuda por
ayuda médica. Puede que el líquido expulsado
de la batería cause irritación o quemaduras.
GUARDE ESTAS
INSTRUCCIONES.
Este aparato está diseñado para uso comercial
solamente.
NORMAS DE SEGURIDAD
ADICIONALES
Advertencias y precauciones
1. Lea este manual de instrucciones y el manual
de instrucciones del cargador con cuidado
antes de usar.
2. No recoja los siguientes materiales:
− Materiales calientes como cigarrillos
encendidos o partículas de metal
encendidas que se generen por el corte y
esmerilado del metal
− Sustancias inflamables como gasolina,
disolventes (tíner), bencina, queroseno o
pintura
− Materiales explosivos como nitroglicerina
− Materiales combustibles como aluminio,
zinc, magnesio, titanio, fósforo o
celuloide
− Tierra mojada, agua, aceite o similares
− Piezas duras con bordes filosos como
partículas de madera, metales, piedras,
vidrios, clavos, alfileres o navajas
− Mezcla para resanar como cemento o
similar
− Polvo que pueda conducir la electricidad
como el polvo de metal o carbón
− Partículas diminutas como las del polvo
de concreto
Tal acción puede que genere incendios,
lesiones y/o daños materiales.
3. Pare la operación inmediatamente si nota algo
anormal.
4. Si deja caer o golpea la aspiradora, verifique
cuidadosamente si hay grietas o daños antes
USB103-1
de la operación.
5. No la aproxime a estufas ni a otras fuentes de
calor.
6. No obstruya el orificio de flujo de entrada ni
los orificios de ventilación.
7. Al utilizar la aspiradora como un soplador
• utilice siempre gafas protectoras, una
gorra y careta (máscara) durante la
operación;
• asegúrese siempre de que la aspiradora
esté apagada y el cartucho de batería
extraído antes de intentar despejar alguna
obstrucción;
• asegure siempre su equilibrio al estar
pisando superficies inclinadas;
• camine, nunca corra;
• nunca apunte la boquilla a nadie alrededor;
• fije todas las tuercas, pernos y tornillos
con firmeza para asegurarse de que la
aspiradora se encuentre en condiciones de
operación seguras;
• almacene la aspiradora sólo en un lugar
seco;
• el operador o usuario es responsable de
los accidentes o peligros que ocurran a
otras personas o sus propiedades.
GUARDE ESTAS
INSTRUCCIONES.
Símbolos
A continuación se muestran los símbolos utilizados para
la herramienta.
・ volts o voltios
・ corriente directa o continua
INSTRUCCIONES IMPORTANTES
DE SEGURIDAD
PARA CARTUCHO DE BATERÍA
1. Antes de utilizar el cartucho de batería, lea
todas las instrucciones e indicaciones de
precaución sobre (1) el cargador de baterías,
(2) la batería, y (3) el producto con el que se
utiliza la batería.
2. No desarme el cartucho de batería.
3. Si el tiempo de operación se ha acortado en
exceso, deje de operar de inmediato. Podría
correrse el riesgo de sobrecalentamiento,
posibles quemaduras e incluso explosión.
19
USD305-1
ENC007-6
Page 20

4. En caso de que ingresen electrolitos en sus
ojos, enjuáguelos bien con agua limpia y
consulte de inmediato a un médico. Podría
perder la visión.
5. No cortocircuite el cartucho de batería:
(1) No toque las terminales con ningún
material conductor.
(2) Evite guardar el cartucho de batería en un
cajón junto con otros objetos metálicos,
tales como clavos, monedas, etc.
(3) No exponga la batería de cartucho a la
lluvia o nieve.
Un corto circuito en la batería puede causar un
flujo grande de corriente, sobrecalentamiento,
posibles quemaduras y aún descomposturas.
6. No guarde la herramienta ni el cartucho de
batería en lugares donde la temperatura pueda
alcanzar o exceder los 50 ゚ C (122 ゚ F).
7. Nunca incinere el cartucho de batería incluso
en el caso de que esté dañado seriamente o ya
no sirva en absoluto. El cartucho de batería
puede explotar si se tira al fuego.
8. Tenga cuidado de no dejar caer ni golpear el
cartucho de batería.
9. No use una batería dañada.
GUARDE ESTAS
INSTRUCCIONES.
Consejos para alargar al máximo la vida útil
de la batería
1. Cargue el cartucho de batería antes de que se
descargue completamente.
Pare siempre la operación y cargue el
cartucho de batería cuando note menos
potencia en la herramienta.
2. No cargue nunca un cartucho de batería que
esté completamente cargado.
La sobrecarga acortará la vida de servicio de
la batería.
3. Cargue el cartucho de batería a temperatura
ambiente de 10 ゚ C - 40 ゚ C (50 ゚ F - 104 ゚ F). Si
un cartucho de batería está caliente, déjelo
enfriar antes de cargarlo.
DESCRIPCIÓN DEL
FUNCIONAMIENTO
PRECAUCIÓN:
•
Asegúrese siempre de que la aspiradora esté
apagada y el cartucho de batería extraído antes de
realizar cualquier ajuste o revisión en la aspiradora.
Instalación o desmontaje del cartucho de
batería
2
3
01111 2
Siempre apague la aspiradora antes de insertar o
•
retirar el cartucho de la batería.
• Para quitar el cartucho de batería, retírelo de la
aspiradora mientras desliza el botón sobre el
costado del cartucho como se ilustra en la figura.
• Para insertar el cartucho de batería, alinee la
lengüeta sobre el cartucho de batería con la ranura
en la carcasa y deslice en su lugar. Siempre
inserte por completo hasta que se fije en su lugar
con un pequeño clic. Si puede ver la parte en rojo
del lado superior del botón, esto indica que no ha
quedado fijo por completo. Inserte completamente
hasta que la parte en rojo no pueda verse. Si no,
podría accidentalmente salirse de la aspiradora y
caer al suelo causando una lesión a usted o
alguien a su alrededor.
• No emplee fuerza cuando inserte el cartucho de
batería. Si el cartucho no se desliza al interior
fácilmente, será porque no se está insertando
correctamente.
1
Sistema de protección de la batería
La aspiradora cuenta con un sistema de protección el
cual automáticamente interrumpe el suministro eléctrico
para prolongar su vida útil.
Esta aspiradora detiene la operación cuando ésta y/o la
batería se sometan a las siguientes circunstancias. Esto
se activa mediante el sistema de protección y no indica
que haya problemas con la aspiradora.
• Cuando hay sobrecarga en la aspiradora:
Presiones el botón de apagado “OFF” en
este momento y despeje las causas de
sobrecarga, y luego presione el botón de
activación “HIGH/LOW” para reiniciar.
1. Parte roja
2. Botón
3. Cartucho de
batería
20
Page 21

• Cuando las celdas de la batería se calientan
(refiérase a la nota a continuación):
El motor permanecerá detenido, en cualquier
operación del botón de activación
“HIGH/LOW” y el botón de apagado “OFF”.
En este momento, descontinúe el uso de la
aspiradora y deje que se enfríe, o recargue el
cartucho de la batería después de extraerlo
• Cuando la carga restante en la capacidad de la
NOTA:
• Esta protección sensible a la temperatura aplica
011389
de la aspiradora.
batería es baja:
El motor permanecerá detenido, en cualquier
operación del botón de activación
“HIGH/LOW” y el botón de apagado “OFF”.
En este momento, retire el cartucho de la
batería de la aspiradora y recárguelo.
sólo cuando la aspiradora se usa con un cartucho
de batería marcado con un asterisco o estrella.
1
1. Marca de
estrella
Accionamiento del interruptor
1
2
1. Botón
HIGH/LOW
para volúmen
ALTO/BAJO de
aire
2. Botón “OFF” de
apagado
ENSAMBLE
PRECAUCIÓN:
• Asegúrese siempre de que la aspiradora esté
apagado y el cartucho de batería extraído antes de
realizar cualquier trabajo en la aspiradora.
• Cualquier trabajo que se realice en la aspiradora
con el cartucho de batería instalado puede que
cause lesiones a la persona o daños a los objetos
alrededor de la aspiradora.
Instalación de la bolsa para polvo
1
1. Salida para el polvo
2. Junta de la bolsa recolectora
3. Clavijas
4. Bolsa para polvo
01111 3
Sujete la sección cuadrada de la junta de bolsa
recolectora de polvo y ensarte las clavijas en el interior
de la junta de la bolsa recolectora de polvo en las
ranuras de la entrada de la aspiradora para la bolsa y
luego inserte y gire en dirección a las agujas del reloj
tanto como sea posible.
2
3
4
1. Gancho
1
0111 21
Para encender la aspiradora, simplemente presione el
botón de activación “HIGH/LOW”. Para apagarla,
presione el botón de apagado “OFF". Para cambiar la
velocidad en la aspiradora, vuelva a presionar el botón
“HIGH/LOW”. La primera vez que el botón se presione
se obtendrá la velocidad mayor y la segunda vez que se
presione se obtendrá la velocidad menor, y cada vez
que se presione el botón, se alternará entre estas dos
velocidades.
01111 4
En este momento, asegúrese de que la parte del
sujetador en la bolsa recolectora de polvo quede
orientada hacia arriba.
21
Page 22

NOTA:
• Cuando la junta de la bolsa recolectora de polvo y
el aro interior en ésta se desprendan, instale de la
siguiente manera.
(1) Alinee la junta de la bolsa recolectora de
polvo con la costura de ésta e instale de tal
forma que la protuberancia quede orientada
hacia arriba.
1
1. Protuberancia
través de la banda de la bolsa recolectora de polvo y
luego adhiera el otro extremo del gancho como se
ilustra en la figura.
Ajuste de la correa para hombro
1
3
1. Sacar
2. Para acortar
3. Para alargar
2
01111 5
(2) Apriete el aro en el interior de la bolsa
recolectora con firmeza de tal forma que las
clavijas y el aro queden orientados como se
ilustra en la figura.
1
01111 6
2
1. Clavijas
2. Anillo
Instalación de la correa para hombro
1. Correa para
hombro
1
2
01111 7
Adhiera uno de los extremos del gancho de la correa
para hombro en el aro de la parte frontal de la
aspiradora y empuje el otro extremo de la correa a
2. Dos ganchos
01111 8
Para ajustar la longitud de la correa para hombro,
sáquela para obtener la longitud deseada y jale la correa
en dirección de la flecha como se ilustra en la figura.
Conexión de la manguera
PRECAUCIÓN:
• No fuerce la manguera para doblarla y/o
estamparla. Forzarla y/o estamparla puede que
cause deformación o daños en la manguera.
• No jale la manguera para cargar la aspiradora
colgándola. Jalar la manguera puede que cause
deformación o daños en ésta.
B
1
2
1. Salida para el polvo
2. Herramienta eléctrica
01111 9
Inserte el extremo “A” de la manguera a la abertura de
succión en la aspiradora y gire en sentido de las agujas
del reloj tanto como sea posible hasta que quede fijo.
Adhiera la boca sobre el extremo “B” de la manguera y
luego conéctela a la entrada de la bolsa de la
herramienta.
A
22
Page 23

Cambio de la boca delantera
Cambie la boca delantera de la manguera de acuerdo al
tamaño de la entrada de la bolsa recolectora de la
herramienta que use.
1. Boca delantera
1
3
2. Manguera
3. Extraer
4. Instalar
1. Papel
decorativo
2. Disco de sierra
3. Base
4. Profundidad de
corte
5. Entablillado
1
2
3
0111 20
2
4
Para quitar la boca delantera, sujete la manguera y gire
en dirección contrario a las agujas del reloj.
Para colocarla, gire en sentido de las agujas del reloj
atornillándola tanto como sea posible.
OPERACIÓN
ADVERTENCIA:
• No use la correa para hombro al estar trabajando
en lugares elevados.
• Al usar la aspiradora de forma estacionaria,
colóquela sobre una superficie plana y estable.
Aspiradora
0111 22
Al usar la aspiradora de forma portátil, colgarse la
correa para hombro de forma transversal cruzando por
el pecho dificulta la liberación de la aspiradora.
4
5
0111 23
NOTA:
• Puede que se ocasione obstrucción de la succión
que puede atascarse en la manguera al usar papel
decorativo de corte largo con la intención de
producir un entablillado dependiendo de las
condiciones de la pieza de trabajo a ser cortada.
Cuando esto ocurra, cambie el ajuste de la
profundidad de corte de la herramienta eléctrica
para cortes más profundos, lo cual libera a la
manguera de la obstrucción en su succión.
PRECAUCIÓN:
•
Cuando se esté recién estrenando la bolsa
recolectora de polvo, puede que salga polvo de su
superficie. Al haberse usado por algunas
ocasiones se minimizará la fuga de polvo de la
superficie.
Operación de la aspiradora con una boquilla o
bolsa recolectora de polvo instalada.
ADVERTENCIA:
• Siempre asegúrese de que la aspiradora esté
apagada y que el cartucho de la batería no esté
puesto antes de instalar o desinstalar la
boquilla o cualquier otro aditamento en la
aspiradora. No seguir esta indicación de retirar el
cartucho de la batería de la herramienta puede
que resulte en graves lesiones personales.
NOTA:
• Antes de activar la modalidad de soplador
justamente después de haberse usado en
modalidad de aspiración, despeje todo residuo de
polvo de la aspiradora debido a la posible
expulsión de polvo.
23
Page 24

Uso como soplador
1
2
1. Salida
(ventilación de
aire)
2. Boquilla
3. Clavija
3
0111 24
Coloque la boquilla en la salida (ventilación de aire) con
precisión.
Para instalar la boquilla, ajuste la clavija protuberante
desde el interior de la boquilla en una de la ranuras de la
aspiradora y luego gire la boquilla en sentido de las
agujas del reloj para fijarla.
Para quitar la boquilla, gire en sentido contrario a las
agujas del reloj y sáquela.
Apunte la parte superior de la aspiradora y luego
encienda.
Vaciado de la bolsa recolectora de polvo
ADVERTENCIA:
• Asegúrese siempre de que tanto la aspiradora
y la herramienta eléctrica a la cual se conecta
estén apagadas y que el cartucho de batería no
esté colocado, o que la herramienta esté
desenchufada del suministro eléctrico, antes
de instalar o desinstalar y vaciar la bolsa
recolectora de polvo (hecha de tela). No seguir
esta indicación de apagar, quitar la batería o
desconectar la herramienta eléctrica puede
resultar en descarga eléctrica y graves lesiones a
la persona.
• Cuando la bolsa recolectora de polvo se haya
llenado aproximadamente a la mitad, quítela de la
aspiradora sacando el sujetador que la fija. Vacíe
la bolsa recolectora de polvo al golpetear
ligeramente de tal forma que elimine los residuos
que hayan quedado adheridos en el interior para
evitar que esto afecte la subsecuente recolección.
NOTA:
• Al momento de vaciar la bolsa recolectora de
polvo, use una línea de guía que indique que la
bolsa se ha llenado tras haber taladrado 450
orificios de 6,5 mm de diámetro y 40 mm de
profundidad sobre el concreto. Una bolsa
recolectora de polvo con residuos atascados que
se han acumulado puede que reduzcan la
potencia de la recolección del polvo y causar
daños en el motor de la aspiradora.
PRECAUCIÓN:
• Adhiera la bolsa recolectora de polvo (hecha
de tela) a la junta de ésta para que quede fija y
cierre el sujetador por completo antes de usar.
No seguir esta indicación de adherir fijamente la
bolsa recolectora de polvo y cerrar el sujetador por
completo puede que causea expulsión de polvo y
resultar en graves lesiones a la persona.
1. Junta de la bolsa
recolectora
2. Sección
cuadrada
1
2
0111 25
Eleve con firmeza la sección cuadrada de la junta de la
bolsa recolectora, gírela en dirección contraria a las
agujas del reloj y luego retírela de la bolsa recolectora
de polvo.
0111 26
Abra el sujetador y elimine el polvo.
PRECAUCIÓN:
• Elimine todos los residuos que hayan quedado
adheridos en la sección del sujetador.
MANTENIMIENTO
ADVERTENCIA:
• Asegúrese siempre de que la aspiradora esté
apagada y el cartucho de batería extraído antes de
intentar realizar cualquier operación de inspección
o mantenimiento.
24
Page 25

Limpieza de la sección del filtro
PRECAUCIÓN:
• No recolecte material que no sea polvo, como
piedras, astillas y similares debido a que la
aspiradora está diseñada para la recolección de
polvo. Puede que se dañe el ventilador de la
aspiradora con la recolección de piedras y astillas.
1. Sección del filtro
1
0111 27
Revise y limpie de forma habitual la sección del filtro en
la entrada de succión. Retire los objetos extraños los
cuales obstruirán la succión.
Limpieza
De vez en vez, limpie el exterior (cuerpo) de la
aspiradora usando un paño húmedo y agua
enjabonada.
PRECAUCIÓN:
• Nunca use gasolina, bencina, diluyente (tíner),
alcohol o sustancias similares. Puede que esto
ocasione grietas o descoloramiento.
Para mantener la SEGURIDAD y FIABILIDAD del
producto, las reparaciones, y cualquier otra tarea de
mantenimiento o ajuste deberán ser realizadas en
Centros de Servicio Autorizados por Makita, empleando
siempre repuestos Makita.
ACCESORIOS
PRECAUCIÓN:
• Estos accesorios o aditamentos están
recomendados para utilizarse con su aspiradora
Makita que se especifica en este manual. El
empleo de cualquier otro accesorio o aditamento
puede conllevar el riesgo de lesiones personales.
Use solamente accesorios o aditamentos para su
propósito designado.
Si necesita cualquier ayuda para más detalles en
relación con estos accesorios, pregunte a su centro de
servicio Makita local.
• Boquillas
• Bolsas recolectoras
• Mangueras
• Bocas delanteras
• Correas para hombro
• Diferentes tipos de baterías y cargadores genuinos
de Makita
GARANTÍA LIMITADA MAKITA DE UN AÑO
Ésta Garantía no aplica para México
Política de garantía
Cada herramienta Makita es inspeccionada y probada
exhaustivamente antes de salir de fábrica. Se
garantiza que va a estar libre de defectos de mano de
obra y materiales por el periodo de UN AÑO a partir de
la fecha de adquisición original. Si durante este
periodo de un año se desarrollase algún problema,
retorne la herramienta COMPLETA, porte pagado con
antelación, a una de las fábricas o centros de servicio
autorizados Makita. Si la inspección muestra que el
problema ha sido causado por mano de obra o
material defectuoso, Makita la reparará (o a nuestra
opción, reemplazará) sin cobrar.
Esta garantía no será aplicable cuando:
se hayan hecho o intentado hacer reparaciones
por otros:
se requieran reparaciones debido al desgaste
normal:
la herramienta haya sido abusada, mal usada o
mantenido indebidamente:
se hayan hecho alteraciones a la herramienta.
EN NINGÚN CASO MAKITA SE HARÁ
RESPONSABLE DE NINGÚN DAÑO INDIRECTO,
FORTUITO O CONSECUENCIAL DERIVADO DE LA
VENTA O USO DEL PRODUCTO.
ESTA RENUNCIA SERÁ APLICABLE TANTO
DURANTE COMO DESPUÉS DEL TÉRMINO DE
ESTA GARANTÍA.
MAKITA RENUNCIA LA RESPONSABILIDAD POR
CUALQUIER GARANTÍA IMPLÍCITA, INCLUYENDO
GARANTÍAS IMPLÍCITAS DE “COMERCIALIDAD” E
“IDONEIDAD PARA UN FIN ESPECÍFICO”, DESPUÉS
DEL TÉRMINO DE UN AÑO DE ESTA GARANTÍA.
Esta garantía le concede a usted derechos legales
específicos, y usted podrá tener también otros
derechos que varían de un estado a otro. Algunos
estados no permiten la exclusión o limitación de daños
fortuitos o consecuenciales, por lo que es posible que
la antedicha limitación o exclusión no le sea de
aplicación a usted. Algunos estados no permiten
limitación sobre la duración de una garantía implícita,
por lo que es posible que la antedicha limitación no le
sea de aplicación a usted.
EN0006-1
25
Page 26

26 27 28
Page 27

Page 28

< USA only >
WARNING
Some dust created by power sanding, sawing, grinding, drilling, and other
construction activities contains chemicals known to the State of California
to cause cancer, birth defects or other reproductive harm. Some examples
of these chemicals are:
• lead from lead-based paints,
• crystalline silica from bricks and cement and other masonry products, and
• arsenic and chromium from chemically-treated lumber.
Your risk from these exposures varies, depending on how often you do this
type of work. To reduce your exposure to these chemicals: work in a well
ventilated area, and work with approved safety equipment, such as those
dust masks that are specially designed to filter out microscopic particles.
< USA solamente >
ADVERTENCIA
Algunos tipos de polvo creados por el lijado, serrado, amolado, taladrado, y
otras actividades de la construccion contienen sustancias quimicas
reconocidas por el Estado de California como causantes de cancer, defectos
de nacimiento y otros peligros de reproduccion. Algunos ejemplos de estos
productos quimicos son:
• plomo de pinturas a base de plomo,
• silice cristalino de ladrillos y cemento y otros productos de albanileria, y
• arsenico y cromo de maderas tratadas quimicamente.
El riesgo al que se expone variara, dependiendo de la frecuencia con la que
realice este tipo de trabajo. Para reducir la exposicion a estos productos
quimicos: trabaje en un area bien ventilada, y pongase el equipo de seguridad
indicado, tal como esas mascaras contra el polvo que estan especialmente
disenadas para filtrar particulas microscopicas.
Makita Corporation
3-11-8, Sumiyoshi-cho,
Anjo, Aichi 446-8502 Japan
884961-947 LXCV02-1
www.makita.com
 Loading...