

Makita EA3600F, EA3601F Original Instruction Manual

EA3600F
EA3601F
EA3600F
EA3601F
GB Petrol Chain Saw ORIGINAL INSTRUCTION MANUAL
S Bensindriven kedjesåg ORIGINALBRUKSANVISNING
N Bensinmotorsag ORIGINAL BRUKSANVISNING
FIN
Bensiinikäyttöinen moottorisaha
ALKUPERÄINEN KÄYTTÖOHJE
LV Benzīnaķēdeszāģis ORIĢINĀLĀINSTRUKCIJU
ROKASGRĀMATA
LT
Benzininisgrandininispjūklas ORIGINALI NAUDOJIMO INSTRUKCIJA
EE
Bensiinimootoriga kettsaag
ALGNE KASUTUSJUHEND
RUS
Цепнаябензопила
ОРИГИНАЛЬНОЕРУКОВОДСТВОПО
ЭКСПЛУАТАЦИИ
Important:
Read this instruction manual carefully before putting the chain saw into operation and strictly observe the safety regulations!
Keep this instruction manual!
Viktigt:
Läs igenom bruksanvisningen noggrant innan du använder kedjesågen och följ säkerhetsanvisningarna noga!
Behåll denna bruksanvisning!
Viktig:
Les denne bruksanvisningen nøye før du tar motorsagen i bruk. Følg sikkerhetsanvisningene nøye!
Ta vare på denne bruksanvisningen!
Tärkeää:
Lue tämä käyttöohje huolellisesti ennen moottorisahan ottamista käyttöön, ja noudata turvamääräyksiä tarkasti.
Säilytä tämä käyttöohje.
Svarīgi:
Pirms ķēdes zāģa ekspluatācijas rūpīgi izlasiet šo instrukciju rokasgrāmatu un pilnībā ievērojiet drošības noteikumus!
Saglabājiet šo instrukciju rokasgrāmatu!
Svarbu:
Prieš pradėdami naudoti grandininį pjūklą, atidžiai perskaitykite visą naudojimo instrukciją ir griežtai laikykitės saugos taisyklių!
Išsaugokite šią naudojimo instrukciją!
Tähtis:
Enne kettsae kasutamist lugege hoolikalt käesolevat kasutusjuhendit ja järgige täpselt kõiki ohutuseeskirju.
Hoidke kasutusjuhend alles.
Важно:
Внимательно ознакомьтесь с данным руководством, прежде чем приступать к эксплуатации цепной пилы, и строго соблюдайте
правила техники безопасности!
Сохраните данную инструкцию по эксплуатации!
2
English
(Original instructions)
Table of Contents Page
Symbols ............................................................................................ 2
Safety precautions ............................................................................ 3
Technical data...................................................................................9
Designation of parts........................................................................10
Chain saw’s safety function ............................................................ 11
Assembly ........................................................................................ 13
Before use ...................................................................................... 16
Starting and stopping engine .......................................................... 18
Maintenance ................................................................................... 20
Maintenance interval ......................................................................25
Trouble shooting .............................................................................26
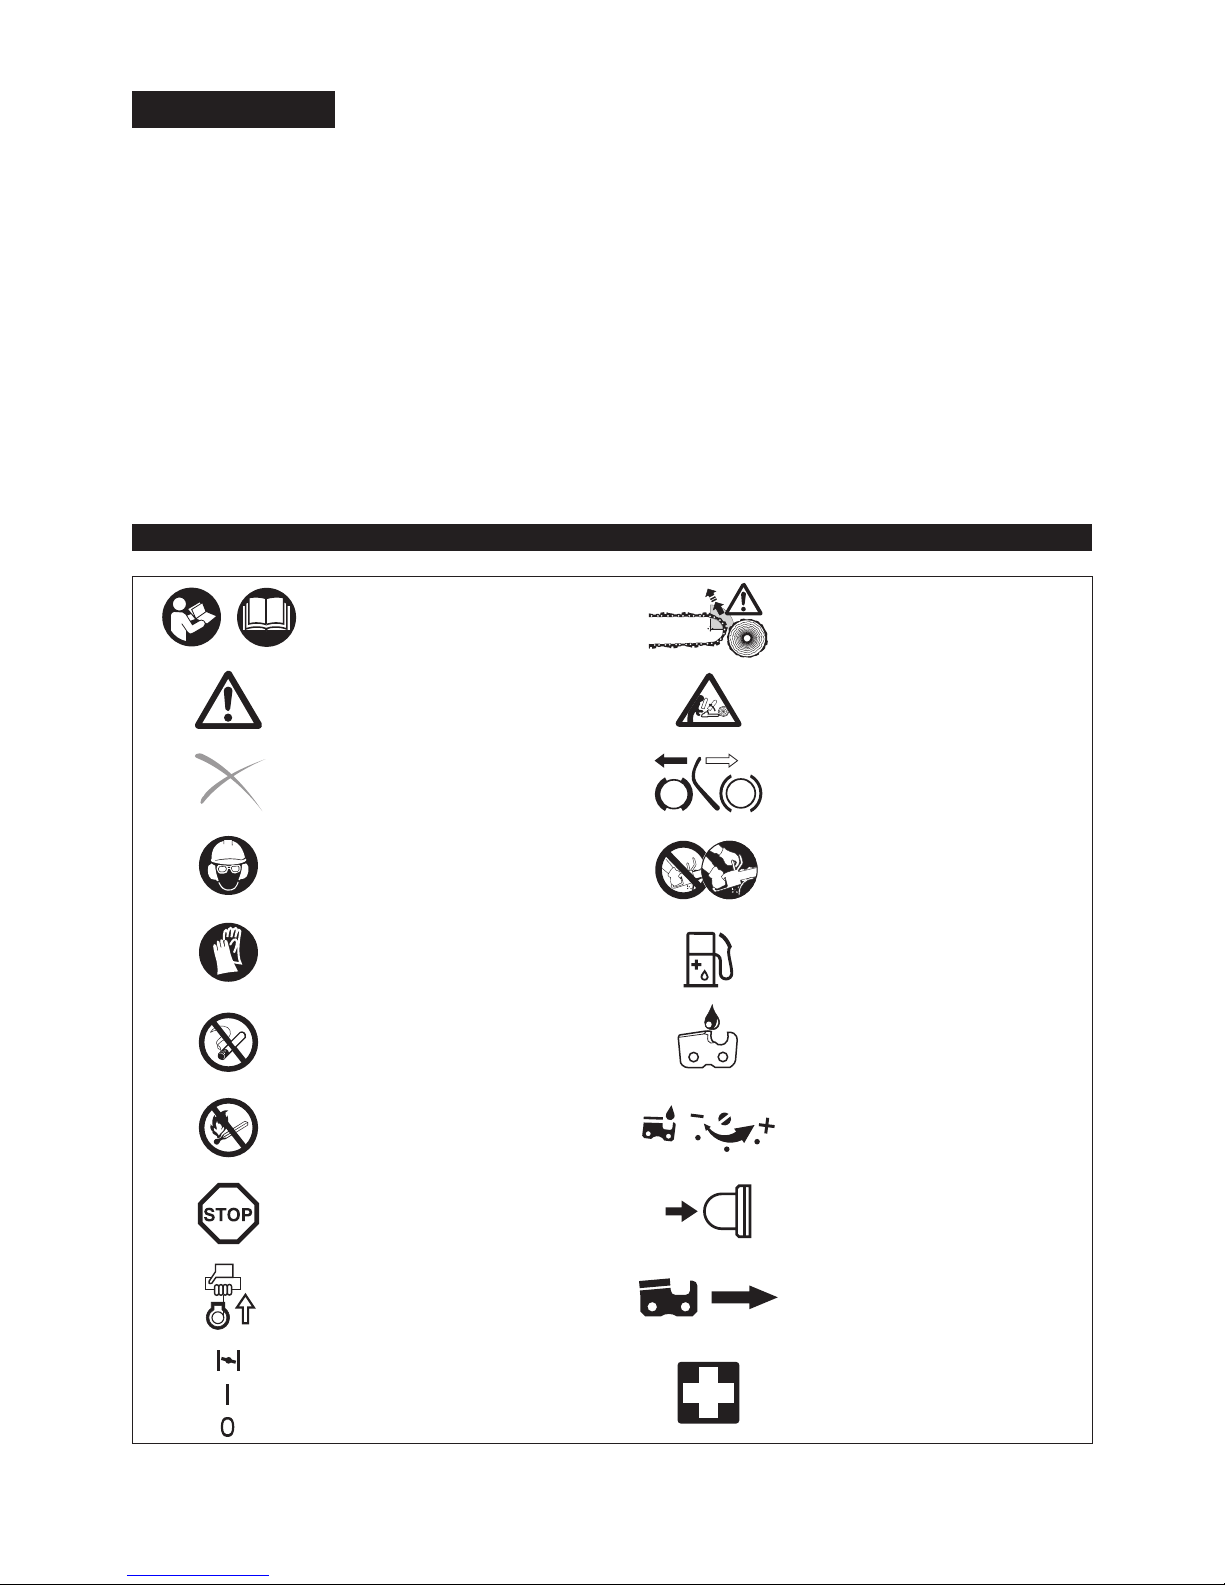
SYMBOLS
Read instruction manual and follow the
warning- and safety precautions!
Caution, kickback!
Particular care and caution!
Forbidden!
Chain brake
Wear protective helmet, eye and ear
protection!
Hold the saw with both hands while
working!
One-handed use is extremely hazardous!
Wear protective gloves! Fuel and oil mixture
No smoking! Chain oil fill/oil pump
No open fire! Saw chain oil adjustment screw
Stop engine! Primer pump
Start engine Chain direction
Combination switch, Choke ON/STOP First aid
3
Intended use
This power chain saw is only intended for sawing wood outdoors.
General precautions
• To ensure correct operation the user has to read this instruction manual to
make himself familiar with the characteristics of the chain saw. Users insufficiently
informed will endanger themselves as well as others due to improper handling.
• It is recommended to lend the chain saw only to people who are experienced in
working with chain saws. Always hand over the instruction manual.
• First users should ask the dealer for basic instructions to become familiarized
with the characteristics of engine powered sawing or even attend a recognized
course of instruction.
• Children and young persons aged under 18 years must not be allowed to operate
the chain saw. Persons over the age of 16 years may, however, use the chain
saw for the purpose of being trained as long as they are under the supervision of
a qualified trainer.
• Operate the chain saw only if you are in good physical condition. If you are tired,
your attention will be reduced. Be especially careful at the end of a working day.
Perform all work calmly and carefully. The user has to accept liability for others.
• Stay alert, watch what you are doing and use common sense when operating a
chain saw. A moment of inattention while operating may result in serious personal
injury.
• Never use the chain saw after having consumed alcohol, drugs or medication.
• The mufer may contain carcinogenic chemicals inside. Avoid contact with them
in case the mufer is damaged.
• Ignition system of the engine emits electromagnetic wave during operation. It
may interfere with medical equipments under certain circumstances, and may
cause serious injury to persons with pace maker. It is recommended that persons
with pace maker shall consult with their physicians and pacemaker manufacturer
before using the chain saw.
• Do not use a chain saw which seems to be modified.
• A fire extinguisher and shovel must be available in the immediate vicinity when
working in easily inammable vegetation or when it has not rained for a long time
(danger of fire).
• National regulation can restrict the use of the machine. Follow your county’s
regulations relating to use of chain saw.
Personal protective equipment
• In order to avoid head, eye, hand or foot injuries as well as to protect your
hearing the following protective equipment must be used during operation
of the chain saw:
• The kind of clothing should be appropriate, i. e. it should be tight-fitting but not
be a hindrance. Do not wear jewellery or clothing which could become entangled
with bushes or shrubs. If you have long hair, always wear a hairnet.
• It is necessary to wear a protective helmet whenever working with the chain saw.
The protective helmet (1) is to be checked in regular intervals for damage and is
to be replaced after 5 years at the latest. Use only approved protective helmets.
• The face shield (2) of the protective helmet (or the goggles) protects against
sawdust and wood chips. During operation of the chain saw always wear a
goggle or a face shield to prevent eye injuries.
• Wear adequate noise protection equipment (ear muffs (3), ear plugs, etc.). Long
time exposure to noise may cause permanent hearing disorder.
• The safety jacket (4) is provided with special signal-colored shoulder straps and
is comfortable and easy to care for.
• The protective brace and bib overall (5) is made of a nylon fabric with 22 layers
and protects against cuts. We strongly recommend its use.
• Protective gloves (6) made of thick leather are part of the prescribed equipment
and must always be worn during operation of the chain saw.
• During operation of the chain saw safety shoes or safety boots (7) fitted with anti
skid sole, steel toe caps and protection for the leg must always to be worn. Safety
shoes equipped with a protective layer provide protection against cuts and ensure
a secure footing.
• Wear protective mask when necessary. Long time exposure to exhaust fumes,
chain oil mist, and saw dust can damage your health.
SAFETY PRECAUTIONS
1
2
3
4
5
6
7
4
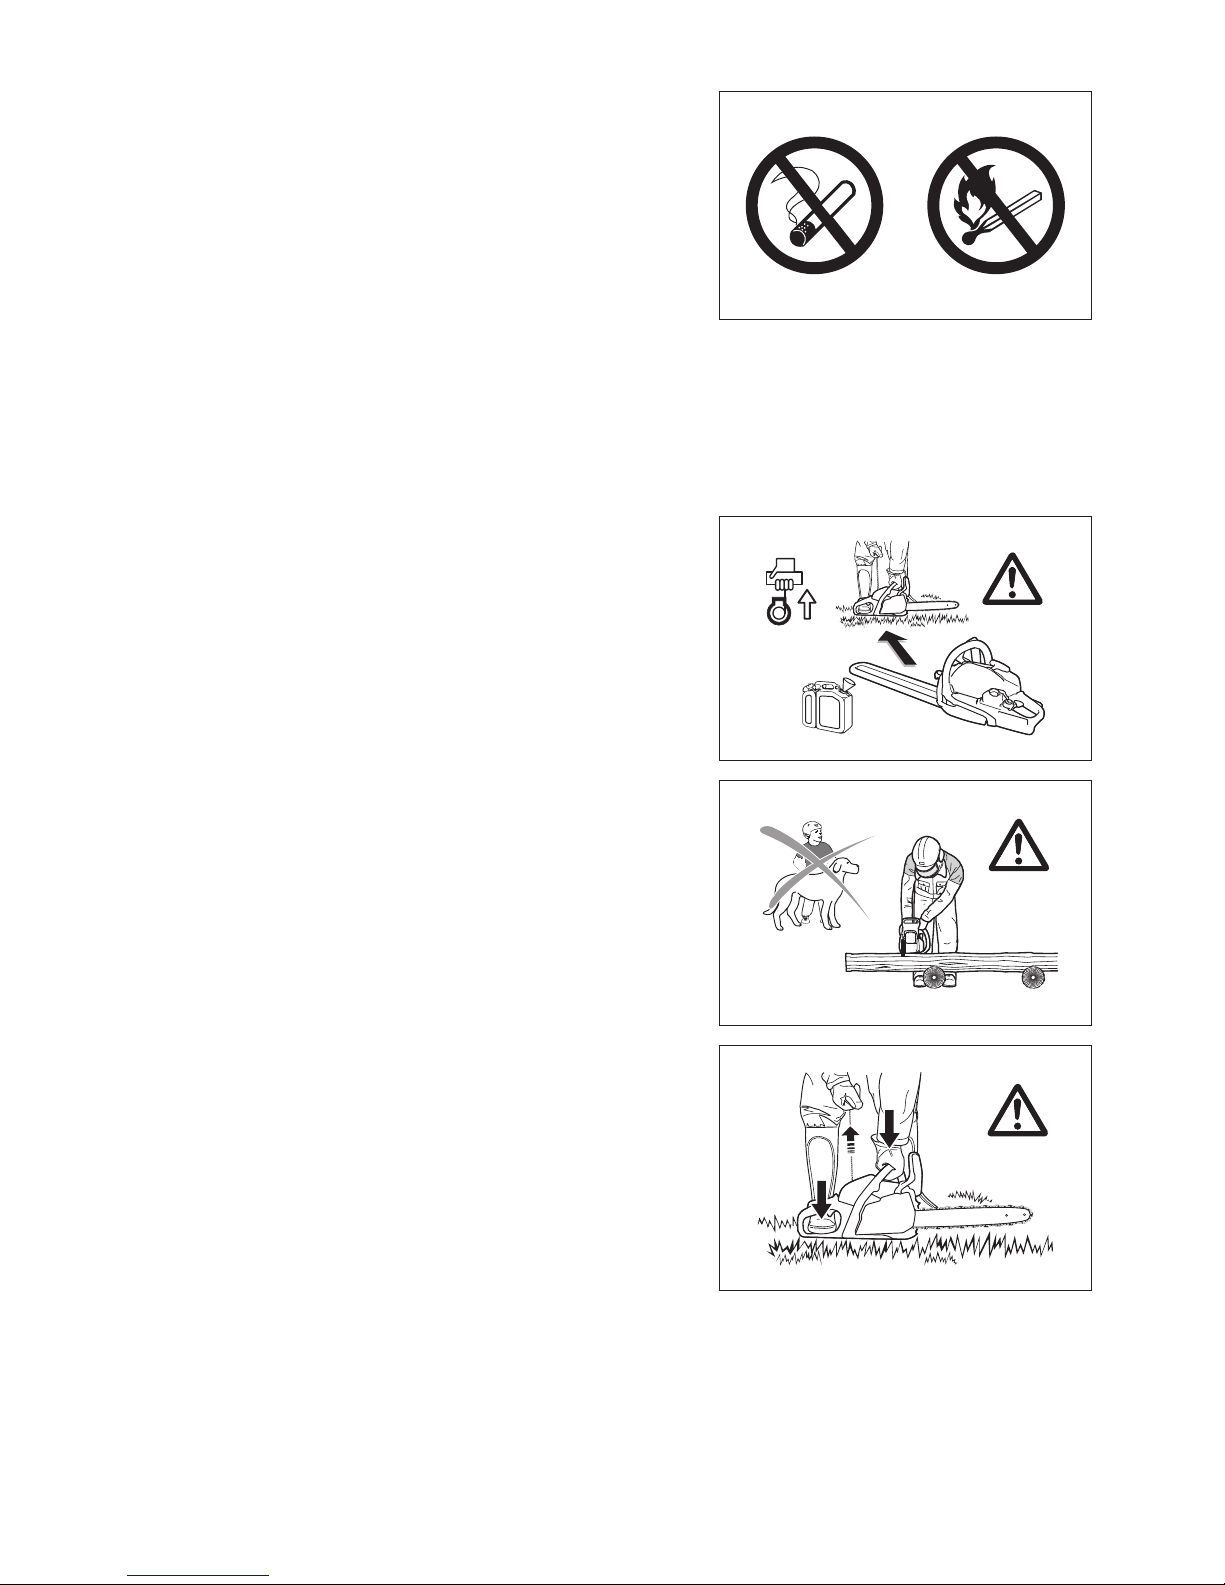
Fuels/Refuelling
• Stop the engine before refuelling the chain saw.
• Do not smoke or work near open fires.
• Let the engine cool down before refuelling.
• Fuels can contain substances similar to solvents. Eyes and skin should not
come in contact with mineral oil products. Always wear protective gloves when
refuelling. Frequently clean and change protective clothes. Do not breathe in fuel
vapors. Inhalation of fuel vapors can be hazardous to your health.
• Do not spill fuel or chain oil. When you have spilt fuel or oil immediately clean
the chain saw. Fuel should not come in contact with clothes. If your clothes have
come in contact with fuel, change them at once.
• Ensure that no fuel or chain oil oozes into the soil (environmental protection). Use
an appropriate base.
• Refuelling is not allowed in closed rooms. Fuel vapors will accumulate near the
oor (explosion hazard).
• Ensure to firmly tighten the screw plugs of the fuel and oil tanks.
• Change the place before starting the engine (at least 3 m from the place of
refuelling).
• Fuel cannot be stored for an unlimited period of time. Buy only as much as will be
consumed in the near future.
• Use only approved and marked containers for the transport and storage of fuel
and chain oil. Ensure children have no access to fuel or chain oil.
Putting into operation
• Do not work on your own. Another person must be nearby in case of
emergencies (within shouting distance).
• Ensure that there are no children or other people within the working area. Pay
attention to any animals in the working area, as well.
• Before starting work the chain saw must be checked for perfect function
and operating safety according to the prescriptions. Never use a chain
saw with defects. Check especially the function of the chain brake, the correct
mounting of the guide bar, the correct sharpening and tightening of the chain,
the firm mounting of the chain cover, the easy motion of the throttle trigger and
the function of the throttle trigger lock-out, the cleanliness and dryness of the
handles, and the function of the combination switch.
• When you drop the chain saw or it gets other impacts, stop using the tool
immediately and perform inspection for identify significant damage or defects.
• Put the chain saw only into operation if it is completely assembled. Never use the
chain saw when it is not completely assembled.
• Check your personal protective equipment.
• Put the chain saw into operation only as described in this instruction manual.
Other starting methods are not allowed.
• Before starting the chain saw ensure that you have a safe footing.
• When starting the chain saw it must be well supported and securely held. The
guide bar and chain must not be in contact with any object.
• Check chain oil reaches sufficiently to the chain.
3 Meter

5
Operation
• When working with the chain saw always hold it with both hands. Take the
rear handle with the right hand and the front handle with the left hand. Hold the
handles tightly with your thumbs facing your fingers.
•
CAUTION: When releasing the throttle trigger the chain will keep on
running for a short period of time (free-wheeling).
• Continuously ensure that you have a safe footing.
• Hold the chain saw such that you will not breathe in the exhaust gas. Do not work
in closed rooms (danger of poisoning).
• Switch off the chain saw immediately if you observe any changes in its
operating behavior.
• The engine must be switched off before checking the chain tension,
tightening the chain, replacing it or clearing malfunctions.
• When the sawing device is hit by stones, nails or other hard objects, switch off
the engine immediately and check the sawing device.
• When stopping work or leaving the working place, switch off the chain saw and
put it down such that nobody is endangered.
•
CAUTION: Do not put the overheated power chain saw in dry grass or on
any inammable objects. The mufer is very hot (danger of re).
• CAUTION: Oil dropping from the chain or guide bar after having stopped the saw
chain will pollute the soil. Always use an appropriate base.
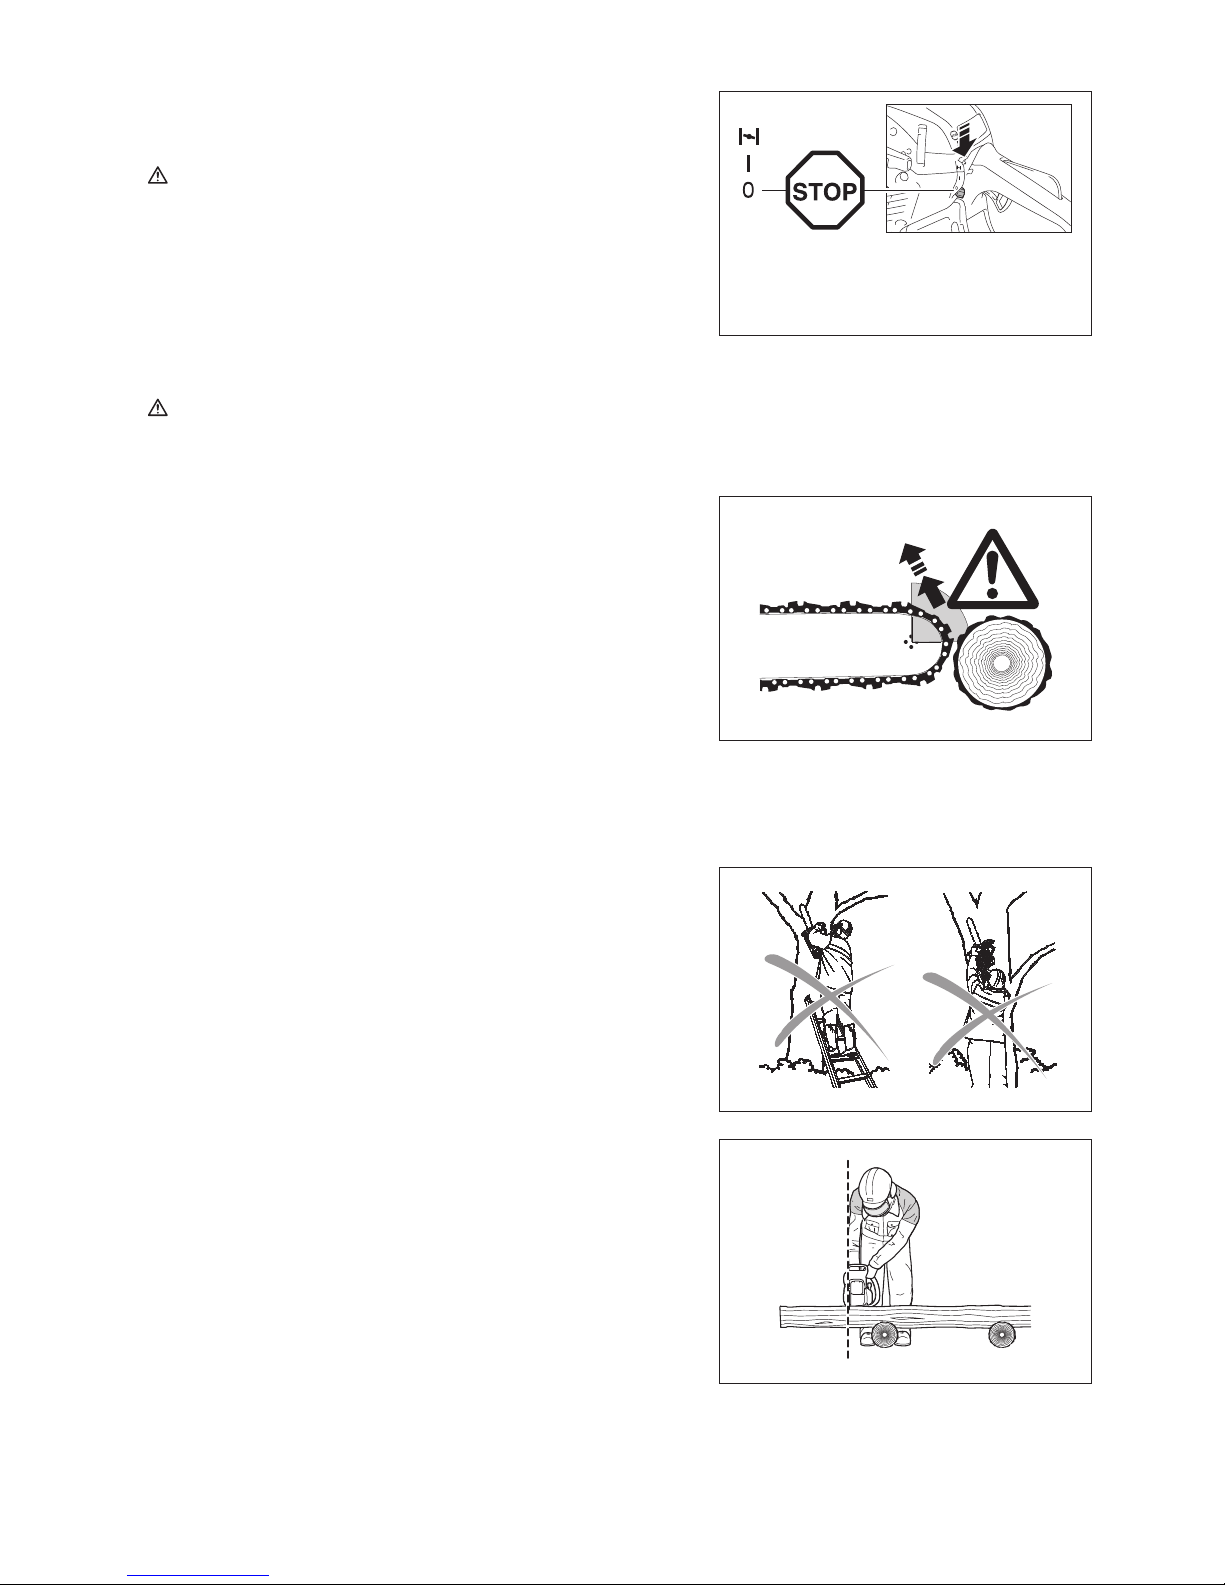
Kickback
• When working with the chain saw dangerous kickbacks may occur.
• Kickback occurs when the upper part of the end of the guide bar inadvertently
touches wood or other hard objects.
• This causes the saw to be thrown back toward the user with great force and out
of control. Risk of injury!
In order to prevent kickback, follow these rules:
- Only specially-trained persons should perform plunge cuts, i.e., piercing timber
or wood with the tip of the saw!
- Never apply the end of the bar when starting to make a cut.
- Always observe the end of the guide bar. Be careful when continuing an
already started cut.
- When starting to cut the chain must be running.
- Ensure that the chain is always sharpened correctly. Pay special attention to
the height of the depth limiter.
- Never cut several branches at the same time. When cutting a branch ensure
that no other branch is touched.
- When crosscutting a trunk be aware of the trunks next to it.
Working behavior/Method of working
• Only use the chain saw during good light and visibility periods. Be aware of
slippery or wet areas, and of ice and snow (risk of slipping). The risk of slipping is
extremely high when working on recently peeled wood (bark).
• Never work on unstable surfaces. Make sure that there are no obstacles in the
working area, risk of stumbling. Always ensure that you have a safe footing.
• Never saw above your shoulder height.
• Never saw while standing on a ladder.
• Never climb up into trees to perform sawing with the chain saw.
• Do not work leaning too far over.
• Guide the chain saw in such a way that no part of your body is within the
elongated swivelling range of the saw.
• Use the chain saw for sawing wood only.
• Avoid touching the ground with the chain saw while it is still running.
• Never use the chain saw for lifting up or removing pieces of wood or other
objects.
• Remove foreign objects such as sand, stones and nails found within the working
area. Foreign objects may damage the sawing device and can cause dangerous
kickback.
• When sawing precut timber use a safe support (sawing jack). Do not steady the
workpiece with your foot, and do not allow anyone else to hold or steady it.
• Secure round pieces against rotation.
• Maintenance
• Refuelling
• Sharpening the chain
• Stopping work
• Transport
• Putting out of function
6
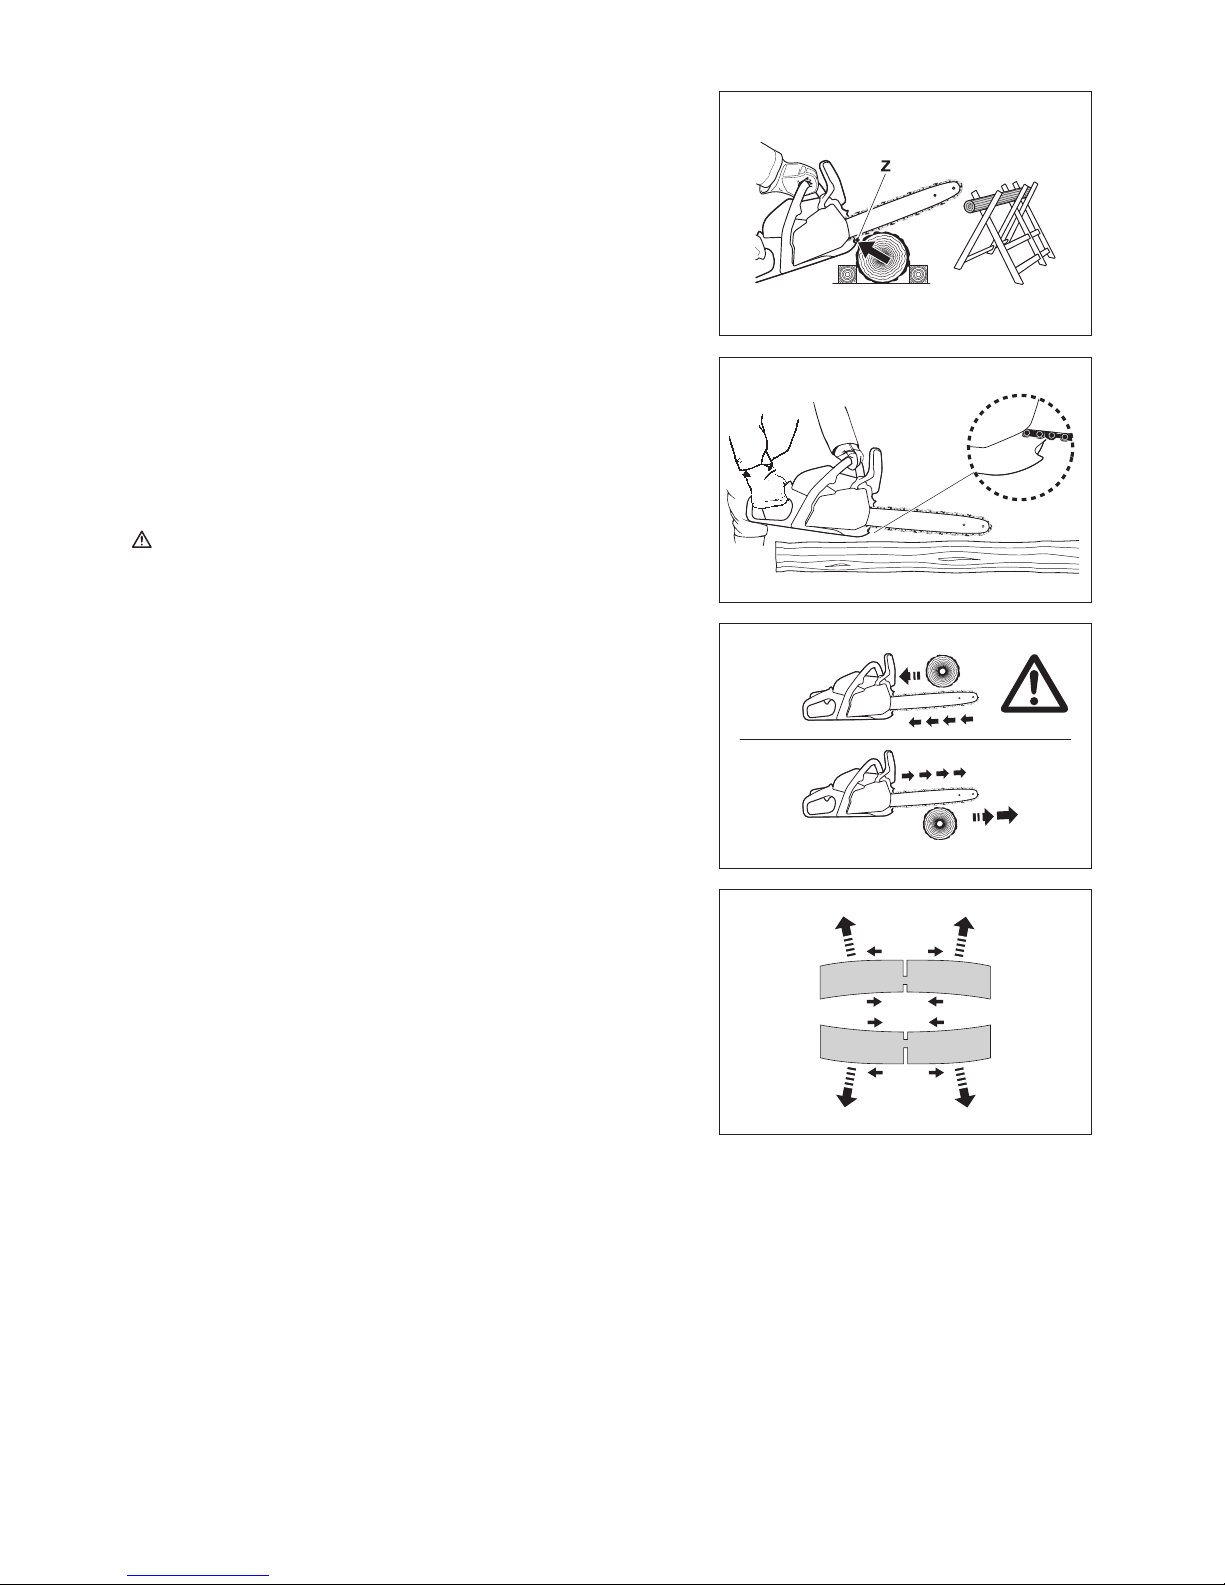
• For cutting down trees or performing crosscuts the spike bumper (Z) must
be applied to the wood to be cut.
• Before performing a crosscut firmly apply the spike bumper to the timber, only
then can the timber be cut with the chain running. For this the chain saw is lifted
at the rear handle and guided with the front handle. The spike bumper serves
as a centre of rotation. Continue by slightly pressing down the front handle and
simultaneously pulling back the chain saw. Apply the spike bumper a little bit
deeper and once again lift the rear handle.
• When the timber must be pierced for cutting or longitudinal cuts are to be
performed it is urgently recommended to have this carried out by specially
trained persons only (high risk of kickback).
• Do longitudinal ‑ lengthwise ‑ cuts at the lowest possible angle. Be very careful
when doing this type of cut, as the spike bumper cannot grip.
• The saw must be running whenever you remove the chain saw from the wood.
• When performing several cuts the throttle trigger must be released in between.
• Be careful when cutting splintery wood. Cut pieces of wood may be pulled along
(risk of injuries).
• When cutting with the upper edge of the guide bar, the chain saw may be pushed
in the direction of the user if the chain gets clamped. For this reason use the
lower edge of the bar whenever possible. The chain saw will then be pushed
away from you.
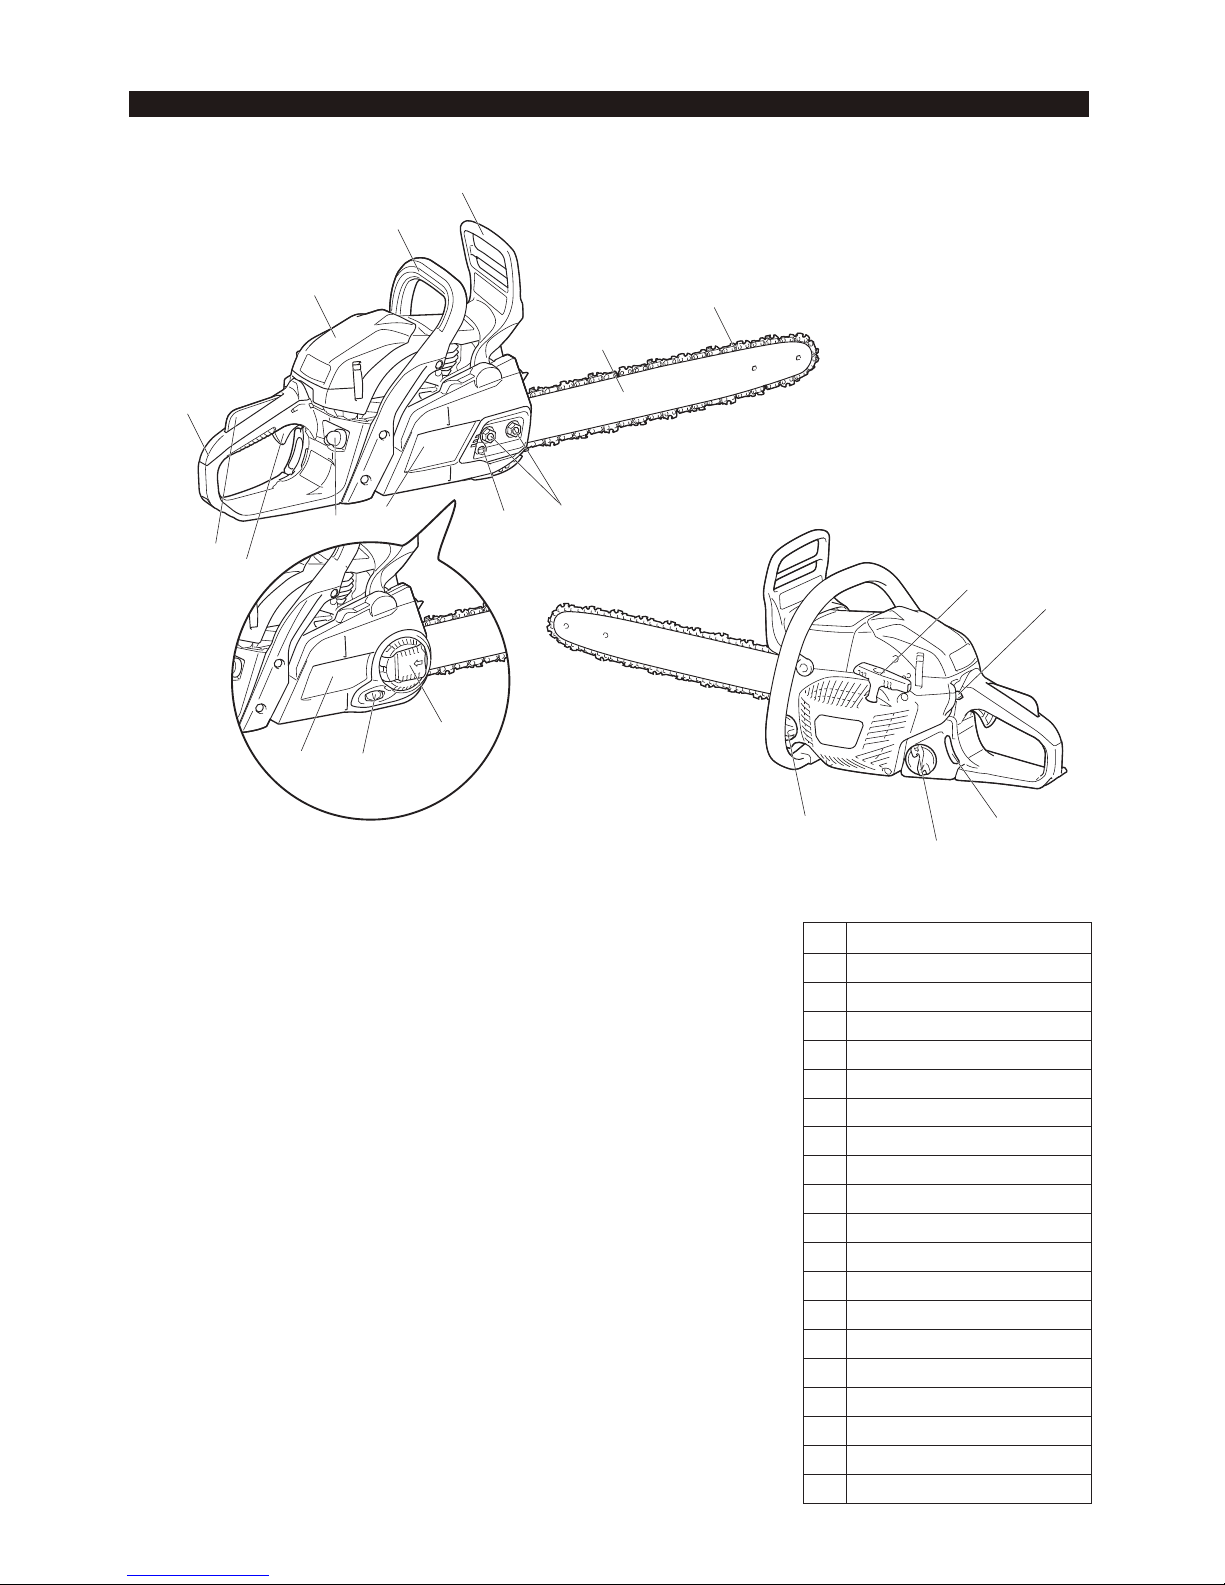
• If the timber is under tension, first cut the pressure side (A). Then the crosscut
can be performed on the tension side (B). Thus clamping of the guide bar can be
avoided.
CAUTION:
People felling trees or cutting of branches must be specially trained. High risk
of injuries!
• When cutting of branches, the chain saw should be supported on the trunk. Do
not use the end of the bar for cutting (risk of kickback).
• Be aware of branches under tension. Do not cut free branches from below.
• Never perform detensioning cuts while standing on the trunk.
B
A
B
7
45
o
45
o
21/2
cutting down area
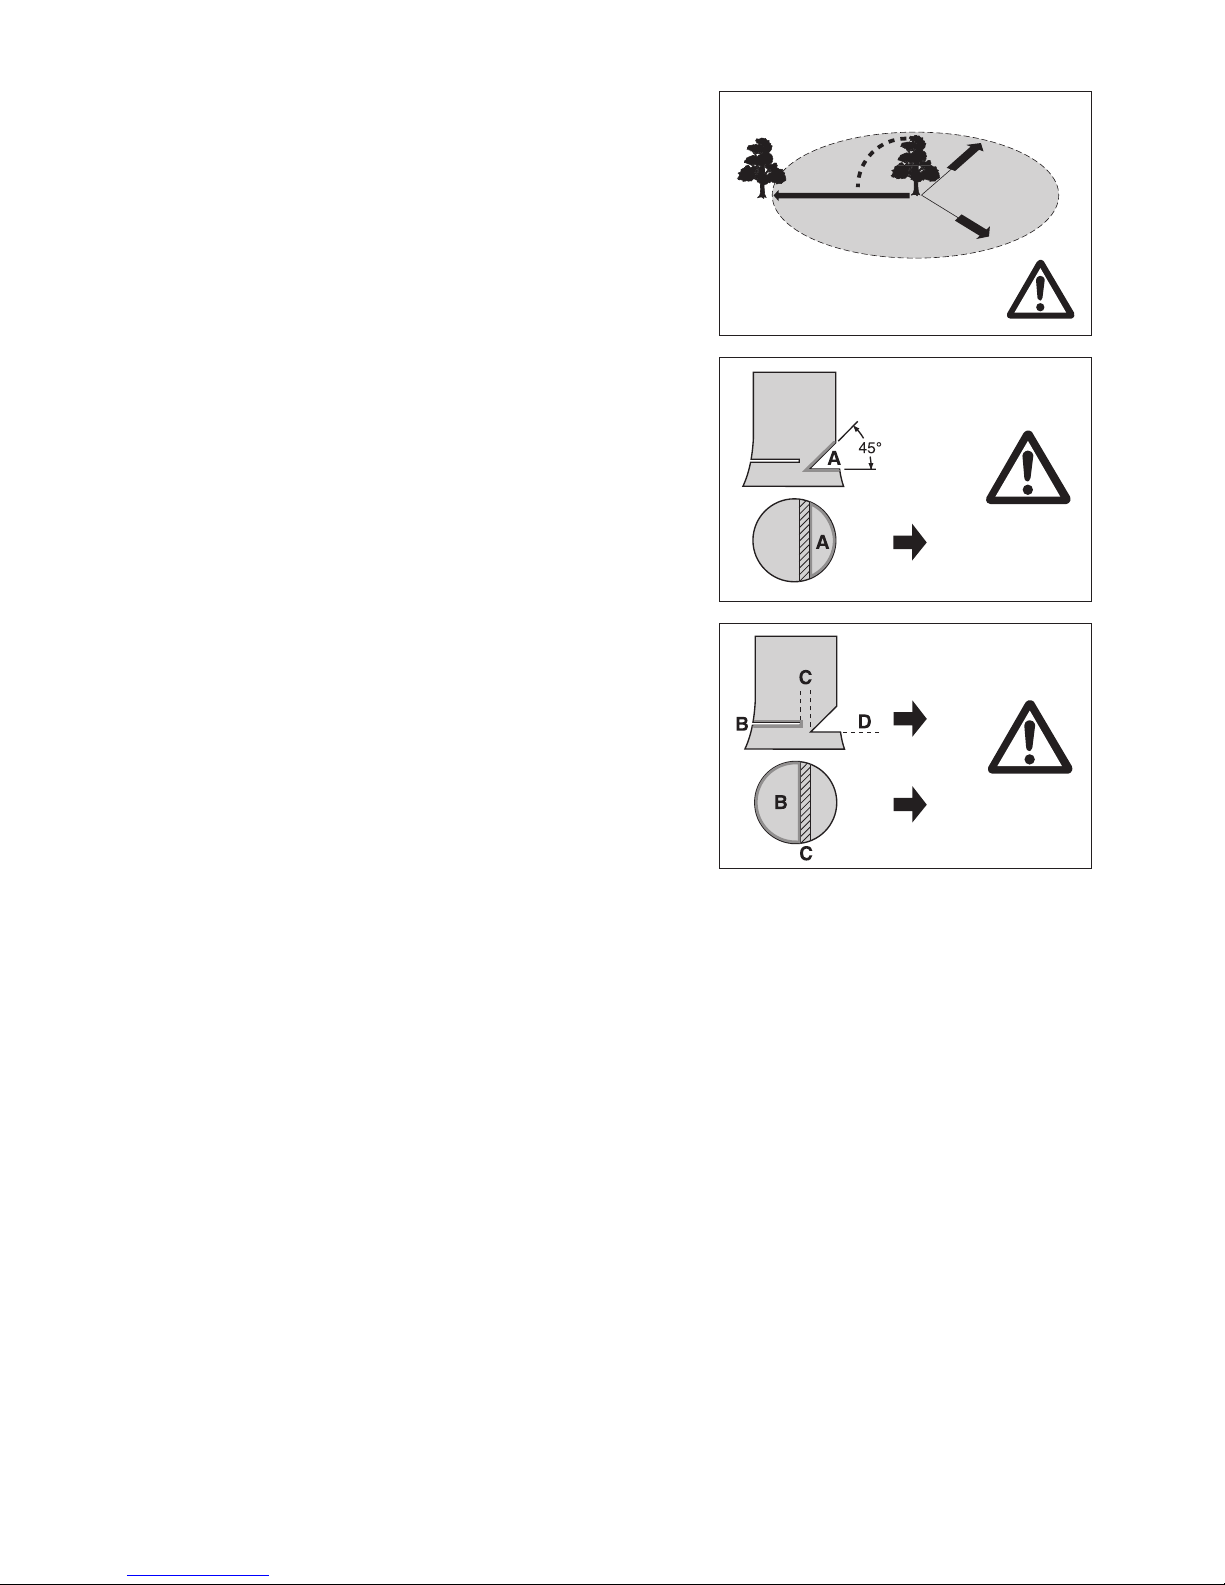
• Before cutting down a tree ensure that
a) only those people are within the working area which are actually involved in
cutting down the tree.
b) every worker involved can withdraw without stumbling (the people should
withdraw backwards in a diagonal line, i. e. at a degree of 45°).
c) the bottom part of the trunk is free from foreign objects, underbrush and
branches. Make sure to have a safe footing (risk of stumbling).
d) the next working place is at least 2 1/2 tree lengths away. Before cutting down
the tree check the direction of fall and make sure that there are neither people
nor objects within a distance of 2 1/2 tree lengths.
• Judging the tree: Direction of hanging - loose or dry branches - height of the
tree - natural overhang - is the tree rotten?
• Take into account the direction and speed of the wind. If strong gusts are
occurring, do not do any felling.
• Cutting the roots: Start with the strongest root. First do the vertical and then the
horizontal cut.
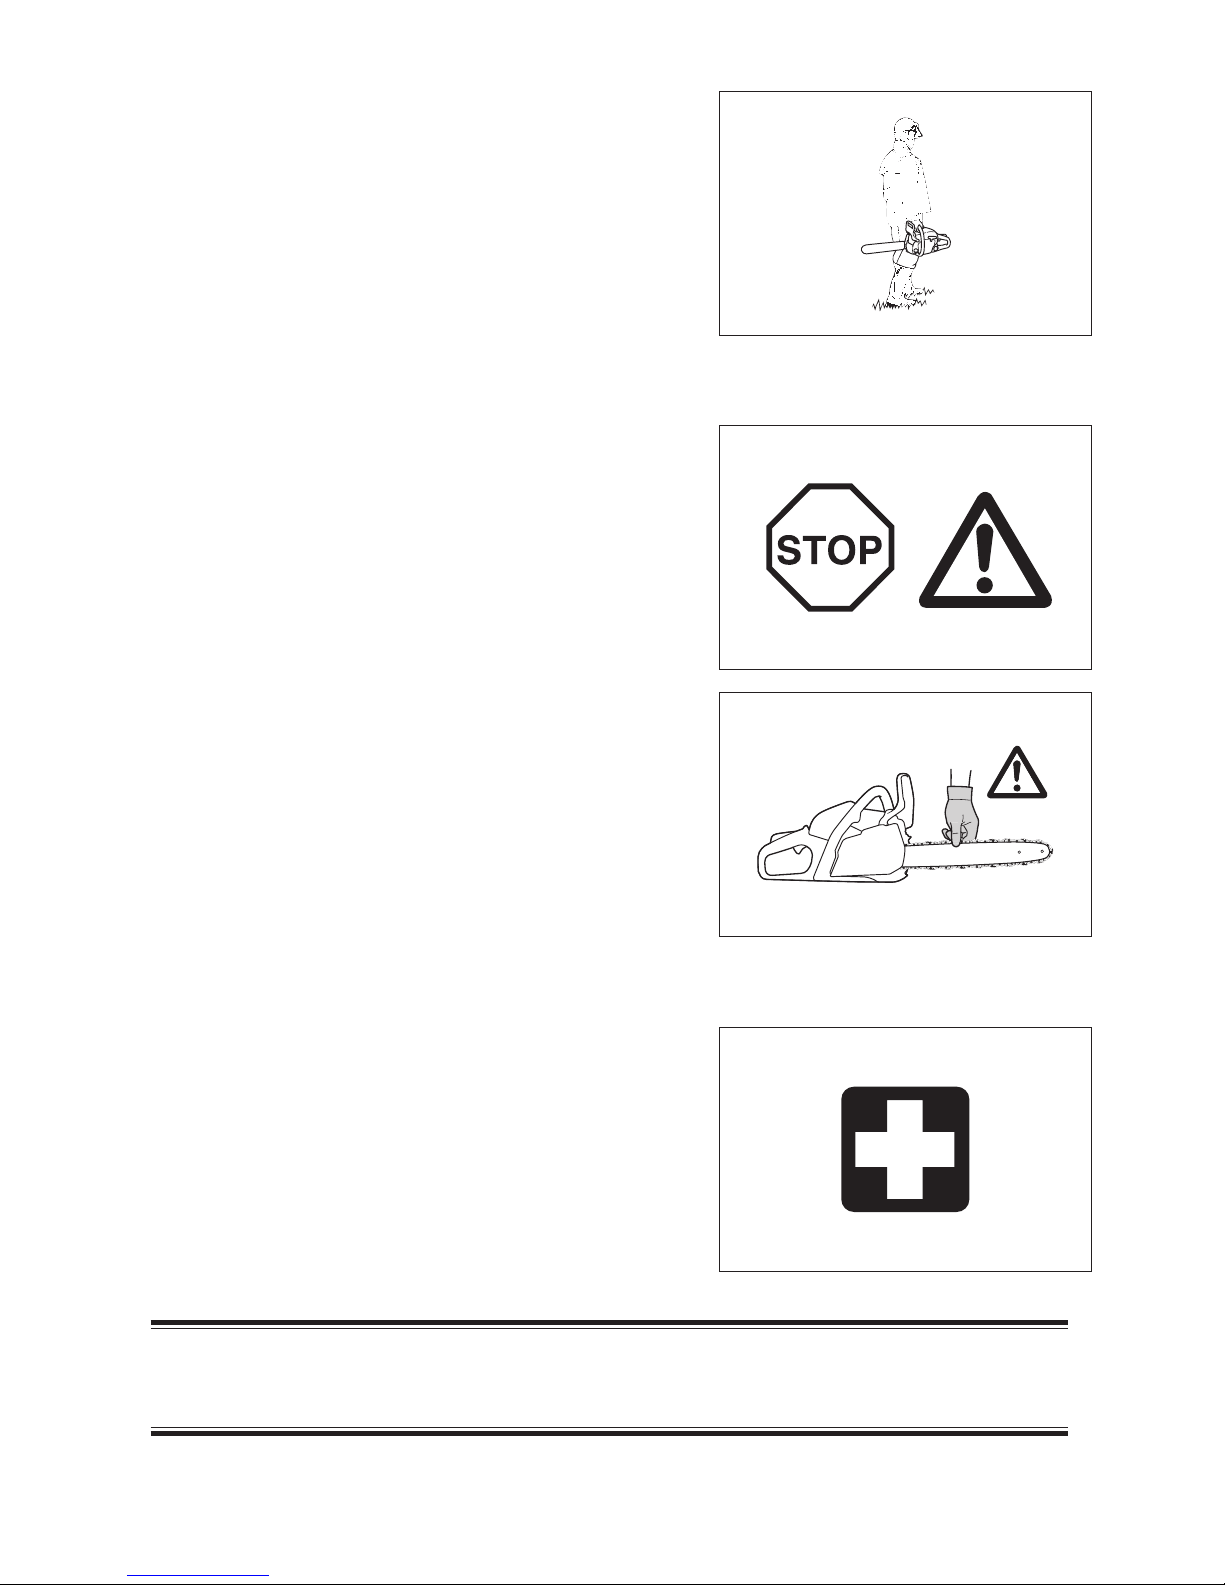
• Notching the trunk: The notch (A) determines the direction of fall and guides the
tree. The trunk is notched perpendicular to the direction of fall and penetrates 1/3
-1/5 of the trunk diameter. Perform the cut near the ground.
• When correcting the cut, always do so over the whole width of the notch.
• Cut down the tree above the bottom edge of the notch (D). The cut must be
exactly horizontal (B). The distance between both cuts (C) must be approx. 1/10
of the trunk diameter.
• The material between both cuts serves as a hinge. Never cut it through,
otherwise the tree will fall without any control. Insert felling wedges in time.
• Secure the cut only with wedges made of plastic or aluminium. Do not use iron
wedges. If the saw hits an iron wedge the chain can be seriously damaged or
torn.
• When cutting down a tree always stay sidewards of the falling tree.
• When withdrawing after having performed the cut, be alert for falling branches.
• When working on sloping ground the user of the chain saw must stay above or
sidewards of the trunk to be cut or the tree already cut down.
• Be alert for trunks which may roll towards you.
8
Transport and storage
• When changing your location during work switch off the chain saw and
actuate the chain brake in order to prevent an inadvertent start of the chain.
• Never carry or transport the chain saw with the chain running. When the
saw is hot, do not cover it (with a tarp, blanket, newspaper or the like). Let
the saw cool down before putting it in a storage case or vehicle. Saws with
catalytic converter take longer to cool down!
• Use the chain protection cover during transport and storage.
• Carry the chain saw with the front handle. The guide bar points backwards. Avoid
coming in contact with the mufer (danger of burns).
• Ensure safe positioning of the chain saw during car transportation to avoid fuel
leakage, damage or injury.
• Store the chain saw safely in a dry place. It must not be stored outdoors. Keep
the chain saw away from children.
• Before storing the chain saw over a long period of time or shipping it, the fuel and
oil tanks must be completely emptied.
• Perform cleaning and maintenance before storage.
Maintenance
• Before performing maintenance work switch off the chain saw and pull out
the plug cap.
• Before starting work always check the operating safety of the chain saw, in
particular the function of the chain brake. Make sure that the chain is always
sharpened and tightened correctly.
• Operate the chain saw only at a low noise and emission level. For this ensure the
carburetor is adjusted correctly.
• Regularly clean the chain saw.
• Regularly check the tank cap for tightness.
• Observe the accident prevention instructions issued by trade associations
and insurance companies.
• Do not perform any modications on the chain saw. You will put your safety
at risk.
• Perform only the maintenance and repair works described in the instruction
manual. All other work must be carried out by Makita Service.
• Use only original Makita spare parts and accessories.
• Using spare parts other than original Makita parts or accessories and guide
bar/chain combinations or lengths which are not approved bring a high risk
of accidents. We cannot accept any responsibility for accidents and damage
resulting from using sawing devices or accessories which have not been
approved.
Vibration
Individuals with poor circulation who are exposed to excessive vibration may
experience injury to blood vessels or the nervous system.
Vibration may cause the following symptoms to occur in the fingers, hands or wrists:
“Falling asleep” (numbness), tingling, pain, stabbing sensation, alteration of skin
color or of the skin.
If any of these symptoms occur, see a physician! To reduce the risk of
vibration white nger, keep your hands warm, wear gloves, and make sure the
saw chain is sharp.
First Aid
In case of accident make sure that a first-aid box is available in the vicinity of the
cutting operations. Immediately replace any item taken from the first aid box.
When asking for help, please give the following information:
- Place of accident
- What happened
- Number of injured persons
- Kind of injuries
- Your name
For European countries only
EC Declaration of Conformity
The EС declaration of conformity is included as Annex A to this instruction manual.

9
Model EA3600F EA3601F
Overall length (without guide bar) mm 388
Net weight kg 4.2
Stroke volume cm
3
35.2
Bore mm 38
Stroke mm 31
Max. power at speed kW/min
-1
1.7/10,000
Max. torque at speed Nm/min
-1
2.0/7,000
Idling speed/max. engine speed with bar and chain min
-1
2,900/13,500
Clutch engagement speed min
-1
4,100
Carburetor Type Diaphragm
Spark plug Type NGK BPMR 8Y
Electrode gap mm 0.7
Fuel tank capacity cm
3
310
Chain oil tank capacity cm
3
260
Mixture ratio (fuel/two stroke oil)
Makita genuine oil or quality grade JASO FC (ISO EGC) or upper
50:1
Chain brake Engages manually or in case of kickback.
Chain speed m/s 25.3
Sprocket pitch mm (inch) 0.95 (3/8)
Number of teeth Z 6
Sound pressure level at the workplace L
PA, eq
per
ISO 22868
1)
dB (A) 99
K
PA
2.5
Sound power level L
WA, Fl + Ra
per ISO 22868
2)
dB (A) 111
K
WA
2.5
Vibration acceleration a
hv, eq
per
ISO22867
1)
front handle
m/s
2
3.3
K 2.0
rear handle
m/s
2
3.4
K 2.0
1) Figures derived in equal part from idling, full-load and racing speed.
2) Figures derived in equal part from full-load and racing speed.
• Due to our continuing program of research and development, the specifications herein are subject to change without notice.
• Specifications may differ from country to country.
Guide bar and saw chain
Guide bar type Sprocket nose bar
Length 350 mm 400 mm
Cutting length 325 mm 360 mm
Saw chain Type 91PX
Pitch 3/8”
Gauge 1.3 mm (0.05”)
No. of drive links 52 56
WARNING:
Use appropriate combination of the guide bar and saw chain. Otherwise personal injury may result.
TECHNICAL DATA
10
Designation of parts
1 Rear handle
2 Cleaner cover
3 Front handle
4 Front hand guard
5 Guide bar
6 Saw chain
7 Throttle trigger lock-out
8 Throttle trigger
9 Fuel pump (Primer)
10 Chain cover
11 Chain adjusting screw
12 Chain adjusting dial
13 Retaining nuts
14 Lever
15 Oil tank cap
16 Fuel tank cap
17 Fuel level gauge
18 Starter grip
19 Combination switch
DESIGNATION OF PARTS
5
14
12
10
3
4
5
6
15
16
17
18
19
1
7
8
9
11
13
2
10
11
WARNING:
• Following safety functions does NOT guarantee all time protection from injury.
Only proper usage and technique can reduce the risk of kickback and other
dangerous accidents.
• Always check the safety functions before use.
• If the chain saw fails any of the checking, switch off the engine immediately, and
do NOT use the chain saw. Contact Makita authorized service center.
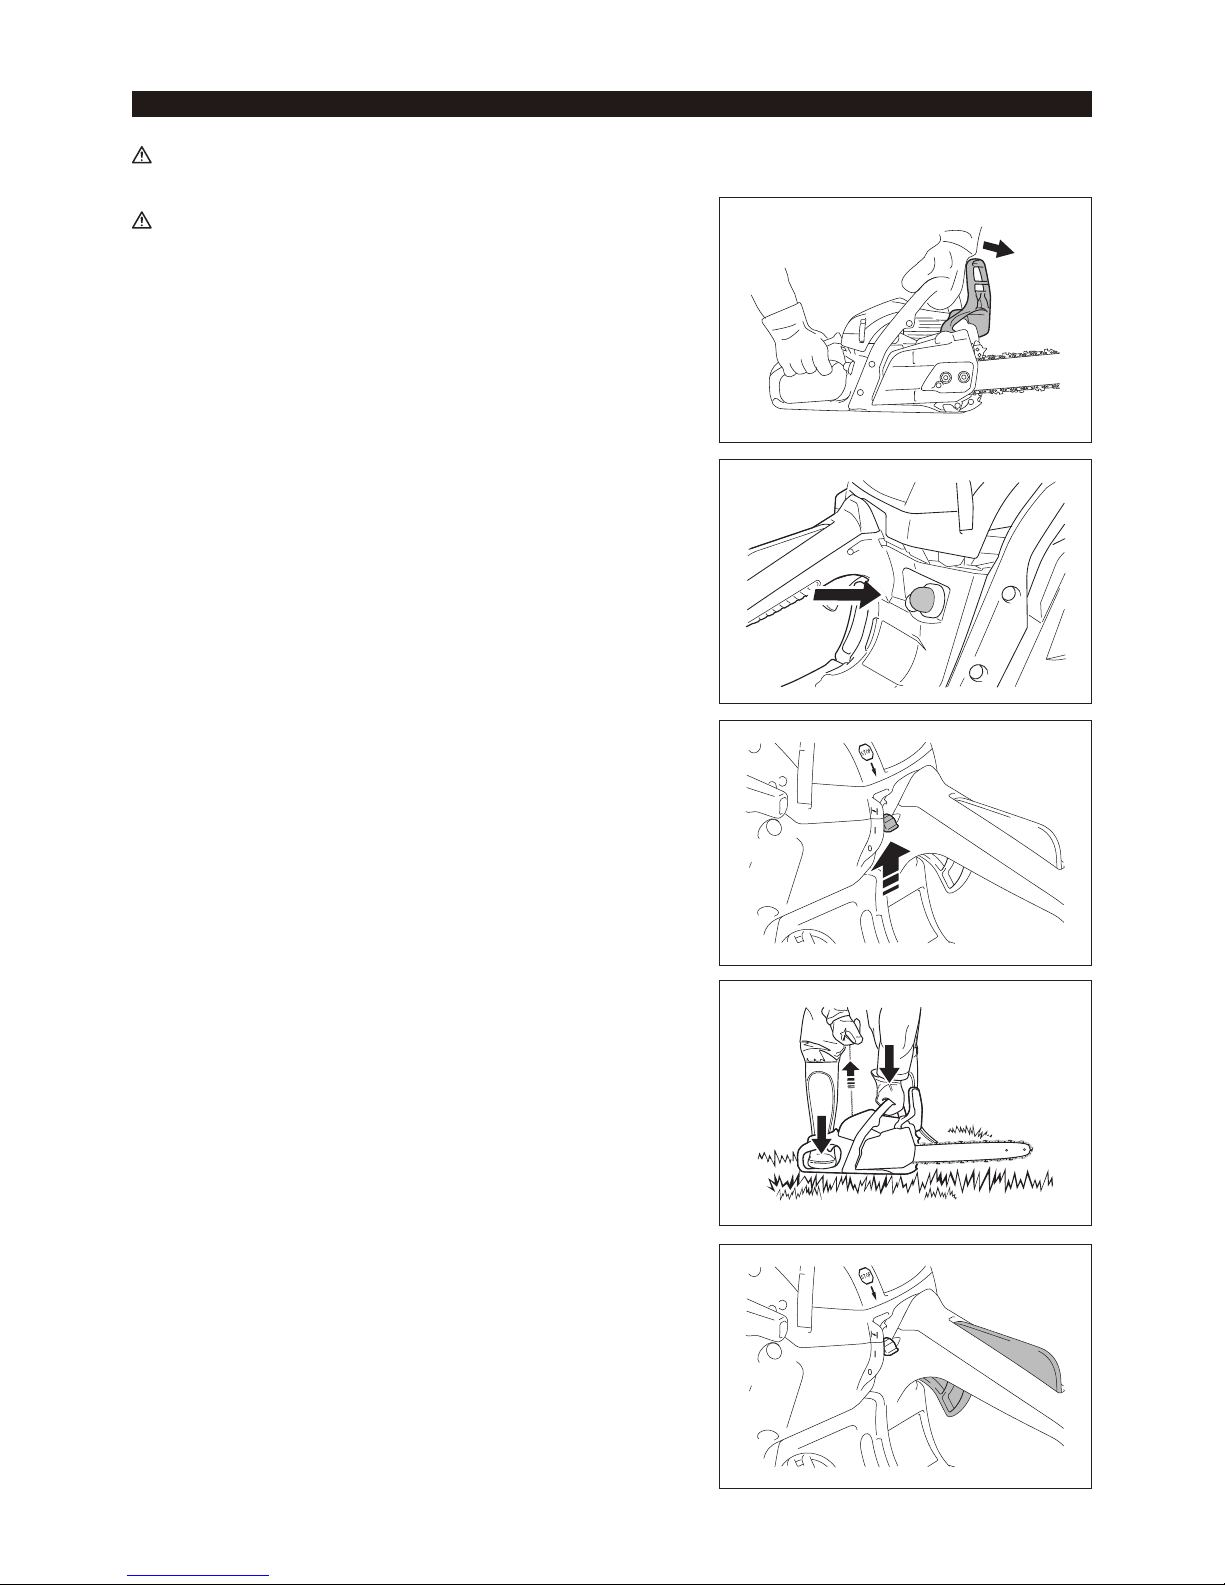
Chain brake
The chain brake is designed to stop the chain to standstill within a fraction of a
second. It is activated when the kickback is sufficiently strong.
To engage the chain brake manually, push the front hand guard forward (forwards
the tip of the saw) with your left hand.
To release the chain brake, pull the front hand guard towards backward (towards
you).
NOTICE:
• Do not accelerate the engine with the chain brake actuated (except for testing).
• Always release the chain brake before starting the operation.
Checking the chain brake
1. Run the engine at idle speed.
2. Hold the chain saw with both hands. Hold the rear handle with your right hand,
the front handle with your left. Make sure that the guide bar and the chain do not
contact with any object.
3. Push the front hand guard using the back of your hand, until the chain brake
engages.
4. Accelerate till engine reaches full throttle for less than 3 seconds. Make sure that
the saw chain does not move at all.
5. Bring the engine back to idle and release the chain brake.
Checking the brake band
The brake band is at the back of the chain cover. Chain brake wears out in course
of time. Have it checked and serviced by Makita authorized service center at least
every 3 month.
Throttle trigger lock‑out
Throttle trigger lock-out is designed to prevent accidental start. You can pull the
throttle trigger only when the throttle trigger lock-out is pressed (i.e. when you grasp
the handle).
Checking throttle trigger lock‑out
Check the throttle trigger lock-out returns its original position after releasing your
hand from the rear handle.
Engine stop
Make sure that the engine stops when you intend to.
Checking the engine stop
Start the engine. Then release the throttle trigger, and press down the combination
switch to lower (O) position.
CHAIN SAW’S SAFETY FUNCTION

12
Chain catcher
Chain catcher is designed to catch the chain in case the saw chain jumps from the
guide bar. The saw chain should not jump if it is properly tensioned. Always check
and adjust the tension of the saw chain in accordance with this instruction manual.
Checking chain catcher
Check the chain catcher is not damaged and securely sits on the housing.
13
WARNING:
• Before performing any work on the guide bar or saw chain, always switch off the
engine and make sure that the cutting tool is stopped.
• Always wear protective gloves.
CAUTION:
• Start the chain saw only after having assembled it completely and inspected.
Installing guide bar and saw chain
NOTICE:
• Installing or removing saw chain should be carried out in a clean place free from
sawdust or other foreign material.
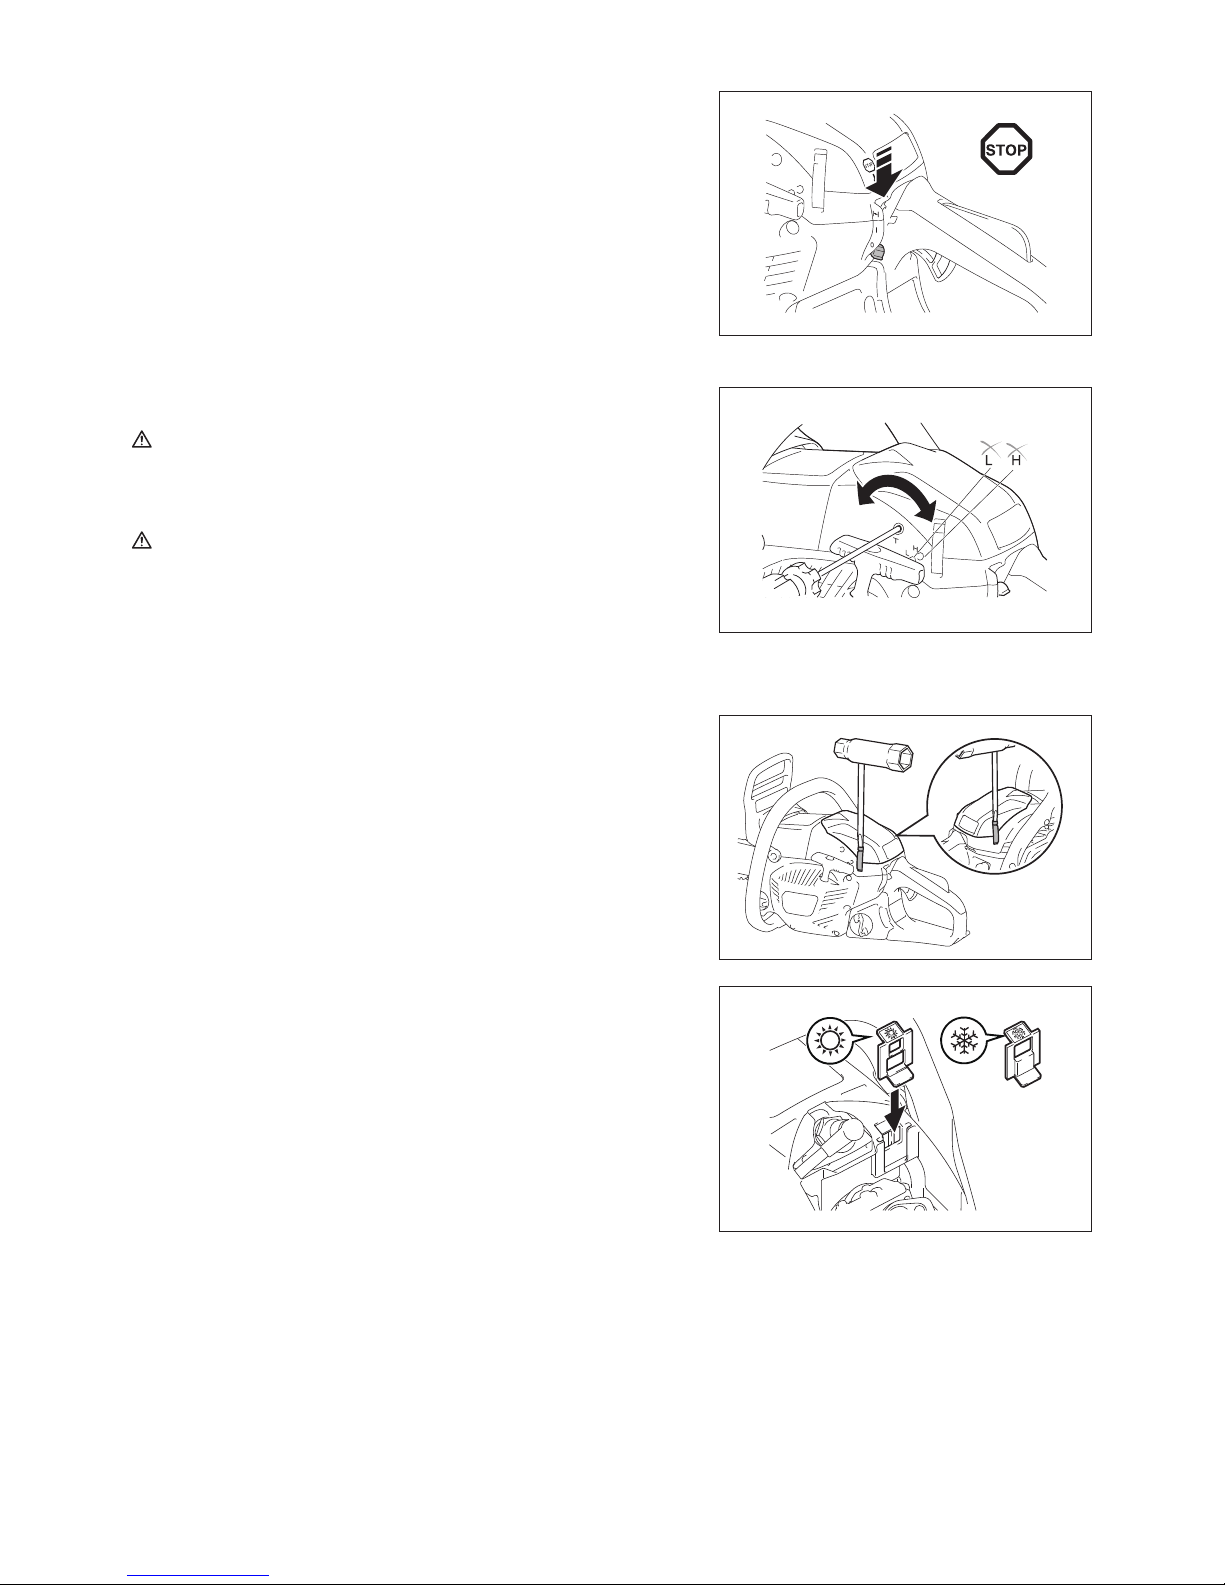
Put the chain saw on a stable surface and carry out the following steps:
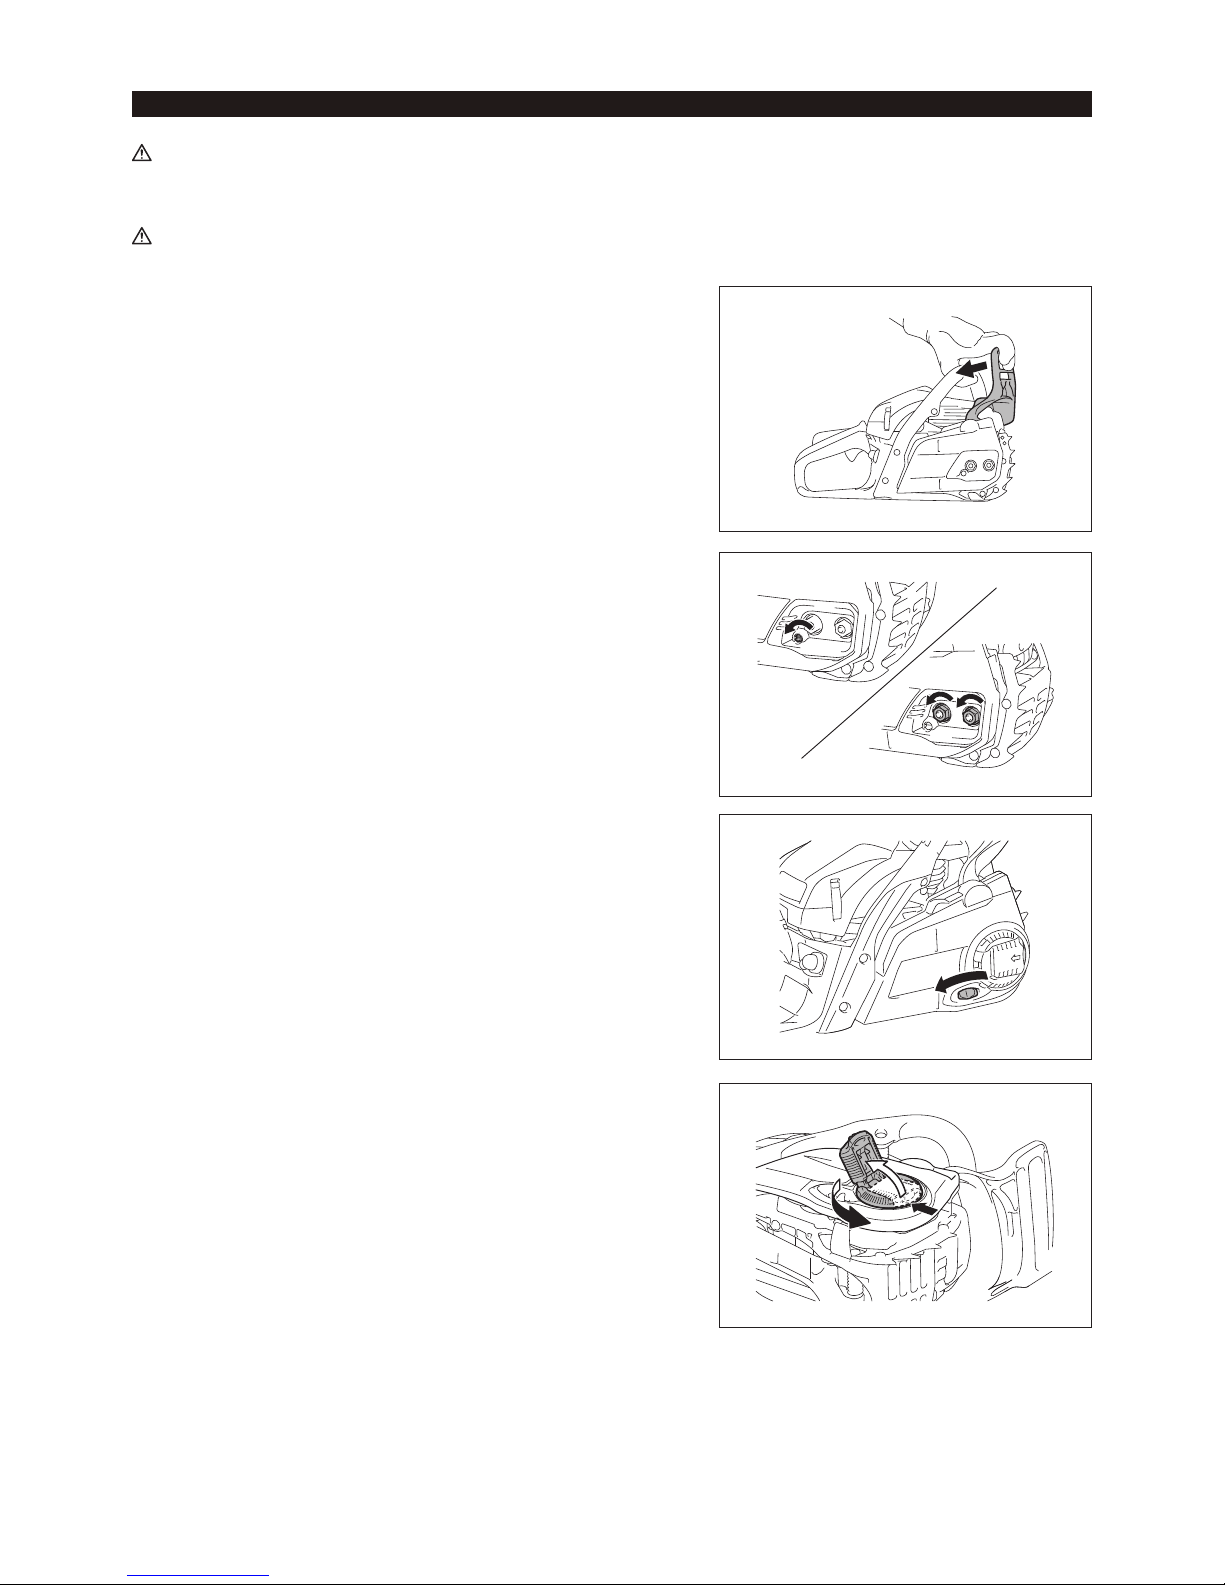
1. Release the chain brake by pulling the front hand guard.
2. Loosen chain tension fully.
3. (For model EA3600F) Unscrew the retaining nuts.
(For model EA3601F) Press and fully open the lever until it stops. Turn the lever
counterclockwise.
4. Remove the chain cover.
NOTICE:
• You can not remove the chain cover without releasing the chain brake.
ASSEMBLY
EA3601F
EA3601F
EA3600F
14
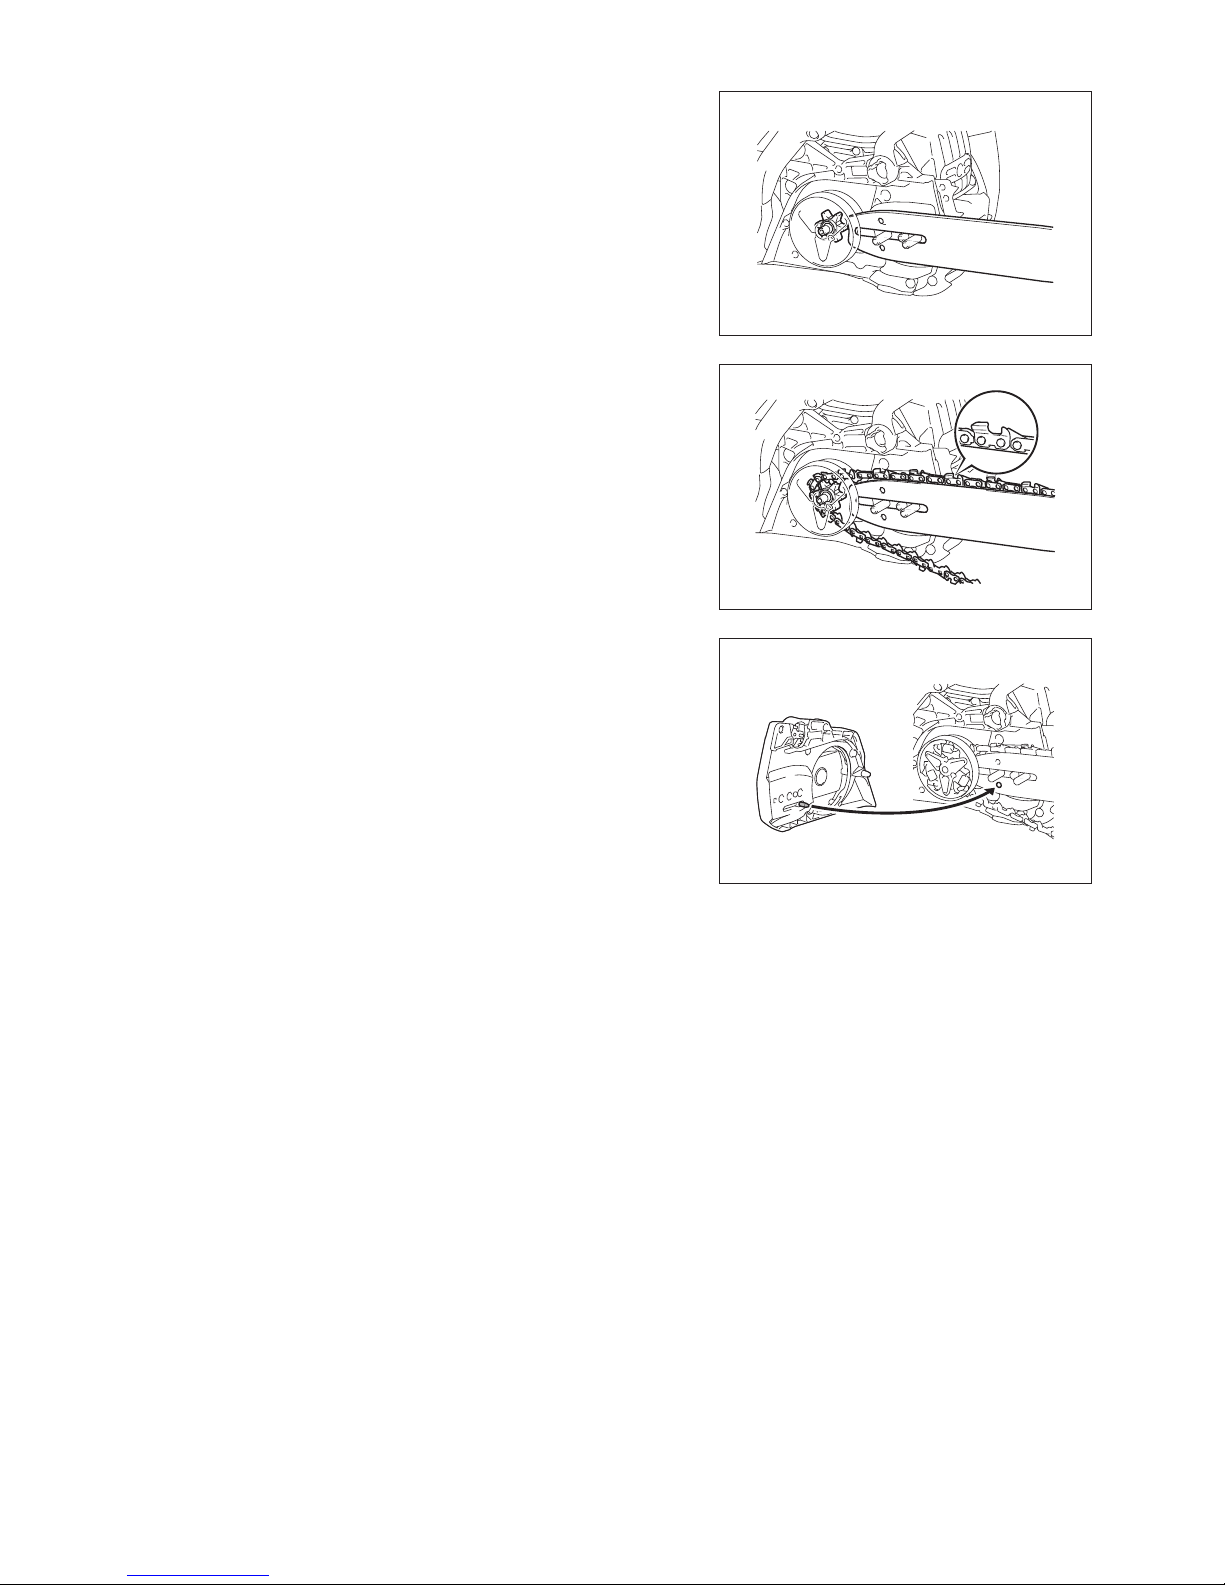
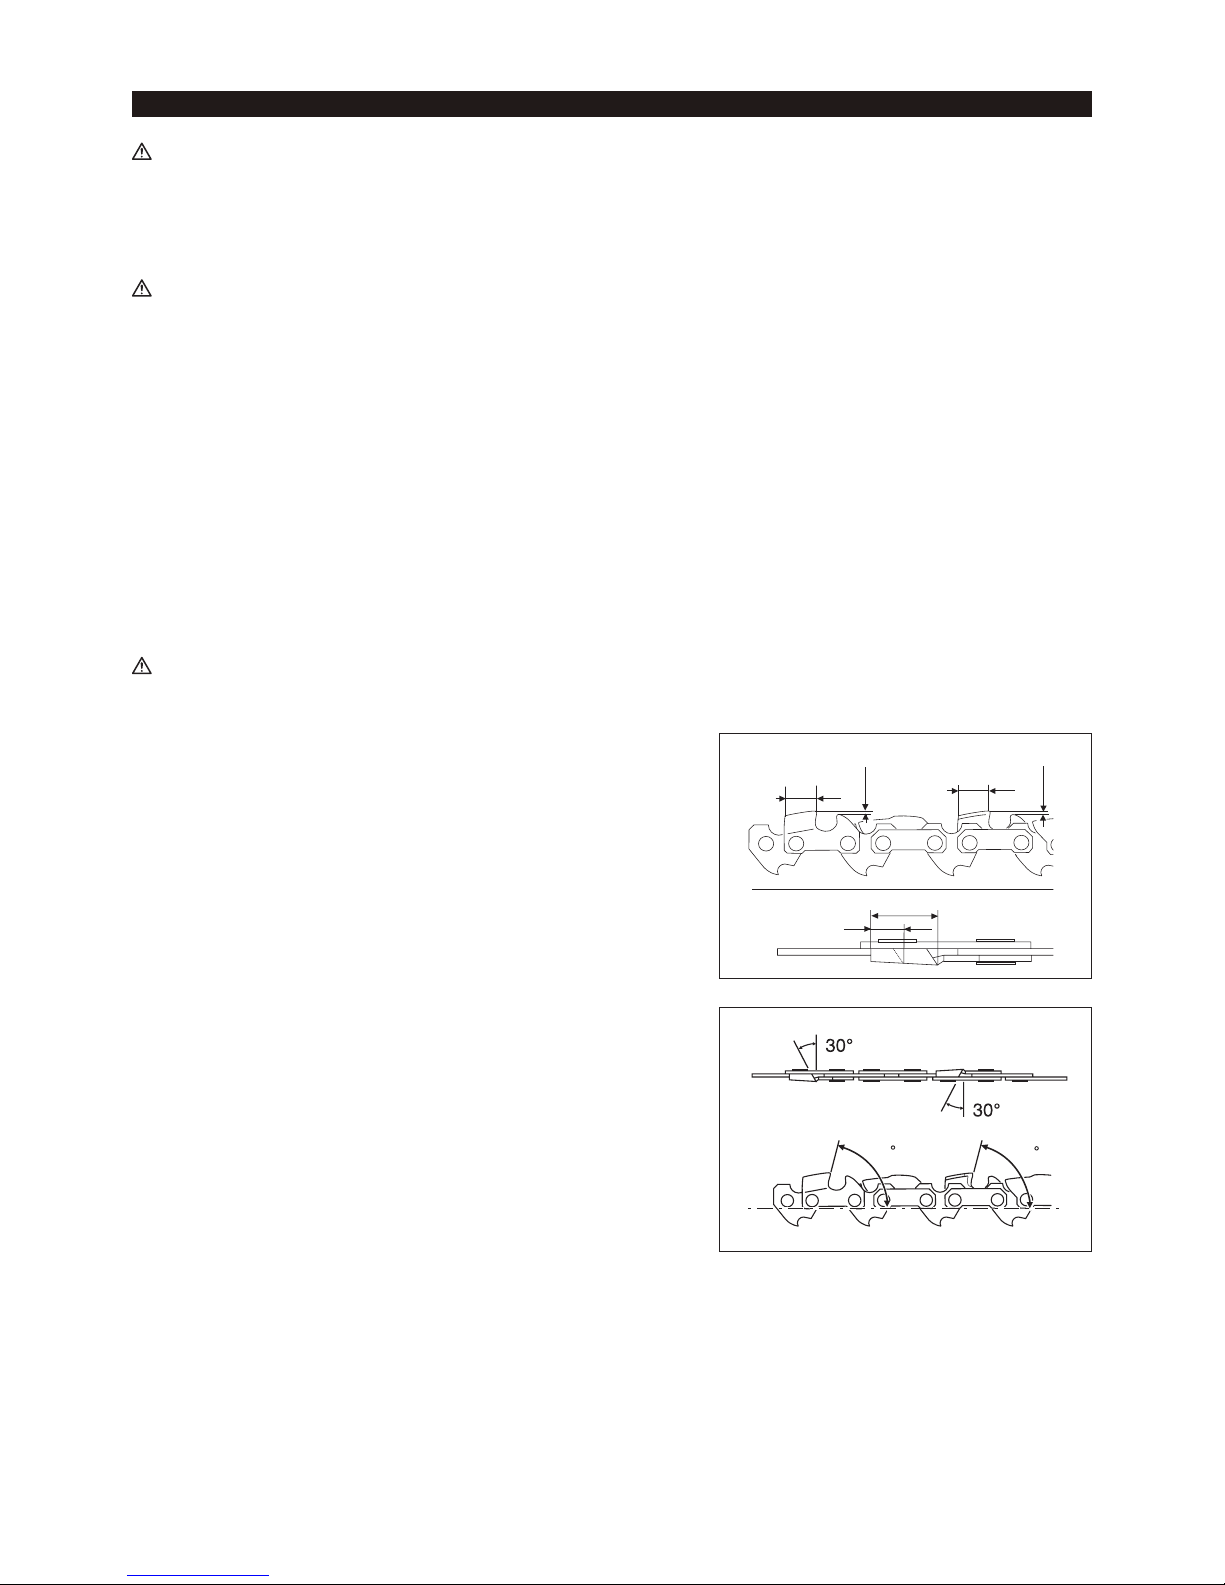
5. Place the guide bar over the bar bolts.
6. Check the direction of the saw chain. The arrows on the saw chain must point the
same direction as the arrow on the saw housing.
7. Fit the saw chain at the sprocket first, then fit the saw chain on the guide bar tip.
8. Place the chain cover as the adjusting pin come on the hole on the guide bar.
NOTICE:
• Lift the saw chain over the chain catcher.
9. (For model EA3600F) Tighten the retaining nuts to secure the chain cover, then
loosen them a bit for tension adjustment.
(For model EA3601F) Turn the lever clockwise to secure the chain cover, then
loosen them a bit for tension adjustment.
10. Adjust the saw chain tension. (See the section “Adjusting saw chain tension”
step 3 and after.)
NOTE:
• In order to gain uniform wear of the guide bar, turned it over when replacing the
chain.
15
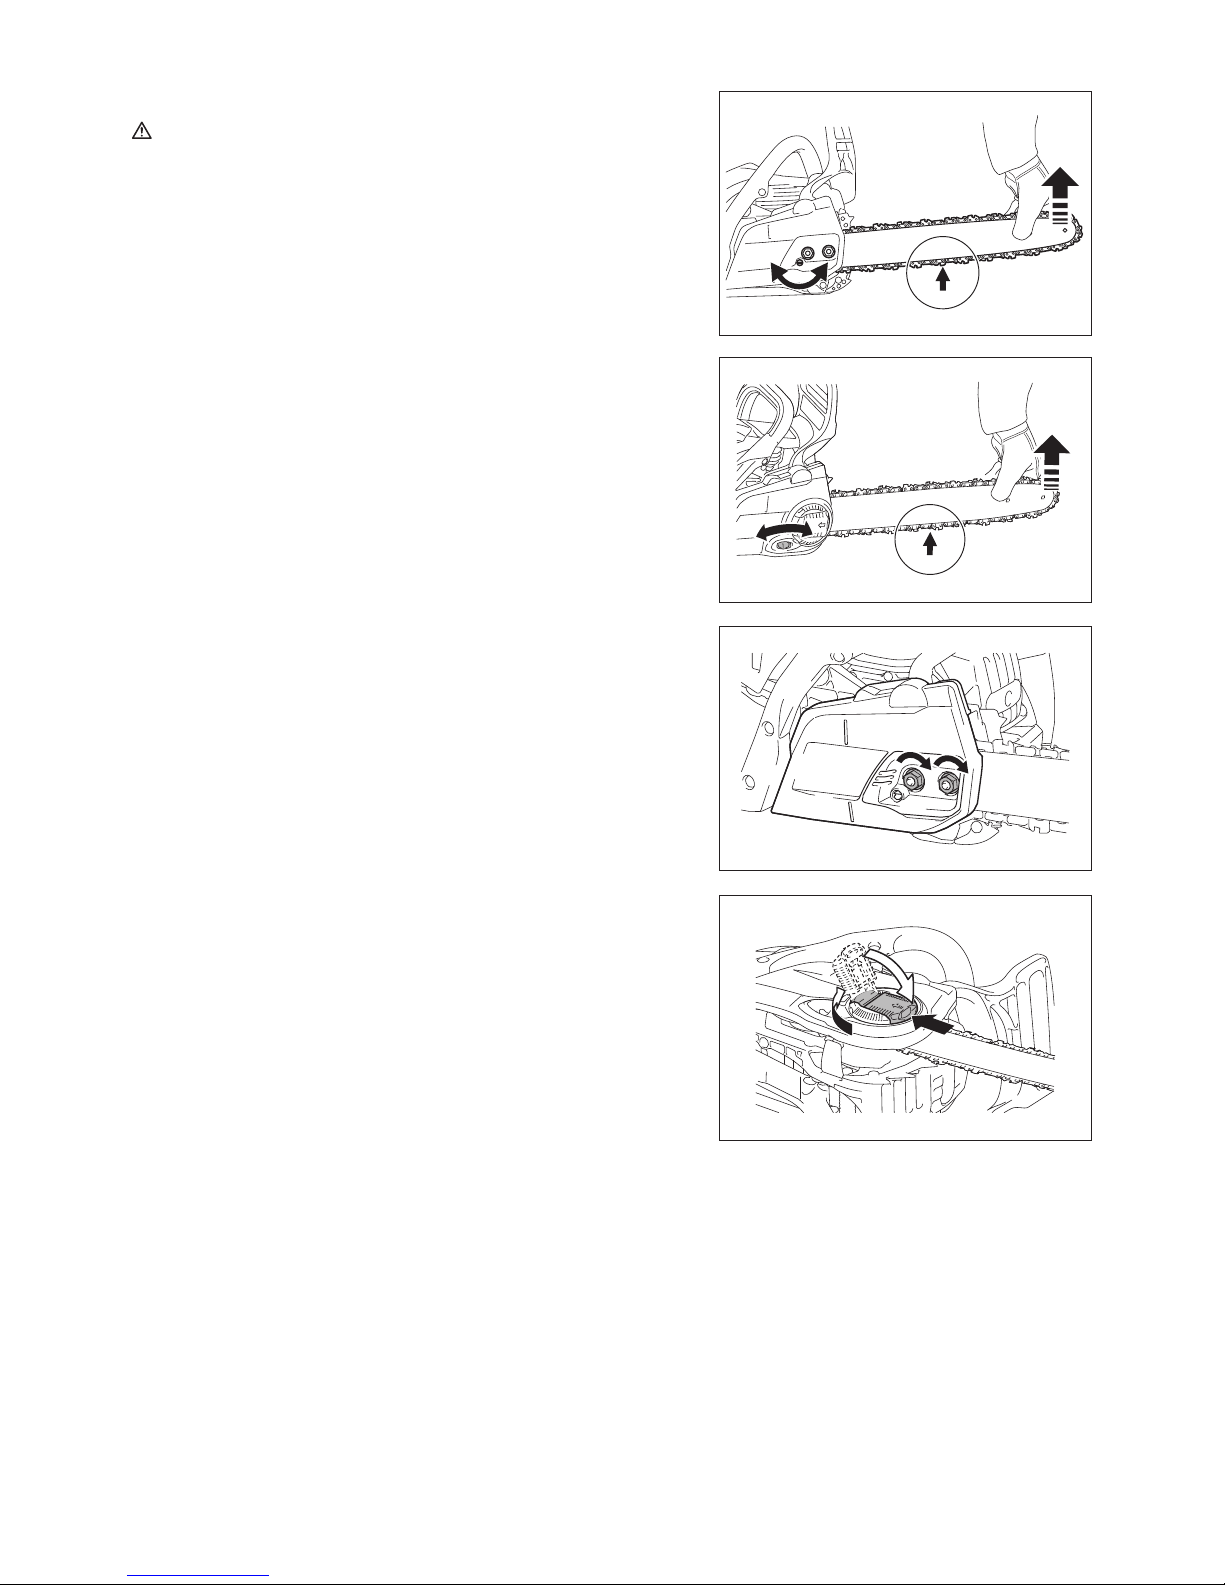
Adjusting saw chain tension
CAUTION:
• Excessively loose saw chain may jump off the bar, and therefore presents an
accident risk. If the saw chain is too loose, adjust it.
• Excessively high tension of saw chain may cause breakage of saw chain, wear of
the guide bar and breakage of the adjusting screw/dial.
The saw chain may become loose after many hours of use. When you change the
saw chain or after some hours of operation, check the saw chain tension before
use. Properly adjusted saw chain contributes good performance and tool’s long life.
The tension of the chain is correct if the chain rests against the bottom side of the
guide bar and can still be easily turned by hand.
Check the chain tension frequently, new chain tends to become longer during use.
To adjust tension of the saw chain, perform the following procedure:
1. Release the chain brake by pulling the front hand guard.
2. (For model EA3600F) Unscrew the retaining nuts a bit to loosen the chain cover.
(For model EA3601F) Press and fully open the lever until it stops. Turn the lever
counterclockwise a bit to loosen the chain cover.
3. Slightly lift and hold the tip of the guide bar.
4. (For model EA3600F) Turn the chain adjusting screw to adjust the saw chain
tension.
(For model EA3601F) Turn the chain adjusting dial to adjust the saw chain
tension.
5. Adjust the chain tension until the lower side of the saw chain fits in the guide bar
rail (see circle in the figure).
During adjusting the chain tension, keep lifting up the tip of the guide bar.
6. Keep holding the guide bar lightly, and tighten the chain cover after adjusting the
chain tension.
(For model EA3600F) Tighten the retaining nuts to secure the chain cover.
(For model EA3601F) Turn the lever fully clockwise to secure the chain cover.
Then press and close the lever.
7. Make sure that the saw chain does not loose at lower side but it fits snugly
against the lower side of the bar.
EA3600F
EA3600F
EA3601F
EA3601F

16
WARNING:
• AVOID SKIN AND EYE CONTACT. Mineral oil products degrease your skin. If
your skin comes in contact with these substances repeatedly and for an extended
period of time, it may dry your skin. Various skin diseases may result. In addition,
allergic reactions are known to occur. Eyes can be irritated by contact with oil. If
oil comes into your eyes, immediately wash them with clear water. If your eyes
are still irritated, see a doctor immediately.
Fuel
CAUTION:
• Be especially careful when handling gasoline.
• Do not smoke. Keep tool well away from open ames, spark, or fire (explosion
hazard).
Fuel mixture
This tool is powered by a high-performance air-cooled two stroke engine. It runs on
a mixture of gasoline and two-stroke engine oil.
The engine is designed for unleaded regular gasoline with a min. octane value of
91 RON (89 AKI), and ethanol contained no more than 10%. In case no such fuel
is available, you can use fuel with a higher octane value. This will not affect the
engine.
In order to obtain an optimum engine output and to protect your health and
the environment use unleaded fuel only.
To lubricate the engine, use synthetic oil for two-stroke air-cooled engines (Makita
genuine oil or quality grade JASO FC (ISO EGC) or upper). Mix engine oil with fuel.
CAUTION:
• Do not use ready-mixed fuel from petrol stations.
The correct mixture ratio: 50:1 i.e. mix 50 parts gasoline with 1 part oil.
NOTE:
• For preparing the fuel-oil mixture first mix the entire oil quantity with half of the
fuel required, then add the remaining fuel. Thoroughly shake the mixture before
filling it into the chain saw tank.
Do not add more engine oil than specified. Incorrect mixture ratio of oil results in
making more polluting combustion residues. It also causes clog exhaust channel
in the cylinder and mufer, and causes poor performance and excessive fuel
consumption.
The Storage of Fuel
Fuels have a limited storage life. Fuel mixtures age through evaporation, especially
at high temperatures. Aged fuel and fuel mixtures can cause starting problems and
damage the engine. Purchase only that amount of fuel, which will be consumed
over the next few months. At high temperatures, once fuel has been mixed it should
be used up in 6-8 weeks.
Preserve fuel only in proper containers, in dry, cool, secure locations.
Chain oil
Use oil with adhesive additive for lubricating the chain and guide bar. The adhesive
additive prevents the oil from being ung off the chain too quickly.
We recommend the use of Makita genuine chain oil or chain oil which is biodegradable in order to protect the environment. The use of bio-degradable oil may
even be required by local regulations.
Bio-degradable oil is stable only for a limited period of time. Use it within 2 years
from the date of manufacture (printed on the container).
Important note on bio‑degradable chain oils
If you are not planning to use the saw again for an extended period of time, empty
the oil tank and put in a small amount of regular engine oil (SAE 30), and then run
the saw for a time. This is necessary to ush out all remaining bio-degradable oil
from the oil tank, oil-feed system, chain and guide bar, as many such oils tend to
leave sticky residues over time, which can cause damage to the oil pump or other
parts.
NEVER USE WASTE OIL
Waste oil is very dangerous for the environment.
Waste oil contains high amounts of carcinogenic substances.
Residues in waste oil result in extreme wear and scuff at the oil pump and the
sawing device.
In case of damage caused by using waste oil or inappropriate chain oil the product
warranty will be void.
BEFORE USE
17
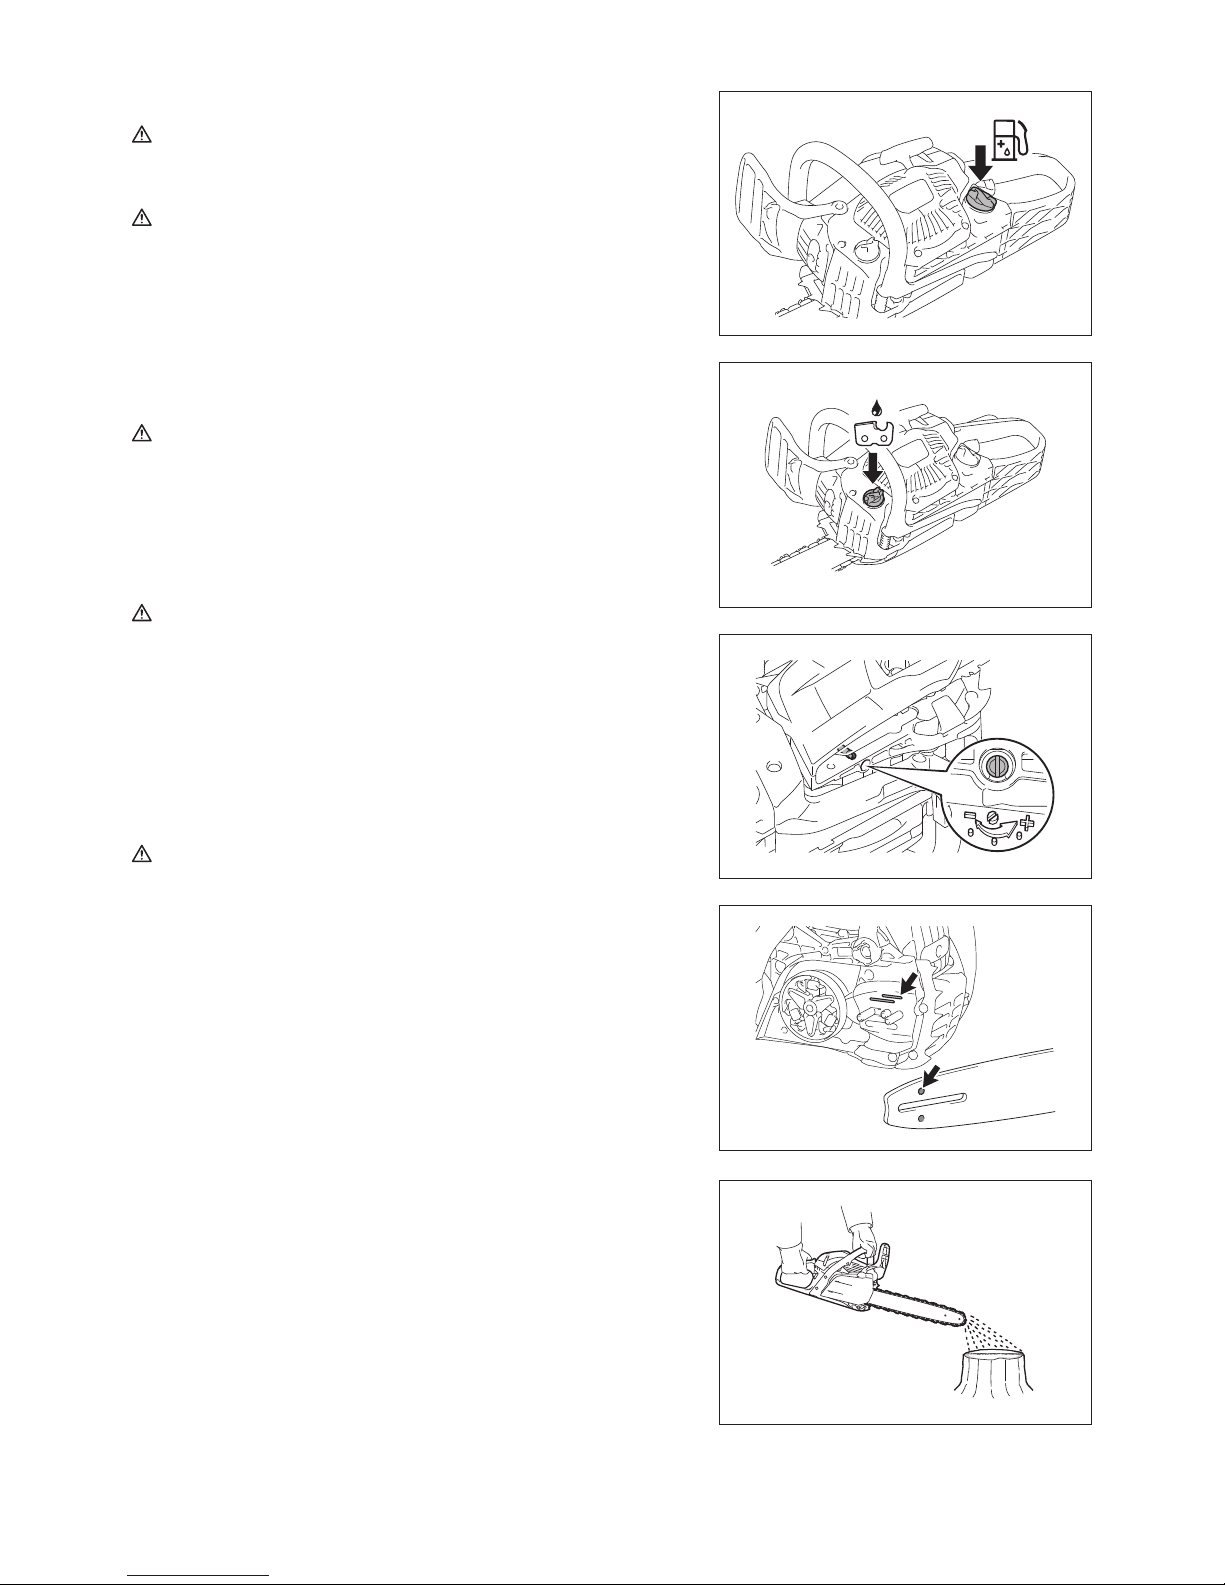
Refuelling and relling chain oil
WARNING:
• FOLLOW THE SAFETY PRECAUTIONS. Be careful and cautious when handling
fuels.
• Switch off the engine.
CAUTION:
• Clean the tank cap and the area around the tank after refuelling.
Refuel or refill the chain oil as follows:
1. Thoroughly clean the area around the caps, to prevent dirt from getting into the
fuel or oil tank.
2. Unscrew the cap and fill the each tanks with fuel (fuel/oil mixture) and chain oil
respectively.
3. Fill up to the bottom edge of the filler neck. Be careful not to spill fuel or chain oil!
4. Tighten the tank caps by hand as far as it goes.
Lubricating the chain
WARNING:
• Check the chain oil tank only when the engine is switched off.
Make sure there is sufficient chain oil in the chain oil tank to provide good chain
lubrication during operation.
At medium oil feed rate, the oil tank capacity is approximately equal to the run time
of one tank of fuel.
Before operation or refueling, check the chain oil level and refill if necessary.
Adjusting the chain lubrication
WARNING:
• Switch off the engine.
You can adjust the oil pump feed rate with adjusting screw. There are three degrees
of the oil pump feed rate, i.e. high, middle or low.
Adjusting screw locates at the bottom of the chain saw. Use a screwdriver and
adjust the amount of oil delivery appropriately.
Cleaning the oil guide
To ensure secure operation of the oil pump, clean the oil guide groove at the
housing and the oil feed hole in the guide bar regularly.
Checking the chain lubrication
CAUTION:
• Never work with the chain saw without sufficient chain lubrication. Otherwise the
service life of the saw chain and guide bar is reduced.
• Before starting work check the oil level in the tank and the oil feed.
• Pay attention to the direction of the wind and avoid unnecessary exposure to the
oil spray.
Check the oil feed rate as follows:
1. Start the chain saw.
2. Hold the running chain saw approx. 15 cm (6”) above a trunk or the ground (use
an appropriate base).
3. If the lubrication is sufficient, you can see light oil trace because oil is scattered
off the chain.
NOTE:
• After turning off the chain saw, it is normal that residual chain oil drips from the
oil feed system, the guide bar and the chain for a while. This does not mean a
defect. Place the saw on a suitable surface.
18
WARNING:
• Do not start the engine before the chain saw is completely assembled and
checked.
CAUTION:
• Move at least 3 meters (10 ft.) away from the place where the chain saw is
fuelled.
• Make sure you have a secure footing, and place the saw on the ground.
• Make sure the guide bar and saw chain does not touch anything.
• Do not forget to activate chain brake before starting the engine.
NOTICE:
• Never pull the rope to the full extension.
• Return the starter grip gently into the housing. Otherwise released starter grip
may hit your body or it may not rewind appropriately.
• The engine must be put in idle immediately after starting. If not, the clutch can be
damaged, ask authorized service center.
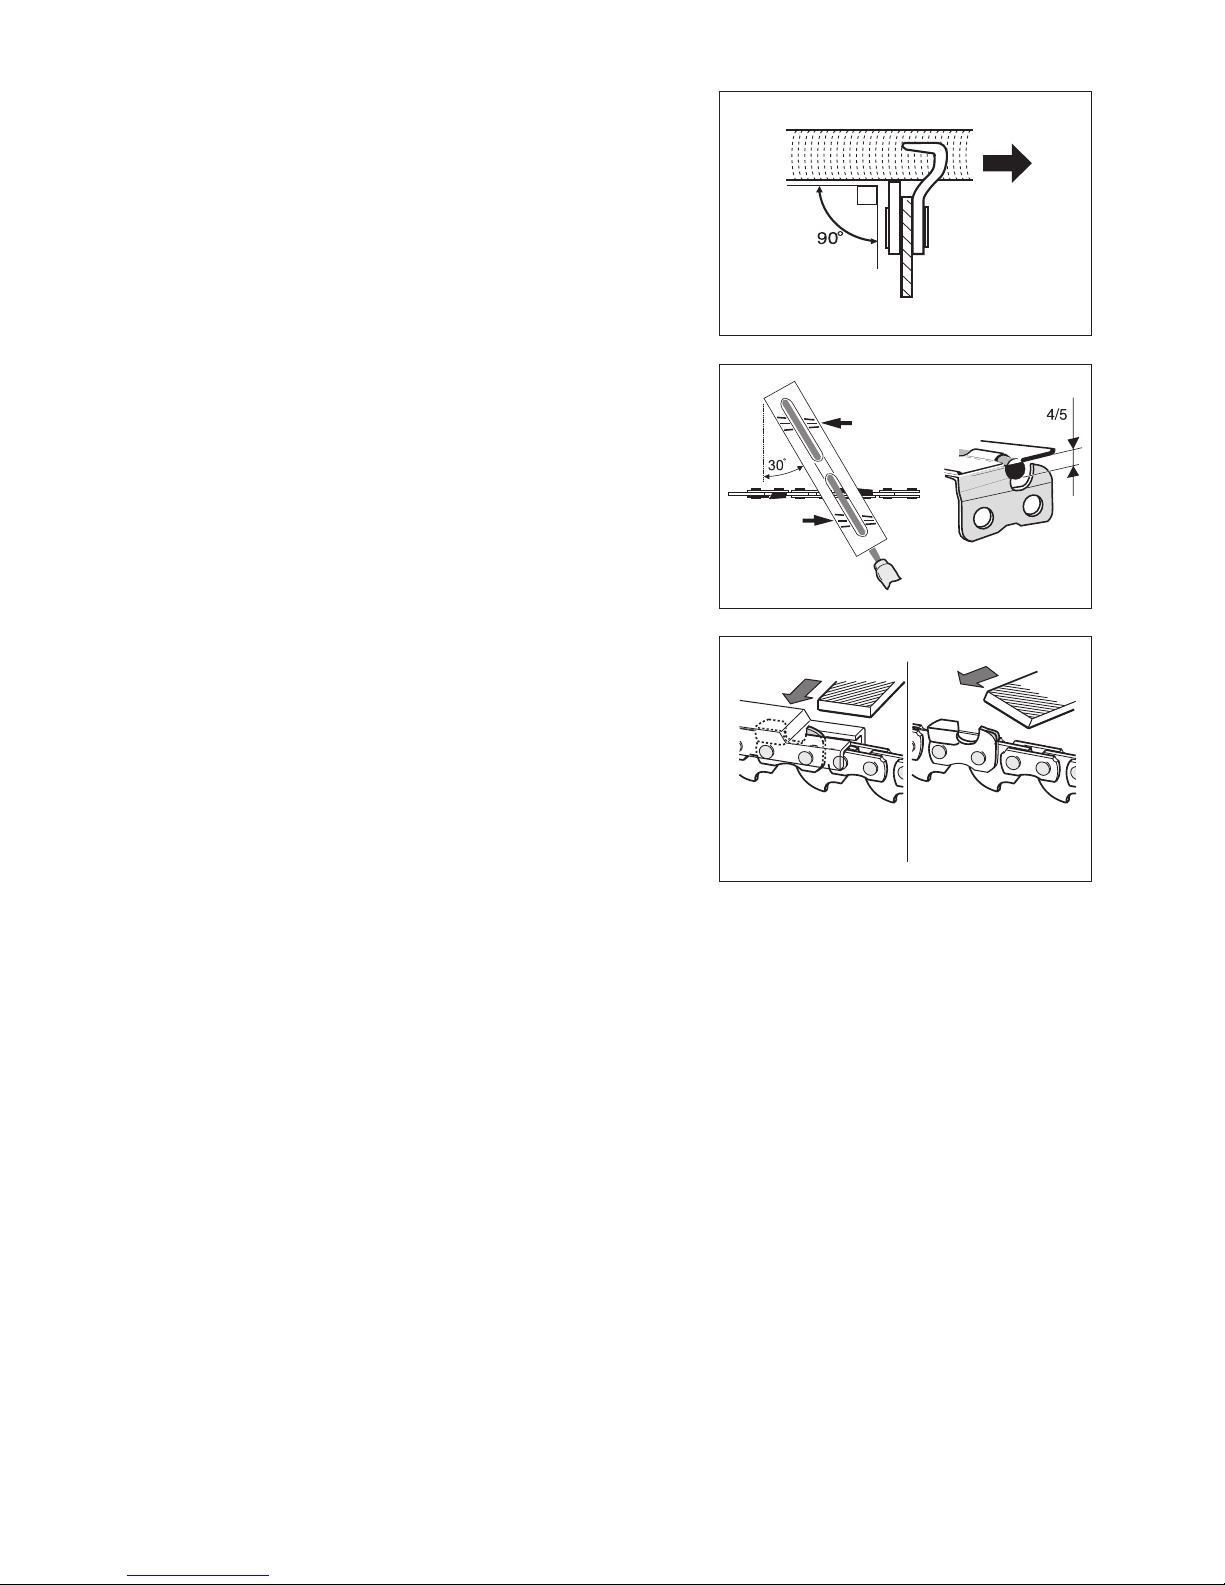
Starting the engine
1. Activate the chain brake (lock).
2. Hold the front handle firmly with left hand and press the chain saw against the
ground.
3. Hold down the rear handguard with your right foot.
4. Start the engine in accordance with engine circumstances as follows.
Cold start
When the engine is not used just before starting, perform the following steps:
1. Push the primer pump several times until fuel comes into the primer pump. (In
general, 7 to 10 pushes.)
2. Move up the combination switch (choke position). This also actuates the half-
throttle lock.
3. Pull the starter grip slowly until feeling compression. Then pull it strongly. It may
take two to four attempts until engine fires.
4. As soon as the engine fires, move the combination switch to the middle (I)
position. Then pull the starter grip strongly again until the engine starts running.
5. Grasp the rear handle (the throttle trigger lock-out is released by the grasp) and
pull the throttle trigger for a little, and release it.
6. Release the chain brake.
Warm start
When the engine is used just before starting and still warm, perform the following
steps:
1. Push the primer pump several times until fuel comes into the primer pump. (In
general, 7 to 10 pushes.)
2. Move up the combination switch (choke position), and then back to the middle (I)
position.
3. Pull the starter grip slowly until feeling compression. Then pull it strongly. It may
take two to four attempts until engine starts. If the engine does not start, perform
the steps of cold start (see the section “Cold start”).
As soon as the engine starts running, grasp the rear handle (the throttle trigger
lock-out is released by the grasp) and pull the throttle trigger for a little then
release it.
4. Release the chain brake.
STARTING AND STOPPING ENGINE
19
Stopping the engine
Release the throttle trigger, and then press down the combination switch to lower
(O) position.
The combination switch reverts to (I) position automatically. The engine stops with
this switch off, but is ready to start.
To cut off the ignition current, push the combination switch all the way down past the
resistance point to lock it at (O) position.
Adjusting idle speed
WARNING:
• Do not adjust idle speed before the chain saw is completely assembled and
checked.
• If the saw chain still moves at idle speed even after adjustment, stop using the
chain saw immediately, and bring it to Makita authorized service center for repair.
CAUTION:
• Do not adjust the screws (H) and (L) in the illustration.
If the saw chain moves in idle without pulling throttle trigger, it is necessary to adjust
the idle speed.
Adjust the idle speed as follows:
1. Start and warm up the engine for two or three minutes, but do not drive the
engine at high speed.
2. To reduce the idle speed, turn the adjusting screw counterclockwise.
3. To increase the idle speed, turn the adjusting screw clockwise.
4. Make sure the saw chain does not move at idle speed.
Prevention from carburetor icing
NOTICE:
• When environmental temperature is higher than 5°C, always return the shutter
to normal (sun mark) setting. Otherwise the engine may be damaged by
overheating.
When the environmental temperature is low (0°C - 5°C) and humidity is high, water
vapor may freeze inside the carburetor and the engine drives unsteadily (carburetor
icing). Change the setting of the shutter as follows if necessary.
1. Open the cleaner cover.
2. Pull out the shutter.
3. Set the shutter in anti-icing position (snow mark).
4. Return the cleaner cover.
20
WARNING:
• Make sure that the chain saw is switched off the engine and pull the plug cap off
the spark plug before performing maintenance or inspection.
• Wait until the engine cools down before performing any maintenance work.
• Always wear protective gloves.
• Start the chain saw only after having assembled and inspected it completely.
• Keep away from open ames and do not smoke.
CAUTION:
• To maintain product SAFETY and RELIABILITY, any repair, maintenance or
adjustment work that is not included in this manual should be performed by
Makita Authorized Service Centers. Always use Makita replacement parts.
Sharpening the saw chain
The chain needs sharpening when:
• Chips produced by cutting look like sawdust.
• The chain penetrates the wood only under great pressure.
• The cutting edge is visibly damaged.
• The saw is pulled to the left or right when sawing. This is caused by uneven
sharpening of the chain.
NOTICE:
• Sharpen frequently, but without removing too much. Generally, two or three
strokes of the file are enough.
• Have the chain resharpened at a service centre when you have already
sharpened it yourself several times.
Proper sharpening
CAUTION:
• Use only chains and guide bars designed for this saw.
• Excessive depth (3) increases the risk of kickback.
Sharpening criteria (for saw chain 91PX)
- Maintain all cutter parts (1) on the saw chain the same length. Cutter parts with
different lengths result in rough running of the chain and can cause cracks in the
chain.
- The minimum cutter length (2): 4 mm. Do not sharpen the chain when the cutter
part length becomes less than 4 mm. At this point, replace the saw chain.
- The depth of the cut (3) is determined by the difference in height between the
depth gauge (round nose) and the cutting edge.
- The best results are obtained with 0.64 mm (.025”) of the depth.
- Maintain the same sharpening angle of 30° for all the cutter parts.
- Use a proper round file so that proper sharpening angle of 55° is kept against the
teeth.
- Sharpen the cutters with proper angle, otherwise it may cause rough and irregular
chain running, and result in increasing wear and breakage of the saw chain.
MAINTENANCE
3
3
1
1
1
2
55
55
21
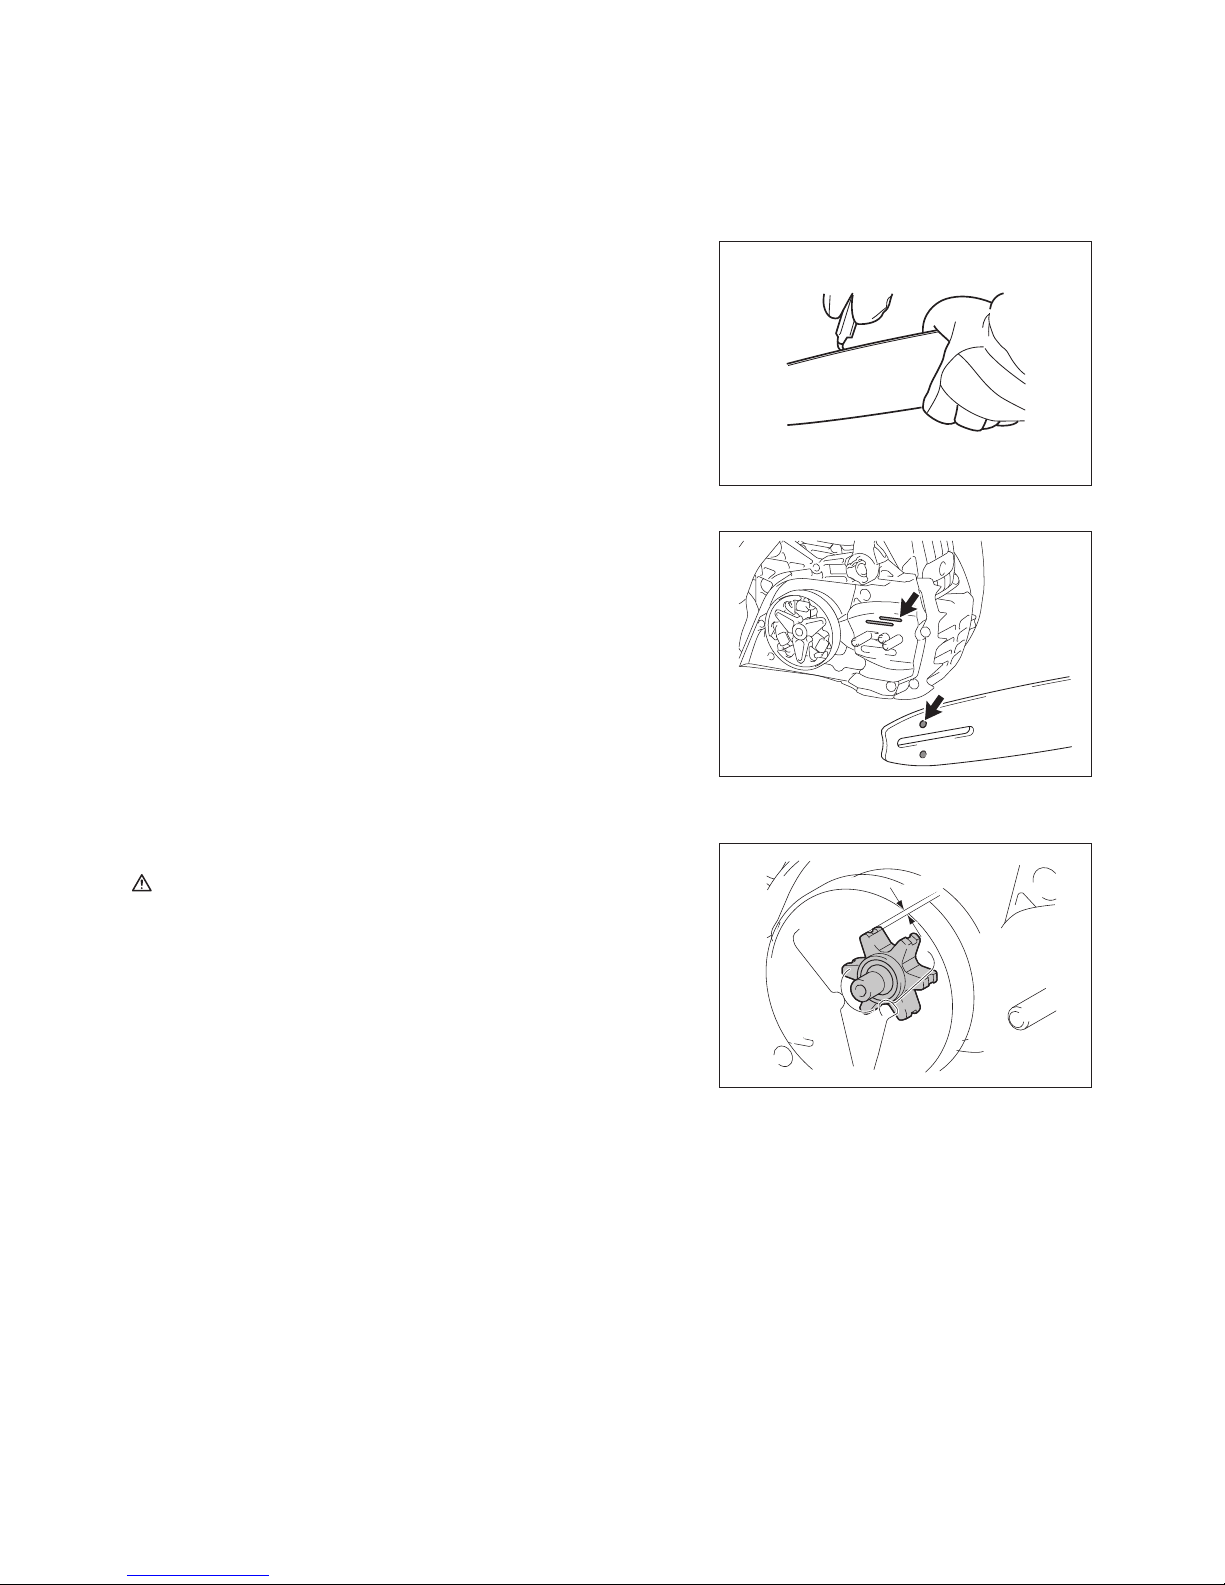
Files and le guiding
- Use a special round file (optional accessory) for saw chains sharpening. Normal
round files are not suitable.
- Use the round file of diameter 4.0 mm.
- The file should only engage the cutter part on the forward stroke. Lift the file off
the cutter part on the return stroke.
- Sharpen the shortest cutter first. Then the length of this shortest cutter becomes
the standard for all other cutters on the saw chain.
- Guide the file as shown in the figure.
- A file holder (optional accessory) makes file guidance easier. The file holder has
markings for the correct sharpening angle of 30°. When using the file holder, align
the markings parallel to the saw chain, and limit the filing depth to 4/5 of the file
diameter.
- After sharpening the chain, check the depth of the cut using the chain gauge tool
(optional accessory).
- Remove the small excess with a special at file (optional accessory).
- Round off the front of the depth gauge.
22
Cleaning the inside of the chain cover
Remove the chain cover, the saw chain and guide bar.
Clean the inside of the chain cover with a brush.
NOTICE:
Make sure there are no residues or foreign matter remaining in the oil guide groove,
chain tension pin, and brake band.
Cleaning the guide bar
Check the running surfaces of the bar regularly for damage. Clean it with using a
suitable tool.
Cleaning the oil guide
Clean the oil guide groove and oil feed hole in the bar at regular intervals.
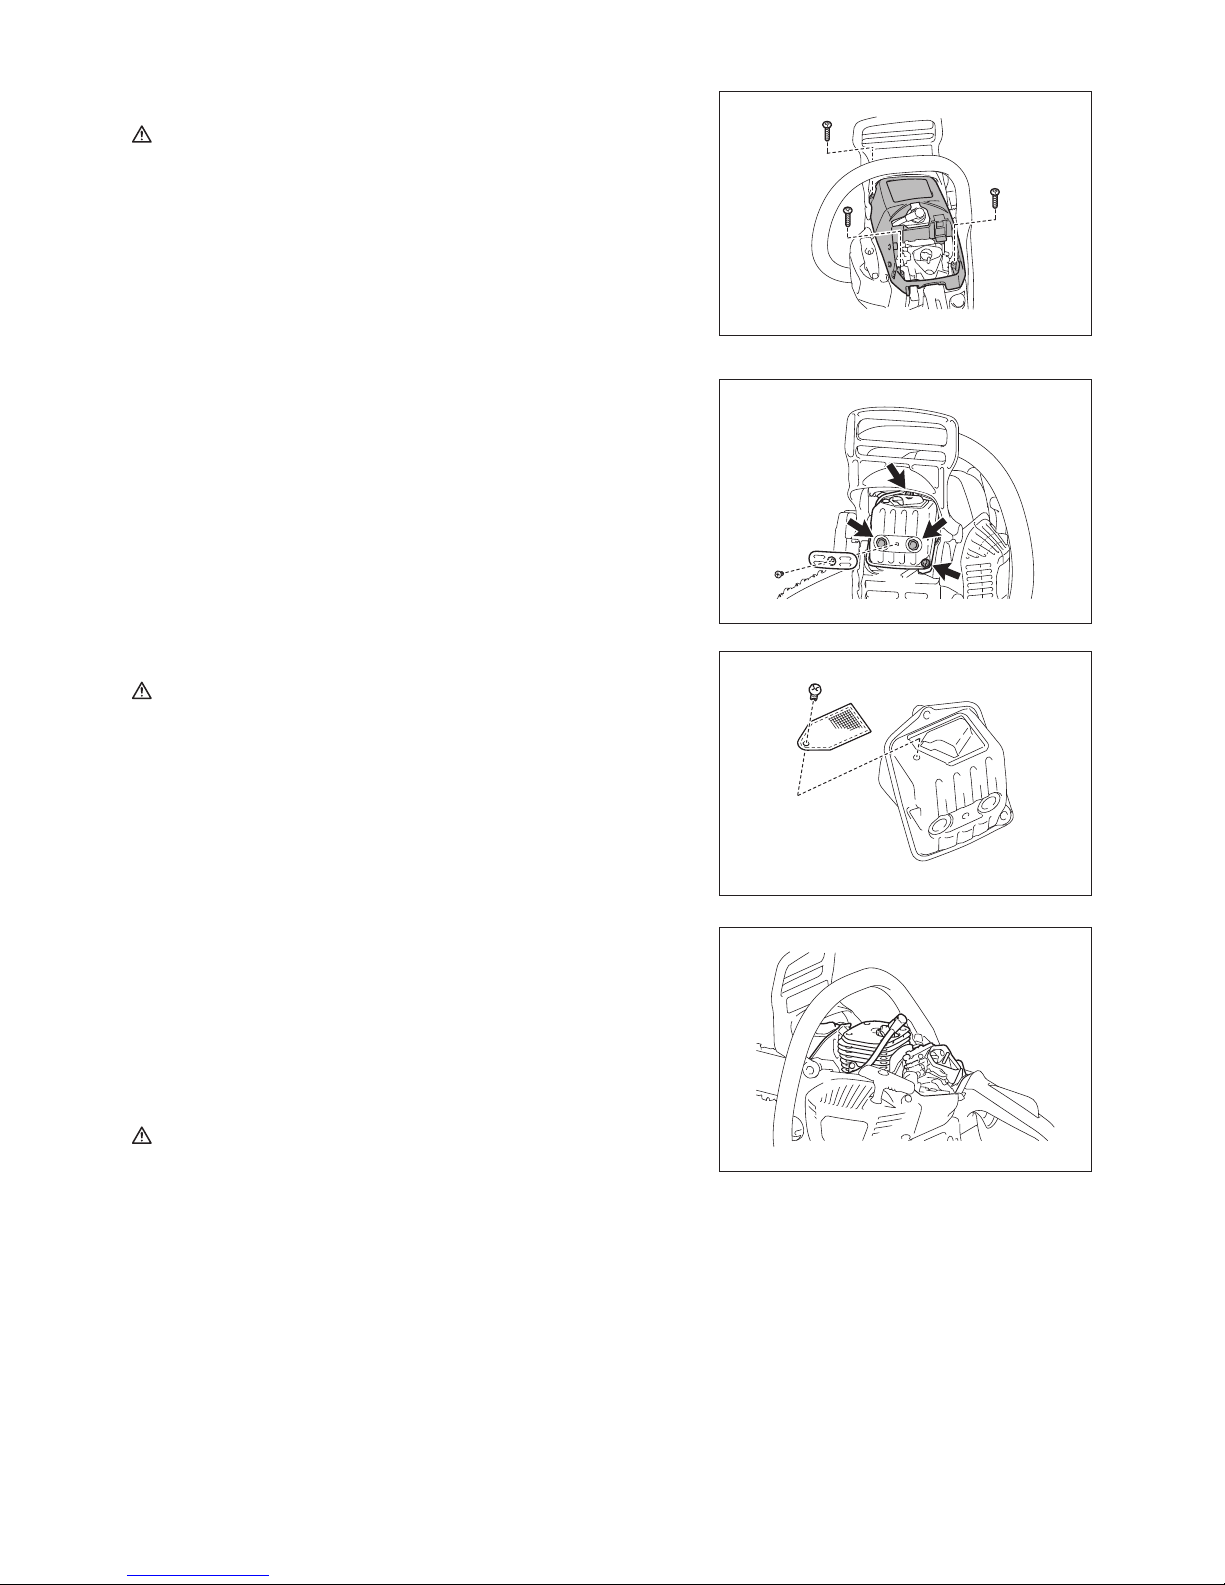
Checking the sprocket
CAUTION:
A worn sprocket may damage a new saw chain. Do not use a new chain on a worn
chain sprocket. Check the sprocket before installing a new saw chain. Ask Makita
authorized service center for repair if there are any defect or if the sprocket is worn
out more than 0.5 mm.
0.5 mm
23
Cleaning the air cleaner
CAUTION:
• Always wear eye protection.
To clean the air cleaner, perform following steps:
1. Move up the combination switch (choke position) to prevent dirt or foreign
materials from falling into the carburetor.
2. Open two hooks with a at screwdriver, and remove the cleaner cover.
3. Loosen the nut, and then remove the air cleaner.
NOTE:
• During cleaning, cover the opening with a clean cloth to prevent dirt or foreign
materials from falling into the carburetor.
• Replace the air cleaner immediately if it is damaged.
4. Tap it or clean it with a brush or air compressor to remove the dirt.
5. If the air cleaner is very dirty, replace it to a new one.
6. Return the air cleaner and cleaner cover by performing above steps in reverse.
Cleaning the fuel lter
The fuel filter of the suction head is used to filter the fuel required by the carburetor.
Perform visual inspection periodically.
1. Open the tank cap, use a wire hook and pull out the suction head through the
tank opening.
2. If the filter is hard or clogged up, replace it.
3. After checking, cleaning or replacing, fix the fuel filter onto the fuel pipe with the
hose clamp. Push the fuel filter in all the way to the bottom of the fuel tank.
NOTE:
• It is recommended to replace the fuel filter at least once every three month to
ensure an enough fuel supply to the carburetor. Otherwise an insufficient fuel
supply may cause the engine defects.
Checking the spark plug
CAUTION:
• Never touch the spark plug connector while the engine is running (danger of high
voltage electric shock).
The gap between the two electrodes of the spark plug should be 0.6 mm - 0.7 mm
(0.028” - 0.030”). If the gap is too wide or too narrow, adjust it. If the spark plug is
clogged or contaminated, clean it thoroughly or replace it.
0.6 mm - 0.7 mm
(0.028” - 0.030”)
24
Cleaning the cylinder space
CAUTION:
• Always wear eye protection.
After long period of operation, dust may accumulate in cylinder space. It may cause
overheating of the engine. Clean the cylinder space occasionally.
Perform cleaning as follows:
1. Open two hooks, and remove the cleaner cover.
2. Remove the air cleaner.
NOTE:
• During cleaning, cover the opening with a clean cloth to prevent dirt or foreign
materials from falling into the carburetor.
3. Remove three screws and remove the cylinder cover. It is easier to remove the
cylinder cover when the front hand guard is forward position.
4. Clean the cylinder space and cylinder fins. Use a brush or air compressor if
necessary.
5. Return the cylinder cover, air cleaner, and cleaner cover after cleaning.
Checking the screws on the mufer
Remove the cylinder cover and dust cover, and check the tightness of four screws
on the mufer. Tighten it if it is loose.
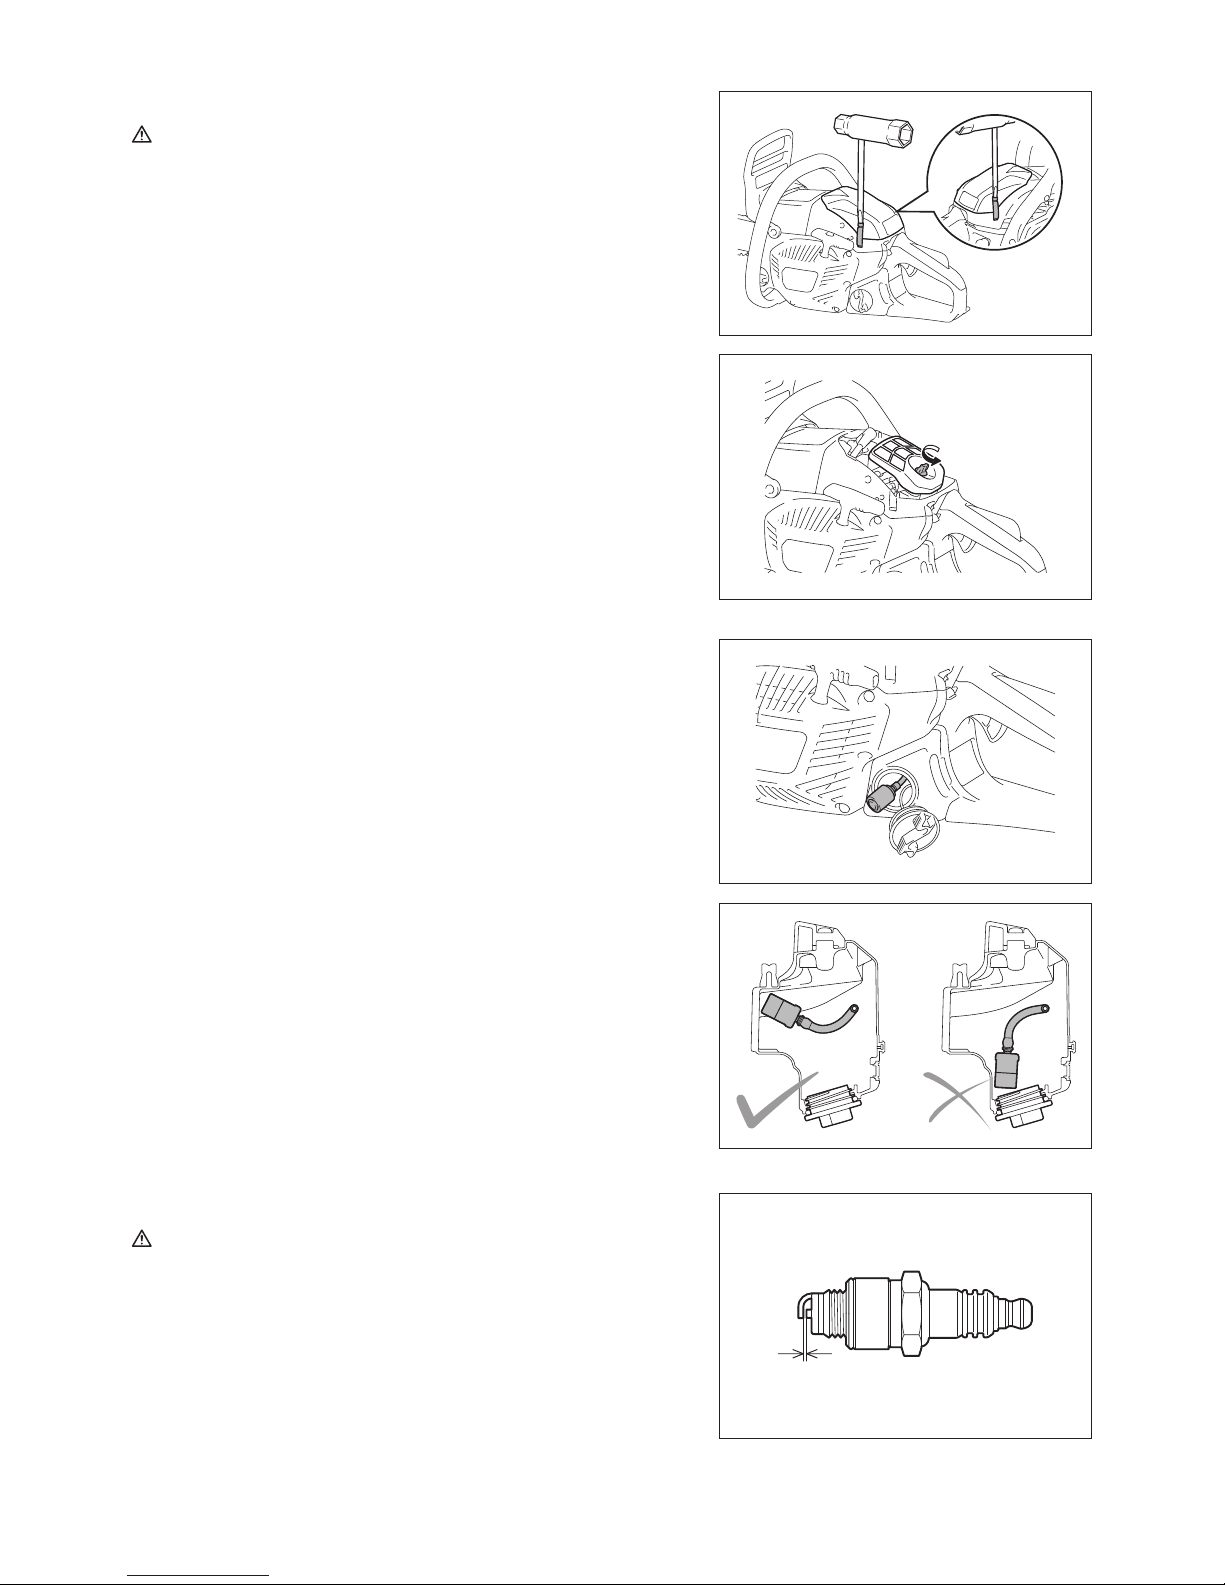
Checking the spark arrester
CAUTION:
• Do not start the engine if the spark arrester is damaged or missing.
The spark arrester prevents hot carbon from ying out of exhaust pipe. Check the
spark arrester regularly as following steps:
1. Remove the cylinder cover.
2. Remove the screw which secures the spark arrester. It is easier to remove the
screw by pushing the front hand guard forwards. Then slide the spark arrester.
Clean the spark arrester if necessary with a wire brush.
If the spark arrester is damaged, replace it.
Cleaning of parts
Always keep the engine clean by wiping down with a cloth rag.
Inspection of bolts, nuts and screws
- Check bolts, nuts, etc. Tighten them if necessary.
- Check the fuel cap and oil cap for tightness. Check for fuel leakage.
- Replace damaged parts with new ones for safety operation.
Storing tool
CAUTION:
• The engine is still hot just after stopping engine. When draining the fuel, allow
sufficient time for the engine to cool down after stopping it. Otherwise a skin burn
and/or fire may result.
• When the machine is kept out of operation for a long time, drain all fuel from the
fuel tank and carburetor, and keep it at a dry and clean place.
Biologically degradable saw chain oil can only be kept for a limited period. Beyond
two years after manufacture, biological oils begin to acquire an adhesive quality,
and cause damage to the oil pump and components in the lubricating system.
- Before taking the chain saw out of service for a longer period, empty the oil tank
and fill it with a small quantity of engine oil (SAE 30).
- Run the chain saw briey to ush all residue of the biological oil out of the tank,
lubricating system and saw mechanism.
Store the chain saw on a suitable surface.
Before returning the chain saw to service, fill up with fresh bio-degradable saw
chain oil.
NOTE:
• When the chain saw is taken out of service, small quantities of chain oil leaks
from it for some time afterwards. This is normal, and is not a sign of a fault.

25
For tool’s long life, and to ensure the full functioning of the safety features, perform maintenance work regularly.
Operating
time
Item
Before
operation
Everyday
Every
week
Every
3 month
Annually
Before
storage
Chain saw
Inspection.
○
Cleaning.
○
Check at authorized service center.
○
Saw chain Inspection. / Sharpening if necessary.
○
Guide bar Inspection.
○
Chain brake
Check the function.
○
Have it inspected regularly at authorized service
center.
○
Starter rope Inspection.
○
Chain lubrication Check the oil feed rate.
○
Combination
switch
Inspection.
○
Throttle trigger
lock-out
Inspection.
○
Throttle trigger Inspection.
○
Fuel tank cap Check tightness.
○
Oil tank cap Check tightness.
○
Air cleaner Cleaning.
○
Idle speed The saw chain does not move at idle speed.
○
Cylinder space Cleaning.
○
Spark plug Inspection. / Cleaning. / Replace if necessary.
○
Spark arrester Inspection. / Cleaning. / Replace if necessary.
○
Mufer Check tightness of screws.
○
Chain catcher Inspection.
○
Screws and nuts Inspection.
○
Fuel filter Inspection. / Replace if necessary.
○
Fuel tank Empty.
○
Carbretor Run empty.
○
* Before emptying oil, check for a suitable way to dispose of old oil. Do not pour it down into sewage drains, onto garden soil or onto open
streams. Your local zoning or environmental regulations will give you more detailed instructions on proper disposal.
MAINTENANCE INTERVAL

26
Before making a request for repairs, check for trouble by yourself. For repairs, contact authorized service centers.
Malfunction status Possible cause Remedy
Chain does not run. Chain brake is engaged. Release chain brake.
Engine does not start.
Spark plug malfunction. Check the spark plug.
Fuel tank is empty. Fill the fuel tank.
Fuel supply problem. Check whether the fuel filter is not clogged.
Tool malfunction. Ask your local authorized service center for repair.
Insufficient performance.
Air cleaner is dirty. Clean the air cleaner. Replace it if necessary.
Cylinder space is dirty. Clean cylinder space.
Environment temperature is very low.
Change the shutter setting of the carburetor. See
section “Prevention from carburetor icing”.
No oil on the saw chain.
Oil tank is empty. Fill the oil tank.
Oil guide groove is dirty. Clean the groove.
Oil delivery is not adjusted properly. Adjust amount of oil delivery.
Oil pump malfunction. Ask your local authorized service center for repair.
Chain does not stop even the chain
brake is activated.
Brake band worn down.
Stop using the tool immediately, and ask your local
authorized service center for repair.
The tool vibrates abnormally.
Loose guide bar or saw chain. Adjust the guide bar and saw chain tension.
Tool malfunction.
Stop using the tool immediately, and ask your local
authorized service center for repair.
Chain does not stop when engine is
idle.
Idle speed is too high. Correct idle speed.
Clutch defect.
Stop using the tool immediately, and ask your local
authorized service center for repair.
TROUBLE SHOOTING

27
Svenska
(Originalanvisningar)
Innehåll Sidan
Symboler ........................................................................................27
Säkerhetsåtgärder .......................................................................... 28
Teknisk data....................................................................................34
Namn på delar ................................................................................ 35
Kedjesågens säkerhetsfunktion......................................................36
Montering........................................................................................38
Före användning.............................................................................41
Starta och stoppa motorn ............................................................... 43
Underhåll ........................................................................................ 45
Underhållsintervall .......................................................................... 50
Felsökning ...................................................................................... 51
SYMBOLER
Läs igenom bruksanvisningen och följ
varnings- och säkerhetsföreskrifterna!
Försiktighet, bakåtkast!
Var särskilt försiktig och uppmärksam!
Förbjudet!
Kedjebroms
Använd skyddshjälm, skyddsglasögon
och hörselskydd!
Håll i sågen med båda händerna medan
du arbetar!
Det är extremt farligt att hålla i maskinen
med bara en hand.
Bär skyddshandskar! Bränsle-och-oljeblandning
Rökning förbjuden! Kedjeoljetankning/oljepump
Ingen öppen låga! Sågkedjeoljans ställskruv
Stoppa motorn! Primerpump
Starta motorn Kedjeriktning
Kombinationsomkopplare, PÅ/STOPP för
choke
Första hjälpen
28
Avsedd användning
Denna motordrivna kedjesåg är endast avsedd att användas till att såga i trä
utomhus.
Allmänna försiktighetsåtgärder
• För att säkerställa korrekt användning ska användaren läsa denna
bruksanvisning för att bli förtrogen med kedjesågens egenskaper. En användare
som inte har tillgodogjort sig informationen utgör en risk både för sig själv och
andra på grund av felaktig hantering.
• Vi rekommenderar att kedjesågen endast lånas ut till personer som har
erfarenhet av att arbeta med kedjesågar. Överlämna alltid bruksanvisningen.
• Om du aldrig har använt en motordriven såg tidigare är det lämpligt att låta
fackhandlaren demonstrera maskinens grundläggande funktioner och även delta i
en godkänd instruktionskurs.
• Barn och ungdomar under 18 år får inte använda kedjesågen. Personer över
16 år kan dock använda kedjesågen för utbildning under övervakning av en
yrkeskunnig person.
• Använd endast kedjesågen när du är i god fysisk form. Om du är trött blir du
ouppmärksam. Var särskilt försiktig vid arbetsdagens slut. Utför allt arbete lugnt
och försiktigt. Maskinen används under användarens fulla ansvar.
• Var vaksam, koncentrera dig på arbetet och använd kedjesågen förnuftigt. Ett
ögonblicks ovaksamhet kan resultera i allvarliga personskador.
• Använd aldrig kedjesågen efter att du konsumerat alkohol, droger eller mediciner.
• Ljuddämparen kan innehålla cancerogena kemikalier. Undvik kontakt med dem
om ljuddämparen är skadad.
• Motorns tändsystem avger elektromagnetiska vågor under drift. Under vissa
omständigheter kan det störa medicinsk utrustning och kan orsaka allvarliga
personskador för en person med pacemaker. Personer med pacemaker
rekommenderas konsultera sin läkare och tillverkaren av pacemakern innan de
använder kedjesågen.
• Användinteenkedjesågsomverkarhamodierats.
• Enbrandsläckareochspademåstennastillgängligiomedelbarnärhetvid
arbete i lättantändlig vegetation eller under torka (brandrisk).
• Nationella bestämmelser kan begränsa användningen av maskinen. Följ
bestämmelserna i ditt land gällande användning av kedjesågar.
Personlig skyddsutrustning
• För att förhindra skador på huvud, ögon, händer och fötter samt för att
skydda hörseln måste följande skyddsutrustning användas vid arbete med
kedjesågen:
• Bekväm och funktionell klädsel med god passform, dvs. varken för hårt eller löst
sittande plagg. Bär varken smycken eller kläder som kan trassla in sig i sly eller
buskar. Använd alltid hårnät om du har långt hår.
• Det är nödvändigt att bära skyddshjälm varje gång du arbetar med kedjesågen.
Kontrollera regelbundet att skyddshjälmen (1) inte är skadad och byt ut den minst
vart 5:e år. Använd endast godkända skyddshjälmar.
• Visiret (2) på skyddshjälmen (eller skyddsglasögonen) skyddar mot sågspån och
träis.Förattundvikaögonskadorskadualltidanvändaskyddsglasögoneller
visir när du arbetar med kedjesågen.
• Använd lämpliga hörselskydd (kåpor (3), öronproppar etc.). Lång exponering för
buller kan orsaka permanenta hörselskador.
• Skyddsjackan (4) är utrustad med speciella signalfärgade axelband och är
bekväm och lätt att ta hand om.
• Skyddsoverallen (5) består av 22-lager nylonväv som skyddar mot skärsår. Vi
rekommenderar starkt att den används.
• Skyddshandskar (6) tillverkade av kraftigt läder är en del av den obligatoriska
utrustningen och måste alltid bäras vid arbete med kedjesågen.
• Använd alltid skyddsskor eller -stövlar (7) med halkskyddssula, stålhätta och
benskydd när du arbetar med kedjesågen. Skyddsskor som är försedda med
förstärkt tåhätta skyddar mot skärsår och ger ett stadigt fotfäste.
• Använd skyddsmask vid behov. Lång exponering för avgaser, kedjeoljedimma
och spågspån kan skada din hälsa.
SÄKERHETSÅTGÄRDER
1
2
3
4
5
6
7

29
Bränsle/tankning
• Stoppa motorn innan du tankar kedjesågen.
• Rök inte och arbeta inte nära öppen eld.
• Låt motorn svalna före tankning.
• Bränsle kan innehålla ämnen liknande lösningsmedel. Se till att du inte får
mineraloljeprodukter i ögonen och på huden. Använd alltid skyddshandskar vid
tankningen. Rengör och byt ut skyddskläderna ofta. Andas inte in bränsleångor.
Inandning av bränsleångor kan vara farligt för din hälsa.
• Spill inte ut bränsle eller kedjeolja. Torka genast av kedjesågen om du spillt
bränsle eller olja på den. Spill inte bränsle på kläderna. Byt genast kläder om du
fått bränsle på dem.
• Se till att du inte spiller bränsle eller kedjeolja på marken (miljöskydd). Använd ett
lämpligt underlag.
• Tankning får inte utföras i slutna rum. Bränsleångor ansamlas nära golvet
(explosionsrisk).
• Se till att du drar åt skruvlocken på bränsle- och oljetanken ordentligt.
• Byt plats innan du startar motorn (åtminstone 3 m från platsen där du tankade).
• Bränsle har begränsad hållbarhet. Köp endast så mycket som du beräknar att
använda inom en snar framtid.
• Använd endast godkända och märkta behållare för transport och förvaring av
bränsle och kedjeolja. Försäkra dig om att barn inte har tillgång till bränsle eller
kedjeolja.
Förberedelser inför användning
• Arbeta inte ensam. En annan person måste nnas i närheten i händelse av
olycka (inom hörhåll).
• Förvissadigomattdetvarkennnsbarnellerandrapersoneriarbetsområdet.
Var även uppmärksam på djur inom arbetsområdet.
• Innan du börjar arbeta ska du kontrollera att kedjesågen fungerar som den
ska och dess driftsäkerhet är i enlighet med föreskrifterna. Använd aldrig
en kedjesåg som är behäftad med fel. Kontrollera särskilt kedjebromsens
funktion, svärdets montering, att sågkedjan är föreskriftsenligt slipad och
spänd, att kedjeskyddet är ordentligt monterat, att gasreglaget går lätt och att
gasreglagespärren fungerar, att handtagen är rena och torra samt funktionen för
kombinationsomkopplaren.
• Om du tappar kedjesågen eller om den får andra stötar ska du omedelbart
avbryta användningen och inspektera för att upptäcka betydande skador eller
defekter.
• Använd kedjesågen endast när den är komplett monterad. Använd den aldrig om
den inte är fullständigt monterad.
• Kontrollera din personliga skyddsutrustning.
• Starta kedjesågen endast enligt beskrivning i denna bruksanvisning. Andra
startmetoder är inte tillåtna.
• Se till att du står stadigt innan du startar kedjesågen.
• Vid start av kedjesågen måste den stödjas bra och hållas i ordentligt. Svärdet och
kedjan får inte vara i kontakt med något föremål.
• Kontrollera att kedjesmörjningen är tillräcklig.
3 meter
30
Arbetsteknik
• Håll alltid i kedjesågen med båda händerna när du arbetar med den. Ta tag
i det bakre handtaget med höger hand och i det främre handtaget med vänster
hand. Håll fast handtagen ordentligt med tumgreppet.
•
FÖRSIKTIGHET: När gasreglaget släpps fortsätter kedjan att löpa en kort
stund (frigångseffekt).
• Se till att du fortfarande har bra fotfäste.
• Håll kedjesågen så att du inte andas in avgaserna. Arbeta inte i slutna rum (risk
för förgiftning).
• Stäng omedelbart av kedjesågen om du upptäcker en förändring i dess
driftegenskap.
• Motorn måste stängas av innan kedjespänningen kontrolleras, kedjan
spänns, byts ut eller när fel åtgärdas.
• När sågen slår emot stenar, spikar eller andra hårda föremål ska motorn genast
stängas av och sågen kontrolleras.
• När du slutar att arbeta eller när du lämnar arbetsplatsen ska kedjesågen stängas
av och läggas ner så att ingen utsätts för fara.
•
FÖRSIKTIGHET: Placera inte den överhettade kedjesågen i torrt gräs
eller på något brandfarligt föremål. Ljuddämparen är mycket het (brandrisk).
• FÖRSIKTIGHET: Olja som droppar från kedjan eller svärdet efter att du har
stoppat sågkedjan förorenar marken. Använd alltid ett lämpligt underlag.
Bakåtkast
• Vid arbete med kedjesågen kan farliga bakåtkast inträffa.
• Bakåtkast sker när den övre spetsdelen på svärdet oavsiktligt kommer i kontakt
med trä eller andra hårda föremål.
• Detta leder till att sågen kastas bakåt mot användaren med stor kraft och utan
kontroll. Risk för skada!
Undvik bakåtkast genom att följa dessa regler:
- Endast särskilt-utbildade personer ska utföra sticksågning, dvs. tränga in i virke
eller trä med sågspetsen!
- Lägg aldrig an svärdspetsen när du ska börja såga.
- Var alltid uppmärksam på svärdet. Var försiktig när du fortsätter att såga ett
redan påbörjat skär.
- Kedjan måste löpa när du börjat ska börja såga.
- Försäkra dig om att kedjan alltid är korrekt slipad. Var särskilt uppmärksam på
höjden för underställningsklacken.
- Sågaaldrigigenomeragrenarsamtidigt.Setillattintekommaåtnågraandra
grenar när du sågar av en gren.
- Vid kapning av en stock måste du vara uppmärksam på stockar som ligger
nära intill.
Arbetsteknik/arbetsmetod
• Använd endast kedjesågen under bra ljus- och siktförhållande. Var uppmärksam
på hala eller våta områden, is och snö (halkrisk). Risken att halka är extrem hög
vid arbete med nyavbarkat timmer.
• Arbetaaldrigpåostadigaunderlag.Kontrollerasåattdetintennsnågothinderi
arbetsområdet, snubbelrisk. Se alltid till att ha bra fotfäste.
• Såga aldrig över axelhöjd.
• Stå aldrig på en stege och såga.
• Klättra aldrig upp i träd för att såga med kedjesågen.
• Luta dig inte för mycket framåt när du arbetar.
• Styr den elektriska kedjesågen på ett sådant sätt att ingen del av din kropp
bennersigiförlängningenavsågensarbetsplan.
• Kedjesågen får endast användas för sågning i trä.
• Undvik att nudda marken med kedjesågen medan den fortfarande är igång.
• Använd aldrig kedjesågen till att lyfta upp eller ta bort träbitar med eller andra
föremål.
• Håll arbetsområdet fritt från sand, stenar och spikar. Främmande föremål kan
skada sågen och orsaka farliga bakåtkast.
• Använd ett stabilt stöd (sågbock) vid sågning av kapat virke. Stöd inte
arbetsstycket med din fot och tillåt inte att någon annan håller eller stödjer det.
• Fäst runda arbetsstycken så att de inte roterar.
• Underhåll
• Tankning
• Skärpning av kedjan
• Slutat arbeta
• Transport
• Ta ur funktion
 Loading...