

Page 1
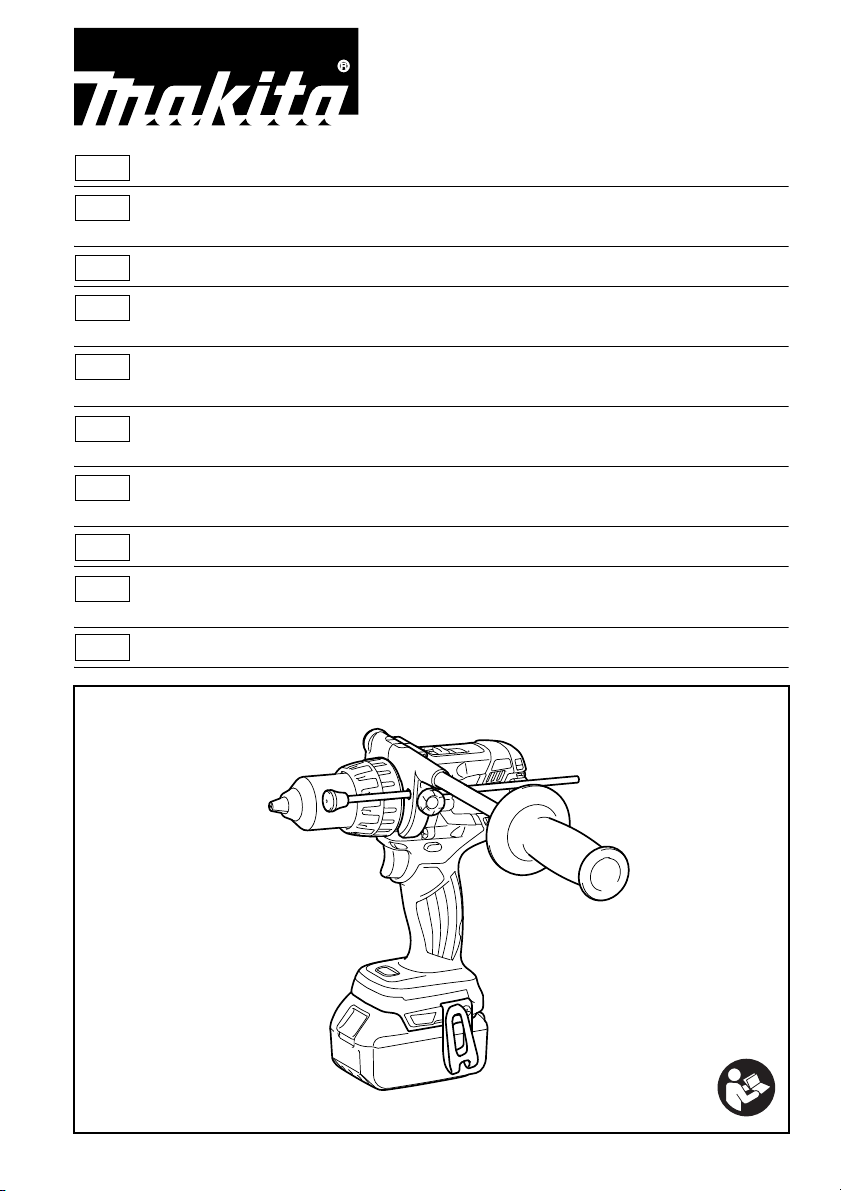
GB Cordless Hammer Driver Drill Instruction manual
Perceuse Percussion-Visseuse
F
sans Fil
D Akku-Schlagbohrschrauber Betriebsanleitung
I Trapano avvitatore a batterie
con percussione Istruzioni per l’uso
NL Accu klopboor-/ Gebruiksaanwijzing
schroefmachine
E Rotomartillo Atornillador Manual de instrucciones
Inalámbrico
P Parafusadeira/ Furadeira de Manual de instruções
Impacto a Bateria
DK Ledningsfri slagboremaskine Brugsanvisning
Manuel d’instructions
GR υ απαα
πααα
TR Akülü Darbeli Matkap Tornavida Kullanım kılavuzu
DHP481
014694
Page 2
1 014707 2 012128
1
2
3
4
5
6
7
8
10
A
B
11
3 015676 4 014696
9
5 014708 6 014709
7 014703 8 014706
2
Page 3
9 014705 10 014704
12
13
14
15
13
16
17
18
19
20
21
22
23
24
25
11 014697 12 014698
13 014699 14 014821
18
26
27
15 014700 16 014702
3
Page 4
17 002449
28
4
Page 5

ENGLISH (Original instructions)
Explanation of general view
1. Red indicator
2. Button
3. Battery cartridge
4. Star marking
5. Indicator lamps
6. Check button
7. LED display
8. Switch trigger
9. Lamp
10. Reversing switch lever
11. Speed change lever
12. Action mode changing ring
13. Arrow
14. Adjusting ring
15. Graduation
16. Protrusion
17. Arm
18. Groove
19. Grip pole
20. Side grip
21. Sleeve
22. Bit holder
23. Bit
24. Depth rod
25. Clamp screw
26. Hook
27. Screw
28. Blow-out bulb
SPECIFICATIONS
Model DHP481
Drilling into concrete 16 mm
Drilling into steel 13 mm
Capacities
No load speed min
Blows per minute
• Due to our continuing program of research and development, the specifications herein are subject to change without
notice.
• Specifications and battery cartridge may differ from country to country.
• Weight, with battery cartridge, according to EPTA-Procedure 01/2003
Intended use
The tool is intended for impact drilling in brick, concrete
and stone. It is also suitable for screw driving and drilling
without impact in wood, metal, ceramic and plastic.
-1
Overall length 205 mm
Net weight 2.7 kg
Rated voltage D.C. 18 V
General Power Tool Safety
Warnings GEA010-1
WARNING Read all safety warnings and all
instructions. Failure to follow the warnings and
instructions may result in electric shock, fire and/or
serious injury.
Save all warnings and
instructions for future reference.
CORDLESS HAMMER DRIVER
DRILL SAFETY WARNINGS
1. Wear ear protectors when impact drilling.
Exposure to noise can cause hearing loss.
2. Use auxiliary handle(s), if supplied with the tool.
Loss of control can cause personal injury.
Drilling into wood 76 mm
Fastening wood screw 10 mm x 90 mm
Fastening machine screw 6 mm
High (2) 0 - 2,100
Low (1) 0 - 550
High (2) 0 - 31,500
Low (1) 0 - 8,250
ENE079-1
GEB056-5
3. Hold power tool by insulated gripping surfaces,
when performing an operation where the cutting
accessory may contact hidden wiring. Cutting
accessory contacting a “live” wire may make exposed
metal parts of the power tool “live” and could give the
operator an electric shock.
4. Hold power tool by insulated gripping surfaces,
when performing an operation where the fastener
may contact hidden wiring. Fasteners contacting a
“live” wire may make exposed metal parts of the
power tool “live” and could give the operator an
electric shock.
5. Always be sure you have a firm footing.
Be sure no one is below when using the tool in
high locations.
6. Hold the tool firmly.
7. Keep hands away from rotating parts.
8. Do not leave the tool running. Operate the tool
only when hand-held.
9. Do not touch the bit or the workpiece immediately
after operation; they may be extremely hot and
could burn your skin.
10. Some material contains chemicals which may be
toxic. Take caution to prevent dust inhalation and
skin contact. Follow material supplier safety data.
5
Page 6

SAVE THESE INSTRUCTIONS.
WARNING:
DO NOT let comfort or familiarity with product (gained
from repeated use) replace strict adherence to safety
rules for the subject product. MISUSE or failure to
follow the safety rules stated in this instruction
manual may cause serious personal injury.
IMPORTANT SAFETY
INSTRUCTIONS ENC007-9
FOR BATTERY CARTRIDGE
1. Before using battery cartridge, read all
instructions and cautionary markings on (1)
battery charger, (2) battery, and (3) product using
battery.
2. Do not disassemble battery cartridge.
3. If operating time has become excessively shorter,
stop operating immediately. It may result in a risk
of overheating, possible burns and even an
explosion.
4. If electrolyte gets into your eyes, rinse them out
with clear water and seek medical attention right
away. It may result in loss of your eyesight.
5. Do not short the battery cartridge:
(1) Do not touch the terminals with any
conductive material.
(2) Avoid storing battery cartridge in a container
with other metal objects such as nails, coins,
etc.
(3) Do not expose battery cartridge to water or
rain.
A battery short can cause a large current flow,
overheating, possible burns and even a
breakdown.
6. Do not store the tool and battery cartridge in
locations where the temperature may reach or
exceed 50°C (122°F).
7. Do not incinerate the battery cartridge even if it is
severely damaged or is completely worn out. The
battery cartridge can explode in a fire.
8. Be careful not to drop or strike battery.
9. Do not use a damaged battery.
10. Follow your local regulations relating to disposal
of battery.
SAVE THESE INSTRUCTIONS.
Tips for maintaining maximum battery life
1. Charge the battery cartridge before completely
discharged.
Always stop tool operation and charge the battery
cartridge when you notice less tool power.
2. Never recharge a fully charged battery cartridge.
Overcharging shortens the battery service life.
3. Charge the battery cartridge with room
temperature at 10°C - 40°C (50°F - 104°F). Let a hot
battery cartridge cool down before charging it.
4. Charge the battery cartridge if you do not use it for
a long period (more than six months).
6
FUNCTIONAL DESCRIPTION
CAUTION:
• Always be sure that the tool is switched off and the
battery cartridge is removed before adjusting or
checking function on the tool.
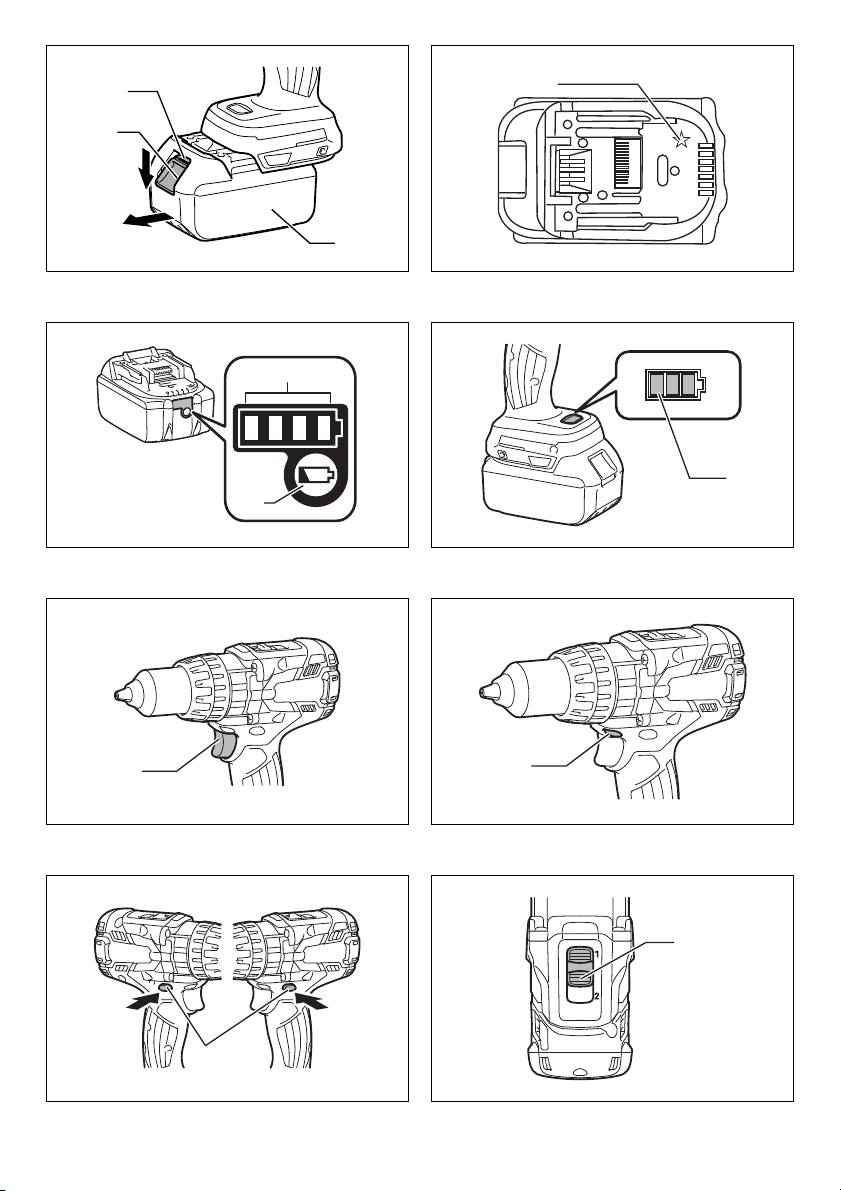
Installing or removing battery cartridge
(Fig. 1)
CAUTION:
• Always switch off the tool before installing or removing
of the battery cartridge.
• Hold the tool and the battery cartridge firmly when
installing or removing battery cartridge. Failure to
hold the tool and the battery cartridge firmly may cause
them to slip off your hands and result in damage to the
tool and battery cartridge and a personal injury.
To remove the battery cartridge, slide it from the tool while
sliding the button on the front of the cartridge.
To install the battery cartridge, align the tongue on the
battery cartridge with the groove in the housing and slip it
into place. Insert it all the way until it locks in place with a
little click. If you can see the red indicator on the upper
side of the button, it is not locked completely.
CAUTION:
• Always install the battery cartridge fully until the red
indicator cannot be seen. If not, it may accidentally fall
out of the tool, causing injury to you or someone
around you.
• Do not install the battery cartridge forcibly. If the
cartridge does not slide in easily, it is not being inserted
correctly.
Battery protection system (Lithium-ion
battery with star marking) (Fig. 2)
Lithium-ion batteries with a star marking are equipped
with a protection system. This system automatically cuts
off power to the tool to extend battery life.
The tool will automatically stop during operation if the tool
and/or battery are placed under one of the following
conditions:
• Overloaded:
The tool is operated in a manner that causes it to
draw an abnormally high current.
In this situation, release the switch trigger on the tool
and stop the application that caused the tool to
become overloaded. Then pull the switch trigger
again to restart.
If the tool does not start, the battery is overheated. In
this situation, let the battery cool before pulling the
switch trigger again.
• Low battery voltage:
The remaining battery capacity is too low and the tool
will not operate. In this situation, remove and
recharge the battery.
Indicating the remaining battery capacity
(Only for battery cartridges with “B” at the end of the
model number.) (Fig. 3)
Press the check button on the battery cartridge to indicate
the remaining battery capacity. The indicator lamps light
up for few seconds.
Page 7

Indicator lamps
Lighted Off Blinking
015658
NOTE:
• Depending on the conditions of use and the ambient
temperature, the indication may differ slightly from the
actual capacity.
Remaining
capacity
75% to 100%
50% to 75%
25% to 50%
0% to 25%
Charge the
battery.
The battery may
have
malfunctioned.
Indicating the remaining battery capacity
(Country specific) (Fig. 4)
When you pull the switch trigger, the LED display shows
the remaining battery capacity as the following table.
LED indicator status Remaining battery capacity
About 50% or more
To start the tool, simply pull the switch trigger. Tool speed
is increased by increasing pressure on the switch trigger.
Release the switch trigger to stop.
Lighting up the front lamp (Fig. 6)
CAUTION:
• Do not look in the light or see the source of light
directly.
Pull the switch trigger to light up the lamp. The lamp
keeps on lighting while the switch trigger is being pulled.
The lamp goes out 10 -15 seconds after releasing the
trigger.
NOTE:
• When the tool is overheated, the tool stops
automatically and the lamp starts flashing. In this case,
release the switch trigger. The lamp turns off in one
minute.
• Use a dry cloth to wipe the dirt off the lens of lamp. Be
careful not to scratch the lens of lamp, or it may lower
the illumination.
Reversing switch action
CAUTION:
• Always check the direction of rotation before operation.
• Use the reversing switch only after the tool comes to a
complete stop. Changing the direction of rotation
before the tool stops may damage the tool.
• When not operating the tool, always set the reversing
switch lever to the neutral position. (Fig. 7)
This tool has a reversing switch to change the direction of
rotation. Depress the reversing switch lever from the A
side for clockwise rotation or from the B side for
counterclockwise rotation.
When the reversing switch lever is in the neutral position,
the switch trigger cannot be pulled.
About 20% - 50%
About less than 20%
013980
NOTE:
• The LED display goes off approximately one minute
after releasing the switch trigger to save the battery
power. To check the remaining battery capacity, slightly
pull the switch trigger.
• When the LED display lights up but the tool does not
work even with a recharged battery cartridge, cool
down the tool fully. If the condition does not change,
have the tool repaired by a Makita local service center.
Switch action
CAUTION:
• Before installing the battery cartridge into the tool,
always check to see that the switch trigger actuates
properly and returns to the “OFF” position when
released. (Fig. 5)
Speed change
CAUTION:
• Always set the speed change lever fully to the correct
position. If you operate the tool with the speed change
lever positioned halfway between the “1” side and, “2”
side, the tool may be damaged.
• Do not use the speed change lever while the tool is
running. The tool may be damaged. (Fig. 8)
To change the speed, first switch off the tool and then
slide the speed change lever to the “2” side for high speed
or, “1” side for low speed. Be sure that the speed change
lever is set to the correct position before operation. Use
the right speed for your job.
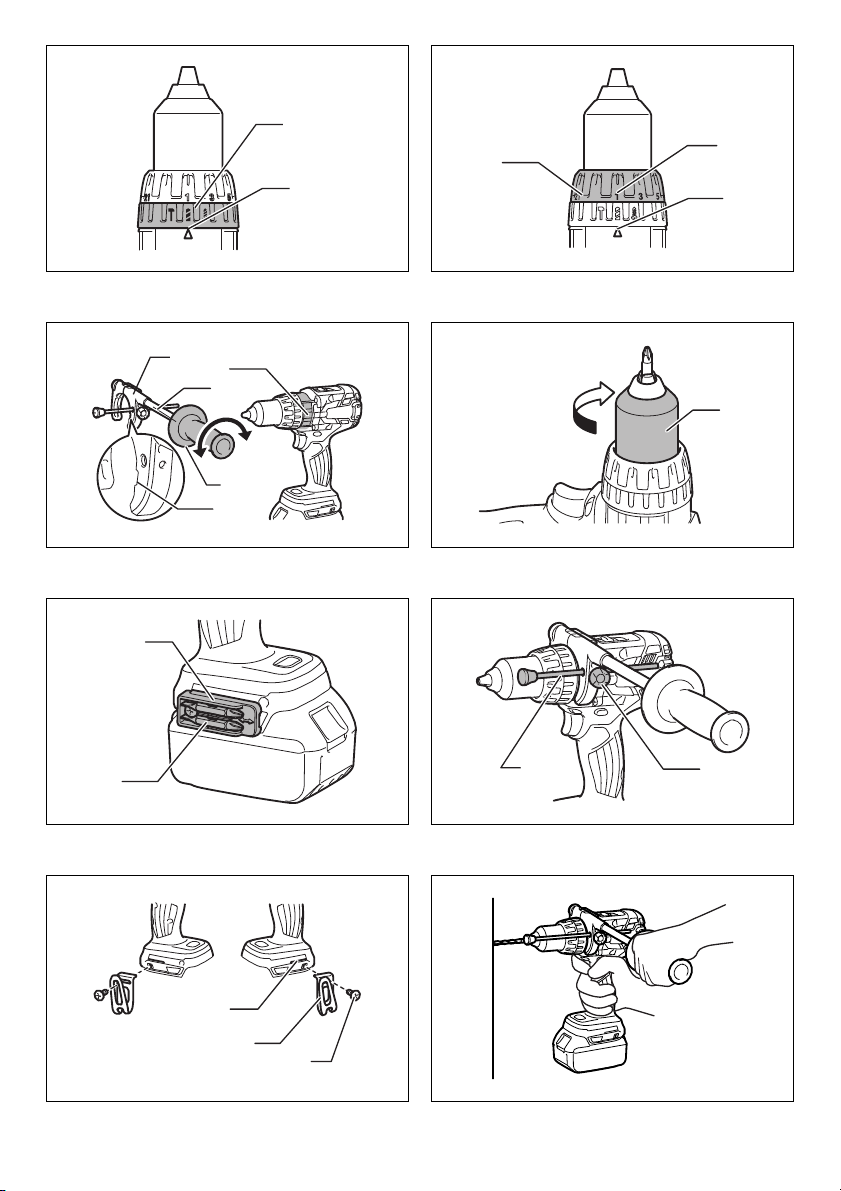
Selecting the action mode
CAUTION:
• Always set the ring correctly to your desired mode
mark. If you operate the tool with the ring positioned
halfway between the mode marks, the tool may be
damaged. (Fig. 9)
This tool employs an action mode changing ring. Select
one of the three modes suitable for your work needs by
using this ring.
For rotation only, turn the ring so that the arrow on the tool
body points toward the mark on the ring.
7
Page 8

For rotation with hammering, turn the ring so that the
arrow points toward the mark on the ring.
For rotation with clutch, turn the ring so that the arrow
points toward the mark on the ring.
Adjusting the fastening torque
(screwdriver mode “ ”) (Fig. 10)
The fastening torque can be adjusted in 21 steps by
turning the adjusting ring so that its graduations are
aligned with the pointer on the tool body.
First, slide the action mode change lever to the position of
symbol.
The fastening torque is minimum when the number 1 is
aligned with the pointer, and maximum when the marking
is aligned with the pointer. The clutch will slip at various
torque levels when set at the number 1 to 21. Before
actual operation, drive a trial screw into your material or a
piece of duplicate material to determine which torque level
is required for a particular application.
NOTE:
• The adjusting ring does not lock when the pointer is
positioned only halfway between the graduations.
ASSEMBLY
CAUTION:
• Always be sure that the tool is switched off and the
battery cartridge is removed before carrying out any
work on the tool.
Installing side grip (auxiliary handle)
(Fig. 11)
Always use the side grip to ensure operating safety.
Insert the side grip so that the groove on the arm fit in one
of the counter parts on the tool. Then tighten the grip by
turning clockwise.
Depending the operations, you can install the side grip
either right or left side of the tool.
Installing or removing driver bit or drill bit
(Fig. 12)
Turn the sleeve counterclockwise to open the chuck jaws.
Place the bit in the chuck as far as it will go. Turn the
sleeve clockwise to tighten the chuck. To remove the bit,
turn the sleeve counterclockwise.
Installing bit holder (Fig. 13)
Fit the bit holder into the protrusion at the tool foot on
either right or left side and secure it with a screw.
When not using the driver bit, keep it in the bit holders.
Bits 45 mm long can be kept there.
Adjustable depth rod (Fig. 14)
The adjustable depth rod is used to drill holes of uniform
depth. Loosen the clamp screw, set to desired position,
then tighten the clamp screw.
Hook (Fig. 15)
The hook is convenient for temporarily hanging the tool.
This can be installed on either side of the tool.
To install the hook, insert it into a groove in the tool
housing on either side and then secure it with a screw. To
remove, loosen the screw and then take it out.
OPERATION (Fig. 16)
Hammer drilling operation
CAUTION:
• There is a tremendous and sudden twisting force
exerted on the tool/bit at the time of hole breakthrough, when the hole becomes clogged with chips
and particles, or when striking reinforcing rods
embedded in the concrete. Always use the side grip
(auxiliary handle) and firmly hold the tool by both side
grip and switch handle during operations. Failure to do
so may result in the loss of control of the tool and
potentially severe injury.
First, slide the action mode change lever so that it points
to the marking. The adjusting ring can be aligned in any
torque levels for this operation.
Be sure to use a tungsten-carbide tipped bit.
Position the bit at the desired location for the hole, then
pull the switch trigger. Do not force the tool. Light pressure
gives best results. Keep the tool in position and prevent it
from slipping away from the hole.
Do not apply more pressure when the hole becomes
clogged with chips or particles. Instead, run the tool at an
idle, then remove the bit partially from the hole. By
repeating this several times, the hole will be cleaned out
and normal drilling may be resumed.
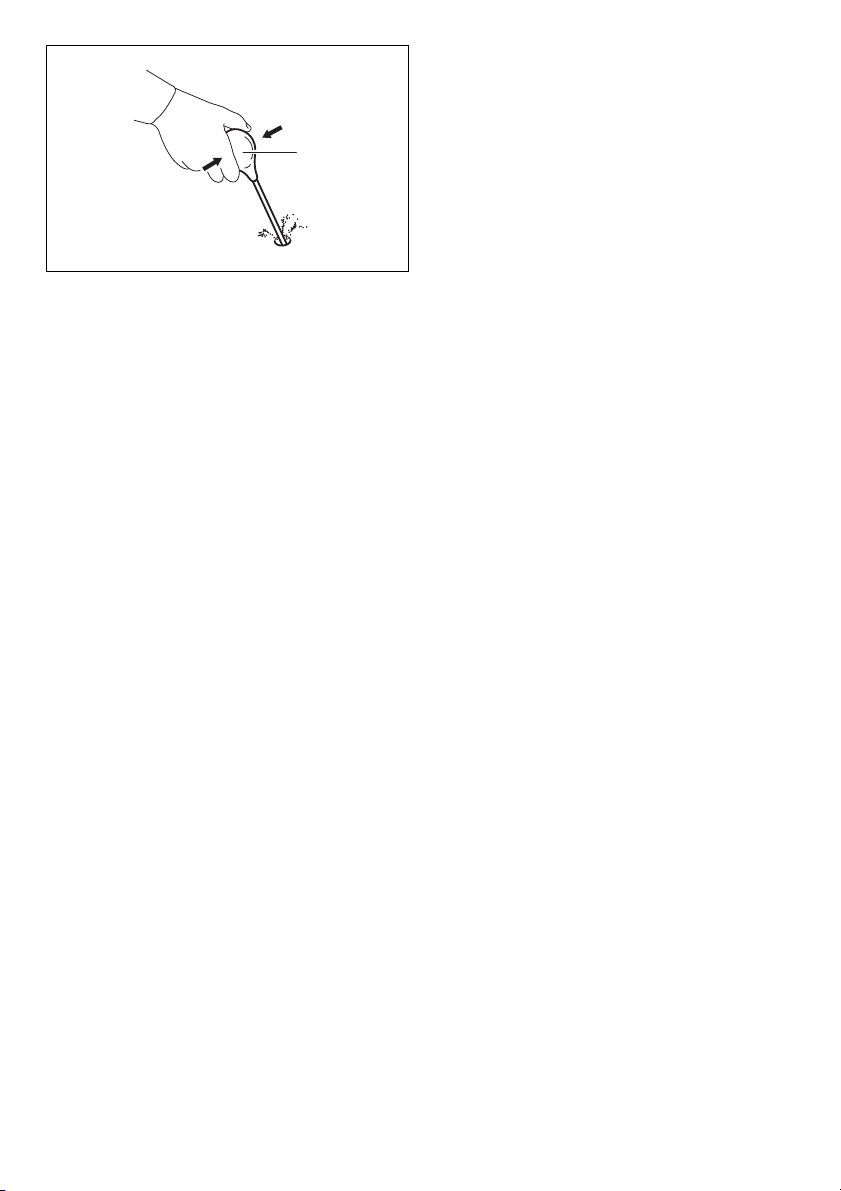
Blow-out bulb (optional accessory)
(Fig. 17)
After drilling the hole, use the blow-out bulb to clean the
dust out of the hole.
Screwdriving operation
First, slide the action mode change lever so that it points
to the marking. Adjust the adjusting ring to the proper
torque level for your work. Then proceed as follows.
Place the point of the driver bit in the screw head and
apply pressure to the tool. Start the tool slowly and then
increase the speed gradually. Release the switch trigger
as soon as the clutch cuts in.
NOTE:
• Make sure that the driver bit is inserted straight in the
screw head, or the screw and/or bit may be damaged.
• When driving wood screw, predrill a pilot hole 2/3 the
diameter of the screw. It makes driving easier and
prevents splitting of the workpiece.
• If the tool is operated continuously until the battery
cartridge has discharged, allow the tool to rest for
15 minutes before proceeding with a fresh battery.
Drilling operation
CAUTION:
• Pressing excessively on the tool will not speed up the
drilling. In fact, this excessive pressure will only serve
to damage the tip of your bit, decrease the tool
performance and shorten the service life of the tool.
8
Page 9

• There is a tremendous force exerted on the tool/bit at
the time of hole break through. Hold the tool firmly and
exert care when the bit begins to break through the
workpiece.
• A stuck bit can be removed simply by setting the
reversing switch to reverse rotation in order to back
out. However, the tool may back out abruptly if you do
not hold it firmly.
• Always secure small workpieces in a vise or similar
hold-down device.
• If the tool is operated continuously until the battery
cartridge has discharged, allow the tool to rest for
15 minutes before proceeding with a fresh battery.
First, slide the action mode change lever so that it points
to the marking. The adjusting ring can be aligned in any
torque levels for this operation. Then proceed as follows.
Drilling in wood
When drilling in wood, the best results are obtained with
wood drills equipped with a guide screw. The guide screw
makes drilling easier by pulling the bit into the workpiece.
Drilling in metal
To prevent the bit from slipping when starting a hole,
make an indentation with a center-punch and hammer at
the point to be drilled. Place the point of the bit in the
indentation and start drilling.
Use a cutting lubricant when drilling metals. The
exceptions are iron and brass which should be drilled dry.
MAINTENANCE
CAUTION:
• Always be sure that the tool is switched off and the
battery cartridge is removed before attempting to
perform inspection or maintenance.
• Never use gasoline, benzine, thinner, alcohol or the
like. Discoloration, deformation or cracks may result.
To maintain product SAFETY and RELIABILITY, repairs,
any other maintenance or adjustment should be
performed by Makita Authorized Service Centers, always
using Makita replacement parts.
OPTIONAL ACCESSORIES
CAUTION:
• These accessories or attachments are recommended
for use with your Makita tool specified in this manual.
The use of any other accessories or attachments might
present a risk of injury to persons. Only use accessory
or attachment for its stated purpose.
If you need any assistance for more details regarding
these accessories, ask your local Makita Service Center.
• Drill bits
• Hammer drill bits
• Screw bits
• Blow-out bulb
• Makita genuine battery and charger
• Grip assembly
•Depth rod
•Hook
• Rubber pad assembly
• Wool bonnet
• Foam polishing pad
NOTE:
• Some items in the list may be included in the tool
package as standard accessories. They may differ
from country to country.
Noise
ENG905-1
The typical A-weighted noise level determined according
to EN60745:
Sound pressure level (L
Sound power level (L
Uncertainty (K): 3 dB (A)
): 85 dB (A)
pA
): 96 dB (A)
WA
Wear ear protection.
Vibration ENG900-1
The vibration total value (tri-axial vector sum) determined
according to EN60745:
Work mode: impact drilling into concrete
Vibration emission (a
Uncertainty (K): 1.5 m/s
h,ID
2
): 6.5 m/s
2
Work mode: drilling into metal
Vibration emission (a
Uncertainty (K): 1.5 m/s
): 2.5 m/s2 or less
h,D
2
ENG901-1
• The declared vibration emission value has been
measured in accordance with the standard test method
and may be used for comparing one tool with another.
• The declared vibration emission value may also be
used in a preliminary assessment of exposure.
WARNING:
• The vibration emission during actual use of the power
tool can differ from the declared emission value
depending on the ways in which the tool is used.
• Be sure to identify safety measures to protect the
operator that are based on an estimation of exposure in
the actual conditions of use (taking account of all parts
of the operating cycle such as the times when the tool
is switched off and when it is running idle in addition to
the trigger time).
For European countries only
ENH101-18
EC Declaration of Conformity
Makita declares that the following Machine(s):
Designation of Machine:
Cordless Hammer Driver Drill
Model No./Type: DHP481
Conforms to the following European Directives:
2006/42/EC
They are manufactured in accordance with the following
Standard or standardized documents:
EN60745
The Technical file in accordance with 2006/42/EC is
available from:
Makita, Jan-Baptist Vinkstraat 2, 3070, Belgium
22. 8. 2013
Yasushi Fukaya
Director
Makita, Jan-Baptist Vinkstraat 2, 3070, Belgium
9
Page 10

DEUTSCH (Originalanweisungen)
Erklärung der Gesamtdarstellung
1. Roter Bereich
2. Taste
3. Akkublock
4. Sternmarkierung
5. Anzeigenlampen
6. Akkuprüftaste
7. LED-Anzeige
8. Ein/Aus-Schalter
9. Lampe
10. Umschalthebel
11. Hebel zum Ändern der Drehzahl
12. Ring zum Wechsel der
Betriebsart
13. Pfeil
14. Einstellring
15. Skala
16. Vorsprung
17. Arm
18. Rille
19. Greifstange
20. Seitengriff
21. Kranz
22. Halter für Werkzeugeinsätze
23. Werkzeugeinsatz
24. Tiefenanschlag
25. Klemmschraube
26. Haken
27. Schraube
28. Ausblasvorrichtung
SPEZIFIKATIONEN
Modell DHP481
Bohren in Beton 16 mm
Bohren in Stahl 13 mm
Leistungen
Leerlaufdrehzahl min
Schläge pro Minute
• Aufgrund unserer beständigen Forschungen und Weiterentwicklungen sind Änderungen an den hier angegebenen
Technischen Daten ohne Vorankündigung vorbehalten.
• Die Technischen Daten und der Akkublock können in den einzelnen Ländern Abweichungen aufweisen.
• Gewicht, mit Akkublock, ermittelt gemäß EPTA-Verfahren 01/2003
Verwendungszweck
Das Werkzeug ist zum Schlagbohren in Ziegelstein,
Beton und Stein vorgesehen. Das Werkzeug eignet sich
auch für das Einschrauben von Schrauben und das
Bohren ohne Schlag in Holz, Metall, Keramik und
Kunststoff.
-1
Einschrauben von Holzschrauben 10 mm x 90 mm
Gesamtlänge 205 mm
Nettogewicht 2,7 kg
Nennspannung 18 V Gleichspannung
Allgemeine Sicherheitshinweise
für Elektrowerkzeuge GEA010-1
WARNUNG Lesen Sie alle Sicherheitshinweise
und Anweisungen sorgfältig durch. Wenn die Hinweise
und Anweisungen nicht beachtet werden, besteht die
Gefahr eines Stromschlags, Brands und/oder das Risiko
von ernsthaften Verletzungen.
Bewahren Sie alle Hinweise und
Anweisungen zur späteren
Referenz gut auf.
16
Bohren in Holz 76 mm
Einschrauben von
Maschinenschrauben
Hoch (2) 0 - 2.100
Niedrig (1) 0 - 550
Hoch (2) 0 - 31.500
Niedrig (1) 0 - 8.250
ENE079-1
SICHERHEITSHINWEISE ZUM
AKKUSCHLAGBOHRSCHRAUBER
1. Tragen Sie beim Schlagbohren einen
Gehörschutz. Beständige Einwirkung von Lärm kann
zu Gehörverlust führen.
2. Verwenden Sie die ggf. mit dem Werkzeug
gelieferten Zusatzgriffe. Bei Verlust der Kontrolle
über das Werkzeug kann es zu Verletzungen
kommen.
3. Halten Sie das Werkzeug an den isolierten
Griffflächen, wenn Sie unter Bedingungen
arbeiten, bei denen das Schneidwerkzeug
verborgene Kabel berühren kann. Bei Kontakt des
Werkzeugs mit einem stromführenden Kabel wird der
Strom an die Metallteile des Elektrowerkzeugs und
dadurch an den Bediener weitergeleitet, und der
Bediener erleidet einen Stromschlag.
4. Halten Sie das Werkzeug an den isolierten
Griffflächen, wenn Sie unter Bedingungen
arbeiten, bei denen das Werkzeug versteckte
Kabel berühren kann. Bei Kontakt von
Befestigungsmitteln mit einem stromführenden Kabel
6 mm
GEB056-5
Page 11

wird der Strom an die Metallteile des
Elektrowerkzeugs und dadurch an den Bediener
weitergeleitet, und der Bediener erleidet einen
Stromschlag.
5. Achten Sie jederzeit auf einen festen Stand.
Achten Sie bei Verwendung des Werkzeugs an
erhöhten Standorten darauf, dass sich keine
Personen unter dem Standort aufhalten.
6. Halten Sie das Werkzeug mit festem Griff.
7. Halten Sie Ihre Hände von beweglichen Teilen
fern.
8. Lassen Sie das Werkzeug nicht unbeaufsichtigt
eingeschaltet. Das Werkzeug darf nur dann in
Betrieb sein, wenn es festgehalten wird.
9. Berühren Sie kurz nach dem Betrieb weder den
Werkzeug-Einsatz noch das Werkstück. Diese
können extrem heiß sein, wodurch es zu
Verbrennungen kommen kann.
10. Einige Materialien enthalten Chemikalien, die
möglicherweise giftig sind. Vermeiden Sie das
Einatmen von Staub und Hautkontakt mit diesen
Materialien. Beachten Sie die Sicherheitshinweise
und Sicherheitsdatenblätter der Materialhersteller.
BEWAHREN SIE DIESE
ANLEITUNG SORGFÄLTIG AUF.
WARNUNG:
Lassen Sie sich NIE durch Bequemlichkeit oder (aus
fortwährendem Gebrauch gewonnener) Vertrautheit
mit dem Werkzeug dazu verleiten, die
Sicherheitsregeln für das Werkzeug zu missachten.
Bei MISSBRÄUCHLICHER Verwendung des
Werkzeugs oder bei Missachtung der in dieser
Betriebsanleitung enthaltenen Sicherheitshinweise
kann es zu schweren Verletzungen kommen.
WICHTIGE SICHERHEITSREGELN
ENC007-9
FÜR AKKUBLOCK
1. Lesen Sie vor der Verwendung des Akkublocks
alle Anweisungen und Sicherheitshinweise für das
Akkuladegerät (1), den Akku (2) und das Produkt
(3), für das der Akku verwendet wird, sorgfältig
durch.
2. Der Akkublock darf nicht zerlegt werden.
3. Falls die Betriebsdauer erheblich kürzer wird,
beenden Sie den Betrieb umgehend. Andernfalls
besteht die Gefahr einer Überhitzung sowie das
Risiko möglicher Verbrennungen und sogar einer
Explosion.
4. Wenn Elektrolyt in Ihre Augen gerät, waschen Sie
diese mit klarem Wasser aus und suchen Sie
sofort einen Arzt auf. Andernfalls können Sie Ihre
Sehfähigkeit verlieren.
5. Vermeiden Sie einen Kurzschluss des
Akkublocks:
(1) Die Kontakte dürfen nicht mit leitendem
Material in Berührung kommen.
(2) Der Akkublock darf nicht in einem Behälter
aufbewahrt werden, in dem sich andere
metallische Gegenstände wie beispielsweise
Nägel, Münzen usw. befinden.
(3) Der Akkublock darf weder Feuchtigkeit noch
Regen ausgesetzt werden.
Ein Kurzschluss des Akkus kann zu hohem
Kriechstrom, Überhitzung, möglichen
Verbrennungen und sogar zu einer Zerstörung des
Werkzeugs führen.
6. Werkzeug und Akkublock dürfen nicht an Orten
aufbewahrt werden, an denen Temperaturen von
50°C oder darüber erreicht werden können.
7. Beschädigte oder verbrauchte Akkus dürfen nicht
verbrannt werden. Der Akkublock kann in den
Flammen explodieren.
8. Lassen Sie den Akku nicht fallen und vermeiden
Sie Schläge gegen den Akku.
9. Verwenden Sie niemals einen beschädigten Akku.
10. Befolgen Sie die in Ihrem Land geltenden
Bestimmungen bzgl. der Entsorgung von Akkus.
BEWAHREN SIE DIESE
ANLEITUNG SORGFÄLTIG AUF.
Tipps für eine maximale Nutzungsdauer
von Akkus
1. Laden Sie den Akkublock auf, bevor der Akku
vollständig entladen ist.
Sobald Sie eine verringerte Leistung des
Werkzeugs bemerken, beenden Sie stets den
Betrieb des Werkzeugs und laden Sie den
Akkublock auf.
2. Ein voll aufgeladener Akkublock darf niemals
erneut geladen werden.
Durch Überladungen wird die Lebensdauer des
Akkus verkürzt.
3. Laden Sie den Akkublock bei einer
Zimmertemperatur von 10°C bis 40°C auf. Lassen
Sie einen heißen Akkublock vor dem Aufladen
abkühlen.
4. Laden Sie den Akkublock auf, wenn Sie diesen für
längere Zeit nicht verwenden (mehr als sechs
Monate).
FUNKTIONSBESCHREIBUNG
ACHTUNG:
• Schalten Sie das Werkzeug stets aus und nehmen Sie
den Akkublock vom Werkzeug ab, bevor Sie
Einstellungen oder Funktionsprüfungen am Werkzeug
vornehmen.
Einsetzen und Abnehmen des
Akkublocks (Abb. 1)
ACHTUNG:
• Schalten Sie das Werkzeug stets aus, bevor Sie den
Akkublock einsetzen oder abnehmen.
• Halten Sie das Werkzeug und den Akkublock
sicher fest, wenn Sie den Akkublock einsetzen
oder herausnehmen. Andernfalls könnte Ihnen das
Werkzeug oder der Akkublock aus den Händen fallen,
sodass das Werkzeug oder der Akkublock beschädigt
werden oder diese Verletzungen verursachen.
17
Page 12

Zum Abnehmen des Akkublocks müssen Sie die Taste
auf der Vorderseite des Akkublocks schieben und
gleichzeitig den Akkublock aus dem Gerät herausziehen.
Zum Einsetzen des Akkublocks müssen Sie die Zunge
des Akkublocks an der Rille im Gehäuse ausrichten und
in die gewünschte Position schieben. Setzen Sie den
Akkublock ganz ein, bis er mit einem leisen Klick
einrastet. Wenn Sie den roten Bereich oben auf der Taste
sehen können, ist der Batterieadapter nicht ganz
eingerastet.
ACHTUNG:
• Setzen Sie den Akkublock unbedingt ganz ein, bis der
rote Bereich nicht mehr zu sehen ist. Andernfalls kann
der Akkublock versehentlich aus dem Werkzeug fallen
und Sie oder umstehende Personen verletzen.
• Wenden Sie beim Einsetzen des Akkublocks keine
Gewalt an. Wenn der Akkublock nicht leicht
hineingleitet, ist er nicht richtig angesetzt.
Akku-Schutzsystem (Lithium-Ionen-Akku
mit Sternmarkierung) (Abb. 2)
Lithium-Ionen-Akkus mit Sternmarkierung verfügen über
ein Schutzsystem. Dieses System schaltet die
Stromversorgung des Werkzeugs automatisch aus, um
die Lebensdauer des Akkus zu verlängern.
Unter folgenden Bedingungen des Werkzeugs und/oder
des Akkus kann das Werkzeug während des Betriebs
automatisch stoppen:
• Überlastet:
Das Werkzeug wird auf eine Weise betrieben, die zu
einer abnormal hohen Stromaufnahme führt.
Lassen Sie in dieser Situation den Ein/Aus-Schalter
des Werkzeugs los und beenden Sie die Arbeiten,
die zu der Überlastung des Werkzeugs geführt
haben. Betätigen Sie anschließend den Ein/AusSchalter wieder, um das Werkzeug wieder in Betrieb
zu nehmen.
Wenn das Werkzeug nicht startet, ist der Akku
überhitzt. Lassen Sie in dieser Situation den Akku
erst abkühlen, bevor Sie wieder den Ein/Aus-Schalter
betätigen.
• Spannung des Akkus zu niedrig:
Die noch vorhandene Akkuladung ist zu niedrig, und
das Werkzeug startet nicht. Nehmen Sie in dieser
Situation den Akku ab und laden Sie den Akku
wieder auf.
Anzeige der verbleibenden Akkuladung
(Nur für Akkublöcke mit einem „B“ am Ende der
Modellnummer.) (Abb. 3)
Drücken Sie zum Anzeigen der Restladung des Akkus die
Akkuprüftaste. Die Anzeigenlampen leuchten dann
wenige Sekunden lang auf.
Anzeigenlampen
Leuchtet Aus Blinkt
015658
HINWEIS:
• In Abhängigkeit von den Bedingungen bei Gebrauch
und von der Umgebungstemperatur kann der
angezeigte Ladezustand geringfügig vom tatsächlichen
Ladezustand abweichen.
Verbleibende
Akkuladung
75% bis 100%
50% bis 75%
25% bis 50%
0% bis 25%
Laden Sie den
Akku auf.
Möglicherweise
liegt ein Defekt
des Akkus vor.
Anzeige der verbleibenden Akkuladung
(länderspezifisch) (Abb. 4)
Wenn Sie den Ein/Aus-Schalter betätigen, erscheint in
der LED-Anzeige eine Anzeige der verbleibenden
Akkuladung als folgende Tabelle.
Status LED-
Anzeige
013980
HINWEIS:
• Die LED-Anzeige erlischt ca. 1 Minute nach dem
Loslassen des Ein/Aus-Schalters, um Akkuenergie zu
sparen. Zum Prüfen der verbleibenden Akkuladung
betätigen Sie den Ein/Aus-Schalter leicht.
• Falls die LED-Anzeige leuchtet und das Werkzeug
auch bei aufgeladenem Akku nicht funktioniert, lassen
Sie das Werkzeug gründlich abkühlen. Falls sich der
Zustand nicht ändert, bringen Sie das Werkzeug
zwecks Reparatur zu einem Makita-Servicecenter in
Ihrer Nähe.
Verbleibende Akkuladung
ca. 50 % oder mehr
ca. 20 % – 50 %
ca. weniger als 20 %
18
Page 13

Einschalten
ACHTUNG:
• Achten Sie vor dem Einsetzen des Akkublocks in das
Werkzeug darauf, dass sich der Ein/Aus-Schalter
korrekt bedienen lässt und beim Loslassen in die
Position „OFF“ (AUS) zurückkehrt. (Abb. 5)
Betätigen Sie zum Starten des Werkzeugs einfach den
Ein/Aus-Schalter. Die Geschwindigkeit des Werkzeugs
wird durch größeren Druck auf den Ein/Aus-Schalter
erhöht. Lassen Sie zum Ausschalten des Werkzeugs den
Ein/Aus-Schalter los.
Einschalten der Frontlampe (Abb. 6)
ACHTUNG:
• Schauen Sie nicht direkt in das Licht oder in die
Lichtquelle.
Betätigen Sie zum Einschalten der Lampe den Ein/AusSchalter. Solange Sie den Ein/Aus-Schalter gedrückt
halten, leuchtet die Lampe. Nach dem Loslassen des Ein/
Aus-Schalter erlischt die Lampe nach 10 bis
15 Sekunden.
HINWEIS:
• Bei Überhitzung stoppt das Werkzeug automatisch und
die Lampe beginnt zu blinken. Lassen Sie in diesem
Fall den Ein/Aus-Schalter los. Die Lampe schaltet sich
in einer Minute aus.
• Wischen Sie Schmutz auf der Lampenlinse mit einem
trockenen Tuch ab. Achten Sie darauf, dass die Linse
der Lampe nicht zerkratzt wird, da dies die
Leuchtstärke mindern kann.
Bedienung des Umschalters
ACHTUNG:
• Überprüfen Sie vor jedem Betrieb immer die
Drehrichtung.
• Der Umschalthebel darf nur betätigt werden, wenn das
Werkzeug im Stillstand ist. Wenn Sie die Drehrichtung
bei noch laufendem Werkzeug umschalten, kann das
Werkzeug beschädigt werden.
• Ist das Werkzeug nicht in Gebrauch, muss der
Umschalthebel immer auf die neutrale Position gestellt
werden. (Abb. 7)
Dieses Werkzeug verfügt über einen Umschalthebel für
die Änderung der Drehrichtung. Für eine Drehrichtung im
Uhrzeigersinn drücken Sie den Umschalthebel von der
Seite A hinein, und für eine Drehrichtung entgegen dem
Uhrzeigersinn von der Seite B.
Wenn sich der Umschalthebel in der neutralen Position
befindet, kann der Ein/Aus-Schalter nicht betätigt werden.
Ändern der Drehzahl
ACHTUNG:
• Stellen Sie den Hebel zum Ändern der Drehzahl immer
exakt in die richtige Position. Wenn sich dieser Hebel
bei Betrieb des Werkzeugs zwischen den
Einstellungen „1“ und „2“ befindet, kann das Werkzeug
beschädigt werden.
• Der Hebel zum Ändern der Drehzahl darf nicht betätigt
werden, solange das Werkzeug in Betrieb ist.
Andernfalls kann das Werkzeug beschädigt werden.
(Abb. 8)
Schalten Sie zum Ändern der Drehzahl zunächst das
Werkzeug aus, und schieben Sie dann den Hebel zur
Änderung der Drehzahl auf „2“ (hohe Drehzahl) oder „1“
(niedrige Drehzahl). Überprüfen Sie vor dem Betrieb des
Werkzeugs, ob sich der Hebel zur Änderung der Drehzahl
in der richtigen Position befindet. Verwenden Sie die für
Ihre Arbeit geeignete Drehzahl.
Auswählen der Betriebsart
ACHTUNG:
• Stellen Sie den Ring immer exakt auf die gewünschte
Betriebsartmarkierung. Wird das Werkzeug betrieben
während sich der Ring zwischen zwei Markierungen für
die einzelnen Betriebsarten befindet, kann das
Werkzeug beschädigt werden. (Abb. 9)
Dieses Werkzeug verfügt über einen Ring zum Wechseln
der Betriebsart. Mit Hilfe dieses Rings können Sie die
Betriebsart auswählen, die sich für die auszuführenden
Arbeiten am besten eignet. Es stehen drei Betriebsarten
zur Auswahl:
Für die Drehung müssen Sie den Ring so drehen, dass
der Pfeil auf dem Werkzeugkörper auf die Markierung
auf dem Ring zeigt.
Für die Drehung mit Hammern müssen Sie den Ring so
drehen, dass der Pfeil auf dem Werkzeugkörper auf die
Markierung auf dem Ring zeigt.
Für die Schlagdrehung müssen Sie den Ring so drehen,
dass der Pfeil auf dem Werkzeugkörper auf die
Markierung auf dem Ring zeigt.
Anpassen des Anzugsdrehmoments
(Betriebsart Schraubendreher „ “)
(Abb. 10)
Das Anzugsdrehmoment kann durch Drehen des
Einstellrings auf eine der 21 Stufen eingestellt werden.
Drehen Sie dazu den Einstellring so, dass die
gewünschte Stufe gegenüber dem Zeiger am
Werkzeuggehäuse steht.
Schieben Sie zunächst den Hebel zum Wechseln der
Betriebsart in die Position mit dem Symbol .
Das geringste Anzugsdrehmoment ist eingestellt, wenn
die Zahl 1 am Zeiger ausgerichtet ist, und das höchste,
wenn die Markierung am Zeiger ausgerichtet ist. Die
Kupplung rutscht wird den verschiedenen
Drehmomentstufen, wenn Sie diese auf die Nummer 1 bis
21 setzen. Schrauben Sie vor den eigentlichen Arbeiten
zur Probe eine Schraube in das Material bzw. in ein
Materialduplikat, um zu ermitteln, welche
Drehmomentstufe für eine bestimmte Anwendung
erforderlich ist.
HINWEIS:
• Wenn sich der Zeiger zwischen den einzelnen
Einteilungen befindet, rastet der Einstellring nicht ein.
MONTAGE
ACHTUNG:
• Schalten Sie das Werkzeug stets aus und entfernen
Sie den Akkublock, bevor Sie Arbeiten am Werkzeug
ausführen.
19
Page 14

Anbringen des Seitengriffs (Zusatzgriff)
(Abb. 11)
Verwenden Sie stets den Seitengriff, um eine sichere
Handhabung zu gewährleisten.
Legen Sie den Seitengriff so, dass die Rille auf dem Arm
in einem der Gegenstücke auf dem Werkzeug passt.
Ziehen Sie anschließend den Griff fest, indem Sie den
Griff im Uhrzeigersinn drehen.
Abhängig vom Betrieb, können Sie den Seitengriff links
oder rechts am Werkzeug befestigem.
Entfernen des Schraubendrehereinsatzes
bzw. Bohreinsatzes (Abb. 12)
Drehen Sie den Kranz gegen den Uhrzeigersinn, um die
Spannfutterbacken zu öffnen. Schieben Sie den
Werkzeugeinsatz so weit wie möglich in das Spannfutter.
Drehen Sie den Kranz im Uhrzeigersinn, um das
Spannfutter anzuziehen. Wenn Sie den Werkzeugeinsatz
abnehmen möchten, drehen Sie den Kranz gegen den
Uhrzeigersinn.
Montieren des Halters für
Werkzeuginsätze (Abb. 13)
Setzen Sie den Halter für Werkzeugeinsätze in den
Vorsprung an der linken oder rechten Seite des
Werkzeugfußes ein und befestigen Sie den Halter mit
einer Schraube.
Wenn Sie den Schraubendrehereinsatz nicht verwenden,
bewahren Sie den Einsatz im Halter für
Werkzeugeinsätze auf. Es können Werkzeugeinsätze bis
zu einer Länge von 45 mm aufbewahrt werden.
Verstellbarer Tiefenanschlag (Abb. 14)
Der verstellbare Tiefenanschlag wird verwendet, um
Löcher von gleichmäßiger Tiefe zu bohren. Lösen Sie die
Klemmschraube, stellen Sie den Tiefenanschlag in die
gewünschte Position und ziehen Sie die Klemmschraube
wieder fest.
Haken (Abb. 15)
Der Haken dient zum kurzzeitigen Aufhängen des
Werkzeugs. Der Haken kann an beiden Seiten des
Werkzeugs befestigt werden.
Setzen Sie den Haken in eine Rille am Werkzeuggehäuse
(die Seite ist beliebig) ein und befestigen Sie den Haken
mit einer Schraube. Zum Abbauen des Hakens müssen
Sie nur die Schraube lösen und den Haken
herausnehmen.
BETRIEB (Abb. 16)
Schlagbohren
ACHTUNG:
• Wenn der Bohrer durchschlägt, wenn die Bohrung
durch Späne und Partikel verstopft ist oder wenn das
Werkzeug auf Verstärkungsstangen im Beton trifft,
wirken enorme und abrupte Drehkräfte auf das
Werkzeug bzw. den Werkzeugeinsatz. Verwenden Sie
stets den Seitengriff (Zusatzgriff) und halten Sie das
Werkzeug während des Betriebs sowohl am Seitengriff
als auch am Schaltergriff kräftig fest. Andernfalls
20
können Sie die Kontrolle über das Werkzeug verlieren
und schwere Verletzungen erleiden.
Schieben Sie zunächst den Hebel zum Wechseln der
Betriebsart in die Position mit dem Symbol . Für diesen
Vorgang kann der Einstellring auf jede beliebige
Drehmomentstufe ausgerichtet sein.
Achten Sie darauf, dass Sie einen Werkzeugeinsatz mit
einer Hartmetallspitze verwenden.
Setzen Sie den Werkzeugeinsatz auf die gewünschte
Position für die Bohrung und betätigen Sie dann den Ein/
Aus-Schalter. Üben Sie keinen übermäßigen Druck auf
das Werkzeug aus. Sie erzielen die besten Ergebnisse,
wenn Sie nur leichten Druck ausüben. Halten Sie das
Werkzeug in Position, und achten Sie darauf, dass es
nicht von der Bohrung abrutscht.
Verstärken Sie den Druck nicht, wenn die Bohrung durch
Späne oder Partikel verstopft ist. Betreiben Sie
stattdessen das Werkzeug im Leerlauf und ziehen Sie
dann den Werkzeugeinsatz teilweise aus der Bohrung.
Wenn Sie diesen Vorgang mehrmals wiederholen, wird
die Bohrung gesäubert, und Sie können den normalen
Bohrvorgang fortsetzen.
Ausblasvorrichtung (Sonderzubehör)
(Abb. 17)
Entfernen Sie nach dem Bohrvorgang mit Hilfe der
Ausblasvorrichtung den Staub aus der Bohrung.
Schraubendreher
Schieben Sie zunächst den Hebel zum Wechseln der
Betriebsart in die Position mit dem Symbol . Stellen Sie
den Einstellring auf die für Ihre Arbeit geeignete
Drehmomentstufe. Gehen Sie anschließend wie folgt vor:
Setzen Sie die Spitze des Schraubendrehereinsatzes auf
den Schraubenkopf auf und üben Sie Druck auf das
Werkzeug aus. Starten Sie das Werkzeug langsam und
erhöhen Sie nach und nach die Drehzahl. Sobald die
Kupplung zu rutschen beginnt, lassen Sie den Ein/AusSchalter los.
HINWEIS:
• Vergewissern Sie sich, dass der
Schraubendrehereinsatz gerade auf dem
Schraubenkopf sitzt. Andernfalls können die Schraube
und/oder der Werkzeugeinsatz beschädigt werden.
• Bohren Sie zum Einschrauben von Holzschrauben erst
Löcher mit 2/3 des Durchmessers der Schrauben vor.
So wird das Einschrauben vereinfacht und das
Werkstück splittert nicht.
• Wenn das Werkzeug bis zur vollständigen Entladung
des Akkus betrieben wurde, lassen Sie es 15 Minuten
liegen, bevor Sie mit einem neuen Akku fortfahren.
Bohren
ACHTUNG:
• Der Bohrvorgang kann nicht durch höheren Druck auf
das Werkzeug beschleunigt werden. Ein zu hoher
Druck beschädigt im Gegenteil die Spitze des
Werkzeugeinsatzes, vermindert die Leistung des
Werkzeugs und verkürzt dessen Lebensdauer.
• Beim Durchbruch der Bohrung wirken enorme Kräfte
auf das Werkzeug/den Werkzeugeinsatz. Halten Sie
Page 15

das Werkzeug fest und seien Sie vorsichtig, wenn der
Werkzeugeinsatz das Werkstück durchbricht.
• Ein festsitzender Werkzeugeinsatz kann problemlos
wieder herausgezogen werden, indem Sie mit Hilfe des
Umschalthebels die Drehrichtung wechseln. Wenn Sie
das Werkzeug nicht sicher festhalten, kann es jedoch
zu einem abrupten Rückschlagen des Werkzeugs
kommen.
• Spannen Sie kleine Werkstücke immer in einem
Schraubstock oder einer ähnlichen Haltevorrichtung
ein.
• Wenn das Werkzeug bis zur vollständigen Entladung
des Akkus betrieben wurde, lassen Sie es 15 Minuten
liegen, bevor Sie mit einem neuen Akku fortfahren.
Schieben Sie zunächst den Hebel zum Wechseln der
Betriebsart in die Position mit dem Symbol . Für diesen
Vorgang kann der Einstellring auf jede beliebige
Drehmomentstufe ausgerichtet sein. Gehen Sie
anschließend wie folgt vor:
Bohren in Holz
Beim Bohren in Holz werden die besten Ergebnisse mit
Holzbohrern erzielt, die über eine Zentrierspitze verfügen.
Die Zentrierspitze erleichtert den Bohrvorgang, da sie den
Werkzeugeinsatz in das Werkstück zieht.
Bohren in Metall
Körnen Sie die Bohrung am vorgesehenen Punkt vor,
damit der Bohrer zu Beginn einer Bohrung nicht
abrutscht. Setzen Sie die Spitze des Werkzeugeinsatzes
in die Körnung und starten Sie den Bohrvorgang.
Verwenden Sie beim Bohren in Metall ein
Bohrschmiermittel. Ausgenommen hiervon sind Eisen und
Messing; diese Metalle sollten trocken gebohrt werden.
WARTUNG
ACHTUNG:
• Schalten Sie das Gerät stets aus und ziehen Sie den
Akkublock ab, bevor Sie Inspektionen oder
Wartungsarbeiten am Gerät vornehmen.
• Verwenden Sie zum Reinigen niemals Kraftstoffe,
Benzin, Verdünner, Alkohol oder ähnliches. Dies kann
zu Verfärbungen, Verformungen oder Rissen führen.
Zur Gewährleistung von SICHERHEIT und
ZUVERLÄSSIGKEIT des Produkts sollten Reparaturen,
Wartungsarbeiten und Einstellungen nur durch von Makita
autorisierte Servicecenter durchgeführt und
ausschließlich Makita-Ersatzteile verwendet werden.
SONDERZUBEHÖR
ACHTUNG:
• Für das in diesem Handbuch beschriebene MakitaGerät werden die folgenden Zubehör- und Zusatzteile
empfohlen. Bei Verwendung anderer Zubehör- und
Zusatzteile kann es zu Verletzungen kommen.
Verwenden Sie Zubehör- und Zusatzteile nur für den
vorgesehenen Zweck.
Informationen zu diesem Zubehör erhalten Sie von Ihrem
Makita-Servicecenter.
• Bohreinsätze
• Schlagbohreinsätze
• Schraubendrehereinsätze
• Ausblasvorrichtung
• Original-Akku und Original-Ladegerät von Makita
• Griff-Set
• Tiefenanschlag
• Haken
• Gummipolster-Set
• Wollhaube
• Polierschwamm
HINWEIS:
• Einige der in der Liste aufgeführten Elemente sind dem
Werkzeugpaket als Standardzubehör beigefügt. Diese
können in den einzelnen Ländern voneinander
abweichen.
Schallpegel
ENG905-1
Typischer A-bewerteter Schallpegel nach EN60745:
Schalldruckpegel (L
Schalldruckpegel (L
Abweichung (K): 3 dB (A)
): 85 dB (A)
pA
): 96 dB (A)
WA
Tragen Sie Gehörschutz.
Schwingung ENG900-1
Schwingungsgesamtwerte (Vektorsumme dreier Achsen)
nach EN60745:
Arbeitsmodus: Schlagbohren in Beton
Schwingungsbelastung (a
Abweichung (K): 1,5 m/s
h, ID
2
): 6,5 m/s
2
Arbeitsmodus: Schlagbohren in Metall
Schwingungsbelastung (a
Abweichung (K): 1,5 m/s
): 2,5 m/s2 oder weniger
h, D
2
ENG901-1
• Der hier angegebene Wert für die erzeugten
Schwingungen wurde gemäß dem genormten
Testverfahren ermittelt und kann als Vergleich zu
anderen Werkzeugen herangezogen werden.
• Der angegebene Wert für die erzeugten Schwingungen
ist außerdem für eine vorbeugende Bewertung der
Belastung zu verwenden.
WARNUNG:
• Die Schwingungsbelastung kann bei tatsächlichem
Gebrauch des Elektrowerkzeugs in Abhängigkeit von
der Handhabung des Elektrowerkzeugs von dem hier
aufgeführten Wert abweichen.
• Stellen Sie sicher, dass Schutzmaßnahmen für den
Bediener getroffen werden, die auf den unter den
tatsächlichen Arbeitsbedingungen zu erwartenden
Belastungen beruhen (beziehen Sie alle Bestandteile
des Arbeitsablaufs ein, also zusätzlich zu den
Arbeitszeiten auch Zeiten, in denen das Werkzeug
ausgeschaltet ist oder ohne Last läuft).
Nur für europäische Länder
ENH101-18
EG-Konformitätserklärung
Makita erklärt, dass die nachfolgende(n) Maschine(n):
Bezeichnung der Maschine(n):
Akku-Schlagbohrschrauber
Nummer/Typ des Modells: DHP481
den folgenden Richtlinien der Europäischen Union
genügt/genügen:
2006/42/EG
Sie werden gemäß den folgenden Standards oder
Normen gefertigt:
EN60745
21
Page 16

Die technischen Unterlagen gemäß 2006/42/EG sind
erhältlich von:
Makita, Jan-Baptist Vinkstraat 2, 3070, Belgien
22. 8. 2013
Yasushi Fukaya
Makita, Jan-Baptist Vinkstraat 2, 3070, Belgien
Direktor
22
Page 17

Makita Jan-Baptist Vinkstraat 2, 3070, Belgium
Makita Corporation Anjo, Aichi, Japan
885341B990 www.makita.com
ALA
 Loading...