

MAKITA DHP459SYE User Manual
GB
Cordless Hammer Driver Drill INSTRUCTION MANUAL
S
Sladdlös slagborrhammare BRUKSANVISNING
N
Batteridrevet slagboremaskin BRUKSANVISNING
FIN
Akkuiskuporakone KÄYTTÖOHJE
LV
Bezvada triecienurbjmašīna/skrūvgriezis
LT
Belaidis kalamasis grąžtas NAUDOJIMO INSTRUKCIJA
EE
Juhtmeta lööktrell-kruvikeeraja KASUTUSJUHEND
RUS
Аккумуляторная ударная дрель-шуруповерт
LIETOŠANAS INSTRUKCIJA
РУКОВОДСТВО ПО ЭКСПЛУАТАЦИИ
DHP459
1
1
1
2
1 012790
1
4 012791
1
2
3
4
7 012795
12
3
10 012797
3
2 012128
A
5 012793
1
8 012795
1
2
11 012798
1
3 012792
1
B
1
6 012794
2
3
4
1
9 012796
1
12 012846
1
13 002449 14 012799
2
ENGLISH (Original instructions)
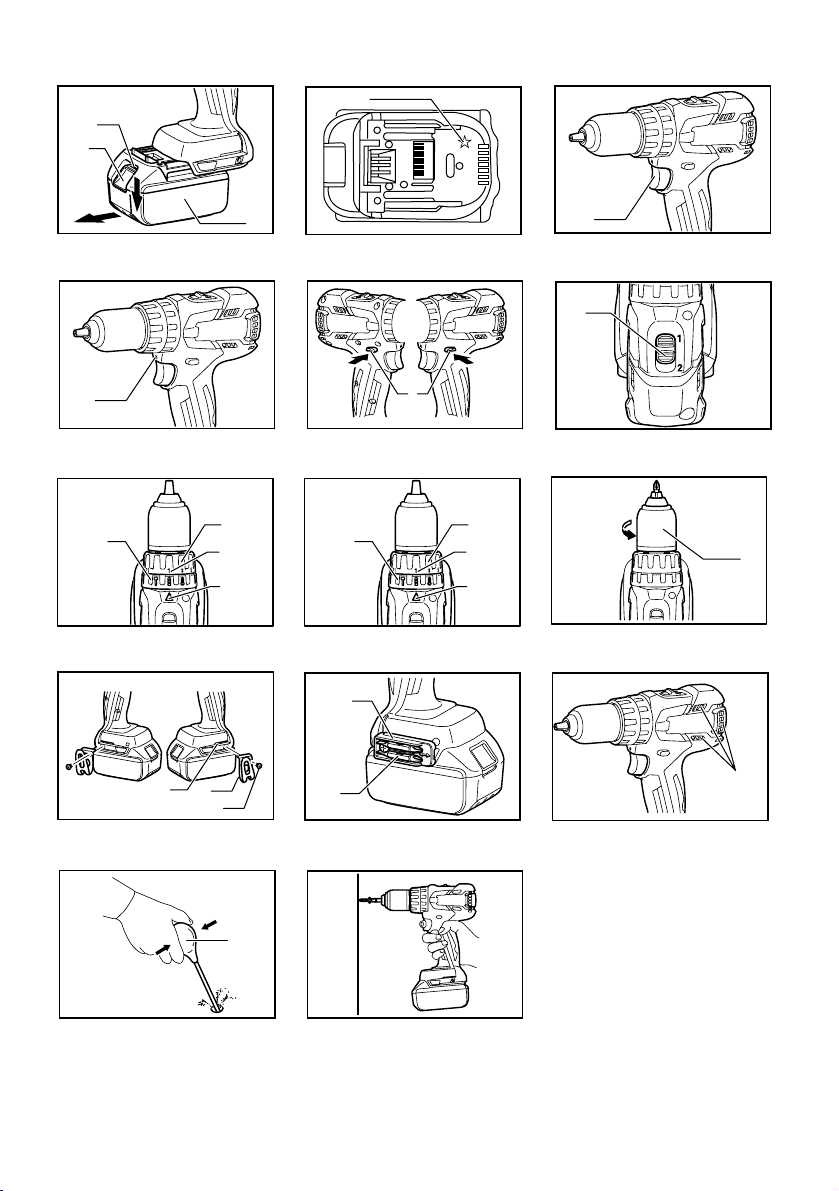
1-1. Red indicator
1-2. Button
1-3. Battery cartridge
2-1. Star marking
3-1. Switch trigger
4-1. Lamp
5-1. Reversing switch lever
6-1. Speed change lever
Explanation of general view
7-1. Action mode changing ring
7-2. Adjusting ring
7-3. Graduation
7-4. Arrow
8-1. Action mode changing ring
8-2. Adjusting ring
8-3. Graduation
8-4. Arrow
9-1. Sleeve
10-1. Groove
10-2. Hook
10-3. Screw
11-1. Bit holder
11-2. Bit
12-1. Vent
13-1. Blow-out bulb
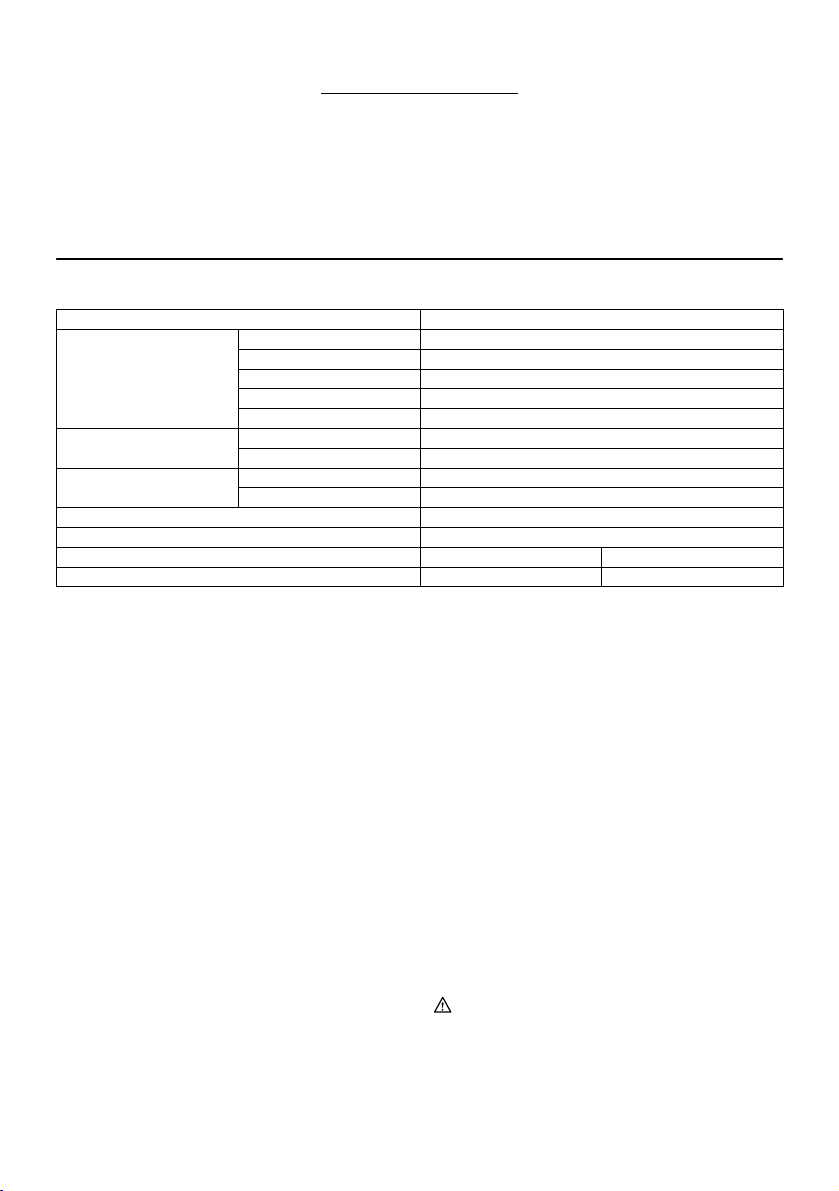
SPECIFICATIONS
Model DHP459
Capacities
No load speed (min-1)
Blows per minute
Overall length 192 mm
Rated voltage D.C. 18 V
Battery cartridge BL1815 / BL1815N / BL1820 BL1830 / BL1840 / BL1850
• Due to our continuing program of research and development, the specifications herein are subject to change without notice.
• Specifications and battery cartridge may differ from country to country.
• Weight, with battery cartridge, according to EPTA-Procedure 01/2003
Net weight 1.5 kg 1.7 kg
Intended use
The tool is intended for impact drilling in brick, concrete
and stone. It is also suitable for screw driving and drilling
without impact in wood, metal, ceramic and plastic.
Noise
The typical A-weighted noise level determined according
to EN60745:
Sound pressure level (LpA) : 82 dB (A)
Sound power level (L
Uncertainty (K) : 3 dB (A)
) : 93 dB (A)
WA
Wear ear protection
Concrete 13 mm
Steel 13 mm
Wood 38 mm
Wood screw 6 mm x 75 mm
Machine screw M6
High (2) 0 - 1,500
Low (1) 0 - 400
High (2) 0 - 22,500
Low (1) 0 - 6,000
ENE079-1
Vibration
The vibration total value (tri-axial vector sum) determined
according to EN60745:
ENG905-1
Work mode: impact drilling into concrete
Vibration emission (a
Uncertainty (K) : 1.5 m/s
h,ID
) : 8 m/s
2
2
Work mode: drilling into metal
Vibration emission (a
Uncertainty (K) : 1.5 m/s
The declared vibration emission value has been
•
) : 2.5 m/s2 or less
h,D
2
measured in accordance with the standard test
method and may be used for comparing one tool
with another.
• The declared vibration emission value may also be
used in a preliminary assessment of exposure.
WARNING:
• The vibration emission during actual use of the
power tool can differ from the declared emission
value depending on the ways in which the tool is
used.
ENG900-1
ENG901-1
3

• Be sure to identify safety measures to protect the
operator that are based on an estimation of
exposure in the actual conditions of use (taking
account of all parts of the operating cycle such as
the times when the tool is switched off and when it
is running idle in addition to the trigger time).
For European countries only
ENH101-17
EC Declaration of Conformity
Makita declares that the following Machine(s):
Designation of Machine:
Cordless Hammer Driver Drill
Model No./ Type: DHP459
Conforms to the following European Directives:
2006/42/EC
They are manufactured in accordance with the following
standard or standardized documents:
EN60745
The technical file in accordance with 2006/42/EC is
available from:
Makita, Jan-Baptist Vinkstraat 2, 3070, Belgium
000331
Makita, Jan-Baptist Vinkstraat 2, 3070, Belgium
31.12.2013
Yasushi Fukaya
Director
GEA010-1
General Power Tool Safety
Warnings
WARNING Read all safety warnings and all
instructions. Failure to follow the warnings and
instructions may result in electric shock, fire and/or
serious injury.
Save all warnings and instructions for
future reference.
GEB056-5
CORDLESS HAMMER DRIVER
DRILL SAFETY WARNINGS
1. Wear ear protectors when impact drilling.
Exposure to noise can cause hearing loss.
2. Use auxiliary handle(s), if supplied with the
tool. Loss of control can cause personal injury.
3.
Hold power tool by insulated gripping surfaces,
when performing an operation where the
cutting accessory may contact hidden wiring.
Cutting accessory contacting a "live" wire may
make exposed metal parts of the power tool "live"
and could give the operator an electric shock.
4. Hold power tool by insulated gripping
surfaces, when performing an operation
where the fastener may contact hidden wiring.
Fasteners contacting a "live" wire may make
exposed metal parts of the power tool "live" and
could give the operator an electric shock.
5. Always be sure you have a firm footing.
Be sure no one is below when using the tool in
high locations.
6. Hold the tool firmly.
7. Keep hands away from rotating parts.
8. Do not leave the tool running. Operate the tool
only when hand-held.
9. Do not touch the bit or the workpiece
immediately after operation; they may be
extremely hot and could burn your skin.
10. Some material contains chemicals which may
be toxic. Take caution to prevent dust
inhalation and skin contact. Follow material
supplier safety data.
SAVE THESE INSTRUCTIONS.
WARNING:
DO NOT let comfort or familiarity with product
(gained from repeated use) replace strict adherence
to safety rules for the subject product. MISUSE or
failure to follow the safety rules stated in this
instruction manual may cause serious personal
injury.
IMPORTANT SAFETY
INSTRUCTIONS
FOR BATTERY CARTRIDGE
1. Before using battery cartridge, read all
instructions and cautionary markings on (1)
battery charger, (2) battery, and (3) product
using battery.
2. Do not disassemble battery cartridge.
3. If operating time has become excessively
shorter, stop operating immediately. It may
result in a risk of overheating, possible burns
and even an explosion.
4. If electrolyte gets into your eyes, rinse them
out with clear water and seek medical
attention right away. It may result in loss of
your eyesight.
5. Do not short the battery cartridge:
(1) Do not touch the terminals with any
conductive material.
(2) Avoid storing battery cartridge in a
4
container with other metal objects such as
nails, coins, etc.
ENC007-8

(3) Do not expose battery cartridge to water
or rain.
A battery short can cause a large current flow,
overheating, possible burns and even a
breakdown.
6. Do not store the tool and battery cartridge in
locations where the temperature may reach or
exceed 50 ゚ C (122 ゚ F).
7. Do not incinerate the battery cartridge even if
it is severely damaged or is completely worn
out. The battery cartridge can explode in a fire.
8. Be careful not to drop or strike battery.
9. Do not use a damaged battery.
10. Follow your local regulations relating to
disposal of battery.
SAVE THESE INSTRUCTIONS.
Tips for maintaining maximum battery life
1. Charge the battery cartridge before
completely discharged.
Always stop tool operation and charge the
battery cartridge when you notice less tool
power.
2. Never recharge a fully charged battery
cartridge.
Overcharging shortens the battery service life.
3. Charge the battery cartridge with room
temperature at 10 ゚ C - 40 ゚ C (50 ゚ F - 104 ゚ F).
Let a hot battery cartridge cool down before
charging it.
4. Charge the battery cartridge once in every six
months if you do not use it for a long period of
time.
FUNCTIONAL DESCRIPTION
CAUTION:
• Always be sure that the tool is switched off and the
battery cartridge is removed before adjusting or
checking function on the tool.
Installing or removing battery cartridge
Fig.1
CAUTION:
• Always switch off the tool before installing or
removing of the battery cartridge.
• Hold the tool and the battery cartridge firmly
when installing or removing battery cartridge.
Failure to hold the tool and the battery cartridge
firmly may cause them to slip off your hands and
result in damage to the tool and battery cartridge
and a personal injury.
To remove the battery cartridge, slide it from the tool
while sliding the button on the front of the cartridge.
To install the battery cartridge, align the tongue on the
battery cartridge with the groove in the housing and slip it
into place. Insert it all the way until it locks in place with a
little click. If you can see the red indicator on the upper
side of the button, it is not locked completely.
CAUTION:
• Always install the battery cartridge fully until the red
indicator cannot be seen. If not, it may accidentally
fall out of the tool, causing injury to you or someone
around you.
• Do not install the battery cartridge forcibly. If the
cartridge does not slide in easily, it is not being
inserted correctly.
Battery protection system
The tool and battery are equipped with a protection
system. This system automatically cuts off power to the
tool to extend battery life.
The tool will automatically stop during operation if the tool
and/or battery are placed under one of the following
conditions:
• Overloaded:
• Low battery voltage:
The tool is operated in a manner that causes
it to draw an abnormally high current.
In this situation, release the switch trigger on
the tool and stop the application that caused
the tool to become overloaded. Then pull the
switch trigger again to restart.
If the tool does not start, the battery is
overheated. In this situation, let the battery
cool before pulling the switch trigger again.
The remaining battery capacity is too low and
the tool will not operate. In this situation,
remove and recharge the battery.
5

NOTE:
• Those temperature-sensitive protection and
low-voltage protection is applied only when the tool
is used with a battery cartridge with a star mark.
Fig.2
Switch action
Fig.3
CAUTION:
• Before inserting the battery cartridge into the tool,
always check to see that the switch trigger actuates
properly and returns to the "OFF" position when
released.
To start the tool, simply pull the switch trigger. Tool speed
is increased by increasing pressure on the switch trigger.
Release the switch trigger to stop.
Lighting up the lamp
Fig.4
CAUTION:
• Do not look in the light or see the source of light
directly.
Pull the switch trigger to light up the lamp. The lamp
keeps on lighting while the switch trigger is being pulled.
The lamp goes out just after releasing the trigger.
NOTE:
• Use a dry cloth to wipe the dirt off the lens of the
lamp. Be careful not to scratch the lens of lamp, or it
may lower the illumination.
Reversing switch action
Fig.5
CAUTION:
• Always check the direction of rotation before
operation.
• Use the reversing switch only after the tool comes
to a complete stop. Changing the direction of
rotation before the tool stops may damage the tool.
• When not operating the tool, always set the
reversing switch lever to the neutral position.
This tool has a reversing switch to change the direction of
rotation. Depress the reversing switch lever from the A
side for clockwise rotation or from the B side for
counterclockwise rotation.
When the reversing switch lever is in the neutral position,
the switch trigger cannot be pulled.
Speed change
Fig.6
CAUTION:
•
Always set the speed change lever fully to the
correct position. If you operate the tool with the
speed change lever positioned halfway between the
"1" side and "2" side, the tool may be damaged.
• Do not use the speed change lever while the tool is
running. The tool may be damaged.
To change the speed, first switch off the tool and then
slide the speed change lever to the "2" side for high
speed or "1" side for low speed. Be sure that the speed
change lever is set to the correct position before
operation. Use the right speed for your job.
Selecting the action mode
Fig.7
This tool employs an action mode changing ring. Select
one of the three modes suitable for your work needs by
using this ring.
For rotation only, turn the ring so that the arrow on the
tool body points toward the
mark on the ring.
For rotation with hammering, turn the ring so that the
arrow points toward the
mark on the ring.
For rotation with clutch, turn the ring so that the arrow
points toward the
mark on the ring.
CAUTION:
• Always set the ring correctly to your desired mode
mark. If you operate the tool with the ring positioned
halfway between the mode marks, the tool may be
damaged.
Adjusting the fastening torque
Fig.8
The fastening torque can be adjusted in 16 steps by turning
the adjusting ring so that the graduations are aligned with
the arrow on the tool body. The fastening torque is
minimum when the number 1 is aligned with the arrow, and
maximum when the number 16 is aligned with the arrow.
Before the actual operation, drive a trial screw into your
material or a piece of duplicate material to determine
which torque level is required for a particular application.
ASSEMBLY
CAUTION:
• Always be sure that the tool is switched off and the
battery cartridge is removed before carrying out
any work on the tool.
Installing or removing the driver bit or drill bit
Fig.9
Turn the sleeve counterclockwise to open the chuck jaws.
Place the bit in the chuck as far as it will go. Turn the
sleeve clockwise to tighten the chuck.
To remove the bit, turn the sleeve counterclockwise.
Installing the hook
Fig.10
The hook is convenient for temporarily hanging the tool.
This can be installed on either side of the tool.
To install the hook, insert it into a groove in the tool
housing on either side and then secure it with a screw. To
remove, loosen the screw and then take it out.
6

Installing the bit holder (Optional accessory)
Fig.11
Fit the bit holder into the protrusion at the tool foot on
either right or left side and secure it with a screw.
When not using the driver bit, keep it in the bit holders.
Bits 45 mm long can be kept there.
OPERATION
CAUTION:
• Always insert the battery cartridge all the way until it
locks in place. If you can see the red part on the
upper side of the button, it is not locked completely.
Insert it fully until the red part cannot be seen. If not,
it may accidentally fall out of the tool, causing injury
to you or someone around you.
Hold the tool firmly with one hand on the grip and the
other hand on the bottom of the battery cartridge to
control the twisting action.
CAUTION:
• Do not cover vents, or it may cause overheating
and damage to the tool.
Fig.12
Hammer drilling operation
CAUTION:
• There is a tremendous and sudden twisting force
exerted on the tool/bit at the time of hole
break-through, when the hole becomes clogged
with chips and particles, or when striking reinforcing
rods embedded in the concrete.
First, turn the action mode changing ring so that the arrow
on the tool body points to the
ring can be aligned in any torque levels for this operation.
Be sure to use a tungsten-carbide tipped bit.
Position the bit at the desired location for the hole, then
pull the switch trigger. Do not force the tool. Light
pressure gives best results. Keep the tool in position and
prevent it from slipping away from the hole.
Do not apply more pressure when the hole becomes
clogged with chips or particles. Instead, run the tool at an
idle, then remove the bit partially from the hole. By
repeating this several times, the hole will be cleaned out
and normal drilling may be resumed.
Blow-out bulb (optional accessory)
Fig.13
After drilling the hole, use the blow-out bulb to clean the
dust out of the hole.
marking. The adjusting
Screwdriving operation
Fig.14
First, turn the action mode changing ring so that the
arrow on the tool body points to the
marking. Adjust
the adjusting ring to the proper torque level for your work.
Then proceed as follows.
Place the point of the driver bit in the screw head and
apply pressure to the tool. Start the tool slowly and then
increase the speed gradually. Release the switch trigger
as soon as the clutch cuts in.
CAUTION:
• Make sure that the driver bit is inserted straight in
the screw head, or the screw and/or bit may be
damaged.
NOTE:
• When driving wood screw, predrill a pilot hole 2/3
the diameter of the screw. It makes driving easier
and prevents splitting of the workpiece.
Drilling operation
First, turn the adjusting ring so that the pointer points to
the
marking. Then proceed as follows.
CAUTION:
• Pressing excessively on the tool will not speed up
the drilling. In fact, this excessive pressure will only
serve to damage the tip of your bit, decrease the
tool performance and shorten the service life of the
tool.
• There is a tremendous force exerted on the tool/bit
at the time of hole break through. Hold the tool
firmly and exert care when the bit begins to break
through the workpiece.
• A stuck bit can be removed simply by setting the
reversing switch to reverse rotation in order to back
out. However, the tool may back out abruptly if you
do not hold it firmly.
• Always secure small workpieces in a vise or with a
similar hold-down device.
• If the tool is operated continuously until the battery
cartridge has discharged, allow the tool to rest for
15 minutes before proceeding with a fresh battery.
• Do not pull the switch trigger repeatedly when the
motor is locked. It may damage the tool.
Drilling in wood
When drilling in wood, the best results are obtained with
wood drills equipped with a guide screw. The guide
screw makes drilling easier by pulling the bit into the
workpiece.
Drilling in metal
To prevent the bit from slipping when starting to make a
hole, make an indentation with a center-punch and
hammer at the point to be drilled. Place the point of the
bit in the indentation and start drilling.
Use a cutting lubricant when drilling metals. The
exceptions are iron and brass which should be drilled dry.
7

MAINTENANCE
CAUTION:
• Always be sure that the tool is switched off and the
battery cartridge is removed before attempting to
perform inspection or maintenance.
• Never use gasoline, benzine, thinner, alcohol or the
like. Discoloration, deformation or cracks may
result.
To maintain product SAFETY and RELIABILITY, repairs,
any other maintenance or adjustment should be
performed by Makita Authorized Service Centers, always
using Makita replacement parts.
OPTIONAL ACCESSORIES
CAUTION:
• These accessories or attachments are
recommended for use with your Makita tool
specified in this manual. The use of any other
accessories or attachments might present a risk of
injury to persons. Only use the accessories or
attachments for their stated purposes.
If you need any assistance for more details regarding
these accessories, ask your local Makita Service Center.
• Drill bits
• Tungsten-carbide tipped hammer bit
• Screw bits
• Socket bit
• Blow-out bulb
• Safety goggles
• Makita genuine battery and charger
• Hook
• Bit holder
NOTE:
Some items in the list may be included in the tool
package as standard accessories. They may differ from
country to country.
8

SVENSKA (Originalbruksanvisning)
1-1. Röd indikator
1-2. Knapp
1-3. Batterikassett
2-1. Stjärnmarkering
3-1. Avtryckare
4-1. Lampa
5-1. Reverseringsknapp
6-1. Hastighetsknapp
Förklaring till översiktsbilderna
7-1. Ring för byte av arbetsläge
7-2. Inställningsring
7-3. Gradering
7-4. Pil
8-1. Ring för byte av arbetsläge
8-2. Inställningsring
8-3. Gradering
8-4. Pil
9-1. Hylsa
10-1. Spår
10-2. Krok
10-3. Skruv
11-1. Bitshållare
11-2. Bits
12-1. Ventil
13-1. Gummituta
SPECIFIKATIONER
Modell DHP459
Kapacitet
Obelastat varvtal (min-1)
Slag per minut
Längd 192 mm
Märkspänning 18 V likström
Batterikassett BL1815 / BL1815N / BL1820 BL1830 / BL1840 / BL1850
• På grund av vårt pågående program för forskning och utveckling kan dessa specifikationer ändras utan föregående meddelande.
• Specifikationer och batterikassett kan variera från land till land.
• Vikt med batterikassett i enlighet med EPTA-procedur 01/2003
Vikt 1,5 kg 1,7 kg
Avsedd användning
Maskinen är avsedd för slagborrning i tegel, cement och
sten. Den är också lämplig för skruvdragning och
borrning utan slag i trä, metall, keramik och plast.
Buller
Typiska A-vägda bullernivån är mätt enligt EN60745:
Ljudtrycksnivå (LpA): 82 dB (A)
Ljudeffektnivå (L
Mättolerans (K): 3 dB (A)
): 93 dB (A)
WA
Använd hörselskydd
Cement 13 mm
Stål 13 mm
Trä 38 mm
Träskruv 6 mm x 75 mm
Maskinskruv M6
Hög (2) 0 - 1 500
Låg (1) 0 - 400
Hög (2) 0 - 22 500
Låg (1) 0 - 6 000
ENE079-1
Vibration
Vibrationens totalvärde (tre-axlars vektorsumma) mätt
enligtEN60745:
ENG905-1
Arbetsläge: slagborrning i cement
Vibrationsemission (a
Mättolerans (K): 1,5 m/s
h,ID
): 8 m/s
2
2
Arbetsläge: borrning i metall
Vibrationsemission (a
Mättolerans (K): 1,5 m/s
•
Det deklarerade vibrationsemissionsvärdet har
uppmätts i enlighet med standardtestmetoden och kan
användas för jämförandet av en maskin med en annan.
• Det deklarerade vibrationsemissionsvärdet kan
också användas i preliminär bedömning av
exponering för vibration.
VAR NING!
• Viberationsemissionen under faktisk användning
av maskinen kan skilja sig från det deklarerade
emissionsvärdet, beroende på hur maskinen
används.
): 2,5 m/s2 eller lägre
h,D
2
9
ENG900-1
ENG901-1

• Se till att hitta säkerhetsåtgärder som kan skydda
användaren och som grundar sig på en
uppskattning av exponering i verkligheten (ta med i
beräkningen alla delar av användandet såsom
antal gånger maskinen är avstängd och när den
körs på tomgång samt då startomkopplaren
används).
ENH101-17
Gäller endast Europa
EU-konformitetsdeklaration
Makita försäkrar att följande maskiner:
Maskinbeteckning:
Sladdlös slagborrhammare
Modellnummer/Typ: DHP459
Följer följande EU-direktiv:
2006/42/EC
De är tillverkade i enlighet med följande standard eller
standardiseringsdokument:
EN60745
Den tekniska dokumentationen i enlighet med
2006/42/EG finns tillgänglig från:
Makita, Jan-Baptist Vinkstraat 2, 3070, Belgium
31.12.2013
000331
Yasushi Fukaya
Direktör
Makita, Jan-Baptist Vinkstraat 2, 3070, Belgium
GEA010-1
Allmänna säkerhetsvarningar för
maskin
VARNING Läs igenom alla säkerhetsvarningar
och instruktioner. Underlåtenhet att följa varningar och
instruktioner kan leda till elektrisk stöt, brand och/eller
allvarliga personskador.
Spara alla varningar och instruktioner
för framtida referens.
GEB056-5
SÄKERHETSVARNINGAR FÖR
SLADDLÖS
SLAGBORRHAMMARE
1. Bär hörselskydd vid slagborrning. Kraftigt
buller kan orsaka hörselskador.
2. Använd extrahandtag, om det levereras med
maskinen. Att tappa kontrollen över maskinen
kan leda till personskador.
3. Håll maskinen i de isolerade handtagen om det
finns risk för att skärverktyget kan komma i
kontakt med en dold elkabel. Om skärverktyget
kommer i kontakt med en strömförande ledning
blir maskinens metalldelar strömförande och kan
ge operatören en elektrisk stöt.
4. Håll maskinen i de isolerade handtagen om det
finns risk för att skruvdragaren kan komma i
kontakt med en dold elkabel. Om skruvdragaren
kommer i kontakt med en strömförande ledning
blir maskinens metalldelar strömförande och kan
ge operatören en elektrisk stöt.
5. Se till att du hela tiden har ett säkert fotfäste.
Se till att ingen står under dig när maskinen
används på hög höjd.
6. Håll i maskinen ordentligt.
7. Håll händerna på avstånd från roterande delar.
8. Lämna inte maskinen igång. Använd endast
maskinen när du håller den i händerna.
9. Rör inte vid borr eller arbetsstycke omedelbart
efter användning eftersom de kan vara extremt
varma och orsaka brännskador.
10. Vissa material kan innehålla giftiga kemikalier.
Se till att du inte andas in damm eller får det
på huden. Följ anvisningarna i leverantörens
materialsäkerhetsblad.
SPARA DESSA ANVISNINGAR.
VARNING!
GLÖM INTE att noggrant följa
säkerhetsanvisningarna för maskinen även efter det
att du har blivit van att använda den. OVARSAM
hantering eller underlåtenhet att följa
säkerhetsanvisningarna i denna bruksanvisning kan
leda till allvarliga personskador.
ENC007-8
VIKTIGA
SÄKERHETSANVISNINGAR
FÖR BATTERIKASSETT
1. Innan batterikassetten används ska alla
instruktioner och varningsmärken på (1)
batteriladdaren, (2) batteriet och (3) produkten
läsas.
2. Montera inte isär batterikassetten.
10

3. Om driftstiden blivit avsevärt kortare ska
användningen avbrytas omedelbart. Det kan
uppstå överhettning, brännskador och t o m
en explosion.
4. Om du får elektrolyt i ögonen ska de sköljas
med rent vatten och läkare uppsökas
omedelbart. Det finns risk för att synen
förloras.
5. Kortslut inte batterikassetten.
(1) Rör inte vid polerna med något
strömförande material.
(2) Undvik att förvara batterikassetten
tillsammans med andra metallobjekt som t
ex spikar, mynt etc.
(3) Skydda batteriet mot vatten och regn.
Ett kortslutet batteri kan orsaka ett stort
strömflöde, överhettning, risk för brännskador
och maskinen kan till och med gå sönder.
6. Förvara inte maskinen och batterikassetten på
platser där temperaturen kan nå eller
överstiga 50 ゚ C (122 ゚ F).
7. Bränn inte upp batterikassetten även om den
är svårt skadad eller helt utsliten.
Batterikassetten kan explodera i öppen eld.
8. Var försiktig så att du inte råkar tappa batteriet
och utsätt det inte för stötar.
9. Använd inte ett skadat batteri.
10. Följ lokala föreskrifter beträffande
avfallshantering av batteriet.
SPARA DESSA ANVISNINGAR.
Tips för att uppnå batteriets maximala
livslängd
1. Ladda batterikassetten innan den är helt
urladdad.
Sluta att använda maskinen och ladda
batterikassetten när du märker att kraften
avtar.
2. Ladda aldrig en fulladdad batterikassett.
Överladdning förkortar batteriets livslängd.
3. Ladda batterikassetten vid rumstemperaturer
mellan 10 ゚ C och 40 ゚ C (50 ゚ F - 104 ゚ F). Låt en
varm batterikassett svalna innan den laddas.
4. Ladda batterikassetten om du inte har använt
den på mer än sex månader.
FUNKTIONSBESKRIVNING
FÖRSIKTIGT!
• Se alltid till att maskinen är avstängd och
batterikassetten borttagen innan du justerar eller
kontrollerar maskinens funktioner.
Montera eller demontera batterikassetten
Fig.1
FÖRSIKTIGT!
• Stäng alltid av maskinen innan du monterar eller tar
bort batterikassetten.
• Håll stadigt i maskinen och batterikassetten
när du installerar eller tar bort batterikassetten.
Om du inte håller stadigt i maskinen och
batterikassetten kan de halka ur dina händer och
skadas samt orsaka personskada.
Ta bort batterikassetten genom att skjuta ner knappen på
kassettens framsida samtidigt som du drar ut
batterikassetten.
Sätt i batterikassetten genom att rikta in tungan på
batterikassetten mot spåret i höljet och skjut den på plats.
Tryck in batterikassetten ordentligt tills den låser fast
med ett klick. Om du kan se den röda indikatorn på
knappens ovansida är batterikassetten inte låst
ordentligt.
FÖRSIKTIGT!
• Sätt alltid i batterikassetten helt tills den röda
indikatorn inte längre syns. I annat fall kan den
oväntat falla ur maskinen och skada dig eller någon
annan.
• Montera inte batterikassetten med våld. Om
kassetten inte lätt glider på plats är den felinsatt.
Skyddssystem för batteri
Maskinen och batteriet är utrustade med ett
skyddssystem. Detta system bryter automatiskt
strömmen till maskinen för att förlänga batteriets
livslängd.
Maskinen stanna automatiskt under användningen om
maskinen och/eller batteriet hamnar i en av följande
situationer:
• Överbelastad:
• Batterispänningen faller:
11
Maskinen används på ett sätt som orsakar att
den förbrukar onormalt mycket ström.
I detta läge släpper du avtryckaren på
maskinen och stoppar aktiviteten som orsakar
att maskinen blir överbelastad. Tryck sedan in
avtryckaren igen för att starta om.
Om maskinen inte startar är batteriet
överhettat. Låt då batteriet svalna innan du
trycker in avtryckaren igen.
Den kvarvarande batterikapaciteten är för låg
och maskinen fungerar inte. I detta läge tar du
bort batteriet och laddar det.

OBS!
• Överhettningsskyddet och lågspänningsskyddet
används endast när maskinen är försedd med ett
stjärnmärkt batteri.
Fig.2
Avtryckarens funktion
Fig.3
FÖRSIKTIGT!
• Innan du sätter i batterikassetten i maskinen ska du
kontrollera att avtryckaren fungerar och återgår till
läget "OFF" när du släpper den.
Tryck in avtryckaren för att starta maskinen. Hastigheten
ökas genom att trycka hårdare på avtryckaren. Släpp
avtryckaren för att stoppa den.
Tända lamporna
Fig.4
FÖRSIKTIGT!
• Titta inte in i ljuset eller direkt i ljuskällan.
Tryck på avtryckaren för att tända lampan. Lampan lyser
medan du håller in avtryckaren. Lampan slocknar strax
efter att du har släppt avtryckaren.
OBS!
• Använd en torr trasa för att torka bort smuts från
lampglaset. Var försiktig så att inte lampglaset
repas eftersom ljuset då kan bli svagare.
Reverseringsknappens funktion
Fig.5
FÖRSIKTIGT!
• Kontrollera alltid rotationsriktningen före
användning.
• Använd endast reverseringsknappen när maskinen
stannat helt. Maskinen kan skadas om du byter
rotationsriktning medan den fortfarande roterar.
• Placera alltid reverseringsknappen i neutralt läge
när du inte använder maskinen.
Denna maskin har en reverseringsknapp för att byta
rotationsriktning. Tryck in reverseringsknappen från
sidan A för medurs rotation och från sidan B för moturs
rotation.
När reverseringsknappen är i neutralt läge fungerar inte
avtryckaren.
Hastighetsändring
Fig.6
FÖRSIKTIGT!
• Var noga när du ändrar läge på hastighetsknappen.
Om du använder maskinen och hastighetsknappen
står halvvägs mellan sida "1" och sida "2" kan
maskinen skadas.
• Ändra inte hastighetsknappen medan maskinen
roterar. Maskinen kan skadas.
För att byta hastighet stänger du först av maskinen. Skjut
sedan hastighetsknappen till "2" för hög hastighet eller till
"1" för låg hastighet. Kontrollera att hastighetsknappen
står i rätt läge innan du börjar arbeta. Använd rätt
hastighet för jobbet.
Välja arbetsläge
Fig.7
På denna maskin använder du en ring för att byta
arbetsläge. Välj det av de tre lägena som bäst passar det
arbete du ska utföra.
För vanlig borrning vrider du ringen så att pilen på
maskinhuset pekar mot
-markeringen på ringen.
För slagborrning vrider du ringen så att pilen pekar mot
-markeringen på ringen.
För borrning med momentbegränsning vrider du ringen
så att pilen pekar mot
-markeringen på ringen.
FÖRSIKTIGT!
• Ställ alltid in ringen noga på det önskade läget. Om
du använder maskinen med ringen placerad
halvvägs mellan lägesmarkeringarna kan
maskinen skadas.
Ställa in åtdragningsmomentet
Fig.8
Åtdragningsmomentet kan justeras i 16 steg genom att
man vrider inställningsringen så att dess gradering är i
linje med pilen på maskinhuset. Åtdragningsmomentet är
minimalt när siffran 1 är i linje med pilen och maximal när
siffran 16 är i linje med pilen.
Innan du börjar arbeta skall du skruva i en provskruv i ditt
material eller i ett stycke av samma material, så att du vet
vilket vridmoment som passar för en viss användning.
MONTERING
FÖRSIKTIGT!
• Se alltid till att maskinen är avstängd och
batterikassetten borttagen innan du underhåller
maskinen.
Sätta i eller ta ur skruvbits eller borrbits
Fig.9
Vrid hylsan moturs för att öppna chucken. Skjut in bitset i
chucken så långt det går. Vrid hylsan medurs för att dra
åt chucken.
Vrid hylsan moturs för att ta bort bitset.
Montera kroken
Fig.10
Kroken kan användas när du vill hänga upp verktyget
temporärt. Den kan monteras på endera sidan av maskinen.
För att montera kroken sätter du i den i ett spår i
maskinhuset på endera sida och drar fast den med en
skruv. Ta bort kroken genom att skruva loss skruven.
12

Sätt i bitshållaren (varfritt tillbehör)
Fig.11
Passa in bitshållaren på den utskjutande delen på
verktygsfoten, antingen på höger eller vänster sida, och
fäst den med en skruv.
Placera skruvbitset i hållaren när det inte används. Bits
upp till 45 mm kan förvaras här.
ANVÄNDNING
FÖRSIKTIGT!
• Skjut alltid in batterikassetten ordentligt tills den
låses på plats. Om du kan se den röda delen på
knappens ovansida är den inte riktigt låst. Skjut in
den helt tills den röda delen inte längre syns. I
annat fall kan batterikassetten lossna oväntat från
maskinen och skada dig eller någon annan.
Håll verktyget stadigt med en hand om handtaget och
den andra handen under batteriet för att kontrollera
vridningen.
FÖRSIKTIGT!
• Täck inte över ventilationsöppningarna, eftersom
det kan orsaka överhettning och skada maskinen.
Fig.12
Slagborrning
FÖRSIKTIGT!
• Maskinen/bitset utsätts för en plötslig och oerhört
stor vridande kraft vid hålgenomslaget, när hålet
fylls av spån och partiklar och när du slår ner
förstärkningar i cement.
Vrid först ringen för byte av läge så att pilen på
maskinhuset pekar mot
ställas in på vilken momentnivå som helst för denna typ
av arbete.
Använd ett hårdmetallbits.
Placera bitset där hålet ska vara och tryck sedan på
avtryckaren. Forcera inte maskinen. Ett lätt tryck ger bäst
resultat. Håll maskinen på rätt plats och hindra den från
att flyttas ur hålet.
Tryck inte hårdare när hålet fylls med spånor eller andra
partiklar. Kör istället maskinen på tomgång och ta ur bitset
ur hålet bit för bit. Genom att upprepa detta flera gånger
rensas hålet och normal borrning kan återupptas.
Gummituta (tillbehör)
Fig.13
Efter borrning av hålet används gummitutan för att blåsa
rent hålet.
Skruvdragning
Fig.14
Vrid först ringen för byte av läge så att pilen på
maskinhuset pekar mot
inställningsringen så att du får rätt åtdragningsmoment
för ditt arbete. Fortsätt sedan enligt följande:
-markeringen. Ringen kan
-markeringen. Anpassa
Placera spetsen på skruvbitset i skruvskallen och tryck
med maskinen. Starta maskinen sakta och öka sedan
hastigheten gradvis. Släpp avtryckaren så fort
kopplingen slirar.
FÖRSIKTIGT!
• Se till att skruvbitset placeras rakt i skruvskallen
annars kan skruven och/eller bitset skadas.
OBS!
• Vid skruvning med träskruv är det lämpligt att
förborra ett styrhål 2/3 av skruvens diameter. Det
gör skruvdragningen enklare och förhindrar att trät
spricker.
Borrning
Vrid först inställningsringen så att pilen pekar på
-markeringen. Fortsätt sedan enligt följande:
FÖRSIKTIGT!
• Borrningen går inte fortare för att du trycker hårdare
på maskinen. Detta extra tryck skadar bara toppen
på ditt borr, sänker maskinens prestanda och
förkortar maskinens livslängd.
• Det utvecklas en enorm kraft på maskinen/borret
vid hålgenomslaget. Håll ett stadigt tag i maskinen
och var försiktig när borret börjar tränga igenom
arbetsstycket.
• Ett borr som fastnat kan enkelt backas ur genom att
reversera borrningens rotationsriktning. Maskinen
kan dock backa för häftigt om du inte håller
ordentligt i den.
• Fäst alltid små arbetsstycken i ett städ eller en
liknande infästningsenhet.
• Om maskinen används löpande tills batteriet är
tomt bör maskinen vila 15 minuter innan arbetet
fortsätter med ett laddat batteri.
• Tryck inte in avtryckaren upprepade gånger när
motorn är låst. Det kan skada maskinen.
Borra i trä
Vid borrning i trä uppnår du bäst resultat om du använder
ett träborr med styrskruv. Styrskruven gör det enklare att
borra genom att den drar in borret i arbetsstycket.
Borra i metall
För att borret inte ska halka när när du börjar borra kan
du göra ett märke med en syl och en hammare i punkten
där hålet ska borras. Placera borrets spets i sylhålet och
påbörja borrningen.
Använd ett smörjmedel vid borrning i metall. Undantagen
är järn och mässing som ska borras torrt.
13

UNDERHÅLL
FÖRSIKTIGT!
• Se alltid till att maskinen är avstängd och
batterikassetten borttagen innan inspektion eller
underhåll utförs.
• Använd inte bensin, thinner, alkohol eller liknande.
Missfärgning, deformation eller sprickor kan
uppstå.
För att upprätthålla produktens SÄKERHET och
TILLFÖRLITLIGHET bör allt underhålls- och
justeringsarbete utföras av ett auktoriserat Makita
servicecenter och med reservdelar från Makita.
VALFRIA TILLBEHÖR
FÖRSIKTIGT!
• Följande tillbehör eller tillsatser rekommenderas för
användning med den Makita-maskin som denna
bruksanvisning avser. Användning av andra
tillbehör eller tillsatsverktyg kan orsaka
personskador. Använd endast tillbehören och
tillsatsverktygen för deras avsedda användning.
Kontakta ditt lokala Makita servicecenter om du behöver
ytterligare information om dessa tillbehör.
• Borrbits
• Slagborrbits med hårdmetallspets
• Skruvbits
• Hylsbits
• Gummituta
• Skyddsglasögon
• Makitas originalbatteri och -laddare
• Krok
• Bitshållare
OBS!
Några av tillbehören i listan kan vara inkluderade i
maskinpaketet som standardtillbehör. De kan variera
mellan olika länder.
14

NORSK (originalinstruksjoner)
1-1. Rød indikator
1-2. Knapp
1-3. Batteri
2-1. Stjernemerking
3-1. Startbryter
4-1. Lampe
5-1. Revershendel
6-1. Turtallsvelger
Oversiktsforklaring
7-1. Funksjonsvelger
7-2. Justeringsring
7-3. Delestreker
7-4. Pil
8-1. Funksjonsvelger
8-2. Justeringsring
8-3. Delestreker
8-4. Pil
9-1. Mansjett
10-1. Spor
10-2. Bøyle
10-3. Skrue
11-1. Bitsholder
11-2. Bits
12-1. Utløp
13-1. Utblåsningsballong
TEKNISKE DATA
Modell DHP459
Kapasitet
Hastighet uten belastning
(min-1)
Slag per minutt
Total lengde 192 mm
Merkespenning DC 18 V
Batteri BL1815 / BL1815N / BL1820 BL1830 / BL1840 / BL1850
• Som følge av vårt kontinuerlige forsknings- og utviklingsprogram kan de tekniske dataene endres uten ytterligere forvarsel.
• Tekniske data og batteri kan variere fra land til land.
• Vekt, med batteri, i henhold til EPTA-prosedyre 01/2003
Nettovekt 1,5 kg 1,7 kg
Beregnet bruk
Dette verktøyet er laget for slagboring i murstein, betong
og stein. Det egner seg også til skruing og boring uten
slagfunksjon i tre, metall, keramikk og plast.
Støy
Typisk A-vektet lydtrykknivå er bestemt i henhold til
EN60745:
Lydtrykknivå (LpA): 82 dB (A)
Lydeffektnivå (L
Usikkerhet (K): 3 dB (A)
): 93 dB (A)
WA
Bruk hørselvern
Vibrasjon
Den totale vibrasjonsverdien (triaksial vektorsum)
bestemt i henhold til EN60745:
Arbeidsmåte: slagboring i betong
Genererte vibrasjoner (a
Usikkerhet (K): 1,5 m/s
h,ID
2
Betong 13 mm
Stål 13 mm
Tre 38 mm
Treskrue 6 mm x 75 mm
Maskinskrue M6
Høy (2) 0 - 1 500
Lav (1) 0 - 400
Høy (2) 0 - 22 500
Lav (1) 0 - 6 000
ENE079-1
Arbeidsmåte: boring i metall
ENG905-1
Genererte vibrasjoner (a
Usikkerhet (K): 1,5 m/s
Den angitte verdien for de genererte vibrasjonene
•
): 2,5 m/s2 eller mindre
h,D
2
er blitt målt i samsvar med standardtestmetoden og
kan brukes til å sammenlikne et verktøy med et
annet.
• Den angitte verdien for de genererte vibrasjonene
kan også brukes til en foreløpig vurdering av
eksponeringen.
ADVARSEL:
• De genererte vibrasjonene ved faktisk bruk av
ENG900-1
elektroverktøyet kan avvike fra den oppgitte
vibrasjonsverdien, avhengig av hvordan verktøyet
brukes.
•
Vær påpasselig med å finne sikkerhetstiltak som
beskytter operatøren, basert på en oppfatning av
risiko under faktiske bruksforhold (på bakgrunn av
alle sider ved brukssyklusen, som når verktøyet slås
av og når det går på tomgang, i tillegg til oppstarten).
): 8 m/s
2
ENG901-1
15

Gjelder bare land i Europa
ENH101-17
EF-samsvarserklæring
Makita erklærer at følgende maskin(er):
Maskinbetegnelse:
Batteridrevet slagboremaskin
Modellnr./type: DHP459
Samsvarer med følgende europeiske direktiver:
2006/42/EC
De er produsert i henhold til følgende standarder eller
standardiserte dokumenter:
EN60745
Den tekniske filen i samsvar med 2006/42/EF er
tilgjengelig fra:
Makita, Jan-Baptist Vinkstraat 2, 3070, Belgia
000331
Makita, Jan-Baptist Vinkstraat 2, 3070, Belgia
31.12.2013
Yasushi Fukaya
Direktør
GEA010-1
Generelle advarsler angående
sikkerhet for elektroverktøy
ADVARSEL Les alle sikkerhetsadvarslene og alle
instruksjonene. Hvis du ikke følger alle advarslene og
instruksjonene som er oppført nedenfor, kan det føre til
elektriske støt, brann og/eller alvorlige helseskader.
Oppbevar alle advarsler og instruksjoner
for senere bruk.
GEB056-5
SIKKERHETSADVARSLER FOR
TRÅDLØS
HAMMERDRIVERDRILL
1. Bruk hørselsvern under slagboring. Støy k an
føre til nedsatt hørsel.
2. Bruk hjelpehåndtak, hvis det (de) følger med
maskinen. Hvis maskinen kommer ut av kontroll,
kan det resultere i helseskader.
3. Hold maskinen i det isolerte håndtaket når
skjæreverktøyet kan komme i kontakt med
skjulte ledninger under arbeidet. Hvis
skjæreverktøyet får kontakt med strømførende
ledninger, vil uisolerte metalldeler av maskinen bli
strømførende og kunne gi brukeren elektrisk støt.
4. Hold maskinen i det isolerte håndtaket når
festemidlet kan komme i kontakt med skjulte
ledninger under arbeidet. Hvis festemidler får
kontakt med strømførende ledninger, vil uisolerte
metalldeler av maskinen bli strømførende og
kunne gi brukeren elektrisk støt.
5. Forviss deg alltid om at du har godt fotfeste.
Forviss deg om at ingen står under deg når du
jobber høyt over bakken.
6. Hold maskinen godt fast.
7. Hold hendene unna roterende deler.
8. Ikke gå fra verktøyet mens det er i gang.
Verktøyet må bare brukes mens operatøren
holder det i hendene.
9. Ikke berør bits eller arbeidsstykke umiddelbart
etter bruk. Disse vil da være ekstremt varme,
og du kan få brannsår.
10. Enkelte materialer inneholder kjemikalier som
kan være giftige. Treff tiltak for å hindre
hudkontakt og innånding av støv. Følg
leverandørens sikkerhetsanvisninger.
TA VARE PÅ DISSE
INSTRUKSENE.
ADVARSEL:
Selv om du har brukt produktet mye og føler deg
fortrolig med det, er det likevel svært viktig at du
følger nøye de retningslinjene for sikkerhet som er
utarbeidet for dette produktet. MISBRUK av
verktøyet eller mislighold av sikkerhetsreglene i
denne brukerhåndboken kan resultere i alvorlige
helseskader.
ENC007-8
VIKTIGE
SIKKERHETSINSTRUKSJONER
FOR BATTERIET
1. Før du begynner å bruke batteriet, må du lese
alle anvisninger og forsiktighetsregler på (1)
batteriladeren, (2) batteriet og (3) det
produktet batteriet skal brukes i.
2. Ikke ta fra hverandre batteriet.
3. Hvis driftstiden er blitt vesentlig kortere, må
du omgående slutte å bruke maskinen. Hvis
ikke kan resultatet bli overoppheting, mulige
forbrenninger eller til og med en eksplosjon.
4. Hvis du får elektrolytt i øynene, må du skylle
dem med store mengder rennende vann og
oppsøke lege med én gang. Denne typen uhell
kan føre til varig blindhet.
5. Ikke kortslutt batteriet.
(1) Ikke berør batteripolene med ledende
materialer.
(2) Ikke lagre batteriet i samme beholder som
andre metallgjenstander, som for
eksempel spiker, mynter osv.
16
 Loading...