

Makita DFJ210, DFJ411, DFJ311, DFJ310, DFJ410 Instruction Manual
...
EN
FR
DE
IT
NL
ES
PT
DA
EL
TR
Cordless Fan Jacket /
Cordless Fan Vest
Blouson Ventilé sans l /
Blouson Ventilé à Batterie
Akku-Klima-Jacke /
Akku-Klimaweste
Giacca ventilata a batteria /
Giubbotto ventilato a batteria
Accuventilatorjas /
Accuventilatorvest
Chamarra Ventilada Inalámbrica /
Chaleco Ventilado Inalámbrico
Jaqueta Ventilada a Bateria /
Colete Ventilado a Bateria
Akku ventilatorjakke /
Akku ventilatorvest
Ζακέτα με φορητό ανεμιστήρα /
Γιλέκο με φορητό ανεμιστήρα
Kablosuz Fanlı Mont /
Kablosuz Fanlı Yelek
INSTRUCTION MANUAL 7
MANUEL D’INSTRUCTIONS 13
BETRIEBSANLEITUNG 20
ISTRUZIONI PER L’USO 27
GEBRUIKSAANWIJZING 34
MANUAL DE
INSTRUCCIONES
MANUAL DE INSTRUÇÕES 48
BRUGSANVISNING 55
ΕΓΧΕΙΡΙΔΙΟ ΟΔΗΓΙΩΝ 62
KULLANMA KILAVUZU 69
41
DFJ210 / DFJ211 /
DFJ310 / DFJ311 /
DFJ410 / DFJ411 /
DFJ212 / DFJ213 /
DFJ214 / DFV210

Fig.1
3
1
2
4
Fig.2
1
5
8
7
2
4
3
6
2
2
3
Fig.3
Fig.4
1
1
4
1
4
1
1
18 V / 14.4 V 10.8 V
1
2
3
Fig.5
3
1
Fig.6
Fig.7
1
2
Fig.9
3
1
4
5
1
Fig.10
1
2
Fig.8
2
3
Fig.11
4
1
21
Fig.12
Fig.13
Fig.14
2
3
1
1
2 3
Fig.16
1
2
Fig.17
1
4 5
Fig.18
1
Fig.15
2
Fig.19
5
1

2
1
Fig.20
Fig.21
Fig.22
1
Fig.24
1
Fig.25
Fig.23
6
ENGLISH (Original instructions)
WARNING
This appliance can be used by children aged from 8 years and
above and persons with reduced physical, sensory or mental capabilities or lack of experience and knowledge if they have been given
supervision or instruction concerning use of the appliance in a safe
way and understand the hazards involved. Children shall not play
with the appliance. Cleaning and user maintenance shall not be
made by children without supervision.
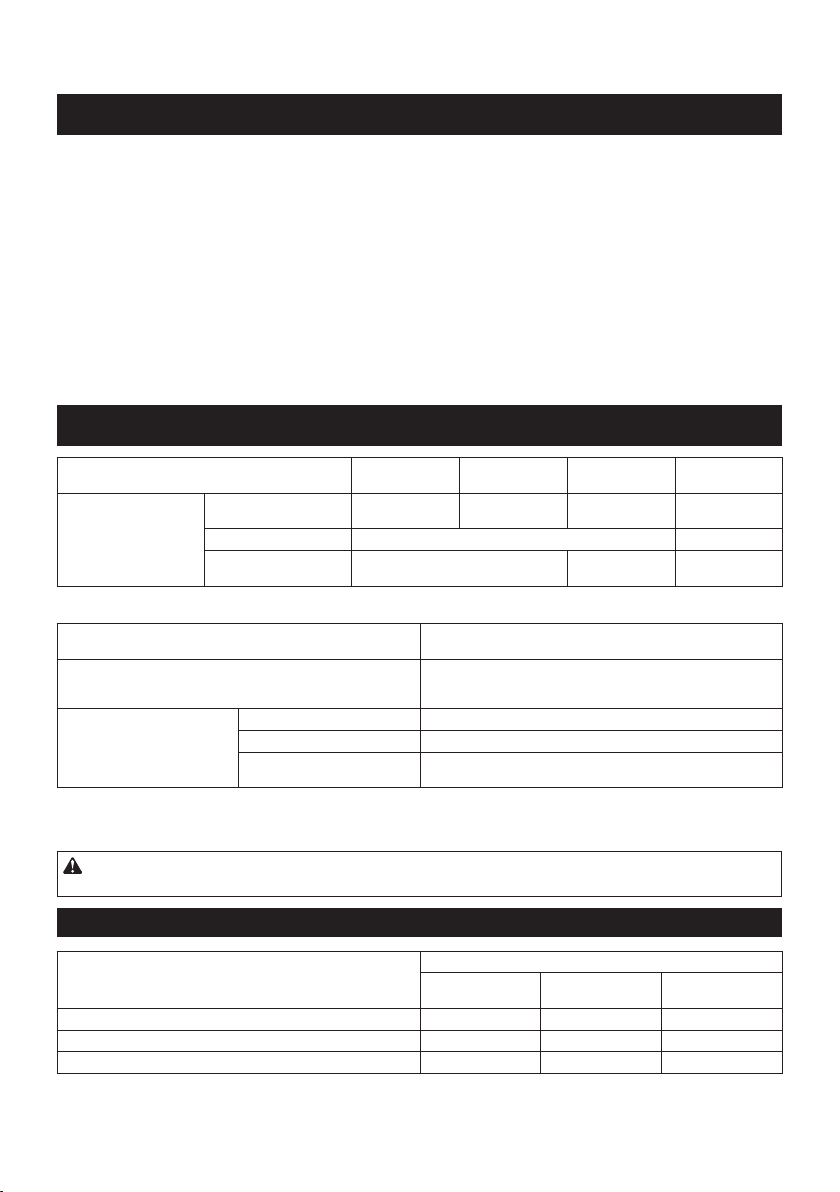
SPECIFICATIONS
Model: DFJ210 / DFJ211 DFJ310 / DFJ311 DFJ410 / DFJ411
Material Outer Polyester 100% Cotton 100%
Pocket Cotton 100% Polyester 100%
Shoulder pad - Polyester 65% +
Specications for the fan unit
USB power supply port
(optional accessory)
Rated voltage DC 10.8 V - 12V max
Battery cartridge 10.8 V - 12V max BL1015 / BL1016 / BL1020B / BL1021B / BL1040B / BL1041B
14.4 V BL1415N / BL1430 / BL1430B / BL1440 / BL1450 / BL1460B
18 V BL1815N / BL1820 / BL1820B / BL1830 / BL1830B / BL1840 /
•
Due to our continuing program of research and development, the specications herein are subject to change without notice.
• Specications and battery cartridge may differ from country to country.
DC 5V, 2.1A, Type A
DC 14.4 V
DC 18 V
BL1840B / BL1850 / BL1850B / BL1860B
Polyester (100%) +
titanium pearly coating
Cotton 35%
DFJ212 / DFJ213 /
DFJ214 / DFV210
Polyester 100%
-
WARNING: Only use the battery cartridges listed above. Use of any other battery cartridges may cause
injury and/or re.
Operating time
Air speed Battery
BL1040B
BL1041B
HIGH 5.0 hours 8.5 hours 13.5 hours
MEDIUM 9.0 hours 16.0 hours 24.5 hours
LOW 13.0 hours 21.0 hours 33.0 hours
• The operating times in the above table are a rough guideline. They may differ from actual operating times.
• Operating times may differ depending on battery type, charging status, and usage condition.
BL1460B BL1860B
7 ENGLISH
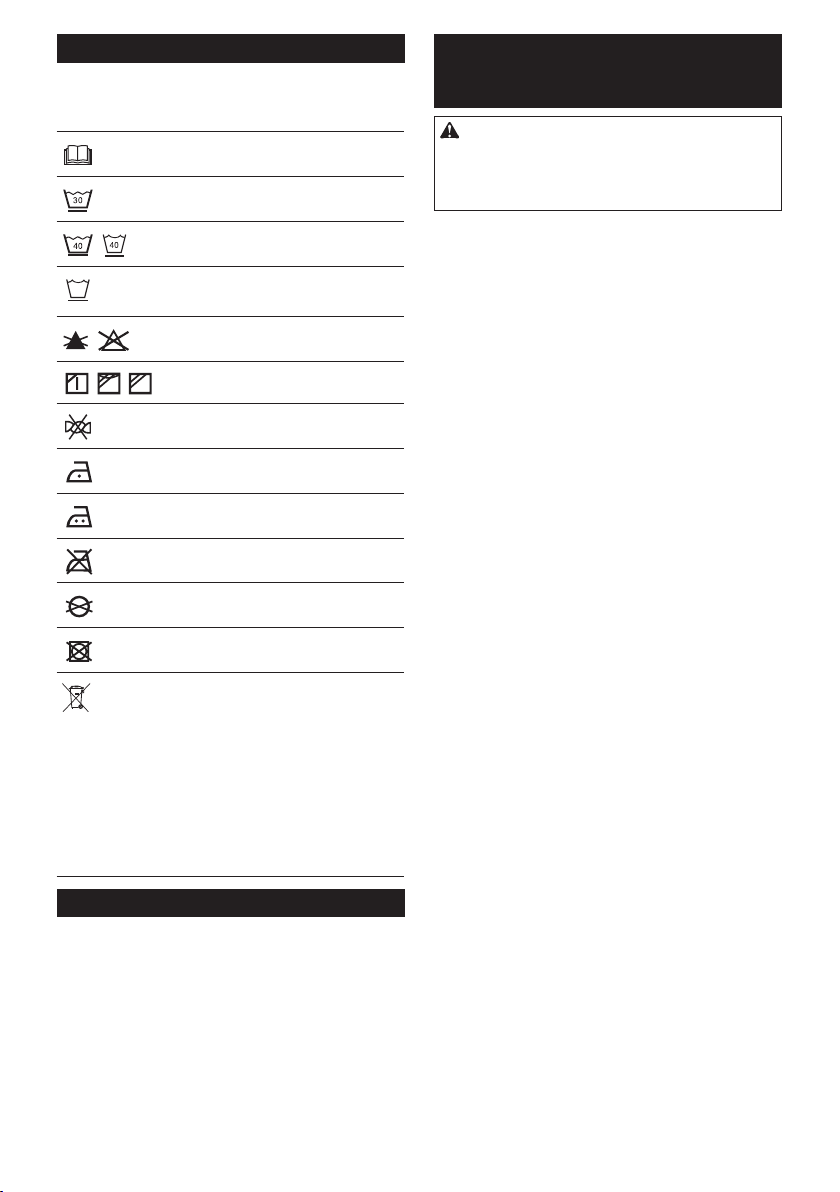
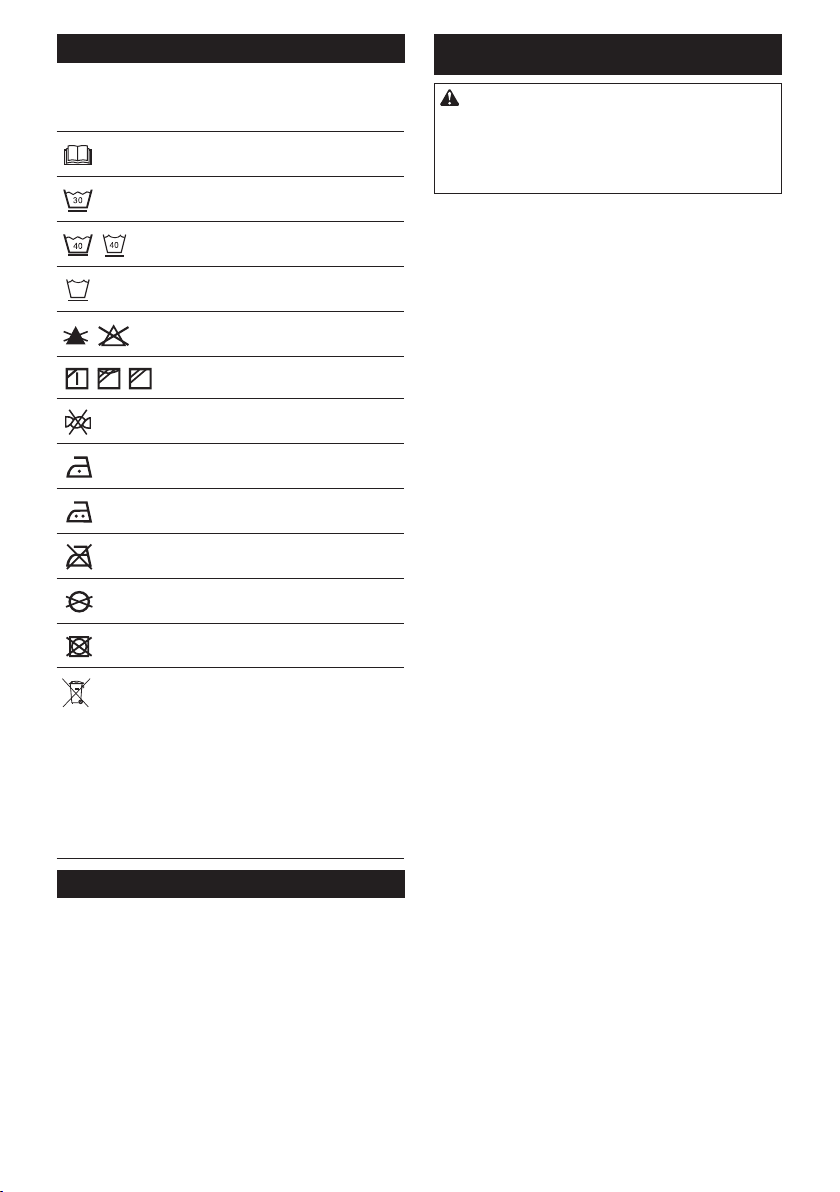
Symbols
Ni-MH
Some of the following symbols are used for the product.
Be sure to understand their meaning before use.
Read the instruction manual.
Machine wash at below 30°C on the gentle
cycle.
Machine wash at below 40°C on the gentle
cycle.
Machine wash in domestic or commercial
machines on the gentle cycle.
Do not bleach.
Line dry in the shade.
Do not wring.
Iron at low temperatures (not exceeding
110°C).
Iron at medium temperatures (not exceeding 150°C).
Do not iron.
Do not dry clean.
Do not tumble dry.
Only for EU countries
Do not dispose of electric equipment or
battery pack together with household
waste material! In observance of the
European Directives, on Waste Electric
and Electronic Equipment and Batteries
and Accumulators and Waste Batteries and
Accumulators and their implementation
in accordance with national laws, electric
equipment and batteries and battery
pack(s) that have reached the end of
their life must be collected separately and
returned to an environmentally compatible
recycling facility.
Li-ion
Intended use
The fan jacket is intended for cooling your body
temperature.
SAFETY WARNINGS
WARNING: Read all safety warnings and
all instructions. Failure to follow the warnings and
instructions may result in electric shock, re and/or
serious injury.
Save all warnings and instruc-
tions for future reference.
1. Never use the fan jacket when temperature
reach more than 50°C (122°F). Also avoid use
in high humidity. Doing so may cause burns.
2. Do not wear the jacket over bare skin.
3. Do not use the jacket while you are under the
inuence of drugs, alcohol or medication.
4.
Do not sleep while wearing the fan jacket. A steep
decline of body temperature may harm your health.
5. Children, handicapped persons, or anyone
who is insensitive to temperature, for example,
someone with poor blood circulation, should
refrain from using the jacket.
6. This appliance is not intended for medical use
in hospitals.
7. Do not use the jacket other than for its
intended purpose.
8. If you sense anything unusual, switch off
the jacket and remove the battery holder
immediately.
9. If any abnormality is found, contact your local
service center for repair.
10. Do not stamp on, throw or otherwise abuse the
fan jacket.
11. Do not put your nger or a foreign object into
the fan unit.
12. Do not blow compressed air toward the fan. Do
not put small sticks into the fan unit. Doing so
may damage the fan and motor.
13. Do not turn on the fan jacket unless you are
wearing it.
14. Do not use the fan jacket in places where a re
or spark could be generated. The fan unit may
catch re or spark and cause a re or burns.
15.
Choose the appropriate fan speed in accordance
with the usage environment for continuous use.
16. Do not wear any clothing over the fan jacket.
17. Keep the nameplate on the fan unit. If it
becomes unreadable or goes missing, contact
your local service center for repair.
18. Before washing, detach the fan unit and battery holder, remove the battery cartridge. Wash
the jacket part only.
19. Do not leave the fan jacket in a place subject
to high heat, such as a car sitting in the sun.
Doing so may cause plastic parts to melt and
become damaged.
20.
For long time storage, remove the battery holder
and battery cartridge from the jacket, and remove
the battery cartridge from the battery holder.
21. When storing, keep the fan jacket, fan units,
battery holder, and battery cartridge out of
reach of children.
Electrical safety
1. Do not expose the jacket to rain or wet conditions. Keep water away from electrical parts.
Water entering the jacket may increase the risk of
an electric shock.
2. Do not handle the cord and battery with wet or
greasy hands.
8 ENGLISH
3. Do not use the fan jacket when the cord or
plug is damaged.
4.
Do not abuse the cord. Do not use the cord for
carrying, pulling or unplugging the jacket. Keep
the cord away from heat, oil, and sharp edges.
5. Do not leave any cord disconnected while the
battery power is supplied. Small children may
put the live plug in their mouth and cause injury.
6. Do not use the supplied cord with appliances
other than the fan unit.
7. Do not insert nails, wires, or other items. into
the USB power supply port. Doing so may cause
short circuit, which can cause smoke or a re.
8.
Do not connect the power source to the USB
port. The USB port is only intended for charging
lower voltage devices. Always place the cover
over the USB port when not charging a lower
voltage device. Otherwise there is risk of re.
9. Recharge only with the charger specied by
the manufacturer. A charger that is suitable for
one type of battery pack may create a risk of
re when used with another battery pack.
10. Only use with specically designated batteries. Use of any other battery may create a risk
of injury and re.
11. When battery pack is not in use, keep it away
from other metal objects, like paper clips,
coins, keys, nails, screws or other small metal
objects, that can make a connection from one
terminal to another. Shorting the battery termi-
nals together may cause burns or a re.
12.
Under abusive conditions, liquid may be ejected
from the battery; avoid contact. If contact accidentally occurs, ush with water. If liquid contacts eyes, additionally seek medical help. Liquid
ejected from the battery may cause irritation or burns.
13. Do not use a battery pack or the fan unit that
is damaged or modied. Damaged or modied
batteries may exhibit unpredictable behaviour
resulting in re, explosion or risk of injury.
14.
Do not expose a battery pack or the fan unit to
re or excessive temperature. Exposure to re or
temperature above 130 °C may cause explosion.
15. Follow all charging instructions and do not
charge the battery pack or the fan unit outside
the temperature range specied in the instruc-
tions. Charging improperly or at temperatures
outside the specied range may damage the
battery and increase the risk of re.
Important safety instructions for
battery cartridge
1.
Before using battery cartridge, read all instructions and cautionary markings on (1) battery
charger, (2) battery, and (3) product using battery.
2. Do not disassemble battery cartridge.
3. If operating time has become excessively
shorter, stop operating immediately. It may
result in a risk of overheating, possible burns
and even an explosion.
4.
If electrolyte gets into your eyes, rinse them out
with clear water and seek medical attention right
away. It may result in loss of your eyesight.
5. Do not short the battery cartridge:
(1) Do not touch the terminals with any con-
ductive material.
(2) Avoid storing battery cartridge in a con-
tainer with other metal objects such as
nails, coins, etc.
(3) Do not expose battery cartridge to water
or rain.
A battery short can cause a large current
ow, overheating, possible burns and even a
breakdown.
6. Do not store the tool and battery cartridge in
locations where the temperature may reach or
exceed 50 °C (122 °F).
7. Do not incinerate the battery cartridge even if
it is severely damaged or is completely worn
out. The battery cartridge can explode in a re.
8. Be careful not to drop or strike battery.
9. Do not use a damaged battery.
10. The contained lithium-ion batteries are subject
to the Dangerous Goods Legislation requirements.
For commercial transports e.g. by third parties,
forwarding agents, special requirement on packaging and labeling must be observed.
For preparation of the item being shipped, consulting an expert for hazardous material is required.
Please also observe possibly more detailed
national regulations.
Tape or mask off open contacts and pack up the
battery in such a manner that it cannot move
around in the packaging.
11. Follow your local regulations relating to dis-
posal of battery.
12. Use the batteries only with the products
specied by Makita. Installing the batteries to
non-compliant products may result in a re, excessive heat, explosion, or leak of electrolyte.
SAVE THESE INSTRUCTIONS.
CAUTION: Only use genuine Makita batteries.
Use of non-genuine Makita batteries, or batteries that
have been altered, may result in the battery bursting
causing res, personal injury and damage. It will
also void the Makita warranty for the Makita tool and
charger.
Tips for maintaining maximum
battery life
1. Charge the battery cartridge before completely
discharged. Always stop tool operation and
charge the battery cartridge when you notice
less tool power.
2. Never recharge a fully charged battery car-
tridge. Overcharging shortens the battery
service life.
3. Charge the battery cartridge with room temperature at 10 °C - 40 °C (50 °F - 104 °F). Let
a hot battery cartridge cool down before
charging it.
4. Charge the battery cartridge if you do not use
it for a long period (more than six months).
9 ENGLISH
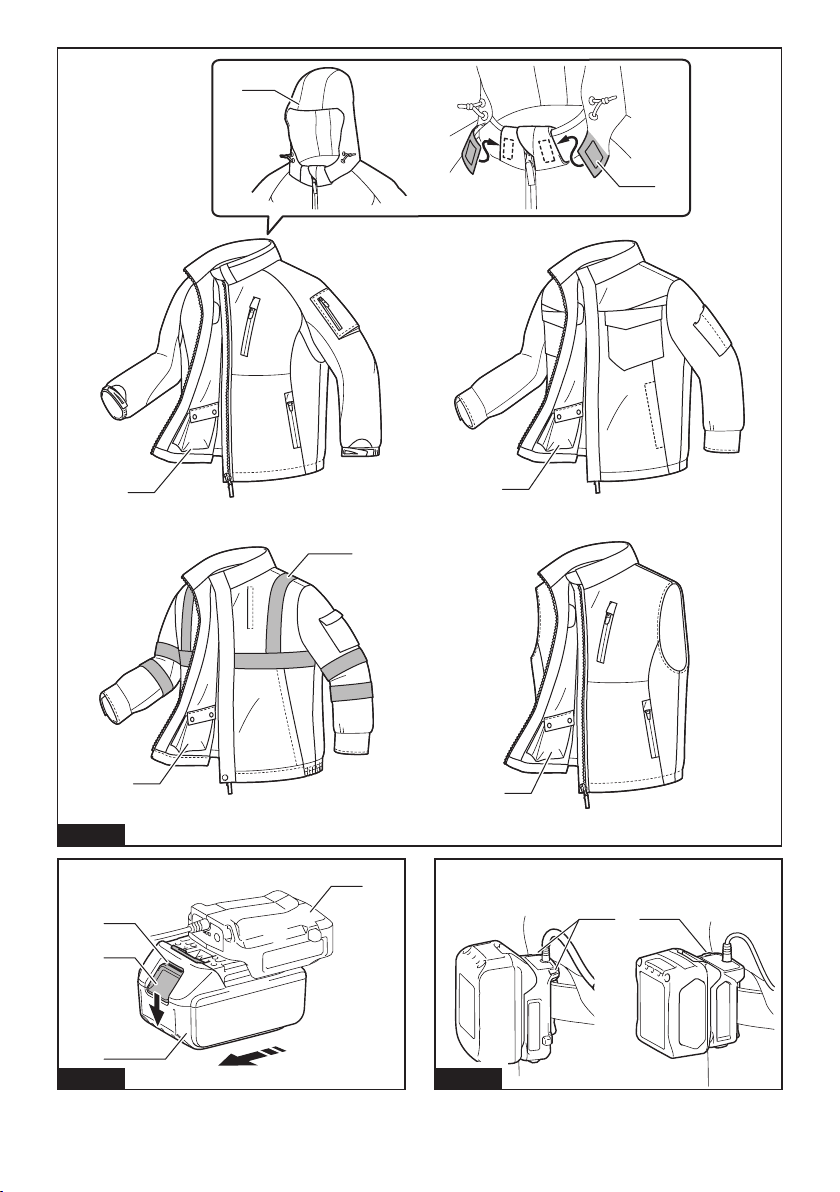
PARTS DESCRIPTION
Battery holder and fan unit
► Fig.1
1 Battery holder
(10.8 V - 12 V max)
(optional accessory)
Model DFJ210 / DFJ211 / DFJ310 / DFJ311 / DFJ410 / DFJ411
► Fig.2
1 Loop for name badge 2 Loop for arm badge 3 Sleeve holder 4 Battery pocket
5 Shoulder pad
(DFJ410 / DFJ411 only)
Model DFJ212 / DFJ213 / DFJ214 / DFV210
► Fig.3
1 Battery pocket 2 Hood
2 Battery holder
(14.4 V /18 V)
(optional accessory)
6 Mesh pocket for ice pack 7 Anti-slip rubber
(DFJ212 only)
3 Fan unit 4 Power cable
(DFJ211, DFJ311 and
DFJ411 only)
3 Hook and loop fastener
(DFJ212 only)
8 Hood
(DFJ211, DFJ311 and
DFJ411 only)
4 Light reector
(DFJ214 only)
INSTALLATION
Installing or removing the battery
cartridge
CAUTION: Always switch off the device
before installing or removing the battery
cartridge.
CAUTION: Hold the battery holder and the
battery cartridge rmly when installing or removing the battery cartridge. Failure to hold the battery
holder and the battery cartridge rmly may cause
them to slip out of your hands and result in damage
to the battery holder and battery cartridge and/or a
personal injury.
► Fig.4: 1. Red indicator 2. Button 3. Battery cartridge
4. Battery holder (optional accessory)
To install the battery cartridge, align the tongue on the
battery cartridge with the groove in the housing and slip
it into place. Insert the battery cartridge all the way until
it locks in place with a small click. If you can see the red
indicator on the upper side of the button, it is not locked
completely.
To remove the battery cartridge, slide it from the battery
holder while pressing the button on the front of the
cartridge.
CAUTION: Always install the battery car-
tridge fully until the red indicator cannot be seen.
Otherwise the battery cartridge may accidentally
fall out of the battery holder, causing injury to you or
someone around you.
CAUTION: Do not forcibly install the battery
cartridge. If the battery cartridge does not slide in
easily, it is not being inserted correctly.
Attaching the battery holder
You can hang the battery holder on your waist belt.
To prevent the battery holder from dropping accidentally, attach a strap using the strap hole and secure it.
► Fig.5: 1. Strap hole
For 18V and 14.4V battery holders
The battery holder has an anti-drop function. When
removing the battery holder from the belt, pull up the
battery holder while pressing the unlock button.
► Fig.6: 1. Unlock button
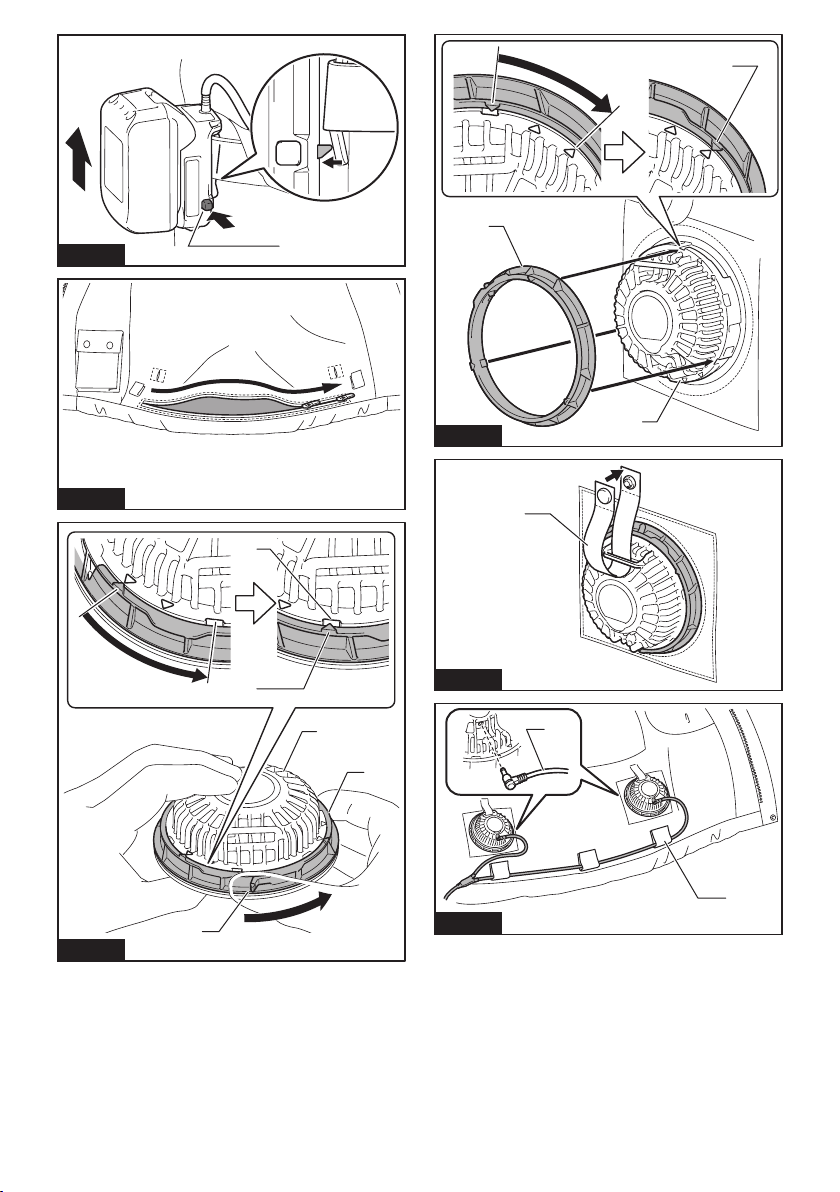
Installing or removing the fan unit
1. (For DFJ212 / DFJ213 / DFJ214 / DFV210 only)
Open the zip fastener before installing or removing the
fan unit.
► Fig.7
2. Turn the ring counterclockwise while lifting the
hook on it. Remove the ring when the mark on the ring
aligns with the slot on the fan unit.
► Fig.8: 1. Fan unit 2. Ring 3. Hook 4. Slot 5. Mark
3. Pass the head of the fan unit into the hole on the
jacket. Set the ring onto the fan unit and turn it clockwise until the mark on the ring aligns with the mark
further from the slot.
► Fig.9: 1. Mark 2. Ring 3. Fan unit
4. Pass the strip through the loop on the fan unit and
fasten the snap button.
► Fig.10: 1. Strip
5. Attach the other fan unit to the jacket in the same
way.
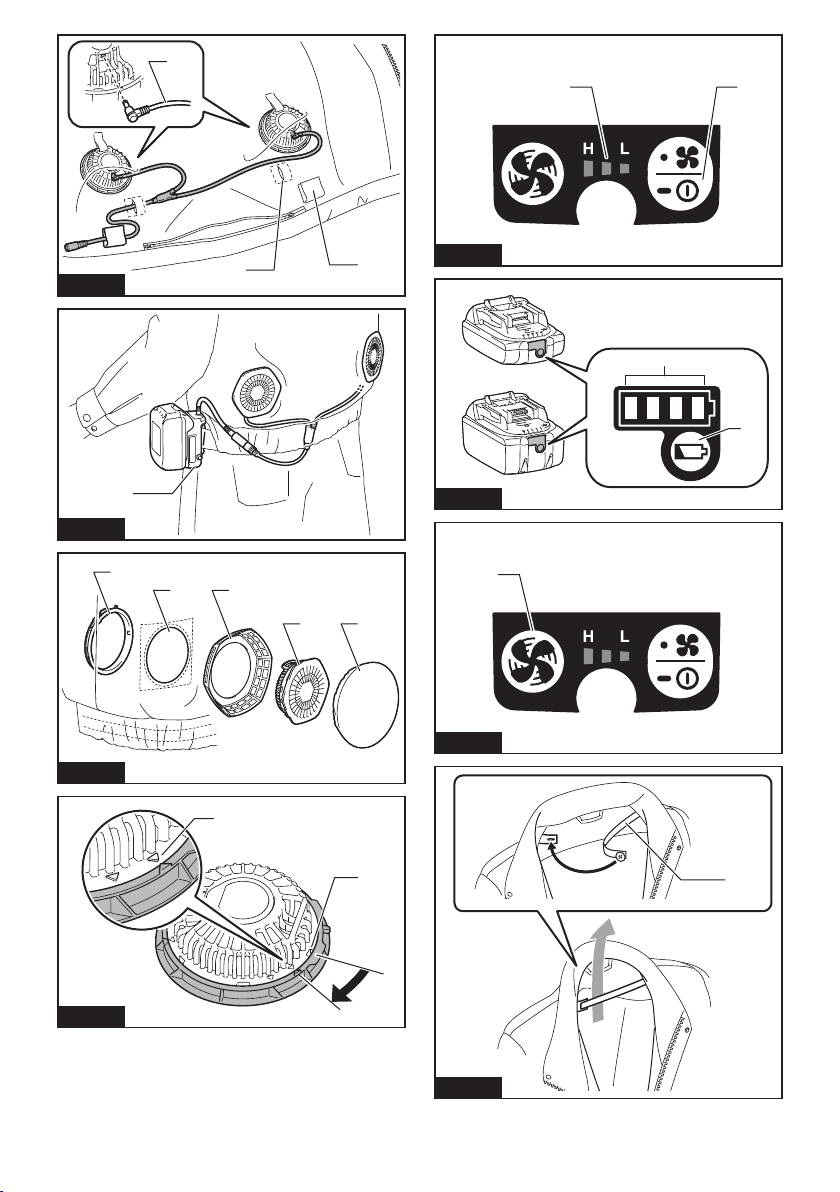
6. Connect the power cable to the fan units. Support
the cable using the cable holder.
For model DFJ210 / DFJ211 / DFJ310 / DFJ311 /
DFJ410 / DFJ411
► Fig.11: 1. Power cable 2. Cable holder
10 ENGLISH
For model DFJ212 / DFJ213 / DFJ214 / DFV210
► Fig.12: 1. Power cable 2. Hole 3. Cable holder
7. (For DFJ212 / DFJ213 / DFJ214 / DFV210 only)
Close the zip fastener after installing or removing the
fan unit.
8. Connect the other end of the power cable to the
battery holder.
► Fig.13: 1. Battery holder
CAUTION: Always use the strip and snap
button to secure the fan unit to the jacket. If the
fan unit falls, it may cause an injury, or damage to the
fan unit.
Follow the installation procedure in reverse when
removing it.
Attaching the lter set
Optional accessory
The lter set protects the fan unit from dust and powder.
We recommend that you use the lter set in a dusty or
powdery work place.
Insert the lter attachment between the jacket and fan
unit as shown in the gure.
► Fig.14: 1. Ring 2. Hole in the jacket 3. Filter attach-
ment 4. Fan unit 5. Filter
When tightening the ring, stop it at the mark near the
slot on the fan unit. After attaching the fan units, cover
the lter attachments with lters.
► Fig.15: 1. Mark 2. Slot
NOTICE: Make sure that the lter fully covers
the lter attachment. For better protection against
dust and powder, tuck the skirt of the lter
between the jacket and lter attachment.
FUNCTIONAL
DESCRIPTION
NOTICE: The fan jacket is effective when the
humidity and temperature of intake air are lower
than those of the body surface. The fan jacket
may not be effective if the air temperature and/or
humidity are higher than those inside the jacket.
Power button
To turn on the jacket, press and hold the power button
on the battery holder (optional accessory). The jacket
starts at high air speed. Each time you tap the power
button, the air speed changes from high to medium,
medium to low, and low to high. The air speed indicator
shows the current air speed.
► Fig.16: 1. Air speed indicator 2. Power button
To turn off, press and hold the power button again.
Indicating the remaining battery capacity
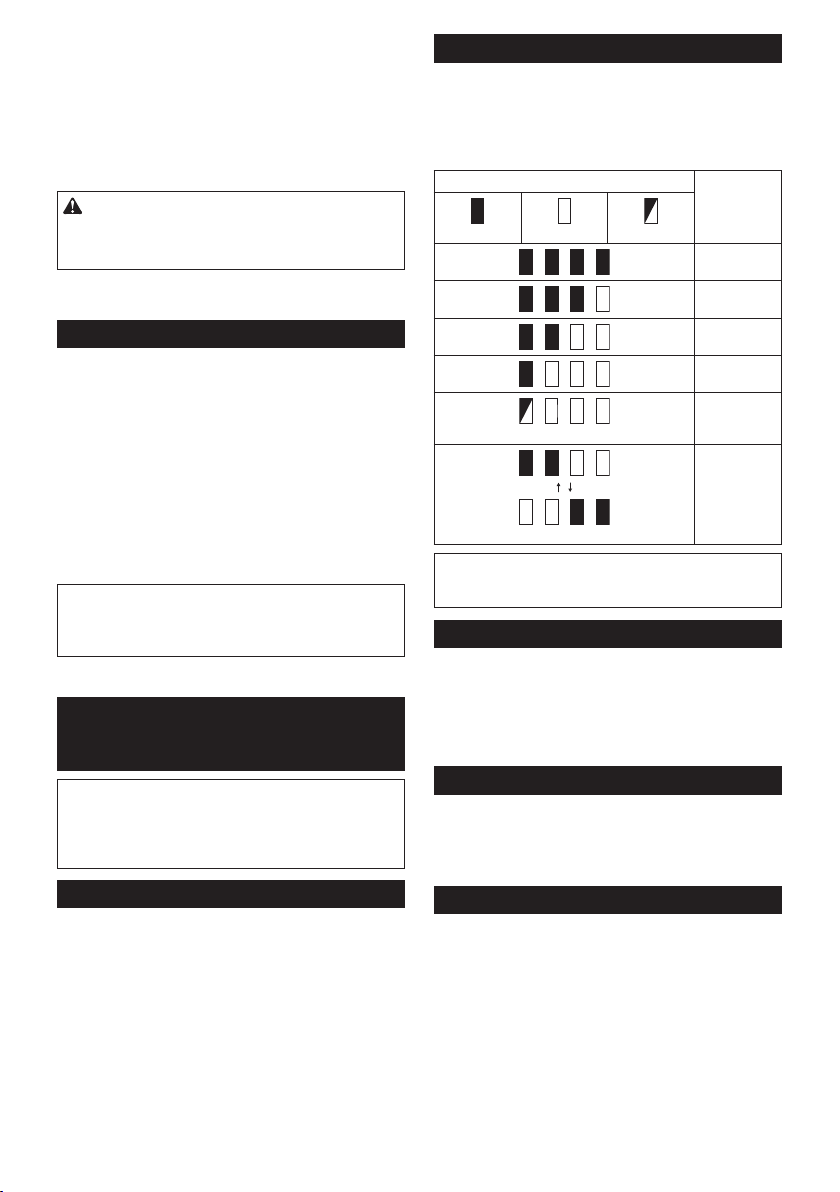
Only for battery cartridges with the indicator
► Fig.17: 1. Indicator lamps 2. Check button
Press the check button on the battery cartridge to indi-
cate the remaining battery capacity. The indicator lamps
light up for a few seconds.
Indicator lamps Remaining
Lighted Off Blinking
(For 14.4 V and 18 V batteries only)
(For 14.4 V and 18 V batteries only)
NOTE: Depending on the conditions of use and the
ambient temperature, the indication may differ slightly
from the actual capacity.
Battery protection system
The device is equipped with a battery protection system. This system automatically cuts off power to the
motor to extend battery life.
If the remaining battery capacity is too low, the device will not operate. When you turn the device on, the motor will run again, but stops
soon. In this situation, remove and recharge the battery cartridge.
Turbo button
By pressing turbo button on the battery holder, the jacket
works in turbo mode for quick cooling. Turbo mode lasts
for a minute and then air speed returns to normal.
► Fig.18: 1. Turbo button
Air ow
For DFJ210 / DFJ211 / DFJ310 / DFJ311 / DFJ410 /
DFJ411 only
To maintain a stable air ow, close the button at the
neck of the jacket. Fasten the button on the ribbon for
better air ow in the back.
► Fig.19: 1. Ribbon
Air ow inside the jacket is shown below.
► Fig.20
For a jacket with a hood, wear the hood over a helmet. The
air from the fan goes through the helmet and cools your head.
► Fig.21
11 ENGLISH
capacity
75% to 100%
50% to 75%
25% to 50%
0% to 25%
Charge the
battery.
The battery
may have
malfunctioned.
Battery pocket
A pocket is provided for storing the battery holder (with battery)
inside the jacket. Connect the power cable to the battery holder,
and then put it into the pocket and fasten the snap buttons.
► Fig.22
Mesh pocket
For DFJ210 / DFJ211 / DFJ310 / DFJ311 / DFJ410 /
DFJ411 only
Mesh pockets are provided on the back of the jacket for
storing ice packs.
► Fig.23: 1. Mesh pocket
Connecting USB devices
CAUTION: Connect only devices that are
compatible with the USB power supply port. Not
doing so may cause a malfunction of the battery
holder.
NOTICE: Before connecting a USB device to
the battery holder (with the battery), always back
up the data on the USB device. Not doing so may
cause a loss of your data.
The battery holder (with the battery) can work as an
external power supply for USB devices.
Open the cover and connect a USB cable (not included)
to the power supply port of the battery holder. Then connect the other end of the cable to the device and turn on
the switch next to the USB port.
The battery holder (with the battery) supplies DC5V, 2.1A.
► Fig.24: 1. Cover 2. Switch
(For DFJ210 / DFJ211 / DFJ310 / DFJ311 / DFJ410 /
DFJ411 only)
The USB cable can be placed inside the jacket for convenience using the hole in the pocket and the cable holder.
► Fig.25: 1. USB cable
NOTE: The battery holder may not supply power to
some USB devices.
NOTE: When not using or after charging, remove the
USB cable and close the cover.
NOTE: Battery power is consumed while the switch is
turned on. Always turn off the switch when not in use.
MAINTENANCE
CAUTION: Always be sure that the jacket is
switched off and the battery cartridge is removed
before attempting to perform inspections or
maintenance.
CAUTION: If the jacket does not switch on
or any fault is found with a fully charged battery
cartridge, clean the terminals of the battery holder
and the battery cartridge. If the jacket still does
not work properly, stop using the jacket and con-
tact our authorized service center.
NOTICE: Never use gasoline, benzine, thinner,
alcohol or the like. Discoloration, deformation or
cracks may result.
To maintain product SAFETY and RELIABILITY,
repairs, any other maintenance or adjustment should
be performed by Makita Authorized or Factory Service
Centers, always using Makita replacement parts.
Cleaning the fan unit
•
Use clean cloth to remove dirt, dust, oil, grease etc.
• Do not disassemble the fan unit when cleaning.
Cleaning the jacket
For all models
• Detach the fan unit(s) and battery holder from the
jacket before washing.
• Follow the instructions on the tag.
• Cotton products may shrink when washed.
• Do not wash the jacket with other clothes. Doing
so may cause color fading or color transfer.
• Use a laundry net when using a washing machine.
• Do not use the fabric softener.
• Use only neutral detergent.
• After washing, take out the jacket from washing
mashine at once.
• Be sure to close the zip fastener before washing.
For DFJ214 only
• The performance of light reector parts may be
weakened by washing.
• Machine wash in gentle cycle (The number of
times for washing is up to 5 times.)
• The number of times for washing is not the only
the factor to decide the lifetime of the jacket.
• The life of the jacket changes by how to use, how
to care and store state.
• If the light reector parts or clothes have been
deteriorated, replace to a new jacket.
OPTIONAL
ACCESSORIES
CAUTION: These accessories or attachments
are recommended for use with your Makita tool
specied in this manual. The use of any other
accessories or attachments might present a risk of
injury to persons. Only use accessory or attachment
for its stated purpose.
If you need any assistance for more details regarding
these accessories, ask your local Makita Service Center.
• Battery holder
• Filter set
• Makita genuine battery and charger
NOTE: Some items in the list may be included in the
tool package as standard accessories. They may
differ from country to country.
12 ENGLISH
FRANÇAIS (Instructions originales)
AVERTISSEMENT
Cet appareil peut être utilisé par des enfants de 8 ans et plus, ainsi que par des
personnes présentant des capacités physiques, sensorielles ou mentales réduites,
ou par des personnes dénuées d’expérience et de connaissances s’ils ont pu faire
l’objet d’une surveillance ou recevoir des instructions préalables concernant l’utilisation en toute sécurité de l’appareil et s’ils comprennent les risques associés. Ne
laissez pas les enfants jouer avec l’appareil. Le nettoyage et l’entretien à la charge
de l’utilisateur ne doivent pas être réalisés par des enfants sans surveillance.
SPÉCIFICATIONS
Modèle : DFJ210 / DFJ211 DFJ310 / DFJ311 DFJ410 / DFJ411
Matériau Extérieur 100 % polyester 100 % coton
Poche 100 % coton 100 % polyester
Protège-épaule - 65 % polyester +
Spécications pour le groupe ventilateur
Port USB
(accessoire en option)
Tension nominale 10,8 - 12 V CC max.
Batterie 10,8 - 12 V max. BL1015 / BL1016 / BL1020B / BL1021B / BL1040B / BL1041B
14,4 V BL1415N / BL1430 / BL1430B / BL1440 / BL1450 / BL1460B
18 V BL1815N / BL1820 / BL1820B / BL1830 / BL1830B / BL1840 /
• En raison de notre programme continu de recherche et développement, les spécications contenues dans ce
manuel sont susceptibles d’être modiées sans préavis.
• Les spécications et la batterie peuvent varier d’un pays à l’autre.
5 V CC, 2,1 A, type A
14,4 V CC
18 V CC
BL1840B / BL1850 / BL1850B / BL1860B
Polyester (100 %) +
revêtement nacré
en titane
35 % coton
DFJ212 / DFJ213 /
DFJ214 / DFV210
100 % polyester
-
AVERTISSEMENT : N’utilisez que les batteries répertoriées ci-dessus. L’utilisation de n’importe quelle
autre batterie peut provoquer des blessures et/ou un incendie.
Durée de fonctionnement
Vitesse de l’air Batterie
BL1040B
BL1041B
ÉLEVÉE 5,0 heures 8,5 heures 13,5 heures
MOYENNE 9,0 heures 16,0 heures 24,5 heures
BASSE 13,0 heures 21,0 heures 33,0 heures
• Les durées de fonctionnement dans le tableau ci-dessus sont données à titre indicatif. Elles peuvent être différentes des durées de fonctionnement réelles.
• Les durées de fonctionnement peuvent être différentes selon le type de batterie, le statut de la charge et les
conditions d’utilisation.
13 FRANÇAIS
BL1460B BL1860B
Symboles
Ni-MH
Certains des symboles suivants sont utilisés pour le
produit. Veillez à comprendre leur signication avant
toute utilisation.
Lire le mode d’emploi.
Lavage machine à 30 °C en cycle délicat.
Lavage machine à 40 °C en cycle délicat.
Lavage machine dans un lave-linge
domestique ou commercial en cycle
délicat.
Blanchiment interdit.
Séchage sur l à l’ombre.
Essorage interdit.
Repassage à température faible (température maximale 110 °C)
Repassage à température moyenne (température maximale 150 °C)
Repassage interdit.
Nettoyage à sec interdit.
Ne pas sécher au sèche-linge.
Uniquement pour les pays européens
Ne jetez pas les appareils électriques ou
les batteries avec vos ordures ménagères !
Conformément aux directives européennes
relatives aux déchets d’équipements
électriques et électroniques et aux piles
et accumulateurs ainsi qu’aux déchets de
piles et d’accumulateurs et leur mise en
œuvre conformément aux lois nationales,
les équipements électriques et les piles et
batteries en n de vie doivent faire l’objet
d’une collecte sélective et être conés à
une usine de recyclage respectueuse de
l’environnement.
Li-ion
Utilisations
Le blouson ventilé est conçu pour refroidir votre température corporelle.
CONSIGNES DE
SÉCURITÉ
AVERTISSEMENT : Lisez toutes les
consignes de sécurité et toutes les instructions. Il
y a risque d’électrocution, d’incendie et/ou de graves
blessures si les mises en garde et les instructions ne
sont pas respectées.
Conservez toutes les mises en
garde et instructions pour référence ultérieure.
1. N’utilisez jamais le blouson ventilé lorsque la
température dépasse 50 °C. Par ailleurs, évitez
de l’utiliser dans un environnement à forte
humidité. Vous risqueriez de vous brûler.
2. Ne portez pas le blouson sur la peau nue.
3. N’utilisez pas le blouson sous l’emprise de
drogues, d’alcool ou de médicaments.
4. Ne dormez pas tout en portant le blouson
ventilé. Une baisse rapide de la température
corporelle pourrait nuire à votre santé.
5. Les enfants, les personnes handicapées ou
toute personne insensible à la température,
par exemple, les personnes ayant une mauvaise circulation sanguine, ne doivent pas
utiliser le blouson.
6. Cet appareil n’est pas conçu pour un usage
médical en milieu hospitalier.
7. N’utilisez pas le blouson à d’autres ns que
celles prévues.
8. Si vous remarquez quelque chose d’inhabituel,
éteignez le blouson et retirez immédiatement
le porte-batterie.
9. En cas d’anomalie, contactez votre centre de
service après-vente local pour réparation.
10. Ne piétinez pas, ni ne lancez ou autrement mal-
traitez le blouson ventilé.
11. Ne mettez pas votre doigt ou un corps étranger
dans le groupe ventilateur.
12. Ne soufez pas d’air comprimé en direction
du ventilateur. Ne placez pas de petits bâtons
dans le groupe ventilateur. Vous risqueriez
d’endommager le ventilateur et le moteur.
13. N’allumez pas le blouson ventilé avant de le
porter.
14. N’utilisez pas le blouson ventilé dans un
endroit propice aux incendies ou dégagement
d’étincelles. Le groupe ventilateur peut prendre
feu ou dégager des étincelles et provoquer un
incendie ou des brûlures.
15. Choisissez la vitesse de ventilateur convenant
à l’environnement d’utilisation pour un fonctionnement continu.
16. Ne portez pas d’autres vêtements par-dessus
le blouson ventilé.
17. Ne retirez pas la plaque signalétique du groupe
ventilateur. Si elle devient illisible ou si vous
la perdez, contactez votre centre de service
après-vente local pour réparation.
14 FRANÇAIS

18. Avant le lavage, retirez le groupe ventilateur, le
porte-batterie et la batterie. Lavez uniquement
la partie blouson.
19. Ne laissez pas le blouson ventilé dans un
endroit exposé à une chaleur élevée, comme
une voiture en plein soleil. Les pièces en plastiques pourraient fondre et être endommagées.
20. Avant de le ranger pendant une période
prolongée, retirez le porte-batterie avec la
batterie du blouson, puis retirez la batterie du
porte-batterie.
21. Une fois rangés, gardez le blouson ventilé,
les groupes ventilateur, le porte-batterie et la
batterie à l’écart des enfants.
Sécurité électrique
1. N’exposez pas le blouson à la pluie ou à l’hu-
midité. Éloignez l’eau des pièces électriques.
La pénétration de l’eau dans le blouson peut
augmenter le risque d’électrocution.
2. Ne manipulez pas le cordon et la batterie avec
les mains mouillées ou graisseuses.
3. N’utilisez pas le blouson ventilé si le cordon
ou la che est endommagé.
4. Ne maltraitez pas le cordon. Ne transportez
pas le blouson par son cordon, ni ne tirez sur
le cordon pour déplacer ou débrancher le blou-
son. Tenez le cordon à l’écart de la chaleur, de
l’huile et de bords tranchants.
5. Ne laissez pas de cordons débranchés pen-
dant le fonctionnement sur batterie. Les
enfants en bas âge peuvent mettre la che d’un
cordon sous tension dans leur bouche et se
blesser.
6. N’utilisez pas le cordon fourni avec d’autres
appareils que le groupe ventilateur.
7. N’insérez pas de clous, ls métalliques ou
autres objets dans le port USB. Vous risqueriez
de provoquer un court-circuit, pouvant entraîner
un dégagement de fumée ou un incendie.
8. Ne raccordez pas la source d’alimentation au
port USB. Le port USB est uniquement destiné
au chargement de dispositifs basse tension.
Placez toujours le couvercle sur le port USB
lorsque vous ne chargez pas de dispositif
basse tension. Cela présente autrement un
risque d’incendie.
9. Rechargez la batterie uniquement avec le
chargeur spécié par le fabricant. Un chargeur
prévu pour un type de batterie peut présenter
un risque d’incendie s’il est utilisé avec une
autre batterie.
10. À utiliser uniquement avec les batteries spéci-
quement indiquées. L’utilisation de tout autre
type de batterie peut présenter un risque de
blessure et d’incendie.
11. Lorsque vous n’utilisez pas la batterie, tenez-la
à l’écart des objets métalliques, comme des
trombones, pièces de monnaie, clés, clous,
vis ou autres petits objets métalliques, susceptibles de créer une connexion entre deux
bornes. Court-circuiter les bornes d’une batterie
entre elles peut provoquer des brûlures ou un
incendie.
12. Dans des conditions d’utilisation inadéquate,
il peut y avoir une fuite de l’électrolyte de la
batterie. Le cas échéant, évitez tout contact
avec ce liquide. En cas de contact accidentel,
rincez à l’eau. Si le liquide pénètre dans les
yeux, consultez par ailleurs un médecin. Le
liquide s’échappant de la batterie peut provoquer
une irritation ou des brûlures.
13. N’utilisez pas une batterie ou un groupe venti-
lateur s’ils sont endommagés ou modiés. Une
batterie endommagée ou modiée peut avoir un
comportement imprévisible susceptible d’entraîner
un incendie, une explosion ou des blessures.
14. N’exposez pas la batterie ou le groupe venti-
lateur au feu ou à une température excessive.
L’exposition au feu ou à une température supérieure à 130 °C peut provoquer une explosion.
15. Respectez toutes les instructions de charge et
ne chargez pas la batterie ou le groupe ventilateur en dehors de la plage de température
indiquée dans les instructions. Une charge
incorrecte ou à une température en dehors de la
plage indiquée peut endommager la batterie et
augmenter le risque d’incendie.
Consignes de sécurité importantes
pour la batterie
1. Avant d’utiliser la batterie, lisez toutes les
instructions et précautions relatives (1) au
chargeur de batterie, (2) à la batterie, et (3) au
produit utilisant la batterie.
2. Ne démontez pas la batterie.
3. Cessez immédiatement l’utilisation si le temps
de fonctionnement devient excessivement
court. Il y a risque de surchauffe, de brûlures,
voire d’explosion.
4. Si l’électrolyte pénètre dans vos yeux, rin-
cez-les à l’eau claire et consultez immédiatement un médecin. Il y a risque de perte de la
vue.
5. Ne court-circuitez pas la batterie :
(1) Ne touchez les bornes avec aucun maté-
riau conducteur.
(2) Évitez de ranger la batterie dans un
conteneur avec d’autres objets métal-
liques, par exemple des clous, des pièces
de monnaie, etc.
(3) N’exposez pas la batterie à l’eau ou à la
pluie.
Un court-circuit de la batterie peut provoquer
une intensité de courant élevée, une surchauffe, parfois des brûlures et même une
panne.
6. Ne rangez pas l’outil et la batterie dans un
endroit où la température risque d’atteindre ou
de dépasser 50 °C.
7. Ne jetez pas la batterie au feu même si elle est
sérieusement endommagée ou complètement
épuisée. La batterie peut exploser au contact
du feu.
8. Évitez de laisser tomber ou de cogner la
batterie.
9. N’utilisez pas la batterie si elle est
endommagée.
15 FRANÇAIS
10. Les batteries au lithium-ion contenues sont
soumises aux exigences de la législation sur
les marchandises dangereuses.
Lors du transport commercial par des tierces
parties ou des transitaires par exemple, des exi-
gences spéciques en matière d’étiquetage et
d’emballage doivent être respectées.
Pour la préparation de l’article expédié, il est
Makita d’origine. L’utilisation de batteries de marque
autre que Makita ou de batteries modiées peut provoquer l’explosion des batteries, ce qui présente un
risque d’incendie, de dommages matériels et corporels. Cela annulera également la garantie Makita pour
l’outil et le chargeur Makita.
nécessaire de consulter un expert en matériau
dangereux. Veuillez également respecter les
réglementations nationales susceptibles d’être
plus détaillées.
Recouvrez les contacts exposés avec du ruban
Conseils pour assurer la durée
de vie optimale de la batterie
1. Chargez la batterie avant qu’elle ne soit com-
adhésif ou du ruban de masquage et emballez la
batterie de telle sorte qu’elle ne puisse pas bouger
dans l’emballage.
11. Suivez les réglementations locales en matière
2. Ne rechargez jamais une batterie complète-
de mise au rebut des batteries.
12. Utilisez les batteries uniquement avec les
produits spéciés par Makita. L’insertion de
3. Chargez la batterie à une température
batteries dans des produits non conformes peut
provoquer un incendie, une chaleur excessive,
une explosion ou une fuite de l’électrolyte.
CONSERVEZ CES
4. Rechargez la batterie si elle est restée inutili-
INSTRUCTIONS.
DESCRIPTION DES PIÈCES
Porte-batterie et groupe ventilateur
► Fig.1
1 Porte-batterie
(10,8 V - 12 V max.)
(accessoire en option)
Modèle DFJ210 / DFJ211 / DFJ310 / DFJ311 / DFJ410 / DFJ411
► Fig.2
1 Boucle pour badge
d’identication
5 Protège-épaule
(DFJ410 / DFJ411
uniquement)
Modèle DFJ212 / DFJ213 / DFJ214 / DFV210
► Fig.3
1 Poche pour batterie 2 Capuche
2 Porte-batterie
(14,4 V/18 V)
(accessoire en option)
2 Boucle pour badge de
bras
6 Poche en maille pour
sachet réfrigérant
(DFJ212 uniquement)
3 Groupe ventilateur 4 Câble d’alimentation
3 Patte pour retrousser la
7 Caoutchouc antiglisse
3 Fixation auto-agrippante
ATTENTION : N’utilisez que des batteries
plètement déchargée. Arrêtez toujours l’outil
et rechargez la batterie quand vous remarquez
que la puissance de l’outil diminue.
ment chargée. La surcharge réduit la durée de
service de la batterie.
ambiante comprise entre 10 °C et 40 °C. Avant
de charger une batterie chaude, laissez-la
refroidir.
sée pendant une période prolongée (plus de
six mois).
manche
(DFJ211, DFJ311 et
DFJ411 uniquement)
(DFJ212 uniquement)
4 Poche pour batterie
8 Capuche
(DFJ211, DFJ311 et
DFJ411 uniquement)
4 Bande rééchissante
(DFJ214 uniquement)
16 FRANÇAIS
INSTALLATION
Mise en place ou retrait de la
batterie
ATTENTION : Éteignez toujours l’appareil
avant de mettre en place ou de retirer la batterie.
ATTENTION : Tenez fermement le porte-bat-
terie et la batterie lors de la mise en place ou du
retrait de la batterie. Si vous ne tenez pas ferme-
ment le porte-batterie et la batterie, ils peuvent vous
glisser des mains, et être endommagés et/ou vous
blesser.
► Fig.4: 1. Voyant rouge 2. Bouton 3. Batterie
Pour mettre en place la batterie, alignez la languette
sur la batterie avec la rainure sur le compartiment et
insérez-la. Insérez la batterie à fond jusqu’à ce qu’elle
se verrouille en place avec un léger déclic. Si la marque
rouge sur le dessus du bouton est visible, cela signie
qu’elle n’est pas bien verrouillée.
Pour retirer la batterie, faites-la glisser hors du porte-batte-
rie tout en appuyant sur le bouton à l’avant de la batterie.
Fixation du porte-batterie
Vous pouvez accrocher le porte-batterie à votre ceinture.
Pour éviter que le porte-batterie tombe accidentellement,
attachez une courroie à l’orice pour courroie et serrez-la.
► Fig.5: 1. Orice pour courroie
Pour les porte-batteries de 18 V et 14,4 V
Le porte-batterie est pourvu d’une fonction anti-chute.
Lorsque vous retirez le porte-batterie de la ceinture,
tirez-le vers le haut tout en appuyant sur le bouton de
déverrouillage.
► Fig.6: 1. Bouton de déverrouillage
Mise en place ou retrait du groupe
ventilateur
1. (Pour le DFJ212 / DFJ213 / DFJ214 / DFV210
uniquement)
Ouvrez la fermeture à glissière avant d’insérer ou de
retirer le groupe ventilateur.
► Fig.7
2. Tournez la bague dans le sens inverse des
aiguilles d’une montre tout en soulevant le crochet
dessus. Retirez la bague lorsque le repère sur la bague
s’aligne avec la fente sur le groupe ventilateur.
► Fig.8: 1. Groupe ventilateur 2. Bague 3. Crochet
4. Porte-batterie (accessoire en option)
ATTENTION :
fond, jusqu’à ce que la marque rouge ne soit plus
visible. Autrement, la batterie pourrait tomber accidentellement du porte-batterie, au risque de vous blesser
ou de blesser quelqu’un se trouvant près de vous.
Insérez toujours la batterie à
ATTENTION : Ne forcez pas pour insérer la
batterie. Si la batterie ne glisse pas facilement, c’est
que vous ne l’insérez pas correctement.
4. Fente 5. Repère
3. Faites passer la tête du groupe ventilateur dans
l’orice sur le blouson. Placez la bague sur le groupe
ventilateur et tournez-la dans le sens des aiguilles
d’une montre jusqu’à ce que le repère sur la bague
s’aligne avec le repère plus éloigné de la fente.
► Fig.9: 1. Repère 2. Bague 3. Groupe ventilateur
4. Faites passer la bande par la boucle sur le groupe
ventilateur et fermez le bouton-pression.
► Fig.10: 1. Bande
5. Fixez l’autre groupe ventilateur sur le blouson de
la même manière.
6. Raccordez le câble d’alimentation aux groupes
ventilateur. Soutenez les câbles au moyen du
porte-câbles.
Pour le modèle DFJ210 / DFJ211 / DFJ310 / DFJ311 /
DFJ410 / DFJ411
► Fig.11: 1. Câble d’alimentation 2. Porte-câbles
Pour le modèle DFJ212 / DFJ213 / DFJ214 / DFV210
► Fig.12: 1. Câble d’alimentation 2. Orice
3. Porte-câbles
7. (Pour le DFJ212 / DFJ213 / DFJ214 / DFV210
uniquement)
Fermez la fermeture à glissière après avoir inséré ou
retiré le groupe ventilateur.
8. Raccordez l’autre extrémité du câble d’alimenta-
tion au porte-batterie.
► Fig.13: 1. Porte-batterie
ATTENTION : Utilisez toujours la bande et le
bouton-pression pour xer le groupe ventilateur
au blouson. Si le groupe ventilateur tombe, il peut
provoquer des dommages corporels ou matériels.
Suivez la procédure d’installation dans l’ordre inverse
pour le retirer.
Fixation de l’ensemble du ltre
Accessoire en option
L’ensemble du ltre protège le groupe ventilateur de la
poussière et de la poudre. Nous vous recommandons
d’utiliser l’ensemble du ltre dans un lieu de travail
poussiéreux ou poudreux.
Insérez le support de ltre entre le blouson et le groupe
ventilateur comme illustré sur la gure.
► Fig.14: 1. Bague 2. Orice dans le blouson
3. Support de ltre 4. Groupe ventilateur
5. Filtre
Lorsque vous serrez la bague, arrêtez-la au niveau du
repère près de la fente sur le groupe ventilateur. Après
avoir xé les groupes ventilateur, posez les ltres sur
les supports de ltre.
► Fig.15: 1. Repère 2. Fente
REMARQUE : Assurez-vous que le ltre
recouvre complètement le support de ltre. Pour
une meilleure protection contre la poussière et la
poudre, placez la collerette du ltre entre le blouson et le support de ltre.
17 FRANÇAIS
DESCRIPTION DU
FONCTIONNEMENT
REMARQUE : Le blouson ventilé est efcace
lorsque l’humidité et la température de l’air
entrant sont inférieures à celles de la surface
du corps. Le blouson ventilé peut ne pas être
efcace si la température et/ou l’humidité de l’air
sont plus élevées qu’à l’intérieur du blouson.
Bouton d’alimentation
Pour allumer le blouson, maintenez enfoncé le bouton
d’alimentation sur le porte-batterie (accessoire en
option). Le blouson démarre à la vitesse d’air élevée.
Chaque fois que vous appuyez sur le bouton d’alimen-
tation, la vitesse de l’air passe d’élevée à moyenne, de
moyenne à basse et de basse à élevée. Le témoin de
vitesse de l’air indique la vitesse actuelle de l’air.
► Fig.16: 1. Témoin de vitesse de l’air 2. Bouton
Pour l’éteindre, maintenez à nouveau enfoncé le bouton
d’alimentation.
Indication de la charge restante de
la batterie
Uniquement pour les batteries avec voyant
lumineux
► Fig.17: 1. Témoins 2. Bouton de vérication
Appuyez sur le bouton de vérication sur la batterie
pour indiquer la charge restante de la batterie. Les
témoins s’allument pendant quelques secondes.
NOTE : Selon les conditions d’utilisation et la température ambiante, l’indication peut être légèrement
différente de la capacité réelle.
d’alimentation
Témoins Charge
Allumé Éteint Clignotant
(Pour les batteries de 14,4 V et 18 V
(Pour les batteries de 14,4 V et 18 V
uniquement)
uniquement)
restante
75 % à 100 %
50 % à 75 %
25 % à 50 %
0 % à 25 %
Chargez la
batterie.
Anomalie
possible
de la batterie.
Système de protection de la batterie
L’appareil est pourvu d’un système de protection de la
batterie. Ce système coupe automatiquement l’alimentation vers le moteur pour prolonger la durée de vie de
la batterie.
Si la charge restante de la batterie est trop faible, l’appareil ne fonctionnera pas. Lorsque vous allumez l’appareil, le moteur redémarre, mais s’arrête rapidement.
Le cas échéant, retirez et rechargez la batterie.
Bouton Turbo
En appuyant sur le bouton Turbo sur le porte-batterie,
le blouson fonctionne en mode Turbo pour un refroidissement rapide. Le mode Turbo dure une minute, puis la
vitesse normale de l’air est rétablie.
► Fig.18: 1. Bouton Turbo
Circulation de l’air
Pour le DFJ210 / DFJ211 / DFJ310 / DFJ311 / DFJ410
/ DFJ411 uniquement
Pour maintenir une circulation de l’air stable, fermez le
bouton sur le haut du blouson. Fermez le bouton sur le
ruban pour une meilleure circulation de l’air dans le dos.
► Fig.19: 1. Ruban
La circulation de l’air dans le blouson est illustrée
ci-dessous.
► Fig.20
Avec le blouson à capuche, portez la capuche par-des-
sus un casque. L’air provenant du ventilateur passe par
le casque et refroidit votre tête.
► Fig.21
Poche pour batterie
Une poche est prévue pour ranger le porte-batterie
(avec la batterie en place) à l’intérieur du blouson.
Raccordez le câble d’alimentation au porte-batterie, puis placez-le dans la poche et fermez les
boutons-pression.
► Fig.22
Poche en maille
Pour le DFJ210 / DFJ211 / DFJ310 / DFJ311 / DFJ410
/ DFJ411 uniquement
Les poches en maille sont prévues au dos du blouson
pour ranger les sachets réfrigérants.
► Fig.23: 1. Poche en maille
Connexion de dispositifs USB
ATTENTION : Connectez uniquement des
dispositifs compatibles avec le port USB. Vous
risqueriez autrement de provoquer un dysfonctionnement du porte-batterie.
18 FRANÇAIS
REMARQUE : Avant de connecter un dispositif
USB au porte-batterie (avec la batterie en place),
sauvegardez toujours les données du disposi-
tif USB. Vous risqueriez autrement de perdre vos
données.
Le porte-batterie (avec la batterie en place) peut servir
de source d’alimentation externe pour les dispositifs
USB.
Ouvrez le couvercle et branchez un câble USB (non
fourni) sur le port d’alimentation du porte-batterie. Puis,
connectez l’autre extrémité du câble au dispositif et
placez le commutateur à côté du port USB sur Marche.
Le porte-batterie (avec la batterie en place) fournit un
courant CC de 5 V, 2,1 A.
► Fig.24: 1. Couvercle 2. Commutateur
(Pour le DFJ210 / DFJ211 / DFJ310 / DFJ311 / DFJ410
/ DFJ411 uniquement)
Par commodité, le câble USB peut être placé à l’intérieur du blouson à travers l’orice dans la poche et le
porte-câbles.
► Fig.25: 1. Câble USB
NOTE : Le porte-batterie peut ne pas fournir de cou-
rant à certains dispositifs USB.
NOTE : Lorsque vous ne l’utilisez pas ou après la
charge, retirez le câble USB et refermez le couvercle.
NOTE : La batterie se décharge pendant que le com-
mutateur est placé sur Marche. Placez toujours le
commutateur sur Arrêt lorsque vous ne l’utilisez pas.
Nettoyage du blouson
Pour tous les modèles
• Retirez le ou les groupes ventilateur et le
porte-batterie du blouson avant de le laver.
• Suivez les instructions sur l’étiquette.
• Les articles en coton peuvent rétrécir au lavage.
• Ne lavez pas le blouson avec d’autres vêtements.
Cela présente un risque de décoloration ou de
transfert des couleurs.
• Utilisez une housse de lavage lors du lavage en
machine.
• N’utilisez pas de produit assouplissant.
• Utilisez uniquement un détergent neutre.
• Après lavage, sortez immédiatement le blouson
du lave-linge.
• Veillez à fermer la fermeture à glissière avant
lavage.
Pour le DFJ214 uniquement
• Les performances des bandes rééchissantes
peuvent diminuer suite au lavage.
• Lavez en machine en cycle délicat (le nombre de
lavages maximum est de 5.)
• Le nombre de lavages n’est pas le seul facteur
déterminant la durée de vie du blouson.
• La durée de vie du blouson dépend de l’utilisation
qui en est faite, des soins qui lui sont apportés et
de la manière dont il est rangé.
• Si les bandes rééchissantes ou le tissu sont
détériorés, utilisez un blouson neuf.
ENTRETIEN
ATTENTION : Assurez-vous toujours que
le blouson est éteint et que la batterie est retirée avant de procéder à une inspection ou un
entretien.
ATTENTION : Si le blouson ne s’allume
pas ou en cas de panne alors que la batterie est
complètement chargée, nettoyez les bornes du
porte-batterie et de la batterie. Si le blouson ne
fonctionne toujours pas correctement, arrêtez
de l’utiliser et contactez votre centre de service
après-vente agréé.
REMARQUE : N’utilisez jamais d’essence, ben-
zine, diluant, alcool ou autre produit similaire.
Cela risquerait de provoquer la décoloration, la
déformation ou la ssuration de l’outil.
Pour assurer la SÉCURITÉ et la FIABILITÉ du produit,
toute réparation, tout travail d’entretien ou de réglage
doivent être effectués par un centre d’entretien Makita
agréé, avec des pièces de rechange Makita.
Nettoyage du groupe ventilateur
• Retirez la saleté, la poussière, les traces d’huile
ou de graisse, etc. avec un chiffon propre.
• Ne démontez pas le groupe ventilateur lors du
nettoyage.
ACCESSOIRES EN
OPTION
ATTENTION : Ces accessoires ou pièces
complémentaires sont recommandés pour l’utili-
sation avec l’outil Makita spécié dans ce mode
d’emploi. L’utilisation de tout autre accessoire ou
pièce complémentaire peut comporter un risque de
blessure. N’utilisez les accessoires ou pièces complé-
mentaires qu’aux ns auxquelles ils ont été conçus.
Pour obtenir plus de détails sur ces accessoires,
contactez votre centre d’entretien local Makita.
• Porte-batterie
• Ensemble du ltre
• Batterie et chargeur Makita d’origine
NOTE : Il se peut que certains éléments de la liste
soient compris dans l’emballage de l’outil en tant
qu’accessoires standard. Ils peuvent varier d’un pays
à l’autre.
19 FRANÇAIS
DEUTSCH (Original-Anleitung)
WARNUNG
Dieses Gerät kann von Kindern ab 8 Jahren und Personen mit verminderten körperlichen, sensorischen oder geistigen Fähigkeiten
oder Mangel an Erfahrung und Kenntnissen benutzt werden, sofern
sie eine Beaufsichtigung oder Anweisung bezüglich des sicheren
Gebrauchs des Gerätes erhalten haben und die damit verbundenen
Gefahren verstehen. Kinder dürfen nicht mit dem Gerät spielen.
Reinigung und Benutzerwartung dürfen nicht von Kindern ohne
Beaufsichtigung durchgeführt werden.
TECHNISCHE DATEN
Modell: DFJ210 / DFJ211 DFJ310 / DFJ311 DFJ410 / DFJ411
Material Obermaterial Polyester 100 % Baumwolle 100 %
Tasche Baumwolle 100 % Polyester 100 %
Schulterpolster - Polyester 65 % +
Spezikationen für die Gebläseeinheit
USB-Stromversorgungsanschluss
(Sonderzubehör)
Nennspannung 10,8 V - 12 V max. Gleichstrom
Akku 10,8 V - 12 V max. BL1015 / BL1016 / BL1020B / BL1021B / BL1040B / BL1041B
14,4 V BL1415N / BL1430 / BL1430B / BL1440 / BL1450 / BL1460B
18 V BL1815N / BL1820 / BL1820B / BL1830 / BL1830B / BL1840 /
• Wir behalten uns vor, Änderungen der technischen Daten im Zuge der Entwicklung und des technischen
Fortschritts ohne vorherige Ankündigung vorzunehmen.
• Die technischen Daten und der Akku können von Land zu Land unterschiedlich sein.
5 V Gleichstrom, 2,1 A, Typ A
14,4 V Gleichstrom
18 V Gleichstrom
BL1840B / BL1850 / BL1850B / BL1860B
Polyester (100 %) +
Titanperlbeschichtung
Baumwolle 35 %
DFJ212 / DFJ213 /
DFJ214 / DFV210
Polyester 100 %
-
WARNUNG: Verwenden Sie nur die oben aufgeführten Akkus. Bei Verwendung irgendwelcher anderer
Akkus besteht Verletzungs- und/oder Brandgefahr.
Betriebszeit
Gebläsedrehzahl Akku
BL1040B
BL1041B
HOCH 5,0 Stunden 8,5 Stunden 13,5 Stunden
MITTEL 9,0 Stunden 16,0 Stunden 24,5 Stunden
NIEDRIG 13,0 Stunden 21,0 Stunden 33,0 Stunden
• Die Betriebszeiten in der obigen Tabelle sind eine grobe Orientierungshilfe. Sie können von den tatsächlichen
Betriebszeiten abweichen.
• Die Betriebszeiten können je nach Akkutyp, Ladezustand und Benutzungsbedingungen unterschiedlich sein.
20 DEUTSCH
BL1460B BL1860B
Symbole
Ni-MH
Einige der folgenden Symbole werden für das Produkt
verwendet. Machen Sie sich vor der Benutzung mit ihrer
Bedeutung vertraut.
Betriebsanleitung lesen.
Maschinenwäsche unter 30°C im
Schongang.
Maschinenwäsche unter 40°C im
Schongang.
Maschinenwäsche in Haushalts- oder
Gewerbemaschinen im Schonwaschgang.
Nicht bleichen.
Zum Trocknen im Schatten aufhängen.
Nicht auswringen.
Bei niedrigen Temperaturen bügeln (110°C
nicht überschreiten).
Bei mittleren Temperaturen bügeln (150°C
nicht überschreiten).
Nicht bügeln.
Nicht chemisch reinigen.
Nicht im Wäschetrockner trocknen.
Nur für EG-Länder
Entsorgen Sie Elektrogeräte oder Akkus
nicht zusammen mit dem Hausmüll! Unter
Einhaltung der Europäischen Richtlinie
über Elektro- und Elektronik-Altgeräte,
Batterien, Akkus sowie verbrauchte
Batterien und Akkus und ihre Umsetzung
gemäß den Landesgesetzen müssen
Elektrogeräte und Batterien bzw. Akkus,
die das Ende ihrer Lebensdauer erreicht
haben, getrennt gesammelt und einer
umweltgerechten Recycling-Einrichtung
zugeführt werden.
Li-ion
Vorgesehene Verwendung
Die Klima-Jacke ist zum Kühlen Ihrer Körpertemperatur
vorgesehen.
SICHERHEITSWARNUNGEN
WARNUNG: Lesen Sie alle
Sicherheitswarnungen und Anweisungen durch.
Eine Missachtung der unten aufgeführten Warnungen
und Anweisungen kann zu einem elektrischen
Schlag, Brand und/oder schweren Verletzungen
führen.
Bewahren Sie alle Warnungen
und Anweisungen für spätere
Bezugnahme auf.
1. Benutzen Sie die Klima-Jacke niemals bei
Temperaturen über 50°C. Vermeiden Sie die
Benutzung auch bei hoher Luftfeuchtigkeit.
Anderenfalls kann es zu Verbrennungen kommen.
2. Tragen Sie die Jacke nicht auf nackter Haut.
3. Benutzen Sie die Jacke nicht, wenn Sie unter
dem Einuss von Drogen, Alkohol oder
Medikamenten stehen.
4. Schlafen Sie nicht mit angezogener
Klima-Jacke. Eine starke Absenkung der
Körpertemperatur kann Ihrer Gesundheit schaden.
5. Kinder, behinderte Personen oder jeder, der
temperaturunempndlich ist, z. B. jemand mit
schwachem Blutkreislauf, sollte die Benutzung
der Jacke unterlassen.
6. Dieses Gerät ist nicht für medizinischen
Gebrauch in Krankenhäusern vorgesehen.
7. Benutzen Sie die Jacke nur für ihren vorgese-
henen Verwendungszweck.
8. Falls Sie irgendetwas Ungewöhnliches bemer-
ken, schalten Sie die Jacke aus, und entfernen
Sie unverzüglich den Akkuhalter.
9. Falls Sie eine Unregelmäßigkeit feststellen,
kontaktieren Sie Ihr lokales Service-Center
bezüglich einer Reparatur.
10. Unterlassen Sie Drauftreten, Werfen oder
sonstigen Missbrauch der Klima-Jacke.
11. Stecken Sie nicht Ihren Finger oder einen
Fremdkörper in die Gebläseeinheit.
12. Blasen Sie keine Druckluft in Richtung des
Gebläses. Stecken Sie keine kleinen Stöcke in
die Gebläseeinheit. Dadurch können Gebläse
und Motor beschädigt werden.
13. Schalten Sie die Klima-Jacke nur ein, wenn Sie
sie tragen.
14. Benutzen Sie die Klima-Jacke nicht an Orten,
wo ein Feuer oder Funken erzeugt werden
könnten. Anderenfalls kann die Gebläseeinheit
Feuer oder Funken fangen und einen Brand oder
Verbrennungen verursachen.
15. Wählen Sie eine angemessene
Gebläsedrehzahl im Einklang mit der
Benutzungsumgebung für Dauerbenutzung.
16. Tragen Sie keine Kleidung über der
Klima-Jacke.
17. Lassen Sie das Typenschild an der
Gebläseeinheit. Falls es unleserlich wird oder
verloren geht, kontaktieren Sie Ihr lokales
Service-Center bezüglich einer Reparatur.
21 DEUTSCH

18. Trennen Sie vor dem Waschen die
Gebläseeinheit und den Akkuhalter ab, und
entfernen Sie den Akku. Waschen Sie nur den
Jackenteil.
19. Lassen Sie die Klima-Jacke nicht an einem Ort
liegen, der starker Hitze ausgesetzt ist, wie z.
B. in einem in praller Sonne geparkten Auto.
Anderenfalls können die Kunststoffteile schmelzen
und beschädigt werden.
20. Entfernen Sie für längere Lagerung den
Akkuhalter und den Akku von der Jacke, und
nehmen Sie den Akku vom Akkuhalter ab.
21. Lagern Sie Klima-Jacke, Gebläseeinheiten,
Akkuhalter und Akku außer Reichweite von
Kindern.
Elektrische Sicherheit
1. Setzen Sie die Jacke keinem Regen
oder Nässe aus. Halten Sie Wasser von
Elektroteilen fern. Wasser, das in die Jacke
eindringt, erhöht die Stromschlaggefahr.
2. Fassen Sie das Kabel und den Akku nicht mit
nassen oder fettigen Händen an.
3. Benutzen Sie die Klima-Jacke nicht, wenn das
Kabel oder der Stecker beschädigt ist.
4. Behandeln Sie das Kabel sorgfältig. Benutzen
Sie das Kabel nicht zum Tragen, Ziehen oder
Abtrennen der Jacke. Halten Sie das Kabel von
Hitze, Öl und scharfen Kanten fern.
5. Lassen Sie kein Kabel abgetrennt, während
Akkustrom zugeführt wird. Es könnte zu
Verletzungen kommen, falls kleine Kinder den
Strom führenden Stecker in den Mund stecken.
6. Benutzen Sie das mitgelieferte Kabel nicht mit
anderen Geräten außer der Gebläseeinheit.
7. Stecken Sie keine Nägel, Drähte oder
andere Gegenstände in den USB-
Stromversorgungsanschluss. Anderenfalls
kann es zu einem Kurzschluss kommen, der
Rauch oder einen Brand verursachen kann.
8. Schließen Sie die Stromquelle nicht an den
USB-Anschluss an. Der USB-Anschluss ist
nur zum Laden von Niederspannungsgeräten
vorgesehen. Bringen Sie stets die Abdeckung
am USB-Anschluss an, wenn Sie kein
Niederspannungsgerät laden. Anderenfalls
besteht Brandgefahr.
9. Laden Sie den Akku nur mit dem vom
Hersteller vorgeschriebenen Ladegerät. Ein
Ladegerät, das für einen bestimmten Akkutyp
geeignet ist, kann bei Verwendung mit einem
anderen Akku eine Brandgefahr darstellen.
10. Verwenden Sie nur die eigens vorgesehenen
Akkus. Bei Verwendung irgendwelcher anderer
Akkus besteht Verletzungs- und Brandgefahr.
11. Bewahren Sie den Akku bei Nichtgebrauch
nicht zusammen mit Metallgegenständen, wie
Büroklammern, Münzen, Schlüsseln, Nägeln,
Schrauben, und anderen kleinen Metallteilen
auf, welche die Kontakte kurzschließen
können. Kurzschließen der Akkukontakte kann
Verbrennungen oder einen Brand verursachen.
12. Bei Missbrauch kann Flüssigkeit aus dem
Akku austreten. Vermeiden Sie Kontakt mit
dieser Flüssigkeit. Falls Sie versehentlich mit
der Flüssigkeit in Berührung kommen, spülen
Sie die betroffenen Stellen mit Wasser ab. Falls
die Flüssigkeit in die Augen gelangt, suchen
Sie zusätzlich ärztliche Hilfe auf. Die vom Akku
austretende Flüssigkeit kann Hautreizungen oder
Verätzungen verursachen.
13. Verwenden Sie keinen Akku und auch keine
Gebläseeinheit, der (die) beschädigt oder
modiziert ist. Beschädigte oder modizierte
Akkus können unvorhersehbares Verhalten zeigen, das zu einem Brand, einer Explosion oder
Verletzungsgefahr führen kann.
14. Setzen Sie einen Akku oder die Gebläseeinheit
nicht Feuer oder übermäßigen Temperaturen
aus. Bei Einwirkung von Feuer oder Temperaturen
über 130 °C kann es zu einer Explosion kommen.
15. Befolgen Sie alle Ladeanweisungen, und laden
Sie den Akku bzw. die Gebläseeinheit nicht
außerhalb des in den Anweisungen angegebe-
nen Temperaturbereichs. Wird der Ladevorgang
unsachgemäß oder bei Temperaturen außerhalb
des angegebenen Bereichs durchgeführt, kann es
zu einer Beschädigung des Akkus und erhöhter
Brandgefahr kommen.
Wichtige Sicherheitsanweisungen
für Akku
1. Lesen Sie vor der Benutzung des Akkus alle
Anweisungen und Warnhinweise, die an (1)
Ladegerät, (2) Akku und (3) Akkuwerkzeug
angebracht sind.
2. Unterlassen Sie ein Zerlegen des Akkus.
3. Falls die Betriebszeit beträchtlich kürzer
geworden ist, stellen Sie den Betrieb sofort
ein. Anderenfalls besteht die Gefahr von
Überhitzung, möglichen Verbrennungen und
sogar einer Explosion.
4. Falls Elektrolyt in Ihre Augen gelangt, waschen
Sie sie mit sauberem Wasser aus, und
begeben Sie sich unverzüglich in ärztliche
Behandlung. Anderenfalls können Sie Ihre
Sehkraft verlieren.
5. Der Akku darf nicht kurzgeschlossen werden:
(1) Die Kontakte dürfen nicht mit leitfähigem
Material berührt werden.
(2)
Lagern Sie den Akku nicht in einem Behälter
zusammen mit anderen Metallgegenständen,
wie z. B. Nägel, Münzen usw.
(3) Setzen Sie den Akku weder Wasser noch
Regen aus.
Ein Kurzschluss des Akkus verursacht star-
ken Stromuss, der Überhitzung, mögliche
Verbrennungen und einen Defekt zur Folge
haben kann.
6. Lagern Sie das Werkzeug und den Akku nicht
an Orten, an denen die Temperatur 50 °C erreichen oder überschreiten kann.
7. Versuchen Sie niemals, den Akku zu verbrennen, selbst wenn er stark beschädigt oder
vollkommen verbraucht ist. Der Akku kann im
Feuer explodieren.
22 DEUTSCH
8. Achten Sie darauf, dass der Akku nicht fallen
gelassen oder Stößen ausgesetzt wird.
9. Benutzen Sie keine beschädigten Akkus.
10. Die enthaltenen Lithium-Ionen-Akkus unter-
liegen den Anforderungen der Gefahrengut-
Gesetzgebung.
Für kommerzielle Transporte, z. B. durch
Dritte oder Spediteure, müssen besondere
Anforderungen zu Verpackung und Etikettierung
beachtet werden.
Zur Vorbereitung des zu transportierenden
Artikels ist eine Beratung durch einen Experten für
Gefahrengut erforderlich. Bitte beachten Sie möglicherweise ausführlichere nationale Vorschriften.
Überkleben oder verdecken Sie offene Kontakte,
und verpacken Sie den Akku so, dass er sich in
der Verpackung nicht umher bewegen kann.
11. Befolgen Sie die örtlichen Bestimmungen
bezüglich der Entsorgung von Akkus.
12. Verwenden Sie die Akkus nur mit den von
Makita angegebenen Produkten. Das Einsetzen
der Akkus in nicht konforme Produkte kann zu
einem Brand, übermäßiger Hitzebildung, einer
Explosion oder Auslaufen von Elektrolyt führen.
DIESE ANWEISUNGEN
Makita-Akkus. Die Verwendung von Nicht-Original-
Makita-Akkus oder von Akkus, die abgeändert
worden sind, kann zum Bersten des Akkus und
daraus resultierenden Bränden, Personenschäden
und Beschädigung führen. Außerdem wird dadurch
die Makita-Garantie für das Makita-Werkzeug und
-Ladegerät ungültig.
Hinweise zur Aufrechterhaltung
der maximalen
Akku-Nutzungsdauer
1. Laden Sie den Akku, bevor er vollkommen
2. Unterlassen Sie erneutes Laden eines voll
3. Laden Sie den Akku bei Raumtemperatur
4. Der Akku muss geladen werden, wenn er lange
AUFBEWAHREN.
BEZEICHNUNG DER TEILE
Akkuhalter und Gebläseeinheit
► Abb.1
1 Akkuhalter
(10,8 V - 12 V max.)
(Sonderzubehör)
Modell DFJ210 / DFJ211 / DFJ310 / DFJ311 / DFJ410 / DFJ411
► Abb.2
1 Schlaufe für
Namensschild
5 Schulterpolster
(nur DFJ410 / DFJ411)
Modell DFJ212 / DFJ213 / DFJ214 / DFV210
► Abb.3
1 Akkutasche 2 Kapuze
2 Akkuhalter
(14,4 V /18 V)
(Sonderzubehör)
2 Schlaufe für Armschild 3 Ärmelhalter 4 Akkutasche
6 Netztasche für Eisbeutel 7 Antirutschgummi
(nur DFJ212)
3 Gebläseeinheit 4 Stromversorgungskabel
3 Klettverschluss
VORSICHT: Verwenden Sie nur Original-
erschöpft ist. Schalten Sie das Werkzeug stets
aus, und laden Sie den Akku, wenn Sie ein
Nachlassen der Werkzeugleistung feststellen.
aufgeladenen Akkus. Überladen führt zu einer
Verkürzung der Nutzungsdauer des Akkus.
zwischen 10 – 40 °C. Lassen Sie einen heißen
Akku abkühlen, bevor Sie ihn laden.
Zeit (länger als sechs Monate) nicht benutzt
wird.
(nur DFJ211, DFJ311
und DFJ411)
(nur DFJ212)
8 Kapuze
(nur DFJ211, DFJ311
und DFJ411)
4 Lichtreektor
(nur DFJ214)
23 DEUTSCH
 Loading...