

Makita AN944 Instruction Manual
GB Pneumatic Framing Nailer
Instruction Manual
F Cloueuse pneumatica
AN944
Manuel d’instructions

ENGLISH
TECHNICAL DATA
Model number AN944
Type of tool ................................................................................... 28 Degree Framing Nailer
Dimension
Weight of tool ............................................................................... 6.97 lbs (3.16 Kg)
Compressed air
Noise characteristic values in accordance with
Recommended lubrications
Fastener specifications ................................................................. 0.113” – 0.131” (2.8 – 3.3 mm)
Accessories .................................................................................. Wrench 3, 4, 5, 6
Applications & suitability ............................................................... Framing, Decking, Trusses, Siding, Subfloor,
Actuating system (Vsafety yoke installed) ...................................Contact/Single sequential actuation
Trigger device ............................................................................... Finger pressure activation
Filling the magazine
1. Slide up to 3 strips of nail into the magazine until they pass through the nail stop lever.
2. Pull back the pusher until it is behind the loaded nail.
3. Release the pusher to engage the nail strips, remembering to keep finger clear.
.................................................................................... 17-1/2” x 4-31/32” x 13-11/32”
Maximum permissible operating pressure ................................120 PSIG
Recommended operating pressure .......................................... 70 – 120 PSIG (4.9 – 8.3 bar)
Air consumption per driving operation ....................................... 2.159 litres/cycle (0.076 scf/cycle) at 101 PSIG
Maximum A-weighted impulse sound power level..................... 104.8 dBA
Maximum A-weighted surface impulse sound pressure level .......94.8 dBA
(445 mm x 126 mm x 339 mm
(7 bar) operating pressure
length 2” – 3-1/2” (50 – 90 mm)
Fencing, Sheathing, Pallets and Crate Assembly
)
IMPORTANT SAFETY INSTRUCTIONS
WARNING: WHEN USING THIS TOOL, BASIC
SAFETY PRECAUTIONS SHOULD ALWAYS BE FOLLOWED TO REDUCE THE RISK OF PERSONAL
INJURY, INCLUDING THE FOLLOWING:
READ ALL INSTRUCTIONS.
1. For personal safety and proper operation and
maintenance of the tool, read this instruction
manual carefully before using the tool.
2. Always wear safety glasses to protect your eyes
from dust or nail injury. The safety glasses
should conform with the requirements of ANSI
Z87.1.
WARNING:
It is an employer’s responsibility to enforce the
use of safety eye protection equipment by the
tool operators and by other persons in the immediate working area.
3. Wear hearing protection to protect your ears
against exhaust noise and head protection. Also
wear light but not loose clothing. Sleeves should
be buttoned or rolled up. No necktie should be
worn.
4. Rushing the job or forcing the tool is dangerous.
Handle the tool carefully. Do not operate when
under the influence of alcohol, drugs or the like.
5. General Tool Handling Guidelines:
(1) Always assume that the tool contains fasten-
ers.
(2) Do not point the tool toward yourself or any-
one whether it contains fasteners or not.
(3) Do not actuate the tool unless the tool is
placed firmly against the workpiece.
(4) Respect the tool as a working implement.
(5) No horseplay.
(6) Do not hold or carry the tool with a finger on
the trigger.
(7) Do not load the tool with fasteners when any
one of the operating controls is activated.
(8) Do not operate the tool with any power
source other than that specified in the tool
operating/safety instructions.
6. An improperly functioning tool must not be
used.
7. Sparks sometimes fly when the tool is used. Do
not use the tool near volatile, flammable materials such as gasoline, thinner, paint, gas, adhesives, etc.; they will ignite and explode, causing
serious injury.
8. The area should be sufficiently illuminated to
assure safe operations. The area should be clear
and litter-free. Be especially careful to maintain
good footing and balance.
9. Only those involved in the work should be in the
vicinity. Children especially must be kept away at
all times.
10. There may be local regulations concerning noise
which must be complied with by keeping noise
levels within prescribed limits. In certain cases,
shutters should be used to contain noise.
11. Do not play with the contact element: it prevents
accidental discharge, so it must be kept on and
not removed. Securing the trigger in the ON
position is also very dangerous. Never attempt
to fasten the trigger. Do not operate a tool if any
portion of the tool operating controls is inoperable, disconnected, altered, or not working properly.
2

12. Operate the tool within the specified air pressure
on the tool label for safety and longer tool life.
Do not exceed the recommended max. operating
pressure. The tool should not be connected to a
source whose pressure potentially exceeds 200
PSIG (13.6 bar).
13. Never use the tool with other than compressed
air. If bottled gas (carbon dioxide, oxygen, nitrogen, hydrogen, air, etc.) or combustible gas
(hydrogen, propane, acetylene, etc.) is used as a
power source for this tool, the tool will explode
and cause serious injury.
14. Always check the tool for its overall condition
and loose screws before operation. Tighten as
required.
15. Make sure all safety systems are in working
order before operation. The tool must not operate if only the trigger is pulled or if only the contact element is pressed against the wood. It must
work only when both actions are performed. Test
for possible faulty operation with nails unloaded
and the contact element in fully pulled position.
16. Check walls, ceilings, floors, roofing and the like
carefully to avoid possible electrical shock, gas
leakage, explosions, etc. caused by striking live
wires, conduits or gas pipes.
17. Use only nails specified in this manual. The use
of any other nails may cause malfunction of the
tool.
18. Do not permit those uninstructed to use the tool.
19. Make sure no one is nearby before nailing.
Never attempt to nail from both the inside and
outside at the same time. Nails may rip through
and/or fly off, presenting a grave danger.
20. Watch your footing and maintain your balance
with the tool. Make sure there is no one below
when working in high locations, and secure the
air hose to prevent danger if there is sudden
jerking or catching.
21. On rooftops and other high locations, nail as you
move forward. It is easy to lose your footing if
you nail while inching backward. When nailing
against perpendicular surface, nail from the top
to the bottom. You can perform nailing operations with less fatigue by doing so.
22. A nail will be bent or the tool can become
jammed if you mistakenly nail on top of another
nail or strike a knot in the wood. The nail may be
thrown and hit someone, or the tool itself can
react dangerously. Place the nails with care.
23. Do not leave the loaded tool or the air compressor under pressure for a long time out in the sun.
Be sure that dust, sand, chips and foreign matter
will not enter the tool in the place where you
leave it setting.
24. Do not point the ejection port at anyone in the
vicinity. Keep hands and feet away from the ejection port area.
25. When the air hose is connected, do not carry the
tool with your finger on the trigger or hand it bar)
to someone in this condition. Accidental firing
can be extremely dangerous.
26. Handle the tool carefully, as there is high pressure inside the tool that can be dangerous if a
crack is caused by rough handling (dropping or
striking). Do not attempt to carve or engrave on
the tool.
27. Stop nailing operations immediately if you
notice something wrong or out of the ordinary
with the tool.
28. Always disconnect the air hose and remove all of
the nails:
(9) When unattended.
(10) Before performing any maintenance or
repair.
(11) Before cleaning a jam.
(12) Before moving the tool to a new location.
29. Perform cleaning and maintenance right after
finishing the job. Keep the tool in tip-top condition. Lubricate moving parts to prevent rusting
and minimize friction-related wear. Wipe off all
dust from the parts.
30. Do not modify tool without authorization from
Makita.
31. Do not attempt to keep the trigger or contact element depressed with tape or wire. Death or serious injury may occur.
32. Always check contact element as instructed in
this manual. Nails may be driven accidentally if
the safety mechanism is not working correctly.
33. Ask Makita’s Authorized service centers for periodical inspection of the tool.
34. To maintain product SAFETY and RELIABILITY,
maintenance and repairs should be performed
by Makita Authorized or Factory Service Centers,
always using Makita replacement parts.
SAVE THESE INSTRUCTIONS.
WARNING:
MISUSE or failure to follow the safety rules stated in
this instruction manual may cause serious personal
injury.
TRIGGERING DEVICES
This fastener driving tool is operated by actuating the
trigger using finger pressure.
Some fastener driving tools are fitted with an additional
safety yoke which enables the driving operation to be
carried out only after the muzzle of the tool is pressed
against a workpiece. These tools are marked with an
inverted triangle (V) and may not be used unless fitted
with an effective safety yoke.
ACTUATING SYSTEMS
Depending on their purpose, fastener driving tools may
be fitted with different actuating systems. See the respective technical data sheet for details of the actuating system of the tools.
Single sequential actuation (preferred version):
actuating system in which the safety yoke and the trigger
have to be activated in such a way that one single driving
operation is actuated via the trigger after the muzzle of the
tool has been applied to the driving location. Thereafter
any further driving operations can only be actuated after
the trigger has been returned to the starting position.
Full sequential actuation: This is an actuating system
in which the safety yoke and the trigger have to be activated in such a way that one single driving operation is
actuated via the trigger after the muzzle of the tool has
been applied to the driving location. Thereafter any further driving operations can only be actuated only after
the trigger and the safety yoke have been returned to the
starting position.
An
3
Contact actuation (restricted version): An actuating
system in which the trigger and the safety yoke have to
be actuated for each driving operation, with the order of
actuation not being specified. For subsequent driving
operations it is sufficient if either the trigger remains activated and the safety yoke is activated thereafter, or vice
versa.
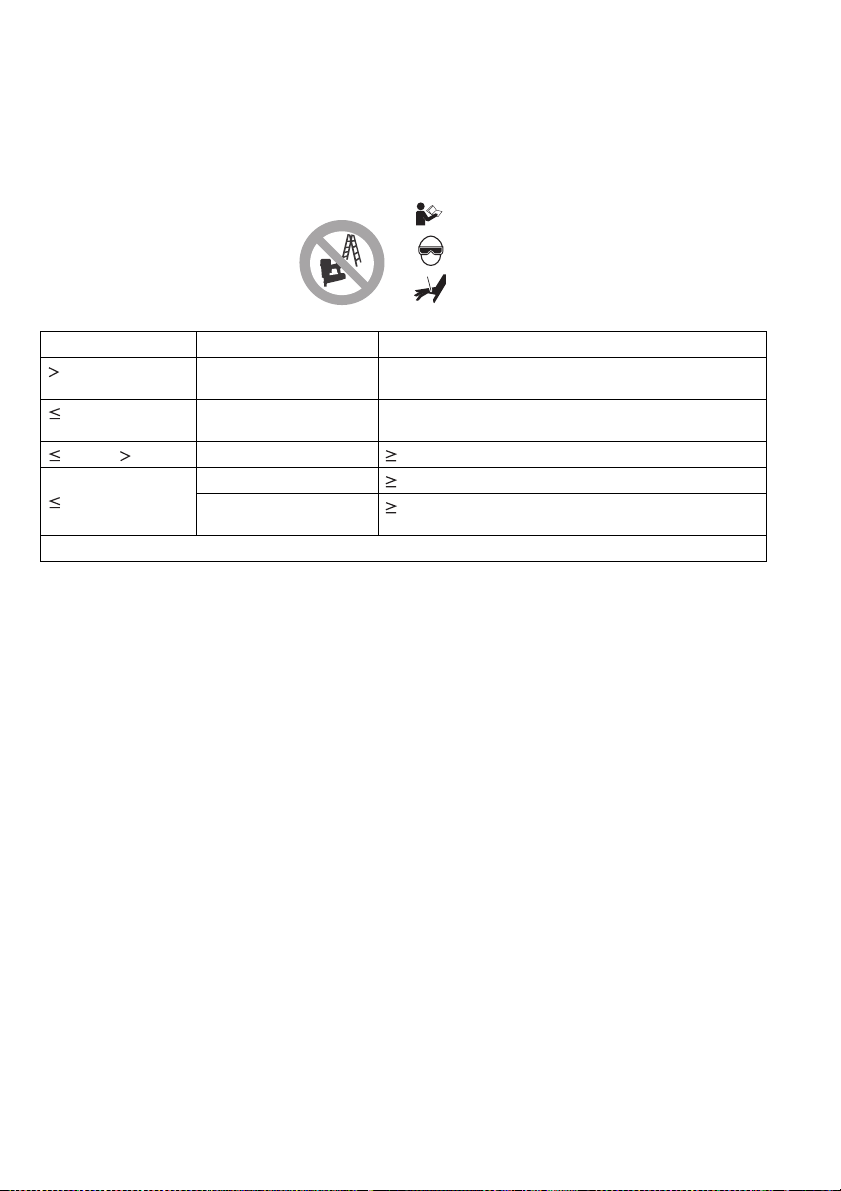
Fastener driving tools equipped with contact actuation
must be marked with the symbol »Do not use on scaffoldings, ladders« and must not be used for specific applications for example:
• when moving from one driving location to another involves the use of
scaffoldings, stairs, ladders, or ladder-like constructions, e.g. roof laths,
• closing boxes or crates,
• fitting transportation safety systems
e.g. on vehicles and wagons.
Length of fasteners Actuation system Special requirements
130 mm Full sequential actuation The safety yoke has to return reliably to its initial position in
130 mm Single sequential actuation
100 mm 65 mm Contact actuation 125% of the tool weight* as safety yoke return force
65 mm
* without fasteners
with safety yoke
Contact actuation 60% of the tool weight* as safety yoke return force
Constant actuation with
safety yo ke
Single sequential actuation with trigger lock: Some
models have a safety system consisting of a small lever
attached behind the trigger which blocks automatically
every time the trigger is released, preventing unintentional triggering. If a fastener is to be driven, the safety
lever must be pulled first, which enables the main trigger
and makes it possible to press.
SYMBOLS
The followings show the symbols used for tool.
..................Read and understand tool labels and
..................Operators and others in work area must
..................Keep fingers away from trigger when
any tool position
The safety yoke has to return reliably to its initial position in
any tool position
60% of the tool weight* as safety yoke return force
manual.
wear safety glasses with side shields.
not driving fasteners to avoid accidental
firing.
2. COMPRESSED AIR SYSTEM
Proper functioning of the fastener driving tool requires filtered, dry and oiled compressed air in adequate quantities.
If the air pressure in the line system exceeds the maximum permissible operating pressure of the fastener driving tool, a pressure reducing valve followed by a
downstream safety valve shall additionally be fitted in the
supply line to the tool.
Note: When compressed air is generated by compressors, the natural moisture in the air condenses and collects as condensed water in pressure vessels and
pipelines. This condensate must be removed by water
separators. These water separators must be checked on
a daily basis and drained if necessary, since corrosion
can otherwise develop in the compressed air system and
in the fastener driving tool, which serves to accelerate
wear.
The compressor plant shall be adequately dimensioned
in terms of pressure output and performance (volumetric
flow) for the consumption which is to be expected. Line
sections which are too small in relation to the length of
the line (pipes and hoses), as well as overloading the
compressor, will result in pressure drops.
4
Permanently laid compressed air pipelines should have
an internal diameter of least 19 mm (0.75 inch) and a
correspondingly larger diameter where relatively long
pipelines or multiple users are involved. Compressed air
pipelines should be laid so as to form a gradient (highest
point in the direction to the compressor). Easily accessible water separators should be installed at the lowest
points.
Junctions for users should be joined to the pipelines from
above.
Connecting points for fastener driving tools should be fitted with a compressed air servicing unit (filter/ water separator/ lubricator) directly at the junction point.
Lubricators must be checked on a daily basis and topped
up with the recommended grade of oil (see technical
data) if necessar y. Adjust the lubricator of the maintenance unit to 1 drop for approx. every 15 blows of the fastener. Check the oil level in the reservoir regularly.
Where hose lengths of over 10 m (33 ft) are used, the oil
supply for the fastener driving tool cannot be guaranteed.
We therefore recommend an lubricator attached directly
to the fastener driving tool. Adjust the dosing so that it
has to be refilled approximately every 30 000 blows.
 Loading...