

Page 1
GB
AM-3643
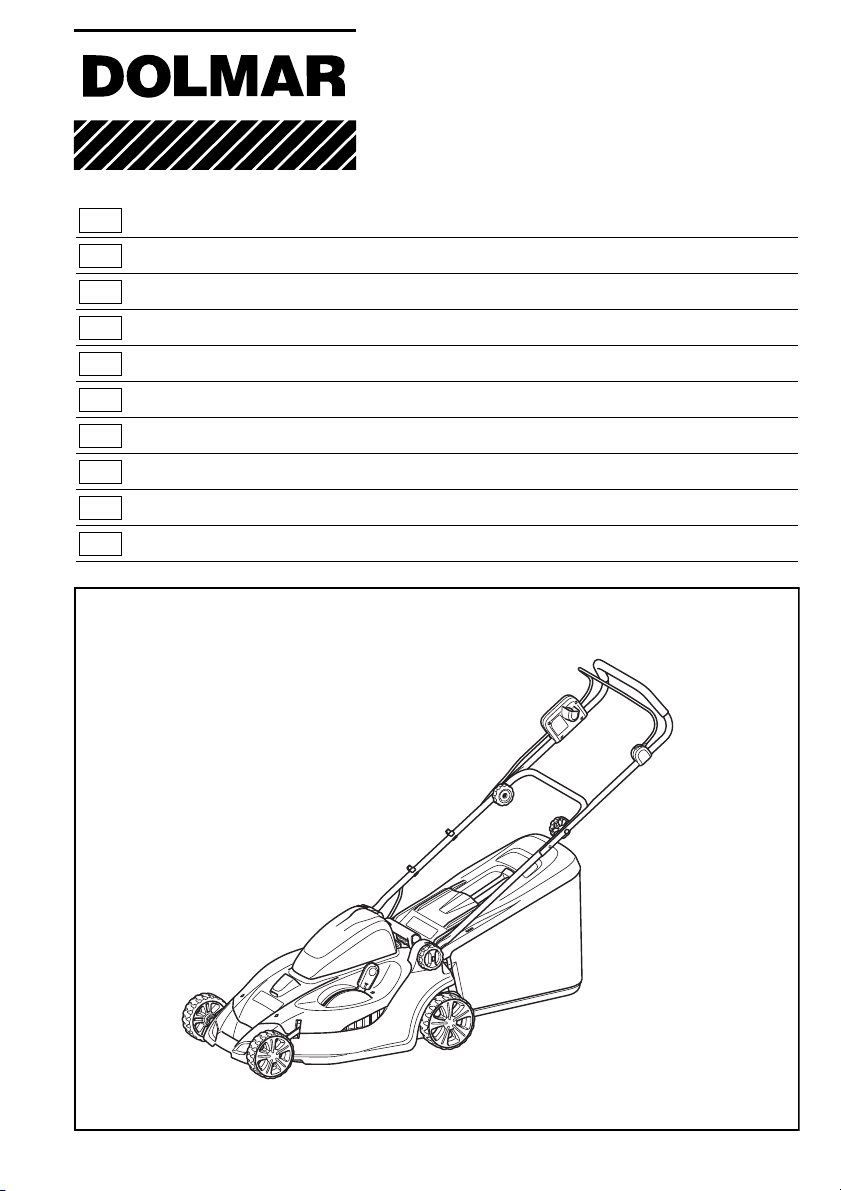
Cordless Lawn Mower Instruction Manual
F
Tondeuse Sans Fil Manuel d’instructions
D
Akku Rasenmäher Betriebsanleitung
I
Tosaerba a batteria Istruzioni per l’uso
NL
Snoerloze grasmaaier Gebruiksaanwijzing
E
Cortadora de Cesped Manual de instrucciones
P
Cortadora de Grama a Bateria Manual de instruções
DK
Akku-plæneklipper Brugsanvisning
GR Μηχανή γκαζόν με μπαταρία Οδηγίες χρήσεως
TR Akülü Çim Biçme Makinesi Kullanma kılavuzu
Page 2
1
3
2
1
3
8
012296
4
7
23
9
012436 012381
11
45
2
5
6
012435012297
10
Page 3
6
4
12
012437
12
7
8
012439
012297
3
Page 4
13
14
9
15
10 11
012303 011715
012603
16
17
4
Page 5
21
18
22
22
18
25
9
20
12
13 14
012386 012606
19
012385
22
23
18
21
24
25
9
15 16
012421 012605
5
Page 6
17
24
23
21
18
012389
18
27
26
28
012304
6
Page 7
29
30
19
27
31
28
012601
32
20
33
012302
7
Page 8
33
32
34
21
22
012301
012382
8
Page 9
32
34
23
24 25
012604 012309
012307
9
Page 10
36
26
37
35
20
23
012298
32
27
10
34
012602
Page 11

38
28 29
012420012600
11
Page 12

Symbols
END016-2
The followings show the symbols used for the equipment. Be sure that you understand their meaning before
use.
Symboles
Nous donnons ci-dessous les symboles utilisés pour l’outil. Assurez-vous que vous en avez bien compris la
signification avant d’utiliser l’outil.
Symbole
Die folgenden Symbole werden für die Maschine verwendet. Machen Sie sich vor der Benutzung unbedingt
mit ihrer Bedeutung vertraut.
Simboli
Per questo utensile vengono usati i simboli seguenti. Bisogna capire il loro significato prima di usare l’utensile.
Symbolen
Voor dit gereedschap worden de volgende symbolen gebruikt. Zorg ervoor dat u de betekenis van deze symbolen begrijpt alvorens het gereedschap te gebruiken.
Símbolos
A continuación se muestran los símbolos utilizados con esta herramienta. Asegúrese de que entiende su significado antes de usarla.
Símbolos
O seguinte mostra os símbolos utilizados para a ferramenta. Certifique-se de que compreende o seu significado antes da utilização.
Symboler
Nedenstående symboler er anvendt i forbindelse med denne maskine. Vær sikker på, at De har forstået symbolernes betydning, før maskinen anvendes.
Σύμβολα
Τα ακόλουθα δείχνουν τα σύμβολα που χρησιμοποιούνται για το μηχάνημα. Βεβαιωθείτε ότι καταλαβαίνετε τη
σημασία τους πριν από τη χρήση.
Semboller
Aşağıdakiler makinanız için kullanılan sembolleri göstermektedir. Kullanmadan önce manalarını
anladığınızdan emin olunuz.
• Take particular care and attention.
• Veuillez être prudent et rester attentif.
• Besondere Umsicht und Aufmerksamkeit erforderlich.
• Prestare una particolare cura e attenzione.
• Wees vooral voorzichtig en let goed op.
• Preste cuidado y atención especiales.
• Tenha muito cuidado e atenção.
• Udvis særlig forsigtighed og opmærksomhed.
• Απαιτούνται ιδιαίτερη φροντίδα και προσοχή.
• Çok dikkatli kullanın.
12
Page 13

• Read instruction manual.
• Lire le mode d’emploi.
• Bitte Bedienungsanleitung lesen.
• Leggete il manuale di istruzioni.
• Lees de gebruiksaanwijzing.
• Lea el manual de instrucciones.
• Leia o manual de instruções.
• Læs brugsanvisningen.
• Διαβάστε τις οδηγίες χρήσης.
•El kitabını okuyun.
• Danger; be aware of thrown objects.
• Danger : prenez garde aux objets éjectés.
• Gefahr durch herausgeschleuderte Objekte.
• Pericolo: fare attenzione agli oggetti scagliati.
• Gevaar; pas op voor rondvliegende voorwerpen.
• Peligro; tenga cuidado con los objetos que salen lanzados.
• Perigo: tenha cuidado com objectos atirados.
• Fare: Vær opmærksom på flyvende genstande.
• Κίνδυνος. Να προσέχετε για εκτοξευόμενα αντικείμενα.
•Tehlike; sıçrayan nesnelerden korunun.
• The distance between the tool and bystanders must be at least 15 m.
• La distance entre l’outil et les personnes présentes doit être d’au moins 15 m.
• Der Abstand zwischen der Maschine und Umstehenden sollte mindestens 15 m betragen.
• La distanza tra il tosaerba e gli astanti deve essere di almeno 15 m.
• Omstanders moeten een afstand van zeker 15 meter bewaren tot het gereedschap.
• La distancia entre la herramienta y los transeúntes deberá ser de 15 m por lo menos.
• Deve-se manter uma distância de pelo menos 15 m entre a ferramenta e os espectadores.
• Afstanden mellem maskinen og omkringstående skal være mindst 15 m.
• Η απόσταση ανάμεσα στο εργαλείο και τους παρευρισκόμενους πρέπει να είναι τουλάχιστον
15 μέτρα.
• Alet ile etrafındaki kişiler arasında en az 15 m olmalıdır.
13
Page 14
• Never put your hands and feet near the blade under the mower.
• Ne mettez jamais les mains ou les pieds près de la lame sous la tondeuse.
• Halten Sie niemals Ihre Hände und Füße in die Nähe des Messers unter dem Mäher.
• Non si devono mai mettere le mani e i piedi vicino alla lama sotto il tosaerba.
• Breng nooit uw handen of voeten dichtbij het snijblad onder de grasmaaier.
• No ponga nunca sus manos ni pies cerca de la cuchilla debajo del cortacésped.
• Nunca aproxime as mãos ou os pés da lâmina localizada embaixo do cortador de relva.
• Anbring aldrig hænder og fødder i nærheden af bladet under plæneklipperen.
• Μη βάζετε ποτέ τα χέρια ή τα πόδια σας κοντά στη λάμα κάτω από τη μηχανή γκαζόν.
• Ellerinizi ve ayaklarınızı asla makinenin altındaki bıçaklara yaklaştırmayın.
• Remove the lock key before inspecting, adjusting, cleaning, servicing, leaving and storing the
mower.
• Retirez la clé de sécurité avant d’inspecter, de régler, de nettoyer, de réparer, de laisser sans
surveillance ou de ranger la tondeuse.
• Entfernen Sie den Sperrschlüssel, bevor Sie den Mäher überprüfen, einstellen, reinigen,
warten, verlassen und lagern.
• Rimuovere la chiave di blocco prima di ispezionare, regolare, pulire, fare la manutenzione,
lasciare e immagazzinare il tosaerba.
• Verwijder de contactsleutel vóór het inspecteren, bijstellen, reinigen, onderhoud, achterlaten
of opbergen van de grasmaaier.
• Retire la llave de bloqueo antes de inspeccionar, ajustar, limpiar, hacer el servicio de mantenimiento, dejar y almacenar el cortacésped.
• Remova a chave de segurança antes de realizar uma inspecção, ajuste, limpeza,
manutenção, armazenamento ou quando não estiver em utilização.
• Fjern låsenøglen, inden du inspicerer, justerer, rengør, servicerer, forlader og stiller plæneklipperen til opbevaring.
• Βγάλτε το κλειδί ασφάλισης πριν εκτελέσετε εργασίες επιθεώρησης, ρύθμισης, καθαρισμού
και σέρβις στη μηχανή γκαζόν και πριν απομακρυνθείτε από τη μηχανή γκαζόν ή την
αποθηκεύσετε.
• Kontrol, ayarlama, temizleme, servis, kenara kaldırma ve depolama işlemlerinden önce kilit
anahtarını çıkarın.
14
Page 15

• Only for EU countries
Cd
Ni-MH
Li-ion
Do not dispose of electric equipment or battery pack together with household waste material!
In observance of European Directive 2002/96/EC on waste electric and electronic equipment, 2006/66/EC on batteries and accumulators and waste batteries and accumulators and
their implementation in accordance with national laws, electric equipment and battery pack
that have reached the end of their life must be collected separately and returned to an environmentally compatible recycling facility.
• Uniquement pour les pays de l’UE
Ne pas jeter les appareils électriques et les batteries avec les ordures ménagères !
Conformément aux directives européennes 2002/96/CE (relative aux déchets d’équipements
électriques et électroniques) et 2006/66/CE (relative aux piles et accumulateurs ainsi qu’aux
déchets de piles et accumulateurs), ainsi qu’à leur application en conformité avec les lois
nationales, les appareils électriques et batteries qui ont atteint la fin de leur durée de service
doivent être collectés séparément et renvoyés à un établissement de recyclage respectueux
de l’environnement.
• Nur für EG-Länder
Werfen Sie Elektrogeräte oder Akkus nicht in den Hausmüll!
Gemäß der Europäischen Richtlinie 2002/96/EG über Elektro- und Elektronik-Altgeräte,
2006/66/EG über Batterien, Akkus sowie verbrauchte Batterien und Akkus und ihre Umsetzung gemäß den Landesgesetzen müssen Elektrogeräte und Akkus, die das Ende ihrer Lebensdauer erreicht haben, getrennt gesammelt und einer umweltgerechten RecyclingEinrichtung zugeführt werden.
• Soltanto per i Paesi dell’unione europea
Questo apparecchio elettrico o la batteria non devono essere gettati via con i rifiuti domestici.
In osservanza alla Direttiva Europea 2002/96/CE sugli apparecchi elettrici ed elettronici di
scarto, 2006/66/CE sulle batterie e gli accumulatori, e sulle batterie e gli accumulatori esausti, e la sua implementazione secondo le leggi locali, gli apparecchi elettrici e le batterie che
hanno raggiunto la fine della loro vita di servizio devono essere raccolti separatamente e portati in un centro di smaltimento ecocompatibile.
• Alleen voor EU-landen
Geef elektrisch gereedschap of accu’s niet met het huisvuil mee!
Volgens de Europese richtlijn 2002/96/EC inzake oude elektrische en elektronische apparaten, richtlijn 2006/66/EC inzake batterijen en accu’s en wegwerpbatterijen, en de toepassing daarvan binnen de nationale wetgeving, dienen gebruikte elektrisch apparaten en accu’s
die het einde van hun levensduur hebben bereikt, gescheiden te worden ingezameld en te
worden afgevoerd naar een recyclebedrijf dat voldoet aan de geldende milieu-eisen.
• Sólo para países de la Unión Europea
¡No tire aparatos eléctricos ni baterías a la basura con los residuos domésticos!
En conformidad con la Directiva Europea 2002/96/EC sobre residuos de aparatos eléctricos
y electrónicos y la Directiva Europea 2006/66/EC sobre baterías y acumuladores y residuos
de baterías y de acumuladores y su aplicación de acuerdo con la legislación nacional, los
aparatos eléctricos y las baterías cuya vida útil haya llegado a su fin se deberán recoger por
separado y trasladar a una planta de reciclaje que cumpla con las exigencias ecológicas.
• Apenas para os países da União Européia
Não deite equipamentos eléctricos nem baterias no lixo doméstico!
De acordo com as directivas europeias 2002/96/CE sobre ferramentas eléctricas e electrónicas usadas e 2006/66/CE sobre baterias e acumuladores e respectivos resíduos e a implementação dessas directivas conforme a lei nacional, as ferramentas eléctricas e as baterias
que atingem o fim de sua vida útil devem ser recolhidas em separado e encaminhadas a
uma instalação de reciclagem compatível com os regulamentos sobre o meio ambiente.
• Gælder kun lande i EU
Undlad at bortskaffe elektrisk udstyr eller akkuer sammen med almindeligt husholdningsaffald.
I henhold til EU-direktiv 2002/96/EC angående brugt elektrisk og elektronisk udstyr, 2006/66/
EC angående batterier og akkumulatorer og brugte batterier og iværksættelse af bortskaffelse af batterier og akkumulatorer i overensstemmelse med nationale love, skal elektrisk
udstyr og akkuer, der har nået slutningen af deres levetid, indsamles separat og afhændes til
en genbrugsfacilitet, som er miljømæssigt kompatibel.
15
Page 16

• Μόνο για χώρες ΕΕ
Μην απορρίπτετε ηλεκτρικό εξοπλισμό ή μπαταρίες μαζί με τα οικιακά απόβλητα!
Σύμφωνα με την Ευρωπαϊκή Οδηγία 2002/96/ΕΚ περί αποβλήτων ειδών ηλεκτρικού και
ηλεκτρονικού εξοπλισμού και την Οδηγία 2006/66/EΚ περί μπαταριών και συσσωρευτών και
αποβλήτων μπαταριών και συσσωρευτών και την εφαρμογή τους σύμφωνα με την εθνική
νομοθεσία, απαιτείται συλλογή του ηλεκτρικού εξοπλισμού και των μπαταριών, το όριο ζωής
των οποίων έχει λήξει, ξεχωριστά και επιστροφή τους σε εγκατάσταση ανακύκλωσης
συμβατή με την προστασία του περιβάλλοντος.
• Sadece AB ülkeleri için
Elektrik donanımını veya pilleri evsel atıklarla birlikte bertaraf etmeyiniz!
Atık elektrikli ve elektronik donanımlar konusundaki 2002/96/EC sayılı, piller ve
akümülatörler ve atık piller ve atık akümülatörler konusundaki 2006/66/EC sayılı Avrupa
Direktifleri ve bunların ulusal yasalara uygulanmaları uyarınca, kullanım ömürleri biten
elektrikli donanımların ve pillerin ayrı toplanmaları ve çevreye uyumlu bir geri kazanım
tesisine getirilmeleri gereklidir.
16
Page 17
ENGLISH (Original instructions)
Explanation of general view
1 Battery cover locking lever
2 Battery cartridge
3 Battery cover
4 Lock key
5 Battery converter (AA-3618)
6 Installation hole
7 Hook
8 Product mounting adapter of the
AA-3618
9Cord
10 Slit
11 Upper holders
12 Battery converter (AA-3618CL)
13 Switch button
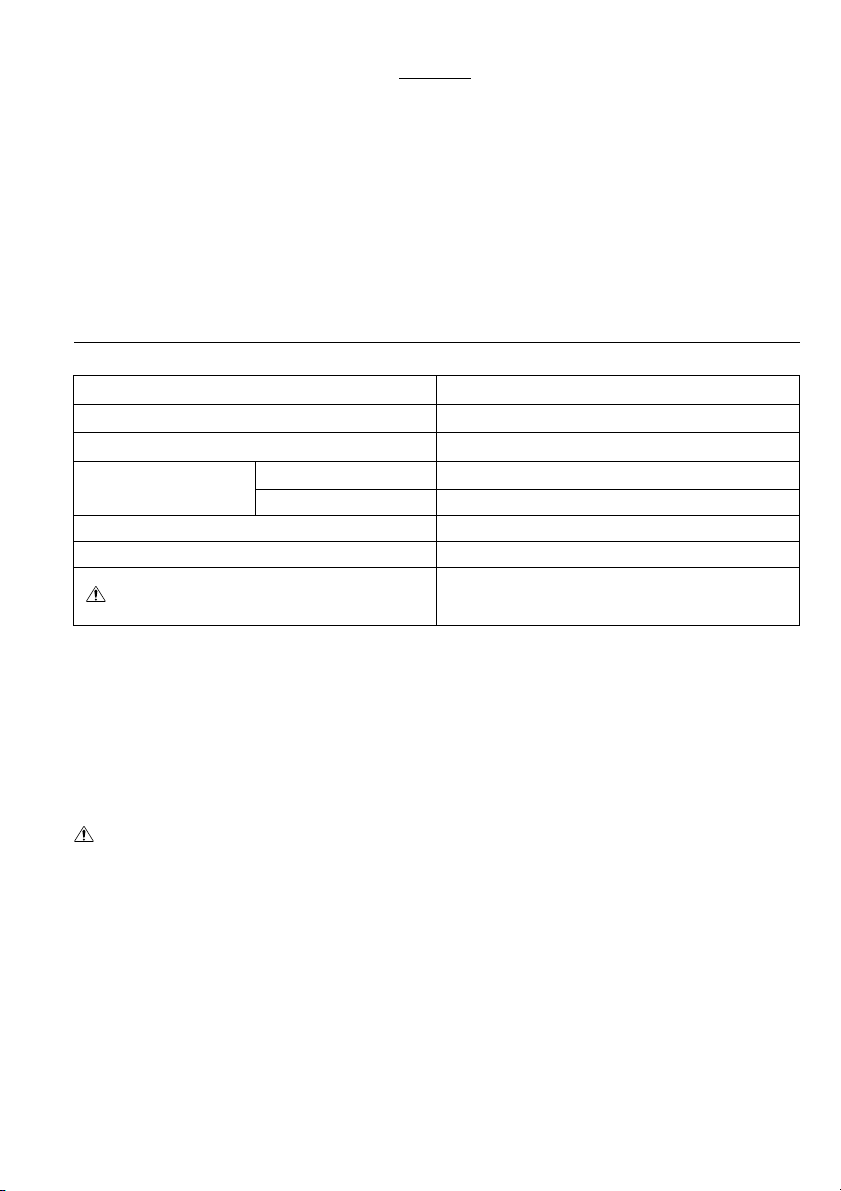
SPECIFICATIONS
Model AM-3643
Mowing width 430 mm
No load speed 3,600 min
Dimensions (L x W x H)
Net weight 17.9 kg
Rated voltage D.C. 36 V
Warning: Use only the battery cartridge(s) described.
• Due to our continuing program of research and devel-
opment, the specifications herein are subject to change
without notice.
• Specifications and battery cartridge may differ from
country to country.
• Weight, with battery cartridge, according to EPTA-Pro-
cedure 01/2003
Standard battery cartridge(s)
IMPORTANT SAFETY INSTRUCTIONS
WARNING! Read all safety warnings and all
instructions. Failure to follow the warnings and instruc-
tions may result in electric shock, fire and/or serious
injury.
Save all warnings and instructions for future reference.
1. Do not insert key into mower until it is ready to
be used.
2. This appliance is not intended for use by per-
sons (including children) with reduced physical,
sensory or mental capabilities, or lack of experi-
ence and knowledge, unless they have been
given supervision or instruction concerning use
of the appliance by a person responsible for
their safety.
3. Children should be supervised to ensure that
they do not play with the appliance.
4. Never allow children or people unfamiliar with
these instructions to use the machine. Local reg-
ulations can restrict the age of the operator.
14 Switch lever
15 Mowing height adjusting lever
16 Indicator lamps
17 CHECK button
18 Lower handle
19 Groove on the deck
20 Clamping screw
21 Upper handle
22 Screw holes
23 Clamping nut
24 Screw
25 Holders
26 Screwdriver
27 Blade
during operation
when stored 490 mm – 500 mm x 460 mm x 810 mm
GEB091-5
28 Bolt
29 Inner flange
30 Arrow
31 Outer flange
32 Rear guard
33 Groove
34 Grass basket
35 Expand
36 Move down forward
37 Pivot back
38 Front grip
–1
1,450 mm – 1,490 mm x 460 mm x 950 mm – 1,020 mm
AP-363 / AP-3622
5. Never operate the machine while people, especially children, or pets are nearby.
6. Keep in mind that the operator or user is responsible for accidents or hazards occurring to other
people or their property.
7. While operating the machine always wear substantial footwear and long trousers. Do not operate the machine when barefoot or wearing open
sandals. Avoid wearing clothing or jewelry that
is loose fitting or that has hanging cords or ties.
They can be caught in moving parts.
8. Operate the machine only in daylight or in good
artificial light.
9. Avoid operating the machine in wet grass.
10. Never operate the mower in the rain.
11. Battery tool use
– Recharge only with the charger specified by
the manufacturer. A charger that is suitable for
one type of battery pack may create a risk of fire
when used with another battery pack.
– Use power tools only with specifically desig-
nated battery packs. Use of any other battery
packs may create a risk of injury and fire.
12. Always keep a firm hold on the handle.
13. Always be sure of your footing on slopes.
14. Walk, never run.
15. Don’t grasp the exposed cutting blades or cutting edges when picking up or holding the appliance.
16. Physical condition — Do not operate mower
while under the influence of drugs, alcohol, or
any medication.
17
Page 18

17. Keep guards in place and in working order.
18. Keep hands and feet away from rotating blades.
Caution — Blades coast after turn off.
19. Remove key before servicing, cleaning or
removing material from the gardening appliance.
20. Use only the manufacturer genuine blades specified in this manual.
21. Check the blades carefully for cracks or damage
before operation. Replace cracked or damaged
blades immediately.
22. Be sure the area is clear of other people before
mowing. Stop mower if anyone enters the area.
23. Remove foreign matters such as rocks, wire,
bottles, bones and large sticks from the work
area before mowing to prevent personal injury or
damage to the mower.
24. Stop operation immediately if you notice anything unusual. Switch off the mower and remove
the key from the appliance. Then inspect the
mower.
25. Never attempt to make wheel height adjustments
while mower is running.
26. Release switch lever and wait for blade rotation
to stop before crossing driveways, walks, roads,
and any gravel-covered areas.
Also remove key if you leave it, reach to pick up
or remove something out of your way, or for any
other reason that may distract you from what
you are doing.
27. Objects struck by the lawn mower blade can
cause severe injuries to persons. The lawn
should always be carefully examined and
cleared of all objects prior to each mowing.
28. If lawn mower strikes a foreign object, follow
these steps:
– Stop the mower, release the switch lever and
wait until the blade comes to a complete stop.
– Remove the lock key and the battery car-
tridge.
– Thoroughly inspect the mower for any dam-
age.
– Replace the blade if it is damaged in any way.
Repair any damage before restarting and continuing to operate the mower.
29. Check the rear bag frequently for wear or deterioration. For storage, always make sure the rear
bag is empty. Replace a worn bag with a new factory replacement bag for safety.
30. Stop the motor and remove key whenever you
leave the equipment, before cleaning the mower
housing, and before making any repairs or
inspections.
31. Use extreme caution when reversing or pulling
the machine towards you.
32. Stop the blade(s) if the machine has to be tilted
for transportation when crossing surfaces other
than grass, and when transporting the machine
to and from the area to be used.
33. Never operate the machine with defective guards
or shields, or without safety devices, for example deflectors and/or grass collector, in place.
34. Switch on the motor carefully according to
instructions and with feet well away from the
blade(s).
35. Do not tilt the machine when switching on the
motor, except if the machine has to be tilted for
starting. In this case, do not tilt it more than
absolutely necessary and lift only the part, which
is away from the operator.
36. Do not start the machine when standing in front
of the discharge opening.
37. Do not put hands or feet near or under rotating
parts. Keep clear of the discharge opening at all
times.
38. Do not transport the machine while the mower is
turned on.
39. Stop the machine, and remove the disabling
device. Make sure that all moving parts have
come to a complete stop
– whenever you leave the machine,
– before clearing blockages or unclogging
chute,
– before checking, cleaning or working on the
machine,
– after striking a foreign object. Inspect the
machine for damage and make repairs before
restarting and operating the machine;
40. If the machine starts to vibrate abnormally
(check immediately)
– inspect for damage,
– replace or repair any damaged parts,
– check for and tighten any loose parts.
41. Be careful during adjustment of the machine to
prevent entrapment of the fingers between moving blades and fixed parts of the machine.
42. Mow across the face of slopes, never up and
down. Exercise extreme caution when changing
direction on slopes. Do not mow excessively
steep slopes.
43. Do not wash with a hose; avoid getting water in
motor and electrical connections.
44. Check the blade mounting bolt at frequent intervals for proper tightness.
45. Keep all nuts, bolts, and screws tight to be sure
the equipment is in safe working condition.
46. Always allow the machine to cool down before
storing.
47. When servicing the blades be aware that, even
though the power source is switched off, the
blades can still be moved.
48. Replace worn or damaged parts for safety. Use
only genuine replacement parts and accessories.
SAVE THESE INSTRUCTIONS.
WARNING:
DO NOT let comfort or familiarity with product
(gained from repeated use) replace strict adherence
to safety rules for the subject product. MISUSE or
failure to follow the safety rules stated in this instruction manual may cause serious personal injury.
18
Page 19

ENC007-7
IMPORTANT SAFETY INSTRUCTIONS
FOR BATTERY CARTRIDGE
1. Before using battery cartridge, read all instructions and cautionary markings on (1) battery
charger, (2) battery, and (3) product using battery.
2. Do not disassemble battery cartridge.
3. If operating time has become excessively
shorter, stop operating immediately. It may
result in a risk of overheating, possible burns
and even an explosion.
4. If electrolyte gets into your eyes, rinse them out
with clear water and seek medical attention right
away. It may result in loss of your eyesight.
5. Do not short the battery cartridge:
(1) Do not touch the terminals with any conduc-
tive material.
(2) Avoid storing battery cartridge in a container
with other metal objects such as nails, coins,
etc.
(3) Do not expose battery cartridge to water or
rain.
A battery short can cause a large current flow,
overheating, possible burns and even a breakdown.
6. Do not store the tool and battery cartridge in
locations where the temperature may reach or
exceed 50°C (122°F).
7. Do not incinerate the battery cartridge even if it
is severely damaged or is completely worn out.
The battery cartridge can explode in a fire.
8. Be careful not to drop or strike battery.
9. Do not use a damaged battery.
SAVE THESE INSTRUCTIONS.
Tips for maintaining maximum battery life
1. Charge the battery cartridge before completely
discharged.
Always stop tool operation and charge the battery cartridge when you notice less tool power.
2. Never recharge a fully charged battery cartridge.
Overcharging shortens the battery service life.
3. Charge the battery cartridge with room temperature at 10°C – 40°C (50°F – 104°F).
Let a hot battery cartridge cool down before
charging it.
4. Charge the battery cartridge once in every six
months if you do not use it for a long period of
time.
FUNCTIONAL DESCRIPTION
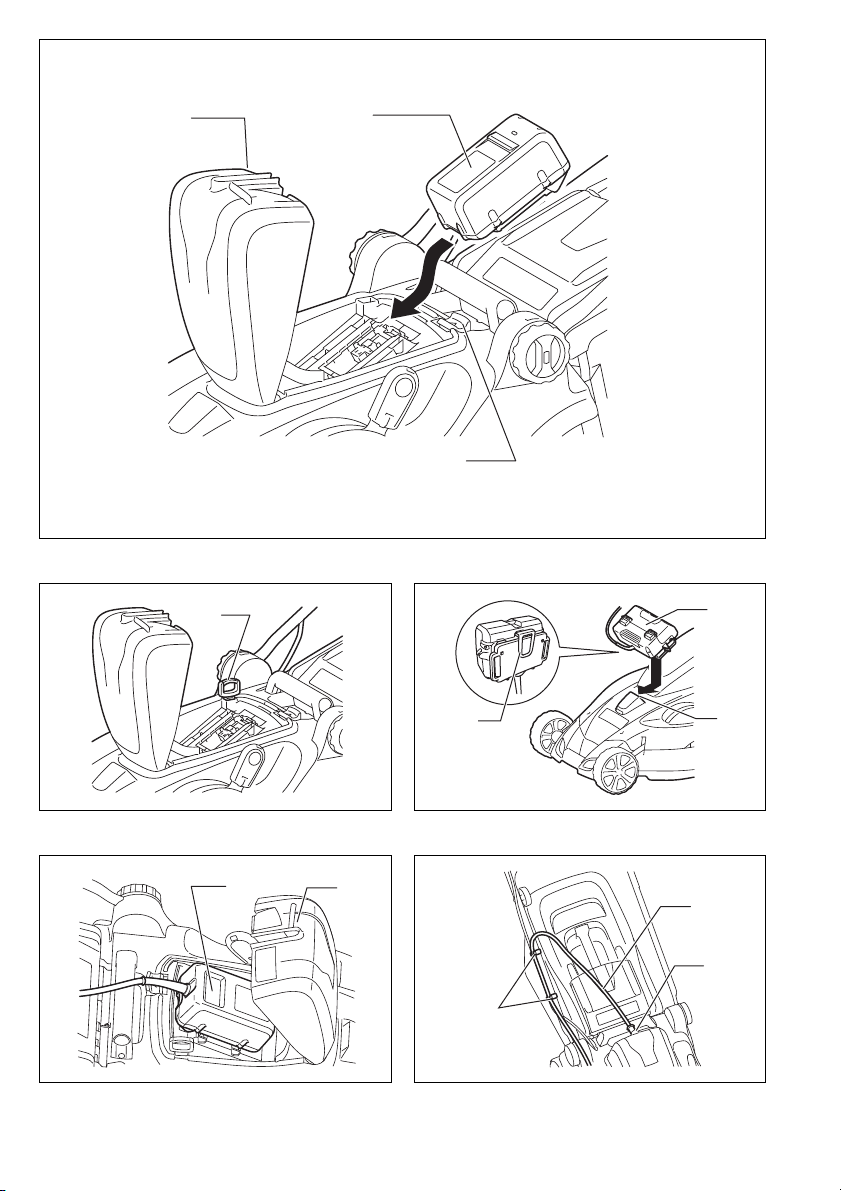
Installing or removing battery cartridge (Fig. 1 &
2)
CAUTION:
• Always switch off the tool before installing or removing
the battery cartridge.
• Make sure that you lock the battery cover before use.
Otherwise, mud, dirt, or water may cause damage to
the product or the battery cartridge.
To install the battery cartridge;
1. Pull the battery cover locking lever toward yourself
and open the battery cover.
2. Insert the battery cartridge in the direction shown in
the figure until a click is heard.
3. Insert the lock key in the place shown in the figure
as far as it will go.
4. Close the battery cover and push it on until it is
latched with the locking lever.
To remove the battery cartridge from the mower;
1. Pull the battery cover locking lever toward yourself
and open the battery cover.
2. Pull out the lock key.
3. Withdraw it from the tool while sliding the button on
the front of the cartridge.
4. Close the battery cover.
Battery converters (optional accessory)
WARNING:
• Before installing or removing the battery converters
AA-3618/AA-3618CL, remove the lock key.
AA-3618 (optional accessory) (Fig. 3, 4 & 5)
WARNING:
• When using the AA-3618, never attach it to any part of
your body. Attaching the AA-3618 to any part of your
body may cause a serious injury.
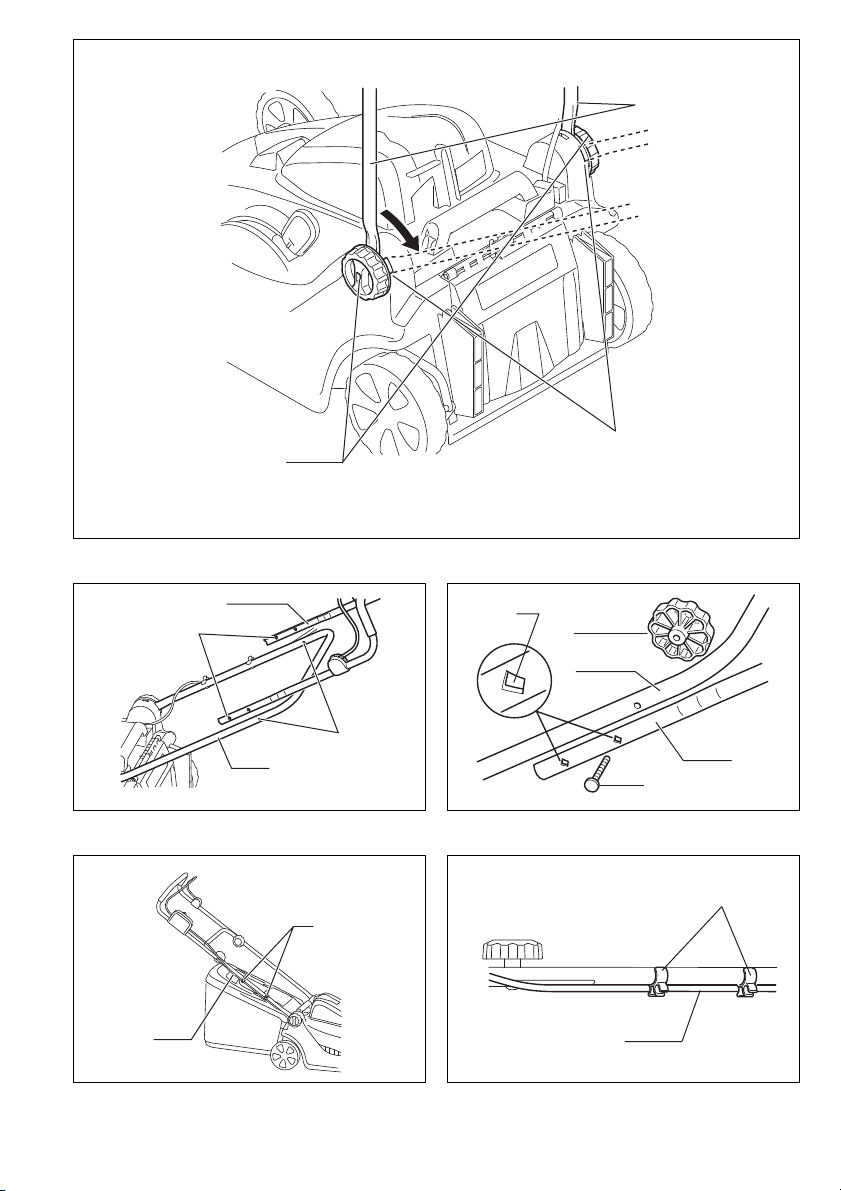
Slide the battery converter AA-3618 into the installation
hole until it stops.
Open out the battery cover on the mower and then slide
all the way and click the product mounting adapter of the
AA-3618 into the battery port on the mower.
Run the cord of the AA-3618 through the slit in the battery cover and close the battery cover.
Fit the cord of the AA-3618 into the upper holders on the
handle.
NOTE:
• When using the battery converter AA-3618 (optional
accessory), hook the power cord to the designated
holder on the mower. Failure to do so may cause the
cord to be cut off.
To remove the AA-3618 from the mower, open out the
battery cover and then press the hook on the battery
mounting side of the AA-3618.
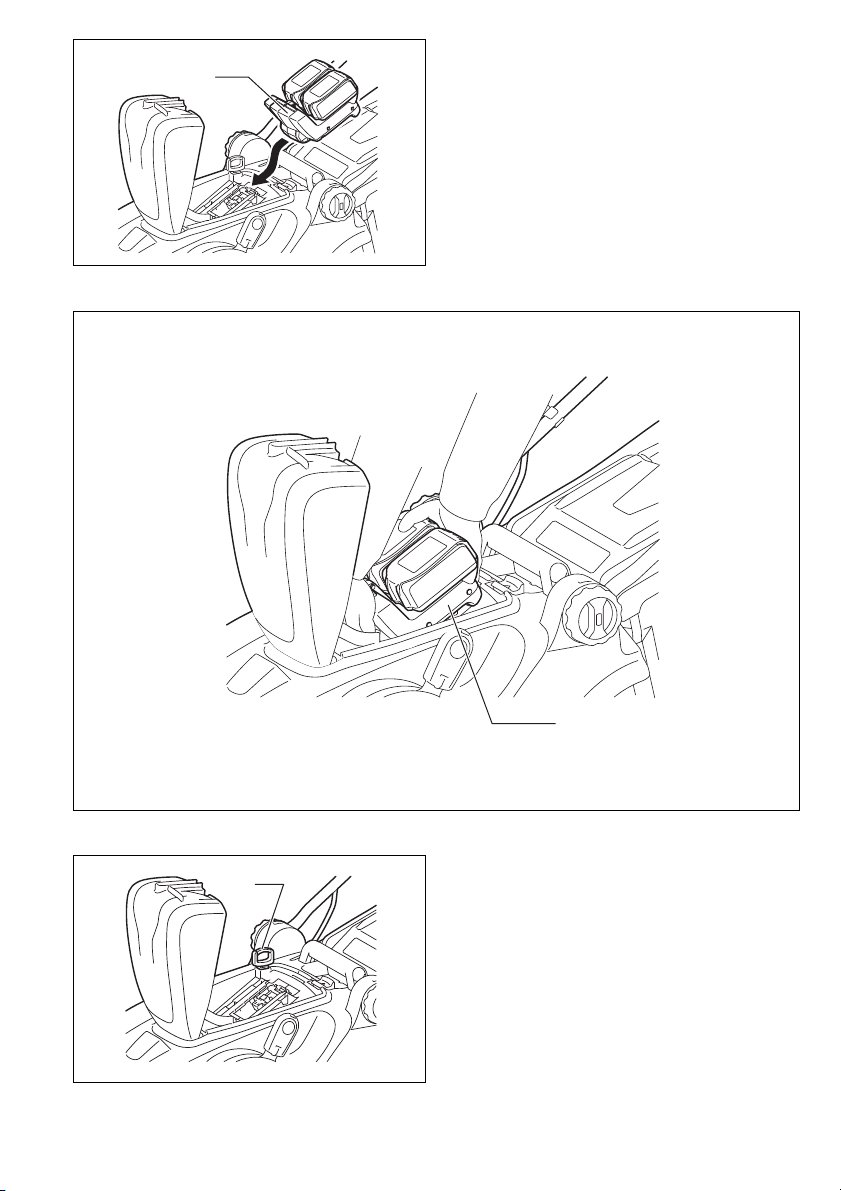
AA-3618CL (optional accessory) (Fig. 6 & 7)
Open the battery cover and click in the AA-3618CL into
the battery port on the mower.
Close the battery cover.
To remove the AA-3618CL, press on the hook of the AA3618CL and withdraw it with both hands.
19
Page 20
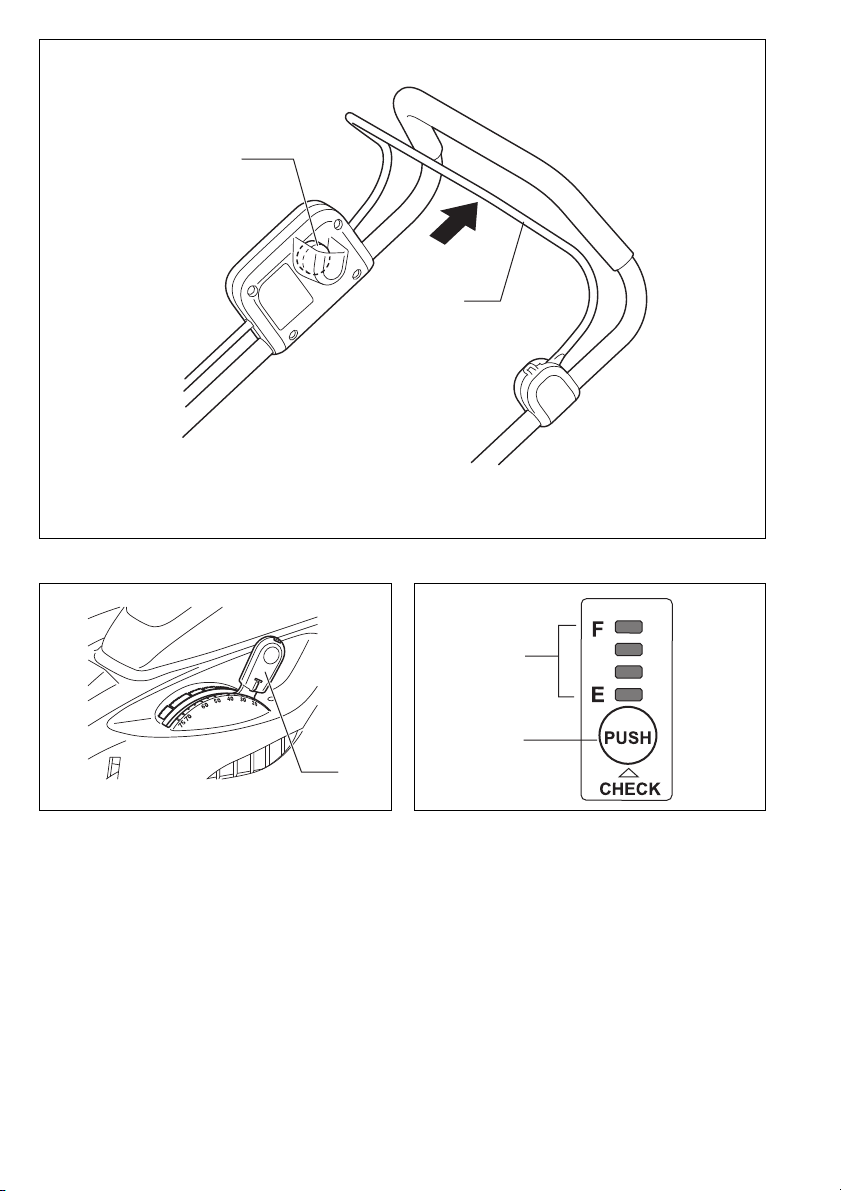
Power switch action (Fig. 8 & 9)
Lighted
Off
Blinking
E
F
011713
WARNING:
• Before inserting the battery cartridge in the tool,
always check to see that the switch lever actuates
properly and returns to the original position when
released. Operating a tool with a switch that does not
actuate properly can lead to loss of control and serious
personal injury.
NOTE:
• Trying to mow much grass at a time may not allow the
motor to start due to the overload. At this time, change
the mowing height to higher level to restart.
• The mower does not start without pressing the switch
button even if the switch lever is squeezed.
This mower is equipped with the interlock switch and
handle switch. If you notice anything unusual with either
of these switches, stop operation immediately and have
them checked by your nearest Dolmar Authorized Service Center.
1. Insert the lock key into the interlock switch.
2. Depress the switch button.
3. Pull the switch lever toward you while depressing
the switch button.
4. Release the switch button as soon as the motor
starts running. The mower will continue to run until
you release the switch lever.
5. Release the switch lever to stop the motor.
6. When not in use, remove the lock key. Store the lock
key in a safe place out of reach of children.
Adjusting the mowing height (Fig. 10)
WARNING:
• Never put your hand or leg under the mower unit when
adjusting the mowing height.
• Always make sure that the lever fits in the groove properly before operation.
The mowing height can be adjusted in the range of
between 20 mm – 75 mm.
1. Remove the lock key.
2. Pull the mowing height adjusting lever toward your-
self and move it to your desired mowing height.
Make sure that the protrusion on the mowing height
adjusting lever fits in the groove in the mower.
NOTE:
• The mowing height figures should be used just as a
guideline, as the state of the lawn or ground may cause
lawn height to be slightly different to the set height figure.
• Try a test mowing of grass in a less conspicuous place
to get your desired height.
Battery protection system
Lithium-ion batteries are equipped with a protection system. This system automatically cuts off power to the tool
to extend battery life.
The tool will automatically stop during operation if the
tool and/or battery are placed under one of the following
conditions:
• Overloaded:
The tool is operated in a manner that causes it to draw
an abnormally high current.
In this situation, release the trigger switch on the tool
and stop the application that caused the tool to become
overloaded. Then pull the trigger switch again to
restart.
If the tool does not start, the battery is overheated. In
this situation, let the battery cool before pulling the trigger switch again.
• Low battery voltage:
The remaining battery capacity is too low and the tool
will not operate. In this situation, remove and recharge
the battery.
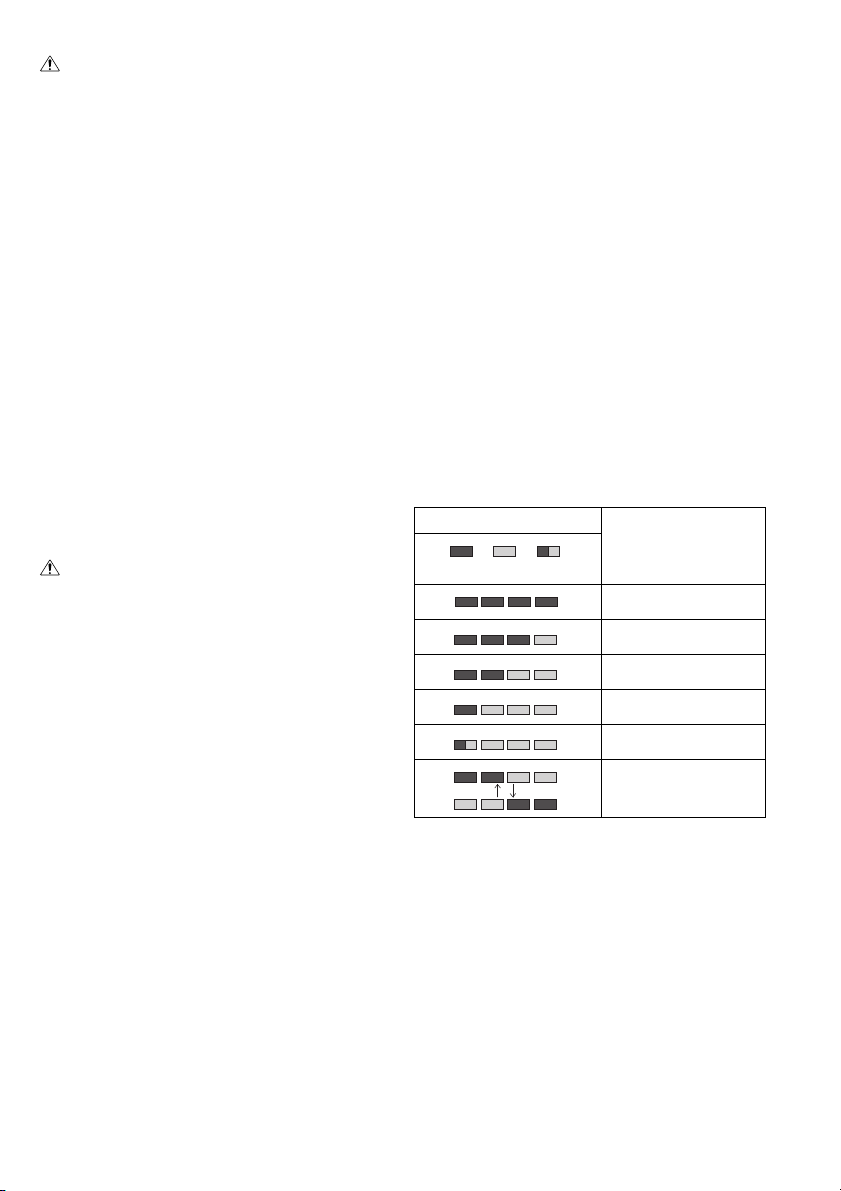
Battery remaining capacity indicator (only for
models with Battery AP-3622) (Fig. 11)
Battery AP-3622 is equipped with the battery remaining
capacity indicator.
Press the CHECK button to indicate the battery remaining capacity. The indicator lamps will then light for
approx. three seconds.
Indicator lamps
Remaining capacity
70% to 100%
45% to 70%
20% to 45%
0% to 20%
Charge the battery.
The battery may have
malfunctioned.
• When only the lowermost indicator lamp (next to the
“E”) blinks, or when none of the indicator lamps light,
the battery capacity has run out, so the tool does not
operate. In these cases, charge the battery or replace
the empty battery with a fully charged one.
• When two or more indicator lamps do not light even
after charging is complete, the battery has reached the
end of its service life.
• When the upper two and lower two indicator lamps light
alternately, the battery may have malfunctioned. Contact your local Dolmar authorized service center.
NOTE:
• The indicated capacity may be lower than the actual
level during use or immediately after using the tool.
• Depending on the conditions of use and the ambient
temperature, the indication may differ slightly from the
actual capacity.
20
Page 21

ASSEMBLY
WARNING:
• Always be sure that the lock key and battery cartridge are removed before carrying out any work on
the mower. Failure to remove the lock key and the bat-
tery cartridge may result in serious personal injury from
accidental start-up.
• Never start the tool unless it is completely assem-
bled. Operation of the tool in a partially assembled
state may result in serious personal injury from accidental start-up.
Installing the handle (Fig. 12, 13, 14, 15, 16 & 17)
WARNING:
• When installing handles, position the wires so that they
are not caught by anything in between the handles.
1. Loosen the clamping screws (two pcs).
Expand the lower handle to its both sides and with it
expanded in that position pivot it backward and then fit it
in the groove in the deck.
2. Tighten the clamping screws on both sides to secure
the lower handle.
3. Raise the upper handle and align the screw holes in
the upper handle with those in the lower handle and
then secure it with the supplied screws and clamping nuts.
NOTE:
• At this time, keep a firm grip on the upper handle so
that it does not drop off your hand.
NOTE:
• Install the upper handle so that the direction of the
upper handle and the power supply cord are positioned
as shown in the figure.
NOTE:
• The upper handle has two holes each on both sides.
Using the different position holes for the screws and
clamping nuts allows the handle height adjustment.
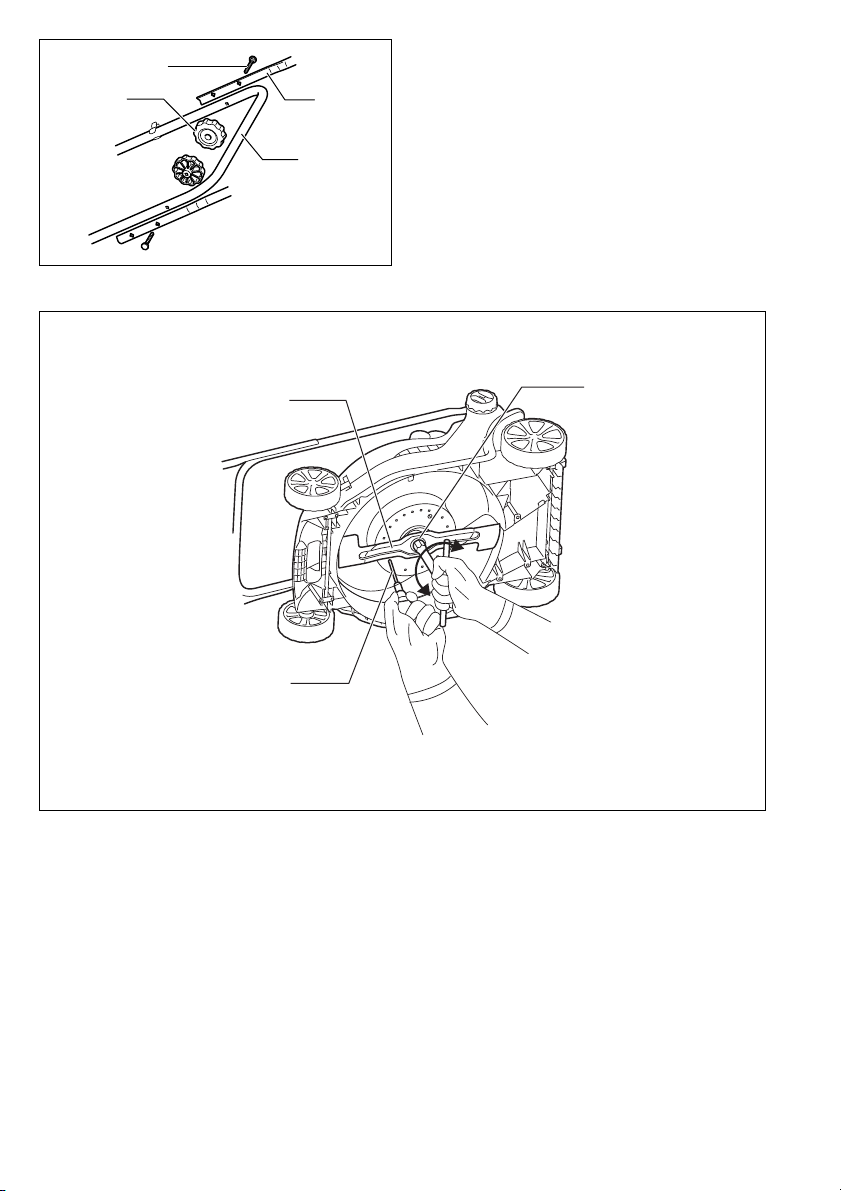
Removing or installing the blade (Fig. 18 & 19)
WARNING:
• Always remove the lock key and battery cartridge when
removing or installing the blade. Failure to remove the
lock key and battery cartridge may cause a serious
injury.
• The blade coasts for a few seconds after releasing the
switch. Make sure that the blade has come to a complete stop.
• Always wear gloves when handling the blade.
1. Put the mower on its side so that the mowing height
adjusting lever is placed on the upper side.
2. To lock the blade, insert a screwdriver available or
the similars in market into a hole in the mower.
3. Loosen the bolt counterclockwise with the wrench.
4. Remove the bolt, outer flange, blade and inner
flange in order.
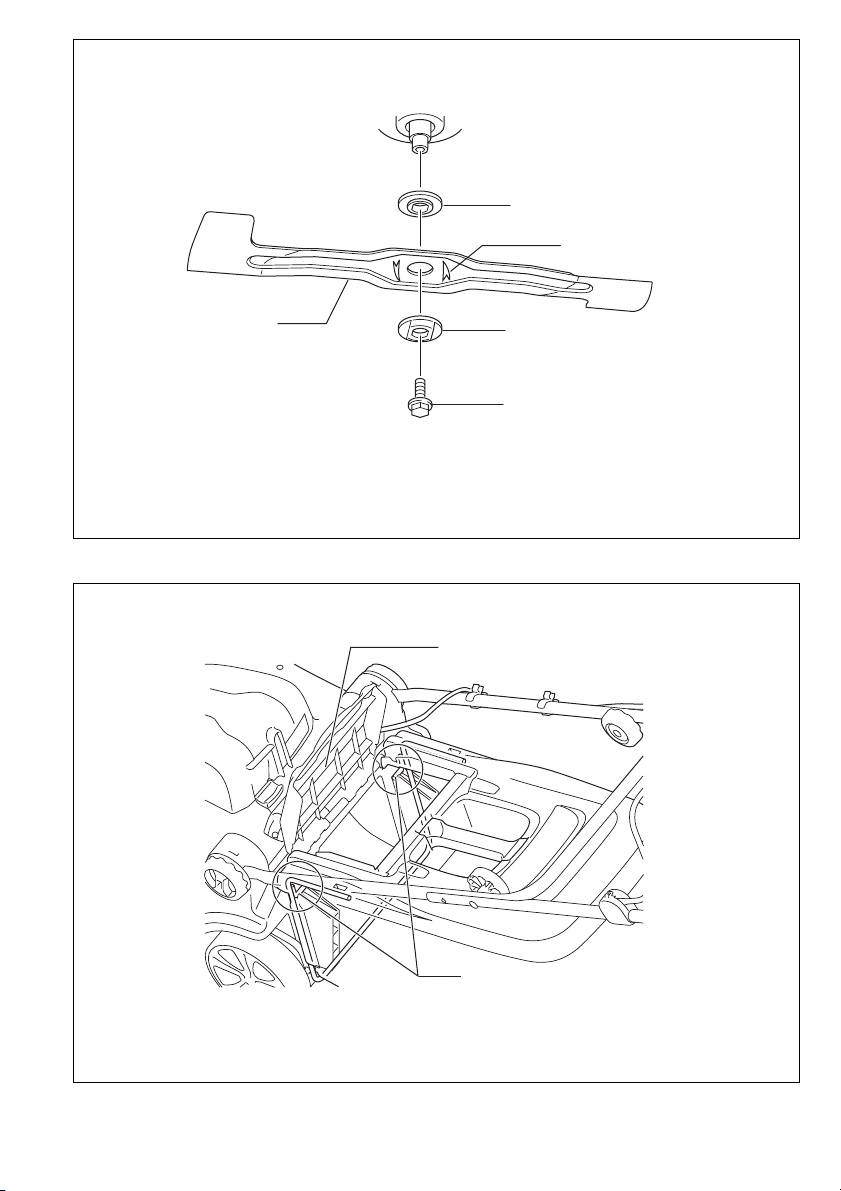
To install the blade, take the blade removal procedure in
reverse.
WARNING:
• Install the inner flange, the blade and the outer flange
carefully as these have a top/bottom facing.
• Tighten the bolt clockwise firmly to secure the blade.
• Put the blade so that the blade side with a rotational
direction arrow faces outward.
• Make sure that the blade is installed securely.
• Always take away the screwdriver or similars inserted
in a hole to lock the blade.
Installing the grass basket (Fig. 20 & 21)
Remove the lock key.
Raise the rear guard of the mower unit and hook the
grass basket on the groove of the mower unit.
OPERATION
Mowing
WARNING:
• Before mowing, clear away sticks and stones from
mowing area. Furthermore, clear away any weeds from
mowing area in advance.
• Always wear the safety goggles or safety glasses with
side shields when operating the mower.
Firmly hold the lawn mower handle with both hands
when mowing.
The front wheel outside edges of the main unit provide a
guideline to mowing width. Using the two front wheel outside edges as a guideline, mow in strips, overlapping by
one half to one third the previous strip, to mow the lawn
evenly.
Periodically check the level of the grass basket, and
empty before it becomes full. Before every periodical
checks, be sure to stop the mower and remove the lock
key and the battery cartridge.
NOTE:
• Using the lawn mower with the grass basket full prevents smooth blade rotation and places an extra load
on the motor, which may cause breakdown.
Mowing a long-grass lawn (Fig. 22)
Do not try to cut long grass all in one go. Instead, mow
the lawn in stages, leaving it for a day or two between
mows, until the lawn is evenly short.
NOTE:
• Mowing long grass to a short length all in one go may
cause the grass to die and/or block up the inside of the
main unit.
Emptying the grass basket (Fig. 23)
WARNING:
• To reduce a risk of accident, regularly check the grass
basket for any damage or weakened strength and
replace it if necessary.
1. Release the switch lever.
2. Remove the lock key.
3. Open the rear guard and take out the grass basket
with its handle.
4. Empty the grass basket.
21
Page 22

MAINTENANCE & STORAGE
WARNING:
• Always be sure that the lock key and battery cartridge
are removed from the mower before storage or
attempting to perform inspection or maintenance.
• Wear gloves when performing inspection or maintenance.
CAUTION:
• Never use gasoline, benzine, thinner, alcohol or the
like. Discoloration, deformation or cracks may result.
MAINTENANCE
1. REMOVE THE LOCK KEY. Store it in a safe place
out of the reach of children.
2. Clean your mower using only mild soap and a damp
cloth. Do not spray or pour water on your mower
when cleaning.
3. Turn mower on its side and clean grass clippings
that have accumulated on the underside of mower
deck.
4. Check all nuts, bolts, knobs, screws, fasteners etc.
for tightness.
5. Inspect moving parts for damage, breakage, and
wear. Have repairs made on any damaged or missing parts.
6. Before storing the mower, remove the battery car-
tridge from it.
7. Store mower indoors in a cool, dry and locked place.
Don’t store the mower and charger in locations
where the temperature may reach or exceed 40°C
(104°F).
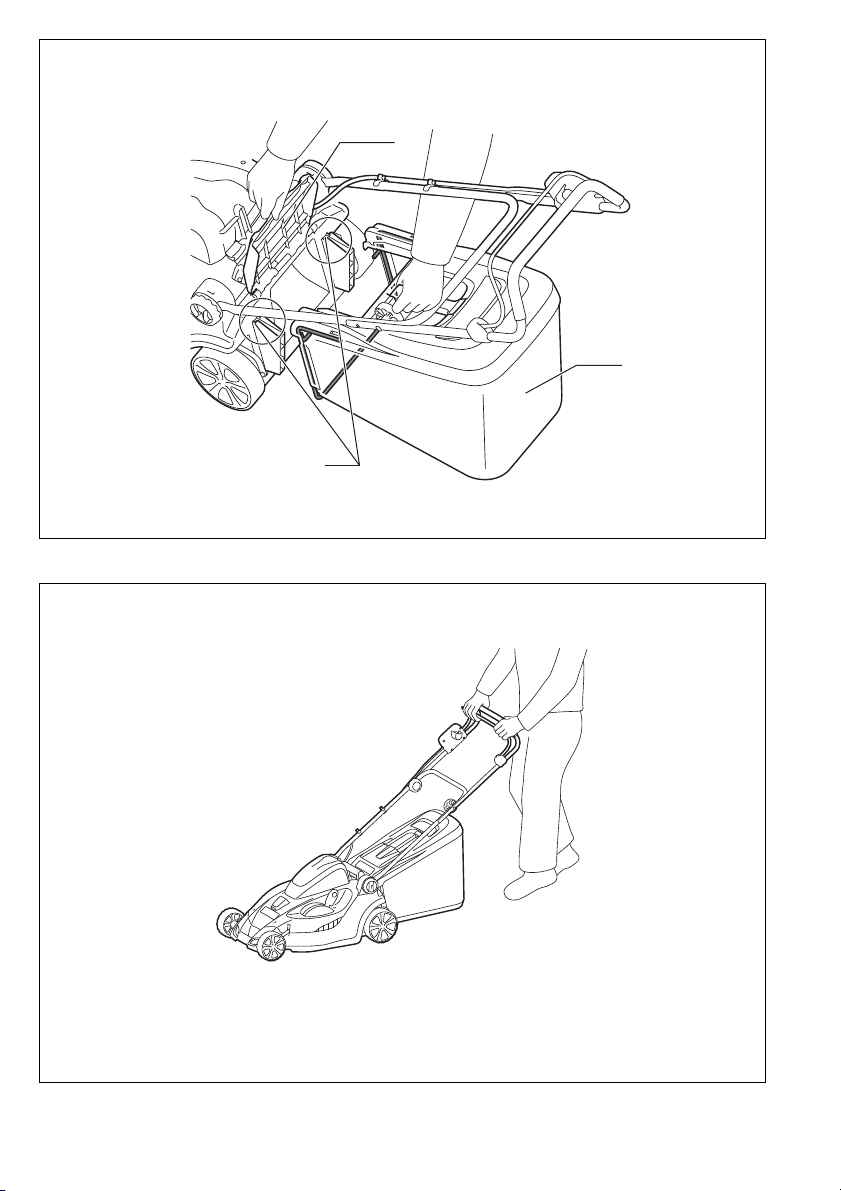
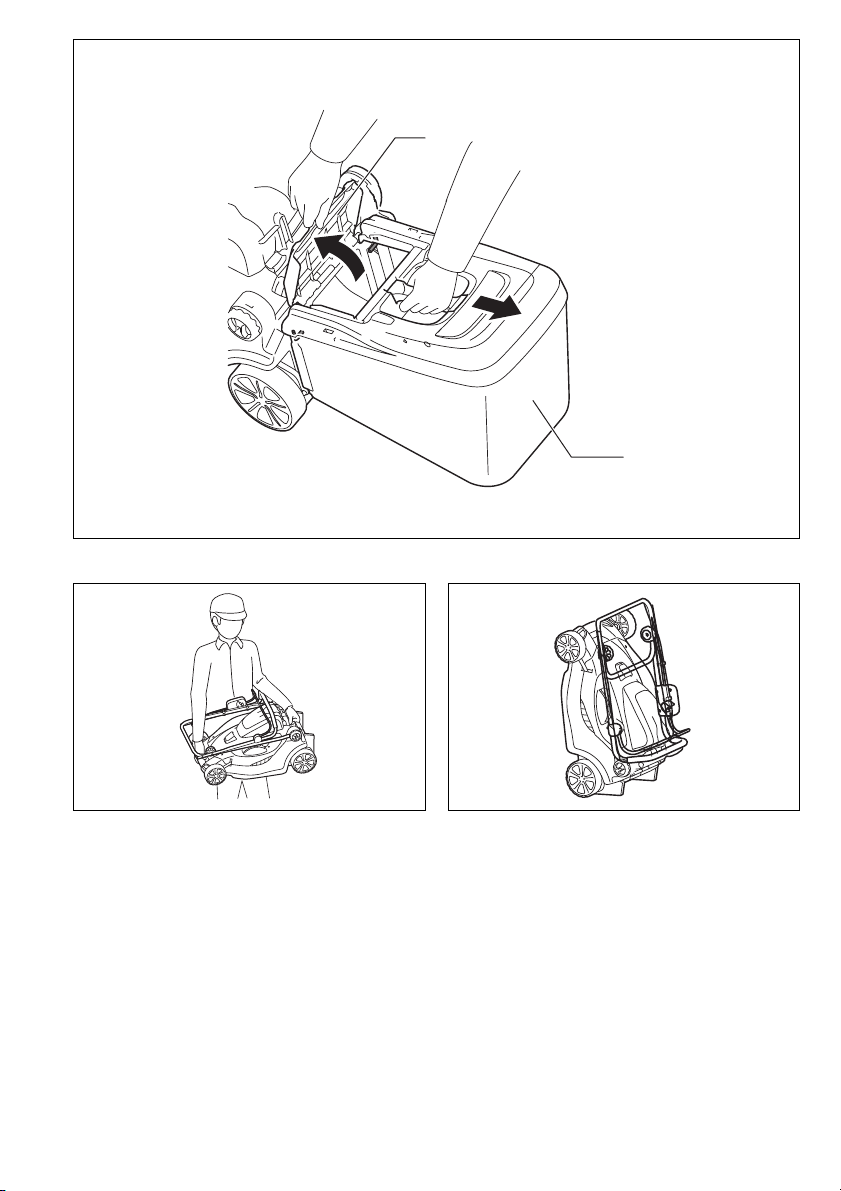
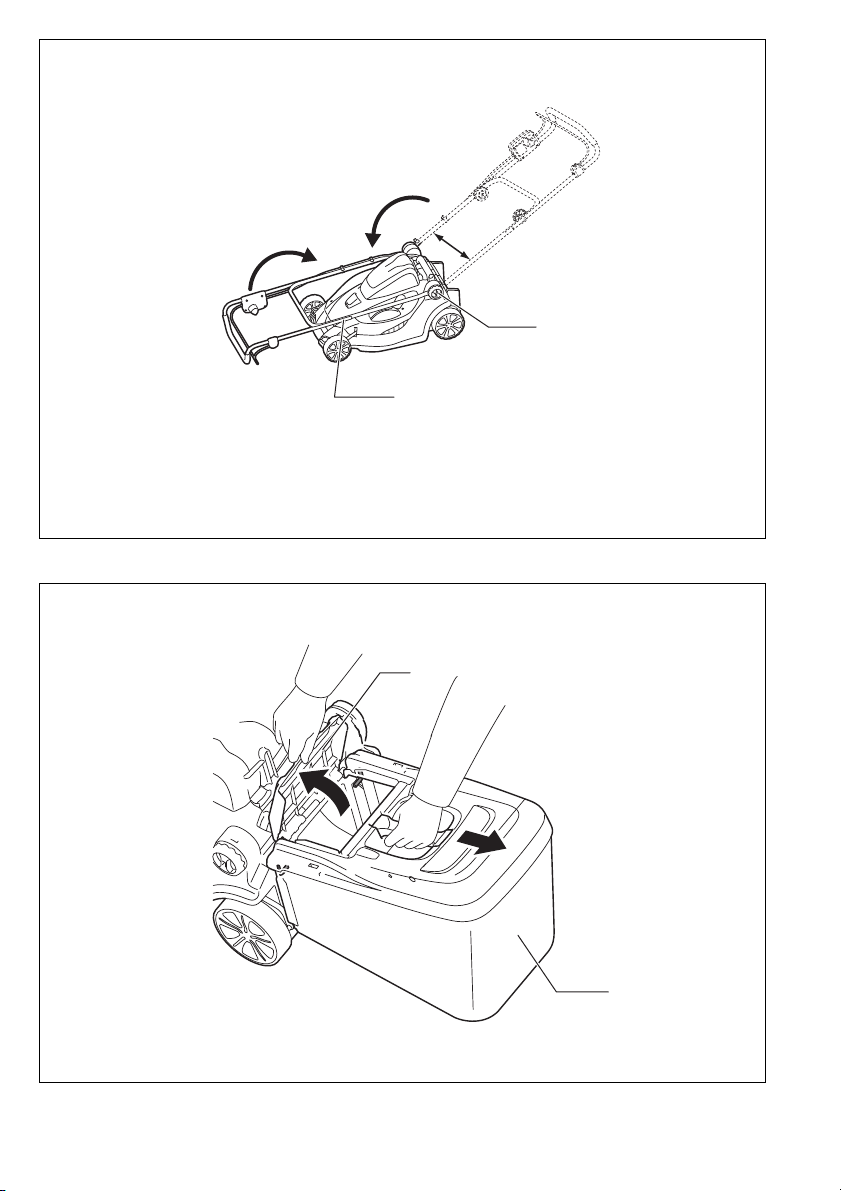
Storage (Fig. 24, 25, 26, 27, 28 & 29)
WARNING:
• When carrying or storing the mower, do not hold the
folded handles but the front grip of the mower. Holding
the folded handles may cause a serious injury or damage to the mower.
The mower can be stored in upright position.
1. Loosen the clamping screw, expand the lower han-
dle to both sides and then move down the handle
forward.
NOTE:
• At this time, keep a firm grip on the lower handle so
that it does not fall down to the far side from the tool.
2. Loosen the clamping nut and pivot the upper handle
back.
3. Take off the grass basket and put the mower in the
upright position.
NOTE:
• When putting the mower in the upright position, do not
hold the handle but use the front grip of the mower.
4. Store the grass basket between the handle and the
mower body.
To maintain product SAFETY and RELIABILITY, repairs,
any other maintenance or adjustment should be performed by Dolmar Authorized Service Centers, always
using Dolmar replacement parts.
22
Page 23

TROUBLE SHOOTING
012350
Before asking for repairs, conduct your own inspection first. If you find a problem that is not explained in the manual,
do not attempt to dismantle the tool. Instead, ask Dolmar Authorized Service Centers, always using Dolmar replacement parts for repairs.
Malfunction status Cause Action
Battery cartridge is not installed. Install the battery cartridge.
Mower does not start.
Motor stops running after a little use.
It does not reach maximum RPM.
Cutting tool does not rotate:
Stop the machine immediately!
Abnormal vibration:
Stop the machine immediately!
Cutting tool and motor cannot stop:
Remove the battery immediately!
Battery problem (under voltage)
The lock key is not inserted. Insert the lock key.
Battery’s charge level is low.
Cutting height set is too low. Raise the height.
Battery is installed improperly.
Battery power is dropping.
The drive system does not work
correctly.
Foreign object such as a branch is
jammed near the blade.
The drive system does not work
correctly.
Blade is imbalanced, excessively or
unevenly worn.
Electric or electronic malfunction.
Recharge the battery. If recharging is
not effective, replace battery.
Recharge the battery. If recharging is
not effective, replace battery.
Install the battery cartridge as
described in this manual.
Recharge the battery. If recharging is
not effective, replace battery.
Ask your local authorized service
center for repair.
Remove the foreign object.
Ask your local authorized service
center for repair.
Replace the blade.
Remove the battery and ask your
local authorized service center for
repair.
OPTIONAL ACCESSORIES
CAUTION:
• These accessories or attachments are recommended for use with your Dolmar tool specified in this manual. The use
of any other accessories or attachments might present a risk of injury to persons. Only use accessory or attachment
for its stated purpose.
If you need any assistance for more details regarding these accessories, ask your local Dolmar Service Center.
• Blade
• Dolmar genuine battery and charger
NOTE:
• Some items in the list may be included in the tool package as standard accessories. They may differ from country to
country.
23
Page 24

ENG905-1
Noise
The typical A-weighted noise level determined according
to EN60335:
Sound pressure level (L
Sound power level (L
Uncertainty (K) : 3 dB (A)
Vibration
The vibration total value (tri-axial vector sum) determined
according to EN60335:
Vibration emission (a
Uncertainty (K) : 1.5 m/s
• The declared vibration emission value has been measured in accordance with the standard test method and
may be used for comparing one tool with another.
• The declared vibration emission value may also be
used in a preliminary assessment of exposure.
WARNING:
• The vibration emission during actual use of the power
tool can differ from the declared emission value
depending on the ways in which the tool is used.
• Be sure to identify safety measures to protect the operator that are based on an estimation of exposure in the
actual conditions of use (taking account of all parts of
the operating cycle such as the times when the tool is
switched off and when it is running idle in addition to
Wear ear protection
) : 80 dB (A)
pA
) : 93 dB (A)
WA
) : 2.5 m/s2 or less
h
2
ENG900-1
ENG901-1
the trigger time).
ENH218-1
For European countries only
EC Declaration of Conformity
The undersigned, Tamiro Kishima and Rainer
Bergfeld, as authorized by Dolmar GmbH, declare
that the DOLMAR machine(s):
Designation of Machine:
Cordless Lawn Mower
Model No./ Type: AM-3643
Specifications: see “SPECIFICATIONS” table.
are of series production and
Conforms to the following European Directives:
2000/14/EC, 2006/42/EC
And are manufactured in accordance with the following
standards or standardised documents:
EN60745, EN60335
The technical documentation is on file at:
Dolmar GmbH,
Jenfelder Straße 38, Abteilung FZ,
D-22045 Hamburg
The conformity assessment procedure required by Directive 2000/14/EC was in Accordance with annex VI.
Notified Body:
TÜV Rheinland LGA Products GmbH
Am Grauen Stein 29
51105 Köln Germany
Identification number 0197
Measured Sound Power Level: 93 dB (A)
Guaranteed Sound Power Level: 94 dB (A)
7.9.2011
24
Tamiro Kishima
Managing Director
Rainer Bergfeld
Managing Director
Page 25
FRANÇAIS (Instructions originales)
Descriptif
1 Levier de verrouillage du
couvercle de batterie
2 Batterie
3 Couvercle de batterie
4 Clé de sécurité
5 Adaptateur-transfo ceinture de
batterie (AA-3618)
6 Orifice d’installation
7 Crochet
8 Adaptateur de montage du
AA-3618
9 Cordon
10 Fente
11 Supports supérieurs
SPÉCIFICATIONS
Modèle AM-3643
Largeur de tonte 430 mm
Vitesse à vide 3 600 min
Dimensions (L x l x H)
Poids net 17,9 kg
Tension nominale 36 V CC
Avertissement : Utilisez exclusivement les batteries
• Étant donné l’évolution constante de notre programme
de recherche et de développement, les spécifications
contenues dans ce manuel sont sujettes à modification
sans préavis.
• Les spécifications et la batterie peuvent être différentes
suivant les pays.
• Poids, avec la batterie, conformément à la procédure
EPTA-01/2003
Batterie(s) standard
spécifiées.
CONSIGNES DE SÉCURITÉ IMPORTANTES
AVERTISSEMENT ! Veuillez lire toutes les mises
en garde et toutes les instructions. Il y a risque de
choc électrique, d’incendie et/ou de blessure grave si les
mises en garde et les instructions ne sont pas respectées.
Conservez toutes les mises en garde et instructions
pour référence ultérieure.
1. N’insérez la clé dans la tondeuse qu’une fois
celle-ci prête pour l’utilisation.
12 Adaptateur-transfo ceinture de
batterie (AA-3618CL)
13 Bouton d’interrupteur
14 Levier d’interrupteur
15 Levier de réglage de la hauteur
de tonte
16 Témoins
17 Bouton CHECK
18 Poignée inférieure
19 Rainure du plateau
20 Vis de serrage
21 Poignée supérieure
22 Trous de vis
23 Écrou de serrage
24 Vis
pendant l’utilisation
pendant le rangement 490 mm – 500 mm x 460 mm x 810 mm
GEB091-5
25 Supports
26 Tournevis
27 Lame
28 Boulon
29 Flasque intérieur
30 Flèche
31 Flasque extérieur
32 Carter de protection arrière
33 Rainure
34 Panier à gazon
35 Déployer
36 Déplacer vers le bas et l’avant
37 Faire pivoter vers l’arrière
38 Prise avant
–1
1 450 mm – 1 490 mm x 460 mm x 950 mm – 1 020 mm
AP-363 / AP-3622
2. Cet appareil n’est pas conçu pour l’utilisation
par des personnes (y compris les enfants) atteintes d’un handicap physique, sensoriel ou mental, ainsi que par des personnes ne possédant
pas l’expérience et les connaissances nécessaires, à moins qu’elles ne soient supervisées ou
n’aient reçu des instructions sur l’utilisation de
l’appareil par une personne responsable de leur
sécurité.
3. Les enfants doivent être surveillés pour s’assurer qu’ils ne jouent pas avec l’appareil.
4. Ne laissez jamais les enfants et personnes non
familières avec ces instructions utiliser la
machine. Les réglementations locales peuvent
spécifier un âge minimum pour l’utilisation.
5. N’utilisez jamais la machine alors que des personnes — et tout particulièrement des enfants —
ou des animaux domestiques se trouvent à
proximité.
6. Gardez à l’esprit que l’opérateur ou l’utilisateur
est responsable des accidents ou risques
encourus par les personnes ou leur propriété.
25
Page 26

7. Pendant l’utilisation de la machine, portez toujours des chaussures résistantes et un pantalon
long. N’utilisez pas la machine pieds nus ou
avec des sandales qui laissent les pieds partiellement découverts. Évitez de porter des vêtements et bijoux amples ou dotés de cordons ou
attaches qui pendent. Les pièces mobiles risqueraient de les happer.
8. N’utilisez la machine qu’à la lumière du jour ou
sous un bon éclairage artificiel.
9. Évitez d’utiliser la machine sur du gazon
mouillé.
10. N’utilisez jamais la tondeuse sous la pluie.
11. Utilisation des outils à batterie
– Ne rechargez qu’avec le chargeur spécifié par
le fabricant. Un chargeur conçu pour un type de
batterie donné peut comporter un risque d’incendie s’il est utilisé avec une batterie d’un autre
type.
– Utilisez les outils électriques uniquement
avec les batteries spécifiquement désignées.
L’utilisation de tout autre type de batterie comporte un risque de blessure ou d’incendie.
12. Tenez toujours la poignée fermement.
13. Assurez-vous toujours d’être en position stable
dans les pentes.
14. Ne courez jamais ; marchez.
15. Ne saisissez pas et ne soulevez pas l’appareil
par ses lames ou par ses bords tranchants.
16. Condition physique — N’utilisez pas la tondeuse
après avoir consommé une drogue, de l’alcool
ou un médicament.
17. Gardez les carters de protection en place et en
bon état de fonctionnement.
18. Gardez mains et pieds à l’écart des lames en
rotation. Attention — Les lames continuent de
tourner une fois le contact coupé.
19. Retirez la clé avant de réparer, de nettoyer ou de
démonter cet appareil de jardinage.
20. Utilisez exclusivement les lames authentiques
du fabricant spécifiées dans ce manuel.
21. Vérifiez soigneusement l’absence de fissures ou
de dommages sur les lames avant l’utilisation.
Remplacez immédiatement les lames fissurées
ou abîmées.
22. Assurez-vous qu’il n’y a personne à proximité
avant de commencer à tondre le gazon. Arrêtez
de tondre le gazon si quelqu’un s’approche.
23. Pour éviter de vous blesser ou d’abîmer la tondeuse, enlevez les corps étrangers tels que pierres, câbles, bouteilles, os et gros bouts de bois
dans la zone de travail avant de commencer à
tondre le gazon.
24. Cessez immédiatement l’utilisation en cas
d’anomalie. Coupez le contact de la tondeuse et
retirez la clé. Inspectez ensuite la tondeuse.
25. N’essayez jamais de régler la hauteur des roues
pendant que la tondeuse tourne.
26. Libérez le levier d’interrupteur et attendez que la
lame ait cessé de tourner avant de traverser une
allée, un trottoir, une route ou une zone recouverte de gravier.
Retirez aussi la clé si vous laissez la tondeuse
sans surveillance, si vous ramassez ou enlevez
un objet qui fait obstacle, ou pour toute autre
action pouvant vous distraire de votre travail.
27. Les objets heurtés par la lame de la tondeuse à
gazon peuvent causer de graves blessures. Pensez toujours à inspecter soigneusement le
gazon et à retirer tous les objets avant de tondre
le gazon.
28. Si la tondeuse à gazon heurte un corps étranger,
procédez comme suit :
– Arrêtez la tondeuse, libérez le levier d’inter-
rupteur et attendez que la lame ait complète-
ment cessé de tourner.
– Retirez la clé de sécurité et la batterie.
– Inspectez minutieusement la tondeuse pour
vous assurer qu’elle n’a subi aucun dom-
mage.
– Si la lame est abîmée, remplacez-la.
Réparez toute pièce endommagée avant de faire
redémarrer la tondeuse.
29. Assurez-vous régulièrement que le sac arrière
n’est ni usé ni abîmé. Avant de ranger la tondeuse, assurez-vous toujours que le sac arrière
est vide. Si le sac est usé, remplacez-le par un
sac de rechange neuf pour votre sécurité.
30. Arrêtez le moteur et retirez la clé chaque fois que
vous laissez l’équipement sans surveillance,
avant de nettoyer le carter de la tondeuse et
avant d’effectuer tout travail de réparation ou
d’inspection.
31. Soyez très prudent lorsque vous faites reculer la
machine ou la tirez vers vous.
32. Immobilisez les lames si vous devez incliner la
machine pour la transporter en traversant une
surface autre que du gazon, et lorsque vous
transportez la machine vers ou de la zone d’utilisation.
33. N’utilisez jamais la machine si ses carters ou
écrans de protection ne fonctionnent pas, ou si
ses dispositifs de sécurité (tels que les déflecteurs et/ou le collecteur de gazon) ne sont pas
posés.
34. Faites démarrer le moteur prudemment, en suivant les instructions et en gardant les pieds bien
à l’écart des lames.
35. N’inclinez pas la machine en allumant le moteur,
sauf si la machine doit être inclinée pour le
démarrage. Le cas échéant, ne l’inclinez pas
plus que nécessaire et n’inclinez que la partie
opposée à vous.
36. Ne vous tenez pas devant l’ouverture de
décharge pour faire démarrer la machine.
37. Ne mettez pas les mains ou les pieds près des
pièces en rotation, ou sous celles-ci. Restez en
tout temps à l’écart de l’ouverture de décharge.
38. Ne transportez pas la tondeuse pendant qu’elle
tourne.
39. Arrêtez la machine et retirez l’objet bloqué.
Assurez-vous que toutes les pièces mobiles
sont parfaitement arrêtées
– chaque fois que vous laissez la machine sans
surveillance,
– avant de retirer un objet bloqué ou de débou-
cher la chute,
– avant d’effectuer la vérification, le nettoyage
ou la maintenance de la machine,
– après avoir heurté un corps étranger. Avant
de faire redémarrer la machine, vérifiez
l’absence de dommages et effectuez les réparations nécessaires.
26
Page 27

40. Si la machine se met à vibrer anormalement
(vérifiez immédiatement)
– inspectez les dommages,
– remplacez ou réparez les pièces endomma-
gées,
– resserrez les pièces mal serrées.
41. Lorsque vous réglez la machine, évitez de vous
coincer les doigts entre les lames en mouvement
et les pièces fixes de la machine.
42. Tondez toujours les pentes latéralement, jamais
de haut en bas ou vice-versa. Soyez très prudent
lorsque vous changez de direction dans les pentes. Ne tondez pas dans les pentes trop abruptes.
43. Ne nettoyez pas la tondeuse avec un boyau
d’arrosage ; évitez de mouiller le moteur et les
connexions électriques.
44. Vérifiez régulièrement le boulon de montage de
la lame pour vous assurer qu’il est bien serré.
45. Gardez tous les écrous, boulons et vis bien serrés pour assurer le fonctionnement sûr de l’équipement.
46. Laissez toujours refroidir la machine avant de la
ranger.
47. Lors de l’entretien des lames, gardez à l’esprit
qu’elles peuvent tourner même si la source d’alimentation est coupée.
48. Pour votre propre sécurité, remplacez les pièces
usées ou endommagées. Utilisez exclusivement
des pièces de rechange et accessoires authentiques.
CONSERVEZ CES INSTRUCTIONS.
AVERTISSEMENT :
NE vous laissez PAS tromper (au fil d’une utilisation
répétée) par un sentiment d’aisance et de familiarité
avec le produit, en négligeant le respect rigoureux
des consignes de sécurité qui accompagnent le produit en question. La MAUVAISE UTILISATION de
l’outil ou l’ignorance des consignes de sécurité indiquées dans ce manuel d’instructions peut entraîner
une blessure grave.
ENC007-7
CONSIGNES DE SÉCURITÉ IMPORTANTES
POUR LA BATTERIE
1. Avant d’utiliser la batterie, lisez toutes les ins-
tructions et précautions relatives (1) au chargeur
de batterie, (2) à la batterie, et (3) à l’outil utilisant la batterie.
2. Ne démontez pas la batterie.
3. Cessez immédiatement l’utilisation si le temps
de fonctionnement devient excessivement court.
Il y a risque de surchauffe, de brûlures, voire
d’explosion.
4. Si l’électrolyte pénètre dans vos yeux, rincez-les
à l’eau claire et consultez immédiatement un
médecin. Il y a risque de perte de la vue.
5. Ne court-circuitez pas la batterie :
(1) Ne touchez les bornes avec aucun matériau
conducteur.
(2) Évitez de ranger la batterie dans un conte-
neur avec d’autres objets métalliques, par
exemple des clous, des pièces de monnaie,
etc.
(3) N’exposez pas la batterie à l’eau ou à la pluie.
Un court-circuit de la batterie pourrait provoquer
un fort courant, une surchauffe, parfois des brûlures et même une panne.
6. Ne rangez pas l’outil ou la batterie dans des
endroits où la température risque d’atteindre ou
de dépasser 50 °C.
7. Ne jetez pas la batterie au feu même si elle est
sérieusement endommagée ou complètement
épuisée. La batterie peut exploser au contact du
feu.
8. Prenez garde d’échapper ou de heurter la batterie.
9. N’utilisez pas une batterie abîmée.
CONSERVEZ CES INSTRUCTIONS.
Conseils pour assurer la durée de vie optimale de
la batterie
1. Rechargez la batterie avant qu’elle ne soit complètement déchargée.
Arrêtez toujours l’outil et rechargez la batterie
quand vous remarquez que la puissance de
l’outil diminue.
2. Ne rechargez jamais une batterie complètement
chargée.
La surcharge réduit la durée de service de la batterie.
3. Chargez la batterie alors que la température de
la pièce se trouve entre 10 °C et 40 °C.
Avant de charger une batterie chaude, laissez-la
refroidir.
4. Chargez la batterie tous les six mois si elle reste
inutilisée pendant une période prolongée.
DESCRIPTION DU FONCTIONNEMENT
Installation ou retrait de la batterie (Fig. 1 et 2)
ATTENTION :
• Mettez toujours l’outil hors tension avant d’installer ou
de retirer la batterie.
• Avant l’utilisation, assurez-vous d’avoir verrouillé le
couvercle de batterie. Autrement de la boue, des saletés ou de l’eau risquent d’abîmer le produit ou la batterie.
Pour poser la batterie :
1. Tirez vers vous le levier de verrouillage du couvercle
de batterie, et ouvrez le couvercle de batterie.
2. Insérez la batterie dans le sens indiqué sur la figure,
jusqu’à ce qu’un bruit de déclic soit émis.
3. Insérez à fond la clé de sécurité à l’emplacement
indiqué sur la figure.
4. Fermez le couvercle de batterie et appuyez dessus
jusqu’à ce qu’il soit verrouillé par le levier de verrouillage.
Pour retirer la batterie de la tondeuse :
1. Tirez vers vous le levier de verrouillage du couvercle
de batterie, et ouvrez le couvercle de batterie.
2. Tirez sur la clé de sécurité pour la retirer.
3. Faites-la sortir de l’outil en faisant glisser le bouton à
l’avant de la batterie.
4. Fermez le couvercle de batterie.
27
Page 28

Adaptateurs-transfo ceinture de batterie
(accessoire en option)
AVERTISSEMENT :
• Avant de poser ou de retirer les adaptateurs-transfo
ceinture de batterie AA-3618/AA-3618CL, retirez la clé
de sécurité.
AA-3618 (accessoire en option) (Fig. 3, 4 et 5)
AVERTISSEMENT :
• Lors de l’utilisation du AA-3618, ne le fixez jamais à
votre corps, quelle que soit la partie du corps. Vous risqueriez une grave blessure en fixant le AA-3618 à
votre corps.
Faites glisser à fond l’adaptateur-transfo ceinture de batterie AA-3618 dans l’orifice d’installation.
Ouvrez le couvercle de batterie sur la tondeuse, puis faites glisser à fond l’adaptateur de montage du AA-3618
dans le port pour batterie sur la tondeuse, jusqu’à ce qu’il
émette un bruit de déclic.
Faites passer le cordon du AA-3618 dans la fente du
couvercle de batterie, puis fermez ce dernier.
Placez le cordon du AA-3618 dans les supports supérieurs sur la poignée.
NOTE :
• Lors de l’utilisation da adaptateur-transfo ceinture de
batterie AA-3618 (accessoire en option), accrochez le
cordon d’alimentation au support spécifié de la tondeuse. Autrement vous risquez de sectionner le cordon.
Pour retirer le AA-3618 de la tondeuse, ouvrez le couvercle de batterie puis appuyez sur le crochet côté montage
de la batterie sur le AA-3618.
AA-3618CL (accessoire en option) (Fig. 6 et 7)
Ouvrez le couvercle de batterie et insérez le AA-3618CL
dans le port pour batterie de la tondeuse, jusqu’à ce qu’il
émette un bruit sec.
Fermez le couvercle de batterie.
Pour retirer le AA-3618CL, appuyez sur le crochet du
AA-3618CL et retirez le AA-3618CL à l’aide des deux
mains.
Interrupteur (Fig. 8 et 9)
AVERTISSEMENT :
• Avant d’insérer la batterie dans l’outil, vérifiez toujours que le levier d’interrupteur fonctionne correctement et revient en position initiale une fois libéré.
Il y a risque de perte de maîtrise et de blessure grave si
l’outil est utilisé avec un interrupteur déficient.
NOTE :
• Si vous essayez de tondre un gazon trop long, le
moteur risquera de ne pas démarrer en raison de la
surcharge. Le cas échéant, augmentez la hauteur de
tonte pour pouvoir redémarrer.
• Même si vous activez le levier d’interrupteur, la tondeuse ne démarrera pas si vous n’appuyez pas sur le
bouton d’interrupteur.
Cette tondeuse est équipée d’un interrupteur d’interverrouillage et d’un interrupteur de poignée. Si vous constatez une anomalie sur l’un ou l’autre de ces interrupteurs,
cessez immédiatement l’utilisation et faites-le vérifier par
le centre de service après-vente Dolmar le plus près.
1. Insérez la clé de sécurité dans l’interrupteur d’interverrouillage.
2. Enfoncez le bouton d’interrupteur.
3. Tirez le levier d’interrupteur vers vous tout en enfonçant le bouton d’interrupteur.
4. Libérez le bouton d’interrupteur dès que le moteur
se met à tourner. La tondeuse continuera de tourner
jusqu’à ce que vous libériez le levier d’interrupteur.
5. Pour couper le moteur, libérez le levier d’interrupteur.
6. Après l’utilisation, retirez la clé de sécurité. Rangez
la clé de sécurité dans un emplacement sûr, hors de
la portée des enfants.
Régler la hauteur de tonte (Fig. 10)
AVERTISSEMENT :
• Ne mettez jamais une main ou une jambe sous la ton-
deuse pendant que vous réglez la hauteur de tonte.
• Avant l’utilisation, assurez-vous toujours que le levier
pénètre bien dans la rainure.
La hauteur de tonte est réglable sur une plage de 20 mm
à 75 mm.
1. Retirez la clé de sécurité.
2. Tirez le levier de réglage de la hauteur de tonte vers
vous, et déplacez-le jusqu’à la hauteur de tonte
désirée.
Assurez-vous que la partie saillante du levier de réglage
de la hauteur de tonte pénètre dans la rainure de la tondeuse.
NOTE :
• Les valeurs de hauteur de tonte ne sont qu’approxima-
tives, car la hauteur réelle du gazon peut varier suivant
l’état de la pelouse ou du sol.
• Faites un essai de tonte en un point peu visible pour
vérifier si vous obtenez la hauteur de tonte désirée.
Dispositif de protection de la batterie
Les batteries au lithium-ion sont dotées d’un dispositif de
protection. Ce dispositif coupe automatiquement l’alimentation de l’outil pour prolonger la durée de service de
la batterie.
Si l’outil et/ou la batterie se trouve dans l’une ou l’autre
des situations suivantes, l’outil cessera automatiquement
de fonctionner.
• Surchargé :
L’outil est utilisé de manière telle qu’il consomme un
courant anormalement élevé.
Il faut alors libérer la gâchette de l’outil et cesser l’application qui cause la surcharge. Tirez ensuite de nouveau sur la gâchette pour redémarrer.
Si l’outil ne démarre pas, cela signifie que la batterie
est trop chaude. Il faut alors laisser refroidir la batterie
avant de tirer de nouveau sur la gâchette.
• Faible tension de la batterie :
La charge restante de la batterie étant trop faible, l’outil
ne fonctionne pas. Il faut alors retirer la batterie et la
recharger.
28
Page 29
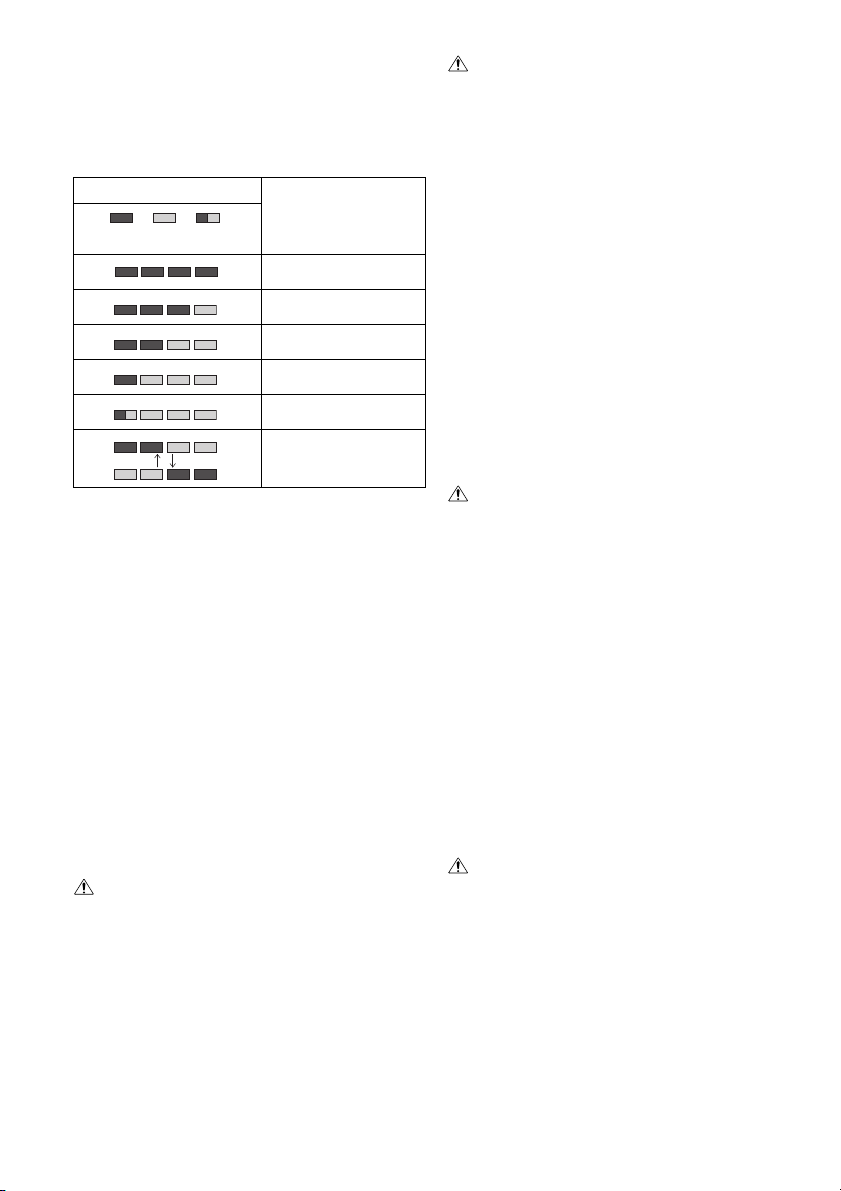
Témoin de capacité restante de la batterie
Allumé
Arrêt
Clignotant
E
F
011713
(uniquement pour les modèles dotés d’une
batterie AP-3622) (Fig. 11)
La batterie AP-3622 est dotée d’un témoin de capacité
restante.
Appuyez sur le bouton CHECK pour afficher la capacité
restante de la batterie. Le témoin s’allume alors pendant
trois secondes environ.
Témoins
Capacité restante
70% à 100%
45% à 70%
20% à 45%
0% à 20%
Chargez la batterie.
Il y a peut-être un
dysfonctionnement de la
batterie.
• Lorsque seul le témoin le plus bas (à côté de l’“E”) clignote, ou lorsque aucun des témoins ne s’allume, la
capacité de la batterie est épuisée et l’outil ne peut plus
fonctionner. Le cas échéant, chargez la batterie ou
remplacez-la par une batterie complètement chargée.
• Si au moins deux témoins ne s’allument pas même
après la charge, cela signifie que la batterie a atteint la
fin de sa durée de service.
• Si les deux témoins supérieurs et les deux témoins
inférieurs s’allument alternativement, il se peut que la
batterie ait un dysfonctionnement. Contactez votre centre de service après-vente agréé Dolmar.
NOTE :
• Pendant ou juste après l’utilisation de l’outil, la charge
restante indiquée peut être inférieure au véritable
niveau de charge.
• Suivant les conditions d’utilisation et la température
ambiante, il se peut que la capacité restante indiquée
par le témoin soit légèrement différente de la charge
réelle.
ASSEMLAGE
AVERTISSEMENT :
• Avant toute intervention sur la tondeuse, assurezvous toujours que la clé de sécurité et la batterie
sont retirées. En ne retirant pas la clé de sécurité et la
batterie, vous risqueriez de vous blesser grièvement en
cas de démarrage accidentel.
• Ne faites démarrer l’outil que si ses pièces sont
toutes montées. En utilisant l’outil alors que ses pièces ne sont pas toutes montées, vous risqueriez de
vous blesser grièvement en cas de démarrage accidentel.
Pose de la poignée (Fig. 12, 13, 14, 15, 16 et 17)
AVERTISSEMENT :
• Lorsque vous posez les poignées, placez les fils de
sorte qu’ils courent librement entre les poignées.
1. Desserrez les vis de serrage (deux pièces).
Déployez la poignée inférieure des deux côtés et, dans
cette position, faites-la pivoter vers l’arrière et placez-la
dans la rainure du plateau.
2. Serrez les vis de serrage des deux côtés pour fixer
la poignée inférieure.
3. Soulevez la poignée supérieure, alignez les trous de
vis de la poignée supérieure sur ceux de la poignée
inférieure, puis fixez la poignée supérieure à l’aide
des vis et écrous de serrage fournis.
NOTE :
• Il faut alors tenir fermement la poignée supérieure pour
ne pas l’échapper.
NOTE :
• Posez la poignée supérieure en orientant celle-ci et le
cordon d’alimentation tel qu’illustré sur la figure.
NOTE :
• La poignée supérieure est dotée de deux trous de chaque côté. Ces trous permettent de régler la hauteur de
la poignée au moyen des vis et écrous de serrage.
Pose ou retrait de la lame (Fig. 18 et 19)
AVERTISSEMENT :
• Avant de retirer ou de poser la lame, retirez toujours la
clé de sécurité et la batterie. Vous risquez une grave
blessure si vous ne retirez pas la clé de sécurité et la
batterie.
• La lame continue de tourner pendant quelques secondes après la libération de l’interrupteur. Assurez-vous
que la lame ne tourne plus.
• Portez toujours des gants pour manipuler la lame.
1. Basculez la tondeuse sur le côté pour que le levier
de réglage de la hauteur de tonte se trouve sur le
dessus.
2. Pour verrouiller la lame, insérez dans un orifice de la
tondeuse un tournevis ou outil similaire disponible
dans le commerce.
3. À l’aide d’une clé, tournez le boulon dans le sens
contraire des aiguilles d’une montre pour le desserrer.
4. Retirez dans l’ordre le boulon, la lame, le flasque
extérieur et le flasque intérieur.
Pour poser la lame, effectuez la procédure contraire du
retrait.
AVERTISSEMENT :
• Posez le flasque intérieur, la lame et le flasque extérieur soigneusement, car ils ont une face supérieure et
une face inférieure.
• Pour fixer la lame, serrez fermement le boulon en tournant dans le sens des aiguilles d’une montre.
• Posez la lame en plaçant du côté extérieur la face qui
porte une flèche d’indication du sens de rotation.
• Assurez-vous d’avoir posé la lame de manière sûre.
• Pensez à retirer le tournevis ou outil similaire que vous
avez inséré dans l’orifice pour verrouiller la lame.
29
Page 30

Pose du panier à gazon (Fig. 20 et 21)
Retirez la clé de sécurité.
Soulevez le carter de protection arrière de la tondeuse et
accrochez le panier à gazon sur la rainure de la tondeuse.
OPÉRATION
Tonte
AVERTISSEMENT :
• Avant de commencer à tondre le gazon, enlevez les
bouts de bois et les cailloux dans la zone à tondre.
Enlevez aussi les mauvaises herbes à l’avance dans la
zone à tondre.
• Lorsque vous utilisez la tondeuse, portez toujours des
lunettes de sécurité ou lunettes à coques.
Pendant la tonte, tenez fermement la poignée de la tondeuse à deux mains.
Les bords extérieurs des roues avant de la tondeuse correspondent approximativement à la largeur de tonte. En
vous guidant sur les bords extérieurs des deux roues
avant, tondez le gazon en formant des bandes uniformes
qui se chevauchent du tiers ou de la moitié.
Vérifiez régulièrement le niveau du panier à gazon, et
videz ce dernier quand il est plein. Avec d’effectuer les
inspections régulières, pensez à arrêter la tondeuse et à
retirer la clé de sécurité et la batterie.
NOTE :
• Si vous continuez d’utiliser la tondeuse alors que le
panier à gazon est plein, la lame ne pourra pas tourner
librement et le moteur sera surchargé, ce qui comporte
un risque de panne.
Tonte du gazon long (Fig. 22)
N’essayez pas de tondre le gazon long d’un seul coup.
Tondez-le plutôt graduellement, en espaçant les tontes
d’un jour ou deux, jusqu’à ce que le gazon soit uniformément court.
NOTE :
• Le gazon long risque de s’étioler si vous le coupez très
court d’un seul coup, et/ou vous risquez de bloquer le
mécanisme intérieur de la tondeuse.
Vider le panier à gazon (Fig. 23)
AVERTISSEMENT :
• Pour réduire les risques d’accident, assurez-vous régulièrement que le panier à gazon n’est pas endommagé
ou affaibli, et remplacez-le lorsque nécessaire.
1. Libérez le levier d’interrupteur.
2. Retirez la clé de sécurité.
3. Ouvrez le carter de protection arrière et retirez le
panier à gazon à l’aide de sa poignée.
4. Videz le panier à gazon.
MAINTENANCE ET RANGEMENT
AVERTISSEMENT :
• Assurez-vous toujours que la clé de sécurité et la batterie sont retirées de la tondeuse avant de la ranger ou
d’en faire l’inspection ou la maintenance.
• Portez des gants lorsque vous effectuez l’inspection ou
la maintenance.
ATT ENTI O N :
• N’utilisez jamais d’essence, benzine, diluant, alcool ou
autre produit similaire. Cela risquerait de provoquer la
décoloration, la déformation ou la fissuration de l’outil.
MAINTENANCE
1. RETIREZ LA CLÉ DE SÉCURITÉ. Rangez-la dans
un emplacement sûr, hors de la portée des enfants.
2. Utilisez uniquement du savon doux et un chiffon
humide pour nettoyer la tondeuse. Évitez de vaporiser ou de verser de l’eau sur la tondeuse pour la
nettoyer.
3. Basculez la tondeuse sur le côté et enlevez les her-
bes arrachées qui se sont accumulées sous le plateau de la tondeuse.
4. Assurez-vous que les écrous, boulons, boutons, vis,
attaches et autres fixations sont bien serrés.
5. Vérifiez l’absence de dommages, de bris et d’usure
sur les pièces mobiles. Faites réparer ou remplacer
toute pièce endommagée ou manquante.
6. Avant de ranger la tondeuse, retirez la batterie.
7. Rangez la tondeuse à l’intérieur, dans un emplace-
ment frais, sec et verrouillé. Ne rangez pas la tondeuse et le chargeur dans un emplacement où la
température peut atteindre ou dépasser 40 °C.
Rangement (Fig. 24, 25, 26, 27, 28 et 29)
AVERTISSEMENT :
• Pour transporter ou ranger la tondeuse, ne la saisissez
pas par ses poignées repliées mais par la prise avant
de la tondeuse. Vous risquez de vous blesser grièvement ou d’endommager la tondeuse si vous la tenez
par ses poignées repliées.
La tondeuse peut être rangée en position verticale.
1. Desserrez la vis de serrage, déployez la poignée
inférieure des deux côtés, puis abaissez la poignée
vers l’avant.
NOTE :
• Il faut alors tenir fermement la poignée inférieure pour
ne pas qu’elle tombe du côté éloigné de l’outil.
2. Desserrez l’écrou de serrage et faites pivoter la poi-
gnée supérieure pour la remettre sur sa position initiale.
3. Enlevez le panier à gazon et mettez la tondeuse à la
verticale.
NOTE :
• Pour mettre la tondeuse à la verticale, ne la saisissez
pas par la poignée ; utilisez plutôt la prise avant de la
tondeuse.
4. Rangez le panier à gazon entre la poignée et le
corps de la tondeuse.
Pour assurer la SÉCURITÉ et la FIABILITÉ du produit,
toute réparation et tout travail d’entretien ou de réglage
doivent être effectués par un Centre de service aprèsvente agréé Dolmar, avec des pièces de rechange Dolmar.
30
Page 31

DÉPANNAGE
012350
Avant de faire une demande de réparation, effectuez d’abord vous-même une inspection. Si vous rencontrez un problème non documenté dans le manuel, n’essayez pas de démonter l’outil. Demandez plutôt à un centre de service
après-vente Dolmar agréé d’effectuer la réparation au moyen de pièces de rechange Dolmar.
Dysfonctionnement Cause Mesure à prendre
La batterie n’est pas posée. Posez la batterie.
La tondeuse ne démarre pas.
Le moteur s’arrête au bout d’un court
moment.
Le moteur ne tourne pas à plein
régime.
L’outil tranchant ne tourne pas :
Arrêtez immédiatement la machine !
Vibrations anormales :
Arrêtez immédiatement la machine !
L’outil tranchant et le moteur ne
s’arrêtent pas :
Retirez immédiatement la batterie !
Problème de batterie (tension
insuffisante)
La clé de sécurité n’est pas insérée. Insérez la clé de sécurité.
La charge de la batterie est faible.
La hauteur de tonte est réglée trop
bas.
La batterie n’est pas bien posée.
La batterie faiblit.
Le mécanisme d’entraînement ne
fonctionne pas bien.
Un corps étranger, tel qu’une branche, est coincé près de la lame.
Le mécanisme d’entraînement ne
fonctionne pas bien.
La lame est déséquilibrée, trop usée
ou usée de manière inégale.
Dysfonctionnement électrique ou
électronique.
Rechargez la batterie. Si la recharge
est inefficace, remplacez la batterie.
Rechargez la batterie. Si la recharge
est inefficace, remplacez la batterie.
Augmentez la hauteur de tonte.
Suivez les instructions du présent
manuel pour poser la batterie.
Rechargez la batterie. Si la recharge
est inefficace, remplacez la batterie.
Demandez à votre centre de service
après-vente agréé d’effectuer la
réparation.
Retirez le corps étranger.
Demandez à votre centre de service
après-vente agréé d’effectuer la
réparation.
Remplacez la lame.
Retirez la batterie et demandez à
votre centre de service après-vente
agréé d’effectuer la réparation.
ACCESSOIRES EN OPTION
ATTENTION :
• Ces accessoires ou pièces complémentaires sont recommandés pour l’utilisation avec l’outil Dolmar spécifié dans
ce mode d’emploi. L’utilisation de tout autre accessoire ou pièce complémentaire peut comporter un risque de blessure. N’utilisez les accessoires ou pièces qu’aux fins auxquelles ils ont été conçus.
Si vous désirez obtenir plus de détails concernant ces accessoires, veuillez contacter le centre de service après-vente
Dolmar le plus près.
• Lame
• Batterie et chargeur Dolmar authentiques
NOTE :
• Il se peut que certains éléments de la liste soient compris dans l’emballage de l’outil en tant qu’accessoires standard. Ils peuvent varier d’un pays à l’autre.
31
Page 32

ENG905-1
Bruit
Niveau de bruit pondéré A typique, déterminé selon
EN60335 :
Niveau de pression sonore (L
Niveau de puissance sonore (L
Incertitude (K) : 3 dB (A)
Porter des protecteurs anti-bruit
Vibrations
Valeur totale de vibrations (somme de vecteur triaxial)
déterminée selon EN60335 :
Émission de vibrations (a
Incertitude (K) : 1,5 m/s
• La valeur d’émission de vibrations déclarée a été
mesurée conformément à la méthode de test standard
et peut être utilisée pour comparer les outils entre eux.
• La valeur d’émission de vibrations déclarée peut aussi
être utilisée pour l’évaluation préliminaire de l’exposi-
) : 80 dB (A)
pA
) : 93 dB (A)
WA
) : 2,5 m/s2 ou moins
h
2
ENG900-1
ENG901-1
tion.
AVERTISSEMENT :
• L’émission de vibrations lors de l’usage réel de l’outil
électrique peut être différente de la valeur d’émission
déclarée, suivant la façon dont l’outil est utilisé.
• Les mesures de sécurité à prendre pour protéger l’utilisateur doivent être basées sur une estimation de
l’exposition dans des conditions réelles d’utilisation (en
tenant compte de toutes les composantes du cycle
d’utilisation, comme par exemple le moment de sa
mise hors tension, lorsqu’il tourne à vide et le moment
de son déclenchement).
ENH218-1
Pour les pays d’Europe uniquement
Déclaration de conformité CE
Les soussignés, Tamiro Kishima et Rainer Bergfeld,
tel qu’autorisés par Dolmar GmbH, déclarent que
le(s) machine(s) DOLMAR suivante(s) :
Désignation de la machine :
Tondeuse Sans Fil
N° de modèle / Type : AM-3643
Spécifications : voir le tableau “SPÉCIFICATIONS”.
sont produites en série et
sont conformes aux Directives européennes
suivantes :
2000/14/CE, 2006/42/CE
et qu’elles sont fabriquées conformément aux normes ou
documents normalisés suivants :
EN60745, EN60335
La documentation technique se trouve sur fichier à
l’adresse suivante :
Dolmar GmbH,
Jenfelder Straße 38, Abteilung FZ,
D-22045 Hamburg
La procédure d’évaluation de la conformité requise par la
Directive 2000/14/CE a été réalisée conformément à
l’Annexe VI.
Organisme notifié :
TÜV Rheinland LGA Products GmbH
Am Grauen Stein 29
51105 Köln Allemagne
Numéro d’identification 0197
Niveau de puissance sonore mesuré : 93 dB (A)
Niveau de puissance sonore garanti : 94 dB (A)
7.9.2011
32
Tamiro Kishima
Président directeur
Rainer Bergfeld
Président directeur
Page 33

DEUTSCH (Originale Anleitungen)
Übersicht
1 Akkuabdeckungs-
Verriegelungshebel
2 Akku
3 Akkuabdeckung
4 Sperrschlüssel
5 Akku-Adapter (AA-3618)
6 Montageöffnung
7 Haken
8 Produkt-Montageadapter des
AA-3618
9 Kabel
10 Schlitz
11 Obere Halter
12 Akku-Adapter (AA-3618CL)
TECHNISCHE DATEN
Modell AM-3643
Mähbreite 430 mm
Leerlaufdrehzahl 3 600 min
Abmessungen (L x B x H)
Nettogewicht 17,9 kg
Nennspannung DC 36 V
Warnung: Verwenden Sie nur den (die) beschriebe-
• Wir behalten uns vor, Änderungen im Zuge der Ent-
wicklung und des technischen Fortschritts ohne vorherige Ankündigung vorzunehmen.
• Die technischen Daten und der Blockakku können von
Land zu Land unterschiedlich sein.
• Gewicht mit Akku nach EPTA-Verfahren 01/2003
Standard-Akku(s)
nen Akku(s).
WICHTIGE SICHERHEITSVORSCHRIFTEN
WARNUNG! Lesen Sie alle Sicherheitswarnungen
und Anweisungen durch. Eine Missachtung der unten
aufgeführten Warnungen und Anweisungen kann zu
einem elektrischen Schlag, Brand und/oder schweren
Verletzungen führen.
Bewahren Sie alle Warnungen und Anweisungen für
spätere Bezugnahme auf.
1. Stecken Sie den Schlüssel nicht eher in den
Mäher, bis dieser betriebsbereit ist.
2. Dieses Gerät ist nicht für den Gebrauch durch
Personen (einschließlich Kindern) mit vermin-
derten körperlichen oder geistigen Fähigkeiten
oder mangelnder Erfahrung und Kenntnis vorge-
sehen, es sei denn, sie haben eine Betreuung
oder Unterweisung im Gebrauch des Gerätes
von einer Person erhalten, die für ihre Sicherheit
verantwortlich ist.
3. Kinder sollten beaufsichtigt werden, um sicher-
zugehen, dass sie nicht mit dem Gerät spielen.
13 Schaltknopf
14 Schalthebel
15 Mähhöhen-Einstellhebel
16 Anzeigelampen
17 Taste CHECK
18 Unterer Griff
19 Führungsnut am Deck
20 Klemmschraube
21 Oberer Griff
22 Schraubenlöcher
23 Knebelmutter
24 Schraube
25 Halter
26 Schraubendreher
während des Betriebs
bei Lagerung 490 mm – 500 mm x 460 mm x 810 mm
GEB091-5
27 Messer
28 Schraube
29 Innenflansch
30 Pfeil
31 Außenflansch
32 Hintere Schutzklappe
33 Führungsnut
34 Graskorb
35 Spreizen
36 Nach vorn herunterklappen
37 Zurückschwenken
38 Frontgriff
–1
1 450 mm – 1 490 mm x 460 mm x 950 mm – 1 020 mm
AP-363 / AP-3622
4. Kinder oder Personen, die nicht mit dieser Anleitung vertraut sind, dürfen die Maschine keinesfalls benutzen. Örtliche Vorschriften können das
Alter der Bedienungsperson einschränken.
5. Betreiben Sie die Maschine keinesfalls, während
sich Personen, besonders Kinder, oder Haustiere in der Nähe aufhalten.
6. Der Bediener oder Benutzer ist verantwortlich
für Verletzungen oder Sachschäden, die an Personen oder ihrem Eigentum entstehen.
7. Tragen Sie während der Benutzung der
Maschine stets kräftiges Schuhwerk und eine
lange Hose. Betreiben Sie die Maschine nicht
barfuß oder mit offenen Sandalen. Vermeiden
Sie das Tragen von Kleidungsstücken oder
Schmucksachen, die lose sitzen oder herunterhängende Schnüre oder Bänder haben. Diese
können von beweglichen Teilen erfasst werden.
8. Betreiben Sie die Maschine nur bei Tageslicht
oder hellem Kunstlicht.
9. Vermeiden Sie die Benutzung der Maschine in
nassem Gras.
10. Betreiben Sie den Mäher niemals bei Regen.
11. Gebrauch von Akkuwerkzeugen
– Laden Sie den Akku nur mit dem vom Herstel-
ler vorgeschriebenen Ladegerät. Ein Ladege-
rät, das für einen Akkutyp geeignet ist, kann bei
Verwendung mit einem anderen Akku eine Brandgefahr darstellen.
33
Page 34

– Benutzen Sie Elektrowerkzeuge nur mit den
ausdrücklich vorgeschriebenen Akkus. Bei
Verwendung irgendwelcher anderer Akkus
besteht Verletzungs- und Brandgefahr.
12. Halten Sie den Bügelgriff stets mit festem Griff.
13. Achten Sie beim Arbeiten auf Hängen stets auf
sicheren Stand.
14. Stets gehen, niemals laufen.
15. Fassen Sie nicht das freiliegende Schneidmesser oder die Schneidkanten an, um das Gerät
anzuheben oder zu halten.
16. Körperliche Verfassung — Betreiben Sie den
Mäher nicht unter dem Einfluss von Drogen,
Alkohol oder Medikamenten.
17. Halten Sie Schutzvorrichtungen stets montiert
und in betriebsfähigem Zustand.
18. Halten Sie Hände und Füße vom rotierenden
Messer fern. Vorsicht — Das Messer läuft nach
dem Ausschalten noch nach.
19. Ziehen Sie den Schlüssel ab, bevor Sie das Gartengerät warten, reinigen oder von Fremdkörpern befreien.
20. Verwenden Sie nur das in dieser Anleitung angegebene Originalmesser des Herstellers.
21. Überprüfen Sie das Messer vor dem Betrieb
sorgfältig auf Risse oder Beschädigung. Wechseln Sie ein gerissenes oder beschädigtes Messer unverzüglich aus.
22. Vergewissern Sie sich, dass sich keine anderen
Personen im Arbeitsbereich aufhalten, bevor Sie
mit dem Mähen beginnen. Stellen Sie den Mäher
ab, falls jemand den Arbeitsbereich betritt.
23. Entfernen Sie vor dem Mähen Fremdkörper, wie
Steine, Draht, Flaschen, Knochen und große
Äste, vom Arbeitsbereich, um Personenverletzungen und Beschädigung des Mähers zu verhüten.
24. Brechen Sie den Betrieb sofort ab, wenn Sie
irgendetwas Ungewöhnliches bemerken. Schalten Sie den Mäher aus, und ziehen Sie den
Schlüssel ab. Überprüfen Sie dann den Mäher.
25. Versuchen Sie niemals, die Radhöhe zu verstellen, während der Mäher läuft.
26. Lassen Sie den Schalthebel los, und warten Sie,
bis das Messer zum Stillstand gekommen ist,
bevor Sie Einfahrten, Gehwege, Straßen und
schotterbedeckte Flächen überqueren.
Ziehen Sie den Schlüssel auch ab, wenn Sie den
Mäher verlassen, wenn Sie sich bücken, um
etwas aufzuheben oder aus dem Weg zu räumen, oder in irgendeiner anderen Situation, bei
der Sie von Ihrer Arbeit abgelenkt werden könnten.
27. Vom Rasenmähermesser herausgeschleuderte
Gegenstände können schwere Personenverletzungen verursachen. Der Rasen ist vor jedem
Mähen sorgfältig zu überprüfen und von allen
Objekten zu räumen.
28. Falls der Rasenmäher auf einen Fremdkörper
stößt, gehen Sie folgendermaßen vor:
– Stellen Sie den Mäher ab, lassen Sie den
Schalthebel los, und warten Sie, bis das Messer zum vollständigen Stillstand gekommen
ist.
– Entfernen Sie den Sperrschlüssel und den
Akku.
– Überprüfen Sie den Mäher gründlich auf etwa-
ige Beschädigung.
– Tauschen Sie das Messer aus, falls es in
irgendeiner Weise beschädigt ist.
Reparieren Sie etwaige Schäden, bevor Sie den
Mäher wieder in Betrieb nehmen und weiter
benutzen.
29. Überprüfen Sie den Grasfangsack öfters auf Verschleiß oder Verschlechterung. Vergewissern
Sie sich vor der Lagerung stets, dass der Grasfangsack leer ist. Ersetzen Sie einen zerrissenen
Sack zur Sicherheit durch einen fabrikneuen
Ersatzsack.
30. Stellen Sie den Motor ab, und ziehen Sie den
Schlüssel ab, wann immer Sie das Gerät verlassen, bevor Sie das Mähergehäuse reinigen, und
bevor Sie irgendwelche Reparaturen oder Inspektionen durchführen.
31. Lassen Sie äußerste Vorsicht walten, wenn Sie
die Maschine rückwärts betreiben oder auf sich
zu ziehen.
32. Halten Sie das (die) Messer an, wenn die
Maschine zum Transportieren gekippt werden
muss, wenn andere Flächen als Rasen überquert
werden müssen, und wenn die Maschine zu und
vom Arbeitsbereich transportiert werden muss.
33. Betreiben Sie die Maschine niemals mit defekten
Schutzklappen oder Abschirmungen oder ohne
Schutzvorrichtungen, z. B. Abweiser und/oder
Grassammler.
34. Schalten Sie den Motor gemäß den Anweisungen vorsichtig ein, während Ihre Füße einen ausreichenden Sicherheitsabstand vom Messer
haben.
35. Neigen Sie die Maschine nicht, wenn Sie den
Motor einschalten, außer wenn die Maschine
zum Starten geneigt werden muss. Neigen Sie
die Maschine in diesem Fall nicht mehr als absolut notwendig, und heben Sie nur den vom
Bediener abgewandten Teil an.
36. Starten Sie die Maschine nicht, wenn Sie vor der
Auswurföffnung stehen.
37. Halten Sie Ihre Hände oder Füße nicht in die
Nähe von rotierenden Teilen oder darunter. Bleiben Sie stets von der Auswurföffnung fern.
38. Transportieren Sie die Maschine nicht bei eingeschaltetem Mähwerk.
39. Stellen Sie die Maschine ab, und entfernen Sie
die Sperrvorrichtung. Vergewissern Sie sich,
dass alle beweglichen Teile zum vollständigen
Stillstand gekommen sind,
– wann immer Sie die Maschine verlassen.
– bevor Sie Blockierungen beseitigen oder den
Auswurf frei machen.
– bevor Sie die Maschine überprüfen, reinigen
oder daran arbeiten.
– nachdem ein Fremdkörper berührt wurde.
Überprüfen Sie die Maschine auf Beschädigung, und führen Sie Reparaturen durch,
bevor Sie die Maschine wieder starten und in
Betrieb nehmen.
40. Falls die Maschine beginnt, ungewöhnlich heftig
zu vibrieren (sofort überprüfen),
– auf Beschädigung überprüfen.
– beschädigte Teile austauschen oder reparieren.
– prüfen, ob lose Teile vorhanden sind, und
diese festziehen.
34
Page 35

41. Lassen Sie während der Einstellung der
Maschine Vorsicht walten, um Einklemmen der
Finger zwischen dem beweglichen Messer und
den feststehenden Teilen der Maschine zu verhüten.
42. Mähen Sie Hänge nur seitwärts, niemals auf und
ab. Gehen Sie bei Richtungsänderungen auf
Hängen äußerst vorsichtig vor. Mähen Sie keine
sehr steilen Hänge.
43. Waschen Sie die Maschine nicht mit einem
Schlauch, um das Eindringen von Wasser in
Motor und elektrische Anschlüsse zu vermeiden.
44. Überprüfen Sie die Messerbefestigungsschraube in regelmäßigen Abständen auf festen
Sitz.
45. Achten Sie auf festen Sitz aller Muttern, Bolzen
und Schrauben, um sicherzugehen, dass sich
die Maschine in einwandfreiem Arbeitszustand
befindet.
46. Lassen Sie die Maschine vor der Lagerung stets
abkühlen.
47. Wenn Sie das Messer warten, bedenken Sie, dass
sich das Messer immer noch bewegen kann,
selbst wenn die Stromquelle abgeschaltet ist.
48. Tauschen Sie verschlissene oder beschädigte
Teile zur Sicherheit aus. Verwenden Sie nur Original-Ersatzteile und -Zubehör.
BEWAHREN SIE DIESE HINWEISE
SORGFÄLTIG AUF.
WARNUNG:
Lassen Sie sich NICHT durch Bequemlichkeit oder
Vertrautheit mit dem Produkt (durch wiederholten
Gebrauch erworben) von der strikten Einhaltung der
Sicherheitsregeln für das vorliegende Produkt abhalten. MISSBRAUCH oder Missachtung der Sicherheitsvorschriften in dieser Anleitung können
schwere Verletzungen verursachen.
ENC007-7
WICHTIGE SICHERHEITSVORSCHRIFTEN
FÜR AKKU
1. Lesen Sie vor der Benutzung des Akkus alle
Anweisungen und Warnhinweise, die an (1)
Ladegerät, (2) Akku und (3) Akkuwerkzeug angebracht sind.
2. Unterlassen Sie ein Zerlegen des Akkus.
3. Falls die Betriebszeit beträchtlich kürzer gewor-
den ist, stellen Sie den Betrieb sofort ein. Anderenfalls besteht die Gefahr von Überhitzung,
möglichen Verbrennungen und sogar einer
Explosion.
4. Falls Elektrolyt in Ihre Augen gelangt, waschen
Sie sie mit sauberem Wasser aus, und begeben
Sie sich unverzüglich in ärztliche Behandlung.
Anderenfalls können Sie Ihre Sehkraft verlieren.
5. Der Akku darf nicht kurzgeschlossen werden:
(1) Die Kontakte dürfen nicht mit leitfähigem
Material berührt werden.
(2) Lagern Sie den Akku nicht in einem Behälter
zusammen mit anderen Metallgegenständen,
wie z.B. Nägel, Münzen usw.
(3) Setzen Sie den Akku weder Wasser noch
Regen aus.
Ein Kurzschluss des Akkus verursacht starken
Stromfluss, der Überhitzung, Verbrennungen
und einen Defekt zur Folge haben kann.
6. Lagern Sie Maschine und Akku nicht an Orten,
an denen die Temperatur 50°C erreichen oder
überschreiten kann.
7. Versuchen Sie niemals, den Akku zu verbrennen, selbst wenn er stark beschädigt oder vollkommen verbraucht ist. Der Akku kann im Feuer
explodieren.
8. Achten Sie darauf, dass der Akku nicht fallen
gelassen oder Stößen ausgesetzt wird.
9. Benutzen Sie keine beschädigten Akkus.
BEWAHREN SIE DIESE HINWEISE
SORGFÄLTIG AUF.
Hinweise zur Aufrechterhaltung der maximalen
Akku-Nutzungsdauer
1. Laden Sie den Akku, bevor er vollkommen
erschöpft ist.
Schalten Sie die Maschine stets aus, und laden
Sie den Akku, wenn Sie ein Nachlassen der
Maschinenleistung feststellen.
2. Unterlassen Sie das erneute Laden eines voll
aufgeladenen Akkus.
Überladen führt zu einer Verkürzung der Nutzungsdauer des Akkus.
3. Laden Sie den Akku bei Raumtemperatur zwischen 10°C – 40°C.
Lassen Sie einen heißen Akku abkühlen, bevor
Sie ihn laden.
4. Laden Sie den Akku bei längerer Nichtbenutzung
alle sechs Monate nach.
FUNKTIONSBESCHREIBUNG
Anbringen und Abnehmen des Akkus (Abb. 1 u.
2)
VORSICHT:
• Schalten Sie die Maschine stets aus, bevor Sie den
Akku anbringen oder abnehmen.
• Verriegeln Sie unbedingt die Akkuabdeckung vor
Gebrauch. Anderenfalls können Schlamm, Schmutz
oder Wasser eine Beschädigung des Produkts oder
des Akkus verursachen.
Zum Einsetzen des Akkus:
1. Ziehen Sie den Akkuabdeckungs-Verriegelungshebel auf sich zu, und öffnen Sie die Akkuabdeckung.
2. Schieben Sie den Akku in der in der Abbildung
gezeigten Richtung ein, bis ein Klicken hörbar ist.
3. Führen Sie den Sperrschlüssel bis zum Anschlag in
den in der Abbildung gezeigten Schlitz ein.
4. Schließen Sie die Akkuabdeckung, und drücken Sie
sie an, bis sie mit dem Verriegelungshebel einrastet.
Zum Abnehmen des Akkus vom Mäher:
1. Ziehen Sie den Akkuabdeckungs-Verriegelungshebel auf sich zu, und öffnen Sie die Akkuabdeckung.
2. Ziehen Sie den Sperrschlüssel heraus.
3. Ziehen Sie den Akku von der Maschine ab, während
Sie den Knopf an der Vorderseite des Akkus verschieben.
4. Schließen Sie die Akkuabdeckung.
35
Page 36

Akku-Adapter (Sonderzubehör)
WARNUNG:
• Bevor Sie die Akku-Adapter AA-3618/AA-3618CL
anbringen oder abnehmen, entfernen Sie den
Sperrschlüssel.
AA-3618 (Sonderzubehör) (Abb. 3, 4 u. 5)
WARNUNG:
• Wenn Sie den AA-3618 verwenden, bringen Sie ihn
niemals mit irgendeinem Körperteil in Berührung.
Kommt der AA-3618 mit irgendeinem Körperteil in
Berührung, kann es zu ernsthaften Verletzungen kommen.
Schieben Sie den Akku-Adapter AA-3618 bis zum
Anschlag in die Montageöffnung ein.
Öffnen Sie die Akkuabdeckung am Mäher, und schieben
Sie dann den Produkt-Montageadapter des AA-3618 bis
zum Anschlag in den Akkuanschluss des Mähers ein, bis
er mit einem Klicken einrastet.
Führen Sie das Kabel des AA-3618 durch den Schlitz in
der Akkuabdeckung, und schließen Sie die Akkuabdeckung.
Setzen Sie das Kabel des AA-3618 in die oberen Halter
am Lenker ein.
HINWEIS:
• Wenn Sie den Akku-Adapter AA-3618 (Sonderzubehör) verwenden, hängen Sie das Stromkabel in den
vorgesehenen Halter am Mäher ein. Anderenfalls
besteht die Gefahr, dass das Kabel abgeschnitten wird.
Um den AA-3618 vom Mäher zu entfernen, öffnen Sie
die Akkuabdeckung, und drücken Sie dann den Haken
auf der Akkumontageseite des AA-3618.
AA-3618CL (Sonderzubehör) (Abb. 6 u. 7)
Öffnen Sie die Akkuabdeckung, und rasten Sie den AA3618CL in den Akkuanschluss am Mäher ein.
Schließen Sie die Akkuabdeckung.
Um den AA-3618CL zu entfernen, drücken Sie auf den
Haken am AA-3618CL, und ziehen Sie ihn mit beiden
Händen heraus.
Funktion des Ein-Aus-Schalters (Abb. 8 u. 9)
WARNUNG:
• Vergewissern Sie sich vor dem Einsetzen des
Akkus in die Maschine stets, dass der Schalthebel
ordnungsgemäß funktioniert und beim Loslassen
in die Ausgangsstellung zurückkehrt. Der Betrieb
einer Maschine mit fehlerhaftem Schalter kann zum
Verlust der Kontrolle und zu schweren Verletzungen
führen.
HINWEIS:
• Wenn Sie versuchen, viel Gras auf einmal zu mähen,
kann der Motor wegen der Überlastung eventuell nicht
starten. Stellen Sie in diesem Fall die Mähhöhe auf ein
höheres Niveau ein, um die Maschine wieder zu starten.
• Der Mäher startet nicht, ohne den Schaltknopf zu drücken, selbst wenn der Schalthebel betätigt wird.
Dieser Mäher ist mit einem Verriegelungsschalter und
Lenkerschalter ausgestattet. Falls Sie etwas Ungewöhnliches bei einem dieser Schalter bemerken, stoppen Sie
die Maschine unverzüglich, und lassen Sie die Schalter
von der nächsten Dolmar-Kundendienststelle überprüfen.
1. Stecken Sie den Sperrschlüssel in den Verriegelungsschalter.
2. Drücken Sie den Schaltknopf.
3. Ziehen Sie den Schalthebel auf sich zu, während
Sie den Schaltknopf drücken.
4. Lassen Sie den Schaltknopf los, sobald der Motor
anläuft. Der Mäher läuft solange weiter, bis Sie den
Schalthebel loslassen.
5. Lassen Sie den Schalthebel los, um den Motor zu
stoppen.
6. Wenn der Mäher nicht benutzt wird, ziehen Sie den
Sperrschlüssel ab. Bewahren Sie den Sperrschlüssel an einem sicheren Ort außer Reichweite von
Kindern auf.
Einstellen der Mähhöhe (Abb. 10)
WARNUNG:
• Halten Sie niemals Ihre Hand oder Ihren Fuß unter das
Mähwerk, wenn Sie die Mähhöhe einstellen.
• Vergewissern Sie sich stets, dass der Hebel einwand-
frei in der Führungsnut sitzt, bevor Sie den Mäher in
Betrieb nehmen.
Die Mähhöhe kann innerhalb des Bereichs zwischen
20 mm – 75 mm eingestellt werden.
1. Entfernen Sie den Sperrschlüssel.
2. Ziehen Sie den Mähhöhen-Einstellhebel auf sich zu,
und stellen Sie ihn auf die gewünschte Mähhöhe
ein.
Achten Sie darauf, dass der Vorsprung am MähhöhenEinstellhebel in der Führungsnut im Mäher sitzt.
HINWEIS:
• Benutzen Sie die Mähhöhenzahlen nur als Richtlinie,
da der Zustand des Rasens oder des Bodens dazu führen kann, dass die Rasenhöhe geringfügig von der eingestellten Höhenzahl abweicht.
• Machen Sie einen Mähtest an einer unauffälligeren
Stelle des Rasens, um die gewünschte Höhe zu erhalten.
Akku-Schutzsystem
Lithium-Ionen-Akkus sind mit einem Schutzsystem ausgestattet. Dieses System schaltet die Stromversorgung
der Maschine automatisch ab, um die Akku-Lebensdauer
zu verlängern.
Die Maschine schaltet sich während des Betriebs automatisch ab, wenn Maschine und/oder Akku einer der folgenden Bedingungen unterliegen:
• Überlastung:
Die Maschine wird auf eine Weise benutzt, die eine
ungewöhnlich hohe Stromaufnahme bewirkt.
Lassen Sie in dieser Situation den Ein-Aus-Schalter
der Maschine los, und brechen Sie die Arbeit ab, die
eine Überlastung der Maschine verursacht hat. Betätigen Sie dann den Ein-Aus-Schalter erneut, um die
Maschine wieder zu starten.
Falls die Maschine nicht startet, ist der Akku überhitzt.
Lassen Sie den Akku in dieser Situation abkühlen,
bevor Sie den Ein-Aus-Schalter erneut betätigen.
• Niedrige Akkuspannung:
Die Akku-Restkapazität ist zu niedrig, und die
Maschine funktioniert nicht. Nehmen Sie in dieser Situation den Akku ab, und laden Sie ihn auf.
36
Page 37

Akku-Restkapazitätsanzeige (nur für Modelle mit
Ein
Aus
Blinkt
011713
Akku AP-3622) (Abb. 11)
Der Akku AP-3622 ist mit einer Akku- Restkapazitätsanzeige ausgestattet.
Drücken Sie die Taste CHECK, um die Akku- Restkapazität anzuzeigen. Daraufhin leuchten die Anzeigelampen
etwa drei Sekunden lang.
Anzeigelampen
Restkapazität
E
• Wenn nur die unterste Anzeigelampe (neben “E”) blinkt
oder keine der Anzeigelampen leuchtet, ist die Akkukapazität aufgebraucht, so dass das Akkuwerkzeug nicht
funktioniert. Laden Sie in diesen Fällen den Akku auf,
oder tauschen Sie den leeren Akku gegen einen voll
aufgeladenen aus.
• Wenn zwei oder mehr Anzeigelampen nach Abschluss
des Ladevorgangs nicht leuchten, hat der Akku das
Ende seiner Nutzungsdauer erreicht.
• Wenn die oberen und unteren zwei Anzeigelampen
abwechselnd leuchten, liegt möglicherweise eine Funktionsstörung im Akku vor. Kontaktieren Sie Ihre örtliche
autorisierte Dolmar-Kundendienststelle.
HINWEIS:
• Während des Gebrauchs oder unmittelbar nach der
Benutzung des Akkuwerkzeugs kann die angezeigte
Kapazität niedriger als das tatsächliche Ladeniveau
sein.
• Abhängig von den Benutzungsbedingungen und der
Umgebungstemperatur kann die Anzeige geringfügig
von der tatsächlichen Kapazität abweichen.
F
70 bis 100%
45 bis 70%
20 bis 45%
0 bis 20%
Den Akku aufladen.
Möglicherweise liegt
eine Funktionsstörung
im Akku vor.
MONTAGE
WARNUNG:
• Vergewissern Sie sich stets, dass der Sperrschlüssel und der Akku entfernt worden sind, bevor Sie
irgendwelche Arbeiten am Mäher ausführen. Wird
das Entfernen des Sperrschlüssels und das Abnehmen
des Akkus unterlassen, kann es zu schweren Verletzungen durch versehentliches Anlaufen kommen.
• Starten Sie die Maschine niemals, wenn sie nicht
vollständig zusammengebaut ist. Der Betrieb der
unvollständig zusammengebauten Maschine kann zu
schweren Verletzungen durch versehentliches Anlaufen führen.
Montieren des Bügelgriffs (Abb. 12, 13, 14, 15, 16
u. 17)
WARNUNG:
• Positionieren Sie die Kabel beim Montieren des Bügelgriffs so, dass sie nicht durch irgendwelche Teile zwischen den Griffstangen erfasst werden.
1. Lösen Sie die Klemmschrauben (zwei Stück).
Spreizen Sie die unteren Griffstangen auseinander, und
schwenken Sie sie in diesem Zustand nach hinten, um
sie in die Führungsnut im Deck einzupassen.
2. Ziehen Sie die Klemmschrauben auf beiden Seiten
fest, um den unteren Griff zu sichern.
3. Heben Sie den oberen Griff an, um die Schraubenlö-
cher im oberen Griff auf die Löcher im unteren Griff
auszurichten, und befestigen Sie dann den Griff mit
den mitgelieferten Schrauben und Knebelmuttern.
HINWEIS:
• Halten Sie dabei den oberen Griff sicher fest, damit er
Ihnen nicht aus der Hand fällt.
HINWEIS:
• Montieren Sie den oberen Griff so, dass Griff und
Stromkabel so positioniert sind, wie in der Abbildung
gezeigt.
HINWEIS:
• Der obere Griff hat zwei Löcher auf jeder Seite. Der
Bügelgriff kann durch Verwendung der entsprechenden
Löcher für die Schrauben und Knebelmuttern auf die
gewünschte Höhe eingestellt werden.
Demontieren oder Montieren des Messers
(Abb. 18 u. 19)
WARNUNG:
• Entfernen Sie stets den Sperrschlüssel und den Akku,
bevor Sie das Messer demontieren oder montieren.
Werden Sperrschlüssel und Akku nicht entfernt, kann
es zu schweren Verletzungen kommen.
• Das Messer dreht sich nach dem Loslassen des Schalters noch einige Sekunden weiter. Vergewissern Sie
sich, dass das Messer zum vollständigen Stillstand
gekommen ist.
• Tragen Sie stets Handschuhe bei der Handhabung des
Messers.
1. Kippen Sie den Mäher auf seine Seite, so dass der
Mähhöhen-Einstellhebel oben liegt.
2. Um das Messer zu blockieren, stecken Sie einen
Schraubendreher oder ein ähnliches im Handel
erhältliches Werkzeug in eines der Löcher des
Mähers.
3. Lösen Sie die Schraube durch Linksdrehen mit dem
Schraubenschlüssel.
4. Entfernen Sie Schraube, Außenflansch, Messer und
Innenflansch in dieser Reihenfolge.
Zum Montieren des Messers ist das Demontageverfahren umgekehrt anzuwenden.
WARNUNG:
• Montieren Sie Innenflansch, Messer und Außenflansch
sorgfältig, da diese Teile unterschiedliche Ober- und
Unterseiten haben.
• Ziehen Sie dann die Schraube zur Sicherung des Messers im Uhrzeigersinn fest.
• Richten Sie das Messer so aus, dass die Seite mit dem
Drehrichtungspfeil außen liegt.
• Vergewissern Sie sich, dass das Messer sicher montiert ist.
37
Page 38

• Vergessen Sie nicht, den zum Blockieren des Messers
in ein Loch eingesteckten Schraubendreher bzw. das
ähnliche Werkzeug wieder herauszunehmen.
Montieren des Graskorbs (Abb. 20 u. 21)
Entfernen Sie den Sperrschlüssel.
Heben Sie die hintere Schutzklappe des Mähwerks an,
und hängen Sie den Graskorb in die Führungsnut der
Mähereinheit ein.
BETRIEB
Mähen
WARNUNG:
• Bevor Sie mit dem Mähen beginnen, entfernen Sie
Äste und Steine vom Mähbereich. Beseitigen Sie vorher auch jegliches Unkraut im Mähbereich.
• Tragen Sie bei der Benutzung des Mähers stets eine
Schutzbrille mit Seitenschützern.
Halten Sie den Rasenmähergriff beim Mähen mit beiden
Händen fest.
Die Außenkanten der Vorderräder der Haupteinheit bieten eine Richtlinie für die Mähbreite. Mähen Sie den
Rasen gleichmäßig in Streifen, indem Sie die Außenkanten der beiden Vorderräder als Richtlinie verwenden,
wobei Sie den vorher gemähten Streifen um die Hälfte
bis zu einem Drittel überlappen.
Überprüfen Sie von Zeit zu Zeit den Füllstand des Graskorbs, und leeren Sie ihn, bevor er ganz voll wird. Stellen
Sie vor jeder regelmäßigen Kontrolle den Mäher ab, und
entfernen Sie Sperrschlüssel und Akku.
HINWEIS:
• Die Benutzung des Rasenmähers mit vollem Graskorb
verhindert eine reibungslose Messerdrehung und übt
eine zusätzliche Last auf den Motor aus, die zu einem
Ausfall führen kann.
Mähen eines Rasens mit hohem Gras (Abb. 22)
Versuchen Sie nicht, hohes Gras in einem Durchgang zu
mähen. Mähen Sie den Rasen statt dessen in Etappen,
indem Sie zwischen den Mähdurchgängen eine Pause
von einem oder zwei Tagen einlegen, bis der Rasen
gleichmäßig kurz ist.
HINWEIS:
• Der Versuch, langes Gras in einem Durchgang auf eine
kurze Länge zu mähen, kann dazu führen, dass das
Gras abstirbt und/oder die Innenseite der Haupteinheit
blockiert.
Leeren des Graskorbs (Abb. 23)
WARNUNG:
• Um die Unfallgefahr zu reduzieren, sollten Sie den Graskorb regelmäßig auf Beschädigung oder Abschwächung überprüfen und nötigenfalls austauschen.
1. Lassen Sie den Schalthebel los.
2. Entfernen Sie den Sperrschlüssel.
3. Öffnen Sie die hintere Schutzklappe, und nehmen
Sie den Graskorb an seinem Griff heraus.
4. Leeren Sie den Graskorb.
WARTUNG UND LAGERUNG
WARNUNG:
• Vergewissern Sie sich stets, dass Sperrschlüssel und
Akku vom Mäher entfernt worden sind, bevor Sie den
Mäher lagern oder eine Überprüfung oder Wartung
durchführen.
• Tragen Sie Handschuhe zur Durchführung von Inspektions- oder Wartungsarbeiten.
VORSICHT:
• Verwenden Sie auf keinen Fall Benzin, Benzol, Verdünner, Alkohol oder dergleichen. Solche Mittel können
Verfärbung, Verformung oder Rissbildung verursachen.
WARTUNG
1. DEN SPERRSCHÜSSEL ABZIEHEN. Bewahren
Sie den Schlüssel an einem sicheren Ort außer
Reichweite von Kindern auf.
2. Reinigen Sie Ihren Mäher nur mit milder Seifenlö-
sung und einem feuchten Tuch. Unterlassen Sie
Bespritzen oder Übergießen des Mähers mit Wasser
während der Reinigung.
3. Kippen Sie den Mäher auf seine Seite, und entfer-
nen Sie Grasschnitzel, die sich auf der Unterseite
des Mähwerks angesammelt haben.
4. Überprüfen Sie alle Muttern, Bolzen, Knöpfe,
Schrauben, Befestigungsteile usw. auf festen Sitz.
5. Überprüfen Sie die beweglichen Teile auf Beschädi-
gung, Bruch und Verschleiß. Lassen Sie beschädigte oder fehlende Teile reparieren oder ersetzen.
6. Nehmen Sie den Akku heraus, bevor Sie den Mäher
lagern.
7. Lagern Sie den Mäher an einem kühlen, trockenen
und abschließbaren Ort. Lagern Sie Mäher und
Akku nicht an Orten, an denen die Temperatur 40°C
erreichen oder überschreiten kann.
Lagerung (Abb. 24, 25, 26, 27, 28 u. 29)
WARNUNG:
• Halten Sie den Mäher zum Tragen oder Lagern nicht
an den zusammengeklappten Griffstangen, sondern an
seinem Frontgriff. Werden die zusammengeklappten
Griffstangen gehalten, kann es zu schweren Verletzungen oder einer Beschädigung des Mähers kommen.
Der Mäher kann in Senkrechtstellung gelagert werden.
1. Die Klemmschrauben lösen, die unteren Griffstan-
gen auseinander spreizen, und dann den Bügelgriff
nach vorn umklappen.
HINWEIS:
• Halten Sie dabei den unteren Griff sicher fest, damit er
nicht auf die abgewandte Seite der Maschine herunterfällt.
2. Die Knebelmutter lösen, und den oberen Bügelgriff
zurückklappen.
3. Nehmen Sie den Graskorb ab, und bringen Sie den
Mäher in Senkrechtstellung.
HINWEIS:
• Halten Sie den Mäher beim Aufrichten in die Senkrechtstellung nicht am Bügelgriff, sondern an seinem
Frontgriff.
4. Lagern Sie den Graskorb zwischen Bügelgriff und
Mäher.
Um die SICHERHEIT und ZUVERLÄSSIGKEIT dieses
Gerätes zu gewährleisten, sollten Reparatur-, Wartungs-,
und Einstellarbeiten nur von Dolmar autorisierten Kundendienstzentren unter ausschließlicher Verwendung
von Dolmar-Originalersatzteilen ausgeführt werden.
38
Page 39

FEHLERSUCHE
012350
Bevor Sie den Reparaturdienst anrufen, führen Sie zunächst Ihre eigene Inspektion durch. Falls Sie ein Problem finden, das nicht in der Anleitung erläutert wird, versuchen Sie nicht, die Maschine zu zerlegen. Wenden Sie sich statt
dessen an eine Dolmar-Kundendienststelle, und achten Sie darauf, dass stets Dolmar-Ersatzteile für Reparaturen verwendet werden.
Störungszustand Ursache Abhilfemaßnahme
Der Akku ist nicht eingesetzt. Den Akku einsetzen.
Der Mäher startet nicht.
Der Motor bleibt nach kurzer Zeit
stehen.
Die Maximaldrehzahl wird nicht
erreicht.
Das Messer dreht sich nicht:
Die Maschine unverzüglich stoppen!
Ungewöhnliche Vibration:
Die Maschine unverzüglich stoppen!
Messer und Motor bleiben nicht stehen:
Den Akku unverzüglich entfernen!
Akkustörung (Unterspannung)
Der Sperrschlüssel ist nicht
eingesteckt.
Der Ladestand des Akkus ist niedrig.
Die Schnitthöhe ist zu niedrig
eingestellt.
Der Akku ist falsch eingesetzt.
Die Akkuleistung lässt nach.
Das Antriebssystem funktioniert nicht
korrekt.
Ein Fremdkörper, wie z. B. ein Ast,
hat sich in der Nähe des Messers
verklemmt.
Das Antriebssystem funktioniert nicht
korrekt.
Das Messer ist unausgeglichen,
übermäßig oder ungleichmäßig
abgenutzt.
Funktionsstörung der Elektrik oder
Elektronik.
Den Akku aufladen. Falls Laden
nichts nützt, den Akku austauschen.
Den Sperrschlüssel einstecken.
Den Akku aufladen. Falls Laden
nichts nützt, den Akku austauschen.
Die Schnitthöhe anheben.
Den Akku gemäß der Beschreibung
in dieser Anleitung einsetzen.
Den Akku aufladen. Falls Laden
nichts nützt, den Akku austauschen.
Wenden Sie sich bezüglich einer
Reparatur an Ihre Vertragswerkstatt.
Den Fremdkörper entfernen.
Wenden Sie sich bezüglich einer
Reparatur an Ihre Vertragswerkstatt.
Das Messer austauschen.
Entfernen Sie den Akku, und wenden
Sie sich bezüglich einer Reparatur
an Ihre Vertragswerkstatt.
SONDERZUBEHÖR
VORSICHT:
• Die folgenden Zubehörteile oder Vorrichtungen werden für den Einsatz mit der in dieser Anleitung beschriebenen
Dolmar-Maschine empfohlen. Die Verwendung anderer Zubehörteile oder Vorrichtungen kann eine Verletzungsgefahr darstellen. Verwenden Sie Zubehörteile oder Vorrichtungen nur für ihren vorgesehenen Zweck.
Wenn Sie weitere Einzelheiten bezüglich dieser Zubehörteile benötigen, wenden Sie sich bitte an Ihre Dolmar- Kundendienststelle.
•Messer
• Original-Dolmar-Akku und -Ladegerät
HINWEIS:
• Manche Teile in der Liste können als Standardzubehör im Werkzeugsatz enthalten sein. Sie können von Land zu
Land unterschiedlich sein.
39
Page 40

ENG905-1
Geräusch
Typischer A-bewerteter Geräuschpegel ermittelt gemäß
EN60335:
Schalldruckpegel (L
Schalleistungspegel (L
Ungewissheit (K): 3 dB (A)
Vibration
Vibrationsgesamtwert (Drei-Achsen-Vektorsumme)
ermittelt gemäß EN60335:
Vibrationsemission (a
Ungewissheit (K): 1,5 m/s
• Der angegebene Vibrationsemissionswert wurde im
Einklang mit der Standardprüfmethode gemessen und
kann für den Vergleich zwischen Maschinen herangezogen werden.
• Der angegebene Vibrationsemissionswert kann auch
für eine Vorbewertung des Gefährdungsgrads verwendet werden.
): 80 dB (A)
pA
): 93 dB (A)
WA
Gehörschutz tragen
): 2,5 m/s2 oder weniger
h
2
ENG900-1
ENG901-1
WARNUNG:
• Die Vibrationsemission während der tatsächlichen
Benutzung des Elektrowerkzeugs kann je nach der
Benutzungsweise der Maschine vom angegebenen
Emissionswert abweichen.
• Identifizieren Sie Sicherheitsmaßnahmen zum Schutz
des Benutzers anhand einer Schätzung des Gefährdungsgrads unter den tatsächlichen Benutzungsbedingungen (unter Berücksichtigung aller Phasen des
Arbeitszyklus, wie z. B. Ausschalt- und Leerlaufzeiten
der Maschine zusätzlich zur Betriebszeit).
ENH218-1
Nur für europäische Länder
EG-Übereinstimmungserklärung
Die unterzeichneten, Tamiro Kishima und Rainer
Bergfeld, bevollmächtigt von Dolmar GmbH,
erklären, dass die DOLMAR-Maschine(n):
Bezeichnung der Maschine:
Akku Rasenmäher
Modell-Nr./ Typ: AM-3643
Technische Daten: Siehe Tabelle “TECHNISCHE
DATEN”.
der Serienproduktion entstammen und
den folgenden europäischen Richtlinien
entsprechen:
2000/14/EG, 2006/42/EG
und gemäß den folgenden Standards oder
standardisierten Dokumenten hergestellt werden:
EN60745, EN60335
Die technische Dokumentation ist archiviert bei:
Dolmar GmbH,
Jenfelder Straße 38, Abteilung FZ,
D-22045 Hamburg
Das von der Richtlinie 2000/14/EG geforderte Konformitätsbewertungsverfahren war in Übereinstimmung mit
Anhang VI.
Gemeldete Stelle:
TÜV Rheinland LGA Products GmbH
Am Grauen Stein 29
51105 Köln Deutschland
Identifikationsnummer 0197
Gemessener Schallleistungspegel: 93 dB (A)
Garantierter Schallleistungspegel: 94 dB (A)
7.9.2011
40
Tamiro Kishima
Geschäftsführer
Rainer Bergfeld
Geschäftsführer
Page 41

ITALIANO (Istruzioni originali)
Visione generale
1 Leva di chiusura coperchio
batteria
2 Batteria
3 Coperchio batteria
4 Chiave di blocco
5 Convertitore batteria (AA-3618)
6 Foro di installazione
7Gancio
8 Adattatore di montaggio
prodotto AA-3618
9 Cavo elettrico
10 Fessura
11 Supporti superiori
12 Convertitore batteria
(AA-3618CL)
DATI TECNICI
Modello AM-3643
Larghezza di taglio 430 mm
Velocità a vuoto 3.600 min
Dimensioni (L x A x P)
Tensione nominale C.c. 36 V
Avvertimento: Usare soltanto le batterie specificate.
• Per il nostro programma di ricerca e sviluppo continui, i
dati tecnici sono soggetti a modifiche senza preavviso.
• I dati tecnici e la cartuccia batteria potrebbero differire
da paese a paese.
• Peso, con batteria, secondo la Procedura EPTA 01/
2003
Batteria standard
durante l’immagazzinaggio 490 mm – 500 mm x 460 mm x 810 mm
Peso netto 17,9 kg
ISTRUZIONI IMPORTANTI DI SICUREZZA
AVVERTIMENTO! Leggere tutti gli avvertimenti
per la sicurezza e le istruzioni. La mancata osservanza
degli avvertimenti e delle istruzioni può causare scosse
elettriche, incendio e/o gravi incidenti.
Conservare tutti gli avvertimenti e le istruzioni per
riferimenti futuri.
1. Non inserire la chiave nel tosaerba finché esso
non è pronto per l’uso.
2. Questo prodotto non deve essere usato dalle
persone (bambini compresi) con capacità fisi-
che, sensoriali o mentali ridotte, senza espe-
rienza e conoscenza, a meno che non siano
sotto la supervisione o ricevano istruzioni per il
suo utilizzo da una persona responsabile della
loro sicurezza.
3. I bambini devono essere sorvegliati, per essere
sicuri che non giochino con il prodotto.
4. Non si deve mai permettere l’uso del tosaerba ai
bambini o alle persone senza familiarità con
queste istruzioni. Le leggi vigenti locali potreb-
bero limitare l’età dell’operatore.
13 Bottone interruttore
14 Leva interruttore
15 Leva di regolazione altezza
taglio
16 Spie
17 Tasto CHECK
18 Manubrio inferiore
19 Scanalatura su carrozzeria
20 Vite di fermo
21 Manubrio superiore
22 Fori viti
23 Dado di fermo
24 Vite
25 Supporti
26 Cacciavite
durante il funzionamento
GEB091-5
27 Lama
28 Bullone
29 Flangia interna
30 Freccia
31 Flangia esterna
32 Protezione posteriore
33 Scanalatura
34 Cassetto erba
35 Per espandere
36 Spostare giù in avanti
37 Girare indietro
38 Impugnatura anteriore
–1
1.450 mm – 1.490 mm x 460 mm x 950 mm – 1.020 mm
AP-363 / AP-3622
5. Il tosaerba non deve mai essere fatto funzionare
se nelle vicinanze ci sono persone, soprattutto
bambini, o animali domestici.
6. Tenere presente che l’operatore o l’utilizzatore è
responsabile degli incidenti o pericoli che possono capitare alle altre persone o alle loro proprietà.
7. Durante il funzionamento del tosaerba, indossare sempre calzature appropriate e pantaloni
lunghi. Non far funzionare il tosaerba a piedi
scalzi o indossando sandali infradito. Evitare di
indossare abiti ampi o gioielli non aderenti o che
hanno catenelle, o cravatte. Essi possono impigliarsi sulle parti mobili.
8. Far funzionare il tosaerba soltanto di giorno o
con una buona illuminazione artificiale.
9. Evitare di far funzionare il tosaerba sull’erba
bagnata.
10. Non si deve mai usare il tosaerba sotto la pioggia.
11. Uso del tosaerba con la batteria
– Ricaricare soltanto con il caricatore specifi-
cato dal produttore. Un caricatore adatto a un
tipo di batteria potrebbe creare un pericolo di
incendio se usato con un altro tipo di batteria.
– Usare gli utensili elettrici soltanto con le bat-
terie specificate. L’impiego di una qualsiasi altra
batteria potrebbe creare un pericolo di infortunio
e di incendio.
12. Mantenere sempre una presa salda sul manubrio.
41
Page 42

13. Stare sempre attenti a dove posare i piedi sui
pendii.
14. Camminare, mai correre.
15. Per sollevare o tenere il tosaerba non si deve
mai prenderlo per la lama o bordi taglienti esposti.
16. Condizione fisica — Il tosaerba non deve essere
usato dopo l’ingestione di droghe, alcol o di una
qualsiasi medicina.
17. Mantenere le protezioni in posizione e in buono
stato.
18. Tenere le mani e i piedi lontani dalla lama
rotante. Attenzione — La lama continua a girare
per inerzia dopo lo spegnimento del tosaerba.
19. Rimuovere la chiave prima della manutenzione,
pulizia o rimozione di materiali dall’attrezzatura
di giardinaggio.
20. Usare soltanto le lame del produttore genuine
specificate in questo manuale.
21. Controllare con cura che la lama non presenti
crepe o altri danni prima di cominciare il lavoro.
Sostituire immediatamente la lama se presenta
crepe o altri danni.
22. Accertarsi che non ci siano persone vicine prima
di cominciare a usare il tosaerba. Fermare il
tosaerba se qualcuno entra nell’area di lavoro.
23. Rimuovere gli oggetti estranei, come sassi, cavi,
bottiglie, ossi e grossi stecchi dall’area di lavoro
prima di usare il tosaerba, per evitare infortuni o
di danneggiare il tosaerba stesso.
24. Smettere immediatamente di usarlo se si nota un
qualcosa di anormale. Spegnere il tosaerba e
rimuovere la chiave. Ispezionare poi il tosaerba.
25. Non si deve mai cercare di regolare l’altezza
delle ruote mentre il tosaerba sta funzionando.
26. Rilasciare la leva interruttore e aspettare l’arresto della rotazione della lama prima di attraversare passi carrai, marciapiedi, strade e qualsiasi
terreno coperto di ghiaia.
Rimuovere la chiave anche prima di lasciare il
tosaerba, protendersi per prendere o rimuovere
qualcosa di mezzo, o per qualsiasi altra ragione
che potrebbe distrarre da ciò che si sta facendo.
27. Gli oggetti colpiti dalla lama del tosaerba possono causare severi infortuni alle persone. Esaminare sempre attentamente il prato e togliere
tutti gli oggetti ogni volta prima di tagliare l’erba.
28. Se il tosaerba colpisce un oggetto estraneo, procedere come segue:
– Arrestare il tosaerba, rilasciare la leva inter-
ruttore e aspettare finché la lama non si è
arrestata completamente.
– Rimuovere la chiave di blocco e la batteria.
– Ispezionare attentamente il tosaerba per
accertarsi che non ci siano danni.
– Sostituire la lama se presenta un qualsiasi
danno.
Riparare ogni danno prima di riavviare e continuare a usare il tosaerba.
29. Controllare frequentemente che il sacco posteriore non sia usurato o deteriorato. Prima di
immagazzinare il tosaerba, accertarsi sempre
che il sacco posteriore sia vuoto. Per la sicurezza, sostituire il sacco posteriore con un
ricambio nuovo della fabbrica se è usurato.
30. Arrestare il motore e rimuovere la chiave ogni
volta che si lascia il tosaerba, prima di pulirlo e
di qualsiasi riparazione o ispezione.
31. Usare estrema cautela quando si inverte il movimento o si tira il tosaerba verso di sé.
32. Arrestare la lama se bisogna inclinare il tosaerba
per il trasporto o per attraversare superfici non
erbose, e quando lo si trasporta sul luogo di utilizzo e da esso.
33. Il tosaerba non deve mai essere fatto funzionare
con protezioni o schermi difettosi, o senza i
dispositivi di protezione, per esempio, senza i
deflettori e/o i raccoglitori dell’erba in posizione.
34. Accendere con cura il motore secondo le istruzioni e con i piedi ben lontani dalla lama.
35. Non inclinare il tosaerba quando si accende il
motore, eccetto quando esso deve essere inclinato per l’avviamento. In questo caso, non inclinarlo più dell’assoluto necessario, e sollevare
soltanto la parte discosta dall’operatore.
36. Non avviare il tosaerba stando di fronte all’apertura di scarico.
37. Non mettere le mani o i piedi vicino o sotto le
parti rotanti. Stare sempre discosti dall’apertura
di scarico.
38. Non trasportare il tosaerba mentre è acceso.
39. Fermare il tosaerba e rimuovere il dispositivo di
disattivazione. Accertarsi che tutte le parti mobili
si siano arrestate completamente.
– ogni volta che si lascia il tosaerba,
– prima di togliere i blocchi o di liberare da
impedimenti lo scivolo,
– prima di controllare, pulire o lavorare sul tosa-
erba,
– dopo che il tosaerba ha colpito un oggetto
estraneo. Ispezionare il tosaerba per danni e
fare le riparazioni prima di riavviarlo o di farlo
funzionare.
40. Se il tosaerba comincia a vibrare in modo anormale (controllare immediatamente)
– ispezionare se ci sono danni,
– sostituire o riparare ogni parte danneggiata,
– controllare e stringere ogni parte allentata.
41. Fare attenzione durante la regolazione del tosaerba, in modo da evitare che le dita rimangano
incastrate tra le lame mobili e le parti fisse di
esso.
42. Tagliare l’erba di traverso lungo la faccia dei
pendii, mai su e giù. Fare la massima attenzione
quando si cambia direzione sui pendii. Non
tagliare l’erba su pendii eccessivamente ripidi.
43. Non lavare il tosaerba con una manichetta. Evitare di spruzzare acqua sul motore o sugli allacciamenti elettrici.
44. Controllare a frequenti intervalli che il bullone di
montaggio della lama sia stretto correttamente.
45. Mantenere stretti tutti i bulloni, dadi e viti, per
assicurare che il tosaerba sia in buone condizioni di lavoro.
46. Lasciare sempre raffreddare il tosaerba prima di
immagazzinarlo.
47. Prima di un intervento sulla lama, tenere presente che anche se il tosaerba è spento, la lama
può lo stesso muoversi.
48. Per motivi di sicurezza, sostituire le parti usurate
o danneggiate. Usare soltanto ricambi e accessori genuini.
42
Page 43

CONSERVARE QUESTE ISTRUZIONI.
AVVERTIMENTO:
NON lasciare che comodità o la familiarità d’utilizzo
con il prodotto (acquisita con l’uso ripetuto) sostituisca la stretta osservanza delle norme di sicurezza.
L’utilizzo SBAGLIATO o la mancata osservanza delle
norme di sicurezza di questo manuale di istruzioni
potrebbero causare lesioni serie.
ENC007-7
ISTRUZIONI IMPORTANTI DI SICUREZZA
PER LA CARTUCCIA DELLA BATTERIA
1. Prima di usare la cartuccia della batteria, leggere
tutte le istruzioni e le avvertenze sul (1) caricabatteria, sulla (2) batteria e sul (3) prodotto che
utilizza la batteria.
2. Non smontare la cartuccia della batteria.
3. Se il tempo di utilizzo è diventato molto corto,
smettere immediatamente di usare l’utensile.
Può risultare un rischio di surriscaldamento,
possibili ustioni e addirittura un’esplosione.
4. Se l’elettrolita va negli occhi, risciacquarli con
acqua pulita e rivolgersi immediatamente ad un
medico. Può risultare la perdita della vista.
5. Non cortocircuitare la cartuccia della batteria:
(1) Non toccare i terminali con qualche metallo
conduttivo.
(2) Evitare di conservare la cartuccia della batte-
ria in un contenitore con altri oggetti metallici
come i chiodi, le monete, ecc.
(3) Non esporre la cartuccia della batteria
all’acqua o alla pioggia.
Un cortocircuito della batteria può causare un
grande flusso di corrente, il surriscaldamento,
possibili ustioni e addirittura un guasto.
6. Non conservare l’utensile e la cartuccia della
batteria in luoghi in cui la temperatura può raggiungere o superare i 50°C.
7. Non incenerire la cartuccia della batteria anche
se è gravemente danneggiata o è completamente
esaurita. La cartuccia della batteria può esplodere e provocare un incendio.
8. Fare attenzione a non lasciar cadere o a colpire
la batteria.
9. Non usare una batteria danneggiata.
CONSERVARE QUESTE ISTRUZIONI.
Suggerimenti per mantenere la durata massima
della batteria
1. Caricare la cartuccia della batteria prima che si
scarichi completamente.
Smettere sempre di usare l’utensile e caricare la
cartuccia della batteria quando si nota che la
potenza dell’utensile è diminuita.
2. Non ricaricare mai una cartuccia della batteria
completamente carica.
La sovraccarica riduce la durata della batteria.
3. Caricare la cartuccia della batteria con la temperatura ambiente da 10°C a 40°C.
Lasciar raffreddare una cartuccia della batteria
calda prima di caricarla.
4. Caricare la cartuccia della batteria una volta ogni
sei mesi se non si intende usarla per un lungo
periodo di tempo.
DESCRIZIONE FUNZIONALE
Installazione o rimozione della batteria (Fig. 1 e 2)
ATTENZIONE:
• Spegnere sempre l’utensile prima di inserire o di rimuovere la cartuccia batteria.
• Accertarsi che il coperchio della batteria sia chiuso
prima dell’uso. In caso contrario, il fango, lo sporco o
l’acqua potrebbero danneggiare il prodotto o la batteria.
Per installare la batteria;
1. Tirare verso di sé la leva di chiusura coperchio bat-
teria, e aprire il coperchio batteria.
2. Inserire la batteria nella direzione mostrata nella illu-
strazione finché si sente uno scatto.
3. Inserire la chiave di blocco nel punto mostrato nella
illustrazione finché non può andare più oltre.
4. Chiudere il coperchio batteria e spingerlo finché è
agganciato alla leva di chiusura.
Per rimuovere la batteria dal tosaerba:
1. Tirare verso di sé la leva di chiusura coperchio bat-
teria, e aprire il coperchio batteria.
2. Estrarre la chiave di blocco.
3. Estrarla dal tosaerba spingendo allo stesso tempo il
bottone sulla parte anteriore della batteria.
4. Chiudere il coperchio batteria.
Convertitori batteria (accessorio opzionale)
AVVERTIMENTO:
• Prima di installare o di rimuovere i convertitori batteria
AA-3618/AA-3618CL, rimuovere la chiave di blocco.
AA-3618 (accessorio opzionale) (Fig. 3, 4 e 5)
AVVERTIMENTO:
• Se si usa il AA-3618, non si deve mai attaccarlo a una
parte del proprio corpo. Se si attacca il AA-3618 a una
parte del proprio corpo, potrebbe causare un serio
infortunio.
Spingere il convertitore batteria AA-3618 nel foro di
installazione finché si arresta.
Aprire il coperchio della batteria sul tosaerba, spingerlo
completamente e far scattare l’adattatore di montaggio
prodotto del AA-3618 nell’apertura della batteria sul tosaerba.
Sistemare il cavo elettrico del AA-3618 nella fessura del
coperchio batteria, e chiudere il coperchio batteria.
Inserire il cavo elettrico del AA-3618 nei supporti superiori del manubrio.
NOTA:
• Se si usa il convertitore batteria AA-3618 (accessorio
opzionale), agganciare il cavo di alimentazione al supporto specificato del tosaerba. Non facendo ciò, il cavo
potrebbe venire tagliato.
Per rimuovere il AA-3618 dal tosaerba, aprire il coperchio batteria e premere poi il gancio sul lato di montaggio
della batteria del AA-3618.
AA-3618CL (accessorio opzionale) (Fig. 6 e 7)
Aprire il coperchio batteria e far scattare il AA-3618CL
nell’apertura della batteria sul tosaerba.
Chiudere il coperchio batteria.
Per rimuovere il AA-3618CL, premere sul gancio del AA3618CL e rimuoverlo con entrambe le mani.
43
Page 44

Funzionamento dell’interruttore di corrente
On
Off
Lampeggiante
011713
(Fig. 8 e 9)
AVVERTIMENTO:
• Prima di inserire la batteria nel tosaerba, controllare sempre che la leva interruttore funzioni correttamente e che torni sulla sua posizione originale
quando viene rilasciata. Se si fa funzionare il tosa-
erba con l’interruttore che non funziona correttamente,
si può verificare una perdita di controllo e un serio infortunio.
NOTA:
• Se si cerca di tagliare troppa erba alla volta, il motore
potrebbe non partire a causa del sovraccarico. Cambiare allora l’altezza di taglio a un livello più alto per
riavviarlo.
• Il tosaerba non si avvia se non si preme il bottone interruttore, anche se si schiaccia la leva interruttore.
Questo tosaerba è dotato dell’interruttore di asservimento e dell’interruttore del manubrio. Se si nota qualcosa di anormale con questi interruttori, smettere
immediatamente di farlo funzionare e farli controllare dal
Centro di Servizio Dolmar autorizzato più vicino.
1. Inserire la chiave di blocco nell’interruttore di asser-
vimento.
2. Schiacciare il bottone interruttore.
3. Tirare verso di sé la leva interruttore schiacciando
allo stesso tempo il bottone interruttore.
4. Rilasciare il bottone interruttore non appena il
motore comincia ad avviarsi. Il motore del tosaerba
continua a girare finché non si rilascia la leva interruttore.
5. Rilasciare la leva interruttore per arrestare il motore.
6. Quando non si usa il tosaerba, rimuovere la chiave
di blocco. Conservare la chiave di blocco in un posto
sicuro, fuori della portata dei bambini.
Regolazione dell’altezza di taglio (Fig. 10)
AVVERTIMENTO:
• Non si devono mai mettere le mani o i piedi sotto il
tosaerba quando si regola l’altezza di taglio.
• Accertarsi sempre che la leva entri correttamente nella
scanalatura prima di cominciare.
L’altezza di taglio può essere regolata nella gamma
20 mm – 75 mm.
1. Rimuovere la chiave di blocco.
2. Tirare verso di sé la leva di regolazione altezza
taglio, e spostarla sull’altezza di taglio desiderata.
Accertarsi che la sporgenza sulla leva di regolazione
altezza taglio entri nella scanalatura del tosaerba.
NOTA:
• Le cifre dell’altezza di taglio devono essere usate come
indicazioni generali, in quanto per lo stato del prato o
del terreno l’altezza di taglio potrebbe essere leggermente diversa da quella indicata dalle cifre.
• Provare un taglio di prova dell’erba in un posto meno in
evidenza, in modo da ottenere l’altezza desiderata.
Sistema di protezione batteria
Le batterie agli ioni di litio sono dotate di un sistema di
protezione. Questo sistema interrompe automaticamente
la corrente al tosaerba per estendere la vita della batteria.
L’utensile si arresta automaticamente mentre funziona se
esso o la batteria vengono a trovarsi in una delle condizioni seguenti:
• Sovraccarico:
L’utensile viene usato in un modo che causa un assorbimento di corrente anormalmente alto.
In tal caso, rilasciare l’interruttore sull’utensile e interrompere l’applicazione che ha causato il sovraccarico.
Schiacciare poi di nuovo l’interruttore per riavviare
l’utensile.
Se l’utensile non si avvia, vuol dire che la batteria è
surriscaldata. In tal caso, lasciare raffreddare la batteria prima di schiacciare di nuovo l’interruttore.
• Bassa tensione della batteria:
La capacità restante della batteria è troppo bassa e
l’utensile non funziona. In tal caso, rimuovere e ricaricare la batteria.
Indicatore della capacità restante della batteria
(soltanto per i modelli con batteria AP-3622)
(Fig. 11)
La batteria AP-3622 è dotata dell’indicatore della capacità restante della batteria.
Premere il tasto CHECK per vedere la capacità restante
della batteria. Le spie si accendono per tre secondi circa.
Spie
Capacità restante
E
• Quando lampeggia soltanto la spia più bassa (vicina a
“E”), o se non si accende alcuna delle spie, la capacità
della batteria si è esaurita e l’utensile non funziona. In
tal caso, caricare la batteria o sostituire la batteria scarica con un’altra completamente carica.
• Se non si accendono due o più spie anche dopo aver
completato la carica, la batteria ha raggiunto la fine
della sua vita di servizio.
• Se le due spie superiori e le due inferiori si accendono
alternativamente, si potrebbe essere verificato un malfunzionamento della batteria. Rivolgersi al Centro di
Assistenza Dolmar locale autorizzato.
NOTA:
• La capacità indicata potrebbe essere inferiore al livello
reale durante l’uso o immediatamente dopo l’uso del
tosaerba.
• A seconda delle condizioni di utilizzo e della temperatura ambiente, l’indicazione potrebbe differire leggermente dalla capacità reale.
F
Dal 70% al 100%
Dal 45% al 70%
Dal 20% al 45%
Dal 0% al 20%
Caricare la batteria.
Si potrebbe essere
verificato un malfunzio-
namento della batteria.
44
Page 45

MONTAGGIO
AVVERTIMENTO:
• Accertarsi sempre che la chiave di blocco e la batteria siano state rimosse prima di eseguire l’intervento sul tosaerba. Se non si rimuovono la chiave di
blocco e la batteria, si potrebbe verificare un serio
infortunio per l’avviamento accidentale del tosaerba.
• Non si deve mai avviare il tosaerba se non è stato
completamente montato. L’uso del tosaerba in uno
stato di montaggio parziale, potrebbe causare un serio
infortunio per il suo avviamento accidentale.
Installazione del manubrio (Fig. 12, 13, 14, 15, 16
e 17)
AVVERTIMENTO:
• Quando si installano i manubri, posizionare i cavi in
modo che non rimangano impigliati tra i manubri.
1. Allentare le viti di fermo (due).
Espandere il manubrio inferiore su entrambi i suoi lati e,
nella sua posizione di espansione, girarlo indietro e montarlo sulla scanalatura della carrozzeria.
2. Stringere le viti di fermo su entrambi i lati per fissare
il manubrio inferiore.
3. Sollevare il manubrio superiore, allineare i fori delle
viti del manubrio superiore su quelli del manubrio
inferiore e fissare poi con le viti in dotazione e i dadi
di fermo.
NOTA:
• A questo punto, tenere saldamente il manubrio superiore in modo che non sfugga di mano.
NOTA:
• Installare il manubrio superiore in modo che la sua
direzione e il cavo di alimentazione siano posizionati
come mostrato nella illustrazione.
NOTA:
• Il manubrio superiore ha due fori su ciascuno di
entrambi i lati. Usando i diversi fori di posizione per le
viti e i dadi di fermo su può regolare l’altezza del manubrio.
Rimozione o installazione della lama (Fig. 18 e 19)
AVVERTIMENTO:
• Rimuovere sempre la chiave di blocco e la batteria
quando si rimuove o installa la lama. La mancata rimozione della chiave di blocco e della batteria potrebbe
causare un serio infortunio.
• La lama continua a girare per inerzia per alcuni secondi
dopo che si è rilasciato l’interruttore. Accertarsi che la
lama si sia arrestata completamente.
• Indossare sempre i guanti quando si maneggia la
lama.
1. Sistemare il tosaerba su un fianco in modo che la
leva di regolazione altezza taglio venga a trovarsi in
alto.
2. Per bloccare la lama, inserire in un foro del tosaerba
un cacciavite o altro attrezzo simile disponibili in
commercio.
3. Allentare in senso antiorario il bullone con la chiave.
4. Rimuovere il bullone, la flangia esterna, la lama e la
flangia interna, in quest’ordine.
Per installare la lama, seguire il procedimento opposto di
rimozione.
AVVERTIMENTO:
• Installare con cura la flangia interna, la lama e la flangia esterna, perché hanno un lato superiore/inferiore.
• Stringere saldamente il bullone in senso orario per fissare la lama.
• Montare la lama con il lato che ha la freccia di direzione
della rotazione rivolto verso l’esterno.
• Accertarsi che la lama sia installata saldamente.
• Togliere sempre il cacciavite o altro attrezzo simile
inserito in un foro per bloccare la lama.
Installazione del cassetto erba (Fig. 20 e 21)
Rimuovere la chiave di blocco.
Sollevare la protezione posteriore del tosaerba e aggan-
ciare il cassetto erba alla scanalatura del tosaerba.
FUNZIONAMENTO
Taglio dell’erba
AVVERTIMENTO:
• Prima di tagliare l’erba, togliere gli stecchi e i sassi
dall’area di taglio. Inoltre, togliere prima le erbacce
dall’area di taglio.
• Indossare sempre occhiali di protezione o occhiali di
sicurezza con schermi laterali quando si usa il tosaerba.
Tenere saldamente il manubrio del tosaerba con
entrambe le mani durante il taglio dell’erba.
I bordi esterni delle ruote anteriori del tosaerba forniscono una guida per la larghezza di taglio. Usando i
bordi esterni delle due ruote anteriori come guida, eseguire il taglio a strisce passando sopra da una metà a un
terzo della striscia precedente per tagliare l’erba uniformemente.
Controllare periodicamente il livello dell’erba nel cassetto, e svuotarlo prima che diventi pieno. Prima di ogni
controllo periodico, arrestare sempre il tosaerba e rimuovere la chiave di blocco e la batteria.
NOTA:
• L’uso del tosaerba con il cassetto erba pieno impedisce
la scorrevole rotazione della lama ed esercita una pressione extra sul motore che potrebbe causare un guasto.
Taglio di un prato di erba alta (Fig. 22)
Non si deve cercare di tagliare un prato di erba alta in
una volta. Tagliare invece l’erba del prato in fasi, interrompendo il taglio per uno o due giorni tra un taglio e
l’altro finché l’erba è uniformemente corta.
NOTA:
• Se si cerca di tagliare corta in una volta l’erba alta,
l’erba potrebbe morire e/o bloccare l’interno del tosaerba.
Svuotamento del cassetto erba (Fig. 23)
AVVERTIMENTO:
• Per ridurre il rischio di un incidente, controllare regolarmente se il cassetto erba presenta danni o se la sua
robustezza si è indebolita, e sostituirlo se necessario.
1. Rilasciare la leva interruttore.
2. Rimuovere la chiave di blocco.
3. Aprire la protezione posteriore e togliere il cassetto
erba con il suo manico.
4. Svuotare il cassetto erba.
45
Page 46

MANUTENZIONE E IMMAGAZZINAGGIO
AVVERTIMENTO:
• Accertarsi sempre di aver rimosso la chiave di blocco e
la batteria dal tosaerba prima dell’immagazzinaggio o
di un intervento di ispezione o di manutenzione.
• Indossare i guanti quando si esegue l’ispezione o la
manutenzione.
ATT EN ZIO NE:
• Mai usare benzina, benzene, solventi, alcol e altre
sostanze simili. Potrebbero causare scolorimenti,
deformazioni o crepe.
MANUTENZIONE
1. RIMUOVERE LA CHIAVE DI BLOCCO. Conservarla
in un posto sicuro fuori della portata dei bambini.
2. Pulire il tosaerba usando soltanto una soluzione
detergente debole e un panno umido. Non spruzzare o versare acqua sul tosaerba quando lo si pulisce.
3. Mettere il tosaerba su un fianco e togliere i residui
d’erba che si sono accumulati sulla parte inferiore
della carrozzeria.
4. Controllare che tutti i dadi, bulloni, manopole, viti,
chiusure, ecc., siano stretti saldamente.
5. Ispezionare che le parti mobili non siano danneg-
giate, rotte o usurate. Far riparare o sostituire ogni
parte danneggiata o mancante.
6. Prima di immagazzinare il tosaerba, rimuovere da
esso la batteria.
7. Immagazzinare il tosaerba al coperto, in un luogo
fresco, asciutto e sotto chiave. Non immagazzinare
il tosaerba e il caricatore in luoghi dove la temperatura potrebbe raggiungere o superare i 40°C.
Immagazzinaggio (Fig. 24, 25, 26, 27, 28 e 29)
AVVERTIMENTO:
• Per trasportare o immagazzinare il tosaerba, tenerlo
per l’impugnatura anteriore e non per i manubri piegati.
Tenendolo per i manubri piegati si potrebbe causare un
serio infortunio o danneggiare il tosaerba.
Il tosaerba può essere immagazzinato diritto.
1. Allentare la vite di fermo, espandere il manubrio
inferiore su entrambi i lati e spostare poi il manubrio
giù in avanti.
NOTA:
• A questo punto, tenere saldamente il manubrio
inferiore in modo che non cada sul lato discosto
dall’utensile.
2. Allentare il dado di fermo e girare indietro il manu-
brio superiore.
3. Estrarre il cassetto erba e mettere diritto il tosaerba.
NOTA:
• Per mettere diritto il tosaerba, prenderlo per l’impugnatura anteriore e non per il manubrio.
4. Sistemare il cassetto erba tra il manubrio e il corpo
del tosaerba.
Per preservare la SICUREZZA e l’AFFIDABILITÀ affidabilità del prodotto, le riparazioni, la manutenzione o la
regolazione devono essere eseguite da un Centro Assistenza Dolmar autorizzato usando sempre ricambi Dolmar.
46
Page 47

SOLUZIONE DEI PROBLEMI
012350
Eseguire da soli l’ispezione prima di richiedere la riparazione. Se si trova un problema che non è spiegato nel
manuale, non cercare di smontare il tosaerba. Rivolgersi invece a un Centro di Servizio Dolmar autorizzato, usando
sempre i ricambi Dolmar per le riparazioni.
Stato di malfunzionamento Causa Rimedio
La batteria non è stata installata. Installare la batteria.
Il tosaerba non si avvia.
Il motore si arresta dopo poco tempo.
Non raggiunge i massimi giri/minuto.
La lama non gira:
Arrestare immediatamente il
tosaerba!
Vibrazione anormale:
Arrestare immediatamente il
tosaerba!
La lama e il motore non si fermano:
Rimuovere immediatamente la
batteria!
Problema della batteria (carica
insufficiente)
La chiave di blocco non è stata
inserita.
La carica della batteria è bassa.
L’altezza di taglio è regolata troppo
bassa.
La batteria non è installata
correttamente.
La potenza della batteria cala.
Il sistema di trasmissione non
funziona correttamente.
Nella lama è incastrato un oggetto
estraneo, come un ramoscello.
Il sistema di trasmissione non
funziona correttamente.
La lama è sbilanciata, usurata
eccessivamente o in modo
disuguale.
Malfunzionamento elettrico o
elettronico.
Ricaricare la batteria. Se la ricarica
non ha effetto, sostituire la batteria.
Inserire la chiave di blocco.
Ricaricare la batteria. Se la ricarica
non ha effetto, sostituire la batteria.
Aumentare l’altezza.
Installare la batteria come descritto
nel manuale.
Ricaricare la batteria. Se la ricarica
non ha effetto, sostituire la batteria.
Chiedere la riparazione al Centro di
Servizio autorizzato locale.
Rimuovere l’oggetto estraneo.
Chiedere la riparazione al Centro di
Servizio autorizzato locale.
Sostituire la lama.
Rimuovere la batteria e chiedere la
riparazione al Centro di Servizio
autorizzato locale.
ACCESSORI OPZIONALI
ATTENZIONE:
• Questi accessori o attrezzi sono consigliati per l’uso con l’utensile Dolmar specificato in questo manuale. L’impiego
di altri accessori o attrezzi può costituire un rischio di lesioni alle persone. Usare gli accessori soltanto per il loro
scopo prefissato.
Per ottenere maggiori dettagli su questi accessori, rivolgersi a un Centro Assistenza Dolmar autorizzato.
• Lama
• Batteria e caricatore Dolmar genuini
NOTA:
• Alcuni articoli nella lista potrebbero essere inclusi nell’imballo dell’utensile come accessori standard. Essi potrebbero
differire da Paese a Paese.
47
Page 48

ENG905-1
Rumore
Il tipico livello di rumore pesato A determinato secondo
EN60335:
Livello pressione sonora (L
Livello potenza sonora (L
Incertezza (K): 3 dB (A)
Vibrazione
Il valore totale di vibrazione (somma vettore triassiale)
determinato secondo EN60335:
Emissione di vibrazione (a
Incertezza (K): 1,5 m/s
• Il valore di emissione delle vibrazioni dichiarato è stato
misurato conformemente al metodo di test standard, e
può essere usato per paragonare un utensile con un
altro.
• Il valore di emissione delle vibrazioni dichiarato può
anche essere usato per una valutazione preliminare
dell’esposizione.
Indossare i paraorecchi
): 80 dB (A)
pA
): 93 dB (A)
WA
): 2,5 m/s2 o meno
h
2
ENG900-1
ENG901-1
AVVERTIMENTO:
• L’emissione delle vibrazioni durante l’uso reale
dell’utensile elettrico può differire dal valore di emissione dichiarato a seconda dei modi in cui viene usato
l’utensile.
• Identificare le misure di sicurezza per la protezione
dell’operatore basate sulla stima dell’esposizione nelle
condizioni reali d’utilizzo (tenendo presente tutte le
parti del ciclo operativo, come le volte in cui l’utensile
viene spento e quando gira a vuoto, oltre al tempo di
funzionamento).
ENH218-1
Modello per l’Europa soltanto
Dichiarazione CE di conformità
I sottoscritti, Tamiro Kishima e Rainer Bergfeld, con
l’autorizzazione della Dolmar GmbH, dichiariamo che
le macchine DOLMAR:
Designazione della macchina:
Tosaerba a batteria
Modello No./Tipo: AM-3643
Dati tecnici: vedere la tabella “DATI TECNICI”.
sono una produzione di serie e
conformi alle direttive europee seguenti:
2000/14/CE, 2006/42/CE
E sono fabbricate conformemente ai seguenti standard o
documenti standardizzati:
EN60745, EN60335
Il file della documentazione tecnica si trova all’indirizzo
seguente:
Dolmar GmbH,
Jenfelder Straße 38, Abteilung FZ,
D-22045 Hamburg
La procedura di determinazione della conformità richiesta dalla Direttiva 2000/14/CE è stata eseguita secondo
l’allegato VI.
Corpo notificato:
TÜV Rheinland LGA Products GmbH
Am Grauen Stein 29
51105 Köln Germania
Numero di identificazione 0197
Livello di potenza sonora misurato: 93 dB (A)
Livello di potenza sonora garantito: 94 dB (A)
7.9.2011
48
Tamiro Kishima
Amministratore delegato
Rainer Bergfeld
Amministratore delegato
Page 49

NEDERLANDS (Originele instructies)
Verklaring van algemene gegevens
1 Accudeksel-borghendel
2 Accu
3 Accudeksel
4 Contactsleutel
5 Accudraaghouder (AA-3618)
6 Aanbrengopening
7 Haak
8 Productbevestigingsadapter
van de AA-3618
9 Snoer
10 Sleuf
11 Bovenste snoerhouders
12 Accudraaghouder (AA-3618CL)
13 Schakelknop
TECHNISCHE GEGEVENS
Model AM-3643
Maaibreedte 430 mm
Toerental onbelast 3 600 min
Afmetingen (L x B x H)
Netto gewicht 17,9 kg
Nominale spanning DC 36 V
Waarschuwing: Gebruik alleen de voorgeschreven
• In verband met ononderbroken research en ontwikke-
ling behouden wij ons het recht voor bovenstaande
technische gegevens te wijzigen zonder voorafgaande
kennisgeving.
• De technische gegevens de accu kunnen van land tot
land verschillen.
• Gewicht, inclusief accu, volgens de EPTA-procedure
01/2003
Standaardaccu(’s)
accu(’s).
BELANGRIJKE
VEILIGHEIDSVOORSCHRIFTEN
WAARSCHUWING! Lees alle veiligheidswaar-
schuwingen en alle instructies. Het niet volgen van de
waarschuwingen en instructies kan leiden tot elektrische
schokken, brand en/of ernstig letsel.
Bewaar alle waarschuwingen en instructies om in de
toekomst te kunnen raadplegen.
1. Steek de contactsleutel pas in de grasmaaier
wanneer die geheel voor gebruik gereed is.
2. Dit apparaat is niet geschikt voor gebruik door
personen (inclusief kinderen) met beperkte
fysieke, zintuiglijke of verstandelijke vermogens,
of gebrek aan ervaring of kennis van zaken, ten-
zij onder toezicht of na degelijk onderricht
betreffende bediening van het apparaat, door
een persoon die verantwoordelijk is voor hun
veiligheid.
14 Schakelhendel
15 Maaihoogte-instelhendel
16 Status van lampjes
17 CHECK-knop
18 Onderste handgreep
19 Gleuf in het maaierhuis
20 Klemschroef
21 Bovenste handgreep
22 Schroefgaten
23 Klemmoer
24 Schroef
25 Snoerhouders
26 Schroevendraaier
27 Snijblad
tijdens gebruik
bij opslag 490 mm – 500 mm x 460 mm x 810 mm
GEB091-5
28 Bout
29 Binnenflens
30 Pijl
31 Buitenflens
32 Achterscherm
33 Gleuf
34 Grasmand
35 Zijwaarts uitschuiven
36 Voorwaarts neerklappen
37 Terugklappen
38 Voorste handvat
–1
1 450 mm – 1 490 mm x 460 mm x 950 mm – 1 020 mm
AP-363 / AP-3622
3. Houd toezicht op kinderen, om te zorgen dat ze
niet met het apparaat gaan spelen.
4. Laat nooit kinderen of anderen die niet vertrouwd zijn met deze instructies het apparaat
bedienen. De toegestane leeftijd van gebruikers
kan ook zijn vastgelegd in de plaatselijke wetgeving.
5. Gebruik het apparaat nooit met personen, in het
bijzonder kinderen, of huisdieren dicht in de
buurt.
6. Onthoud dat de bediener of gebruiker aansprakelijk is voor ongelukken met letsel aan andere
personen of schade aan hun eigendommen.
7. Draag bij gebruik van dit apparaat altijd stevig
schoeisel en een lange broek. Gebruik het apparaat niet wanneer u op blote voeten loopt of
open sandalen draagt. Draag geen loshangende
kleding, shawls of kettingen, of ceintuurs met
bandjes die los bengelen. Loshangende kleding
of sieraden kunnen door de bewegende delen
gegrepen worden.
8. Gebruik het apparaat alleen bij daglicht of helder
kunstlicht.
9. Gebruik het apparaat niet wanneer het gras nat
is.
10. Gebruik de grasmaaier nooit in de regen.
49
Page 50

11. Voor apparatuur met accu’s
– Gebruik voor het opladen alleen het door de
fabrikant voorgeschreven oplaadapparaat.
Een acculader die geschikt is voor een bepaald
type accu kan brandgevaarlijk zijn bij gebruik met
een ander type accu.
– Gebruik elektrische apparatuur alleen op
accu’s die daar specifiek voor zijn ontworpen.
Gebruik van andere accu’s of batterijen kan
gevaar voor letsel of brandgevaar opleveren.
12. Houd de handgreep altijd stevig vast.
13. Zorg dat u stevig staat op hellingen of glooiingen.
14. Loop gewoon en ga niet rennen.
15. Raak het snijblad of andere scherpe randen niet
aan bij het optillen of meedragen van het apparaat.
16. Lichamelijke conditie — Gebruik de grasmaaier
niet onder de invloed van alcohol, stimulerende
of verdovende middelen, of na het innemen van
medicijnen.
17. Zorg dat de beveiligingsdelen zijn aangebracht
en in goede staat verkeren.
18. Houd uw handen en voeten uit de buurt van het
snijblad en de draaiende delen. Let op — Na uitschakelen blijven de snijbladen nog even doordraaien.
19. Verwijder de contactsleutel vóór het bijstellen of
schoonmaken van de grasmaaier, en ook wanneer u er materiaal uit moet verwijderen.
20. Gebruik uitsluitend de in deze handleiding door
de fabrikant voorgeschreven snijbladen.
21. Controleer vóór het gebruik zorgvuldig de snijbladen op barsten of andere beschadigingen.
Vervang gebarsten of beschadigde snijbladen
onmiddellijk.
22. Zorg dat er geen andere personen in de buurt
zijn voordat u met maaien begint. Staak het
maaien wanneer er iemand nadert.
23. Verwijder vóór het maaien eerst obstakels en
voorwerpen zoals stenen, ijzerdraad, glas, botten en grote takken uit uw werkgebied, om
schade aan de grasmaaier en letsel te voorkomen.
24. Stop onmiddellijk met maaien wanneer u iets
vreemds bemerkt. Schakel de grasmaaier uit en
verwijder de contactsleutel uit het apparaat.
Inspecteer vervolgens de grasmaaier.
25. Probeer nooit om de wielhoogte bij te stellen terwijl de grasmaaier werkt.
26. Laat de schakelhendel los en wacht tot het snijblad gestopt is voordat u een tuinpad, trottoir,
oprijlaan, straat of weg oversteekt, of enig terrein waar grind ligt.
Verwijder ook de contactsleutel wanneer u de
grasmaaier achterlaat, wanneer u een voorwerp
uit uw baan gaat verwijderen of in enige andere
situatie waarbij u afgeleid kunt worden.
27. Als het snijblad van de grasmaaier een hard
voorwerp raakt en wegslingert, zou dat ernstige
verwondingen kunnen veroorzaken. Controleer
altijd vóór het maaien het gras op voorwerpen
die hinder of gevaar kunnen veroorzaken en verwijder ze op afdoende wijze.
28. Als de grasmaaier een obstakel raakt, gaat u als
volgt te werk:
– Stop de grasmaaier, laat de schakelhendel los
en wacht tot het snijblad helemaal tot stilstand is gekomen.
– Verwijder eerst de contactsleutel en dan de
accu.
– Controleer de grasmaaier zorgvuldig op
beschadigingen.
– Vervang het snijblad als het op enige wijze
beschadigd is.
Zorg dat alle schade is hersteld alvorens u de
grasmaaier opnieuw start om die te gebruiken.
29. Controleer de grasopvangzak achteraan regelmatig op slijtage of schade. Vóór opslag van het
apparaat zorgt u eerst dat de grasopvangzak
helemaal leeg is. Vervang een versleten zak door
een nieuwe, van de fabriek bestelde zak, voor uw
veiligheid.
30. Stop de motor en verwijder de contactsleutel
wanneer u het apparaat achterlaat, vóór het reinigen van de buitenkant van de grasmaaier en
voordat u enige inspectie of reparatie uitvoert.
31. Wees uiterst voorzichtig wanneer u het apparaat
achteruit laat rijden of naar u toe trekt.
32. Stop de snijblad(en) wanneer u het apparaat
moet kantelen om het te verplaatsen over een
ander oppervlak dan gras, en ook wanneer u het
apparaat vervoert van of naar het te maaien terrein.
33. Gebruik het apparaat in geen geval wanneer de
beveiligingskappen of schermen defect zijn, of
wanneer beveiligingsdelen zoals de keerschotten en/of grasvanger afwezig zijn.
34. Schakel de motor zorgvuldig in volgens de voorschriften, met uw voeten op veilige afstand van
de snijblad(en).
35. Kantel het apparaat niet wanneer u de motor
inschakelt, behalve wanneer het noodzakelijk is
het apparaat ietwat te kantelen om de motor te
starten. In dat geval kantelt u het apparaat niet
verder dan strikt noodzakelijk en tilt u alleen het
van u afgerichte deel ietwat omhoog.
36. Start het apparaat niet terwijl u recht voor de uitblaasopening staat.
37. Steek nooit uw handen of voeten onder of vlakbij
de draaiende onderdelen. Blijf steeds uit de
buurt van de uitblaasopening.
38. Vervoer het apparaat niet terwijl de grasmaaier is
ingeschakeld.
39. Stop het apparaat en verwijder het blokkerende
voorwerp. Let goed op dat alle bewegende
onderdelen volledig tot stilstand zijn gekomen
– wanneer u het apparaat achterlaat,
– voor het opheffen van een blokkering of het
vrijmaken van de grasafvoerbaan,
– voor het controleren, reinigen of werken aan
het apparaat,
– na het raken van een obstakel. Inspecteer het
apparaat op schade en verricht de nodige
reparaties alvorens u het apparaat opnieuw
start en weer in gebruik neemt;
50
Page 51

40. Als het apparaat heftig gaat trillen of schudden
(onmiddellijk controleren)
– inspecteer rondom op schade,
– vervang of repareer alle beschadigde delen,
– controleer op loszittende delen en zet die
goed vast.
41. Wees uiterst voorzichtig tijdens het bijstellen
van het apparaat, om te voorkomen dat uw vingers bekneld raken tussen de bewegende en
vaste delen van het apparaat.
42. Maai altijd horizontaal langs een glooiing, nooit
omhoog en omlaag. Wees uiterst voorzichtig
wanneer u op een hellend vlak van richting verandert. Probeer niet om te maaien op al te steile
hellingen.
43. Niet besproeien of afspoelen met een tuinslang;
zorg dat er geen water in de motor en elektrische
contacten komt.
44. Controleer regelmatig of de snijbladbevestigingsbout stevig vast zit.
45. Zorg dat alle moeren, bouten en schroeven stevig zijn aangedraaid, om het apparaat veilig te
kunnen gebruiken.
46. Laat het apparaat altijd eerst afkoelen voordat u
het opbergt.
47. Onthoud goed bij onderhoud aan de snijbladen
dat ook als de stroom is uitgeschakeld, de snijbladen nog wel kunnen bewegen.
48. Vervang alle versleten of beschadigde onderdelen, voor uw veiligheid. Gebruik uitsluitend originele vervangingsonderdelen en accessoires.
BEWAAR DEZE VOORSCHRIFTEN.
WAARSCHUWING:
Laat u NIET misleiden door een vals gevoel van comfort en bekendheid met het gereedschap (na veelvuldig gebruik) en neem alle veiligheidsvoorschriften
van het betreffende gereedschap altijd strikt in acht.
VERKEERD GEBRUIK of het niet naleven van de veiligheidsvoorschriften in deze gebruiksaanwijzing
kan leiden tot ernstige verwondingen.
ENC007-7
BELANGRIJKE
VEILIGHEIDSVOORSCHRIFTEN
VOOR ACCU
1. Lees alle voorschriften en waarschuwingen op
(1) de acculader, (2) de accu, en (3) het product
waarvoor de accu wordt gebruikt, aandachtig
door alvorens de acculader in gebruik te nemen.
2. Neem de accu niet uit elkaar.
3. Als de gebruikstijd van een opgeladen accu aan-
zienlijk korter is geworden, moet u het gebruik
ervan onmiddellijk stopzetten. Voortgezet
gebruik kan oververhitting, brandwonden en
zelfs een ontploffing veroorzaken.
4. Als er elektrolyt in uw ogen is terechtgekomen,
spoel dan uw ogen met schoon water en roep
onmiddellijk de hulp van een dokter in. Elektrolyt
in de ogen kan blindheid veroorzaken.
5. Voorkom kortsluiting van de accu:
(1) Raak de accuklemmen nooit aan met een
geleidend materiaal.
(2) Bewaar de accu niet in een bak waarin andere
metalen voorwerpen zoals spijkers, munten
e.d. worden bewaard.
(3) Stel de accu niet bloot aan water of regen.
Kortsluiting van de accu kan oorzaak zijn van
een grote stroomafgifte, oververhitting, brandwonden, en zelfs defecten.
6. Bewaar het gereedschap en de accu niet op
plaatsen waar de temperatuur kan oplopen tot
50°C of hoger.
7. Werp de accu nooit in het vuur, ook niet wanneer
hij zwaar beschadigd of volledig versleten is. De
accu kan namelijk ontploffen in het vuur.
8. Wees voorzichtig dat u de accu niet laat vallen
en hem niet blootstelt aan schokken of stoten.
9. Gebruik nooit een beschadigde accu.
BEWAAR DEZE VOORSCHRIFTEN.
Tips voor een maximale levensduur van de accu
1. Laad de accu op voordat hij volledig ontladen is.
Stop het gebruik van het gereedschap en laad de
accu op telkens wanneer u vaststelt dat het vermogen van het gereedschap is afgenomen.
2. Laad een volledig opgeladen accu nooit opnieuw
op.
Als u de accu te veel oplaadt, zal hij minder lang
meegaan.
3. Laad de accu op bij een kamertemperatuur tussen 10°C en 40°C.
Laat een warme accu afkoelen alvorens hem op
te laden.
4. Laad de accu zeker elk half jaar een keer op, ook
als u deze geruime tijd lang niet gebruikt.
BESCHRIJVING VAN DE FUNCTIES
Installeren of verwijderen van de accu (Fig. 1 en
2)
LET OP:
• Schakel het gereedschap altijd uit alvorens de accu te
installeren of te verwijderen.
• Zorg dat u voor gebruik het accudeksel stevig afsluit.
Anders zou er regen, vocht of vuil in kunnen komen en
het apparaat of de accu kunnen beschadigen.
Voor aanbrengen van de accu:
1. Trek de accudeksel-borghendel naar u toe en open
het accudeksel.
2. Plaats de accu in de richting die in de afbeelding is
aangegeven, totdat u een klik hoort.
3. Steek de contactsleutel in op de plaats die in de
afbeelding is aangegeven, zover de sleutel gaat.
4. Sluit het accudeksel en druk het aan totdat het is
vergrendeld met de borghendel.
Om de accu uit de grasmaaier te verwijderen:
1. Trek de accudeksel-borghendel naar u toe en open
het accudeksel.
2. Trek eerst de contactsleutel er uit.
3. Schuif de accu uit het apparaat terwijl u de knop
voorop de accu verschoven houdt.
4. Sluit het accudeksel.
51
Page 52

Accudraaghouders (optionele accessoire)
WAARSCHUWING:
• Alvorens u de accudraaghouder AA-3618/AA-3618CL
aanbrengt of uitneemt, verwijdert u eerst de contactsleutel uit het apparaat.
AA-3618 (optionele accessoire) (Fig. 3, 4 en 5)
WAARSCHUWING:
• Bij gebruik van de AA-3618 mag u die niet op enig deel
van uw lichaam dragen. Als u de AA-3618 dicht op uw
lichaam meedraagt, kan dat tot ernstig letsel leiden.
Schuif de accudraaghouder AA-3618 in de aanbrengopening totdat de houder niet verder gaat.
Klap het accudeksel van de grasmaaier open en schuif
dan de productbevestigingsadapter van de AA-3618 in
de accuhouder van de grasmaaier.
Leid het snoer van de AA-3618 door de sleuf in het accudeksel en sluit het accudeksel.
Leid het snoer van de AA-3618 door de bovenste snoerhouders aan de handgreep.
OPMERKING:
• Bij gebruik van de accudraaghouder AA-3618 (optionele accessoire) haakt u het stroomsnoer in de daarvoor bestemde snoerhouder van de grasmaaier. Als u
dit nalaat, bestaat de kans dat het snoer doorgesneden
wordt.
Om de AA-3618 uit de grasmaaier te verwijderen, klapt u
het accudeksel open en drukt u op de haak aan de accubevestigingskant van de AA-3618.
AA-3618CL (optionele accessoire) (Fig. 6 en 7)
Open het accudeksel en klik de AA-3618CL in de accubevestigingsopening van de grasmaaier.
Sluit het accudeksel.
Om de AA-3618CL te verwijderen, drukt u op de haak
van de AA-3618CL en trekt u die er met beide handen
uit.
Werking van de stroomschakelaar (Fig. 8 en 9)
WAARSCHUWING:
• Alvorens u de accu in het apparaat plaatst, controleert u altijd even of de schakelhendel naar behoren werkt en bij loslaten naar de uitgangsstand
terugkeert. Bediening van het apparaat met een scha-
kelhendel die niet goed werkt kan leiden tot ongecontroleerde bewegingen, met kans op ernstig lichamelijk
letsel.
OPMERKING:
• Wanneer u te veel gras tegelijk probeert te maaien, kan
de motor soms niet starten, vanwege overbelasting. In
dat geval stelt u de maaihoogte hoger in, om het vervolgens opnieuw te proberen.
• De grasmaaier start niet zonder dat u de schakelknop
indrukt, ook al trekt u de schakelhendel in.
Deze grasmaaier is voorzien van een contactslotschakelaar en een handgreepschakelaar. Als er iets niet in orde
is met een van deze twee schakelaars, staakt u dan
onmiddellijk het gebruik en laat u ze controleren bij uw
dichtstbijzijnde erkende Dolmar servicecentrum.
1. Steek de contactsleutel in het contactslot.
2. Druk de schakelknop in.
3. Trek de schakelhendel naar u toe terwijl u de scha-
kelknop ingedrukt houdt.
4. Laat de schakelknop los zodra de motor op toeren
komt. De grasmaaier zal blijven werken totdat u de
schakelhendel loslaat.
5. Laat de schakelhendel los om de motor te stoppen.
6. Verwijder altijd de contactsleutel wanneer u het
apparaat niet gebruikt. Bewaar de contactsleutel op
een veilige plaats, buiten bereik van kinderen.
Afstellen van de maaihoogte (Fig. 10)
WAARSCHUWING:
• Steek bij het afstellen van de maaihoogte nooit uw
hand of voet onder de grasmaaier.
• Controleer vóór het gebruik zorgvuldig of de hendel
juist in de gleuf valt.
De maaihoogte is instelbaar binnen een bereik van
20 mm – 75 mm.
1. Verwijder de contactsleutel.
2. Trek de maaihoogte-instelhendel naar u toe en stel
in op de gewenste maaihoogte.
Zorg dat de uitstekende nok op de maaihoogte-instelhendel precies in de gleuf van het grasmaaierhuis valt.
OPMERKING:
• De aanduidingen voor de maaihoogte moeten slechts
als richtlijn beschouwd worden, aangezien de toestand
van het gazon of de grond de uiteindelijke hoogte van
het gras kan doen afwijken van de gekozen hoogtewaarde.
• Met een maaiproef in een minder opvallende plaats
kunt u door uitproberen de gewenste hoogte vinden.
Accubeveiligingssysteem
Lithiumionenaccu’s zijn voorzien van een beveiligingssysteem. Dat systeem kan automatisch de stroomtoevoer van het apparaat afsluiten om de levensduur van de
accu te verlengen.
Het gereedschap kan tijdens gebruik automatisch stoppen wanneer het gereedschap en/of de accu aan één
van de volgende omstandigheden wordt blootgesteld:
• Overbelasting:
Als het gereedschap wordt gebruikt op een manier die
een abnormaal hoge stroomsterkte vergt.
In dat geval laat u de trekschakelaar van het gereedschap los en verhelpt u de oorzaak van de overbelasting. Vervolgens drukt u de trekschakelaar weer in om
het gereedschap te herstarten.
Als het gereedschap niet start, kan de accu oververhit
zijn. In dat geval laat u de accu even afkoelen voordat
u de trekschakelaar opnieuw indrukt.
• Onvoldoende accuspanning:
Als de resterende accuspanning onvoldoende is, zal
het gereedschap niet starten. In dat geval verwijdert u
de accu en laadt u die opnieuw op.
52
Page 53

Aanduiding van de resterende acculading (alleen
Aan
Uit
Knipperen
011713
bij modellen met accu type AP-3622) (Fig. 11)
De accu van type AP-3622 is voorzien van een resterende acculadingsaanduiding.
Druk op de CHECK-knop om de resterende acculading
te zien. Dan gaan de lampjes ongeveer drie seconden
lang branden.
Status van lampjes
Resterende lading
E
• Wanneer alleen het onderste lampje knippert (naast de
letter “E”), of wanneer geen van de lampjes brandt, is
de acculading leeg en werkt het gereedschap niet
meer. In dit geval, laadt u de accu op of vervangt u de
lege accu door een volledig opgeladen accu.
• Wanneer twee of meer lampjes niet branden, ook niet
nadat het opladen voltooid is, heeft de accu het einde
van zijn levensduur bereikt.
• Wanneer de bovenste twee en de onderste twee lampjes beurtelings branden, kan een storing in de accu
opgetreden zijn. Neem contact op met uw dichtstbijzijnde erkende Dolmar-servicecentrum.
OPMERKING:
• De aangegeven accuspanning kan tijdens of vlak na
gebruik van het apparaat wat lager uitvallen dan de feitelijke accuspanning.
• Afhankelijk van de gebruiksomstandigheden en de
omgevingstemperatuur, kan de aanduiding iets verschillen van de werkelijke acculading.
F
70% t/m 100%
45% t/m 70%
20% t/m 45%
0% t/m 20%
Laad de accu op.
Er kan een storing in de
accu zijn opgetreden.
INEENZETTEN
WAARSCHUWING:
• Zorg er altijd voor dat de contactsleutel en de accu
zijn verwijderd, alvorens u enig werk aan de grasmaaier gaat uitvoeren. Als u vergeet de contactsleutel
en de accu te verwijderen, kan dat leiden tot ernstige
verwondingen als de maaier plotseling zou starten.
• Start nooit het apparaat voordat het geheel naar
behoren is gemonteerd. Gebruik van het apparaat in
een deels gemonteerde staat kan leiden tot ernstige
verwondingen als het apparaat plotseling zou starten.
Aanbrengen van de handgreep (Fig. 12, 13, 14,
15, 16 en 17)
WAARSCHUWING:
• Bij het aanbrengen van de handgrepen leidt u de snoeren zo dat ze niet verward of bekneld kunnen raken
door voorwerpen tussen de handgrepen.
1. Draai de klemschroeven los (twee stuks).
Schuif de onderste handgreep aan beide kanten zij-
waarts uit en klap de handgreep in die stand geheel
terug en pas deze in de gleuf in het maaierhuis.
2. Draai de klemschroeven aan beide zijden vast om
de onderste handgreep vast te zetten.
3. Til de bovenste handgreep op, zodanig dat de
schroefgaten in de bovenste handgreep samenvallen met die in de onderste handgreep en zet deze
beide dan vast met de bijgeleverde schroeven en
klemmoeren.
OPMERKING:
• Houd hierbij de bovenste handgreep stevig vast, zodat
de handgreep niet uit uw hand wegglijdt.
OPMERKING:
• Monteer de bovenste handgreep zo dat de richting
daarvan en het verloop van het stroomsnoer overeen
komen met die getoond in de afbeelding.
OPMERKING:
• De bovenste handgreep heeft aan allebei de kanten
twee schroefgaten. Door de gaten op verschillende
plaatsen te gebruiken voor de schroeven en klemmoeren kunt u de lengte van de handgreep bepalen.
Verwijderen en aanbrengen van het snijblad
(Fig. 18 en 19)
WAARSCHUWING:
• Verwijder altijd eerst de contactsleutel en de accu voor-
dat u het snijblad gaat verwijderen of installeren. Als u
vergeet de contactsleutel en de accu te verwijderen,
kan dat leiden tot ernstig letsel.
• Na het loslaten van de schakelhendel kan het snijblad
nog enkele seconden doordraaien. Let op dat het snijblad volledig tot stilstand is gekomen.
• Draag voor het hanteren van het snijblad altijd een
paar handschoenen.
1. Leg de grasmaaier zodanig op zijn zijkant, dat de
maaihoogte-instelhendel boven komt.
2. Om het snijblad te blokkeren, steekt u een gewone,
algemeen verkrijgbare schroevendraaier e.d. in een
opening in de grasmaaier.
3. Draai de bout linksom los met de sleutel.
4. Verwijder de bout, de buitenflens, het snijblad en de
binnenflens, in die volgorde.
Voor het weer aanbrengen van het snijblad verricht u de
stappen voor het verwijderen in omgekeerde volgorde.
WAARSCHUWING:
• Let goed op bij het installeren van de binnenflens, het
snijblad en de buitenflens, want die hebben alle een
vaste boven/onderkant.
• Draai de bout rechtsom stevig aan om het snijblad vast
te zetten.
• Plaats het snijblad zo, dat de kant met de draairich-
tingspijl naar buiten wijst.
• Let op dat het snijblad stevig is vastgezet.
• Verwijder vooral de schroevendraaier e.d. uit de ope-
ning waarmee u het snijblad had geblokkeerd.
Aanbrengen van de grasmand (Fig. 20 en 21)
Verwijder de contactsleutel.
Til het achterscherm van de grasmaaier op en haak de
grasmand in de gleuf van de grasmaaier.
53
Page 54

BEDIENING
Maaien
WAARSCHUWING:
• Voor het maaien verwijdert u alle takken en stenen van
het te maaien terrein. Bovendien kunt u beter ook van
tevoren alle onkruid uit het te maaien grasveld wieden.
• Draag bij het maaien altijd een veiligheidsbril met volledig gesloten zijkantbescherming.
Houd bij het maaien de grasmaaier stevig met beide
handen aan de handgreep vast.
De buitenranden van de voorwielen van de grasmaaier
geven een richtlijn voor de maaibreedte. Met de buitenranden van de beide voorwielen als richtlijn maait u het
gras in stroken, waarbij elke maaistrook de vorige met
een-derde tot de helft overlapt, voor een gelijkmatig
gemaaid gazon.
Controleer regelmatig de inhoud van de grasmand en
leeg die voordat de mand overvol raakt. Vóór elke periodieke inspectie dient u de grasmaaier uit te schakelen en
de contactsleutel en de accu te verwijderen.
OPMERKING:
• Als u de grasmaaier gebruikt met een overvolle grasmand kan het snijblad niet soepel draaien, hetgeen de
motor overmatig belast, waardoor de kans op defecten
toeneemt.
Maaien van lang gras (Fig. 22)
Probeer niet om erg lang gras in één keer kort te maaien.
Maai uw gazon liever in meerdere fasen, met een dag of
twee tussen de maaibeurten, tot uw gehele gazon gelijkmatig kort is.
OPMERKING:
• Als u erg lang gras in één keer helemaal kort maait,
kan het gras verdorren en kan het inwendige van de
grasmaaier verstopt raken door het gemaaide gras.
Legen van de grasmand (Fig. 23)
WAARSCHUWING:
• Om ongelukken te voorkomen, controleert u regelmatig
de grasmand op schade of verzwakking door slijtage
en vervangt u die wanneer nodig.
1. Laat de schakelhendel los.
2. Verwijder de contactsleutel.
3. Open het achterscherm en verwijder de grasmand
aan het handvat.
4. Leeg de grasmand.
ONDERHOUD EN OPSLAG
WAARSCHUWING:
• Zorg altijd dat de contactsleutel en de accu uit de grasmaaier zijn verwijderd voordat u die opbergt, of voordat
u inspectie of onderhoud gaat verrichten.
• Draag handschoenen bij het verrichten van inspectie of
onderhoud.
LET OP:
• Gebruik nooit benzine, wasbenzine, thinner, alcohol en
dergelijke. Hierdoor kunnen verkleuring, vervormingen
en barsten worden veroorzaakt.
ONDERHOUD
1. VERWIJDER DE CONTACTSLEUTEL. Bewaar
deze op een veilige plaats, buiten bereik van kinderen.
2. Maak uw grasmaaier schoon met een vochtige doek
en wat mild zeepsop. Sproei of giet geen water over
uw grasmaaier wanneer u die schoonmaakt.
3. Leg de grasmaaier op zijn kant en verwijder de grassprieten die er aan de onderkant in en rond het
maaimechanisme vastgeraakt zijn.
4. Controleer of alle moeren, bouten, knoppen, schroeven en andere bevestigingspunten stevig vast zitten.
5. Inspecteer de bewegende onderdelen op schade,
defecten en slijtage. Als er onderdelen beschadigd
zijn of ontbreken, laat u die dan repareren of vervangen.
6. Alvorens u de grasmaaier opbergt, verwijdert u de
accu uit het apparaat.
7. Berg de grasmaaier binnenshuis op, in een koele,
droge en veilig afgesloten ruimte. Berg de grasmaaier en de acculader niet op in een plaats waar
de temperatuur tot boven de 40°C kan stijgen.
Opslag (Fig. 24, 25, 26, 27, 28 en 29)
WAARSCHUWING:
• Voor het optillen of meedragen van de grasmaaier pakt
u niet de ingeklapte bovenhandgrepen vast, maar het
voorste handvat, vooraan de grasmaaier. Als u de
ingeklapte bovenhandgrepen vastpakt, kan dat leiden
tot letsel, of schade aan de grasmaaier.
De grasmaaier kan in rechtopstaande stand worden
bewaard.
1. Draai de klemschroef los, schuif de onderste handgreep naar weerszijden uiteen en klap dan de handgreep omlaag en naar voren.
OPMERKING:
• Houd hierbij de onderste handgreep stevig vast, zodat
de handgreep niet naar de andere kant van het apparaat valt.
2. Draai de klemmoer los en klap de bovenste handgreep terug.
3. Verwijder de grasmand en plaats de grasmaaier in
rechtopstaande stand.
OPMERKING:
• Voor het rechtop zetten van de grasmaaier pakt u niet
de bovenhandgreep vast, maar gebruikt u het voorste
handvat van de grasmaaier.
4. Berg de grasmand op tussen de handgreep en het
hoofddeel van de grasmaaier.
Om de VEILIGHEID en BETROUWBAARHEID van het
gereedschap te handhaven, dienen alle reparaties,
onderhoud en afstellingen te worden uitgevoerd door
een erkend Dolmar-servicecentrum, en altijd met
gebruikmaking van originele Dolmar vervangingsonderdelen.
54
Page 55

STORINGEN OPLOSSEN
012350
Alvorens u verzoekt om reparatie, kunt u zelf als volgt het probleem opsporen en verhelpen. Als u met een probleem
kampt dat in deze handleiding niet voorkomt, probeert u dan in geen geval om het apparaat te demonteren. Laat reparaties over aan een erkend Dolmar-servicecentrum, en dit uitsluitend met gebruik van originele Dolmar vervangingsonderdelen.
Storing of probleem Oorzaak Oplossing
Er is geen accu geplaatst. Plaats een accu in het apparaat.
Laad de accu opnieuw op. Als
opladen het probleem niet verhelpt,
vervangt u dan de accu door een
nieuwe.
Laad de accu opnieuw op. Als
opladen het probleem niet verhelpt,
vervangt u dan de accu door een
nieuwe.
Installeer de accu zoals beschreven
in deze handleiding.
Laad de accu opnieuw op. Als
opladen het probleem niet verhelpt,
vervangt u dan de accu door een
nieuwe.
Verzoek uw plaatselijke erkende
onderhoudsdienst om reparatie.
Verwijder het hinderlijke voorwerp.
Verzoek uw plaatselijke erkende
onderhoudsdienst om reparatie.
Vervang het snijblad.
Verwijder de accu en verzoek uw
plaatselijke erkende onderhoudsdienst om reparatie.
De grasmaaier start niet.
Na kortstondig gebruik stopt de
motor al gauw.
Het maximale toerental wordt niet
bereikt.
Het maaimechanisme draait niet:
Stop de machine onmiddellijk!
Abnormale trillingen:
Stop de machine onmiddellijk!
Het maaimechanisme en de motor
kunnen niet gestopt worden:
Verwijder onmiddellijk de accu!
Probleem met de accu (onvoldoende
spanning)
De contactsleutel is niet ingestoken. Steek de contactsleutel er in.
De accuspanning is te gering.
De maaihoogte is te laag ingesteld. Kies een grotere maaihoogte.
De accu is niet juist aangebracht.
De accuspanning valt weg.
Het aandrijfsysteem werkt niet goed.
Een hinderlijk voorwerp zoals een tak
is vastgeraakt dichtbij het snijblad.
Het aandrijfsysteem werkt niet goed.
Het snijblad is uit evenwicht, of er is
overmatige of ongelijkmatige slijtage.
Elektrische of elektronische storing.
OPTIONELE ACCESSOIRES
LET OP:
• Deze accessoires of hulpstukken worden aanbevolen voor gebruik met het Dolmar gereedschap dat in deze
gebruiksaanwijzing is beschreven. Bij gebruik van andere accessoires of hulpstukken bestaat er gevaar voor persoonlijke verwonding. Gebruik de accessoires of hulpstukken uitsluitend voor hun bestemde doel.
Raadpleeg het dichtstbijzijnde Dolmar-servicecentrum voor verder advies of bijzonderheden omtrent deze accessoires.
• Snijblad
• Originele Dolmar accu en oplader
OPMERKING:
• Sommige van de onderdelen in deze lijst kunnen bijgeleverd zijn als standaard-accessoires. Deze accessoires kunnen per land verschillend zijn.
55
Page 56

ENG905-1
Geluidsniveau
De typisch, A-gewogen geluidsniveaus vastgesteld volgens EN60335:
Geluidsdrukniveau (L
Geluidsvermogenniveau (L
Onnauwkeurigheid (K): 3 dB (A)
Trilling
De totaalwaarde van de trillingen (triaxiale vectorsom)
vastgesteld volgens EN60335:
Trillingsemissie (a
Onnauwkeurigheid (K): 1,5 m/s
• De opgegeven trillingsemissiewaarde is gemeten volgens de standaardtestmethode en kan worden gebruikt
om dit gereedschap te vergelijken met andere gereedschappen.
• De opgegeven trillingsemissiewaarde kan ook worden
gebruikt voor een beoordeling vooraf van de blootstelling.
Draag oorbeschermers
): 80 dB (A)
pA
): 93 dB (A)
WA
): 2,5 m/s2 of lager
h
2
ENG900-1
ENG901-1
WAARSCHUWING:
• De trillingsemissie tijdens het gebruik van het elektrisch
gereedschap in de praktijk kan verschillen van de
opgegeven trillingsemissiewaarde afhankelijk van de
manier waarop het gereedschap wordt gebruikt.
• Zorg ervoor dat veiligheidsmaatregelen worden getroffen ter bescherming van de operator die zijn gebaseerd
op een schatting van de blootstelling onder praktijkomstandigheden (rekening houdend met alle fasen van de
bedrijfscyclus, zoals de tijdsduur gedurende welke het
gereedschap is uitgeschakeld en stationair draait,
naast de ingeschakelde tijdsduur).
ENH218-1
Alleen voor Europese landen
EU-Verklaring van Conformiteit
Ondergetekenden, Tamiro Kishima en Rainer
Bergfeld, als erkende vertegenwoordigers van
Dolmar GmbH, verklaren dat de DOLMARmachine(s):
Aanduiding van de machine:
Snoerloze grasmaaier
Modelnr./Type: AM-3643
Technische gegevens: zie de tabel “TECHNISCHE
GEGEVENS”.
in serie zijn geproduceerd en
Voldoen aan de volgende Europese richtlijnen:
2000/14/EC, 2006/42/EC
En zijn gefabriceerd in overeenstemming met de
volgende normen of genormaliseerde documenten:
EN60745, EN60335
De technische documentatie wordt bewaard door:
Dolmar GmbH,
Jenfelder Straße 38, Abteilung FZ,
D-22045 Hamburg
De conformiteitsbeoordelingsprocedure vereist door
Richtlijn 2000/14/EC was in Overeenstemming met
annex VI.
Verwittigde instantie:
TÜV Rheinland LGA Products GmbH
Am Grauen Stein 29
51105 Köln Duitsland
Identificatienummer 0197
Gemeten geluidsvermogenniveau: 93 dB (A)
Gegarandeerd geluidsvermogenniveau: 94 dB (A)
7.9.2011
56
Tamiro Kishima
Hoofddirecteur
Rainer Bergfeld
Hoofddirecteur
Page 57

ESPAÑOL (Instrucciones originales)
Explicación de los dibujos
1 Palanca de bloqueo de la tapa
de la batería
2 Cartucho de batería
3 Tapa de la batería
4 Llave de bloqueo
5 Convertidor de batería
(AA-3618)
6 Orificio de instalación
7Gancho
8 Adaptador de montaje de
producto del AA-3618
9 Cable
10 Hendidura
11 Soportes superiores
ESPECIFICACIONES
Modelo AM-3643
Anchura de la siega 430 mm
Velocidad en vacío 3.600 min
Dimensiones (La x An x Al)
Peso neto 17,9 kg
Tensión nominal CC 36 V
Cartucho(s) de batería estándar
Advertencia: Utilice solamente el cartucho(s) de
• Debido a un programa continuo de investigación y
desarrollo, las especificaciones aquí dadas están sujetas a cambios sin previo aviso.
• Las especificaciones y el cartucho de batería pueden
diferir de país a país.
• Peso, con el cartucho de batería, de acuerdo con el
procedimiento EPTA 01/2003
batería descrito.
INSTRUCCIONES DE SEGURIDAD
IMPORTANTES
¡ADVERTENCIA! Lea todas las advertencias de
seguridad y todas las instrucciones. Si no sigue todas
las advertencias e instrucciones podrá ocasionar una
descarga eléctrica, un incendio y/o heridas graves.
Guarde todas las advertencias e instrucciones para
futuras referencias.
1. No inserte la llave en el cortacésped hasta que
esté listo para ser utilizado.
2. Este aparato no ha sido pensado para ser usado
por personas (incluidos niños) con sus capaci-
dades físicas, sensoriales o mentales merma-
das, o sin experiencia y conocimiento, a menos
que una persona responsable de su seguridad
las supervise o les dé instrucciones sobre el uso
del aparato.
12 Convertidor de batería
(AA-3618CL)
13 Botón de interruptor
14 Palanca de interruptor
15 Palanca de ajuste de altura de
la siega
16 Lámparas indicadoras
17 Botón CHECK
18 Asidero inferior
19 Ranura en la cubierta
20 Tornillo de apriete
21 Asidero superior
22 Orificios para tornillos
23 Tuerca de apriete
24 Tornillo
durante la utilización
cuando está almacenado 490 mm – 500 mm x 460 mm x 810 mm
GEB091-5
25 Soportes
26 Destornillador
27 Cuchilla
28 Perno
29 Brida interior
30 Flecha
31 Brida exterior
32 Protector trasero
33 Ranura
34 Cesta para hierva
35 Expandir
36 Mover hacia abajo al frente
37 Pivotar hacia atrás
38 Empuñadura delantera
–1
1.450 mm – 1.490 mm x 460 mm x 950 mm – 1.020 mm
AP-363 / AP-3622
3. Los niños pequeños deberán ser supervisados
para asegurarse de que no juegan con el aparato.
4. No permita nunca que niños o gente no familiarizada con estas instrucciones utilicen la
máquina. Los reglamentos locales pueden restringir la edad del operario.
5. No utilice nunca la máquina cuando haya gente,
especialmente niños o animales domésticos
cerca.
6. Tenga en cuenta que el operario o usuario es el
responsable de los accidentes o riesgos ocasionados a otras personas o propiedades de las
mismas.
7. Mientras utiliza la máquina póngase siempre calzado robusto y pantalones largos. No utilice la
máquina estando descalzo ni con sandalias
abiertas. Evite ponerse ropa o joyas que queden
holgadas o que tengan cordones colgando o
corbatas. Pueden engancharse en las piezas que
se mueven.
8. Utilice la máquina solamente en luz diurna o con
buena luz artificial.
9. Evite utilizar la máquina en hierba mojada.
10. No utilice nunca el cortacésped en la lluvia.
57
Page 58

11. Utilización de la batería
– Cargue la batería solamente con el cargador
especificado por el fabricante. Un cargador
que es apropiado para un tipo de batería puede
crear un riesgo de incendio cuando si se utiliza
con otra batería.
– Utilice las herramientas eléctricas solamente
con las baterías designadas específicamente
para ellas. La utilización de cualquier otra batería
puede crear un riesgo de heridas o incendio.
12. Sujete siempre firmemente el asidero.
13. Asegúrese siempre de que en pendientes apoya
bien los pies.
14. Camine, nunca corra.
15. No agarre las cuchillas de corte o bordes de
corte expuestos cuando recoja o sujete el aparato.
16. Condición física — No utilice el cortacésped
bajo la influencia de drogas, alcohol, o cualquier
medicación.
17. No quite los protectores y manténgalos en buen
estado de funcionamiento.
18. Mantenga las manos y los pies alejados de las
cuchillas giratorias. Precaución — Las cuchillas
siguen girando por inercia después de apagar la
máquina.
19. Retire la llave antes de hacer el servicio de mantenimiento, limpieza o retirar material del aparato de jardinería.
20. Utilice solamente las cuchillas genuinas del
fabricante especificadas en este manual.
21. Compruebe las cuchillas cuidadosamente para
ver si tienen grietas o daños antes de comenzar
la operación. Reemplace las cuchillas agrietadas
o dañadas inmediatamente.
22. Asegúrese de que el área está despejada de
gente antes de segar. Detenga el cortacésped si
entra alguien en el área.
23. Retire los objetos extraños tales como rocas,
alambres, botellas, huesos y palos largos del
área de trabajo antes de segar para evitar heridas personales o daños al cortacésped.
24. Detenga la operación inmediatamente si nota
algo inusual. Apague el cortacésped y retire la
llave del aparato. Después inspeccione el cortacésped.
25. No intente nunca realizar el ajuste de altura de
las ruedas mientras el cortacésped está en marcha.
26. Suelte la palanca de interruptor y espere a que la
cuchilla deje de girar antes de cruzar caminos
de acceso, paseos, carreteras, o cualquier área
cubierta con gravilla.
Retire también la llave si lo deja, si se adelanta
para recoger o retirar algo del camino, o por
cualquier otra razón que pueda distraerle de lo
que está haciendo.
27. Los objetos golpeados por la cuchilla del cortacésped pueden ocasionar graves heridas personales. El césped deberá ser siempre examinado
atentamente y despejado de todos los objetos
antes de cada siega.
28. Si el cortacésped golpea un objeto extraño, siga
estos pasos:
– Detenga el cortacésped, suelte la palanca de
interruptor y espere hasta que la cuchilla se
haya detenido completamente.
– Retire la llave de bloqueo y el cartucho de
batería.
– Inspeccione detenidamente el cortacésped
para ver si se ha dañado.
– Sustituya la cuchilla si tiene cualquier tipo de
daño.
Repare cualquier daño antes de volver a poner
en marcha y continuar utilizando el cortacésped.
29. Compruebe la bolsa trasera con frecuencia para
ver si está gastada o deteriorada. Para el almacenaje, asegúrese siempre de que la bolsa trasera está vacía. Sustituya la bolsa si está
gastada con una bolsa de recambio de fábrica
por seguridad.
30. Detenga el motor y retire la llave siempre que
deje el equipo, antes de limpiar la carcasa del
cortacésped, y antes de realizar reparaciones o
inspecciones.
31. Utilice mucha precaución cuando retroceda o
tire de la máquina hacia usted.
32. Detenga la cuchilla(s) si la máquina tiene que ser
inclinada para transportarla cuando atraviese
superficies que no sean de hierba, y cuando
transporte la máquina hasta o desde el área
donde la utiliza.
33. No utilice nunca la máquina con protectores o
escudos defectuosos, ni sin los dispositivos de
seguridad, por ejemplo, deflectores y/o recogedores de hierba, en su sitio.
34. Encienda el motor con cuidado de acuerdo con
las instrucciones y con los pies bien alejados de
la cuchilla(s).
35. No incline la máquina cuando vaya a encender el
motor, excepto si la máquina tiene que ser inclinada para arrancarla. En este caso, no la incline
más de lo absolutamente necesario y levante
solamente la parte que está alejada del operario.
36. No ponga en marcha la máquina cuando se
encuentre enfrente de la abertura de descarga.
37. No ponga las manos ni los pies cerca o debajo
de las piezas giratorias. Manténgase alejado de
la abertura de descarga en todo momento.
38. No transporte la máquina mientras el cortacésped está encendido.
39. Detenga la máquina, y retire el dispositivo de
inhabilitación. Asegúrese de que todas las piezas que se mueven se hayan parado completamente
– siempre que vaya a dejar la máquina,
– antes de retirar obstrucciones o desatascar la
tolva,
– antes de comprobar, limpiar o trabajar en la
máquina,
– después de haber golpeado un objeto
extraño. Inspeccione la máquina para ver si
está dañada y realice las reparaciones antes
de volver a ponerla en marcha y utilizarla;
58
Page 59

40. Si la máquina comienza a vibrar anormalmente
(compruebe inmediatamente)
– inspeccione para ver si está dañada,
– sustituya o repare cualquier pieza dañada,
– compruebe si hay alguna pieza floja y aprié-
tela.
41. Tenga cuidado durante el ajuste de la máquina
para evitar pillarse los dedos entre las cuchillas
que se mueven y las piezas fijas de la máquina.
42. Siegue a través de la cara de la pendiente, nunca
de arriba a abajo. Extreme las precauciones
cuando cambie de dirección en pendientes. No
siegue en cuestas empinadas excesivamente.
43. No lave la máquina con una manguera; evite
mojar el motor y las conexiones eléctricas.
44. Compruebe el perno de montaje de la cuchilla a
intervalos frecuentes para ver que está bien
apretado.
45. Mantenga todas las tuercas, pernos y tornillos
apretados para asegurarse de que el equipo está
en condiciones de trabajo seguras.
46. Deje siempre que la máquina se enfríe antes de
almacenarla.
47. Cuando haga el mantenimiento a las cuchillas,
sea consciente de que, aunque la fuente de alimentación esté apagada, las cuchillas todavía se
pueden mover.
48. Sustituya las piezas gastadas o dañadas por
seguridad. Utilice solamente piezas de repuesto
y accesorios genuinos.
GUARDE ESTAS INSTRUCCIONES.
ADVERTENCIA:
NO deje que la comodidad o familiaridad con el producto (a base de utilizarlo repetidamente) sustituya
la estricta observancia de las normas de seguridad
para el producto en cuestión. El MAL USO o el no
seguir las normas de seguridad establecidas en este
manual de instrucciones podrá ocasionar graves
heridas personales.
ENC007-7
INSTRUCCIONES DE SEGURIDAD
IMPORTANTES
PARA EL CARTUCHO DE BATERÍA
1. Antes de utilizar el cartucho de batería, lea todas
las instrucciones e indicaciones de precaución
sobre (1) el cargador de baterías, (2) la batería, y
(3) el producto con el que se utiliza la batería.
2. No desarme el cartucho de batería.
3. Si el tiempo de uso del cartucho de batería se
acorta demasiado, deje de usarlo inmediatamente. Podría resultar en un riesgo de recalentamiento, posibles quemaduras e incluso una
explosión.
4. Si entra electrólito en sus ojos, aclárelos con
agua limpia y vea a un médico inmediatamente.
Existe el riesgo de poder perder la vista.
5. No cortocircuite el cartucho de batería:
(1) No toque los terminales con ningún material
conductor.
(2) Evite guardar el cartucho de batería en un
cajón junto con otros objetos metálicos,
tales como clavos, monedas, etc.
(3) No exponga el cartucho de batería al agua ni
a la lluvia.
Un cortocircuito en la batería puede producir
una gran circulación de corriente, un recalentamiento, posibles quemaduras e incluso una
rotura de la misma.
6. No guarde la herramienta ni el cartucho de batería en lugares donde la temperatura pueda
alcanzar o exceder los 50°C.
7. Nunca incinere el cartucho de batería incluso en
el caso de que esté dañado seriamente o ya no
sirva en absoluto. El cartucho de batería puede
explotar si se tira al fuego.
8. Tenga cuidado de no dejar caer ni golpear el cartucho de batería.
9. No utilice una batería dañada.
GUARDE ESTAS INSTRUCCIONES.
Consejos para alargar al máximo la vida de
servicio de la batería
1. Cargue el cartucho de batería antes de que se
descargue completamente.
Pare siempre la operación y cargue el cartucho
de batería cuando note menos potencia en la
herramienta.
2. No cargue nunca un cartucho de batería que
esté completamente cargado.
La sobrecarga acortará la vida de servicio de la
batería.
3. Cargue el cartucho de batería a temperatura
ambiente de 10°C – 40°C.
Si un cartucho de batería está caliente, déjelo
enfriar antes de cargarlo.
4. Cargue el cartucho de batería una vez cada seis
meses si no lo utiliza durante un periodo de
tiempo prolongado.
DESCRIPCIÓN DEL FUNCIONAMIENTO
Instalación o desmontaje del cartucho de batería
(Fig. 1 y 2)
PRECAUCIÓN:
• Apague siempre la herramienta antes de instalar o
extraer el cartucho de batería.
• Asegúrese de que ha bloqueado la tapa de la batería
antes de utilizar la herramienta. De lo contrario, el
barro, la suciedad o el agua podrán ocasionar daños a
la herramienta o al cartucho de batería.
Para instalar el cartucho de batería;
1. Tire de la palanca de bloqueo de la tapa de la batería hacia usted y abra la tapa de la batería.
2. Inserte el cartucho de batería en la dirección mostrada en la figura hasta que se oiga un chasquido.
3. Inserte la llave de bloqueo en el lugar mostrado en
la figura a tope.
4. Cierre la tapa de la batería y presiónela hasta que
se quede trincada con la palanca de bloqueo.
Para retirar el cartucho de batería del cortacésped;
1. Tire de la palanca de bloqueo de la tapa de la batería hacia usted y abra la tapa de la batería.
2. Saque la llave de bloqueo.
3. Retírela de la herramienta a la vez que desliza el
botón de la parte frontal del cartucho.
4. Cierre la tapa de la batería.
59
Page 60

Convertidores de batería (accesorio opcional)
ADVERTENCIA:
• Antes de instalar o retirar los convertidores de batería
AA-3618/AA-3618CL, retire la llave de bloqueo.
AA-3618 (accesorio opcional) (Fig. 3, 4 y 5)
ADVERTENCIA:
• Cuando utilice el AA-3618, nunca lo fije a ninguna
parte de su cuerpo. La fijación del AA-3618 a cualquier
parte de su cuerpo puede ocasionarle graves heridas.
Deslice el convertidor de batería AA-3618 en el orificio
de instalación hasta que se detenga.
Abra la tapa de la batería del cortacésped y después
deslícela a tope y ponga el adaptador de montaje de producto del AA-3618 en el puerto de la batería del cortacésped.
Tienda el cable del AA-3618 a través de la hendidura en
la tapa de la batería y cierre la tapa de la batería.
Encaje el cable del AA-3618 en los soportes superiores
del asidero.
NOTA:
• Cuando utilice el convertidor de batería AA-3618
(accesorio opcional), enganche el cable de alimentación en el soporte designado del cortacésped. En caso
contrario el cable podrá cortarse.
Para retirar el AA-3618 del cortacésped, abra la tapa de
la batería y después presione el gancho del lado de
montaje de la batería del AA-3618.
AA-3618CL (accesorio opcional) (Fig. 6 y 7)
Abra la tapa de la batería y ponga el AA-3618CL en el
puerto de batería del cortacésped.
Cierre la tapa de la batería.
Para retirar el AA-3618CL, presione sobre el gancho del
AA-3618CL y retírelo con ambas manos.
Accionamiento del interruptor de alimentación
(Fig. 8 y 9)
ADVERTENCIA:
• Antes de insertar el cartucho de batería en la herramienta, compruebe siempre para cerciorarse de
que la palanca de interruptor se acciona debidamente y que vuelve a la posición original cuando la
suelta. La utilización de una herramienta con un inte-
rruptor que no se acciona debidamente puede dar
lugar a la pérdida de control y graves heridas personales.
NOTA:
• Si intenta segar mucha hierba de una vez es posible
que el motor no pueda ponerse en marcha debido a la
sobrecarga. En este momento, cambie la altura de la
siega a un nivel más alto y vuelva a comenzar.
• El cortacésped no se pone en marcha sin apretar el
botón de interruptor aunque se apriete la palanca de
interruptor.
Este cortacésped está equipado con un interruptor de
enclavamiento e interruptor de asidero. Si nota algo
inusual con cualquiera de estos interruptores, detenga la
operación inmediatamente y haga que se los comprueben en el Centro de Servicio Dolmar autorizado más cercano.
1. Inserte la llave de bloqueo en el interruptor de enclavamiento.
2. Presione hacia abajo el botón de interruptor.
3. Tire de la palanca de interruptor hacia usted mientras presiona hacia abajo el botón de interruptor.
4. Suelte el botón de interruptor tan pronto como el
motor se ponga en marcha. El cortacésped continuará en marcha hasta que suelte la palanca de
interruptor.
5. Suelte la palanca de interruptor para parar el motor.
6. Cuando no lo esté utilizando, retire la llave de bloqueo. Almacene la llave de bloqueo en un lugar
seguro fuera del alcance de los niños.
Ajuste de la altura de la siega (Fig. 10)
ADVERTENCIA:
• No ponga nunca su mano ni pierna debajo de la unidad
del cortacésped cuando ajuste la altura de la siega.
• Asegúrese siempre de que la palanca encaja en la
ranura debidamente antes de la operación.
La altura de la siega se puede ajustar en el rango de
entre 20 mm – 75 mm.
1. Retire la llave de bloqueo.
2. Tire de la palanca de ajuste de altura de la siega
hacia usted y muévala hasta la altura de siega que
desee.
Asegúrese de que la protuberancia de la palanca de
ajuste de altura de la siega encaja en la ranura del cortacésped.
NOTA:
• Las cifras de altura de la siega deberán ser utilizadas
sólo como guía, dado que el estado del césped o el
suelo podrán hacer que la altura del césped sea ligeramente diferente del de la cifra de altura establecida.
• Realice una prueba segando hierba en un lugar menos
notorio para obtener la altura que desea.
Sistema de protección de la batería
Las baterías de litio-ión están equipadas con un sistema
de protección. Este sistema corta automáticamente la
alimentación de la herramienta para alargar la vida útil
de la batería.
La herramienta se detendrá automáticamente durante la
operación si la herramienta y/o la batería son puestas en
una de las condiciones siguientes:
• Sobrecargada:
La herramienta es utilizada de una manera que da
lugar a que tenga que absorber una corriente anormalmente alta.
En esta situación, suelte el gatillo interruptor de la
herramienta y detenga la tarea que ocasiona la sobrecarga de la herramienta. Después apriete el gatillo interruptor otra vez para volver a ponerla en marcha.
Si la herramienta no se pone en marcha, la batería
estará recalentada. En esta situación, deje que la batería se enfríe antes de apretar el gatillo interruptor otra
vez.
• Tensión baja en la batería:
La capacidad de batería restante es muy baja y la
herramienta no funcionará. En esta situación, extraiga
la batería y vuelva a cargarla.
60
Page 61

Indicador de capacidad de batería restante
Encendida
Apagada
Parpadeo
E
F
011713
(solamente para modelos con batería AP-3622)
(Fig. 11)
La batería AP-3622 está equipada con el indicador de
capacidad de batería restante.
Presione el botón CHECK para indicar la capacidad de
batería restante. Entonces las lámparas indicadoras se
iluminarán durante tres segundos aproximadamente.
Lámparas indicadoras
Capacidad restante
70% a 100%
45% a 70%
20% a 45%
0% a 20%
Cargue la batería.
Es posible que la batería
no funcione bien.
• Cuando solamente parpadee la lámpara indicadora
más baja (junto a la “E”), o cuando ninguna de las lámparas indicadoras se encienda, la capacidad de la atería se habrá agotado y la herramienta no funcionará.
En estos casos, cargue la batería o reemplace la batería agotada con una completamente cargada.
• Cuando dos o más lámparas indicadoras no se enciendan incluso después de haberse completado la carga,
la batería habrá alcanzado el final de su vida de servicio.
• Cuando las dos lámparas indicadoras superiores o
inferiores se enciendan alternativamente, es posible
que la batería no esté funcionando bien. Póngase en
contacto con el centro de servicio autorizado de
Dolmar local.
NOTA:
• La capacidad indicada podrá ser inferior que el nivel
actual durante el uso o inmediatamente después de
utilizar la herramienta.
• Dependiendo de las condiciones de utilización y la
temperatura ambiente, es posible que la indicación
varíe ligeramente de la capacidad real.
MONTAJE
ADVERTENCIA:
• Asegúrese siempre de que la llave de bloqueo y el
cartucho de batería han sido retirados antes de
realizar cualquier trabajo en el cortacésped. Si no
retira la llave de bloqueo y el cartucho de batería podrá
resultar en graves heridas personales a causa de un
arranque accidental.
• No ponga nunca en marcha la herramienta a menos
que esté completamente ensamblada. La utilización
de la herramienta en un estado parcialmente ensamblado podrá resultar en graves heridas personales a
causa de un arranque accidental.
Instalación del asidero (Fig. 12, 13, 14, 15, 16 y
17)
ADVERTENCIA:
• Cuando instale los asideros, coloque los cables de
forma que no sean pillados con ninguna cosa entre los
asideros.
1. Afloje los tornillos de apriete (dos piezas).
Expanda el asidero inferior a ambos lados del mismo y
con él expandido en esa posición pivótelo hacia atrás y
después encájelo en la ranura de la cubierta.
2. Apriete los tornillos de apriete en ambos lados para
sujetar el asidero inferior.
3. Levante el asidero superior y alinee los orificios para
tornillos en el asidero superior con los del asidero
inferior y después sujételo con los tornillos y tuercas
de apriete suministrados.
NOTA:
• Ahora, sujete el asidero superior firmemente de forma
que no se le caiga de la mano.
NOTA:
• Instale el asidero superior de forma que la dirección del
asidero superior y el cable de suministro de alimentación estén en la posición mostrada en la figura.
NOTA:
• El asidero superior tiene dos orificios en ambos lados.
La utilización de los orificios de posición diferentes
para los tornillos y tuercas de apriete permite el ajuste
de la altura del asidero.
Desmontaje o instalación de la cuchilla (Fig. 18 y
19)
ADVERTENCIA:
• Retire siempre la llave de bloqueo y el cartucho de
batería cuando vaya a desmontar o instalar la cuchilla.
Si no retira la llave de bloqueo y el cartucho de batería
podrá ocasionar una herida grave.
• La cuchilla sigue girando por inercia durante unos
cuantos segundos después de soltar el interruptor.
Asegúrese de que la cuchilla se ha detenido completamente.
• Póngase siempre guantes cuando maneje la cuchilla.
1. Ponga el cortacésped sobre su costado de forma
que la palanca de ajuste de altura de la siega esté
colocada en el lado superior.
2. Para bloquear la cuchilla, inserte un destornillador
disponible o uno similar disponible en el comercio
en el orificio del cortacésped.
3. Afloje el perno girándolo hacia la izquierda con la
llave.
4. Retire el perno, brida exterior, cuchilla y brida inte-
rior en ese orden.
Para instalar la cuchilla, siga el procedimiento de desmontaje de la cuchilla a la inversa.
ADVERTENCIA:
• Instale la brida interior, la cuchilla y la brida exterior con
cuidado porque tienen una cara superior/inferior.
• Apriete el perno girándolo hacia la derecha firmemente
para sujetar la cuchilla.
• Ponga la cuchilla de forma que el lado de la cuchilla
con flecha de dirección de giro quede orientado hacia
afuera.
• Asegúrese de que la cuchilla está instalada firmemente.
61
Page 62

• Retire siempre el destornillador o herramienta similar
insertado en el orificio para bloquear la cuchilla.
Instalación de la cesta para hierba (Fig. 20 y 21)
Retire la llave de bloqueo.
Levante el protector trasero de la unidad del cortacésped
y enganche la cesta para hierba en la ranura de la unidad del cortacésped.
OPERACIÓN
Siega
ADVERTENCIA:
• Antes de segar, retire los palos y piedras del área de la
siega. Además, retire cualquier maleza del área de la
siega de antemano.
• Póngase siempre gafas de seguridad o gafas de protección con escudos laterales cuando utilice el cortacésped.
Sujete firmemente el asidero del cortacésped con ambas
manos cuando siegue.
Los bordes exteriores de las ruedas delanteras de la unidad principal proveen una guía para la anchura de la
siega. Utilizando los bordes exteriores de las dos ruedas
delanteras como guía, siegue en bandas, solapando
entre la mitad y un tercio de la banda anterior, para segar
el césped uniformemente.
Compruebe periódicamente el nivel de la cesta para
hierba, y vacíela antes de que se llene. Antes de cada
comprobación periódica, asegúrese de parar el cortacésped y retirar la llave de bloqueo y el cartucho de batería.
NOTA:
• La utilización del cortacésped con la cesta para hierba
llena impide el giro uniforme de la cuchilla y añade una
carga extra al motor, que puede ocasionar una avería.
Siega de un césped largo (Fig. 22)
No intente cortar hierba larga de una sola vez. En su
lugar, siegue el césped en etapas, dejando uno o dos
días entre las siegas, hasta que el césped esté uniformemente corto.
NOTA:
• El segar hierba larga a una longitud corta de una vez
puede hacer que la hierba muera y/o bloquee el interior
de la unidad principal.
Vaciado de la cesta para hierba (Fig. 23)
ADVERTENCIA:
• Para reducir el riesgo de un accidente, compruebe
regularmente la cesta para hierba para ver si tiene
algún daño o resistencia debilitada y reemplace si es
necesario.
1. Suelte la palanca de interruptor.
2. Retire la llave de bloqueo.
3. Abra el protector trasero y saque la cesta para
hierba con su asidero.
4. Vacíe la cesta para hierba.
MANTENIMIENTO Y ALMACENAJE
ADVERTENCIA:
• Asegúrese siempre de que la llave de bloqueo y el cartucho de batería han sido retirados del cortacésped
antes de almacenar o intentar realizar la inspección o
el mantenimiento.
• Póngase guantes cuando realice la inspección o el
mantenimiento.
PRECAUCIÓN:
• No utilice nunca gasolina, bencina, disolvente, alcohol
o similares. Podría producir descoloración, deformación o grietas.
MANTENIMIENTO
1. RETIRE LA LLAVE DE BLOQUEO. Almacénela en
un lugar seguro fuera del alcance de los niños.
2. Limpie su cortacésped utilizando solamente jabón
suave y un paño humedecido. No pulverice ni vierta
agua sobre su cortacésped cuando lo limpie.
3. Ponga el cortacésped sobre su costado y limpie los
recortes de hierba que se hayan acumulado debajo
de la cubierta del cortacésped.
4. Compruebe todas las tuercas, pernos, pomos, torni-
llos, sujetadores, etc. para ver que están bien apretados.
5. Inspeccione las piezas que se mueven para ver si
están dañadas, rotas, y gastadas. Haga que le reparen cualquier pieza dañada o que falte.
6. Antes de almacenar el cortacésped, retire de él el
cartucho de batería.
7. Almacénelo en interiores en un lugar fresco, seco y
cerrado con llave. No almacene el cortacésped y el
cargador en lugares donde la temperatura pueda
alcanzar o exceder los 40ºC.
Almacenamiento (Fig. 24, 25, 26, 27, 28 y 29)
ADVERTENCIA:
• Cuando transporte o almacene el cortacésped, no lo
sujete por los asideros plegados, sujételo por la empuñadura delantera del cortacésped. Si lo sujeta por los
asideros plegados podrá ocasionar una herida grave o
daños al cortacésped.
El cortacésped se puede almacenar en posición vertical.
1. Afloje el tornillo de apriete, expanda el asidero infe-
rior a ambos lados y después mueva hacia abajo el
asidero al frente.
NOTA:
• Ahora, sujete el asidero inferior firmemente de forma
que no se caiga en el lado alejado de la herramienta.
2. Afloje la tuerca de apriete y pivote el asidero supe-
rior hacia atrás.
3. Quite la cesta para hierba y ponga el cortacésped
en posición vertical.
NOTA:
• Cuando vaya a poner el cortacésped en posición vertical, no lo sujete por el asidero, utilice la empuñadura
delantera del cortacésped.
4. Almacene la cesta para hierba entre el asidero y el
cuerpo del cortacésped.
Para mantener la SEGURIDAD y FIABILIDAD del
producto, las reparaciones, el mantenimiento y los
ajustes deberán ser realizados por un Centro de Servicio
Autorizado de Dolmar, siempre con piezas de repuesto
de Dolmar.
62
Page 63

SOLUCIÓN DE PROBLEMAS
012350
Antes de solicitar reparaciones, realice su propia inspección en primer lugar. Si encuentra un problema que no está
explicado en el manual, no intente desmontar la herramienta. En su lugar, pregunte en Centros de Servicio Dolmar
autorizado, utilizando siempre piezas de recambio Dolmar para las reparaciones.
Estado de malfuncionamiento Causa Acción
El cortacésped no se pone en
marcha.
El motor se para después de usarlo
un poco.
No alcanza el máximo de RPM.
La herramienta de corte no gira.
¡Detenga la máquina
inmediatamente!
Vibración anormal:
¡Detenga la máquina
inmediatamente!
La herramienta de corte y el motor
no se pueden parar:
¡Retire la batería inmediatamente!
El cartucho de batería no está
instalado.
Problema de batería (poca tensión)
La llave de bloqueo no está
insertada.
El nivel de carga de la batería es
bajo.
La altura de corte ajustada es muy
baja.
La batería está instalada
incorrectamente.
La potencia de la batería está
cayendo.
El sistema de accionamiento no
funciona correctamente.
Se han atascado objetos extraños
tales como una rama cerca de la
cuchilla.
El sistema de accionamiento no
funciona correctamente.
La cuchilla está desequilibrada,
excesivamente o desigualmente
gastada.
Malfuncionamiento eléctrico o
electrónico.
Instale el cartucho de batería.
Cargue la batería. Si la recarga no se
realiza efectivamente, sustituya la
batería.
Inserte la llave de bloqueo.
Cargue la batería. Si la recarga no se
realiza efectivamente, sustituya la
batería.
Suba la altura.
Instale el cartucho de batería como
se describe en este manual.
Cargue la batería. Si la recarga no se
realiza efectivamente, sustituya la
batería.
Pida a su centro de servicio
autorizado local que se lo reparen.
Retire el objeto extraño.
Pida a su centro de servicio
autorizado local que se lo reparen.
Sustituya la cuchilla.
Retire la batería y pida a su centro
de servicio autorizado local que se lo
reparen.
ACCESORIOS OPCIONALES
PRECAUCIÓN:
• Estos accesorios o aditamentos están recomendados para su uso con la herramienta Dolmar especificada en este
manual. El uso de cualquier otro accesorio o aditamento puede suponer un riesgo de lesiones personales. Utilice el
accesorio o aditamento exclusivamente para su uso declarado.
Si necesita información más detallada sobre estos accesorios, consulte con su centro local de servicio de Dolmar.
• Cuchilla
• Batería y cargador genuinos de Dolmar
NOTA:
• Algunos elementos de la lista podrán estar incluidos en la paquete de la herramienta como accesorios estándar.
Pueden variar de un país a otro.
63
Page 64

ENG905-1
Ruido
El nivel de ruido A-ponderado típico determinado de
acuerdo con la norma EN60335:
Nivel de presión sonora (L
Nivel de potencia sonora (L
Incerteza (K): 3 dB (A)
Póngase protectores en los oídos
Vibración
El valor total de la vibración (suma de vectores triaxiales)
determinado de acuerdo con la norma EN60335:
Emisión de vibración (a
Incerteza (K): 1,5 m/s
• El valor de emisión de vibración declarado ha sido
medido de acuerdo con el método de prueba estándar
y se puede utilizar para comparar una herramienta con
otra.
• El valor de emisión de vibración declarado también se
puede utilizar en una valoración preliminar de exposición.
): 80 dB (A)
pA
): 93 dB (A)
WA
): 2,5 m/s2 o menos
h
2
ENG900-1
ENG901-1
ADVERTENCIA:
• La emisión de vibración durante la utilización real de la
herramienta eléctrica puede variar del valor de emisión
declarado dependiendo de las formas en las que la
herramienta sea utilizada.
• Asegúrese de identificar medidas de seguridad para
proteger al operario que estén basadas en una estimación de la exposición en las condiciones reales de utilización (teniendo en cuenta todas las partes del ciclo
operativo tal como las veces cuando la herramienta
está apagada y cuando está funcionando en vacío
además del tiempo de gatillo).
ENH218-1
Para países europeos solamente
Declaración de conformidad CE
Los abajo firmantes, Tamiro Kishima y Rainer
Bergfeld, como personas autorizadas por Dolmar
GmbH, declaran que la(s) máquina(s) DOLMAR:
Designación de máquina:
Cortadora de Cesped
Modelo N°/Tipo: AM-3643
Especificaciones: consulte la tabla de “ESPECIFICACIONES”.
son producidas en serie y
Cumplen con las directivas europeas siguientes:
2000/14/EC, 2006/42/EC
Y que están fabricadas de acuerdo con las normas o
documentos normalizados siguientes:
EN60745, EN60335
Los documentos técnicos están en un archivo en:
Dolmar GmbH,
Jenfelder Straße 38, Abteilung FZ,
D-22045 Hamburgo
El procedimiento de valoración de conformidad requerido por la Directiva 2000/14/EC ha sido realizado de
acuerdo con el anexo VI.
Organismo notificado:
TÜV Rheinland LGA Products GmbH
Am Grauen Stein 29
51105 Köln Alemania
Número de identificación 0197
Nivel de potencia de sonido medido: 93 dB (A)
Nivel de potencia de sonido garantizado: 94 dB (A)
7.9.2011
64
Tamiro Kishima
Director General
Rainer Bergfeld
Director General
Page 65

PORTUGUÊS (Instruções originais)
Explicação geral
1 Alavanca de bloqueio da tampa
da bateria
2 Bateria
3 Tampa da bateria
4 Chave de segurança
5 Conversor de bateria (AA-3618)
6 Orifício de instalação
7Gancho
8 Adaptador para montagem do
produto AA-3618
9Fio
10 Abertura
11 Encaixes superiores
12 Conversor de bateria
(AA-3618CL)
ESPECIFICAÇÕES
Modelo AM-3643
Largura do corte 430 mm
Velocidade em vazio 3.600 min
Dimensões (C x L x A)
Peso líquido 17,9 kg
Voltagem nominal 36 V CC
Aviso: Utilize só a(s) bateria(s) indicada(s).
• Devido a um programa contínuo de pesquisa e desen-
volvimento, estas especificações podem ser alteradas
sem aviso prévio.
• As especificações e a bateria podem diferir de país
para país.
• Peso, com a bateria, de acordo com o Procedimento
01/2003 da EPTA (European Power Tool Association)
Bateria(s) padrão
IMPORTANTES INSTRUÇÕES DE
SEGURANÇA
AVISO! Leia todos os avisos de segurança e
todas as instruções. O não cumprimento de todos os
avisos e instruções pode originar choque eléctrico,
incêndio e/ou ferimentos graves.
Guarde todos os avisos e instruções para futuras
referências.
1. Não insira a chave no cortador de relva antes
que esteja pronto para ser utilizado.
2. Este aparelho não foi concebido para ser utili-
zado por pessoas (inclusive crianças) com capa-
cidades físicas, sensoriais ou mentais reduzidas
ou sem experiência e conhecimento, a menos
que sejam supervisionadas ou recebam instru-
ções sobre a utilização da pessoa responsável
pela sua segurança.
3. Supervisione as crianças para que elas não brin-
quem com o aparelho.
13 Botão do interruptor
14 Alavanca do interruptor
15 Alavanca de ajuste da altura do
corte
16 Lâmpadas indicadoras
17 Botão CHECK
18 Guiador inferior
19 Ranhura no chassi
20 Parafuso de fixação
21 Guiador superior
22 Furos dos parafusos
23 Porca de fixação
24 Parafuso
25 Suportes
26 Chave de parafusos
durante a operação
quando armazenado 490 mm – 500 mm x 460 mm x 810 mm
GEB091-5
27 Lâmina
28 Perno
29 Flange interior
30 Seta
31 Flange exterior
32 Protector traseiro
33 Ranhura
34 Colector de relva
35 Alargar
36 Mover para baixo
37 Rodar para trás
38 Pega frontal
–1
1.450 mm – 1.490 mm x 460 mm x 950 mm – 1.020 mm
AP-363 / AP-3622
4. Nunca permita que crianças nem pessoas não
familiarizadas com estas instruções utilizem a
máquina. A idade do operador pode ser restricta
segundo com os regulamentos locais.
5. Nunca utilize a máquina se pessoas, especialmente crianças, ou animais estiverem presentes.
6. Lembre-se que o operador ou utilizador é responsável por riscos ou acidentes que possam
ferir outras pessoas ou danificar propriedade
alheia.
7. Utilize sempre calçados apropriados e calças
compridas quando utilizar a máquina. Não utilize
a máquina se estiver descalço ou calçando sandálias abertas. Evite vestir roupas largas, usar
jóias com pingentes ou gravatas. Essas podem
ser presas nas peças em movimento.
8. Opere a máquina só durante o dia ou com boa
iluminação artificial.
9. Evite operar a máquina em relva molhada.
10. Nunca opere o cortador de relva na chuva.
11. Utilização de ferramenta a bateria
– Recarregue a bateria só com o carregador
especificado pelo fabricante. Um carregador
que é próprio para um tipo de bateria pode criar o
risco de incêndio se utilizado com outro tipo de
bateria.
– Utilize as ferramentas eléctricas somente com
as baterias especificamente designadas. A uti-
lização de outras baterias pode provocar o risco
de incêndio e ferimentos.
65
Page 66

12. Segure o guiador sempre com firmeza.
13. Mantenha-se sempre em uma posição segura e
firme ao trabalhar em declives.
14. Ande, nunca corra.
15. Não agarre nas lâminas de corte expostas nem
nos bordos cortantes ao apanhar ou segurar o
aparelho.
16. Condição física — Não opere o cortador de relva
se estiver sob a influência de drogas, bebidas
alcoólicas ou qualquer medicamento.
17. Mantenha os protectores instalados e em boas
condições.
18. Mantenha as mãos e os pés longe das lâminas
rotativas. Precaução — A lâmina continua a
rodar depois de desligar a ferramenta.
19. Retire a chave antes de fazer manutenção, limpeza, ou remover detritos do equipamento de
jardinagem.
20. Utilize só as lâminas originais do fabricante
especificadas neste manual.
21. Antes de utilizar a ferramenta, verifique cuidadosamente se as lâminas não estão trincadas ou
danificadas. Substitua imediatamente as lâminas trincadas ou danificadas.
22. Verifique se não há outras pessoas na área
antes de cortar a relva. Pare o cortador de relva
se alguém se aproximar da área.
23. Antes de iniciar o corte do relvado, remova os
objectos estranhos tais como pedras, fios,
garrafas, ossos ou pedaços de madeira de área
de trabalho para evitar ferimentos pessoais ou
danos ao cortador de relva.
24. Pare imediatamente a operação se notar qualquer funcionamento anormal. Desligue o cortador de relva e retire a chave do aparelho. Em
seguida, inspeccione o cortador de relva.
25. Nunca tente fazer ajustes na altura das rodas
enquanto o cortador de relva está em funcionamento.
26. Liberte a alavanca do interruptor e espere a rotação da lâmina parar antes de cruzar calçamento,
caminhos, ruas ou qualquer área com cascalhos.
Retire também a chave quando se afastar do cortador de relva por alguns instantes, for apanhar
ou remover qualquer coisa do caminho ou por
qualquer motivo que possa distraí-lo do seu trabalho.
27. Os objectos atingidos pela lâmina do cortador
de relva podem causar ferimentos pessoais
sérios. Inspeccione sempre o relvado cuidadosamente e remova todos os objectos antes de
cada corte da relva.
28. Se o cortador de relva bater em um objecto
estranho, siga os passos abaixo:
– Desligue o cortador de relva, liberte a ala-
vanca do interruptor e aguarde até a lâmina
parar completamente.
– Retire a chave de segurança e a bateria.
– Inspeccione o cortador de relva cuidadosa-
mente para ver se não está danificado.
– Substitua a lâmina se estiver danificada.
Conserte qualquer avaria antes de reiniciar e
continuar a operar o cortador de relva.
29. Verifique o saco traseiro com frequência para
ver se não está desgastado ou estragado. Assegure-se sempre de que o saco traseiro esteja
vazio antes de armazenar. Para segurança,
substitua o saco desgastado por um novo original de fábrica.
30. Desligue o motor e retire a chave sempre que se
afastar do equipamento, antes de limpar a caixa
do cortador de relva e antes de executar qualquer reparo ou inspecção.
31. Tenha muito cuidado quando volta ou puxa a
máquina na sua própria direcção.
32. Pare a(s) lâmina(s) se tiver que transportar a
máquina inclinada para cruzar áreas não relvadas e quando levar ou trazer a máquina para a
área onde será utilizada.
33. Nunca opere a máquina com protectores defeituosos ou sem os dispositivos de segurança instalados, como por exemplo os deflectores e/ou
colector de relva.
34. Ligue o motor com cuidado segundo as instruções e com os pés bem afastados da(s)
lâmina(s).
35. Não incline a máquina ao ligar o motor, a menos
que ela seja projectada para ser inclinada para
ligar. Nesse caso, não incline mais do que o
necessário e levante apenas a parte afastada do
operador.
36. Não ligue a máquina quando estiver em frente
do escapamento.
37. Não coloque as mãos ou pés perto nem debaixo
das peças rotativas. Mantenha-se sempre afastado do escapamento.
38. Não transporte a máquina com o cortador de
relva ligado.
39. Desligue a máquina e retire o dispositivo de
desabilitação. Certifique-se de que todas as
peças em movimento estejam paradas completamente
– sempre que se afastar da máquina,
– antes de desbloquear ou limpar a saída de
relva,
– antes de inspeccionar, limpar ou fazer manu-
tenção na máquina,
– depois de ter batido num objecto estranho.
Inspeccione a máquina e conserte-a se estiver
danificada antes de reiniciar e operar outra
vez;
40. Se a máquina começar a vibrar demais (verifique
imediatamente)
– inspeccione para ver se não há danos,
– substitua ou conserte as peças danificadas,
– verifique se há peças soltas e aperte-as.
41. Tenha muito cuidado ao regular a máquina para
evitar prender os dedos entre as lâminas em
movimento e as peças fixas da máquina.
42. Em terrenos inclinados, corte a relva transversalmente, nunca para cima e para baixo. Tenha
muito cuidado ao mudar de direcção em declives. Não corte relva em terrenos extremamente
inclinados.
43. Não lave utilizando uma mangueira; não deixe
entrar água no motor e nas conexões eléctricas.
44. Inspeccione o parafuso de montagem da lâmina
frequentemente para verificar se está bem apertado.
66
Page 67

45. Mantenha todas as porcas, pernos e parafusos
bem apertados para garantir que o equipamento
esteja em condições seguras de trabalho.
46. Sempre espere a máquina arrefecer antes de a
armazenar.
47. Ao fazer a manutenção nas lâminas, lembre-se
que as lâminas podem se movimentar, mesmo
com a alimentação desligada.
48. Por medida de segurança, substitua as peças
desgastadas ou danificadas. Utilize somente
acessórios e peças sobressalentes originais.
GUARDE ESTAS INSTRUÇÕES.
AVISO:
NÃO permita que conforto ou familiaridade com o
produto (adquirido com o uso repetido) substitua a
aderência estrita às regras de segurança da ferramenta. MÁ INTERPRETAÇÃO ou não seguimento das
regras de segurança estabelecidas neste manual de
instruções pode causar danos pessoais sérios.
ENC007-7
IMPORTANTES INSTRUÇÕES DE
SEGURANÇA
PARA A BATERIA
1. Antes de utilizar a bateria, leia todas as instru-
ções e etiquetas de precaução no (1) carregador
de bateria (2) bateria e (3) produto que utiliza a
bateria.
2. Não abra a bateria.
3. Se o tempo de funcionamento se tornar excessi-
vamente curto, pare o funcionamento imediatamente. Pode resultar em sobreaquecimento,
possíveis queimaduras e mesmo explosão.
4. Se entrar electrólito nos seus olhos, lave-os com
água e consulte imediatamente um médico.
Pode resultar em perca de visão.
5. Não curte-circuite a bateria:
(1) Não toque nos terminais com qualquer mate-
rial condutor.
(2) Evite guardar a bateria juntamente com
outros objectos metálicos tais como pregos,
moedas, etc.
(3) Não exponha a bateria à água ou chuva.
Um curto-circuito pode ocasionar um enorme
fluxo de corrente, sobreaquecimento, possíveis
queimaduras e mesmo estragar-se.
6. Não guarde a ferramenta e a bateria em locais
onde a temperatura pode atingir ou exceder
50°C.
7. Não queime a bateria mesmo que esteja estragada ou completamente gasta. A bateria pode
explodir no fogo.
8. Tenha cuidado para não deixar cair ou dar pancadas na bateria.
9. Não utilize uma bateria danificada.
GUARDE ESTAS INSTRUÇÕES.
Conselhos para manter a máxima vida útil da
bateria
1. Carregue a bateria antes que esteja completamente descarregada.
Pare sempre o funcionamento da ferramenta e
carregue a bateria quando notar menos poder na
ferramenta.
2. Nunca carregue uma bateria completamente carregada.
Carregamento excessivo diminui a vida útil da
bateria.
3. Carregue a bateria à temperatura ambiente de
10°C – 40°C.
Deixe que uma bateria quente arrefeça antes de
a carregar.
4. Carregue a bateria uma vez a cada seis meses
se não for utilizá-la por um longo período de
tempo.
DESCRIÇÃO FUNCIONAL
Instalar ou retirar a bateria (Fig. 1 e 2)
PRECAUÇÃO:
• Desligue sempre a ferramenta antes de instalar ou reti-
rar a bateria.
• Certifique-se de bloquear a tampa da bateria antes de
utilizar. Se assim não for, lama, sujidade ou água pode
danificar o produto ou a bateria.
Para instalar a bateria:
1. Puxe a alavanca de bloqueio da tampa da bateria
para si e abra a tampa.
2. Coloque a bateria na direcção indicada na ilustração
até ouvir um clique.
3. Insira a chave de segurança como indicado na ilustração o mais fundo possível.
4. Feche a tampa da bateria e pressione-a até travar
com a alavanca de bloqueio.
Para remover a bateria do cortador de relva:
1. Puxe a alavanca de bloqueio da tampa da bateria
para si e abra a tampa.
2. Retire a chave de segurança.
3. Retire-a da ferramenta enquanto desliza o botão na
frente da bateria.
4. Feche a tampa da bateria.
Conversores de bateria (acessório opcional)
AVISO:
• Antes de instalar ou retirar os conversores de bateria
AA-3618/AA-3618CL, remova a chave de segurança.
AA-3618 (acessório opcional) (Fig. 3, 4 e 5)
AVISO:
• Quando utiliza o AA-3618, nunca prenda-o a qualquer
parte do seu corpo. Prender o AA-3618 ao seu corpo
pode causar ferimentos sérios.
Deslize o conversor de bateria AA-3618 no orifício de
instalação até o fundo.
Abra a tampa da bateria no cortador de relva e deslize o
adaptador para montagem do produto AA-3618 no compartimento da bateria até ouvir um clique.
Passe o fio do AA-3618 através da abertura na tampa da
bateria e feche a tampa.
Prenda o fio do AA-3618 nos encaixes superiores do guiador.
67
Page 68

NOTA:
• Quando utilizar o conversor de bateria AA-3618 (acessório opcional), enganche o fio de alimentação no
suporte indicado no cortador de relva. Se assim não
for, o fio poderá ser cortado.
Para retirar o AA-3618 do cortador de relva, abra a
tampa da bateria e pressione o gancho no lado de instalação da bateria do AA-3618.
AA-3618CL (acessório opcional) (Fig. 6 e 7)
Abra a tampa da bateria e afixe o AA-3618CL no compartimento da bateria no cortador de relva.
Feche a tampa da bateria.
Para retirar o AA-3618CL, pressione o gancho do AA3618CL e retire-o com as duas mãos.
Funcionamento do interruptor de alimentação
(Fig. 8 e 9)
AVI SO :
• Antes de instalar a bateria na ferramenta, verifique
sempre se a alavanca do interruptor funciona correctamente e volta para a posição original quando
libertada. Utilizar a ferramenta com um interruptor que
não opera correctamente pode provocar a perda de
controlo e resultar em ferimentos pessoais sérios.
NOTA:
• Se tentar cortar muita relva de uma vez, o motor pode
não ligar devido à sobrecarga. Nesse caso, altere o
ajuste da altura do corte para um nível mais alto e ligue
outra vez.
• O cortador de relva não liga se não carregar no botão
do interruptor, mesmo que tenha pressionado a alavanca do interruptor.
Este cortador de relva está equipado com um interruptor
de interligação e interruptor no guiador. Se observar
qualquer coisa anormal com um desses, pare a operação imediatamente e leve o equipamento para ser inspeccionado no Centro de assistência técnica autorizada
Dolmar mais próximo.
1. Insira a chave de segurança no interruptor de interli-
gação.
2. Carregue no botão do interruptor.
3. Puxe a alavanca do interruptor para si enquanto
carrega no botão do interruptor.
4. Liberte o botão do interruptor assim que o motor
começar a funcionar. O cortador de relva continuará
a funcionar até que liberte a alavanca do interruptor.
5. Liberte a alavanca do interruptor para parar o motor.
6. Retire a chave de segurança quando não estiver em
utilização. Guarde a chave de segurança em um
lugar seguro e fora do alcance de crianças.
Ajuste da altura do corte (Fig. 10)
AVI SO :
• Nunca coloque as mãos ou pés embaixo do cortador
de relva quando ajusta a altura do corte.
• Verifique sempre se a alavanca está devidamente
presa na ranhura antes da operação.
A altura do corte pode ser ajustada entre 20 mm a
75 mm.
1. Retire a chave de segurança.
2. Puxe a alavanca de ajuste da altura do corte para si
e mova-a na posição da altura desejada.
Certifique-se de que a saliência da alavanca de ajuste
da altura do corte entra na ranhura no cortador de relva.
NOTA:
• Os números da altura de corte devem ser utilizados
apenas como orientação, já que as condições do relvado ou do solo podem fazer com que a altura da relva
seja um pouco diferente da altura ajustada.
• Faça um teste cortando a relva em um local menos evidente para obter a altura desejada.
Sistema de protecção da bateria
As baterias de íões de lítio são equipadas com um sistema de protecção. Este sistema desactiva o fornecimento de energia automaticamente a fim de prolongar a
vida útil da bateria.
A ferramenta para automaticamente durante o funcionamento se a mesma e/ou bateria se encontrar em uma
das seguintes circunstâncias.
• Sobrecarga:
A ferramenta funcionou de maneira que puxa corrente
elevada demais.
Nesse caso, liberte o gatilho do interruptor da ferramenta para parar a operação que provocou a sobrecarga da ferramenta. A seguir, carregue no gatilho do
interruptor outra vez para ligar.
Se a ferramenta não ligar, a bateria está superaquecida. Nesse caso, aguarde até a bateria arrefecer
antes de carregar no gatilho do interruptor outra vez.
• Baixa tensão da bateria:
A carga restante da bateria está baixa demais e a ferramenta não funciona. Nesse caso, retire a bateria e
recarregue-a.
68
Page 69

Indicador da capacidade restante da bateria
Acesa
Apagada
Piscando
E
F
011713
(apenas para os modelos com a bateria AP-3622)
(Fig. 11)
A bateria AP-3622 é equipada com um indicador de
capacidade restante da bateria.
Carregue no botão CHECK para indicar a capacidade
restante da bateria. A lâmpada indicadora se acenderá
por aprox. três segundos.
Lâmpadas indicadoras
Capacidade restante
70% a 100%
45% a 70%
20% a 45%
0% a 20%
Recarregue a bateria.
A bateria pode estar
avariada.
• Quando apenas a lâmpada indicadora inferior (próxima
ao “E”) piscar, ou se nenhuma lâmpada acender, a
capacidade da bateria acabou e a ferramenta não funcionará. Nesses casos, recarregue a bateria ou troquea por uma completamente carregada.
• Se duas ou mais lâmpadas indicadoras não acenderem mesmo depois que a carga estiver completa, a
vida útil da bateria chegou ao fim.
• Se as duas lâmpadas indicadoras superiores e inferiores acenderem alternadamente, a bateria pode estar
avariada. Entre em contacto com o centro autorizado
de assistência local da Dolmar.
NOTA:
• A capacidade indicada pode ser mais baixa do que o
nível real durante ou logo após a utilização da ferramenta.
• A indicação pode variar ligeiramente da capacidade
real segundo as condições de utilização e a temperatura ambiente.
ASSEMBLAGEM
AVISO:
• Verifique sempre se a chave de segurança e a bateria estão removidas antes de executar qualquer
serviço de manutenção no cortador de relva. Se
não retirar a chave de segurança e a bateria, pode
ocorrer um arranque acidental e resultar em ferimentos
pessoais sérios.
• Nunca ligue a ferramenta a menos que esteja com-
pletamente montada. A operação da ferramenta parcialmente montada pode provocar o arranque acidental
e resultar em ferimentos pessoais sérios.
Instalação do guiador (Fig. 12, 13, 14, 15, 16 e 17)
AVISO:
• Quando instalar os guiadores, posicione os fios de
forma a que não fiquem presos em nada entre os guiadores.
1. Desaperte os parafusos de fixação (dois).
Alargue o guiador inferior em ambos os lados e, quando
alargado nessa posição, rode-o para trás e encaixe-o na
ranhura no chassi.
2. Aperte os parafusos de fixação nos dois lados para
prender o guiador inferior.
3. Levante o guiador superior e alinhe os furos dos
parafusos no guiador superior com os no guiador
inferior e prenda-o com os parafusos e porcas de
fixação fornecidas.
NOTA:
• Nesta altura, agarre com firmeza o guiador superior
para não o deixar cair.
NOTA:
• Instale o guiador superior de forma a que a sua direcção e o fio de alimentação fiquem como mostrado na
ilustração.
NOTA:
• O guiador superior tem dois furos em cada um dos
lados. Utilizar os furos dos parafusos e porcas de fixação em posições diferentes permite regular a altura do
guiador.
Retirar ou instalar a lâmina (Fig. 18 e 19)
AVISO:
• Retire sempre a chave de segurança e a bateria antes
de remover ou instalar a lâmina. Falha em retirar a
chave de segurança e a bateria pode provocar ferimentos sérios.
• A lâmina continua a girar devagar por alguns segundos
depois de libertar o interruptor. Aguarde até que a
lâmina pare completamente.
• Sempre use luvas para manusear a lâmina.
1. Coloque o cortador de relva de lado de forma a que
a alavanca de ajuste da altura do corte fique no lado
de cima.
2. Para bloquear a lâmina, insira uma chave de parafu-
sos disponível ou algo semelhante à venda no orifício do cortador de relva.
3. Desaperte o perno para a esquerda com uma
chave.
4. Retire o parafuso, flange exterior, lâmina e flange
interior, nessa ordem.
Para instalar a lâmina, execute inversamente o procedimento de retirar.
AVISO:
• Instale o flange interior, a lâmina e o flange exterior cuidadosamente, observando que esses têm face superior e inferior.
• Aperte o perno rodando com firmeza para a direita
para prender a lâmina.
• Coloque a lâmina de maneira que o lado com a seta
indicando o sentido de rotação fique virado para fora.
• Assegure-se de que a lâmina esteja instalada com
segurança.
• Lembre-se de retirar a chave de parafusos, etc. inserida no orifício para bloquear a lâmina.
69
Page 70

Instalação do colector de relva (Fig. 20 e 21)
Retire a chave de segurança.
Levante o protector traseiro do cortador de relva e
enganche o colector na ranhura do cortador de relva.
FUNCIONAMENTO
Cortar a relva
AVI SO :
• Antes de cortar a relva, retire os pedaços de madeira e
pedras da área que vai cortar. Remova também as
ervas daninhas da área antes de cortar.
• Utilize sempre óculos de segurança com protecção
lateral ao operar o cortador de relva.
Agarre o guiador do cortador de relva firmemente com as
duas mãos para cortar a relva.
As bordas externas das rodas frontais da unidade principal proporcionam um guia para a largura do corte. Utilize
as bordas externas das duas rodas frontais como guia e
corte a relva em faixas, sobrepondo-as por metade a um
terço da faixa anterior para cortar a relva uniformemente.
Verifique periodicamente o nível do colector de relva e
esvazie-o antes que fique cheio. Lembre-se de desligar
o cortador de relva e retirar a chave de segurança e a
bateria antes de cada inspecção periódica.
NOTA:
• Utilizar o cortador de relva com o colector cheio previne a rotação suave da lâmina e sobrecarrega o
motor, o que pode provocar avarias.
Cortar relva alta (Fig. 22)
Não tente cortar relva alta de uma vez. Em vez disso,
corte a relva em etapas, deixando um ou dois dias de
intervalo entre os cortes, até que a relva fique curta uniformemente.
NOTA:
• Cortar relva alta em uma altura muito curta de uma vez
pode prejudicar a relva e/ou obstruir o interior da unidade principal.
Esvaziar o colector de relva (Fig. 23)
AVI SO :
• Para reduzir o risco de acidentes, inspeccione o colector de relva regularmente para ver se não está danificado ou enfraquecido e substitua-o, se necessário.
1. Liberte a alavanca do interruptor.
2. Retire a chave de segurança.
3. Abra o protector traseiro para retirar o colector de
relva pela pega.
4. Esvazie o colector de relva.
MANUTENÇÃO E ARMAZENAMENTO
AVI SO :
• Certifique-se sempre de que a chave de segurança e a
bateria estão retiradas do cortador de relva antes de o
armazenar ou de realizar inspecção ou manutenção.
• Use luvas de segurança quando efectua uma inspecção ou manutenção.
PRECAUÇÃO:
• Nunca utilize gasolina, benzina, diluente, álcool ou produtos semelhantes. Pode ocorrer a descoloração,
deformação ou rachaduras.
MANUTENÇÃO
1. RETIRE A CHAVE DE SEGURANÇA. Guarde-a em
um lugar seguro e fora do alcance de crianças.
2. Limpe o cortador de relva só com pano húmido e
sabão suave. Não borrife nem jogue água no cortador de relva para o limpar.
3. Vire o cortador de relva de lado e limpe os resíduos
de relva acumulados embaixo do chassi.
4. Verifique se todas as porcas, pernos, pinos, parafu-
sos, grampos, etc. estão bem apertados.
5. Inspeccione as peças em movimento para ver se
não estão danificadas, quebradas ou desgastadas.
Conserte ou substitua as peças faltando ou danificadas.
6. Retire a bateria do cortador de relva antes de o
armazenar.
7. Guarde o cortador de relva em recinto interno fresco
e seco, com porta travada. Não guarde o cortador
de relva nem a bateria em locais onde a temperatura possa atingir ou exceder 40°C.
Armazenamento (Fig. 24, 25, 26, 27, 28 e 29)
AVI SO :
• Para carregar ou armazenar o cortador de relva,
segure pela pega frontal e não pelos guiadores rebatidos. Segurar pelos guiadores rebatidos pode causar
ferimentos sérios ou danificar o cortador de relva.
O cortador de relva pode ser armazenado na posição
vertical.
1. Desaperte o parafuso de fixação, alargue o guiador
inferior para os lados e abaixe o guiador para a
frente.
NOTA:
• Nesta altura, agarre com firmeza o guiador inferior
para não o deixar cair do outro lado da ferramenta.
2. Desaperte a porca de fixação e rode o guiador
superior para trás.
3. Retire o colector de relva e coloque o cortador na
posição vertical.
NOTA:
• Quando colocar o cortador de relva na posição vertical,
segure pela pega frontal e não pelo guiador.
4. Guarde o colector de relva entre o guiador e o corpo
do cortador de relva.
Para manter a SEGURANÇA e FIABILIDADE, as
reparações e outras acções de manutenção ou ajustes
devem ser executados pelos Centros de assistência
autorizados da Dolmar, utilizando sempre peças de
substituição Dolmar.
70
Page 71

SOLUÇÃO DE PROBLEMAS
012350
Antes de solicitar reparos, faça primeiro uma inspecção. Se encontrar um problema que não esteja explicado no
manual, não tente desmontar a ferramenta. Em vez disso, solicite o conserto a um centro de assistência técnica autorizada Dolmar, usando sempre peças de reposição originais Dolmar.
Problema Causa Solução
A bateria não está instalada. Instale a bateria.
Recarregue a bateria. Se o
recarregamento não solucionar,
substitua a bateria.
Insira a chave de segurança.
Recarregue a bateria. Se o
recarregamento não solucionar,
substitua a bateria.
Aumente a altura.
Instale a bateria como descrito neste
manual.
Recarregue a bateria. Se o
recarregamento não solucionar,
substitua a bateria.
Solicite o conserto em um centro de
assistência técnica autorizada local.
Remova o objecto estranho.
Solicite o conserto em um centro de
assistência técnica autorizada local.
Substitua a lâmina.
Retire a bateria e solicite o conserto
em um centro de assistência técnica
autorizada local.
O cortador de relva não liga.
O motor pára de funcionar depois de
pouco tempo de utilização.
Não atinge o RPM máximo.
A ferramenta de corte não roda:
Desligue a máquina imediatamente!
Vibração anormal:
Desligue a máquina imediatamente!
A ferramenta de corte e o motor não
param:
Retire a bateria imediatamente!
Problema com a bateria (tensão
baixa)
A chave de segurança não está
inserida.
O nível da carga da bateria está
baixo.
O ajuste da altura de corte é muito
baixo.
A bateria não está instalada
correctamente.
A potência da bateria cai.
O sistema de accionamento não
funciona correctamente.
Um objecto estranho, como um
ramo, está enroscado perto da
lâmina.
O sistema de accionamento não
funciona correctamente.
A lâmina está desbalanceada,
desgastada excessivamente ou de
maneira desuniforme.
Mau funcionamento eléctrico ou
electrónico.
ACESSÓRIOS OPCIONAIS
PRECAUÇÃO:
• Estes acessórios ou peças são recomendados para utilização com a ferramenta Dolmar especificada neste manual.
A utilização de outros acessórios ou peças pode ser perigosa para as pessoas. Utilize apenas acessórios ou peças
para os fins indicados.
Se precisar de ajuda para obter mais informações relativas a estes acessórios, entre em contacto com o centro de
assistência Dolmar local.
• Lâmina
• Bateria e carregador originais Dolmar
NOTA:
• Alguns itens da lista podem estar incluídos na embalagem da ferramenta como acessórios padrão. Eles podem
variar de país para país.
71
Page 72

ENG905-1
Ruído
A característica do nível de ruído A determinado de
acordo com EN60335:
Nível de pressão de som (L
Nível do som (L
Variabilidade (K): 3 dB (A)
Utilize protectores para os ouvidos
Vibração
O valor total da vibração (soma vectorial tri-axial) determinado de acordo com EN60335:
Emissão de vibração (a
Variabilidade (K): 1,5 m/s
• O valor da emissão de vibração indicado foi medido de
acordo com o método de teste padrão e pode ser utilizado para comparar duas ferramentas.
• O valor da emissão de vibração indicado pode também
ser utilizado na avaliação preliminar da exposição.
AVI SO :
• A emissão de vibração durante a utilização real da ferramenta eléctrica pode diferir do valor de emissão indicado, dependendo das formas como a ferramenta é
utilizada.
• Certifique-se de identificar as medidas de segurança
para protecção do operador que sejam baseadas em
uma estimativa de exposição em condições reais de
utilização (considerando todas as partes do ciclo de
operação, tal como quando a ferramenta está desligada e quando está a funcionar em marcha lenta além
do tempo de accionamento).
): 93 dB (A)
WA
): 80 dB (A)
pA
): 2,5 m/s2 ou inferior
h
2
ENG900-1
ENG901-1
ENH218-1
Só para países Europeus
Declaração de conformidade CE
Os abaixo assinados, Tamiro Kishima e Rainer
Bergfeld, autorizados por Dolmar GmbH, declaram
que a(s) máquinas(s) DOLMAR:
Designação da ferramenta:
Cortadora de Grama a Bateria
Modelo n°/Tipo: AM-3643
Especificações: consulte a tabela
“ESPECIFICAÇÕES”.
são de produção de série e
Em conformidade com as seguintes directivas
europeias:
2000/14/EC, 2006/42/EC
E estão fabricadas de acordo com as seguintes normas
ou documentos normativos:
EN60745, EN60335
A documentação técnica encontra-se arquivada em:
Dolmar GmbH,
Jenfelder Straße 38, Abteilung FZ,
D-22045 Hamburg
Os procedimentos de avaliação da conformidade requeridos pela directiva 2000/14/EC foram efectuados de
acordo com o anexo VI.
Organização notificada:
TÜV Rheinland LGA Products GmbH
Am Grauen Stein 29
51105 Köln Alemanha
Número de identificação 0197
Nível de potência sonora medido: 93 dB (A)
Nível de potência sonora garantido: 94 dB (A)
7.9.2011
72
Tamiro Kishima
Director Gerente
Rainer Bergfeld
Director Gerente
Page 73

DANSK (Oprindelige anvisninger)
llustrationsoversigt
1 Låsearm til akku-dæksel
2 Akku
3 Akkudæksel
4 Låsenøgle
5 Akku-konverter (AA-3618)
6 Installationshul
7Krog
8 Produktmonteringsadapter til
AA-3618
9 Ledning
10 Sprække
11 Øvre holdere
12 Akku-konverter (AA-3618CL)
13 Afbryderknap
SPECIFIKATIONER
Model AM-3643
Klippebredde 430 mm
Omdrejninger 3 600 min
Mål (L x B x H)
Nettovægt 17,9 kg
Mærkespænding DC 36 V
Advarsel: Brug kun den akku (akkuer), som er
• På grund af vores kontinuerlige forskningsprogrammer
og udvikling, kan hosstående specifikationer blive
ændret uden varsel.
• Specifikationer og akku kan variere fra land til land.
• Vægt inklusive akku, i henhold til EPTA-Procedure 01/
2003
Standard-akku(er)
foreskrevet.
VIGTIGE SIKKERHEDSFORSKRIFTER
ADVARSEL! Læs alle sikkerhedsadvarsler og alle
sikkerhedsinstruktioner. Hvis nedenstående advarsler
og instruktioner ikke overholdes, kan resultatet blive
elektrisk stød, brand og/eller alvorlig personskade.
Gem alle advarsler og instruktioner til fremtidig reference.
1. Sæt ikke nøglen i plæneklipperen, før den er klar
til brug.
2. Denne maskine er ikke beregnet til at bruges af
personer (inkl. børn) med nedsatte fysiske, sen-
soriske eller mentale evner eller manglende erfa-
ring og kendskab, med mindre de er under
opsyn eller har modtaget instruktion angående
brug af maskinen af en person, som er ansvarlig
for deres sikkerhed.
3. Børn bør være under opsyn for at sikre, at de
ikke leger med maskinen.
4. Tillad aldrig, at børn eller personer, som ikke er
bekendt med disse instruktioner, anvender
maskinen. Operatørens alder kan være begræn-
set af lokale bestemmelser.
14 Afbryderarm
15 Justeringsarm til klippehøjde
16 Indikatorlamper
17 CHECK-knap
18 Nederste håndtag
19 Rille på klippeskiven
20 Fastspændingsskrue
21 Øverste håndtag
22 Skruehuller
23 Fastspændingsmøtrik
24 Skrue
25 Holdere
26 Skruetrækker
27 Blad
under anvendelse
under opbevaring 490 mm – 500 mm x 460 mm x 810 mm
GEB091-5
28 Bolt
29 Indre flange
30 Pil
31 Ydre flange
32 Bagskærm
33 Rille
34 Græskurv
35 Forlæng
36 Flyt ned og frem
37 Drej tilbage
38 Frontgreb
–1
1 450 mm – 1 490 mm x 460 mm x 950 mm – 1 020 mm
AP-363 / AP-3622
5. Anvend aldrig maskinen, hvis der er personer,
specielt børn, eller kæledyr, i nærheden.
6. Husk at operatøren eller brugeren er ansvarlig
for ulykker eller farlige situationer, som andre
personer eller deres ejendom udsættes for.
7. Under anvendelse af maskinen skal man altid
bruge solidt fodtøj og lange bukser. Anvend ikke
maskinen med bare fødder eller åbne sandaler.
Undgå at bære løst tøj eller smykker med løsthængende kæder eller slips. Disse kan sætte sig
fast i de bevægelige dele.
8. Anvend kun maskinen i dagslys eller i god kunstig belysning.
9. Anvend ikke maskinen i vådt græs.
10. Plæneklipperen må aldrig anvendes i regnvejr.
11. Brug af maskine med akku
– Må kun genoplades med den oplader, der er
specificeret af fabrikanten. En oplader, som er
passende til en type akku, kan udgøre en risiko
for brand, hvis den anvendes med en anden type
akku.
– Anvend kun el-værktøj med de specifikt speci-
ficerede akkuer. Anvendelse af andre akkuer,
kan give risiko for tilskadekomst og brand.
12. Hold altid godt fast i håndtaget.
13. Sørg altid for et godt fodfæste på skråninger.
14. Gå, løb aldrig.
15. Tag ikke fat i de blotlagte skæreblade eller skærekanter, når maskinen løftes eller holdes.
73
Page 74

16. Fysisk tilstand — Anvend ikke plæneklipperen
under indflydelse af medikamenter, alkohol eller
nogen former for medicin.
17. Hold dækslerne på plads og i god funktionsstand.
18. Hold hænder og fødder på god afstand af de
roterende blade. Forsigtig — Bladene vedbliver
at dreje rundt, efter at de er slukket.
19. Fjern nøglen inden servicering, rengøring eller
fjernelse af materiale fra plæneklipperen.
20. Anvend kun originale blade fra fabrikanten, som
er specificeret i denne brugsanvisning.
21. Inspicér omhyggeligt bladene for revner og
beskadigelse inden brugen. Revnede eller
beskadigede blade skal straks skiftes ud.
22. Sørg for, at der ikke er nogen personer i arbejdsområdet, inden arbejdet påbegyndes. Stop plæneklipperen, hvis der kommer nogen ind i
området.
23. Fjern fremmedlegemer såsom sten, ståltråd, flasker, ben eller store kæppe fra arbejdsområdet
inden klipningen, således at tilskadekomst og
skade på plæneklipperen undgås.
24. Hold straks op med at bruge maskinen, hvis
noget usædvanligt opdages. Sluk for plæneklipperen og tag nøglen ud af maskinen. Inspicér
derefter plæneklipperen.
25. Forsøg aldrig at foretage indstillinger af højden,
mens plæneklipperen er i gang.
26. Frigør afbryderarmen og vent til bladrotationen
er stoppet, inden der køres over indkørsler, stier,
veje og grusbelagte områder.
Fjern ligeledes nøglen, hvis du efterlader maskinen, rækker ud for at samle noget op uden for
din rækkevidde, eller af andre årsager, som kan
distrahere dig fra det, du er i gang med.
27. Genstande, der rammes af plæneklipperens
blad, kan være årsag til alvorlig tilskadekomst.
Plænen bør altid undersøges omhyggeligt og
alle genstande skal fjernes inden hver plæneklipning.
28. Hvis plæneklipperen rammer et fremmedlegeme,
skal nedenstående trin følges:
– Stop plæneklipperen, frigør afbryderarmen og
vent, indtil bladene er helt standset.
– Fjern låsenøglen og akkuen.
– Inspicér plæneklipperen grundigt for beskadi-
gelse.
– Skift bladet ud, hvis det på nogen måde er
beskadiget.
Få enhver beskadigelse repareret, inden du igen
starter og fortsætter med at anvende plæneklipperen.
29. Kontroller bagsækken hyppigt for slitage og forringelse. Ved opbevaring skal man altid sørge
for, at bagsækken er tom. Af sikkerhedsårsager
skal man skifte en slidt sæk ud med en ny sæk
fra fabrikken.
30. Stop motoren og fjern nøglen, hver gang du forlader udstyret, inden plæneklipperhuset rengøres, og inden reparationer eller inspektioner
udføres.
31. Vær yderst forsigtig, når du bakker eller trækker
maskinen mod dig.
32. Stop bladet (bladene), hvis maskinen skal vippes
i transportøjemed, når andre overflader end
græs krydses, og maskinen transporteres til og
fra det område, hvor den skal anvendes.
33. Anvend aldrig maskinen med defekte dæksler
eller skjold eller uden sikkerhedsanordninger,
f.eks. deflektor og/eller græsopsamler, på plads.
34. Vær påpasselig med at afbryde motoren i overensstemmelse med instruktionerne og med fødderne på god afstand af bladet (bladene).
35. Vip ikke maskinen, når du tænder for motoren,
undtagen hvis maskinen skal vippes for at starte
den. I dette tilfælde må den ikke vippes mere end
absolut nødvendigt og kun den del, der vender
væk fra operatøren, må vippes.
36. Start ikke maskinen, mens du står foran udledningsåbningen.
37. Anbring ikke hænder og fødder i nærheden af
eller under de roterende dele. Hold dig til enhver
tid på god afstand af udledningsåbningen.
38. Transporter ikke maskinen, mens der er tændt
for den.
39. Stop maskinen og fjern den obstruerende ting.
Sørg for, at alle de bevægelige dele er helt stoppet:
– når du forlader maskinen,
– inden rengøring af tilstopninger eller rensning
af rende,
– inden inspektion, rengøring eller arbejde på
maskinen,
– efter at maskinen har ramt et fremmedlegeme.
Inspicér maskinen for beskadigelser og udfør
reparationer, inden du igen starter og anvender maskinen:
40. Hvis maskinen begynder at vibrere unormalt
(kontroller straks)
– inspicér for beskadigelse,
– udskift eller reparer alle beskadigede dele,
– kontroller, om der er løse dele og stram dem i
så fald.
41. Vær påpasselig, når maskinen justeres, således
at du ikke får fingrene i klemme mellem maskinens roterende blade og dens faste dele.
42. Kør plæneklipperen tværs over fladen på skråninger, aldrig op og ned ad dem. Udvis den største forsigtighed, når du skifter retning på en
skråning. Anvend ikke plæneklipperen på meget
stejle skråninger.
43. Skyl ikke maskinen med en vandslange. Undgå
at der kommer vand ind i motoren og de elektriske tilslutninger.
44. Kontroller med jævne mellemrum bladets befæstelsesbolt for den rigtige stramning.
45. Hold alle møtrikker, bolte og skruer stramme for
at sikre, at udstyret er i sikker funktionsstand.
46. Lad altid maskinen køle af, inden den stilles til
opbevaring.
47. Når du servicerer bladene, skal du være klar
over, at bladene stadig kan bevæge sig, selv om
der er slukket for maskinen.
48. Skift af sikkerhedsårsager slidte eller beskadigede dele ud med nye. Anvend kun originale
udskiftningsdele og originalt tilbehør.
GEM DENNE BRUGSANVISNING.
74
Page 75

ADVARSEL:
LAD IKKE bekvemmelighed eller kendskab til produktet (opnået gennem gentagen brug) forhindre, at
sikkerhedsforskrifterne for produktet nøje overholdes. MISBRUG eller forsømmelse af at følge de i
denne brugsvejledning givne sikkerhedsforskrifter
kan føre til, at De kommer alvorligt til skade.
ENC007-7
VIGTIGE SIKKERHEDSFORSKRIFTER
FOR AKKU
1. Læs alle instruktioner og advarselsmærkater på
(1) akku opladeren, (2) akku og (3) produktet,
som anvender akku.
2. Lad være med at skille akkuen ad.
3. Hold straks op med at anvende opladeren, hvis
brugstiden er blevet stærkt afkortet. Fortsat
anvendelse kan resultere i risiko for overophedning, forbrændinger og endog eksplosion.
4. Hvis du har fået elektrolytvæske i øjnene, skal
du straks skylle den ud med rent vand og derefter øjeblikkeligt søge lægehjælp. I modsat fald
kan resultatet blive, at du mister synet.
5. Vær påpasselig med ikke at komme til at kort-
slutte akkuen:
(1) Rør ikke ved terminalerne med noget ledende
materiale.
(2) Undgå at opbevare akkuen i en beholder
sammen med andre genstande af metal, som
for eksempel søm, mønter og lignende.
(3) Udsæt ikke akkuen for vand eller regn.
Kortslutning af akkuen kan være årsag til en
kraftig øgning af strømmen, overophedning,
mulige forbrændinger og endog maskinstop.
6. Opbevar ikke værktøj og akkuen på et sted, hvor
temperaturen kan nå eller overstige 50°C.
7. Lad være med at brænde akkuen, selv ikke i tilfælde, hvor det har lidt alvorlig skade eller er
fuldstændig udtjent. Akkuen kan eksplodere,
hvis man forsøger at brænde den.
8. Lad være med at brænde akkuen eller udsætte
det for stød.
9. Anvend ikke en beskadiget akku.
GEM DENNE BRUGSANVISNING.
Tips til opnåelse af maksimal akku-levetid
1. Oplad altid akkuen, inden den er helt afladet.
Stop altid værktøj og oplad akkuen, hvis det
bemærkes, at maskineffekten er dalende.
2. Genoplad aldrig en fuldt opladet akku.
Overopladning vil afkorte akkuens levetid.
3. Oplad akkuen ved stuetemperatur ved 10°C –
40°C.
Lad altid en varm akku få tid til at køle af, inden
den oplades.
4. Oplad akkuen en gang hver sjette måned, hvis
den ikke anvendes i et længere tidsrum.
FUNKTIONSBESKRIVELSE
Isætning og udtagning af akku (Fig. 1 og 2)
FORSIGTIG:
• Sluk altid for maskinen, før akkuen installeres eller
tages ud.
• Sørg for at akku-dækslet er låst inden brugen. Ellers
kan mudder, snavs eller vand øve skade på produktet
eller akkuen.
Installation af akkuen:
1. Træk låsearmen til akku-dækslet mod dig og åbn
akku-dækslet.
2. Sæt akkuen i i den retning, der vises på illustratio-
nen, så et klik høres.
3. Sæt låsenøglen så langt den kan komme ind i det
sted, der vises på illustrationen.
4. Luk akku-dækslet og tryk på det, så det går i indgreb
med låsearmen.
Fjernelse af akkuen fra plæneklipperen:
1. Træk låsearmen til akku-dækslet mod dig og åbn
akku-dækslet.
2. Træk låsenøglen ud.
3. Træk den af maskinen, idet du skyder knappen på
forsiden af akkuen i stilling.
4. Luk akku-dækslet.
Akku-konvertere (ekstraudstyr)
ADVARSEL:
• Fjern låsenøglen, inden akku-konverterne AA-3618/
AA-3618CL installeres eller fjernes.
AA-3618 (ekstraudstyr) (Fig. 3, 4 og 5)
ADVARSEL:
• Når AA-3618 anvendes, må du aldrig fastgøre den på
nogen del af din krop. Fastgøring af AA-3618 til kroppen kan føre til alvorlig tilskadekomst.
Tryk akku-konverteren AA-3618 ind i installationshullet,
indtil den ikke kan komme længere.
Åbn akku-dækslet på plæneklipperen og tryk derefter
hele vejen ind og klik produktmonteringsadapteren til AA3618 ind i akku-porten på plæneklipperen.
Før AA-3618’s ledning gennem sprækken i akku-dækslet
og luk akku-dækslet.
Sæt AA-3618’s ledning ind i de øverste holdere på håndtaget.
BEMÆRK:
• Når akku-konverteren AA-3618 (ekstraudstyr) anvendes, skal strømledningen sættes på den dertil beregnede holder på plæneklipperen. Hvis dette ikke gøres,
kan ledningen blive skåret over.
For at fjerne AA-3618 fra plæneklipperen, skal man åbne
akku-dækslet og derefter trykke krogen på akku-monteringssiden af AA-3618.
AA-3618CL (ekstraudstyr) (Fig. 6 og 7)
Åbn akku-dækslet og klik AA-3618CL ind i akku-porten
på plæneklipperen.
Luk akku-dækslet.
For at fjerne AA-3618CL, skal man trykke på krogen på
AA-3618CL og trække den ud med begge hænder.
75
Page 76

Anvendelse af afbryder (Fig. 8 og 9)
Til
Fra
Blinkende
011713
ADVARSEL:
• Inden man sætter akkuen i maskinen, skal man
altid kontrollere, at afbryderarmen fungerer ordentligt og går tilbage til udgangsstillingen, når den
slippes. Anvendelse af en maskine med en afbryder,
der ikke fungerer ordentligt, kan føre til at man mister
herredømmet over maskinen med alvorlig tilskadekomst som resultat.
BEMÆRK:
• Forsøg på at klippe meget græs ad gangen kan
bevirke, at motoren ikke starter på grund af overbelastning. Ændr i så tilfælde klippehøjden til en større højde
for at starte igen.
• Plæneklipperen starter ikke, uden at man trykker på
afbryderknappen, selv hvis afbryderarmen trykkes ind.
Denne plæneklipper er udstyret med en blokeringsomskifter og en håndtagsknap. Hvis du bemærker noget
usædvanligt med en af disse knapper, skal du straks
stoppe anvendelsen og få dem efterset hos nærmeste,
autoriserede Dolmar Service Center.
1. Sæt låsenøglen ind i blokeringsknappen.
2. Tryk afbryderknappen ned.
3. Træk afbryderarmen mod dig, idet du trykker afbry-
derknappen ned.
4. Frigør afbryderknappen, så snart motoren begynder
at køre. Plæneklipperen vil fortsætte med at køre,
indtil du frigør afbryderarmen.
5. Frigør afbryderarmen for at stoppe motoren.
6. Når plæneklipperen ikke bruges, skal låsenøglen
fjernes. Opbevar låsenøglen på et sikkert sted, hvor
børn ikke kan få fat i den.
Indstilling af klippehøjden (Fig. 10)
ADVARSEL:
• Stik aldrig en hånd eller et ben ind under plæneklipperen, når du indstiller klippehøjden.
• Sørg altid for, at armen passer ordentligt ind i rillen
inden brugen.
Klippehøjden kan indstilles inden for et område mellem
20 mm – 75 mm.
1. Fjern låsenøglen.
2. Træk justeringsarmen til klippehøjden mod dig og
flyt den til den ønskede klippehøjde.
Sørg for, at fremspringet på justeringsarmen for klippehøjden passer ind i rillen på plæneklipperen.
BEMÆRK:
• Tallene for klippehøjden bør kun anvendes som rettesnor, da plænens eller jordens tilstand kan bevirke, at
plænens højde er en smule anderledes end den indstillede højde.
• Udfør en testklipning på et mindre iøjenfaldende sted
for at opnå den ønskede højde.
Akku-beskyttelsessystem
Lithium-ion akkuer er udstyret med et beskyttelsessystem. Dette system afbryder automatisk strømmen til
maskinen, således at akku-levetiden forlænges.
Maskinen stopper automatisk under driften, hvis den og/
eller akkuen kommer i en af følgende situationer:
• Overbelastet:
Maskinen anvendes på en måde, der bevirker, at den
forbruger abnormt høj strøm.
Slip i denne situation afbryderknappen på maskinen og
stop den anvendelse, der bevirkede, at maskinen blev
overbelastet. Tryk derefter afbryderknappen ind igen
for at starte igen.
Hvis maskinen ikke starter, er akkuen overophedet.
Lad i dette tilfælde akkuen køle af, inden afbryderknappen trykkes ind igen.
• Lav akku-spænding:
Den tilbageværende akku-kapacitet er for lav, og
maskinen vil ikke fungere. Fjern i denne situation
akkuen fra maskinen og oplad den.
Indikator for tilbageværende akku-kapacitet (kun
modeller med akku AP-3622) (Fig. 11)
Akku AP-3622 er udstyret med en indikator for tilbageværende akku-kapacitet.
Tryk på CHECK-knappen for at vise akkuens tilbageværende kapacitet. Indikatorlamperne vil derefter lyse i
omkring tre sekunder.
Indikatorlamper
E
• Hvis kun den nederste indikatorlampe (ved siden af
“E”) blinker, eller hvis ingen af indikatorlamperne lyser,
betyder det, at akku-kapaciteten er udtjent og maskinen ikke vil fungere. Oplad i sådanne tilfælde akkuen
eller skift den udtjente akku ud med en fuldt opladet
akku.
• Hvis to eller flere indikatorlamper ikke lyser, selv efter
at opladningen er færdig, har akkuen nået slutningen af
sin levetid.
• Hvis de to øverste og to nederste indikatorlamper lyser
skiftevis, kan akkuen have fungeret forkert. Kontakt et
autoriseret Dolmar service-center.
BEMÆRK:
• Den angivne kapacitet kan være lavere end det faktiske niveau under brugen eller umiddelbart efter brugen
af maskinen.
• Afhængigt af brugsforholdene og den omgivende temperatur, kan angivelsen afvige en smule fra den faktiske kapacitet.
F
Tilbageværende
kapacitet
70% til 100%
45% til 70%
20% til 45%
0% til 20%
Oplad akkuen.
Akkuen kan have
fejlfungeret.
76
Page 77

SAMLING
ADVARSEL:
• Vær altid sikker på, at låsenøglen og akkuen er fjernet, inden du udfører noget arbejde på plæneklipperen. Forsømmelse af at fjerne låsenøglen og akkuen
kan resultere i alvorlig tilskadekomst forårsaget af utilsigtet start.
• Start aldrig maskinen med mindre den er fuldstæn-
dig samlet. Anvendelse af maskinen i kun delvist samlet tilstand kan resultere i alvorlig tilskadekomst
forårsaget af utilsigtet start.
Montering af håndtaget (Fig. 12, 13, 14, 15, 16 og
17)
ADVARSEL:
• Når der monteres håndtag, skal ledningerne placeres
således, at de ikke sætter sig fast i noget mellem håndtagene.
1. Løsn fastspændingsskruerne (to stk.).
Forlæng det nederste håndtag til begge sider og drej
med det forlænget i denne stilling bagud og sæt det derefter ind i rillen i klippeskiven.
2. Stram fastspændingsskruerne på begge sider for at
fastgøre det nederste håndtag.
3. Hæv det øverste håndtag og sæt skruehullerne i det
øverste håndtag ud for dem i det nederste håndtag
og fastgør det derefter med de medfølgende skruer
og fastspændingsmøtrikker.
BEMÆRK:
• Tag på dette tidspunkt godt fat i det øverste håndtag,
så det ikke glider ud af dit greb.
BEMÆRK:
• Monter det øverste håndtag således, at retningen af
det øverste håndtag og strømforsyningsledningen er
placeret som vist på illustrationen.
BEMÆRK:
• Det øverste håndtag har to huller hver på begge sider.
Anvendelse af de forskellige positionshuller til skruerne
og fastspændingsmøtrikkerne gør det muligt at udføre
højdejustering.
Afmontering og montering af bladet (Fig. 18 og
19)
ADVARSEL:
• Fjern altid låsenøglen og akkuen, når bladet afmonteres og monteres. Forsømmelse af at fjerne låsenøglen
og akkuen kan føre til alvorlig tilskadekomst.
• Bladet drejer rundt i et par sekunder, efter at afbryderen
er frigjort. Kontroller, at bladet er helt stoppet.
• Brug altid handsker, når du håndterer bladet.
1. Læg plæneklipperen på siden, så justeringsarmen til
klippehøjden er placeret på oversiden.
2. For at låse bladet, skal man sætte en skruetrækker
eller et lignende instrument, der fås i handelen, ind i
et hul i plæneklipperen.
3. Løsn bolten i retningen mod uret med nøglen.
4. Fjern bolten, den ydre flange, bladet og den indre
flange i nævnte rækkefølge.
For at installere bladet, skal man udføre proceduren for
afmontering af bladet i modsat rækkefølge.
ADVARSEL:
• Monter den indre flange, bladet og den ydre flange forsigtigt, da de har en top/bund flade.
• Stram bolten godt til i retningen med uret for at fastgøre
bladet.
• Anbring bladet således, at bladsiden med rotationsretningspilen vender udad.
• Sørg for, at bladet er ordentligt monteret.
• Fjern altid skruetrækkeren eller lignende, der er sat i et
hul for at låse bladet.
Montering af græskurven (Fig. 20 og 21)
Fjern låsenøglen.
Hæv bagskærmen på dækselenheden og sæt græskur-
ven på plæneklipperens rille.
ANVENDELSE
Klipning
ADVARSEL:
• Fjern grene og sten fra klipningsområdet inden klipningen. Fjern desuden i forvejen alt ukrudt fra klipningsområdet.
• Bær altid beskyttelsesbriller eller sikkerhedsbriller med
sideafskærmning, når du anvender plæneklipperen.
Hold godt fast i plæneklipperens håndtag med begge
hænder, når du klipper græs.
De ydre kanter på hovedenhedens forreste hjul giver en
rettesnor for klippevidden. Anvend de to forreste hjuls
ydre kanter som en rettesnor og klip i striber med overlapning af halvdelen til en trediedel af den foregående
stribe, så der klippes jævnt.
Kontroller med jævne mellemrum niveauet i græskurven
og tøm den, inden den bliver fuld. Inden hvert periodisk
eftersyn skal man sørge for at stoppe plæneklipperen og
fjerne låsenøglen og akkuen.
BEMÆRK:
• Hvis plæneklipperen anvendes med græskurven fuld,
kan der ikke opnås problemfri rotation af bladet og
motoren udsættes for ekstra belastning, hvilket kan
føre til maskinsammenbrud.
Klipning af en plæne med højt græs (Fig. 22)
Forsøg ikke at klippe langt græs i en enkelt arbejdsgang.
Klip i stedet for plænen i etaper ved at holde en pause på
en dag eller to mellem klipningerne, indtil plænen er ensartet kort.
BEMÆRK:
• Klipning af højt græs til en kort længde i en enkelt
arbejdsgang kan bevirke, at græsset dør og/eller blokerer hovedenhedens indre.
Tømning af græskurven (Fig. 23)
ADVARSEL:
• For at reducere risikoen for ulykker, skal man med
jævne mellemrum efterse græskurven for beskadigelse
eller forringet styrke og om nødvendigt skifte den ud.
1. Frigør afbryderarmen.
2. Fjern låsenøglen.
3. Åbn bagskærmen og tag græskurven ud sammen
med dens håndtag.
4. Tøm græskurven.
77
Page 78

VEDLIGEHOLDELSE & OPBEVARING
ADVARSEL:
• Vær altid sikker på, at låsenøglen og akkuen er fjernet
fra plæneklipperen, inden den stilles til opbevaring eller
inden man udfører inspektion eller vedligeholdelse.
• Bær altid handsker under udførelse af inspektion eller
vedligeholdelse.
FORSIGTIG:
• Anvend aldrig benzin, rensebenzin, fortynder, alkohol
og lignende. Resultatet kan blive misfarvning, deformering eller revner.
VEDLIGEHOLDELSE
1. FJERN LÅSENØGLEN. Anbring den på et sikkert
sted, hvor børn ikke kan få fat i den.
2. Rengør kun plæneklipperen med mild sæbe og en
fugtig klud. Lad være med at sprøjte eller hælde
vand på plæneklipperen, når den rengøres.
3. Læg plæneklipperen på siden og fjern græsafklip,
der har samlet sig på undersiden af klippeskiven.
4. Kontroller at alle møtrikker, bolte, knapper, skruer,
fastgøringsanordninger, etc. er strammet.
5. Inspicér de bevægende del for skade, brud og sli-
tage. Få beskadigede dele repareret og manglende
dele erstattet.
6. Fjern akkuen fra plæneklipperen, inden den stilles til
opbevaring.
7. Opbevar plæneklipperen indendørs på et køligt, tørt
og aflåst sted. Opbevar ikke plæneklipperen og
opladeren på steder, hvor temperaturen kan komme
op på eller overstige 40°C.
Opbevaring (Fig. 24, 25, 26, 27, 28 og 29)
ADVARSEL:
• Hold ikke i foldehåndtagene, men i frontgrebet på plæneklipperen, når du bærer den eller stiller den til opbevaring. Hvis du holder den i foldehåndtagene, kan
resultatet blive alvorlig tilskadekomst og/eller beskadigelse af plæneklipperen.
Plæneklipperen kan opbevares i opret stilling.
1. Løsn fastspændingsskruen, forlæng det nederste
håndtag til begge sider og flyt derefter håndtaget
ned og fremefter.
BEMÆRK:
• Tag på dette tidspunkt godt fat i det nederste håndtag,
så det ikke falder ned til den fjerne side af maskinen.
2. Løsn fastspændingsskruen og drej det øverste
håndtag tilbage.
3. Tag græskurven af og stil plæneklipperen i opret stil-
ling.
BEMÆRK:
• Når man anbringer plæneklipperen i opret stilling, må
man ikke holde i håndtaget, men man skal bruge frontgrebet på plæneklipperen.
4. Opbevar græskurven mellem håndtaget og selve
plæneklipperen.
For at opretholde produktets SIKKERHED og PÅLIDELIGHED bør reparation, vedligeholdelse og justering kun
udføres af et Dolmar Service Center med anvendelse af
original Dolmar udskiftningsdele.
78
Page 79

FEJLFINDING
012350
Udfør selv en inspektion, inden du beder om reparation. Hvis du opdager et problem, som ikke er forklaret i brugsanvisningen, må du ikke forsøge at adskille maskinen. Rådfør dig i stedet med et autoriseret Dolmar Service Center og
brug altid originale Dolmar udskiftningsdele til reparationer.
Fejlfunktionsstatus Årsag Udbedring
Akkuen er ikke installeret. Installér akkuen.
Plæneklipperen starter ikke.
Motoren stopper efter kort tids brug.
Max. RMP (omdr. pr. min.) nås ikke.
Klippedelen roterer ikke:
Stop maskinen øjeblikkeligt!
Unormal vibration:
Stop maskinen øjeblikkeligt!
Klippedelen og motoren kan ikke
stoppe:
Fjern øjeblikkeligt akkuen!
Akku-problem (underspænding)
Låsenøglen er ikke sat i. Sæt låsenøglen i.
Akkuens ladeniveau er lavt.
Klippehøjden er for lavt indstillet. Øg højden.
Akkuen er ikke sat ordentligt i.
Akkuens effekt mindskes.
Drivsystemet fungerer ikke korrekt.
Et fremmedlegeme såsom en gren
har sat sig fast i nærheden af bladet.
Drivsystemet fungerer ikke korrekt.
Bladet er ubalanceret, ekstremt eller
uensartet slidt.
Elektrisk eller elektronisk
fejlfunktion.
Genoplad akkuen. Skift akkuen ud
med en ny, hvis genopladningen ikke
er effektiv.
Genoplad akkuen. Skift akkuen ud
med en ny, hvis genopladningen ikke
er effektiv.
Installér akkuen som beskrevet i
denne brugsanvisning.
Genoplad akkuen. Skift akkuen ud
med en ny, hvis genopladningen ikke
er effektiv.
Få et lokalt, autoriseret servicecenter til at reparere det.
Fjern fremmedlegemet.
Få et lokalt, autoriseret servicecenter til at reparere det.
Skift bladet ud med et nyt.
Fjern akkuen og få et lokalt,
autoriseret service-center til at
foretage reparation.
EKSTRAUDSTYR
FORSIGTIG:
• Det følgende tilbehør og ekstraudstyr er anbefalet til brug med Deres Dolmar maskine, der er beskrevet i denne
brugsanvisning. Anvendelse af andet tilbehør eller ekstraudstyr kan udgøre en risiko for personskade. Anvend kun
tilbehør og ekstraudstyr til det beskrevne formål.
Hvis De har behov for yderligere detaljer om dette tilbehør, bedes De kontakte Deres lokale Dolmar Servicecenter.
•Blad
• Original Dolmar akku og oplader
BEMÆRK:
• Nogle ting på denne liste kan være inkluderet i værktøjspakken som standardtilbehør. Det kan være forskellige fra
land til land.
79
Page 80

ENG905-1
Lyd
Det typiske A-vægtede støjniveau bestemt i overensstemmelse med EN60335:
Lydtryksniveau (L
Lydeffektniveau (L
Usikkerhed (K): 3 dB (A)
Vibration
Vibrations totalværdi (tre-aksial vektorsum) bestemt i
overensstemmelse med EN60335:
Vibrationsafgivelse (a
Usikkerhed (K): 1,5 m/s
• Den angivne vibrationsemmisionsværdi er blevet målt i
overensstemmelse med standardtestmetoden og kan
anvendes til at sammenligne en maskine med en
anden.
• Den angivne vibrationsemmisionsværdi kan også
): 80 dB (A)
pA
): 93 dB (A)
WA
Bær høreværn
): 2,5 m/s2 eller mindre
h
2
ENG900-1
ENG901-1
anvendes i en preliminær eksponeringsvurdering.
ADVARSEL:
• Vibrationsemissionen under den faktiske anvendelse af
maskinen kan være forskellig fra den erklærede emissionsværdi, afhængigt af den måde, hvorpå maskinen
anvendes.
• Sørg for at identificere de sikkerhedsforskrifter til
beskyttelse af operatøren, som er baseret på en vurdering af eksponering under de faktiske brugsforhold
(med hensyntagen til alle dele i brugscyklen, som f.eks.
de gange, hvor maskinen er slukket og når den kører i
tomgang i tilgift til afbrydertiden).
ENH218-1
Kun for lande i Europa
EU-konformitetserklæring
Undertegnede Tamiro Kishima og Rainer Bergfeld,
som autoriseret af Dolmar GmbH, erklærer at
DOLMAR maskinen (maskinerne):
Maskinens betegnelse:
Akku-plæneklipper
Model nr./Type: AM-3643
Specifikationer: Se oversigten “SPECIFIKATIONER”.
er i serieproduktion og
opfylder betingelserne i de følgende EU-direktiver:
2000/14/EC, 2006/42/EC
og er fremstillet i overensstemmelse med de følgende
standarder eller standardiserede dokumenter:
EN60745, EN60335
Den tekniske information opbevares hos:
Dolmar GmbH,
Jenfelder Straße 38, Abteilung FZ,
D-22045 Hamburg
Den procedure for konformitetsfastsættelse, som kræves
i Direktiv 2000/14/EC, er fundet i overensstemmelse med
tillæg VI.
Notificeret organisation:
TÜV Rheinland LGA Products GmbH
Am Grauen Stein 29
51105 Köln Tyskland
Identifikationsnummer 0197
Målt lydbelastningsniveau: 93 dB (A)
Garanteret lydbelastningsniveau: 94 dB (A)
7.9.2011
80
Tamiro Kishima
Administrerende direktør
Rainer Bergfeld
Administrerende direktør
Page 81

ΕΛΛΗΝΙΚΑ (Αρχικές οδηγίες)
Περιγραφή γενικής άποψης
1 Μοχλός ασφάλισης καλύμματος
μπαταρίας
2 Κασέτα μπαταρίας
3 Κάλυμμα μπαταρίας
4 Κλειδί ασφάλισης
5 Μετατροπέας μπαταριών
(AA-3618)
6 Οπή τοποθέτησης
7 Γάντζος
8 Προσαρμογέας στερέωσης
προϊόντος του AA-3618
9 Καλώδιο
10 Σχισμή
11 Άνω υποδοχείς
ΤΕΧΝΙΚΑ ΧΑΡΑΚΤΗΡΙΣΤΙΚΑ
Μοντέλο AM-3643
Πλάτος κοπής 430 χιλ
ρελαντί 3.600 λεπ
Στροφές
Διαστάσεις (Μ x Π x Υ)
Καθαρό Βάρος 17,9 κιλά
Έξοδος D.C. 36 V
Στάνταρ κασέτες μπαταριών
Προειδοποίηση: Χρησιμοποιήστε μόνο τις κασέτες
μπαταριών που περιγράφονται.
• Λόγω του συνεχιζόμενου προγράμματος έρευνας και
ανάπτυξης, οι παρούσες προδιαγραφές υπόκεινται σε
αλλαγή χωρίς προειδοποίηση.
• Τα τεχνικά χαρακτηριστικά και η κασέτα μπαταρίας
μπορεί να διαφέρουν από χώρα σε χώρα.
• Βάρος, με κασέτα μπαταρίας, σύμφωνα με τη
διαδικασία EPTA 01/2003
ΣΗΜΑΝΤΙΚΕΣ ΟΔΗΓΙΕΣ ΑΣΦΑΛΕΙΑΣ
ΠΡΟΕΙΔΟΠΟΙΗΣΗ! Διαβάστε όλες τις
προειδοποιήσεις ασφαλείας και όλες τις οδηγίες. Η
μη τήρηση των προειδοποιήσεων και οδηγιών ενδέχεται
να καταλήξει σε ηλεκτροπληξία, πυρκαγιά ή/και σοβαρό
τραυματισμό.
Φυλάξτε όλες τις προειδοποιήσεις και τις οδηγίες για
μελλοντική παραπομπή.
1. Μην εισάγετε το κλειδί στη μηχανή γκαζόν μέχρι
να είναι έτοιμη για χρήση.
2. Η συσκευή αυτή
οποιοδήποτε άτομο (περιλαμβανομένων των
παιδιών) με μειωμένες σωματικές, αισθητήριες ή
διανοητικές ικανότητες, ή από άτομο που δεν
έχει πείρα και γνώσεις, εκτός αν επιτηρείται ή αν
του έχουν δοθεί οδηγίες για τη χρήση της
συσκευής από άτομο το οποίο είναι υπεύθυνο
για την ασφάλειά του.
δεν προορίζεται για χρήση από
12 Μετατροπέας μπαταριών
(AA-3618CL)
13 Κουμπί διακόπτης
14 Μοχλός διακόπτης
15 Μοχλός ρύθμισης ύψους κοπής
16 Ενδεικτικές λυχνίες
17 Κουμπί CHECK (Έλεγχος)
18 Κάτω λαβή
19 Εγκοπή στη βάση
20 Βίδα σύσφιξης
21 Άνω λαβή
Οπές βιδώματος
22
23 Παξιμάδι σύσφιξης
24 Βίδα
25 Υποδοχείς
κατά τη λειτουργία
κατά την αποθήκευση 490 χιλ – 500 χιλ x 460 χιλ x 810 χιλ
GEB091-5
26 Κατσαβίδι
27 Λάμα
28 Μπουλόνι
29 Εσωτερική φλάντζα
30 Βέλος
31 Εξωτερική φλάντζα
32 Πίσω προστατευτικό
33 Εγκοπή
34 Καλάθι χορταριού
35 Επέκταση
36 Μετακινήστε προς τα εμπρός
37 Περιστρέψτε προς τα πίσω
38 Μπροστινή λαβή
–1
1.450 χιλ – 1.490 χιλ x 460 χιλ x 950 χιλ – 1.020 χιλ
AP-363 / AP-3622
3. Τα παιδιά θα
εξασφαλιστεί ότι δεν παίζουν με τη συσκευή.
4. Μην αφήνετε ποτέ παιδιά ή άτομα που δεν
γνωρίζουν αυτές τις οδηγίες να χρησιμοποιούν
τη μηχανή. Μπορεί να υπάρχει περιορισμός
ηλικίας για το χειριστή βάσει τοπικών
κανονισμών.
5. Μη χειρίζεστε ποτέ τη μηχανή όταν άλλα άτομα,
ειδικά παιδιά ή κατοικίδια, βρίσκονται
απόσταση.
6. Να θυμάστε ότι ο χειριστής ή ο χρήστης είναι
υπεύθυνος για ατυχήματα ή κινδύνους που
υφίστανται άλλα άτομα ή η ιδιοκτησία τους.
7. Κατά το χειρισμό της μηχανής να φοράτε πάντα
κατάλληλα υποδήματα και μακρύ παντελόνι. Μη
χειρίζεστε το μηχάνημα ξυπόλυτοι ή με ανοικτά
σαντάλια. Αποφεύγετε να φοράτε ρούχα ή
κοσμήματα
σκοινιά που κρέμονται. Μπορεί να πιαστούν στα
κινούμενα μέρη.
8. Να χειρίζεστε τη μηχανή μόνο όταν έχει ακόμα
φως έξω ή με καλό τεχνητό φωτισμό.
9. Αποφεύγετε το χειρισμό της μηχανής σε
βρεγμένο γκαζόν.
10. Μη χειρίζεστε ποτέ τη μηχανή γκαζόν στη βροχή.
πρέπει να επιτηρούνται για να
σε κοντινή
που είναι χαλαρά ή έχουν κορδόνια ή
81
Page 82

11. Χρήση εργαλείου με μπαταρία
– Να επαναφορτίζετε την μπαταρία μόνο με το
φορτιστή που καθορίζεται από τον
κατασκευαστή. Ένας φορτιστής που είναι
κατάλληλος για μια συγκεκριμένη μπαταρία
μπορεί να δημιουργήσει κίνδυνο πυρκαγιάς όταν
χρησιμοποιείται με μια άλλη μπαταρία.
– Χρησιμοποιείτε ηλεκτρικά εργαλεία μόνο με
ειδικά καθορισμένες μπαταρίες. Η χρήση κάθε
άλλης μπαταρίας μπορεί να δημιουργήσει
τραυματισμού ή πυρκαγιάς.
κίνδυνο
12. Να κρατάτε πάντα τη λαβή σταθερά.
13. Να είστε πάντα βέβαιοι ότι έχετε καλό πάτημα σε
πλαγιές.
14. Να περπατάτε, να μην τρέχετε ποτέ.
15. Μην πιάνετε τις εκτεθειμένες λάμες κοπής ή τα
κοπτικά άκρα όταν σηκώνετε ή κρατάτε το
μηχάνημα.
16. Σωματική κατάσταση — Μη χειρίζεστε τη μηχανή
γκαζόν υπό την
άλλων φαρμάκων.
17. Διατηρείτε τα προστατευτικά στη θέση τους και
σε λειτουργική κατάσταση.
18. Διατηρείτε τα χέρια και τα πόδια σας μακριά από
τις περιστρεφόμενες λάμες. Προσοχή — Οι
λάμες περιστρέφεται ελεύθερα μετά το σβήσιμο.
19. Βγάλτε το κλειδί πριν από την εκτέλεση
εργασιών σέρβις ή καθαρισμού, ή την αφαίρεση
υλικού από
20. Να χρησιμοποιείτε μόνο γνήσιες λάμες του
κατασκευαστή που καθορίζονται σε αυτό το
εγχειρίδιο.
21. Πριν από τη λειτουργία, να ελέγχετε προσεχτικά
τις λάμες για ραγίσματα ή ζημιά. Να
αντικαθιστάτε αμέσως τις ραγισμένες ή
κατεστραμμένες λάμες.
22. Βεβαιωθείτε ότι στην περιοχή δεν υπάρχουν
άλλα άτομα πριν ξεκινήσετε να κουρεύετε το
γκαζόν. Σβήστε
κάποιος στην περιοχή.
23. Απομακρύνετε ξένα υλικά όπως πέτρες,
καλώδια, μπουκάλια, κόκαλα και μεγάλα ξύλα
από την περιοχή εργασίας πριν από το κούρεμα
του γκαζόν για την αποφυγή προσωπικού
τραυματισμού ή πρόκλησης ζημιάς στη μηχανή
γκαζόν.
24. Διακόψτε αμέσως τη λειτουργία αν
παρατηρήσετε οτιδήποτε ασυνήθιστο. Σβήστε τη
μηχανή γκαζόν και
μηχάνημα. Στη συνέχεια, επιθεωρήστε τη
μηχανή γκαζόν.
25. Μην επιχειρήσετε ποτέ να κάνετε ρυθμίσεις του
ύψους των τροχών ενώ η μηχανή γκαζόν
βρίσκεται σε λειτουργία.
26. Αφήστε το μοχλό διακόπτη και περιμένετε μέχρι
να σταματήσει η περιστροφή της λάμας πριν
διασχίσετε ιδιωτικούς δρόμους, πεζοδρόμια,
δρόμους και οποιαδήποτε περιοχή είναι
καλυμμένη
Επίσης βγάλτε το κλειδί αν απομακρυνθείτε από
τη μηχανή, αν σκύψετε για να πιάσετε ή να
απομακρύνετε κάτι από μπροστά σας ή για
οποιονδήποτε άλλο λόγο που μπορεί να
αποσπάσει την προσοχή σας από αυτό που
κάνετε.
επήρεια ναρκωτικών, αλκοόλ ή
το μηχάνημα κηπουρικής.
τη μηχανή γκαζόν αν εισέλθει
βγάλτε το κλειδί από το
με χαλίκια.
27. Τα αντικείμενα στα οποία έχει προσκρούσει η
λάμα της μηχανής γκαζόν μπορεί να
προκαλέσουν σοβαρό
ανθρώπους. Πρέπει να εξετάζετε προσεκτικά το
γκαζόν και να απομακρύνετε όλα τα αντικείμενα
που εμποδίζουν πριν από το κάθε κούρεμα του
γκαζόν.
28. Αν η μηχανή γκαζόν χτυπήσει σε ένα ξένο
αντικείμενο, ακολουθήστε τα εξής βήματα:
– Σβήστε τη μηχανή γκαζόν, αφήστε το μοχλό
διακόπτη και περιμένετε μέχρι να σταματήσει
να περιστρέφεται η
– Βγάλτε το κλειδί ασφάλισης και την κασέτα
μπαταρίας.
– Επιθεωρήστε καλά τη μηχανή γκαζόν για
τυχόν ζημιά.
– Αντικαταστήστε τη λάμα αν έχει υποστεί ζημιά
με οποιονδήποτε τρόπο.
Επισκευάστε κάθε ζημιά πριν την επανέναρξη
και συνεχίστε να χρησιμοποιείτε τη μηχανή
γκαζόν.
29. Ελέγχετε τακτικά τον πίσω σάκο για φθορά ή
παραμόρφωση. Για την
βεβαιώνεστε ότι ο πίσω σάκος είναι άδειος.
Αντικαθιστάτε ένα φθαρμένο σάκο με ένα
καινούργιο ανταλλακτικό σάκο εργοστασίου για
ασφάλεια.
30. Σβήστε το μοτέρ και βγάλτε το κλειδί όταν
απομακρύνεστε από τον εξοπλισμό, πριν από
τον καθαρισμό του περιβλήματος της μηχανής
γκαζόν και πριν από την εκτέλεση τυχόν
επισκευών ή επιθεωρήσεων.
είστε ιδιαίτερα προσεκτικοί όταν κινείστε
31. Να
προς τα πίσω ή τραβάτε τη μηχανή προς το
μέρος σας.
32. Οι λάμες πρέπει να είναι ακινητοποιημένες όταν
πρέπει να γείρετε τη μηχανή για μεταφορά κατά
τη διέλευση επιφανειών εκτός από το γκαζόν και
κατά τη μεταφορά της μηχανής από και προς την
περιοχή όπου θα χρησιμοποιηθεί.
χειρίζεστε ποτέ τη μηχανή με ελαττωματικά
33. Μη
προστατευτικά ή καλύμματα ή χωρίς τις
διατάξεις ασφάλειας, για παράδειγμα, διατάξεις
παρεκτροπής ή/και διάταξη συλλογής γκαζόν,
στη θέση τους.
34. Ενεργοποιήστε προσεκτικά το μοτέρ σύμφωνα
με τις οδηγίες και με τα πόδια σας μακριά από
τις λάμες.
35. Μη γέρνετε τη μηχανή όταν ενεργοποιείτε το
μοτέρ, εκτός
την έναρξη. Σε αυτή την περίπτωση, μην τη
γέρνετε περισσότερο από όσο είναι απολύτως
απαραίτητο και να σηκώνετε μόνο το τμήμα που
βρίσκεται μακριά από το χειριστή.
36. Μην ενεργοποιείτε τη μηχανή όταν στέκεστε
μπροστά από το άνοιγμα εκκένωσης.
37. Μη βάζετε τα χέρια ή τα πόδια
από περιστρεφόμενα μέρη. Μείνετε μακριά από
το άνοιγμα εκκένωσης κάθε στιγμή.
38. Μη μεταφέρετε τη μηχανή γκαζόν ενώ είναι
ενεργοποιημένη.
αν πρέπει να γέρνετε τη μηχανή για
τραυματισμό σε
λάμα.
αποθήκευση, πάντα να
σας κοντά ή κάτω
82
Page 83

39. Σβήστε τη μηχανή και βγάλτε τη διάταξη
απενεργοποίησης. Βεβαιωθείτε ότι όλα τα
κινούμενα μέρη έχουν ακινητοποιηθεί πλήρως
– κάθε φορά που απομακρύνεστε από τη
μηχανή,
– πριν καθαρίσετε εμπόδια ή ξεφράξετε τη
χοάνη,
– πριν ελέγξετε ή καθαρίσετε τη μηχανή ή πριν
εκτελέσετε εργασίες σε αυτή,
– μετά από την πρόσκρουση σε ξένο
αντικείμενο. Επιθεωρήστε τη
ζημιά και εκτελέστε επισκευές πριν την
επανεκκίνηση και λειτουργία της μηχανής.
40. Αν η μηχανή αρχίσει να δονείται με ασυνήθιστο
τρόπο (ελέγξτε αμέσως)
– επιθεωρήστε για ζημιά,
– αντικαταστήστε ή επισκευάστε τα
κατεστραμμένα μέρη,
– ελέγξτε για χαλαρά μέρη και σφίξτε τα
ανάλογα.
41. Προσέχετε κατά τη διάρκεια ρυθμίσεων στη
μηχανή για την αποφυγή
μεταξύ των κινούμενων λαμών και των
σταθερών μερών της μηχανής.
42. Να κινήστε κατά πλάτος της πρόσοψης της
πλαγιάς, ποτέ προς τα επάνω ή κάτω. Να είστε
ιδιαίτερα προσεκτικοί όταν αλλάζετε κατεύθυνση
σε πλαγιές. Μην κουρεύετε το γκαζόν σε
εξαιρετικά απότομες πλαγιές.
43. Μην πλένετε τη μηχανή με λάστιχο. Αποφεύγετε
την εισχώρηση νερού
ηλεκτρικές συνδέσεις.
44. Ελέγξτε σε τακτικά διαστήματα αν το μπουλόνι
στερέωσης λάμας είναι καλά σφιγμένο.
45. Διατηρείτε σφικτά όλα τα παξιμάδια, τα
μπουλόνια και τις βίδες για να βεβαιωθείτε ότι ο
εξοπλισμός βρίσκεται σε ασφαλή λειτουργική
κατάσταση.
46. Να αφήνετε πάντα τη μηχανή να κρυώσει πριν
την αποθήκευση.
47. Κατά την
να γνωρίζετε ότι οι λάμες μπορεί να συνεχίζουν
να κινούνται παρότι η τροφοδοσία
απενεργοποιήθηκε.
48. Αντικαταστήστε τα φθαρμένα ή κατεστραμμένα
μέρη για ασφάλεια. Να χρησιμοποιείτε μόνο
γνήσια ανταλλακτικά εξαρτήματα και αξεσουάρ.
εκτέλεση εργασιών σέρβις στις λάμες,
παγίδευσης δακτύλων
στο μοτέρ ή στις
μηχανή για
ΦΥΛΑΞΤΕ ΤΙΣ ΟΔΗΓΙΕΣ ΑΥΤΕ Σ .
ΠΡΟΕΙΔΟΠΟΙΗΣΗ:
ΜΗΝ επιτρέψετε το βαθμό άνεσης ή εξοικείωσης με
το προϊόν (λόγω επανειλημμένης χρήσης) να
αντικαταστήσει την αυστηρή τήρηση των κανόνων
ασφαλείας του παρόντος εργαλείου. ΚΑΚΗ ΧΡΗΣΗ ή
αμέλεια να ακολουθήσετε τους κανόνες ασφάλειας
που διατυπώνονται σ’αυτό το εγχειρίδιο οδηγιών
μπορεί να προκαλέσει σοβαρό προσωπικό
τραυματισμό.
ENC007-7
ΣΗΜΑΝΤΙΚΕΣ ΟΔΗΓΙΕΣ ΑΣΦΑΛΕΙΑΣ
ΓΙΑ ΚΑΣΕΤΑ ΜΠΑΤΑΡΙΑΣ
1. Πριν χρησιμοποιήσετε την κασέτα μπαταρίας,
διαβάστε όλες τις οδηγίες και σημειώσεις
προφύλαξης (1) στον φορτιστή μπαταρίας, (2)
στην μπαταρία και (3) στο προϊόν που
χρησιμοποιεί την μπαταρία.
2. Μην αποσυναρμολογήσετε την κασέτα
μπαταρίας.
3. Εάν ο χρόνος λειτουργίας έχει γίνει υπερβολικά
βραχύς, σταματήστε την λειτουργία αμέσως.
Αλλιώς, μπορεί να έχει ως αποτέλεσμα κίνδυνο
υπερθέρμανσης, πιθανά εγκαύματα ή
έκρηξη.
4. Εάν ηλεκτρολύτης μπει στα μάτια σας,
ξεπλύνετέ τα με καθαρό νερό και ζητήστε ιατρική
φροντίδα αμέσως. Αλλιώς, μπορεί να έχει ως
αποτέλεσμα απώλεια της όρασης σας.
5. Μη βραχυκυκλώνετε την κασέτα μπαταρίας:
(1) Μην αγγίζετε τους πόλους με οτιδήποτε
αγώγιμο υλικό.
(2) Αποφεύγετε να αποθηκεύετε την κασέτα
μπαταρίας μέσα σε ένα
μεταλλικά αντικείμενα όπως καρφιά,
νομίσματα, κλπ.
(3) Μην εκθέτετε την κασέτα μπαταρίας στο νερό
ή στη βροχή.
Ένα βραχυκύκλωμα μπαταρίας μπορεί να
προκαλέσει μεγάλη ροή ρεύματος,
υπερθέρμανση, πιθανά εγκαύματα ακόμη και
σοβαρή βλάβη.
6. Μην αποθηκεύετε το εργαλείο και την κασέτα
μπαταρίας σε τοποθεσίες όπου η θερμοκρασία
μπορεί να φτάσει
7. Μη καίτε την κασέτα μπαταρίας ακόμη και εάν
έχει σοβαρή ζημιά ή είναι εντελώς φθαρμένη. Η
κασέτα μπαταρίας μπορεί να εκραγεί στην
φωτιά.
8. Προσέχετε να μη ρίξετε κάτω ή χτυπήσετε την
μπαταρία.
9. Μην χρησιμοποιείτε μπαταρία που έχει υποστεί
ζημία.
ή να ξεπεράσει τους 50°C.
δοχείο μαζί με άλλα
ακόμη και
ΦΥΛΑΞΤΕ ΤΙΣ ΟΔΗΓΙΕΣ ΑΥΤΕΣ .
Συμβουλές για διατήρηση μέγιστης ζωή ς
μπαταρίας
1. Φορτίζετε την κασέτα μπαταρίας πριν από την
πλήρη αποφόρτιση της.
Πάντοτε σταματάτε την λειτουργία του εργαλείου
και φορτίζετε την κασέτα μπαταρίας όταν
παρατηρείτε μειωμένη ισχύ εργαλείου.
2. Ποτέ μην επαναφορτίζετε μία πλήρως
φορτισμένη κασέτα μπαταρίας.
Υπερφόρτιση μειώνει την ωφέλιμη ζωή της
μπαταρίας.
3. Φορτίζετε την κασέτα μπαταρίας σε
θερμοκρασία δωματίου 10°C – 40°C.
Αφήστε μία θερμή κασέτα
πριν την φορτίσετε.
4. Φορτίστε την κασέτα μπαταρίας μία φορά κάθε
έξι μήνες εάν δεν τη χρησιμοποιείτε για μεγάλη
χρονική περίοδο.
μπαταρίας να κρυώσει
83
Page 84

ΠΕΡΙΓΡΑΦΗ ΛΕΙΤΟΥΡΓΙΑΣ
Τοπο θέτ ηση ή αφαίρεση της κασέτας μπαταρίας
(Εικ. 1 και 2)
ΠΡΟΣΟΧΗ:
• Πάντοτε σβήνετε το εργαλείο πριν εγκαταστήσετε ή
βγάλετε την κασέτα μπαταρίας.
• Βεβαιωθείτε να ασφαλίσετε το κάλυμμα μπαταρίας
πριν από τη χρήση. Διαφορετικά, η λάσπη, η σκόνη ή
το νερό μπορεί να προκαλέσουν ζημιά στο προϊόν ή
στην κασέτα μπαταρίας.
Για να τοποθετήσετε την κασέτα μπαταρίας:
1. Τραβήξτε το μοχλό ασφάλισης καλύμματος
μπαταρίας
κάλυμμα μπαταρίας.
2. Εισαγάγετε την κασέτα μπαταρίας προς την
κατεύθυνση που απεικονίζεται στο σχήμα μέχρι να
ακούσετε τον ήχο ασφάλισης.
3. Εισαγάγετε το κλειδί ασφάλισης στη θέση που
απεικονίζεται στην εικόνα μέχρι τέρμα.
4. Κλείστε το κάλυμμα μπαταρίας και ωθήστε το μέχρι
να ασφαλίσει με το μοχλό
Για να βγάλετε την κασέτα μπαταρίας από τη μηχανή
γκαζόν:
1. Τραβήξτε το μοχλό ασφάλισης καλύμματος
μπαταρίας προς το μέρος σας και ανοίξτε το
κάλυμμα μπαταρίας.
2. Τραβήξτε προς τα έξω το κλειδί ασφάλισης.
3. Αποσύρετέ το από το εργαλείο ενώ ολισθαίνετε το
κουμπί μπροστά από την κασέτα.
4. Κλείστε το κάλυμμα μπαταρίας.
προς το μέρος σας και ανοίξτε το
ασφάλισης.
Μετατροπείς μπαταριών (προεραιτικό εξάρτημα)
ΠΡΟΕΙΔΟΠΟΙΗΣΗ:
• Πριν τοποθετήσετε ή αφαιρέσετε τους μετατροπείς
μπαταριών AA-3618/AA-3618CL, βγάλτε το κλειδί
ασφάλισης.
AA-3618 (προεραιτικό εξάρτημα) (Εικ. 3, 4 και 5)
ΠΡΟΕΙΔΟΠΟΙΗΣΗ:
• Όταν χρησιμοποιείτε το AA-3618, μην το συνδέετε ποτέ
σε οποιοδήποτε μέρος του σώματός σας. Η σύνδεση
του AA-3618 σε οποιοδήποτε μέρος του σώματός σας
μπορεί να προκαλέσει σοβαρό τραυματισμό.
Ολισθήστε το μετατροπέα μπαταριών AA-3618 στην οπή
τοποθέτησης μέχρι να σταματήσει.
Ανοίξτε το κάλυμμα μπαταρίας στη μηχανή γκαζόν προς
τα έξω μέχρι τέρμα. Κατόπιν κάντε κλικ
προσαρμογέα στερέωσης προϊόντος του AA-3618 μέσα
στη θύρα μπαταρίας στη μηχανή γκαζόν.
Δρομολογήστε το καλώδιο του AA-3618 μέσα από τη
σχισμή στο κάλυμμα μπαταρίας και κλείστε το κάλυμμα
μπαταρίας.
Προσαρμόστε το καλώδιο του AA-3618 στους άνω
υποδοχείς της λαβής.
ΠΑΡΑΤΗΡΗΣΗ:
• Όταν χρησιμοποιείτε τον μετατροπέα μπαταρίας AA-
3618 (προεραιτικό εξάρτημα), αγκιστρώστε το
ηλεκτρικό καλώδιο στην καθορισμένη υποδοχή
μηχανή γκαζόν. Αν δεν το κάνετε αυτό, μπορεί να
προκληθεί αποκοπή του καλωδίου.
στον
στη
Για να βγάλετε το AA-3618 από τη μηχανή γκαζόν,
ανοίξτε προς τα έξω το κάλυμμα μπαταρίας και μετά
πατήστε το γάντζο στην πλευρά στερέωσης της
μπαταρίας του AA-3618.
AA-3618CL (προεραιτικό εξάρτημα) (Εικ. 6 και 7)
Ανοίξτε το κάλυμμα μπαταρίας και κάντε κλικ στο AA3618CL μέσα στη θύρα μπαταρίας στη μηχανή γκαζόν.
Κλείστε το κάλυμμα μπαταρίας.
Για να βγάλετε το AA-3618CL, πατήστε το γάντζο του AA-
3618CL και αποσύρετε το με τα δύο χέρια.
Δράση διακόπτη τροφοδοσίας (Εικ. 8 και 9)
ΠΡΟΕΙΔΟΠΟΙΗΣΗ:
• Πριν εισαγάγετε την κασέτα μπαταρίας στο
εργαλείο, να ελέγχετε πάντοτε ότι ο μοχλός
διακόπτης ενεργοποιείται κανονικά και επιστρέφει
στην αρχική θέση όταν ελευθερώνεται. Η λειτουργία
ενός εργαλείου με ένα διακόπτη που δεν ενεργοποιείται
σωστά μπορεί να οδηγήσει σε απώλεια ελέγχου και
σοβαρό προσωπικό τραυματισμό.
ΠΑΡΑΤΗΡΗΣΗ:
• Αν προσπαθείτε να κουρεύετε μεγάλες ποσότητες
με τη μία, μπορεί να μην εκκινείται το μοτέρ
γκαζόν
εξαιτίας υπερβολικού φορτίου. Σε αυτή την περίπτωση,
αλλάξτε το ύψος κοπής σε ένα υψηλότερο επίπεδο για
να κάνετε επανέναρξη.
• Η μηχανή γκαζόν δεν ενεργοποιείται αν δεν πατήσετε
το κουμπί διακόπτη ακόμα και αν έχετε πατήσει το
μοχλό διακόπτη.
Αυτή η μηχανή γκαζόν είναι
αλληλασφάλισης και διακόπτη λαβής. Αν παρατηρήσετε
οτιδήποτε ασυνήθιστο με οποιονδήποτε από αυτούς τους
διακόπτες, διακόψτε αμέσως τη λειτουργία και φροντίστε
να ελεγχθούν από το πλησιέστερο εξουσιοδοτημένο
κέντρο εξυπηρέτησης της Dolmar.
1. Εισαγάγετε το κλειδί ασφάλισης στο διακόπτη
αλληλασφάλισης.
2. Πατήστε το κουμπί διακόπτη.
3. Τραβήξτε το μοχλό διακόπτη προς τα μέρος σας ενώ
κρατάτε πατημένο το κουμπί διακόπτη.
4. Αφήστε το κουμπί διακόπτη μόλις πάρει μπροστά το
μοτέρ. Η μηχανή γκαζόν θα συνεχίσει να λειτουργεί
μέχρι να αφήσετε το μοχλό διακόπτη.
5. Για να σταματήσετε το μοτέρ, αφήστε το μοχλό
διακόπτη.
6. Όταν δεν χρησιμοποιείτε τη μηχανή γκαζόν, βγάλτε
το κλειδί ασφάλισης. Φυλάξτε το κλειδί ασφάλισης
ασφαλές μέρος μακριά από παιδιά.
σε ένα
εξοπλισμένη με διακόπτη
Ρύθμιση του ύψους κοπής (Εικ. 10)
ΠΡΟΕΙΔΟΠΟΙΗΣΗ:
• Μη βάζετε ποτέ το χέρι ή το πόδι σας κάτω από τη
μονάδα της μηχανής γκαζόν όταν ρυθμίζετε το ύψος
κοπής.
• Να βεβαιώνεστε πάντα ότι ο μοχλός προσαρμόζεται
σωστά στην εγκοπή πριν από τη λειτουργία.
Το ύψος κοπής μπορεί να ρυθμιστεί σε εύρος από
20 mm – 75 mm.
1. Βγάλτε το κλειδί ασφάλισης.
2. Τραβήξτε
μέρος σας και μετακινήστε το στο ύψος κοπής που
επιθυμείτε.
Βεβαιωθείτε ότι η προεξοχή στο μοχλό ρύθμισης ύψους
κοπής προσαρμόζει στην εγκοπή στη μηχανή γκαζόν.
το μοχλό ρύθμισης ύψους κοπής προς το
84
Page 85

ΠΑΡΑΤΗΡΗΣΗ:
011713
• Οι τιμές με τα ύψη κοπής πρέπει να χρησιμοποιούνται
μόνο ως οδηγός, επειδή η κατάσταση του γκαζόν ή του
εδάφους μπορεί να έχει ως αποτέλεσμα το ύψος του
γκαζόν να διαφέρει λίγο από τη τιμή με το καθορισμένο
ύψος.
• Κάντε ένα δοκιμαστικό κούρεμα του γκαζόν σε ένα
λιγότερο εμφανές μέρος για
ύψος.
να πετύχετε το επιθυμητό
Σύστημα προστασίας μπαταρίας
Οι μπαταρίες λιθίου είναι εξοπλισμένες με ένα σύστημα
προστασίας. Αυτό το σύστημα αποκόπτει αυτόματα την
ισχύ προς το εργαλείο για να παραταθεί η διάρκεια
λειτουργίας της.
Το εργαλείο σταματάει αυτόματα κατά τη διάρκεια της
λειτουργίας εάν το εργαλείο ή/και η μπαταρία βρεθούν
κάτω από τις παρακάτω συνθήκες:
• Υπερφόρτωση:
Το εργαλείο λειτουργεί με
να καταναλώνει ασυνήθιστα υψηλό ρεύμα.
Σε αυτή την κατάσταση, αφήστε το διακόπτη
σκανδάλης και διακόψτε την εφαρμογή που προκαλεί
την υπερφόρτωση του εργαλείου. Μετά, τραβήξτε ξανά
το διακόπτη σκανδάλης για επανεκκίνηση.
Εάν το εργαλείο δεν ξεκινάει, η μπαταρία έχει
υπερθερμανθεί. Σε αυτή την κατάσταση, αφήστε την
μπαταρία να ψυχθεί
σκανδάλης.
• Χαμηλή τάση μπαταρίας:
Η υπόλοιπη χωρητικότητα μπαταρίας είναι πολύ
χαμηλή και το εργαλείο δεν λειτουργεί. Σε αυτή την
κατάσταση, αφαιρέστε και επαναφορτίστε την
μπαταρία.
τρόπο ώστε να αναγκάζεται
πριν τραβήξετε ξανά το διακόπτη
Ένδειξη υπόλοιπης χωρητικότητας μπαταρίας
(μόνο για μοντέλα με μπαταρία AP-3622) (Εικ. 11)
Η μπαταρία AP-3622 είναι εφοδιασμένη με ένδειξη
υπόλοιπης χωρητικότητας μπαταρίας.
Πιέστε το κουμπί CHECK (Έλεγχος) για να υποδείξετε
την υπόλοιπη χωρητικότητα της μπαταρίας. Οι
ενδεικτικές λυχνίες θα ανάψουν για τρία δευτερόλεπτα
περίπου.
Ενδεικτικές λυχνίες
E
F
Υπόλοιπη
χωρητικότητα
70% έως 100%
45% έως 70%
20% έως 45%
0% έως 20%
Φορτίστε τη μπαταρία.
Η μπαταρία ενδέχεται
να έχει παρουσιάσει
δυσλειτουργία.
• Όταν αναβοσβήνει η πρώτη ενδεικτική λυχνία στο κάτω
μέρος (δίπλα στην ένδειξη “E”) ή όταν δεν ανάψει καμία
ενδεικτική λυχνία, η χωρητικότητα της μπαταρίας
μηδενική, επομένως το εργαλείο δεν λειτουργεί. Στις
περιπτώσεις αυτές, φορτίστε τη μπαταρία ή
αντικαταστήστε την κενή μπαταρία με μια άλλη πλήρως
φορτισμένη.
• Όταν δύο ή περισσότερες ενδεικτικές λυχνίες δεν
ανάβουν ακόμη και μετά από πλήρη φόρτιση, η
διάρκεια ζωή ς της μπαταρίας έχει λήξει.
• Όταν οι δύο ενδεικτικές λυχνίες στο άνω μέρος και
δύο ενδεικτικές λυχνίες στο κάτω μέρος ανάβουν
εναλλάξ, η μπαταρία ενδέχεται να παρουσιάζει
δυσλειτουργία. Επικοινωνήστε με το τοπικό σας κέντρο
εξυπηρέτησης, εξουσιοδοτημένο από την Dolmar.
ΠΑΡΑΤΗΡΗΣΗ:
• Η υποδεικνυόμενη χωρητικότητα ενδέχεται να είναι
χαμηλότερη από το πραγματικό επίπεδο κατά τη χρήση
ή αμέσως μετά από τη χρήση του εργαλείου.
• Ανάλογα με τις συνθήκες
περιβάλλοντος, η ένδειξη ενδέχεται να διαφέρει λίγο
από την πραγματική χωρητικότητα.
χρήσης και τη θερμοκρασία
ΣΥΝΑΡΜΟΛΟΓΗΣΗ
ΠΡΟΕΙΔΟΠΟΙΗΣΗ:
• Να βεβαιώνεστε πάντα ότι έχετε βγάλει το κλειδί
ασφάλισης και την κασέτα μπαταρίας όταν
πραγματοποιείτε οποιαδήποτε εργασία στη
μηχανή γκαζόν. Αν δεν βγάλετε το κλειδί ασφάλισης
και την κασέτα μπαταρίας μπορεί να έχει ως
αποτέλεσμα σοβαρό προσωπικό τραυματισμό από
τυχαία εκκίνηση.
• Μη βάζετε ποτέ μπροστά το εργαλείο αν δεν είναι
πλήρως συναρμολογημένο
εργαλείου σε μερικώς συναρμολογημένη κατάσταση
μπορεί να έχει ως αποτέλεσμα σοβαρό προσωπικό
τραυματισμό από τυχαία έναρξη.
. Η λειτουργία του
Τοποθ έτησ η της λαβής (Εικ. 12, 13, 14, 15, 16 και
17)
ΠΡΟΕΙΔΟΠΟΙΗΣΗ:
• Όταν τοποθετείτε τις λαβές, τοποθετήστε τα καλώδια
για να μην πιαστούν από οτιδήποτε μεταξύ των λαβών.
1. Χαλαρώστε τις βίδες σύσφιξης (δύο τεμάχια).
Επεκτείνετε την κάτω λαβή προς τις δύο πλευρές της και
με τη λαβή επεκταμένη σε αυτή τη θέση περιστρέψτε την
προς τα πίσω και κατόπιν τοποθετήστε τη μέσα
εγκοπή στη βάση.
2. Σφίξτε τις βίδες σύσφιξης και στις δύο πλευρές για
να ασφαλίσετε την κάτω λαβή.
3. Ανυψώστε την άνω λαβή και ευθυγραμμίστε τις οπές
βιδώματος στην άνω λαβή με αυτές στην κάτω λαβή.
Κατόπιν, ασφαλίστε τη με τις παρεχόμενες βίδες και
τα παξιμάδια σύσφιξης.
ΠΑΡΑΤΗΡΗΣΗ:
• Αυτή τη στιγμή, κρατήστε
μην πέσει από το χέρι σας.
ΠΑΡΑΤΗΡΗΣΗ:
• Τοπο θ ε τ ή σ τ ε την άνω λαβή ώστε η κατεύθυνση της
άνω λαβής και το καλώδιο τροφοδοσίας να είναι
τοποθετημένα όπως απεικονίζεται στην εικόνα.
καλά την άνω λαβή για να
είναι
οι
στην
85
Page 86

ΠΑΡΑΤΗΡΗΣΗ:
• Η άνω λαβή έχει δύο οπές σε κάθε πλευρά. Με τη
χρήση των διαφορετικών οπών τοποθέτησης για τις
βίδες και τα παξιμάδια σύσφιξης είναι δυνατή η
ρύθμιση του ύψους της λαβής.
Αφαίρεση ή τοποθέτηση της λάμας (Εικ. 18 και
19)
ΠΡΟΕΙΔΟΠΟΙΗΣΗ:
• Να αφαιρείτε πάντα το κλειδί ασφάλισης και την κασέτα
μπαταρίας όταν αφαιρείτε ή τοποθετείτε τη λάμα. Αν
δεν αφαιρέσετε το κλειδί ασφάλισης και την κασέτα
μπαταρίας μπορεί να προκληθεί σοβαρός
τραυματισμός.
• Η λάμα κινείται ελεύθερα για μερικά δευτερόλεπτα
αφού αφήσετε το διακόπτη. Βεβαιωθείτε ότι η λάμα έχει
ακινητοποιηθεί τελείως.
• Να φοράτε
1. Τοποθετή σ τ ε τη μηχανή γκαζόν στο πλάι ώστε ο
2. Για να ασφαλίσετε τη λάμα, εισαγάγετε διαθέσιμο
3. Χαλαρώστε το μπουλόνι αριστερόστροφα με το
4.
Για να τοποθετήσετε τη λάμα, ακολουθήστε τη διαδικασία
αφαίρεσης με αντίστροφη σειρά.
• Εισαγάγετε την εσωτερική φλάντζα, τη λάμα και την
εξωτερική φλάντζα προσεκτικά επειδή έχουν μια
επάνω/κάτω πρόσοψη.
• Σφίξτε καλά το μπουλόνι δεξιόστροφα για να
ασφαλίσετε τη λάμα.
• Τοποθετήστε τη λάμα ώστε η πλευρά της λάμας με το
περιστροφικό βέλος κατεύθυνσης να είναι στραμμένο
προς τα έξω.
• Βεβαιωθείτε ότι η λάμα είναι τοποθετημένη με
ασφάλεια.
• Να βγάζετε πάντα το κατσαβίδι ή το παρόμοιο εργαλείο
που έχετε εισάγει στην οπή για να ασφαλίσει η λάμα.
πάντα γάντια κατά το χειρισμό της λάμας.
μοχλός ρύθμισης ύψους κοπής να τοποθετηθεί στην
άνω πλευρά.
κατσαβίδι ή παρόμοιο εργαλείο που διατίθεται στην
αγορά στην οπή στη μηχανή γκαζόν.
κλειδί.
Αφαιρέστε το μπουλόνι, την εξωτερική φλάντζα, τη
λάμα και την εσωτερική φλάντζα με τη σειρά.
ΠΡΟΕΙΔΟΠΟΙΗΣΗ:
Τοπο θέτ ηση του καλαθιού χορταριού (Εικ. 20 και
21)
Βγάλτε το κλειδί ασφάλισης.
Ανυψώστε το πίσω προστατευτικό της μονάδας της
μηχανής γκαζόν και γαντζώστε το καλάθι χορταριού στην
εγκοπή της μονάδας της μηχανής γκαζόν.
ΛΕΙΤΟΥΡΓΙΑ
Κούρεμα γκαζόν
ΠΡΟΕΙΔΟΠΟΙΗΣΗ:
• Πριν κουρέψετε το γκαζόν, καθαρίστε τα ξύλα και τις
πέτρες από την περιοχή που θα κουρέψετε. Επιπλέον,
καθαρίστε εκ των προτέρων τυχόν αγριόχορτα από την
περιοχή που θα κουρέψετε.
• Να φοράτε πάντα προστατευτικά γυαλιά-προσωπίδες ή
γυαλιά ασφάλειας με πλαϊνά προστατευτικά όταν
χειρίζεστε τη μηχανή γκαζόν.
Να κρατάτε καλά τη λαβή
δύο χέρια κατά το κούρεμα.
της μηχανής γκαζόν και με τα
Τα εξωτερικά άκρα των μπροστινών τροχών της κύριας
μονάδας παρέχουν έναν οδηγό για το πλάτος
κουρέματος. Όταν χρησιμοποιείτε τα άκρα των δύο
μπροστινών τροχών ως οδηγό, να κουρεύετε το γκαζόν
σε λωρίδες, επικαλύπτοντας το μισό ή το ένα τρίτο της
προηγούμενης λωρίδας
κοπή του γκαζόν.
Ελέγχετε περιοδικά τη στάθμη του καλαθιού χορταριού
και αδειάστε το πριν γεμίσει. Πριν από κάθε περιοδικό
έλεγχο, βεβαιωθείτε να σβήσετε τη μηχανή γκαζόν και να
βγάλετε το κλειδί ασφάλισης και την κασέτα μπαταρίας.
ΠΑΡΑΤΗΡΗΣΗ:
• Η χρήση της μηχανής γκαζόν με το καλάθι χορταριών
γεμάτο αποτρέπει την
θέτει επιπλέον φορτίο στο μοτέρ, το οποίο μπορεί να
προκαλέσει βλάβη.
για να πετύχετε ομοιόμορφη
ομαλή περιστροφή της λάμας και
Κούρεμα μακριού γκαζόν (Εικ. 22)
Μην προσπαθείτε να κουρέψετε μακρύ γκαζόν με τη μία.
Αντ’ αυτού, κουρέψτε το γκαζόν σε στάδια, αφήνοντας
μία ή δύο μέρες ανάμεσα στα κουρέματα, μέχρι το γκαζόν
να είναι ομοιόμορφα κοντό.
ΠΑΡΑΤΗΡΗΣΗ:
• Αν κουρέψετε το μακρύ γκαζόν κοντό με τη μία μπορεί
να έχει ως αποτέλεσμα να νεκρωθεί το γκαζόν ή/και
φράξει το εσωτερικό της κύριας μονάδας.
να
Άδειασμα του καλαθιού χορταριού (Εικ. 23)
ΠΡΟΕΙΔΟΠΟΙΗΣΗ:
• Για τη μείωση του κινδύνου πρόκλησης ατυχήματος, να
ελέγχετε τακτικά το καλάθι χορταριού για τυχόν ζημιά ή
μειωμένη αντοχή και να το αντικαθιστάτε αν είναι
απαραίτητο.
1. Απελευθερώστε το μοχλό διακόπτη.
2. Βγάλτε το κλειδί ασφάλισης.
3. Ανοίξτε το πίσω προστατευτικό και βγάλτε το καλάθι
χορταριού με τη λαβή του.
4. Αδειάστε το
καλάθι χορταριού.
ΣΥΝΤΗΡΗΣΗ ΚΑΙ ΑΠΟΘΗΚΕΥΣΗ
ΠΡΟΕΙΔΟΠΟΙΗΣΗ:
• Να βεβαιώνεστε πάντα ότι έχετε βγάλει το κλειδί
ασφάλισης και την κασέτα μπαταρίας από τη μηχανή
γκαζόν πριν από την αποθήκευση ή την εκτέλεση
εργασιών επιθεώρησης ή συντήρησης.
• Να φοράτε γάντια όταν εκτελείτε εργασίες
επιθεώρησης ή συντήρησης.
ΠΡΟΣΟΧΗ:
• Μην χρησιμοποιείτε ποτέ βενζίνη, πετρελαϊκό αιθέρα,
διαλυτικό, αλκοόλη ή παρόμοιες ουσίες. Ενδέχεται
προκληθεί αποχρωματισμός παραμόρφωση ή ρωγμές.
να
86
Page 87

ΣΥΝΤΗΡΗΣΗ
1. ΒΓΑΛΤΕ ΤΟ ΚΛΕΙΔΙ ΑΣΦΑΛΙΣΗΣ. Φυλάξτε το σε
ένα ασφαλές μέρος μακριά από παιδιά.
2. Καθαρίστε τη μηχανή γκαζόν μόνο με τη χρήση
ήπιου σαπουνιού και ενός βρεγμένου πανιού. Μην
ψεκάζετε και μη χύνετε νερό στη μηχανή γκαζόν
όταν την καθαρίζετε.
3. Γυρίστε τη μηχανή γκαζόν στο πλάι και καθαρίστε τα
μικρά κομμάτια χορταριού που
στο κάτω μέρος της βάσης της μηχανής γκαζόν.
4. Ελέγξτε αν είναι σφικτά όλα τα παξιμάδια, τα
μπουλόνια, οι διακόπτες, οι βίδες, οι σύνδεσμοι, κτλ.
5. Επιθεωρήστε τα κινούμενη μέρη για ζημιά, σπάσιμο
και φθορά. Φροντίστε να επισκευαστούν τα μέρη
που έχουν υποστεί ζημιά ή που λείπουν.
6. Πριν από την αποθήκευση
βγάλτε την κασέτα μπαταρίας από τη μηχανή.
7. Αποθηκεύστε τη μηχανή γκαζόν σε εσωτερικό,
δροσερό και στεγνό, κλειδωμένο χώρο. Μην
αποθηκεύετε τη μηχανή γκαζόν και το φορτιστή σε
μέρη όπου η θερμοκρασία μπορεί να φτάσει ή να
ξεπεράσει τους 40°C.
έχουν συσσωρευτεί
της μηχανής γκαζόν,
Αποθήκευση (Εικ. 24, 25, 26, 27, 28 και 29)
ΠΡΟΕΙΔΟΠΟΙΗΣΗ:
• Κατά τη μεταφορά ή αποθήκευση της μηχανής γκαζόν,
μην την κρατάτε από τις αναδιπλούμενες λαβές αλλά
να πιάνετε την μπροστινή λαβή της μηχανής γκαζόν. Αν
κρατάτε τη μηχανή γκαζόν από τις αναδιπλούμενες
λαβές, μπορεί να προκληθεί σοβαρός τραυματισμός ή
ζημιά στη μηχανή γκαζόν.
Η μηχανή γκαζόν μπορεί να αποθηκευτεί στην όρθια
.
θέση
1. Χαλαρώστε τη βίδα σύσφιξης, εκτείνετε την κάτω
λαβή προς τις δύο πλευρές και, στη συνέχεια,
μετακινήστε τη λαβή προς τα εμπρός.
ΠΑΡΑΤΗΡΗΣΗ:
• Αυτή τη στιγμή, κρατήστε καλά την κάτω λαβή για να
μην πέσει στην μακρινή πλευρά του εργαλείου.
2. Χαλαρώστε το παξιμάδι σύσφιξης και περιστρέψτε
την άνω λαβή προς τα
3. Βγάλτε το καλάθι χορταριού και τοποθετήστε τη
μηχανή γκαζόν στην όρθια θέση.
ΠΑΡΑΤΗΡΗΣΗ:
• Όταν τοποθετείτε τη μηχανή γκαζόν στην όρθια θέση,
μην κρατάτε τη λαβή αλλά να χρησιμοποιείτε την
μπροστινή λαβή της μηχανής γκαζόν.
4. Αποθηκεύστε το καλάθι χορταριού μεταξύ της λαβής
και του σώματος της μηχανής γκαζόν.
Για την διατήρηση
προιόντος, επισκευές, οποιαδήποτε άλλη συντήρηση ή
ρύθμιση πρέπει να εκτελούνται από τα Εξουσιοδοτημένα
Κέντρα Εξυπηρέτησης της Dolmar, με χρήση πάντοτε
ανταλλακτικών Dolmar.
της ΑΣΦΑΛΕΙΑΣ και ΑΞΙΟΠΙΣΤΙΑΣ του
πίσω.
87
Page 88

ΑΝΤΙΜΕΤΩΠΙΣΗ ΠΡΟΒΛΗΜΑΤΩΝ
012350
Πριν ζητήσετε επισκευές, εκτελέστε αρχικά τη δική σας επιθεώρηση. Αν εντοπίσετε πρόβλημα που δεν επεξηγείται στο
εγχειρίδιο, μην επιχειρήσετε να αποσυναρμολογήσετε το εργαλείο. Αντ’ αυτού, ζητήστε βοήθεια από εξουσιοδοτημένα
κέντρα εξυπηρέτησης της Dolmar και πάντοτε να χρησιμοποιείτε γνήσια ανταλλακτικά της Dolmar.
Κατάσταση δυσλειτουργίας Αιτία Ενέργεια
Τοποθετήστε την κασέτα μπαταρίας.
Επαναφορτίστε την μπαταρία. Αν η
επαναφόρτιση δεν είναι
αποτελεσματική, αντικαταστήστε την
μπαταρία.
Εισαγάγετε το κλειδί ασφάλισης.
Επαναφορτίστε την μπαταρία. Αν
επαναφόρτιση δεν είναι
αποτελεσματική, αντικαταστήστε την
μπαταρία.
Ανεβάστε το ύψος.
Τοποθετήστε την κασέτα μπαταρίας
όπως περιγράφεται σε αυτό το
εγχειρίδιο.
Επαναφορτίστε την μπαταρία. Αν η
επαναφόρτιση δεν
αποτελεσματική, αντικαταστήστε την
μπαταρία.
Απευθυνθείτε στο τοπικό
εξουσιοδοτημένο κέντρο σέρβις για
επισκευή.
Αφαιρέστε το ξένο αντικείμενο.
Απευθυνθείτε στο τοπικό
εξουσιοδοτημένο κέντρο σέρβις για
επισκευή.
Αντικαταστήστε τη λάμα.
Βγάλτε την μπαταρία και
απευθυνθείτε στο
εξουσιοδοτημένο κέντρο σέρβις για
επισκευή.
είναι
τοπικό
η
Η μηχανή γκαζόν δεν ενεργοποιείται.
Το μοτέρ σταματά να λειτουργεί μετά
από μικρή χρήση.
Δεν φτάνει τις μέγιστες ΣΑΛ.
Το εργαλείο κοπής δεν
περιστρέφεται:
Σταματή στε τη μηχανή αμέσως!
Ασυνήθιστοι κραδασμοί:
Σταματή στε τη μηχανή αμέσως!
Το εργαλείο κοπής και το μοτέρ δεν
σταματούν:
Βγάλτε αμέσως την μπαταρία!
Δεν είναι τοποθετημένη η κασέτα
μπαταρίας.
Πρόβλημα μπαταρίας (μικρή τάση)
Δεν έχετε εισάγει το κλειδί
ασφάλισης.
Το επίπεδο φόρτισης μπαταρίας είναι
χαμηλό.
Το ύψος κοπής έχει ρυθμιστεί πολύ
χαμηλά.
Η μπαταρία δεν είναι σωστά
τοποθετημένη.
Η ισχύς της μπαταρίας πέφτει.
Το σύστημα μετάδοσης κίνησης δεν
λειτουργεί σωστά.
Έχει φράξει ένα ξένο αντικείμενο,
όπως ένα κλαδί, κοντά στη λάμα.
Το σύστημα μετάδοσης κίνησης δεν
λειτουργεί
Η λάμα δεν είναι ισορροπημένη ή
έχει φθαρεί υπερβολικά ή
ανομοιόμορφα.
Ηλεκτρική ή ηλεκτρονική
δυσλειτουργία.
σωστά.
ΠΡΟΑΙΡΕΤΙΚΑ ΕΞΑΡΤΗΜΑΤΑ
ΠΡΟΣΟΧΗ:
• Αυτά τα ανταλλακτικά ή προσαρτήματα συνιστώνται για χρήση με το εργαλείο σας της Dolmar που περιγράφεται στο
εγχειρίδιο αυτό. Η χρήση οτιδήποτε άλλων ανταλλακτικών ή προσαρτημάτων μπορεί να παρουσιάσουν κίνδυνο
τραυματισμού σε άτομα. Χρησιμοποιείτε μόνο εξαρτήματα ή προσαρτήματα μόνο για το σκοπό που προορίζονται.
Εάν χρειάζεστε βοήθεια ή περισσότερες λεπτομέρειες σε
κέντρο εξυπηρέτησης της Dolmar.
• Λάμα
• Γνήσια μπαταρία και φορτιστής της Dolmar
ΠΑΡΑΤΗΡΗΣΗ:
• Μερικά στοιχεία στη λίστα μπορεί να συμπεριλαμβάνονται στη συσκευασία εργαλείου ως στάνταρ εξαρτήματα.
Μπορεί να διαφέρουν ανάλογα με τη χώρα.
σχέση με αυτά τα ανταλλακτικά, ρωτήστε το τοπικό σας
88
Page 89

ENG905-1
Θόρυβος
Το τυπικό Α επίπεδο μετρημένου θορύβου καθορίζεται
σύμφωνα με το EN60335:
Στάθμη πίεσης ήχου (L
Στάθμη δύναμης ήχου (L
Αβεβαιότητα (Κ): 3 dB (A)
Κραδασμός
Η ολική τιμή δόνησης (άθροισμα τρι-αξονικού
διανύσματος) καθορίζεται σύμφωνα με το EN60335:
Εκπομπή δόνησης (a
Αβεβαιότητα (Κ): 1,5 m/s
• Η δηλωμένη τιμή εκπομπής κραδασμών έχει μετρηθεί
σύμφωνα με την πρότυπη μέθοδο δοκιμής και μπορεί
να χρησιμοποιηθεί για τη σύγκριση ενός εργαλείου με
άλλο.
• Η δηλωμένη τιμή εκπομπής κραδασμών μπορεί να
χρησιμοποιηθεί και στην προκαταρκτική αξιολόγηση
έκθεσης.
Φοράτε ωτοασπίδες
): 80 dB (A)
pA
): 93 dB (A)
WA
): 2,5 m/s2 ή λιγότερο
h
2
ENG900-1
ENG901-1
ΠΡΟΕΙΔΟΠΟΙΗΣΗ:
• Η εκπομπή κραδασμών κατά τη χρήση του ηλεκτρικού
εργαλείου σε πραγματικές συνθήκες μπορεί να
από τη δηλωμένη τιμή εκπομπής ανάλογα με
διαφέρει
τον τρόπο χρήσης του εργαλείου.
• Φροντίστε να λάβετε τα κατάλληλα μέτρα προστασίας
του χειριστή βάσει υπολογισμού της έκθεσης σε
πραγματικές συνθήκες χρήσης (λαμβάνοντας υπόψη
όλες τις συνιστώσες του κύκλου λειτουργίας όπως τους
χρόνους που το εργαλείο είναι εκτός λειτουργίας και
όταν βρίσκεται σε αδρανή λειτουργία πέραν
ενεργοποίησης).
του χρόνου
ENH218-1
Μόνο για χώρες της Ευρώπης
Δήλωση Συμμόρφωσης ΕΚ
Οι κάτωθι υπογεγραμμένοι, Tamiro Kishima και
Rainer Bergfeld, εξουσιοδοτούμενοι από τη Dolmar
GmbH, δηλώνουν ότι το/τα μηχάνημα(τα) DOLMAR:
Χαρακτηρισμός μηχανήματος:
Μηχανή γκαζόν με μπαταρία
Αρ. μοντέλου/ Τύπος: AM-3643
Προδιαγραφές:
βλ. πίνακα “ΤΕΧΝΙΚΑ ΧΑΡΑΚΤΗΡΙΣΤΙΚΑ”.
είναι εν σειρά παραγωγή και
συμμορφώνονται με τις ακόλουθες Ευρωπαϊκές
Οδηγίες:
2000/14/ΕΚ, 2006/42/ΕΚ
και κατασκευάζονται σύμφωνα με τα ακόλουθα πρότυπα
ή έγγραφα τυποποίησης:
EN60745, EN60335
Το αρχείο
διεύθυνση:
Η απαιτούμενη διαδικασία αξιολόγησης συμμόρφωσης
βάσει της Οδηγίας 2000/14/ΕΚ ήταν σύμφωνη με το
Παράρτημα VI.
Κοινοποιημένος φορέας:
Στάθμη ηχητικής ισχύος μέτρησης: 93 dB (A)
Εγγυημένη στάθμη ηχητικής ισχύος: 94 dB (A)
της τεχνικής τεκμηρίωσης φυλάσσεται στη
Dolmar GmbH,
Jenfelder Straße 38, Abteilung FZ,
D-22045 Hamburg (Αμβούργο)
TÜV Rheinland LGA Products GmbH
Am Grauen Stein 29
51105 Köln Γερμανία
Αριθμός αναγνώρισης 0197
7.9.2011
Tamiro Kishima
Γενικός Διευθυντής
Rainer Bergfeld
Γενικός Διευθυντής
89
Page 90

TÜRKÇE (Orijinal Talimatlar)
Genel görünüşün açıklanması
1 Batarya kapağı kilitleme kolu
2 Batarya kartuşu
3 Batarya kapağı
4 Kilit anahtarı
5 Batarya dönüştürücü (AA-3618)
6 Montaj deliği
7 Kanca
8 AA-3618 ürün montaj adaptörü
9 Kablo
10 Yarık
11 Üst tutucular
12 Batarya dönüştürücü
(AA-3618CL)
13 Anahtar düğmesi
TEKNİK ÖZELLİKLER
Model AM-3643
Biçme genişliği430mm
Yüksüz hız 3.600 dak
Boyutlar (B x E x Y)
Net ağırlık 17,9 kg
Belirlenmiş voltaj D.C. 36 V
Standart batarya kartuşu (kartuşları)
Uyarı: Sadece açıklanan batarya kartuşunu
(kartuşlarını) kullanın.
• Sürekli yapılan araştırma ve geliştirmelerden dolayı,
burada belirtilen özellikler önceden bildirilmeksizin
değiştirilebilir.
• Özellikler ve batarya kartuşu ülkeden ülkeye
değişebilir.
• EPTA-Prosedürü 01/2003 uyarınca, batarya kartuşu
dahil, ağırlık
ÖNEMLİ GÜVENLİK TALİMATLARI
UYARI! Tüm güvenlik uyarılarını ve tüm talimatları
okuyun. Uyarılara ve talimatlara uyulmaması elektrik
şoku, yangın ve/veya ciddi yaralanmalar ile
sonuçlanabilir.
Tüm uyarıları ve talimatları ileride başvurmak için
saklayın.
1. Kullanıma hazır oluncaya kadar anahtarı
makineye takmayın.
2. Bu alet fiziksel, duyusal ya da zihinsel
yetenekleri kısıtlı olan veya deneyim ya da
bilgileri olmayan kişiler (ve çocuklar) tarafından
kullanıma uygun değildir. Ancak, bu kişilerin
güvenliklerinden sorumlu bir kişinin gözetimi ya
da aletin kullanımına ilişkin talimatları
doğrultusunda kullanılabilir.
3. Çocukların aletle oynamasına izin vermeyin.
4. Bu talimatlar konusunda bilgisi olmayan
çocukların ve büyüklerin makineyi kullanmasına
asla izin vermeyin. Yerel düzenlemeler kullanıcı
yaşına sınırlandırma getirebilir.
14 Anahtar kolu
15 Biçme yüksekliği ayar kolu
16 Gösterge lambaları
17 CHECK (kontrol) düğmesi
18 Alt tutamağı
19 Gövde üzerindeki oluk
20 Sıkma vidası
21 Üst tutamağı
22 Vida delikleri
23 Sıkıştırma somunu
24 Vida
25 Tutucular
26 Tornavida
27 Bıçak
çalışma sırasında
saklama sırasında 490 mm – 500 mm x 460 mm x 810 mm
GEB091-5
28 Cıvata
29 İç flanş
30 Ok
31 Dış flanş
32 Arka koruma
33 Oluk
34 Çim sepeti
35 Genişlet
36 Aşağı doğru taşı
37 Geri döndür
38 Ön kavrama
–1
1.450 mm – 1.490 mm x 460 mm x 950 mm – 1.020 mm
AP-363 / AP-3622
5. Makineyi asla çevresinde insanlar, özellikle de
çocuklar veya evcil hayvanlar varken
kullanmayın.
6. Diğer insanlara ya da mallarına gelecek
zararlardan ve kazalardan operatör ya da
kullanıcının sorumlu olduğunu unutmayın.
7. Makineyi kullanırken daima uygun bir ayakkabı
ve uzun pantolon giyin. Makineyi çıplak ayakla
ya da açık sandaletlerle kullanmayın. Bol ya da
askılı, bağcıklı kıyafetler veya takılar takmaktan
kaçının. Hareket eden parçalara takılabilir.
8. Makineyi sadece günışığında ya da iyi
aydınlatma sağlayan yapay ışıkta kullanın.
9. Makineyi ıslak çim üzerinde kullanmayın.
10. Çim biçme makinesini yağmurlu havalarda asla
kullanmayın.
11. Batarya aletinin kullanımı
– Sadece üretici tarafından belirtilen şarj aleti ile
şarj edin. Bir batarya kutusu için uygun olan şarj
başka bir batarya kutusu ile kullanıldığında
cihazı
yangın riski oluşturabilir.
– Elektrikli aletleri sadece özel olarak belirtilen
batarya kutuları ile kullanın. Başka batarya
kutularının kullanımı yaralanma ve yangın riski
oluşturabilir.
12. Tutamağı daima sıkıca tutun.
13. Eğimli yerlerde adımlarını za dikkat edin.
14. Yürüyerek kullanın, asla koşmayın.
15. Aleti kaldırırken veya tutarken açıkta kalan
keskin bıçakları ya da keskin kenarları tutmayın.
90
Page 91

16. Fiziksel durum — Uyuşturucu, alkol ya da
herhangi bir ilacın etkisindeyken çim biçme
makinesini kullanmayın.
17. Korumaların yerinde ve çalışır durumunda
olduğundan emin olun.
18. Ellerinizi ve ayaklarınızı dönen bıçaklardan uzak
tutun. Dikkat — Kapatıldıktan sonra bıçaklar bir
müddet boşta hareket edebilir.
19. Servis, temizlik ya da bahçe aletinden malzeme
çıkarma sırasında anahtarı çıkarın.
20. Sadece bu kılavuzda belirtilen üreticinin orijinal
bıçaklarını kullanın.
21. Kullanmadan önce bıçaklarda çatlak ya da hasar
olup olmadığını kontrol edin. Çatlak ya da hasarlı
bıçakları hemen değiştirin.
22. Çim biçmeye başlamadan önce alanda kimsenin
kalmadığından emin olun. Alana birisi girerse
çim biçme makinesini durdurun.
23. Kişisel yaralanmaları ve alete zarar gelmesini
önlemek için taş, tel,
yabancı maddeleri çim biçmeye başlamadan
önce alandan kaldırın.
24. Anormal bir durum fark ederseniz kullanımı
derhal durdurun. Çim biçme makinesini kapatın
ve anahtarı aletten çıkarın. Ardından çim biçme
makinesini kontrol edin.
25. Makine çalışırken asla tekerlek yüksekliği ayarı
yapmaya çalışmayın.
26. Taşıt yollarından, kaldırımlardan, geçitlerden ve
çakıl kaplı alanlardan geçmeden önce anahtar
kolunu serbest bırakın ve bıçak dönüşünün
durmasını bekleyin.
Makineyi bıraktığınızda, yolunuza çıkan bir şeyi
almak ya da kaldırmak için durduğunuzda ya da
dikkatinizi kaçıracak herhangi bir olay
olduğunda da anahtarı
27. Çim biçme makinesinin çaptığı nesneler etraftaki
kişilerin ciddi şekilde yaralanmasına sebep
olabilir. Her biçme işleminden önce çim kontrol
edilmeli ve üzerindeki tüm nesneler
kaldırılmalıdır.
28. Çim biçme makinesi yabancı bir cisme çarparsa
şu adımları izleyin:
– Çim biçme makinesini durdurun, anahtar
kolunu serbest bırakın ve bıçak tamamen
durana kadar bekleyin.
– Kilit anahtarını ve batarya kartuşunu çıkarın.
– Çim biçme makinesinde hasar olup olmadığını
dikkatlice kontrol edin.
– Herhangi bir şekilde zarar görmüşse bıçağı
yenisiyle değiştirin.
Yeniden başlatmadan ve makineyi kullanmaya
devam etmeden önce herhangi bir hasar varsa
onarın.
29. Arka sepeti aşınma ve yıpranmalara karşı sık sık
kontrol edin. Saklarken arka sepetin bo
olduğundan mutlaka emin olun. Güvenlik için,
yıpranmış sepeti yeni bir orijinal sepet ile
değiştirin.
30. Cihazı kullanmayı bıraktığınızda, makinenin
sepetini temizlemeden önce ve herhangi bir
tamir ya da kontrol işleminden önce motoru
durdurun ve anahtarı çıkarın.
31. Geri geri giderken ya da makineyi kendinize
doğru çekerken çok dikkatli olun.
şişe, kemik, kalın dallar gibi
çıkarın.
32. Çim dışındaki yüzeylerden geçerken makinenin
eğilmesi gerekiyorsa ve makineyi kullanılacak
alana ya da kullanılan alandan dışarı taşımak için
bıçakları durdurun.
33. Makineyi hasarlı koruma veya siperle ya da
deflektör ve/veya çim toplayıcı yerine takılı
olmadan kullanmayın.
34. Motoru talimatlara uygun olarak çalıştırın ve
ayaklarınızı bıçaklardan uzak tutun.
şlatma için makinenin eğilmesi gereken
35. Ba
durumlar haricinde, motoru çalıştırırken
makineyi eğmeyin. Eğmenin gerekli olduğu
durumlarda gereken miktardan fazla eğmeyin ve
sadece kullanıcıdan uzakta olan kısmı kaldırın.
36. Boşaltma ağzının önünde dururken makineyi
başlatmayın.
37. Ellerinizi veya ayaklarınızı dönen parçaların
yakınına ya da altına koymayın. Boşaltma
ağzından daima uzak durun.
38. Makine çalışırken bir yerden bir yere
nakletmeyin.
39. Makineyi durdurun ve devre dışı bırakma aygıtını
kaldırın. Şunları yapmadan önce hareket eden
tüm parçaların tamamen durduğundan emin
olun:
– makineyi kullanmayı bıraktığınızda,
–tıkanmaları temizlemeden ya da sepeti
boşaltmadan önce,
– kontrol etmeden, temizlemeden ve makine
üzerinde çalışmadan önce,
– yabancı bir cisme çarptığınızda. Makinede
hasar olup olmadığını kontrol edin ve yeniden
başlatmadan ve makineyi kullanmadan önce
hasarları onarın.
40. Makine anormal şekilde titremeye başlarsa
(hemen kontrol edin)
– hasarları kontrol edin,
– hasarlı parça varsa yenisiyle değiştirin veya
tamir edin,
–Gevşek parça olup olmadığını kontrol edin ve
varsa sıkılayın.
41. Makineyi ayarlarken parmaklarınızı hareketli
bıçaklar ile makinenin sabit parçaları arasına
ıkıştırmamaya dikkat edin.
s
42. Eğimli bölgelerde çimleri enlemesine biçin,
yukarı veya aşağı doğru biçmeyin. Eğimli
bölgelerde yön değiştirirken çok dikkatli olun.
Dik eğimli bölgelerdeki çimleri aşırı derecede
biçmeyin.
43. Hortumla yıkamayın; motora ve elektrikli
bağlantılara su kaçmasını önleyin.
44. Uygun şekilde sıkılandığından emin olmak için
bıçak montaj cıvatasını belirli aralıklarla kontrol
edin.
45. Güvenli bir çalışma için tüm somun, cıvata ve
ş
vidaların sıkı olduğundan emin olun.
46. Aleti depolamadan önce soğuduğundan emin
olun.
47. Bıçaklarla ilgili işlem yaparken, güç kaynağı
kapalı olsa da bıçakların hareket edebileceğini
unutmayın.
48. Güvenlik için, aşınmış veya hasar görmüş
parçaları yenisiyle değiştirin. Sadece orijinal
yedek parça ve aksesuar kullanın.
BU TALİMATLARI SAKLAYIN.
91
Page 92

UYARI:
Ürünü kullanırken (defalarca kullanınca kazanılan)
rahatlık ve tanıdıklık duygusunun ilgili ürünün
güvenlik kurallarına sıkı sıkıya bağlı kalmanın yerine
geçmesine İZİN VERMEYİN. YANLIŞ KULLANIM veya
bu kullanma kılavuzunda belirtilen emniyet
kurallarına uymama ciddi yaralanmaya neden
olabilir.
ENC007-7
ÖNEMLİ GÜVENLİK TALİMATLARI
BATARYA KARTUŞU HAKKINDA
1. Batarya kartuşunu kullanmadan önce, tüm
talimatları ve (1) batarya şarj aleti, (2) batarya ve
(3) bataryasi kullanan alet üstündeki tüm
uyarıları okuyun.
2. Batarya kartuşunu sökmeyin.
3. Kullanım süresi çok kısalırsa, kullanmayı derhal
kesin. Bu aşırı ısınma, olası yanıklar ve hatta bir
patlama riski sonucunu doğurabilir.
4. Eğer gözünüze elektrolit kaçarsa, temiz suyla
yıkayın ve derhal tıbbi bakım arayın. Bunun
sonucunda görme yeteneğinizi
kaybedebilirsiniz.
5. Batarya kartuşunu kısa devre yaptırmayın:
(1) Terminallere herhangi bir iletken madde
değdirmeyin.
(2) Batarya kartuşunu çiviler, madeni paralar, vb.
gibi başka metal nesnelerle aynı kaba
koymaktan kaçının.
(3) Batarya kartuşunu yağmura ya da suya
maruz bırakmayın.
Bataryada bir kısa devre büyük bir elektrik
ımına, aşırı ısınmaya, olası yanıklara ve hatta
ak
bir bozulmaya neden olabilir.
6. Aleti ve batarya kartuşunu sıcaklığın 50°C ya da
daha yükseğe ulaştığı yerlerde muhafaza
etmeyin.
7. Batarya kartuşunu ciddi hasar görmüş ya da
tamamen kullanılmaz hale gelmiş olsa bile ateşe
atmayın. Batarya kartuşu ateşin içinde
patlayabilir.
8. Bataryasi düşürmemeye ya da darbe
almamasına dikkat edin.
9. Zarar gören bataryasi kullanmayın.
BU TALİMATLARI SAKLAYIN.
Maksimum batarya ömrünü koruma için
tavsiyeler
1. Batarya kartuşunu tamamen boşalmadan şarj
edin.
Aletin gücünün zayıfladığını fark ettiğiniz zaman
daima kullanmayı durdurarak batarya kartuşunu
şarj edin.
2. Tam şarjlı bir batarya kartuşunu asla tekrar şarj
etmeyin.
Fazla şarj etme bataryanın kullanım ömrünü
kısaltır.
3. Batarya kartuşunu 10°C – 40°C oda sıcaklığında
şarj edin.
Sıcak bir batarya kartuşunu şarj etmeden önce
soğumasını bekleyin.
4. Uzun bir süre kullanmadığınız durumlarda
batarya kartuşunu altı ayda bir şarj edin.
İŞLEVSEL NİTELİKLER
Batarya kartuşunun takılması veya çıkarılması
(Şekil. 1 ve 2)
DİKKAT:
• Batarya kartuşunun takılması ya da çıkarılmasından
önce daima aleti kapatın.
• Kullanmadan önce batarya kapağını kilitlediğinizden
emin olun. Aksi takdirde; çamur, kir veya su ürüne ya
da batarya kartuşuna zarar verebilir.
Batarya kartuşunu takmak için;
1. Batarya kapağı kilitleme kolunu kendinize doğru
çekin ve batarya kapağını açın.
2. Batarya kartuşunu şekilde gösterilen yönde takın, bir
tık sesi duyulacaktır.
3. Kilit anahtarını şekilde gösterilen yere sonuna kadar
girecek şekilde takın.
4. Batarya kapağını kapatın ve kilitleme kolu ile iterek
kilitleyin.
Batarya kartuşunu makineden çıkartmak için;
1. Batarya kapağı kilitleme kolunu kendinize doğru
çekin ve batarya kapağını açın.
2. Kilit anahtarını çekip çıkarın.
3. Kartuşun önündeki düğmeyi kaydırırken kartuşu
aletten dışarı çekin.
4. Batarya kapağını kapatın.
Batarya dönüştürücüler (isteğe bağlı aksesuar)
UYARI:
• AA-3618/AA-3618CL batarya dönüştürücülerini
takarken ve çıkarırken kilit anahtarını çıkarın.
AA-3618 (isteğe bağlı aksesuar) (Şekil. 3, 4 ve 5)
UYARI:
• AA-3618’i kullanırken, batarya dönüştürücüyü asla
vücudunuza takmayın. AA-3618’i vücudunuza takmak
ciddi yaralanmalara sebep olabilir.
AA-3618 batarya dönüştürücüyü durana kadar montaj
deliğine doğru kaydırın.
Çim biçme makinesinin üzerindeki batarya kapağını açın
ve kaydırarak AA-3618’in ürün montaj adaptörünü makinenin batarya bölmesine oturtun.
AA-3618’in kablosunu batarya kapağındaki yarıktan
geçirin ve batarya kapağını kapatın.
AA-3618’in kablosunu tutamağın üzerindeki üst tutuculara takın.
NOT:
• AA-3618 batarya dönüştürücü kullanırken (isteğe bağlı
aksesuar), güç kablosunu makinenin üzerindeki ilgili
tutucuya tutturun. Aksi takdirde, kablo kesilebilir.
AA-3618’i makineden çıkarmak için, batarya kapağını
açın ve AA-3618’in batarya montaj tarafındaki çengele
basın.
AA-3618CL (isteğe bağlı aksesuar) (Şekil. 6 ve 7)
Batarya kapağını açın ve AA-3618CL’yi makinenin
batarya bölmesine oturtun.
Batarya kapağını kapatın.
AA-3618CL’yi çıkarmak için AA-3618CL’nin üzerindeki
çengele bastırın ve iki elinizle tutup çekin.
92
Page 93

Güç düğmesinin işleyişi (Şekil. 8 ve 9)
011713
UYARI:
• Batarya kartuşunu alete takmadan önce, anahtar
kolunun düzgün çalıştığından ve bırakıldığında
orijinal pozisyona döndüğünden emin olun.
Anahtarı düzgün bir şekilde çalışmayan bir aletle işlem
yapmak kontrolün kaybedilmesine ve ciddi kişisel
yaralanmalara neden olabilir.
NOT:
• Bir seferde çok fazla çim biçmeye çalışmak aşırı
yüklenmeden dolayı motorun çalışmamasına neden
olabilir. Bu gibi durumlarda, biçme yüksekliğini daha
yüksek bir seviyeye ayarlayarak makineyi yeniden
başlatın.
• Çim biçme makinesi, anahtar koluna basılsa da
anahtar düğmesine basmadan çalışmaz.
Bu makine, kilit devresi ve kollu şalter ile donatılmıştır. B u
devrelerden herhangi birinde bir hata fark ederseniz, derhal kullanımı durdurun ve size en yakın Dolmar Yetkili
Servis Merkezine kontrol ettirin.
1. Kilit anahtarını kilit devresine takın.
2. Anahtar düğmesine basarak eski konumuna getirin.
3. Anahtar düğmesine basarken anahtar kolunu kendi-
nize doğru çekin.
4. Motor çalışmaya başlar başlamaz şalter düğmesini
serbest bırakın. Siz anahtar kolunu serbest bırakana
kadar çim biçme makinesi çalışmaya devam edecektir.
5. Motoru durdurmak için anahtar kolunu serbest
bırakın.
6. Makineyi kullanmadığınız zamanlarda, kilit
anahtarını çıkarın. Kilit anahtarını çocukların
erişemeyeceği güvenli bir yerde saklayın.
Biçme yüksekliğinin ayarlanması (Şekil. 10)
UYARI:
• Biçme yüksekliğini ayarlarken ellerinizi ve ayaklarınızı
asla çim biçme makinesinin altına koymayın.
• Kullanmadan önce kolun oluğe tam olarak
oturduğundan daima emin olun.
Biçme yüksekliği 20 mm – 75 mm aralığında ayarlanabilir.
1. Kilit anahtarını çıkarın.
2. Biçme yüksekliği ayar kolunu kendinize doğru çekin
ve istediğiniz biçme yüksekliğine getirin.
Biçme yüksekliği ayar kolu üzerindeki çıkıntının makine
üzerindeki oluğe oturduğundan emin olun.
NOT:
• Biçme yüksekliğini gösteren rakamlar sadece bir
kılavuz olarak kullanılmalıdır, çünkü çimin ya da
zeminin durumu çim yükseliğinin ayarlanan
yükseklikten az bir miktar farklı olmasına neden olabilir.
• İstediğiniz yükseliği elde etmek için az görünen bir
yerdeki çimleri biçerek deneyin.
Batarya koruma sistemi
Lityum-ion bataryalar bir koruma sistemi ile donatılmıştır.
Bu sistem, batarya ömrünü uzatmak için alete giden
gücü otomatik olarak keser.
Alet ya da bataryada aşağıdaki durumlardan birinin
oluşması durumunda alet çalışmayı otomatik olarak
durdurur:
•Aşırı yüklenme:
Alet anormal derecede yüksek akım çekmesine neden
olan bir şekilde çalıştırılmaktadır.
Bu durum söz konusuysa, alet üzerindeki tetik
anahtarını serbest bırakın ve alete aşırı yük binmesine
neden olan uygulamayı durdurun. Yeniden başlatmak
için anahtar tetiğini çekin.
Alet çalışmaya başlamazsa, batarya aşırı ısınmış
olabilir. Bu durumda, anahtar tetiği tekrar çekmeden
önce bataryanın soğumasını bekleyin.
ük batarya voltajı:
•Düş
Kalan batarya kapasitesi çok düşük olursa alet
çalışmaz. Bu durumda, bataryasi çıkarın ve şarj edin.
Kalan batarya kapasitesi göstergesi (sadece
Bataryalı AP-3622 modelleri için) (Şekil. 11)
Bataryalı AP-3622, kalan batarya kapasitesini belirten bir
gösterge ile donatılmıştır.
Kalan batarya kapasitesini öğrenmek için CHECK (kontrol) düğmesine basın. Düğmeye basmanızın ardından
gösterge lambaları yaklaşık üç saniye yanacaktır.
Gösterge lambaları
Kalan kapasite
E
• Sadece en alttaki (“E”nin yanındaki) gösterge lambası
yanıp sönüyorsa ya da gösterge lambalarının hiçbiri
yanmıyorsa bataryanın kapasitesi tükenmiş demektir,
dolayısıyla alet çalışmaz. Bu durumda bataryayı şarj
edin ya da boşalan bataryayı tam olarak şarj edilmiş bir
bataryayla değiştirin.
• Şarj tamamlandıktan sonra bile iki veya daha fazla
gösterge lambası yanmıyorsa batarya hizmet ömrünü
tamamlamıştır.
•Sırayla üstteki iki ve alttaki iki gösterge lambası yandı
zaman, batarya bozulmuş olabilir. Size en yakın
Dolmar yetkili servisiyle iletişim kurun.
NOT:
• Belirtilen kapasite kullanım sırasında ya da kullanımın
hemen sonrasında gerçek düzeyden daha düşük
görünebilir.
• Kullanım koşullarına ve ortam sıcaklığına bağlı olarak
göstergenin belirttiği kapasite gerçek kapasiteden biraz
farklı olabilir.
F
%70 ila %100
%45 ila %70
%20 ila %45
%0 ila %20
Bataryasi şarj edin.
Batarya bozulmuş
olabilir.
ğı
93
Page 94

MONTAJ
UYARI:
• Makine üzerinde herhangi bir işlem yapmadan
önce kilit anahtarını ve batarya kartuşunu
çıkardığınızdan emin olun. Kilit anahtarının ve
batarya kartuşunun çıkarılmaması istemsiz olarak
aletin başlatılması sonucu ciddi kişisel yaralanmalara
neden olabilir.
• Tamamen montajlanmadan önce aleti asla
çalıştırmayın. Montajı kısmen yapılmış durumdayken
aletin kaza sonucu çalıştırılması ciddi kişisel
yaralanmalara neden olabilir.
Tut amağın montajı (Şekil. 12, 13, 14, 15, 16 ve 17)
UYARI:
• Tutamakları monte ederken, kabloları tutamaklar
arasında herhangi bir şeye takılmayacakları şekilde
konumlandırın.
1. Sıkıştırma vidalarını gevşetin (iki adet).
Alt tutamağı her iki tarafına doğru genişletin ve
genişletilmiş konumdayken geri döndürüp gövde üzerindeki oluğe oturtun.
2. Alt tutamağı sabitlemek için her iki taraftaki
sıkıştırma vidalarını sıkılayın.
3. Üst tutamağı kaldırın ve üst tutamaktaki vida
deliklerini alt tutamaktakilerle hizalayın. Ardından,
makineyle verilen vida ve sıkıştırma somunlarını kullanarak sabitleyin.
NOT:
• Bunu yaparken, elinizden kayıp düşmesini önlemek
için üst tutamağı sıkıca kavrayın.
NOT:
• Üst tutamağı güç kaynağı kablosu ve üst tutamak
şekilde gösterildiği gibi konumlanacak şekilde takın.
NOT:
• Üst tutamakta her iki tarafta iki delik bulunur. Vida ve
sıkıştırma somunları için farklı konum deliklerinin
kullanılması tutamağın yüksekliğini ayarlayabilmenizi
sağlar.
Bıçağın takılması ve çıkarılması (Şekil. 18 ve 19)
UYARI:
•Bıçağı takıp çıkarırken kilit anahtarını ve batarya
kartuşunu daima çıkarın. Kilit anahtarının ve batarya
kartuşunun çıkarılmaması ciddi yaralanmalara sebep
olabilir.
• Anahtar bırakıldıktan sonra bıçak birkaç saniye boşta
dönebilir. Bıçağın tamamen durduğundan emin olun.
•Bıçak üzerinde bir işlem yaparken daima eldiven
kullanın.
1. Çim biçme makinesini yükseklik ayar kolu üst tarafa
gelecek şekilde yan yatırın.
2. Bıçağı kilitlemek için elinizdeki bir tornavidayı ya da
piyasada bulunabilecek bir benzerini makinedeki
deliğe sokun.
3. Cıvatayı anahtarla saatin aksi yönünde çevirerek
gevşetin.
4. Cıvatayı, dış flanş
çıkarın.
Bıçağı takmak için, bıçak çıkarma prosedürünü tersten
izleyin.
ı, bıçağı ve iç flanşı sırasıyla
UYARI:
• İç flanşı, bıçağı ve dış flanşı takarken dikkatli olun,
bunların üst/alt yüzlerine dikkat edin.
•Bıçağı sabitlemek için cıvatayı saat yönünde iyice
sıkılayın.
•Bıçağı, dönen ok işaretli tarafı dışarı bakacak şekilde
yerleştirin.
•Bıçağın iyi bir şekilde sabitlendiğinden emin olun.
ğı kilitlemek için deliğe sokulan tornavida ya da
•Bıça
benzeri aleti mutlaka çıkarın.
Çim sepetinin takılması (Şekil. 20 ve 21)
Kilit anahtarını çıkarın.
Makine ünitesinin arka korumasını kaldırın ve çim sepe-
tini makinenin üzerindeki oluğe takın.
KULLANIM
Çim biçme işlemi
UYARI:
• Çim biçmeye başlamadan önce alandaki kalın dalları
ve taşları kaldırın. Ayrıca yabani otları da biçme
alanından önceden temizleyin.
• Çim biçme makinesini kullanırken yanları korumalı
güvenlik gözlükleri takın.
Biçme işlemi sırasında, çim biçme makinesinin tutamağını iki elinizle sıkıca tutun.
Ana ünitenin ön tekerleğinin dış kenarları biçme genişliği
konusunda kılavuzluk eder. Dengeli bir biçme işlemi için,
iki ön tekerleğin dış kenarlarını referans alarak, şeritler
halinde, önceki şeridin genişliğinin ikide bir ila üçte bir
oranında bir kısmının üstünden tekrar geçecek şekilde
biçin.
Çim sepetinin sık sık kontrol edin ve dolmadan önce
boşaltın. Kontrollerden önce makineyi
durdurduğunuzdan ve kilit anahtarı ile batarya kartuşunu
çıkardığınızdan emin olun.
NOT:
• Çim biçme makinesini çim sepeti dolu olarak kullanmak
bıçakların düzgün bir şekilde dönmesini engeller ve
motora aşırı yük bindirir, bu da aletin arızalanmasına
sebep olabilir.
Uzamış çimlerin biçilmesi (Şekil. 22)
Uzamış çimleri bir seferde biçmeye çalışmayın. Bunun
yerine, alan eşit bir biçimde biçilene kadar çimleri bir-iki
gün arayla aşamalı olarak biçin.
NOT:
•Uzamış çimlerin bir seferde kısaltılması çimin ölmesine
ve/veya ana üniteyi tıkamasına sebep olabilir.
Çim sepetinin boşaltılması (Şekil. 23)
UYARI:
• Kaza riskini azaltmak için, çim sepetinde herhangi bir
hasar ya da gücünde herhangi bir zayıflama olup
olmadığını düzenli olarak kontrol edin ve gerekirse
yenisiyle değiştirin.
1. Anahtar kolunu serbest bırakın.
2. Kilit anahtarını çıkarın.
3. Arka korumayı açın ve sepeti tutamağından tutarak
çıkarın.
4. Çim sepetini boşaltın.
94
Page 95

BAKIM & SAKLAMA
UYARI:
• Saklamadan ya da herhangi biri kontrol veya bakım
işlemi yapmadan önce kilit anahtarının ve batarya
kartuşunun çıkarıldığından mutlaka emin olun.
• Kontrol veya bakım işlemi yapmadan önce eldiven
giyin.
DİKKAT:
• Benzin, tiner, alkol ve benzeri maddeleri kesinlikle
kullanmayın. Renk değişimi, deformasyon veya
çatlaklar oluşabilir.
BAKIM
1. KİLİT ANAHTARINI ÇIKARIN. Anahtarı çocukların
erişiminden uzak güvenli bir yerde saklayın.
2. Makinenizi sadece yumuşak sabun ve nemli bir bez
kullanarak temizleyin. Temizleme sırasında makinenin üzerine su sıkmayın ve dökmeyin.
3. Makineyi yan tarafına yatırın ve makine gövdesinin
alt tarafında biriken çim parçalarını temizleyin.
4. Tüm somunların, cıvataların, düğmelerin, vidaların,
mandalların vb. sıkılığını kontrol edin.
5. Hareketli parçaları, hasar, kırılma ve aşınmalara
karşı kontrol edin. Hasarlı veya eksik parçaları tamir
ettirin.
6. Çim biçme makinesini saklamadan önce batarya
kartuşunu çıkarın.
7. Çim biçme makinesini serin, kuru ve kilitli bir yerde
saklayın. Makineyi ve kartuşu sıcaklı
geçtiği ortamlarda saklamayın.
ğın 40°C’yi
Saklama (Şekil. 24, 25, 26, 27, 28 ve 29)
UYARI:
• Çim biçme makinesini taşırken ve saklarken katlanan
tutamaklarda değil aletin ön kavrama kolundan tutun.
Katlanan tutamaklardan tutmak ciddi yaralanmalara
veya makineye zarar gelmesine neden olabilir.
Çim biçme makinesi dik konumda saklanabilir.
1. Sıkıştırma vidasını gevşetin, alt tutamağı her iki
tarafa doğru genişletin ve ardından tutamağı öne
doğru itin.
NOT:
• Bunu yaparken, düşüp aletten uzaklaşmaması için alt
tutamağı sıkıca kavrayın.
2. Sıkıştırma somununu gevşetin ve üst tutamağı geri
çevirin.
3. Çim sepetini çıkarın ve makineyi dik konumda
yerleştirin.
NOT:
• Çim biçme makinesini dik konumda yerleştirirken
tutamaktan değil, makinenin önündeki kavrama
kolundan tutun.
4. Çim sepetini tutamak ile makine gövdesi arasında
saklayın.
Ürünün EMNİYETLİ ve GÜVENİ
için tüm onarımlar, bakım ya da ayarlamalar Dolmar Yetkili Servis Merkezleri tarafından, daima Dolmar yedek
parçaları kullanılarak, yapılmalıdır.
LİR durumda tutulması
95
Page 96

SORUN GİDERME
012350
Onarım için servise gitmeden önce aşağıdaki kontrolleri yapın. Kılavuzda açıklanmayan bir problemle karşılaşırsanız
aleti demonte etmeyin. Bunun yerine, Dolmar Yetkili Servis Merkezlerine başvurun ve daima orijinal Dolmar yedek
parçaları kullanın.
Arıza tanımı Neden Çözüm
Batarya kartuşu takılı değil. Batarya kartuşunu takın.
Çim biçme makinesi başlatılamıyor.
Kısa bir süre kullanımdan sonra
motor duruyor.
Maksimum dev/dak oranına
ulaşılamıyor.
Kesici alet dönmüyor:
Makineyi hemen durdurun!
Anormal vibrasyon:
Makineyi hemen durdurun!
Kesim aleti ve motor durmuyor:
Bataryayı hemen çıkarın!
Batarya sorunu (voltaj yetersiz)
Kilit anahtarı takılı değil. Kilit anahtarını takın.
Bataryanın şarj seviyesi düşük.
Kesim yüksekliği çok düşük
ayarlanmış.
Batarya düzgün takılmamış.
Batarya gücü düşüyor.
Sürüş sistemi doğru işlemiyor.
Bıçağın kenarına yabancı bir cisim,
örn. bir dal parçası takılmış.
Sürüş sistemi doğru işlemiyor.
Bıçak dengesiz, aşırı derecede ya da
bir tarafı daha fazla olacak şekilde
aşınmış.
Elektriksel veya elektronik ar
ıza.
Bataryayı şarj edin. Şarj etmek işe
yaramıyorsa, bataryayı değiştirin.
Bataryayı şarj edin. Şarj etmek işe
yaramıyorsa, bataryayı değiştirin.
Yüksekliği artırın.
Batarya kartuşunu kılavuzda
açıklandığı gibi takın.
Bataryayı şarj edin. Şarj etmek i
yaramıyorsa, bataryayı değiştirin.
Yerel yetkili servis merkezinden
yardım isteyin.
Yabancı cismi çıkarın.
Yerel yetkili servis merkezinden
yardım isteyin.
Bıçağı değiştirin.
Bataryayı çıkarın ve yerel yetkili
servis merkezinizden yardım isteyin.
şe
İSTEĞE BAĞLI AKSESUARLAR
DİKKAT:
• Bu aksesuarlar ve ek parçalar bu el kitabında belirtilen Dolmar aletiniz ile kullanılmak için tavsiye edilmektedir.
Herhangi başka bir aksesuar ya da ek parça kullanılması insanlar için bir yaralanma riski getirebilir. Aksesuarları ya
da ek parçaları yalnızca belirtilmiş olan kullanım amaçlarına uygun olarak kullanın.
Bu aksesuarlarla ilgili daha fazla bilgiye ihtiyaç duyarsanız bulunduğunuz yerdeki yetkili Dolmar servisine başvurun.
•Bıçak
• Orijinal Dolmar batarya ve şarj aleti
NOT:
• Listedeki bazı parçalar standart aksesuar olarak ürün paketinin içine dahil edilmiş olabilir. Aksesuarlar ülkeden
ülkeye farklılık gösterebilir.
96
Page 97

ENG905-1
Gürültü
EN60335 standardına göre belirlenen tipik A-ağırlıklı
gürültü düzeyi:
Ses basıncı düzeyi (L
Ses gücü düzeyi (L
Belirsizlik (K): 3 dB (A)
Titreşim
EN60335 standardına göre hesaplanan titreşim toplam
değeri (üç eksenli vektör toplamı):
Titreşim emisyonu (a
Belirsizlik (K): 1,5 m/s
• Beyan edilen titreşim emisyon değeri standart test
yöntemine uygun şekilde ölçülmüştür ve bir aleti bir
başkasıyla karşılaştırmak için kullanılabilir.
• Beyan edilen titreşim emisyon değeri bir ön maruz
kalma değerlendirmesi olarak da kullanılabilir.
UYARI:
• Bu elektrikli aletin gerçek kullanımı sırasındaki titreşim
emisyonu aletin kullanım biçimlerine bağlı olarak beyan
edilen emisyon değerinden farklı olabilir.
• Gerçek kullanım koşullarındaki maruz kalmanın bir
tahmini hesaplaması temelinde operatörü koruyacak
güvenlik önlemlerini mutlaka belirleyin (çalışma
döngüsü içerisinde aletin kapalı olduğu ve aktif
durumda olmasının yanı sıra boşta çalıştı ğı zamanlar
gibi, bütün zaman dilimleri göz önünde bulundurularak
değerlendirilmelidir).
Kulak koruyucuları takın
): 80 dB (A)
pA
): 93 dB (A)
WA
): 2,5 m/s2’den az
h
2
ENG900-1
ENG901-1
ENH218-1
Sadece Avrupa ülkeleri için
EC Uygunluk Beyanı
Aşağıda imzaları bulunan Tamiro Kishima ve Rainer
Bergfeld, Dolmar GmbH tarafından yetkilendirildikleri
şekilde, DOLMAR makinesinin (makinelerinin)
aşağıdaki özelliklere sahip olduğunu beyan eder:
Makine Adı:
Akülü Çim Biçme Makinesi
Model No./ Tipi: AM-3643
Teknik Özellikler: “TEKNİK ÖZELLİKLER” tablosuna
bakınız.
seri üretilmişlerdir ve
aşağıdaki Avrupa Direktiflerine uygundurlar:
2000/14/EC, 2006/42/EC
ve aşağıdaki standartlara veya standartlaştırılmış
belgelere uygun olarak imal edilmişlerdir:
EN60745, EN60335
Teknik dokümantasyon dosyası buradan edinilebilir:
Dolmar GmbH,
Jenfelder Straße 38, Abteilung FZ,
D-22045 Hamburg
2000/14/EC Direktifi uyarınca gereken uygunluk
değerlendirmesi prosedürü ek VI ile uygundu.
Onaylanmış Kuruluş:
TÜV Rheinland LGA Products GmbH
Am Grauen Stein 29
51105 Köln Almanya
Ta nımlama numarası 0197
Ölçülen Ses Gücü Seviyesi: 93 dB (A)
Garanti Edilen Ses Gücü Seviyesi: 94 dB (A)
7.9.2011
Tamiro Kishima
Genel Müdür
Rainer Bergfeld
Genel Müdür
97
Page 98

98
Page 99

99
Page 100

885081A938
IDE
DOLMAR GmbH
Postfach 70 04 20
D-22004 Hamburg
Germany
http://www.dolmar.com
 Loading...