

Page 1

GB Pneumatic Brad Nailer
Instruction Manual
F Cloueuse pneumatique
SP Clava puntas neumático
AF600
Manuel d’instructions
Manual de instrucciones
Page 2

ENGLISH
TECHNICAL DATA
Model number AF600
Type of tool ...................................................................................16 Gauge Lightweight finish nailer
Dimension ...................................................................................... 11-1/2” x 2-7/8” x 10-3/4” (292 mm x 74 mm x 272 mm)
Weight of tool ............................................................................... 3.51 lbs (1.59 Kg)
Compressed air
Maximum permissble operating pressure ................................116 PSIG
Recommended operating pressure .......................................... 72.5 – 116 PSIG (5 – 8 bar)
Air consumption per driving operation.......................................1.335 litres/cycle (0.047 scf/cycle) at 101 PSIG
Noise characteristic values in accordance with
Maximum A-weighted impulse sound power level.....................94.4 dBA
Maximum A-weighted surface impulse sound pressure level .......81.4 dBA
Recommended lubrications
Fastener specifications ................................................................. 1.6 x 1.4 length 3/4” – 2-1/2” (20 – 64 mm) (16 gauge)
Acessories.................................................................................... 1/8” (3 mm) and 5/32” (4 mm) wrenches
Aplications & suitability.................................................................Paneling, door/window casings, and furniture frames
Actuating system (Vsafety yoke installed) ................................... Contact/Single sequential actuation
Trigger device ............................................................................... Finger pressure activation
Filling the magazine
1. Pull back the spring loaded pusher until it latches into position.
2. Load up to 2 strips or 100 nails into the top of the magazine.
3. Press the latching mechanism to allow pusher return to its original position, remembering to keep fingers clear.
(7 bar) operating pressure
IMPORTANT SAFETY INSTRUCTIONS
WARNING: WHEN USING THIS TOOL, BASIC
SAFETY PRECAUTIONS SHOULD ALWAYS BE FOLLOWED TO REDUCE THE RISK OF PERSONAL
INJURY, INCLUDING THE FOLLOWING:
READ ALL INSTRUCTIONS.
1. For personal safety and proper operation and
maintenance of the tool, read this instruction
manual carefully before using the tool.
2. Always wear safety glasses to protect your eyes
from dust or nail injury. The safety glasses
should conform with the requirements of ANSI
Z87.1.
WARNING:
It is an employer’s responsibility to enforce the
use of safety eye protection equipment by the
tool operators and by other persons in the immediate working area.
3. Wear hearing protection to protect your ears
against exhaust noise and head protection. Also
wear light but not loose clothing. Sleeves should
be buttoned or rolled up. No necktie should be
worn.
4. Rushing the job or forcing the tool is dangerous.
Handle the tool carefully. Do not operate when
under the influence of alcohol, drugs or the like.
5. General Tool Handling Guidelines:
(1) Always assume that the tool contains fasten-
ers.
(2) Do not point the tool toward yourself or any-
one whether it contains fasteners or not.
(3) Do not actuate the tool unless the tool is
placed firmly against the workpiece.
(4) Respect the tool as a working implement.
(5) No horseplay.
(6) Do not hold or carry the tool with a finger on
the trigger.
(7) Do not load the tool with fasteners when any
one of the operating controls is activated.
(8) Do not operate the tool with any power
source other than that specified in the tool
operating/safety instructions.
6. An improperly functioning tool must not be
used.
7. Sparks sometimes fly when the tool is used. Do
not use the tool near volatile, flammable materials such as gasoline, thinner, paint, gas, adhesives, etc.; they will ignite and explode, causing
serious injury.
8. The area should be sufficiently illuminated to
assure safe operations. The area should be clear
and litter-free. Be especially careful to maintain
good footing and balance.
9. Only those involved in the work should be in the
vicinity. Children especially must be kept away at
all times.
10. There may be local regulations concerning noise
which must be complied with by keeping noise
levels within prescribed limits. In certain cases,
shutters should be used to contain noise.
11. Do not play with the contact element: it prevents
accidental discharge, so it must be kept on and
not removed. Securing the trigger in the ON
position is also very dangerous. Never attempt
to fasten the trigger. Do not operate a tool if any
portion of the tool operating controls is inoperable, disconnected, altered, or not working properly.
12. Operate the tool within the specified air pressure
on the tool label for safety and longer tool life.
Do not exceed the recommended max. operating
pressure. The tool should not be connected to a
source whose pressure potentially exceeds 200
PSIG (13.6 bar).
2
Page 3

13. Never use the tool with other than compressed
air. If bottled gas (carbon dioxide, oxygen, nitrogen, hydrogen, air, etc.) or combustible gas
(hydrogen, propane, acetylene, etc.) is used as a
power source for this tool, the tool will explode
and cause serious injury.
14. Always check the tool for its overall condition
and loose screws before operation. Tighten as
required.
15. Make sure all safety systems are in working
order before operation. The tool must not operate if only the trigger is pulled or if only the contact element is pressed against the wood. It must
work only when both actions are performed. Test
for possible faulty operation with nails unloaded
and the contact element in fully pulled position.
16. Check walls, ceilings, floors, roofing and the like
carefully to avoid possible electrical shock, gas
leakage, explosions, etc. caused by striking live
wires, conduits or gas pipes.
17. Use only nails specified in this manual. The use
of any other nails may cause malfunction of the
tool.
18. Do not permit those uninstructed to use the tool.
19. Make sure no one is nearby before nailing.
Never attempt to nail from both the inside and
outside at the same time. Nails may rip through
and/or fly off, presenting a grave danger.
20. Watch your footing and maintain your balance
with the tool. Make sure there is no one below
when working in high locations, and secure the
air hose to prevent danger if there is sudden
jerking or catching.
21. On rooftops and other high locations, nail as you
move forward. It is easy to lose your footing if
you nail while inching backward. When nailing
against perpendicular surface, nail from the top
to the bottom. You can perform nailing operations with less fatigue by doing so.
22. A nail will be bent or the tool can become
jammed if you mistakenly nail on top of another
nail or strike a knot in the wood. The nail may be
thrown and hit someone, or the tool itself can
react dangerously. Place the nails with care.
23. Do not leave the loaded tool or the air compressor under pressure for a long time out in the sun.
Be sure that dust, sand, chips and foreign matter
will not enter the tool in the place where you
leave it setting.
24. Do not point the ejection port at anyone in the
vicinity. Keep hands and feet away from the ejection port area.
25. When the air hose is connected, do not carry the
tool with your finger on the trigger or hand it bar)
to someone in this condition. Accidental firing
can be extremely dangerous.
26. Handle the tool carefully, as there is high pressure inside the tool that can be dangerous if a
crack is caused by rough handling (dropping or
striking). Do not attempt to carve or engrave on
the tool.
27. Stop nailing operations immediately if you
notice something wrong or out of the ordinary
with the tool.
28. Always disconnect the air hose and remove all of
the nails:
(9) When unattended.
(10) Before performing any maintenance or
repair.
(11) Before cleaning a jam.
(12) Before moving the tool to a new location.
29. Perform cleaning and maintenance right after
finishing the job. Keep the tool in tip-top condition. Lubricate moving parts to prevent rusting
and minimize friction-related wear. Wipe off all
dust from the parts.
30. Do not modify tool without authorization from
Makita.
31. Do not attempt to keep the trigger or contact element depressed with tape or wire. Death or serious injury may occur.
32. Always check contact element as instructed in
this manual. Nails may be driven accidentally if
the safety mechanism is not working correctly.
33. Ask Makita’s Authorized service centers for periodical inspection of the tool.
34. To maintain product SAFETY and RELIABILITY,
maintenance and repairs should be performed
by Makita Authorized or Factory Service Centers,
always using Makita replacement parts.
SAVE THESE INSTRUCTIONS.
WARNING:
MISUSE or failure to follow the safety rules stated in
this instruction manual may cause serious personal
injury.
TRIGGERING DEVICES
This fastener driving tool is operated by actuating the
trigger using finger pressure.
Some fastener driving tools are fitted with an additional
safety yoke which enables the driving operation to be
carried out only after the muzzle of the tool is pressed
against a workpiece. These tools are marked with an
inverted triangle (V) and may not be used unless fitted
with an effective safety yoke.
ACTUATING SYSTEMS
Depending on their purpose, fastener driving tools may
be fitted with different actuating systems. See the respective technical data sheet for details of the actuating system of the tools.
Single sequential actuation (preferred version): An
actuating system in which the safety yoke and the trigger
have to be activated in such a way that one single driving
operation is actuated via the trigger after the muzzle of the
tool has been applied to the driving location. Thereafter
any further driving operations can only be actuated after
the trigger has been returned to the starting position.
Full sequential actuation: This is an actuating system
in which the safety yoke and the trigger have to be activated in such a way that one single driving operation is
actuated via the trigger after the muzzle of the tool has
been applied to the driving location. Thereafter any further driving operations can only be actuated only after
the trigger and the safety yoke have been returned to the
starting position.
3
Page 4
Contact actuation (restricted version): An actuating
system in which the trigger and the safety yoke have to
be actuated for each driving operation, with the order of
actuation not being specified. For subsequent driving
operations it is sufficient if either the trigger remains activated and the safety yoke is activated thereafter, or vice
versa.
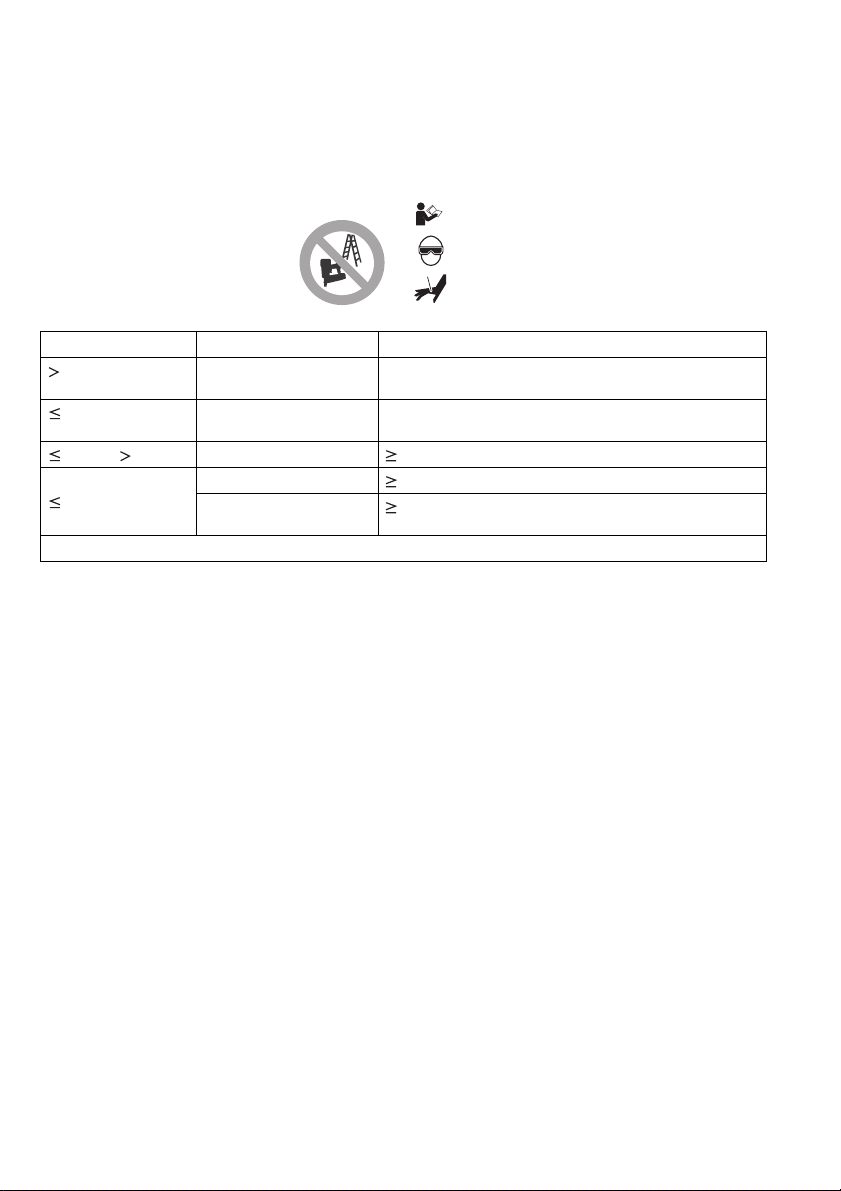
Fastener driving tools equipped with contact actuation
must be marked with the symbol »Do not use on scaffoldings, ladders« and must not be used for specific applications for example:
• when moving from one driving location to another involves the use of
scaffoldings, stairs, ladders, or ladder-like constructions, e.g. roof laths,
• closing boxes or crates,
• fitting transportation safety systems
e.g. on vehicles and wagons.
Length of fasteners Actuation system Special requirements
130 mm Full sequential actuation The safety yoke has to return reliably to its initial position in
130 mm Single sequential actuation
100 mm 65 mm Contact actuation 125% of the tool weight* as safety yoke return force
65 mm
* without fasteners
with safety yoke
Contact actuation 60% of the tool weight* as safety yoke return force
Constant actuation with
safety yoke
Single sequential actuation with trigger lock: Some
models have a safety system consisting of a small lever
attached behind the trigger which blocks automatically
every time the trigger is released, preventing unintentional triggering. If a fastener is to be driven, the safety
lever must be pulled first, which enables the main trigger
and makes it possible to press.
SYMBOLS
The followings show the symbols used for tool.
..................Read and understand tool labels and
..................Operators and others in work area must
..................Keep fingers away from trigger when
any tool position
The safety yoke has to return reliably to its initial position in
any tool position
60% of the tool weight* as safety yoke return force
manual.
wear safety glasses with side shields.
not driving fasteners to avoid accidental
firing.
2. COMPRESSED AIR SYSTEM
Proper functioning of the fastener driving tool requires filtered, dry and oiled compressed air in adequate quantities.
If the air pressure in the line system exceeds the maximum permissible operating pressure of the fastener driving tool, a pressure reducing valve followed by a
downstream safety valve shall additionally be fitted in the
supply line to the tool.
Note: When compressed air is generated by compressors, the natural moisture in the air condenses and collects as condensed water in pressure vessels and
pipelines. This condensate must be removed by water
separators. These water separators must be checked on
a daily basis and drained if necessary, since corrosion
can otherwise develop in the compressed air system and
in the fastener driving tool, which serves to accelerate
wear.
The compressor plant shall be adequately dimensioned
in terms of pressure output and performance (volumetric
flow) for the consumption which is to be expected. Line
sections which are too small in relation to the length of
the line (pipes and hoses), as well as overloading the
compressor, will result in pressure drops.
4
Permanently laid compressed air pipelines should have
an internal diameter of least 19 mm (0.75 inch) and a
correspondingly larger diameter where relatively long
pipelines or multiple users are involved. Compressed air
pipelines should be laid so as to form a gradient (highest
point in the direction to the compressor). Easily accessible water separators should be installed at the lowest
points.
Junctions for users should be joined to the pipelines from
above.
Connecting points for fastener driving tools should be fitted with a compressed air servicing unit (filter/ water separator/ lubricator) directly at the junction point.
Lubricators must be checked on a daily basis and topped
up with the recommended grade of oil(see technical
data) if necessary. Adjust the lubricator of the maintenance unit to 1 drop for approx. every 15 blows of the fastener. Check the oil level in the reservoir regularly.
Where hose lengths of over 10 m (33 ft) are used, the oil
supply for the fastener driving tool cannot be guaranteed.
We therefore recommend an lubricator attached directly
to the fastener driving tool. Adjust the dosing so that it
has to be refilled approximately every 30 000 blows.
Page 5
3. PREPARING THE TOOL FOR USE
3.1 PREPARING A TOOL FOR FIRST TIME
OPERATION
Please read and observe these operating instructions
before using the tool. Basic safety measures should
always be strictly followed to protect against damage to
the equipment and personal injury to the user or other
people working in the vicinity of operation.
3.2 CONNECTION TO THE COMPRESSED AIR
SYSTEM
Ensure that the pressure supplied by the compressed air
system does not exceed the maximum permissible operating pressure of the fastener driving tool. Set the air
pressure initially to the lower value of the recommended
operating pressure (see technical data). Empty the magazine to prevent a fastener from being ejected at the next
stage of work in the event that internal parts of the fastener driving tool are not in the starting position following
maintenance and repair work or transportation.
Connect the fastener driving tool to the compressed air
supply using suitable pressure hose equipped with quickaction connectors.
Refer to the technical data sheet for the size of plug-in
nipple.
3.3 FILLING THE MAGAZINE
Only those fasteners specified under technical data (see
2) may be used.
When filling the magazine, hold the tool so that the muzzle is not pointing towards your own body or towards any
other person. Do not load the tool with fasteners with the
safety yoke or trigger depressed. Further design-related
specifications such as the fastener insertion or removal
as well as filling can be found in the technical data sheet.
3.4 HANDLING THE TOOL
Note section 1. Special references of these operating
instructions.
Having checked that the fastener driving tool is functioning correctly, apply the tool to a workpiece and actuate
the trigger.
You should endeavour in any event to work with the lowest possible air pressure. This will give you three signifi
cant advantages:
1. energy will be saved,
2. less noise will be produced,
3. a reduction in fastener driving tool wear will be
achieved.
Avoid triggering the fastener driving tool if the magazine
is empty.
Any defective or improperly functioning fastener driving
tool must immediately be disconnected from the compressed air supply and passed to a specialist for inspection.
In the event of longer breaks in work or at the end of the
working shift, disconnect the tool from the compressed
air supply and empty the magazine.
The compressed air connectors of the fastener driving
tool and the hoses should be protected against contamination. The ingression of coarse dust, chips, sand etc.
will result in leaks and damage to the fastener driving tool
and the couplings.
Keep the tool dry.
3.5 SUITABLE NAILS
We recommend the use of machine nails for our nailer,
as these have a clean finish and are therefore the most
suitable. We can supply you with the name of a suitable
manufacturer upon request. Nails with bulging, irregular
and non-circular heads must not be used. Nails bearing a
pronounced fluting or ribbing on the shaft should be
avoided.
Other nails i.e. spiral nails, annular grooved nails, harpoon-type nails and screw nails may be used, with limitations depending on size, wood and available air pressure.
Remember: a single, bad nail could become the direct
cause of a serious malfunction.
3.6 PENETRATION SETTING
When the tool leaves the factory it is adjusted in such a
way that the fastener is driven in flush when the necessary
operating pressure is used. If the fastener is driven in too
far, the correct lower operating pressure has to be set.
Only if this is not sufficient or if the driver is too short after
the tip has been ground, an adjustment must be made.
Adjustment is only possible in the unpressurized condition.
Therefore disconnect the tool from the supply hose.
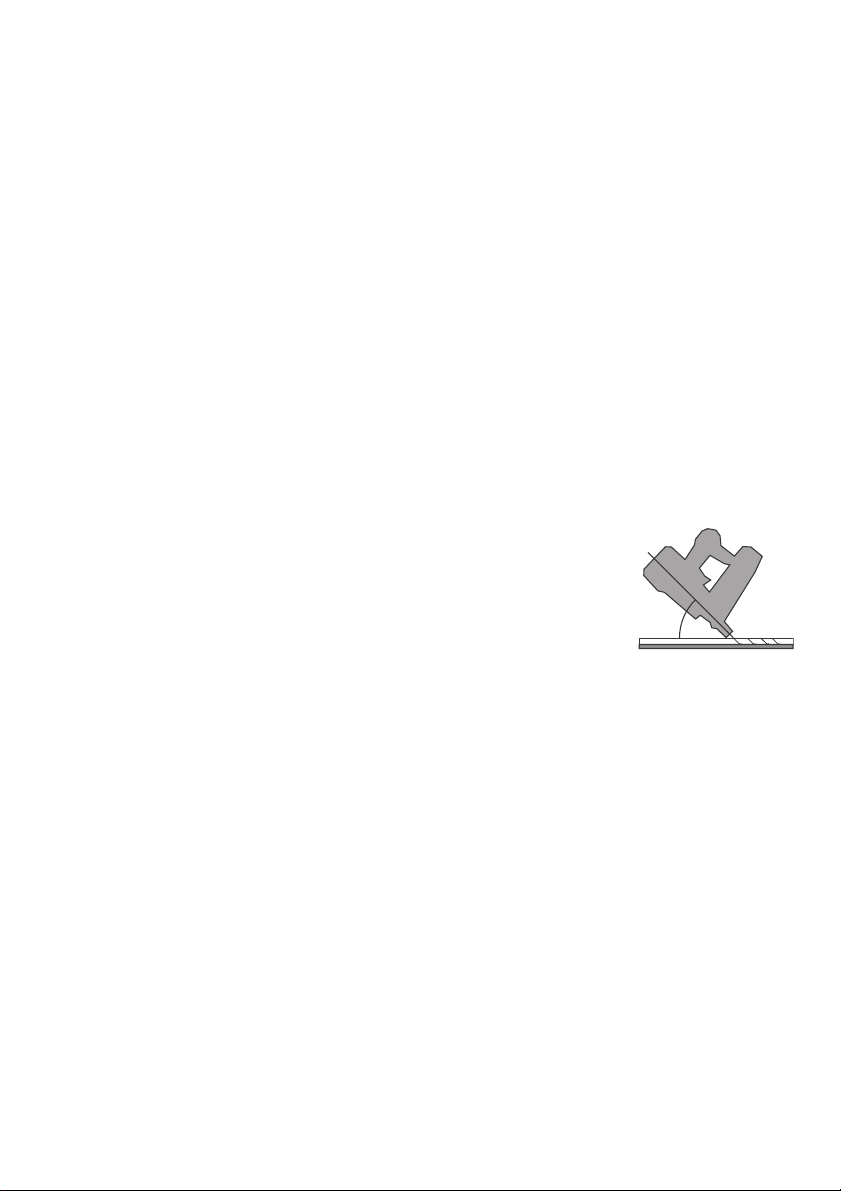
3.7 CLINCH NAILING
This procedure is used when you require a particularly
stable joint (cases, diagonal fences).
The nails should be approx. 10 – 15 mm (0.39 –
0.59 inch) longer than the thickness of the actual workpiece.
Place the workpiece on a
table which is covered with
a steel plate and set the
nailer (tilted by approx. 45°)
on the workpiece and press
firmly. The nail is then
driven through the workpiece and clinched on the
rear side.
45
˚
4. MAINTENANCE
Disconnect fastener from hose before servicing. When
connecting the tool, it must not contain any fasteners.
Maintain the tool properly; clean it frequently, and oil the
moving parts once a week.
The fastener has special grease so that no additional
greasing is necessary between regular maintenance
work. Additional greasing with the lubricator of the maintenance unit or a line lubricator increase the length of
time before re-greasing the surface of the cylinder.
After approx. 100 000 driven fasteners, or at least once a
year, have the tool inspected by a specialist in order to
guarantee the safe function of the fastener driving tool.
5
Page 6

FRANÇAIS
DONNÉES TECHNIQUES
Numéro de modèle AF600
Type d’outil ...................................................................................Cloueur de finition léger, calibre 16
Dimensions..................................................................................... 11-1/2” x 2-7/8” x 10-3/4” (292 mm x 74 mm x 272 mm)
Poids de l’outil .............................................................................. 3,51 lbs (1,59 Kg)
Air comprimé
Pression de service maximale admissible.................................116 PSIG
Pression de service recommandée ........................................... 72,5 – 116 PSIG (5 – 8 bar)
Consommation d’air par opération d’enfoncement ................... 1,335 litres/cycle (0,047 scf/cycle) à pression de ser-
Valeurs de caractéristiques de bruit conformes à
Niveau maximal de puissance sonore d’impulsion pondérée A ........................................... 94,4 dBA
Niveau maximal de puissance sonore d’impulsion de surface pondérée A .........................81,4 dBA
Graissages recommandés
Spécifications des fixations ......................................................... 1,6 x 1,4 longueur 3/4” – 2-1/2” (20 – 64 mm)
Accessoires ................................................................................. clés de 1/8” (3 mm) et 5/32” (4 mm)
Applications et usages adéquats ..................panneautage, encadrement de porte/fenêtre, et cadres de meubles
Système de commande (V palpeur de sécurité installé) ........ commande par contact ou coup par coup à simple armement
Dispositif déclencheur ................................................................. activation par pression du doigt
Remplir le magasin
1. Tirez le poussoir à ressort vers l’arrière jusqu’à ce qu’il se verrouille en position.
2. Chargez jusqu’à 2 bandes ou 100 clous par le dessus du magasin.
3. Appuyez sur le mécanisme de verrouillage pour permettre au poussoir de revenir sur sa position initiale, en pre-
nant soin de garder vos doigts à l'écart.
vice de 101 PSIG (7 bar)
(calibre 16)
CONSIGNES DE SÉCURITÉ IMPORTANTES
AVERTISSEMENT : PAR MESURE DE SÉCURITÉ,
DES PRÉCAUTIONS DE BASE DOIVENT ÊTRE PRISES LORS DE L’UTILISATION DE CET OUTIL, AFIN
DE RÉDUIRE LES RISQUES DE BLESSURE. CES
PRÉCAUTIONS COMPRENNENT LES SUIVANTES :
LISEZ TOUTES LES INSTRUCTIONS.
1. Par mesure de sécurité personnelle et pour
assurer une utilisation et un entretien adéquats,
veuillez lire ce manuel d’instructions avant d’utiliser l’outil.
2. Portez toujours des lunettes de sécurité pour
protéger vos yeux contre toute blessure au contact de la poussière ou d’un clou. Les lunettes
de sécurité doivent répondre aux exigences de
la norme ANSI Z87.1.
AVERTISSEMENT :
L’employeur a la responsabilité d’imposer le port
d’un dispositif de protection des yeux aux utilisateurs des outils et à toute personne présente
dans la zone de travail.
3. Portez une protection d’oreilles pour les proté-
ger contre le bruit, et portez un casque de sécurité. Les vêtements portés doivent être légers et
ne doivent pas être amples. Veuillez boutonner
ou rouler vos manches. Ne portez pas de cravate.
4. Il est dangereux de travailler trop vite ou d’appli-
quer une charge de travail excessive à l’outil.
Manipulez l’outil avec soin. N’utilisez pas l’outil
si vous avez consommé de l’alcool, une drogue
ou des médicaments, etc.
5. Conseils généraux pour l’utilisation des outils :
(1) Gardez toujours à l’esprit que l’outil contient
des clous.
(2) L’outil ne doit jamais être pointé vers vous-
même ou vers une autre personne, qu’il contienne ou non des clous.
(3) Ne mettez pas l’outil en marche avant qu’il ne
soit fermement placé sur la pièce à travailler.
(4) Respectez votre outil en tant qu’instrument
de travail.
(5) Évitez tout chahut.
(6) L’outil ne doit jamais être saisi ou transporté
en posant un doigt sur la gâchette.
(7) Ne mettez jamais de clous dans l’outil alors
que l’une de ses commandes est activée.
(8) Ne branchez jamais l’outil sur une source
d’alimentation autre que celle spécifiée dans
les instructions d’utilisation/sécurité qui
l’accompagnent.
6. Tout outil défectueux ne doit pas être utilisé.
7. Des étincelles s’échappent parfois de l’outil pendant son utilisation. N’utilisez pas l’outil près de
substances ou matériaux volatiles ou inflammables tels que l’essence, le diluant, la peinture, le
gaz, les adhésifs, etc. Ils risqueraient de prendre
feu, d’exploser et de causer une blessure grave.
8. L’aire de travail doit être suffisamment éclairée
pour assurer la sécurité du travail. L’aire de travail doit être maintenue propre et exempte de
déchets. Veillez particulièrement à maintenir une
bonne assise et une bonne position d’équilibre.
9. Seules les personnes qui participent au travail
doivent pénétrer dans la zone de travail. Les
enfants, tout particulièrement, doivent être maintenus à l’écart en tout temps.
6
Page 7

10. Il se peut que des réglementations locales
s’appliquent concernant les niveaux de bruit
permis. Veuillez les respecter. Le cas échéant,
des volets doivent être installés pour réduire le
bruit.
11. Ne modifiez pas l’élément de contact. Il permet
de prévenir toute décharge accidentelle et doit
donc être laissé en place. Il est également très
dangereux de fixer la gâchette en position de
marche. Il ne faut jamais essayer d’immobiliser
la gâchette. N’utilisez jamais un outil dont une
des commandes est inutilisable, déconnectée,
modifiée ou ne fonctionne pas correctement.
12. Faites fonctionner l’outil avec la pression d’air
spécifiée sur sa plaque signalétique pour assurer votre sécurité et une durée de service plus
longue pour l’outil. Ne dépassez jamais la pression maximale recommandée. L’outil ne doit pas
être raccordé à une source dont la pression peut
dépasser 200 PSIG (13,6 bar).
13. Cet outil doit être exclusivement utilisé avec de
l’air comprimé. L’utilisation d’une bouteille de
gaz (dioxyde de carbone, oxygène, nitrogène,
hydrogène, air, etc.) ou de gaz combustible
(hydrogène, propane, acétylène, etc.) comme
source de pression de cet outil entraînera une
explosion et risque de causer une blessure
grave.
14. Avant d’utiliser l’outil, assurez-vous qu’il est en
bon état et qu’aucune de ses vis n’est desserrée.
Le cas échéant, serrez les vis.
15. Assurez-vous que tous les dispositifs de sécurité sont en état de fonctionner avant d’utiliser
l’outil. Il ne faut pas que l’outil s’active lorsque
vous appuyez uniquement sur la gâchette ou
appuyez simplement l’élément de contact contre
le bois. Il ne doit s’activer que lorsque ces deux
actions sont exécutées. Retirez les clous de
l’outil et tirez complètement l’élément de contact
pour vérifier l’absence de tout vice de fonctionnement.
16. Pour éviter tout risque de choc électrique, de
fuite de gaz, d’explosion, etc., provoqué par le
contact avec des fils dénudés, des conduites ou
des tuyaux de gaz, vérifiez le mur ou le plafond,
le plancher, le toit, etc.
17. Utilisez uniquement les clous spécifiés dans ce
manuel. L’outil risque de mal fonctionner si vous
utilisez tout autre type de clou.
18. Seules les personnes ayant pris connaissance
du fonctionnement de l’outil doivent être autorisées à l’utiliser.
19. Avant de procéder au clouage, assurez-vous que
personne ne se trouve près de vous. N’essayez
jamais de clouer une pièce en même temps des
côtés intérieur et extérieur. Cela est très dangereux, puisque les clous risquent alors de défoncer la pièce ou d’être projetés.
20. Regardez où vous posez les pieds et assurezvous d’un bon équilibre pendant l’utilisation de
l’outil. Assurez-vous qu’il n’y a personne au-dessous de vous vous lorsque vous travaillez dans
un endroit élevé, et fixez le tuyau d’air de sorte
qu’il ne risque pas de se détacher s’il est secoué
ou s’il se coince.
21. Sur les toits et autres endroits élevés, clouez en
vous déplaçant vers l’avant. Vous risquez de perdre pied si vous clouez en vous déplaçant à
reculons. Lorsque vous clouez sur une surface
verticale, faites-le du haut vers le bas. De cette
façon le travail de clouage sera moins exigeant
physiquement.
22. Le clou risque de se plier ou l’outil de se bloquer
si vous clouez par inadvertance dans un nœud
ou sur un autre clou. Le clou risque alors d’être
projeté et de frapper quelqu’un, ou bien l’outil
lui-même risque de réagir de manière dangereuse. Choisissez l’emplacement des clous avec
soin.
23. N’abandonnez pas pour une période prolongée
un outil chargé ou un compresseur d’air sous
pression exposé au soleil à l’extérieur. Assurezvous de toujours déposer l’outil en un endroit où
la poussière, le sable, les copeaux et corps
étrangers ne risquent pas d’y pénétrer.
24. Ne pointez jamais la sortie d’éjection vers une
personne se trouvant à proximité. Gardez les
mains et les pieds à l’écart de la zone de la sortie
d’éjection.
25. Pour transporter l’outil ou le donner à quelqu’un
alors que le tuyau d’air est raccordé, ne posez
pas le doigt sur la gâchette. Le déclenchement
accidentel de l’outil peut être extrêmement dangereux.
26. Manipulez l’outil prudemment. La pression élevée à l’intérieur de l’outil représente un danger
si une fissure est provoquée par un manipulation brusque (si vous échappez ou heurter
l’outil). Ne tentez jamais de tailler ou graver une
inscription sur l’outil.
27. Cessez immédiatement le clouage si vous notez
une anomalie ou un fonctionnement inhabituel
de l’outil.
28. Déconnectez toujours le tuyau d’air et retirez
tous les clous dans les cas suivants :
(9) Lorsque l’outil est laissé sans surveillance.
(10) Avant d’effectuer tout travail d’entretien ou
de réparation sur l’outil.
(11) Avant de réparer un blocage.
(12) Avant de déplacer l’outil vers un autre lieu.
29. Procédez au nettoyage et à l’entretien de l’outil
une fois le travail terminé. Maintenez l’outil en
excellente condition. Lubrifiez les pièces mobiles pour éviter qu’elles ne rouillent et pour limiter l’usure entraînée par la friction. Retirez toute
poussière déposée sur les pièces.
30. Ne modifiez pas l’outil sans l’autorisation de
Makita.
31. N’essayez pas de maintenir en position enfoncée la gâchette ou l’élément de contact avec un
bout de ruban adhésif ou de fil. Il y a risque de
décès ou de blessure grave.
32. Vérifiez toujours l’élément de contact, tel
qu’indiqué dans ce manuel. Des clous risquent
d’être projetés par accident si le mécanisme de
sécurité ne fonctionne pas correctement.
33. Confiez régulièrement l’outil à un centre de service après-vente agréé Makita pour une inspection.
7
Page 8

34. Pour maintenir la SÉCURITÉ et la FIABILITÉ de
l’outil, son entretien et sa réparation doivent être
effectués dans un centre de service après-vente
agréé Makita, exclusivement avec des pièces de
rechange Makita.
CONSERVEZ CE MODE D’EMPLOI.
AVERTISSEMENT :
Une MAUVAISE UTILISATION de l’outil ou l’ignorance
des consignes de sécurité du présent manuel d’instructions peuvent entraîner une grave blessure.
EQUIPEMENTS DE COMMANDE
C’est l’action du doigt sur la gâchette qui commande le
fonctionnement des cloueurs. Quelques appareils sont
équipés en plus d’un palpeur de sécurité, grâce auquel
l’enfoncement des fixations ne peut commencer que lorsque le nez de l’appareil est mis en contact avec la pièce
à travailler. Ces appareils sont signalés par un triangle
renversé sur la pointe (V) et ne doivent pas être utilisés
sans un palpeur de sécurité qui fonctionne correctement.
SYSTÈMES DE COMMANDE
Suivant le cas, ce cloueur peut être équipée de différents systèmes de commande. Pour savoir de quel
système de commande un appareil est équipé, veuillez
vous reporter aux Données Techniques correspondantes.
Commande coup par coup à simple armement (version recommandée): Système de commande dans le-
quel le palpeur de sécurité et la gâchette doivent être
actionnés de telle sorte qu’aucune opération d’enfoncement ne puisse être déclenchée par la gâchette sans
que le nez de l’appareil soit appliqué sur le point de tir.
Les opérations suivantes ne peuvent être alors commandées qu’après le retour de la gâchette dans sa position
de départ.
Commande coup par coup avec sécurités successives: Celui-ci est un système de déclenchement par le-
quel l’enfoncement des clous s’effectue en actionnant le
palpeur de sécurité et la gâchette, afin que chaque coup
soit obentu par la gâchette, après que la bouche du
cloueur soit positionnée sur l’endroit à cloueur. D’autres
clouages ne seront possibles, qu’une fois la gâchette et
le palpeur de sécurité sont dans leur position initiale.
Longueur des fixations Systèmes de commande Contraintes particulières
130 mm Commande coup par coup
130 mm Commande coup par coup
100 mm 65 mm Commande par contact La force de rappel du palpeur de sécurité doit être :
65 mm
* sans fixations
avec sécurités successives
avec palpeur de sécurité
Commande par contact La force de rappel du palpeur de sécurité doit être :
Commande en continu
avec palpeur de sécurité
Commande par contact (version limitée): Système de
commande pour lequel la gâchette et le palpeur de sécurité doivent être actionnés pour chaque opération
d’enfoncement, l’ordre des actions n’étant pas spécifié.
Pour les opérations d’enfoncement successifs, il suffi t
d’actionner le palpeur de sécurité, la gâchette restant
actionnée ou vice-versa.
Les machines à enfoncer les fixations équipées de commande par contact doivent être marquées avec le symbole »Ne pas utiliser sur des échafaudages ou échelles«
et ne seront pas utilisées pour utilisations spécifiques,
par exemple:
• en cours de déplacement d’un lieu
d’enfoncement à l’autre sur des échafaudages, escaliers, échelles ou constructions de même qu’échelles
comme p.e. lattis du toit
• pour fermer des boîtes ou des caisses
• pour fixer par exemple des systèmes d’arrimage sur
véhicules ou wagons.
Commande coup par coup avec verrouillage de la
gâchette: Quelques modèles sont dotés d’un système
de sécurité qui consiste en un petit levier placé derrière
la gâchette; ce levier verrouille chaque fois que la
gâchette est relâchée, si bien que tout déclenchement
accidentel est impossible. Si l’on veut déclencher, il faut
relever au préalable le levier de sécurité: c’est seulement
alors que la gâchette pourra être ac-tionnée.
SYMBOLES
Les symboles utilisés pour l’outil sont indiqués ci-dessous.
..................Veuillez lire lesétiquettes et le manuel,
..................L’utilisateur et toute personne présente
..................Pouréviter le déclenchement accidentel
Le palpeur de sécurité doit toujours pouvoir revenir à sa position de départ quelque soit l’orientation de l’appareil
Le palpeur de sécurité doit toujours pouvoir revenir à sa position de départ quelque soit l’orientation de l’appareil
125% du poids* de l’appareila
60% du poids* de l’appareila
La force de rappel du palpeur de sécurité doit être :
60% du poids* de l’appareila
en vous assurant d’en avoir bien compris le contenu.
dans la zone de travail doivent porter
des lunettes de sécurité avec protecteurs latéraux.
de l’outil, ne placez pas les doigts près
de la gâchette lorsque vous n’êtes pas
en train de clouer.
8
Page 9

2. SYSTÈME D’AIR COMPRIMÉ
Pour un fonctionnement correct des machines à enfoncer
les fixations, il est nécessaire d’avoir un air comprimé
sec, filtré, et lubrifié, en quantité adéquate.
Si la pression du réseau d’air comprimé est supérieure à
la pression de service admissible du cloueur, un robinet
de réduction de pression muni d’une soupape de sûreté
en aval doit être installé sur le réseau d’air comprimé.
NOTE: Lorsque l’air comprimé est fourni par des compresseurs, l’humidité naturelle de l’air se condense et
s’accumule sous forme d’eau condensée dans les récipients sous pression et dans les tuyauteries. Il est nécessaire d’évacuer ces condensats par des séparateurs
d’eau. Ces séparateurs d’eau doivent être vérifiés quotidiennement et vidangés si nécessaire: faute de quoi il
pourrait se produire de la corrosion dans l’installation
d’air comprimé et dans le cloueur et provoquer une
usure.
Le dispositif de compression doit être dimensionné à
l’égard de la capacité de pression et d’aspiration (courant
volumétrique) pour la consommation estimée. Sections
de conduite trop petites à proportion de la longueur de la
conduite (conduits ou tuyaux) ou surcharge du compresseur mènent à une réduction de pression.
Pour les conduites d’air comprimé fixes, il est recommandé d’avoir un diamètre intérieur de 19 mm au minimum et d’augmenter ce diamètre en fonction de la longueur des conduites et du nombre d’utilisateurs. Il
convient d’installer les conduites d’air comprimé avec
une pente (le point le plus haut vers le compresseur). Il
est recommandé d’installer des séparateurs d’eau facilement accessibles aux points les plus bas. il convient
d’installer les points de branchement pour les utilisateurs
sur le dessus des tuyauteries.
Il est recommandé d’installer les points de branchement
des machines à enfoncer les fixations directement au
point de raccordement d’un dispositif d’entretien de l’air
comprimé (filtre/séparateur d’eau/graisseur). Les graisseurs doivent être vérifi és quotidiennement et remplis si
nécessaire avec l’huile recommandée (voir Données
techniques). L’huileur du lubrificateur doit être réglé de
telle façon qu‘une goutte d‘huile tombe environ tous
15 coups.
Lorsque l’on utilise des tuyaux flexibles de plus de 10 m
de long, l’alimentation en huile du cloueur n’est pas
garantie. Nous suggérons alors d’installer un graisseur
directement sur l’appareil. Ajuster le dosage que cela
suffit pour ca. 30 000 coups.
3. PRÉPARATION DE L’APPAREIL AVANT
MISE EN SERVICE
3.1 PRÉPARATION DE L’APPAREIL AVANT LA
PREMIÉRE UTILISATION
Lire et faire attention à ce mode d’emploi avant la mise
en service de l’appareil. Mesures de sécurité fondamentales doivent être absolument suivies pour éviter des
dommages de l’appareil et des blessures de l’opérateur
ou d’autres personnes qui se trouvent à proximité du travail.
3.2 RACCORDEMENT AU RÉSEAU D‘AIR
COMPRIMÉ
Vérifier que la pression d’air du réseau d‘air comprimé ne
dépasse pas la pression de service admissible du
cloueur. Dans un premier temps, régler la pression de
l’air à la valeur la plus faible de la pression de service
recommandée (voir Données techniques). Vider le
magasin afin d’éviter toute éjection de fixation lors de la
séquence de travail suivante dans le cas où des éléments intérieurs de guidage du cloueur n’aient pas étré
remis dans leur position normale de fonctionnement.
Raccorder le cloueur au réseau d’air comprimé en utilisant un tuyau souple adapté à la pression, et équipé de
raccord rapides avec un diamètre intérieur utile de 8 mm.
La douille de raccordement sur l‘appareil doit avoir un Ø
intérieur mini. de 7,4 mm.
Pour connaître la dimension extérieure de la douille de
raccordement veuillez vous reporter aux Données Techniques.
3.3 REMPLISSAGE DU MAGASIN
N’utiliser que les fixations spécifiées dans les données
techniques (voir section 1.1).
Lors du remplissage du magasin, tenir l’appareil de
manière à ce que le nez ne soit pas dirigé vers votre
corps ou vers une autre personne.
Pendant le chargement de l’appareil il est interdit de toucher la gâchette ni le palpeur de sécurité.
Vous trouverez toutes les autres indications concernant
la manière de placer ou d’enlever les fixations ou la
manière de recharger l’appareil – et qui peuvent varier
suivant les modèles – dans les Données Techniques.
3.4 MANUTENTION DE L’APPAREIL
Tenir compte de la section »1. Références spéciales« de
cette instruction d’emploi.
Après avoir vérifié le fonctionnement impeccable du
cloueur, placer l’appareil sur la pièce à travail et actionner la gâchette.
Dans tous les cas, il convient de s’efforcer de travailler à
la pression d’air la plus faible. Ceci apporte trois avantages significatifs
1. économie d’énergie
2. réduction du niveau de bruit
3. diminution de l’usure du cloueur.
Eviter d’actionner la gâchette du cloueur si le magasin
est vide.
En cas de défaut ou de fonctionnement incorrect, le
cloueur doit immédiatement être débranchée de l’alimentation en air comprimé et remise à un spécialiste
pour vérifi cation.
Pendant les pauses de travail prolongées ou à la fin de la
période de travail, débrancher l’appareil de la source
d’énergie et il est recommandé de vider le magasin.
Protéger les raccords d’air comprimé du cloueur et les
tuyaux souples contre tout polluant. La pénétration de
grosses poussières, de copeaux, de sable etc… provoquera des fuites et endommagera le cloueur. Préserver
l’appareil de l’humidité
9
Page 10

3.5 POINTES À UTILISER
Nous recommandons d’employer de préférence des
pointes calibrées qui en raison de leur uniformité sont le
mieux adaptées au clouage pneumatique. Nous sommes
en mesure de recommander sur demande un fabricant.
Ne sont pas appropriés des pointes à têtes refoulées
normales, irrégulières ou ovales. Eviter l’emploi de clous
présentant des nervures ou des cannelures prononcées
sur la tige.
L’on peut également enfoncer des clous-vis, des pointes
annelées, des clous-harpons et des fausses vis aux
dimensions appropriées et dont le filetage et les têtes ne
présentent pas d’arêtes vives.
Considérez que chaque pointe en mauvais état peut provoquer des incidents de fonctionnement.
3.6 RÉGLAGE DE LA PROFONDEUR
D’ENFONCEMENT
Quand l’outil est livré, il est ajusté de manière que
l’enfoncement du projectile est affleuré si la pression d’air
nécessaire est utilisée. Si le projectile est trop enfoncée,
il est nécessaire d’ajuster la pression d’air plus bas juste.
Seulement si cela ne suffit pas ou si le piston est trop
court après le réaffilage de sa pointe, il faut faire un ajustage. Celui-ci est seulement possible une fois le cloueur
est débranché de son tuyau d’alimentation en air comprimé.
3.7 REBATTRE OU RIVETAGE DES POINTES
Cette méthode est employée quand vous avez besoin
d’un assemblage particulièrement solide (des caisses,
clôtures croisées).
Les pointes doivent être 10 – 15 mm env. plus longues
que l’épaisseur de la pièce.
Posez la pièce sur une table
qui est couverte d’une plaque d’acier et appuyez le
cloueur incliné par 45° env.
sur la pièce et presser fermement. En suite la pointe
est enfoncée à travers la
pièce et recourbée sur le
revers.
45
˚
4. MAINTENANCE
L’appareil doit être impérativement séparé du tuyau à air
comprimé et aucun projectile ne doit être dans l’appareil.
L’appareil doit être toujours propre, nettoyez-le fréquemment et lubrifiez les pièces mobiles chaque se-maine.
L’appareil est fourni d’une graisse spéciale, pour qu’une
lubrification supplémentaire entre les travaux d’entretien
ne soit pas nécessaire. On peut graisser de plus avec
l’huileur du groupe de conditionnement ou un graisseur
de ligne, pour qu’il ne soit pas nécessaire de regraisser si
fréquemment la surface du cylindre.
Faire examiner le cloueur par un expert après 100 000
fixations environ ou une fois par an au minimum pour
garantir la fonction sûre du cloueur.
Veillez à ce que le palpeur de sécurité et l’étrier de sécurité aient un mouvement facile.
10
Page 11

ESPAÑOL
DATOS TÉCNICOS
Número de modelo AF600
Tipo de herramienta .......................................................................... 16 Clavador neumático ligero de acabado
Dimensiones...................................................................................... 11-1/2” x 2-7/8” x 10-3/4”
Peso de la herramienta...................................................................... 3,51 lbs (1,59 Kg)
Compresor de aire
Presión de funcionamiento máxima permisible ............................. 116 PSIG
Presión de funcionamiento recomendada ..................................... 72,5 – 116 PSIG (5 – 8 barias)
Consumo de aire por operación de clavado .................................. 1,335 litres/cycle (0,047 scf/cycle) a 101 PSIG
Valores de características de ruido de acuerdo con
Nivel de potencia de sonido de impulso ponderado A máximo ..... 94,4 dBA
Nivel de presión de sonido de impulso de
superficie ponderado A máximo ..................................................... 81,4 dBA
Lubricaciones recomendadas
Especificaciones de clavador ........................................................... 1,6 x 1,4 longitud 3/4”–2-1/2” (20 – 64 mm)
Accesorios ........................................................................................ Llaves de 3 y 4 mm
Aplicaciones e idoneidad ............................... Paneles, revestimientos de puertas/ventanas, y marcos de muebles.
Sistema de accionamiento (V brida de seguridad instalada) .......... Accionamiento secuencial Contacto/Individual
Dispositivo de gatillo ......................................................................... Activación por presión con dedo
Llenado de cargador.
1. Eche hacia atrás el empujador cargado por resorte hasta que se enganche en posición.
2. Cargue hasta 2 ristras de 100 clavos en la parte superior del cargador.
3. Presione el mecanismo de enganche para permitir que el empujador vuelva a su posición original, recordando
tener apartados los dedos.
(292 mm x 74 mm x 272 mm)
(7 barias) de presión de funcionamiento
(calibre 16)
INSTRUCCIONES IMPORTANTES DE
SEGURIDAD
ADVERTENCIA: AL UTILIZAR ESTA HERRAMIENTA,
SE DEBEN SEGUIR SIEMPRE LAS PRECAUCIONES
DE SEGURIDAD BÁSICAS PARA REDUCIR EL
RIESGO DE LESIÓN PERSONAL, ENTRE LAS CUALES SE INCLUYEN LAS SIGUIENTES:
LEA TODAS LAS INSTRUCCIONES
1. Por su seguridad personal y para una operación
y mantenimiento adecuados de la herramienta,
lea este manual de instrucciones atentamente
antes de usar la herramienta.
2. Siempre use gafas de seguridad para la protec-
ción de sus ojos contra el polvo y lesiones ocasionadas por los clavos. Las gafas de seguridad
deben cumplir con los requisitos de la norma
ANSI Z87.1.
ADVERTENCIA
Es responsabilidad del empleador imponer el
uso de equipo para protección de los ojos por
los usuarios de las herramientas y por otras personas inmediatamente próximas a las áreas de
trabajo.
3. Use protección para los oídos para protegerlos
contra el ruido del escape, así como también
debe usarse protección para la cabeza. Además
vistase con ropa ligera pero no holgada. Las
mangas deben estar abotonadas o arremangadas. No deben usarse corbatas.
4. Apresurar la labor o forzar la herramienta es
peligroso. Maneje la herramienta con cuidado.
No opere al estar bajo la influencia de alcohol,
drogas, medicamentos o similares.
5. Directivas generales para el manejo de la herramienta:
(1) Siempre asuma que la herramienta contiene
clavos.
(2) No apunte la herramienta hacia usted ni a
ninguna persona independientemente de que
contenga clavos o no.
(3) No ejecute la herramienta a menos que esté
colocada firmemente contra la pieza de trabajo.
(4) Trate la herramienta como un utensilio de tra-
bajo.
(5) No juguetee ni haga bromas con la herra-
mienta.
(6) No sostenga ni cargue la herramienta con el
dedo sobre el gatillo.
(7) No recargue la herramienta con los clavos
cuando cualquiera de los controles de operación se encuentre activado.
(8) No opere la herramienta con un suministro
de energía que no sea el especificado en las
instrucciones de seguridad y operación de la
herramienta.
6. Una herramienta con un funcionamiento inadecuado no debe ser utilizada.
7. A veces salen volando chispazos cuando la
herramienta está siendo utilizada. No use la
herramienta cerca de materiales volátiles e inflamables como gasolina, tíner, pintura, gas, adhesivos, etc. los cuales podrían encenderse y
explotar, causando graves lesiones.
11
Page 12

8. El área de trabajo debe estar suficientemente iluminada para garantizar la seguridad en las operaciones. El área de trabajo debe estar
despejada y limpia. Sea especialmente cuidadoso en pisar suelo firme y mantener el equilibrio.
9. Sólo aquellos involucrados en la labor deberían
estar alrededor. Los niños especialmente deben
mantenerse alejados durante todo el tiempo.
10. Puede que haya regulaciones locales respecto al
ruido las cuales debe cumplirse al mantener los
niveles de ruido dentro de los límites preestablecidos. En determinados casos, deberán usarse
obturadores para contener el ruido.
11. No juegue con el elemento de contacto: esto
evita la descarga accidental, por lo que debe
conservarse y no quitarse. Asegurar el gatillo en
la posición de encendido “ON” también es muy
peligroso. Nunca intente trabar el gatillo. No
opere la herramienta si cualquier sección de los
controles de operación está inoperable, desconectada, alterada o no está funcionando apropiadamente.
12. Opere la herramienta dentro de la presión de aire
especificada en la etiqueta de la herramienta por
su seguridad y para un mayor tiempo de vida útil
de la herramienta. No exceda la máxima presión
de operación recomendada. La herramienta no
deberá conectarse a un suministro cuya presión
potencialmente exceda los 200 PSIG (13,6
barias).
13. Nunca use la herramienta con algo más que no
sea aire comprimido. Si se utiliza algún gas
embotellado (bióxido de carbono, oxígeno, nitrógeno, hidrógeno, aire, etc.) o algún gas combustible (hidrógeno, propano, acetileno, etc.) como
suministro de energía para esta herramienta,
ésta explotará y causará graves lesiones.
14. Siempre verifique el estado general de la herramienta, así como si hay tornillos sueltos antes
de la operación. Apriete según sea necesario.
15. Asegúrese de que los sistemas de seguridad
estén funcionando antes de la operación. La
herramienta no debe operarse si para que ésta
clave solo es necesario apretar el gatillo o presionar contra la madera el elemento de contacto.
Sólo debe activarse cuando ambas acciones
sean ejecutadas. Compruebe si hay alguna operación defectuosa sin que haya clavos cargados
y con el elemento de contacto en posición
retraida por completo.
16. Revise paredes, techos, tejados, pisos y similares con atención para evitar una descarga eléctrica accidental, así como una fuga de gas,
explosiones, etc. que sean provocadas por
haber insertado el clavo en cables con corriente,
tubos o ductos de gas.
17. Use solamente los clavos que se especifican en
este manual. El uso de cualquier otro clavo
puede provocar un funcionamiento inapropiado
de la herramienta.
18. No permita que aquellas personas que no estén
entrenadas usen la herramienta.
19. Asegúrese que nadie está cerca antes de clavar.
Nunca intente clavar al mismo tiempo tanto de la
parte interior como de la parte exterior. Los clavos podrían desgarrarse y/o salir volando, lo
cual representa un serio peligro.
20. Esté atento de pisar suelo firme y de mantener el
equilibrio con la herramienta. Asegúrese que
nadie se encuentra debajo al estar trabajando en
lugares elevados, y fije la manguera de aire para
evitar el peligro en caso de un jaloneo o enganchado accidental.
21. En los tejados y otros lugares elevados, clave a
medida que va avanzando en dirección hacia
adelante. Es fácil que deje de tener suelo firme si
clava mientras retrocede. Al clavar contra una
superficie perpendicular, hágalo de la parte
superior a la inferior. Pude realizar las operaciones de clavado con menor fatiga al hacerlo así.
22. Un clavo se doblará o la herramienta se atorará
si por error clava sobre otro clavo o si lo hace
sobre algún punto nodular en la madera. Puede
que el clavo salga arrojado y pegue sobre
alguien, o que la misma herramienta reaccione
de forma peligrosa. Coloque los clavos con cuidado.
23. No deje la herramienta cargada o con el compresor de aire funcionando por un tiempo prolongado bajo el sol. Asegúrese de que el polvo, la
arena, las astillas o el material extraño no
ingrese a la herramienta al dejarla en el lugar
que designe.
24. No apunte el puerto de expulsión a nadie alrededor. Mantenga las manos y los pies alejados del
área del puerto de expulsión.
25. Cuando se encuentre conectada la manguera de
aire, no cargue la herramienta con su dedo en el
gatillo, ni se la dé a alguien bajo estas circunstancias. El disparado accidental puede ser extremadamente peligroso.
26. Maneje la herramienta con cuidado, ya que dentro de la herramienta hay mucha presión contenida que puede ser peligrosa si se causa una
grieta debido a un manejo brusco (como dejar
caer o golpear la herramienta). No intente labrar
o hacer grabados sobre la herramienta.
27. Detenga la operación de clavado de inmediato si
nota algo mal o fuera de lo común con la herramienta.
28. Siempre desconecte la manguera de aire y retire
todos los cuando:
(9) Al desatender la herramienta.
(10) Antes de realizar cualquier mantenimiento o
reparación.
(11) Antes de liberar algún atoramiento.
(12) Antes de llevar la herramienta a una loca-
ción distinta.
29. Realice operaciones de limpieza y mantenimiento justo después de haber terminado la
labor. Mantenga la herramienta en excelentes
condiciones. Lubrique las piezas móviles para
prevenir la oxidación y minimizar el desgaste
por fricción. Limpie la herramienta y las piezas
del polvo.
30. No modifique ni altere la herramienta sin la autorización de Makita.
12
Page 13

31. No intente mantener el gatillo o el elemento de
contacto presionados con cinta adhesiva o con
algún alambre. Podría causarse una lesión grave
o la muerte.
32. Siempre verifique el elemento de contacto como
se indica en este manual. Los clavos podrían
clavarse accidentalmente si el mecanismo de
seguridad no está funcionando adecuadamente.
33. Solicite una inspección periódica de la herramienta en los centros de servicios autorizados
de Makita.
34. Para mantener la SEGURIDAD y FIABILIDAD del
producto, las reparaciones y cualquier mantenimiento deberán ser realizados por los centros
de servicio autorizados o de fabricación de
Makita, usando siempre repuestos Makita.
GUARDE ESTAS INSTRUCCIONES.
AVISO:
El mal uso o incumplimiento de las reglas de seguridad descritas en el presente manual de instrucciones puede ocasionar graves lesiones personales.
DISPOSITIVOS DE DISPARO
Este aparato clavador se pone en acción al oprimir el
gatillo con el dedo. Adicionalmente algunos aparatos
están provistos de un seguro de disparo que únicamente permite el ciclo de clavado cuando la boca del
aparato está apoyada contra la pieza. Estos aparatos
van marcados con un triángulo invertido (V) y no deben
ser utilizados sin un eficaz seguro de disparo.
SISTEMAS DE DISPARO
Según los usos respectivos, este aparato puede equiparse con diferentes sistemas de disparo. El modo de
disparo de los aparatos correspondientes lo puede
extraer usted de la Ficha de datos técnicos.
Disparo individual con seguro de disparo (uso preferente): Un procedimiento de disparo en el cual para
cada ciclo de clavado tienen que estar accionados el
seguro de disparo y el gatillo: el proceso de clavado individual se obtiene mediante el gatillo, después de que la
boca del aparato haya sido aplicada sobre el punto de
clavado.
Cada proceso de clavado subsiguiente sólo se puede
producir cuando el gatillo ha estado previamente en la
posición de reposo.
Disparo individual con secuencia de seguridad: Esto
constituye un procedimiento de disparo en el cual para
cada ciclo de clavado tienen que ser accionados el
seguro de disparo y el gatillo: el proceso de clavado individual se obtiene mediante el gatillo, después de que la
boca del aparato haya sido aplicada sobre el punto de
clavado. Cada proceso de clavado subsiguiente sólo
puede tener lugar cuando el gatillo y el seguro de disparo han estado previamente en la posición de reposo.
Disparo por contacto (uso restringido): Un procedimiento de disparo en el cual para cada ciclo de clavado
tienen que estar accionados el seguro de disparo y el
gatillo: en el orden en que se desee. Para los procesos
sucesivos de clavado, es suficiente si el gatillo se mantiene oprimido y se acciona el seguro de disparo, o bien
a la inversa.
Los aparatos clavadores equipados para disparo por
contacto deben marcarse con el símbolo «No utilizar
sobre andamios o escaleras de mano» y no deben utilizarse en casos determinados, por ejemplo:
• cuando para cambiar de un lugar de
clavado a otro haya que pasar por
andamios, escaleras, escaleras de
mano o construcciones parecidas,
como por ejemplo chapas de techo,
• para cerrar cajas o jaulas de madera,
• para colocar bloqueadores en embalajes de transporte,
por ejemplo sobre vehículos y vagones.
Disparo individual con bloqueo en el gatillo: Algunos
modelos disponen de un sistema de seguridad que consiste en una pequeña palanca instalada detrás del gatillo
y que se bloquea automáticamente cada vez que se
suelta el gatillo, de modo que se evita el disparo accidental. Si se quiere disparar, primero debe tirarse de la
palanca de seguridad: sólo así está listo para funcionar
el gatillo principal y se puede disparar.
SÍMBOLOS
A continuación se muestran los símbolos utilizados para
la herramienta.
..................Lea y entienda el manual y las etiquetas
..................Los operarios y demás personas que se
..................Mantenga los dedos alejados del gatillo
de la herramienta.
encuentran en elárea de trabajo deben
usar gafas de seguridad con protección
lateral.
cuando no esté clavando los sujetado-
res a fin de evitar un disparo accidental.
13
Page 14

Longitud de los objetos
de clavar
130 mm
130 mm
100 mm 65 mm disparo por contacto
65 mm
* sin objetos de clavar
Sistema de disparo Requisitos especiales
disparo individual con
secuencia de seguridad
disparo individual con seguro de disparo
disparo por contacto
disparo duradero con seguro de disparo
el seguro de disparo debe volver a la posición de reposo de
forma fiable en cualquier posición del aparato
el seguro de disparo debe volver a la posición de reposo de
forma fiable en cualquier posición del aparato
125% del peso* del aparatoa como fuerza de recupera-
ción del seguro de disparo
60% del peso* del aparatoa como fuerza de recuperación
del seguro de disparo
60% del peso* del aparatoa como fuerza de recuperación
del seguro de disparo
2. SISTEMA DE AIRE COMPRIMIDO
El buen funcionamiento del aparato clavador requiere un
caudal suficiente de aire comprimido filtrado, seco e
impregnado de aceite.
Si la presión existente en la conducción neumática es
superior a la presión de trabajo máxima permitida para el
aparato clavador, es necesario instalar adicionalmente
en la manguera que va al aparato un manorreductor
seguido de una válvula limitadora de presión.
Aclaración: Al producir aire comprimido en un compresor, la humedad natural del aire se condensa y esta agua
se acumula en el calderón de presión y en las tuberías.
Esta agua condensada debe ser eliminada mediante
separadores de agua. Los separadores hay que controlarlos a diario y vaciarlos en su caso, para evitar la corrosión y el desgaste inherente en el sistema neumático y
en el aparato clavador. El compresor debe ser dimensionado con respecto a la capacidad de presión y de aspiración (flujo volumétrico) para la utilización esperada. Las
secciones de tubo demasiado pequeñas en proporción a
la longitud del tubo (tubo o manguera) o la sobrecarga
del compresor ocasionan una caída de presión.
Las conducciones fijas de aire comprimido deben tener
como mínimo 19 mm de diámetro interior. Para tuberías
de gran longitud o con utilización múltiple, debe aumentarse el diámetro interior en proporción. Las líneas de
aire comprimido deben instalarse con pendiente (el
punto más alto hacia el lado del compresor). En los puntos más bajos conviene instalar, bien accesibles, los
separadores de agua.
Las tomas para consumidores deben acoplarse a las
tuberías por arriba.
Las tomas previstas para aparatos clavadores deben
equiparse, junto al punto de conexión, con un acondicionador de aire (filtro/separador de agua/lubricador). Los
lubricadores deben verificarse a diario y rellenarse en
caso necesario con el aceite recomendado (véase Datos
técnicos). Ajuste el lubricador del grupo acondicionador
de aire de modo que aporte una gota de aceite por cada
15 disparos aproximadamente. Revise periódicamente el
nivel de aceite.
Si se usan mangueras de más de 10 m de longitud, el
abastecimiento de aceite al aparato clavador no estaría
garantizado. Por ello recomendamos montar un lubricador a la entrada misma del aparato clavador. Ajuste la
dosificación de manera que un llenado sea suficiente
para 30 000 disparos aproximadamente.
3. PREPARACIÓN ANTES DE PONER EL
APARATO EN SERVICIO
3.1 PREPARACIÓN ANTES DE LA PRIMERA
UTILIZACIÓN
Léanse y obsérvense estas instrucciones de servicio
antes de poner el aparato en funcionamiento. Las medidas de seguridad fundamentales deben ser respetadas para evitar deterioros del aparato, lesiones del
operador o de otras personas que estén cerca de la zona
de trabajo.
3.2 CONEXIÓN AL SISTEMA DE AIRE
COMPRIMIDO
Cerciórese de que la presión del sistema neumático no
rebase la presión de trabajo máxima permitida para el
aparato clavador. Inicialmente ajuste la presión al valor
inferior de presión de trabajo recomendada (véase Datos
técnicos).
Vac íe siempre el cargador para evitar que en el paso
siguiente se pueda disparar un objeto de clavar si, a
causa de trabajos de reparación y mantenimiento o
transporte, algún elemento interior del aparato clavador
no se encontrase en posición de reposo.
Conecte el aparato clavador al suministro de aire comprimido mediante una manguera de presión adecuada con
diámetro interior de al menos 8 mm y dotada de racores
rápidos. En el aparato debe enroscarse la espiga abierta
(Ø interior mín. 7,4 mm).
El tamaño de la conexión de la espiga puede extraerse
de la Ficha de datos técnicos.
14
Page 15

3.3 LLENADO DEL CARGADOR
Únicamente está permitido el uso de los objetos de clavar especificados en los Datos técnicos (véase Ficha de
datos técnicos).
Para llenar el cargador mantenga el aparato apoyado
sobre un lado, de manera que la boca no apunte al propio cuerpo ni a otras personas. Durante la operación de
llenado del cargador no deben estar pulsados el seguro
de disparo y el gatillo.
Más indicaciones sobre el modelo, como la colocación y
extracción de objetos de clavar o el relleno, se pueden
leer en la Ficha adjunta de datos técnicos.
3.4 CONSERVACIÓN DEL APARATO
Observe la sección «1. Requisitos especiales» de es-tas
Instrucciones de servicio.
El aparato clavador, cuyo funcionamiento correcto se ha
comprobado y está listo para funcionar, se aplica a la
pieza y se dispara.
En todo momento debe procurar trabajar con la menor
presión de aire posible en cada caso. Esto le permite
obtener estas tres ventajas esenciales:
1. ahorra usted energía,
2. reduce el nivel de ruidos,
3. reduce usted el deterioro del aparato clavador.
Evite disparar el aparato clavador con el cargador vacío.
Todo aparato clavador defectuoso o que presente alguna anomalía en su funcionamiento debe separarse
inmediatamente del aire comprimido y debe entregarse a
un experto para su revisión.
Al terminar de trabajar o durante una pausa, sepárese el
aparato del sistema de aire comprimido y a ser posible
vacíese el cargador.
Protéjase de la suciedad las conexiones de aire com-primido del aparato clavador y de las mangueras. La
entrada de polvo grueso, viruta, arena, etc. produce
fugas y el deterioro del aparato clavador.
Protéjase el aparato de la humedad.
3.5 CLAVOS UTILIZABLES
Para nuestras clavadoras recomendamos emplear clavos de máquina, que son los más adecuados por su
esmerada ejecución. A petición podemos indicar un
fabricante idóneo. No son admisibles los clavos con
estrías o aristas pronunciadas en el cuerpo.
Otros tipos de clavos, por ejemplo clavo-tornillos, clavos
de tuerca anular, clavos arponados y tornillos autocortantes de hincadura, no se pueden utilizar en todos los
casos según la medida, la madera y la presión de aire
existente. Piense que todo clavo malo puede causar averías.
3.6 AJUSTE DE PENETRACIÓN
El aparato esta ajustado de fábrica de tal manera que un
proyectil está introducida enrasada si la presión del aire
necesario es utilizanda. Si la proyectil está muy profonda, debe reducirse la presión del aire. Solamente si
esto no fuese suficiente o si el pistón es más corto después de reafilamiento de la punta, debe efectuar un
ajuste. La regulación sólo es posible estando el aire cor-
tado. (Desenchufar el aparato de la acometida de aire).
3.7 REMACHADO
Este procedimiento puede serle útil cuando necesita una
unión especialmente duradera (tablas para formar cajas,
vallas).
Coloque el ajuste de impacto al máximo (+).
Seleccione unos clavos de 10 – 15 mm más longitud que
el grosor de las tablas que vaya a clavar. Coloque las
piezas sobre una mesa con cubierta de acero, mantenga
la clavadora con una inclinación de 45° aproximadamente sobre la pieza y apriete con fuerza sobre la
misma. El aparato clavará a través de la pieza y la parte
contraria se remachará.
45
˚
4. MANTENIMIENTO
Es imprescindible separar el aparato de la manguera de
alimentación.
Al acoplarlo no debe haber objetos en el aparato. Mantenga el aparato siempre limpio, límpielo y lubrique las
piezas móviles semanalmente.
El aparato está provisto de una grasa especial, de manera que no es necesario engrasar entre los trabajos de
mantenimiento. Para que sólo sea necesario engrasar la
superficie de rodamiento cilíndrica a intervalos aún
mayores se puede también engrasar con el lubricador
del grupo acondicionador o un lubricador de línea.
Haga que un experto revise la máquina después de
haber introducido aproximadamente 100 000 objetos de
clavar, en todo caso por lo menos una vez al año, para
garantizar la seguridad de funcionamiento del aparato
clavador.
Cuide de que el seguro de disparo/gancho de seguridad se pueda mover siempre con facilidad.
15
Page 16

Makita Corporation
Anjo, Aichi, Japan
AF600-3L-200804
 Loading...