

Page 1
INSTRUCTION MANUAL
MANUEL D'INSTRUCTION
MANUAL DE INSTRUCCIONES
Pneumatic Brad Nailer
Cloueur Pneumatique Polyvalent
Clavadora Neumática para
Clavos de Cabeza Redonda
AF505N
IMPORTANT: Read Before Using.
IMPORTANT : Lire avant usage.
IMPORTANTE: Lea antes de usar.
Page 2

ENGLISH (Original instructions)
SPECIFICATIONS
Model AF505N
Air pressure 0.39 - 0.78 MPa (60 - 115 PSIG)
Nail length 15 mm (5/8") - 50 mm (2")
Nail capacity 100 pcs.
Min. hose diameter 6.5 mm (1/4")
Dimensions (L X H X W) 260 mm X 237 mm X 64 mm (10-1/4" X 9-5/8" X 2-1/2")
Net weight 1.4 kg (3.01 lbs)
• Due to our continuing program of research and development, the specications herein are subject to change without notice.
• Note: Specications may differ from country to country.
Important safety instructions
For personal safety and proper operation and maintenance of the tool, read this instruction manual
carefully before using the tool.
WARNING: WHEN USING THIS TOOL, BASIC
SAFETY PRECAUTIONS SHOULD ALWAYS BE
FOLLOWED TO REDUCE THE RISK OF PERSONAL
INJURY, INCLUDING THE FOLLOWING:
READ ALL INSTRUCTIONS.
Personal Protective Equipment
1.
Always wear safety glasses to avoid eye injury
from dust or fasteners. The safety glasses should
conform with the requirements of ANSI Z87.1.
WARNING:It is an employer's responsibility
to enforce the use of safety eye protection
equipment by the tool operators and by other
persons in the immediate working area.
2. Wear hearing protection to protect your ears
against exhaust noise and head protection.
Also wear light but not loose clothing. Sleeves
should be buttoned or rolled up. No necktie
should be worn.
Flammable Atmospheres
1. Do not operate tool in explosive atmospheres,
such as in the presence of ammable liquids,
gases or combustible dust.
Tool modication
1. The tool should not be modied unless autho-
rized in the tool manual or approved in writing
by the tool manufacturer.
Tool maintenance
1. Refer to the tool maintenance instructions for
detailed information on the proper maintenance of a tool.
Recommended fasteners and accessories
1. Use only fasteners made or recommended by
the tool manufacturer, or fasteners that perform equivalently to those recommended by
the manufacturer.
2. Use only accessories made or recommended
by the tool manufacturer, or accessories that
perform equivalently to those recommended
by the manufacturer.
Inspect tool before operating to:
1. Use only power source specied in the instruc-
tion manual.
Operate the tool within the specied air pressure on the tool label for safety and longer tool
life. Do not exceed the recommended max.
operating pressure. The tool should not be
connected to a source whose pressure potentially exceeds 1.37 MPa (200 PSIG).
2. Never use the tool with other than compressed
air. If bottled gas (carbon dioxide, oxygen,
nitrogen, hydrogen, air, etc.) or combustible
gas (hydrogen, propane, acetylene, etc.) is
used as a power source for this tool, the tool
will explode and cause serious injury.
3. Always check the tool for its overall condition
and loose screws before operation. Tighten as
required.
4. Make sure all safety systems are in working
order before operation. The tool must not
operate if only the trigger is pulled or if only
the contact element is pressed against the
wood. It must work only when both actions are
performed. Test for possible faulty operation
with fasteners unloaded and the contact element in fully pulled position.
5.
Always check contact element as instructed in
this manual. Fasteners may be driven accidentally
if the safety mechanism is not working correctly.
Operating controls
1. Do not use a tool with missing or damaged
safety warning label(s.)
2. A tool that is not in proper working order must
not be used. Tags and physical segregation
shall be used for control.
3. Do not remove, tamper with, or otherwise
cause tool operating controls to become
inoperable.
4. Do not operate tool if any portion of the tool
operating controls is inoperable, disconnected, altered, or not working properly.
Tool handling
1. Only persons who have read and understand
the tool operating/safety instructions should
operate the tool.
2. Always assume that tool contains fasteners.
2 ENGLISH
Page 3

3. Do not point tool toward yourself or anyone
whether it contains fasteners or not.
4. Keep bystanders and children away while
operating tool.
5. Do not actuate tool unless tool is placed rmly
against the workpiece.
6. Respect tool as a working implement.
7. Do not engage in horseplay.
8. Stay alert, focus on your work and use com-
mon sense when working with tools.
9. Do not use tool while tired, after having consumed drugs or alcohol, or while under the
inuence of medication.
10. Do not overreach. Keep proper footing and
balance at all times.
11. Do not hold or carry tool with a nger on the
trigger.
12. Drive fasteners into proper work surface only.
13. Do not drive fasteners into other fasteners.
14. After driving a fastener, tool may spring back
(“recoil”) causing it to move away from the
work surface. To reduce risk of injury always
manage recoil by:
a) always maintaining control of tool.
b) allowing recoil to move tool away from
work surface.
c)
not resisting recoil such that tool will
be forced back into the work surface. In
“Contact Actuation Mode,” if workpiece
contact is allowed to re-contact work surface before the trigger is released, an unintended discharge of a fastener will occur.
d) keeping face and body parts away from
15. When working close to an edge of a workpiece
16. Keep hands and body away from fastener
17. Do not load tool with fasteners when any one
18. Do not operate tool with any power source
19. Do not operate tool with any operating pres-
20. Always select an actuation system that is
21. Use extra caution when driving fasteners into
22. Do not lift, pull or lower tool by the hose.
Disconnecting tool
Disconnect tool from the power source when:
1. Not in use;
2. Performing any maintenance or repairs;
3. Clearing a jam;
4. Elevating, lowering or otherwise moving the
tool.
or at steep angles use care to minimize chip-
ping, splitting or splintering, or free ight or
ricochet of fasteners, which may cause injury.
discharge area of tool.
of the operating controls is activated.
other than that specied in tool operating/
safety instructions.
sure other than that specied in tool operating/
safety instructions.
appropriate to the fastener application and the
training of the operator.
existing walls or other blind areas to prevent
contact with hidden objects or persons on
other side (e.g., wires, pipes.)
tool to a new location;
5. Tool is outside of the operator’s supervision or
control; or
6. Removing fasteners from the magazine.
Additional safety instructions
1. The area should be sufciently illuminated to
assure safe operations. The area should be
clear and litter-free.
2.
There may be local regulations concerning
noise which must be complied with by keeping
noise levels within prescribed limits. In certain
cases, shutters should be used to contain noise.
3. Check walls, ceilings, oors, roong and
the like carefully to avoid possible electrical
shock, gas leakage, explosions, etc. caused by
striking live wires, conduits or gas pipes.
4. On rooftops and other high locations, drive
fasteners as you move forward. It is easy to
lose your footing if you drive fasteners while
inching backward. When driving against perpendicular surface, drive fasteners from the
top to the bottom. You can perform the operations with less fatigue by doing so.
5. Do not leave the loaded tool or the air compressor under pressure for a long time out in
the sun. Be sure that dust, sand, chips and
foreign matter will not enter the tool in the
place where you leave it setting.
6. Perform cleaning and maintenance right after
nishing the job. Keep the tool in tip-top condition. Lubricate moving parts to prevent rusting
and minimize friction-related wear. Wipe off all
dust from the parts.
7. Do not disconnect the air hose with a nger
on the trigger. An unexpected driving will cause
serious injury when the air hose is connected.
8. When you drop or strike the tool, check the
tool damage or crack and make sure that
safety systems are in working order before
operation. As there is high pressure inside the
tool, failure to do so will cause serious injury.
9. Ask Makita's Authorized service centers for
periodical inspection of the tool.
10.
To maintain product SAFETY and RELIABILITY,
maintenance and repairs should be performed
by Makita Authorized or Factory Service Centers,
always using Makita replacement parts.
SAVE THESE INSTRUCTIONS.
WARNING: MISUSE or failure to follow the
safety rules stated in this instruction manual may
cause serious personal injury.
Symbols
The followings show the symbols used for tool.
Read and understand tool labels and manual. Failure to follow warnings could result
in death or serious injury.
Operators and others in work area must
wear safety glasses with side shields.
Keep ngers away from trigger when
not driving fasteners to avoid accidental
discharge.
3 ENGLISH
Page 4
INSTALLATION
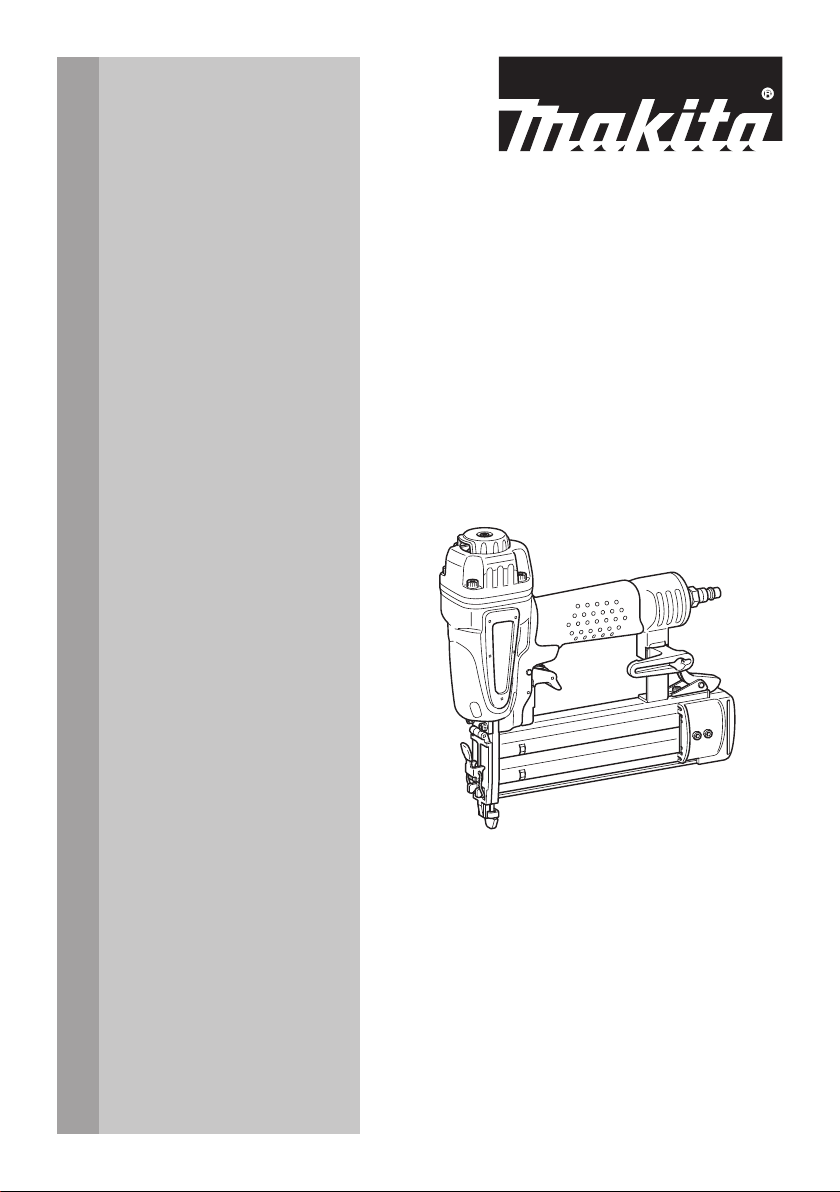
Selecting compressor
CFM
(ft3 /min.)
3
CAUTION:
• Low air output of the compressor, or a long
or smaller diameter air hose in relation to the
nailing frequency may cause a decrease in the
driving capability of the tool.
Lubrication
2
1
Compressor air output per minute
0
10 20 30 40 50
Nailing frequency (times/min.)
The air compressor must comply with the requirements
of ANSI B19.3.
Select a compressor that has ample pressure and air
output to assure cost-efcient operation. The graph
shows the relation between nailing frequency, applica-
ble pressure and compressor air output.
Thus, for example, if nailing takes place at a rate of
approximately 60 times per minute at a compression of
0.69 MPa (100 PSIG), a compressor with an air output
over 2 CFM ( ft
Pressure regulators must be used to limit air pressure to
the rated pressure of the tool where air supply pressure
exceeds the tool's rated pressure. Failure to do so may
result in serious injury to tool operator or persons in the
vicinity.
3
/minute) is required.
0.79 MPa (115PSIG)
0.69 MPa (100PSIG)
0.59MPa (85PSIG)
60
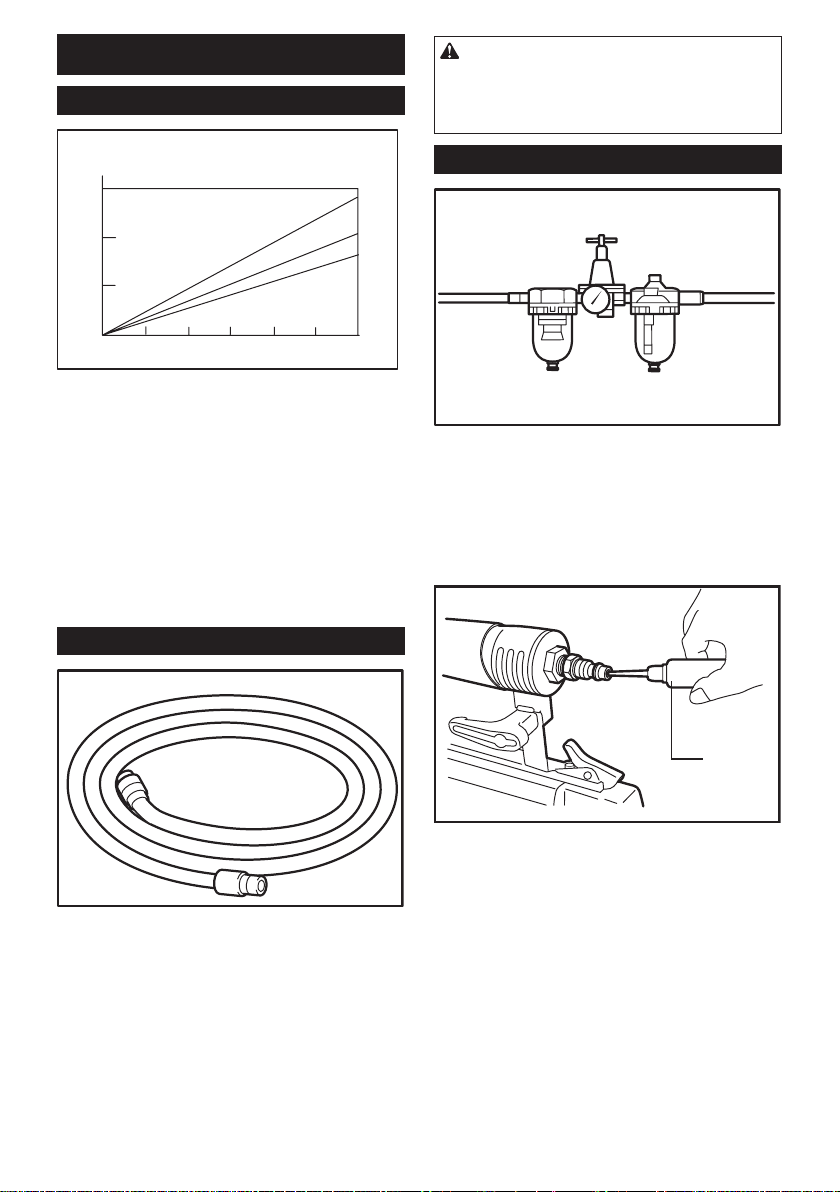
Selecting air hose
To insure maximum performance, install an air set (oiler,
regulator, air lter) as close as possible to the tool.
Adjust the oiler so that one drop of oil will be provided
for every 50 nails.
When an air set is not used, oil the tool with pneumatic
tool oil by placing 2 (two) or 3 (three) drops into the air
tting. This should be done before and after use. For
proper lubrication, the tool must be red a couple of
times after pneumatic tool oil is introduced.
1
Use an air hose as large and as short as possible to
assure continuous, efcient nailing operation. With an
air pressure of 0.49 MPa (70 PSIG), an air hose with
an internal diameter of over 6.5 mm (1/4") and a length
of less than 20 m (6.6 ft.) is recommended when the
interval between each nailing is 0.5 seconds. Air supply
hoses shall have a minimum working pressure rating of
1.03 MPa (150 PSIG) or 150 percent of the maximum
pressure produced in the system whichever is higher.
► 1. Pneumatic tool oil
4 ENGLISH
Page 5
FUNCTIONAL
DESCRIPTION
CAUTION:
• Always disconnect the hose before adjusting or
checking function on the tool.
CAUTION:
• Always disconnect the hose from the tool.
• Never hook the tool at high location or on poten-
tially unstable surface.
The hook is convenient for hanging the tool temporarily.
Adjusting depth of nailing
B
A
► 1. Adjuster
To adjust the depth of nailing, turn the adjuster. The
depth of nailing is the deepest when the adjuster is
turned fully in the A direction shown in the gure. It will
become shallower as the adjuster is turned in the B
direction. If nails cannot be driven deep enough even
when the adjuster is turned fully in the A direction,
increase the air pressure. If nails are driven too deep
even when the adjuster is turned fully in the B direction,
decrease the air pressure. Generally speaking, the tool
service life will be longer when the tool is used with
lower air pressure and the adjuster set to a lower depth
of nail driving.
CAUTION:
• Always disconnect the hose before adjusting the
depth of nailing.
1
ASSEMBLY
CAUTION:
• Always disconnect the hose before carrying out
any work on the tool.
• Load the same kind, size and uniform length of
nails when loading nails in the magazine.
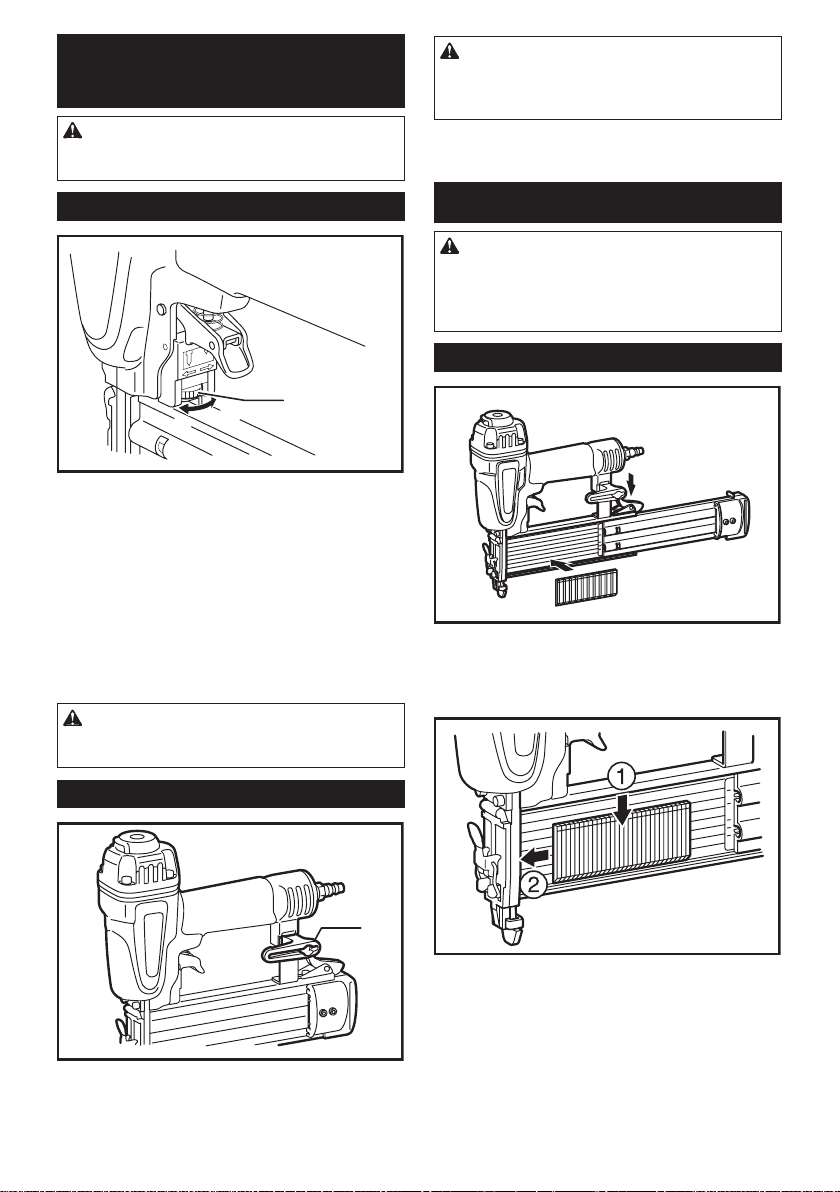
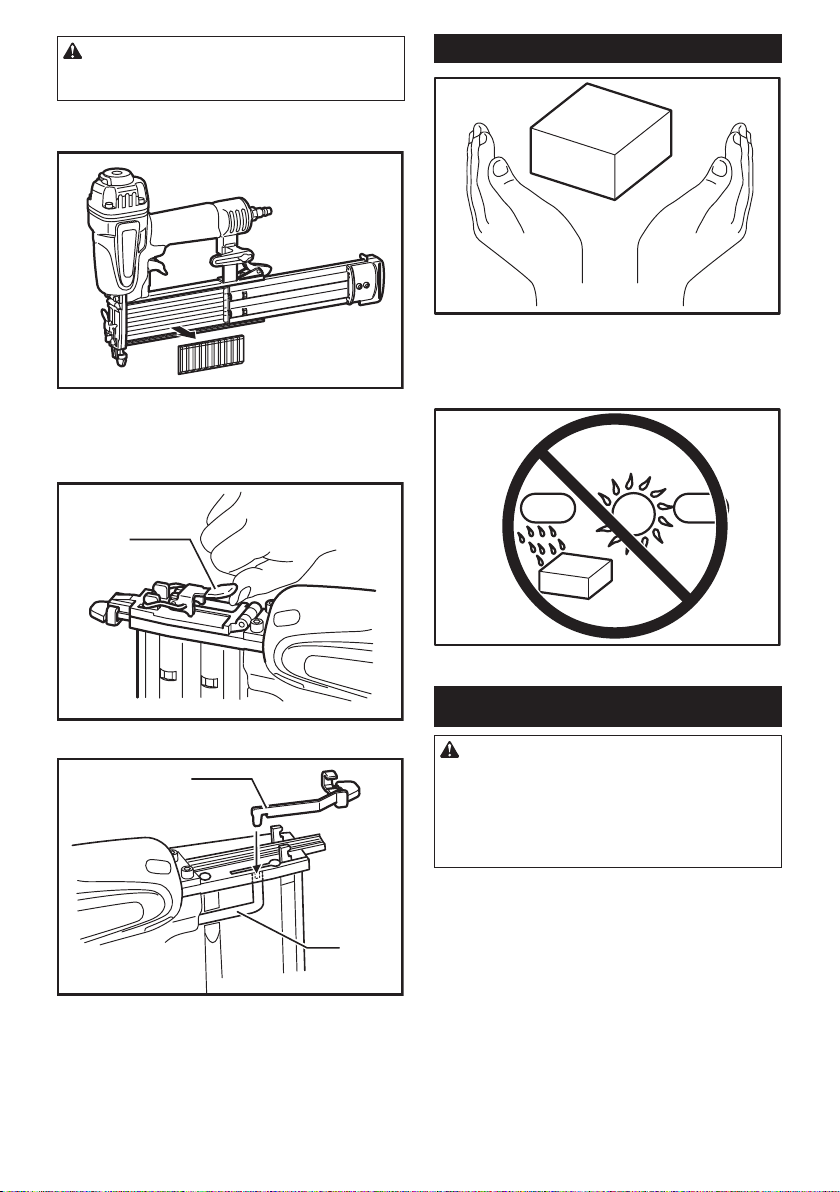
Loading nailer
Press the lever and open the sliding door of the maga-
zine by pulling it toward yourself with the lever pressed.
Align the tip of nails with the grooves at the bottom of
the magazine and push the whole part of nails toward
the ring opening.
Hook
► 1. Hook
1
Close the sliding door.
5 ENGLISH
Page 6
Nose adapter
1
► 1. Nose adapter
CAUTION:
• Always disconnect the hose before installing the
nose adapter.
To prevent the surface of workpiece from being
scratched or damaged, use the nose adapter.
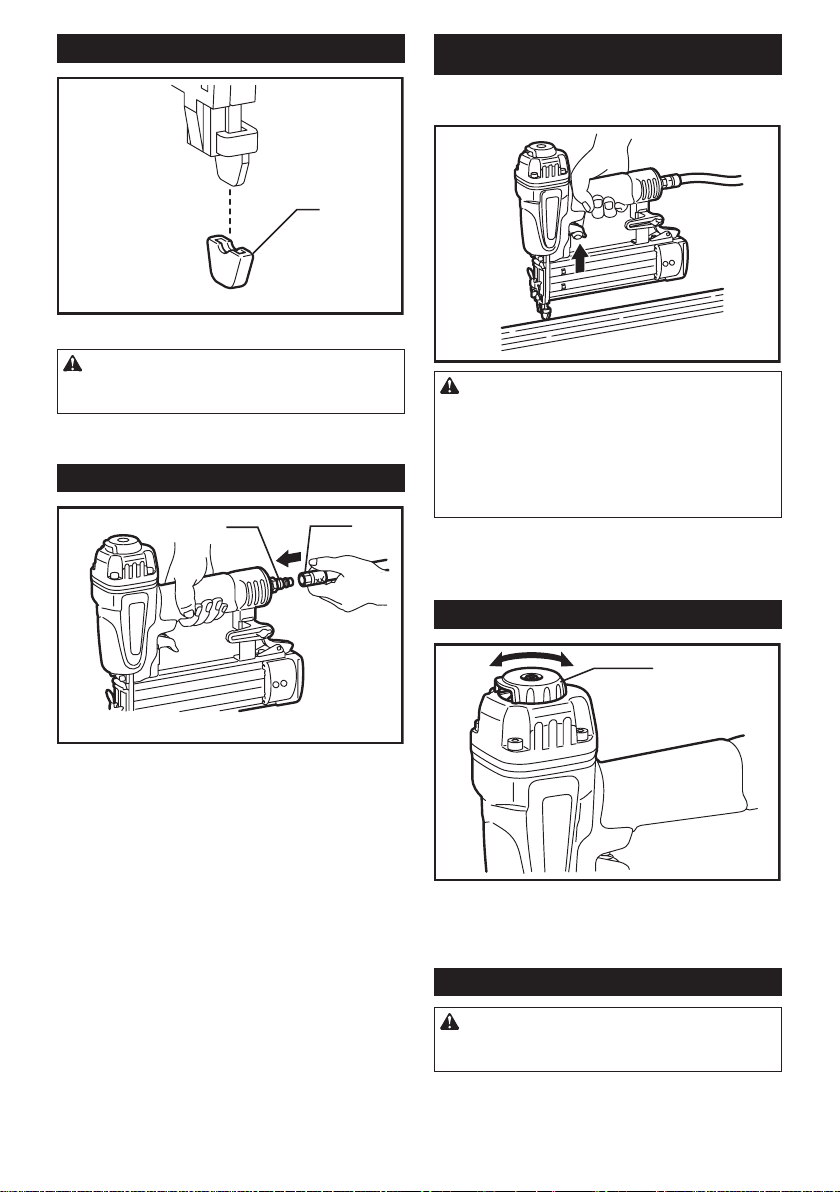
Connecting air hose
1
2
OPERATION
To drive a nail, you may place the contact element
against the workpiece and pull the trigger.
CAUTION:
• WITH THE TRIGGER HELD IN A HALFPULLED POSITION, an unexpected nailing
could occur, if contact element is allowed to
re-contact against the workpiece or the other
surface under the inuence of recoil.
In order to avoid this unexpected nailing, per-
form as follows;
A. Do not place the contact element against the workpiece with excessive force.
B. Pull the trigger fully and hold it on for 1-2 seconds
after nailing.
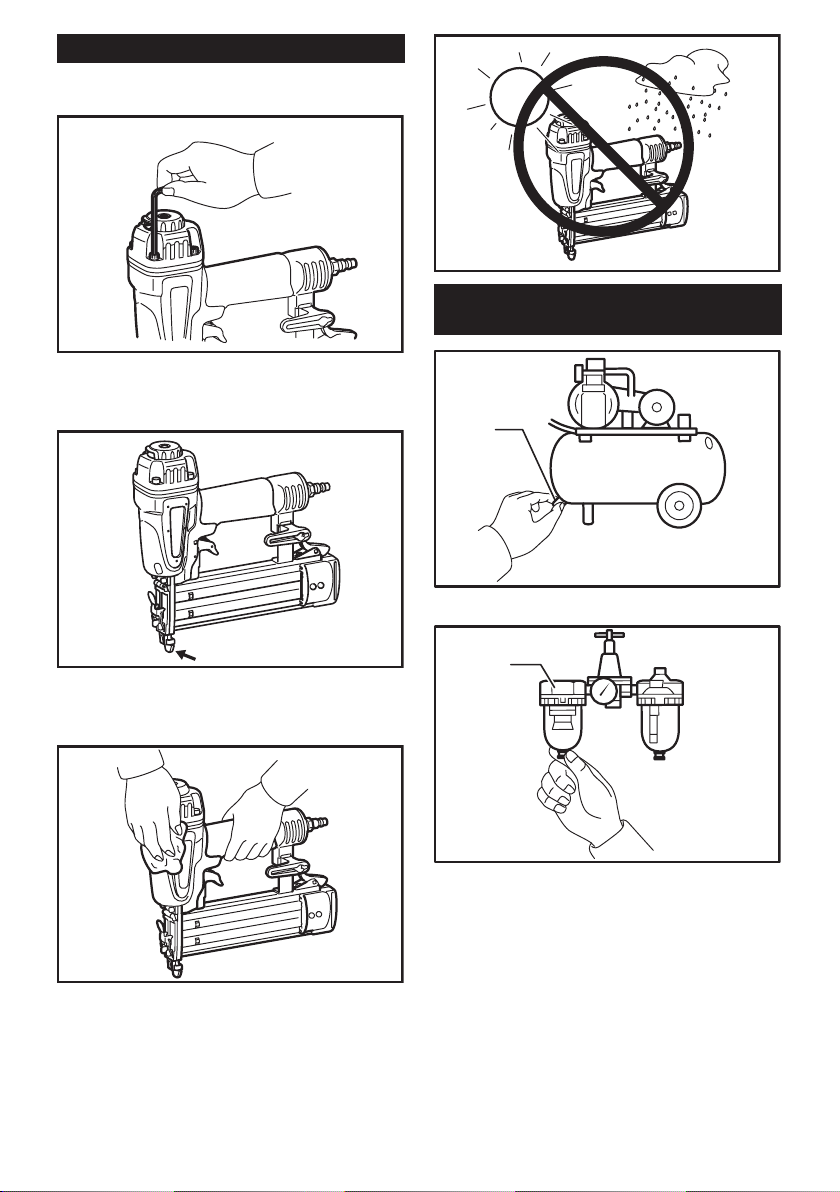
Direction of exhaust air
► 1. Air tting 2. Air socket
Slip the air socket of the air hose onto the air tting on
the nailer. Be sure that the air socket locks rmly into
position when installed onto the air tting. A hose cou-
pling must be installed on or near the tool in such a way
that the pressure reservoir will discharge at the time the
air supply coupling is disconnected.
1
► 1. Exhaust cover
The direction of exhaust air can be changed 360
degrees of angle by turning the exhaust cover with a
hand.
Removing nails
CAUTION:
• Do not use deformed nails or nail strip. Failure
to do so causes poor nail feeding.
6 ENGLISH
Page 7
WARNING:
dH
• Always disconnect the hose before removing
nails.
Open the slide door and remove nails from the
magazine.
With the slide door kept open, open the door and take
out nails.
Removing the contact top allows nails to be easily taken
out. When re-installing the contact top, insert the prorusion of the contact top into the notch in the contact arm.
Nails
Nail
Handle nail coils and their box carefully. If the nail coils
have been handled roughly, they may be out of shape
or their connector breaks, causing poor nail feed.
Avoid storing nails in a very humid or hot place or place
exposed to direct sunlight.
1
► 1. Latch
1
► 1. Contact top 2. Contact arm
Humi
Nail
ot
MAINTENANCE
CAUTION:
• Always disconnect the air hose from the tool
before attempting to perform inspection or
maintenance.
• Never use gasoline, benzine, thinner, alcohol
or the like. Discoloration, deformation or cracks
may result.
2
7 ENGLISH
Page 8
Maintenance of nailer
Always check the tool for its overall condition and loose
screws before operation. Tighten as required.
With tool disconnected, make daily inspection to assure
free movement of the contact element and trigger. Do
not use tool if the contact element or trigger sticks or
binds.
Maintenance of compressor, air set
and air hose
1
► 1. Drain cock
When the tool is not to be used for an extended period
of time, lubricate the tool using pneumatic tool oil and
store the tool in a safe place. Avoid exposure to direct
sunlight and/or humid or hot environment.
1
► 1. Air lter
After operation, always drain the compressor tank and
the air lter. If moisture is allowed to enter the tool,
It may result in poor performance and possible tool
failure.
Check regularly to see if there is sufcient pneumatic
oil in the oiler of the air set. Failure to maintain sufcient
lubrication will cause O-rings to wear quickly.
8 ENGLISH
Page 9
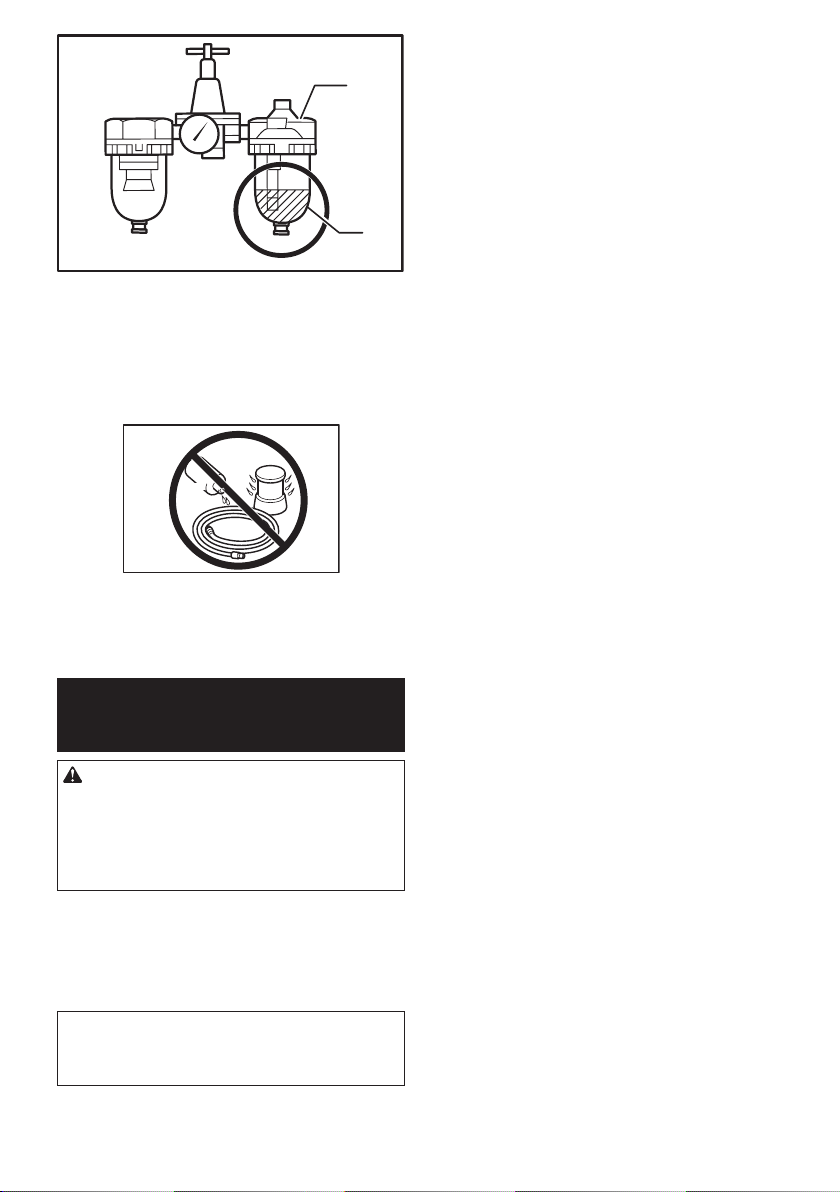
1
2
► 1. Oiler 2. Pneumatic oil
Keep the air hose away from heat (over 60°C, over
140°F), away from chemicals (thinner, strong acids or
alkalis). Also, route the hose away from obstacles which
it may become dangerously caught on during operation.
Hoses must also be directed away from sharp edges
and areas which may lead to damage or abrasion to
the hose.
Stove
Thinner
To maintain product SAFETY and RELIABILITY,
repairs, any other maintenance or adjustment should
be performed by Makita Authorized or Factory Service
Centers, always using Makita replacement parts.
OPTIONAL
ACCESSORIES
CAUTION:
• These accessories or attachments are recommended for use with your Makita tool specied
in this manual. The use of any other accessories
or attachments might present a risk of injury to
persons. Only use accessory or attachment for
its stated purpose.
If you need any assistance for more details regard-
ing these accessories, ask your local Makita Service
Center.
• Nails
• Air hoses
• Safety goggles
NOTE:
• Some items in the list may be included in the
tool package as standard accessories. They
may differ from country to country.
9 ENGLISH
Page 10

FRANÇAIS (Mode d’emploi original)
SPÉCIFICATIONS
Modèle AF505N
Pression d'air 0,39 - 0,78 MPa (60 - 115 PSIG)
Longueur de clou 15 mm (5/8") - 50 mm (2")
Capacité de clouage 100 unités
Diamètre min. du tuyau 6,5 mm (1/4")
Dimensions (L x H x P) 260 mm X 237 mm X 64 mm (10-1/4" X 9-5/8" X 2-1/2")
Poids net 1,4 kg (3,01 lbs)
• Étant donné l'évolution constante de notre programme de recherche et de développement, les spécications contenues dans ce manuel sont sujettes à modication sans préavis.
• Note : Les spécications peuvent varier suivant les pays.
Consignes de sécurité importantes
Par mesure de sécurité personnelle et pour assurer
une utilisation et un entretien adéquats, veuillez
lire attentivement ce manuel d’instructions avant
d’utiliser l’outil.
MISE EN GARDE : PAR MESURE DE SÉCURITÉ,
DES PRÉCAUTIONS DE BASE DOIVENT ÊTRE
PRISES LORS DE L’UTILISATION DE CET OUTIL,
AFIN DE RÉDUIRE LES RISQUES DE BLESSURE.
CES PRÉCAUTIONS COMPRENNENT LES
SUIVANTES :
LISEZ TOUTES LES
INSTRUCTIONS.
Équipement de protection personnelle
1. Portez toujours des lunettes de sécurité pour
éviter les blessures aux yeux au contact de
la poussière ou des xations. Les lunettes de
sécurité doivent répondre aux exigences de la
norme ANSI Z87.1.
MISE EN GARDE : L’employeur a la responsabilité d’imposer le port d’un dispositif de
protection des yeux aux utilisateurs des outils
et à toute personne présente dans la zone de
travail.
2. Portez une protection d’oreilles pour les
protéger contre le bruit d’échappement, et
portez un casque de sécurité. Les vêtements
portés doivent être légers et ne doivent pas
être amples. Veuillez boutonner ou rouler vos
manches. Ne portez pas de cravate.
Atmosphères inammables
1. N’utilisez pas l’outil dans les atmosphères
explosives, par exemple en présence de
liquides inammables, de gaz ou de poussières combustibles.
Modication de l’outil
1. L’outil ne doit être modié que si cela est auto-
risé dans le manuel de l’outil ou approuvé par
écrit par le fabricant de l’outil.
Entretien de l’outil
1. Reportez-vous aux instructions d’entretien
de l’outil pour des informations détaillées sur
l’entretien adéquat d’un outil.
Fixations et accessoires recommandés
1. Utilisez exclusivement les xations fabriquées
ou recommandées par le fabricant de l’outil,
ou des xations qui offrent un rendement équivalent à celles recommandées par le fabricant.
2. Utilisez exclusivement les accessoires fabriqués ou recommandés par le fabricant de
l’outil, ou des accessoires qui offrent un rendement équivalent à ceux recommandés par le
fabricant.
Inspectez l’outil avant de l’utiliser :
1.
Utilisez uniquement la source d’alimentation
spéciée dans le manuel d’instructions.
Utilisez l’outil sans dépasser la pression d’air
spéciée sur l’étiquette de l’outil, pour votre
sécurité et pour prolonger la durée de service
de l’outil. Ne dépassez pas la pression d’utili
sation max. recommandée. L’outil ne doit pas
être raccordé à une source dont la pression est
susceptible de dépasser 1,37 MPa (200 PSIG).
2. Cet outil doit être exclusivement utilisé avec
de l’air comprimé. L’utilisation d’une bouteille de gaz (dioxyde de carbone, oxygène,
nitrogène, hydrogène, air, etc.) ou de gaz
combustible (hydrogène, propane, acétylène,
etc.) comme source d’alimentation de cet outil
entraînera une explosion et risque de causer
une blessure grave.
3. Avant d’utiliser l’outil, assurez-vous qu’il est
en bon état et qu’aucune de ses vis n’est desserrée. Le cas échéant, serrez les vis.
4. Assurez-vous que tous les dispositifs de sécurité sont en état de fonctionner avant d’utiliser
l’outil. Il ne faut pas que l’outil s’active lorsque
vous appuyez uniquement sur la gâchette
ou appuyez simplement l’élément de contact
contre le bois. Il ne doit s’activer que lorsque
ces deux actions sont exécutées. Retirez les
xations de l’outil et tirez complètement l’élément de contact pour vérier l’absence de tout
vice de fonctionnement.
5. Vériez toujours l’élément de contact, tel
qu’indiqué dans ce manuel. Des xations
risquent d’être projetées par accident si le
mécanisme de sécurité ne fonctionne pas
correctement.
10 FRANÇAIS
-
Page 11

Commandes
1. N’utilisez pas un outil dont des étiquettes de
mise en garde sont manquantes et abîmées.
2.
Un outil qui n’est pas en bon état de marche ne
doit pas être utilisé. Des balises et la séparation
matérielle seront utilisées pour la commande.
3. Ne retirez pas, ne modiez pas et ne rendez
d’aucune façon les commandes inutilisables.
4. N’utilisez pas l’outil si toute partie des commandes de l’outil est inutilisable, déconnectée,
altérée ou défectueuse.
Manipulation de l’outil
1. L’outil ne doit être utilisé que par des personnes qui ont lu et compris les instructions
d’utilisation et consignes de sécurité.
2. Supposez toujours que l’outil contient des
xations.
3. Ne pointez pas l’outil vers vous-même ou toute
autre personne, peu importe qu’il contienne ou
non des xations.
4. Ne laissez pas approcher les curieux et les
enfants pendant que vous utilisez l’outil.
5. N’activez l’outil que s’il est fermement placé
contre la pièce à travailler.
6.
Respectez l’outil en tant qu’instrument de travail.
7. Évitez tout chahut.
8.
Restez alerte, attentif à votre travail et faites preuve
de bon sens lorsque vous utilisez des outils.
9. N’utilisez pas l’outil si vous êtes fatigué, avez
consommé une drogue ou de l’alcool, ou êtes
sous l’effet de médicaments.
10. Ne vous étirez pas trop. Assurez-vous d’une
bonne prise au sol et d’un bon équilibre en
tout temps.
11. Évitez de tenir ou de transporter l’outil avec un
doigt sur la gâchette.
12. Ne posez les xations que sur une surface à
travailler adéquate.
13. Ne posez pas de xations dans d’autres
xations.
14. Après la pose d’une xation, il se peut que l’ef-
fet de ressort (« recul ») de l’outil l’éloigne de
la surface à travailler. Pour réduire les risques
de blessure, contrôlez toujours le recul en :
a)
gardant constamment la maîtrise de l’outil;
b) laissant le recul éloigner l’outil de la
surface à travailler;
c) ne résistant pas au recul, an de ne pas
forcer le retour de l’outil sur la surface
à travailler. En « Mode de commande
par contact », une xation sera libérée
involontairement si vous laissez l’outil
retoucher la surface à travailler avant la
libération de la gâchette.
d) gardant le visage et autres parties du
15. Lorsque vous travaillez près du bord d’une
corps à l’écart de l’outil.
pièce à travailler ou sur des angles prononcés,
faites-le prudemment pour réduire les risques
d’écaillage, de fendillement ou d’éclatement,
ou pour éviter que les xations ne s’envolent
librement ou ricochent, ce qui peut causer des
blessures.
16. Gardez les mains et le corps à l’écart de la
zone de libération des xations.
17. Ne mettez pas de xations dans l’outil pendant
que toute commande est activée.
18. Ne faites fonctionner l’outil avec aucune autre
source d’alimentation que celle spéciée dans
les instructions d’utilisation et consignes de
sécurité de l’outil.
19. Ne faites fonctionner l’outil avec aucune autre
pression d’utilisation que celle spéciée dans
les instructions d’utilisation et consignes de
sécurité de l’outil.
20. Sélectionnez toujours un système de com-
mande qui convient à l’application de xation
et à la formation reçue par l’utilisateur.
21. Soyez tout particulièrement prudent lorsque
vous posez des xations dans des cloisons
existantes ou tout autre matériau dont l’arrière
n’est pas visible, pour éviter le contact avec
des objets dissimulés (p. ex., des câbles ou
tuyaux) ou avec des personnes se trouvant de
l’autre côté.
22. Évitez de soulever, tirer ou abaisser l’outil par
le tuyau.
Débranchement de l’outil
Débranchez l’outil de la source d’alimentation
lorsque :
1. non utilisé;
2. exécution de tout entretien ou réparation;
3. nettoyage d’un blocage;
4. élévation, abaissement ou déplacement de
l’outil vers un nouvel emplacement;
5. outil non surveillé ou contrôlé par l’utilisateur; ou
6. retrait des xations du magasin.
Consignes de sécurité supplémentaires
1. La zone doit être sufsamment éclairée pour
assurer un travail sécuritaire. La zone doit être
dégagée et sans déchets.
2. Il se peut que des réglementations locales
s’appliquent concernant les niveaux de bruit
permis. Veuillez les respecter. Le cas échéant,
des volets doivent être installés pour réduire le
bruit.
3. Pour éviter tout risque de choc électrique, de
fuite de gaz, d’explosion, etc., provoqué par le
contact avec des ls dénudés, des conduites
ou des tuyaux de gaz, vériez le mur ou le
plafond, le plancher, le toit, etc.
4. Sur les toits et autres endroits élevés, posez
les xations en vous déplaçant vers l’avant.
Vous risquez de perdre pied si vous posez
les xations en vous déplaçant à reculons.
Lorsque vous posez des xations sur une
surface verticale, faites-le du haut vers le bas.
De cette façon le travail sera moins exigeant
physiquement.
5. N’abandonnez pas pour une période prolongée un outil chargé ou un compresseur d’air
sous pression exposé au soleil à l’extérieur.
Assurez-vous de toujours déposer l’outil
en un endroit où la poussière, le sable, les
copeaux et corps étrangers ne risquent pas
d’y pénétrer.
11 FRANÇAIS
Page 12

6. Procédez au nettoyage et à l’entretien de l’outil
une fois le travail terminé. Maintenez l’outil
en excellente condition. Lubriez les pièces
mobiles pour éviter qu’elles ne rouillent et
pour limiter l’usure entraînée par la friction.
Retirez toute poussière déposée sur les
pièces.
7. Ne déconnectez pas le tuyau d’air avec un
doigt posé sur la gâchette. Le déclenchement
accidentel causerait une grave blessure au
moment du raccordement du tuyau d’air.
8. Si vous échappez ou heurtez l’outil, vériez
l’absence de dommages ou ssures, et assurez-vous que tous les dispositifs de sécurité
sont en état de fonctionner avant d’utiliser
l’outil. Comme la pression est élevée à l’intérieur
de l’outil, la négligence de cette consigne risque
de causer une blessure grave.
9. Conez régulièrement l’outil à un centre de
service après-vente agréé Makita pour une
inspection.
10. Pour maintenir la SÉCURITÉ et la FIABILITÉ de
l’outil, son entretien et sa réparation doivent
être effectués dans un centre de service aprèsvente agréé ou d’usine Makita, exclusivement
avec des pièces de rechange Makita.
CONSERVEZ CE MODE
D’EMPLOI.
MISE EN GARDE : Une MAUVAISE
UTILISATION de l’outil ou l’ignorance des
consignes de sécurité du présent manuel d’instructions peuvent entraîner une grave blessure.
Symboles
Les symboles utilisés pour l’outil sont indiqués
ci-dessous.
Veuillez lire et comprendre les étiquettes et
le manuel de l’outil. L’ignorance des mises
en garde peut entraîner le décès ou une
grave blessure.
L’utilisateur et toute personne présente
dans la zone de travail doivent porter
des lunettes de sécurité avec protecteurs
latéraux.
Gardez les doigts à l’écart de la gâchette
lorsque vous ne posez pas de xations,
pour éviter la libération accidentelle de
xations.
INSTALLATION
Sélection du compresseur
CFM
(pi3/min)
3
2
1
0
10 20 30 40 50
Sortie d'air du compresseur par minute
Fréquence de clouage (clous/min)
Le compresseur d'air doit répondre aux exigences de la
norme ANSI B19.3.
Choisissez un compresseur dont la capacité de pressurisation et de sortie d'air assurera un bon rapport
qualité/ coût. Le graphique indique la relation entre la
fréquence de clouage, la pression applicable et la sortie
d'air du compresseur.
Ainsi, par exemple, pour clouer environ 60 fois par
minute avec une compression de 0,69 MPa (100 PSIG),
il faudra un compresseur dont la sortie d'air est supé-
rieure à 2 pi
3
/minute.
Un régulateur de pression doit être utilisé si la pression
d'air fournie dépasse la capacité nominale de l'outil.
Autrement, l'utilisateur et les personnes présentes
courent un risque de blessure grave.
Sélection du tuyau d'air
0,79 MPa (115 PSIG)
0,69 MPa (100 PSIG)
0,59 MPa (85 PSIG)
60
Le tuyau d'air utilisé doit être le plus large et le plus
court possible, pour assurer un travail de clouage
continu et efcace. Avec une pression d'air de 0,49
MPa (70 PSIG), nous recommandons tuyau d'air d'un
diamètre interne supérieur à 6.5 mm (1/4") et d'une
longueur inférieure à 20 m (6.6 pi) pour un intervalle de
0.5 seconde entre chaque clou. Les tuyaux d'adduction
d'air doivent avoir une pression de service minimale de
1,03 MPa (150 PSIG) ou de 1.5 fois la pression maximale produite par le système, la valeur la plus élevée
parmi les précédentes s'appliquant.
12 FRANÇAIS
Page 13

ATTENTION :
• La capacité d'entraînement de l'outil risque
de diminuer si la sortie d'air du compresseur
est faible ou si le tuyau d'air est trop long ou
d'un diamètre trop petit pour la fréquence de
clouage.
Lubrication
DESCRIPTION DU
FONCTIONNEMENT
ATTENTION :
• Débranchez toujours le tuyau avant de régler ou
de vérier le fonctionnement de l'outil.
Réglage de la profondeur de
clouage
Pour obtenir un rendement maximum, installez une
chambre à air (réservoir d'huile, régulateur ou ltre à
air) le plus près possible de l'outil. Réglez le réservoir
d'huile de façon à fournir une goutte d'huile par 50
clous.
Si vous n'utilisez pas de chambre à air, graissez l'outil
en versant deux (2) ou trois (3) gouttes d'huile pour outil
pneumatique dans le raccord à air. Cette opération doit
être effectuée avant et après l'utilisation. Pour assurer
une lubrication adéquate, il faut faire déclencher l'outil
à quelques reprises après l'insertion de l'huile pour outil
pneumatique.
1
► 1. Huile pour outil pneumatique
B
A
► 1. Dispositif de réglage
Pour ajuster la profondeur de clouage, tournez le dispo-
sitif de réglage. La profondeur de coupe est plus grande
lorsque le dispositif de réglage est tourné complète-
ment dans le sens A indiqué sur la gure. Elle diminue
lorsque l'on tourne le dispositif de réglage dans le sens
B. Si les clous ne s'enfoncent pas assez profondément même lorsque le dispositif de réglage est tourné
complètement dans le sens A, augmentez la pression
d'air. Si les clous s'enfoncent trop profondément même
lorsque le dispositif de réglage est tourné complètement
dans le sens B, réduisez la pression d'air. En général, la
durée de service de l'outil est plus longue s'il est utilisé
avec une pression d'air basse et en plaçant le dispositif
de réglage sur une faible profondeur de clouage.
ATTENTION :
• Déconnectez toujours le tuyau avant d'ajuster la
profondeur de clouage.
1
Crochet
1
► 1. Crochet
13 FRANÇAIS
Page 14

ATTENTION :
• Débranchez toujours le tuyau de l'outil.
• Ne suspendez jamais l'outil dans un endroit
très élevé ou sur une surface qui risque d'être
instable.
Le crochet est pratique pour suspendre l'outil
temporairement.
ASSEMBLAGE
ATTENTION :
• Débranchez toujours le tuyau avant tout réglage
de l'outil.
• Chargez des clous de même type, de même
taille et de même longueur dans le magasin.
Chargement de la cloueuse
Adaptateur de bec
1
► 1. Adaptateur de bec
ATTENTION :
• Débranchez toujours le tuyau avant d'installer
l'adaptateur de bec.
Pour éviter de rayer ou d’endommager la surface de la
pièce, utilisez l’adaptateur de bec.
Raccordement du tuyau d'air
Appuyez sur le levier sans le relâcher, et ouvrez la porte
coulissante du magasin en la tirant vers vous.
Alignez la pointe des clous sur la rainure dans la partie
inférieure du magasin. Poussez l'ensemble des clous
vers l'orice de clouage.
Refermez la porte coulissante.
1
► 1. Raccord à air 2. Douille à air
Glissez la douille à air du tuyau d'air dans le raccord à
air de la cloueuse. Assurez-vous que la douille à air est
verrouillée fermement en position lorsque vous installez
le raccord à air. Un raccord à tuyau doit être installé sur
ou près de l'outil de sorte que le réservoir de pression
se vide au moment de la déconnexion du raccord d'adduction d'air.
2
14 FRANÇAIS
Page 15

UTILISATION
Pour clouer, placez l'élément de contact sur la pièce et
appuyez sur la gâchette.
ATTENTION :
• SI VOUS MAINTENEZ LA GÂCHETTE EN
POSITION À MOITIÉ DÉCLENCHÉE, l'élément
de contact peut entrer à nouveau en contact
avec la pièce par effet de recul, ce qui cause un
clouage inattendu.
Pour éviter une telle situation, procédez comme
suit :
A. N'appliquez pas une force excessive en plaçant
l'élément de contact contre la pièce.
B. Appuyez à fond sur la gâchette et maintenez-la telle
quelle pendant 1 ou 2 secondes après le clouage.
Orientation de l'échappement
Ouvrez la porte coulissante et retirez les clous du
magasin.
Gardez la porte coulissante ouverte et retirez les clous.
Enlevez le dessus du contact pour retirer plus facilement les clous. Pour le réinstaller, insérez la saillie du
dessus de contact sur l'entaille du bras de contact.
1
► 1. Verrou
1
► 1. Couvercle de sortie
L'orientation de la sortie d'air peut être modiée sur
360° en tournant manuellement le couvercle de sortie.
Retrait des clous
ATTENTION :
• N'utilisez pas des clous déformés ou en bande,
car l'alimentation fera défaut.
MISE EN GARDE :
• Déconnectez toujours le tuyau avant de retirer
les clous.
1
2
► 1. Dessus de contact 2. Bras de contact
15 FRANÇAIS
Page 16

Clous
Clou
Manipulez avec soin les bandes de clous et les boîtes
de clous. Si un bande de clous est manipulée de
manière brusque, elle risque d'être déformée ou la
connexion entre les clous risque de se détacher, cau-
sant une mauvaise alimentation en clous.
Évitez de ranger les clous dans un endroit très humide
ou chaud, ou dans un endroit exposé directement aux
rayons du soleil.
Avec l'outil débranché, inspectez-le quotidiennement
pour vous assurer que l'élément de contact et la
gâchette se déplacent librement. N'utilisez pas l'outil si
l'élément de contact ou la gâchette se coince.
Humide
Clou
Chaud
ENTRETIEN
ATTENTION :
• Déconnectez toujours le tuyau avant d'effectuer
tout travail d'inspection ou d'entretien sur l'outil.
• N'utilisez jamais d'essence, de benzine, de
solvant, d'alcool ou d'autres produits similaires.
Une décoloration, une déformation, ou la formation de ssures peuvent en découler.
Entretien de la cloueuse
Avant d'utiliser l'outil, assurez-vous qu'il est en bon
état et qu'aucune de ses vis n'est desserrée. Le cas
échéant, serrez les vis.
Si vous prévoyez que l'outil restera inutilisé pendant
une période prolongée, lubriez-le avec de l'huile à outil
pneumatique et rangez-le dans un endroit sûr. Évitez de
l'exposer directement aux rayons du soleil et/ou de le
laisser dans un environnement humide ou chaud.
16 FRANÇAIS
Page 17

1
2
Entretien du compresseur, de la
chambre à air et du tuyau d'air
1
► 1. Robinet de vidange
1
► 1. Filtre à air
Après l'utilisation, videz toujours le réservoir du compresseur et le ltre à air. L'outil risque de mal fonction-
ner ou de tomber en panne si l'humidité y pénètre.
Vériez régulièrement le chambre à air pour vous assurer que le réservoir d'huile contient assez d'huile à outil
pneumatique. Les joints toriques s'useront rapidement
s'ils ne sont pas toujours bien graissés.
► 1. Réservoir d’huile 2. Huile à outil pneumatique
Gardez le tuyau d'air à l'écart de la chaleur (plus de
60°C ou 140°F) et des produits chimiques (diluant,
acides puissants, substances alcalines). Il faut également faire courir le tuyau à l'écart des obstacles où il
risquerait de se coincer pendant l'utilisation de l'outil.
Les tuyaux doivent également être placés à l'écart des
bords tranchants et de toute surface pouvant entraîner
l'endommagement ou l'abrasion du tuyau.
Réchaud
Diluant
Pour maintenir la SÉCURITÉ et la FIABILITÉ du produit, les réparations, tout autre travail d'entretien ou de
réglage doivent être effectués dans un centre de service
Makita agréé ou un centre de service de l'usine Makita,
exclusivement avec des pièces de rechange Makita.
ACCESSOIRES EN
OPTION
ATTENTION :
• Ces accessoires ou pièces complémentaires
sont recommandés pour l'utilisation avec
l'outil Makita spécié dans ce mode d'emploi.
L'utilisation de tout autre accessoire ou pièce
complémentaire peut comporter un risque de
blessure. N'utilisez les accessoires ou pièces
qu'aux ns auxquelles ils ont été conçus.
Si vous désirez obtenir plus de détails concernant ces
accessoires, veuillez contacter le centre de service
après-vente Makita le plus près.
• Clous
• Tuyau d'air
• Lunettes de sécurité
NOTE :
• Certains éléments de la liste peuvent être inclus
avec l'outil comme accessoires standard. Ils
peuvent varier suivant les pays.
17 FRANÇAIS
Page 18

ESPAÑOL (Instrucciones originales)
ESPECIFICACIONES
Modelo AF505N
Presión de aire 0,39 MPa - 0,78 MPa (60 PSIG - 115 PSIG)
Longitud del clavo 15 mm (5/8") - 50 mm (2")
Capacidad de clavos 100 pzs
Diámetro mínimo de la manguera 6,5 mm (1/4")
Dimensiones (La x Al x An) 260 mm X 237 mm X 64 mm (10-1/4" X 9-5/8" X 2-1/2")
Peso neto 1,4 kg (3,01 lbs)
• Debido a nuestro programa continuo de investigación y desarrollo, las especicaciones aquí dadas están sujetas a
cambios sin previo aviso.
• Nota: Las especicaciones pueden ser diferentes de país a país.
Instrucciones importantes de
seguridad
Por su seguridad personal y para una operación y
mantenimiento adecuados de la herramienta, lea
este manual de instrucciones atentamente antes de
usar la herramienta.
ADVERTENCIA: AL UTILIZAR ESTA HERRAMIENTA,
SE DEBEN SEGUIR SIEMPRE LAS PRECAUCIONES
DE SEGURIDAD BÁSICAS PARA REDUCIR EL
RIESGO DE LESIÓN PERSONAL, ENTRE LAS
CUALES SE INCLUYEN LAS SIGUIENTES:
LEA TODAS LAS
INSTRUCCIONES.
Equipo de protección personal
1.
Siempre use gafas de seguridad para evitar
lesiones en los ojos ocasionadas por el polvo o
los clavos. Las gafas de seguridad deben cumplir con los requisitos de la norma ANSI Z87.1.
ADVERTENCIA: Es responsabilidad del
empleador imponer el uso de equipo de seguridad para la protección de los ojos a los usuarios de las herramientas y demás personas en
las inmediaciones del área de trabajo.
2. Use protección para los oídos para protegerlos contra el ruido del escape, así como también debe usarse protección para la cabeza.
Además vistase con ropa ligera pero no holgada. Las mangas deben estar abotonadas o
arremangadas. No deben usarse corbatas.
Atmósferas inamables
1. No opere la herramienta en atmósferas explosivas, tal como en la presencia de líquidos,
gases o polvo inamables.
Modicación de la herramienta
1. La herramienta no deberá ser modicada a
menos que esté autorizado en el manual de
la herramienta o aprobado por escrito por el
fabricante de la herramienta.
Mantenimiento de la herramienta
1. Consulte las instrucciones de mantenimiento
de la herramienta para ver información detallada sobre el mantenimiento adecuado de la
herramienta.
Clavos y accesorios recomendados
1. Utilice solamente clavos hechos o recomendados por el fabricante de la herramienta, o
clavos que funcionen de manera similar a los
recomendados por el fabricante.
2. Utilice solamente accesorios hechos o recomendados por el fabricante de la herramienta,
o accesorios que funcionen de manera similar
a los recomendados por el fabricante.
Inspeccione la herramienta antes de la operación
para que:
1.
Use solamente el suministro de energía especicado en el manual de instrucciones.
Opere la herramienta dentro del rango de presión
de aire especicado en la etiqueta de la herramienta para garantizar la seguridad y prolongar la
vida útil de la herramienta. No exceda la presión
de operación máxima recomendada. La herramienta no deberá conectarse a un suministro cuya
presión pueda exceder los 1,37 MPa (200 PSIG).
2.
Nunca use la herramienta con algo más que
no sea aire comprimido. Si se utiliza algún gas
embotellado (bióxido de carbono, oxígeno, nitrógeno, hidrógeno, aire, etc.) o algún gas combustible (hidrógeno, propano, acetileno, etc.) como
suministro de energía para esta herramienta,
ésta explotará y causará graves lesiones.
3.
Siempre verique el estado general de la herramienta, así como si hay tornillos sueltos antes
de la operación. Apriete según sea necesario.
4. Asegúrese de que todos los sistemas de seguridad funcionen adecuadamente antes de la
operación. La herramienta no deberá ser operada si solamente se ha jalado el gatillo interruptor o si sólo se ha presionado el elemento
de contacto contra la madera. Ésta deberá
operarse únicamente cuando ambas acciones
hayan sido ejecutadas. Compruebe si hay
alguna operación defectuosa sin que haya
clavos cargados y con el elemento de contacto
en la posición completamente retraída.
5. Siempre inspeccione el elemento de contacto
tal como se indica en este manual. Los clavos podrían clavarse accidentalmente si el
mecanismo de seguridad no está funcionando
correctamente.
18 ESPAÑOL
Page 19

Controles de operación
1. No utilice una herramienta que no tenga o
tenga dañadas la(s) etiqueta(s) de advertencia
de seguridad.
2. Una herramienta que no esté en buenas condiciones de funcionamiento no deberá ser
utilizada. Los rótulos y la segregación física
deberán ser utilizados para el control.
3. No quite ni altere los controles de operación
de la herramienta, ni cause de otra manera que
éstos se vuelvan inoperables.
4. No opere la herramienta si cualquier sección
de los controles de operación de la herramienta está inoperable, desconectada, alterada o no está funcionando apropiadamente.
Manipulación de la herramienta
1.
Solamente las personas que hayan leído y entendido las instrucciones de operación/seguridad
de la herramienta deberán operar la herramienta.
2.
Siempre asuma que la herramienta contiene clavos.
3. No apunte la herramienta hacia usted ni a
ninguna persona independientemente de que
contenga clavos o no.
4. Mantenga alejados a los niños y demás personas alrededor durante la operación de la
herramienta.
5.
No accione la herramienta a menos que esté
colocada rmemente contra la pieza de trabajo.
6.
Trate la herramienta como un utensilio de trabajo.
7. No utilice la herramienta para juguetear.
8. Manténgase alerta, concéntrese en su trabajo
y utilice el sentido común cuando trabaje con
herramientas.
9. No utilice la herramienta cuando esté cansado,
después de haber consumido drogas o alco-
hol, o bajo la inuencia de medicamentos.
10. No utilice la herramienta donde no alcance.
Pise sobre suelo rme y mantenga el equilibrio
en todo momento.
11. No sostenga ni cargue la herramienta con el
dedo sobre el gatillo interruptor.
12. Coloque los clavos únicamente sobre una
supercie de trabajo adecuada.
13. No coloque los clavos sobre otros clavos.
14. Después de colocar un clavo, la herramienta
podría saltar hacia atrás (“retroceder”) aleján-
dose de la supercie de trabajo. Para reducir el
riesgo de lesiones asociadas con el retroceso,
siempre haga lo siguiente:
a) mantenga siempre el control sobre la
herramienta.
b) permita que el retroceso aleje a la herra-
mienta de la supercie de trabajo.
c)
no resista el retroceso para hacer regresar
a la fuerza la herramienta a la supercie de
trabajo. En el “Modo de accionamiento por
contacto”, si el contacto con la pieza de
trabajo es permitido para volver a entrar en
contacto con la supercie de trabajo antes
de soltar el gatillo interruptor, ocurrirá la
descarga accidental de un clavo.
d) mantenga la cara y las partes del cuerpo
alejados de la herramienta.
15. Cuando trabaje cerca del borde de una pieza
de trabajo o en ángulos pronunciados, tenga
cuidado para minimizar el astillado, sura
o fragmentación, o que los clavos salgan
volando o reboten, pudiendo ocasionar una
lesión.
16. Mantenga las manos y el cuerpo alejados del
área de descarga de clavos de la herramienta.
17. No cargue la herramienta con los clavos
cuando cualquiera de los controles de operación se encuentre activado.
18. No opere la herramienta con un suministro
de energía que no sea el especicado en las
instrucciones de operación/seguridad de la
herramienta.
19. No opere la herramienta con ninguna presión
de operación que no sea la especicada en las
instrucciones de operación/seguridad de la
herramienta.
20. Siempre seleccione un sistema de accionamiento que sea apropiado para la aplicación
de clavos y la capacitación del operador.
21.
Tenga extrema precaución cuando coloque los
clavos en las paredes existentes u otras áreas
ciegas para evitar el contacto con objetos ocultos
o personas del otro lado (p. ej., cables, tubos).
22. No levante, jale o baje la herramienta tomándola de la manguera.
Desconexión de la herramienta
Desconecte la herramienta del suministro de energía cuando:
1. no la esté usando;
2. realice cualquier tarea de mantenimiento o
reparación;
3. despeje algún atascamiento;
4. eleve, baje o mueva de alguna otra forma la
herramienta a otro lugar;
5. la herramienta esté fuera de la supervisión o
control del operador; o
6. retire los clavos del cartucho.
Instrucciones adicionales de seguridad
1. El área de trabajo debe estar sucientemente
iluminada para garantizar la seguridad en las
operaciones. El área de trabajo debe estar
despejada y limpia.
2. Puede que haya regulaciones locales respecto
al ruido las cuales deben cumplirse al mantener los niveles de ruido dentro de los límites
preestablecidos. En determinados casos,
deberán usarse persianas para contener el
ruido.
3. Revise paredes, techos, tejados, pisos y similares con atención para evitar una descarga
eléctrica accidental, así como una fuga de
gas, explosiones, etc. que sean provocadas
por haber insertado el jador en cables con
corriente, tubos o ductos de gas.
4. En los tejados y otros lugares elevados, clave
a medida que vaya avanzando hacia adelante.
Usted puede perder fácilmente el equilibrio si
clava mientras retrocede. Al clavar contra una
supercie perpendicular, hágalo de la parte
superior a la inferior. Si lo hace así, se fatigará
menos al realizar las operaciones.
19 ESPAÑOL
Page 20

5. No deje la herramienta cargada o con el compresor de aire funcionando por un tiempo
prolongado bajo el sol. Asegúrese de que
el polvo, la arena, las astillas o el material
extraño no ingrese a la herramienta al dejarla
en el lugar que designe.
6. Realice operaciones de limpieza y mantenimiento justo después de haber terminado la
labor. Mantenga la herramienta en excelentes
condiciones. Lubrique las piezas móviles para
prevenir la oxidación y minimizar el desgaste
por fricción. Limpie la herramienta y las piezas
del polvo.
7. No desconecte la manguera de aire con el
dedo sobre el gatillo interruptor. Un clavado
inesperado podría causar lesiones graves si la
manguera de aire está conectada.
8. Si la herramienta llegara a caerse o golpearse,
revise los daños o grietas en la herramienta y
asegúrese de que los sistemas de seguridad
estén funcionando correctamente antes de la
operación. El no hacerlo podría causar lesiones
graves debido a la alta presión en el interior de la
herramienta.
9. Solicite una inspección periódica de la herra-
mienta en los centros de servicios autorizados
de Makita.
10. Para mantener la SEGURIDAD y FIABILIDAD
del producto, las reparaciones y cualquier
mantenimiento deberán ser realizados por los
centros de servicio autorizados o de fabricación de Makita, usando siempre repuestos
Makita.
GUARDE ESTAS
INSTRUCCIONES.
ADVERTENCIA: El USO INCORRECTO o el
no seguir las normas de seguridad que se declaran en este instructivo podría resultar en lesiones
personales graves.
INSTALACIÓN
Cómo elegir un compresor
Pies cúbicos por minuto (CFM)
(ft3 /min)
3
2
1
0
10 20 30 40 50
Salida de aire del compresor por minuto
Frecuencia de clavado (veces por minuto)
El compresor de aire debe cumplir con los requerimientos de ANSI B19.3.
Seleccione un compresor que tenga presión amplia y
salida de aire para garantizar una operación económica. El
gráco muestra la relación entre la frecuencia de clavado,
la presión aplicable y la salida del compresor de aire.
Así, por ejemplo, si el clavado se lleva a cabo a una
velocidad aproximada de 60 veces por minuto a una
compresión de 0,69 MPa (100 PSIG), se requerirá de
un compresor con una salida mayor a 0,05 m3 por
minuto (2 ft3/min).
Los reguladores de presión deben usarse para limitar la
presión del aire suministrado cuando éste excede la pre-
sión nominal de la herramienta. Si no lo hiciere, podrían
ocurrir graves daños al operador de la herramienta o las
personas que se encuentren en las proximidades del lugar.
Cómo seleccionar una manguera de
aire
0,79 MPa (115PSIG)
0,69 MPa (100PSIG)
0,59 MPa (85PSIG)
60
Símbolos
A continuación se muestran los símbolos utilizados
para la herramienta.
Lea y entienda el manual y las etiquetas
de la herramienta. El no seguir las advertencias podría ocasionar la muerte o una
lesión grave.
Los operarios y demás personas que se
encuentran en el área de trabajo deben
usar gafas de seguridad con protección
lateral.
Mantenga los dedos alejados del gatillo
interruptor cuando no esté colocando cla-
vos a n de evitar una descarga accidental.
Use una manguera de aire tan larga o tan corta como
fuése necesario para garantizar un clavado continuo
y eciente. Con una presión de aire de 0,49 MPa (70
PSIG), se recomienda una manguera de aire con un
diámetro interno superior a 6,5 mm (1/4") y una longitud
menor de 20 m (6,6 ft) cuando el intervalo entre cada
clavado es de 0,5 segundos. Las mangueras de sumi-
nistro de aire deberán tener una escala de presión de
funcionamiento mínima de 1,03 MPa (150 PSIG) o de
150 por ciento de la máxima presión producida en el
sistema, cualquiera sea la mayor.
20 ESPAÑOL
Page 21

PRECAUCIÓN:
• Una baja presión en la salida de aire del com-
presor o una manguera de aire de mayor o
menor diámetro en relación con la frecuencia
de clavado puede causar una disminución en la
capacidad de manejo de la herramienta.
Lubricación
DESCRIPCIÓN DEL
FUNCIONAMIENTO
PRECAUCIÓN:
• Siempre desconecte la manguera antes de
ajustes o revisiones en la herramienta.
Cómo ajustar la profundidad de
clavado
Para garantizar un desempeño óptimo, instale un sistema de aire (lubricador, regulador y ltro de aire) tan
cerca como sea posible a la herramienta. Ajuste el lubri-
cador de tal forma que una gota de aceite sea usado
por cada 50 clavos.
Cuando no se use el juego de aire, lubrique la herramienta con aceite para herramientas neumáticas, colo-
cando 2 (dos) o 3 (tres) gotas en el adaptador de aire.
Esto deberá realizarse antes y después de cada uso.
Para una lubricación adecuada, la herramienta debe
dispararse un par de veces después de introducir el
aceite para herramientas neumáticas.
1
► 1. Aceite para herramienta neumática
B
A
► 1. Ajustador
Para ajustar la profundidad del clavado, gire el ajusta-
dor. La profundidad del clavado está a su punto máximo
cuando el ajustador está completamente girado hacia la
dirección A que se muestra en la gura. A medida que el
ajustador se gire hacia la posición B se hará menos pro-
fundo. Si los clavos no están penetrando a una profun-
didad suciente incluso cuando se está completamente
en la dirección A, aumente la presión del aire. Si los
clavos están penetrando con demasiada profundidad
incluso cuando el ajustador está completamente en la
dirección B, disminuya la presión del aire. En general,
la vida útil de la herramienta será mayor cuando ésta es
utilizada a menor presión y el ajustador está puesto a
una menor profundidad para la operación de clavado.
PRECAUCIÓN:
• Siempre desconecte la manguera antes de
hacer ajustes de la profundidad de clavado.
1
Gancho
1
► 1. Gancho
21 ESPAÑOL
Page 22

PRECAUCIÓN:
• Siempre desconecte la manguera de la
herramienta.
• Nunca enganche la herramienta en un lugar
elevado o en una supercie potencialmente
inestable.
El gancho resulta conveniente a la hora de colgar la
herramienta en forma temporal.
ENSAMBLE
PRECAUCIÓN:
• Siempre desconecte la manguera antes de llevar a cabo cualquier servicio de mantenimiento
en la herramienta.
• Recargue el cartucho de almacenamiento con
clavos de un mismo tipo, tamaño y longitud
uniforme.
Cómo cargar una clavadora
Adaptador de nariz
1
► 1. Adaptador de nariz
PRECAUCIÓN:
• Siempre desconecte la manguera antes de
instalar el adaptador de nariz.
Para prevenir que la supercie de la pieza de trabajo se
raye o dañe, use un adaptador de nariz.
Cómo conectar la manguera
Presione la palanca y abra la compuerta deslizable del
cartucho de almacenamiento al jalarlo hacia usted con
la palanca presionada.
Alinee la punta de los clavos con las ranuras en el
fondo del cartucho de almacenamiento y empuje la
parte completa de los clavos hacia la apertura de
disparo.
Cierre la compuerta deslizable.
1
► 1. Entrada de aire de la clavadora 2. Conexión de la
manguera de aire
Deslice la conexión de la manguera de aire en la
entrada de aire de la clavadora. Asegúrese de que la
conexión de aire quede rmemente asegurada en su
lugar al instalarse en la entrada de aire. Debe instalarse
un acoplador de manguera sobre o cerca de la herramienta de tal forma que el contenedor de presión se
descargue al momento en que el acoplador del suministro de aire se desconecte.
2
22 ESPAÑOL
Page 23

OPERACIÓN
Para clavar, puede colocar el elemento de contacto
contra la pieza de trabajo y jalar el gatillo.
ADVERTENCIA:
• Siempre desconecte la manguera antes de
retirar los clavos.
Abra la compuerta deslizable y retire los clavos del
cartucho de almacenamiento.
PRECAUCIÓN:
• MANTENER APRETADO EL GATILLO EN UNA
POSICIÓN INTERMEDIA puede provocar un
clavado inesperado, si el elemento de contacto
se deja que vuelva a hacer contacto con la
pieza de trabajo u otra supercie bajo la inuen-
cia del retroimpacto (retroceso brusco de la
herramienta).
Para evitar este clavado inesperado, proceda
como se indica a continuación;
A. No coloque el elemento de contacto contra la pieza
de trabajo con demasiada fuerza.
B. Tire del gatillo por completo y sosténgalo por 1-2
segundos después de clavar.
Dirección del aire de escape
1
► 1. Cubierta de escape
La dirección del aire de escape puede modicarse a un
ángulo de 360 grados al girar la cubierta de escape con
la mano.
Extracción de clavos
PRECAUCIÓN:
• No utilice clavos deformes, ni una tira de clavos
con clavos deformes. No seguir esta indicación provocaría una alimentación de clavos
deciente.
Con la compuerta abierta, abra el acceso y saque los
clavos.
Quitar la cubierta superior de contacto permite que los
clavos sean retirados con facilidad. Al volver a instalar
la cubierta superior de contacto, inserte la protuberancia de la cubierta de contacto en la ranura del brazo de
contacto.
1
► 1. Cerrojo
1
2
► 1. Supercie de contacto 2. Brazo de contacto
23 ESPAÑOL
Page 24

Clavos
Clavo
Manipule los carretes de clavos y sus cajas con cuidado. Si los carretes de clavos se manipulan sin cui-
dado, pueden perder la forma o romperse sus conectores, teniendo como resultado una alimentación escasa
de clavos.
Evite guardar clavos en un lugar húmedo o caluroso o
colocarlos expuestos a la luz solar directa.
Con la herramienta desconectada, realice una inspección diaria para garantizar un movimiento libre del
elemento de contacto y el gatillo. No use la herramienta
si el elemento de contacto o el gatillo quedan trabados
o atorados.
Húmedo
Clavo
Caluroso
MANTENIMIENTO
PRECAUCIÓN:
• Desconecte siempre la manguera de aire de la
herramienta antes de intentar hacer una inspección o mantenimiento.
• Nunca use gasolina, bencina, diluyente (tíner),
alcohol o sustancias similares. Puede que esto
ocasione grietas o descoloramiento.
Mantenimiento de la clavadora
Verique siempre el estado general de la herramienta y
aoje los tornillos antes de ponerla en funcionamiento.
Ajuste según lo requerido.
Cuando la herramienta no se use durante un largo
tiempo, lubríquela usando aceite para herramientas
neumáticas y guarde la herramienta en un lugar seguro.
Evite exponerla a la luz solar directa y/ o al calor o
humedad ambiental.
24 ESPAÑOL
Page 25

1
2
Mantenimiento del compresor, juego
de aire o manguera de aire
1
► 1. Llave de drenaje
1
► 1. Filtro de aire
Luego de utilizarla, vacíe siempre el tanque del compresor y el ltro de aire. Si permite que la humedad
entre en la herramienta, esto podría ocasionar un mal
funcionamiento y la posible falla de la misma.
Verique regularmente para ver si hay suciente aceite
neumático en el lubricador del juego de aire. La falta de
mantenimiento de una lubricación suciente ocasionará
el desgaste rápido de los aros.
► 1. Lubricador 2. Aceite neumático
Mantenga la manguera de aire alejada del calor (más de
60°C, más de 140°F), lejos de las sustancias químicas
(diluyente, ácidos fuertes o álcalis). Además, encamine la
manguera fuera de los obstáculos dado que podría quedar peligrosamente atrapada durante el funcionamiento.
Las mangueras deben también dirigirse lejos de bordes
losos y áreas que podrían dañarlas o desgastarlas.
Horno
Diluyente
Para mantener la SEGURIDAD y FIABILIDAD del producto, las reparaciones, y cualquier otra tarea de mantenimiento o ajuste deberán ser realizadas en Centros
de Servicio Autorizados por Makita, empleando siempre
repuestos Makita.
ACCESORIOS
OPCIONALES
PRECAUCIÓN:
• Estos accesorios o aditamentos (incluidos o no)
están recomendados para utilizar con su herramienta Makita especicada en este manual.
El empleo de cualesquiera otros accesorios o
acoplamientos conllevará un riesgo de sufrir
heridas personales. Utilice los accesorios o aco-
plamientos solamente para su n establecido.
Si necesita cualquier ayuda para más detalles en
relación con estos accesorios, pregunte a su centro de
servicio Makita local.
• Clavos
• Mangueras de aire
• Gafas de seguridad
NOTA:
• Algunos de los artículos en la lista puede que
vengan junto con el paquete de la herramienta
como accesorios incluidos. Puede que estos
accesorios varíen de país a país.
25 ESPAÑOL
Page 26

26
Page 27

27
Page 28

< USA only >
WARNING
Some dust created by power sanding, sawing, grinding, drilling, and other
construction activities contains chemicals known to the State of California
to cause cancer, birth defects or other reproductive harm. Some examples
of these chemicals are:
• lead from lead-based paints,
• crystalline silica from bricks and cement and other masonry products, and
• arsenic and chromium from chemically-treated lumber.
Your risk from these exposures varies, depending on how often you do this
type of work. To reduce your exposure to these ch emicals: work in a well
ventilated area, and work with approved safety equipment, such as those
dust masks that are specially designed to filter out microscopic particles.
< Sólo en los Estados Unidos >
ADVERTENCIA
Algunos polvos creados por el lijado, aserrado, esmerilado, taladrado y
otras actividades de la construcción contienen sustancias químicas
reconocidas por el Estado de California como causantes de cáncer, defectos
de nacimiento y otros peligros de reproducción. Algunos ejemplos de estos
productos químicos son:
• plomo de pinturas a base de plomo,
• sílice cristalino de ladrillos y cemento y otros productos de albañilería, y
• arsénico y cromo de maderas tratadas químicamente.
El riesgo al que se expone varía, dependiendo de la frecuencia con la que
realice este tipo de trabajo. Para reducir la exposición a estos productos
químicos: trabaje en un área bien ventilada y póngase el equipo de seguridad
indicado, tal como las máscaras contra polvo que están especialmente
diseñadas para filtrar partículas microscó
picas.
Makita Corporation
3-11-8, Sumiyoshi-cho,
Anjo, Aichi 446-8502 Japan
www.makita.com
AF505N-NA3-0316
EN, FRCA, ESMX
20160325
 Loading...