

Makita 9921, 9403 User Manual
GB
Belt Sander Instruction Manual
F
Ponceuse à bande Manuel d’instructions
D
Bandschleifer Betriebsanleitung
I
Levigatrice a nastro Istruzioni per l’uso
NL
Bandschuurmachine Gebruiksaanwijzing
E
Lijadora de banda Manual de instrucciones
P
Lixadeira de rolos Manual de instruções
DK
Båndstørrelse Brugsanvisning
S
Bandslipmaskin Bruksanvisning
N
Båndslipemaskin Bruksanvisning
SF
Nauhahiomakone Käyttöohje
GR Λειαντήρας ζώνης Οδηγίες χρήσεως
TR Kayışlı zımpara makinası El kitabı
9403
9921
1
12
2
3
4
34
6
5
7
56
11
8
9
10
78
2

12
13
9
3

ENGLISH
Explanation of general view
1Lever
2 Adjusting knob
3 Dust bag
4 Dust nozzle
5 Fastener
SPECIFICATIONS
Model 9403 9921
Belt size ................ ................................ ..... ..... ..... ...... ..... .............100 mmx 610mm 76mm x610mm
Belt speed ....................... ..... ..... ..... ...... ..... ..... .............................500 m/min. 500m/min .
Overall length ..............................................................................353 mm 353mm
Net weight ...................................................................................5.9kg 5.5 kg
6 Lock button
7 Switch trigger
8 Cork rubber plate
9 Carbon plate or steel plate
10 Strap washer
11 Limit mark
12 Brush holder cap
13 Screwdriver
• Due to our conti nuing program of rese arch and development, the specifications herein are subject to change
without notice.
• Note: Specifications may differ from country to country.
Intended use
The tool is intended for the san ding of large surface of
wood, plastics and metal materials as well as painted
surfaces.
Power supply
The tool should be connected o nly to a power s upply of
the same voltage as indicated on the nameplate, and can
only be operated on sing le-phase AC supply. They are
double-insulated in accor dance with E uropean Stand ard
and can, therefore, also be us ed from sockets without
earth wire.
For public low-voltage distribution systems of
between 220 V and 250 V
Switching operatio ns of e lectr ic appara tus cause voltage
fluctuations. The operation of this device under unfavorable mains conditions can h ave adverse effects to the
operation of other equipmen t. With a mains impedance
equal or less than 0.4 3 Ohms it can be presumed that
there will be no negative effects.
The mains socket used for this device must be protected
with a fuse or protective circuit breaker having slow tripping characteristics.
Safety hints
For your own safety, please refer to the en closed safety
instructions.
SPECIFIC SAF E TY RULES
DO NOT let comfort or familiarity with product
(gained from repe ated use) replace str ict adherence
to belt sander safety rules. If you use this tool
unsafely or incorrectly, you can suffer serious personal injury.
1. Hold power tools by insulat ed gripping s urfaces
when performing an operation where the cutting
tool may contact hidden wiring or its own cord.
Contact with a “live” wire will make exposed metal
parts of the tool “live” and shock the operator.
2. Ventilate your work area adequately when you
perform sand ing operations.
GEB015-1
3. Some material contains chemicals which may be
toxic. Take caution to prevent working dust inhalation and skin contac t. Follow m aterial s upplier
safety data .
4. Always use the co rrect dust ma sk/respirator for
the material and application you are working
with.
5. Always use safety g lasses or goggl es. Ordinary
eye or sun glasses are NOT safety glasses.
6. Hold the tool firmly with both hands.
7. Make sure the belt is not contacting the work8
piece before the switch is turned on.
8. Keep hands away from rotating parts.
9. Do not leave t he tool running. Oper ate the tool
only when hand-held.
10. This tool has not been waterproofed, so do not
use water on the workpiece surface.
SAVE THESE INSTRUCTIONS.
WARNING:
MISUSE or failure to follow th e safety rule s stated in
this instruction manual may cause serious persona l
injury.
OPERATING INSTRUCTIONS
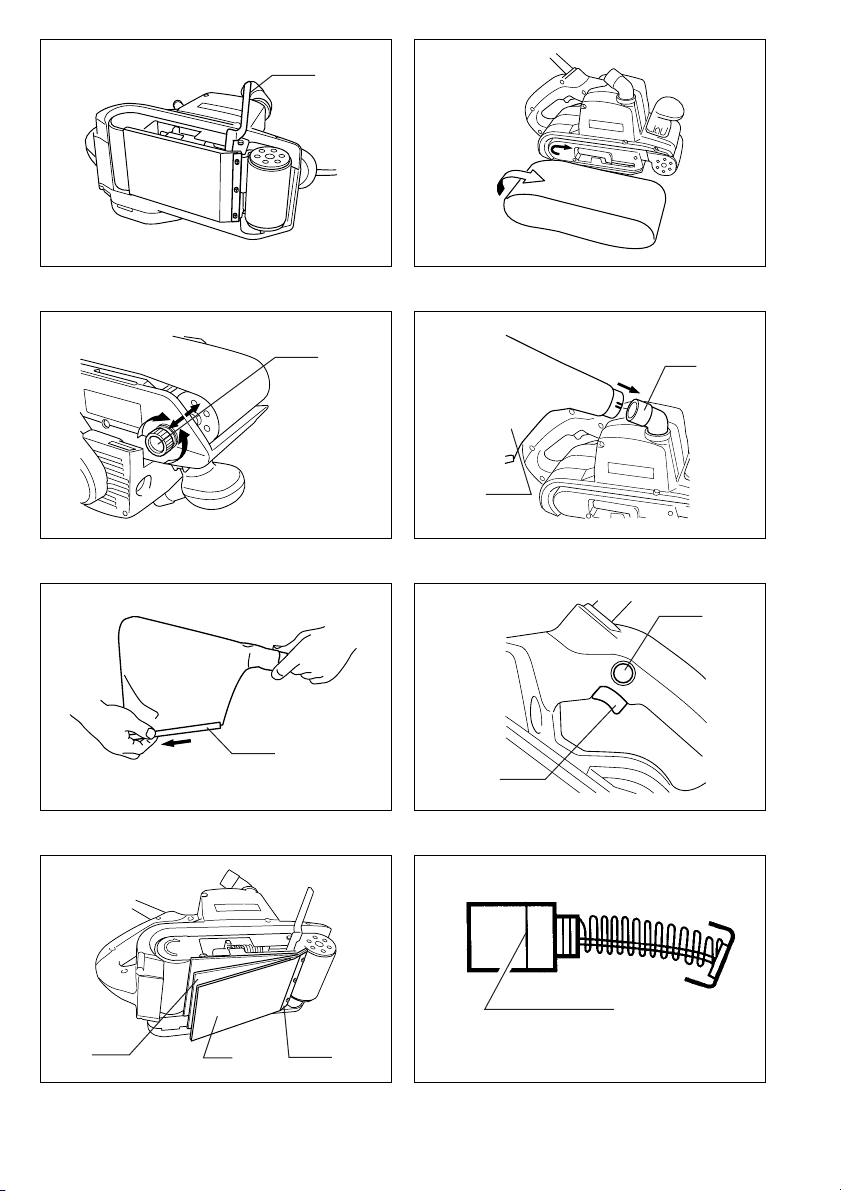
Installing or removing abrasive belt (Fig.1 &2 )
Important:
Always be sure that the tool is switched off and
unplugged before installing or removing the belt.
Pull the lever all the way out and install the belt over the
rollers, then return the lever to the original position.
CAUTION:
When installing the belt, make sure that the direction of
the arrow on the back of the belt cor respo nds to t he one
on the tool itself.
Adjusting belt tracking (Fig.3)
While the belt is running, use the adjusting knob to center
the belt tracking.
Dust bag (Fig.4 & 5)
Attach the dust bag onto the dust nozzle. The dust nozzle is tapered. Wh en atta chi n g t he dust ba g, push it onto
the dust nozzle firmly as far as it will go to prevent it from
coming off during operation. For the best r esults, empty
the dust bag when it b ecomes about half ful l, tapping it
lightly to remove as much dust as possible.
4
 Loading...