

Page 1
GB
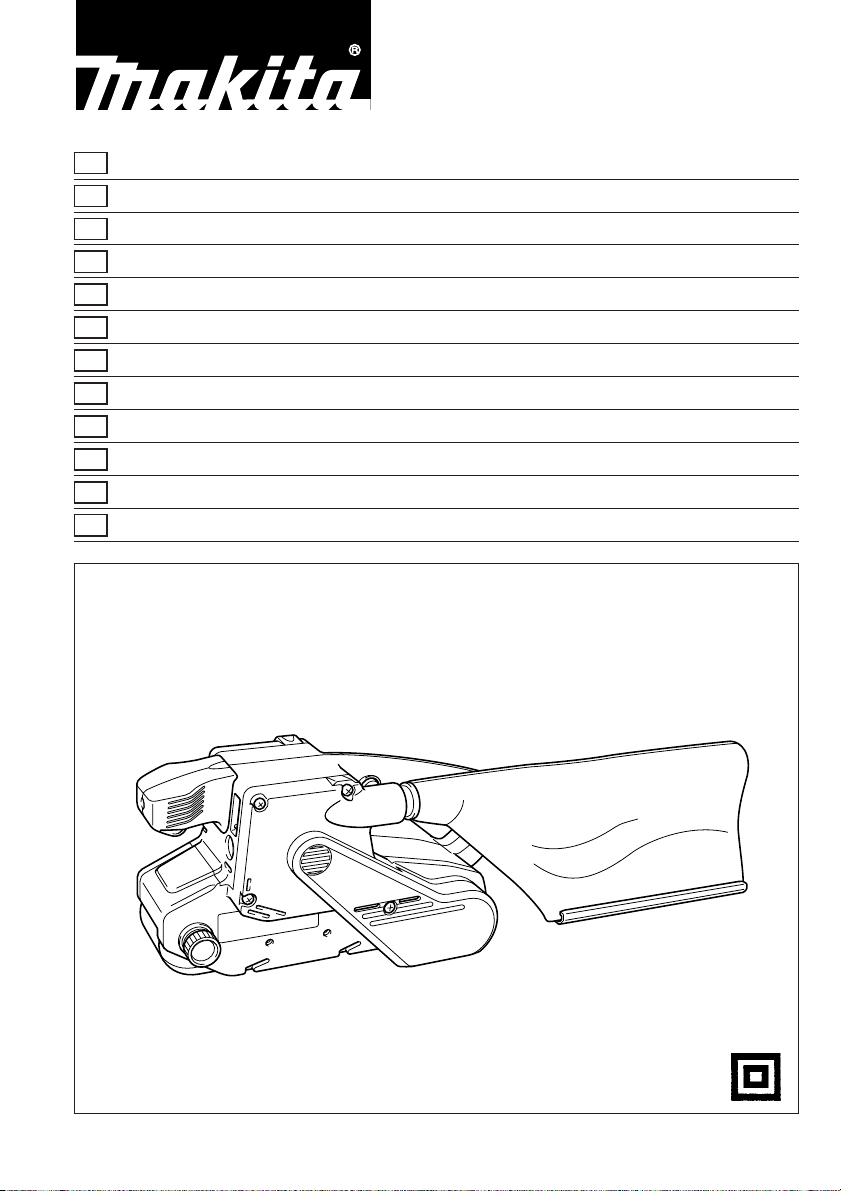
Belt Sander Instruction Manual
F
Ponceuse à Bande Manuel d’instructions
D
Bandschleifer Betriebsanleitung
I
Levigatrice a Nastro Istruzioni d’uso
NL
Bandschuurmachine Gebruiksaanwijzing
E
Lijadora de Banda Manual de instrucciones
P
Lixadeira de Rolos Manual de instruço˜es
DK
Båndpudser Brugsanvisning
S
Bandslipmaskin Bruksanvisning
N
Båndslipemaskin Bruksanvisning
SF
Nauhahiomakone Käyttöohje
GR
§ÂÈ·ÓÙ‹Ú·˜ ˙ÒÓ˘ √‰ËÁ›Â˜ ¯Ú‹Ûˆ˜
9902
9903
9920
9404
Page 2
1
4
5
1 2
2
3
3 4
5
6
5 6
9
7 8
2
7
8
Page 3

0
q
w
9 10
t
11 12
r
e
y
i
13
u
3
Page 4

Symbols
The following show the symbols used for the machine. Be sure that you understand their meaning before use.
Symboles
Nous donnons ci-dessous les symboles utilisés pour l’outil. Assurez-vous que vous en avez bien compris la
signification avant d’utiliser l’outil.
Symbole
Die folgendenSymbolewerden für die Maschine verwendet. Machen Sie sich vor der Benutzung unbedingt mit
ihrer Bedeutung vertraut.
Symboli
Per questo utensile vengono usati i simboli seguenti. Bisogna capire il loro significato prima di usare l’utensile.
Symbolen
Voor dit gereedschap worden de volgende symbolen gebruikt. Zorg ervoor dat u de betekenis van deze
symbolen begrijpt alvorens het gereedschap te gebruiken.
Símbolos
A continuación se muestran los símbolos utilizados con esta herramienta. Asegúrese de que entiende su
significado antes de usarla.
Símbolos
O seguinte mostra os símbolos utilizados para a ferramenta. Certifique-se de que compreende o seu
significado antes da utilização.
Symboler
Nedenstående symboler er anvendt i forbindelse med denne maskine. Vær sikker på, at De har forstået
symbolernes betydning, før maskinen anvendes.
Symboler
Det följande visar de symboler som används för den här maskinen. Se noga till att du förstår deras innebörd
innan maskinen används.
Symbolene
Følgende viser de symblene som brukes for maskinen. Det er viktig å forstå betydningen av disse før maskinen
tas i bruk.
Symbolit
Alla on esitetty koneessa käytetyt symbolit. Opettele näiden merkitys, ennen kuin käytät konetta.
™‡Ì‚ÔÏ·
∆· ·ОfiПФ˘ı· ‰В›¯УФ˘У Щ· Ы‡М‚ФП· Ф˘ ¯ЪЛЫИМФФИФ‡УЩ·И БИ· ЩФ МЛ¯¿УЛМ·. µВ‚·ИˆıВ›ЩВ fiЩИ
О·Щ·П·‚·›УВЩВ ЩЛ ЫЛМ·Ы›· ЩФ˘˜ ЪИУ ·fi ЩЛ ¯Ъ‹ЫЛ.
[ Read instruction manual.
[ Lire le mode d’emploi.
[ Bitte Bedienungsanleitung lesen.
[ Leggete il manuale di istruzioni.
[ Lees de gebruiksaanwijzing.
[ Lea el manual de instrucciones.
[ DOUBLE INSULATION
[ DOUBLE ISOLATION
[ DOPPELT SCHUTZISOLIERT
[ DOPPIO ISOLAMENTO
[ DUBBELE ISOLATIE
[ DOBLE AISLAMIENTO
[ Leia o manual de instruço˜es.
[ Læs brugsanvisningen.
[ Läs bruksanvisningen.
[ Les bruksanvisingen.
[ Katso käyttöohjeita.
[ ¢È·‚¿ÛÙ ÙȘ Ô‰ËÁ›Â˜ ¯Ú‹Û˘.
[ DUPLO ISOLAMENTO
[ DOBBELT ISOLERET
[ DUBBEL ISOLERING
[ DOBBEL ISOLERING
[ KAKSINKERTAINEN ERISTYS
[ ¢π¶§∏ ª√¡ø™∏
4
Page 5

ENGLISH
Explanation of general view
1 Lever
2 Base
3 Adjusting knob
4 Dust spout
5 Dust bag
6 Fastener
7 Lock button
8 Switch trigger
9 Speed adjusting dial
0 Optional hose 28 mm in inner
diameter
q Hose of vacuum cleaner
w Vacuum cleaner
e Belt sander stand
r Guide fence
t Sanding shoe
y Limit mark
u Brush holder cap
i Screwdriver
SPECIFICATIONS
Model Belt size Belt speed Overall length Net weight
9902 ............. 76 mm x 533 mm 440 m/min. 296 mm 4.3 kg
9903 ............. 76 mm x 533 mm 210 – 440 m/min. 296 mm 4.3 kg
9920 ............. 76 mm x 610 mm 210 – 440 m/min. 334 mm 4.5 kg
9404 ............. 100 mm x 610 mm 210 – 440 m/min. 334 mm 4.7 kg
•
Due to our continuing program of research and
development, the specifications herein are subject
to change without notice.
•
Note: Specifications may differ from country to
country.
Power supply
The machine should be connected only to a power
supply of the same voltage as indicated on the
nameplate, and can only be operated on single-phase
AC supply. They are double-insulated in accordance
with European Standard and can, therefore, also be
used from sockets without earth wire.
Safety hints
For your own safety, please refer to the enclosed
safety instructions.
ADDITIONAL SAFETY RULES
1. Hold machines by insulated gripping surfaces
when performing an operation where the cutting machine may contact hidden wiring or its
own cord. Contact with a ‘‘live’’ wire will make
exposed metal parts of the machine ‘‘live’’and
shock the operator.
2. Hold the machine firmly with both hands.
3. Make sure the belt is not contacting the workpiece before the switch is turned on.
4. Keep hands away from rotating parts.
5. Do not leave the machine running. Operate the
machine only when hand-held.
6. This machine has not been waterproofed, so
do not use water on the workpiece surface.
SAVE THESE INSTRUCTIONS.
OPERATING INSTRUCTIONS
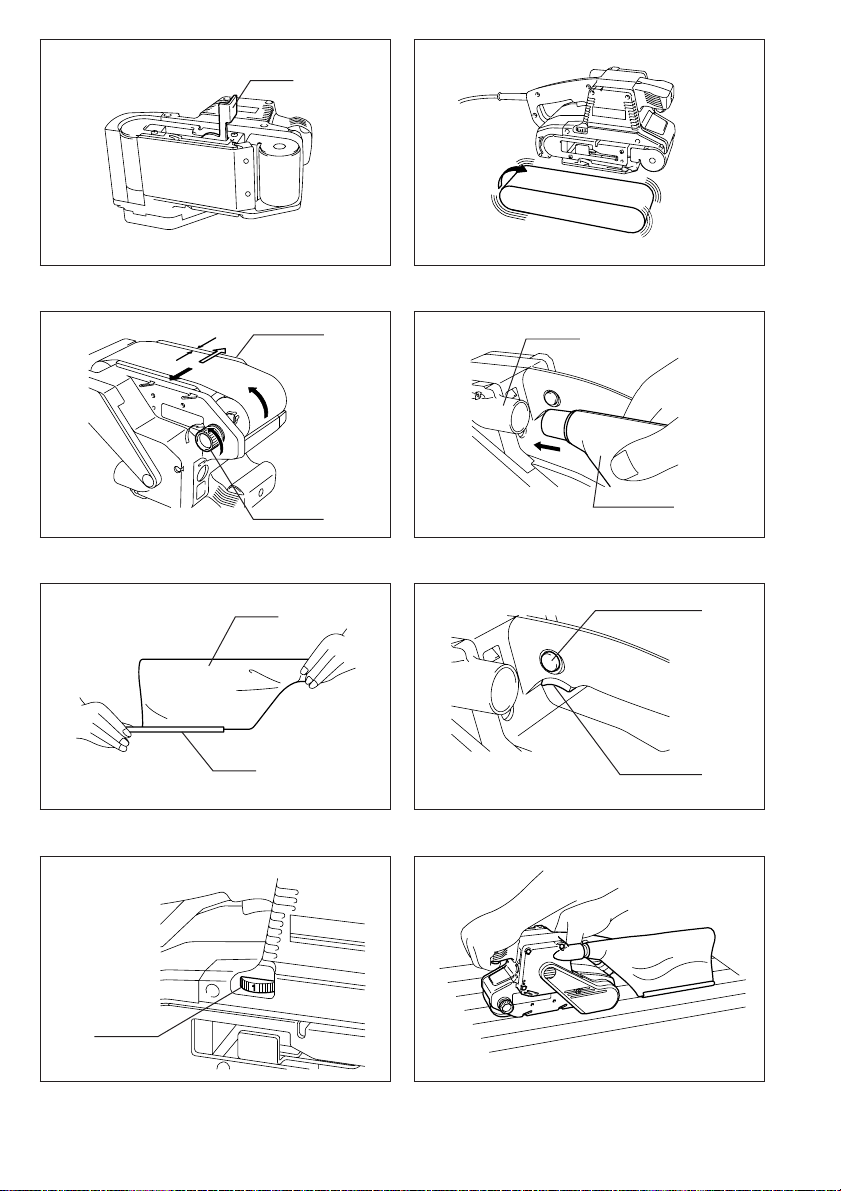
Installing or removing abrasive belt (Fig. 1)
Important:
Always be sure that the machine is switched off and
unplugged before installing or removing the belt.
Pull the lever all the way out and install the belt over
the rollers, then return the lever to the original position.
CAUTION:
When installing the belt, make sure that the direction
of the arrow on the back of the belt corresponds to the
one on the machine itself. (Fig. 2)
Adjusting belt tracking (Fig. 3)
Switch on the machine and make sure that the belt is
aligned properly. If the edge of the belt extends
beyond the edge of the base or the edge of the belt
retracts more than 6 mm away from the edge of the
base, use the adjusting knob to adjust the belt tracking.
Dust bag (Fig.4&5)
Attach the dust bag onto the dust spout. The dust
spout is tapered. When attaching the dust bag, push
it onto the dust spout firmly as far as it will go to
prevent it from coming off during operation. For the
best results, empty the dust bag when it becomes
about half full, tapping it lightly to remove as much
dust as possible.
Switch action (Fig. 6)
CAUTION:
•
Before plugging in the machine, always check to
see that the switch trigger actuates properly and
returns to the ‘‘OFF’’ position when released.
•
The machine should not be in contact with the
workpiece surface when you turn the machine on or
off. Otherwise a poor sanding finish or damage of
the belt may result.
To start the machine, simply pull the trigger. Release
the trigger to stop. For continuous operation, pull the
trigger and then push in the lock button. To stop the
machine from the locked position, pull the trigger fully,
then release it.
5
Page 6

Speed adjusting dial (Fig. 7)
For 9903, 9920 and 9404
The belt speed can be infinitely adjusted between
210 m and 440 m per minute by turning the speed
adjusting dial to a given number setting from 1 to 5.
Higher speed isobtained when the dial is turned in the
direction of number 5; lower speed is obtained when
it is turned in the direction of number 1. Select the
proper speed for the workpiece to be sanded.
CAUTION:
The speed adjusting dial can be turned only as far as
5 and back to 1. Do not force it past 5 or 1, or the
speed adjusting function may no longer work.
Sanding operation (Fig. 8)
Hold the machine firmly with both hands. Turn the
machine on and wait until it attains full speed. Then
gently place the machine on the workpiece surface.
Keep the belt flush with the workpiece at all times and
move the machine back and forth. Never force the
machine. The weight of the machine applies
adequate pressure. Excessive pressure may cause
stalling, overheating of the motor, burning of the
workpiece and possible kickback.
Connecting to Makita vacuum cleaner or dust
collector
Cleaner sanding operations can be performed by
connecting the belt sander to Makita vacuum cleaner
or dust collector.
When connecting to Makita vacuum cleaner (Model
406/431), an optional hose 28 mm in inner diameter is
necessary. See Fig. 9.
When connecting to Makita dust collector (Model
420/420S), the optional hose is not necessary. You
can connect the belt sander directly to the hose of the
dust collector.
Belt sander stand (optional accessory)
(Fig. 10)
The belt sander stand is handy for sanding small
workpieces or deburring workpieces.
Sanding shoe (optional accessory) (Fig. 11)
The sanding shoe readily allows you to sand workpieces more evenly.
MAINTENANCE
CAUTION:
Always be sure that the machine is switched off and
unplugged before carrying out any work on the
machine.
Replacement of carbon brushes (Fig. 12 & 13)
Replace carbon brushes when they are worn down to
the limit mark. Both identical carbon brushes should
be replaced at the same time.
To maintain product safety and reliability, repairs,
maintenance or adjustment should be carried out by a
Makita Authorized Service Center.
6
Page 7

NEDERLANDS
Verklaring van algemene gegevens
1 Hefboom
2 Voet
3 Afstelknop
4 Stofuitlaat
5 Stofzak
6 Snelsluiting
7 Vastzetknop
8 Trekschakelaar
9 Snelheidsregelknop
0 Optionele slang met 28 mm
binnendiameter
q Stofzuigerslang
w Stofzuiger
e Schuurgereedschapstaander
r Geleider
t Schuurgeleischoen
y Limietstreep
u Borstelhouderdop
i Schroevendraaier
TECHNISCHE GEGEVENS
Model Bandmaat Bandsnelheid Totale lengte Netto gewicht
9902 ............. 76 mm x 533 mm 440 m/min. 296 mm 4,3 kg
9903 ............. 76 mm x 533 mm 210 – 440 m/min. 296 mm 4,3 kg
9920 ............. 76 mm x 610 mm 210 – 440 m/min. 334 mm 4,5 kg
9404 ............. 100 mm x 610 mm 210 – 440 m/min. 334 mm 4,7 kg
•
In verband met ononderbroken research en ontwikkeling behouden wij ons het recht voor bovenstaande technische gegevens te wijzigen zonder
voorafgaande kennisgeving.
•
Opmerking: De technische gegevens kunnen van
land tot land verschillen.
Stroomvoorziening
De machine mag alleen worden aangesloten op een
stroombron van hetzelfde voltage als aangegeven op
de naamplaat, en kan alleen op enkel-fase wisselstroom worden gebruikt. De machine is dubbelgeı¨soleerd volgens de Europese standaard en kan
derhalve ook op een niet-geaard stopcontact worden
aangesloten.
Veiligheidswenken
Vooruw veiligheid dient u de bijgevoegde Veiligheidsvoorschriften nauwkeurig op te volgen.
AANVULLENDE
VEILIGHEIDSVOORSCHRIFTEN
1. Houd de machine vast bij de geïsoleerde
gedeelten van de handgreep wanneer de
machine tijdens het gebruik in aanraking kan
komen met verborgen bedrading of met zijn
netsnoer. Door contact met een onder spanning staande draad komen de blootgestelde
metalen delen van de machine onder spanning
te staan zodat de gebruiker een elektrische
schok kan krijgen.
2. Houd het gereedschap altijd met beide handen
stevig vast.
3. Zorg ervoor dat de schuurband niet in aanraking is met het werkstuk, wanneer u het gereedschap inschakelt.
4. Houd uw handen uit de buurt van de draaiende
delen.
5. Schakel het gereedschap altijd uit wanneer u
tijdens het werk weg moet. Schakel het
gereedschap alleen in, als u het in handen
houdt.
6. Dit gereedschap is niet waterdicht. Zorg er dus
voor dat het werkstuk droog is.
BEDIENINGSVOORSCHRIFTEN
Aanzetten of verwijderen van de schuurband
(Fig. 1)
Belangrijk:
Kontroleer altijd of het gereedschap uitgeschakeld is
en de stekker uit het stopkontakt is getrokken, alvorens de schuurband aan te brengen of te verwijderen.
Trek het hefboompje totaal uit, monteer dan de
schuurband voordat u het hefboompje terug in de
oorspronkelijke positie zet.
LET OP:
Wanneer u de schuurband installeert, wees er zeker
van dat de richting van de pijl op de achterkant van de
band hetzelfde is als die op de machine. Tegenovergestelde montage heeft een kortere levensduur van de
band tot gevolg. (Fig. 2)
Centreren van de band (Fig. 3)
Schakel het gereedschap in en controleer of de
schuurband goed gecentreerd is. Indien de rand van
de schuurband verder komt dan de rand van de voet
of meer dan 6 mm ervan is verwijderd, dient u de
afstelknop te gebruiken om de band te centreren.
Stofzak (Fig. 4 en 5)
Bevestig de stofzakaan de stofuitlaat. De stofuitlaat is
kegelvormig. Wanneer u de stofzak eraan bevestigt,
dient u dezezo ver mogelijk op de stofuitlaat te duwen
om te voorkomen dat deze tijdens het gebruik
loskomt. Voor de beste resultaten dient u de stofzak
te ledigen wanneer deze ongeveer halfvol is. Geef
daarbij een paar lichte tikken op de stofzak om zoveel
mogelijk stof eruit te verwijderen.
BEWAAR DEZE VOORSCHRIFTEN.
13
Page 8

Trekschakelaar (Fig. 6)
LET OP:
•
Alvorens het netsnoer op het stopkontakt aan te
sluiten, dient u altijd te kontroleren of de trekkerschakelaarbehoorlijk werkt enbij loslaten onmiddellijk naar de ‘‘OFF’’ positie terugkeert.
•
De machine mag niet in contact zijn met het werkstuk wanneer u de machine in- of uitschakelt,
aangezien anders het werkstuk niet goed zal worden afgeschuurd of de band beschadigd kan raken.
Druk eenvoudig de schakelaar in om de machine te
starten. Om te stoppen, de trekker loslaten. Om
continu door te draaien bij het indrukken tevens de
vastzetknop indrukken.
Snelheidsregelknop (Fig. 7)
Voor 9903, 9920 en 9404
De bandsnelheid kan worden afgesteld op een willekeurige snelheid tussen 210 m en 440 m per minuut
door de snelheidsregelknop te draaien en in te stellen
op een cijfer van 1 tot 5. De snelheid vermeerdert
wanneer de knop in de richting van cijfer 5 wordt
gedraaid, en vermindert wanneer deze in de richting
van cijfer 1 wordt gedraaid. Kies de snelheid die
geschikt is voor het werkstuk dat u wilt schuren.
LET OP:
De snelheidsregelknop kan niet verder dan 5 en niet
verder terug dan 1 worden gedraaid. Forceer de knop
niet voorbij 5 of 1, aangezien de snelheidsregeling
daardoor defect kan raken.
Schuren (Fig. 8)
Houd het gereedschap met beide handen stevig vast.
Schakel het gereedschap in en wacht totdat het op
volle snelheid is gekomen. Plaats vervolgens het
gereedschap zachtjes op het te schuren oppervlak.
Zorg ervoor dat de schuurband volledig in aanraking
is met hetwerkstuk en beweeg het gereedschap heen
en weer. U dient nooit kracht op het gereedschap uit
te oefenen. Hetgewicht van het gereedschap zelf is al
voldoende. Teveel druk op het gereedschap kan
leiden tot afslaan of oververhitting van de motor. Ook
kan terugslag (kickback) en zelfs brandvlekken op het
werkstuk veroorzaakt worden.
Aansluiten op een Makita stofzuiger of stofvanger
U kunt schoner werken door de bandschuurmachine
aan te sluiten op een Makita stofzuiger of stofvanger.
Om aan te sluiten op een Makita stofzuiger (Model
406/431), is een optionele slang met een binnendiameter van 28 mm nodig. Zie Fig. 9.
Om aan te sluiten op de Makita stofvanger (Model
420/420S), is de optionele slang niet nodig. U kunt de
bandschuurmachine direct aansluiten op de slang
van de stofvanger.
Schuurgereedschapstaander
(optioneel accessoire) (Fig. 10)
De schuurgereedschapstaander is handig voor het
schuren van kleine werkstukken of voor het verwijderen van bramen.
Schuurgeleischoen (optioneel accessoire)
(Fig. 11)
Door de schuurgeleischoen te gebruiken kunt u de
werkstukken vlakker schuren.
ONDERHOUD
LET OP:
Zorg er altijd voor dat de machine is uitgeschakeld en
de stekker uit het stopcontact is verwijderd vooraleer
onderhoud aan de machine uit te voeren.
Vervangen van koolborstels (Fig. 12 en 13)
Vervang de koolborstels wanneer deze tot aan de
limietmarkering zijn afgesleten. Beide identieke koolborstels dienen tegelijkertijd te worden vervangen.
Opdat het gereedschap veilig en betrouwbaar blijft,
dienen alle reparaties, onderhoud of afstellingen te
worden uitgevoerd in een erkend Makita service
centrum.
14
 Loading...