


Sharpener
200
mm
(7-718")
MODEL
INSTRUCTION MANUAL
9820-2
SPECIFICATIONS
Wheel size
200
mm
x
25
(7-7/8"
mm x 75
x
1"
x
mm
3")
No load speed Overall length Net weight
560
R/min.
390
mm
(1
5-3/8")
11
kg (24.3
Ibs)

BEFORE CONNECTING YOUR TOOL
TO
A
POWER SOURCE
Be sure
you
have read all
GENERAL POWER TOOL SAFETY RULES
GENERAL SAFETY PRECAUTIONS
(For
All
Tools)
1.
KNOW YOUR POWER TOOL. Read the owner's manual carefully. Learn the
tools applications and limitations, as well as the specific potential hazards
peculiar to
2.
KEEP GUARDS IN PLACE and in working order.
3.
REMOVE ADJUSTING KEYS AND WRENCHES. Form habit of checking to
see that keys and adjusting wrenches are removed from tool before turning
it
on.
4.
KEEP WORK AREA CLEAN. Cluttered areas and benches invit? accidents.
5.
DON'T USE IN DANGEROUS ENVIRONMENT. Don't use power tools
or wet locations, or expose them to rain. Keep work area well lighted.
6.
KEEP CHILDREN AWAY. All visitors should be kept safe distance from work
area.
7.
MAKE WORKSHOP KID PROOF with padlocks, master switches, or by
removing starter keys.
8.
DON'T FORCE TOOL.
it
was designed.
9.
USE RIGHT TOOL. Don't force tool
was not designed.
IO.
WEAR PROPER APPAREL. Wear no loose clothing, gloves, neckties, rings.
bracelets, or other jewelry which may get caught
footwear is recommended. Wear protective hair covering to contain long hair.
1 1.
ALWAYS USE SAFETY GLASSES. Also use face or dust mask
ation is dusty. Everyday eyeglasses only have impact resistant lenses, they
are NOT safety glasses.
12.
SECURE WORK. Use clamps or a vise to hold work when practical. It's safer
than using your hand and
13.
DON'T OVERREACH. Keep proper footing and balance at all times.
.
14.
MAINTAIN TOOLS WITH CARE. Keep tools sharp and clean for best and
safest performance. Follow instructions for lubricating and changing accessories.
15.
DISCONNECT TOOLS before servicing; when changing accessories such as
blades, bits, cutters, and the like.
16.
REDUCE
in off position before plugging in.
it.
It
will do the job better and safer at the rate for which
or
attachment to do a job for which
in
moving parts. Nonslip
if
cutting oper-
it
frees both hands to operate tool.
THE
RISK OF UNINTENTIONAL STARTING. Make sure switch is
in
damp
it
L
17. USE RECOMMENDED ACCESSORIES. Consult the owner's manual for
recommended accessories. The use of improper accessories may cause risk
of injury to persons.
18. NEVER STAND ON TOOL. Serious injury could occur if the tool is tipped or
if the cutting tool is accidentally contacted.
19.
CHECK DAMAGED PARTS. Before further use of the tool, a guard or other
part that is damaged should be carefully checked to determine that
operate properly and perform its intended function
of
moving parts, binding of moving parts, breakage
-
check for alignment
of
parts, mounting, and
it
will
any other conditions that may affect its operation. A guard or other part that
is
damaged should be properly repaired or replaced.
20.
DIRECTION OF FEED. Feed work into a blade or cutter against the direction
of
rotation of the blade or cutter only.
21. NEVER LEAVE TOOL RUNNING UNATTENDED. TURN POWER OFF. Don't
leave tool
until
it
comes to a complete stop.
22. PROPER GROUNDING. This tool should be grounded while in use to protect
the operator from electric shock.
23.
EXTENSION CORDS: Use only three-wire extension cords which have threeprong grounding-type plugs and three-pole receptacles which accept the
tool's plug. Replace or repair damaged or worn cord immediately.
VOLTAGE WARNING: Before connecting the tool to a power source (receptacle,
outlet, etc.) be sure the voltage supplied is the same as that specified on the
nameplate of the tool. A power source with voltage greater than that specified
for the tool can result in SERIOUS INJURY to the user
-
as well as damage to
the tool. If in doubt, DO NOT PLUG IN THE TOOL. Using a power source with
voltage less than the nameplate rating is harmful to the motor.
3
GROUNDING INSTRUCTIONS
ALL GROUNDED, CORD-CONNECTED TOOLS:
In
the event of a malfunction or
breakdown, grounding provides a path of least resistance for electric current to
reduce the risk of electric shock. This tool is equipped with an electric cord hav-
ing
an equipment-grounding conductor and a grounding
plug.
The plug must be
plugged into a matching outlet that is properly installed and grounded in accordance
with
all local codes and ordinances.
Do not modify the
.
let installed
plug
provided
by
a qualified electrician.
-
if
it
will not
fit
the outlet, have the proper out-
Improper connection of the equipment-grounding conductor can result
of
electric shock. The conductor
with
insulation having an outer surface that is
green with or without yellow stripes is the equipment-grounding conductor.
repair or replacement of the electric cord or plug is necessary, do not connect
the equipment-grounding conductor to a live terminal.
Check
not completely understood, or
with
a qualified electrician or serviceman
if
in
if
the grounding instructions are
doubt as to whether the tool is properly
grounded.
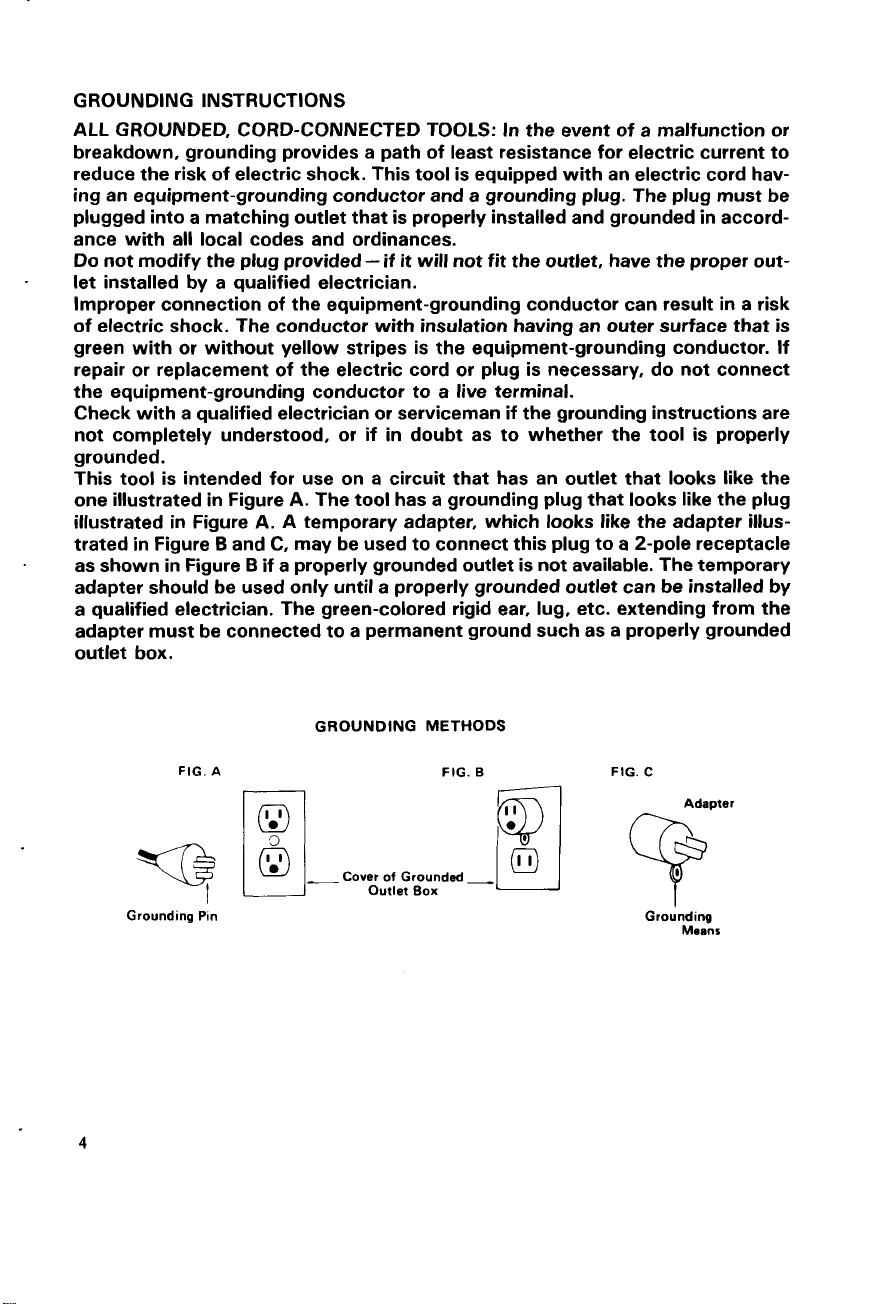
This tool is intended for use on a circuit that has an outlet that looks like the
one illustrated
illustrated
trated in Figure B and C, may be used to connect this plug to a 2-pole receptacle
.
as shown in Figure B
adapter should be used only
a qualified electrician. The green-colored rigid ear,
in
in
Figure
Figure
A.
The tool has a grounding plug that looks like the plug
A. A
temporary adapter, which looks like the adapter
if
a properly grounded outlet is not available. The temporary
until
a properly grounded outlet can be installed
lug,
etc. extending from the
adapter must be connected to a permanent ground such as a properly grounded
outlet box.
in
a risk
If
illus-
by
4
FIG.
Q
Grounding Pin
I
GROUNDING
A
-
Cover
-
Cover
of
of
Outlet
Outlet
METHODS
FIG.
FIG.
Grounded
Grounded
Box
Box
-
-
B
B
FIG. C
Adapter
Grounding
Means
ADDITIONAL SAFETY RULES
1.
Use only wheels having a maximum operating speed at least as high as
Load RPM" marked on the tool's nameplate.
2.
Check the wheel carefully for cracks or damage before operation. Replace
cracked or damaged wheel immediately.
3.
Secure the wheel carefully.
4.
Be careful not to damage the spindle or the bolt, or the wheel itself might
break.
5.
Keep a space of 5 mm (3/16") between the sharpening platform guide (rail)
and the grinding wheel.
6.
Keep hands away from rotating parts.
7.
Make sure the workpiece is not contacting the wheel before the switch is
turned on.
8.
Before using the tool on an actual workpiece, let
Watch for flutter that might be caused by incorrect installation or a poorly
balanced wheel.
9.
Use the upper surface of the wheel only. Don't use the side surface.
10.
If
the wheel stops during operation, makes an odd noise
switch off the tool immediately.
11.
Always switch off and wait for the wheel to come to a complete stop be-
fore adjustment or inspection.
12.
Do not touch the workpiece immediately after operation,
hot and could burn your skin.
13.
Dry the wheel by idling the tool after operation to prevent
in
freezing
14.
Store wheels in a dry location only.
cold weather. Freezing can crack the wheel.
it
run for several minutes.
or
begins to vibrate,
it
may be extremely
the
wheel from
"No
SAVE THESE INSTRUCTIONS.
WARNING
For Your Own Safety Read Instruction
Manual Before Operating Grinder
1.
Wear eye protection.
2.
Use grinding wheel suitable for speed of grinder.
3.
Replace cracked wheel immediately.
4.
Always use guards and eye shields.
5.
Do not overtighten wheel nut.
6.
Use only flanges furnished with the grinder.
5
 Loading...