

Page 1
GB
Belt Sander Instruction Manual
F
Ponceuse à bande Manuel d’instructions
D
Bandschleifer Betriebsanleitung
I
Levigatrice a nastro Istruzioni per l’uso
NL
Bandschuurmachine Gebruiksaanwijzing
E
Lijadora de banda Manual de instrucciones
P
Lixadeira de rolos Manual de instruções
DK
Båndstørrelse Brugsanvisning
S
Bandslipmaskin Bruksanvisning
N
Båndslipemaskin Bruksanvisning
SF
Nauhahiomakone Käyttöohje
GR Λειαντήρας ζώνης Οδηγίες χρήσεως
9401
9402
9901
9924DB
Page 2
1
12
3
2
4
34
6
7
5
56
9
10
8
78
2
Page 3

ENGLISH
Explanation of general view
1Lever
2 Adjusting knob
3 Dust spout
4 Dust bag
SPECIFICATIONS
Model Belt size Belt speed Overall length Net weight
9401 ..........................................100 mm x 610 mm 350 m/min 374 mm 7.3 kg
9402 ..........................................100 mm x 610 mm H 350 m/min 374 mm 7.3 kg
9901 ............................................ 76 mm x 533 mm 380 m/min 328 mm 3.5 kg
9924DB ......................................76 mm x 610 mm 400 m/min 355 mm 4.8 kg
5 Switch trigger
6 Lock button
7 Speed change switch
8 Limit mark
L 300 m/min
360 m/min (U.K. only)
9 Brush holder cap
10 Screwdriver
• Due to our continuing program of research and development, the specifications herein are subject to change
without notice.
• Note: Specifications may differ from country to country.
Powe r supply
The tool should be connected only to a power supply of
the same voltage as indicated on the nameplate, and can
only be operated on single-phase AC supply. They are
double-insulated in accordance with European Standard
and can, therefore, also be used from sockets without
earth wire.
Safety hints
For your own safety, please refer to the enclosed safety
instructions.
SPECIFIC SAFETY RULES
DO NOT let comfort or familiarity with product
(gained from repeated use) replace strict adherence
to belt sander safety rules. If you use this tool
unsafely or incorrectly, you can suffer serious personal injury.
1. Hold power tools by insulated gripping surfaces
when performing an operation where the cutting
tool may contact hidden wiring or its own cord.
Contact with a “live” wire will make exposed metal
parts of the tool “live” and shock the operator.
2. Ventilate your work area adequately when you
perform sanding operations.
3. Some material contains chemicals which may be
toxic. Take caution to prevent working dust inhalation and skin contact. Follow material supplier
safety data.
4. Always use the correct dust mask/respirator for
the material and application you are working
with.
5. Always use safety glasses or goggles. Ordinary
eye or sun glasses are NOT safety glasses.
6. Hold the tool firmly with both hands.
7. Make sure the belt is not contacting the work8
piece before the switch is turned on.
8. Keep hands away from rotating parts.
9. Do not leave the tool running. Operate the tool
only when hand-held.
10. This tool has not been waterproofed, so do not
use water on the workpiece surface.
GEB015-1
SAVE THESE INSTRUCTIONS.
WARNING:
MISUSE or failure to follow the safety rules stated in
this instruction manual may cause serious personal
injury.
OPERATING INSTRUCTIONS
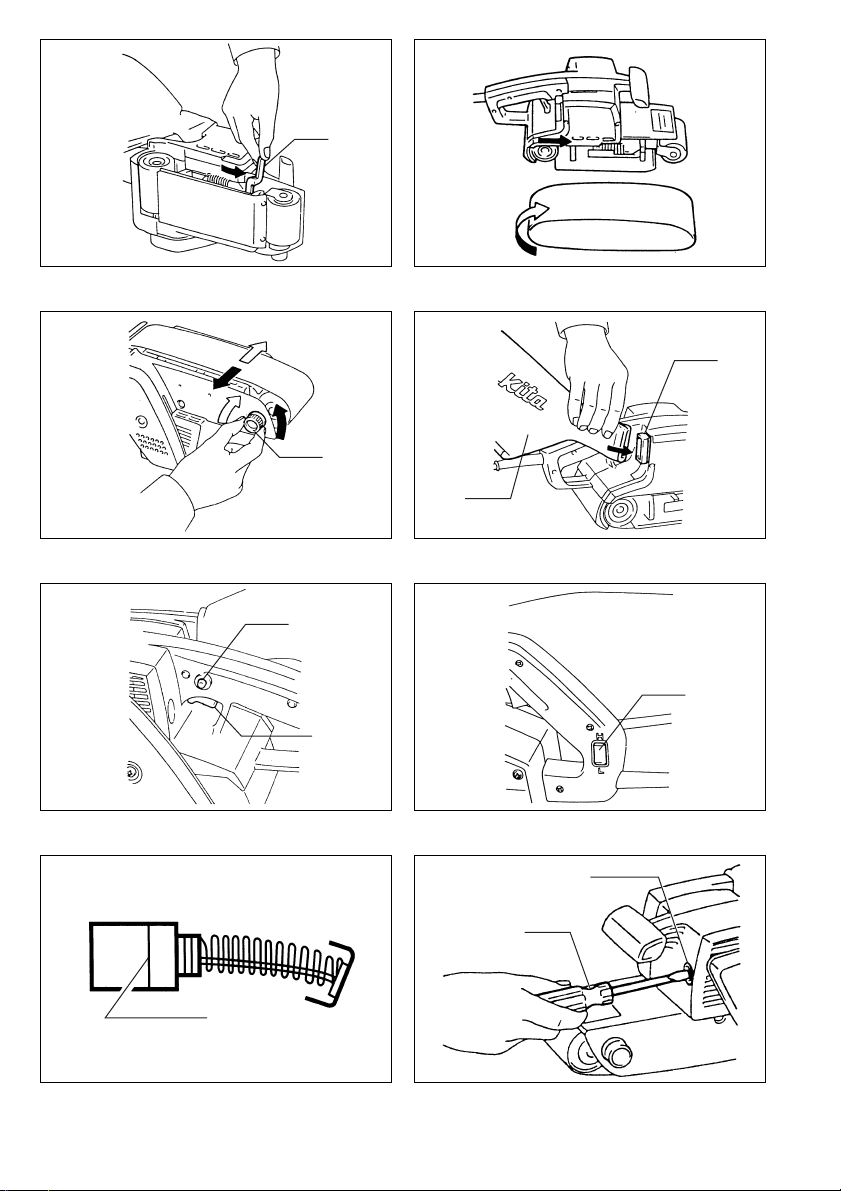
Installing or removing abrasive belt (Fig. 1 & 2)
Important:
Always be sure that the tool is switched off and
unplugged before installing or removing the belt.
Pull the lever all the way out and install the belt over the
rollers, then return the lever to the original position.
CAUTION:
When installing the belt, make sure that the direction of
the arrow on the back of the belt corresponds to the one
on the tool itself.
Adjusting belt tracking (Fig. 3)
While the belt is running, use the adjusting knob to center
the belt tracking. Failure to do so can result in frayed belt
edges and wear on the sander frame.
Dust bag (Fig. 4)
The use of the dust bag makes sanding operations clean
and dust collection easy. To attach the dust bag, fit it onto
the dust spout.
For the best results, empty the dust bag when it becomes
about half full, tapping it lightly to remove as much dust
as possible.
Switch action (Fig. 5)
CAUTION:
Before plugging in the tool, always check to see that the
switch trigger actuates properly and returns to the “OFF”
position when released.
To start the tool, simply pull the trigger. Release the trigger to stop. For continuous operation, pull the trigger and
then push in the lock button. To stop the tool from the
locked position, pull the trigger fully, then release it.
3
Page 4

Speed change (Fig. 6)
For Model 9402
To change the tool speed, press the “H” side of the speed
change switch for high speed or the “L” side for low
speed.
CAUTION:
Use the speed change switch only after the tool comes to
a complete stop.
Operation
Hold the tool firmly with both hands. Turn the tool on and
wait until it attains full speed. Then gently place the tool
on the workpiece surface. Keep the belt flush with the
workpiece at all times and move the tool back and forth.
Never force the tool. The weight of the tool applies adequate pressure. Excessive pressure may cause stalling,
overheating of the motor, burning of the workpiece and
possible kickback.
CAUTION:
The tool should not be in contact with the workpiece surface when you turn the tool on or off. Otherwise a poor
sanding finish or damage of the belt may result.
MAINTENANCE
CAUTION:
Always be sure that the tool is switched off and
unplugged before carrying out any work on the tool.
Replacement of carbon brushes (Fig. 7 & 8)
Replace carbon brushes when they are worn down to the
limit mark. Both identical carbon brushes should be
replaced at the same time.
To maintain product safety and reliability, repairs, maintenance or adjustment should be carried out by a Makita
Authorized Service Center.
4
Page 5

NEDERLANDS
Verklaring van algemene gegevens
1 Hefboom
2 Afstelknop
3 Stofuitlaat
4Stofzak
TECHNISCHE GEGEVENS
Model Bandmaat Bandsnelheid Totale lengte Netto gewicht
9401.................................................. 100 mm x 610 mm 350 m/min 374 mm 7,3 kg
9402.................................................. 100 mm x 610 mm H 350 m/min 374 mm 7,3 kg
9901.................................................... 76 mm x 533 mm 380 m/min 328 mm 3,5 kg
9924DB .............................................. 76 mm x 610 mm 400 m/min 355 mm 4,8 kg
5 Trekschakelaar
6 Vastzetknop
7 Snelheidschakelaar
8 Limiet
L 300 m/min
9 Koolborsteldop
10 Schroevedraaier
• In verband met ononderbroken research en ontwikkeling behouden wij ons het recht voor bovenstaande
technische gegevens te wijzigen zonder voorafgaande
kennisgeving.
• Opmerking: De technische gegevens kunnen van land
tot land verschillen.
Stroomvoorziening
De machine mag alleen worden aangesloten op een
stroombron van hetzelfde voltage als aangegeven op de
naamplaat, en kan alleen op enkel-fase wisselstroom
worden gebruikt. De machine is dubbel-geïsoleerd volgens de Europese standaard en kan derhalve ook op
een niet-geaard stopcontact worden aangesloten.
Veiligheidswenken
Voor uw veiligheid dient u de bijgevoegde Veiligheidsvoorschriften nauwkeurig op te volgen.
AANVULLENDE
VEILIGHEIDSVOORSCHRIFTEN
Laat u NIET misleiden door een vals gevoel van comfort en bekendheid met het gereedschap (na veelvuldig gebruik) en neem alle veiligheidsvoorschriften
van de bandschuurmachine altijd strikt in acht. Bij
onveilig of verkeerd gebruik van het elektrisch
gereedschap, bestaat de kans op ernstig persoonlijk
letsel.
1. Houd elektrisch gereedschap vast aan het geïso-
leerde oppervlak van de handgrepen wanneer u
werkt op plaatsen waar het zaaggereedschap
met verborgen bedrading of zijn eigen snoer in
aanraking kan komen. Door contact met onder
spanning staande draden, zullen de niet-geïsoleerde metalen delen van het gereedschap onder
spanning komen te staan zodat de gebruiker een
elektrische schok kan krijgen.
2. Ventileer goed uw werkplaats wanneer u het
gereedschap gebruikt om te schuren.
3. Sommige materialen bevatten chemicaliën die
giftig kunnen zijn. Pas op dat u geen werkstof
inademt en vermijd contact met de huid. Volg de
veiligheidsvoorschriften van de leverancier van
het materiaal op.
4. Gebruik altijd het juiste stofmasker/gasmasker
dat nodig is voor het materiaal en de toepassing
waarmee u werkt.
5. Draag altijd een veiligheidsbril. Een gewone bril
of een zonnebril is GEEN veiligheidsbril.
6. Houd het gereedschap altijd met beide handen
stevig vast.
7. Zorg ervoor dat de schuurband niet in aanraking
is met het werkstuk, wanneer u het gereedschap
inschakelt.
8. Houd uw handen uit de buur t van de draaiende
delen.
9. Schakel het gereedschap altijd uit wanneer u tijdens het werk weg moet. Schakel het gereedschap alleen in, als u het in handen houdt.
10. Dit gereedschap is niet waterdicht. Zorg er dus
voor dat het werkstuk droog is.
BEWAAR DEZE VOORSCHRIFTEN.
WAARSCHUWING:
VERKEERD GEBRUIK of het niet naleven van de veiligheidsvoorschriften in deze gebruiksaanwijzing
kan leiden tot ernstige verwondingen.
BEDIENINGSVOORSCHRIFTEN
Aanzetten of verwijderen van de schuurband
(Fig. 1 en 2)
LET OP:
Kontroleer altijd of het gereedschap uitgeschakeld is en
de stekker uit het stopkontakt is getrokken, alvorens de
schuurband aan te brengen of te verwijderen.
Trek het hefboompje totaal uit, monteer dan de schuurband voordat u het hefboompje terug in de oorspronkelijke positie zet.
LET OP:
Wanneer u de schuurband installeert, wees er zeker van
dat de richting van de pijl op de achter kant van de band
hetzelfde is als die op de machine. Tegenovergestelde
montage heeft een kortere levensduur van de band tot
gevolg.
Centreren van de band (Fig. 3)
Centreren van de schuurband dient u te doen wanneer
het gereedschap ingeschakeld is. Verdraai de afstelknop
zodanig dat de schuurband precies in het midden van de
rollen loopt. Wanneer u dit nalaat, kan uitrafelen van de
bandrand of verslijten van de frame het resultaat zijn.
11
Page 6

Stofzak (Fig. 4)
Wanneer u de stofzak op het gereedschap bevestigt,
heeft u tijdens het werk geen last van stof en houdt u uw
werkplaats schoon. Voor het bevestigen van de stofzak,
plaatst u deze op de stofuitlaat.
Voor de beste resultaten dient u de stofzak te ledigen
wanneer deze halfvol is. Geef daarbij een paar lichte tikken voor het verwijderen van vastzittende stofdeeltjes.
Trekschakelaar (Fig. 5)
LET OP:
Alvorens het netsnoer op het stopkontakt aan te sluiten,
dient u altijd te kontroleren of de trekkerschakelaar
behoorlijk werkt en bij loslaten onmiddellijk naar de
“OFF” positie terugkeert.
Druk eenvoudig de schakelaar in om de machine te starten. Om te stoppen, de trekker loslaten. Om continu door
te draaien bij het indrukken tevens de vastzetknop
indrukken.
Snelheidschakelaar standen (Fig. 6)
Voor Model 9402
Zet de schakelaar op “H” voor een hoge bandsnelheid en
op “L” voor een lage bandsnelheid.
LET OP:
De snelheidschakelaar MAG ALLEEN WORDEN
GEBRUIKT NADAT DE MACHINE TOTAAL TOT STILSTAND IS GEKOMEN.
Bediening
Houd het gereedschap met beide handen stevig vast.
Schakel het gereedschap in en wacht totdat het op volle
snelheid is gekomen. Plaats vervolgens het gereedschap
zachtjes op het te schuren oppervlak. Zorg ervoor dat de
schuurband volledig in aanraking is met het werkstuk en
beweeg het gereedschap heen en weer. U dient nooit
kracht op het gereedschap uit te oefenen. Het gewicht
van het gereedschap zelf is al voldoende. Teveel druk op
het gereedschap kan leiden tot afslaan of oververhitting
van de motor. Ook kan terugslag (kickback) en zelfs
brandvlekken op het werkstuk veroorzaakt worden.
LET OP:
De schuurband mag niet in kontakt zijn met het werkstuk
wanneer u het gereedschap in of uitschakelt, aangezien
anders het werkstuk niet goed afgeschuurd wordt of de
band beschadigd kan worden.
ONDERHOUD
LET OP:
Zorg er altijd voor dat de machine is uitgeschakeld en de
stekker uit het stopcontact is verwijderd vooraleer onderhoud aan de machine uit te voeren.
Vervangen van koolborstels (Fig. 7 en 8)
Vervang de borstels wanneer ze tot aan de limietmarkering zijn afgesleten. Beide koolborstels dienen tegelijkertijd te worden vervangen.
Opdat het gereedschap veilig en betrouwbaar blijft, dienen alle reparaties, onderhoud of afstellingen te worden
uitgevoerd in een erkend Makita service centrum.
12
Page 7

ENGLISH
EC-DECLARATION OF CONFORMITY
We declare under our sole responsibility that this product
is in compliance with the following standards of standardized documents,
in accordance with Council Directives, 89/336/EEC and
98/37/EC.
EN60745, EN55014, EN61000
ENH101-5
ITALIANO
DICHIARAZIONE DI CONFORMITÀ
CON LE NORME DELLA COMUNITÀ EUROPEA
Dichiariamo sotto la nostra sola responsabilità che
questo prodotto è conforme agli standard di documenti
standardizzati seguenti:
secondo le direttive del Consiglio 89/336/CEE e 98/37/CE.
EN60745, EN55014, EN61000
FRANÇAISE
DÉCLARATION DE CONFORMITÉ CE
Nous déclarons sous notre entière responsabilité que ce
produit est conforme aux normes des documents standardisés suivants,
conformément aux Directives du Conseil, 89/336/CEE et
98/37/EG.
EN60745, EN55014, EN61000
DEUTSCH
CE-KONFORMITÄTSERKLÄRUNG
Hiermit erklärt wir unter unserer alleinigen Verantwortung, daß dieses Produkt gemäß den Ratsdirektiven
89/336/EWG und 98/37/EG mit den folgenden Normen
von Normendokumenten übereinstimmen:
EN60745, EN55014, EN61000.
Yasuhiko Kanzaki
NEDERLANDS
EG-VERKLARING VAN CONFORMITEIT
Wij verklaren hierbij uitsluitend op eigen verantwoordelijkheid dat dit produkt voldoet aan de volgende
normen van genormaliseerde documenten,
in overeenstemming met de richtlijnen van de Raad
89/336/EEC en 98/37/EC.
EN60745, EN55014, EN61000
ESPAÑOL
DECLARACIÓN DE CONFORMIDAD DE LA CE
Declaramos bajo nuestra sola responsabilidad que este
producto cumple con las siguientes normas de documentos normalizados,
de acuerdo con las directivas comunitarias,
89/336/EEC y 98/37/CE.
CE 2005
EN60745, EN55014, EN61000
Director Amministratore
Directeur Directeur
Direktor Director
MAKITA INTERNATIONAL EUROPE LTD.
Michigan Drive, Tongwell, Milton Keynes,
Bucks MK15 8JD, ENGLAND
Responsible manufacturer: Produttore responsabile:
Fabricant responsable
Verantwortlicher Hersteller: Fabricante responsable:
Makita Corporation Anjo Aichi Japan
Verantwoordelijke fabrikant:
:
27
Page 8

PORTUGUÊS
DECLARAÇÃO DE CONFORMIDADE DA CE
Declaramos sob inteira responsabilidade que este
produto obedece às seguintes normas de documentos
normalizados,
de acordo com as directivas 89/336/CEE e 98/37/CE do
Conselho.
EN60745, EN55014, EN61000
ENH101-5
NORSK
EUs SAMSVARS-ERKLÆRING
Vi erklærer på eget ansvar at dette produktet er i overensstemmelse med følgende standard i de standardiserte dokumenter:
i samsvar med Råds-direktivene, 89/336/EEC og
98/37/EC.
EN60745, EN55014, EN61000,
DANSK
EU-DEKLARATION OM KONFORMITET
Vi erklærer hermed på eget ansvar, at dette produkt er i
overensstemmelse med de følgende standarder i de normsættende dokumenter,
i overensstemmelse med Rådets Direktiver 89/336/EEC
og 98/37/EC.
EN60745, EN55014, EN61000
SVENSKA
EG-DEKLARATION OM ÖVERENSSTÄMMELSE
Under eget ansvar deklarerar vi härmed att denna
produkt överensstämmer med följande standardiseringar
för standardiserade dokument,
i enlighet med EG-direktiven 89/336/EEC och 98/37/EC.
EN60745, EN55014, EN61000
Yasuhiko Kanzaki
SUOMI
VAKUUTUS EC-VASTAAVUUDESTA
Yksinomaisesti vastuullisina ilmoitamme, että tämä tuote
on seuraavien standardoitujen dokumenttien standardien mukainen,
neuvoston direktiivien 89/336/EEC ja 98/37/EC mukaisesti.
EN60745, EN55014, EN61000
ΕΛΛΗΝΙΚΑ
∆ΗΛΩΣΗ ΣΥΜΜΟΡΦΩΣΗΣ ΕΚ
∆ηλώνουµε υπ την µοναδική µας ευθύνη τι αυτ
το προιν βρίσκεται σε Συµφωνία µε τα ακλουθα
πρτυπα τυποποιηµένων εγγράφων,
σύµφωνα µε τις Οδηγίες του Συµβουλίου,
89/336/EEC και 98/37/ΚE.
CE 2005
EN60745, EN55014, EN61000
28
Director Direktor
Direktør Johtaja
Direktör ∆ιευθυντής
MAKITA INTERNATIONAL EUROPE LTD.
Michigan Drive, Tongwell, Milton Keynes,
Bucks MK15 8JD, ENGLAND
Fabricante responsável: Ansvarlig produsent:
Ansvarlig fabrikant: Vastaava valmistaja:
Ansvarig tillverkare: Υπεύθυνος κατασκευαστής:
Makita Corporation Anjo Aichi Japan
Page 9

ENGLISH
For European countries only
Noise and Vibration of Model 9401/9402
The typical A-weighted noise levels are
The typical weighted root mean square acceleration
value is not more than 2.5 m/s
These values have been obtained according to
EN60745.
sound pressure level: 92 dB (A)
sound power level: 103 dB (A)
Uncertainty is 3 dB (A).
– Wear ear protection. –
2
.
ENG005-2-V3
ITALIANO
Modello per l’Europa soltanto
Rumore e vibrazione del modello 9401/9402
I livelli del rumore pesati secondo la curva A sono:
Il valore quadratico medio di accellerazione non supera i
2,5 m/s
Questi valori sono stati ottenuti in conformità EN60745.
Livello pressione sonora: 92dB (A)
Livello potenza sonora: 103dB (A)
L’incertezza è di 3 dB (A).
– Indossare i paraorecchi. –
2
.
FRANÇAISE
Pour les pays d’Europe uniquement
Bruit et vibrations du modèle 9401/9402
Les niveaux de bruit ponderes types A sont:
niveau de pression sonore: 92dB (A)
niveau de puissance du son: 103 dB (A)
L’incer titude de mesure est de 3 dB (A).
L’accélération pondérée ne dépasse pas 2,5 m/s
– Porter des protecteurs anti-bruit. –
Ces valeurs ont été obtenues selon EN60745.
2
.
DEUTSCH
Nur für europäische Länder
Geräusch- und Vibrationsentwicklung
Die typischen A-bewerteten Geräuschpegel betragen:
Der gewichtete Effektivwer t der Beschleunigung beträgt
nicht mehr als 2,5 m/s
Diese Werte wurden gemäß EN60745 erhalten.
des Modells 9401/9402
Schalldruckpegel: 92 dB (A)
Schalleistungspegel: 103 dB (A)
Die Abweichung beträgt 3 dB (A).
– Gehörschutz tragen. –
2
.
NEDERLANDS
Alleen voor Europese landen
Geluidsniveau en trilling van het model 9401/9402
De typische A-gewogen geluidsniveau’s zijn
geluidsdrukniveau: 92 dB (A)
geluidsenergie-niveau: 103 dB (A)
Onzekerheid is 3 dB (A).
De typische gewogen effectieve versnellingswaarde is
niet meer dan 2,5 m/s
– Draag oorbeschermers. –
2
.
Deze waarden werden verkregen in overeenstemming
met EN60745.
ESPAÑOL
Para países europeos solamente
Ruido y vibración del modelo 9401/9402
Los niveles típicos de ruido ponderados A son
El valor ponderado de la aceleración no sobrepasa los
2,5 m/s
Estos valores han sido obtenidos de acuerdo con
EN60745.
presión sonora: 92 dB (A)
nivel de potencia sonora: 103 dB (A)
Incerteza 3 dB (A).
– Póngase protectores en los oídos. –
2
.
29
Page 10

PORTUGUÊS
Só para países Europeus
Ruído e vibração do modelo 9401/9402
Os níveis normais de ruído A são
O valor médio da aceleração é inferior a 2,5 m/s
Estes valores foram obtidos de acordo com EN60745.
nível de pressão de som: 92 dB (A)
nível do sum: 103 dB (A)
A incerteza é de 3 dB (A).
– Utilize protectores para os ouvidos –
2
.
ENG005-2-V3
NORSK
Gjelder bare land i Europa
Støy og vibrasjon fra modell 9401/9402
De vanlige A-belastede støynivå er
Den vanlig belastede effektiv-verdi for akselerasjon overskrider ikke 2,5 m/s
Disse verdiene er beregnet eller målt i samsvar med
EN60745.
lydtrykksnivå: 92 dB (A)
lydstyrkenivå: 103dB (A)
Usikkerheten er på 3 dB (A).
– Benytt hørselvern. –
2
.
DANSK
Kun for lande i Europa
Lyd og vibration fra model 9401/9402
De typiske A-vægtede lydniveauer er
lydtryksniveau: 92 dB (A)
lydeffektniveau: 103 dB (A)
Der er en usikkerhed på 3 dB (A).
Den vægtede effektive accelerationsværdi overstiger ikke
2
.
2,5 m/s
– Bær høreværn. –
Disse værdier er beregnet i overensstemmelse med
EN60745.
SVENSKA
Endast för Europa
Buller och vibration hos modell 9401/9402
De typiska A-vägda bullernivåerna är
Det typiskt vägda effektivvärdet för acceleration öve rsti-
ger inte 2,5 m/s
Dessa värden har erhållits i enlighet med EN60745.
ljudtrycksnivå: 92 dB (A)
ljudeffektnivå: 103 dB (A)
Osäkerheten är 3 dB (A).
– Använd hörselskydd –
2
.
SUOMI
Vain Euroopan maat
Mallin 9401/9402 melutaso ja tärinä
Tyypilliset A-painotetut melutasot ovat
äänenpainetaso: 92 dB (A)
äänen tehotaso: 103 dB (A)
Epävarmuus on 3 dB (A).
Tyypillinen kiihtyvyyden painotettu tehollisarvo ei ylitä
2,5 m/s
Nämä arvot on mitattu normin EN60745 mukaisesti.
– Käytä kuulosuojaimia. –
2
.
ΕΛΛΗΝΙΚΑ
Μνο για χώρες της Ευρώπης
Θρυβος και κραδασµς του µοντέλου 9401/9402
Οι τυπικές A-µετρούµενες εντάσεις ήχου είναι
Η τυπική αξία της µετρούµενης ρίζας του µέσου
τετραγώνου της επιτάχυνσης δεν ξεπερνά τα
2,5 m/s
Αυτές οι τιµές έχουν σηµειωθεί σύµφωνα µε το
EN60745.
πίεση ήχου: 92 dB (A)
δύναµη του ήχου: 103dB (A)
Η Αβεβαιτητα είναι 3 dB (A).
– Φοράτε ωτοασπίδες. –
2
.
30
Page 11

ENGLISH
For European countries only
The typical A-weighted noise levels are
The typical weighted root mean square acceleration
value is not more than 2.5 m/s
These values have been obtained according to
EN60745.
Noise and Vibration of Model 9901
sound pressure level: 89 dB (A)
sound power level: 100 dB (A)
Uncertainty is 3 dB (A).
– Wear ear protection. –
2
.
ENG005-2-V3
ITALIANO
Modello per l’Europa soltanto
Rumore e vibrazione del modello 9901
I livelli del rumore pesati secondo la curva A sono:
Il valore quadratico medio di accellerazione non supera i
2,5 m/s
Questi valori sono stati ottenuti in conformità EN60745.
Livello pressione sonora: 89dB (A)
Livello potenza sonora: 100dB (A)
L’incertezza è di 3 dB (A).
– Indossare i paraorecchi. –
2
.
FRANÇAISE
Pour les pays d’Europe uniquement
Les niveaux de bruit ponderes types A sont:
Bruit et vibrations du modèle 9901
niveau de pression sonore: 89dB (A)
niveau de puissance du son: 100 dB (A)
L’incer titude de mesure est de 3 dB (A).
L’accélération pondérée ne dépasse pas 2,5 m/s
– Porter des protecteurs anti-bruit. –
Ces valeurs ont été obtenues selon EN60745.
2
.
DEUTSCH
Nur für europäische Länder
Geräusch- und Vibrationsentwicklung
Die typischen A-bewerteten Geräuschpegel betragen:
Der gewichtete Effektivwer t der Beschleunigung beträgt
nicht mehr als 2,5 m/s
Diese Werte wurden gemäß EN60745 erhalten.
des Modells 9901
Schalldruckpegel: 89 dB (A)
Schalleistungspegel: 100 dB (A)
Die Abweichung beträgt 3 dB (A).
– Gehörschutz tragen. –
2
.
NEDERLANDS
Alleen voor Europese landen
Geluidsniveau en trilling van het model 9901
De typische A-gewogen geluidsniveau’s zijn
geluidsdrukniveau: 89 dB (A)
geluidsenergie-niveau: 100 dB (A)
Onzekerheid is 3 dB (A).
De typische gewogen effectieve versnellingswaarde is
niet meer dan 2,5 m/s
– Draag oorbeschermers. –
2
.
Deze waarden werden verkregen in overeenstemming
met EN60745.
ESPAÑOL
Para países europeos solamente
Ruido y vibración del modelo 9901
Los niveles típicos de ruido ponderados A son
El valor ponderado de la aceleración no sobrepasa los
2,5 m/s
Estos valores han sido obtenidos de acuerdo con
EN60745.
presión sonora: 89 dB (A)
nivel de potencia sonora: 100 dB (A)
Incerteza 3 dB (A).
– Póngase protectores en los oídos. –
2
.
31
Page 12

PORTUGUÊS
Só para países Europeus
Os níveis normais de ruído A são
O valor médio da aceleração é inferior a 2,5 m/s
Estes valores foram obtidos de acordo com EN60745.
Ruído e vibração do modelo 9901
nível de pressão de som: 89 dB (A)
nível do sum: 100 dB (A)
A incerteza é de 3 dB (A).
– Utilize protectores para os ouvidos –
2
.
ENG005-2-V3
NORSK
Gjelder bare land i Europa
De vanlige A-belastede støynivå er
Den vanlig belastede effektiv-verdi for akselerasjon overskrider ikke 2,5 m/s
Disse verdiene er beregnet eller målt i samsvar med
EN60745.
Støy og vibrasjon fra modell 9901
lydtrykksnivå: 89 dB (A)
lydstyrkenivå: 100dB (A)
Usikkerheten er på 3 dB (A).
– Benytt hørselvern. –
2
.
DANSK
Kun for lande i Europa
Lyd og vibration fra model 9901
De typiske A-vægtede lydniveauer er
lydtryksniveau: 89 dB (A)
lydeffektniveau: 100 dB (A)
Der er en usikkerhed på 3 dB (A).
Den vægtede effektive accelerationsværdi overstiger ikke
2
.
2,5 m/s
– Bær høreværn. –
Disse værdier er beregnet i overensstemmelse med
EN60745.
SVENSKA
Endast för Europa
Buller och vibration hos modell 9901
De typiska A-vägda bullernivåerna är
Det typiskt vägda effektivvärdet för acceleration öve rsti-
ger inte 2,5 m/s
Dessa värden har erhållits i enlighet med EN60745.
ljudtrycksnivå: 89 dB (A)
ljudeffektnivå: 100 dB (A)
Osäkerheten är 3 dB (A).
– Använd hörselskydd –
2
.
SUOMI
Vain Euroopan maat
Mallin 9901 melutaso ja tärinä
Tyypilliset A-painotetut melutasot ovat
äänenpainetaso: 89 dB (A)
äänen tehotaso: 100 dB (A)
Epävarmuus on 3 dB (A).
Tyypillinen kiihtyvyyden painotettu tehollisarvo ei ylitä
2,5 m/s
Nämä arvot on mitattu normin EN60745 mukaisesti.
– Käytä kuulosuojaimia. –
2
.
ΕΛΛΗΝΙΚΑ
Μνο για χώρες της Ευρώπης
Θρυβος και κραδασµς του µοντέλου 9901
Οι τυπικές A-µετρούµενες εντάσεις ήχου είναι
Η τυπική αξία της µετρούµενης ρίζας του µέσου
τετραγώνου της επιτάχυνσης δεν ξεπερνά τα
2,5 m/s
Αυτές οι τιµές έχουν σηµειωθεί σύµφωνα µε το
EN60745.
πίεση ήχου: 89 dB (A)
δύναµη του ήχου: 100dB (A)
Η Αβεβαιτητα είναι 3 dB (A).
– Φοράτε ωτοασπίδες. –
2
.
32
Page 13

ENGLISH
For European countries only
Noise and Vibration of Model 9924DB
The typical A-weighted noise levels are
The typical weighted root mean square acceleration
value is not more than 2.5 m/s
These values have been obtained according to
EN60745.
sound pressure level: 93 dB (A)
sound power level: 104 dB (A)
Uncertainty is 3 dB (A).
– Wear ear protection. –
2
.
ENG005-2-V3
ITALIANO
Modello per l’Europa soltanto
Rumore e vibrazione del modello 9924DB
I livelli del rumore pesati secondo la curva A sono:
Il valore quadratico medio di accellerazione non supera i
2,5 m/s
Questi valori sono stati ottenuti in conformità EN60745.
Livello pressione sonora: 93dB (A)
Livello potenza sonora: 104dB (A)
L’incertezza è di 3 dB (A).
– Indossare i paraorecchi. –
2
.
FRANÇAISE
Pour les pays d’Europe uniquement
Bruit et vibrations du modèle 9924DB
Les niveaux de bruit ponderes types A sont:
niveau de pression sonore: 93dB (A)
niveau de puissance du son: 104 dB (A)
L’incer titude de mesure est de 3 dB (A).
L’accélération pondérée ne dépasse pas 2,5 m/s
– Porter des protecteurs anti-bruit. –
Ces valeurs ont été obtenues selon EN60745.
2
.
DEUTSCH
Nur für europäische Länder
Geräusch- und Vibrationsentwicklung
Die typischen A-bewerteten Geräuschpegel betragen:
Der gewichtete Effektivwer t der Beschleunigung beträgt
nicht mehr als 2,5 m/s
Diese Werte wurden gemäß EN60745 erhalten.
des Modells 9924DB
Schalldruckpegel: 93 dB (A)
Schalleistungspegel: 104 dB (A)
Die Abweichung beträgt 3 dB (A).
– Gehörschutz tragen. –
2
.
NEDERLANDS
Alleen voor Europese landen
Geluidsniveau en trilling van het model 9924DB
De typische A-gewogen geluidsniveau’s zijn
geluidsdrukniveau: 93 dB (A)
geluidsenergie-niveau: 104 dB (A)
Onzekerheid is 3 dB (A).
De typische gewogen effectieve versnellingswaarde is
niet meer dan 2,5 m/s
– Draag oorbeschermers. –
2
.
Deze waarden werden verkregen in overeenstemming
met EN60745.
ESPAÑOL
Para países europeos solamente
Ruido y vibración del modelo 9924DB
Los niveles típicos de ruido ponderados A son
El valor ponderado de la aceleración no sobrepasa los
2,5 m/s
Estos valores han sido obtenidos de acuerdo con
EN60745.
presión sonora: 93 dB (A)
nivel de potencia sonora: 104 dB (A)
Incerteza 3 dB (A).
– Póngase protectores en los oídos. –
2
.
33
Page 14

PORTUGUÊS
Só para países Europeus
Ruído e vibração do modelo 9924DB
Os níveis normais de ruído A são
O valor médio da aceleração é inferior a 2,5 m/s
Estes valores foram obtidos de acordo com EN60745.
nível de pressão de som: 93 dB (A)
nível do sum: 104 dB (A)
A incerteza é de 3 dB (A).
– Utilize protectores para os ouvidos –
2
.
ENG005-2-V3
NORSK
Gjelder bare land i Europa
Støy og vibrasjon fra modell 9924DB
De vanlige A-belastede støynivå er
Den vanlig belastede effektiv-verdi for akselerasjon overskrider ikke 2,5 m/s
Disse verdiene er beregnet eller målt i samsvar med
EN60745.
lydtrykksnivå: 93 dB (A)
lydstyrkenivå: 104dB (A)
Usikkerheten er på 3 dB (A).
– Benytt hørselvern. –
2
.
DANSK
Kun for lande i Europa
Lyd og vibration fra model 9924DB
De typiske A-vægtede lydniveauer er
lydtryksniveau: 93 dB (A)
lydeffektniveau: 104 dB (A)
Der er en usikkerhed på 3 dB (A).
Den vægtede effektive accelerationsværdi overstiger ikke
2
.
2,5 m/s
– Bær høreværn. –
Disse værdier er beregnet i overensstemmelse med
EN60745.
SVENSKA
Endast för Europa
Buller och vibration hos modell 9924DB
De typiska A-vägda bullernivåerna är
Det typiskt vägda effektivvärdet för acceleration öve rsti-
ger inte 2,5 m/s
Dessa värden har erhållits i enlighet med EN60745.
ljudtrycksnivå: 93 dB (A)
ljudeffektnivå: 104 dB (A)
Osäkerheten är 3 dB (A).
– Använd hörselskydd –
2
.
SUOMI
Vain Euroopan maat
Mallin 9924DB melutaso ja tärinä
Tyypilliset A-painotetut melutasot ovat
äänenpainetaso: 93 dB (A)
äänen tehotaso: 104 dB (A)
Epävarmuus on 3 dB (A).
Tyypillinen kiihtyvyyden painotettu tehollisarvo ei ylitä
2,5 m/s
Nämä arvot on mitattu normin EN60745 mukaisesti.
– Käytä kuulosuojaimia. –
2
.
ΕΛΛΗΝΙΚΑ
Μνο για χώρες της Ευρώπης
Θρυβος και κραδασµς του µοντέλου 9924DB
Οι τυπικές A-µετρούµενες εντάσεις ήχου είναι
Η τυπική αξία της µετρούµενης ρίζας του µέσου
τετραγώνου της επιτάχυνσης δεν ξεπερνά τα
2,5 m/s
Αυτές οι τιµές έχουν σηµειωθεί σύµφωνα µε το
EN60745.
πίεση ήχου: 93 dB (A)
δύναµη του ήχου: 104dB (A)
Η Αβεβαιτητα είναι 3 dB (A).
– Φοράτε ωτοασπίδες. –
2
.
34
Page 15

35
Page 16

Makita Corporation
Anjo, Aichi, Japan
883836I997
 Loading...