

Page 1
GB
Cordless Angle Impact Driver Instruction Manual
F
Visseuse d’angle à chocs à batterie Manuel d’instructions
D
Akku-Winkel-Schlagschrauber Betriebsanleitung
I
Avvitatore angolare ad impulso a batteria Istruzioni per l’uso
NL
Accu haakse slagschroevedraaier Gebruiksaanwijzing
E
Llave angular de impacto a batería Manual de instrucciones
P
Berbequim angular de impacto a bateria Manual de instruções
DK
Akku-vinkelslagskruetrækker Brugsanvisning
S
Sladdlös vinklad slagskruvdragare Bruksanvisning
N
Batteridrevet vinkel slagskrujern Bruksanvisning
SF
Akkukäyttöinen kulmaiskuväännin Käyttöohje
GR Ασύρµατος γωνιακς οδηγς ώθησης Οδηγίες χρήσεως
6940D
6941D
Page 2
1
3
2
4
12
5
8
6
7
34
9
14
11
12
10
A
B
13
56
15
7
2
Page 3

ENGLISH
Explanation of general view
1 Battery cartridge
2 Set plate
3 Insert bit
4Spindle
5Hex bolt
6 Angle head
SPECIFICATIONS
Model 6940D 6941D
Capacities
Bolt ...........................................................................................M4 – M10 M4 – M10
Machine screw ..........................................................................M4 –M8 M4 –M8
No load speed (min
Impacts per minute ......................................................................0 –2,700 0– 2,700
Fastening torque ..........................................................................29 N.m 39 N.m
Overall length ..............................................................................370 mm 360 mm
Net weight ....................................................................................1.5 kg 1.4 kg
Rated voltage ..............................................................................D.C.9.6 V D.C.9.6 V
-1
) ..................................................................0 –2,000 0 – 2,000
7 Groove
8Tooth
9 Reversing switch
10 Switch lever
11 Position R
(Counterclockwise rotation)
(with Angle head) (with Straight head)
12 Position F
(Clockwise rotation)
13 Release button
14 Straight head
15 Ratchet head
• Due to our continuing program of research and development, the specifications herein are subject to change
without notice.
• Note: Specifications may differ from country to country.
Intended Use
The tool is intended for drilling and screw driving in wood,
metal and plastic.
Safety hints
For your own safety, please refer to the enclosed safety
instructions.
IMPORTANT SAFETY INSTRUCTIONS FOR
CHARGER & BATTERY CARTRIDGE
1. Before using battery cartridge, read all instruc-
tions and cautionary markings on (1) battery
charger, (2) battery, and (3) product using battery.
2. Do not disassemble battery cartridge.
3. If operating time has become excessively
shorter, stop operating immediately. It may
result in a risk of overheating, possible burns
and even an explosion.
4. If electrolyte gets into your eyes, rinse them out
with clear water and seek medical attention right
away. It may result in loss of your eyesight.
5. Always cover the battery terminals with the bat-
tery cover when the battery cartridge is not
used.
6. Do not short the battery cartridge:
(1) Do not touch the terminals with any conduc-
tive material.
(2) Avoid storing battery cartridge in a container
with other metal objects such as nails, coins,
etc.
(3) Do not expose battery cartridge to water or
rain.
A battery short can cause a large current flow,
overheating, possible burns and even a breakdown.
ENC004-1
7. Do not store the tool and battery cartridge in
locations where the temperature may reach or
exceed 50°C (122°F).
8. Do not incinerate the battery cartridge even if it
is severely damaged or is completely worn out.
The battery cartridge can explode in a fire.
9. Be careful not to drop or strike battery.
SAVE THESE INSTRUCTIONS.
Tips for maintaining maximum battery life
1. Charge the battery cartridge before completely
discharged.
Always stop tool operation and charge the battery cartridge when you notice less tool power.
2. Never recharge a fully charged battery cartridge.
Overcharging shortens the battery service life.
3. Charge the battery cartridge with room temperature at 10°C – 40°C (50°F – 104°F). Let a hot battery cartridge cool down before charging it.
4. Charge the Nickel Metal Hydride battery cartridge when you do not use it for more than six
months.
ADDITIONAL SAFETY RULES FOR TOOL
1. Be aware that this tool is always in an operating
condition, because it does not have to be
plugged into an electrical outlet.
2. Wear ear protectors.
3. Check the socket carefully for wear, cracks or
damage before installation.
4. Hold the tool firmly.
5. Always be sure you have a firm footing. Be sure
no one is below when using the tool in high locations.
6. The proper fastening torque may differ depending upon the kind or size of the bolt. Check the
torque with a torque wrench.
3
Page 4

7. When driving into walls, floors or wherever
“live” electrical wires may be encountered, DO
NOT TOUCH ANY METAL PARTS OF THE TOOL!
Hold the tool only by the insulated grasping surfaces to prevent electric shock if you drive into a
“live” wire.
SAVE THESE INSTRUCTIONS.
OPERATING INSTRUCTIONS
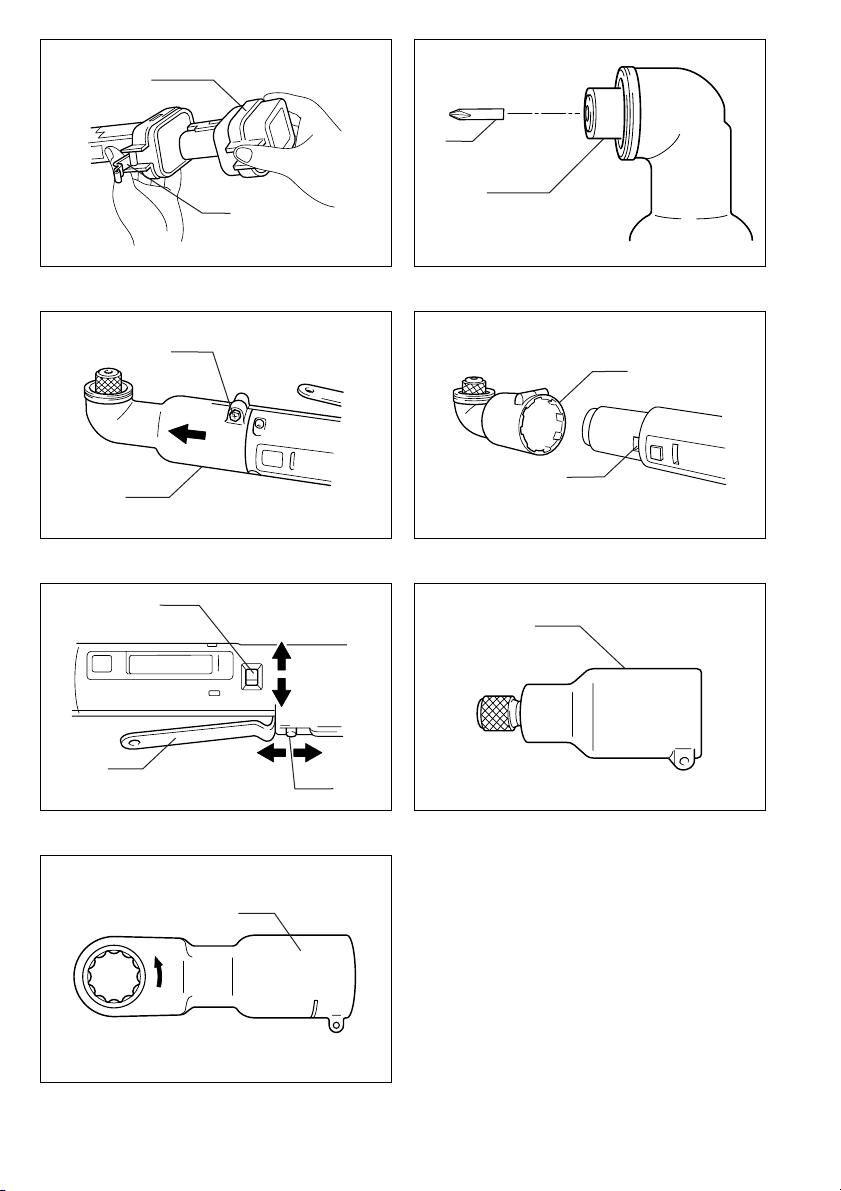
Installing or removing battery cartridge (Fig. 1)
• Always switch off the tool before insertion or removal of
the battery cartridge.
• To remove the battery cartridge, pull out the set plate
on the tool and grasp both sides of the cartridge while
withdrawing it from the tool.
• To insert the battery cartridge, align the tongue on the
battery cartridge with the groove in the housing and slip
it into place. Snap the set plate back into place. Be sure
to close the set plate fully before using the tool.
• Do not use force when inserting the battery cartridge. If
the cartridge does not slide in easily, it is not being
inserted correctly.
Installing or removing the bit (Fig. 2)
Important:
Always be sure that the tool is switched off and the battery cartridge is removed before installing or removing
the bit.
For tool without sleeve to retain the bit
Use insert bits shown in figure. To install the bit, just
insert it into the spindle.
Adjusting the angle head (Fig. 3& 4)
Important:
Always be sure that the tool is switched off and the battery cartridge is removed before adjusting the angle
head.
The angle head can be adjusted 360° (8 positions in 45degree increments). To adjust it, loosen the hex bolt and
remove the angle head. Adjust the angle head to the
desired position and reinstall it so that the teeth on the
housing will match up with the grooves in the angle head.
Then tighten the hex bolt to secure the angle head.
Switch action (Fig.5)
CAUTION:
Before inserting the battery cartridge into the tool, always
check to see that the switch lever actuates properly and
returns to the “OFF” position when released.
To start the tool, move the release button forward (A
direction) and squeeze the switch lever. Tool speed is
increased by increasing pressure on the switch lever. To
stop the tool, release the switch lever.
CAUTION:
After switching off, always move the release button backward (B direction) to prevent the tool from being accidentally switched on.
Reversing switch (Fig.5)
CAUTION:
• Always check the direction of rotation before operation.
• Use the reversing switch only after the tool comes to a
complete stop. Changing the direction of rotation
before the tool stops may damage the tool.
This tool has a reversing switch to change the direction of
rotation. Slide the reversing switch down (Position F) for
clockwise rotation or slide it up (Position R) for counterclockwise rotation.
Operation
The proper fastening torque may differ depending upon
the kind or size of screws, the type of materials to be fastened, etc. Before starting your job, always perform a test
operation to verify adequate fastening torque.
Straight head and ratchet head (Fig. 6& 7)
Straight heads and ratchet heads are available as
optional accessories for various applications on the job.
MAINTENANCE
CAUTION:
Always be sure that the tool is switched off and the battery cartridge is removed before carrying out any work on
the tool.
To maintain product safety and reliability, repairs, maintenance or adjustment should be carried out by a Makita
Authorized Service Center.
ACCESSORIES
CAUTION:
These accessories or attachments are recommended for
use with your Makita tool specified in this manual. The
use of any other accessories or attachments might
present a risk of injury to persons. Only use accessory or
attachment for its stated purpose.
If you need any assistance for more details regarding
these accessories, ask your local Makita service center.
• Straight head
• Ratchet head
• Battery cover
• Various type of Makita genuine batteries and chargers
• Plastic carrying case
4
Page 5

NEDERLANDS
Verklaring van algemene gegevens
1 Accu
2 Sluitplaat
3 Insteekbit
4 Spil
5 Zeskante bout
TECHNISCHE GEGEVENS
Model 6940D 6941D
Capaciteit
Bout ..........................................................................................M4 – M10 M4 – M10
Kolomschroef ............................................................................ M4 –M8 M4 –M8
Toerental onbelast (min
Aantal slagen per minuut .............................................................0 – 2 700 0 – 2 700
Aantrekkoppel ............................................................................. 29 N.m 39 N.m
Totale lengte ................................................................................370 mm 360 mm
Netto gewicht ............................................................................... 1,5kg 1,4kg
Nominale spanning ..................................................................... DC9,6 V DC 9,6 V
–1
) ........................................................... 0–2000 0–2000
6 Ronde kop
7Groeven
8 Tanden
9 Omkeerschakelaar
10 Schakelhendel
(met ronde kop) (met rechte kop)
11 Positie R (Linkse draairichting)
12 Positie F (Rechtse draairichting)
13 Ontgrendelknop
14 Rechte kop
15 Ratelkop
• In verband met ononderbroken research en ontwikke-
ling behouden wij ons het recht voor bovenstaande
technische gegevens te wijzigen zonder voorafgaande
kennisgeving.
• Opmerking: De technische gegevens kunnen van land
tot land verschillen.
Doeleinden van gebruik
Dit gereedschap is bedoeld voor het indraaien van
schroeven in hout, metaal en kunststof.
Veiligheidswenken
Voor uw veiligheid dient u de bijgevoegde Veiligheidsvoorschriften nauwkeurig op te volgen.
BELANGRIJKE
VEILIGHEIDSVOORSCHRIFTEN
VOOR ACCULADER EN ACCU
1. Lees alle voorschriften en waarschuwingen op
(1) de acculader, (2) de accu, en (3) het product
waarvoor de accu wordt gebruikt, aandachtig
door alvorens de acculader in gebruik te nemen.
2. Neem de accu niet uit elkaar.
3. Als de gebruikstijd van een opgeladen accu aan-
zienlijk korter is geworden, moet u het gebruik
ervan onmiddellijk stopzetten. Voortgezet
gebruik kan oververhitting, brandwonden en
zelfs een ontploffing veroorzaken.
4. Als er elektrolyt in uw ogen is terechtgekomen,
spoel dan uw ogen met schoon water en roep
onmiddellijk de hulp van een dokter in. Elektrolyt
in de ogen kan blindheid veroorzaken.
5. Bedek de accuklemmen altijd met de accukap
wanneer u de accu niet gebruikt.
6. Voorkom kortsluiting van de accu:
(1) Raak de accuklemmen nooit aan met een
geleidend materiaal.
(2) Bewaar de accu niet in een bak waarin
andere metalen voorwerpen zoals spijkers,
munten e.d. worden bewaard.
(3) Stel de accu niet bloot aan water of regen.
Kortsluiting van de accu kan oorzaak zijn van
een grote stroomafgifte, oververhitting, brandwonden, en zelfs defecten.
7. Bewaar het gereedschap en de accu niet op
plaatsen waar de temperatuur kan oplopen tot
50°C of hoger.
8. Werp de accu nooit in het vuur, ook niet wanneer
hij zwaar beschadigd of volledig versleten is. De
accu kan namelijk ontploffen in het vuur.
9. Wees voorzichtig dat u de accu niet laat vallen
en hem niet blootstelt aan schokken of stoten.
BEWAAR DEZE VOORSCHRIFTEN.
Tips voor een maximale levensduur van de accu
1. Laad de accu op voordat hij volledig ontladen is.
Stop het gebruik van het gereedschap en laad de
accu op telkens wanneer u vaststelt dat het vermogen van het gereedschap is afgenomen.
2. Laad een volledig opgeladen accu nooit opnieuw
op. Als u de accu te veel oplaadt, zal hij minder
lang meegaan.
3. Laad de accu op bij een kamertemperatuur tussen 10°C en 40°C. Laat een warme accu afkoelen
alvorens hem op te laden.
4. Laad de nikkel-metaalhydride accu op telkens
wanneer u hem langer dan zes maanden niet
hebt gebruikt.
BIJGEVOEGDE
VEILIGHEIDSVOORSCHRIFTEN
VOOR DE MACHINE
1. Denk eraan dat dit gereedschap altijd gebruiksklaar is, aangezien het niet op een stopcontact
hoeft te worden aangesloten.
2. Draag oorbeschermers.
3. Controleer de sok nauwkeurig op slijtage,
scheuren of beschadiging alvorens deze op het
gereedschap te monteren.
4. Houd het gereedschap stevig vast.
12
Page 6

5. Zorg ervoor dat u altijd stevige steun voor de
voeten hebt. Controleer of er niemand beneden u
aanwezig is wanneer u het gereedschap op een
hoge plaats gaat gebruiken.
6. Het juiste aantrekkoppel kan verschillen afhankelijk van de soort of grootte van de bout. Controleer het aantrekkoppel met een
momentsleutel.
7. Bij inschroeven in muren, vloeren of andere dergelijke plaatsen, bestaat het gevaar dat u onder
spanning staande elektrische kabels tegenkomt. RAAK DERHALVE DE METALEN DELEN
VAN HET GEREEDSCHAP NIET AAN! Houd het
gereedschap uitsluitend vast bij de geïsoleerde
handgreep, om een elektrische schok te voorkomen wanneer het gereedschap per ongeluk in
aanraking komt met een onder spanning staande
kabel.
BEWAAR DEZE VOORSCHRIFTEN.
BEDIENINGSVOORSCHRIFTEN
Plaatsen en uithalen van batterij (Fig.1)
• Schakel het gereedschap altijd uit voordat de accu
geplaatst of verwijderd wordt.
• Om de accu te verwijderen, trek eerst de sluitplaat uit
het gereedschap, pak dan de accu aan beide zijden
vast en verwijder het uit het gereedschap.
• Voor het plaatsen van de accu zorgt u ervoor dat de rug
op de accu in de groef van het accucompartiment
komt, waarna u de accu naar binnen schuift. Klap alvorens het gereedschap te gebruiken de stelplaat oftewel
deksel weer dicht, kontroleer of de stelplaat goed vast
geklemd zit en niet gemakkelijk opengaat.
• Als de accu moeilijk in de houder komt, probeer het
dan niet met geweld erin te duwen. Indien de accu er
niet gemakkelijk ingaat, dan houdt u het verkeerd om.
Installeren of verwijderen van de schroefbit
(Fig. 2)
Belangrijk:
Zorg altijd ervoor dat het gereedschap is uitgeschakeld
en de accu ervan is verwijderd alvorens u de schroefbit
installeert of verwijdert.
Voor gereedschap zonder bitklembus
Gebruik insteekbits zoals afgebeeld. Om de bit te installeren schuift u deze gewoon in de spil.
Afstellen van de ronde kop (Fig. 3 en 4)
Belangrijk:
Controleer altijd of het gereedschap is uitgeschakeld en
de accu ervan is verwijderd alvorens de ronde kop af te
stellen.
De ronde kop is 360° afstelbaar (8 standen in stappen
van 45 graden). Om de ronde kop af te stellen, draait u
de zeskante bout los en verwijdert u de ronde kop. Monteer de ronde kop in de gewenste stand zodat de tanden
op het gereedschapshuis in de groeven van de ronde
kop passen. Draai daarna de zeskante bout vast om de
ronde kop vast te zetten.
Werking van de schakelhendel (Fig. 5)
LET OP:
Alvorens de accu in het gereedschap te plaatsen, moet u
altijd controleren of de schakelhendel naar behoren
werkt en na loslaten naar de “OFF” positie terugkeert.
Om het gereedschap te starten, duwt u de ontgrendelknop naar voren (richting A) en drukt u de schakelhendel
in. Het toerental vermeerdert naarmate de schakelhendel harder wordt ingedrukt. Laat de schakelhendel los
om het gereedschap te stoppen.
LET OP:
Na het uitschakelen van het gereedschap, moet u altijd
de ontgrendelknop naar achteren (richting B) schuiven
om te voorkomen dat het gereedschap per toeval wordt
ingeschakeld.
Omkeerschakelaar (Fig. 5)
LET OP:
• Controleer de draairichting alvorens het gereedschap
te gebruiken.
• Verander de instelling van de omkeerschakelaar alleen
nadat het gereedschap volledig tot stilstand is gekomen. Indien u de draairichting verandert voordat het
gereedschap tot stilstand is gekomen, kan het gereedschap beschadigd raken.
Dit gereedschap is voorzien van een omkeerschakelaar
voor het veranderen van de draairichting. Schuif de
omkeerschakelaar naar beneden (Positie F) voor rechtse
draairichting, en naar boven (Positie R) voor linkse draairichting.
Bediening
Het juiste aandraaimoment hangt af van het soort of de
afmeting van de schroeven, het soort materiaal waarin u
de schroeven wilt vastdraaien, enz. Daarom dient u, alvorens het eigenlijke werk te doen, altijd een proef te
nemen om het juiste aandraaimoment te controleren.
Rechte kop en ratelkop (Fig. 6 en 7)
Rechte koppen en ratelkoppen voor diverse toepassingen zijn afzonderlijk verkrijgbaar.
ONDERHOUD
LET OP:
Controleer altijd of het gereedschap is uitgeschakeld en
de accu is losgekoppeld vooraleer onderhoud uit te voeren aan de machine.
Opdat het gereedschap veilig en betrouwbaar blijft, dienen alle reparaties, onderhoud of afstellingen te worden
uitgevoerd bij een erkend Makita service centrum.
13
Page 7

ACCESSOIRES
LET OP:
Deze accessoires of hulpstukken worden aanbevolen
voor gebruik met het Makita gereedschap dat in deze
gebruiksaanwijzing wordt beschreven. Het gebruik van
andere accessoires of hulpstukken kan gevaar voor persoonlijke verwonding opleveren. Gebruik de accessoires
of hulpstukken uitsluitend voor het gespecificeerde doel.
Wenst u meer informatie over deze accessoires, neem
dan contact op met het dichtstbijzijnde Makita servicecentrum.
• Rechte kop
•Ratelkop
• Batterijkapje
• Diverse types originele Makita accu’s en acculaders
• Kunststof koffer
14
 Loading...