

Page 1
Cordless Screwdriver
Cordless Screwdriver
Cordless ScrewdriverCordless Screwdriver
Tournevis sans fil
Tournevis sans fil
Tournevis sans filTournevis sans fil
Akku-Schrauber
Akku-Schrauber
Akku-SchrauberAkku-Schrauber
Avvitatore a batteria
Avvitatore a batteria
Avvitatore a batteriaAvvitatore a batteria
Accuschroevendraaier
Accuschroevendraaier
AccuschroevendraaierAccuschroevendraaier
Atornillador a batería
Atornillador a batería
Atornillador a bateríaAtornillador a batería
MODEL 6722DW
INSTRUCTION MANUAL
WARNING:
For your personal safety. READ and UNDERSTAND before using.
SAVE THESE INSTRUCTIONS FOR FUTURE REFERENCE.
MODE D’EMPLOI
AVERTISSEMENT :
Pour votre propre sécurité, vous devez LIRE et COMPRENDRE ce mode d’emploi avant d’utiliser
l’outil.
CONSERVEZ CE MODE D’EMPLOI POUR RÉFÉRENCE ULTÉRIEURE.
BEDIENUNGSANLEITUNG
WARNUNG:
Bitte LESEN und VERSTEHEN Sie diese Anleitung vor Gebrauch zu Ihrer persönlichen
Sicherheit.
BEWAHREN SIE DIESE ANLEITUNG FÜR SPÄTERE BEZUGNAHME AUF.
MANUALE DI ISTRUZIONI
AVVERTIMENTO:
Per motivi di sicurezza, LEGGERE e CAPIRE prima dell’utilizzo.
CONSERVARE QUESTE ISTRUZIONI PER RIFERIMENTI FUTURI.
GEBRUIKSAANWIJZING
WARNUNG:
Bitte LESEN und VERSTEHEN Sie diese Anleitung vor Gebrauch zu Ihrer persönlichen
Sicherheit.
BEWAHREN SIE DIESE ANLEITUNG FÜR SPÄTERE BEZUGNAHME AUF.
MANUAL DE INSTRUCCIONES
ADVERTENCIA:
Para su seguridad personal, LEA DETENIDAMENTE este manual antes de usar la herramienta.
GUARDE ESTAS INSTRUCCIONES PARA FUTURA REFERENCIA.
Page 2

ENGLISH
WARNING: Please read all of these safety and operating instructions
carefully before using this cordless screwdriver. Please pay particular
attention to all of the sections of this instruction manual that carry
warning symbols and notices.
Contents page
PRODUCT SPECIFICATION 3
FEATURES 3
PACK CONTENTS 3
SAFETY INSTRUCTIONS 4
ELECTRICAL SAFETY 6
PARTS IDENTIFICATION 6
OPERATING INSTRUCTIONS 7 – 10
• Charging the battery
• Inserting screwdriver bits
• Operating the On/Off switch
• Using the LED light
• Using the folding handle
• Using the screwdriver
CLEANING AND MAINTENANCE 10
ENVIRONMENTAL PROTECTION 11
EC DECLARATION OF CONFORMITY 12
Specifications subject to change without notice.
2
Page 3

PRODUCT SPECIFICATION
Model number 6722DW
Screwdriver voltage 4.8 volts
Charging adaptor 230 V AC – 50 Hz
Charging time 3 – 5 hours
Battery type Ni-cd battery cartridge
Number of cells 4
Capacity 600 mAh
FEATURES
Foldable handle Forward / reverse action
Auto spindle lock Carrying strap
LED illumination light Accessory pack
Rubberized hand grip
PACK CONTENTS
6722DW Cordless screwdriver
3 hour charging adaptor
Carrying/storage case
80 piece accessory pack containing:
1 x magnetic bit holder
9 x nut drivers 5, 6, 7, 8, 9, 10, 11, 12, 13 mm
6 x 50 mm bits 3 Slotted – 4, 5, 6 mm
3 Crosspoint – numbers 1, 2, 3
64 x 25 mm bits
12 Slotted 3, 4, 5, 5.5, 6, 7 mm (2 pcs each)
8 Crosspoint numbers 0, 1, 2, 3 (2 pcs each)
16 Pozidriv numbers 0, 1, 2, 3 (4 pcs each)
10 Hexagonal 2, 2.5, 3, 3, 4, 4, 5, 5, 6, 7 mm (1 pc each)
7 Hexagonal 5/64", 3/32", 1/8", 5/32", 3/16", 1/4", 9/32" (1 pc each)
4 Square numbers 0, 1, 2, 3 (1 pc each)
7 Torx T10, 15, 20, 25, 27, 30, 40 (1 pc each)
3
Page 4

SAFETY INSTRUCTIONS
ENA002-2
WARNING:
When using battery operated tools basic safety precautions, including the
following, should be followed to reduce the risk of fire, leaking batteries and
personal injury: Read these instructions before operating this product and save
these instructions.
For safe operation:
1. Keep work area clean.
Cluttered areas and benches invite injuries.
2. Consider the work environment.
Do not expose the tool to rain. Keep work area well lit. Do not use tools in the presence of
flammable liquids or gases.
3. Keep children away.
Do not let visitors touch the tool. Keep visitors away from work area.
4. Store batteries or idle tools.
When not in use, tools and batteries should be stored separately in a dry, high or locked up
place, out of reach of children.
Ensure that battery terminals cannot be shorted by other metal parts such as screws, nails,
etc.
5. Do not force the tool.
It will do the job better and safer at the rate for which it was intended.
6. Use the right tool.
Do not force small tools or attachments to do the job of a heavy duty tool. Do not use tools for
purposes not intended.
7. Dress properly.
Do not wear loose clothing or jewellery, they can be caught in moving parts. Non-skid
footwear is recommended when working outdoors. Wear protecting hair covering to contain
long hair.
8. Use protective equipment.
Use safety glasses and if the cutting operation is dusty, a face or dust mask.
9. Connect dust extraction equipment.
If devices are provided for the connection of dust extraction and collection ensure these are
connected and properly used.
10. Do not abuse the supply cord (if fitted).
Never carry the tool by the cord or yank it to disconnect from the socket. Keep the cord away
from heat, oil and sharp edges.
11. Secure the work.
Use clamps or a vice to hold the work. It is safer than using your hand and it frees both hands
to operate the tool.
12. Do not over-reach.
Keep proper footing and balance at all times.
4
Page 5

13. Maintain tools with care.
Keep cutting tools sharp and clean for better and safer performance. Follow instructions for
lubrication and changing accessories. Inspect tool cords periodically and if damaged have
repaired by an authorized service facility.
14. Disconnect tools.
Where the design permits, disconnect the tool from its battery pack when not in use, before
servicing and when changing accessories such as blades, bits and cutters.
15. Remove adjusting keys and wrenches.
Form the habit of checking to see that keys and adjusting wrenches are removed from the
tool before turning it on.
16. Avoid unintentional starting.
Do not carry the tool with a finger on the switch.
17. Stay alert.
Watch what you are doing. Use common sense. Do not operate the tool when you are tired.
18. Check damaged parts.
Before further use of the tool, a guard or other part that is damaged should be carefully
checked to determine that it will operate properly and perform its intended function. Check for
alignment of moving parts, free running of moving parts, breakage of parts, mounting and any
other condition that may affect its operation. A guard or other part that is damaged should be
properly repaired or replaced by an authorized service facility unless otherwise indicated in
this instruction manual. Have defective switches replaced by an authorized service facility. Do
not use the tool if the switch does not turn it on and off.
19. Warning.
The use of any accessory or attachment, other than recommended in this instruction manual
or the catalog, may present a risk of personal injury.
Ensure that the battery pack is correct for the tool.
Ensure that the outside surface of battery pack or tool is clean and dry before plugging into
charger.
Ensure that batteries are charged using the correct charger recommended by the
manufacturer. Incorrect use may result in a risk of electric shock, overheating or leakage of
corrosive liquid from the battery.
20. Have your tool repaired by a qualified person.
This tool is constructed in accordance with the relevant safety requirements. Repairs should
only be carried out by qualified persons using original spare parts, otherwise this may result
in considerable danger to the user.
21. Disposal of battery.
Ensure battery is disposed of safely as instructed by the manufacturer.
5
Page 6

ADDITIONAL SAFETY RULES FOR TOOL
ENB026-1
1. Be aware that this tool is always in an operating condition, because it does not have to
be plugged into an electrical outlet.
2. Hold tool by insulated gripping surfaces when performing an operation where the
cutting tool may contact hidden wiring. Contact with a “live” wire will also make
exposed metal parts of the tool “live” and shock the operator.
3. Always be sure you have a firm footing. Be sure no one is below when using the tool in
high locations.
4. Hold the tool firmly.
5. Keep hands away from rotating parts.
SAVE THESE INSTRUCTIONS.
ELECTRICAL SAFETY
WARNING: Read these safety instructions carefully before connecting
the charger to the mains supply. Make sure that the voltage of the
electricity supply is the same as that indicated on the rating plate on
the charger.
This charger has been designed to operate on 230 V AC 50 Hz.
Connecting it to any other power source may cause damage to the
tool. Do not allow the cordless screwdriver to be exposed to rain or
moisture.
This symbol indicates that this charger is a Class
does not require an Earth connection.
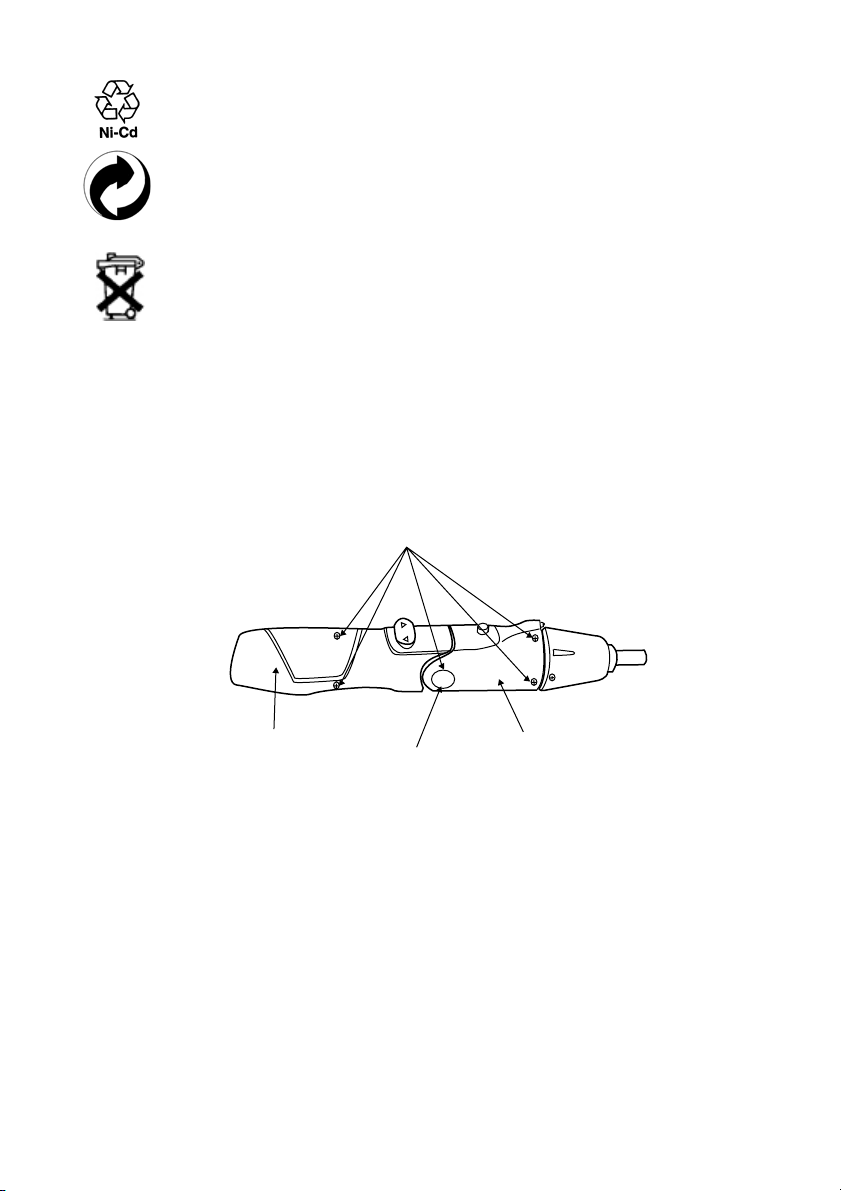
PARTS IDENTIFICATION
1. LED light
2. LED light On/Off switch
3. Forward / reverse selector and On/Off switch
4. Screwdriver bit holder
5. Handle folding bush
6. Carrying strap
7. Charging socket
8. Charging adaptor
9. Charging plug
10. Carrying / storage case
6
II
appliance and
Page 7
OPERATING INSTRUCTIONS
WARNIN G!
Do not overcharge the battery. Recharge only when the tool starts to
run slowly.
1. Charging the battery
1. Before the first use, the battery must be charged for 5 hours.
2. New batteries, or a battery that has been stored uncharged for some time, may not initially
accept a full charge. This is normal. It will charge fully after several charge and discharge
cycles.
3. The battery should always be charged at ambient air temperatures of between 4° and 40°C.
4. Before the first charge, the battery should be fully discharged. Operate the On/Off switch until
the motor stops.
5. Make sure that the On/Off switch is not activated. The battery will not charge if the switch is in
the On position.
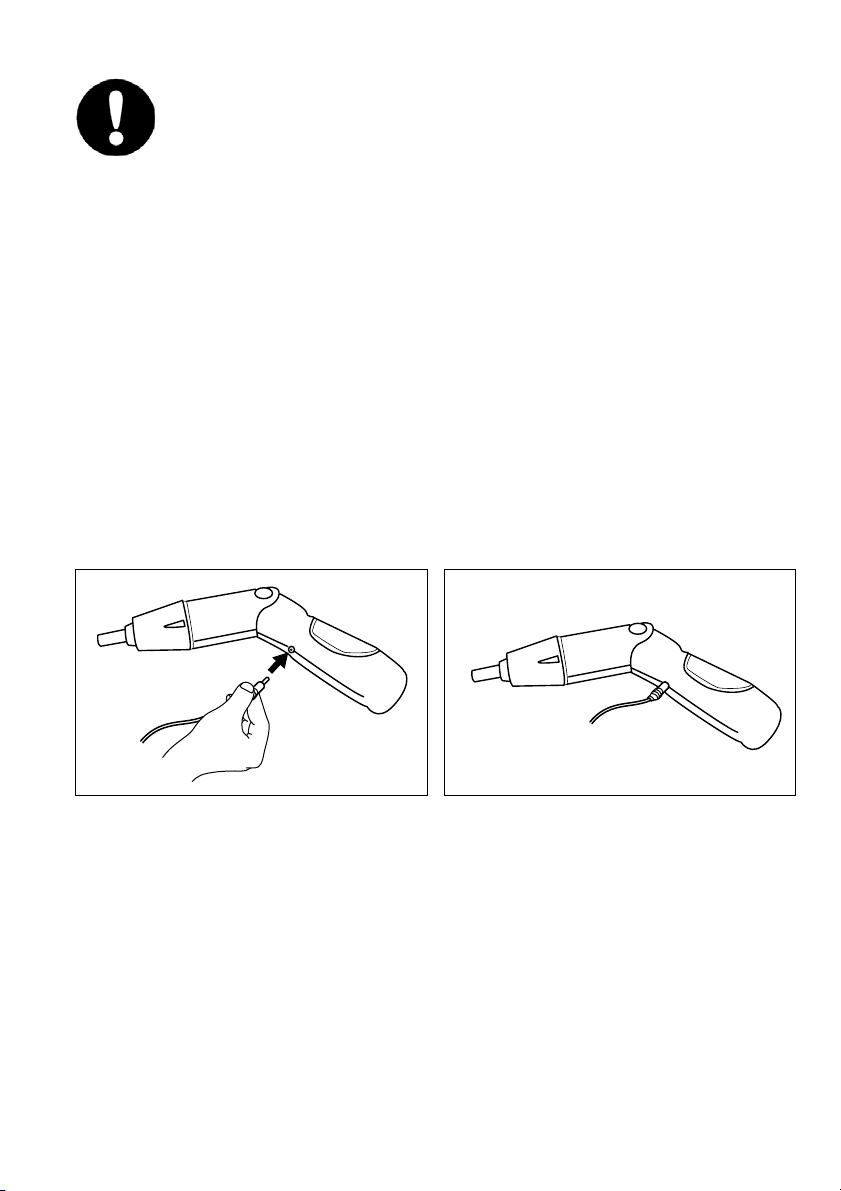
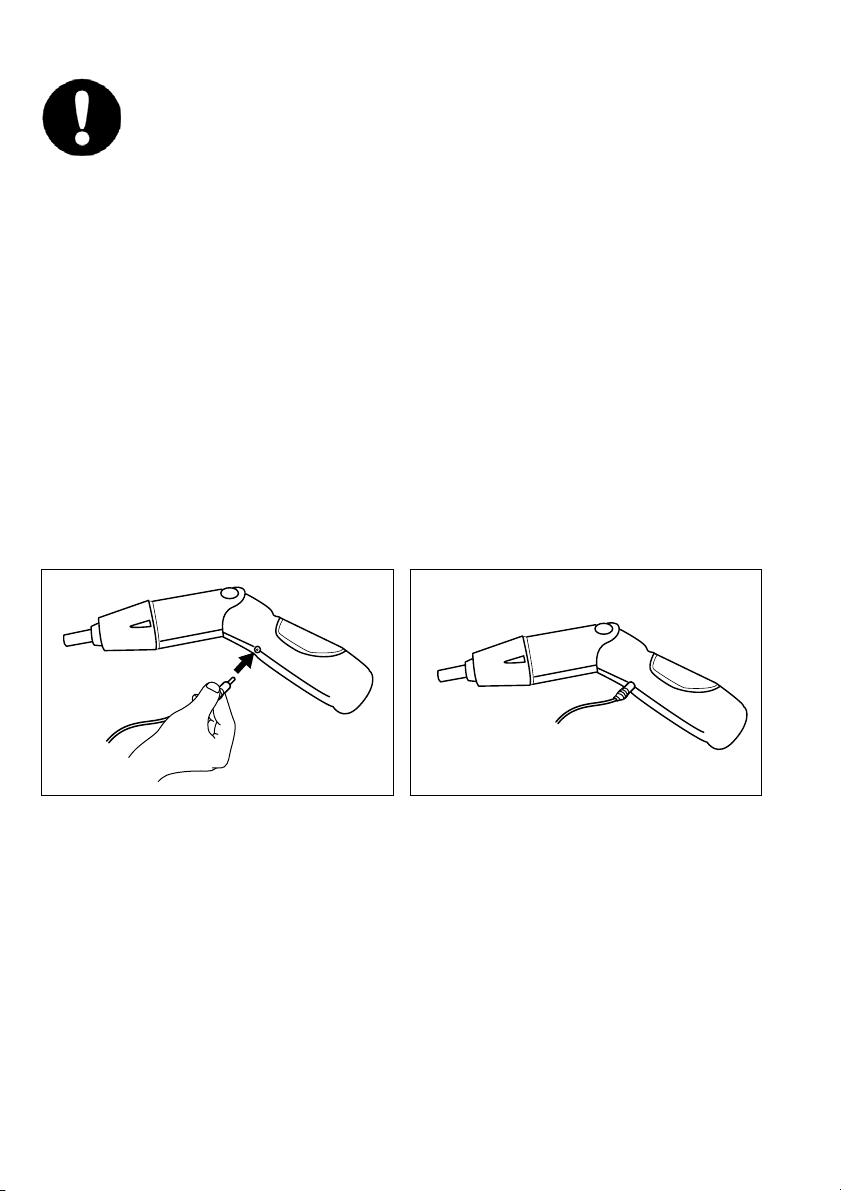
6. Locate the charging adaptor plug in the charging socket on the screwdriver. See figures 1 and
2.
7. Plug the charging adaptor into the mains supply.
8. After the initial 5 hour charge, the screwdriver will be ready for use. Subsequent full charges
will take 3 hours.
9. Switch off and remove the charging adaptor from the mains supply and remove the charging
plug from the screwdriver.
12
Whilst charging, the battery pack and charger may become warm. This is normal and
will continue until the battery is fully charged and the charger has been disconnected
from the mains supply.
7
Page 8
OPERATING INSTRUCTIONS
WARNING!
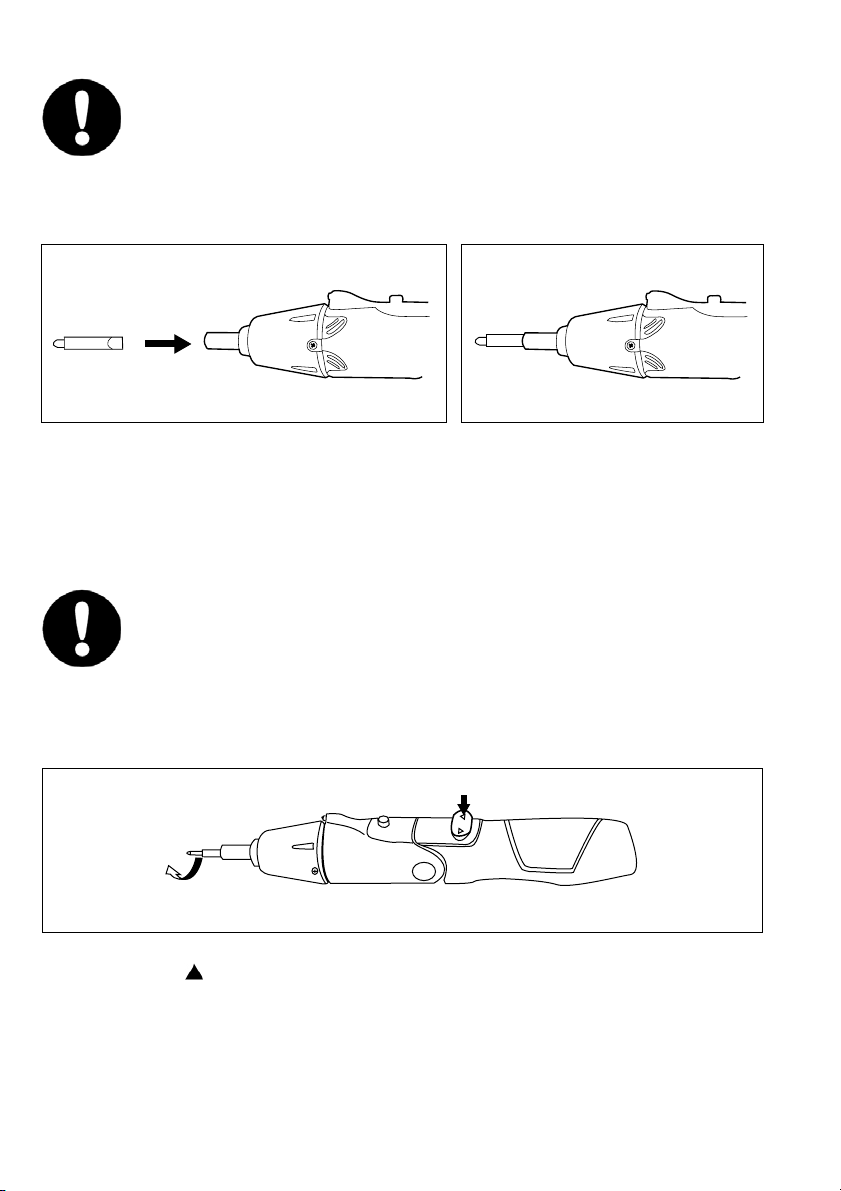
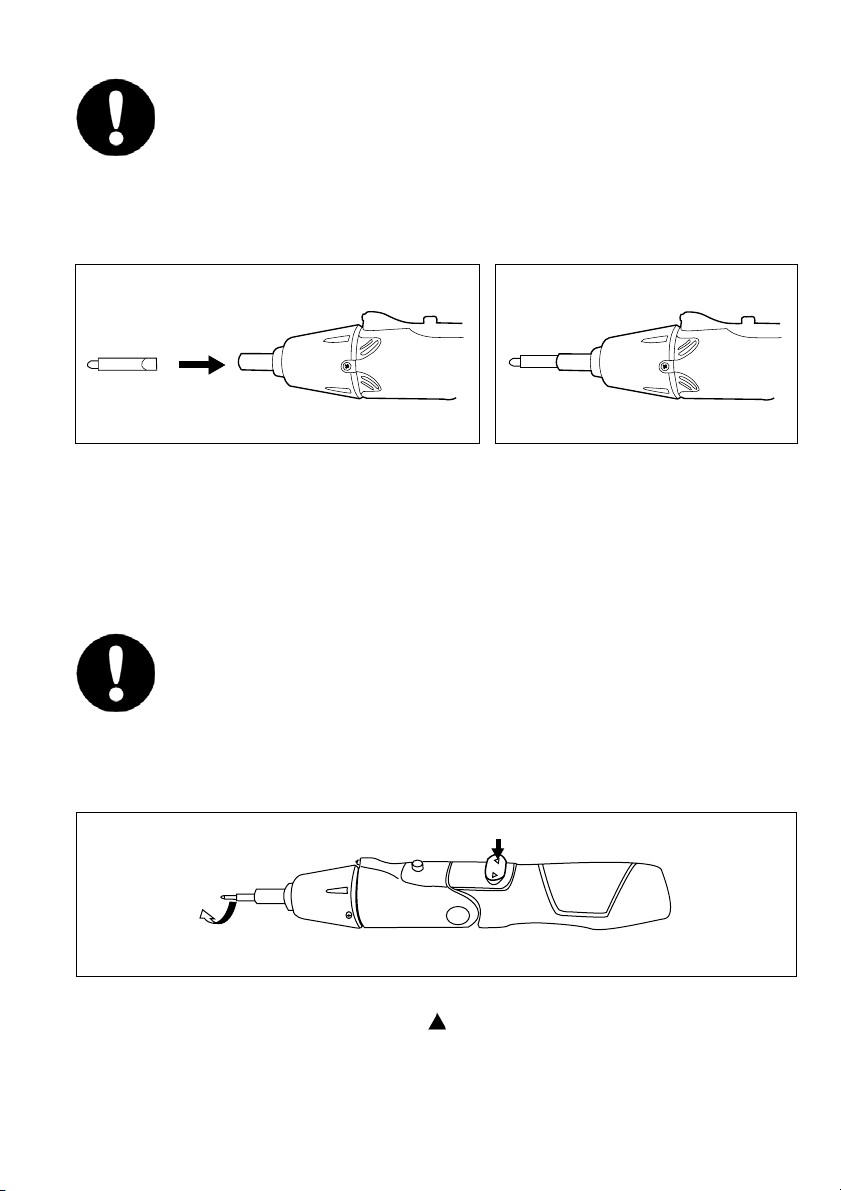
Do not press the On/Off switch when removing, or installing a screwdriver
bit.
2. Inserting screwdriver bits
To insert a screwdriver bit, push it firmly into the screwdriver bit holder. See figures 3 & 4.
34
To remove a screwdriver bit, pull it firmly out of the screwdriver bit holder.
If required the magnetic bit holder supplied with the screwdriver, can be inserted into the
screwdriver bit holder and the screwdriver bit can then be inserted into the magnetic bit holder.
This cordless screwdriver is supplied with an 80 piece accessory pack. See page 3 for details.
NOTE:
Replacement screwdriver bits can be obtained from most tool or DIY stores.
WARNING!
Before operating the On/Off switch, make sure that you have read all of
the safety instructions on pages 4, 5 and 6.
3. Operating the On/Off switch
The On/Off switch is used to start the screwdriver. It also controls the direction in which the bit
holder rotates.
Forward
(Driving)
5
1. To rotate the bit holder in a forward (driving) direction, press the right hand side of the On/Off
switch marked . See figure 5.
8
Page 9
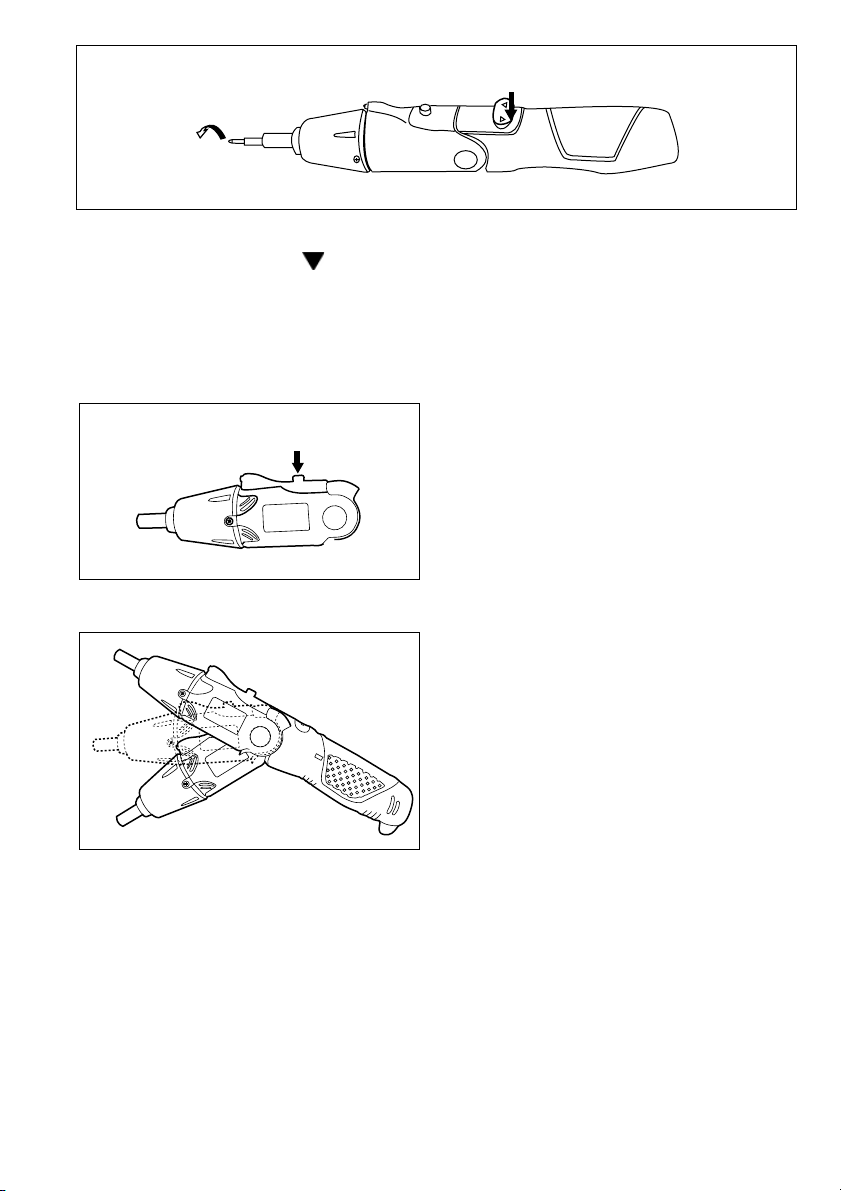
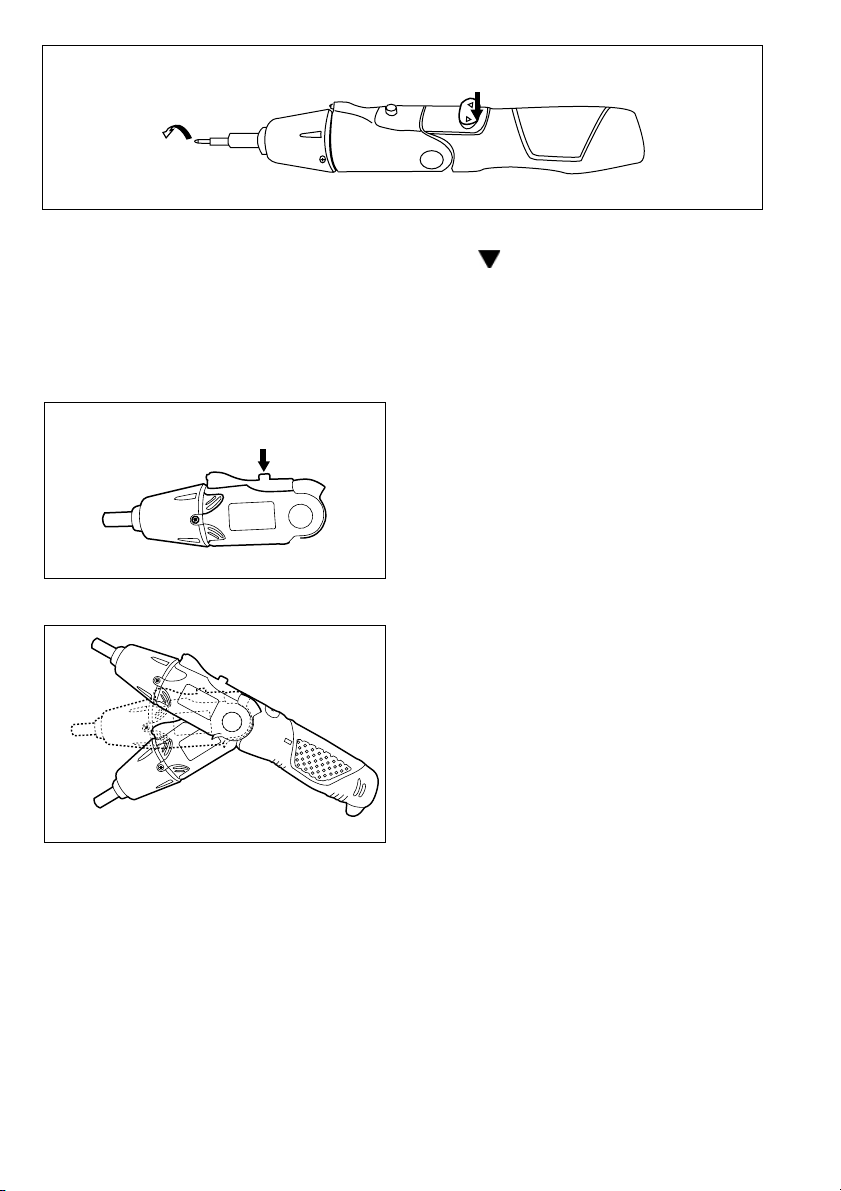
Reverse
(Removing screws)
6
2. To rotate the bit holder in a reverse (removing screws) direction, press the left hand side of
the On/Off switch marked . See figure 6.
3. Release the On/Off switch to stop the screwdriver.
NOTE:
Always use sharp good quality screwdriver bits. The performance and safety of the screwdriver is
dependant on the quality of the bits used.
4. Using the LED light
The screwdriver is equipped with an LED light to
Press
assist when operating the screwdriver in dark
recesses or other poorly lit areas. To switch the
LED light On, press the LED light On/Off switch
as shown in figure 7.
To switch the LED light Off press the LED light
On/Off switch again.
7
5. Using the folding handle
The screwdriver is equipped with a folding
handle for either in-line, or pistol grip use. When
folded into the pistol grip position it gives
assistance when used in areas that may have
restricted access. See figure 8.
To use the folding handle, grip the lower handle
with one hand and move the upper handle to the
desired position with the other hand.
8
9
Page 10

6. Using the screwdriver
When using the screwdriver the following points should be observed.
1. Place the point of the screwdriver bit in the head of the screw and apply light pressure to the
screwdriver.
2. Make sure that the screwdriver bit is inserted straight and upright in the screw head, or the
screw may be damaged.
3. Start the screwdriver by pressing the On/Off switch.
4. When driving wood screws, pre-drill pilot holes to make driving easier and to prevent splitting
the material.
5. The pilot hole has two purposes. It acts as a guide for the screw to follow and it prevents
distortion or splitting of the wood.
6. Pilot holes should be drilled to a depth equal to or greater than the length of the screw to be
used.
7. The table below should be used as a guide for the size of the pilot hole.
Pilot hole diameter
Screw size Soft wood Hard wood
No. 6 (3.5 mm) 2.0 mm 2.5 mm
No. 8 (4.0 mm) 3.2 mm 3.5 mm
No.10 (5.0 mm) 3.5 mm 4.0 mm
8. Select forward rotation to drive screws in and reverse rotation to take them out.
9. Take care not to overtighten small brass screws. The screw head is easily twisted off and the
threads can strip. Hand tightening of these screws is recommended.
10. Use Posidrive screws whenever possible. They are easier to drive, as the screwdriver bit
engages more firmly in the screw head.
11. When inserting a screw into a hole that is already threaded, start the screw by hand. Run the
screw until you feel the threads catch and then use the screwdriver to tighten the screw.
12. When using the nut drivers supplied with this screwdriver, take care not to overtighten the
nuts as they could be damaged.
CLEANING AND MAINTENANCE
WARNING!
Do not press the On/Off switch when performing cleaning and
maintenance procedures.
After use, remove the screwdriver bit and tap the side of the screwdriver bit holder to remove any
dust, or chippings etc.
Clean the body of the screwdriver with a soft cloth. Keep the handle clean and free from oil and
grease.
Keep the charging adaptor clean and free from dust and grease. Worn or damaged parts must be
replaced by qualified personnel. There are no user servicable parts inside the screwdriver. Refer
to qualified service personnel if internal maintenance is required. Always store the screwdriver
and the charging adaptor in the carrying case.
10
Page 11
ENVIRONMENTAL PROTECTION
Always recycle batteries.
Recycle unwanted materials instead of disposing of them as waste. All
tools, accessories and packaging should be sorted, taken to a
recycling centre and disposed of in a manner which is compatible with
the environment.
When the battery inside the screwdriver is no longer required, it must
be disposed of in an environmentally protective way. The battery
contain nickel cadmium (NiCad). It is recyclable. Take it to your tool
dealer or a local recycling centre to be disposed of properly. Do not
incinerate NiCad battery packs as they may explode when exposed to
fire. Do not attempt to open the battery pack.
How to remove the inside battery (for recycle)
Please follow instruction (1 to 3) as belows.
1. Please loosen out screws (4 pcs.) in grip/main housing body.
2. Please remove black colored cap by sharp pointed tools, and loosen out screw.
3. Please disconnect receptacle (battery).
Screws
Grip
Black colored cap
Main housing
11
Page 12

EC DECLARATION OF CONFORMITY
ENH002-3
We declare under our sole responsibility that this product is in compliance with the following
standards of standardized documents, EN50260, EN55014 in accordance with Council
Directives, 89/336/EEC and 98/37/EC.
Yasuhiko Kanzaki
Director
CE 2004
MAKITA INTERNATIONAL EUROPE LTD.
Michigan Drive, Tongwell, Milton Keynes,
Bucks MK15 8JD, ENGLAND
Responsible manufacturer:
Makita Corporation Anjo Aichi Japan
Noise and Vibration
ENG001-1
The typical A-weighted sound pressure level is not more than 70 dB (A).
The noise level under working may exceed 85 dB (A).
– Wear ear protection. –
The typical weighted root mean square acceleration value is not more than 2.5 m/s
2
.
12
Page 13

FRANÇAIS
AVERTISSEMENT : Avant d’utiliser ce tournevis sans fil, veuillez lire
toutes les consignes de sécurité et instructions d’utilisation. Veuillez
prêter une attention particulière à toutes les sections du présent mode
d’emploi qui comportent des symboles et avis.
Matières page
SPÉCIFICATIONS DU PRODUIT 14
CARACTÉRISTIQUES 14
CONTENU DE L’EMBALLAGE 14
CONSIGNES DE SÉCURITÉ 15
SÉCURITÉ EN MATIÈRE D’ÉLECTRICITÉ 17
IDENTIFICATION DES PIÈCES 17
INSTRUCTIONS D’UTILISATION 17 – 21
• Charger la batterie
• Insérer des embouts de tournevis
• Utilisation du commutateur de marche/arrêt
• Utilisation de la lumière DEL
• Utilisation de la poignée pliable
• Utilisation du tournevis
NETTOYAGE ET ENTRETIEN 21
PROTECTION DE L’ENVIRONNEMENT 22
DÉCLARATION DE CONFORMITÉ CE 23
Spécifications sujettes à modification sans préavis.
13
Page 14

SPÉCIFICATIONS DU PRODUIT
Numéro de modèle 6722DW
Tension du tournevis 4,8 volts
Adaptateur de charge CA 230 V – 50 Hz
Durée de charge 3 à 5 heures
Type de batterie Nickel-cadmium
Nombre de cellules 4
Capacité 600 mAh
CARACTÉRISTIQUES
Poignée pliable Marche avant/arrière
Blocage automatique de l’axe Courroie de transport
Lumière DEL d’éclairage Kit d’accessoires
Poignée caoutchoutée
CONTENU DE L’EMBALLAGE
Tournevis sans fil 6722DW
Adaptateur de charge 3 heures
Étui de transport/rangement
Kits de 80 accessoires :
1 porte-embout magnétique
9 douilles 5, 6, 7, 8, 9, 10, 11, 12, 13 mm
6 embouts de 50 mm 3 embouts à fente – 4, 5, 6 mm
3 embouts cruciformes – numéros 1, 2, 3
64 embouts de 25 mm
12 embouts à fente 3, 4, 5, 5,5, 6, 7 mm (2 de chaque)
8 embouts cruciformes numéros 0, 1, 2, 3 (2 de chaque)
16 embouts cruciformes renforcés numéros 0, 1, 2, 3 (4 de chaque)
10 embouts hexagonaux 2, 2,5, 3, 3, 4, 4, 5, 5, 6, 7 mm (1 de chaque)
7 embouts hexagonaux 5/64", 3/32", 1/8", 5/32", 3/16", 1/4", 9/32" (1 de chaque)
4 embouts carrés numéros 0, 1, 2, 3 (1 de chaque)
7 embouts Torx (à 6 lobes) T10, 15, 20, 25, 27, 30, 40 (1 de chaque)
14
Page 15

CONSIGNES DE SÉCURITÉ
AVERTISSEMENT :
Lors de l’utilisation d’outils alimentés par batterie, des précautions de base en
sécurité, incluant les suivantes, doivent toujours être prises pour réduire les
risques d’incendie, de fuite des batteries et de blessure. Veuillez lire le présent
mode d’emploi avant d’utiliser cet outil, et conservez-le.
Pour une utilisation sûre :
1. Maintenez l’aire de travail propre.
Les aires de travail et les établis encombrés ouvrent la porte aux blessures.
2. Prêtez attention à votre environnement de travail.
N’exposez pas l’outil à la pluie. Maintenez un éclairage adéquat dans l’aire de travail.
N’utilisez pas les outils en présence de liquides ou gaz inflammables.
3. Maintenez les enfants à l’écart.
Ne laissez pas les visiteurs toucher l’outil. Ne laissez pas les visiteurs approcher de votre
zone de travail.
4. Rangez les batteries ou outils après l’utilisation.
Après l’utilisation, outils et batteries doivent être rangés séparément dans un endroit sec,
élevé ou verrouillé, hors de portée des enfants.
Assurez-vous que les bornes de la batterie ne risquent pas d’être court-circuitées par
d’autres objets métalliques tels que des vis, des clous, etc.
5. Ne forcez pas l’outil.
Il effectuera un travail de meilleure qualité et plus sûr s’il est utilisé au régime pour lequel il a
été conçu.
6. Utilisez le bon outil.
Ne forcez jamais un petit outil ou un petit accessoire à effectuer un travail trop exigeant pour
lui. N’utilisez pas les outils pour effectuer des travaux pour lesquels ils n’ont pas été conçus.
7. Portez des vêtements adéquats.
Ne portez ni vêtements amples ni bijoux, car ils risqueraient de se coincer dans les pièces en
mouvement. Des chaussures à semelle antidérapante sont recommandées pour les travaux
à effectuer à l’extérieur. Portez un filet de protection pour envelopper vos cheveux s’ils sont
longs.
8. Utilisez des dispositifs de protection.
Portez des lunettes de sécurité et, si les travaux de coupe génèrent de la poussière, un écran
facial ou un masque antipoussières.
9. Raccordez un appareil d’aspiration de la poussière.
Si des accessoires sont fournis pour le raccordement d’un appareil d’aspiration et de collecte
de la poussière, assurez-vous que les raccordements sont corrects et que l’appareil est bien
utilisé.
10. Ne maltraitez pas le cordon d’alimentation (s’il est utilisé).
Il ne faut jamais transporter l’outil par son cordon ou tirer directement sur ce dernier pour le
débrancher de la prise d’alimentation. Maintenez le cordon à l’écart de la chaleur, de l’huile et
des objets à bords tranchants.
11. Fixez la pièce à travailler.
Fixez la pièce à travailler à l’aide de dispositifs de serrage ou d’un étau. Cela est plus sûr que
l’utilisation de la main et libère les deux mains pour le maniement de l’outil.
15
Page 16

12. Maintenez une bonne position.
Assurez-vous d’une bonne prise au sol et d’une bonne position d’équilibre en tout temps.
13. Prenez soin des outils.
Maintenez les outils tranchants bien aiguisés et propres pour assurer une performance
supérieure et plus sûre. Suivez les instructions de lubrification et de changement des
accessoires. Inspectez les cordons d’outil régulièrement et faites-les réparer dans un centre
de service agréé s’il sont endommagés.
14. Débranchez les outils.
Si l’outil a été prévu à cet effet, débranchez-le de sa batterie après l’utilisation, avant de le
faire réparer et avant de changer les accessoires tels que les lames, embouts et couteaux.
15. Retirez les clés de réglage et autres clés.
Prenez l’habitude de vous assurer que les clés et clés de réglage ont été retirées de l’outil
avant de le mettre sous tension.
16. Prévenez tout démarrage accidentel.
Ne laissez pas le doigt sur l’interrupteur lorsque vous transportez l’outil.
17. Restez attentif.
Soyez conscient de vos gestes. Faites preuve de bon sens. N’utilisez pas l’outil lorsque vous
êtes fatigué.
18. Vérifiez s’il y a des pièces endommagées.
Avant de reprendre des travaux avec un outil, vous devez vérifier soigneusement l’absence
de dommage sur le carter ou toute autre pièce, afin de vous assurer que l’outil fonctionnera
correctement et pourra exécuter le travail pour lequel il a été conçu. Vérifiez l’alignement des
pièces mobiles, assurez-vous qu’elles tournent librement, qu’elles n’ont aucune fissure et
sont bien montées, et assurez-vous de l’absence de toute autre anomalie pouvant affecter
son fonctionnement. Un carter ou autre pièce endommagé(e) doit être correctement
réparé(e) ou remplacé(e) par un centre de service après-vente agréé, sauf indication
contraire dans le mode d’emploi. Les commutateurs défectueux doivent être remplacés par
un centre de service après-vente agréé. N’utilisez pas l’outil si le commutateur ne peut pas
être activé et désactivé.
19. Mise en garde.
L’utilisation de tout accessoire ou de toute autre pièce que ceux recommandés dans le
présent mode d’emploi ou dans le catalogue peut comporter un risque de blessure.
Assurez-vous que la batterie convient pour l’outil.
Assurez-vous que la surface extérieure de la batterie ou de l’outil est propre et sèche avant
de brancher l’outil dans le chargeur.
Assurez-vous de charger les batteries avec le bon chargeur recommandé par le fabricant.
Toute utilisation incorrecte comporte un risque de choc électrique, de surchauffe ou de fuite
de liquide corrosif de la batterie.
20. Confiez la réparation de l’outil à un technicien qualifié.
Cet outil est conçu conformément aux exigences de sécurité qui s’y appliquent. Les
réparations doivent être confiées exclusivement à des techniciens qualifiés utilisant des
pièces de rechange originales, sinon il y a un risque élevé de danger pour l’utilisateur.
21. Mise au rebut de la batterie
Assurez-vous de respecter les consignes de sécurité du fabricant pour mettre la batterie au
rebut.
16
Page 17

PRECAUTIONS SUPPLEMENTAIRES
POUR L’OUTIL
1. Ayez bien conscience que l’outil est constamment en état de marche, car il n’a pas à
être raccordé au secteur.
2. Tenez l’outil par les surfaces de saisie isolées dans les situations où la partie
tranchante peut entrer en contact avec des fils électriques cachés. Le contact avec un
fil sous tension mettra également les parties métalliques exposées de l’outil sous
tension et causera une décharge électrique à l’utilisateur.
3. Veillez toujours à avoir une bonne assise. Veillez à ce qu’il n’y ait personne endessous quand vous utilisez l’outil dans des endroits élevés.
4. Tenez votre outil fermement.
5. N’approchez pas les mains des pièces en mouvement.
CONSERVEZ CES INSTRUCTIONS.
SÉCURITÉ EN MATIÈRE D’ÉLECTRICITÉ
AVERTISSEMENT: Veuillez lire attentivement les présentes consignes
de sécurité avant de brancher le chargeur sur une prise de courant.
Assurez-vous que la tension de la source d’électricité est la même que
celle indiquée sur la plaque signalétique du chargeur.
Ce chargeur est conçu pour fonctionner sur une source de courant
alternatif de 230 V, 50 Hz. Vous risquez d’endommager l’outil si vous le
branchez sur tout autre type de source d’alimentation. Éviter
d’exposer le tournevis sans fil à la pluie ou à l’humidité.
Ce symbole indique que ce chargeur est un appareil de Catégorie
ne requiert aucune mise à la terre.
IDENTIFICATION DES PIÈCES
1. Lumière DEL
2. Commutateur de marche/arrêt de la lumière DEL
3. Sélecteur de marche avant/arrière et commutateur de marche/arrêt
4. Porte-embout du tournevis
5. Bague de pliage de la poignée
6. Courroie de transport
7. Prise de charge
8. Adaptateur de charge
9. Fiche de charge
10. Étui de transport/rangement
II
et
17
Page 18
INSTRUCTIONS D’UTILISATION
AVERTISSEMENT !
Ne pas charger trop souvent la batterie. Ne rechargez la batterie que
lorsque le fonctionnement de l’outil commence à ralentir.
1. Charger la batterie
1. Avant la première utilisation, la batterie doit être chargée pendant 5 heures.
2. Il se peut que les piles neuves ou les piles inutilisées pendant une période prolongée
n’acceptent pas une charge complète. Cela est normal. Elles se chargeront complètement
après quelques cycles de charge et décharge.
3. La charge de la batterie doit toujours s’effectuer à une température ambiante de 4° à 40 °C.
4. Avant la première charge, la batterie doit être complètement déchargée. Activez le
commutateur de marche/arrêt jusqu’à ce que le moteur s’arrête.
5. Assurez-vous que le commutateur de marche/arrêt n’est pas en position de marche. La
batterie ne se chargera pas si le commutateur est en position de marche.
6. Placez la fiche de l’adaptateur de charge dans la prise de charge du tournevis. Voir figures 1
et 2.
7. Branchez l’adaptateur de charge dans une prise de courant.
8. Le tournevis sera prêt pour l’utilisation après les 5 premières heures de charge. La charge
complète ne prendra que 3 heures les fois suivantes.
9. Mettez l’adaptateur de charge hors tension et débranchez-le de la prise de courant, puis
retirez la fiche de charge du tournevis.
1
2
Il se peut que la batterie et le chargeur deviennent chauds pendant la charge. Cela est
normal et durera jusqu’à ce que la charge soit complète et que le chargeur soit
débranché de la prise de courant.
18
Page 19
INSTRUCTIONS D’UTILISATION
AVERTISSEMENT !
Évitez d’appuyer sur le commutateur de marche/arrêt pendant le retrait ou
la pose d’un embout de tournevis.
2. Insérer des embouts de tournevis
Pour insérer un embout, poussez-le fermement dans le porte-embout du tournevis. Voir figures 3
et 4.
3
Pour retirer un embout, tirez fermement pour le sortir du porte-embout du tournevis.
Si nécessaire, on peut d’abord insérer le porte-embout magnétique fourni avec le tournevis dans
le porte-embout ordinaire, puis insérer l’embout dans le porte-embout magnétique.
Cet tournevis sans fil est fourni avec un kit de 80 accessoires. Voir page 14 pour plus de détails.
Note :
Des embouts de rechange sont disponibles pour ce tournevis dans la plupart des magasins
d’outils ou de bricolage.
AVERTISSEMENT !
Avant d’activer le commutateur de marche/arrêt, vous devez lire toutes
les consignes de sécurité des pages 15, 16 et 17.
4
3. Utilisation du commutateur de marche/arrêt
Le commutateur de marche/arrêt sert à démarrer le tournevis. Il commande aussi le sens de
rotation du porte-embout.
Marche avant
(vissage)
5
1. Pour faire tourner le porte-embout vers l’avant (vissage), appuyez sur le côté droit du
commutateur de marche/arrêt, indiqué par . Voir figure 5.
19
Page 20
Marche arrière
(Retrait des vis)
6
2. Pour faire tourner le porte-embout en sens inverse (retrait des vis), appuyez sur le côté
gauche du commutateur de marche/arrêt, indiqué par . Voir figure 6.
3. Pour arrêter le tournevis, relâchez le commutateur de marche/arrêt.
Note :
Utilisez toujours des embouts de tournevis de bonne qualité et bien aiguisés. Les performances
du tournevis et votre sécurité dépendent de la qualité des embouts utilisés.
4. Utilisation de la lumière DEL
Le tournevis est équipé d’une lumière DEL qui
Appuyer
7
5. Utilisation de la poignée pliable
8
facilite sa manipulation dans les recoins
sombres et autres endroits mal éclairés. Pour
allumer la lumière DEL, appuyez sur son
commutateur de marche/arrêt, comme indiqué
sur la figure 7.
Pour éteindre la lumière DEL, appuyez à
nouveau sur son commutateur de marche/arrêt.
La poignée du tournevis étant pliable, il est
possible de la placer dans l’alignement de l’outil
ou en forme de manche de pistolet. Lorsque la
poignée est pliée en position de manche de
pistolet, elle facilite l’utilisation de l’outil dans les
zones difficiles d’accès. Voir figure 8.
Pour plier la poignée, saisissez sa partie
inférieure d’une main et déplacez sa partie
supérieure jusqu’à la position désirée avec
l’autre main.
20
Page 21

6. Utilisation du tournevis
Il faut tenir compte des points suivants lors de l’utilisation du tournevis.
1. Placez la pointe de l’embout dans la vis et appliquez une légère pression sur le tournevis.
2. Assurez-vous que l’embout est inséré bien droit dans le tête de la vis pour éviter
d’endommager cette dernière.
3. Démarrez le tournevis en appuyant sur le commutateur de marche/arrêt.
4. Si vous vissez des vis à bois, le perçage de trous-pilotes rendra votre tâche plus aisée et
empêchera que le matériau ne se fende.
5. Le trou-pilote remplit deux fonctions. Il sert de guide pour la vis et il prévient la distorsion ou le
fendillement du bois.
6. La profondeur des trous-pilotes doit être égale ou supérieure à la longueur des vis utilisées.
7. Le tableau ci-dessous doit être utilisé comme guide pour la taille des trous-pilotes.
Diamètre du trou-pilote
Taille de la vis Bois mou Bois dur
No 6 (3,5 mm) 2,0 mm 2,5 mm
No 8 (4,0 mm) 3,2 mm 3,5 mm
No 10 (5,0 mm) 3,5 mm 4,0 mm
8. Sélectionnez la rotation en marche avant pour visser et la rotation en marche arrière pour
les retirer.
9. Prenez garde de trop serrer les petites vis de laiton. La tête de ces vis se déforme facilement
et les filets peuvent foirer. Il est conseillé de serrer ce type de vis manuellement avec un
tournevis ordinaire.
10. Utilisez autant que possible des vis Posidrive (vis renforcées). Elles sont plus faciles à visser
et l’embout du tournevis s’engage plus solidement dans la tête de la vis.
11. Lorsque vous insérez une vis dans un trou déjà fileté, commencez le vissage manuellement.
Enfoncez la vis jusqu’à ce que vous sentiez que les filets s’engagent puis utilisez le tournevis
pour serrer la vis à fond.
12. Lorsque vous utilisez les douilles fournies avec ce tournevis, prenez garde d’endommager les
écrous en les serrant trop fort.
NETTOYAGE ET ENTRETIEN
AVERTISSEMENT !
Évitez d’appuyer sur le commutateur de marche/arrêt pendant que
vous effectuez le nettoyage et l’entretien.
Après l’utilisation, retirez l’embout et frappez légèrement le côté du porte-embout pour enlever la
poussière, les copeaux, etc.
Nettoyez le corps du tournevis avec un chiffon doux. Maintenez la poignée propre et exempte
d’huile et de graisse.
Maintenez l’adaptateur de charge propre et exempt de poussière et de graisse. Le remplacement
des pièces usées ou endommagées doit être confié à un technicien qualifié. Aucune pièce n’est
réparable par l’utilisateur à l’intérieur du tournevis. S’il est nécessaire d’effectuer l’entretien des
pièces internes, demandez à un technicien de service après-vente qualifié de le faire. Rangez
toujours le tournevis et l’adaptateur de charge dans l’étui de transport.
21
Page 22

PROTECTION DE L’ENVIRONNEMENT
Toujours recycler les batteries.
Recyclez les matériaux indésirables au lieu de les jeter. Les outils,
accessoires et emballages doivent être triés, emportés dans un centre
de recyclage et traités dans le respect de l’environnement.
Lorsque la batterie du tournevis devient inutilisable, elle doit être mise
au rebut de façon à ne pas polluer l’environnement. La batterie
contient du nickel cadmium (NiCad). Elle est recyclable. Emportez-la
chez votre revendeur d’outils ou au centre de recyclage local pour
qu’elle soit traitée de manière appropriée. Ne pas jeter les batteries
NiCad au feu car elles risqueraient d’exploser. Ne pas essayer d’ouvrir
la batterie.
Comment retirer la batterie interne (pour le recyclage)
Veuillez suivre les instructions (1 à 3) ci-dessous.
1. Retirer les vis (4 pièces) qui se trouvent dans la poignée et le corps de l’outil.
2. Retirez le capuchon noir avec un instrument pointu et desserrez la vis.
3. Débranchez l’outil de la prise de courant (ou retirez la batterie).
Vis
22
Poignée
Capuchon noir
Corps de l’outil
Page 23

DÉCLARATION DE CONFORMITÉ CE
ENH002-3
Nous déclarons sous notre entière responsabilité que ce produit est conforme aux normes des
documents standardisés suivants, EN50260, EN55014 conformément aux Directives du Conseil,
89/336/CEE et 98/37/EG.
Yasuhiko Kanzaki
Directeur
CE 2004
MAKITA INTERNATIONAL EUROPE LTD.
Michigan Drive, Tongwell, Milton Keynes,
Bucks MK15 8JD, ENGLAND
Fabricant responsable :
Makita Corporation Anjo Aichi Japan
Bruit et vibrations
ENG001-1
Le niveau de pression sonore pondere type A ne dépasse pas 70 dB (A).
Le niveau de bruit en fonctionnement peut dépasser 85 dB (A).
– Porter des protecteurs anti-bruit. –
L’accélération pondérée ne dépasse pas 2,5 m/s
2
.
23
Page 24

DEUTSCH
WARNUNG: Bitte lesen Sie diese Sicherheitsvorschriften und
Bedienungsanweisungen vollständig durch, bevor Sie diesen AkkuSchrauber benutzen. Bitte beachten Sie besonders die Abschnitte
dieser Bedienungsanleitung, die Warnsymbole und Hinweise
enthalten.
Inhalt Seite
PRODUKTSPEZIFIKATIONEN 25
MERKMALE 25
VERPACKUNGSINHALT 25
SICHERHEITSHINWEISE 26
ELEKTRISCHE SICHERHEIT 28
BEZEICHNUNG DER TEILE 28
BEDIENUNGSANLEITUNG 29 – 32
• Laden des Akkus
• Einsetzen von Schraubendreherbits
• Bedienung des Ein-Aus-Schalters
• Verwendung der LED-Lampe
• Verwendung des Klappgriffs
• Verwendung des Schraubers
REINIGUNG UND WARTUNG 33
UMWELTSCHUTZ 33
CE-KONFORMITÄTSERKLÄRUNG 34
Änderungen der Spezifikationen vorbehalten.
24
Page 25

PRODUKTSPEZIFIKATIONEN
Modellnummer 6722DW
Schrauberspannung 4,8 Volt
Ladegerät 230 V Wechselstrom – 50 Hz
Ladezeit 3 – 5 Stunden
Akkutyp Ni-Cd-Akku
Anzahl der Zellen 4
Kapazität600 mAh
MERKMALE
Klappgriff Vorwärts-/Rückwärtsdrehung
Automatische Spindelarretierung Tragegurt
LED-Beleuchtung Zubehörsatz
Gummierter Handgriff
VERPACKUNGSINHALT
Akku-Schrauber 6722DW
3-Stunden-Ladegerät
Trage-/Aufbewahrungskoffer
80-teiliger Zubehörsatz:
1 × magnetischer Bithalter
9 x Steckschlüssel 5, 6, 7, 8, 9, 10, 11, 12, 13 mm
6 x 50-mm-Bits 3 Schlitz – 4, 5, 6 mm
3 Kreuzschlitz – Nummern 1, 2, 3
64 x 25-mm-Bits
12 Schlitz 3, 4, 5, 5,5, 6, 7 mm (je 2 Stück)
8 Kreuzschlitz Nummern 0, 1, 2, 3 (je 2 Stück)
16 Pozidrive Nummern 0, 1, 2, 3 (je 4 Stück)
10 Sechskant 2, 2,5, 3, 3, 4, 4, 5, 5, 6, 7 mm (je 1 Stück)
7 Sechskant 5/64", 3/32", 1/8", 5/32", 3/16", 1/4", 9/32" (je 1 Stück)
4 Vierkant Nummern 0, 1, 2, 3 (je 1 Stück)
7 Torx T10, 15, 20, 25, 27, 30, 40 (je 1 Stück)
25
Page 26

SICHERHEITSHINWEISE
WARNUNG:
Beim Gebrauch von batteriegetriebenen Werkzeugen sollten die grundlegenden
Sicherheitsvorkehrungen, einschließlich der folgenden, beachtet werden, um die
Gefahr von Brand, Auslaufen der Batterien und Verletzungen zu reduzieren: Bitte
lesen Sie diese Anweisungen vor Inbetriebnahme dieses Produkts durch und
bewahren Sie sie gut auf.
Für sicheren Betrieb:
1. Arbeitsplatz sauber halten
Durcheinander am Arbeitsplatz und auf der Werkbank führt zu Verletzungen.
2. Arbeitsumgebung berücksichtigen
Setzen Sie Elektrowerkzeuge keinem Regen aus. Sorgen Sie für gute Beleuchtung des
Arbeitsplatzes. Benutzen Sie Elektrowerkzeuge nicht in Gegenwart von brennbaren
Flüssigkeiten oder Gasen.
3. Kinder fernhalten
Lassen Sie das Werkzeug nicht von Unbefugten berühren. Halten Sie Unbefugte vom
Arbeitsplatz fern.
4. Akkus oder unbenutzte Werkzeuge sicher aufbewahren
Werkzeuge und Akkus sollten bei Nichtgebrauch getrennt an einem trockenen,
hochgelegenen oder abschließbaren Ort für Kinder unzugänglich aufbewahrt werden.
Achten Sie darauf, dass die Akkukontakte nicht durch Metallteile, wie z.B. Schrauben, Nägel
usw., kurzgeschlossen werden können.
5. Keinen übermäßigen Druck auf das Werkzeug ausüben
Das Werkzeug kann seinen Zweck besser und sicherer erfüllen, wenn es sachgemäß
gehandhabt wird.
6. Sachgerechte Werkzeuge benutzen
Versuchen Sie nicht, mit kleinen Werkzeugen oder Einsätzen die Arbeit von
Hochleistungswerkzeugen zu verrichten. Benutzen Sie Werkzeuge nicht für sachfremde
Zwecke.
7. Auf zweckmäßige Kleidung achten
Tragen Sie keine losen Kleidungsstücke oder Schmucksachen, da sie von beweglichen Teilen
erfaßt werden können. Schuhe mit rutschfesten Sohlen sind für Arbeiten im Freien zu
empfehlen. Tragen Sie eine schützende Kopfbedeckung, um langes Haar zu raffen.
8. Schutzvorrichtungen benutzen
Tragen Sie eine Schutzbrille, und bei stauberzeugenden Arbeiten auch eine Gesichts- oder
Staubmaske.
9. Staubsammelvorrichtungen anschließen
Wenn Anschlußvorrichtungen für Staubabsaug- und -sammelgeräte vorhanden sind, sollten
diese montiert und sachgerecht verwendet werden.
10. Netzkabel (falls vorhanden) nicht missbrauchen
Das Netzkabel darf auf keinen Fall zum Tragen des Werkzeugs missbraucht oder gewaltsam
aus der Steckdose gerissen werden. Halten Sie das Netzkabel von Hitze, Öl und scharfen
Kanten fern.
11. Werkstück sichern
Benutzen Sie Klemmen oder eine Schraubzwinge, um Werkstücke einzuspannen. Dies ist
sicherer als Handhaltung, und außerdem haben Sie beide Hände zur Bedienung des
Werkzeugs frei.
12. Nicht zu weit reichen
Achten Sie stets auf sicheren Stand und gute Balance.
26
Page 27

13. Werkzeuge sorgfältig warten
Halten Sie Schneidwerkzeuge stets scharf und sauber, um höhere Leistung und Sicherheit zu
erzielen. Befolgen Sie die Anweisungen für die Schmierung und den Austausch von Zubehör.
Überprüfen Sie Kabel regelmäßig, und lassen Sie sie bei Beschädigung von einer
autorisierten Kundendienststelle reparieren.
14. Werkzeuge von der Stromquelle trennen
Wenn es die Konstruktion zulässt, sollten Sie den Akku bei Nichtgebrauch des Werkzeugs,
vor der Ausführung von Wartungsarbeiten oder dem Auswechseln von Zubehör (Messer,
Einsätze, Meißel usw.), vom Werkzeug abnehmen.
15. Einstell- und Schraubenschlüssel entfernen
Vergewissern Sie sich vor dem Einschalten des Werkzeugs stets, dass Einstell- und
Schraubenschlüssel entfernt worden sind.
16. Unbeabsichtigtes Einschalten vermeiden
Tragen Sie das Werkzeug nicht mit dem Finger am Ein-Aus-Schalter.
17. Wachsam sein
Lassen Sie bei der Arbeit Vorsicht und Vernunft walten. Benutzen Sie das Werkzeug nicht,
wenn Sie müde sind.
18. Werkzeug auf beschädigte Teile überprüfen
Bevor Sie das Werkzeug weiterbenutzen, sollten Sie beschädigte Schutzvorrichtungen und
Teile sorgfältig auf ihre Betriebsfähigkeit und Funktionstüchtigkeit hin überprüfen. Überprüfen
Sie das Werkzeug auf Ausrichtung und Leichtgängigkeit beweglicher Teile, Bruchstellen,
Befestigungszustand und sonstige Mängel von Teilen, die seinen Betrieb beeinträchtigen
können. Beschädigte Schutzvorrichtungen oder Teile sollten von einer autorisierten
Kundendienststelle ordnungsgemäß repariert oder ausgewechselt werden, wenn nicht
anders in dieser Bedienungsanleitung angegeben. Lassen Sie fehlerhafte Schalter von einer
autorisierten Kundendienststelle auswechseln. Benutzen Sie das Werkzeug nicht, wenn es
sich nicht mit dem Ein-Aus-Schalter ein- und ausschalten lässt.
19. Warnung
Die Verwendung von anderen Zubehörteilen oder Einsätzen als den in diesem Handbuch
oder dem Katalog empfohlenen kann eine Verletzungsgefahr darstellen.
Verwenden Sie nur die für dieses Werkzeug vorgeschriebenen Akkus.
Vergewissern Sie sich vor dem Anschluss an das Ladegerät, dass die Oberfläche des Akkus
oder Werkzeugs sauber und trocken ist.
Benutzen Sie das vom Akkuhersteller empfohlene Ladegerät zum Laden von Akkus. Falscher
Gebrauch kann zu elektrischen Schlägen, Überhitzen oder Auslaufen korrosiver Flüssigkeiten
aus dem Akku führen.
20. Werkzeug nur von einem Fachmann reparieren lassen
Dieses Werkzeug wurde gemäß den relevanten Sicherheitsvorschriften konstruiert.
Reparaturen sollten nur von einem Fachmann unter Verwendung von Original-Ersatzteilen
ausgeführt werden. Anderenfalls besteht erhöhte Gefahr für den Benutzer.
21. Entsorgung des Akkus
Achten Sie darauf, dass der Akku gemäß den Herstelleranweisungen vorschriftsmäßig
entsorgt wird.
27
Page 28

ZUSÄTZLICHE SICHERHEITSREGELN
FÜR DIE MASCHINE
1. Beachten Sie, dass diese Maschine stets betriebsbereit ist, da sie nicht erst an eine
Netzsteckdose angeschlossen werden muss.
2. Halten Sie die Maschine nur an den isolierten Griffflächen, wenn Sie Arbeiten
ausführen, bei denen verborgene Kabel angebohrt werden können. Bei Kontakt mit
einem stromführenden Kabel werden die freiliegenden Metallteile der Maschine
ebenfalls stromführend, so dass der Benutzer einen elektrischen Schlag erleiden kann.
3. Achten Sie stets auf sicheren Stand. Vergewissern Sie sich bei Einsatz der Maschine
an hochgelegenen Arbeitsplätzen, dass sich keine Personen darunter aufhalten.
4. Halten Sie die Maschine mit festem Griff.
5. Halten Sie die Hände von rotierenden Teilen fern.
BEWAHREN SIE DIESE HINWEISE SORGFÄLTIG AUF.
ELEKTRISCHE SICHERHEIT
WARNUNG: Lesen Sie diese Sicherheitsvorschriften aufmerksam
durch, bevor Sie das Ladegerät an den Netzstrom anschließen.
Vergewissern Sie sich, dass die Spannung der Stromversorgung mit
der Angabe auf dem Typenschild des Ladegerätes übereinstimmt.
Dieses Ladegerät ist für den Betrieb an 230 V Wechselstrom, 50 Hz,
vorgesehen. Der Anschluss an eine andere Stromquelle kann zu einer
Beschädigung des Werkzeugs führen. Setzen Sie den Akku-Schrauber
weder Regen noch Feuchtigkeit aus.
Dieses Symbol zeigt an, dass es sich bei diesem Ladegerät um ein
II
Gerät der Klasse
handelt, das keinen Erdanschluss benötigt.
BEZEICHNUNG DER TEILE
1. LED-Lampe
2. LED-Lampen-Ein-Aus-Schalter
3. Vorlauf/Rücklauf-Wahlschalter und Ein-Aus-Schalter
4. Schraubendreherbithalter
5. Handgriff-Klapplager
6. Tragegurt
7. Ladebuchse
8. Ladegerät
9. Ladestecker
10. Trage-/Aufbewahrungskoffer
28
Page 29

BEDIENUNGSANLEITUNG
WARNUNG!
Überladen Sie den Akku nicht. Laden Sie den Akku erst auf, wenn die
Drehzahl des Werkzeugs abzufallen beginnt.
1. Laden des Akkus
1. Vor der ersten Benutzung muss der Akku 5 Stunden lang geladen werden.
2. Neue oder längere Zeit im entladenen Zustand gelagerte Akkus akzeptieren anfänglich
möglicherweise keine volle Ladung. Dies ist normal. Nach mehreren Lade- und
Entladezyklen wird der Akku voll aufgeladen.
3. Der Akku ist stets bei einer Lufttemperatur zwischen 4°C und 40°C zu laden.
4. Vor der ersten Ladung ist der Akku völlig zu entladen. Betätigen Sie den Ein-Aus-Schalter, bis
der Motor stehen bleibt.
5. Vergewissern Sie sich, dass der Ein-Aus-Schalter ausgeschaltet ist. Befindet sich der
Schalter in der Ein-Stellung, wird der Akku nicht geladen.
6. Führen Sie den Stecker des Ladegeräts in die Ladebuchse des Schraubers ein. Siehe
Abbildungen 1 und 2.
7. Schließen Sie das Ladegerät an eine Netzsteckdose an.
8. Nach der ersten 5-Stunden-Ladung ist der Schrauber einsatzbereit. Jede weitere volle
Ladung dauert 3 Stunden.
9. Schalten Sie das Ladegerät aus, trennen Sie es von der Netzsteckdose, und ziehen Sie den
Ladestecker vom Schrauber ab.
1
2
Während des Ladevorgangs können Akku und Ladegerät warm werden. Dieser
Zustand ist normal und dauert an, bis der Akku voll aufgeladen und das Ladegerät
von der Netzsteckdose abgetrennt worden ist.
29
Page 30

BEDIENUNGSANLEITUNG
WARNUNG!
Drücken Sie nicht den Ein-Aus-Schalter beim Abnehmen oder Anbringen
eines Schraubendreherbits.
2. Einsetzen von Schraubendreherbits
Um ein Schraubendreherbit anzubringen, führen Sie es fest in den Schraubendreherbithalter ein.
Siehe Abbildungen 3 und 4.
3
Um ein Schraubendreherbit abzunehmen, ziehen Sie es fest aus dem Schraubendreherbithalter
heraus.
Erforderlichenfalls kann der mit dem Schrauber gelieferte magnetische Bithalter mit
eingesetztem Bit in den Schraubendreherbithalter eingeführt werden.
Ein 80-teiliger Zubehörsatz ist im Lieferumfang dieses Akku-Schraubers enthalten. Einzelheiten
auf Seite 25.
HINWEIS:
Ersatz-Schraubendreherbits sind in den meisten Werkzeug- oder Heimwerkerläden erhältlich.
WARNUNG!
Lesen Sie unbedingt alle Sicherheitsvorschriften auf den Seiten 26, 27
und 28 durch, bevor Sie den Ein-Aus-Schalter betätigen.
4
3. Bedienung des Ein-Aus-Schalters
Der Ein-Aus-Schalter dient zum Starten des Schraubers. Er dient auch zum Umschalten der
Drehrichtung des Bithalters.
Vorw ärts
(Eindrehen)
5
1. Um den Bithalter in Vorwärtsrichtung (Eindrehen) zu drehen, drücken Sie die mit
markierte rechte Seite des Ein-Aus-Schalters. Siehe Abbildung 5.
30
Page 31

Rückwärts
(Herausdrehen von Schrauben)
6
2. Um den Bithalter in Rückwärtsrichtung (Herausdrehen von Schrauben) zu drehen, drücken
Sie die mit markierte linke Seite des Ein-Aus-Schalters. Siehe Abbildung 6.
3. Lassen Sie den Ein-Aus-Schalter los, um den Schrauber anzuhalten.
HINWEIS:
Verwenden Sie stets scharfe Schraubendreherbits von guter Qualität. Die Leistung und
Sicherheit des Schrauber hängen von der Qualität der verwendeten Bits ab.
4. Verwendung der LED-Lampe
Um bei Einsatz des Schraubers in dunklen
Drücken
7
5. Verwendung des Klappgriffs
8
Nischen und an schlecht beleuchteten Orten
bessere Sicht zu haben, ist er mit einer LEDLampe ausgestattet. Um die LED-Lampe
einzuschalten, drücken Sie den LED-LampenEin-Aus-Schalter, wie in Abbildung 7 gezeigt.
Um die LED-Lampe auszuschalten, drücken Sie
den LED-Lampen-Ein-Aus-Schalter erneut.
Der Schrauber besitzt einen Klappgriff, der
entweder gerade gestellt oder wie ein
Pistolengriff abgewinkelt werden kann. Wenn er
in die Pistolengriffposition abgewinkelt wird,
lässt sich der Schrauber an schlecht
zugänglichen Or ten besser halten. Siehe
Abbildung 8.
Um den Klappgriff zu benutzen, halten Sie den
unteren Griff mit der einen Hand, während Sie
den oberen Griff mit der anderen Hand in die
gewünschte Position bringen.
31
Page 32

6. Verwendung des Schraubers
Beachten Sie die folgenden Punkte bei der Benutzung des Schraubers.
1. Setzen Sie die Spitze des Schraubendreherbits in den Schraubenkopf ein, und üben Sie
leichten Druck auf den Schrauber aus.
2. Achten Sie darauf, dass die Spitze des Schraubendreherbits gerade und senkrecht in den
Schraubenkopf eingeführt wird, um eine Beschädigung der Schraube zu vermeiden.
3. Starten Sie den Schrauber durch Drücken des Ein-Aus-Schalters.
4. Beim Eindrehen von Holzschrauben ist das Bohren von Führungsbohrungen zu empfehlen,
um das Eindrehen zu erleichtern und Spaltung des Materials zu vermeiden.
5. Die Führungsbohrung dient zwei Zwecken. Sie wirkt als Führung für die einzudrehende
Schraube und verhütet Verzug oder Spaltung des Holzes.
6. Führungsbohrungen sind auf eine Tiefe zu bohren, die der Länge der zu verwendenden
Schraube entspricht oder diese übertrifft.
7. Die folgende Tabelle dient als Richtlinie für die Größe der Führungsbohrung.
Führungsbohrungsdurchmesser
Schraubengröße Weichholz Hartholz
Nr. 6 (3,5 mm) 2,0 mm 2,5 mm
Nr. 8 (4,0 mm) 3,2 mm 3,5 mm
Nr. 10 (5,0 mm) 3,5 mm 4,0 mm
8. Wählen Sie Vorwärtsdrehung zum Eindrehen von Schrauben und Rückwärtsdrehung zum
Herausdrehen.
9. Vermeiden Sie Überdrehen von kleinen Messingschrauben. Der Schraubenkopf kann leicht
abscheren, und das Gewinde kann abreißen. Es wird empfohlen, solche Schrauben von
Hand anzuziehen.
10. Verwenden Sie nach Möglichkeit Posidrive-Schrauben. Diese lassen sich leichter eindrehen,
weil das Schraubendreherbit fester in den Schraubenkopf eingreift.
11. Um eine Schraube in eine bereits vorhandene Gewindebohrung einzudrehen, sollte die
Spitze von Hand eingedreht werden. Drehen Sie die Schraube ein, bis das Gewinde greift,
und benutzen Sie dann den Schrauber zum Anziehen der Schraube.
12. Wenn Sie die im Lieferumfang dieses Schraubers enthaltenen Steckschlüssel verwenden,
achten Sie darauf, dass Sie die Muttern nicht überdrehen, weil sie sonst beschädigt werden
können.
32
Page 33

REINIGUNG UND WARTUNG
WARNUNG!
Drücken Sie während der Durchführung von Reinigungs- und
Wartungsarbeiten nicht den Ein-Aus-Schalter.
Entfernen Sie nach dem Gebrauch das Schraubendreherbit, und klopfen Sie gegen die Seite des
Schraubendreherbithalters, um Staub oder Späne usw. zu lösen.
Reinigen Sie das Gehäuse des Schraubers mit einem weichen Tuch. Halten Sie den Griff sauber
und frei von Öl und Fett.
Halten Sie das Ladegerät sauber und frei von Öl und Fett. Abgenutzte oder beschädigte Teile
müssen von qualifiziertem Personal ausgewechselt werden. Im Inneren des Schraubers befinden
sich keine Teile, die vom Benutzer gewartet werden können. Überlassen Sie die Wartung der
Innenteile qualifiziertem Wartungspersonal, falls erforderlich. Bewahren Sie Schrauber und
Ladegerät immer im Tragekoffer auf.
UMWELTSCHUTZ
Verbrauchte Akkus stets dem Recycling zuführen.
Führen Sie verbrauchtes Material dem Recycling zu, anstatt es in den
Müll zu werfen. Alle Werkzeuge, Zubehörteile und
Verpackungsmaterialien sollten sortiert, zu einem Recyclingzentrum
gebracht und umweltschonend entsorgt werden.
Wenn der Akku im Schrauber unbrauchbar geworden ist, muss er auf
umweltschonende Weise entsorgt werden. Der Akku enthält NickelKadmium (NiCad). Er ist wiederverwertbar. Bringen Sie ihn zu Ihrem
Werkzeughändler oder einem lokalen Recyclingzentrum, um ihn
sachgerecht entsorgen zu lassen. Werfen Sie NiCad-Akkus nicht ins
Feuer, weil sie sonst explodieren können. Versuchen Sie nicht, den
Akku zu öffnen.
33
Page 34

Entfernen des internen Akkus. (für Recycling)
Bitte folgen Sie den nachstehenden Anweisungen (1 bis 3).
1. Die Schrauben (4 Stück) an Griff/Hauptgehäuse lösen.
2. Die schwarze Kappe mit einem spitzen Werkzeug entfernen, und die Schraube lösen.
3. Die Fassung (Akku) trennen.
Schrauben
Griff
Schwarze Kappe
Hauptgehäuse
CE-KONFORMITÄTSERKLÄRUNG
ENH002-3
Hiermit erklärt wir unter unserer alleinigen Verantwortung, daß dieses Produkt gemäß den
Ratsdirektiven 89/336/EWG und 98/37/EG mit den folgenden Normen von Normendokumenten
übereinstimmen: EN50260, EN55014.
Yasuhiko Kanzaki
Direktor
CE 2004
MAKITA INTERNATIONAL EUROPE LTD.
Michigan Drive, Tongwell, Milton Keynes,
Bucks MK15 8JD, ENGLAND
Verantwortlicher Hersteller:
Makita Corporation Anjo Aichi Japan
Geräusch- und Vibrationsentwicklung
ENG001-1
Der typische A-bewertete Schalldruckpegel beträgt nicht mehr als 70 dB (A).
Der Lärmpegel kann während des Betriebs 85 dB (A) überschreiten.
– Gehörschutz tragen. –
Der gewichtete Effektivwert der Beschleunigung beträgt nicht mehr als 2,5 m/s
2
.
34
Page 35

ITALIANO
ATTENZIONE: Leggere attentamente e completamente tutte le
istruzioni per la sicurezza e per l’uso prima di usare questo avvitatore
a batteria. Fare particolarmente attenzione a tutte le sezioni di questo
manuale di istruzioni che recano simboli e note di avvertimento.
Indice pagina
DATI TECNICI 36
CARATTERISTICHE 36
CONTENUTO DEL PACCO 36
ISTRUZIONI PER LA SICUREZZA 37
SICUREZZA ELETTRICA 39
IDENTIFICAZIONE DELLE PARTI 39
ISTRUZIONI PER L’USO 40 – 43
• Carica della batteria
• Inserimento delle punte
• Funzionamento dell’interruttore di accensione/spegnimento
• Uso della luce LED
• Uso del manico pieghevole
• Uso dell’avvitatore
PULIZIA E MANUTENZIONE 43
PROTEZIONE DELL’AMBIENTE 44
DICHIARAZIONE DI CONFORMITÀ
CON LE NORME DELLA COMUNITÀ EUROPEA 45
Dati tecnici soggetti a modifiche senza avviso.
35
Page 36

DATI TECNICI
Numero del modello 6722DW
Tensione avvitatore 4,8 volt
Adattatore di carica C.a. 230 V, 50 Hz
Tempo di carica 3 – 5 ore
Tipo di batteria NiCad
Numero di celle 4
Capacità 600 mAh
CARATTERISTICHE
Manico pieghevole Rotazione in avanti/inversione
Blocco automatico mandrino Cinghia di trasporto
Luce di illuminazione a LED Pacco accessori
Impugnatura gommata
CONTENUTO DEL PACCO
Avvitatore a batteria 6722DW
Adattatore di carica di 3 ore
Valigetta di trasporto/conservazione
Pacco accessori di 80 pezzi contenente:
1 portapunta magnetico
9 avvitadadi 5, 6, 7, 8, 9, 10, 11, 12, 13 mm
Punte 6 x 50 mm 3 meno – 4, 5, 6 mm
3 più – numeri 1, 2, 3
Punte 64 x 25 mm
12 meno 3, 4, 5, 5,5, 6, 7 mm (2 pezzi ciascuna)
8 più numeri 0, 1, 2, 3 (2 pezzi ciascuna)
16 a croce numeri 0, 1, 2, 3 (4 pezzi ciascuna)
10 esagonali 2, 2,5, 3, 3, 4, 5, 5, 5, 6, 7 mm (1 pezzo ciascuna)
7 esagonali 5/64”, 3/32”, 1/8”, 5/32", 3/16", 1/4", 9/32" (1 pezzo ciascuna)
4 quadrate numeri 0, 1, 2, 3 (1 pezzo ciascuna)
7 torcenti T10, 15, 20, 25, 27, 30, 40 (1 pezzo ciascuna)
36
Page 37

ISTRUZIONI PER LA SICUREZZA
ATTENZIONE:
Quando si usano utensili a batteria, bisogna osservare le precauzioni di base per
la sicurezza, comprese quelle seguenti, per ridurre il rischio d’incendio, perdita
delle batterie e lesioni personali: Leggere queste istruzioni prima di far
funzionare questo prodotto, e conservare queste istruzioni.
Per un funzionamento di sicurezza:
1. Mantenere pulita l’area di lavoro.
Le aree e i banchi con ingombri invitano le lesioni.
2. Tenere in considerazione l’ambiente di lavoro.
Non esporre l’utensile alla pioggia. Mantenere bene illuminata l’area di lavoro. Non usare
l’utensile in presenza di liquidi o gas infiammabili.
3. Tenere lontani i bambini.
Non far toccare l’utensile dai visitatori. Tenere lontani i visitatori dall’area di lavoro.
4. Mettere via le batterie o gli utensili non utilizzati.
Quando non vengono usati, gli utensili e le batterie devono essere riposti separatamente in
un luogo asciutto, alto o chiuso, fuori della portata dei bambini.
Accertarsi che i terminali della batteria non vengano cortocircuitati da altri oggetti metallici,
come viti, chiodi, ecc.
5. Non forzare l’utensile.
Esso esegue il lavoro meglio e in modo più sicuro alla velocità per cui è stato progettato.
6. Usare l’utensile adatto.
Non forzare i piccoli utensili o accessori a fare il lavoro degli utensili per lavori pesanti. Non
usare gli utensili per scopi per i quali non sono stati progettati.
7. Vestirsi in modo appropriato.
Non portare abiti o gioielli che possono impigliarsi sulle parti mobili. Per il lavoro in esterni si
consigliano calzature che non scivolano. Proteggere i capelli coprendoli se sono lunghi.
8. Usare l’equipaggiamento di protezione.
Usare occhiali di protezione e, se l’operazione di taglio è polverosa, mettere una visiera o
maschera antipolvere.
9. Collegare l’attrezzatura di estrazione della polvere.
Se vengono forniti dispositivi per il collegamento di estrazione e raccolta della polvere,
accertarsi che siano collegati e usati correttamente.
10. Non maltrattare il cavo di alimentazione (se c’è).
Non trasportare mai l’utensile tenendolo per il cavo di alimentazione, o staccarlo dalla presa
di corrente tirando il cavo. Tenere il cavo lontano dal calore, olio e bordi taglienti.
11. Fissare sempre il pezzo.
Usare ganasce o una morsa per fissare il pezzo. Ciò è più sicuro dell’uso delle mani, e lascia
le mani libere per usare l’utensile.
12. Non sporgersi.
Mantenere sempre i piedi bene appoggiati e il corretto equilibrio.
13. Mantenere gli utensili con cura.
Per delle prestazioni migliori e più sicure, mantenere affilati e puliti gli utensili da taglio.
Seguire le istruzioni per la lubrificazione e il cambio degli accessori. Controllare
periodicamente i cavi degli utensili e, se sono danneggiati, farli riparare da un centro di
assistenza autorizzato.
14. Scollegare gli utensili.
Se ciò è possibile, staccare la batteria dall’utensile quando non viene usato, prima della
manutenzione e cambiando accessori come lame, punte e cesoie.
37
Page 38

15. Rimuovere le chiavi di regolazione.
Prendere l’abitudine di controllare che le chiavi di regolazione siano rimosse dall’utensile
prima di accenderlo.
16. Evitare gli avviamenti accidentali.
Non trasportare l’utensile con un dito sull’interruttore.
17. Stare sempre attenti.
Guardare ciò che si sta facendo. Usare buonsenso. Non usare l’utensile quando si è stanchi.
18. Controllare se ci sono parti danneggiate.
Prima di continuare a usare l’utensile, una protezione od altra parte danneggiata devono
essere controllate con cura per determinare che possano funzionare correttamente e
svolgere la loro funzione. Controllare l’allineamento delle parti mobili, la corsa libera delle
parti mobili, il rodaggio delle parti, il montaggio e qualsiasi altra condizione avente un effetto
sul funzionamento. Una protezione od altra parte danneggiata deve essere riparata
correttamente o sostituita da un centro di assistenza autorizzato, a meno che diversamente
indicato in questo manuale di istruzioni. Gli interruttori difettosi vanno riparati da un centro di
assistenza autorizzato. Non usare l’utensile se l’interruttore non lo accende e spegne.
19. Attenzione.
L’impiego di qualsiasi accessorio o parte diversi da quelli raccomandati in questo manuale di
istruzioni o catalogo può causare lesioni personali.
Accertarsi che la batteria sia quella corretta per l’utensile.
Accertarsi che la superficie esterna della batteria o dell’utensile sia pulita e asciutta prima di
attaccare il caricatore.
Accertarsi che le batterie siano caricate usando il caricatore corretto raccomandato dal
produttore. L’uso sbagliato può causare scosse elettriche, surriscaldamento o perdita di
liquido corrosivo dalla batteria.
20. Far riparare l’utensile da persone qualificate.
Questo utensile e costruito conformemente ai relativi requisiti sulla sicurezza. Le riparazioni
devono essere eseguite da persone qualificate usando ricambi originali, perché altrimenti c’è
un grande pericolo per l’utente.
21. Modo di disfarsi della batteria.
Disfarsi in modo sicuro della batteria secondo le istruzioni del produttore.
38
Page 39

REGOLE ADDIZIONALI DI SICUREZZA
PER L’UTENSILE
1. Tenere a mente che questo utensile è sempre in condizioni operative, in quanto non è
necessario collegarlo ad una presa di corrente.
2. Tenere l’utensile per le superfici isolate quando si esegue una operazione in cui lo
strumento di taglio potrebbe venire a contatto con fili elettrici nascosti. Il contatto con
un filo “sotto tensione” mette “sotto tensione” anche le parti metalliche esposte
dell’utensile, dando una scossa all’operatore.
3. Appoggiare sempre saldamente i piedi per terra. Se si usa l’utensile in un luogo alto,
accertarsi che sotto non ci sia nessuno.
4. Tenere saldamente l’utensile.
5. Tenere le mani lontane dalle parti rotanti.
CONSERVARE QUESTE ISTRUZIONI.
SICUREZZA ELETTRICA
ATTENZIONE: Leggere attentamente queste istruzioni per la sicurezza
prima di collegare il caricatore alla rete. Accertarsi che la tensione
della fonte di alimentazione sia la stessa di quella indicata sulla
targhetta di taratura del caricatore.
Questo caricatore è progettato per l’uso con la corrente alternata di
230 V, 50 Hz. Collegandolo a una qualsiasi altra fonte di alimentazione
si potrebbe danneggiare l’utensile. Non esporre l’avvitatore a batteria
alla pioggia o all’umidità.
Questo simbolo indica che il caricatore è un dispositivo di Classe
che non richiede la messa a terra.
IDENTIFICAZIONE DELLE PARTI
1. Luce LED
2. Interruttore di accensione/spegnimento luce LED
3. Selettore di rotazione in avanti/inversione e interruttore di accensione/spegnimento
4. Portapunta avvitatore
5. Boccola di piegamento manico
6. Cinghia di trasporto
7. Presa di carica
8. Adattatore di carica
9. Spina di carica
10. Valigetta di trasporto/conservazione
II
39
Page 40

ISTRUZIONI PER L’USO
ATTENZIONE!
Non sovraccaricare la batteria. Ricaricarla soltanto quando l’utensile
comincia a funzionare con lentezza.
1. Carica della batteria
1. La batteria deve essere caricata per 5 ore prima del suo primo uso.
2. Le nuove batterie, oppure una batteria che è stata lasciata scarica per qualche tempo,
potrebbero non accettare una carica piena. Ciò è normale. Esse si caricano pienamente
dopo diversi cicli di carica e scarica.
3. La batteria deve sempre essere caricata a una temperatura ambiente compresa tra i 4° e i
40°C.
4. Prima della prima carica, la batteria deve essere completamente scarica. Usare l'interruttore
di accensione/spegnimento finché il motore si ferma.
5. Accertarsi che l’interruttore di accensione/spegnimento non sia attivato. La batteria non si
carica se l’interruttore è sulla posizione di accensione.
6. Inserire la spina dell’adattatore di carica nella presa di carica dell’avvitatore. Vedere le figure
1 e 2.
7. Collegare l’adattatore di carica alla presa di rete.
8. Dopo la carica iniziale di 5 ore, l’avvitatore è pronto per l’uso. Le cariche piene successive
richiedono 3 ore.
9. Spegnere e rimuovere l’adattatore di carica dalla presa di rete e staccare la spina di carica
dall’avvitatore.
1
2
Durante la carica, la batteria e il caricatore potrebbero diventare caldi. Ciò è normale
e continua finché la batteria è completamente carica e si stacca il caricatore dalla
presa di rete.
40
Page 41

ISTRUZIONI PER L’USO
ATTENZIONE!
Non premere l’interruttore di accensione/spegnimento durante la
rimozione o l’installazione delle punte.
2. Inserimento delle punte
Per inserire una punta, spingerla saldamente nel portapunta dell’avvitatore. Vedere le figure 3 e
4.
3
Per rimuovere una punta, tirarla fuori saldamente dal portapunta.
Se necessario, il portapunta magnetico in dotazione all’avvitatore può essere inserito nel
portapunta e la punta può poi essere inserita nel portapunta magnetico.
Questo avvitatore a batteria è dotato di un pacco accessori di 80 pezzi. Per i dettagli, vedere a
pagina 36.
NOTA:
Le punte di ricambio possono essere acquistate nella maggior parte dei negozi di utensili.
ATTENZIONE!
Prima di azionare l’interruttore di accensione/spegnimento, bisogna
aver letto completamente le istruzioni per la sicurezza alle pagine 37,
38 e 39.
4
3. Funzionamento dell’interruttore di accensione/spegnimento
L’interruttore di accensione/spegnimento serve ad avviare l’avvitatore. Esso controlla anche la
direzione di rotazione del portapunta.
Rotazione in avanti
(avvitamento)
5
1. Per far ruotare il portapunta in avanti (avvitamento), premere il lato destro dell’interruttore di
accensione/spegnimento marcato . Vedere la figura 5.
41
Page 42

Inversione
(Rimozione delle viti)
6
2. Per far ruotare il portapunta in direzione inversa (rimozione delle viti), premere il lato sinistro
dell’interruttore di accensione/spegnimento marcato . Vedere la figura 6.
3. Rilasciare l’interruttore di accensione/spegnimento per fermare l’avvitatore.
NOTA:
Usare sempre punte per avvitatore affilate di buona qualità. Le prestazioni e la sicurezza
dell’avvitatore dipendono dalla qualità delle punte usate.
4. Uso della luce LED
L’avvitatore è dotato di una luce LED, che è di
Premere
7
5. Uso del manico pieghevole
8
aiuto quando si usa l’avvitatore in rientranze
scure o aree poco illuminate. Per accendere la
luce LED, premere l’interruttore di accensione/
spegnimento luce LED come mostrato nella
figura 7.
Per spegnere la luce LED, premere di nuovo
l’interruttore di accensione/spegnimento.
L’avvitatore è dotato di un manico pieghevole,
per l’uso in linea diritta o come impugnatura di
pistola. Quando esso è piegato nella posizione
di impugnatura di pistola, aiuta a usare
l’avvitatore nelle aree con accesso ristretto.
Vedere la figura 8.
Per usare il manico pieghevole, afferrare il
manico inferiore con una mano e spostare il
manico superiore sulla posizione desiderata con
l’altra mano.
42
Page 43

6. Uso dell’avvitatore
Usando l’avvitatore bisogna osservare i punti seguenti.
1. Mettere la punta sulla testa della vite ed esercitare una leggera pressione sull’avvitatore.
2. Accertarsi che la punta sia inserita diritta nella testa della vite, perché altrimenti si potrebbe
danneggiare la vite.
3. Avviare l’avvitatore premendo l’interruttore di accensione/spegnimento.
4. Per avvitare le viti per legno, praticare prima un foro di guida per facilitare l’avvitamento ed
evitare che il pezzo si scheggi.
5. Il foro di guida ha due scopi. Agisce da guida per l’ingresso della vite ed evita che il legno
diventi distorto o si scheggi.
6. I fori di guida devono essere praticati a una profondità pari o maggiore della lunghezza della
vite usata.
7. La tabella sotto va usata come guida per le dimensioni del foro di guida.
Diametro foro guida
Dimensioni vite Legno tenero Legno duro
No. 6 (3,5 mm) 2,0 mm 2,5 mm
No. 8 (4,0 mm) 3,2 mm 3,5 mm
No. 10 (5,0 mm) 3,5 mm 4,0 mm
8. Selezionare la rotazione in avanti per avvitare le viti, e la rotazione inversa per estrarle.
9. Fare attenzione a non stringere troppo le piccole viti di ottone. La loro testa si storce
facilmente e la filettatura potrebbe rovinarsi. Si consiglia di stringere manualmente queste viti.
10. Usare le viti a croce ogni volta possibile. Esse sono più facili da avvitare, perché la punta
dell’avvitatore entra più saldamente nella testa della vite.
11. Per inserire una vite in un foro già filettato, cominciare l’avvitamento a mano. Avvitare la vite
finché si sente che la filettatura fa presa, e usare poi l’avvitatore per stringere la vite.
12. Per usare gli avvitadadi forniti con questo avvitatore, fare attenzione a non stringere troppo i
dadi perché potrebbero danneggiarsi.
PULIZIA E MANUTENZIONE
ATTENZIONE!
Non premere l’interruttore di accensione/spegnimento quando si
eseguono le procedure di pulizia e manutenzione.
Dopo l’uso, rimuovere la punta e dare dei leggeri colpetti sul fianco dell’avvitatore per togliere
tutta la polvere, i trucioli, ecc.
Pulire il corpo dell’avvitatore con un panno morbido. Mantenere le mani pulite ed esenti da olio e
grasso.
Mantenere l’adattatore di carica pulito ed esente da polvere e grasso. Le parti usurate o
danneggiate devono essere sostituite da personale qualificato. All’interno dell’avvitatore non ci
sono parti riparabili dall’utente. Se è necessaria la manutenzione interna, farla eseguire da
personale qualificato. Conservare sempre l’avvitatore e l’adattatore di carica nella valigetta di
trasporto.
43
Page 44

PROTEZIONE DELL’AMBIENTE
Riciclate sempre le batterie.
Riciclare sempre i materiali indesiderati invece di gettarli via. Tutti gli
utensili, accessori e materiali d’imballaggio devono essere separati,
portati in un centro di riciclaggio e rottamati in un modo compatibile
con l’ambiente.
Quando la batteria all’interno dell’avvitatore non è più necessaria,
bisogna disfarsene in un modo che protegga l’ambiente. La batteria
contiene nichel-cadmio (NiCad). Essa è riciclabile. Portarla dal
rivenditore o in un centro locale di riciclaggio, in modo che venga
rottamata correttamente. Non bruciare le batterie NiCad, perché
possono esplodere se esposte al fuoco. Non cercare di aprire la
batteria.
Modo di rimuovere la batteria all’interno (per il riciclaggio)
Seguire le istruzioni (da 1 a 3) sotto.
1. Svitare le viti (4 pezzi) nell’impugnatura/corpo principale alloggiamento.
2. Rimuovere il tappo nero con un attrezzo appuntito, e svitare la vite.
3. Scollegare il ricettacolo (batteria).
Viti
44
Impugnatura
Tappo nero
Alloggiamento principale
Page 45

DICHIARAZIONE DI CONFORMITÀ CON LE NORME DELLA
COMUNITÀ EUROPEA
ENH002-3
Dichiariamo sotto la nostra sola responsabilità che questo prodotto è conforme agli standard di
documenti standardizzati seguenti: EN50260, EN55014 secondo le direttive del Consiglio 89/
336/CEE e 98/37/CE.
Yasuhiko Kanzaki
Amministratore
CE 2004
MAKITA INTERNATIONAL EUROPE LTD.
Michigan Drive, Tongwell, Milton Keynes,
Bucks MK15 8JD, ENGLAND
Produttore responsabile:
Makita Corporation Anjo Aichi Japan
Rumore e vibrazione
ENG001-1
Il livello di pressione sonora pesata secondo la curva A non supera i 70 dB (A).
Il livello di rumore durante il lavoro potrebbe superare gli 85dB (A).
– Indossare i paraorecchi. –
Il valore quadratico medio di accellerazione non supera i 2,5 m/s
2
.
45
Page 46

NEDERLANDS
LET OP: Lees a.u.b. zorgvuldig alle veiligheids- en
bedieningsinstructies, voordat u deze accuschroevendraaier gaat
gebruiken. Besteed in het bijzonder aandacht aan alle secties van deze
gebruiksaanwijzing, die voorzien zijn van symbolen en opmerkingen.
Inhoud Blz.
TECHNISCHE GEGEVENS 47
EIGENSCHAPPEN 47
INHOUD VERPAKKING 47
VEILIGHEIDSINSTRUCTIES 48
ELEKTRISCHE VEILIGHEID 50
BENAMING VAN DE ONDERDELEN 50
BEDIENINGSINSTRUCTIES 51 – 54
• De accu opladen
• Plaatsen van bits
• Werking aan/uit-schakelaar
• Gebruik van het LED-lamp
• Instellen van de knikstand-handgreep
• Gebruik van de schroevendraaier
REINIGING EN ONDERHOUD 55
MILIEUBESCHERMING 55
EG-VERKLARING VAN CONFORMITEIT 56
De technische gegevens zijn onderhevig aan wijzigingen zonder voorafgaande kennisgeving.
46
Page 47

TECHNISCHE GEGEVENS
Modelnummer 6722DW
Spanning van schroevendraaier 4,8 volt
Oplaadapparaat 230 V wisselstroom, 50 Hz
Oplaadtijd 3 tot 5 uur
Type accu Nikkelcadmiumaccu
Aantal cellen 4
Capaciteit 600 mAh
EIGENSCHAPPEN
Handgreep met knikstand Draairichtingomschakeling
Automatische asblokkering Draagriem
LED-lamp Accessoirepakket
Handgreep met rubberlaag
INHOUD VERPAKKING
Accuschroevendraaier 6722DW
3-uurs oplaadapparaat
Draag-/opbergtas
80-delig accessoirepakket bevattende:
1 magnetische bithouder
9 dopsleutelbits 5, 6, 7, 8, 9, 10, 11, 12, 13 mm
6 lange bits (50 mm) 3 bits voor sleufschroeven: 4, 5, 6 mm
3 bits voor kruiskopschroeven: nummers 1, 2, 3
64 korte bits (25 mm)
12 bits voor sleufschroeven 3, 4, 5, 5,5, 6, 7 mm (elk 2 stuks)
8 bits voor kruiskopschroeven nummers 0, 1, 2, 3 (elk 2 stuks)
16 bits voor pozidriv-schroeven nummers 0, 1, 2, 3 (elk 4 stuks)
10 zeskante stiftbits 2, 2,5, 3, 3, 4, 4, 5, 5, 6, 7 mm (elk 1 stuk)
7 zeskante stiftbits 5/64", 3/32", 1/8", 5/32", 3/16", 1/4", 9/32" (elk 1 stuk)
4 vierkante stiftbits nummers 0, 1, 2, 3 (elk 1 stuk)
7 bits voor Torx-schroeven T10, 15, 20, 25, 27, 30, 40 (elk 1 stuk)
47
Page 48

VEILIGHEIDSINSTRUCTIES
LET OP:
Bij gebruik van accugereedschappen moeten, om het risico van brand, lekkende
accu’s en persoonlijk letsel te voorkomen, de algemene veiligheidsvoorschriften,
met inbegrip van de volgende, in acht worden genomen: Lees deze instructies,
voordat u dit product gaat gebruiken en bewaar ze goed.
Voor veilig gebruik:
1. Houd uw werkomgeving schoon.
Een rommelige werkomgeving of werkbank kan tot ongevallen leiden.
2. Denk aan de werkomgeving.
Stel het gereedschap niet bloot aan regen. Zorg ervoor dat de werkomgeving goed verlicht is.
Werk met het gereedschap niet in een omgeving waarin zich brandbare vloeistoffen en
gassen bevinden.
3. Houd kinderen uit de buurt.
Laat andere personen niet aan het gereedschap komen. Houd andere personen uit de buurt
van de werkplek.
4. Berg accu’s en niet-gebruikte gereedschappen op.
Niet-gebruikte gereedschappen en accu’s moeten, buiten bereik van kinderen, op een droge,
hoge en vergrendelde plaats opgeborgen worden.
Zorg ervoor dat kortsluiting van de accucontacten, door schroeven, spijkers of iets dergelijks,
niet kan voorkomen.
5. Overbelast het gereedschap niet.
U werkt beter en veiliger binnen het aangegeven capaciteitsbereik.
6. Gebruik het juiste gereedschap.
Overbelast licht gereedschap of toebehoren niet bij het gebruik voor werkzaamheden die
bestemd zijn voor zwaarder gereedschap. Gebruik het gereedschap niet voor
werkzaamheden waarvoor het niet bestemd is.
7. Draag geschikte kleding.
Draag geen loshangende kleding of sieraden, die door bewegende delen vastgepakt kunnen
worden. Bij werkzaamheden buitenshuis worden slipvaste werkschoenen aangeraden.
Gebruik een veiligheidsnetje om losse haren bij elkaar te houden.
8. Draag beschermingsmiddelen.
Draag een veiligheidsbril en, bij veel stofontwikkeling, een stofmasker.
9. Sluit een stofafzuigvoorziening aan.
Als er stofafzuig- of stofopvangvoorzieningen beschikbaar zijn moet u ervoor zorgen dat deze
zijn aangesloten en op de juiste wijze worden gebruikt.
10. Gebruik het elektrische snoer (indien meegeleverd) niet voor een verkeerd doel.
Draag het gereedschap nooit aan het snoer en trek de stekker nooit met een ruk uit het
stopcontact. Houd het snoer uit de buurt van hitte, olie en scherpe randen.
11. Zet het werkstuk vast.
Gebruik spanklemmen of een bankschroef om het werkstuk vast te klemmen. Dit is veiliger
dan het vastklemmen met uw hand en u hebt beide handen vrij om het gereedschap te
hanteren.
12. Werk niet buiten uw macht.
Zorg ervoor dat u stevig staat en steeds in evenwicht blijft.
48
Page 49

13. Verzorg het gereedschap zorgvuldig.
Houd snijdende gereedschappen scherp en schoon voor betere en veiligere prestaties. Volg
de instructies voor het invetten en wisselen van de accessoires op. Controleer regelmatig de
snoeren en laat beschadigde delen repareren door een erkende serviceafdeling.
14. De accu uit het gereedschap verwijderen.
Verwijder, indien mogelijk, de accu uit het gereedschap, als deze niet gebruikt wordt, voordat
u onderhoud uitvoert of als u accessoires, zoals beitels, bits en messen, wisselt.
15. Verwijder instelgereedschappen of schroefsleutels.
Maak er een gewoonte van om te controleren, dat de instelgereedschappen of
schroefsleutels verwijderd zijn, voordat u het gereedschap inschakelt.
16. Voorkom onbedoeld starten van het gereedschap.
Draag het gereedschap niet met een vinger aan de schakelaar.
17. Wees alert.
Let op wat u doet. Ga met verstand te werk. Gebruik het gereedschap niet als u moe bent.
18. Controleer onderdelen op beschadiging.
Voordat u verder gebruik maakt van dit gereedschap, moet een beschadigde beschermkap of
ander onderdeel zorgvuldig nagekeken worden om na te gaan of deze nog correct
functioneert en of zijn beoogde werking niet aangetast is. Controleer de bewegende delen of
ze goed uitgelijnd zijn en niet vastklemmen, onderdelen op breuk, de bevestiging en elke
andere omstandigheid waardoor de werking nadelig beïnvloed kan worden. Een beschadigde
beschermkap of ander onderdeel moet, tenzij anders aangegeven in deze
gebruiksaanwijzing, op de juiste wijze gerepareerd of vervangen worden door een erkende
serviceafdeling. Laat beschadigde schakelaars vervangen door een erkende serviceafdeling.
Gebruik geen elektrisch gereedschap waarvan de schakelaar defect is.
19. Let op.
Het gebruik van accessoires of inzetgereedschappen, anders dan aanbevolen in deze
gebruiksaanwijzing of catalogus, kan leiden tot persoonlijk letsel.
Zorg ervoor dat u alleen geschikte accu’s in het gereedschap gebruikt.
Zorg ervoor dat de buitenkant van de accu schoon en droog is, voordat u deze in het
oplaadapparaat plaatst.
Laad accu’s alleen op in oplaadapparaten die door de fabrikant worden geadviseerd. Onjuist
gebruik kan leiden tot een elektrische schok, oververhitting of lekkage van de corroderende
vloeistof uit de accu.
20. Laat het gereedschap repareren door gekwalificeerd personeel.
Dit gereedschap is vervaardigd volgens de relevante veiligheidseisen. Laat het gereedschap
alleen repareren door gekwalificeerd personeel en alleen met originele
vervangingsonderdelen. Zoniet kan dit een aanzienlijk gevaar voor de gebruiker opleveren.
21. Verwijdering van de accu.
Zorg ervoor dat de accu veilig en in overeenstemming met de instructies van de fabrikant
verwijderd wordt.
49
Page 50

AANVULLENDE VEILIGHEIDSVOORSCHRIFTEN
VOOR HET GEREEDSCHAP
1. Denk eraan dat dit gereedschap altijd gebruiksklaar is, omdat het niet op een
stopcontact hoeft te worden aangesloten.
2. Houd het gereedschap bij de geïsoleerde handgrepen vast wanneer u boort op
plaatsen waar het gereedschap met verborgen elektrische bedrading in aanraking kan
komen. Door contact met een onder spanning staande draad, zullen ook de nietgeïsoleerde metalen delen van het gereedschap onder spanning komen te staan en zal
de gebruiker een elektrische schok krijgen.
3. Zorg ervoor dat u altijd stevige steun voor de voeten hebt. Controleer of er zich
niemand beneden bevindt wanneer u het gereedschap op een hoge plaats gaat
gebruiken.
4. Houd het gereedschap stevig vast.
5. Houd uw handen uit de buurt van roterende onderdelen.
BEWAAR DEZE VOORSCHRIFTEN.
ELEKTRISCHE VEILIGHEID
LET OP: Lees deze veiligheidsinstructies zorgvuldig, voordat u de
stekker van het oplaadapparaat in het stopcontact steekt. Controleer
of het voltage van het stopcontact overeenkomt met de aanduiding op
het typeplaatje van het oplaadapparaat.
Dit oplaadapparaat is ontworpen voor gebruik met 230 V wisselstoom
(50 Hz). Aansluiting van het oplaadapparaat met een andere spanning
kan leiden tot beschadiging van het gereedschap. Houd de
accuschroevendraaier uit de buurt van regen en vocht.
Dit symbool geeft aan dat het oplaadapparaat een Class
en geen aardaansluiting nodig heeft.
BENAMING VAN DE ONDERDELEN
1. LED-lamp
2. Aan/uit-schakelaar van LED-lamp
3. Draairichtingomschakelaar en aan/uit-schakelaar
4. Bithouder
5. As van de knikstand-handgreep
6. Draagriem
7. Aansluitcontact voor oplaadstekker
8. Oplaadapparaat
9. Oplaadstekker
10. Draag-/opbergtas
50
II
-apparaat is
Page 51

BEDIENINGSINSTRUCTIES
LET OP!
Overlaad de accu niet. Laad het gereedschap alleen op als deze
langzaam begint te draaien.
1. De accu opladen
1. Voor ingebruikneming moet de accu 5 uur opgeladen worden.
2. Een nieuwe of lang niet gebruikte accu is aanvankelijk niet in staat om de maximale
accucapaciteit te leveren. Dit is normaal. Pas na enkele oplaad- en ontlaadcycli wordt de
volledige capaciteit geleverd.
3. De accu moet altijd opgeladen worden bij een omgevingstemperatuur tussen 4°C en 40°C.
4. Voor de eerste oplading moet de accu volledig ontladen zijn. Gebruik de aan/uit-schakelaar
totdat de motor stopt.
5. Zorg ervoor dat het gereedschap uitgeschakeld is. De accu wordt niet opgeladen als het
gereedschap ingeschakeld is.
6. Plaats de oplaadstekker in het desbetreffende aansluitcontact op de schroevendraaier. Zie
afbeeldingen 1 en 2.
7. Steek de stekker van het oplaadapparaat in het stopcontact.
8. Na de eerste oplading van 5 uur is de schroevendraaier gereed voor gebruik. Volgende
volledige opladingen duren 3 uur.
9. Haal de stekker van het oplaadapparaat uit het stopcontact en verwijder de oplaadstekker uit
de schroevendraaier.
1
2
Tijdens het opladen kunnen de accu en het oplaadapparaat warm worden. Dit is
normaal en zal zo blijven totdat de accu volledig opgeladen is en de stekker van het
oplaadapparaat uit het stopcontact is gehaald.
51
Page 52

BEDIENINGSINSTRUCTIES
LET OP!
Druk niet op de aan/uit-schakelaar bij het verwijderen of plaatsen van een
bit.
2. Plaatsen van bits
Om een bit te plaatsen moet deze stevig in de bithouder van de schroevendraaier geduwd
worden. Zie afbeeldingen 3 en 4.
3
Om een bit te verwijderen moet deze stevig uit de bithouder van de schroevendraaier getrokken
worden.
Indien nodig kan de meegeleverde magnetische bithouder in de bithouder van de
schroevendraaier geplaatst worden. De bits kunnen dan in de magnetische bithouder geplaatst
worden.
Deze accuschroevendraaier wordt geleverd met een 80-delig accessoirepakket. Zie bladzijde 47
voor details.
OPMERKING:
Vervangende bits kunnen in de meeste gereedschap- of doe-het-zelfzaken gekocht worden.
LET OP!
Zorg ervoor dat u alle veiligheidsinstructies op bladzijden 48, 49 en 50
gelezen hebt, voordat u de aan/uit-schakelaar gebruikt.
4
52
Page 53

3. Werking aan/uit-schakelaar
De aan/uit-schakelaar wordt gebruikt om de schroevendraaier in te schakelen. Hiermee kunt u
ook de draairichting van de bithouder regelen.
Voor wa ar ts
(Indraaien)
5
1. Om de bithouder in voorwaartse richting (indraaien) te laten draaien, moet u op de
rechterkant van de aan/uit-schakelaar, met de aanduiding , drukken. Zie afbeelding 5.
Achterwaarts
(Schroeven uitdraaien)
6
2. Om de bithouder in achterwaartse richting (schroeven uitdraaien) te laten draaien moet u op
de linkerkant van de aan/uit-schakelaar, met de aanduiding , drukken. Zie afbeelding 6.
3. Laat de aan/uit-schakelaar los om de schroevendraaier uit te schakelen.
OPMERKING:
Gebruik altijd scherpe bits van goede kwaliteit. De prestatie en veiligheid van de
schroevendraaier is afhankelijk van de kwaliteit van de gebruikte bits.
4. Gebruik van het LED-lamp
Druk
7
De schroevendraaier is voorzien van een LEDlamp, om u te assisteren bij het gebruik van de
schroevendraaier in donkere hoekjes en op
plaatsen waar de lichtomstandigheden
ongunstig zijn. Om het LED-lamp in te
schakelen moet u op de aan/uit-schakelaar van
het LED-lamp, zoals weergegeven in afbeelding
7, drukken.
Om het LED-lamp uit te schakelen moet u
nogmaals op de aan/uit-schakelaar van het
LED-lamp drukken.
53
Page 54

5. Instellen van de knikstand-handgreep
De schroevendraaier is voorzien van een
knikstand-handgreep die gebruikt kan worden
als een rechte greep of als een pistoolgreep. De
handgreep geknikt als een pistoolgreep is
handig bij gebruik op moeilijk toegankelijke
plaatsen. Zie afbeelding 8.
Om de knikstand-handgreep in te stellen, moet
u het onderste gedeelte met een hand
vasthouden en het bovenste gedeelte met de
8
andere hand in de gewenste positie brengen.
6. Gebruik van de schroevendraaier
Bij gebruik van de schroevendraaier moet u op volgende punten letten.
1. Plaats de punt van het bit in de schroefkop en druk licht met de schroevendraaier.
2. Zorg ervoor, om beschadiging van de schroefkop te voorkomen, dat het bit recht in de
schroefkop geplaatst is.
3. Schakel de schroevendraaier in door op de aan/uit-schakelaar te drukken.
4. Voorboren van de schroefgaten zorgt ervoor dat houtschroeven makkelijker indraaien en dat
het materiaal niet splijt.
5. Het voorgeboorde gat heeft twee functies. Het zorgt voor de geleiding van de schroef tijdens
het indraaien en het voorkomt vervorming of splijting van het hout.
6. De diepte bij het voorboren is gelijk aan of groter dan de lengte van de gebruikte schroef.
7. Onderstaande tabel kan gebruikt worden als richtlijn voor de grootte van het voorgeboorde
gat.
Diameter voorgeboorde gat.
Grootte schroef Zacht hout Hard hout
No. 6 (3,5 mm) 2,0 mm 2,5 mm
No. 8 (4,0 mm) 3,2 mm 3,5 mm
No.10 (5,0 mm) 3,5 mm 4,0 mm
8. Kies
9. Zorg ervoor kleine koperen schroeven niet te strak aan te draaien. De schroefkop kan
10. Gebruik zoveel mogelijk pozidriv-schroeven. Ze zijn gemakkelijker in te draaien omdat het bit
11. Bij plaatsing van een schroef in een gat, waarin al een schroefdraad aanwezig is, moet u het
12. Bij gebruik van de, bij deze schroevendraaier geleverde, dopsleutelbits, moet u ervoor zorgen
voorwaartse
om ze uit te draaien.
gemakkelijk afbreken en de schroefdraad beschadigd raken. Het wordt aanbevolen deze
schroeven met de hand aan te draaien.
steviger in de schroefkop zit.
begin met de hand schroeven. Draai de schroef aan totdat u voelt dat de schroefdraad pakt
en gebruik daarna de schroevendraaier om de schroef aan te draaien.
de bouten niet te hard aan te draaien omdat ze anders beschadigd kunnen raken.
draairichting om schroeven in te draaien en
achterwaartse
draairichting
54
Page 55

REINIGING EN ONDERHOUD
LET OP!
Druk niet op de aan/uit-schakelaar tijdens schoonmaak- en
onderhoudswerkzaamheden.
Verwijder na gebruik het bit en klop op de zijkant van de bithouder om eventueel stof of scherfjes
te verwijderen.
Reinig het oppervlak van de schroevendraaier met een zachte doek. Houd de handgreep schoon
en olie- en vetvrij.
Houd het oplaadapparaat schoon en stof- en vetvrij. Versleten en beschadigde onderdelen
moeten door gekwalificeerd personeel vervangen worden. Er zijn geen onderdelen in de
schroevendraaier waaraan de gebruiker onderhoud moet plegen. Wendt u tot gekwalificeerd
servicepersoneel voor noodzakelijk onderhoud van het gereedschap. Berg de schroevendraaier
en het oplaadapparaat altijd op in de draagtas.
MILIEUBESCHERMING
Recycle altijd de accu’s.
Terugwinnen van grondstoffen in plaats van het weggooien van afval.
Alle gereedschappen, toebehoren en verpakkingen moeten gesorteerd
en naar een recyclecentrum gebracht worden en op milieuvriendelijke
wijze worden afgevoerd.
Als de accu in de schroevendraaier niet langer gebruikt wordt, moet
deze op milieuvriendelijke wijze worden afgevoerd. De accu bevat
nikkelcadmium (NiCd). Het kan gerecycled worden. Breng het naar uw
gereedschapwinkel of een lokaal recyclecentrum, zodat het op juiste
wijze afgevoerd wordt. Verbrand NiCd-accu’s niet in verband met
explosiegevaar. Probeer de accu niet open te maken.
55
Page 56

De accu uit het gereedschap verwijderen. (voor recycling)
Voer a.u.b. onderstaande handelingen (1 t/m 3) uit.
1. Draai de schroeven (4 stuks) in de handgreep/behuizing los.
2. Verwijder de zwartgekleurde dop met behulp van een scherp voorwerp en draai de schroef
los.
3. Maak de aansluitingen van de accu los.
Schroeven
Handgreep
Zwartgekleurde dop
Behuizing
EG-VERKLARING VAN CONFORMITEIT
ENH002-3
Wij verklaren hierbij uitsluitend op eigen verantwoordelijkheid dat dit produkt voldoet aan de
volgende normen van genormaliseerde documenten, EN50260, EN55014 in overeenstemming
met de richtlijnen van de Raad 89/336/EEC en 98/37/EC.
Yasuhiko Kanzaki
Directeur
CE 2004
MAKITA INTERNATIONAL EUROPE LTD.
Michigan Drive, Tongwell, Milton Keynes,
Bucks MK15 8JD, ENGLAND
Verantwoordelijke fabrikant:
Makita Corporation Anjo Aichi Japan
Geluidsniveau en trilling
ENG001-1
Het typische A-gewogen geluidsdrukniveau is niet meer dan 70 dB (A).
Tijdens het werken kan het geluidsniveau 85 dB (A) overschrijden.
– Draag oorbeschermers. –
De typische gewogen effectieve versnellingswaarde is niet meer dan 2,5 m/s
2
.
56
Page 57

ESPAÑOL
ADVERTENCIA: Lea todas estas instrucciones de seguridad y
funcionamiento detenidamente antes de utilizar el atornillador a
batería. Preste atención particular a todas las secciones de este
manual de instrucciones que contengan símbolos y notas de
advertencia.
Índice página
ESPECIFICACIONES DEL PRODUCTO 58
CARACTERÍSTICAS 58
CONTENIDO DEL PAQUETE 58
INSTRUCCIONES DE SEGURIDAD 59
SEGURIDAD ELÉCTRICA 61
IDENTIFICACIÓN DE LAS PARTES 61
INSTRUCCIONES DE FUNCIONAMIENTO 62 – 65
• Carga de la batería
• Inserción de las puntas de atornillar
• Accionamiento del interruptor de encendido/apagado
• Utilización de la luz LED
• Utilización del mango plegable
• Utilización del atornillador
LIMPIEZA Y MANTENIMIENTO 66
PROTECCIÓN MEDIOAMBIENTAL 66
DECLARACIÓN DE CONFORMIDAD DE LA CE 67
Las especificaciones están sujetas a cambio sin previo aviso.
57
Page 58

ESPECIFICACIONES DEL PRODUCTO
Número de modelo 6722DW
Te ns i ón del atornillador 4,8 voltios
Adaptador de carga 230 V CA – 50 Hz
Tiempo en cargar 3 – 5 horas
Tipo de batería Cartucho de batería de níquel-cadmio (Ni-cd)
Número de celdas 4
Capacidad 600 mAh
CARACTERÍSTICAS
Mango plegable Accionamiento hacia delante/atrás
Bloqueo automático del eje Correa de transporte
Luz de iluminaión de LED Paquete de accesorios
Empuñadura recubierta de goma
CONTENIDO DEL PAQUETE
Atornillador a batería 6722DW
Adaptador de carga de 3 horas
Caja de transporte/almacenamiento
Paquete de accesorios de 80 piezas que contiene:
1 portapuntas magnético
9 llaves de tuercas 5, 6, 7, 8, 9, 10, 11, 12 y 13 mm
6 puntas de 50 mm 3 planas de 4, 5 y 6 mm
3 de estrella números 1, 2 y 3
64 puntas de 25 mm
12 planas 3, 4, 5, 5,5, 6 y 7 mm (2 piezas de cada una)
8 de estrella números 0, 1, 2 y 3 (2 piezas de cada una)
16 Pozidrive números 0, 1, 2 y 3 (4 piezas de cada una)
10 Hexagonales 2, 2,5, 3, 3, 4, 4, 5, 5, 6 y 7 mm (1 pieza de cada una)
7 Hexagonales 5/64", 3/32", 1/8", 5/32", 3/16", 1/4" y 9/32" (1 pieza de cada una)
4 cuadradas números 0, 1, 2 y 3 (1 pieza de cada una)
7 Torx T10, 15, 20, 25, 27, 30 y 40 (1 de cada una)
58
Page 59

INSTRUCCIONES DE SEGURIDAD
ADVERTENCIA:
Cuando utilice herramientas de funcionamiento a batería, deberá tomar siempre
precauciones básicas, incluyendo las siguientes, para reducir el riesgo de
incendios, fugas del líquido de las baterías y heridas personales. Lea estas
instrucciones antes de utilizar este producto y guárdelas para futuras consultas.
Para trabajar de forma segura:
1. Mantenga el área de trabajo limpia.
Las áreas y bancos de trabajo atestados acarrean heridas.
2. Considere el ambiente de trabajo.
No exponga la herramienta a la lluvia. Mantenga el área de trabajo bien iluminada. No utilice
la herramienta en presencia de líquidos o gases inflamables.
3. Mantenga alejados a los niños.
No deje que los visitantes toquen la herramienta. Mantenga a los visitantes alejados del área
de trabajo.
4. Guarde las baterías y herramientas que no esté utilizando.
Cuando no estén siendo utilizadas, las herramientas y las baterías deberán
estar guardadas en un lugar seco, alto o cerrado con llave, alejadas de los niños.
Asegúrese de que los terminales de las baterías no se cortocircuiten con algo metálico tal
como tornillos, puntas, etc.
5. No fuerce la herramienta.
La herramienta realizará la tarea mejor y de forma más segura a la potencia para la que ha
sido diseñada.
6. Utilice la herramienta correcta.
No fuerce herramientas o accesorios pequeños realizando con ellos tareas propias de una
herramienta para trabajos pesados. No utilice la herramienta con fines para los que no ha
sido diseñada.
7. Vístase apropiadamente.
No se ponga ropa holgada ni joyas, porque podrán enganchare en las partes móviles. Para
trabajos en el exterior se recomienda utilizar calzado antideslizante. Cúbrase el pelo para
protegerlo si lo tiene largo.
8. Utilice equipo de protección.
Utilice gafas de seguridad y, si la operación es polvorienta, una máscara facial o mascarilla
de polvo.
9. Conecte equipo extractor de polvo.
Si hay provistos dispositivos para la conexión de equipos de extracción y recogida de polvo,
asegúrese de conectarlos y utilizarlos debidamente.
10. No maltrate el cable de alimentación (si lo hay).
No coja nunca la herramienta por el cable ni tire de él para desenchufarlo de la toma de
corriente. Mantenga el cable alejado de calor, aceite, agua y bordes cortantes.
11. Sujete la pieza de trabajo.
Utilice mordazas o un tornillo de banco para sujetar la pieza de trabajo. Es más seguro que
utilizar la mano y además dispondrá de ambas manos para manejar la herramienta.
12. No realice tareas donde no alcance.
Mantenga los pies sobre suelo firme y el equilibrio en todo momento.
59
Page 60

13. Mantenga las herramientas con cuidado.
Mantenga las herramientas afiladas y limpias para obtener de ellas un mejor y más seguro
rendimiento. Siga las instrucciones para lubricarlas y cambiar los accesorios. Inspeccione
periódicamente el cable de la herramienta y, si está dañado, haga que se lo reparen en un
taller de servicio autorizado.
14. Desconecte las herramientas.
Si el diseño lo permite, desconecte la herramienta de la batería cuando no la esté utilizando,
antes de hacerle el servicio y cuando cambie accesorios tales como discos, puntas de
atornillar y cuchillas.
15. Retire las llaves de ajuste y apriete.
Adquiera el hábito de comprobar y ver que las llaves de ajuste y de apriete estén retiradas de
la herramienta antes de ponerla en marcha.
16. Evite los arranques indeseados.
No transporte ninguna herramienta con el dedo puesto en el interruptor.
17. Esté siempre alerta.
Esté atento a lo que esté haciendo. Emplee el sentido común. No utilice la herramienta
cuando esté cansado.
18. Compruebe las partes dañadas.
Si un protector u otra parte se daña, antes de seguir utilizando la herramienta deberá
comprobar cuidadosamente para determinar que va a funcionar debidamente y realizar la
función para la que ha sido diseñado. Compruebe que las partes móviles estén bien
alineadas, que se mueven libremente, que no haya ninguna parte rota, el montaje y cualquier
otra condición que pueda afectar su operación. Si hay una parte o protector dañado deberá
ser reparado debidamente o cambiado en un taller de servicio autorizado a menos que se
indique de otra forma en este manual de instrucciones. Haga que los interruptores
defectuosos se los reparen en un centro de servicio autorizado. No utilice la herramienta si el
interruptor no la enciende y apaga.
19. Advertencia.
La utilización de cualquier accesorio o acoplamiento diferente a los recomendados en este
manual de instrucciones o el catálogo, podrá presentar un riesgo de sufrir heridas
personales.
Asegúrese de que la batería es la correcta para la herramienta.
Asegúrese de que la superficie exterior de la batería o de la herramienta esté limpia y seca
antes de ponerla en el cargador.
Asegúrese de cargar las baterías utilizando el cargador correcto recomendado por el
fabricante. El uso de uno incorrecto podrá resultar en un riesgo de descarga eléctrica,
recalentamiento o fuga del líquido corrosivo de la batería.
20. Deje que su herramienta sea reparada por una persona cualificada.
Esta herramienta ha sido fabricada de acuerdo con los requisitos de seguridad aplicables.
Las reparaciones deberán ser realizadas solamente por personas cualificadas utilizando
repuestos originales, de lo contrario, podrá suponer un considerable peligro para el operario.
21. Para desechar la batería.
Asegúrese de desechar la batería de manera segura como indica el fabricante.
60
Page 61

NORMAS DE SEGURIDAD ADICIONALES PARA LA
HERRAMIENTA
1. Tenga en cuenta que esta herramienta está siempre en condición de funcionamiento,
porque no hay que enchufarla a una toma de corriente eléctrica.
2. Cuando realice una operación donde el implemento de corte pueda entrar en contacto
con cables eléctricos ocultos o con su propio cable de alimentación, sujete la
herramienta por las superficies de asimiento aisladas. Si toca un cable con corriente,
la corriente se transmitirá a las superficies metálicas expuestas de la herramienta y
podrá sufrir una descarga eléctrica.
3. Asegúrese siempre de que el piso bajo sus pies sea firme. Asegúrese de que no haya
nadie debajo cuando utilice la herramienta en lugares elevados.
4. Sujete firmemente la herramienta.
5. Mantenga las manos alejadas de las piezas giratorias.
GUARDE ESTAS INSTRUCCIONES.
SEGURIDAD ELÉCTRICA
ADVERTENCIA: Lea estas instrucciones de seguridad atentamente
antes de conectar el cargador a la toma de corriente. Asegúrese de
que la tensión de la toma de corriente sea la misma que la indicada en
la chapa de capacidad de funcionamiento del cargador.
Este cargador ha sido diseñado para funcionar a 230 V CA, 50 Hz. Si lo
conecta a cualquier otra fuente de alimentación podrá ocasionar
daños a la herramienta. No permita que el atornillador a batería sea
expuesto a la lluvia ni a la humedad.
Este símbolo indica que este cargador es un aparato de clase
II
no requiere conexión a tierra.
IDENTIFICACIÓN DE LAS PARTES
1. Luz LED
2. Interruptor de encendido/apagado de la luz LED
3. Selector de dirección hacia delante/atrás e interruptor de encendido/apagado
4. Portapuntas del atornillador
5. Casquillo de plegamiento del mango
6. Correa de transporte
7. Conector de carga
8. Adaptador de carga
9. Clavija de carga
10. Caja de transporte/almacenamiento
y que
61
Page 62

INSTRUCCIONES DE FUNCIONAMIENTO
¡ADVERTENCIA!
No sobrecargue la batería. Cárguela solamente cuando la herramienta
empiece a funcionar lentamente.
1. Carga de la batería
1. Antes de utilizar la batería por primera vez, deberá cargarla durante 5 horas.
2. Las baterías nuevas o una batería que haya estado almacenada durante algún tiempo sin
haberla cargado, tal vez no acepte inicialmente una carga completa. Esto es normal. La
batería se volverá a cargar completamente después de varios ciclos de carga y descarga.
3. La batería deberá ser cargada siempre a una temperatura ambiente de entre 4° y 40°C.
4. Antes de la primera carga, la batería deberá estar completamente descargada. Accione el
interruptor de encendido/apagado hasta que el motor se pare.
5. Asegúrese de que el interruptor de encendido/apagado no esté activado. La batería no se
cargará si el interruptor está en la posición de encendido.
6. Coloque la clavija del adaptador de carga en el conector de carga del atornillador. Consulte
las figuras 1 y 2.
7. Enchufe el adaptador de carga en la toma de corriente.
8. Después de las 5 horas de carga iniciales, el atornillador estará listo para ser utilizado. Las
cargas completas posteriores llevarán 3 horas.
9. Apague y desenchufe el adaptador de carga de la toma de corriente y desenchufe la clavija
de carga del atornillador.
1
2
Durante la carga, la batería y el cargador podrán calentarse. Esto es normal y
continuará hasta que la batería esté completamente cargada y el cargador haya sido
desconectado de la toma de corriente.
62
Page 63

INSTRUCCIONES DE FUNCIONAMIENTO
¡ADVERTENCIA!
No pulse el interruptor de encendido/apagado cuando esté extrayendo o
instalando la punta de atornillar.
2. Inserción de las puntas de atornillar
Para insertar una punta de atornillar, empújela firmemente al interior del portapuntas del
atornillador. Consulte las figuras 3 y 4.
3
Para extraer una punta de atornillar, tire de ella firmemente para sacarla del portapuntas del
atornillador.
Si necesita utilizar el portapuntas magnético suministrado con el atornillador, puede insertarlo en
el portapuntas del atornillador y después insertar la punta de atornillar en el portapuntas
magnético.
Este atornillador a batería se suministra con un paquete de accesorios de 80 piezas. Consulte la
página 58 para ver detalles.
NOTA:
Los repuestos de puntas de atornillar se pueden obtener en la mayoría de las tiendas de
herramientas o de bricolaje.
¡ADVERTENCIA!
Antes de accionar el interruptor de encendido/apagado, asegúrese de
haber leído todas las instrucciones de seguridad de las páginas 59, 60
y 61.
4
63
Page 64

3. Accionamiento del interruptor de encendido/apagado
El interruptor de encendido/apagado se utiliza para poner en marcha el atornillador. También
controla la dirección en la que gira el portapuntas.
Hacia delante
(Atornillar)
5
1. Para girar el portapuntas en dirección hacia delante (atornillar), pulse el lado derecho del
interruptor de encendido/apagado marcado como . Consulte la figura 5.
Hacia atrás
(Destornillar)
6
2. Para girar el portapuntas en dirección hacia atrás (destornillar), pulse el lado izquierdo del
interruptor de encendido/apagado marcado como . Consulte la figura 6.
3. Suelte el interruptor de encendido/apagado para parar el atornillador.
NOTA:
Utilice siempre puntas de atornillar de buena calidad. El rendimiento y seguridad del atornillador
dependen de la calidad de las puntas utilizadas.
4. Utilización de la luz LED
Presionar
7
64
El atornillador está equipado con una luz LED
para ayudarle a ver cuando lo utilice en
recovecos oscuros y otros sitios poco
iluminados. Para encender la luz LED, pulse el
interruptor de encendido/apagado de la luz LED
como se muestra en la figura 7.
Para apagar la luz LED, vuelva a pulsar el
interruptor de encendido/apagado de la luz LED.
Page 65

5. Utilización del mango plegable
El atornillador está equipado con un mango
plegable para utilizarlo en línea recta o como
empuñadura de pistola. Cuando se pliega en
posición de empuñadura de pistola, resulta útil
para utilizarlo en sitios donde el acceso puede
ser dificultoso de otra forma. Consulte la figura
8.
Para utilizar el mango plegable, agarre la parte
inferior del mango con una mano y mueva la
8
parte superior hasta la posición deseada con la
otra mano.
6. Utilización del atornillador
Cuando utilice el atornillador deberá observar los puntos siguientes.
1. Ponga la punta de atornillar en la cabeza del tornillo y aplique una ligera presión al
atornillador.
2. Asegúrese de que la punta de atornillar esté insertada en línea recta en la cabeza del tornillo,
o de lo contrario podrá dañar el tornillo.
3. Encienda el atornillador pulsando el interruptor de encendido/apagado.
4. Cuando atornille tornillos para madera, taladre primero agujeros piloto para facilitar el
atornillado y para evitar que se resquebraje el material.
5. El agujero piloto tiene dos propósitos. Actúa como guía para conducir el tornillo y evita que la
madera se distorsione o resquebraje.
6. Los agujeros piloto deberán ser taladrados a una profundidad igual o mayor que la longitud
del tornillo a utilizar.
7. La tabla de abajo deberá ser utilizada como guía para el tamaño del agujero piloto.
Diámetro del agujero piloto
Tamaños del tornillo Madera blanda Madera dura
No. 6 (3,5 mm) 2,0 mm 2,5 mm
No. 8 (4,0 mm) 3,2 mm 3,5 mm
No.10 (5,0 mm) 3,5 mm 4,0 mm
8. Seleccione
9. Tenga cuidado de no apretar demasiado los tornillos pequeños de latón. La cabeza del
tornillo se retuerce fácilmente y las roscas pueden romperse. Se recomienda atornillar a
mano estos tornillos.
10. Utilice tornillos Posidriv siempre que sea posible. Son más fáciles de roscar, porque la punta
de atornillar encaja más firmemente en la cabeza del tornillo.
11. Cuando inserte un tornillo en un agujero que ya esté roscado, comience a roscarlo a mano.
Rosque el tornillo hasta que sienta que agarra y después utilice el atornillador para apretarlo.
12. Cuando utilice las llaves de tuercas suministradas con el atornillador, tenga cuidado de no
apretar demasiado las tuercas porque podría dañarlas.
giro hacia delante
para atornillar y
giro hacia atrás
para destornillar.
65
Page 66

LIMPIEZA Y MANTENIMIENTO
¡ADVERTENCIA!
No pulse el interruptor de encendido/apagado cuando esté realizando
procedimientos de limpieza y mantenimiento.
Después de la utilización, extraiga la punta de atornillar y golpee ligeramente el costado del
portapuntas del atornillador para quitar cualquier resto de polvo o virutas, etc.
Limpie el cuerpo del atornillador con un paño suave. Mantenga el mango limpio y libre de aceite
y grasa.
Mantenga el adaptador de carga limpio y libre de aceite y grasa. Las partes desgastadas o
dañadas deberán ser reemplazadas por personal cualificado. En el interior del atornillador no
hay partes que el usuario pueda arreglar. Si se requiere mantenimiento interno, recurra a
personal de servicio cualificado. Guarde siempre el atornillador y el adaptador de carga en la
caja de transporte.
PROTECCIÓN MEDIOAMBIENTAL
Recicle siempre las baterías.
Recicle los materiales de desecho en lugar de tirarlos a la basura.
Todas las herramientas, accesorios y material de embalaje deberán
ser separados, llevados a un centro de reciclaje y desechados de
manera respetuosa con el medioambiente.
Cuando la batería del interior del atornillador ya no sirva, deberá
desecharse de forma respetuosa con el medioambiente. La batería
contiene níquel-cadmio (NiCad). Es reciclable. Llévela al distribuidor
de la herramienta o a un centro de reciclaje local para que la desechen
debidamente. No incinere las baterías de níquel-cadmio porque
pueden explotar cuando se exponen al fuego. No intente abrir la
batería.
66
Page 67

Modo de extraer la batería interior. (para reciclar)
Siga las instrucciones (1 a 3) de abajo.
1. Afloje los tornillos (4 en total) de la empuñadura/cuerpo principal.
2. Quite la tapa de color negro con una herramienta puntiaguda y afloje el tornillo.
3. Desconecte el conector (batería).
Tornillos
Mango
Tapa de color negro
Cuerpo principal
DECLARACIÓN DE CONFORMIDAD DE LA CE
ENH002-3
Declaramos bajo nuestra sola responsabilidad que este producto cumple con las siguientes
normas de documentos normalizados, EN50260, EN55014 de acuerdo con las directivas
comunitarias, 89/336/EEC y 98/37/CE.
Yasuhiko Kanzaki
Director
CE 2004
MAKITA INTERNATIONAL EUROPE LTD.
Michigan Drive, Tongwell, Milton Keynes,
Bucks MK15 8JD, ENGLAND
Fabricante responsable:
Makita Corporation Anjo Aichi Japan
Ruido y vibración
ENG001-1
El nivel de presión sonora ponderada A no sobrepasa los 70 dB (A).
El nivel de ruido en condiciones de trabajo puede que sobrepase los 85dB (A).
– Póngase protectores en los oídos. –
El valor ponderado de la aceleración no sobrepasa los 2,5 m/s
2
.
67
Page 68

Makita Corporation
Anjo, Aichi, Japan
 Loading...