

Makita 6510LVR User Manual [ru]
6510LVR
Drill
Instruction Manual
Bohrmaschine
Betriebsanleitung
Wiertarka
Instrukcja obsługi
Дрель
Инструкция по эксплуатации
1
2
3
2

Symbols
The followings show the symbols used for the tool. Be sure that you understand their meaning before use.
Symbole
Die folgenden Symbole werden für die Ma schine verwendet . Machen Sie si ch vor der Benutzun g unbeding t mit ihrer
Bedeutung vertraut.
Symbole
Poniższe symbole używane są do opisu urządzenia. Przed użyciem należy upewnić się, że rozumie się ich znaczenie.
Символы
Следующие объяснения показывают символы, используемые для инструмента. Убедитесь перед
использованием, что Вы понимаете их значение.
❏ Read instruction manual.
❏ Bitte Bedienungsanleitung lesen.
❏ Przeczytaj instrukcję obsługi.
❏ Прочитайте инструкцию по эксплуатации.
❏ DOUBLE INSULATION
❏ DOPPELT SCHUTZISOLIERT
❏ PODWÓJNA IZOLACJA
❏ ДВОЙНАЯ ИЗОЛЯЦИЯ
❏ Only for EU countries
Do not dispose of electric equipment together with household waste material!
In observance of European D irective 2002/96/EC on waste electr ical and electronic equi pment and
its implementation in accordan ce with nationa l law, electric equipm ent that h ave reached the e nd of
their life must be collected separately and returned to an environmentally compatible recycling facility.
❏ Nur für EU-Länder
Werfen Sie Elektrowerkzeuge nicht in den Hausmüll!
Gemäß Europäischer Richtlinie 2002/96/EG über Elektro- und Elektronik-Altgeräte und Umsetzung in
nationales Recht müssen verbrauchte Elek trower kzeuge getr ennt gesa mmelt un d einer um weltger echten Wiederverwertung zugeführ t werde n.
❏ Dotyczy tylko państw UE
Nie wyrzucaj urządzeń elektrycznych wraz z odpadami z gospodarstwa domowego!
Zgodnie z Europejską Dyrektywą 2002/96/WE w sprawie zużytego sprzętu elektrotechnicznego i
elektronicznego oraz dostosowaniem jej do prawa krajowego, zużyte urządzenia elektryczne należy
posegregować i zutylizować w sposób przyjazny dla środowiska.
❏ Только для стран ЕС
Не выкидывайте электрическое оборудование вместе с бытовым мусором!
В соответствии с европейской директивой 2002/96/EC об утилизацияи старого
электрического и электронного оборудования и её применения в соответствии с местными
законами электрическое оборудование, бывшее в эксплуатации, должно утилизовываться
отдельно безопасным для окружающей среды способом.
3

ENGLISH
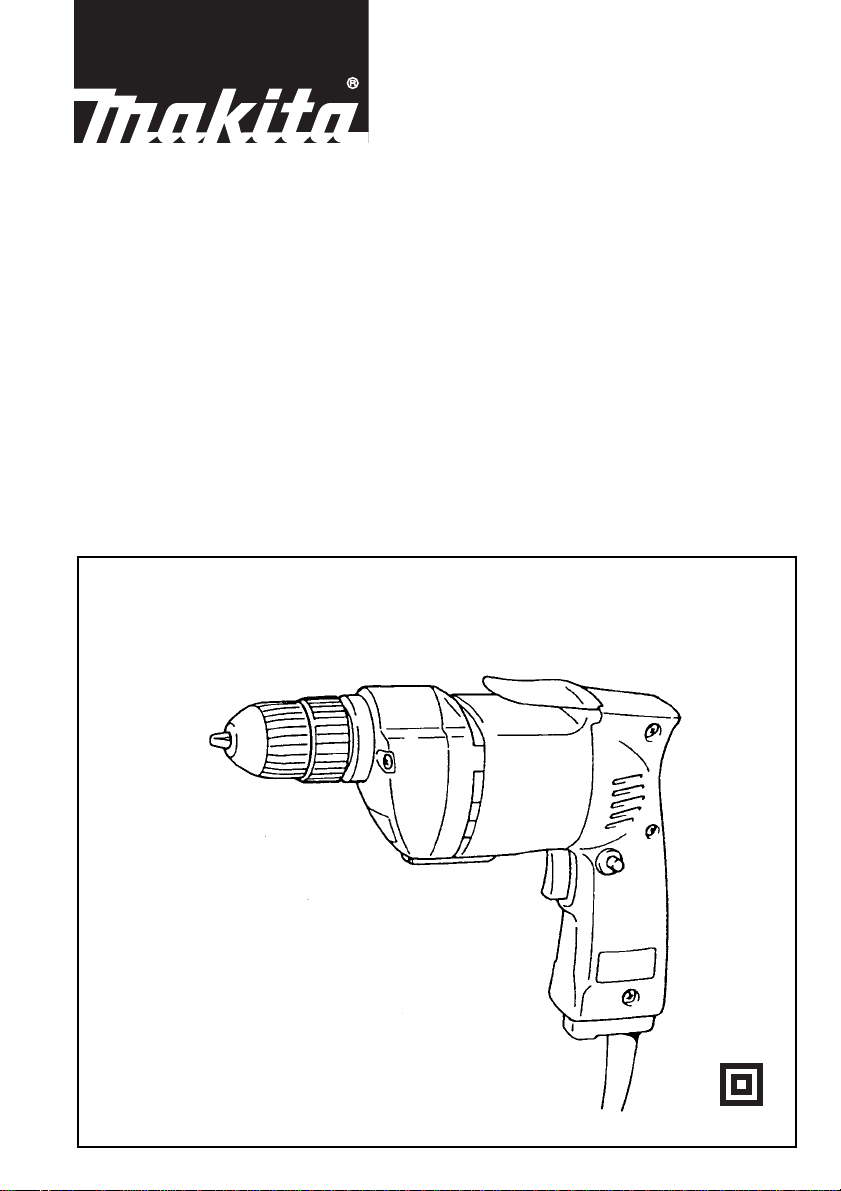
Explanation of general view
1 Tighten
2Sleeve
3 Ring
4 Low
5 High
6 Speed control screw
SPECIFICATIONS
Model 6510LVR
Capacities
Steel ......... ......................... ......................... . 10 mm
Wood ........................................................... 18 mm
No load speed (min
-1
) .............. .. ... .............. 0 – 1,050
Overall length ............................................... 242 mm
Net weight ............................ ................. .. ... ....1.48 kg
• Due to our continuing program of research and
development, the specifications herein are subject
to change without notice.
• Note: Specifications may differ from country to
country.
Power supply
The tool should be connected only to a power supply
of the same voltage as indicated on the nameplate,
and can only be operated on si ngle-p has e A C s uppl y.
They are double-insulated in accordance with European Standard and can, therefore, also be used from
sockets without earth wire.
GENERAL SAFETY RULES
WARNING! Read all instructions. Failure to follow all
instructions lis ted below may resul t in electric shock, fire
and/or serious injur y. The term “power tool” in all of the
warnings listed below refers to your mains-operated
(corded) power tool or battery-operated (cordless) power
tool.
SAVE THESE INSTRUCTIONS.
Work area safe ty
1. Keep work area clean and well lit. Clutt ered and
dark areas invite accidents.
2. Do not operate p ower tools in explosive atmo-
spheres, such as in the presence of f lammable
liquids, gases or d ust. Power tools create sparks
which may ignite the dust or fumes.
3. Keep children and bystanders away while ope r-
ating a power tool. Distractions can cause you to
lose control.
Electrical safety
4. Power tool plugs must match the o utlet. Never
modify the plug in any way. Do not use any
adapter plugs with earthed (grounded) power
tools. Unmodified plugs and matching outlets will
reduce risk of electric shock.
5. Avoid body contact with earthed or grounded
surfaces such as pipes, radiators, ranges and
refrigerators. The re is an increased r isk of electri c
shock if your body is earthed or grounded.
6. Do not expose power tools to rain or wet condi-
tions. Water entering a power tool w ill increase the
risk of electric shock.
7 Switch trigger
8Lock button
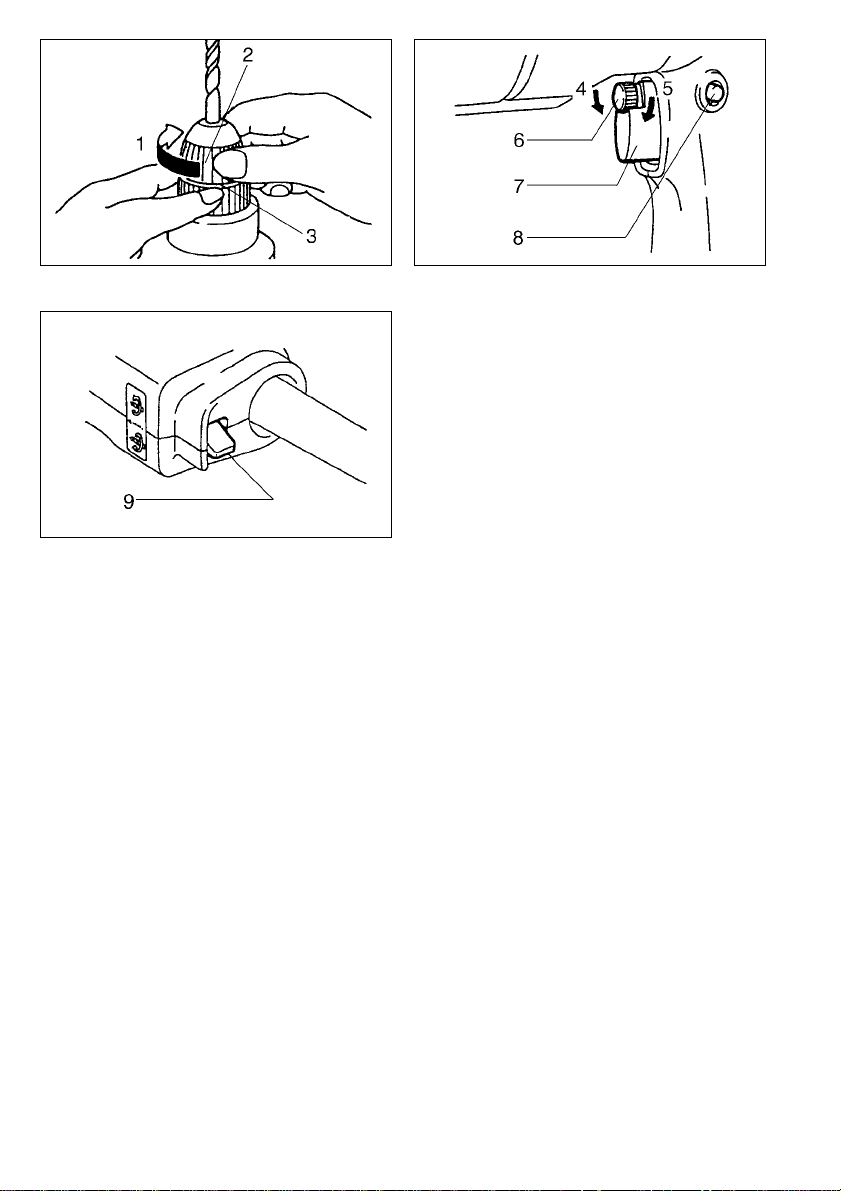
9 Reversing switch lever
7. Do not abuse the cord. Never use the cord for
carrying, pulling o r unplugging the power tool.
Keep cord away from heat, oil, sharp edges or
moving parts. Damaged or entangled cords
increase the risk of electric shock.
8. When operating a power tool outdoors, use an
extension cord suitable for ou td oo r use. Use of a
cord suitable for outdoor use reduces the risk of
electric shock.
Personal safety
9. Stay alert, watch what you are doing and use
common sense wh en op er at in g a p ower to o l. D o
not use a power tool while you are tired or under
the influence of drugs, alcohol or medication. A
moment of inattention while operating power tools
may result in serious personal injury.
10. Use safety equipment. Always wear eye protection. Safety equipment such as dust mask, non-sk id
safety shoes, hard hat, or hearing protection used
for appropriate conditions will reduce personal injuries.
11. Avoid accidental starting. Ensure the switch is in
the off-position before plugging in. Carrying
power tools with your fin ger on the switch or plugging in power tools that have the switch on invites
accidents.
12. Remove any adjusting key or wrench before
turning the power tool on. A wr ench or a key left
attached to a rotating part of the power tool may
result in personal injury.
13. Do not overreach. Keep proper footing and balance at all times. This enables better control of the
power to ol in unexpected situations .
14. Dress properly. Do not wear loose clothing or
jewellery. Keep your hair, clothing, and gloves
away from moving part s. Loose clothes, jewellery
or long hair can be caught in moving parts.
15. If devices are provided for the connection of
dust extraction and collection facilities, ensure
these are conn ected and properly used. Use of
these devices can reduce dust-related hazards.
Power tool use and care
16. Do not force the power tool. Use the correct
power tool for yo ur application. The correct power
tool will do the job better and safer at the rate for
which it was designed.
17. Do not use the power tool if the switch does not
turn it on and off. Any power tool that cannot be
controlled with the switch is dange rous a nd must be
repaired.
4

18. Disconn ect th e plu g from th e power source and/
or the battery pack from the power tool before
making any adjust ments, chan ging ac cessori es,
or storing power tools. Such preventive safety
measures reduce the risk of starting the power tool
accidentally.
19. Store idle power tools out of the reach of children and do not allow persons unfamiliar with
the power tool or these instructions to operate
the power tool. Power tools are dangerous in the
hands of untrained users.
20. Maintai n p ower too ls. Check for mi sa lig nm en t or
binding of moving par ts, breakage of par ts and
any other condition that may affect the power
tools operation. If damaged, have the power tool
repaired befo re use. Many accidents are caused by
poorly maintained power tool s.
21. Keep cutting tools sharp and clean. Properly
maintained cutting tools with sharp cutting edges
are less likely to bind and are easier to control.
22. Use the power tool, accessories and tool bits
etc. in accordance with these inst ruct ion s an d in
the manner intended for the particular type of
power tool, taking in to ac co un t th e wor kin g con ditions and the work to be performed. Use of the
power tool for operations different from those
intended could result in a hazardous situati on .
Service
23. Have your power tool serviced by a qualified
repair person using only identical replacement
parts. This will ensure that the safety of the power
tool is maintained.
24. Follow in struction for lubricating and ch anging
accessories.
25. Keep hand les dry, clean and free from oil and
grease.
SPECIFIC SAFETY RULES
DO NOT let comfort or familiarity with product
(gained from repeated use) replace strict adherence
to drill safety rules. If you use this power tool
unsafely or incorrec tly, you can suffer serious personal injury.
1. Use auxiliary handles supplied with the tool.
Loss of control can cause personal injury.
2. Hold power tools by insulated gripping surfaces
when performing an operation where the cutting
tool may contact hidden wiring or its own cord.
Contact with a “live” wire will make exposed metal
parts of the tool “live” and shock the operator.
3. Always be sure you have a firm footing.
Be sure no o ne is below wh en using t he tool in
high locations.
4. Hold the tool firmly.
5. Keep hands away from rotating parts.
6. Do not leave the too l running. Operate the tool
only when hand-held.
7. Do not touch the drill bit or the workpiece immediately after operation; they may be extremely
hot and could burn your skin.
8. Some material contains chemicals which may be
toxic. Take caution to prevent dust inhalation
and skin contact. F ol low m ate ri al s up pl ier sa fety
data.
GEB001-2
SAVE THESE INSTRUCTIONS.
WARNING:
MISUSE or failure to follow the safety rules stated in
this instruction manual may cause serious personal
injury.
OPERATING INSTRUCTIONS
Installing or removing drill bit (Fig. 1)
Important:
Always be sure that the tool is switched off and
unplugged before installing or removing the bit.
Hold the ring and turn the sleeve counterciockwise to
open the chuck jaws. Place the bit in the chuck as far
as it will go. Hold the ring firmly and turn the sleeve
clockwise to tighten the chuck. To remove the bit,
hold the ring and turn the sleeve counterclockwise.
Switch action (Fig. 2)
CAUTION:
Before plugging in the tool, always check to see the
switch trigger actuates properly and returns to the
“OFF” position when released.
To start the tool, simply pull the trigger. Tool speed is
increased by increasing pressure on the trigger.
Release the trigger to stop. For continuous operation,
pull the trigger and then push in the lock button. To
stop the tool fr om the lo cked posit ion, p ull the tr igge r
fully, then release it. A speed control screw is provided so that maximum tool speed can be limited
(variable). Turn the speed control screw clockwise for
higher speed, and counterclockwise for lower speed.
Reversing switch action (Fig. 3)
CAUTION:
• Always check the direction of rotation before drilling.
• Use the reversing switch only after the tool comes
to a complete stop. Changing the direction of rotation before the tool stop may damage the tool.
This tool has a reversing switch to change the direction of rotation. Move the reversing switch lever to the
i position for clockwise rotation or the j position
for counterclockwise rotation.
5

Drilling operation
• Drilling in wood
When drilling in wood, the best results are obtained
with wood drills equipped with a guide screw. The
guide screw makes drilling easier by pulling the bit
into the workpiece.
• Drilling in metal
To prevent the bit from slipping when starting a
hole, make an indentation with a center-punch and
hammer at the point to be drilled. Place the point of
the bit in the indentation and start drilling. Use a
cutting lubricant when drilling metals. The exceptions are iron and b ra ss whic h shoul d b e drilled d ry.
CAUTION:
• Pressing excessively on the tool will not speed up
the drilling. In fact, this excessive pressure will only
serve to damage the tip of your bit, decrease the
tool performance and shorten the service life of the
tool.
• There is a tremendous force exerted on the tool/bit
at the time of hole breakthrough. Hold the tool
firmly and exert care when the bit begins to break
through the workpiece .
• A stuck bit can be removed simply by setting the
reversing switch to reverse rotation in order to back
out. However, the tool may back out abruptly if you
do not hold it firmly.
• Always secure small workpieces in a vise or similar
hold-down device.
MAINTENANCE
CAUTION:
Always be sure that the tool is switched off andunplugged before carrying out any work on the tool.
To maintain product safety and reliability, repairs,
maintenance or adjustment should be carried out by
a Makita Authorized Service Center.
For European countries only
Noise and Vib r at ion
ENG005-2-V3
The typical A-weighted noise levels are
sound pressure level:89 dB (A)
sound power level: 100 dB (A)
Uncertainty is 3 dB (A).
The typical weighted root mean square acceleration
value is not more than 2.5 m/s
These values have been obtained according to
EN60745.
We declare under our sole responsibility that this product
is in compliance with the following standards of standardized documents,
in accordance with Council Directives, 89/336/EEC and
98/37/EC.
– Wear ear protection. –
2
.
EC-DECLARATION OF CONFORMITY
EN60745, EN55014, EN61000
Yasuhiko Kanzaki
Director
CE 2005
ENH101-5
MAKITA INTERNATIONAL EUROPE LTD.
Michigan Drive, Tongwell, Milton Keynes,
Bucks MK15 8JD, ENGLAND
Responsible manufacturer:
Makita Corporation Anjo Aichi Japan
6
 Loading...