

Page 1

Cleaner
INSTRUCTION
MANUAL
MODEL
40931)
Rated voltage
D.C.
9.6
V
Capacity
500
mY
Dimensions
484mmx112mmx143mm
(19-1116''
x
4-13/32"
(L
x W x
x
H)
5-518")
Net weight
1.3 kg (2.9
Ibsl
Page 2

IMPORTANT
SAFETY INSTRUCTIONS
When using an electrical appliance, basic precautions should
always be followed, including the following:
READ ALL INSTRUCTIONS
BEFORE USING THIS APPLIANCE
WARNINGTO
reduce the risk
of
fire, electric shock, or
injury:
1.
Do
not leave appliance when the battery cartridge is installed.
Remove the battery cartridge from your appliance when not in use and
before servicing.
2.
Do
not allow to be used as a toy. Close attention is necessary when used
by or near children.
3.
Use only as described
mended attachments.
4.
If appliance is not working as
outdoors, or dropped into water, return
5.
Do
not handle appliance with wet hands.
6.
Do
not put any object into openings.
keep free of dust,
7.
Keep hair, loose clothing, fingers, and all parts of body away from openings
and moving parts.
8.
Do
not pick up anything that is burning or smoking, such as cigarettes,
matches, or hot ashes.
9.
Do
not use without filters in place.
IO.
Turn off all controls before removing the battery cartridge.
11.
Use extra care when cleaning on stairs.
12.
Do
not use to pick up flammable or combustible liquids such as gasoline or
use
in
areas where they may be present.
13.
Use only the charger supplied by the manufacturer to recharge.
14.
Do
not charge the unit outdoors.
in
this manual. Use only manufacturer's recom-
it
should, has been dropped, damaged, left
it
to a service center.
Do
not use with any opening blocked;
lint,
hair, and anything that may reduce air flow.
This appliance is intended for household use.
2
Page 3
ADDITIONAL
1.
Read this instruction manual and the charger instruction manual carefully
before use.
2.
Do
not pick up wet materials,
3.
Stop operation immediately if
4.
If you drop or strike the cleaner, check if carefully for cracks or damage before
operation.
5.
Do
not bring close to stoves or other heat sources.
6.
Do
not block the intake hole or vent holes.
SAFETY
lit
cigarettes
you
notice anything abnormal.
or
the like.
RULES
SAVE
THESE
INSTRUCTIONS.
3
Page 4
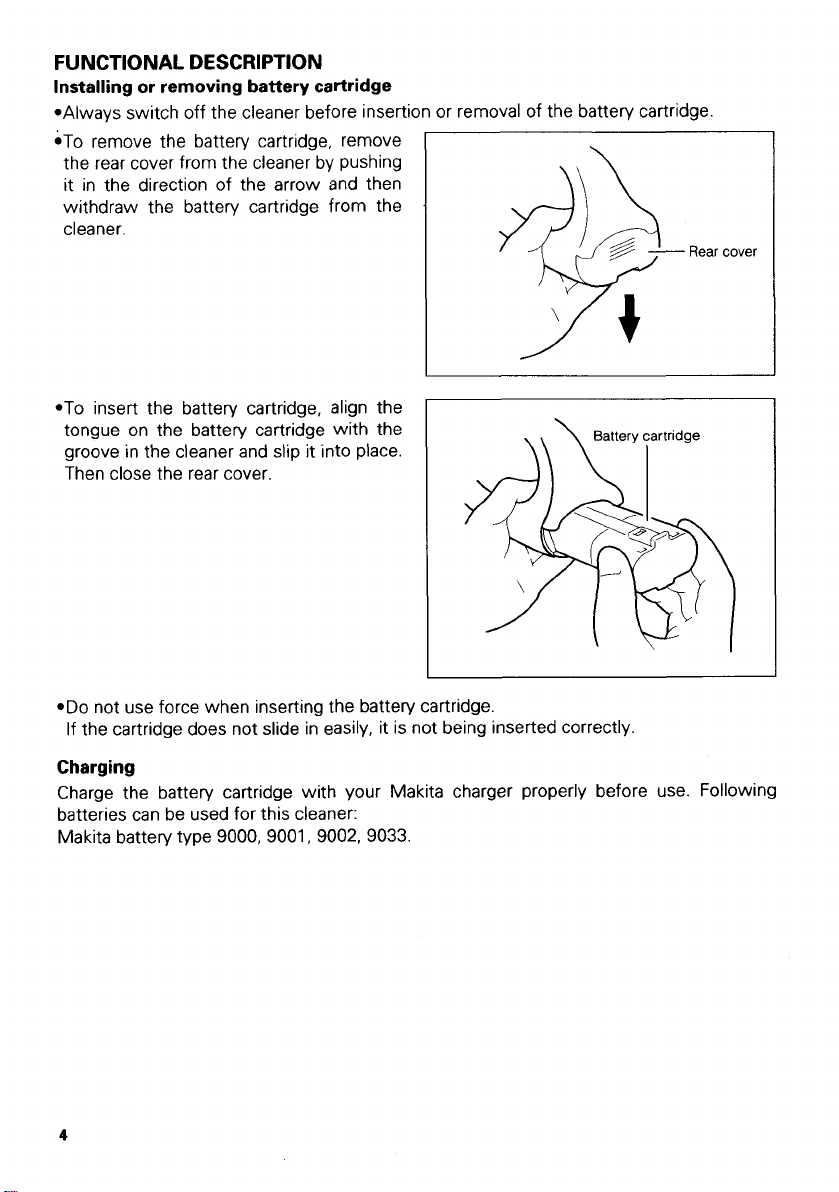
FUNCTIONAL
Installing or removing battery cartridge
*Always switch off the cleaner before insertion or removal
.To remove the battery cartridge, remove
the rear cover from the cleaner by pushing
it
in the direction of the arrow and then
withdraw the battery cartridge from the
cleaner.
DESCRIPTION
9-
.To insert the battery cartridge, align the
tongue on the battery cartridge with the
groove in the cleaner and slip
Then close the rear cover.
it
into place.
of
the battery cartridge.
Battery cartridge
Rear cover
*Do
not use force when inserting the battery cartridge.
If the cartridge does not slide in easily, it is not being inserted correctly
Charging
Charge the battery cartridge with your Makita charger properly before use. Following
batteries can be used for this cleaner:
Makita battery type 9000, 9001, 9002, 9033.
4
Page 5
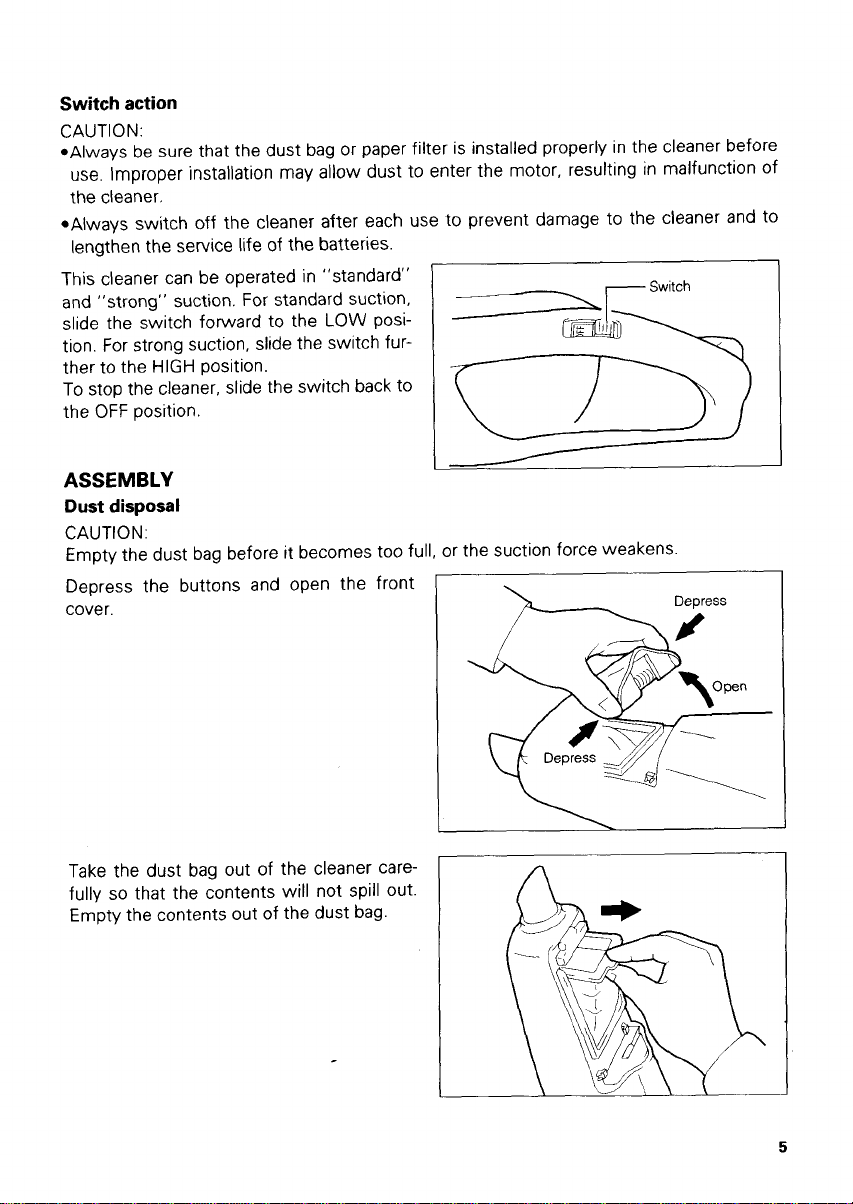
Switch
action
CAUTION:
*Always be sure that the dust bag or paper filter is installed properly in the cleaner before
use. Improper installation may allow dust to enter the motor, resulting in malfunction of
the cleaner.
to
*Always switch off the cleaner after each use
prevent damage to the cleaner and to
lengthen the service life of the batteries.
This cleaner can be operated in "standard"
and "strong" suction.
slide the switch forward
For
standard suction,
to
the
LOW
posi-
Switch
tion. For strong suction, slide the switch further to the
HIGH
position.
To stop the cleaner, slide the switch back to
OFF
the
position.
ASSEMBLY
Dust disposal
CAUTION
Empty the dust bag before
Depress the buttons and
cover.
:
it
becomes
oDen the
too full, or the suction force weakens.
front
Take the dust bag out of the cleaner carefully
so
that the contents will not spill out.
Empty the contents out
of
the dust bag.
5
Page 6

Also empty out the dust inside the cleaner
itself. Failure to do
sponge filter to
be damaged.
..
so
may cause the
be
clogged or the motor to
Installing dust bag
Place the dust bag into the cleaner cavity.
I
Insert the holder of the dust bag
into the slots in the cleaner cavitv.
CAUTION:
Forgetting
the slots or using a broken or ripped bag, may allow dust to get into the motor. This may
result in motor failure.
6
to
install the dust bag, failure to insert the holder of the dust bag all the way into
all
the way
Page 7

Hook
the front
the cleaner. Then close the front cover.
cover
onto
the
front
lip
of
NOTE:
*When installing the paper filter, follow the
same procedures for the dust bag.
*Always unfold
installing it on the cleaner.
a
new paper filter before
OPERATION
Cleaning (Suction)
Nozzle
Attach the nozzle to clean off tables, desks,
furniture, etc. Nozzle slips on easily.
I
.
Nozzle + Extension wand (Straight pipe)
The extension wand fits in between the
nozzle and the cleaner itself. This arrangement is convenient for cleaning
while standing erect.
a
floor
Cleaner
body
Extension
Nozzle
wand
f/
7
Page 8
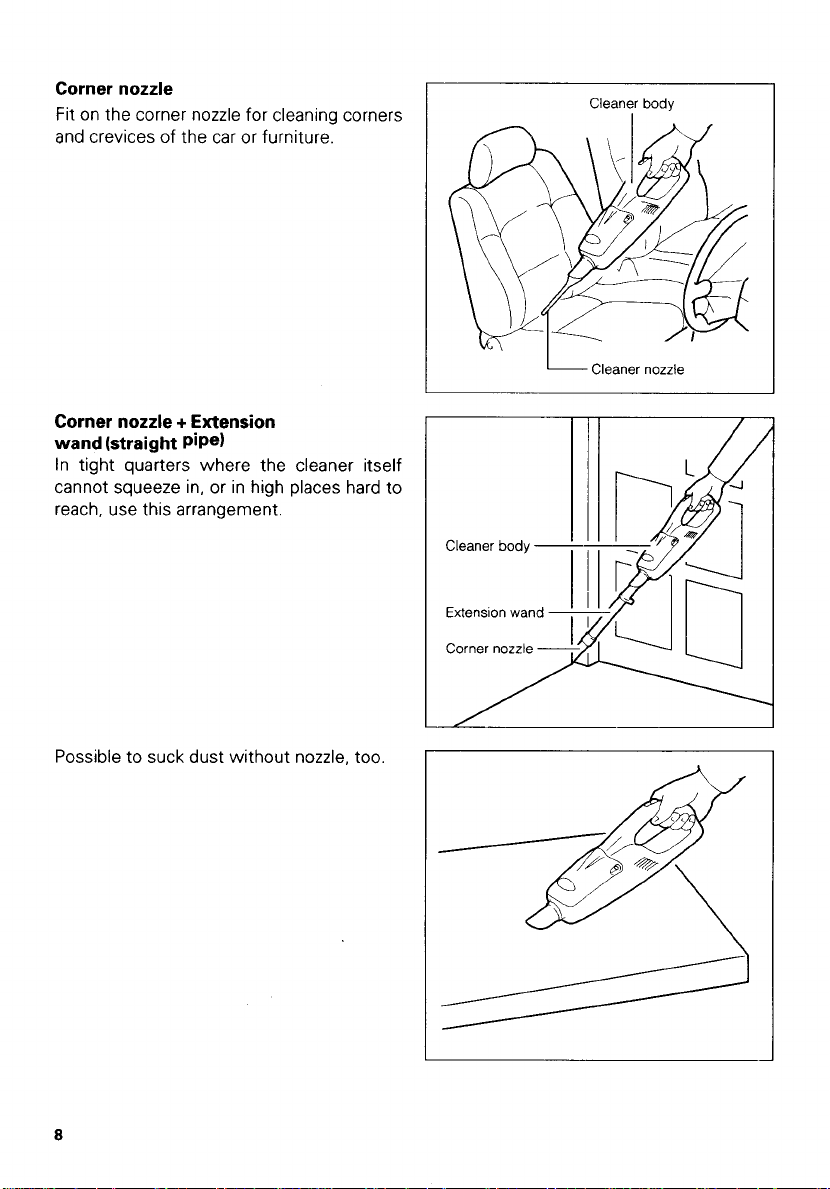
Corner nozzle
Fit on the corner nozzle for cleaning corners
and crevices of the car or furniture.
Corner nozzle + Extension
wand (straight Pipe)
In tight quarters where the cleaner itself
cannot squeeze in, or in high places hard to
reach, use this arrangement.
I
Extension wand
Corner nozzle
I
Cleaner
body
Cleaner nozzle
Possible to suck dust without nozzle, too
8
Page 9

MAINTENANCE
CAUTl
ON
:
Always be sure that the cleaner is switched off and the battery cartridge is removed
before carrying out any work on the cleaner.
After
use
When storing the cleaner, hang it from
a
nail using the convenient hanger in back.
Cleaning
From time to time wipe off the outside
a
(cleaner body) of the cleaner using
cloth
dampened in soapy water. Never use gasoline, thinner or the like. Discoloration
or
cracks may result.
Wash the dust bag in soapy water occasionally. Dry it out thoroughly before use. An
insufficiently dried bag may cause poor
I\
suc-
,-
tion and shorten the service life of the
motor.
To
maintain product SAFETY and RELIABILITY, repairs. maintenance or adjustment should
be performed by Makita Authorized or Factory Service Centers, always using Makita
replacement parts.
9
Page 10

Recycling the Battery
The
only
way to dispose
to recycle it. The law prohibits any other
method
To recycle the battery:
1.
Remove the battery from the tool.
2.
a). Take the battery
or
b). Take the battery
Distributor that has been designated as a Makita battery recycling location.
Call your nearest Makita Service Center or Distributor
that provides Makita battery recycling. See your local Yellow Pages under
’
’Tools- Electric’
of
disposal.
to
your nearest Makita Factory Service Center
to
your nearest Makita Authorized Service Center or
of
a Makita battery is
to
determine the location
I
Ni-Cd
I
10
Page 11

ACCESSORIES
CAUTION
These accessories or attachments are recommended for use with your Makita
manual The use
The accessories or attachments should be used only in the proper and intended manner
of
any other accessories or attachments might present a risk
tool
specified in this
of
injury to persons
Extension wand
Part
No.
41 6042-8
Corner nozzle
Part
No.
416041-0
Paper filter
Part
High capacity battery charger
Model DC1411
No.
(1 0 pcs.)
192608-5
Nozzle assembly
Part
No.
122520-5
..
Shelf brush
Part
No.
191 724-0
Battery cartridge Battery charger
9000/900119002/9033 Model DC9710
Automotive battery charger
Model DC1412
Nozzle assembly (for carpet)
Part
No.
122291-4
Flexible hose
Part
No.
191496-7
11
Page 12

CORDLESS CLEANER
Model
4093D
Dec-09-'99
us
12
Note: The switch and other part configurations
may differ from country
to
country.
Page 13

MODFL
IF,',"
MACHINE
-
__
1
2
3
4
5
6
7
8
9
10
11
12
13
14
15
Note
40930
The
$:D
switch
DESCRIPTION
1
Tdpping
1
Houslnq
1
Makila
1
Front
1
Hook
Rod
1
1
Compression Spring
I
Honk
Switch
1
1
Switch
1
Sponge
1
Battery
1
Sponge
Dust
Hanger
and
Cover
2
5
Cover
other
Screw
Set
Label
Lever
Sheet
Holder
20 ~ 34
part
Pi
3x20
IWiIh
Item
Complete
6
43~
15
Complete
specil$catioris
261
may
dtffer
from
country
'zM
&
16
11
18
19
20
21
22
23
24
25
26
27
28
29
30
__
to
country
1
1
1
1
1
1
1
1
1
1
1
1
2
1
1
-
DESCRIPTION
COW,
DC
Motor
Baie
Fan
82
Fan
Cover
Rubber
Ring
Sponge Sheet
Dusf
Bag
Packing
Inlet
Housing
Sei
[With
Resistance Circuit
Pan Head
Screw
Sponge
Sheet 43
Name
Plat?
70
106
Item
M3x8
15
Dec-09-
99
US
21
13
Page 14

MAKITA
LIMrIED
ONE
YEAR WARRANTY
Warranty Policy
Every Makita
be free of defects from workmanship and materials for the period of ONE YEAR from the date
original purchase. Should any trouble develop during this one-year period, return the COMPLETE
tool,
the trouble is caused by defective workmanship or material, Makita will repair (or at our option,
replace) without charge.
This Warranty does not apply where:
repairs have been made or attempted by others:
repairs are required because of normal wear and tear:
The tool has been abused, misused or improperly maintained;
alterations have been made
IN NO EVENT SHALL MAKITA BE LIABLE FOR ANY INDIRECT, INCIDENTAL OR CONSEQUENTIAL DAMAGES FROM THE SALE OR USE
APPLIES BOTH DURING AND AFTER THE TERM OF THIS WARRANTY.
MAKITA DISCLAIMS LIABILITY FOR ANY IMPLIED WARRANTIES, INCLUDING IMPLIED
WARRANTIES OF “MERCHANTABILITY” AND “FITNESS FOR
AFTER THE ONE-YEAR TERM OF THIS WARRANTY.
This Warranty gives you specific legal rights, and you may also have other rights which vary from
state
damages,
limitation
tool
is thoroughly inspected and tested before leaving the factory. It is warranted
freight prepaid,
to
state. Some states do not allow the exclusion or limitation of incidental or consequential
so
to
one
of
Makita’s Factory or Authorized Service Centers. If inspection shows
to
the
tool.
the above limitation or exclusion may
on
how long an implied warranty lasts,
OF
THE PRODUCT. THIS DISCLAIMER
A
SPECIFIC PURPOSE,”
not
apply
to
so
the above limitation may not apply
you. Some states do not allow
to
you.
to
of
Makita Corporation
3-11
-8,
Sumiyoshi-cho,
Anjo, Aichi
446-8502
Japan
 Loading...