

Page 1
Cordless Cleaner
4072D
Page 2
SPECIFICATIONS
Model 4072D
Capacity ................................................................................................................................................................ 500 ml
Continuous use .............................................................................................................................. High: Approx.10 min.
Overall length ...................................................................................................................................................... 383 mm
Net weight .............................................................................................................................................................. 1.0 kg
Output .............................................................................................................................................................. D.C.7.2 V
Charging time .......................................................................................................................................... Approx. 3 hours
• Due to the continuing program of research and development, the specifications herein are subject to change without
prior notice.
• Note: Specifications may differ from country to country.
Intended use
The tool is intended for collecting dry dust.
Symbols
The followings show the symbols used for the tool. Be sure that you understand their meaning before use.
Only for EU countries
Do not dispose of electric equipment together with household waste material!
In observance of European Directive 2002/96/EC on waste electrical and electronic equipment and its
implementation in accordance with national law, electric equipment that have reached the end of their life
must be collected separately and returned to an environmentally compatible recycling facility.
Low: Approx. 20 min.
The typical A-weighted sound pressure level is not more
than 70 dB (A).
The noise level under working may exceed 85 dB (A).
The typical weighted root mean square acceleration
value is not more than 2.5 m/s
Noise and Vibration
– Wear ear protection. –
2
.
EC-DECLARATION OF CONFORMITY
We declare under our sole responsibility that this product
is in compliance with the following standards or standardized documents, EN55014 in accordance with Council
Directives, 89/336/EEC and 98/37/EC.
Yasuhiko Kanzaki
CE 2005
Director
MAKITA INTERNATIONAL EUROPE LTD.
Michigan Drive, Tongwell, Milton Keynes,
Bucks MK15 8JD, ENGLAND
2
Page 3
12
34
56
78
3
Page 4

910
11 12
13 14
15 16
4
Page 5

ENGLISH
1 Charging connector
2 Charging plug
3 Switch
4 Nozzle
5 Cleaner body
6 Extension wand (Straight pipe)
Explanation of general view
7 Corner nozzle
8Front cover
9 Depress
10 Open
11 Dust bag
12 Hook front cover onto front lip
13 Close
14 Front lip
15 Rear cover
16 Built-in battery
17 Terminal
SAFETY INSTRUCTIONS
WARNING! When using battery operated tools basic
safety precautions, including the following, should
be followed to reduce the risk of fire, leaking batteries and personal injury: Read these instructions
before operating this product and save these instructions.
For safe operation:
1. Keep work area clean.
– Cluttered areas and benches invite injuries.
2. Consider the work environment.
– Do not expose the tool to rain. Keep work area well
lit. Do not use tools in the presence of flammable
liquids or gases.
3. Keep children away.
– Do not let visitors touch the tool. Keep visitors
away from work area.
4. Store batteries or idle tools.
– When not in use, tools and batteries should be
stored separately in a dr y, high or locked up place,
out of reach of children.
– Ensure that battery terminals cannot be shorted by
other metal parts such as screws, nails, etc.
5. Do not force the tool.
– It will do the job better and safer at the rate for
which it was intended.
6. Use the right tool.
– Do not force small tools or attachments to do the
job of a heavy duty tool. Do not use tools for purposes not intended.
7. Dress properly.
– Do not wear loose clothing or jewellery, they can
be caught in moving par ts. Non-skid footwear is
recommended when working outdoors. Wear protecting hair covering to contain long hair.
8. Use protective equipment.
– Use safety glasses and if the cutting operation is
dusty, a face or dust mask.
9. Connect dust extraction equipment.
– If devices are provided for the connection of dust
extraction and collection ensure these are connected and properly used.
10. Do not abuse the supply cord (if fitted).
– Never carry the tool by the cord or yank it to dis-
connect from the socket. Keep the cord away from
heat, oil and sharp edges.
11. Secure the work.
– Use clamps or a vice to hold the work. It is safer
than using your hand and it frees both hands to
operate the tool.
12. Do not over-reach.
– Keep proper footing and balance at all times.
ENA002-2
13. Maintain tools with care .
– Keep cutting tools sharp and clean for better and
safer performance. Follow instructions for lubrication and changing accessories. Inspect tool cords
periodically and if damaged have repaired by an
authorized service facility.
14. Disconnect tools.
– Where the design permits, disconnect the tool
from its battery pack when not in use, before servicing and when changing accessories such as
blades, bits and cutters.
15. Remove adjusting keys and wrenches.
– Form the habit of checking to see that keys and
adjusting wrenches are removed from the tool
before turning it on.
16. Avoid unintentional starting.
– Do not carry the tool with a finger on the switch.
17. Stay alert.
– Watch what you are doing. Use common sense.
Do not operate the tool when you are tired.
18. Check damaged parts.
– Before further use of the tool, a guard or other par t
that is damaged should be carefully checked to
determine that it will operate properly and perform
its intended function. Check for alignment of moving parts, free running of moving parts, breakage
of parts, mounting and any other condition that
may affect its operation. A guard or other part that
is damaged should be properly repaired or
replaced by an authorized service facility unless
otherwise indicated in this instruction manual.
Have defective switches replaced by an authorized
service facility. Do not use the tool if the switch
does not turn it on and off.
19. Warning.
– The use of any accessory or attachment, other
than recommended in this instruction manual or
the catalogue, may present a risk of personal
injury.
– Ensure that the batter y pack is correct for the tool.
– Ensure that the outside surface of battery pack or
tool is clean and dry before plugging into charger.
– Ensure that batteries are charged using the cor-
rect charger recommended by the manufacturer.
Incorrect use may result in a risk of electric shock,
overheating or leakage of corrosive liquid from the
battery.
20. Have your tool repaired by a qualified person.
– This tool is constructed in accordance with the rel-
evant safety requirements. Repairs should only be
carried out by qualified persons using original
spare parts, otherwise this may result in consider-
able danger to the user.
5
Page 6

21. Disposal of batter y.
– Ensure battery is disposed of safely as instructed
by the manufacturer.
ADDITIONAL SAFETY RULES FOR CLEANER
1. Do not pick up wet materials, lit cigarettes or the
like.
2. Stop operation immediately if you notice anything abnormal.
3. If you drop or strike the cleaner, check it carefully for cracks or damage before operation.
4. Do not charge the cleaner close to dangerous
flammable materials such as gasoline, gas, paint
or adhesives.
5. Do not charge the cleaner on papers, cloth, carpet, vinyl, etc. This may cause a fire.
6. Do not charge the cleaner in a dusty place.
7. Be sure no one is below when using the cleaner
in high locations.
8. Do not bring close to stoves or other heat
sources.
9. Do not block the intake hole or vent holes.
SAVE THESE INSTRUCTIONS.
OPERATING INSTRUCTIONS
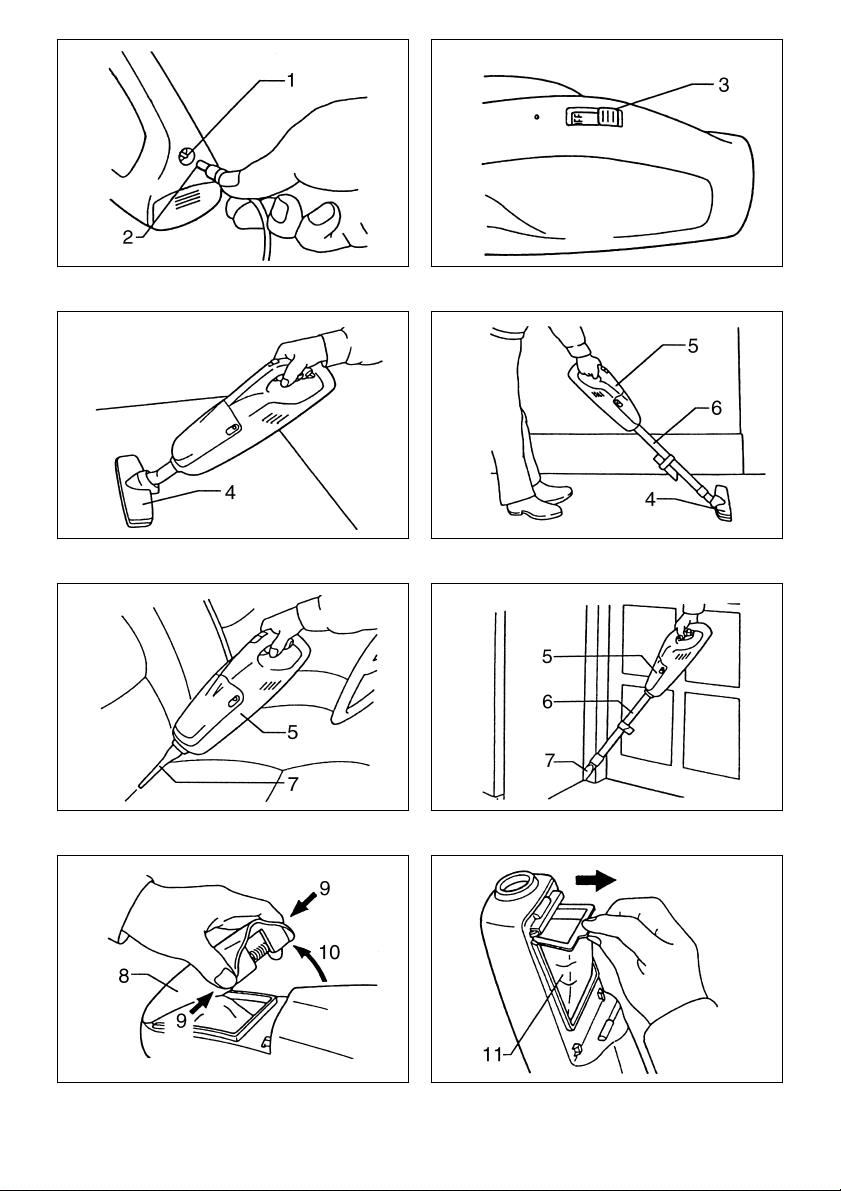
Charging (Fig. 1)
CAUTION:
Use only the Makita charger DC7020 or DC7022 to
charge this cleaner. Use of other type chargers may
cause the battery to burst, resulting in personal injury
and damage.
Charge the cleaner when it is to be used for the first time
or it has been left uncharged for a long time. Connect the
charging plug to the charging connector, then plug in the
charger to the power receptacle. The light in front of the
cleaner switch will come on and charging will begin.
Charging takes approx. 3 hours.
CAUTION:
• The light in front of the cleaner switch is ON whenever
battery operation is normal. The light does not go out
even after the charging is completed.
• Do not operate the cleaner during charging. It may be
damaged.
• Always disconnect the charging plug from the cleaner
after charging.
• Overcharging more than 24 hours shortens the battery
service life. Always unplug the charger after completing
the charge.
• When you charge a new cleaner or a cleaner which has
been left uncharged for a long time, it may not accept a
full charge. This is a normal condition and does not
indicate a problem. You can recharge the cleaner fully
after discharging it completely a couple of times.
Switch action (Fig. 2)
CAUTION:
• Always be sure that the dust bag or paper pack is
installed properly in the cleaner before use. Improper
installation may allow dust to enter the motor, resulting
in malfunction of the cleaner.
• Always switch off the cleaner after each use to prevent
damage to the cleaner and to lengthen the service life
of the batteries.
This cleaner can be operated in “standard” and “strong”
suction. For standard suction, slide the switch forward to
the LOW position. For strong suction, slide the switch further to the HIGH position.
To stop the cleaner, slide the switch back to the OFF
position.
Cleaning (Suction)
Nozzle (Fig. 3)
Attach the nozzle to clean off tables, desks, furniture, etc.
Nozzle slips on easily.
Nozzle+ Extension wand (Straight pipe) (Fig. 4)
The extension wand fits in between the nozzle and the
cleaner itself. This arrangement is convenient for cleaning a floor while standing erect.
Corner nozzle (Fig. 5)
Fit on the corner nozzle for cleaning corners and crevices
of a car or furniture.
Corner nozzle + Extension wand (Straight pipe)
(Fig. 6)
In tight quarters where the cleaner itself cannot squeeze
in, or in high places hard to reach, use this arrangement.
Dust disposal
CAUTION:
Empty the cleaner before it becomes too full, or the suction force weakens.
Depress the buttons and open the front cover. (Fig. 7)
Take the dust bag out of the cleaner carefully so that the
contents will not spill out. Empty the contents out of the
dust bag. (Fig. 8)
Also empty out the dust inside the cleaner itself. Failure
to do so may cause the sponge filter to be clogged or the
motor to be damaged. (Fig. 9)
Installing dust bag
Place the dust bag into the cleaner cavity. (Fig.10)
Insert the holder of the dust bag all the way into the slots
in the cleaner cavity. (Fig.11)
CAUTION:
Forgetting to install the dust bag, failure to insert the
holder of the dust bag all the way into the slots or using a
broken or ripped bag, may allow dust to get into the
motor. This may result in motor failure.
Hook the front cover onto the front lip of the cleaner.
Then close the front cover. (Fig. 12)
NOTE:
• When installing the paper pack, follow the same procedures for the dust bag.
• Always unfold a new paper pack before installing it on
the cleaner.
6
Page 7

MAINTENANCE
CAUTION:
Always be sure that the cleaner is switched off before
carrying out any work on the cleaner.
After use (Fig. 13)
When recharging or storing the cleaner, hang it from a
nail using the convenient hanger in back.
Cleaning (Fig. 14)
From time to time wipe off the outside (cleaner body) of
the cleaner using a cloth dampened in soapy water.
Never use gasoline, thinner or the like. Discoloration or
cracks may result.
Wash the dust bag in soapy water occasionally. Dry it out
thoroughly before use. An insufficiently dried bag may
cause poor suction and shorten the service life of the
motor.
To maintain product safety and reliability, repairs, maintenance or adjustment should be carried out by Makita
Authorized Service Center.
DISPOSING OF CLEANER
A nicad battery is built into this cleaner. Always remove it
before disposing of the cleaner.
Removing built-in battery
CAUTION:
Never remove the built-in battery from the cleaner except
when disposing of the cleaner. The battery will be damaged or a battery short-circuit could result.
To remove the rear cover, push it in the direction of the
arrow. (Fig. 15)
Withdraw the built-in battery halfway. Disconnect the two
lead wires from the battery by pulling them from the battery terminals. Then withdraw the battery completely.
(Fig. 16)
To prevent a battery short-circuit, tape the battery terminals or put the battery into a plastic bag.
CAUTION:
Never incinerate the battery even if it is severely damaged or is completely worn out. It can explode in a fire or
toxic materials can leak out of it.
ACCESSORIES
CAUTION:
These accessories or attachments are recommended for
use with your Makita tool specified in this manual. The
use of any other accessories or attachments might
present a risk of injury to persons. Only use accessory or
attachment for its stated purpose.
If you need any assistance for more details regarding
these accessories, ask your local Makita service center.
• Extension wand (Straight pipe)
• Nozzle
• Corner nozzle
• Paper pack
•Flexible hose
• Nozzle for carpet
• Shelf brush
• Quick charger DC7022 (12 V)
7
Page 8

Makita Corporation
Anjo, Aichi, Japan
884079-223
 Loading...