

Page 1
GB
Cordless Cleaner Instruction Manual
F
Aspirateur sans Fil Manuel d’instructions
D
Akku-Staubsauger Betriebsanleitung
I
Aspiratore a Batteria Istruzioni per l’uso
NL
Snoerloze stofzuiger Gebruiksaanwijzing
E
Aspiradora sin Cable Manual de instrucciones
P
Aspirador a Bateria Manual de instruções
DK
Akku Støvsuger Brugsanvisning
S
Sladdlös Dammsugare Bruksanvisning
N
Batteristøvsuger Bruksanvisning
SF
Akku-Pölynimuri Käyttöohje
GR Φορητή ηλεκτρική σκούπα Οδηγίες χρήσεως
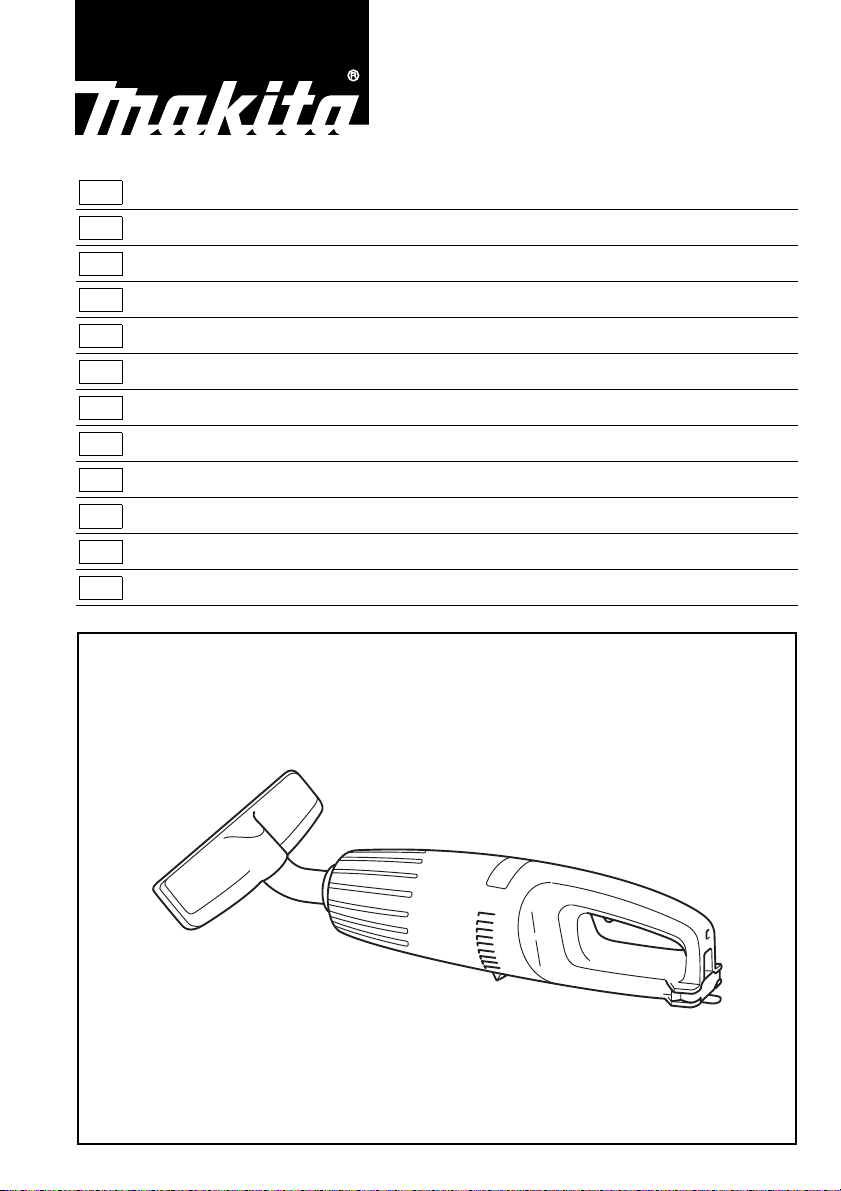
4071D
Page 2
1
2
3
12
4
5
34
6
56
7
8
78
2
Page 3
9
10
9
10
8
9
10
3
Page 4

ENGLISH
1 Set plate
2 Battery car tridge
3 Switch trigger
4 Nozzle
Explanation of general view
5 Extension wand (Straight pipe)
6 Corner nozzle
7 Tap or rap here
8 Capsule
9 Pre-filter
10 Filter
SPECIFICATIONS
Model 4071D
Capacity ................................................................600 ml
Continuous use ...............................................8 – 10 min.
Overall length ......................................................365 mm
Net weight .............................................................. 0.6 kg
Rated voltage ...................................................D.C.7.2 V
• Due to our continuing program of research and development, the specifications herein are subject to change
without notice.
• Note: Specifications may differ from country to country.
Intended use
The tool is intended for collecting dry dust.
Safety hints
For your own safety, please refer to the enclosed Safety
instructions.
IMPORTANT SAFETY INSTRUCTIONS
FOR CHARGER & BATTERY CARTRIDGE
1. Before using battery cartridge, read all instruc-
tions and cautionary markings on (1) battery
charger, (2) battery, and (3) product using battery.
2. Do not disassemble battery cartridge.
3. If operating time has become excessively
shorter, stop operating immediately. It may
result in a risk of overheating, possible burns
and even an explosion.
4. If electrolyte gets into your eyes, rinse them out
with clear water and seek medical attention right
away. It may result in loss of your eyesight.
5. Always cover the battery terminals with the bat-
tery cover when the battery cartridge is not
used.
6. Do not short the battery cartridge:
(1) Do not touch the terminals with any conduc-
tive material.
(2) Avoid storing battery cartridge in a container
with other metal objects such as nails, coins,
etc.
(3) Do not expose battery cartridge to water or
rain.
A battery short can cause a large current flow,
overheating, possible burns and even a breakdown.
7. Do not store the tool and battery cartridge in
locations where the temperature may reach or
exceed 50°C (122°F).
8. Do not incinerate the battery cartridge even if it
is severely damaged or is completely worn out.
The battery cartridge can explode in a fire.
9. Be careful not to drop or strike battery.
ENC004-1
SAVE THESE INSTRUCTIONS.
Tips for maintaining maximum battery life
1. Charge the battery cartridge before completely
discharged.
Always stop tool operation and charge the battery cartridge when you notice less tool power.
2. Never recharge a fully charged battery cartridge.
Overcharging shortens the battery service life.
3. Charge the battery cartridge with room temperature at 10°C – 40°C (50°F – 104°F). Let a hot battery cartridge cool down before charging it.
4. Charge the Nickel Metal Hydride battery cartridge when you do not use it for more than six
months.
ADDITIONAL SAFETY RULES FOR TOOL
1. Do not use cleaner close to dangerous flammable materials such as gasoline, gas, paint or
adhesives.
2. Do not suck up wet materials.
3. Do not pick up sticky items.
4. Do not pick up pins or thumbtacks.
5. Do not pick up lit cigarettes and the like.
6. When you suck up a large item and revolution
becomes difficult, immediately switch off the
cleaner and remove it.
7. Be careful not to let anything enter the exhaust
port.
8. Do not bring close to stoves or other heat
sources.
9. Shut off the cleaner the moment you notice anything abnormal in operation.
10. Always remove the dust case and empty out the
contents before beginning or after completing a
cleaning job. A full dust case can cause problems, even a breakdown.
11. When not in use, it should be stored in dry place.
SAVE THESE INSTRUCTIONS.
OPERATING INSTRUCTIONS
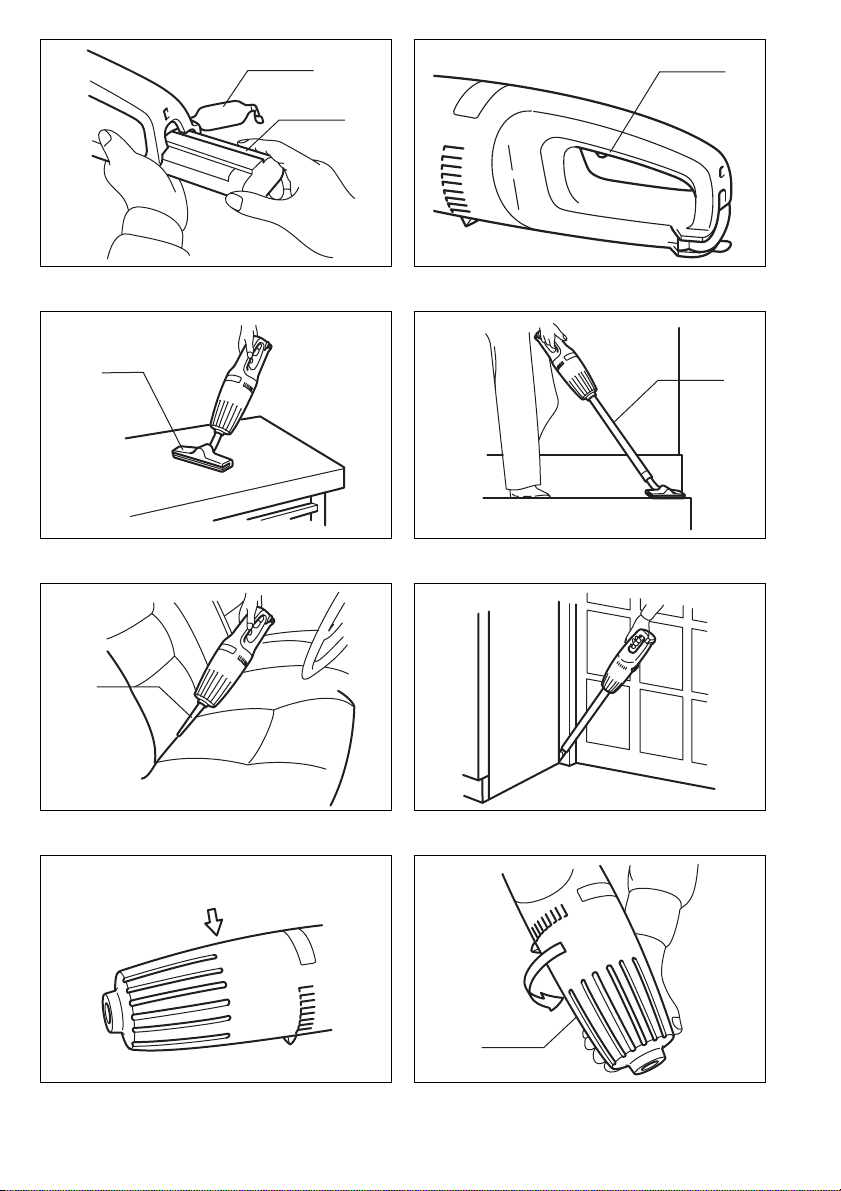
Installing or removing battery cartridge (Fig. 1)
• Always switch off the tool before insertion or removal of
the battery cartridge.
• To remove the battery cartridge, pull out the set plate
on the tool and grasp both sides of the cartridge while
withdrawing it from the tool.
• To insert the battery cartridge, align the tongue on the
battery cartridge with the groove in the housing and slip
it into place. Snap the set plate back into place. Be sure
to close the set plate fully before using the tool.
• Do not use force when inserting the battery cartridge. If
the cartridge does not slide in easily, it is not being
inserted correctly.
4
Page 5

Switch action (Fig.2)
CAUTION:
Before operation, always check to be sure that the filter
and pre-filter are correctly installed, or dirt and foreign
matter will get into the motor and cause a failure.
To start the tool, simply pull the trigger. Release the trigger to stop.
Cleaning (Suction)
Nozzle (Fig. 3)
Attach the nozzle to clean off tables, desks, furniture, etc.
Nozzle slips on easily.
Nozzle+ Extension wand (Straight pipe) (Fig. 4)
The extension wand (straight pipe) fits in between the
nozzle and the cleaner itself. This arrangement keeps the
weight of the cleaner near your hand. It is especially convenient for overhead cleaning or when reach is important
in close quarters.
Corner nozzle (Fig. 5)
Fit on the corner nozzle for cleaning corners and crevice
of a car or furniture. Sand and other heavy items can be
sucked up easily.
Corner nozzle+ Extension wand (Straight pipe)
(Fig. 6)
In tight quarters where the cleaner itself cannot squeeze
in, or in high places hard to reach, the extension wand
(straight pipe) may be used.
Tapping out filter
When you notice less suction force during operation,
stand the cleaner so that the intake hole is in the upright
position and tap by hand the side of the cleaner 4 or 5
times. This will unclog the pre-filter and filter and restore
suction force.
CAUTION:
Empty the cleaner before it becomes too full, or the suction force weakens.
Dust disposal
Raise the end of the cleaner so that the contents will not
fall out. Then tap by hand the side of the capsule 4 or 5
times in order to detach materials from the pre-filter and
filter and facilitate emptying. (Fig. 7)
Tip end of cleaner (with suction hole) down and unscrew
capsule as indicated in arrow direction. Remove capsule
carefully keeping it straight up and down so that the contents will not spill out. (Fig. 8)
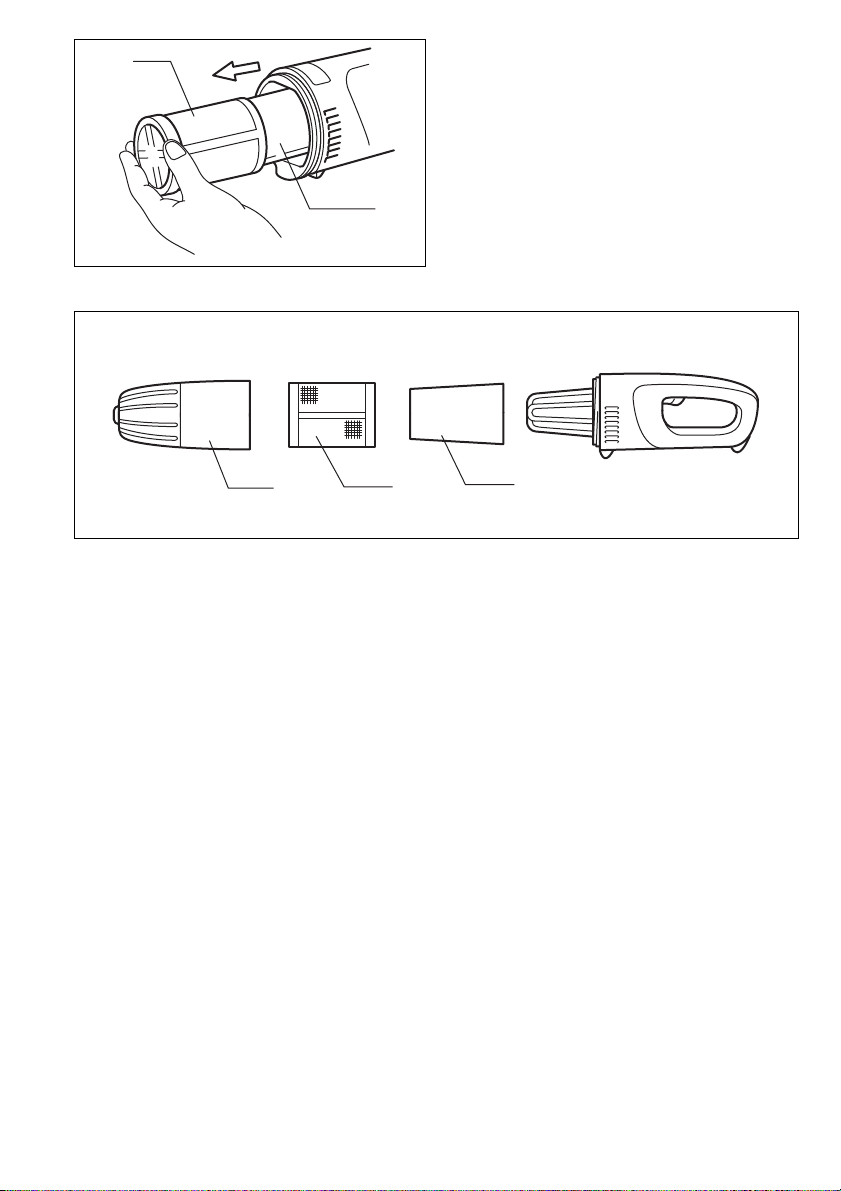
Empty the contents of the capsule and also the dust
adhering to the pre-filter.
Turn the pre-filter and pull it off toward you, emptying out
the fine dust inside. Then take out the filter and tap out
any adhering dust. (Fig. 9)
After emptying out the cleaner, re-assemble in the order
shown in Fig. 10.
1. Fit filter snugly on all the way.
2. Slip on pre-filter.
3. Screw on the capsule.
CAUTION:
• Failure to re-assemble the filter and/or pre-filter so that
they are back on all the way, or using a broken or
ripped filter, can cause dust to get into the motor and
result in a failure.
• Screw the capsule tightly into place. Tighten accessories (nozzle, etc.) in the same direction as the capsule
screws on.
After use (Fig.11)
When recharging or storing the cleaner, hang the cleaner
from a nail using the convenient hanger in back.
MAINTENANCE
CAUTION:
Always be sure that the tool is switched off and the battery cartridge is removed before carrying out any work on
the tool.
From time to time wipe off the outside (housing) of the
cleaner using a cloth dampened in soapy water. Never
use gasoline, thinner or the like or discoloration or cracks
can take place.
Rinsing out the filter in soapy water occasionally. Never
use a washing tool to clean the filter. Dry it out thoroughly
before use.
Do not use oil, benzine, thinner or the like to clean off the
cleaner itself. Cracks or discoloration will result.
To maintain product safety and reliability, repairs, maintenance or adjustment should be carried out by a Makita
Authorized Service Center.
5
Page 6

NEDERLANDS
1 Sluitplaat
2Batterij
3 Schakelaar
4 Mondstuk
Verklaring van algemene gegevens
5 Verlengstuk (rechte buis)
6 Hoekmondstuk
7 Hier tegenaan kloppen
8 Voorhuis
9 Voorfilter
10 Filter
TECHNISCHE GEGEVENS
Model 4071D
Capaciteit ..............................................................600 ml
Continu gebruik ...............................................8 –10 min.
Totale lengte ........................................................365 mm
Netto gewicht ..........................................................0,6 kg
Nominale spanning ........................................... DC 7,2 V
• In verband met ononderbroken research en ontwikkeling behouden wij ons het recht voor bovenstaande
technische gegevens te wijzigen zonder voorafgaande
kennisgeving.
• Opmerking: De technische gegevens kunnen van land
tot land verschillen.
Doeleinden van gebruik
Het gereedschap is bedoeld voor het verzamelen van
droog stof.
Veiligheidswenken
Voor uw veiligheid dient u de bijgevoegde Veiligheidsvoorschriften nauwkeurig op te volgen.
BELANGRIJKE
VEILIGHEIDSVOORSCHRIFTEN
VOOR ACCULADER EN ACCU
1. Lees alle voorschriften en waarschuwingen op
(1) de acculader, (2) de accu, en (3) het product
waarvoor de accu wordt gebruikt, aandachtig
door alvorens de acculader in gebruik te nemen.
2. Neem de accu niet uit elkaar.
3. Als de gebruikstijd van een opgeladen accu aan-
zienlijk korter is geworden, moet u het gebruik
ervan onmiddellijk stopzetten. Voortgezet
gebruik kan oververhitting, brandwonden en
zelfs een ontploffing veroorzaken.
4. Als er elektrolyt in uw ogen is terechtgekomen,
spoel dan uw ogen met schoon water en roep
onmiddellijk de hulp van een dokter in. Elektrolyt
in de ogen kan blindheid veroorzaken.
5. Bedek de accuklemmen altijd met de accukap
wanneer u de accu niet gebruikt.
6. Voorkom kortsluiting van de accu:
(1) Raak de accuklemmen nooit aan met een
geleidend materiaal.
(2) Bewaar de accu niet in een bak waarin
andere metalen voorwerpen zoals spijkers,
munten e.d. worden bewaard.
(3) Stel de accu niet bloot aan water of regen.
Kortsluiting van de accu kan oorzaak zijn van
een grote stroomafgifte, oververhitting, brand-
wonden, en zelfs defecten.
7. Bewaar het gereedschap en de accu niet op
plaatsen waar de temperatuur kan oplopen tot
50°C of hoger.
8. Werp de accu nooit in het vuur, ook niet wanneer
hij zwaar beschadigd of volledig versleten is. De
accu kan namelijk ontploffen in het vuur.
9. Wees voorzichtig dat u de accu niet laat vallen
en hem niet blootstelt aan schokken of stoten.
BEWAAR DEZE VOORSCHRIFTEN.
Tips voor een maximale levensduur van de accu
1. Laad de accu op voordat hij volledig ontladen is.
Stop het gebruik van het gereedschap en laad de
accu op telkens wanneer u vaststelt dat het vermogen van het gereedschap is afgenomen.
2. Laad een volledig opgeladen accu nooit opnieuw
op. Als u de accu te veel oplaadt, zal hij minder
lang meegaan.
3. Laad de accu op bij een kamertemperatuur tussen 10°C en 40°C. Laat een warme accu afkoelen
alvorens hem op te laden.
4. Laad de nikkel-metaalhydride accu op telkens
wanneer u hem langer dan zes maanden niet
hebt gebruikt.
BIJGEVOEGDE
VEILIGHEIDSVOORSCHRIFTEN
VOOR DE MACHINE
1. Gebruik de stofzuiger niet in de nabijheid van
licht ontvlambare stoffen zoals benzine, gas,
verf- en kleefstoffen.
2. Zuig geen nat stof of vuil op.
3. Zuig geen kleverige zaken op.
4. Zuig geen pennen of punaises op.
5. Zuig geen brandende peuken of iets dergelijks
op.
6. Is een nogal groot brok opgezogen en het zuigen
gaat moeilijk, schakel dan de stofzuiger onmiddellijk uit en verwijder het brok.
7. Zorg er voor dat niets in de uitlaatopening
terecht komt.
8. Breng de stofzuiger niet in de nabijheid van verwarmingsapparaten en andere hittebronnen.
9. Schakel de stofzuiger uit zodra u iets abnormaals opmerkt.
10. Verwijder en ledig de stofzak altijd alvorens de
stofzuiger te gebruiken of nadat het werk is
gedaan. Een volle stofzak veroorzaakt problemen en kan zelfs schade toebrengen.
11. Wanneer de stofzuiger niet in gebruik is, bewaar
hem op een droge plaats.
BEWAAR DEZE VOORSCHRIFTEN.
12
Page 7

BEDIENINGSVOORSCHRIFTEN
Plaatsen en verwijderen van batterij (Fig.1)
• Schakel de machine altijd uit voordat een batterij
geplaatst of verwijdert wordt.
• Om de batterij te verwijderen, wordt de sluitplaat losgetrokken en de batterij met twee vingers uit het handvat
gehaald.
• Voor het plaatsen van de batterij zorgt u ervoor dat de
rug op de batterij in de groef van het batterijkompartiment komt, waarna u de batterij naar binnen schuift.
Klap alvorens het gereedschap te gebruiken de sluitplaat oftewel deksel weer dicht, kontroleer of de sluitplaat goed vast geklemd zit en niet gemakkelijk
opengaat.
• Als het batterijpak moeilijk in de houder komt, probeer
het dan niet met geweld in te duwen. Indien het batterijpak er niet gemakkelijk ingaat, dan houdt u het verkeerd om.
Bediening trekschakelaar (Fig. 2)
LET OP:
Voor inbedrijfneming, overtuig u ervan dat de filter en de
voorfilter juist zijn installeerd want anders kan stof of iets
ander in de motor geraken en daardoor een storing veroorzaken.
Om de machine te laten lopen drukt u eenvouding de
trekschakelaar in. Laat deze weer los om te stoppen.
Stofzuigen
Mondstuk (Fig. 3)
Bevestig het mondstuk op de stofzuiger voor het schoonmaken van tafels, stoelen en ander meubilair. Het mondstuk is gemakkelijk in te schuiven.
Mondstuk+ verlengstuk (rechte buis) (Fig. 4)
Het verlengstuk (rechte buis) dient tussen het mondstuk
en de stofzuiger bevestigd te worden. Het gewicht van de
stofzuiger ligt dan vlak bij uw hand, hetgeen gemakkelijk
is voor het schoonmaken van hooggelegen plaatsen en
in nauwe ruimten.
Hoekmondstuk (Fig. 5)
Bevestig het hoekmondstuk op de stofzuiger voor het reinigen van hoeken, en spleten, vooral bij het schoonmaken van het interieur van auto’s en meubilair. De
stofzuiger is dan in staat om ook zand en ander zwaar
vuil te zuigen.
Hoekmondstuk +verlengstuk (rechte buis) (Fig. 6)
Het verlengstuk (rechte buis) is erg nuttig in nauwe ruimten waar nauwelijks plaats is voor de stofzuiger of het
schoonmaken van hooggelegen, moeilijk te bereiken
plaatsen.
De filter schoonkloppen
Wanner u tijdens het stofzuigen merkt dat de zuigkracht
begint te verminderen, houd dan de stofzuiger rechtop
met de inlaatopening naar boven. Klop vervolgens met
uw hand 4 of 5 keer op de zijkant van de stofzuiger.
Daardoor zal dan het stof van de voorfilter en de filter losraken en de zuigkracht worden hersteld.
LET OP:
Ledig de stofzuiger voordat hij te vol raakt, aangezien
anders de zuigkracht minder wordt.
Ledigen
Til het uiteinde van de stofzuiger op, zodat de inhoud er
niet uitvalt. Klop daarna met de hand 4 of 5 keer op de
zijkant van het omhulsel zodat het stof van de voorfilter
en de filter loskomt, waar door dan het ledigen wordt vergemakkelijkt. (Fig.7)
Kantel de stofzuiger zodat het eind met de zuigopening
naar beneden gericht is en schroef het voorhuis los zoals
getoond in de pijlrichting. Verwijder het voorhuis met zorg
door deze rechtop te houden opdat de inhoud niet
gemorst wordt. (Fig. 8)
Verwijder niet slechts de inhoud van het voorhuis maar
ook de aan het voorfilter aanklevende stof.
Draai het voorfilter en trek deze naar u toe om de fijne
stof vanaf binnen te verwijderen. Trek daarna het filter
eruit en klop iedere aan klevende stof af. (Fig.9)
Na de lediging van de stofzuiger, monteer weer in de
volgorde zoals afgebeeld in Fig. 10.
1. Breng het filter in zijn geheel nauwkeurig aan.
2. Breng de voorfilter aan.
3. Schroef het voorhuis vast.
LET OP:
• Indien het filter en/of het voorfilter niet weer behoorlijk
gemonteerd zijn of gebruik is gemaakt van een kapot of
gescheurd filter, dan kan dit het binnendringen van stof
in de motor en daardoor ook zijn storing veroorzaken.
• Schroef het voorhuis vast op zijn plaats. Draai de
accessoires (mondstuk enz.) aan in dezelfde richting
als voor het aanschroeven van het voorhuis.
Na het gebruik (Fig. 11)
Bij het opnieuw laden of opbergen van de stofzuiger, kan
deze aan een spijker gehanden worden door gebruik te
maken van de “haak” op de achterzijde.
ONDERHOUD
LET OP:
Controleer altijd of de machine is uitgeschakeld en de
accu is losgekoppeld vooraleer onderhoud uit te voeren
aan de machine.
Reinig de buitenkant (behuizing) van de stofzuiger regelmatig met een doek die met zeepsop is bevochtigd.
Gebruik hiervoor nooit benzine, verdunner e.d. omdat
deze verkleuring of scheurvorming kunnen veroorzaken.
Spoel het filter regelmatig uit in zeepsop. Gebruik nooit
een wasmachine om het filter te reinigen. Laat het filter
grondig drogen alvorens u het opnieuw gebruikt. Gebruik
geen olie, benzine, verdunner e.d. om de stofzuiger zelf
te reinigen. Dit zal namelijk scheurvorming of verkleuring
tot gevolg hebben.
Opdat het gereedschap veilig en betrouwbaar blijft, dienen alle reparaties, onderhoud of afstellingen te worden
uitgevoerd bij een erkend Makita service centrum.
13
Page 8

ENGLISH
EC-DECLARATION OF CONFORMITY
We declare under our sole responsibility that this product is in compliance with the following standards of standardized documents,
in accordance with Council Directives, 89/336/EEC and 98/37/EC.
EN50260, EN55014
FRANÇAISE
DÉCLARATION DE CONFORMITÉ CE
Nous déclarons sous notre entière responsabilité que ce produit
est conforme aux normes des documents standardisés suivants,
conformément aux Directives du Conseil, 89/336/CEE et
98/37/EG.
EN50260, EN55014
DEUTSCH
Hiermit erklär t wir unter unserer alleinigen Verantwortung, daß
dieses Produkt gemäß den Ratsdirektiven 89/336/EWG und
98/37/EG mit den folgenden Normen von Normendokumenten
übereinstimmen:
CE-KONFORMITÄTSERKLÄRUNG
EN50260, EN55014.
ITALIANO
DICHIARAZIONE DI CONFORMITÀ
CON LE NORME DELLA COMUNITÀ EUROPEA
Dichiariamo sotto la nostra sola responsabilità che questo prodotto
è conforme agli standard di documenti standardizzati seguenti:
secondo le diretti ve del Consiglio 89/336/CEE e 98/37/CE.
EN50260, EN55014
NEDERLANDS
EG-VERKLARING VAN CONFORMITEIT
Wij verklaren hierbij uitsluitend op eigen verantwoordelijkheid dat
dit produkt voldoet aan de volgende normen van genormaliseerde
documenten,
in overeenstemming met de richtlijnen van de Raad 89/336/EEC
en 98/37/EC.
EN50260, EN55014
ESPAÑOL
DECLARACIÓN DE CONFORMIDAD DE LA CE
Declaramos bajo nuestra sola responsabilidad que este producto
cumple con las siguientes normas de documentos normalizados,
de acuerdo con las directivas comunitarias, 89/336/EEC y
98/37/CE.
EN50260, EN55014
ENH002-1
PORTUGUÊS
DECLARAÇÃO DE CONFORMIDADE DA CE
Declaramos sob inteira responsabilidade que este produto obedece às seguintes normas de documentos normalizados,
de acordo com as directivas 89/336/CEE e 98/37/CE do Conselho.
EN50260, EN55014
DANSK
EU-DEKLARATION OM KONFORMITET
Vi erklærer hermed på eget ansvar, at dette produkt er i overensstemmelse med de følgende standarder i de normsættende dokumenter,
i overensstemmelse med Rådets Direktiver 89/336/EEC og
98/37/EC.
EN50260, EN55014
SVENSKA
EG-DEKLARATION OM ÖVERENSSTÄMMELSE
Under eget ansvar deklarerar vi härmed att denna produkt överensstämmer med följande standardiseringar för standardiserade
dokument,
i enlighet med EG-direktiven 89/336/EEC och 98/37/EC.
EN50260, EN55014
NORSK
Vi erklærer på eget ansvar at dette produktet er i overensstemmelse med følgende standard i de standardiserte dokumenter:
i samsvar med Råds-direktivene, 89/336/EEC og 98/37/EC.
EUs SAMSVARS-ERKLÆRING
EN50260, EN55014,
SUOMI
VAKUUTUS EC-VASTAAVUUDESTA
Yksinomaisesti vastuullisina ilmoitamme, että tämä tuote on
seuraavien standardoitujen dokumenttien standardien mukainen,
neuvoston direktiivien 89/336/EEC ja 98/37/EC mukaisesti.
EN50260, EN55014
ΕΛΛΗΝΙΚΑ
∆ηλώνουµε υπ την µοναδικ ή µας ευθύνη τι αυτ το προιν
βρίσκεται σε Συµφωνία µε τα ακλουθα πρτυπα
τυποποιηµένων εγγράφων,
σύµφωνα µε τις Οδηγίες του Συµβουλίου, 89/336/EEC και
98/37/ΚE.
∆ΗΛΩΣΗ ΣΥΜΜΟΡΦΩΣΗΣ ΕΚ
EN50260, EN55014
28
Yasuhiko Kanzaki
Director Director
Directeur Direktør
CE 2003
Direktor Direktör
Amministratore Direktor
Directeur Johtaja
Director ∆ιευθυντής
MAKITA INTERNATIONAL EUROPE LTD.
Michigan Drive, Tongwell, Milton Keynes,
Bucks MK15 8JD, ENGLAND
Page 9

ENGLISH
The typical A-weighted sound pressure level is 71 dB (A).
The noise level under working may exceed 85 dB (A).
The typical weighted root mean square acceleration value is
not more than 2.5 m/s
Noise and Vibration
– Wear ear protection. –
2
.
ENG003-1
PORTUGUÊS
O nível normal de pressão sonora A é 71 dB (A).
O nível de ruído durante o trabalho pode exceder 85 dB (A).
O valor médio da aceleração é inferior a 2,5 m/s
Ruído e vibração
– Utilize protectores para os ouvidos –
2
.
FRANÇAISE
Le niveau de pression sonore pondere type A est de
71 dB (A).
Le niveau de bruit en fonctionnement peut dépasser
85 dB (A).
L’accélération pondérée ne dépasse pas 2,5 m/s
Bruit et vibrations
– Porter des protecteurs anti-bruit. –
2
.
DEUTSCH
Geräusch- und Vibrationsentwicklung
Der typische A-bewertete Schalldruckpegel beträgt
71 dB (A).
Der Lärmpegel kann während des Betriebs 85 dB (A) überschreiten.
Der gewichtete Effektivwert der Beschleunigung beträgt nicht
mehr als 2,5 m/s
– Gehörschutz tragen. –
2
.
ITALIANO
Il livello di pressione sonora pesata secondo la curva A è di
71 dB (A).
Il livello di rumore durante il lavoro potrebbe superare gli
85 dB (A).
Il valore quadratico medio di accellerazione non supera i
2
2,5 m/s
Rumore e vibrazione
– Indossare i paraorecchi. –
.
NEDERLANDS
Het typische A-gewogen geluidsdrukniveau is 71 dB (A).
Tijdens het werken kan het geluidsniveau 85 dB (A) overschrijden.
De typische gewogen effectieve versnellingswaarde is niet
meer dan 2,5 m/s
Geluidsniveau en trilling
– Draag oorbeschermers. –
2
.
DANSK
Det typiske A-vægtede lydtryksniveau er 71 dB (A).
Støjniveauet under arbejde kan overstige 85 dB (A).
Den vægtede effektive accelerationsværdi overstiger ikke
2
.
2,5 m/s
Lyd og vibration
– Bær høreværn. –
SVENSKA
Den typiska-A-vägda ljudtrycksnivån är 71 dB (A).
Bullernivån under pågående arbete kan överstiga 85 dB (A).
Det typiskt vägda effektivvärdet för acceleration överstiger
inte 2,5 m/s
Buller och vibration
– Använd hörselskydd –
2
.
NORSK
Det vanlige A-belastede lydtrykksnivå er 71 dB (A).
Under bruk kan støynivået overskride 85dB (A).
Den vanlig belastede effektiv-verdi for akselerasjon overskrider ikke 2,5 m/s
Støy og vibrasjon
– Benytt hørselvern. –
2
.
SUOMI
Tyypillinen A-painotettu äänenpainetaso on 71 dB (A).
Melutaso työpaikalla saattaa ylittää 85 dB (A).
Tyypillinen kiihtyvyyden painotettu tehollisarvo ei ylitä
2
.
2,5 m/s
Melutaso ja tärinä
– Käytä kuulosuojaimia. –
ESPAÑOL
El nivel de presión sonora ponderada A es de 71 dB (A).
El nivel de ruido en condiciones de trabajo puede que sobrepase los 85 dB (A).
El valor ponderado de la aceleración no sobrepasa los
2
.
2,5 m/s
Ruido y vibración
– Póngase protectores en los oídos. –
ΕΛΛΗΝΙΚΑ
Η τυπική Α-µετρούµενη ηχητική πίεση είναι 71 dB (A).
Η ένταση ήχου υπο συνθήκες εργασίας µπορεί να
µπερβεί τα 85 dB (A).
Η τυπική αξία της µετρούµενης ρίζας του µέσου
τετραγώνου της επιτάχυνσης δεν ξεπερνά τα 2,5 m/s
Θρυβος και κραδασµς
– Φοράτε ωτοασπίδες. –
2
.
29
Page 10

30
Page 11

31
Page 12

Makita Corporation
883562C998
 Loading...