

Page 1

M2 rev G
USER GUIDE
Page 2

1 - Welcome
2 - Important Safeguards
3 - What’s Included
4 - Hardware Setup
7 - A Note About Nozzles
8 - Slicing Files
9 - Changing Filament
10 - M2 Features
13 - What’s the Function?
14 - Filament Settings
15 - Maintenance & Storage
16 - Warranty & Support
17 - About Us
Contents
Page 3
1
Welcome
Your MakerGear M2 3D Printer has arrived!
Do not change the M2’s rmware unless you know exactly
what you’re doing or have been instructed to do so by
MakerGear support.
This User Guide can also be found on the MakerGear website at
www.makergear.com/pages/user-guides, where you can access
additional, more specic information and resources.
Following minimal setup, your M2 is ready to print out-of-the-box. To
ensure safety as well as high quality printing, carefully follow the setup
instructions included in this User Guide.
This printer was assembled at the MakerGear factory in Beachwood,
Ohio, USA, and was tested for at least six hours to ensure that it was fully
operational at the time of shipping.
Do not remove the lm of yellow polyimide tape from the
M2’s glass build plate; this functions as the print surface, and
should be facing up.
Page 4

3. To protect against electrical shock, do not put the printer body,
cord, or electrical plug in liquid. If the printer falls into liquid, do not
touch it. Instead, unplug the printer from power outlet, then remove
it immediately. Do not reach into the liquid without unplugging the
4. This printer should not be used by children unless supervised by an
adult who understands the risks and precautions involved in its use. To
avoid potential injuries, close supervision is necessary when the printer
is used by or near children.
2. Unplug the power cord when the printer is not in use. To unplug,
grasp the plug and rmly pull it from power outlet. You should never
5. Avoid any contact with moving parts. The printer can move quickly,
so stay clear to avoid being struck or pinched.
6. Keep hands/hair/clothing away from printer attachments while the
printer is operating to reduce risk of injury to persons and/or damage to
7. Do not operate the printer if it has a damaged cord/plug, is
malfunctioning, or has been dropped or damaged in any way. If
you are having any problems with the printer (such as temperature
errors, unexplained shutdowns, or other erratic behavior), unplug
the printer from power outlet and contact support. Do not operate a
malfunctioning printer.
1. The following safeguards exist to ensure the safety of users and to
avoid potential risks. Ignoring these safeguards can cause damage to
the printer and its environment.
8. Keep area around the printer clear. The heated build platform moves
horizontally and vertically and may cause the printer to move or damage other pieces of equipment if it strikes them.
2
Important Safeguards
Page 5
3
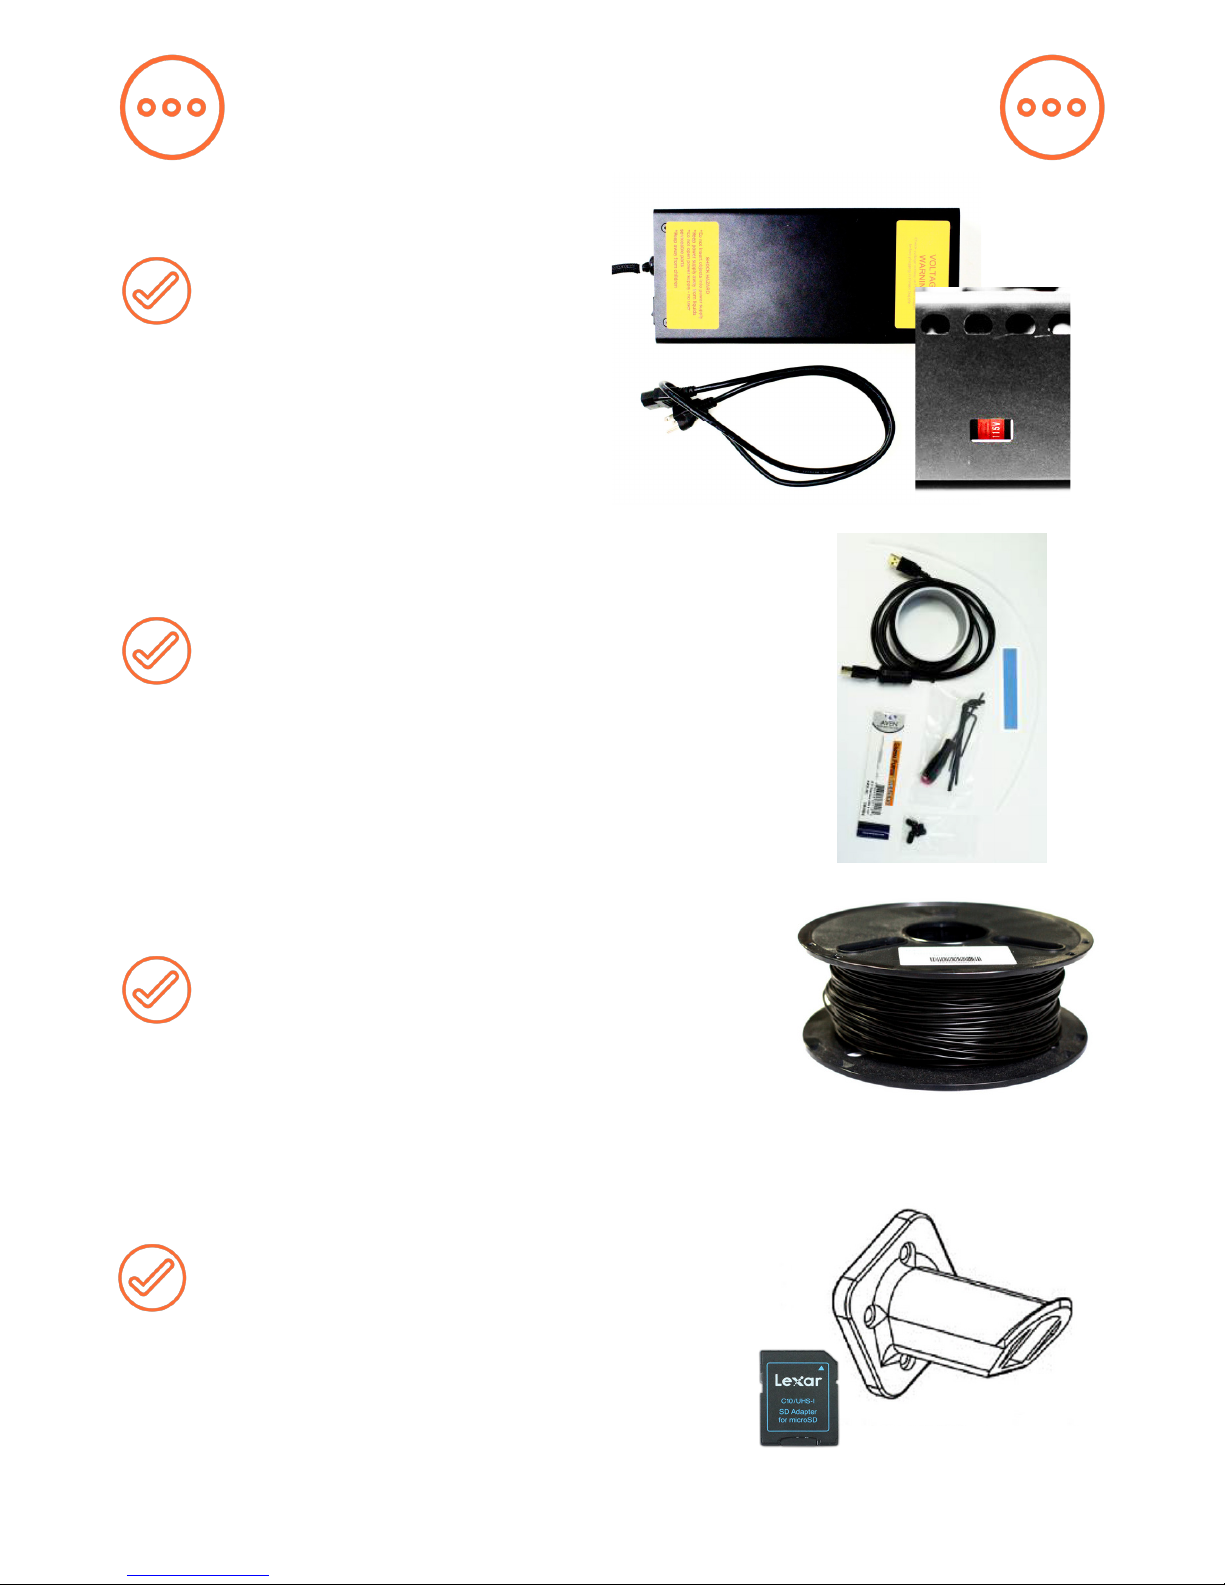
Power supply and cord. If
your power supply has a
voltage switch as shown
to the right, ensure that
it is set to the correct
voltage.
Tool kit: hex drivers, tweezers,
lament guide tube, polyimide tape,
USB cord, feeler gauge, brush, and 4
extra build plate hold-down clips.
1 kg spool of 1.75 mm PLA (color may
vary).
Spool holder with screws which
was printed on your M2 using the
included SD card.
What’s Included
Page 6
4
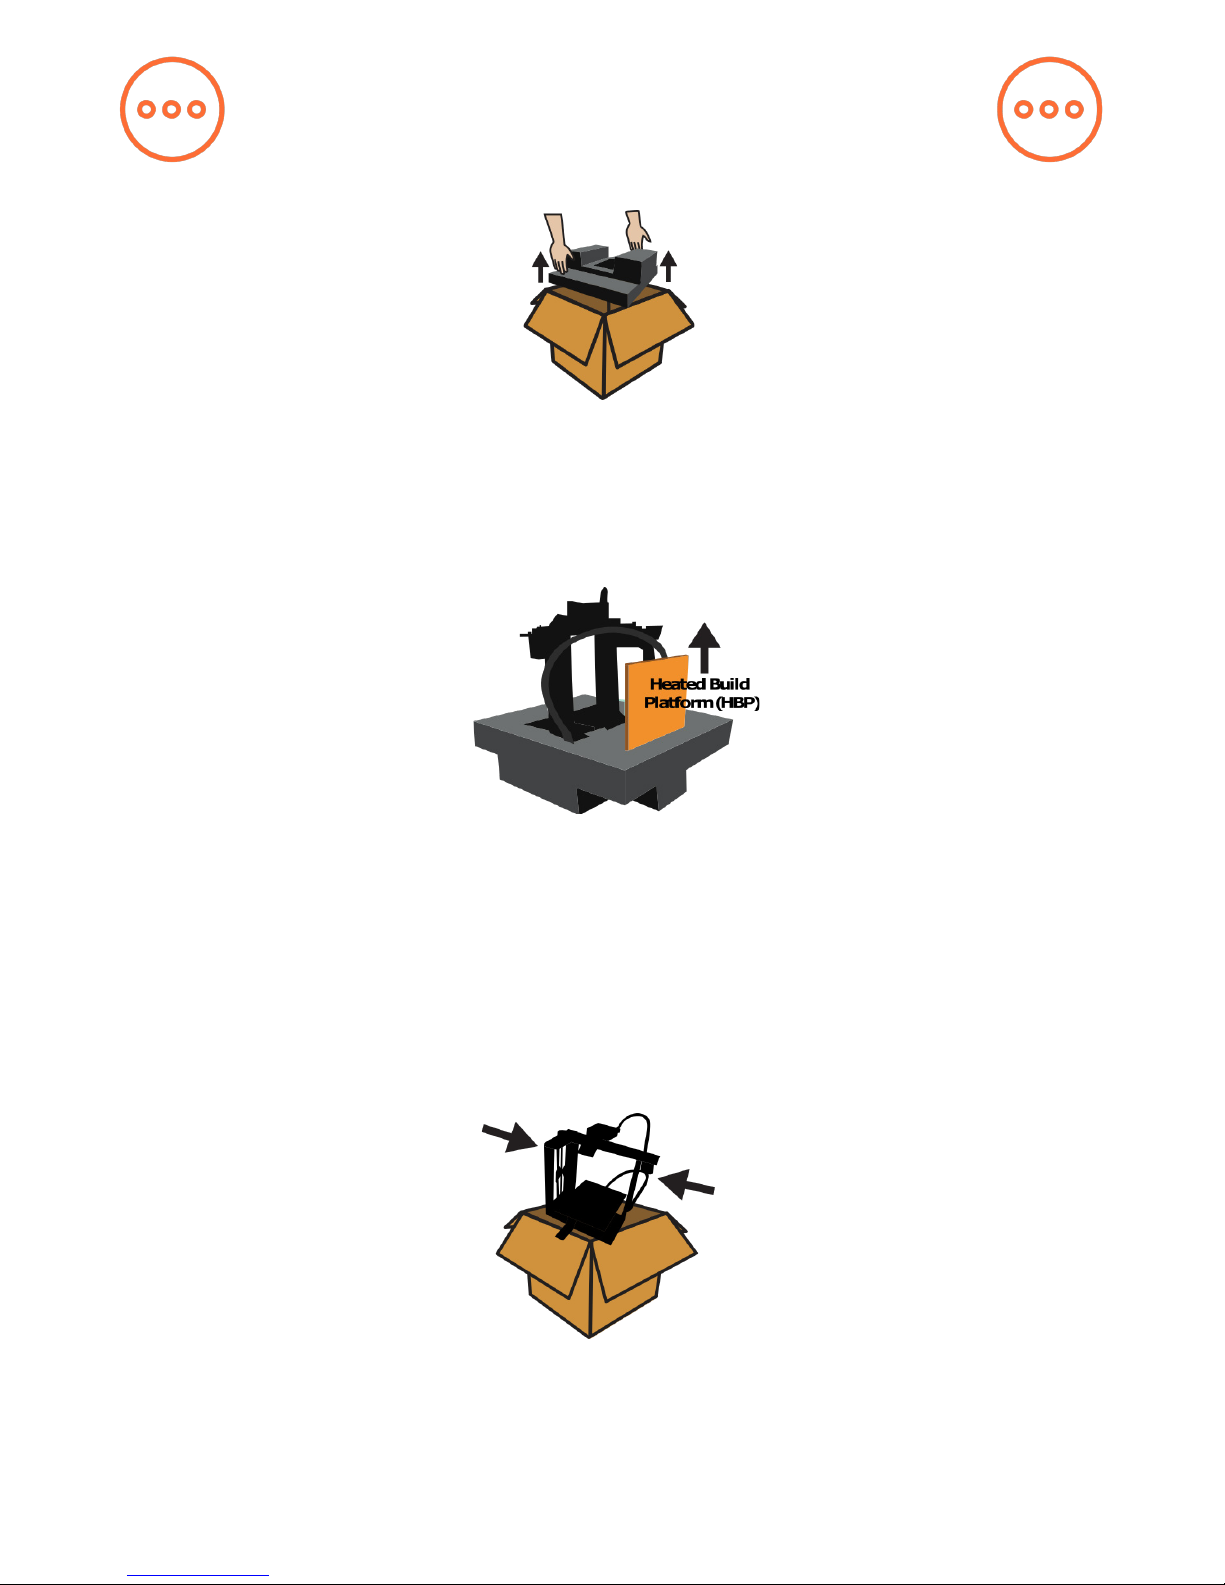
1. Carefully compress and remove the foam from the top of the printer
and from inside the printer frame.
2. Remove foam from above and below the 4-legged “spider” inside the
frame. Remove the heated build platform from its slot in the foam and
place it on the spider with the glass build plate facing up, as shown on
page 5.
3. Grasp the printer where the arrows indicate, and remove it from the
box.
Hardware Setup
Page 7
5
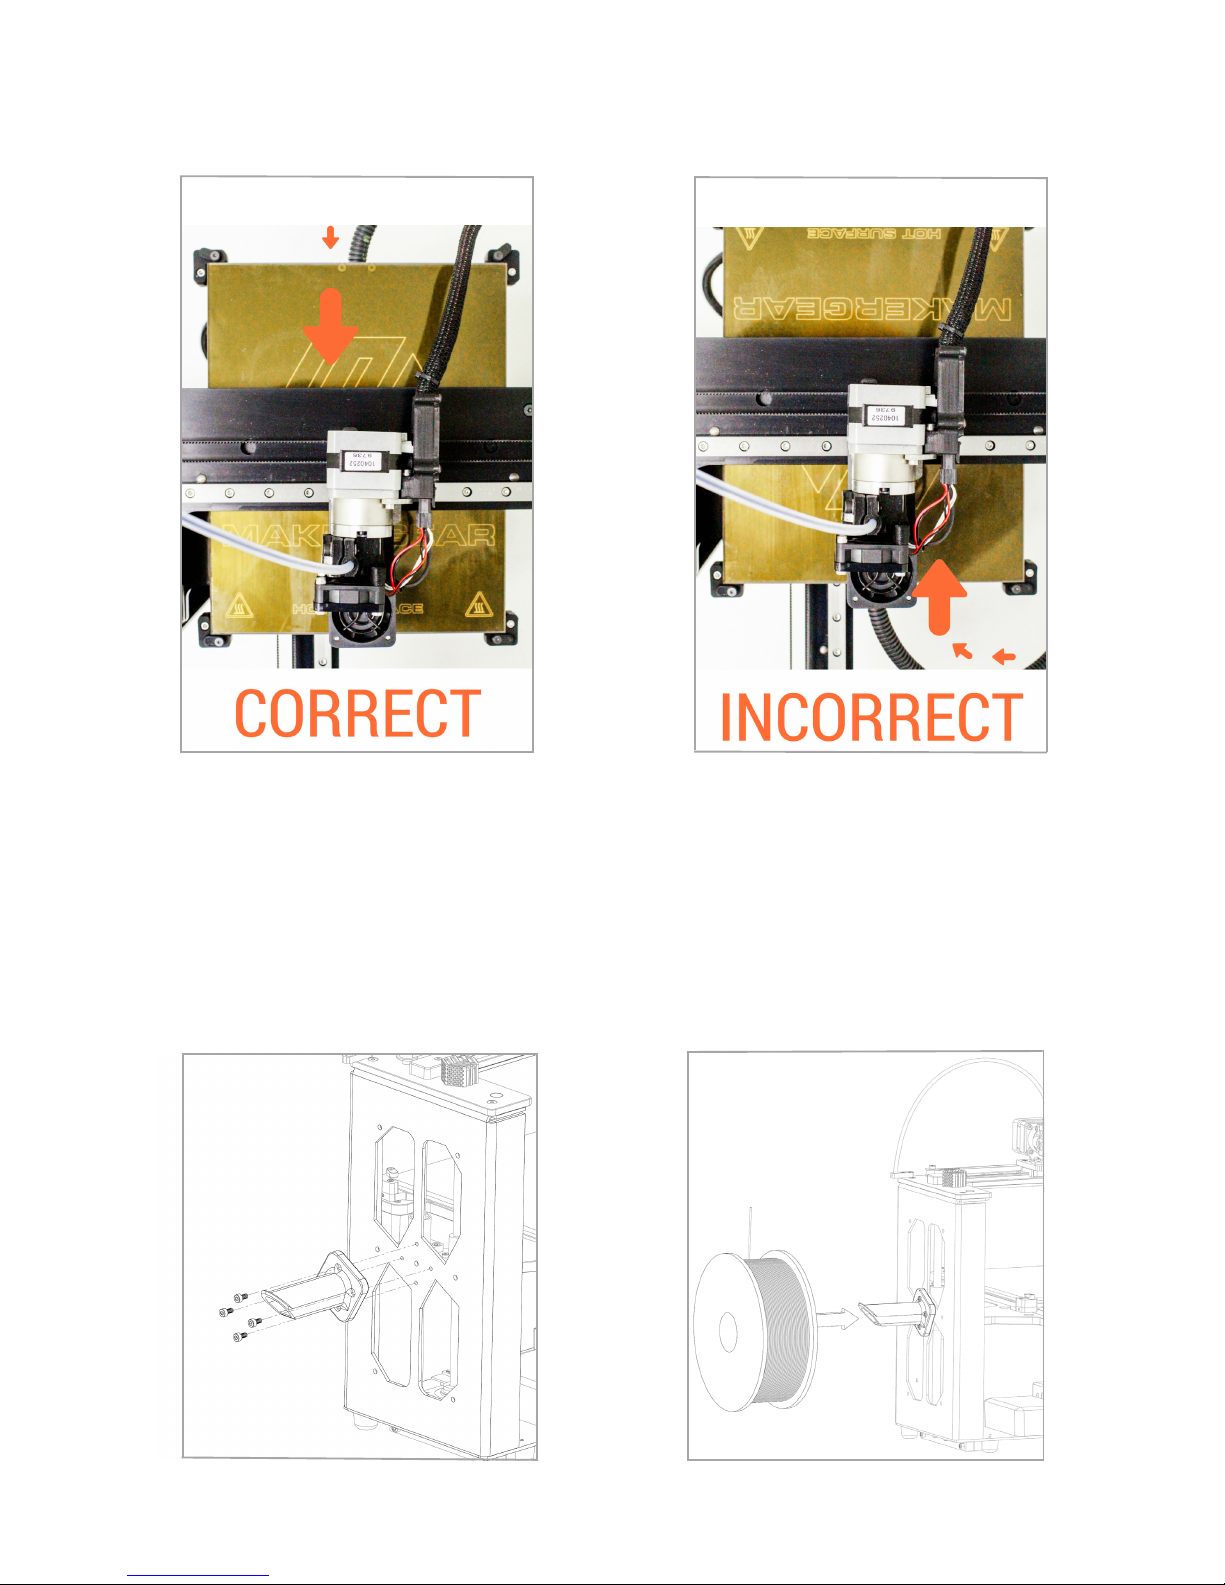
4. Remove the binder clip, and rotate the hold-down clips to point toward the front and back of the glass build plate in order to secure it in
place.
5. Install the spool holder with the 4 included screws using the 3 mm
allen key, ensuring that the longer side is facing up. Place your PLA
spool on the spool holder so that the lament unwinds clockwise.
Page 8
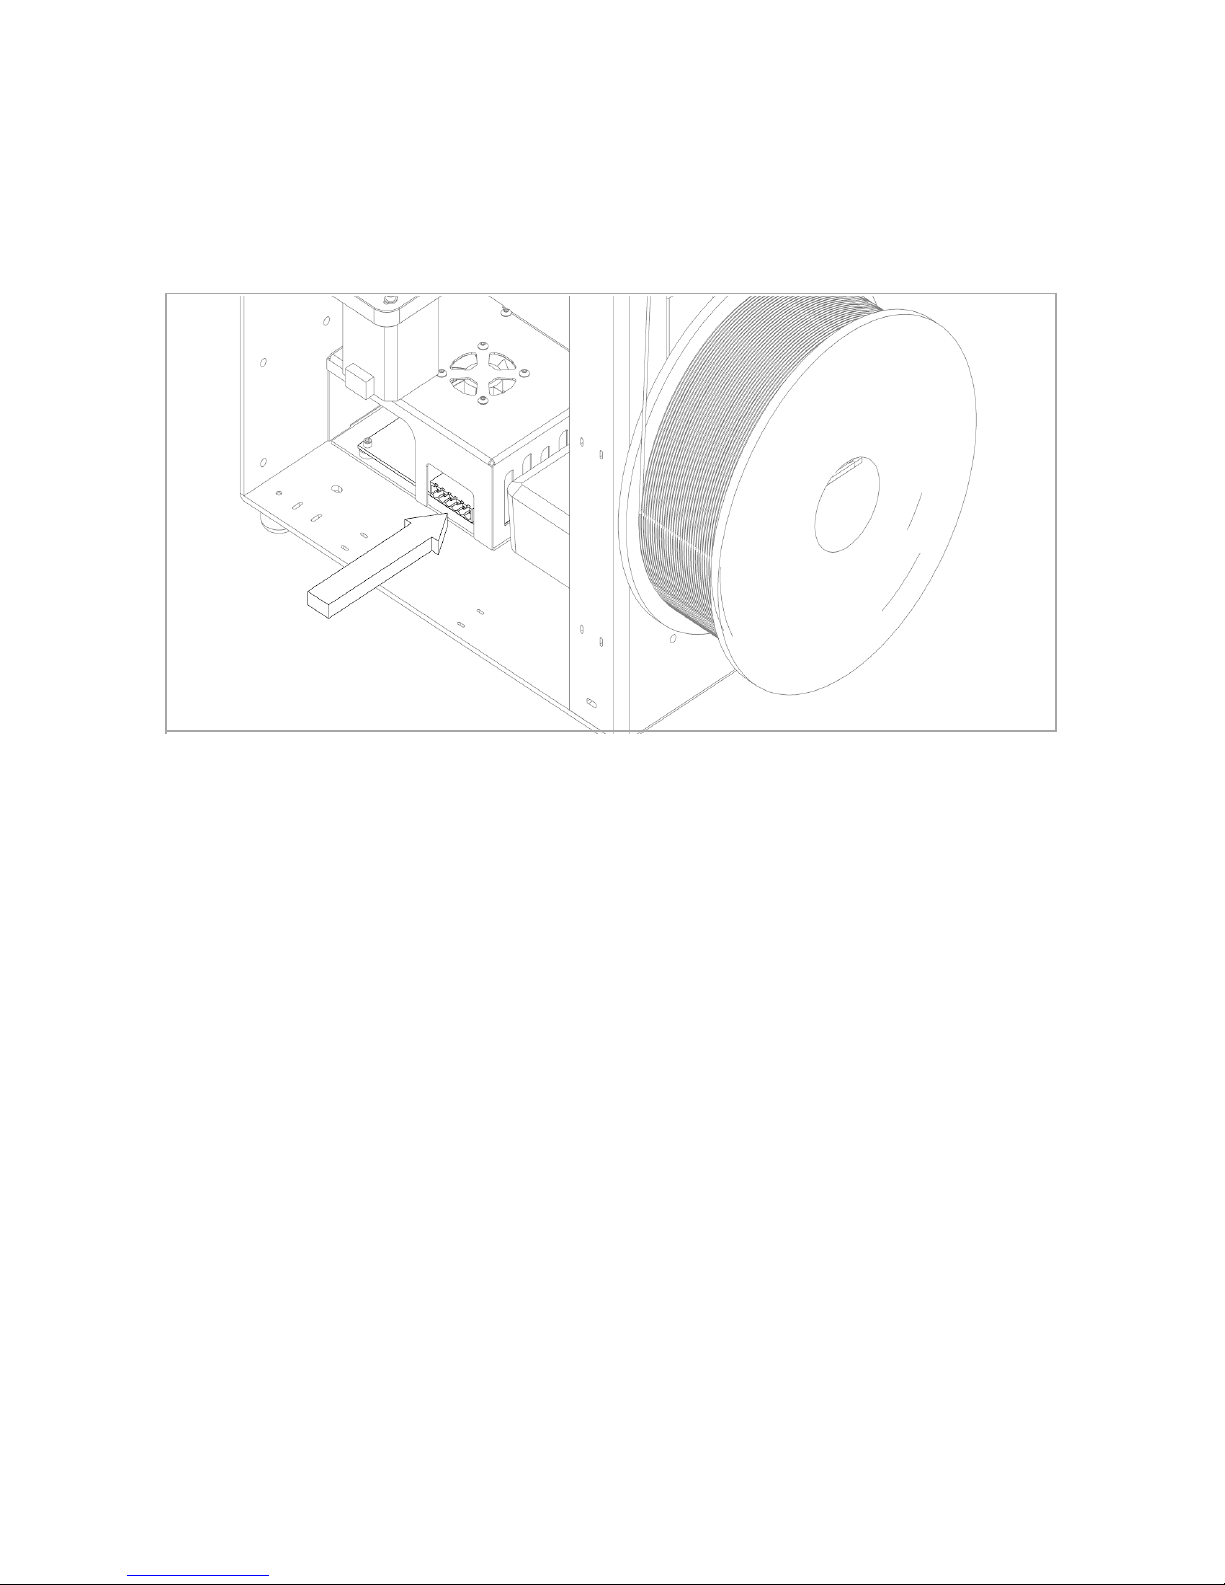
6. Insert the 6-position power supply connector into the 6-position
electronics connector, making sure that it is SECURELY IN PLACE in the
electronics case. Connect the power supply cord to the power supply.
Next, plug the power supply into power outlet, and ip the switch on
the power supply to the on position.
6
7. Visit www.makergear.com/pages/get-started to register your printer,
download the QuickStart App, and watch a tutorial on the process.
8. In the QuickStart App, you will:
a. Connect install driver (Windows only)
b. Check your build platform’s level and starting height
c. Heat your build platform & extruder and load lament.
d. Print “Bracelet.g” from your SD Card
9. After printing “Bracelet.g”, you will be given three options:
a. Print Another File: click this to print another le stored on
your SD Card.
b. Retry: this will return you to re-check your build platform in
order to address any issues that may have caused print defects.
c. Done: click this to navigate to the “Advanced” tab, where you
can nd manual controls for your M2 as well as a real-time
display of the temperatures and coordiantes of your extruder
and HBP.
Page 9
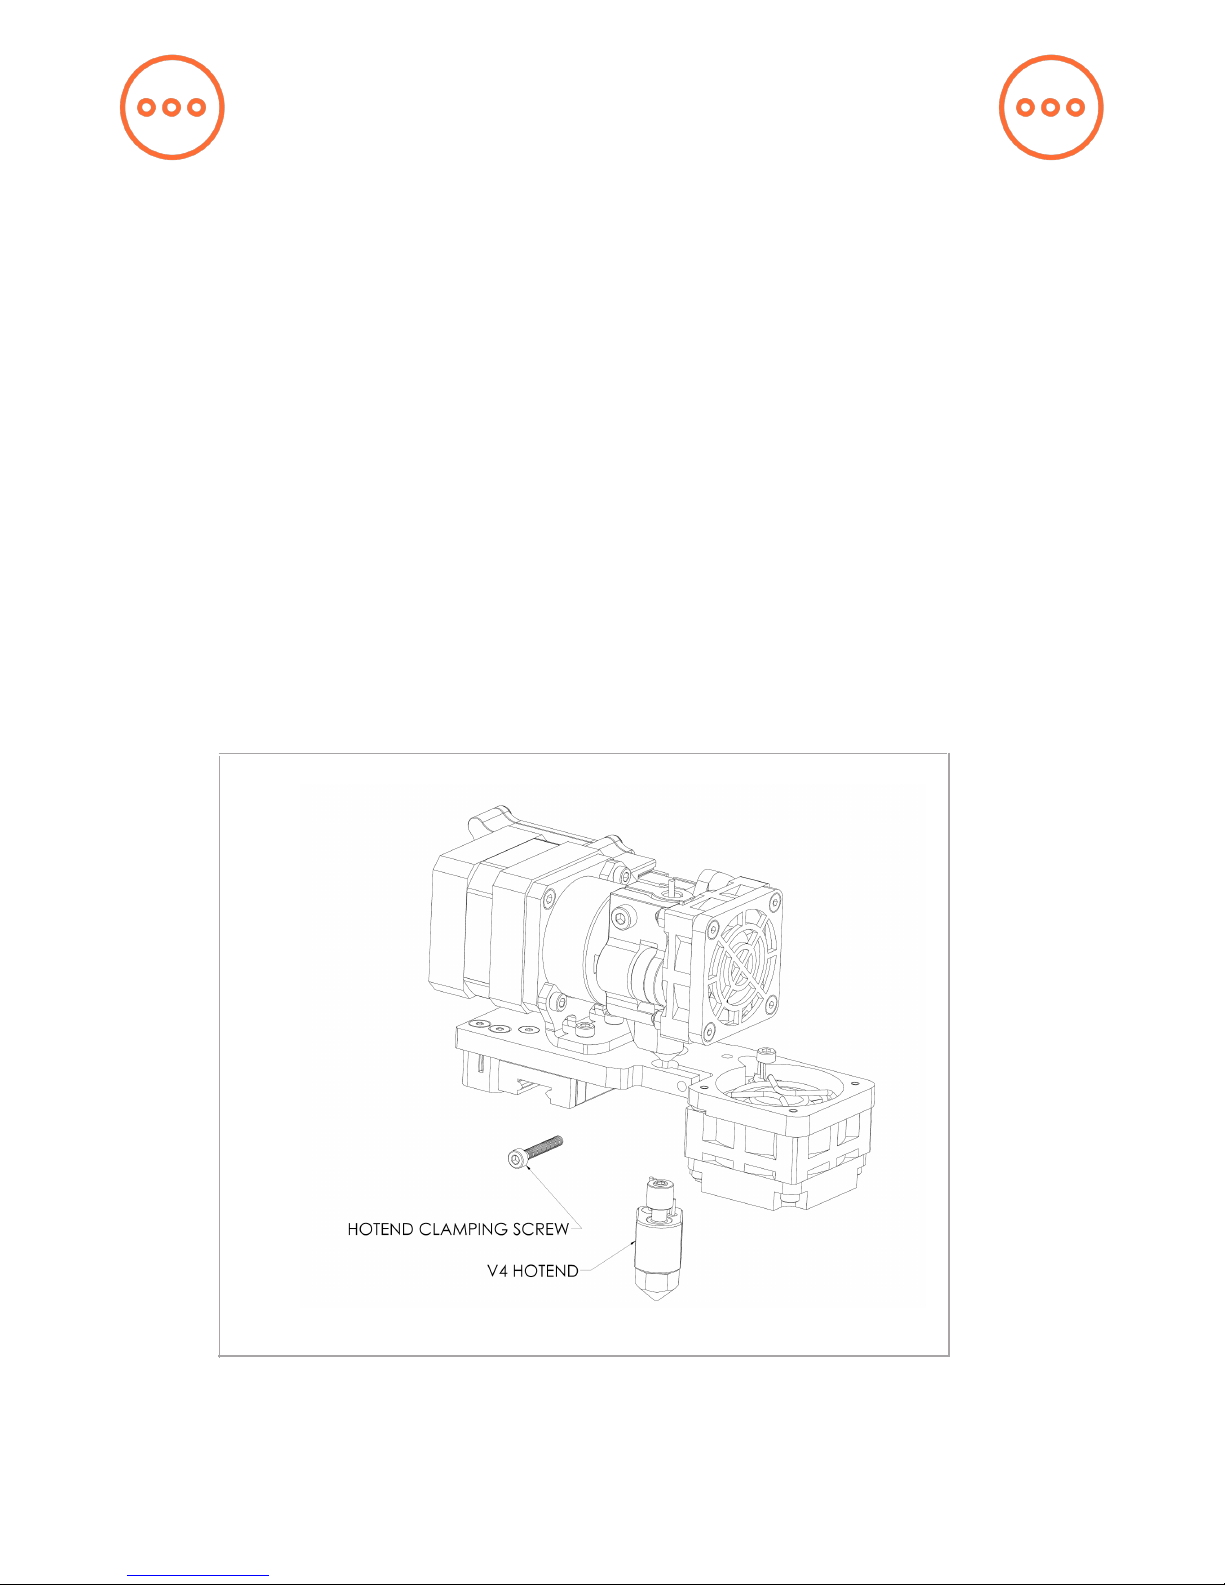
Visit the MakerGear YouTube channel for step-by-step instructions on
how to remove the V4 hot end and remove/mount a nozzle.
The nozzle is the brass conical piece with a six sided base. It attaches
to the other parts of the hot end and dispenses material through a
precisely sized hole.
If you wish to remove or change the nozzle, you must rst remove the
entire hot end. Attempting to unscrew the nozzle directly from the M2
will damage the hot end.
Some of our users choose to print with nozzles that are either larger or
smaller than the 0.35 mm nozzle included on the M2 in order to
accommodate specic printing needs. If you plan to print with dierentsized nozzles, we recommend keeping each nozzle installed in a
separate hot end, as this allows you to switch between nozzles more
easily.
7
A Note About Nozzles
Page 10

Step 1: Using the QuickStart App, print “hexa.g” from the included SD
card, which we have sliced for you using Simplify3D software. This
should take about 15 minutes to print and will serve as a comparison to
your sliced version of the same model.
Step 2: Remove your SD card from the card reader on your M2 and in-
sert it into your computer’s card reader — this will enable signicantly
faster transfer of les between you computer and the SD card. For computers that do not have an SD card reader, external card readers that
connect to your computer via USB are available.
8
Slicing Files
If you try to dowload and print a le from the internet, you’ll notice its
format is either .STL or .OBJ, which your M2 is unable to read. In order
to print these les, you must use special software designed to “slice”
them into “.g” or “.gcode” format — this le format, known as G-Code,
gives your M2 step-by-step commands for where/how to extrude material. The steps listed below will help you set up your slicer settings to
slice a .STL le stored on your SD card into .g format.
Step 3: Download the most recent Slic3r from slic3r.org. Your slicer
settings will be incorrect. To correct them, click “Load Cong Bundle”
under “File” and select the “cong.ini” le available on your SD card.
Step 4: Import “hexa.stl” into your slicing software, slice the le (i.e.,
click export in .g format), and then name it “hexa2.g”. Transfer this new
.g le to your SD card, eject the card from your computer, and then
insert it back into the card reader on your printer.
Step 5: Use your printer control software (e.g., Printrun by Pronterface,
available at http://www.pronterface.com/#download) to instruct your
M2 to print hexa2.g from your SD card.
Page 11

1. After ensuring that your hot end is hot enough to print with your
current lament material, use the manual controls in your software
package to “Retract” while pulling lament gently until it is released
from the lament drive.
2. If switching between lament material types (e.g., PLA to ABS), heat
your extruder to the hotter of the two printing temperatures in order to
purge the old material and properly extrude the new material.
3. Cut the end of the new material at an angle and feed it into the
lament drive. While applying gentle downward pressure, use the
manual controls of your software package to “Extrude” until you can
see the lament extruding from the nozzle.
9
Changing Filament
If the “hexa2.g” print does not have similar strength and appearance to
the “hexa.g” sample that you printed, see the online resources oered
by your slicing software provider in order to familiarize yourself with
dierent slicing settings’ impact on various aspects of print quality.
If you experience persistent issues, contact MakerGear support via:
http://www.MakerGear.com/support
Page 12
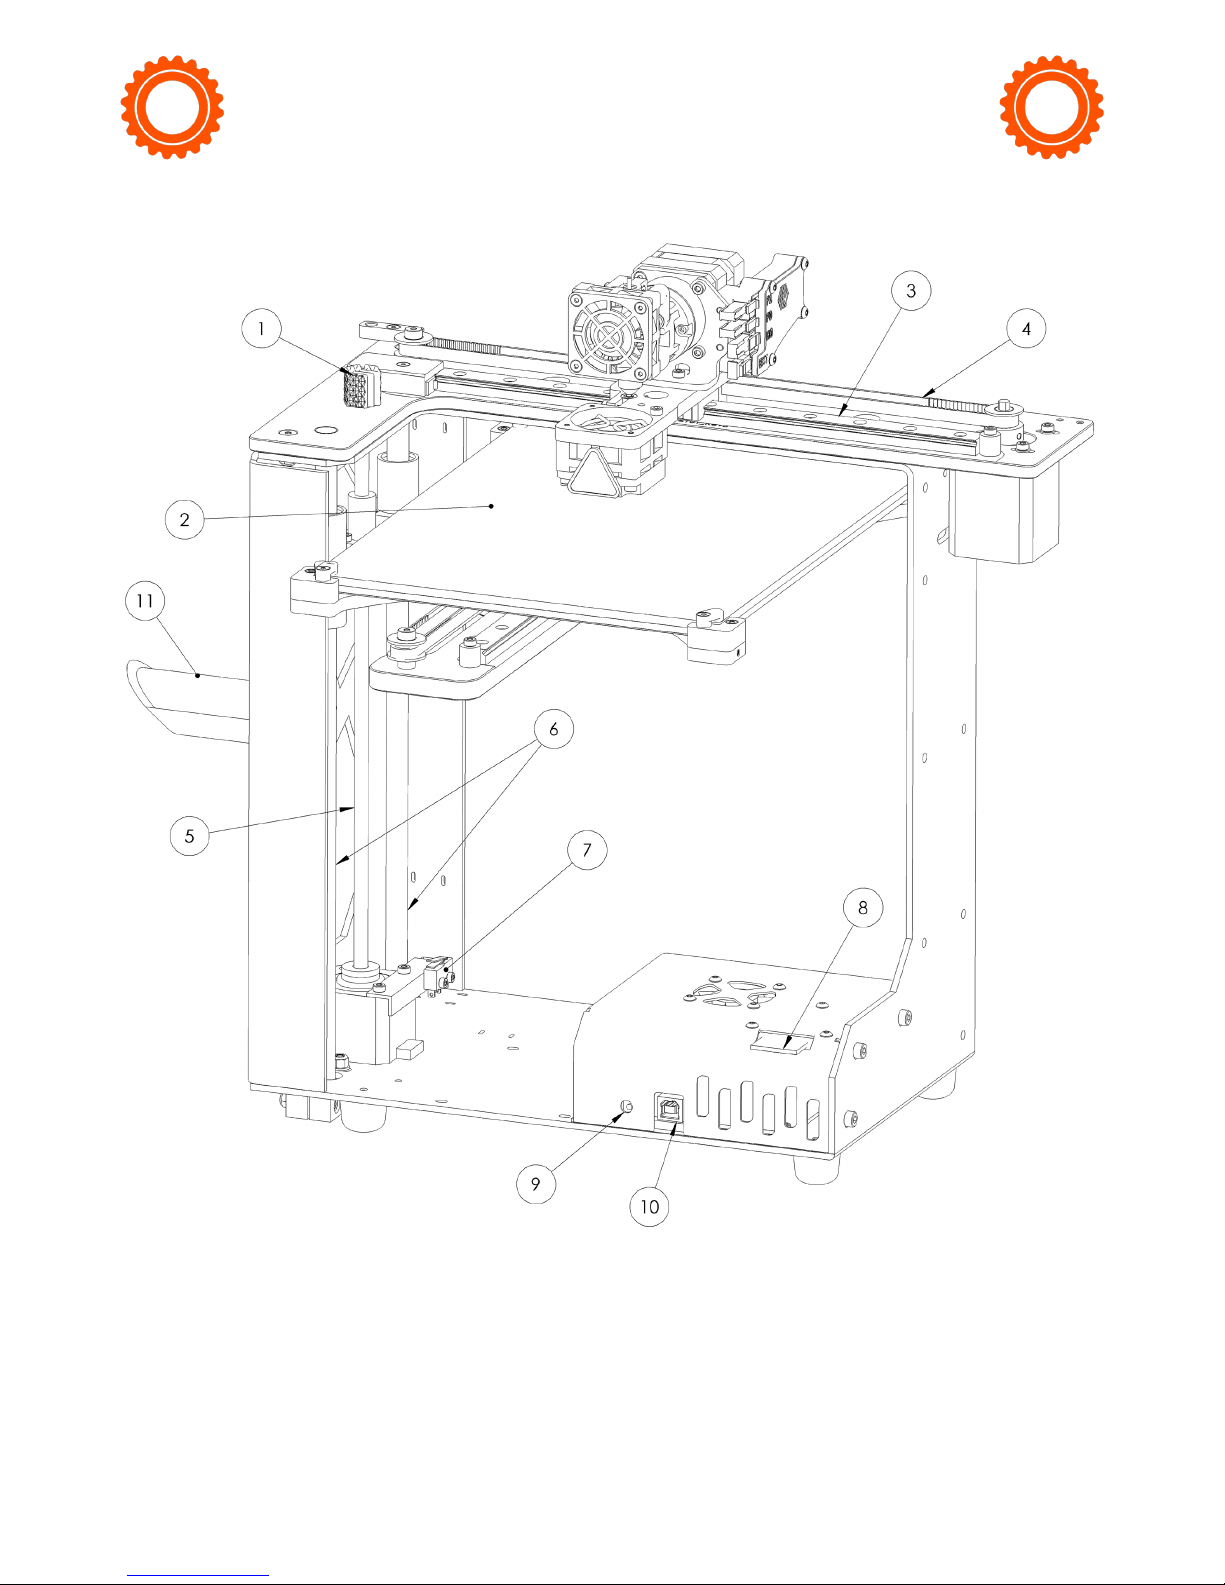
10
M2 Features
Front
1 Z Fine Adjust Knob
2 Heated Build Platform (HBP)
3 X Axis Linear Rail
4 X Axis Belt
5 Z Axis Lead Screw
6 Z Axis Linear Rods
7 Z Axis Limit Switch
8 SD Card Reader
9 Reset Button
10 USB Port
11 Spool Holder
Page 13
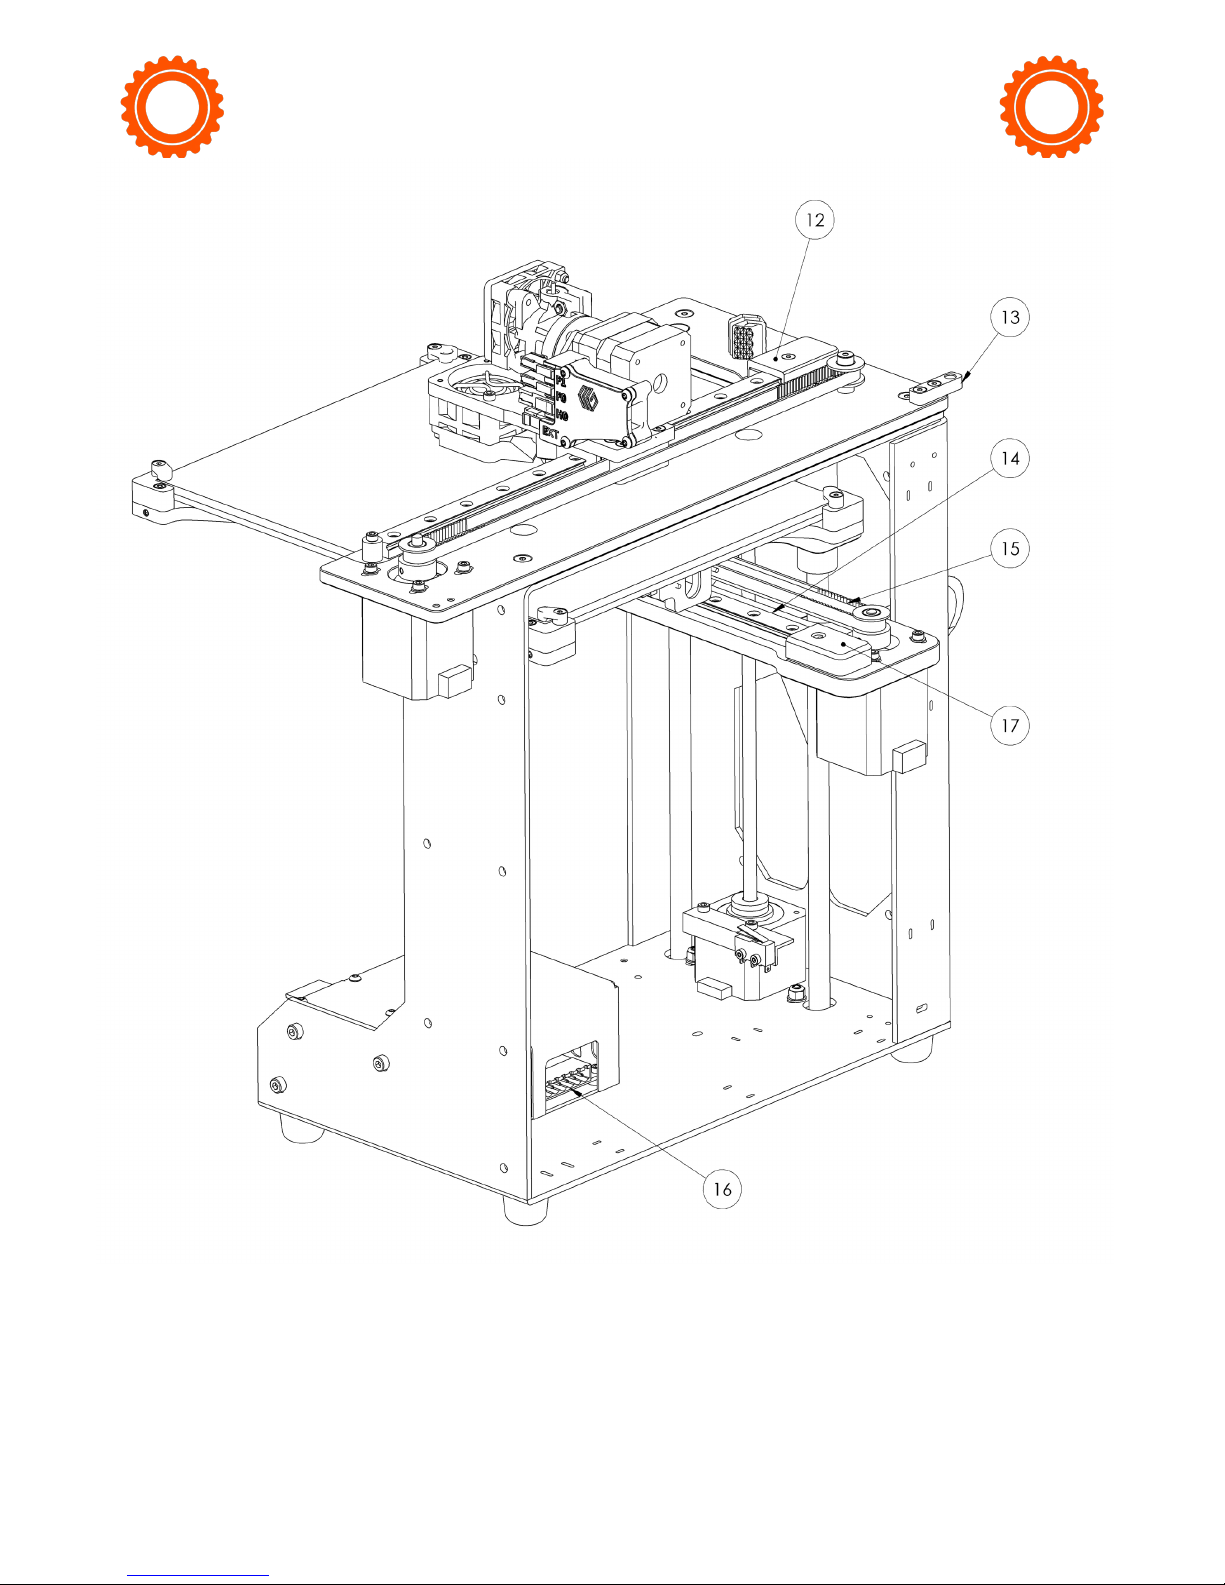
11
M2 Features
Rear
12 X Axis Limit Switch
13 Filament Guide
14 Y Axis Linear Rail
15 Y Axis Belt
16 6-Position Power Connector
17 Y Axis Limit Switch
Page 14
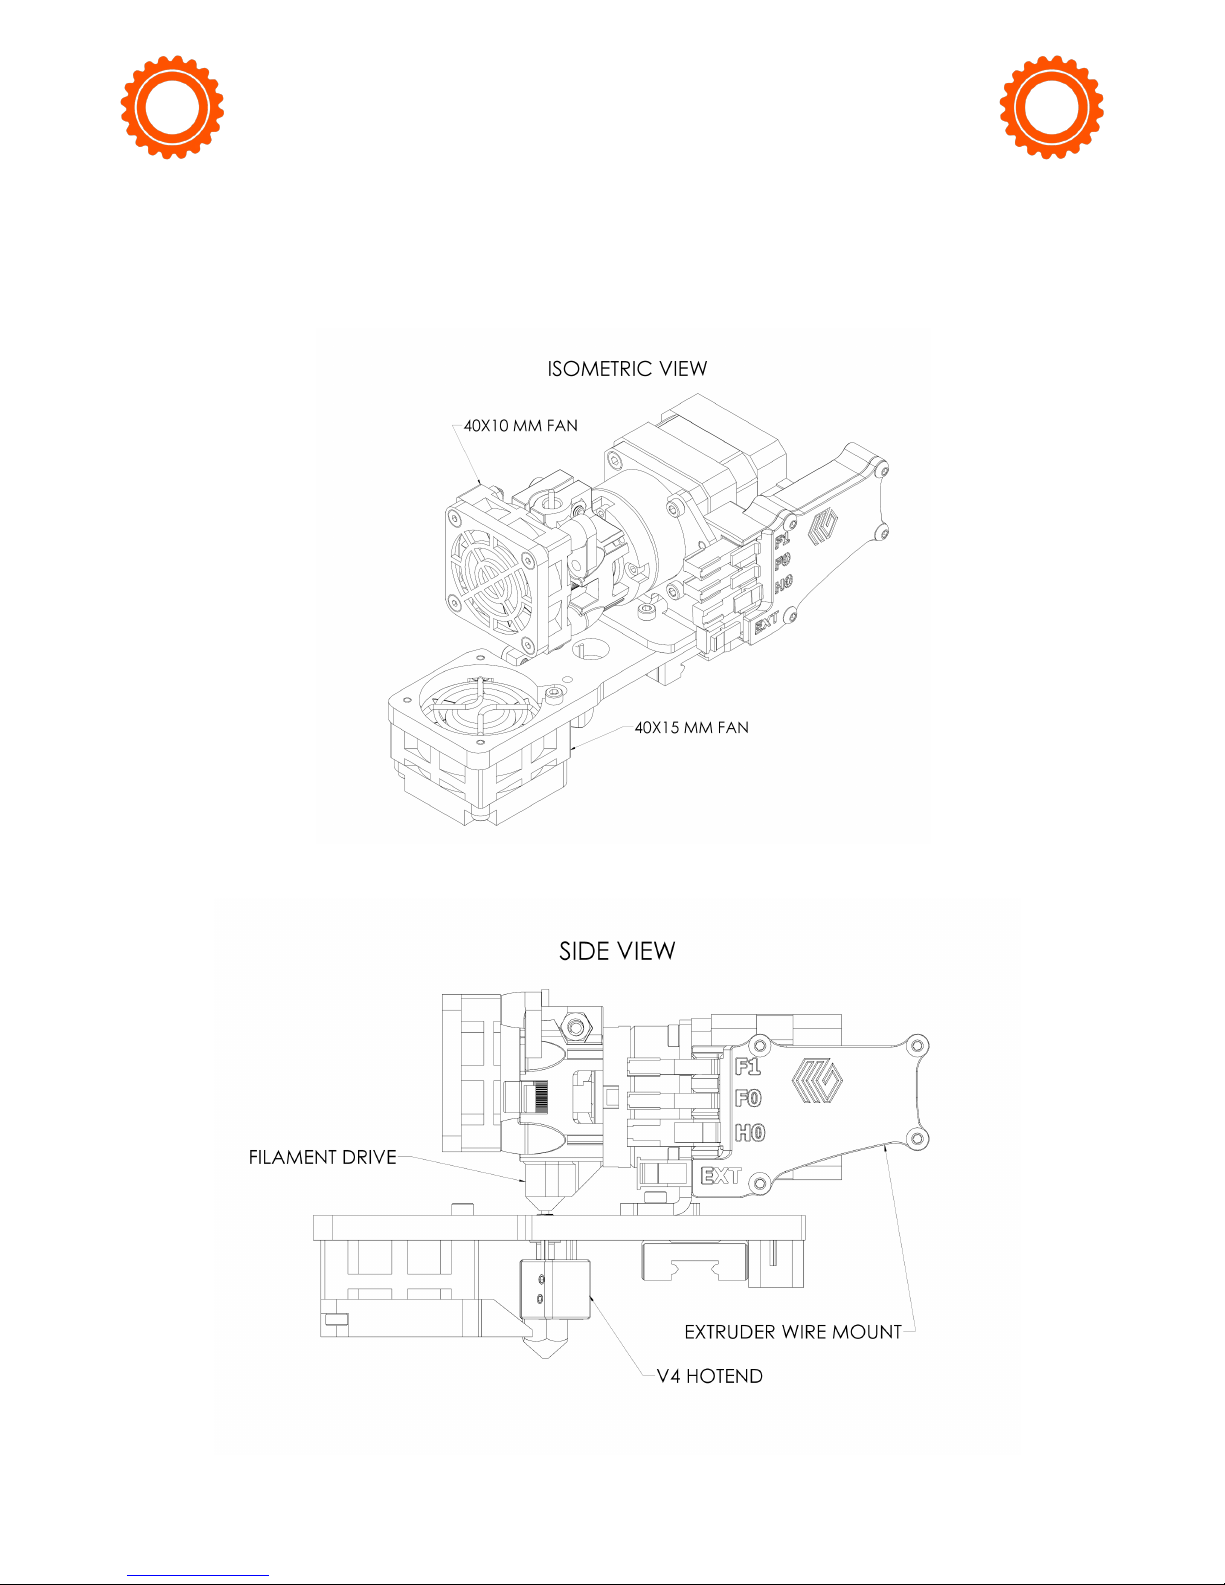
12
M2 Features
Extruder Assembly
Page 15

What’s the Function?
Simple explanations of M3-ID Features
40x10 mm Fans (24 V) cool lament drive and RAMBo board.
40x15 mm Fan (24 V) cools printed layers (as needed).
6-Position Power Connector brings low voltage DC power to M2.
Extruder Wire Mount locates and clamps connectors for extruder.
Filament Drive pulls lament into extruder.
Filament Guide guides lament from spool to lament guide tube.
Filament Guide Tube guides lament from lament guide to lament drive.
Glass Build Plate (with polyimide lm) serves as the print surface.
Heated Build Platform (HBP) controls glass build plate temperature.
M2 Serial Number is a unique identier for each printer.
RAMBo Housing shields and cools RAMBo processor board.
Reset Button resets the control electronics and shuts down the printer.
SD Card Reader reads stored command info from SD Card.
Spool Holder secures the lament spool during printing.
USB Port allows communication between external computer and RAMBo.
V4 Hot End melts lament and controls extruded diameter of lament.
X-Axis Belt keeps extruder in sync with X-motor.
X-Axis Limit Switch sets “home” position for X-axis motion.
X-Axis Rail guides extruder during side-to-side movement.
Y-Axis Belt keeps heated build platform in sync with Y-motor.
Y-Axis Limit Switch sets “home” position for Y-axis motion.
Y-Axis Rail guides heated build platform during front-to-back movement.
Z-Axis Fine Adjust Knob is for last-minute changes to the distance
between nozzle and glass build plate.
Z-Axis Leadscrew rotates to move HBP up and down.
Z-Axis Limit Switch sets “home” position for Z-axis motion.
13
Page 16
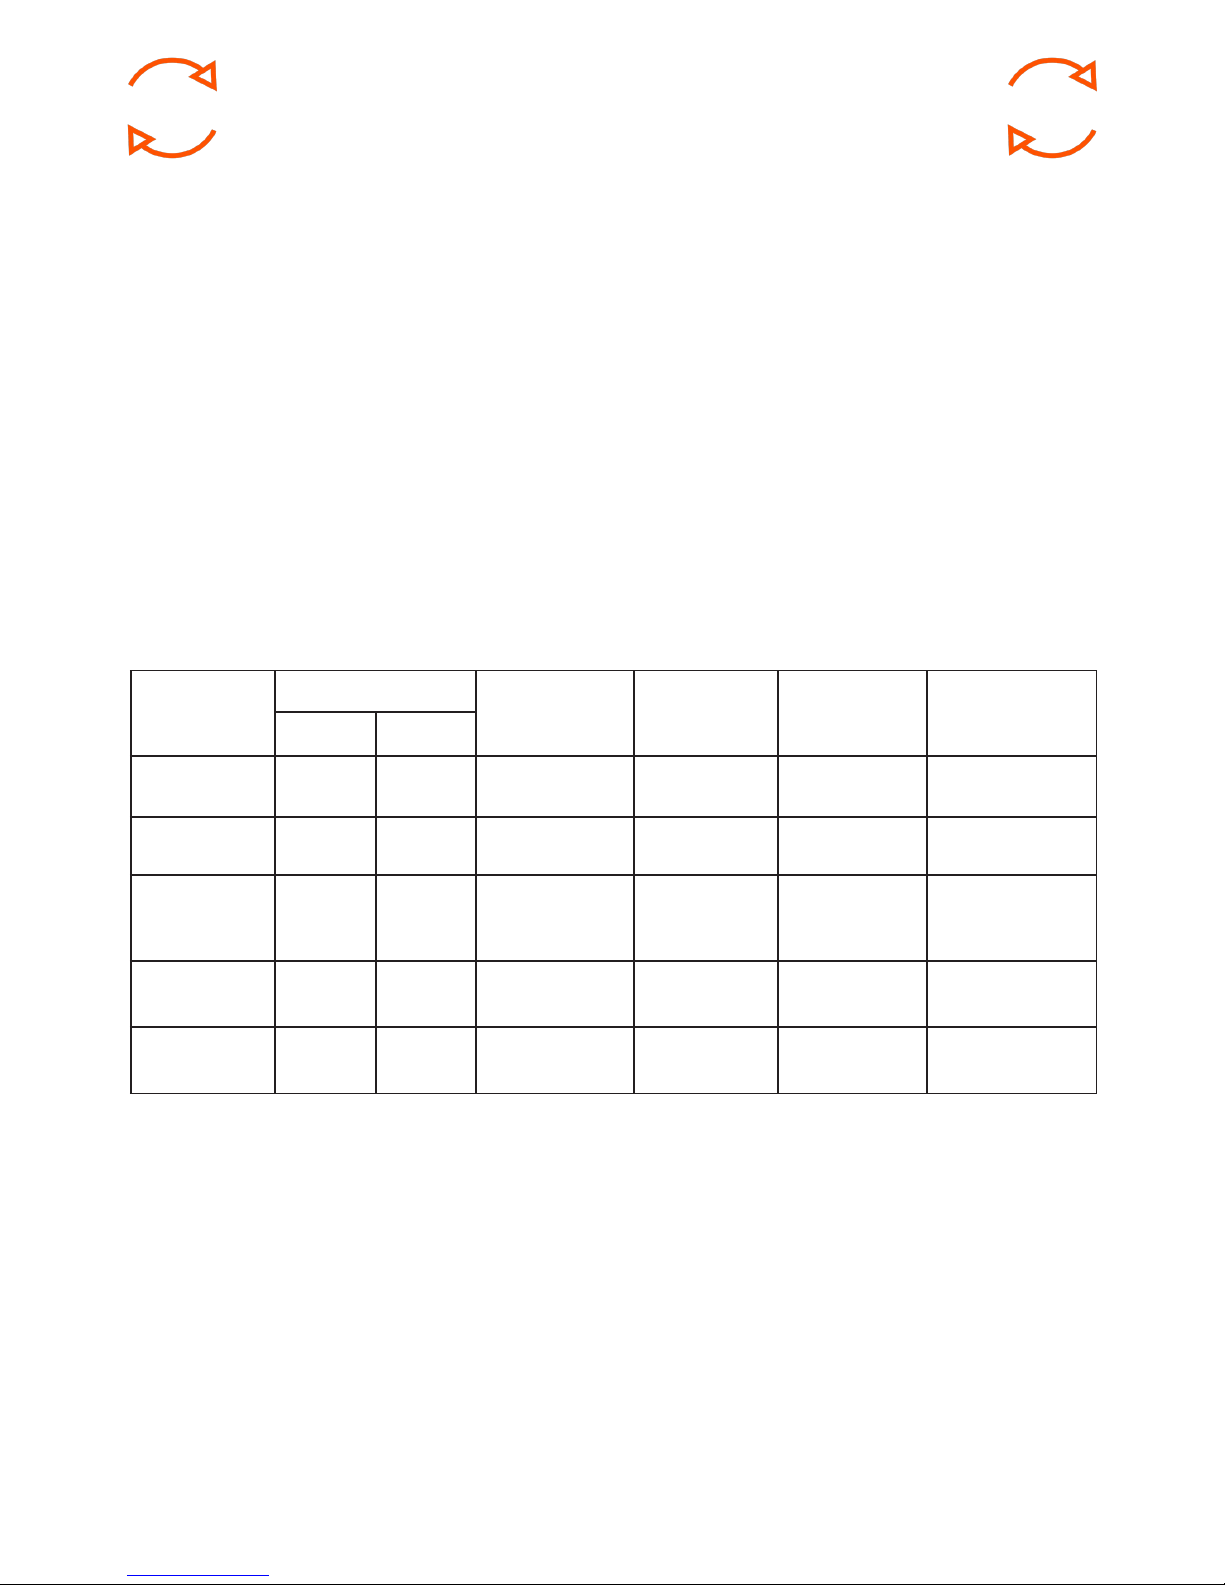
Filament Settings
14
Material
Temperature, oC
Recommended
Printing Speed,
mm/min
Extrusion
Multiplier
Fan Setting
Recommended
Nozzle
Hot End Bed
PLA 215 - 220 60 - 70 2800 - 4000 0.95
100% Aer
First Layer
0.35 mm Brass
ABS 255 - 265 105 - 115 2800 - 4000 1 No Fan 0.35 mm Brass
PET-G 240 - 250 65 - 75 2800 - 4000 0.95
100% Aer
First Layer/No
Fan
0.35 mm Brass
Carbon Fiber
Nylon
255 - 265 105 - 115 2800 - 4000 1 No Fan
0.5 mm Stainless
Steel
TPE/TPU
(Shore A 95)
210 - 225 55 - 60 500 - 1500 1.1
100% Aer
Second Layer
0.5 mm Brass
The MakerGear M2, with its V4 hot end operable at 300 oC, is capable
of running a wide variety of materials. The table below recommends
settings for a few of the most popular materials.
Page 17

Maintenance & Storage
Weekly Maintenance (every 50 hours)
Ensure that the heated build platform (HBP) is at the correct height and
properly leveled. To do so, open the MakerGear QuickStart app and follow the Set Up process in order to complete the following steps:
1) Check Starting Height 2) Check HBP Level
Ensure that the glass build plate is free of defects (torn or bubbled
polymide tape) and dust/dirt/grease, and replace tape or clean surface
with appropriate cleaner (alcohol/water at 50%/50% is recommended).
Monthly Maintenance (every 200-250 hours)
Ensure that the printer is free of dust and lament debris, and clean it
if necessary. Focus areas include fans and fan guards, lament surface
and lament drive, and the entire frame. Clean the oil from the X and Y
linear rails and apply a fresh coat to each. A dot of oil in each of the long
grooves on the X and Y rails is sucient. Once applied, move each axis
through its full travel multiple times to spread the oil.
15
• If you are using the M2 regularly, turn o and unplug the power
supply when nished.
• If you are storing the M2 for a period of 1-2 weeks, follow the
instructions listed above. Additionally, fully seal the lament spool in
a bag, preferably with a new desiccant packet inside.
• If you are storing the M2 for a period of 2 weeks or more, follow all
above instructions, THEN cover the entire printer in order to protect it
from the buildup of dust and other airborne particles.
DO NOT unscrew the nozzle directly from the M2. To change or remove
the nozzle, the entire hot end must be removed. Visit our website or the
MakerGear YouTube channel for step-by-step instructions on how to
remove a hot end and change the nozzle.
M2 Storage
Page 18

Warranty & Support
New M2s ordered from MakerGear or from an authorized MakerGear
distributor have a Six-Month Limited Warranty. MakerGear will replace
defective parts on M2s that are under warranty. Replacement parts
may be new or refurbished and include free shipping in the US. Non-US
customers are responsible for shipping costs for replacement parts. If
you need to return your printer to us for any reason and do not have
the original packaging, there will be a cost ($100 within the US) for us to
send a new box and foam out to you.
The M2 has an open design (no proprietary cartridges) and M2 owners
are free to use third party lament. However, the MakerGear hot end
is only covered when MakerGear lament and authentic MakerGear
components are used. Due to variance in quality, MakerGear is unable
to provide technical support for issues related to third party lament.
If you are using lament or extruder components from a third party,
you must contact your supplier for technical support. The six-month
warranty oered by MakerGear does not cover printer abuse.
16
Technical Support lives on our website at
www.makergear.com/pages/support
Warranty
Exceptions
Support
Notice
This is a Class A product. In a domestic environment, this product may
cause radio interference requiring the user to take adequate measures
to mitigate. The MakerGear M2 can, in very rare cases, stop operating
due to electrostatic discharge (ESD). Operation can be restored by
turning the machine o and on again.
Page 19

About Us
Welcome to the family!
Our company began as a hobby in an unheated residential garage, way
back in 2009, when our Founder & CEO, Rick, was hand-making parts
for the edgling desktop 3D printing community. Today, we apply strict
standards to our printers, which are made and tested in the USA using
domestic and foreign parts. Yet despite countless improvements and
advancements during the years since MakerGear’s humble beginnings,
our dedication to quality and community remains unchanged.
Our work revolves around providing three things: quality printers,
excellent customer service, and a user-centric 3D printing experience.
Focusing on these three pillars has resulted in outstanding customer
reviews, awards, and top-rated recognition in publications both in and
out of the 3D printing world.
Our customers include schools, engineers, entrepreneurs, designers,
businesses, and DIYers in more than 75 countries, many of whom are
involved in our active, growing and extremely helpful community,
located at forum.makergear.com.
For general inquiries, you can reach us by email at [email protected].
For technical assistance, please visit our website’s support page to ac-
cess our support resources as well as instructions for how to submit a
support ticket.
We’re here when you need us. Now it’s time to roll up your sleeves and
create something! Thanks for choosing MakerGear.
The MakerGear Team
17
Page 20
What are you making? Tag
#madewithMAKERGEAR
for a chance to be featured!
©2018 MakerGear. MakerGear LLC
23632 Mercantile Road Unit G
Beachwood, Ohio, US 44122
@MakerGear
 Loading...