

Page 1

USER MANUAL
WELCOME, LET’S GET STARTED 1
Page 2

Chapter 1
Welcome
Welcome to the Reference Guide for the MakerBot® Replicator®+
Desktop 3D Printer. The MakerBot Replicator+ connects you to a
better experience from inspiration to innovation using MakerBot
Print™, our design-to-print soware, and the MakerBot Mobile App.
WELCOME, LET’S GET STARTED 2
Page 3
LEGAL NOTICES
PRODUCT WARRANTY
The MakerBot Replicator+ 3D Printer , Model PABH65 is covered by a limited warranty.
For terms and conditions, see MakerBot.com/legal.
OVERALL PROVISIONS
All information in this user manual (“Manual”) is subject to change at any time without notice and is
suppliers (“MakerBot”) reserves the right to modify or revise this Manual in its sole discretion and at
any time and makes no commitment to provide any such changes, updates, enhancements, or other
additions to this Manual in a timely manner or at all. Contact the MakerBot Support Team for up-to-date
information. In order to protect MakerBot proprietary and confidential information and/or trade secrets,
this manual may describe some aspects of MakerBot technology in generalized terms.
DISCLAIMERS
MakerBot does not warrant the accuracy or completeness of the information, products, or services
provided by or through this Manual and assumes no responsibility for any typographical, technical, or other
inaccuracies in this Manual, which is provided “as is” and without any express or implied warranties of
any kind, including warranties of merchantability, fitness for a particular purpose, or non-infringement of
intellectual property. In connection with your use of this Manual, MakerBot shall not be liable to you for any
damages whatsoever, be they direct, economic, commercial, special, consequential, incidental, exemplary,
or indirect damages, even if MakerBot has been advised of the possibility of such damages, including
without limitation, loss of business revenue or earnings, lost data, or lost profits. MakerBot assumes
no responsibility, nor will be liable, for any damages to, or any viruses or malware that may infect, your
computer, telecommunication equipment, or other property caused by or arising from your downloading
of any information or materials related to this Manual. The foregoing exclusions do not apply to the
extent prohibited by law; please refer to your local laws for any such prohibitions. MakerBot makes no
warranties to those defined as “consumers” in the Magnuson-Moss Warranty-Federal Trade Commission
Improvement Act.
INTELLECTUAL PROPERTY
Certain trademarks, trade names, service marks, and logos (the “Marks”) used in this Manual are registered
contained in this Manual grants or should be construed as granting, by implication, estoppel, or otherwise,
any license or right to use any Marks without the written permission of MakerBot. Any unauthorized use
of any information, materials, or Marks may violate copyright laws, trademark laws, laws of privacy and
publicity, and/or other laws and regulations. Other company and/or product names mentioned herein may
be trademarks of their respective companies.
© 2009-2016 MakerBot Industries, LLC. All rights reserved.
WELCOME, LET’S GET STARTED 3
Page 4
SAFETY AND COMPLIANCE
MANUFACTURER
MakerBot Industries, LLC
One MetroTech Center, 21st Floor
Brooklyn, NY 11201
347.334.6800
מספר אישור אלחוטי של משרד התקשורת הוא 9652316756
אסור להחליף את האנטנה המקורית של המכשיר ולא לעשות בו כל שינוי טכני אחר
This telecommunication equipment conforms to NTC technical requirement.
8.9.2 Connection and use of this communications equipment is permitted by the Nigerian
Communications Commission
RADIO AND TELEVISION INTERFERENCE
This equipment has been tested and found to comply with the limits for a Class B digital device, pursuant
to Part 15 of the Federal Communications Commission (FCC) rules. These limits are designed to provide
reasonable protection against harmful interference in a residential installation. This equipment generates,
uses and can radiate radio frequency energy and, if not installed and used in accordance with the
instructions, may cause harmful interference to radio communications. However, there is no guarantee that
interference will not occur in a particular installation. If this equipment does cause harmful interference
encouraged to try to correct the interference by one or more of the following measures:
• Reorient or relocate the machine.
• Increase the separation between the equipment.
Any changes or modifications made to this equipment voids your authority to operate this equipment
under FCC Rules.
WIRELESS SPECIFICATIONS
Frequency
Frequency Range
2.4 GHz 2.412 – 2.472 GHz 802.11 b/g/n
WELCOME, LET’S GET STARTED 4
WLAN RF
Protocol Antenna Type
Taoglas, part #
FX831.07.0100C
Antenna
Specifications
2.5 dBi in the 2.4
GHz band
Page 5
Safety alert symbols precede each safety message in this manual.
These symbols indicate potential safety hazards that could harm
you or others or cause product or property damage.
Warning: The MakerBot Replicator+ 3D printer generates high temperatures. Always allow
the MakerBot Replicator+ Smart Extruder+ to cool down before you reach inside.
Warning: The MakerBot Replicator+ includes moving parts that can cause injury. Never
reach inside the MakerBot Replicator+ while it is in operation.
Warning: There is a risk of shock. The MakerBot Replicator+ is not user serviceable.
Warning: The MakerBot Replicator+ generates high temperatures. Always allow the
Smart Extruder+ to cool down before you reach inside.
Caution: Do not print using materials that have not been approved by MakerBot for use with
the MakerBot Replicator+.
Caution: The socket outlet must be located near the machine and must be easily accessible.
Caution: In case of emergency, disconnect the MakerBot Replicator+ from the socket outlet.
Caution: The MakerBot Replicator+ melts plastic during printing. Plastic odors may be
emitted during this operation. Make sure to set up the MakerBot Replicator+ in a wellventilated area.
Caution:
printer.
Caution: Do not look directly at any operating LED component.
Caution: Children under 12 should be supervised by an adult.
Caution: Dust generation and accumulation should be minimized. Some dust and dry
powders can build static electricity charges when subjected to friction and create an ignition
hazard.
Note: For users in Japan the power cord is only for use with this printer, model
MakerBot Replicator+.
WELCOME, LET’S GET STARTED 5
Page 6

ABOUT THE MAKERBOT REPLICATOR+
HOW THE MAKERBOT REPLICATOR+ WORKS
The MakerBot Replicator+ makes solid, three-dimensional objects out of melted MakerBot
PLA Filament. First, use MakerBot Print to translate 3D design files into instructions for the
MakerBot Replicator+. Then, transfer those instructions to the MakerBot Replicator+ via your local
network, USB drive, or USB cable.
The MakerBot Replicator+ will melt MakerBot PLA Filament and squeeze it out onto the build plate in
thin lines to build your object layer by layer. The build chamber allows the extruded PLA to cool slowly,
minimizing warping and curling. This method of 3D printing is called fused deposition modeling (FDM).
WELCOME, LET’S GET STARTED 6
Page 7
MAKERBOT REPLICATOR+ DIAGRAMS
3
1
7
6
5
4
2
6. Filament Drawer
7. Filament Spindle
WELCOME, LET’S GET STARTED 7
Page 8

Chapter 2
Getting Started
When you set up your MakerBot® Replicator®+ Desktop 3D
Printer, remember that it was built and packaged very carefully.
We hope you’ll take your time and be just as careful unpacking it
and getting it set up.
WELCOME, LET’S GET STARTED 8
Page 9
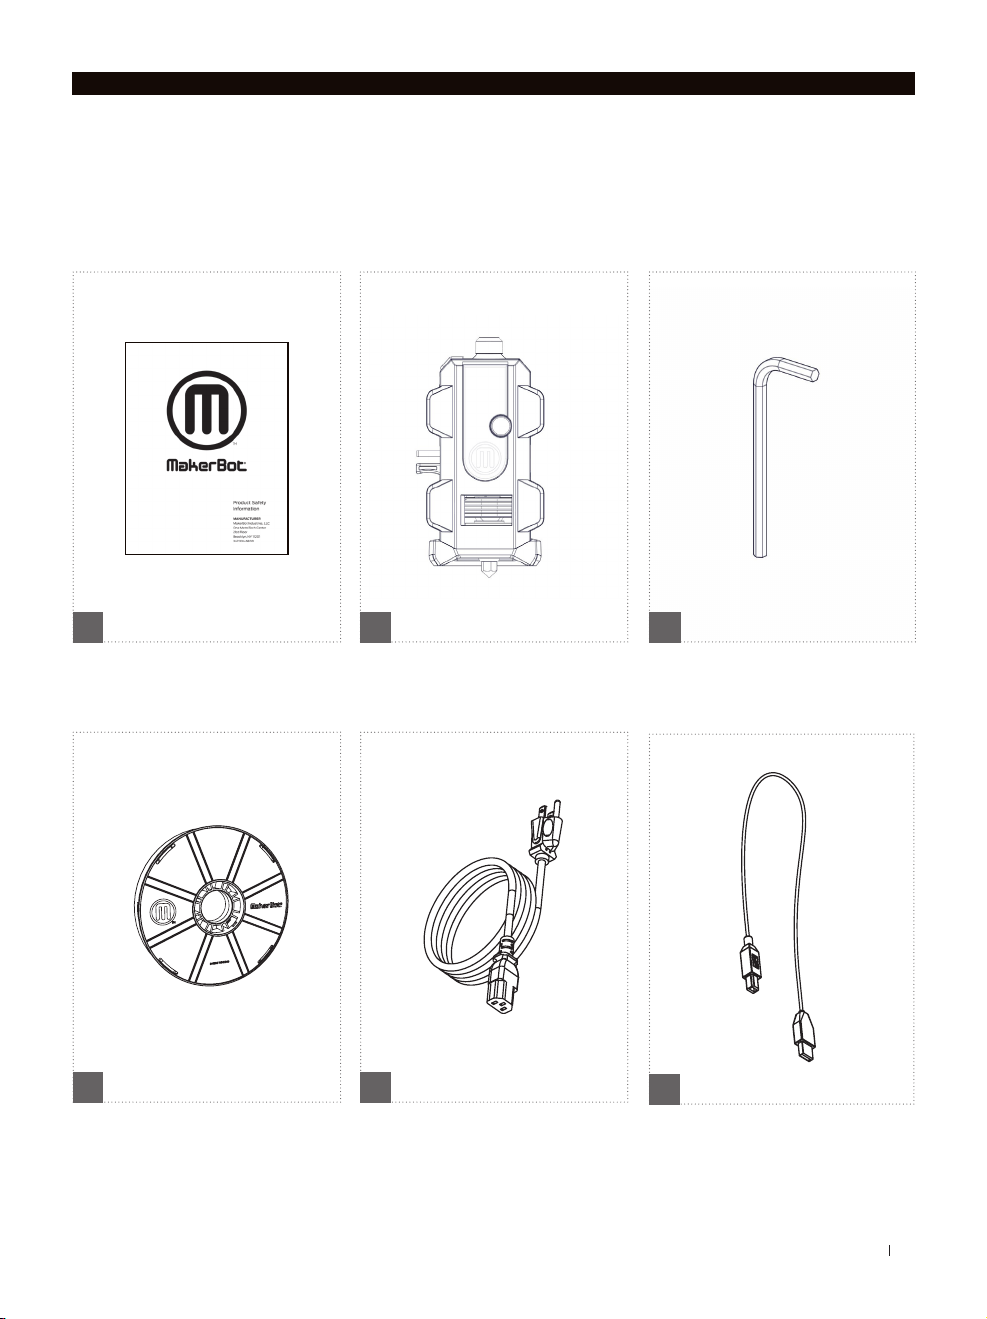
SETUP KIT
Inside your MakerBot Replicator+, you’ll find everything you need to get started, including a spool of
MakerBot PLA Filament, USB cable, safety booklet, hex key and a power cord. To order more filament,
go to store.makerbot.com
1
MAKERBOT PRODUCT SAFETY
INFORMATION BOOKLET
1
LARGE MAKERBOT PLA
FILAMENT SPOOL [2 LB]
1 1
SMART EXTRUDER+ 4MM HEX KEY
1
POWER CORD USB A-TO-B CABLE
1
GETTING STARTED 9
Page 10
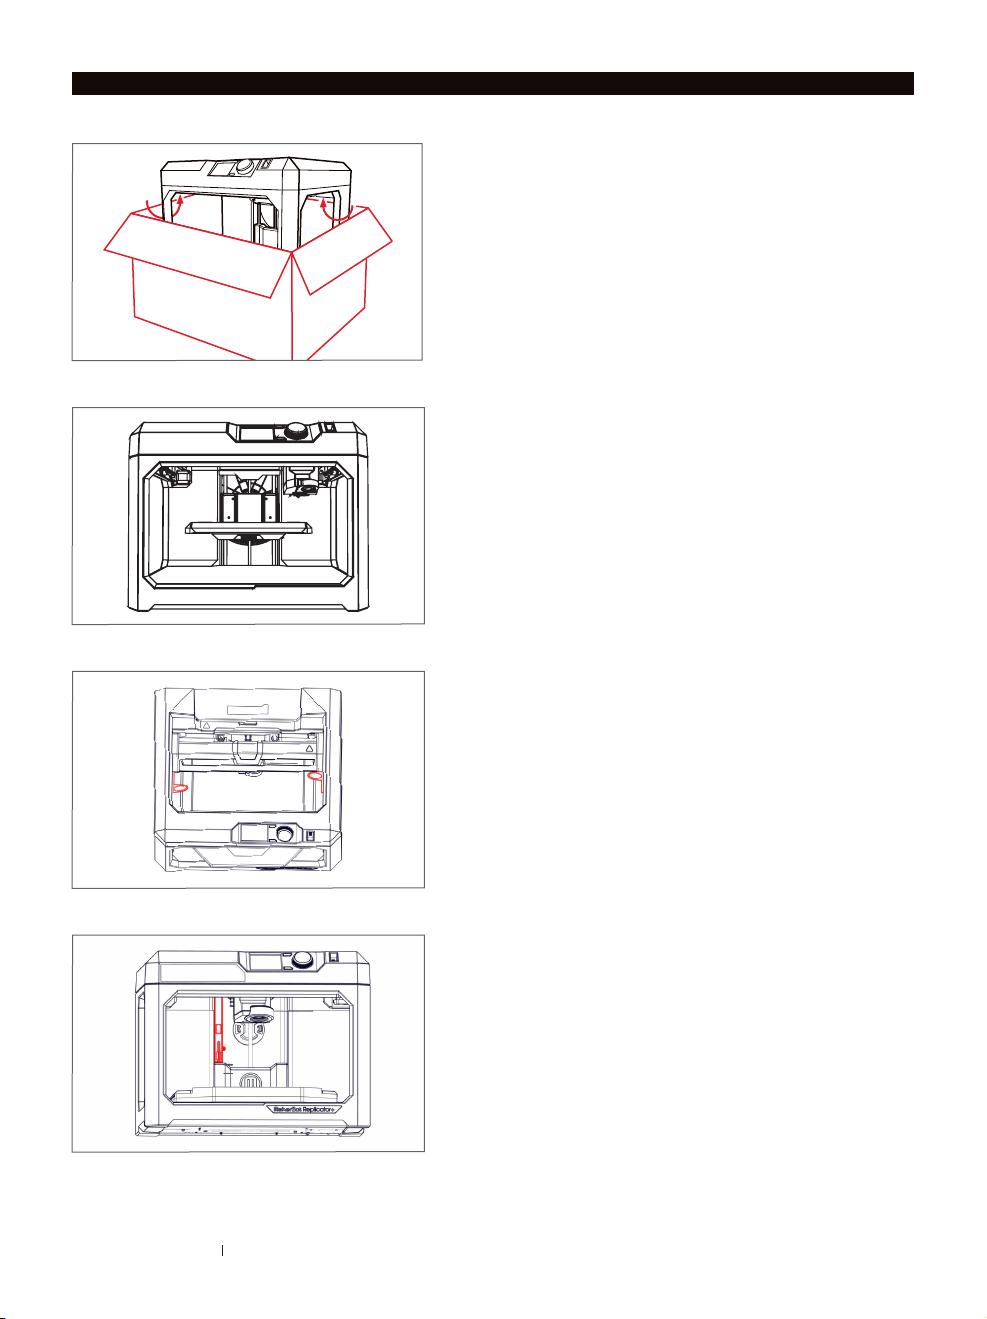
UNPACKING THE REPLICATOR+
Open the Box
Open the box containing your MakerBot Replicator+
and remove the setup kit.
Remove the MakerBot Replicator+
Remove the MakerBot Replicator+ from its plastic bag
and set it down on a stable surface.
Remove Gantry and Extruder Carriage Clips
Remove the two clips on each side of the MakerBot
Replicator+ that hold the gantry and extruder carriage
in place during shipping. Save these clips! They will
be handy if you ever need to transport your MakerBot
Replicator+ in the future.
Remove Build Platform Clip
Remove the clip that prevents the build platform
from moving during shipping. Save this clip! It will be
handy if you ever need to transport your MakerBot
Replicator+ in the future.
Page 11

SETTING UP THE REPLICATOR+
INSTALL THE SMART EXTRUDER+
1. Go to the MakerBot Replicator+ control panel and select Extruder > Attach Smart Extruder Now.
2. When directed, press the Smart Extruder+ against the back of the extruder carriage, with the connector
pins facing the carriage. Magnets will lock the Smart Extruder+ into place.
Caution: Never remove the Smart Extruder+ from your MakerBot Replicator+ during or immediately
aer printing. Always allow the Smart Extruder+ to cool completely for five to ten minutes before
removing it from the MakerBot Replicator+ 3D printer.
GETTING STARTED 11
Page 12
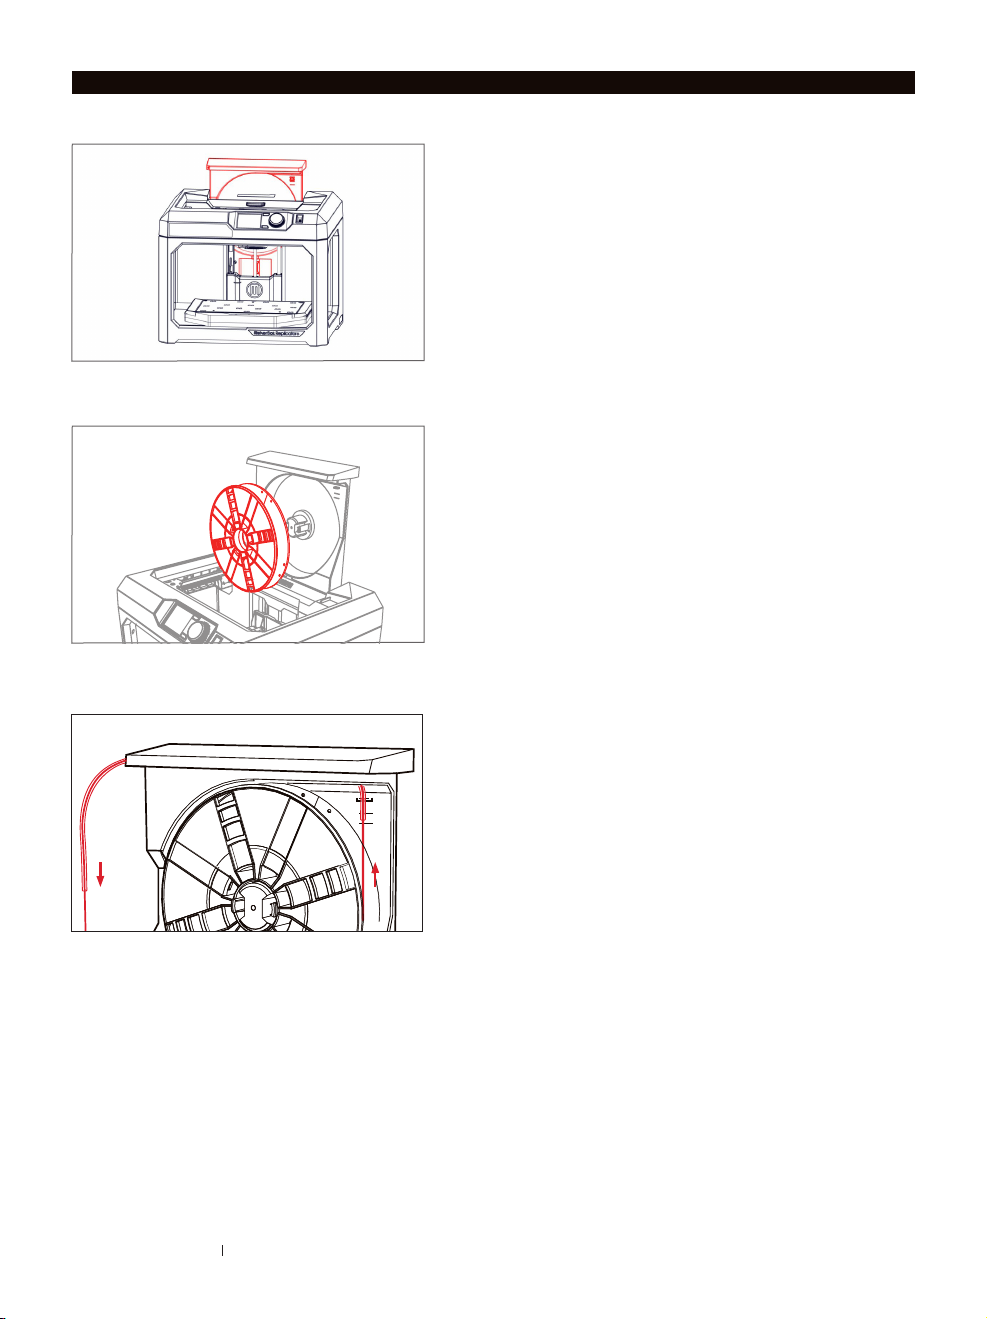
INSTALL THE SPOOL OF MAKERBOT PLA FILAMENT
2a. Locate the MakerBot PLA Filament spool and
remove it from its plastic bag. Save this plastic bag
and included desiccant packet so you can store
the spool eectively later.
2b. Grasp the back section of the frame of the
MakerBot Replicator+ and pull upwards to open
the filament drawer. Open the drawer all the way
until it locks into place.
2c. Position the filament spool so that it will unwind
counterclockwise and fit the spool onto the
filament spindle. Be careful not to let the filament
loosen or tangle on the spool.
2d. Locate the free end of the spooled filament and
insert it into the filament guide tube at the upper
right corner of the filament drawer.
2e. Push filament through the tube until the free end
emerges from the end of the guide tube.
2f. Hold the filament drawer open and depress the
latch, then slide the filament drawer closed.
Windows in the front of the spool will let you see
how much filament you have le.
Page 13
PLUG IN AND POWER ON
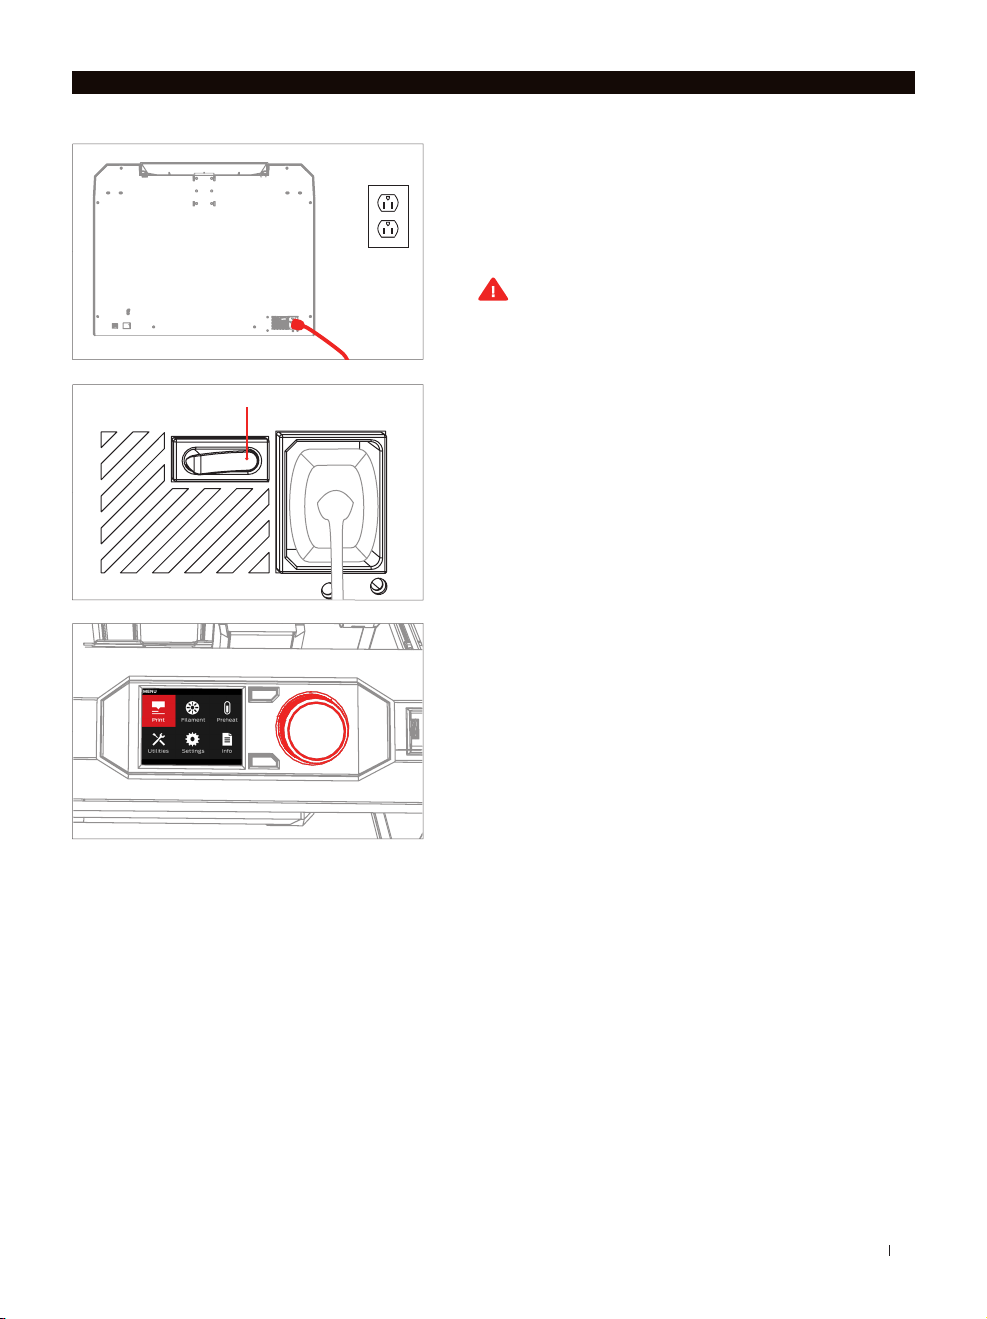
Power On
4a. Make sure the power switch is in the O position.
4b. Locate the power cord and plug it into the power
input port at the back of the MakerBot Replicator+.
4c. Plug the power cord into an electrical outlet.
Caution: The socket outlet must be located
near the equipment and must be easily
accessible.
4d. Switch the power on and press the dial on the
control panel.
GETTING STARTED 13
Page 14

Chapter 3
Start Up
The first time you turn on your MakerBot® Replicator®+ Desktop
3D Printer, it will run a Setup Assistant that will guide you in
using the Control Panel. From there, you’ll learn everything you’ll
need to know about starting your first 3D print. Press the dial to
begin the setup assistant.
WELCOME, LET’S GET STARTED 14
Page 15

THE MAKERBOT REPLICATOR+ CONTROL PANEL
The MakerBot Replicator+ is operated by means of a control panel at the upper right of the machine.
The control panel includes a color LCD screen, a rotary/push dial, and two buttons.
See Chapter 4 The Control Panel for more related information.
Push to
LCD
Screen
go back or
cancel an
action.
Push to see
additional
options.
Rotate to
scroll. Push
to select.
USB
Port
START UP 15
Page 16

THE MAKERBOT MOBILE APP
MakerBot Mobile is a free app that allows you to monitor and control your MakerBot Replicator+ from your
smartphone. MakerBot Mobile allows you to do the following:
· Start, pause, and cancel prints
· Initiate filament changes
· Monitor your prints
· Receive notifications about your prints, such as print
completion, any errors that may occur, and more
· Visually monitor your prints via the onboard camera
DOWNLOADING THE MAKERBOT MOBILE APP
For Android devices
1. Open the Google Play store and type in MakerBot.
2. When you find the MakerBot Mobile App, tap Install.
3. Aer the mobile app is installed, open the app.
4. You will be asked to sign in with you MakerBot account information.
If you do not have a MakerBot account, tap Sign Up and create one.
For IOS devices
1. Go to the App Store on your iOS device and type in MakerBot.
2. When you find the MakerBot Mobile App, tap Install.
3. Aer the mobile app is installed, open the app.
4. You will be asked to sign in with you MakerBot account information.
If you do not have a MakerBot account, tap Sign Up and create one.
START UP 16
Page 17

THE GUIDED SETUP
The first time you turn on your MakerBot Replicator+, you will be guided through the initial setup process
using the MakerBot Mobile App and the MakerBot Replicator+ control panel to connect this printer to a WiFi network. The guided setup is the first time that your MakerBot Replicator+ connects to the Internet via
your Wi-Fi connection and is the most ecient way to establish this connection.
This Guided Setup will walk you through pairing your smartphone or tablet to your printer, connecting the
printer to a Wi-Fi connection, printing oset calibration, and loading filament. From there, it will prompt
you to print a preloaded example print.
BEGIN THE GUIDED SETUP
1. Open MakerBot Mobile on your mobile device and log in with your MakerBot credentials. If you do not
already have a MakerBot account, create one.
2. Tap the Printers icon, or tap the Navigation button and tap Printers.
3. You will be taken to the My Printers screen, which will list any saved printers and will allow you to
connect to new printers.
a. For iOS users, tap the Add a Printer button if there are no printers on your list.
b. For Android users, tap the Floating Action Button to add a printer.
4. Tap Setup a New Printer.
5. Follow the instructions on the MakerBot Mobile App and MakerBot Replicator+ to complete the
Guided Setup.
RERUN THE GUIDED SETUP
To rerun the Guided Setup, select Settings > Reset To Factory Settings > Reset To Factory. Restoring
factory settings will allow you to rerun the Guided Setup.
START UP 17
Page 18

RERUN FIRST RUN EXPERIENCE
CONNECT TO A NETWORKED PRINTER
To Connect to a Networked Printer
1. Open the MakerBot Mobile App and log in with your credentials on your mobile device.
a. For iOS users, tap Add a Printer.
b. For Android users, tap the Printers icon, or tap the Navigation button and tap Printers.
2. You will be taken to the My Printers screen, which will list any saved printers and will allow you to
connect to new printers.
a. For iOS users, tap Add+.
b. For Android users, tap Add a Printer or tap the Floating Action Button to add a printer then tap
Connect to a Networked Printer.
3. Scroll through the list of available printers already connected on the specified network and tap
on a printer.
4. You will see an information screen which lists the name of the printer, the printer type, and the printer
IP address. Once you have found the correct printer, tap Use This Printer.
5. Push the dial on the MakerBot Replicator+ control panel to authenticate the connection. On the
MakerBot Mobile App, you will see the live camera feed and print state from the MakerBot Replicator+.
To Connect to a Printer via IP Address
If you have a non-standard network setup, you may need to manually connect your 3D printer to a network
via IP address. If so, follow these steps:
1. Open the MakerBot Mobile App and log in with your credentials on your mobile device.
a. For iOS users, tap Add a Printer.
b. For Android users, tap the Printers icon, or tap the Navigation button and tap Printers.
2. You will be taken to the My Printers screen, which will list any saved printers and will allow you to
connect to new printers.
a. For iOS users, tap Add+.
b. For Android users, tap Add a Printer or tap the Floating Action Button to add a printer.
3. Tap Connect Via IP Address.
4. Type in the printer’s IP address and tap OK.
5. You will see an information screen which lists the name of the printer, the printer type, and the printer
IP address. If this is the correct printer, tap Use This Printer.
6. Push the dial on the MakerBot Replicator+ control panel to authenticate the connection. On the
MakerBot Mobile App, you will see the live camera feed and print state from the MakerBot Replicator+.
START UP 18
Page 19

START UP 19
Page 20

Chapter 4
The Control Panel
The Control Panel gives you options that enable you to manage
the printing process. You can use these options to print objects
from a USB flash drive or the internal storage of your MakerBot®
Replicator®+ or start prints initiated via MakerBot Print™. You can
also change printer settings and view print history and statistics.
Page 21

HOME SCREEN
The Control Panel gives you six options that enable you to manage the printing process:
· Print
· Filament
· Preheat
· Settings
· Extruder
· Info
Push to
LCD
Screen
go back or
cancel an
action.
Push to see
additional
options.
Rotate to
scroll. Push
to select.
USB
Port
THE CONTROL PANEL 21
Page 22

PRINT
SELECT A FILE
Select Print with the dial to initiate a print stored on
a USB flash drive or on the internal storage of the
MakerBot Replicator+.
Turn the dial to scroll through the list of available
locations. Push the dial to select the location of the file
you want to print.
Select USB Storage to print a file stored on a USB
drive inserted into the USB port.
Select Internal Storage to print a file stored on the
MakerBot Replicator+. The internal
storage has a capacity of 2 GB.
Press the dial to select a location. Turn the dial to
scroll through the list of available files and press it
again to select one.
START PRINT
If you select a file from a USB drive or internal storage,
the control panel will display the File screen. Files from a
USB drive must be in .makerbot format in order to print.
THE CONTROL PANEL 22
From the File screen, you can begin your print, gain more
information about the print, copy files, or delete files.
Select Print to start printing the file.
Select Info for more information on the print. Turn the
dial to toggle between the three screens which contain
a rendering of your model and more information about
your print.
Select Copy to copy a file to internal storage or to an
attached USB drive.
Select Delete to delete a file from internal storage or
from an attached USB drive.
Page 23

PRINTING
During a print, you will be able to view print progress
information as well as other details about your print.
1
The dial will glow red during printing.
1. Percentage of the print completed.
2. Time elapsed and estimated time remaining in the
2
print. While the Smart Extruder+ is heating, this
area will display the current and target temperatures.
3. Location in active print screens. Turn the dial to
scroll between the following screens:
43
· Print progress
· Rendering of your model or layout
· File information
· Print options information
· Extruder temperature
4. Print Menu. Press the control panel’s Menu button to open the Print menu. The Print menu contains
the following options:
· Pause - Select this option to temporarily pause your print. You can also pause by pressing the
control panel dial.
· Change Filament - Select this option to load or unload filament.
· Extruder Info - Select this option to view more information about the Smart Extruder+ in use.
· Printer Info - Select this option to view more information about the MakerBot Replicator+,
including firmware information, network information, and print statistics.
· Take a Picture - Select this option to take a picture of the build area with the camera built into the
MakerBot Replicator+. Push the dial to take the picture. Next, choose if you wish to save the
picture to the internal storage of the MakerBot Replicator+ or to a USB drive and push the dial
with your selection. When the picture has saved, you will see a message on the control panel
stating the file saved successfully. Select Continue on the dial to return to the Print Menu Screen.
· Cancel - Select this option to cancel your print. You can also cancel a print by pressing the back button.
PRINT COMPLETE
Aer the print is complete, the dial will glow white. Push the dial to continue to the next menu. You will then
be asked if you would like to print the object again, or return to the storage menu screen. Select your choice
with the dial.
If you wish to print the object again, make sure to clear the build plate.
THE CONTROL PANEL 23
Page 24

FILAMENT
Select the Filament icon to load or unload filament.
TO LOAD FILAMENT
1. Use the dial to select Load Filament.
2. Wait for the Smart Extruder+ to heat.
3. Cut the end of your filament to create a clean edge.
4. Grasp the top of the extruder assembly and push the filament into the Smart Extruder+’s
loading tube until you can feel the motor pulling the filament in.
4. When you see filament extruding through the extruder nozzle, select Filament is Extruding
on the control panel.
TO UNLOAD FILAMENT
1. Use the dial to select Unload Filament.
2. Wait for the Smart Extruder+ to heat.
3. Allow the Smart Extruder+ to unload the filament.
4. When the Smart Extruder+ has stopped pushing the filament out and the control panel states that
the filament is ready to be removed, gently pull the filament free. If the filament can not be removed
easily, depress the release lever on the Smart Extruder+ and pull the filament free. Select Continue with
the dial to return to the previous menu screen.
If you are changing filament spools, make sure to keep the spool tightly wound as you pull the filament free
of the guide tube. If you do not, the filament could unravel or tangle on the spool.
Note: When you are not using a filament spool, make sure the free end of the filament is inserted into
one of the slots of the spool. This allows you to find the insertion end of the filament much faster and will
prevent the spool from tangling. Spools not in use should also be stored in the original plastic bag they
came in with the desiccant packet.
PREHEAT
Select the Preheat icon to preheat your Smart Extruder+. When you select Preheat, the Smart Extruder+
will immediately start heating. The current and target temperatures will be visible on the main screen. The
MakerBot Replicator+ preheats the Smart Extruder+ to 180 degrees. Preheat the Smart Extruder+ to speed
up the printing process. When you print an object, the MakerBot Replicator+ must first heat the extruder
and then begin printing. With the Smart Extruder+ already preheated, the MakerBot Replicator+ will take
less time to heat the extruder, thus beginning printing faster.
SETTINGS
Select the Settings icon to personalize your MakerBot Replicator+, edit network and sharing settings,
update firmware, and access plate leveling, diagnostics, and other tools.
THE CONTROL PANEL 24
Page 25

FIRMWARE UPDATE
Select Firmware Update to see if you have the most up to date firmware. If the MakerBot Replicator+ is
already connected to a network, then it will automatically check for an update. If there is an update, push
the dial to begin the download. If the MakerBot Replicator+ already has the most current firmware, a
message will display on the control panel stating that your firmware is already up to date.
CONFIGURE WI-FI
Select Configure Wi-Fi to begin the setup process of connecting your MakerBot Replicator+ to a Wi-Fi
connection. When you select Configure Wi-Fi, the MakerBot Replicator+ will create a mobile hotspot that
you can connect to with your phone. The control panel screen on your MakerBot Replicator+ will display
the name of the hotspot and the dial will blink blue.
To configure Wi-Fi for a New Printer
1. Open the MakerBot Mobile App on your mobile device and tap the Printers icon or tap the Menu
button and tap Printers.
2. You will be taken to the My Printers screen, which will list any saved printers and will allow you to
connect to new printers. Tap the Add Printers icon.
3. Tap Setup a New Printer.
4. Select the type of printer you wish to connect to. Tap Replicator+.
5. You will see a message telling you to connect your phone to your local Wi-Fi network, remove any
packaging clips and to make sure the MakerBot Replicator+ is plugged in and powered on. Tap Continue.
6. Tap Connect to Printer to begin the pairing process and connect to the MakerBot Replicator+ hotspot.
Make sure the MakerBot Replicator+ hotspot is active before tapping Connect to Printer. The MakerBot
Replicator+ should take 30 seconds to a minute to create the hotspot. The name of the hotspot is
displayed on the control panel. Open the Wi-Fi Connections/Settings on your mobile device and find
the hotspot that the MakerBot Replicator+ created.
7. Connect to the hotspot. Your mobile device will attempt to authenticate and pair with the MakerBot
Replicator+ and if successful, you will see a completion screen on your mobile device and the
MakerBot Replicator+ control panel stating the pair was successful.
8. With your mobile device now paired to the MakerBot Replicator+, tap Name Printer to name your
printer. Once the printer is named, tap Next.
9. Aer your printer is named, select the Wi-Fi network that you would like your MakerBot printer to be
connected to. Once you have selected the Wi-Fi network, type in the Wi-Fi network password.
10. When connected to the selected Wi-Fi network, the MakerBot Replicator+ control panel and the
MakerBot Mobile App will show a message saying that you have successfully connected your printer to
the selected Wi-Fi network. Tap Continue on your mobile device or on the control panel.
CALIBRATION
Select Calibration to adjust factory calibration settings, such as Level the Build Plate and Run Z-axis
calibration. For more information on leveling the build plate and running Z-axis calibration, see Chapter 6
Maintenance.
NOTIFICATION SETTINGS
Select Notification Settings to enable or disable notification settings regarding printing with the Replicator+.
Filament Error Detection
Enables the ability to turn on or o errors during a filament jam. A filament jam occurs when filament
is unable to pass through the extruder smoothly. When a filament jam occurs, printing will suspend.
THE CONTROL PANEL 25
Page 26

MakerBot recommends keeping Filament Error Detection on. For more information on filament jams, go to
https://support.makerbot.com.
Sound
Enable or disable the notification sounds on the MakerBot Replicator+.
Auto-Unload
Enables or disables whether the Smart Extruder+ will unload any remaining filament, when the print it
complete. You can select:
1. All Prints to auto unload aer every print, even if the print fails, and when the Smart Extruder+ has run
out of filament.
2. Successful Prints to auto unload only if the print is successful and when the Smart Extruder+ has run
out of filament.
3. O to disable the Auto-Unload feature.
DIAGNOSTICS AND LOGS
Select Diagnostics and Logs to run a system diagnostic scan of the MakerBot Replicator+ and save the
resulting logs. These logs can be sent to MakerBot should you ever need support.
Copy System Logs to USB
Allows you to copy system logs of the MakerBot Replicator+ to a USB drive.
Run Diagnostics
Allows you to run a diagnostic scan of the MakerBot Replicator+. Once the diagnostic scan is complete,
you can choose to save the log to a USB drive or to the internal storage of the MakerBot Replicator+.
Copy Diagnostics Logs to USB Drive
Allows you to copy reports of diagnostic scans run on the MakerBot Replicator+ to a USB drive.
CAMERA
Select Camera to take a picture of the build plate and manage saved images.
Take A Picture
Enables you to take a picture of the build plate using the onboard camera. Press the dial to take the picture.
Once the picture has been taken, use the dial to select whether you would like to save the image to the
internal storage of the MakerBot Replicator+ or to a USB drive. Once the image is saved to the desired
location, press the dial to continue.
Browse Pictures
Allows you to view stored images on the internal storage of the MakerBot Replicator+.
Copy Pictures to USB
Enables you to copy images from the internal storage of the MakerBot Replicator+ to a USB drive.
Clear Pictures
Enables you to remove images stored on the internal storage of the MakerBot Replicator+.
THE CONTROL PANEL 26
Page 27

MAKERBOT CLOUD SERVICES
Select MakerBot Cloud Services to enable or disable MakerBot Analytics. Enabling Analytics allows you
to share information about your MakerBot Replicator+ with MakerBot to help us improve our products.
Please see http://www.makerbot.com/legal/privacy for more information.
DEAUTHORIZE ACCOUNTS
Select Deauthorize Accounts to deauthorize any accounts already connected to your MakerBot
Replicator+.
RESET TO FACTORY SETTINGS
Select Reset To Factory Settings to restore the MakerBot Replicator+ to its original factory settings and
wipe any information stored on the internal storage drive.
POWER OFF
Select Power O to turn o the MakerBot Replicator+.
EXTRUDER
Select the Extruder icon for assistance in attaching the Smart Extruder+. If the Smart Extruder+ is
attached, the control panel will show the Smart Extruder+ information such as temperature and print
statistics.
If the Smart Extruder+ is not attached, the Extruder icon will look like this:
Select Attach Smart Extruder Now to attach the Smart Extruder+ to the Extruder Assembly.
When attaching the Smart Extruder+, position the extruder so that it magnetically locks into place with the
Extruder Assembly and then press the dial to continue. If the Smart Extruder+ is successfully attached, you
will see a message on the control panel stating that the Smart Extruder+ has been successfully attached.
Push the dial to return to the Extruder screen.
Note: Only the Smart Extruder+ is supported for the MakerBot Replicator+. The original Smart Extruder is
not supported.
INFO
Select the Info icon to view firmware information, network information, and print statistics from your
MakerBot Replicator+.
THE CONTROL PANEL 27
Page 28

Chapter 5
MakerBot Print
The MakerBot® Replicator®+ Desktop 3D Printer streamlines 3D
print preparation and file management using MakerBot Print.
MakerBot Print™ is a free desktop application that allows you to
discover, prepare, manage, and share 3D prints.
WELCOME, LET’S GET STARTED 28
Page 29

DOWNLOADING AND INSTALLING MAKERBOT PRINT (WEBSITE)
1. Go to makerbot.com/print. Click the Download button.
2. Select your operating system from the drop-down menu on the download pack and click Download.
3. Double-click the MakerBot Print installer to run the installation wizard. Follow the installation instructions.
HOW IT WORKS
MakerBot Print streamlines 3D print preparation and file management. PC users can also import and
manipulate Native CAD files. MakerBot Print allows you to Arrange, Orient, Scale, and View your 3D models
and prepare them for print. You can also access print settings to modify your print.
CONNECTING TO MAKERBOT PRINT (WI-FI, ETHERNET, USB)
To connect via USB cable, insert the USB-B end of the cable into the port on the back of your MakerBot
Replicator+ and insert the USB-A end of the cable into a USB port on your computer. MakerBot Print will
detect your MakerBot Replicator+.
To connect via Ethernet, connect an Ethernet cable to your MakerBot Replicator+ and to a wall jack or
router. In MakerBot Print, navigate to the Printer Panel and select Add a Printer > Add a Network Printer.
Find your MakerBot Replicator+ in the list of networked devices and click Add. Press the dial on the
MakerBot Replicator+ to authenticate the connection.
To connect via Wi-Fi, in MakerBot Print, navigate to the Printer Panel and select Add a Printer > Add a
Network Printer. Find your MakerBot Replicator+ in the list of networked devices and click Add. Press the
dial on the MakerBot Replicator+ to authenticate the connection.
To transfer files via USB drive, insert a USB drive into the port next to the dial, select Print > USB Storage
and select the desired file. The menu will prompt you to print, transfer the file to onboard memory, or delete.
You can also export .makerbot files to USB using MakerBot Print. When the MakerBot Replicator+ is not
connected to a printer, the Print button becomes the Export button, which allows you to export files to your
computer or a USB drive.
To add an oine printer, open the printer panel and click Add a Printer. Select Add an Unconnected
Printer and then select the type of printer you are using. The build plate will update to the appropriate size.
MAKERBOT PRINT 29
Page 30

PRINTING WITH MAKERBOT PRINT
CHOOSING A 3D MODEL
Every 3D print starts with a 3D model. If you want to print a 3D model you designed yourself, export it from
your 3D modeling application in a compatible format. You can also download 3D models on Thingiverse®.
To open an object from your local computer, open the Project Panel, click Add Models, and navigate to the
location of the saved file. Select the file and click Open to import it into MakerBot Print. You can also click
File > Insert File to import the object into MakerBot Print. Once a model has been added, it is available to
be used on your build plate.
File
· Allows you to create new projects, open/save projects, insert/import files, and access system preferences.
· If you have a multi-file STL assembly, select File > Insert STL Files Assembled.
Edit
· Allows you to undo an action, redo an action, as well as, copy and paste objects.
View
· Allows you to view your model from an array of 2D views, 3D views, and multiple perspectives.
Help
· Enables Help with MakerBot Print and allows you to check for updates.
Login Account
· Log into your MakerBot account. You can also switch to a dierent MakerBot account.
Explore MakerBot
· Log in with your MakerBot account to find technical support for your 3D printer as well as access the
MakerBot store to purchase the materials necessary for your printing needs.
Explore Thingiverse
· From MakerBot Print, you can navigate out to Thingiverse for exploring hundreds of thousands of free
3D printable files.
Export
· Export your 3D model to a .makerbot file, which is the product of a sliced 3D file that creates the
instructions for your 3D printer to follow. These instructions create your 3D object.
Print
· The print option is only available when MakerBot Print is connected to a 3D printer.
Project Panel
· Click the Project Panel to import models into MakerBot Print.
· The heading shows the name of the project. To rename the project, select File>Save Project As...
· You can also create multiple build plates to manage large build projects. Under Build Plates, click the
+ button to insert another build plate.
MAKERBOT PRINT 30
Page 31

· To delete a build plate, right-click the build plate preview and select Delete Build Plate. Models that
were on the deleted build plate become hidden, but they are not deleted.
Model View
· Prepare and arrange your 3D models on the build plate.
· Click and hold the right mouse button and move the mouse to be able to view your model from any angle.
· Press and hold the Shi key and the right mouse button together to move the build plate in space.
· Zoom using a trackpad or the scroll wheel on your mouse.
Print Preview
· Slices the 3D model into layers so that you can view the path the Smart Extruder+ tool will make while
printing the model.
· Play Preview shows all the layers that make up the sliced model and animates them. Play preview
shows you how your 3D model will be printed before any printing is even done.
· Layer Range allows you to view sliced the model up to a certain layer. You can slice the model and view
all layers, up to a certain layer, a single layer, a single layer with one layer above and a single layer with
one layer below.
· Select Layer allows you to set which layer you would like to view up to.
· Head Moves the number of moves the extruder head makes in creating your 3D print.
· Display allows you to turn on or o certain information regarding the slice preview.
Select the Model Material checkbox to turn on or o viewing the rendering of your 3D model.
Select the Support Material checkbox to view the support structures that may be part of your 3D model.
Select the Head Moves checkbox to view the travel moves from a project. Travel moves are parts of the
extruder path where the Smart Extruder+ moves without extruding any plastic.
Select the Layer Highlight checkbox to highlight the selected layer.
In Print Preview, drag the Layer Slider up and down to change the selected layer.
In Print Preview, drag the Move Slider le and right to change the selected tool path movement.
Model Info
· Allows you to change the units that your 3D model is measured in. You can cycle between mm,
cm, m, in, and .
Print Settings
· Select Extruder Type to choose which type of extruder you are using. MakerBot Print will automatically
detect the extruder type if already connected to a printer.
· Select Layer Height to set the thickness of your printed object’s individual layers. A lower layer height
will result in a smoother surface. An object with a higher layer height will print faster.
· Select Shells to set the number of outlines the extruder prints on each layer before printing the infill.
More shells make an object stronger and heavier and increase print times.
· Adjust the Infill percentage to set the density of your printed object’s internal support structure. A higher
percentage will result in a heavier, stronger object.
· Select the Supports checkbox to print support structures on your model. MakerBot Print will
automatically generate supports for any overhanging sections of your object. Supports will be easily
removable once you detach your finished object from the build plate.
· Select the Ras checkbox, which is selected by default, to have your 3D object printed on a ra. The ra
acts as a base for your object and any support structures. It ensures that everything adheres well to the
build plate. The ra will be easily removable once you detach your finished object from the build plate.
MAKERBOT PRINT 31
Page 32

Arrange
· If there are multiple objects on the build plate, select the Arrange Build Plate to move the objects to the
most optimal placement on the build plate.
· If there are multiple objects on the build plate and all of the objects can’t fit on the original build plate, select
Arrange project to arrange the objects to the most optimal placement on the build plate. Objects that can’t be
arranged on the original build plate will be moved to another build plate and arranged optimally as well.
· Use the right-click menu to copy, paste, hide, or delete your model from the build plate.
Adjust Orientation
· Select Place Face on Build Plates to lay your model flat on the build plate
· Rotate your model by 90 degrees or by a specific number of degrees along the x-, y-, or z-axis.
Adjust Scale
· Select Uniform Scaling to adjust the scale of your model equally along the x-, y-, or z-axis. Enter the
percentage of how much you want your model scaled.
· De-select Uniform Scaling to scale the model by a specific amount along the x-, y-, or z-axis.
Printer Panel
· Select the 3D printer to be used with your project.
· Select the printer drop-down and Add a Printer > Add a Network Printer on your local network or
Add an Unconnected Printer for exporting files.
· Once finished editing your 3D model, select Export to export your model into a sliced file or Print to
print your file if it MakerBot Print is connected to a printer.
Export
· Export your 3D model to a .makerbot file.
Print
· The print option is only available when MakerBot Print is connected to a 3D printer.
SYSTEM PREFERENCES
If you want to change any system preferences before printing, click File>System Preferences. Here, you
can specify options that will aect the quality of your printed object and MakerBot Print experience, like
graphics quality and view manipulation.
Unit Controls
Select the default model unit that you wish to use when you insert a model into MakerBot Print.
Display Settings
Choose Low, Medium, or High resolution to specify the display resolution of the object in MakerBot Print.
Note: These resolution profiles only aect the object in screen preview. The printed model quality is not aected.
Warning Settings
Select the checkbox to allow warnings regarding graphic performance. This option will check to see if you
are using an integrated graphics processor.
View Manipulation
Edit the default Zoom, Pan, and rotate button configurations.
MAKERBOT PRINT 32
Page 33

Privacy
Select the checkboxes to automatically send anonymous usage statistics and personal statistics to MakerBot.
BEGINNING A PRINT WITH THE MAKERBOT REPLICATOR+
There are three ways in which you can begin your printing an object. You can use the MakerBot Mobile App,
the control panel on the MakerBot Replicator+, and MakerBot Print.
When you are ready to print your model, click Print in MakerBot Print to slice the model using the current
settings and send a .makerbot print file to your MakerBot Replicator+. You will be reminded to clear the
build plate and asked to initiate the print on the control panel. You can also select Begin Printing on the
control panel aer starting the file transfer or tap Print on the MakerBot Mobile App.
If MakerBot Print is connected to your MakerBot Replicator+, the print file will be sent directly to your 3D
printer. If MakerBot Print is not connected to your MakerBot Replicator+, this button will open a dialog allowing
you to export and save a .makerbot print file. You can transfer the print file to your MakerBot Replicator+ using
a USB drive. Click Show Print Preview in MakerBot Print to open a preview of the sliced model.
If you so choose, you can have your object printed on a ra. The ra acts as a base for your object and
any support structures and ensures that everything adheres well to the build plate. The ra will be easily
removable once you detach your finished object from the build plate.
HOW TO PAUSE OR CANCEL A PRINT
To pause a print, push the menu button on the MakerBot Replicator+ and select Pause with the dial. You can
also select the printer in MakerBot Print and select Pause.
To cancel a print, push the menu button on the MakerBot Replicator+ and select Cancel with the dial. You can
also select the printer in MakerBot Print and select Cancel.
TO ADD AN OFFLINE PRINTER
1. Open the printer panel and click Add a printer.
2. Select Add an Unconnected Printer and then click on MakerBot.
3. Select a printer, and the build plate will update to the appropriate size.
AFTER YOU PRINT
REMOVING THE PRINT FROM THE BUILD PLATE
When your print finishes, remove the flexible build plate from the MakerBot Replicator+. Remove the
print from the build plate by simply bending the flexible build plate. The print will peel o the smooth grip
surface. Peel the ra o of the bottom of the print, if you printed the object with a ra. When you have
removed the print from the build plate, make sure to clean the build plate of any debris before reloading
the build plate into the MakerBot Replicator+.
Note: When you bend the flexible build plate, some pieces of the ra may remain on the plate. Simply bend
the flex build plate again or use a flat, non-sharp tool to remove the ra pieces. Never use a knife to remove
pieces of the ra. You can damage the build plate.
MAKERBOT PRINT 33
Page 34

Chapter 6
Maintenance
As soon as you take your MakerBot® Replicator®+ Desktop 3D
Printer out of the box, it is ready to print high-quality models.
However, like any precision machine, routine maintenance
is needed. Here are some ways you can keep your MakerBot
Replicator+ printing smoothly and guarantee a great print
every time.
WELCOME, LET’S GET STARTED 34
Page 35

Z-AXIS HOMING CALIBRATION
Each time you attach a new Smart Extruder+, you will need to run the Z-Axis Homing Calibration routine.
This process will make sure the build plate is positioned at the correct distance from the Smart Extruder+
when you begin a print. Before attempting to run Z-axis homing, allow the Smart Extruder+ to cool. Once
cooled, unload any filament and clear any debris from the extruder nozzle and build plate. Navigate to
Settings > Calibration > Calibrate Z-Axis Oset on the Control Panel to begin Z-axis homing calibration.
The MakerBot Replicator+ will then check and record the location of the build plate.
LEVEL THE BUILD PLATE
Before beginning the leveling process, please consult MakerBot Support at https://support.makerbot.com.
The build plate is the base on which your prints will form and is leveled at the MakerBot factory, but over
time it might shi slightly. If you’re having trouble with print adhesion, you may need to level the plate
again.
Navigate to Settings > Calibration > Level Build Plate > Start Assisted Leveling on the Control Panel to
begin leveling the build plate. If filament is loaded, you will be prompted to unload filament.
Before attempting to level your build plate, allow the Smart Extruder+ to cool and clear any debris from the
extruder nozzle and build plate.
When directed with the control panel, using the 4 mm hex key included in the setup kit, first tighten the
front le and right screws 2-3 full turns. Select Continue with the dial.
Next, turn the leveling screws slowly until a light appears on the extruder. Press the control panel dial to
move to the next step of the leveling process. The extruder will move to dierent points around the build
plate to make sure the plate is at the appropriate distance from the Smart Extruder+ nozzle. Turn the
leveling screws according to the instructions that appear on the control panel screen. Instructions on the
MakerBot Replicator+ control panel will also guide you through this process.
MAINTAINING THE BUILD PLATE
The surface of the MakerBot Replicator+ build plate, known as the Grip Surface, allows for better print
adhesion and quality than using a surface like blue tape. However, over time, the grip surface can become
cracked and damaged. If these cracks or tears begin to aect print quality, it is time to replace the grip
surface.
Go to https://store.makerbot.com/ to order more Grip Surfaces.
MAINTENANCE 35
Page 36

Chapter 7
Troubleshooting
As you get to know your MakerBot® Replicator®+ Desktop
3D Printer, you may run into issues with dierent parts of the
printing process. Here is a handy guide to some simple-to-fix
problems. For help with issues not covered in this chapter, go to
https://support.makerbot.com.
MAINTENANCE 36
Page 37

PRINTING PROBLEMS/CONNECTIVITY PROBLEMS
PROBLEM SOLUTION
Can’t load filament into the Smart
Extruder+.
Can’t remove filament from the
Smart Extruder+.
Filament won’t extrude from the
Smart Extruder+.
Printed object is stuck to the
build plate.
Try unloading and loading again. Hold the Smart Extruder+ in
place and try pushing the filament through. As long as you are
holding the Smart Extruder+ in place, pushing on the filament
will not damage it. Be sure to insert the filament and not the
filament guide tube into the Smart Extruder+. Also, make sure
the filament end has a clean edge before inserting it into the
Smart Extruder+. A clean edge will allow for easier insertion.
Try running the filament load script and allowing the plastic to
extrude for a few seconds. Then try unloading again.
Try unloading and reloading the filament.
If the object is still stuck, take a thin metal cra spatula and
carefully work the blade under the object. When the blade is
most of the way under the object, twist the handle slightly.
The object should come free. Never use a knife or sharp tool
to remove pieces of the object or pieces of the ra. You can
damage the build plate and also injure yourself.
Object peels o the build plate
during printing.
Recalibrate your Z Oset by selecting Settings > Calibration
> Calibrate Z Oset on your printer’s display. It’s possible the
starting distance between your build plate and extruder is too
large, which can result in poor adhesion. If any one part of your
object does not adhere well to the build plate, the whole object
may peel o the plate.
If objects continue to peel during printing, you may need to
manually adjust your Z Oset. This can be adjusted in MakerBot Print or MakerBot Mobile. Your printer’s build plate is
factory leveled, so you typically will not need to relevel your
build plate. Leveling should only be done aer adjusting your
Z Oset and only if an object is curling towards one side of the
build plate.
TROUBLESHOOTING 37
Page 38

PROBLEM SOLUTION
Screen does not respond to
touch.
The control panel screen on the MakerBot Replicator+ is not
a touchscreen. Turn the dial to scroll through the available
options on the screen. Press the dial to select.
The plate leveling routine does
not result in a level build plate.
The assisted leveling routine depends on a clean, flat plate and a
clean extruder nozzle. Plastic debris on the build plate or nozzle
can interfere with the extruder sensor.
Filament breaks between the
spool and the Smart Extruder+.
Open the filament drawer and ensure that the filament unwinds
counterclockwise. Check that the filament guide tube is not
twisted or bent. Make sure to unload the filament le in the Smart
Extruder+ before reloading.
The Smart Extruder+ is installed,
but the MakerBot Replicator+
Remove the Smart Extruder+ and run the extruder attachment
script by going to Extruder > Attach Smart Extruder Now.
does not recognize it.
Print files don’t appear in USB
storage.
Make sure that your print files are in the appropriate format. Print
files for the MakerBot Replicator+ must have a .makerbot file
extension. Also, make sure that the USB drive is formatted to
FAT32. USB drives that are formatted to NTFS will not be visible.
If these solutions don’t solve your issue, or if you are having a problem that doesn’t appear here,
please visit makerbot.com/support.
TROUBLESHOOTING 38
Page 39

TROUBLESHOOTING 39
Page 40

Chapter 8
Reference
WELCOME, LET’S GET STARTED 40
Page 41

GLOSSARY
MENU BUTTONS: The buttons at the top and
bottom right corner of the control panel’s LCD screen.
The menu buttons will oen allow you to proceed in
an action, cancel an action, access dierent menus,
or return to a previous menu.
FLEX BUILD PLATE: The flat plate on which the
MakerBot Replicator+ Desktop 3D Printer builds an
object. This plate is removable and bending the plate
allows you to remove objects.
BUILD PLATFORM: The support for the build plate.
The build platform includes screws for manual
leveling.
CONTROL PANEL: The LCD screen, dial, and
buttons at the upper right corner of the MakerBot
Replicator+. The control panel allows you to start
prints, change settings and view status information.
DIAL: The rotary/push dial on the control panel.
Rotate the dial to scroll through available options
and push the dial to select.
ETHERNET CABLE: The cable used to connect your
MakerBot Replicator+ to a local area network.
FIRMWARE: The soware that runs on your
MakerBot Replicator+.
GANTRY: The apparatus that allows the carriage
and extruder assembly to move along the x and y
axis.
GRIP SURFACE: The surface on which the extruder
prints on. Prints adhere better to the Grip Surface
resulting in reduced warping and curling and no blue
tape required.
INTERNAL STORAGE: The part of the MakerBot
Replicator+ onboard storage that you can use to
store print files. The capacity of the internal storage
of the MakerBot Replicator+ is about 2GB.
LAYOUT: An arrangement of 3D models on the build
plate. Multiple layouts can be saved as part of any
Thing in your Library.
LEVELING SCREWS: The two screws underneath
the build platform that allow you to pivot the build
plate around its center point during the leveling
process.
EXTRUDER ASSEMBLY: The Smart Extruder+
installed in the extruder carriage.
EXTRUDER CARRIAGE: The part of the extruder
assembly that sits on the gantry and moves back and
forth. When the Smart Extruder+ is installed in the
extruder carriage, the extruder assembly is complete.
EXTRUDER NOZZLE: The opening on the end of the
Smart Extruder+ from which heated MakerBot PLA
Filament emerges to be spread onto the build plate.
FILAMENT DRAWER: The part of your MakerBot
Replicator+ that slides up to allow you to load a
spool of MakerBot PLA Filament.
FILAMENT GUIDE TUBE: The plastic tube that
guides the MakerBot PLA Filament from the filament
spool to the Smart Extruder+.
.MAKERBOT: The format of print files for your
MakerBot Replicator+. Print files contain instructions
for your MakerBot Replicator+.
MAKERBOT ACCOUNT: The username and
password you will use to sign in to MakerBot Print,
and log on to Thingiverse and other MakerBot sites.
MAKERBOT PRINT SOFTWARE: Free soware for
use with your MakerBot Replicator+. MakerBot Print
will help you discover, manage, share and print 3D
models.
MAKERBOT PLA FILAMENT: Polylactic acid
filament. PLA is a corn-based thermoplastic.
MakerBot PLA Filament is the source material
from which you make objects on the MakerBot
Replicator+.
REFERENCE 41
Page 42

MAKERBOT REPLICATOR+: The MakerBot®
Replicator+ Desktop 3D Printer.
MENU BUTTON: The button at the bottom right
corner of the control panel’s LCD screen. The
menu button will oen allow you to open a menu
containing additional options.
.OBJ: A file format used for 3D models.
SMART EXTRUDER+: The Smart Extruder+ draws
the filament from the spool, melts it, and pushes it
through a nozzle onto the build plate.
.STL: A widely used file format for 3D models.
SUPPORTS: Automatically generated support
structures used to prop up any sections of a print
that will not stand alone.
PROFILE: The settings used to slice your 3D model
and create a print file. MakerBot Print Soware
comes with preset profiles for Low, Standard, and
High-resolution prints.
RAFT: A plastic base printed on the build plate and
used as a printing surface for your printed object.
GUIDED SETUP: The set of tasks that runs when
you turn on the MakerBot Replicator+ for the first
time. The setup assistant helps you level the build
plate, load filament and start a test print.
SLICING: The process of turning a 3D model into a
print file containing instructions for your MakerBot
Replicator+. The MakerBot Replicator+ uses print
files with the extension .makerbot.
.THING: A file format used by MakerBot Print that
stores additional information about your 3D model
files.
THING: A file or group of files saved to Thingiverse
or to your MakerBot Cloud Library. THINGIVERSE: An
online community for sharing 3D design files.
USB CABLE: A cable that allows your computer to
communicate with the MakerBot Replicator+.
USB DRIVE: A USB flash drive. You can use a USB
drive to transfer print files to and from the MakerBot
Replicator+. Make sure that the USB drive is
formatted to FAT32. USB drives that are formatted
to NTFS will not be visible.
REFERENCE 42
Page 43

SPECIFICATIONS
PRINTING
Print Technology: Fused deposition modeling
Build Volume: 29.5 L x 19.5 W x 16 H cm [11.6 L x 7.5 W x 6.3 H in]
Layer Resolution: 100-300 microns
Filament: 1.75 mm [0.069 in]
MakerBot PLA Filament
Nozzle Diameter: 0.4 mm [0.015 in]
Print File Type: .makerbot
Grip Build Surface: Polycarbonate film
SOFTWARE
MakerBot Print
3D Model File Types: Windows: .stl, .obj, .thing, .sldprt, .sldasm, .ipt, .iam, .iges, .igs, .step, .stp.
CATPart, .CATProduct, .prt, .par, .asm, .wrl, .x_t, .x_b
Mac: .stl, .makerbot
Supported OS: Windows (7+), Mac OSX (10.9, 10.10, 10.11)
PHYSICAL DIMENSIONS
Printer: 52.8 L x 44.1 W x 41.0 H cm [20.8 L x 17.4 W x 16.2 H in]
Shipping Box: 61.6 X 52.4 X 57.9 [24.3 X 20.7 X 22.9]
Printer Weight: 18.3 kg [40.4 lb.]
Shipping Weight: 22.8 kg [50.2 lb.]
TEMPERATURE:
Ambient Operating
Temperature: 15-26°C [60-78°F]
Storage Temperature: 0-38°C [32-100°F]
ELECTRICAL
Power Requirements: 100-240 VAC; 0.76-0.43 A; 50/60 Hz; 100W
Connectivity: USB, Ethernet, Wi-Fi
EMC Tested With: USB and Unshielded Ethernet Cable
CAMERA
Camera Resolution: 640X480 at 4 fps
REFERENCE 43
Page 44

CONTACT
Support
support.makerbot.com
Our website has extensive documentation and troubleshooting information about your MakerBot Replicator+. It’s a great resource when you want to try to solve issues quickly on your own.
makerbot.com/support/select
At MakerBot, we take pride in oering expert, responsive, friendly customer support to our customers
around the world. If you need help resolving an issue with your MakerBot Replicator+, open a case with the
MakerBot Support Team at the web address above.
Sales
sales@makerbot.com
To learn about other MakerBot products, including MakerBot PLA Filament, please email the address
above, or call our Sales Team at 347.334.6800.
REFERENCE 44
Page 45

REFERENCE 45
Page 46

MakerBot One MetroTech Center, 21st Floor, Brooklyn, NY support@makerbot.com makerbot.com
 Loading...