

Page 1
Ultimate Robot Kit
T
Page 2
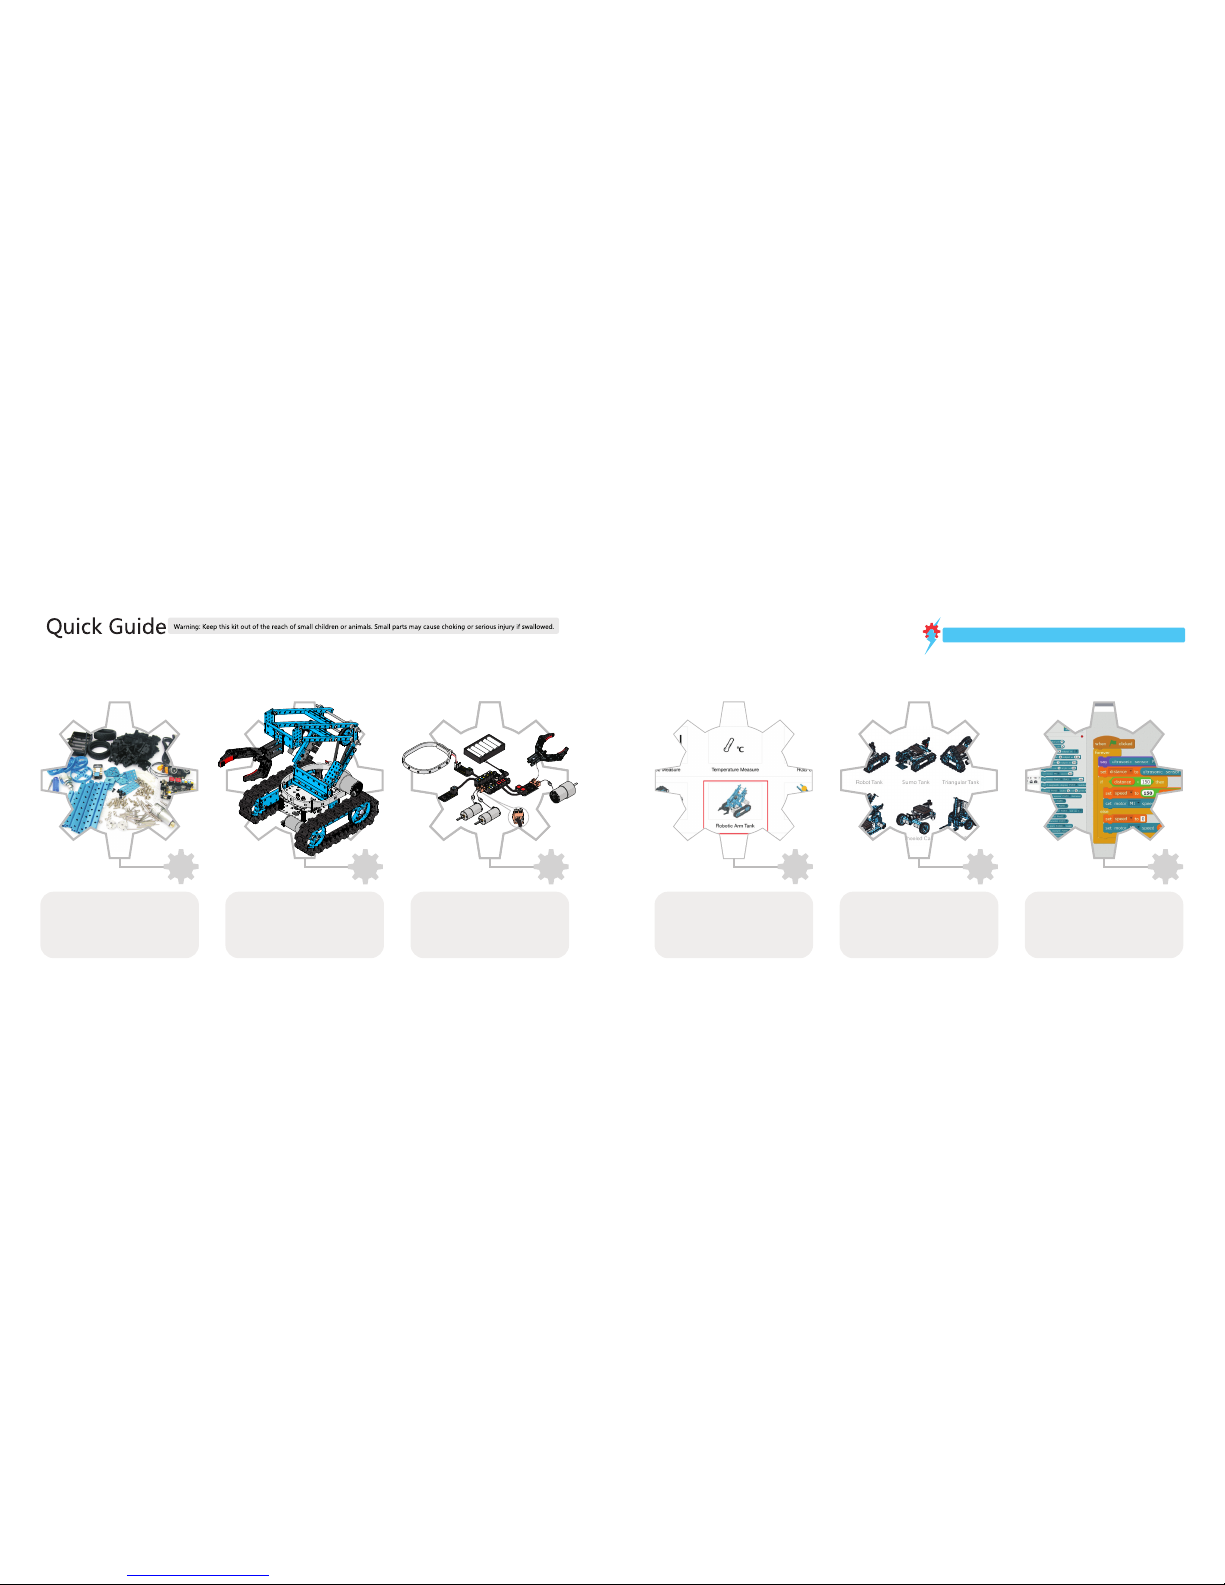
Check all components in parts list,
please contact Makeblock or the
distributor if any component lacked.
Follow our manual to build the
Robotic Arm Tank.
Do wiring. Install batteries for
your robot .
Turn on the power of your
robot, control your robot with
App.Now it's time to play your robot!
Robot Ideas--Further exploration Programming Guide--Further exploration
Parts List Wiring
Build the Robotic Arm Tank Control with App
Please visit
http://learn.makeblock.cc/ultimate-robot-kit/
to view the build and programming guide.
1
3
22
23
25 26
Advanced player can re-program to
the robot by mBlock or Arduino to
explore the wonderful robotic world.
Makeblock Ultimate Robot Kit can build as various styles,Robotic Arm Tank,Triangular Tank,Ball Launcher,Forklift etc.It is also a
great tool to learn mBlock,Scratch and Arduino programming.
Follow our guideline on website to
build the other 9 robot styles.
Try other styles:
Page 3

LED RGB Strip-Addressable
Parts List
Pictures for reference only
Me Ultrasonic Sensor
1×
Plastic Rivet R4060
Plastic Rivet R4120
BaseBracket
Battery Holder for (6) AA
Makeblock Orion
Me Dual Motor Driver
16×
12×
2×
1×
1×
1×
Me Bluetooth Module
Me Line Follower
Me Sound Sensor
Me RJ25 Adapter
RJ25 Cable-20cm
RJ25 Cable-35cm
Micro USB Cable
1×
1×
1×
1×
1×
3×
3×
1×
3×
3×
3×
Beam 0824-64
Beam 0824-80
Beam 0824-96
Beam 0824-128
Beam 0824-144
Beam 0808-88
Beam 0808-184
Bracket 3×3
Bracket 3×6
Plate 3×6
Plate 7×9
Link Rod
Bracket P3
Caster Wheel
DC Motor-25 Bracket
DC Motor-37 Bracket
Shaft Connector 4mm
Timing Pulley 18T
Timing Pulley 62T
Timing Pulley 90T
Timing Pulley Slice 90T
Gear 16
Gear 80
Tire 68.5×22mm
Track
Track Axle
Timing Belt 98MXL
Timing Belt 240MXL
D Shaft 4×56mm
D Shaft 4×128mm
Threaded Shaft 4×39mm
Shaft Collar 4mm
Flange Bearing 4×8×3mm
2×
2×
3×
2×
2×
4×
4×
4×
1×
4×
1×
8×
2×
1×
2×
1×
3×
1×
2×
4×
2×
1×
1×
4×
40×
40×
1×
1×
2×
2×
6×
10×
8×
Plastic Ring 4×7×2mm
Nylon Pulley with Bearing
Timing Belt Connector
50×
4×
2×
Plate 45°
Disc D72
4×
1×
Rubber Ring
6×
Terminal Block
Motor Cable
Ferrite Ring
Screw M4×8
Screw M4×14
Screw M4×22
Screw M4×30
Nut M4
Nut M8
Nylon Lock Nut M4
Screw M3×8
Headless Set Screw M3×5
Nylon Stud M4×30
31×
42×
10×
10×
28×
2×
30×
10×
16×
6×
Hex Screwdriver
Cross Screwdriver
Hex Allen Key 2.5mm
1×
1×
2×
Wrench
1×
Hex Allen Key 1.5mm
1×
Robot Gripper
1×
DC Motor-25
DC Motor-37
2×
1×
Micro Switch
2×
Micro Switch Bracket
1×
Micro Switch Cable
Tapping Screws-2×10
4×
2×
21
Bearing 4×8×3mm
8×
Page 4
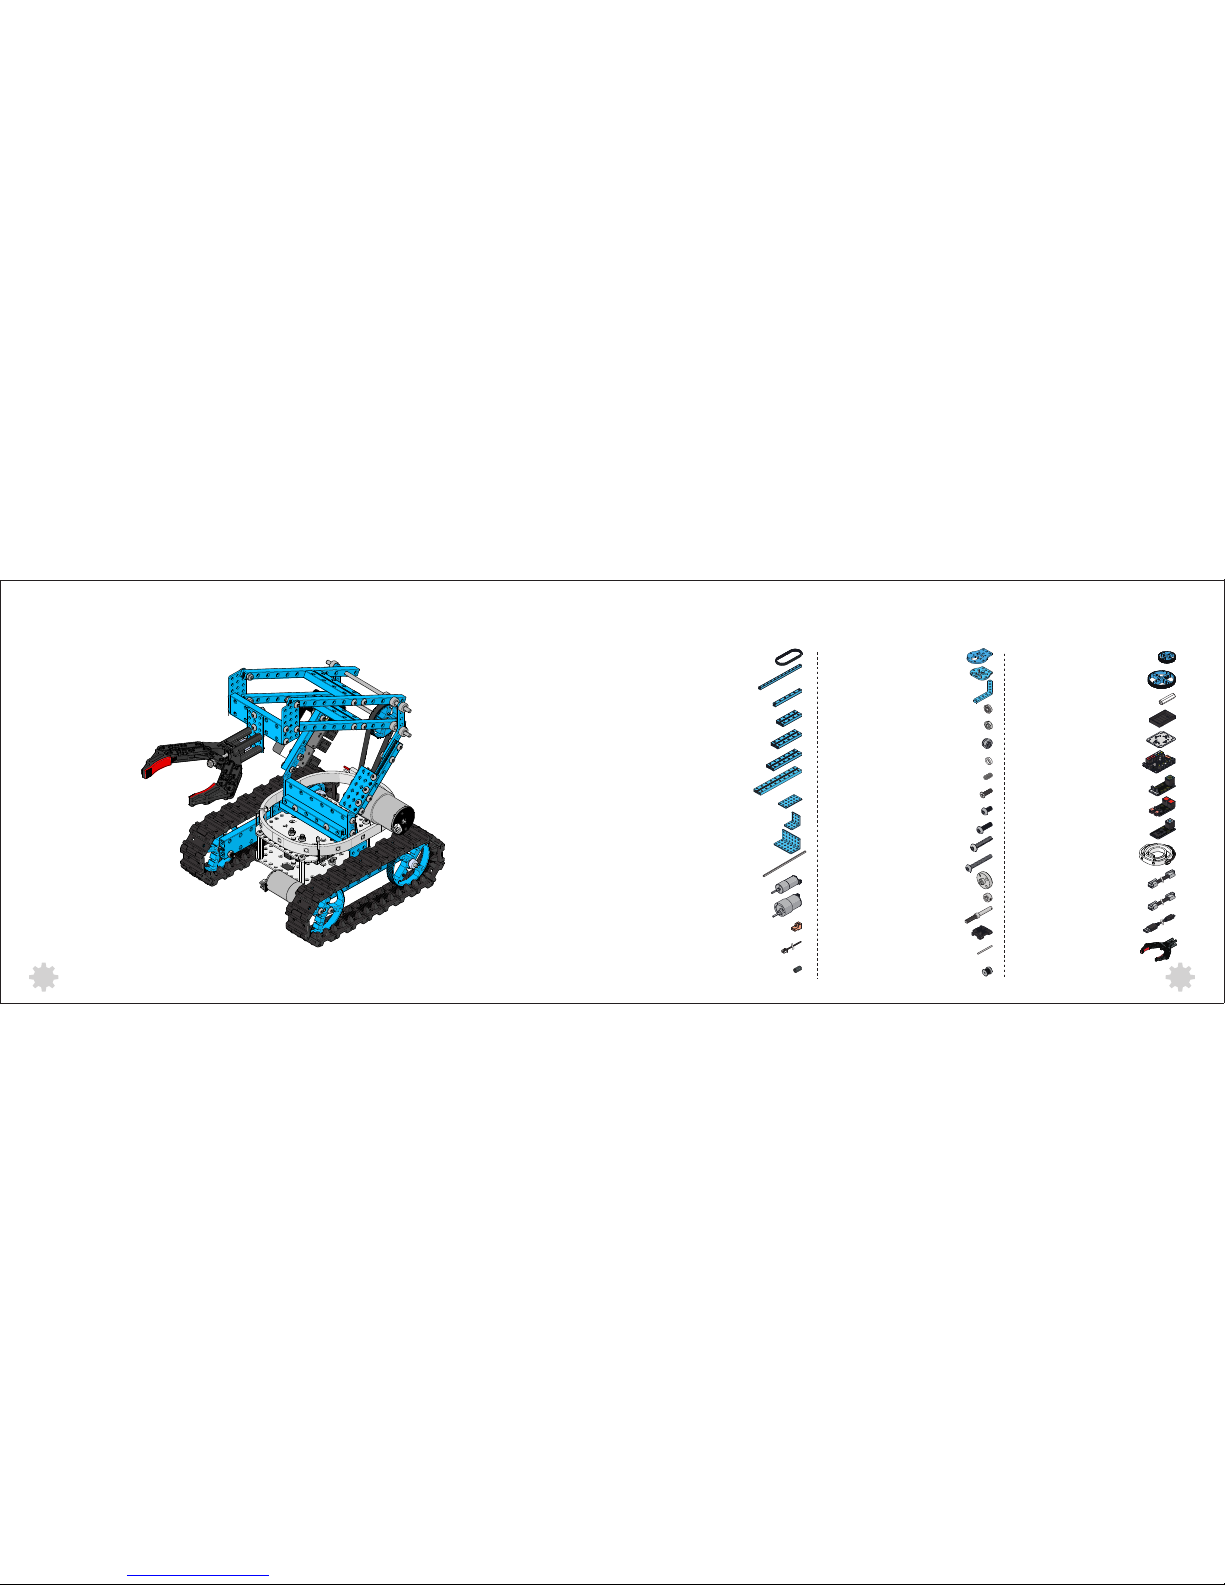
Build the Robotic Arm Tank
Part List for the Robotic Arm Tank
Plate 3×6
3×
Timing Belt 98MXL
Beam 0808-184
Beam 0808-88
Beam 0824-64
Beam 0824-80
Beam 0824-96
Beam 0824-144
Bracket 3×3
Bracket 3×6
D Shaft 4×128mm
DC Motor-25
DC Motor-37
1×
4×
4×
2×
1×
2×
2×
2×
1×
2×
2×
1×
3×
3×
3×
Terminal Block
Motor Cable
Ferrite Ring
HeadlessSetScrewM3x5
Screw M4×8
Screw M4×14
13×
31×
42×
Plastic Ring 4×7×2
DC Motor-37 Bracket
DC Motor-25 Bracket
Plate 45°
1×
2×
4×
4×
Screw M3×8
8×
Nut 4mm
Flange bearing 4×8×3mm
6×
21×
Nylon Lock Nut 4mm
4×
Track
Track Axle
Screw M4×30
Shaft Connector 4mm
Shaft Collar 4mm
Threaded Shaft 4×39
2×
2×
10×
2×
36×
36×
Timing Pulley 18T1×
Timing Pulley 62T
Timing Pulley 90T
Me RJ25 Adapter
Me Dual Motor Driver
Me Bluetooth Module
Nylon Stud
Battery Holder for (6)AA
BaseBracket
Makeblock Orion
Robot Gripper
RJ25 Cable-20cm
RJ25 Cable-35cm
Micro USB Cable
1×
4×
1×
1×
1×
4×
1×
2×
1×
1×
2×
2×
1×
1×
LED RGB Strip-Addressable
Screw M4×22
1×
43
Page 5
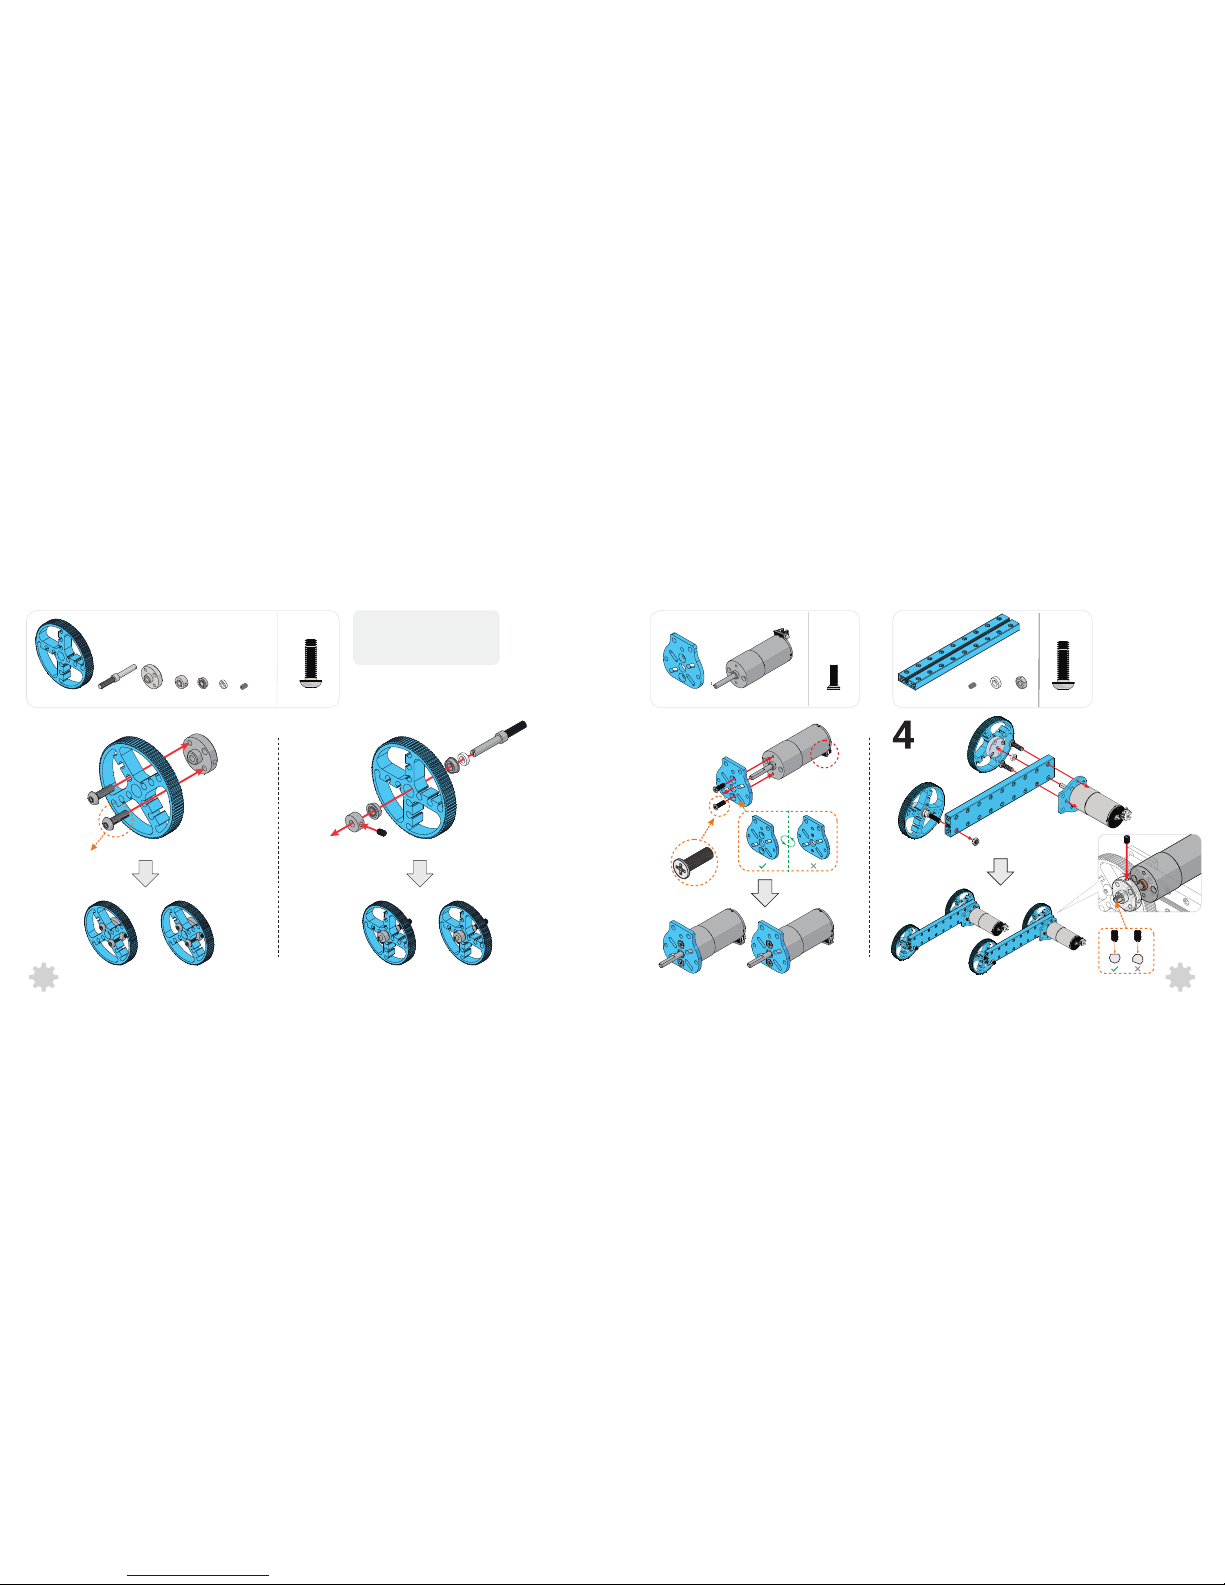
2× Screw M4×14
1
2
3
M3×8(4)
1:11:1
(2) (2) (2) (4) (2)
M4×14(4)
(2)(4)
M4×14(4)
1:1
(2) (2) (2) (2) (2) (2)
65
Tips:Identify the right mechanical
parts from similar ones with
different hole quantity included.
Page 6
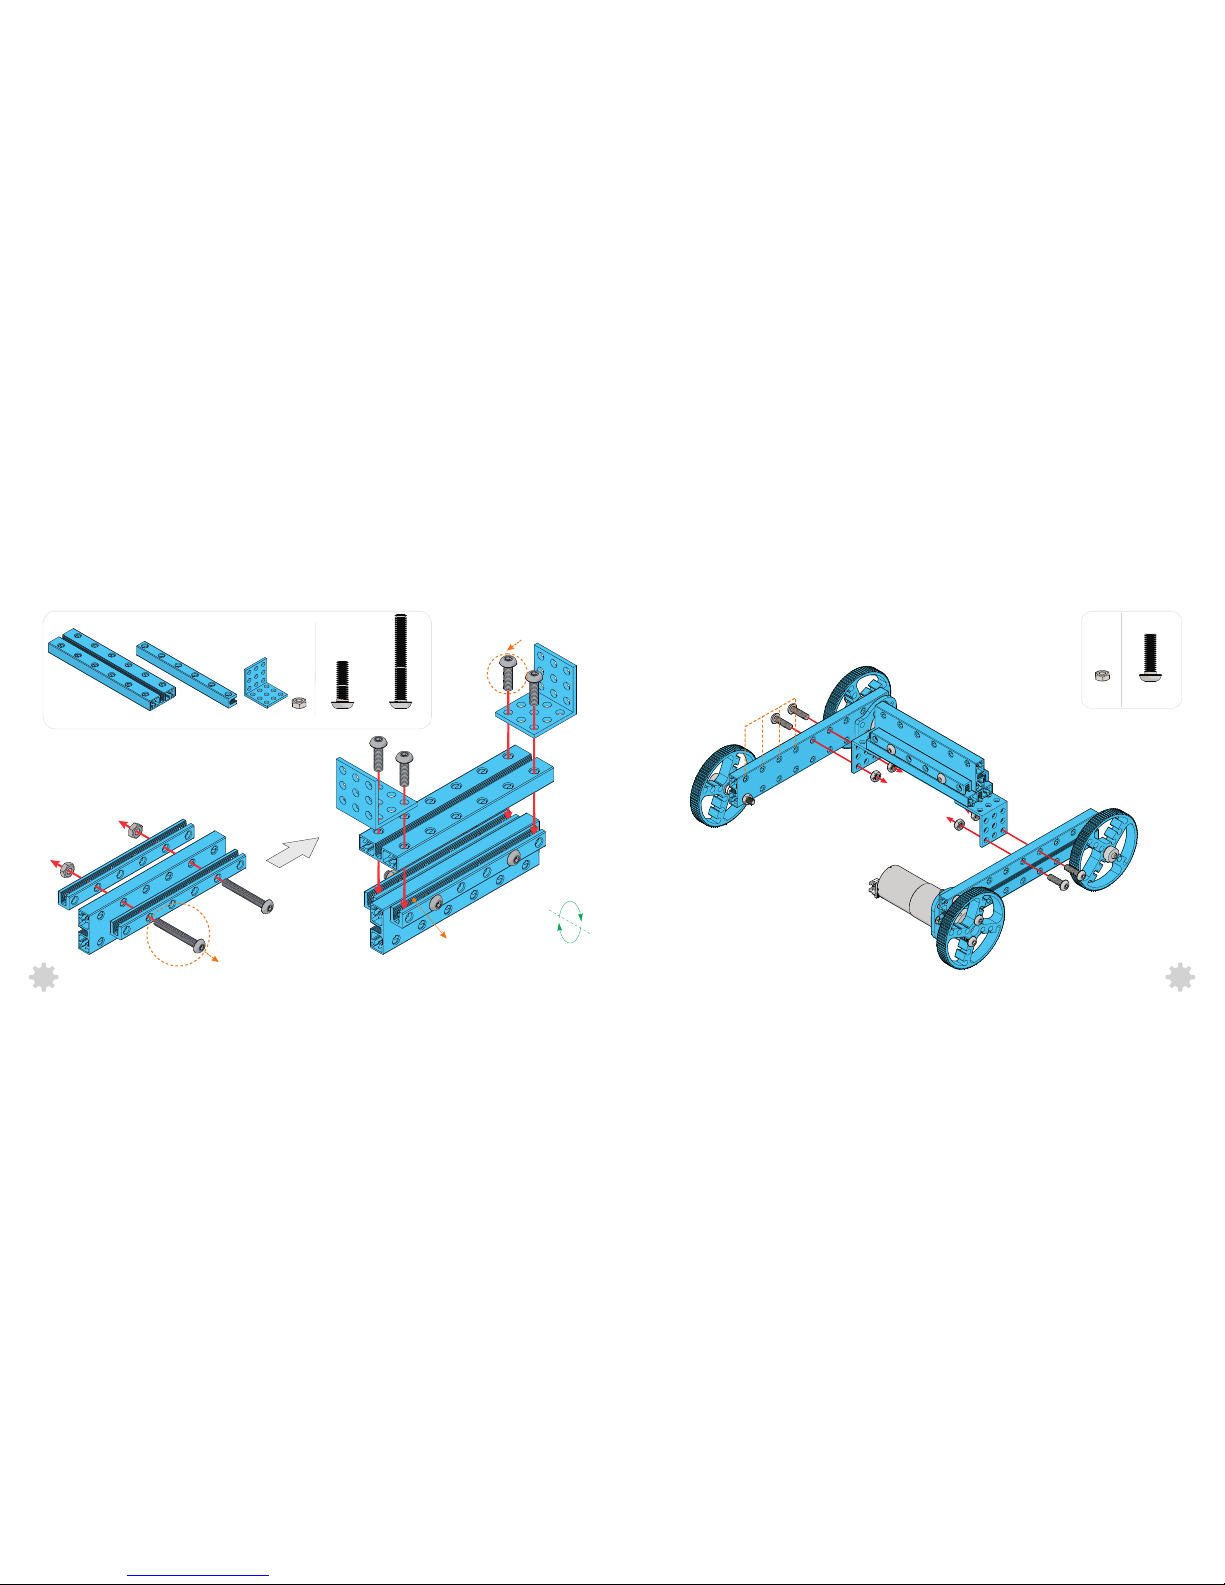
5
6
7
4× Screw M4×14
2× Screw M4×30
Threaded slot
(4)
M4×14 4( )
1:1
(2) (2)(2)
M4×30(2)
(2)
M4×14(4)
1:1
87
1
4
2
3
Page 7
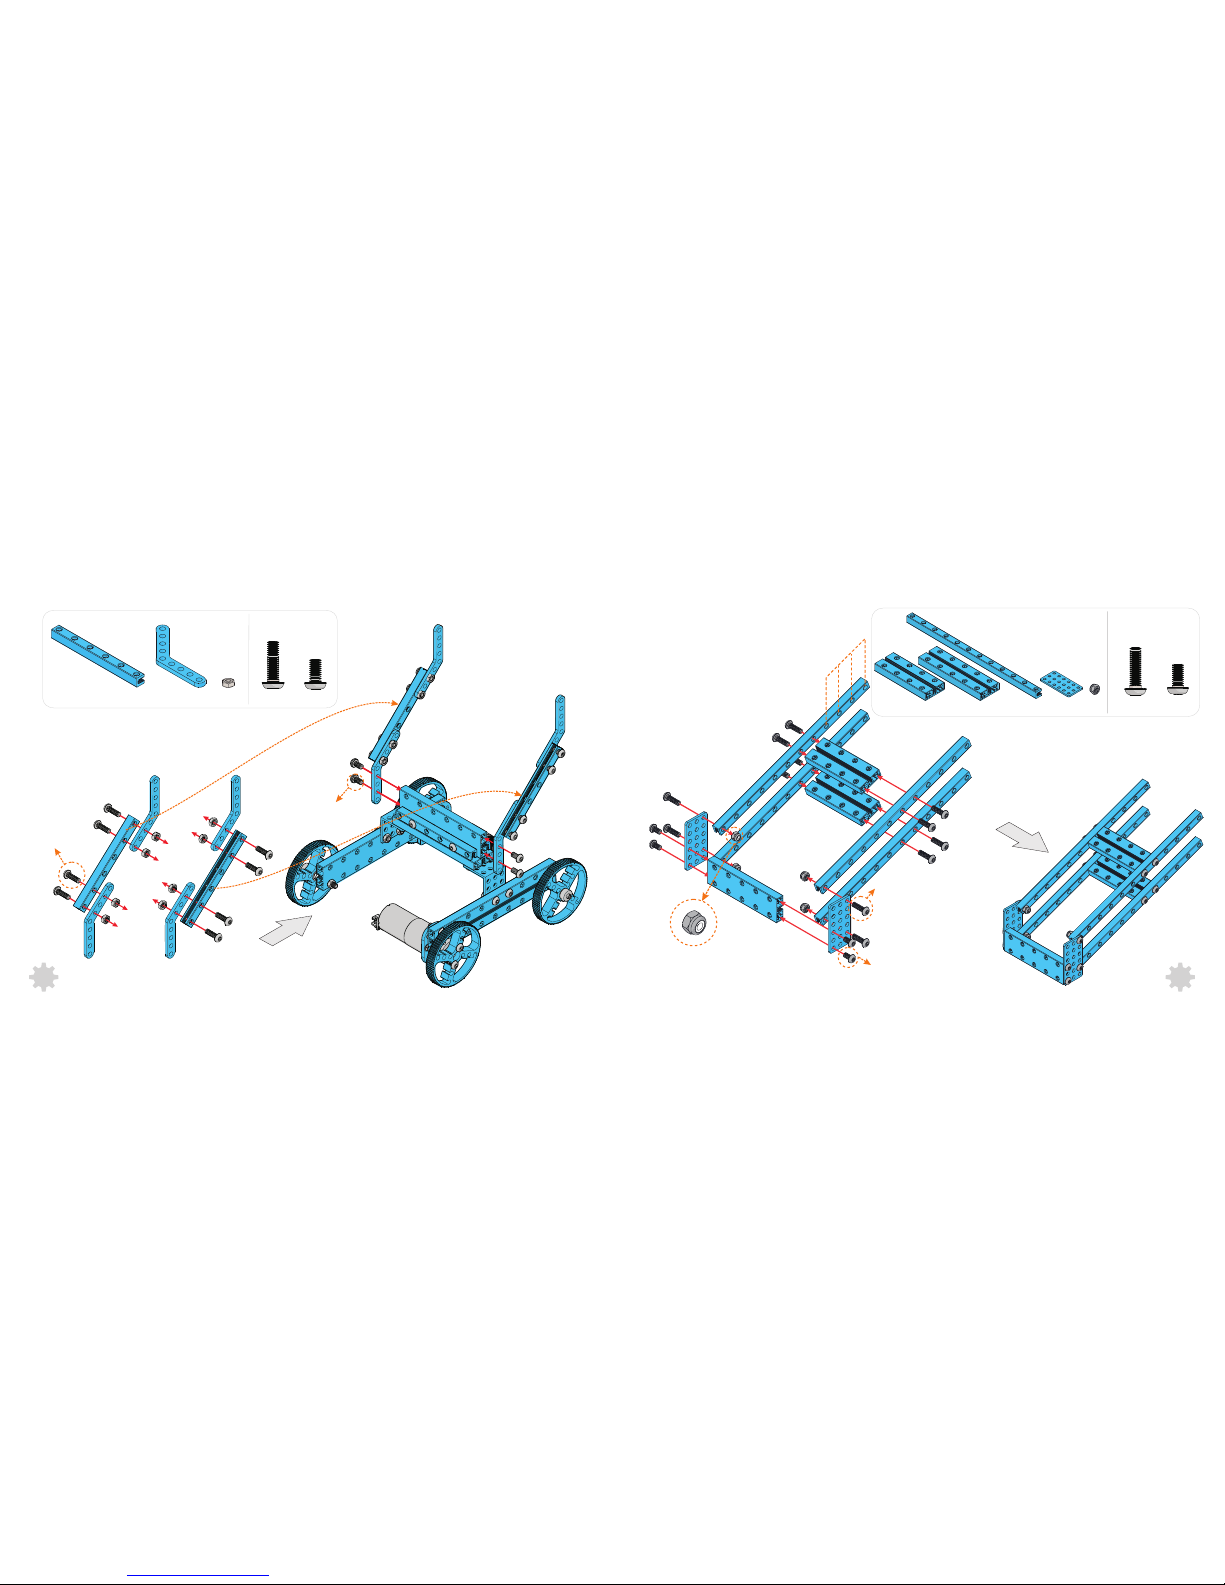
98
2× Screw M4×8
4× Screw M4×14
(4)(2) (8)
M4×14(8) M4×8(4)
1:1
(2) (1) (4)
(2)
(4)
M4×14(12) M4×8(4)
1:1
109
4× Screw M4×8
12× Screw M4×14
4× Nylon Lock Nut M4
4
3
2
1
Page 8
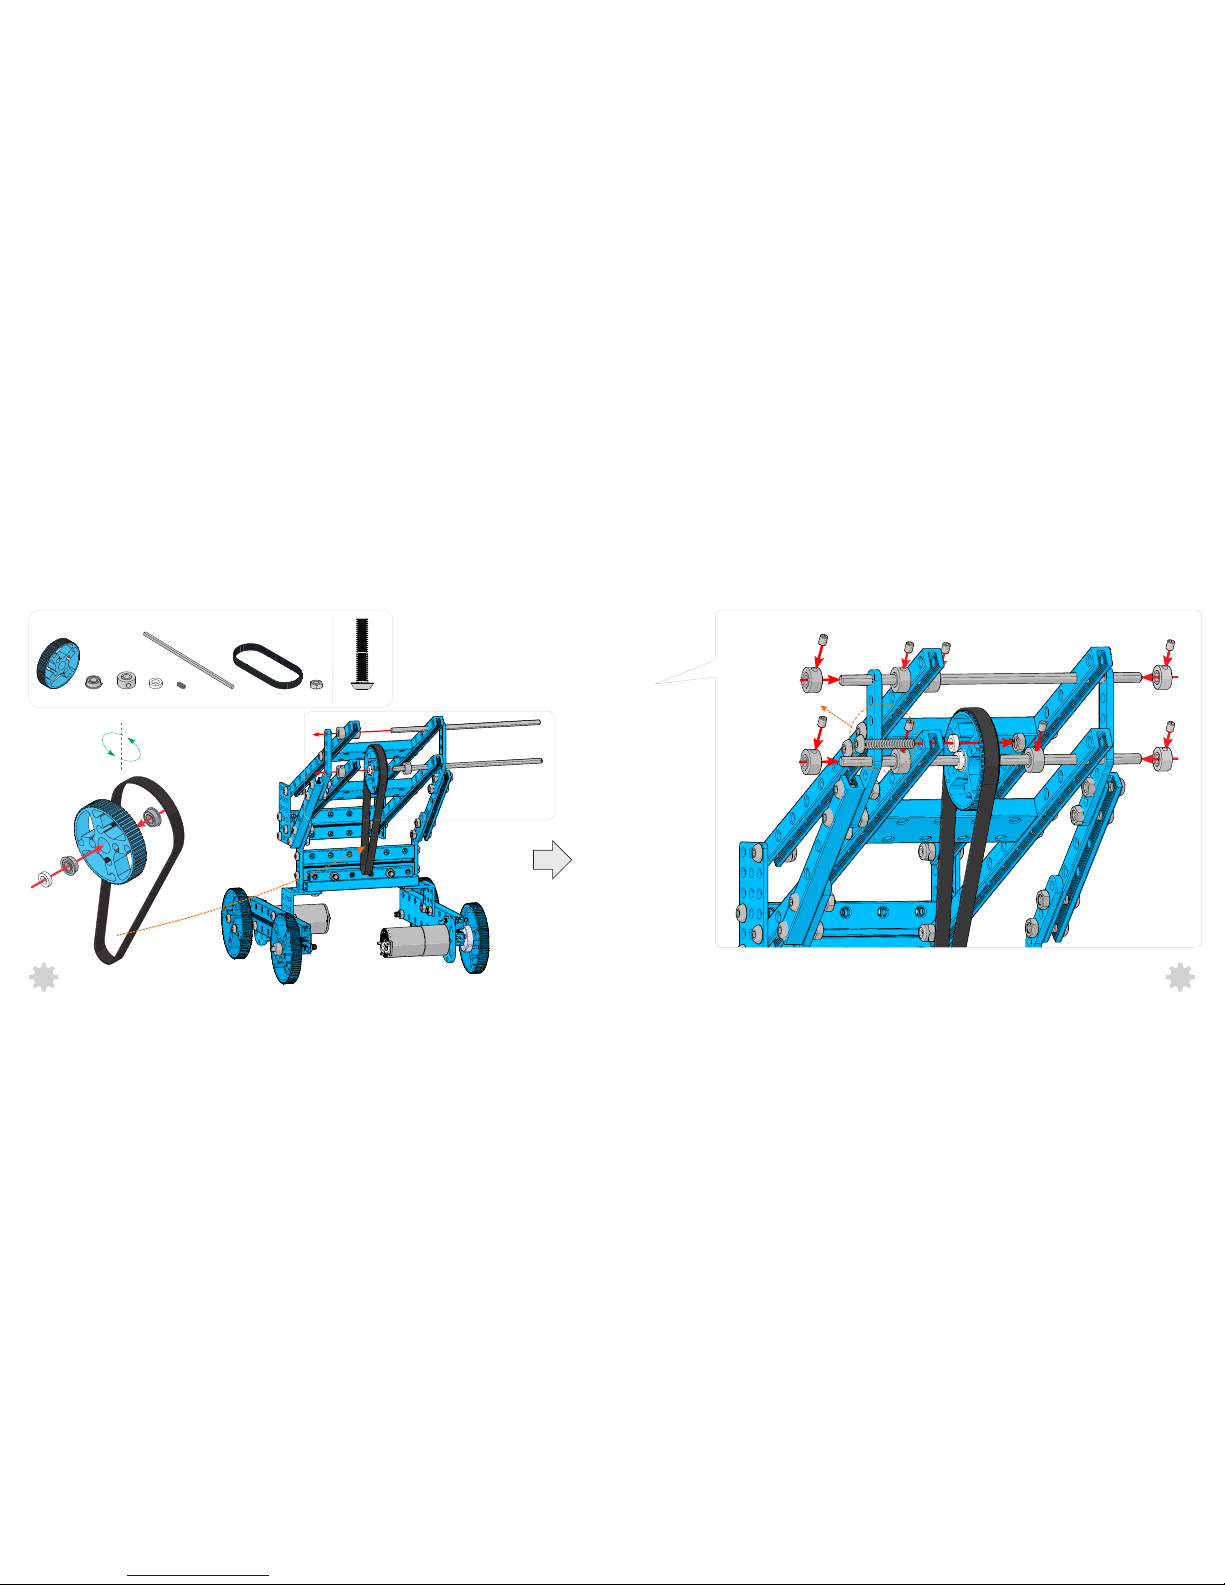
11
10
(8)
(2)(2)
(8)
(1) (1)
(1)
(2)
M4×22(1)
1:1
12
11
Screw M4×22
Page 9
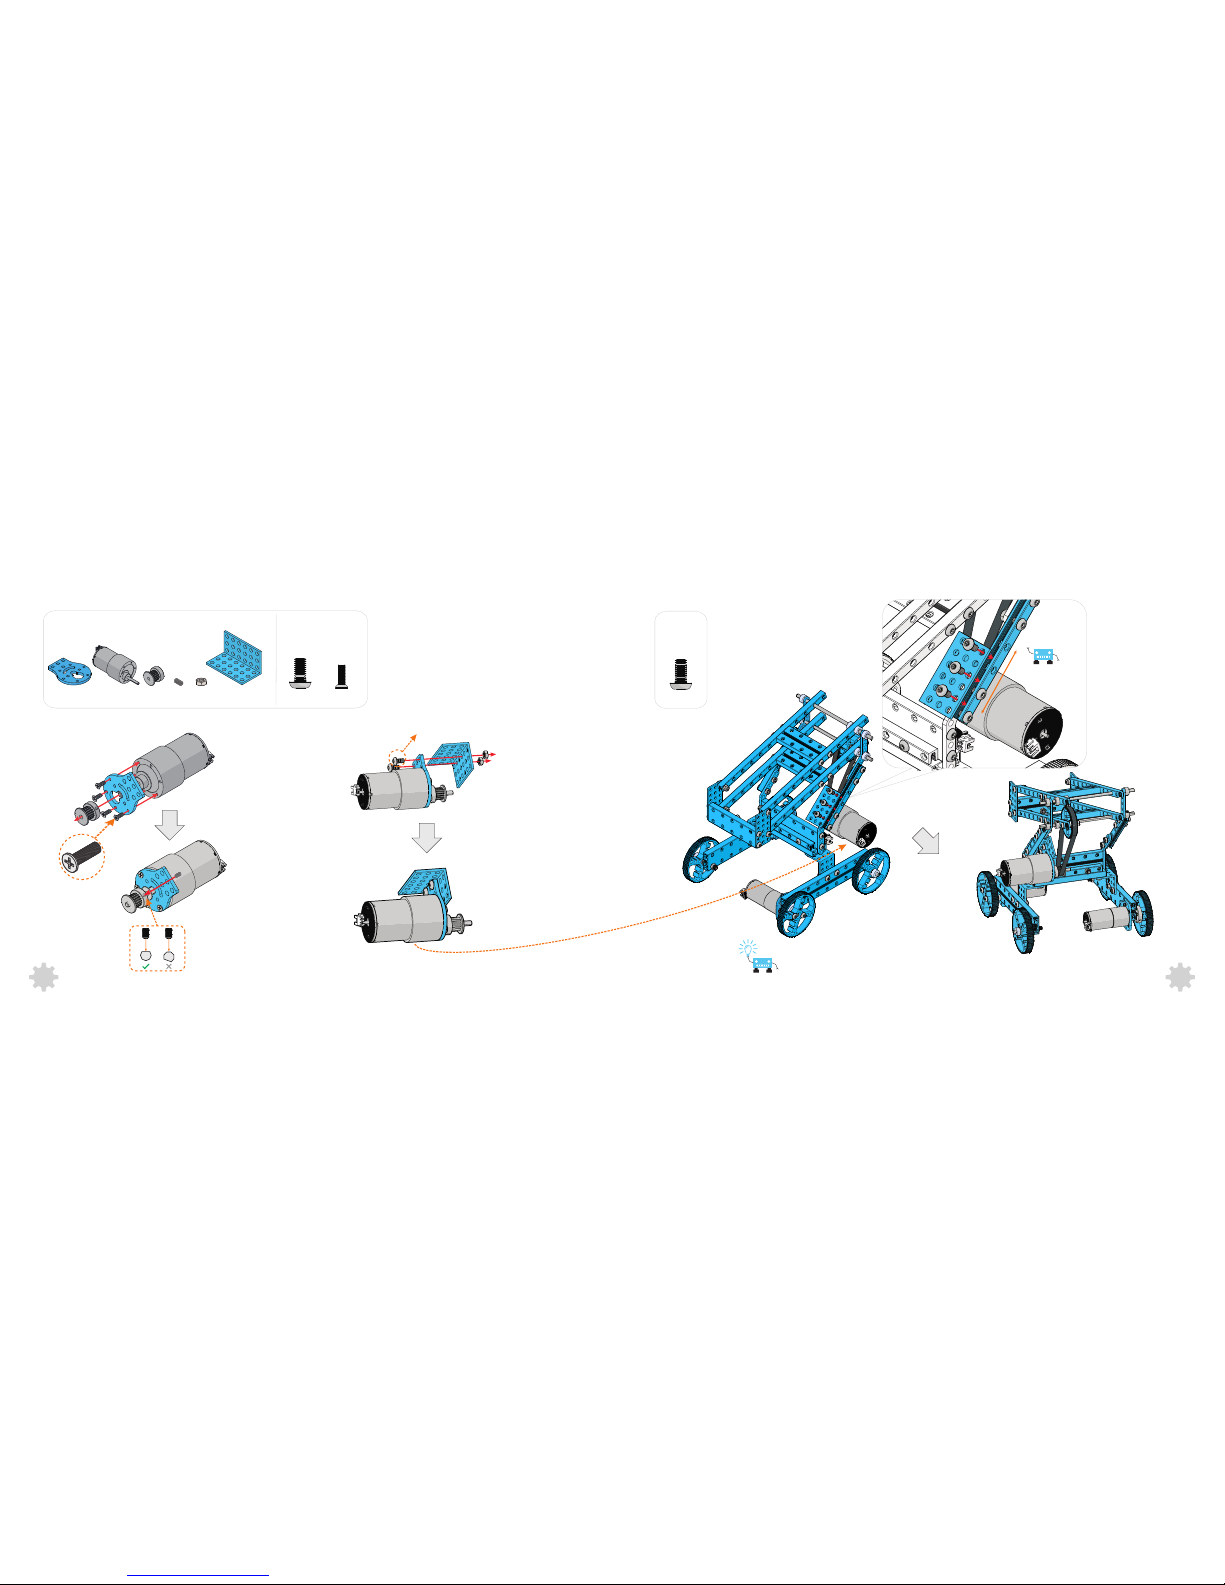
(2)
13
(1) (1) (1)(1)
12
(1)
You may need to adjust the position of Bracket 3×6 to tension the timing belt.
M4×8(2) M3×8(4)
Screw M3×8
Screw M4×8
14
M4×8(3)
1:1
1:1
14
13
Page 10
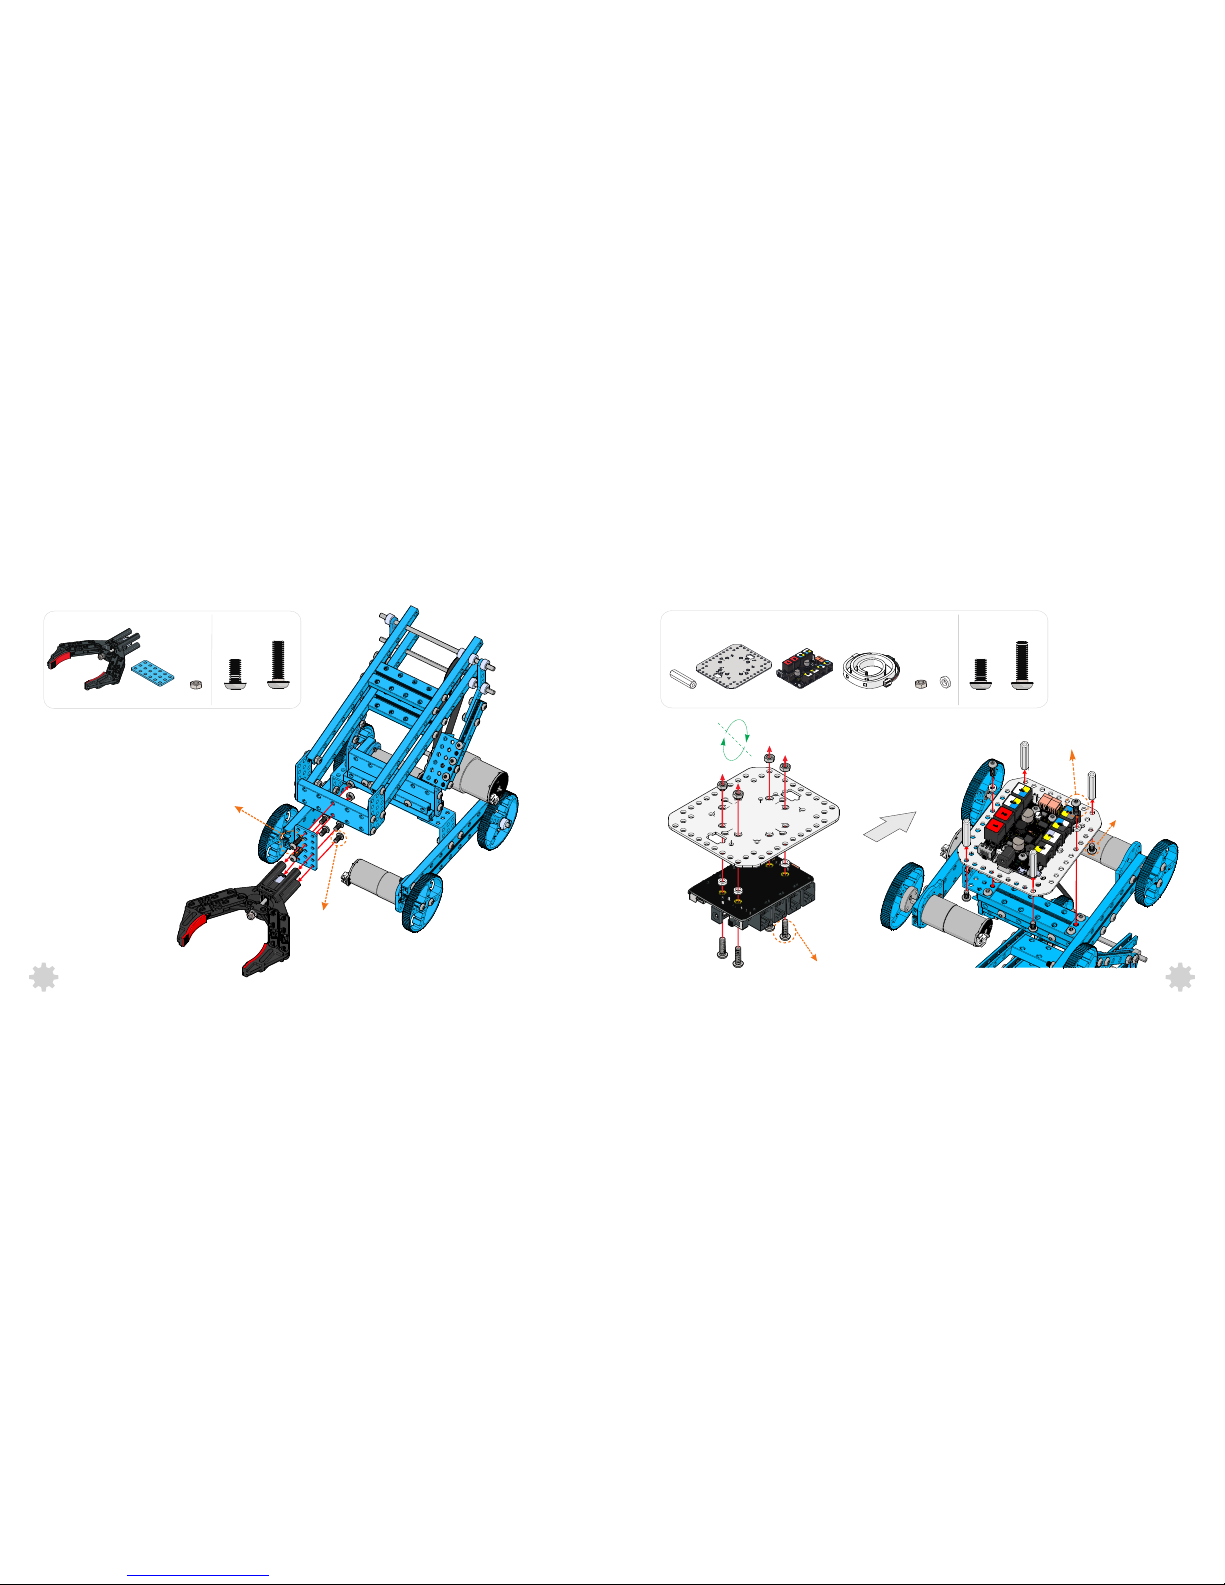
(1)(1)(4)
(4)
16 17
(1)
(6) M4×8(4) M4×14(6)
15
4× Screw M4×8
2× Screw M4×14
(2)(1) (1) M4×14(2)M4×8(4)
1:1 1:1
15 16
4× Screw M4×14
4× Screw M4×8
2× Screw M4×14
Page 11
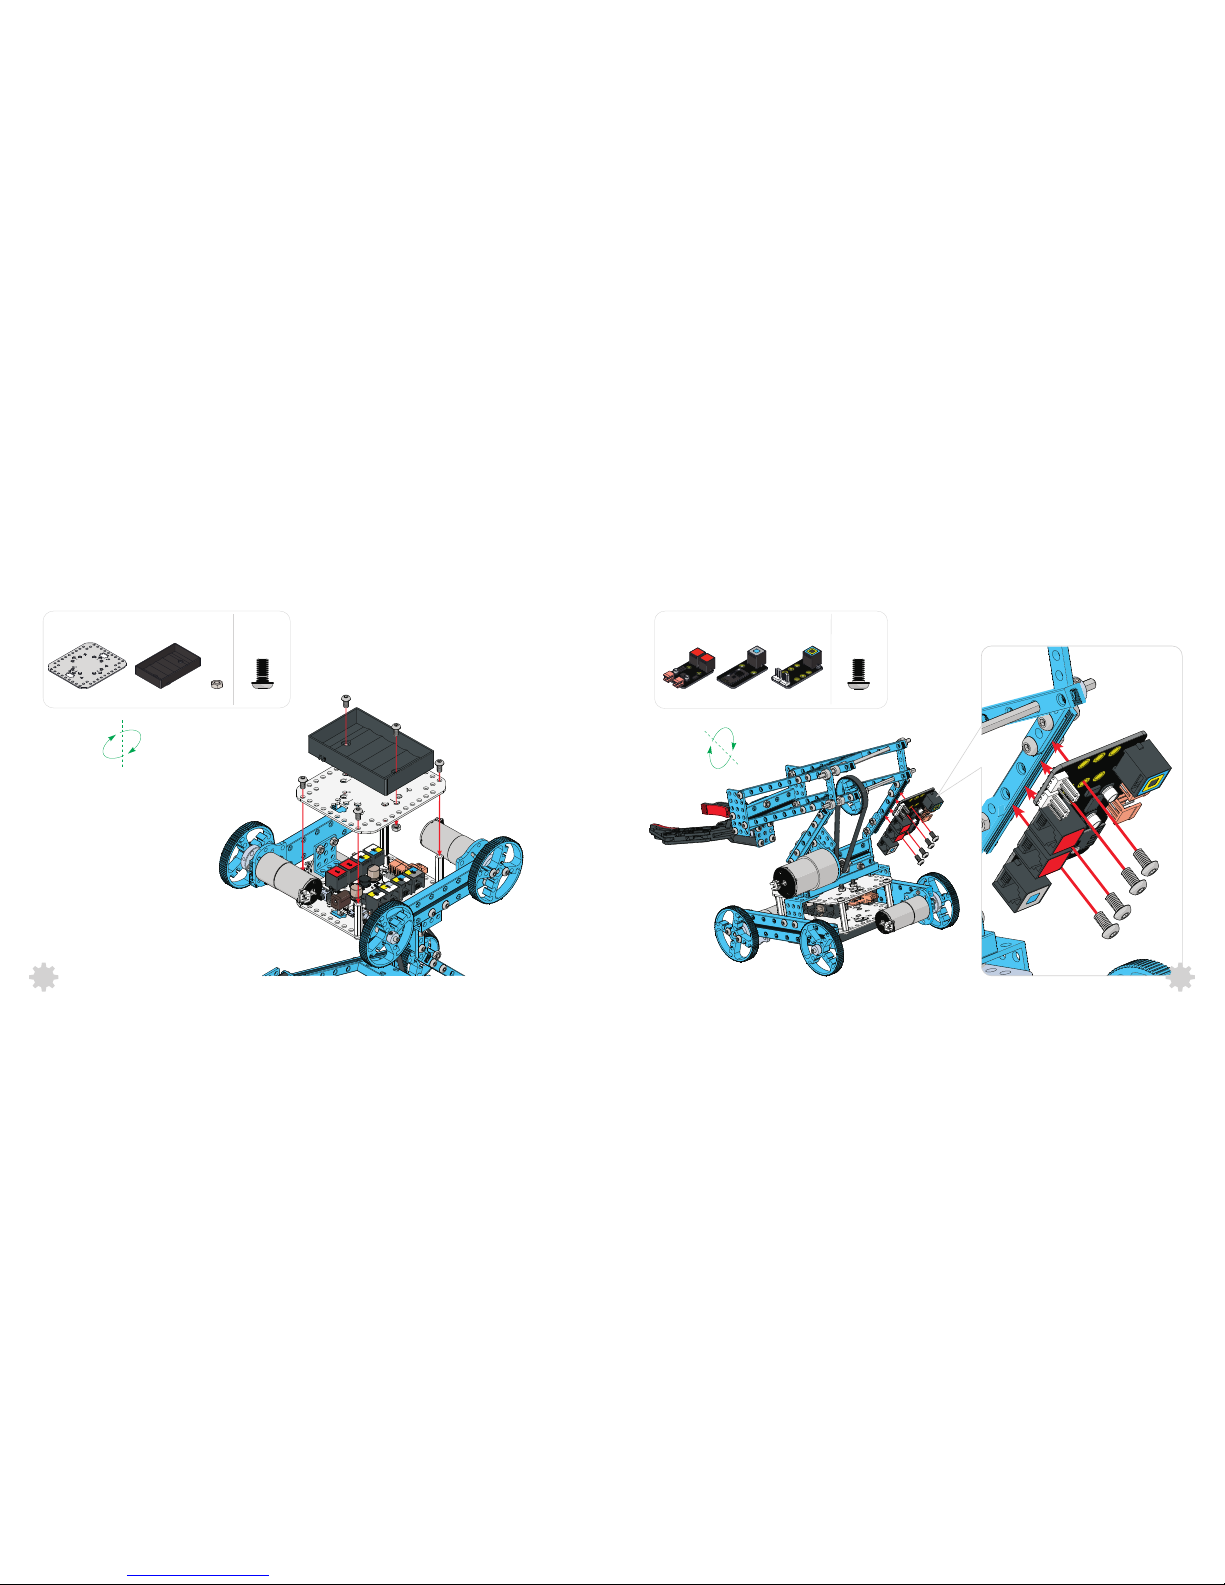
18 19
(1) (1)
(1)
M4×8(4)
(2)(1) (1)
M4×8(6)
1:1 1:1
1817
Page 12
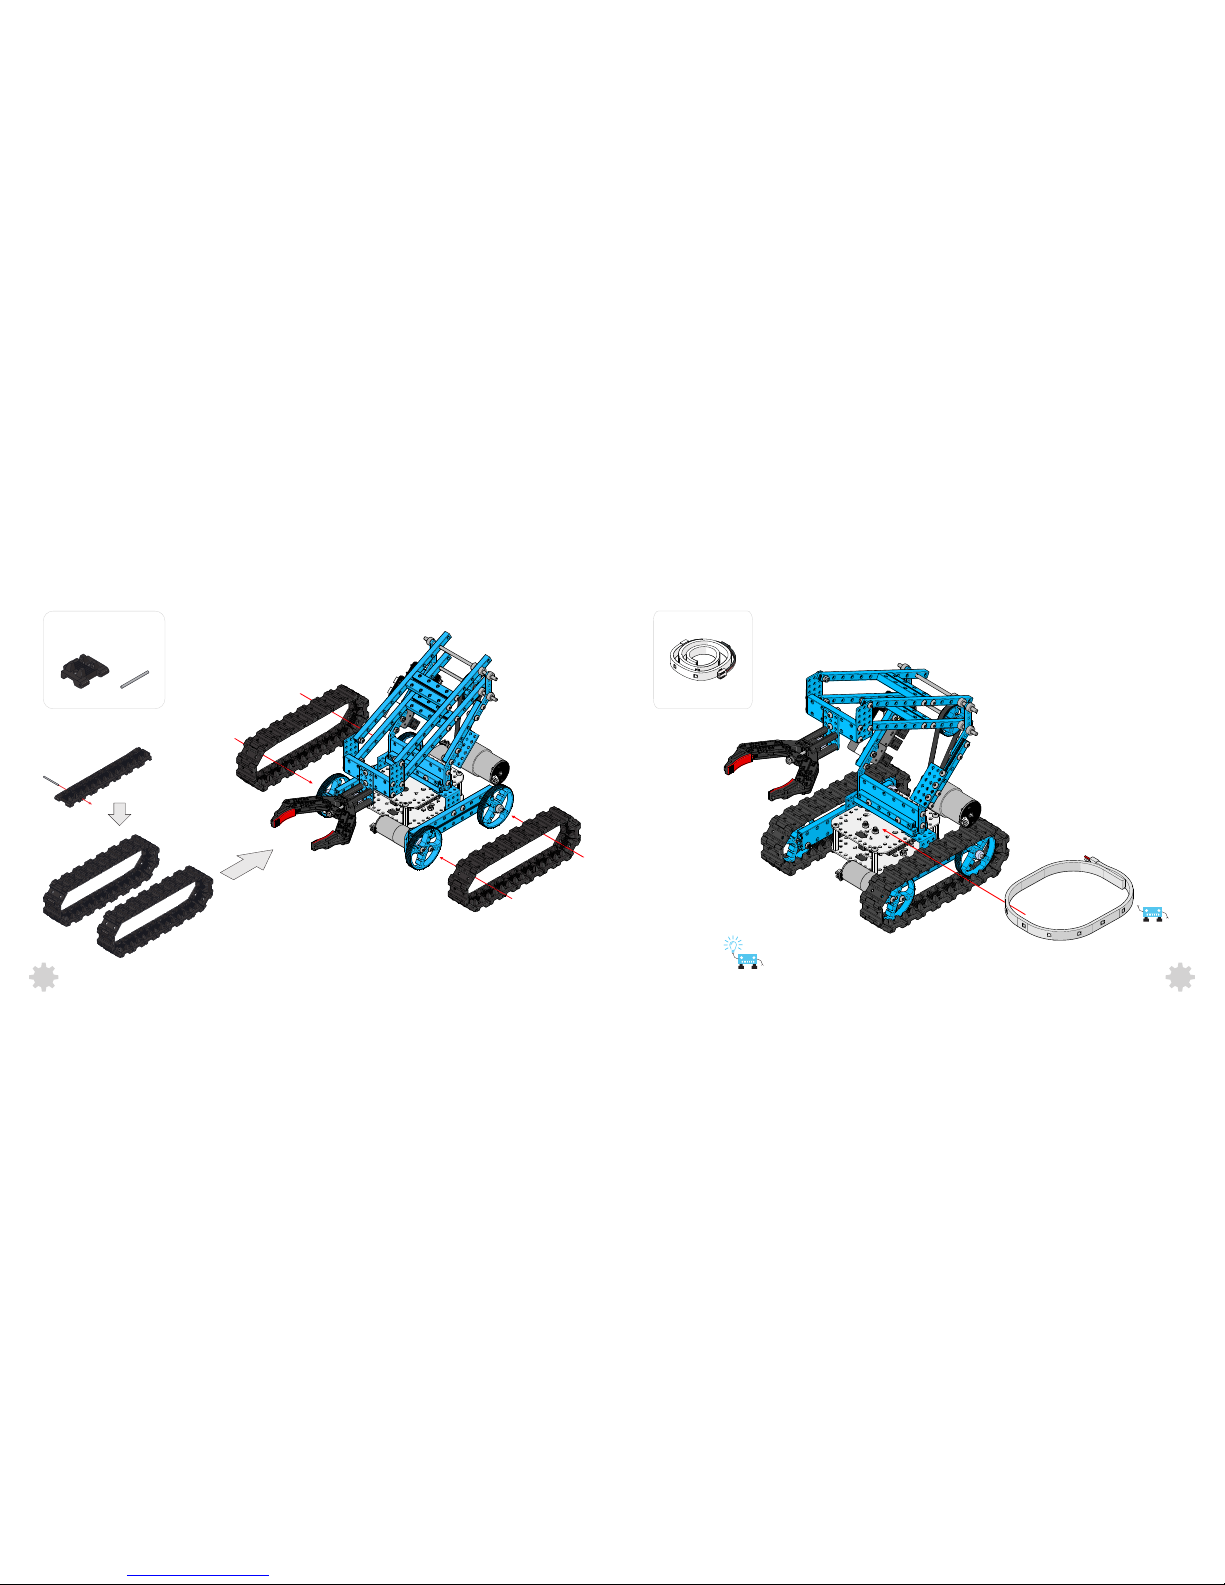
20
(36) (36)
Use nylon cable ties when necessary.
21
(1)
20
19
Page 13
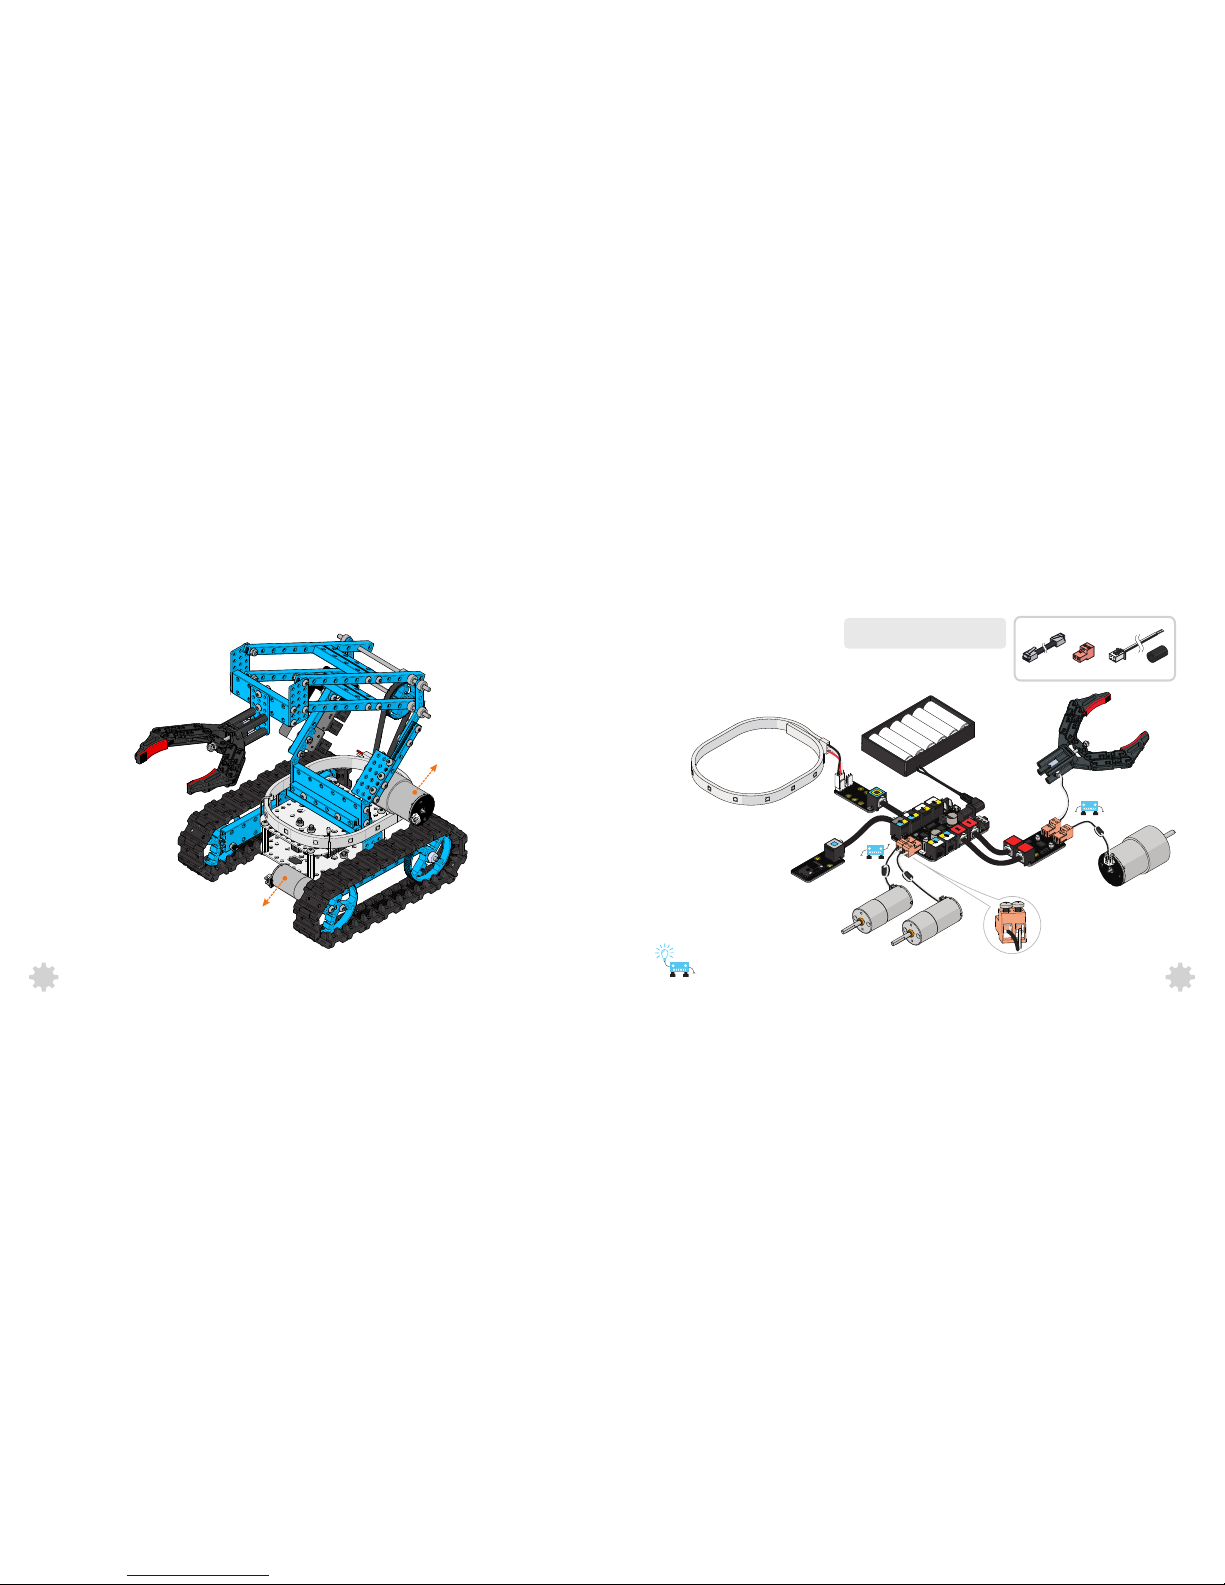
Wiring
To reduce the electromagnetic interference,
please consider to add the ferrite ring to the
wires which connnected to motors.
DC Motor-37
DC Motor-25(M1)
Me Bluetooth Module
Me Dual Motor Driver
DC Motor-37
Me RJ25 Adapter
LED RGB Strip Addressable
DC Motor-25(M2)
DC Motor-25(M1)
?
?
Makeblock Orion
Battery Holder(6×AA battery, )not included
Robot Gripper
22
21
You may need to switch the order of two
wires to correct the rotation direction.
4×
4×
4× 3×
Page 14
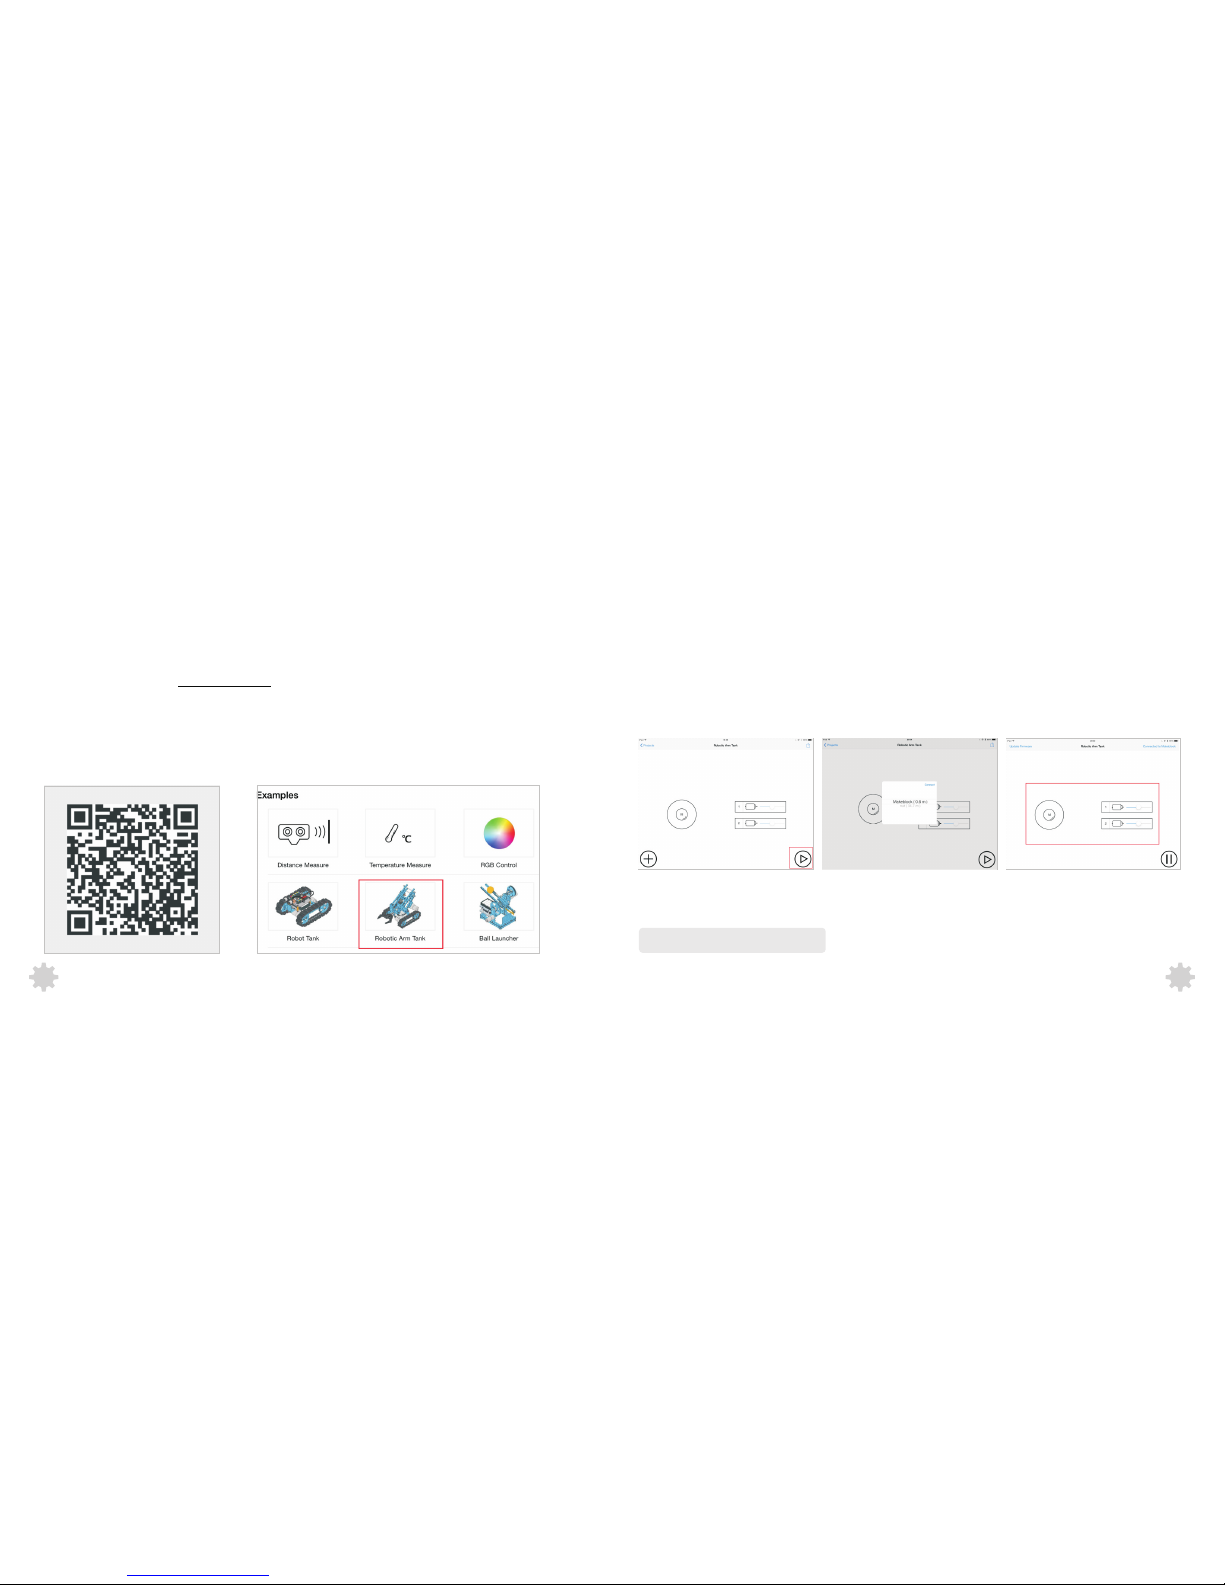
Control with App
1、Download and install Makeblock HD app . by either way below
A. Download Makeblock appat http://app.makeblock.cc/ .
B. Scan QR code below to download Makeblock app.(Figure 1)
2 Check wiring, make sure everything is correct, and then turn on the power of your robot.
3、Turn on the Bluetooth of your smart device.
4、Run Makeblock app,select your robot from Examples.(Figure 2)
、
Figure 1 Figure 2
5 Put your smart device close to robot, touch the play button(Figure3)to find Bluetooth device,and then connect 、
6 Control your robot by the direction button(direction) and slider(speed).(Figure 5) 、
Figure 4
Figure 5Figure 3
24
23
the robot to your smart device.(Figure 4)
Now it’s time to play your robot!
Page 15
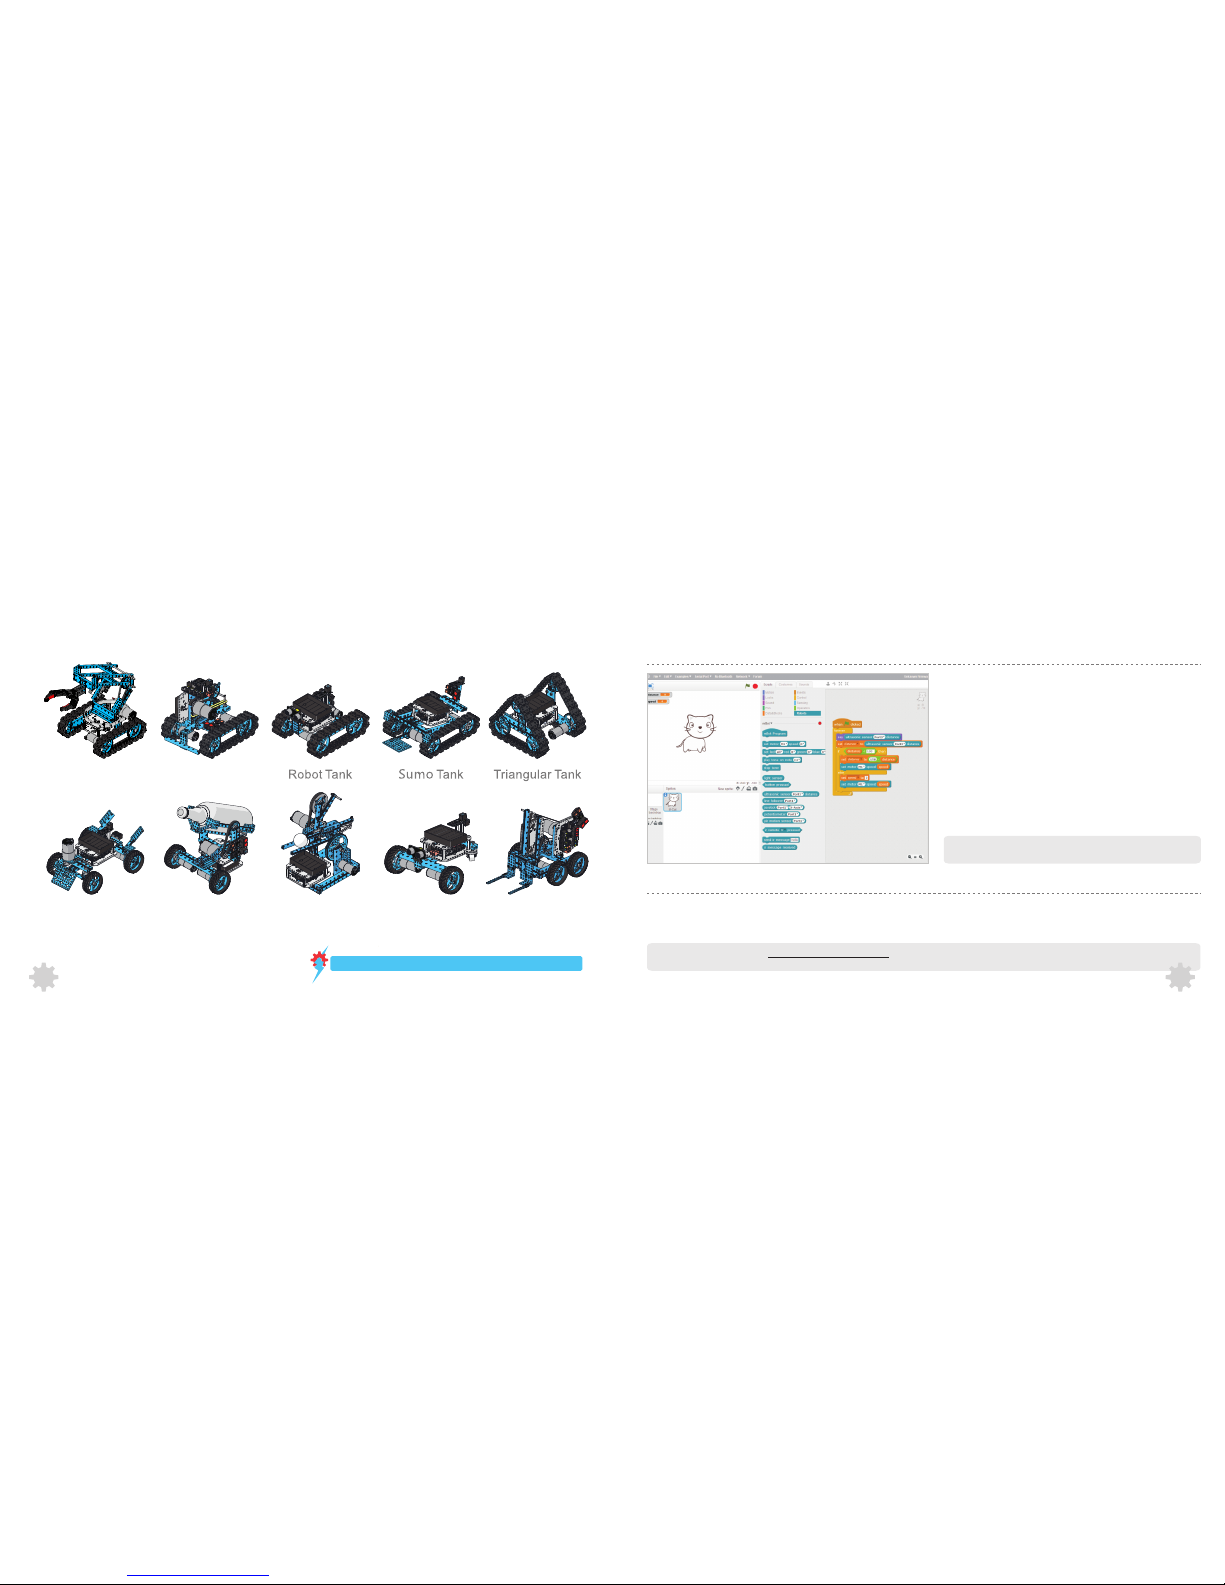
Robot Ideas--Further exploration
Robotic Arm Tank
Forklift
Ball Launcher
Attack Tank
3-Wheeled Car
Drink CarSkill Racing car
Please visit
to view 3D models.
https://grabcad.com/makeblock-1/projects
26
25
Working with mBlock--Hack the Physical World
Programming--Further exploration
Working with Arduino IDE
Learn Programming the Fun Way--
http://learn.makeblock.cc/learning-Arduino
Down load th e libra ry zip pa ckage : https ://gi thub. com/M akeblo ck-off icial /Makeb lock-L ibrar y/ar chive /maste r.zip
Visit the following URL for more details:
Arduino is an open-source electronics prototyping platform based on flexible , easy-to-use hardware and software.The Arduino software consists of a development environment
(IDE) and the core libraries. The IDE is written in Java and based on the Processing development environment.
The Ultimate Robot Kit support mBlock perfectly which allow you re-
programming your robot by simply drag and joint the blocks of mBlock. No
more difficult coding.
mBlock is a free modified version of Scratch 2.0 developed by MIT Media Lab,
mBlock add some hardware-related blocks in the original Scratch, with these
blocks, users can read sensors, control motors and even a whole robot.
Besides blocks for the basic microcontroller functionalities, analog and digital
writes and reads, PWM outputs. There are also blocks for each specific
electronic modules, such as ultrasonic sensor, temperature sensor, light
sensor, DC motor driver, stepper driver, etc. With these blocks, it’s simple to
interact with many kinds of electronic modules.
Visit the following URL for more details:
http://learn.makeblock.cc/learning-scratch
Page 16
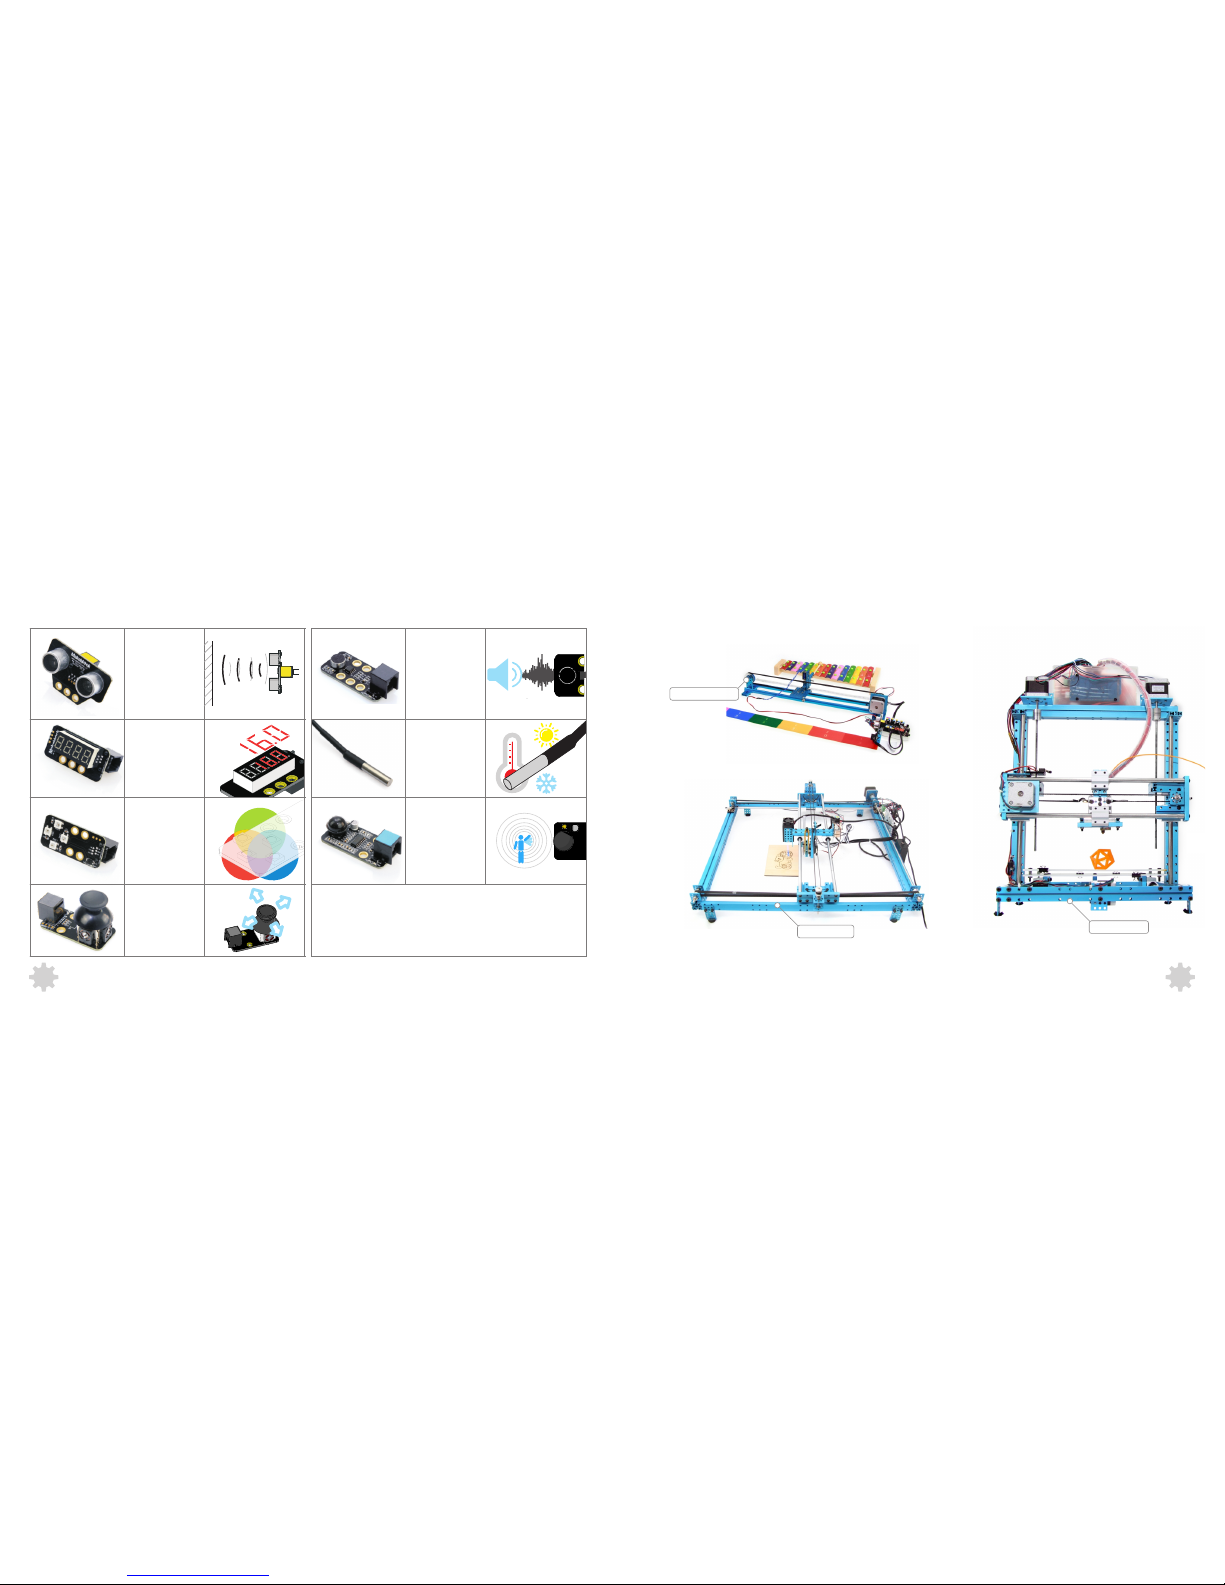
Kits on Makeblock--Further exploration
Electronic modules on makeblock--Further exploration
3D Printer
XY Plotter
Music Robot Kit
27
http://learn.makeblock.cc/ultrasonic-sensor/
3
see mor e on mak ebl ock pla tfo rm
Ultrasonic module
works for measuring
distance from 3cm to
400cm.
Me Sound Sensor
can measure the
volume.It can used
in some sound
interactive
projects,such as an
voice operated
switch.
Me Temperature
Sensor is a stainless
steel tube sensor
which is used for
measuring
temperature.
Me PIR Motion
Sensor can detect
infrared ray which
derives from
animals/humans in
less than 6 meters.
Me 7-Segment
Display is a display
module with four
digit tube which can
show some data
,such as speed
,time ,score etc.
Me RGB LED
module contains
four programmable
RGB LEDs. Color
of each LED can be
set by editing
components of red,
green, and blue.
Me Joystick is
normally used to
control the move
direcion of object.
28
 Loading...